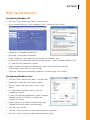
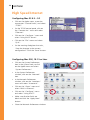
Download Wave Broadband User`s guide
Transcript
Small Business User’s Guide Table of Contents Welcome...............................................................................................3 Payment Options..................................................................................4 How to Contact Us/Payment Locations..................................................5 High Speed Internet Your Cable Modem........................................................................7 Installing Cable Modem Configuring Your Computer...........................................................9 Wave Email...................................................................................13 Getting Set Up Server Settings High Speed Internet Troubleshooting............................................14 Cable Services Basic Cable...................................................................................15 Installing Basic Cable Audio/Video Cables......................................................................16 Digital Cable.................................................................................17 Installing Digital Receiver Digital Cable Troubleshooting Business Phone Phone Equipment.........................................................................21 Standby Button & Battery Backup.................................................23 Wave Phone Portal.......................................................................24 Voicemail.....................................................................................24 Setting Up Changing Your Greeting, Name and PIN Calling Features............................................................................26 Troubleshooting...........................................................................29 Small Business User’s Guide 3 Welcome To Wave Business Solutions! Thank you for choosing Wave. Wave is your premier local provider of high speed internet, phone and video services. No matter which package you select we hope you will be impressed with our service – from the speed of our internet access to the quality and affordability of our phone service, to the ease of reaching a support representative when you need them. Wave prides itself on being number one in hassle-free maintenance, offering FREE service calls and live 24x7 customer care. This User’s Guide will help you install and get acquainted with your new service, and help you to reinstall your existing connection should you get new business equipment. Questions? Contact us! With Wave Business Solutions you get prompt, courteous local service. Technical Support is available 24 hours a day, 7 days a week. If you have questions, please call us at 1-888-202-9820 or visit our web site at WaveBroadband.com/Business. 3 4 Small Business User’s Guide Payment Options: Pay Online You can view your account and make payments at our billing website: https://CableAnytime.net/Wave You will need to register your account and select a PIN the first time you access your account online. Pay by Check Separate the payment slip portion of your bill and mail it, along with your payment check, in the envelope provided with your bill. Make your check payable to “Wave Broadband” and write your account number on your check. Automatic Payment Program You can set up your account to automatically debit your credit card or checking account each month. Contact us at 1-888-202-9820 to complete the one-time set up. Online Banking or Bill Pay You can also pay your Wave Broadband bill through your financial institution’s or another third party’s bill payment program. Enter “Wave Broadband” as the payee and enter the payment address and account number as they appear on your bill. Paperless Billing Save paper and save time by getting your billing statement delivered electronically each month. Go to https://CableAnytime.net/Wave to sign up today! Pay in Person In addition to the methods mentioned above you may stop by one of our designated payment locations to pay your bill in person. Check for the location nearest you on the following page. 4 Small Business User’s Guide 5 How to Contact Us: 1-888-202-9820 WaveBroadband.com/Business Billing & Sales Phone Hours: Technical Support Phone Hours: Monday to Friday7:30am – 8pm Saturday 8am– 5pm Sunday 9am– 1pm 24 hours a day, 7 days a week Mailing Address: Wave Broadband P.O. Box 34808 Seattle, WA 98124-1808 Payment Locations: Washington Arlington/Lakewood Payments Only (Posting may take up to a week) 24-Hour Drop Box Lakewood Grocery 1507 172nd St. NE Arlington, WA 98223 Bangor Full Service Office Mon-Fri 8:30 am – 5:00 pm (Closed 12 – 1 pm) 24-Hour Drop Box Wave Broadband 2720 Ohio St. Silverdale, WA 98315 Belfair Full Service Office Mon-Fri 8:30 am – 5 pm (Closed 1 – 2 pm) Sat 9 am – 1 pm Wave Broadband 23910 NE State Highway 3 (in Chamber Building) Belfair, WA 98528 Burlington Payments Only (Posting may take up to a week) 24-Hour Drop Box Index Cable 1781 Old Hwy 99 N Rd. Burlington, WA 98233 Clear Lake La Conner Full Service Office Drive-Up Payment Drop Box Mon-Sat 8 am – 5 pm (Closed 12 - 1 pm Sat) Wave Broadband 115 South Maple Avenue LaConner, WA 98257 Mt. Vernon Payments & Equipment Drop-off (Posting may take up to a week) Mon-Thurs 6 am – 9 pm Fri 6 am – 10 pm Sat-Sun 7 am – 8 pm Big Lake Grocery 16818 Lake View Blvd. Mt. Vernon, WA 98274 Port Angeles Full Service Office Mon-Fri 9 am – 5 pm 24-Hour Drop Box Wave Broadband 725 E. First Street Port Angeles, WA 98362 Port Orchard Full Service Office Mon-Fri 8:30 am – 5:30 pm Sat 9:00 am – 6:00 pm 24-Hour Drop Box Wave Broadband 4519 SE Mile Hill Drive Port Orchard, WA 98366 Sedro-Woolley Payments only (Posting may take up to a week) Mon-Thurs 6 am – 8 pm Fri 6 am – 8:30 pm Sat 7 am – 8:30 pm Sun 8 am – 8 pm Glen Haven Store 3094 Glenhaven Drive Sedro-Woolley, WA 98284 Sequim Full Service Office Mon-Sat 8:30 am – 5:30 pm (Closed Sat 12:00 pm – 1:00 pm) Wave Broadband 153 S. Sunnyside Avenue Sequim, WA 98382 (Across from Post Office) Sequim Payments only (Posting may take up to a week) Sequim City Hall 152 W Cedar St. Sequim, WA 98382 Silverdale Full Service Office Mon-Sat 9 am – 6 pm Wave Broadband 9853 Silverdale Way NW, Ste 102 Silverdale, WA 98383 (next to Papa John’s Pizza) Payments Only (Posting may take up to a week) Mon-Sun 7 am – 8 pm Clear Lake Market 12689 State Route 9 Clear Lake, WA 98235 5 6 Small Business User’s Guide Payment Locations (continued): Washington cont... Stanwood Full Service Office Mon-Sat 9 am – 6 pm (Closed 12 - 1 pm Sat) 24-Hour Drop Box Wave Broadband 9300 271st NW, Suite B-1 Stanwood, WA 98292 Rocklin Full Service Office Mon-Fri: 8 am – 6 pm Sat: 10 am – 4 pm 24-Hour Drop Box Wave Broadband 4120 Citrus Ave Rocklin, CA 95677 West Sacramento California Auburn Full Service Office Mon-Wed, Fri: 8 am – 5 pm; Thur: 8 am – 6 pm Wave Broadband 1015 Lincoln Way Auburn, CA 95603 Dixon Payments only Mon-Fri: 9:30 am – 6:30 pm; Sat: 9:30 am – 5 pm Hometown Market 925 N. Adams Street Dixon, CA 95620 Garberville Full Service Office Mon-Fri: 8:00 am – 5:00 pm (Closed 1-2 pm daily) 24-Hour Drop Box Wave Broadband 615 Bear Creek Road Garberville, CA 95542 Lincoln Full Service Office Mon-Fri: 8 am – 5 pm 24-Hour Drop Box Wave Broadband 554 E Street Lincoln, CA 95648 6 Full Service Office Mon-Fri: 8:00 am – 6:00 pm Sat: 10:00 am – 4:00 pm Wave Broadband 1031 Triangle Court West Sacramento, CA 95605 Winters Payments only Mon-Fri: 8 am – 7 pm; Sat: 8 am – 6 pm; Sun: 8 am – 5 pm Pacific Ace Hardware 35 Main Street Winters, CA 95694 Woodland Full Service Office Mon-Fri: 8:30 am – 5:30 pm Wave Broadband 1296 E. Gibson Road, Suite D Woodland, CA 95776 Oregon Canby Full Service Office Mon, Wed-Fri: 8 am – 5 pm Tues: 9 am – 5 pm (closed daily 12:30 – 2 pm) 24-Hour Drop Box Wave Broadband 353 NW 2nd Street Canby, OR 97373 Sandy Full Service Office Mon-Fri: 9 am – 6pm Wave Broadband 36653 Hwy. 26 Sandy, OR 97055 Sheridan Full Service Office Mon, Wed-Fri: 8 am – 5 pm Tues: 9 am – 5 pm (closed daily 12:30 – 1:30 pm) 24-Hour Drop Box Wave Broadband 128 North Bridge Street Sheridan, OR 97378 Silverton Payments only Mon-Fri: 9 am – 9 pm Sat: 9 am – 7 pm Sun: 9 am – 6 pm Hi-School Pharmacy 406 McClaine St. Silverton, OR 97381 Stayton Full Service Office Mon, Wed-Fri: 8 am – 5 pm Tues: 10 am – 5 pm (closed daily 12:30 – 1:30 pm) 24-Hour Drop Box Wave Broadband 277 3rd Avenue Stayton, OR 97383 Woodburn Full Service Office Mon-Fri: 9 am- 6 pm Sat: 10 am - 2:30 pm 24-Hour Drop Box Wave Broadband 669 Glatt Circle Woodburn, OR 97071 Small Business User’s Guide 7 High Speed Internet This guide will help you become acquainted with Wave’s internet service and provide stepby-step instructions on how to install your cable modem. It also provides instructions on how to create your wavecable.com email account, and configure it to work with email software on your computer. Any standard cable modem will work with Wave service. These instructions reference the Motorola Surfboard modem, but can be used with any model. If you have specific questions about your model of cable modem, please check the user’s manual, many of which are available on www.wavebroadband.com. Your Cable Modem The installation kit should come with the following items: two coaxial cables, one Ethernet (RJ45) cable, one USB cable, one CD-ROM used for USB installation, and one cable modem with power cord. First, connect the coaxial cable to the wall outlet or cable splitter, and to the CABLE port on the modem. Thread and tighten the connections by hand; do not use tools to tighten. Then attach the power cord to the cable modem and plug the cord into an electrical outlet. Check the modem lights to verify it is able to connect to the internet. 1 1 Standby 2 3 WE R E CEIV E R PO 4 SEND D T AN B Y S /ACTIVI TY PC ON LIN E SB5100 SURF b oard® Ca b le Mo de m 5 6 2 Power Flashing: Startup diagnostics in progress On: The cable modem is powered on. 3 Receive Flashing: Scanning for a receive (downstream) channel connection On: The downstream channel is connected 7 4 Send During normal operation, the Power, Receive, Send, and Online lights are on and the PC/Activity light flashes when the cable modem is transferring data. Press to suspend your Internet connection. No data is transmitted or received when the Standby light is on. All other front panel lights turn off until you press the Standby button again. Flashing: Scanning for a send (upstream) channel connection On: The upstream channel is connected 5 Online Flashing: Scanning for a network connection On: The startup process is complete 6 PC/Activity Flashing: Transmitting or receiving data On: A device, such as a computer or hub, is connected to the USB or Ethernet connectors on the back panel 7 Standby This light does not flash On: Internet service is blocked because the Standby button was pressed. If this light is on, all other lights are off. 7 8 Small Business User’s Guide High Speed Internet Most cable modems other than the Motorola Surfboard indicate online status with a single cable light. If the cable light is flashing, the modem is acquiring a connection to the internet; if it is solid, the modem is online. If the modem is not able to connect to the internet, then the cable wall outlet may need to be adjusted. Please call our support department to schedule a time when a Wave technician can perform this work. If you are using a cable splitter to connect both the modem and your TV, it will affect the signal received by the modem. You can bypass the splitter and connect the modem directly to the wall outlet, to see if the modem can connect to the internet without using the splitter. Once the modem is connected to the internet, connect the cable modem to your computer using either the Ethernet cable, or the USB cable. Ethernet or USB? Your computer may have a NIC, also called an Ethernet card. The NIC can be found in the back of your computer with a port that looks similar to a telephone jack, but somewhat larger. Alternatively, most computers have one or more USB ports built in. This is a small rectangular port on the front or rear panel of the case, and will be labeled USB. ETHERNE T USB 1 2 C AB LE 3 CUSTOMER S/N:BCDFGHJKLMNP HFC MAC ID: ABCDEF012345 S/ N: PPPPMMYJJJSSSSSCAABBCCCC USB CPE MAC ID: ABDCEF0123 45 +12VDC 8 4 NIC Port USB Port 1 Ethernet The Ethernet port provides a connection to Ethernet equipped computers using a cable terminated with an RJ-45 connector. 2 USB The USB port provides a connection to USB equipped computers. 3 Cable The Cable port provides a connection to the coaxial cable (coax) outlet. 4 +12VDC This connector provides power to the cable modem. Small Business User’s Guide 9 High Speed Internet Configuring Your Computer Once the cable modem is online and connected to your computer, it is necessary to set up your computer to access the internet through the modem. If you do not have a NIC and are connecting with USB, it is necessary to first install the USB drivers from the CD-ROM. If you are using Windows 98 SE or Windows ME, you may also need your Windows operating system software CD. Important If your computer has a NIC, you do not need to install software and you will have better computer performance by using Ethernet. Skip this section and follow the instructions for your operating system. Installing USB Software – Windows PC If you connect the modem to your computer with a USB cable and Windows does not automatically open the Add New Hardware Wizard, the USB port may be inactive or disabled. You can try another USB port, or use the Device Manager to enable the USB port, if it is disabled. To open the Device Manager, right-click on “My Computer” and select “Properties”, and go to the “Hardware” or “Device Manager” tab. Once the Add New Hardware Wizard is open, follow the on-screen instructions to install the USB driver software. When the wizard asks what to do, select “Search for the best driver for your device.” and click “Next”. On the following screen, select “Specify a location:” and choose your CD-ROM drive; click “Next”. Windows will find an updated driver from the selected location, and will install that driver by default; click the “Next” button on each screen until installation begins. Once loading the driver, Windows may ask you to insert your Windows CD to add certain cabinet files, or “cabs”. If you do not have your Windows CD, you can see if these files are already present on your computer; click “OK” on the Insert Disk dialog box and you will be prompted to enter a location to copy files from. Enter the path C:\Windows\Options\Cabs Click “OK” and wait for Windows to finish installing software. Then click “Finish” and restart your computer. If you encounter an error installing cabinet files, contact your computer manufacturer for support. 9 10 Small Business User’s Guide High Speed Internet Configuring Windows 98 SE / Windows ME • Click the “Start” button, move the mouse over “Settings” and select “Control Panel”. • Double-click the “Network” icon. • In the Network options, make sure you are on the “Configuration” tab. • In the list of network components, select “TCP/IP ->” for your model of NIC or cable modem. • Click the “Properties” button. • Select “Obtain an IP address automatically” and “Obtain DNS server address automatically”. • Click the “OK” button. • Close the Network options by clicking the “OK” button Configuring Windows 2000 • Click the “Start” button and select “Control Panel”. • Double-click the “Network and Dial-Up Connections” icon. • Double-click “Local Area Connection”. • Select either “USB” or “Ethernet Adapter” (NIC), as appropriate. • Double-click on “Internet Protocol”. • On the Properties screen, select “Obtain an IP address automatically” and “Obtain DNS server address automatically”. • Click the “OK” button. • Close the “Local Area Connection” window by clicking the “OK” button. • Close the “Network and Dial-Up Connections” control panel. 10 Small Business User’s Guide 11 High Speed Internet Configuring Windows XP • Click the “Start” button and select “Control Panel”. • If the Control Panel says “Pick a category” click “Switch to Classic View”. • Double-click “Network Connections” • Right-click “Local Area Connection”, select “Properties” and make sure you are on the “General” tab. • In the list of “This connection uses the following items:” select “Internet Protocol (TCP/ IP)” and click the “Properties” button. • Select “Obtain an IP address automatically” and “Obtain DNS server address automatically”, then click the “OK” button. • Close the “Local Area Connection Properties” by clicking the “OK” button. Configuring Windows Vista • Click the “Start” button and select “Control Panel”. • Double-click “Network and Sharing Center”. • Next to “Local Area Connection”, click “View Status”. • In “Local Area Connection Status” click the “Properties” button. • In the list of network components, select “Internet Protocol Version 4 (TCP/Ipv4)” and click the “Properties” button. • Select “Obtain an IP address automatically” and “Obtain DNS server address automatically”. • Click the “OK” button. • Click the “Close” button on Local Area Connection Properties. • Click the “Close” button on Local Area Connection Status. 11 12 Small Business User’s Guide High Speed Internet Configuring Mac OS 8.5 – 9.2 • Click on the Apple menu, move the mouse over “Control Panel”, and select “TCP/IP” • On the TCP/IP control panel, click on the “Connect via:” menu and select “Ethernet”. • Click on the “Configure:” menu and select “Using DHCP Server”. • Click on the “File” menu and select “Quit”. • On the warning dialog box that asks, “Save the changes to the current configuration?” click the “Save” button. Configuring Mac OSX, 10.1.5 or later • Click on the System Preferences icon in the System Dock, or click on the Apple menu and select “System Preferences”. • In the System Preferences window, click on the “Network” icon. • In the Network Preferences window, click on the “Locations” menu and select “Automatic”. • Click on the “Show” menu and select “Built-in Ethernet”. • Click on the “Configure” menu and select “Using DHCP”. • Make sure all other fields are black and click the “Apply Now” button. • Close the Network Preferences window. 12 Small Business User’s Guide 13 High Speed Internet Wave Email While you can use any email provider you choose with Wave High Speed Internet, up to ten wavecable.com email addresses are included with your service. Each email address can store up to 100 MB of messages on Wave’s mail server. You can create an email address by going to www.wavebroadband.com, click on the “Support” menu and then select “Request Email Address”. Alternately, you can call our technical support department, and our staff can create one or more email addresses for you, and help you configure your computer. Once your email address is created, you can configure email client software on your computer to access it, such as Windows Mail, Outlook Express or Mac Mail. Any email software you use will need the following information to send and receive email for your wavecable.com address: Display Name: Your full name as you want it to appear in emails Email Address: Your email address, eg. [email protected] Incoming Mail Server: mail.wavecable.com Outgoing Mail Server: mail.wavecable.com Account Name: The first part of your address, eg. johndoe Password: The password you used when creating the address For complete instructions on how to set up the most common email client programs, visit www.wavebroadband.com, click on the “Support” menu and select “Email Setup”. Webmail Any time you are away from your business location and wish to check for new mail, or if you have not set up an email client program on your computer, you also have the option of accessing your email through our Webmail program. Webmail is available by going to www. wavebroadband.com, selecting “Webmail”. Alternately, you can access Webmail directly at http://webmail.wavecable.com/ When you login, your Login Name is the first part of your email address, eg. if your email address is [email protected], your Login Name is johndoe. If you are connecting from a computer using some forms of network security, you may need to select one or both of the check-mark boxes below the Login Name and Password. Internet Account Manager Additional tools for managing your internet account can be found online within the Internet Account Manager at www.wavebroadband.com/iam. From there you can add new email accounts or update the ones you have, and track the data transfer usage on your account. 13 14 Small Business User’s Guide High Speed Internet High Speed Internet Troubleshooting If you are unable to connect to the internet, first check your cable modem to see if it is online (see diagram, p.7). If it is not online, power-cycle the modem by unplugging the power for 30 seconds. If the modem cannot establish the connection to the internet within a few minutes after the power-cycle, please call our technical support department for more help. If you are using a cable splitter to connect both the modem and your TV, you can bypass the splitter and connect the modem directly to the wall outlet to see if the modem can connect to the internet without using the splitter. If you have created a network using a router, you will want to power-cycle both pieces of equipment: 1. Unplug power to both the modem and the router. 2. After 30 seconds without power, restore power to the modem. 3. Once the modem is online, restore power to the router. 4. Once the lights on the router indicate a connection, repair the internet connection on each computer. This may require restarting the computer. If the cable modem indicates a connection to the internet, but your computer cannot connect through a router, you will need to bypass the router and plug one computer directly into the modem: 1. Unplug the power to both the modem and the router. 2. Use a single Ethernet cable to connect the modem and one computer. 3. After 30 seconds without power, restore power to the modem. 4. Once the modem is online, repair the internet connection on the computer. This may require restarting the computer. If you are able to connect to the internet using a computer plugged directly into the modem, but cannot connect using your router, then your Wave internet service is working. You will want to contact the support department for the manufacturer of your router. If you received the router from Wave Broadband as part of our Wireless Networking service, please contact our technical support department for problems connecting with the router. If you are able to connect to the internet, but have another issue with your internet service, please check our website for a number of troubleshooting guides and tips. Go to www. wavebroadband.com, and select “Support”. 14 Small Business User’s Guide 15 Cable Television Basic Cable Wave Basic Cable is simple to install. You don’t need any additional devices, and you can connect to any cable-ready TV – provided you have activated your Wave cable service. To connect to Wave cable, you simply run a coaxial cable from your wall mounted cable outlet to your cable-ready television set or to your VCR. If you find that your cable outlet is not activated, or you need additional cable outlets installed, please contact us to schedule a professional installation. Installing Basic Cable • The connection from the outlet to your TV or VCR will always be coaxial cable. If you use a VCR, you can use a different cable from your VCR to your TV. • Check connections to ensure they are threaded correctly and firmly tighten by hand; do not use tools to tighten. • If you use a VCR, you will need to tune your TV to channel 3 or 4 to watch cable. Check the VCR user manual for more information. • Since your components may vary as well, please refer to your user manual(s) for installation of those components. • Some channels in Basic Cable may require additional equipment. Check your Channel Lineup card for more information on which channels require equipment. Digital Cable Wave Digital Cable gives you access to up to 300 channels of entertainment, as well as digital music, and interactive on-screen programming guide. Digital cable requires a digital cable terminal (DCT) installed, or a CableCard installed into a television with a card slot. Not all DCTs look alike. The one you receive may vary slightly from the diagrams on the following pages. Digital Music Set the soundtrack for your business with 45 channels of commercial-free, CD-quality music. Digital Music is available through a Wave digital cable box. To install use the audio connections from your cable box and connect to your stereo speaker system. 15 
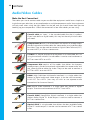
16 Small Business User’s Guide Audio/Video Cables Make the Best Connection! The cables you use to connect cable to your audio/video equipment could be as simple as a single line to your television, or as complicated as a multiple component audio. Your equipment will only work when using the right cables for the job, and you should know how you are hooking up your components. Check the connectors to see what cables you are using: Coaxial cable, or “coax,” is the standard cable line that is installed. If you have basic or digital cable, this may be the only kind of cable you need. Composite RCA consists of three cables that deliver an analog output divided into red and white cables for stereo audio, and a yellow cable for video. They can be used to connect a Digital Cable Terminal (DCT) to a non-HDTV, a VCR or a stereo tuner. S-Video is a sharper alternative to the yellow RCA video cable, but still using the red and white RCA audio cables. It can be used to connect a DCT to a non-HDTV or a VCR. Component RCA consists of five cables that deliver the sharpest analog output, divided into red and white cables for stereo audio, and red, green and blue cables for video. They can be used to connect a DCT to a HDTV or a non-HDTV. HDMI (High Definition Multimedia Interface) is a single cable that delivers a digital audio and video output. It can be used to connect a HD DCT to a HDTV. (You may still wish to use separate audio connections for Surround Sound.) DVI (Digital Video Interface) is a single cable that delivers a digital output. It can be used to connect a HD DCT to a HDTV. Coaxial SPDIF (Sony/Philips Digital InterFace) is a single cable that delivers Dolby Digital 5.1 audio output. It can be used to connect a DCT to a stereo tuner. Optical SPDIF is a single cable that delivers the best available Dolby Digital 5.1 audio output. It can be used to connect a DCT to a stereo tuner. 16 Small Business User’s Guide 17 Cable Television Installing Digital Cable Connect your digital cable terminal to your TV or VCR by referring to the following diagrams. After installation you may be receiving more channels than what you ordered. Within 24 hours, the DCT will automatically reset itself with your programming package. 1 2 3 4 5 DCT2000 Series CURSOR REMOTE MESSAGES A/ B GUIDE INFO 6 7 8 CHANNEL POWER MENU 9 SELECT 10 POWER A/B 11 12 13 1 Lights if optional A/B switch is activated (see #11). 2 Lights to indicate that a message is present. Refer to the “Using Your Interactive Programming Guide” for instructions on how to retrieve messages. 3 Normally displays current channel number or time of day; in the diagnostic mode, displays diagnostic codes. 4 Flashes when an error-free signal is received from the remote control. 5 Lights when the unit is on. 6 Displays the interactive programming guide (i-Guide). 7 Moves the cursor in menu and program guide screens. 8 Displays current channel and program information. 9 Displays the Main Menu. 10 Selects function options and tunes channels from the i-Guide. 11 When enabled, this switches an add-on module from one function to another function. 12 Changes channel up and down. 13 Turns DCT on/off. 17 18 Small Business User’s Guide Cable Television 1 2 3 AUX AUD IO IN TO T V/VCR 5 4 SPDIF TO RF IN S-V IDEO RF IN CAB LE IN R L AUD IO OU T DCT2000 Series V IDEO HIGH SPEED OUT OF BAND T V Pass Card DATA IR SWITCHED 105-125V 60Hz 4A MAX 500W MAX 6 7 18 8 1 Coaxial connector used to connect the DCT to a standard TV or VCR. 2 Coaxial connector used for DCT input from the TO RF IN connector. Deactivated on boxes without a pre-installed connecting cable. 3 Coaxial connector used to connect the TO RF IN port to the RF in port. Deactivated on boxes without a pre-installed connecting cable. 4 RCA jacks for looping through audio from auxiliary audio equipment. 5 S-Video connector used for high qulity video to external devices such as highend VCRs or TVs. 6 RCA jack used to connect the DCT to a composite (baseband) video TV or a monitor; in some configurations this jack connects to a VCR. 7 Optional connectors. Not active. 8 AC power outlet that can be configured as a switched or unswitched outlet and a two-pronged plug for attaching a power cord. Small Business User’s Guide 19 Cable Television Using Coaxial Cables Using Audio & Video Cable or Audio & S-Video Cables DCT2000 Series AUX AUD IO IN TO T V/VCR SPDIF TO RF IN S-V IDEO RF IN R L AUD IO OU T CAB LE IN V IDEO HIGH SPEED OUT OF BAND T V Pass Card DATA IR SWITCHED 105-125V 60Hz 4A MAX 500W MAX Either or For Digital Music only, connect audio cables directly to stereo speaker system. CABLE IN CABLE OUT R AUDIO IN L AUDIO R OUT L VIDEO IN SVIDEO IN VIDEO OUT SVIDEO OUT VCR (optional) Either or AUDIO IN R L AUDIO OUT CABLE IN R L VIDEO IN SVIDEO IN TV 19 20 Small Business User’s Guide Cable Television Digital Cable Troubleshooting If you subscribe to Digital Cable you can connect any number of television sets for service, but you will need an additional DCT or CableCard to receive digital channels for each television you connect. You do not need extra equipment to receive Basic Cable on additional television sets. • If you have a VCR, be sure to connect it between the DCT and the TV. • Make sure to tune your TV or VCR to channel 3 and use the digital remote to watch cable. • If you have a TV with multiple inputs for coaxial, S-Video and RCA cables, make sure your TV is set to the correct input. • If you have picture but no sound, check to see if the DCT volume has been reset, or if the TV is muted. • If you have no sound and are using a stereo tuner, check the cable connections and settings for the tuner. • If you are not receiving all of your channels, or if the on-screen i-Guide is showing “One Moment Please” for more than a few minutes, power-cycle the DCT by unplugging the power for one minute. Your programming package should reload within a few minutes, but the on-screen i-Guide and menu, and TV On Demand programming, can each take up to one hour to reload. • If the DCT indicates it is downloading programming with “DL” displayed on the front panel, this process may take up to 30 minutes. If you power-cycle the DCT during this time, the download will start over. If the display shows “DL” for more than 30 minutes, you should call our technical support department. • If the DCT shows another error code on the front panel, please call our technical support department. • If you have a TV with a CableCard and you lose some of the programming, unplug the CableCard and power-cycle the TV by unplugging the power for one minute. Securely plug the CableCard back into the TV and then restore power to the set. 20 Small Business User’s Guide 21 Business Phone Wave Phone works just like other business phone services you may be used to, though it does require some equipment that you may not be familiar with. A Wave Technician will connect a small device called a Multimedia Terminal Adaptor (MTA) between your cable line and the existing phone jacks in your office to enable the service. If you have high-speed internet service from Wave, the MTA may also act as your internet cable modem. Phone Equipment Note: Not all Multimedia Terminal Adapters (MTAs) look alike. The one you receive may vary slightly from the diagram below. 1. Power Light: indicates whether AC power is available to the unit 1 2 3 4 5 6 7 8 2. DS (Downstream): indicates downstream connectivity 3. US (Upstream): indicates upstream connectivity 4. Online: indicates internet data transmission status 5. Link: indicates Ethernet or USB connectivity between the MTA and computer 6. Telephone Line 1: indicates status of line 1 7. Telephone Line 2: indicates status of line 2 8. Battery: indicates status of the battery in the MTA Operation Safety Connecting the Telephony Modem (MTA) to your existing telephone wiring should be performed by a professional installer. Failure to do so may result in electrical shock, loss of phone service, loss of 911/E911 service and/or permanent damage to the Telephony Modem. 21 22 Small Business User’s Guide ( ( Power Outlet Phone 1 Phone 2 Computer USB (choice of either connection) Computer Ethernet Standby Button on the front of the MTA (It terminates the USB/Ethernet connection.) Cable Wall Outlet Reset Button The Wave Phone Telephony Modem can be connected to your computer to work as an internet modem as well as a phone. While the MTA has two lines, the second line is only active if you have purchased an additional line from Wave Broadband. If problems exist with your phone service, connecting a phone directly into the back of the MTA will bypass your existing wiring and help determine if the issue exists with the service or the wiring at your location. 22 Small Business User’s Guide 23 Business Phone During a power outage your modem may lose power if it is not equipped with a battery backup or the battery has been drained. This may require you to be temporarily disconnected until a power cycle is performed. If your modem disconnects, you will not be able to use the phone until service is restored or a power cycle is performed. See the Troubleshooting section on page 29 for more troubleshooting steps. Standby Button Some MTAs have a Standby button on the front of the unit. Pressing the Standby button will either suspend or activate your computers connection to the Internet. • Online Mode – Modem is online indicated by an illuminated Online light on the Telephony Modem. • Standby Mode – Modem is offline and in standby indicated by a blinking Online light. The Standby button does not affect telephone service; telephony service will work regardless of the status of your computer’s connection to the internet. Battery Backup Not all Telephony Modems (MTAs) have a battery backup. If your MTA does not have a battery light on the front then you do not have a battery backup. The battery backup will allow your phone service to continue to work for a short period of time should you lose power. However, if Wave’s network facilities are without power due to a local outage, cable service will not work, including your Business Phone service. Reset Button Using a paper clip to push the Reset button on the back of the Telephony Modem will reset the modem. • Straighten a paper clip and press into the reset hole in the back of the MTA. • Hold down this button until the lights on the front of the MTA turn off and then release. 911/E911 Emergency Information If you attempt to install or use the Wave Broadband equipment or VoIP services at another location, the VoIP services, including but not limited to 911/E911, may fail to function or may function improperly. Business Phone service is electrically powered and that service, including the ability to access 911 services, security and medical monitoring services, may not operate in the event of an area power outage or if the cable connection is disrupted or not operating. Included with your equipment are advisory warning stickers that provide information regarding the limitations of 911/E911 service with VoIP services. Please place these stickers on or near the equipment used with Wave Phone services. 23 24 Small Business User’s Guide Business Phone MyWavePhone.com Portal • Check voice mail messages online at http://www.mywavephone.com. • Set up your voicemail preferences. • Manage your phone features such as voicemail/call forwarding, call screening and contact list. • Get e-mail alerts when you receive voicemails. • Detailed instructions for using the WavePhone™ Portal can be found at http://www.wavebroadband.com/mywavephone Go to: http://www.mywavephone.com Use your voicemail PIN to log into the Phone Portal. Setting Up Your Voice Mailbox • To set up your voice mailbox for the first time you must dial (*9) or your telephone number from your office phone. • You will be prompted to create a PIN of four to twenty digits. • Record a name announcement. • Record a greeting or select one of the standard greeting options. • Prompts will allow you to correct and re-record announcements in case you are not satisfied with what you have recorded. Accessing Your Voice Mail • From your office, dial (*9) or your telephone number • Away from home, dial your telephone number and press (*) during the greeting • Online, go to http://www.mywavephone.com 24 Small Business User’s Guide 25 Business Phone Voice Mail Features • Incoming calls will be forwarded to voicemail after 24 seconds /4 rings by default. You can change this setting at MyWavePhone.com • Each message is time and date stamped • Messages can be up to 2 minutes in length • You can store up to 30 messages or 60 minutes worth of messages • Messages can be saved for up to 30 days. To save messages, press (2) • To fast-forward 5 seconds during message playback, press (99) • To rewind 5 seconds during the message playback, press (77) • Press (#) to keep the current message and skip to the next message • To delete a message, press (3) • To reply to a message, press (4) • Press (0) for helpful hints Changing Your Greeting, Name and PIN • Access your voice mail by dialing (* 9) or your phone number, followed by your PIN • Press (3) to change your greeting and follow the prompts • To change your name, press (3) for the greetings menu, then press (3) to change your name and follow the prompts • To change your PIN, press (4) for mailbox settings, then press (3) for security options and follow the prompts Message Indicator If you have a new voice mail, you will notice a “staggered” dial tone when you pick up the line. This will continue until you have called and checked your voice mail. 25 Small Business User’s Guide 26 Business Phone Calling Features The following features are included with Unlimited Phone or can be added to our other phone plans for an additional monthly charge. • Call Waiting – A tone will announce an incoming call when you are already on the phone. This feature comes automatically activated when included with or added to your Wave Phone service. Cancel Call Waiting (*70) – Turn off call waiting on a per call basis. Enter the code before making the call. • Caller ID & Call Waiting Caller ID – View caller information for incoming calls. These features come automatically activated when included with or added to your Wave Phone service. • Caller ID Block (*67) – Block your Caller ID information from displaying on outbound calls on a per call basis. Enter the code before making the call. • Disable Caller ID Privacy (*82) – Turn off Caller ID Privacy on a per call basis. Enter the code before making the call. Note: This feature is used if you have Caller ID Privacy set as a permanent feature on your Business Phone. You will receive a message when calling an individual who does not accept anonymous calls. Simply hang up, dial *82 and try again. • Repeat Dial (*66) – If you receive a busy signal when making a call, you can hang up, pick up the receiver again and enter the code. The system will continue to call the last number you dialed for up to 30 minutes. Once that line is free, your phone will ring with a distinctive ring. You may continue to make and receive phone calls as normal while this feature is activated. Cancel Repeat Dial (*86) – Disable repeat dial before the 30 minute time frame is over. • Return Call (*69) – Return the call of the last person who called you. Like Repeat Dial, if the line is busy it will continue to redial the number for up to 30 minutes. Note: If the caller is calling you from a cellular phone, this feature will tell you the number of the last caller but you will receive a busy signal if you attempt to dial them back through the Return Call menu. Simply hang up and dial the number directly. Cancel Return Dial (*86) – Disable return call before the 30 minute time frame is over. 26 Small Business User’s Guide 27 Business Phone • Call Forward (*72) – Forward incoming calls to another telephone number. If you forward calls to a long distance number, long distance charges may apply depending on your Wave Phone package. To activate Call Forwarding, press *72, wait for the confirming beeps, and then enter the phone number you would like calls forwarded to. You will immediately get a courtesy call at the phone number where calls will be forwarded. Answer the courtesy call to activate Call Forwarding. If you cannot answer the courtesy call, you must dial *72 again from your Business Phone and wait for the confirmation tone. Cancel Call Forward (*73) – Disables current call forwarding. • Selective Call Forwarding (*63) – Forward calls from a list of up to 12 people to another phone line. All other calls will ring through normally. Enter code again to edit or cancel Selective Call Forwarding. Simply listen to the helpful prompts that will walk you through setting up, adding and removing numbers or turning off this feature. Note: Selective Call Forwarding and Call Forwarding can be available on the same line, but only one can be active at a time. • Selective Call Rejection (*60) – Screen calls from up to 12 numbers that you specify. Enter code again to edit or cancel Selective Call Rejection. Simply listen to the helpful prompts that will walk you through setting up, adding and removing numbers or turning off this feature. • Selective Call Acceptance (*64) – Accept calls only from phone numbers that you specify. Simply listen to the helpful prompts that will walk you through setting up, adding and removing numbers or turning off this feature. • Anonymous Call Rejection (*77) – Automatically block numbers that have disabled their Caller ID information. They will hear a message that you are not receiving anonymous calls with instructions on how to disable their Caller ID privacy. Cancel Anonymous Call Rejection (*87) – Disables anonymous call rejection. • Distinctive Alert (*61) – Assign up to 12 phone numbers a distinctive ring. To set up this feature, dial *61, then follow the helpful prompts to add or remove numbers. • Speed Dial (*74) – Store up to eight unique numbers for convenience and speed. It is as easy as pressing a one-digit number followed by the # key. Adding a new number on speed dial automatically replaces the previously saved number. 1. Pick up the line and listen for the dial tone. 2. Dial *74 and listen for a second dial tone 3. Enter a one-digit code from two to nine, followed by the local or long-distance number you want to store exactly how you would need to dial it to make the call and then press the # button to store it 4. Listen for two beeps or a recording to confirm the number is stored and hang up. Note: To remove a speed dial number entirely, simply dial *74, enter the one-digit code you wish to remove and then press # again. 27 Small Business User’s Guide 28 Business Phone • Two-Digit Speed Dial (*75) - Store up to thirty unique numbers for convenience and speed. Similar to Speed Dial, it is as easy as pressing a two-digit number followed by the # key. Adding a new number on two-digit speed dial automatically replaces the previously saved number. 1. Pick up the line and listen for the dial tone. 2. Dial *75 and listen for a second dial tone 3. Enter a two-digit code from twenty to forty nine, followed by the local or longdistance number you want to store exactly how you would need to dial it to make the call and then press the # button to store it 4. Listen for two beeps or a recording to confirm the number is stored and hang up. Note: To remove a speed dial number entirely, simply dial *75, enter the two-digit code you wish to remove and then press # again. • Three Way Calling – Bridge together two lines in addition to your own so that three separate individuals can speak on a single call. 1. While on a call with one of the individuals you wish to conference with, press the receiver button for one second. You will get a dial tone and the other caller will be put on hold. 2. Dial the number of the third party. When you get an answer, press the receiver button briefly again and all three parties will be connected. If the third party does not answer the phone, press the receiver button two times to cancel. You will still be connected to the first call. 3. When either of the people you called hangs up, you remain connected to the other person. When you hang up, everyone is disconnected. Note: Some phones have a “flash” or “link” button. Use this instead of the receiver button to change lines. While using three way calling, call waiting is unavailable. 28 Small Business User’s Guide 29 Business Phone Troubleshooting Tips • Power-cycling a Telephony Modem will often resolve most phone issues. If your Telephony Modem has a battery backup, please remove it before attempting a power cycle. 1. Unplug the power from the MTA for one full minute. 2. Plug the power back into the MTA and wait for all the lights to become solid. 3. Pick up your hand set and check for dial-tone Note: It can take up to 5 minutes for phone service to restore after a power cycle. • If the Online light is blinking on your modem, press the standby button to take your MTA out of standby mode. • If the Downstream (DS) or Upstream (US) lights are blinking, see the internet troubleshooting steps located on page 14. • Unplug the phone line from Line 1 in the back of the MTA and set aside. Plug a noncordless phone directly into the MTA and test for dial-tone. If there is a dial-tone, plug each of your phones in one at a time to try and find the piece of equipment causing the problem. • Some equipment such as fax machines, certain cordless phones and caller ID units were designed before digital phone service was available. Please check with the manufacturer to determine if your equipment can be used with a digital phone line. • Voice Mail can interfere with a fax machine by taking the calls and/or confusing a fax machine into thinking there is no dial tone. Plug a phone directly into the line and listen for a staggered dial tone. If a staggered dial tone exists you must first check the voice mail on that line and then call Customer Service to have the voice mail feature removed. Call Data Records If you are having technical difficulties with an existing feature of your Business Phone service, it is very helpful to have a call data record ready before calling technical support. Simply write down the date, time and phone number or feature you are attempting to dial as an example to give to our technical support representative. This information will allow us to investigate the error more quickly. 29 30 Small Business User’s Guide The official Wave Broadband local franchise authority names and addresses are below. Please do not mail payments to your local franchise authority. Washington City of Sequim 152 W. Cedar Sequim, WA 98382 FCC Community Unit: WA-0135 County of Clallam – Courthouse 223 E. 4th St. Port Angeles, WA 98362 FCC Community Unit: WA-0177; WA-0257 Skagit County – Treasurer PO Box 1306 Mount Vernon, WA 98273 FCC Community Unit: WA 0412 Island County – Engineer PO Box 5000 Coupeville, WA 98239 FCC Community Unit: WA 0274 Subase Bangor 1100 Hunley Rd. Silverdale, WA 98383 Naval Station Bremerton PSNS - BLDG 943-3 120 S. Dewey St. Bremerton, WA 98314 Kitsap County – Telecommunications Dept. 614 Division St. Port Orchard, WA 98366 FCC Community Unit: WA 0249; WA 0311; WA 0313; WA 0321; WA 0491; WA 0492 30 California City of Bremerton 239 4th St. Bremerton, WA 98377 FCC Community Unit: WA 0229 County of Snohomish 6th Floor County Admin Bldg. Everett, WA 98201 FCC Community Unit: WA 0468; WA 0336 City of Stanwood 10220 270th St NW, Stanwood, WA 98292 FCC Community Unit: WA0289 Swinomish Tribal Community PO Box 817 La Conner, WA 98257 FCC Community Unit: WA0440 Whatcom County 311 Grand Ave. Bellingham, WA 98225 FCC Community Unit: WA 0540; WA 0474 Town of La Conner PO Box 400 La Conner, WA 98257 FCC Community Unit: WA 0324 City of Port Angeles City Clerk, P.O. Box 1150 Port Angeles, WA 98362 FCC Community Unit: WA-0134 Mason County 411 N. 5th St. Shelton, WA 98584 FCC Community Unit: WA 0332; WA 0335 City of Port Orchard 214 Prospect St. Port Orchard, WA 98366 FCC Community Unit: WA Washin0167; WA 0168 City of Rocklin 3980 Rocklin Road Rocklin, CA 95677 City of Auburn 1225 Lincoln Way Auburn, CA 95603 Humboldt County 825 5th Street Room 111 Eureka, CA 95501 City of Lincoln 640 5th Street Lincoln, CA 95648 Placer County 2986 Richardson Dr. Auburn, CA 95603 Lakeside Village Mobile Home Park – Park Mgr. 410 Danielle Way Folsom, CA 95630 Town of Loomis 6140 Horseshoe Bar Road, Suite K Loomis, CA 95650 City of Colfax 33 South Main Street Colfax, CA 95713 Pinebrook Village 214 Prospect St. Folsom, CA 95630 Small Business User’s Guide 31 Oregon City of West Sacramento Administrative Dept. PO Box 966 West Sacramento, CA 95691 City of Winters 318 First St. Winters, CA 95691 City of Woodland City Hall 300 First St. Woodland, WA 95695 City of Dixon 600 E. A St. Dixon, CA 95620-3619 Summerset at Rio Vista Braddock & Logam Group 4155 Blackhawk Plaza Danville, CA 94506 City of Rio Vista PO Box 745 Rio Vista, CA 94571 City of Mill City 252 SW Cedar Street Mill City, OR 97360 City of Hubbard 3720 Second Street Hubbard, OR 97032 Clackamas County 2051 Kaen Street Oregon City, OR 97045 City of Lyons 449 5th Street Lyons, OR 97358 City of Sandy 39250 Pioneer Boulevard Sandy, OR 97055 City of Molalla 117 S. Molalla Avenue Molalla, OR 97038 City of Mount Angel 5 N. Garfield St. Mt. Angel, OR 97362 City of Sheridan 120 SW Mill Street Sheridan, OR 97378 City of Silverton 306 S. Water Street Silverton, OR 97381 City of Stayton 362 North 3rd Avenue Stayton, OR 97383 City of Aumsville 595 Main Street Aumsville, OR 97325 City of Sublimity 245 NW Johnson Street Sublimity, OR 97385 City of Aurora 21420 Main Street Aurora, OR 97002 City of Turner 7250 Third Street Turner, OR 97392 City of Barlow 106 N. Main Street Barlow, OR 97013 Clackamas County 2051 Kaen Road Oregon City, OR 97045 City of Canby 182 N. Holly Street Canby, OR 97013 Marion County 555 Court Street NE Salem, OR 97301 City of Donald 10790 Main Street NE Donald, OR 97020 City of Gates 101 Sorbin Avenue Gates, OR 97346 City of Gervais 524 Fourth Street Gervais, OR 97026 31 05.10 Serving Businesses in Washington, Oregon & California 1-888-202-9820 WaveBroadband.com/Business ©2010 WaveDivision Holdings, LLC