1
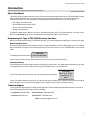
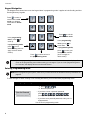
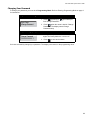
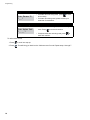
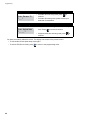
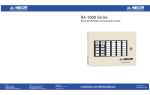
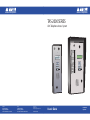
Advanced Life Safety Solutions
Advanced Life Safety Solutions
TAS-2000 SERIES
ADC Telephone Access System
3
3
4
5
7
8
0
Canada
25 Interchange Way
Vaughan, ON L4K 5W3
Tel: 905-660-4655 Fax: 905-660-4113
U.S.A.
60 Industrial Parkway
Cheektowaga, NY 14227
Tel: 1-888-660-4655 Fax: 1-888-660-4113
© Mircom 2003
Printed in Canada
Subject to change without prior notice
www.mircom.com
User’s Guide
9
4
5
7
8
9
0
LT-884 Rev. 0
April 2005
TAS-2000 ADC System User’s Guide
Contents
Introduction .....................................................................................................................................................
About this Manual ........................................................................................................................................
Determining the Type of TAS-2000 Directory You Have .............................................................................
Technical Support ........................................................................................................................................
Keypad Navigation.......................................................................................................................................
Entering Programming Mode .......................................................................................................................
Exiting Programming Mode .........................................................................................................................
1
1
1
1
2
2
3
Part 1: Non-Scrolling Directory Programming
Programming...................................................................................................................................................
Adding New Records ...................................................................................................................................
Editing Records ...........................................................................................................................................
Deleting Records .........................................................................................................................................
Setting Main and Aux Door DTMF ...............................................................................................................
Setting the Online and Door Timers ............................................................................................................
Changing Your Password ............................................................................................................................
6
6
8
10
11
12
13
Part 2: Scrolling Directory Programming
Entering Names...............................................................................................................................................
Programming...................................................................................................................................................
Adding New Records ...................................................................................................................................
Editing Records ...........................................................................................................................................
Deleting Records .........................................................................................................................................
Setting Main and Aux Door DTMF ...............................................................................................................
Setting the Online and Door Timers ............................................................................................................
Changing Your Password ............................................................................................................................
Glossary...........................................................................................................................................................
Frequently Asked Questions .........................................................................................................................
Resident Directory Worksheet.......................................................................................................................
TAS-2000 ADC System Resident Operating Instructions ...........................................................................
16
17
17
19
21
22
23
24
25
27
29
30
i
TAS-2000 ADC User’s Guide
ii
TAS-2000 ADC System User’s Guide
Introduction
About this Manual
This user’s guide provides information on the most common programming features of the TAS-2000 ADC Scrolling
and Non-Scrolling Directories. It is broken down into two sets of instructions: Part 1 Non-Scrolling Directory
Programming and Part 2 Scrolling Directory Programming. With these instructions, you will be able to:
• Add, delete, and edit records
• Set the Main and Aux doors’ DTMF
• Set the online and door timers
• Change your password
To determine which type of directory you have, see Determining the Type of TAS-2000 Directory You Have, below.
Refer to the Glossary page 25 for an explanation of commonly used terms in this manual.
Determining the Type of TAS-2000 Directory You Have
Before you begin programming your TAS-2000 directory, you must first determine which type of directory you have.
Non-Scrolling Directory
A non-scrolling directory lists the resident records on a paper template to the left of the display screen. The easiest
way to determine if you have a non-scrolling directory is to look at the screen on your TAS-2000 when it is in normal
mode.
The display should look like this:
<<Mircom>>
Enter the dial code
If your screen looks like the one pictured above, then you have a non-scrolling directory.
Scrolling Directory
A scrolling directory lists the resident records electronically on the screen. The easiest way to determine if you have
a scrolling directory is to look at the screen on your TAS-2000 when it is in normal mode.
If your LCD display shows four lines, you will see the following message:
<<Mircom>>
Press ‘*’ or ‘#’ key
to scroll up or
down
If your LCD display shows only two lines, you will see the same message, but it will scroll on two lines from right to
left. Either way, if you see the above message on your display, then you have a scrolling directory.
Technical Support
For all technical support inquiries, please contact Mircom’s Technical Support Department between 8 A.M. and 5
P.M. (EST) Monday through Friday, excluding holidays.
Local Phone: 905-695-3535
Toll-Free Phone: 1-888-449-3535
Local Fax: 905-660-4113
Toll-Free Fax: 1-888-660-4113
Email: [email protected]
1
Introduction
Keypad Navigation
The diagram below shows how to use the keypad when in programming mode. It applies to both Scrolling and NonScrolling Directory keypads.
3
Press
to enter a
record when in edit
mode or to delete a
record when in delete
mode
In the programming
menu, press
scroll up.
4
5
7
8
9
Press 9 to exit the
edit or delete mode
to
In the programming
0
In programming mode,
press
to exit
without saving (does not
apply to edit or delete
modes).
menu, press
scroll down.
to
In programming mode,
press
to save your
changes and continue
(does not apply to
delete mode).
Press 0 to select an item in
the programming menu
Note: If you are programming a function and do not enter information for three minutes, the display will
return to the programming menu without saving your changes. If you are in the programming menu
for 3 minutes, the display will return to the main screen.
Entering Programming Mode
Note: Before programming the system, make sure you have filled out the Resident Directory Worksheet on
page 29.
To make changes to either scrolling or non-scrolling directories, you must first enter programming mode.
Entering Programming mode
1. Press
9
9
9
9 .
2. Enter the password.
Enter the Password
[_________]
• If you have not set a personal password,
press
(ten-digit factory default).
• If you have set a personal password, enter your 10digit password.
You are now in programming mode.
2
TAS-2000 ADC System User’s Guide
Exiting Programming Mode
To exit programming mode, you must first be in the programming menu. If you are not in the programming menu,
use the keypad navigation diagram to exit from the mode you are currently in.
Exiting Programming Mode
Init/Erase all data
> Exit
1. Press
to scroll down until the arrow is
beside “Exit”.
2. Press 0 to select.
3
Introduction
4
Part 1: Non-Scrolling Directory Programming
5
Programming
Programming
Adding New Records
To add a new record, you must be in Programming Mode. Refer to Entering Programming Mode on page 2 for
instructions.
Step 1: Enter Add New Record mode
>Add New Record
Edit Record
Press 0 to add a new record. The display enters Add
New Record mode.
Step 2: Enter Dial Code
1. Enter the resident’s dial (door) code. The code
may be between 1 to 4 digits long.
Enter Dial Code
[____]
2. Press
to save and continue.
Step 3: Enter Telephone Number
1. Enter the resident’s telephone number (and
area code if applicable).
Enter Telephone No.
[_____________]
2. Press
twice to save and continue.
Step 4: Enter Elevator Code
Enter Elevator Code
[__]
6
• If elevator control is not being used, press
save and continue.
to
• If elevator control is being used, please contact your
technician for assistance.
TAS-2000 ADC System User’s Guide
Step 5: Enter Elevator ID
Enter Elevator ID
[__]
• If elevator ID is not being used, press
and continue.
to save
• If elevator ID is being used, please contact your
technician for assistance.
Step 6: Enter Keyless Code
• If keyless codes are being used, enter the 4-digit
Enter Keyless Code
[____]
code. Press
to save and continue.
• If keyless codes are not being used, press
save and continue.
to
You have successfully added a new record to the system. The display now returns to the programming menu.
To add another record,
1. Press
2. Press
to scroll one step up.
0 . This will bring you back into the Add New Record mode. Repeat steps 1 through 6.
7
Programming
Editing Records
To edit a record, you must be in Programming Mode. Refer to Entering Programming Mode on page 2 for
instructions
Step 1: Enter Edit Record mode
1. Press
Add New Record
>Edit Record
(scroll up) or
(scroll down).
2. Press 0 when the arrow is pointed beside
“Edit Record”. The display enters Edit Record
mode.
Step 2: Select record
1. Press
(scroll up) or
(scroll down) to
find the record you want to change.
1000 >
1001
2. Press
when the arrow is beside the record
you want to change. The display now enters the
record. Note: Records are listed according to
resident dial code.
Step 3: Enter Dial Code
• If you want to change the dial code, enter a code
Enter Dial Code
[____]
that is between 1 to 4 digits long. Press
and continue.
to save
• If you do not want to change the dial code,
press
to continue.
Step 4: Enter Telephone Number
• If you want to change the telephone number, enter
Enter Telephone No.
[______________]
the number. Press
twice to save and continue.
• If you do not want to change the telephone number,
press
twice to continue.
Step 5: Enter Elevator Code
Enter Elevator Code
[__]
8
• If elevator control is not being used, press
continue.
to
• If elevator control is being used, please contact your
technician for assistance.
TAS-2000 ADC System User’s Guide
Step 6: Enter Elevator ID
Enter Elevator ID
[__]
• If elevator ID is not being used, press
continue.
to
• If elevator ID is being used, please contact your
technician for assistance.
Step 7: Enter Keyless Code
• If keyless codes are being used, enter the 4-digit
Enter Keyless Code
[____]
code. Press
to save and continue.
• If keyless codes are not being used, press
continue.
to
You have successfully edited the record. The display now returns to the previous menu.
• To edit another record repeat steps 2 through 7.
• To exit the Edit Record mode, press
9 to return to the programming menu.
9
Programming
Deleting Records
To delete a record, you must be in Programming Mode. Refer to Entering Programming Mode on page 2 for
instructions.
Step 1: Enter “Delete Record” mode
1. Press
(scroll up) or
find “Delete record”.
Edit Record
>Delete Record
(scroll down) to
2. Press 0 when the arrow is pointed beside
“Delete Record”. The display enters Delete
Record mode.
Step 2: Select record
1. Press
(scroll up) or
(scroll down) to
find the record you want to delete. Note:
Records are listed according to resident dial
code.
1000 >
1001
2. Press
to delete the record.
You have successfully deleted the record. The display now returns to the residents list.
• To delete another record repeat step 2.
• To exit Delete Record mode, press
10
9 to return to the programming menu.
TAS-2000 ADC System User’s Guide
Setting Main and Aux Door DTMF
To set the main and aux door DTMF, you must be in Programming Mode. Refer to Entering Programming Mode on
page 2 for instructions.
Main Door DTMF setup
Step 1: Select Main Door DTMF setup
1. Press
(scroll up) or
find “Main Door DTMF”.
Delete Record
>Main Door DTMF
(scroll down) to
2. Press 0 when the arrow is beside “Main Door
DTMF”. The display enters Main Door DTMF
setup.
Step 2: Set Main Door DTMF
1. Choose any digit between 0 and 9. This will
become the designated (touch tone) number
that opens the lobby door. the factory default is
“9”.
Main Door DTMF
[9]
2. Press
to save and continue.
You have successfully set the main door DTMF. The display now returns to the programming menu.
Aux Door DTMF setup
Step 1: Select Aux Door DTMF setup
• If you have just set up Main Door DTMF, the arrow is
now pointed beside “Aux door DTMF”. Press
enter Aux Door DTMF setup.
Main Door DTMF
>Aux Door DTMF
0 to
• If you have not just set up Main Door DTMF,
1. Press
(scroll up) or
“Main Door DTMF”.
(scroll down) to find
2. Press 0 when the arrow is beside “Aux Door
DTMF”. The display enters Aux Door DTMF setup.
Step 2: Set Aux Door DTMF
Aux Door DTMF
[6]
1. Choose any digit between 0 and 9. The factory
default is “6”.
2. Press
to save and continue.
You have successfully set the aux door DTMF. The display now returns to the programming menu.
11
Programming
Setting the Online and Door Timers
To set the online and door timers, you must be in Programming Mode. Refer to Entering Programming Mode on
page 2 for instructions.
Online Timer setup
Step 1: Select Online Timer setup
>Online Timer
Door Timer
1. Press
(scroll up) or
find “Online TImer”.
(scroll down) to
2. Press 0 when the arrow is beside “Online
Timer”. The display enters Online Timer setup.
Step 2: Set Online Timer
Online Timer
[ 0060 ]
You can now set the length of time that a visitor may talk
with a resident.
1. Enter time duration between 0 to 9999 seconds.
The factory default is 60 seconds.
2. Press
to save and continue.
You have successfully set up the online timer. The display now returns to the programming menu.
Door Timer setup
Step 1: Select Door Timer setup
• If you have just set up Online Timer, the arrow is now
pointed beside “Door Timer”. Press 0 to enter Door
Timer setup.
Online Timer
>Door Timer
• If you have not just set up Online Timer,
1. Press
(scroll up) or
“Door Timer”.
(scroll down) to find
2. Press 0 when the arrow is beside “Door Timer”.
The display enters Door Timer setup.
Step 2: Set Door Timer
Door Timer
[ 20 ]
You can now set the length of time the door release
stays unlocked.
1. Choose a time duration between 0 and 99
seconds. The factory default is 20 seconds.
2. Press
to save and continue.
You have successfully set up the door timer. The display now returns to the programming menu.
12
TAS-2000 ADC System User’s Guide
Changing Your Password
To change your password, you must be in Programming Mode. Refer to Entering Programming Mode on page 2
for instructions.
Step 1: Select “Change Password”
Door Timer
>Change Password
1. Press
(scroll up) or
find “Change Password”.
(scroll down) to
2. Press 0 when the arrow is beside “Change
Password”. The display enters Change
Password setup.
Step 2: Change your password
Change Password
[1111111111]
1. Enter your new password. It must consist of 10
digits. The factory default is “1111111111”.
2. Press
to save and continue.
You have successfully changed your password. The display now returns to the programming menu.
13
Programming
14
Part 2: Scrolling Directory Programming
15
Entering Names
Entering Names
To enter a name, use the number keys to select the appropriate character. See the diagram below for the characters
that correspond to each number.
To select a character, press any number key once, twice, or three times to cycle through the character associated
with that key (Note: you will not see the characters on the display as they cycle). When you reach the character you
want, stop pressing the key and after a one second delay, the character will appear in the display.
Note: If you accidentally enter the wrong character while programming a name, press
backspace and delete the letter.
ABC
DEF
3
press once = backspace
press twice = comma
press 3 times = dash "-"
GHI
JKL
4
5
PRS
TUV
8
7
MNO
WXY
9
QZ
0
press once = blank space
press twice = "Q"
press 3 times = "Z"
For example, to enter the last name “Doe”,
1. Press “3” once for the letter “D”.
2. Press “6” three times for the letter “O”.
3. Press “3” twice for the letter “E”.
4. Press
to save and continue.
Press once
for “D”
DEF
3
16
Press 3 times
for “O”
MNO
Press twice for “E”
DEF
3
once to
TAS-2000 ADC System User’s Guide
Programming
Adding New Records
To add a new record, you must be in Programming Mode. Refer to Entering Programming Mode on page 2 for
instructions.
Step 1: Enter Add New Record mode
>Add New Record
Edit Record
Press 0 to add a new record. The display enters Add
New Record mode.
Step 2: Enter resident’s name
1. Enter the resident’s name (see page 16 for
instructions). The name may be up to 15
characters long.
Enter Name
[___________]
2. Press
to save and continue.
Step 3: Enter Dial Code
1. Enter the resident’s dial (door) code. The code
may be between 1 to 4 digits long.
Enter Dial Code
[____]
2. Press
to save and continue.
Step 4: Enter Telephone Number
1. Enter the resident’s telephone number (and
area code if applicable).
Enter Telephone No.
[______________]
2. Press
twice to save and continue.
Step 5: Enter Elevator Code
Enter Elevator Code
[__]
• If elevator control is not being used, press
save and continue.
to
• If elevator control is being used, please contact your
technician for assistance.
17
Programming
Step 6: Enter Elevator ID
Enter Elevator ID
[__]
• If elevator ID is not being used, press
and continue.
to save
• If elevator ID is being used, please contact your
technician for assistance.
Step 7: Enter Keyless Code
• If keyless codes are being used, enter the 4-digit
Enter Keyless Code
[____]
code. Press
to save and continue.
• If keyless codes are not being used, press
save and continue.
to
To add another record,
1. Press
2. Press
18
to scroll one step up.
0 . This will bring you back into the “Add new record” mode. Repeat steps 1 through 7.
TAS-2000 ADC System User’s Guide
Editing Records
To edit a record, you must be in Programming Mode. Refer to Entering Programming Mode on page 2 for
instructions
Step 1: Enter Edit Record mode
1. Press
Add New Record
>Edit Record
(scroll up) or
(scroll down).
2. Press 0 when the arrow is pointed beside
“Edit Record”. The display enters Edit Record
mode.
Step 2: Select Record
1. Press
(scroll up) or
(scroll down) to
find the record you want to change.
1000 >John Doe
1001 Sam Spade
2. Press
to enter the record.
Step 3: Enter resident’s name
• If you want to change the resident’s name, enter it
now. (see page 16 for instructions). The name may
Enter Name
[_________]
be up to 15 characters long. Press
continue.
to save and
• If you do not want to change the resident’s name,
press
to continue.
Step 4: Enter Dial Code
• If you want to change the dial code, enter a code
Enter Dial Code
[____]
that is between 1 to 4 digits long. Press
and continue.
to save
• If you do not want to change the dial code,
press
to continue.
Step 5: Enter Telephone Number
• If you want to change the telephone number, enter
Enter Telephone No.
[______________]
the number. Press
twice to save and continue.
• If you do not want to change the telephone number,
press
twice to continue.
Step 6: Enter Elevator Code
Enter Elevator Code
[__]
• If elevator control is not being used, press
continue.
to
• If elevator control is being used, please contact your
technician for assistance.
19
Programming
Step 7: Enter Elevator ID
Enter Elevator ID
[__]
• If elevator ID is not being used, press
continue.
to
• If elevator ID is being used, please contact your
technician for assistance.
Step 8: Enter Keyless Code
• If keyless codes are being used, enter the 4-digit
Enter Keyless Code
[____]
code. Press
to save and continue.
• If keyless codes are not being used, press
continue.
You have successfully edited the record. The display now returns to the previous menu.
• To edit another record repeat steps 2 through 8.
• To exit the Edit Record mode, press
20
9 to return to the programming menu.
to
TAS-2000 ADC System User’s Guide
Deleting Records
To delete a record, you must be in Programming Mode. Refer to Entering Programming Mode on page 2 for
instructions.
Step 1: Enter “Delete Record” mode
Edit Record
>Delete Record
1. Press
(scroll up) or
find “Delete record”.
(scroll down) to
2. Press 0 when the arrow is pointed beside
“Delete Record”. The display enters Delete
Record mode.
Step 2: Select Record
1000 >John Doe
1001 Sam Spade
1. Press
(scroll up) or
(scroll down) to
find the record you want to delete.
2. Line up the arrow with the record, then press
to delete the record.
You have successfully deleted the record. The display now returns to the residents list.
• To delete another record repeat step 2.
• To exit the Delete Record mode, press
9 to return to the programming menu.
21
Programming
Setting Main and Aux Door DTMF
To set the main and aux door DTMF, you must be in Programming Mode. Refer to Entering Programming Mode on
page 2 for instructions.
Main Door DTMF setup
Step 1: Select Main Door DTMF setup
1. Press
(scroll up) or
find “Main Door DTMF”.
Delete Record
>Main Door DTMF
(scroll down) to
2. Press 0 when the arrow is beside “Main Door
DTMF”. The display enters Main Door DTMF
setup.
Step 2: Set Main Door DTMF
1. Choose any digit between 0 and 9. This will
become the designated (touch tone) number
that opens the lobby door. The factory default is
“9”.
Main Door DTMF
[9]
2. Press
to save and continue.
You have successfully set the main door DTMF. The display now returns to the programming menu.
Aux Door DTMF setup
Step 1: Select Aux Door DTMF setup
• If you have just set up Main Door DTMF, the arrow is
now pointed beside “Aux door DTMF”. Press
enter Aux Door DTMF setup.
Main Door DTMF
>Aux Door DTMF
0 to
• If you have not just set up Main Door DTMF,
1. Press
(scroll up) or
“Main Door DTMF”.
(scroll down) to find
2. Press 0 when the arrow is beside “Aux Door
DTMF”. The display enters Aux Door DTMF setup.
Step 2: Set Aux Door DTMF
Aux Door DTMF
[6]
1. Choose any digit between 0 and 9. The factory
default is “‘6”.
2. Press
to save and continue.
You have successfully set the aux door DTMF. The display now returns to the programming menu.
22
TAS-2000 ADC System User’s Guide
Setting the Online and Door Timers
To set the online and door timers, you must be in Programming Mode. Refer to Entering Programming Mode on
page 2 for instructions.
Online Timer setup
Step 1: Select Online Timer setup
>Online Timer
Door Timer
1. Press
(scroll up) or
find “Online TImer”.
(scroll down) to
2. Press 0 when the arrow is beside “Online
Timer”. The display enters Online Timer setup.
Step 2: Set Online Timer
Online Timer
[ 0060 ]
You can now set the length of time that a visitor may talk
with a resident.
1. Enter time duration between 0 to 9999 seconds.
The factory default is 60 seconds.
2. Press
to save and continue.
You have successfully set up the online timer. The display now returns to the programming menu.
Door Timer setup
Step 1: Select Door Timer setup
• If you have just set up Online Timer, the arrow is now
pointed beside “Door Timer”. Press 0 to enter Door
Timer setup.
Online Timer
>Door Timer
• If you have not just set up Online Timer,
1. Press
(scroll up) or
“Door Timer”.
(scroll down) to find
2. Press 0 when the arrow is beside “Door Timer”.
You enters Door Timer setup.
Step 2: Set Door Timer
Door Timer
[ 20 ]
You can now set the length of time the door release
stays unlocked.
1. Choose a time duration between 0 and 99
seconds. The factory default is 20 seconds.
2. Press
to save and continue.
You have successfully set up the door timer. The display now returns to the programming menu.
23
Programming
Changing Your Password
To change your password, you must be in Programming Mode. Refer to Entering Programming Mode on page 2
for instructions.
Step 1: Select “Change Password”
Door Timer
>Change Password
1. Press
(scroll up) or
find “Change Password”.
(scroll down) to
2. Press 0 when the arrow is beside “Change
Password”. The display enters Change
Password setup.
Step 2: Change your password
Change Password
[1111111111]
1. Enter your new password. It must consist of 10
digits. The factory default is “1111111111”.
2. Press
to save and continue.
You have successfully changed your password. The display now returns to the programming menu.
24
TAS-2000 ADC System User’s Guide
Glossary
ADC
(Autodialer)
When a visitor enters a resident’s code in the lobby unit, the Autodialer Controller
(ADC) dials the resident’s local telephone number so that the visitor can
communicate with the resident. This feature requires a dedicated phone line.
Add Record
This function is used to add a new resident to the system.
Aux Door
When this function is set, the resident can press a number on his or her telephone
pad to release the aux door.
Delete Record
Mode
This function is used to delete the an entire resident record from the system. In
delete record mode, you will see records listed according to dial code.
Dial Code
A one- to four-digit code that a visitor enters into the lobby unit to call a resident. In
a non-scrolling directory, records are listed according to resident dial code.
DTMF
“Dual Tone Modulated Frequency” is a technical term for “touch tone”.
Edit Record
Mode
This function is used to edit a resident’s existing record. In edit record mode, you
will
see records listed according to dial code.
Keyless Code
This feature allows you to enter a four-digit dial code that will enable a resident to
open the main door without a key.
Keypad
Navigation
Instructions on how to use the keypad.
Non-Scrolling
Directory
A paper directory that lists the residents of the building.
Online Timer
This operation controls the maximum length of time that a visitor can speak with a
resident from the lobby unit.
Programming
Mode
This operation consists of multiple functions that allow you to customize your
Telephone Access System.
Potentiometer
A technical term for a variable resistor which functions as a volume control.
Scrolling
Directory
An electronic directory that lists the residents of the building.
25
Glossary
26
TAS-2000 ADC System User’s Guide
Frequently Asked Questions
Q. What is the ADC feature?
A. The telephone access system is a speed-dialer that is connected to a public telephone line. When a visitor dials
a resident’s dial code number, the system dials the resident’s home or cell telephone number (Note: as a security
precaution, the visitor cannot see the resident’s home or cell telephone number). When the resident answers the
call, he or she can press “9” to unlock the main door and automatically end the telephone call.
Q. Visitors cannot place calls to residents. Why?
A. If the problem is consistent with every resident, there may be a problem with the telephone line. Check the
telephone line with a regular telephone for a dial tone. If the dial tone is not present contact your local telephone
company.
If the problem is consistent for one resident only, the resident’s telephone number may be programmed incorrectly.
Check the programming to confirm that the resident’s telephone number and area code are entered correctly.
Q. Why does the system hang up as soon as a visitor begins to talk with a resident?
A. The online timer may be set for too short a duration. While in programming mode, check that the online timer is
set to more than 30 seconds (factory default is set to 60 seconds).
Q. Why can’t residents unlock the door/gate from their units by pressing “9” on their telephones?
A. This may be caused by one of the following:
•
Incorrect Main Door DTMF setup.
Solution: While in programming mode, check that the “Main Door” (DTMF) is programmed to digit “9”.
•
Improper voltage on the door strike power supply.
Solution: Check for the correct voltage on the door strike power supply.
• The door strike and system (main board) wires may be damaged or loose.
Solution: Check and verify that the door strike and system wires are intact.
Q. What will occur with an incoming call when the resident is on an Internet connection using his or
her telephone line?
If the resident is connected to the Internet via a dial-up modem, the visitor will hear a busy signal. The TAS 2000
ADC system does not provide a call waiting feature; however, the resident can order the call waiting feature from
his or her local telephone company.
Q. Why won’t the system accept a language change from English to either Spanish or French?
A. The system must be reset for language changes to take effect. Reset the system after you make a language
change. There are two ways to reset the system:
• Enter the programming mode and scroll down the menu option list to locate “system reset”. Press “0” to reset
the system.
• Turn the on/off switch (located at the bottom of the circuit board) to the OFF position and keep it off for
approximately ten seconds before powering up again.
27
Frequently Asked Questions
Q. When a visitor places a call and begins to talk, he or she cannot hear the resident. Why?
A. The speaker may not be working correctly. Unlock the panel and perform a visual inspection of the speaker:
•
Look for loose wires as well as damaged components.
•
Check that the volume in the panel speaker is set properly. VR4 (volume control) is the adjustment
potentiometer for the standard board and VR2 is the adjustment potentionmeter for the slim line board; both are
located at the bottom of the board. Adjust the potentionmeter clockwise to increase the volume.
If there are no loose wires and the volume in the panel speaker is set properly, there may be a problem with the
speaker impedance. To see if this might be the problem, follow the instructions below:
1. Turn the system power off and disconnect the white and green speaker wires from the main board.
2. Set your meter to ohms and set the scale to 50 ohms or higher.
3. Place the meter leads on the white and green speaker wires. The meter should read between 40-45 ohms. If your
readings are different please contact Mircom’s technical support department for assistance.
Q. The LCD display has no display or the display has dark blocks on it. Why?
A. There may be a problem with the contrast level. VR1 (contrast control) is located on the back of the keypad/
display board. Adjust the potentionmeter counter-clockwise for a darker display and clockwise for a lighter display.
Q. Why can’t I find/change the ring pattern in programming mode?
A. Because the ADC system requires a dedicated telephone line, it is not equipped with a ring pattern option. The
ring pattern is dependent on your local telephone company.
Q. I misplaced the key for the telephone access system. How do I obtain a replacement?
A. The Mircom key part number is LK-304. Contact your local distributor or Mircom Head Office for a replacement.
Q. What happens when the visitor gets an answering machine when trying to contact a resident?
A. The system will allow the visitor to leave a message on the answering machine.
28
TAS-2000 ADC System User’s Guide
Resident Directory Worksheet
For your records, photocopy this sheet and fill in the resident information.
Unit No.
Resident’s Name
Flr.
Apt.
Dial
Code
Phone
Number
Phone
Type
(pulse or
tone)
Keyless
Entry
Code
29
TAS-2000 ADC System Resident Operating Instructions
Mircom's state-of-the-art door entry system has been installed
in this building to provide you and your guest with an
increased level of confidence and security.
The system operates with your existing telephone. Your guest
dials your code number or selects your name by scrolling
through the electronic directory on the lobby unit, causing
your telephone to ring. When you answer your telephone, you
will be in communication with your guest.
To unlock the main door, press " 9 " on your telephone
keypad.
To refuse entry, hang up or press "4" on your telephone
keypad.
Keyless Entry Codes
To unlock the front door without using a key, press “0”
followed by the four-digit keyless code. The last four digits
are confidentially assigned to each resident.
Advanced Life Safety Solutions
Canada
25 Interchange Way
Vaughan, ON L4K 5W3
Tel: 905-660-4655 Fax: 905-660-4113
U.S.A.
60 Industrial Parkway
Cheektowaga, NY 14227
Tel: 1-888-660-4655 Fax: 1-888-660-4113
© Mircom 2005
Printed in Canada
Subject to change without prior notice
www.mircom.com