1
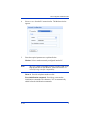
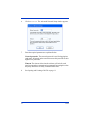
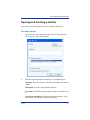
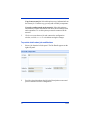
TX3 Series
TELEPHONE ACCESS SYSTEMS
Configurator Quick Start
Version 1.00.0
LT-973
Mircom
Copyright 2010
Copyright 2010 Mircom Inc.
All rights reserved.
Mircom Configurator Software Guide v.1.00.0 for Windows 2000/NT/XP®.
This manual, as well as the software described in it, is provided under licence or other
agreements and may be used or copied only in accordance with the terms of such license. The
content of this manual is furnished for informational use only. It is subject to change without
notice, and should not be construed as a commitment by Mircom. Mircom assumes no
responsibility or liability for any errors or inaccuracies that appear in this book.
Except as permitted by such license, no part of this publication may be reproduced, stored in a
retrieval system, transmitted in any form by means electronic, mechanical, using any recorded
media, or any other format without the prior written permission of Mircom.
Microsoft, MS-DOS, Windows, and Windows 2000/NT/XP are either registered trademarks or
trademarks of Microsoft Corporation in the United States and/or other countries.
Mircom
25 Interchange Way
Vaughan, Ontario
L4K 5W3
905.660.4655
Fax:905.660.4113
Version 1.00.0
LT-973
Mircom
Copyright 2010
TX3 Configurator Software Guide
Contents
Introducing the Configurator Software 5
About This Manual 5
Installing the Software 6
Connecting Using the USB 8
Connecting Using a Modem 9
Opening and Creating a Job File 11
Configuring Phone Lines 14
Creating a Resident Database 15
Sending a Job 19
Getting a Job 19
Troubleshooting 21
LT-973
3
4
LT-973
TX3 Configurator Software Guide
Introducing the Configurator Software
The Mircom Configurator Software is part of the Mircom suite of products
that provide building ready monitoring, control and software management
solutions for use in the residential market.
The Configurator is a user friendly graphical application that lets you add
and update the tenant registry and setup telephone access. Telephone access
can be easily configured as an autodialer controller (ADC) or as a no
subscriber line (NSL) system.
Note:
Mircom periodically updates panel firmware and
Configurator Software to add features and correct any
minor inconsistencies. For information about the latest
firmware or software visit the Mircom website at
www.mircom.com.
About This Manual
This manual provides basic information on the use of the Configurator
Software for the purposes of adding and updating the tenant profiles.
This guide assumes that all TX3 system components are setup and
operational. It is organized so that tasks are performed in the order in which
they need to be performed to add a list of residents to a panel.
This manual explains how you:
•
connect to the entry panel using a direct USB connection or a remote
modem connection.
•
access a panel
•
add residents to the panel database
•
establish telephone access
LT-973
5
Additional Documentation
For additional documentation, see the following Mircom literature:
•
TX3 Telephone Access System User’s Guide LT-968.
•
TX3 Telephone/Card Access System Installation and Operation
Manual LT-969.
•
TX3-CX Card Access System Installation and Operation Manual LT980.
•
TX3 Configuration and Administration Guide LT-995
Installing the Software
This document introduces the system and presents the basic requirements
for configuration.
Press F1 at any time when using the software for more detailed information.
To install the Configurator Software
1.
Insert the installation CD into the appropriate drive on the computer
and run setup.exe. The Configurator Server Setup Wizard appears.
2.
Follow the instructions. Once installed, the TX3 Configurator icon
appears on the desktop.
3.
Click the TX3 Configurator icon and wait until the legion window
appears.
6
LT-973
TX3 Configurator Software Guide
4.
Note:
Enter your password to log in to the system and click OK (The
default password is blank). The Main Window appears. You are
now ready to begin configuration. To facilitate configuration, the
previous session displays whenever you log in.
The panel address (ID) in the software must be set correctly in
order to upload or download data. Check the SW1 DIP switch
settings on the main board of the Telephone Access panel you
are connected to (SW2 for Card Access). Refer to the TX3
Installation and Operation Manual for the DIP switch settings.
Connecting Using the USB
The USB is a direct connection from your computer to the entry panel.
To connect to the USB
1.
Connect the USB of your PC to the USB connector on the TX3 Entry
Panel board.
2.
Click Network. The Network Configuration window appears.
LT-973
7
3.
Select USB from the PC connection list. The connection
automatically establishes and no settings are required.
4.
Click Advanced. The Advanced Network Setup window appears.
The settings are the same as the Modem port option.
5.
Connect the USB cable from the computer to the USB connection on
the entry panel board.
6.
Click on the “USB Connect” icon on the top picture menu to connect.
It will give you a connected message.
7.
When finished adding, editing and deleting within the job file select
the “Right Arrow “ icon on the top picture menu to “Send Job to
Panels” or download the configuration to the entry panel.
8.
See Opening and Creating a Job File on page 11.
Connecting Using a Modem
The modem on the entry panel lets you establish a connection from your
computer to the entry panel using the telephone network.
To establish a modem connection
1.
Connect the dedicated telephone line at the Entry Panel to one of the
telephone jack connectors on the TX3-MDM Modem board.
2.
Connect the modem on your PC to a standard telephone line.
3.
Click Network. The Network Configuration window appears.
8
LT-973
TX3 Configurator Software Guide
4.
Select Modem from the PC connection list. The Modem window
appears.
5.
Enter the required parameters as explained below:
Modem. Select a modem currently configured into the PC.
Note:
The TX3 system is compatible with the TrendNet TFM-560U
High Speed USB 2.0 Fax Modem. Additional modems are
currently being tested for compatibility.
Phone #. Provide a telephone number to dial.
Extra initialization commands. Provide any extra modem
initialization commands. The characters "AT" are automatically
added before the initialization commands.
LT-973
9
6.
Click Advanced. The Advanced Network Setup window appears.
7.
Enter the required parameters as explained below:
Network passcode. The network passcode is used for logging into
each panel. All panels on the network must use this passcode as their
highest level passcodes.
Timeout. The timeout is the time the software will wait for each
panel to respond to a communication command. Increasing this value
may help when there are many communication errors.
8.
10
See Opening and Creating a Job File on page 11.
LT-973
TX3 Configurator Software Guide
Opening and Creating a Job File
A job file lets you access the panel your are currently connected to.
To create a new job
1.
Select File/New Job from the menu bar or New from the Tool bar.
The Create New Job window appears.
2.
Enter the required parameters about the job as explained below:
Job name. Enter the job name. This field is mandatory and must be
unique.
Description. Provide a description about the job.
Created by. This field is read only and is set to the user when they log
in.
Create from a template. Select from an existing template. From
this template you may add or modify components.
LT-973
11
Copy from current job. Select this option to copy information from
the current job. From the copy you may add or modify components.
Create by reading panels on the network. Select this option to
automatically retrieve information from all of the networked panels
and components. To use this option you must be connected to the
network.
3.
Click OK to create the new job and return to the configuration
window, or click Cancel to exit without saving the changes.
To provide details about job modifications
1.
Select a job from the left side panel. The Job Details appears on the
right side panel.
2.
Provide a description about the job in the Description text area and
proceed with the rest of the configuration.
12
LT-973
TX3 Configurator Software Guide
To open an existing job
1.
To open an existing job, select File/Open Job from the Menu Bar.
The Open Job window appears.
2.
Select a job and click OK, or click Close to exit without saving the
changes.
To delete an existing job
1.
To delete a job permanently from the database, select the job from the
list and click Delete. A confirmation window appears.
2.
Click Yes to confirm the deletion or No to exit and return to the
previous window.
LT-973
13
Configuring Phone Lines
The panel telephone lines must be defined as either ADC or NSL. The
Phone lines window lets you select the panel line type either ADC or NSL.
To configure phone lines
1.
Select Phone Lines from the Panel Configuration window. The
Phone Lines window appears.
2.
Provide information for each the following:
Phone lines. Select either ADC or NSL.
Phone lines/Guard phone is connected. Select this check box if a
guard phone unit is currently connected to this panel.
3.
14
Proceed with Creating a Resident Database on page 15.
LT-973
TX3 Configurator Software Guide
Creating a Resident Database
The Configurator lets you add residents and modifying resident
information. When adding a resident you must define their line type as ADC
or NSL.
To add residents:
1.
Select Residents from the job tree. Then select Add
Residents from the Menu Bar or right click on the list view. The
Add Residents window appears.
2.
Provide information for the following parameters:
Total number of residents to add. Specify the number of residents
to add.
Connect to panel. Select the panel to add residents to.
Panel phone line. Select the phone line on the panel the resident will
use.
LT-973
15
Resident name. Provide the resident name. A number will be
attached to the names to make them unique.
Dial code. Provide the dial code.
Keyless entry code. Provide the keyless entry code.
Relay code (NSL only). Provide the NSL relay code.
3.
Click OK to add a resident and return to the configuration window, or
click close to exit without saving the changes.
To edit resident information
1.
Select Residents from the job tree. The Resident Configuration
window appears.
2.
To edit a resident, click its row header on the far left or double click
elsewhere on the row. You may also right click and select Edit
Resident. The Resident Details window appears.
16
LT-973
TX3 Configurator Software Guide
3.
Provide the following information:
Name. Enter the resident’s name.
Dial code. Enter the resident’s dial code.
Apt#. Enter the apartment or suite number.
Hide from directory. Check this box to hide the resident’s name
from the panel directory.
4.
Select the Phone lines tab and provide the following information to
determine which panels will have telephone access:
Lobby Unit. Select the lobby unit the resident will use.
Phone Line. From the list select the telephone line number. Select
Not connected for no connection. This line only works for ADC
lines only.
Phone number. Provide the resident’s phone number.
Relay code. Enter the NSL unit relay code associated with the
resident This code only works for NSL lines only.
Ring pattern. Select the ring pattern from the list. Each panel may
have its own unique ring. This feature only works for NSL lines only.
5.
Select the Keyless Entry tab and provide the following information to
enable the use of resident keyless entry code:
Keyless entry code. Enter the resident keyless entry code.
Open Main door. Selecting this box opens the main door when the
resident enters their keyless entry code.
Open Aux door. Selecting this box opens the auxiliary door when
the resident enters their keyless entry code.
6.
Select the Elevator taband provide the following information to
restrict elevator use:
Enable Elevator Restriction. Select this box to enable elevator
restrictions.
LT-973
17
Elevator address. Provide the network address of the elevator
restriction unit.
Elevator relay code. Provide the elevator relay code for the
resident’s floor.
7.
Select Profile and provide the following information:
Select a photo. Select the resident’s photo from a directory.
First name. Enter the resident’s first name.
Last name. Enter the resident’s last name.
email. Enter the resident’s email.
Mobile phone. Enter the resident’s mobile phone number.
Notes. Provide additional notes.
Profile ID. Provide a profile ID.
8.
Click OK to add a resident and return to the configuration window, or
click cancel to exit without saving the changes.
To delete one or more residents
1.
Right click one or more residents and then select Delete. Pressing
Del key will achieve the same purpose.
2.
Click Yes to delete a resident and return to the configuration
window, or click No to exit without saving the changes.
To find a resident
1.
Enter the person's name in the Find box. The list automatically
refreshes as you type. To refine the search, select a parameter from
the column list.
2.
Press the Clear button to restore the list back to its full state.
18
LT-973
TX3 Configurator Software Guide
Sending a Job
Once panel connectivity is established, you can send the current job
configuration to the panel.
To send to a single panel
1.
Right click on a panel in the job tree and select Send to Single
Panel.
To send to all panels
1.
Click Send Job to Panels icon from the Menu Bar.
Getting a Job
A Job can be created by reading the configuration information from the
panel.
To get a job
1.
LT-973
Select Get from the Tool Bar. The Get Job from Panels window
appears.
19
2.
Select the required parameters as explained below:
Create a new job. Scans the network for panels and uses their
configuration information to create a new job. The Detect new panels
check box is automatically checked.
Create a new job based on current job. Copies the current job and
creates a new job based on the existing job. If Detect new panels is
checked, new panels information is also retrieved.
Overwrite current job. The most recent configuration overwrites
the existing information panel information.
Detect new panels. If selected the software scans the network for
any new panels and reads their configurations. This option is only
available when configuring the current job.
20
LT-973
TX3 Configurator Software Guide
Troubleshooting
Unable to connect to USB device. Please unplug and plug in the
USB cable again
Common causes: Users unplug the USB cable when the PC is still
communicating with the panel or the USB driver is not installed properly.
Solution: Unplug and then plug in the USB cable again. If not working,
restart the application. If still not working, re-install the application.
Panel xxxxxxx (address x) is a wrong controller type
Common causes: The panel type or model the user is trying to connect to
is different from the configuration.
Solution: Check the actual model of the panel (e.g. Lobby unit 8-Line).
Delete the incorrect panel item from the configurator tree then add the
correct panel item. The controller type depends on display type and the
name capacity of the panel.
Panel xxxxxxx (address) not responding
Common causes: Incorrect address DIP switch setting on the panel’s
main board.
Solution: Check the DIP switches address setting of all panels and set
them correctly. Make sure the addresses match the addresses on the
configurator tree. Try to connect again.
Resident data does not get programmed to the panel even after
the job is sent.
Common causes: No panel phone line is assigned to the resident.
Solution: Edit resident details. Under “Select lobby line(s) to connect to
this resident”, select a phone line on the drop down list.
LT-973
21
22
LT-973