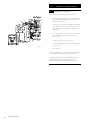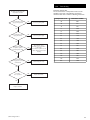
1
2nd Fix Solar Manual
Please read these instructions before installing or commissioning.
This Solar Thermal Domestic Hot Water System should only be
installed by a competent person.
PLEASE LEAVE THESE INSTRUCTIONS WITH THE
USER FOR SAFE KEEPING.
© Baxi Heating UK 2012
Index
2
3
4
5
6
Index
Introduction to Solar
Hydraulic station specifications
Differential temperature controller specifications
Ancillary components
Expansion vessel
Solar heat transfer fluid
7 Cylinder specifications
Unvented
Cistern-fed vented
9 Safety information
11 Installation of hydraulic station
Parts list
Identification of components
Pipework installation - general
Installing the hydraulic station - positioning
Installing the wall brackets and hydraulic station
Installing the safety group
Connecting the solar expansion vessel
Connecting pipework
17 Commissioning of system
Air test
Flushing and filling the pipework
© Baxi Heating UK Ltd 2012. All rights reserved. No part of this publication may be reproduced or
transmitted in any form or by any means, or stored in any retrieval system of any nature (including in
any database), in each case whether electronic, mechanical, recording or otherwise, without prior
written permission of the copyright owner, except for permitted fair dealing under Copyrights, Designs
and Patents Act 1988.
19
Installation of solar controller
Appliance installation
Opening the controller
Electrical connection overview
230/240V~ connections
Solar gain measurement
Connection of temperature sensors
Control of auxiliary heat input
24
Commissioning of hydraulic station
Ensure the solar primary system is free from air
Setting the system pressure
25
Commissioning of solar controller
Main menu
Control button
Menu “info”
Menu “programming”
Menu “Manual operation”
Menu “Basic adjustment”
Overview of display and operating elements
Controller functions
General controller functions
Cylinder heating by solar primary system
Systems with two storage cylinders
Rotational speed regulation
Thermostat (heating)
Thermostat (cooling)
Tube collector
Sensor monitoring
Flow monitoring
System protection function
Frost protection
Energy productivity measurement
Operating hours meter
37
Setting the system flow rate
Checking and adjusting the flow rate
Installation of the thermal insulation
Commissioning record
41
Maintenance
Check heat transfer fluid
Maintenance of the collector
Cylinder
42
Fault Finding
Failures with error message
45
Spares
Spare parts and accessories
46
Warranty
Standard warranty terms & conditions
Applications for the copyright owner’s permission to reproduce or make other use of any part of this
publication should be made, giving any details of the proposed use to the following address:
The Company Secretary, Baxi Heating UK Ltd, Brooks House, Coventry Road, Warwick CV34 4LL.
Full acknowledgement of author and source must be given.
WARNING: Any person who does any unauthorised act in relation to a copyright work may be liable
to criminal prosecution and civil claims for damages.
2
© Baxi Heating UK 2012
1.0
6
1.1
Description
1. Thank you for purchasing a high quality Solar Thermal
Domestic Hot Water System.
14
4
2. The sun is the ultimate source of most of our renewable
energy supplies. Energy from the sun is clean and abundant.
2
3
8
Introduction to Solar
3. There is a widely held opinion that the UK does not have
enough sun to make solar systems worthwhile. In fact parts of
the UK have annual solar radiation levels equal to 60% of those
experienced at the equator.
11
13
4. However, this energy is not received uniformly throughout the
year. Some 70% of UK annual radiation is received over the
period April to September and 25% is received in the months
of June and July.
10
1
5. Solar water heating technology captures energy from the sun
and transfers this to a water heater to raise the water
temperature therefore reducing the reliance on fossil fuel
energies such as gas, oil and electricity. Up to 60% of a dwelling’s
annual hot water requirement can be provided by a solar water
heating system. The balance is provided by traditional means via
a second heat exchanger connected to a fossil fuel boiler or
electrical heating by electric boiler or immersion heater.
12
Fig. 1
Cold Supply for Domestic Hot Water
Domestic Hot Water Outlet
Auxiliary Discharge Arrangement
Solar Collector 1
Solar Collector 2 (For East / West Array Installation)
Collector Sensor 1 (PT 1000)
Collector Sensor 2 (PT 1000)
Solar Pumping Station with Controller
Solar Pumping Station Cascade Module
Solar Expansion Vessel
Auxiliary Heat Source (Central Heating Boiler)
Flow Meter on a ‘COMMON’ Return (Accessory code 84515064)
Solar Fluid Discharge Vessel (Accessory code 720294601)
Thermostatic Blending Valve (Accessory code 720223301)
1
2
3
4
5
6
7
8
9
10
11
12
13
14
6
7
14
4
5
6. The water heating system provides all the principal
components required for an efficient solar water heating system.
The sun’s energy is captured by a series of solar collector panels
through which a special heat transfer fluid is pumped. As the
fluid passes through the collector panels its temperature is
raised. The heated fluid is circulated through a heat exchanger
coil in the base of the solar storage cylinder transferring the
heat gained to the stored water, gradually raising its
temperature. The cooled fluid then returns to the collector
panel to be heated again. Heating by the solar coil is controlled
by a solar differential temperature controller that ensures the
system will only operate when there is useful solar heating gain
at the collector panel. As the sun’s energy input to the collector
panels is variable supplementary heating by a conventional boiler
or electric immersion heater should be provided. The optional
cylinders that can be supplied with the package provide a
supplementary heat exchanger coil and immersion heater as
standard.
2
8
3
11
13
9
10
1
12
Fig. 2
© Baxi Heating UK 2012
3
2.0
2.1
Hydraulic station specifications
Technical data
Dimensions
System Module
Pump Station
Cascade Module
Pump Station
(Height/Width/Depth)
375/250/190mm
375/190/190mm
Flow and return connections
(compression fittings) 22mm
Maximum working temperature:
Maximum working pressure:
Pressure Relief Valve setting:
Circulating Pump:
Circulating Pump voltage:
Power consumption Setting 1:
Setting 2:
Setting 3:
Maximum Pump Head:
Maximum Pump Capacity:
Flow meter scale:
Fig. 3 System Module
Fig. 4 Cascade Module
4
© Baxi Heating UK 2012
160°C
6 bar
6 bar
Baxi
230/240 V ~
45W / 45W
68W / 65W
90W / 85W
6 metres
4.5 m3/h / 3.5 m3/h
2 to 15 l/min
3.0
3.1
Fig. 5
Differential temperature controller
Technical data
Housing
Material
100% recyclable ABS
Dimensions
L x W x D in mm
weight
175 x 134 x 56
ca. 360 g
Ingress protection
IP40 according to VDE 0470
Electrical values
Operating voltage
230/240V ~ 50 Hz
Interference grade
N according to VDE 0875
Max. conductor
cross-section
240V-connections
2.5 mm2 fine-strand/single-wire
Temperature sensor /
temperature range
PTF6 - 25°C to 200°C
PT1000, 1,000 kΩ at 0°C
Test voltage
4 kV 1 min according to
VDE 0631
Switching voltage
230V / 240V
Capability per one
switch output
1A / ca. 230VA for cos j = 0,7-1,0
Total capability of
all outputs
2A / ca. 460VA maximum
Fuse protection
fine-wire fuse 5 x 20mm, 2A/T
(2 amperes, slow)
Features
Self explanatory, menu driven operation
Adjustable control values
System monitoring
Energy yield, (solar gain) measurement
Suitable for flat plate and evacuated tube type collectors
Reheat thermostat function
Can be used in a number of system configurations
© Baxi Heating UK 2012
5
4.0
Ø300mm
Expansion vessel
392mm
3/4”
4.1
Ancillary components
Expansion vessel
1. Membrane expansion tanks for solar primary heating
circuit. Manufactured according to the Directive PED 97/23/CE
(approved noZ-DDK-MUC-02-396876-04).
2. Butyl membrane suitable for solar primary heating fluid, DIN
4807-3 approval.
Maximum working temperature +110°C.
Maximum percentage of glycol 50%.
Connection: 3/4” BSP male parallel
3. Expansion vessel supplied with wall mounting bracket
and self sealing vessel connection that will allow removal of the
vessel for maintenance without losing solar heat transfer fluid.
Fig. 6
4.2
Solar heat transfer fluid
1. The system uses a sealed system indirect solar primary circuit
which must be filled with the solar heat transfer fluid provided.
This is a Pre-mixed (40% glycol / 60% water) Solar thermal
transfer fluid, based on1,2 - propylene glycol with corrosion
inhibitors. It is Non-toxic, odourless, bio-degradable.
2. DO NOT mix the fluid with other types.
3. The use of chemical resistant gloves and suitable eye
protection is required when handling.
4. A full safety data sheet is available on request.
5. The system should be filled when there is no direct radiation
from the sun. If direct radiation occurs the collector panels
should be shaded by covering them during filling and flushing.
6. Although the solar heat transfer fluid is non corrosive and biodegradable appropriate precautions should be taken when
handling.
7. Wash with soap and water if the fluid comes into contact with
skin.
8. If fluid gets into eyes, immediately rinse with large quantities of
clear running water.
9. The solar heat transfer fluid must be pumped into the system.
The pump can be electric or manual but must be capable of
producing a pressure of at least 2 bar. The system should be
thoroughly flushed to remove any contaminants in the solar
primary circuit prior to filling with the heat transfer fluid
10. The fluid is supplied in 20litre container.
Weight of container full - 21kg.
11. Systems found to have low glycol concentrations will not be
covered by the warranty.
6
© Baxi Heating UK 2012
5.0
5.1
Cylinder specifications
Unvented
Unvented system - schematic diagram
Nominal capacities 210, 250 and 300 litre.
Rating Immersion heater(s) 1 x 3 kW (indirect models),
2 x 3kW (direct models) @ 240V~.
Outer casing White plastic coated corrosion proofed steel.
Thermal insulation CFC/HCFC-free (ODP zero) flameretardant expanded polyurethane (60mm thick). GWP 3.1
(Global Warming Potential).
Cylinder Duplex stainless steel.
Pressure testing To 15 bar.
Heat unit Titanium
element/s, incorporated into an easily removable heater plate,
should replacement be necessary. Rated 3.0kW @ 240V~.
Primary coil (for Auxiliary boiler heating) 22mm
diameter stainless steel. Coil in coil design for improved
performance
Solar coil 25mm diameter stainless steel. Coil in coil design
and large surface area for improved performance.
6
14
4
2
3
8
13
11
10
1
12
Note: Indirect twin coil unit shown.
Fig. 7
Thermostat
Direct models: Element thermostat adjustable from 10°C to
70°C.
Indirect models: Factory-fitted cylinder thermostat adjustable
to 70°C.
Solar: Factory fitted control pocket suitable for
insertion of solar controller temperature probe.
Factory fitted safety features:
Direct models: Manually re-settable cut-out on heating
element operates at 85°C.
Indirect models: High limit thermal cut-out operates at 85°C.
Wired in series with two-port motorised valve (supplied) to
provide primary over temperature protection when using
auxiliary (boiler) coil.
All models: Temperature and Pressure Relief Valve,
factory set to operate at 10 bar and 90°C.
High limit thermal cut-out operating at 85°C at solar coil
position. Wired in series with the solar differential temperature
controller to provide over temperature protection if
overheating occurs from solar collector panels.
N.B. This must be used in an unvented installation to comply
with the requirements of Building Regulation G3.
Anode Not required.
For full technical and performance specification see
cylinder installation instructions.
The cylinders are unvented so installation must comply with
Building Regulation G3 and / or other local regulatory
requirements.
© Baxi Heating UK 2012
7
5.0
5.2
Cylinder specifications
Cistern-fed vented
Vented system - schematic diagram
Nominal capacities 210, 250 and 300 litre.
Rating Immersion heater(s) 1 x 3 kW (indirect models),
2 x 3kW (direct models) @ 240V~.
Outer casing White plastic coated corrosion proofed steel.
Thermal insulation CFC/HCFC-free (ODP zero) flameretardant expanded polyurethane (60mm thick). GWP 3.1
(Global Warming Potential).
Water container Duplex 2304 stainless steel. 40 metres
(4 bar) maximum working head.
Heat unit Titanium element/s, incorporated into an easily
removable heater plate, should replacement be necessary.
Rated 3.0kW @ 240V~.
Primary coil (for auxiliary boiler heating) 22mm
diameter stainless steel. Coil in coil design for improved
performance.
Solar coil 25mm diameter stainless steel. Coil in coil design
and large surface area for improved performance.
Note: Direct unit shown. Auxiliary heating by immersion heater.
Fig. 8
Thermostat
Direct models: Element thermostat adjustable from 10°C to
70°C.
Indirect models: Factory-fitted cylinder thermostat from 10°C
to 70°C.
Solar: Factory fitted control pocket suitable for
insertion of solar controller temperature probe.
Safety features Thermostats with manually resettable thermal
cut-out.
High limit thermal cut-out operating at 85°C at solar coil
position. Wired in series with the solar differential temperature
controller to provide over temperature protection if
overheating occurs from solar collector panels.
Anode Not required.
For full technical and performance specification see
cylinder installation instructions.
Detailed installation and commissioning instructions are
supplied with the cylinders.
NOTE: The system is also compatible with cylinders configured
for solar DHW systems. For installation and specification details
refer to the manufacturers instructions supplied with the solar
cylinder.
Any system installed using an unvented cylinder must comply
with Building Regulations G3 and/or other Local Regulations.
8
© Baxi Heating UK 2012
6.0
6.1
Safety Information
Safety
1. In order to reduce the number of deaths and major accidents
attributable to work at height, the Health and Safety Executive
has introduced comprehensive regulations and guidance that
should be followed by all businesses working at height.
2. We consider in the following paragraphs some of the main
features of the regulations and guidance. This is, however, only a
limited summary and it is recommended that all businesses
planning on undertaking solar water heating installations obtain
a copy of the regulations and guidance issued by the Health and
Safety Executive and carefully consider the contents.
3. The regulations and guidance state that you are required to
carry out a risk assessment for all work conducted at height and
to put in place arrangements for:
• Eliminating or minimising risks from work at height.
• Safe systems of work for organising and performing
work at height.
• Safe systems for selecting suitable work equipment.
• Safe systems for protecting people from the
consequences of work at height.
4. The regulations and guidance highlight a hierarchy for safe
work at height:
• Avoid the risk by not working at height if practicable.
• Prevent falls, where it is not reasonably practicable to
avoid work at height; you are required to take suitable
and sufficient steps to prevent the risk of a fall
including selecting the most suitable work equipment
(in accordance with the regulations).
• Mitigate the consequences of a fall; where the risk of
a person or object falling still remains, take suitable
and sufficient measures to minimise the distance and
consequences of any fall.
5. Collective protection measures, such as guard rails on scaffold,
should be given priority over personal protection measures,
such as safety harnesses.
6. Within the regulations’ framework, you are required to:
a) Assess the risk to help you decide how to work safely.
b) Follow the hierarchy for safe work at height (i.e. avoid,
prevent and mitigate).
c) Plan and organise your work properly, taking account of
weather conditions and the possibility of emergencies.
d) Make sure those working at height are competent.
e) Make use of appropriate work equipment.
f) Manage the risks from working on or around fragile surfaces
and from falling objects.
g) Inspect and maintain the work equipment to be used and
inspect the place where the work will be carried out
(including access and egress).
7. When preparing to install a solar water heating system, it is
required that you perform a risk assessment in relation to work
at height and plan how you will organise your work, taking into
account the site, the weather conditionsand the experience and
competence of colleagues or contractors who may be working
at height with you.
© Baxi Heating UK 2012
9
6.0
6.1
Safety Information
Safety (cont)
Risk Assessments
8. The HSE has published a number of very useful free
publications that advise how to undertake risk assessments.
9. Two of these that you should obtain are:
Five Steps to Risk Assessment.
A Guide to Risk Assessment Requirements.
10. The five steps outlined in the HSE leaflet are:
Step 1: Look for the hazards, this will mean looking at the site
and identifying significant hazards. These could be features such
as a steep roof, a fragile surface where the collectors may be
mounted, uneven ground or obstructions where access to the
roof might be required.
Step 2: Decide who may be harmed and how, this might
mean considering the particular risks that young workers or
trainees might face and thinking about the residents of the
household or visitors who could be hurt by your activities.
Step 3: Evaluate the risks and decide which precautions
should be made, you should consider how likely it is that each
hazard will cause harm, decide which precautions you might
take and then assess, after you have taken those precautions,
whether the remaining risk will be high, medium or low. Where
you identify remaining risks, you should consider which further
action you could take to control the risks so that harm is
unlikely.
Step 4: Record your findings, if you have fewer than five
employees you do not need to write anything down, though it
is useful to keep a written record of what you have done. If
you employ five or more people you must record the
significant findings of your assessment. You must also tell your
employees about your findings. You need to be able to show
that a proper check was made, that you considered who might
be affected, that you dealt with all the obvious significant
hazards, that the precautions you propose are reasonable and
that the remaining risk is low.
Step 5: Review your assessment if necessary, each solar water
heating installation may bring its own challenges and present its
own particular hazards. You should therefore be careful not to
rely on a “standard” risk assessment for installing a solar water
heating system in a house, but review the particular hazards
for each new situation. The issue of work equipment must be
considered, but at the preparation stage you should consider
where scaffold or other access equipment might be positioned
and look out for any obvious obstacles to this, such as a
conservatory or porch. In addition to the risks associated with
work at height, you should also consider the risks associated
with lifting and carrying solar collectors, using electric drills and
using blow lamps or blow torches for soldering. This is not an
exclusive list and so you should consider all aspects of the
proposed installation to assess whether there are additional
risks that need to be taken into account.
10
© Baxi Heating UK 2012
7.0
Installation of hydraulic station
Fig. 9 (Diagrams not to scale)
7.1
3
1
Parts list
Before commencing the installation check all listed components
are contained in the following cartons.
Hydraulic Station carton:
2
4
1.
Hydraulic pump station with insulation incorporating
wall mounting bracket.
2.
Solar differential temperature controller.
3.
Safety group, comprisingPressure relief valve, pressure gauge and fill &
drain valve.
4.
22mm compression fitting nut and olive(4 off).
5.
Sensor extension cable (13m) (not shown).
Ancillary component carton:
7
6
6.
Solar expansion vessel complete with mounting bracket
and strap assembly.
7.
Expansion vessel connecting hose.
8.
Expansion vessel self sealing connection.
8
© Baxi Heating UK 2012
11
7.0
7.2
Installation of hydraulic station
Identification of components
1. The main components of the hydraulic station are:
1
3
2
4
6
–
Two isolating valves (Fig. 10, Item 1 & 2) with integral
thermometers which display the solar primary flow
and return temperatures.
–
A safety group (Fig. 10, Item 3, supplied unconnected),
which protects the solar primary circuit. The pressure
relief valve and pressure gauge are integrated in the
safety group.
–
A non-return valve in both feed and return prevents
the possibility of gravity circulation in the solar
primary circuit.
–
A solar circulation pump (Fig. 10, Item 4).
–
A flow meter with fill & drain valve and shut-off valve
(Fig. 10, Item 5).
–
An air separator.
5
Fig. 10
2. The heat transfer fluid is circulated by the solar circulation
pump integrated in the hydraulic pump station (Fig. 10).
3. The hydraulic station has a solar differential temperature
controller (Fig. 10 Item 6) integrated into the front
insulation moulding. This is pre-wired to the solar pump.
12
© Baxi Heating UK 2012
7.0
Installation of hydraulic station
Fig. 11
7.3
See Fig. 11
1
Cold Supply for Domestic Hot Water
2
Domestic Hot Water Outlet
3
Auxiliary Discharge Arrangement
4
Solar Collector 1
5
Solar Collector 2 (For East / West Array Installation)
6
Collector Sensor 1 (PT 1000)
7
Collector Sensor 2 (PT 1000)
8
Solar Pumping Station with Controller
9
Solar Pumping Station Cascade Module
10
Solar Expansion Vessel
11
Auxiliary Heat Source (Central Heating Boiler)
12
Flow Meter on a ‘COMMON’ Return
(Accessory code 84515064)
13
Solar Fluid Discharge Vessel
(Accessory code 720294601)
14
Thermostatic Blending Valve
(Accessory code 720223301)
6
14
Static
Height (m)
4
2
3
8
13
11
10
1
12
7.4
Pipework installation - general
1. In Solar Heating Systems, the collectors, the hydraulic station
and solar cylinder (Fig. 11, Item 1) must be connected with
brazed or silver soldered copper pipes, compression fittings or
the multifit accessory flexible steel tube and insulation. (See
brochure for details) N.B. Plastic pipes MUST NOT be used.
2. Connections supplied are suitable for pipe diameters of
22mm. However for short pipe runs (up to 10m flow and
return) the use of 15mm diameter pipe is acceptable.
3. All connections and joints must be resistant to temperatures
of up to 150°C and resistant to glycol.
4. If any pipe sealants are used these should be resistant to
glycol and be able to withstand temperatures of up to 150°C.
5. The difference in height between the highest point in the
pipework (collector) and the level of the hydraulic pump
station determines the static head for the system. The static
head is 0.1 bar times this height in metres. This static head is
used when setting the expansion vessel precharge pressure
and the system pressure.
6. If the static head is greater than 1.5 bar (15m) then a larger
expansion vessel may be required for larger collector arrays.
7. If the pipe runs between the solar collector and pump
station are short (<6m) then a protection vessel (Accessary
No. 5131963) should be installed between the pump station
and expansion vessel.
8. Earthing pipework
All solar primary pipework between the solar collectors,
hydraulic station and solar cylinder should be earth bonded in
accordance with current IEE wiring regulations.;
© Baxi Heating UK 2012
13
7.0
Installation of hydraulic station
Fig. 12
7.4
9. Venting the pipework
The hydraulic station the component includes an air
collector/separator and bleed point so an automatic air vent is
not necessary. Any section of solar pipework that falls and rises
again should be fitted with an additional air vent valve to relieve
any trapped air which may cause air locking in the system. The
automatic air vent and isolating valve used must be compatible
with solar primary systems, i.e. be resistant to glycol and
temperatures up to 180ºC.
6
14
4
2
3
8
13
11
10
1
12
See Section 7.3 for Key
14
© Baxi Heating UK 2012
Pipework installation - general (cont)
10. Insulating the pipework
External pipework should be insulated with high temperature
resistant materials and be protected against UV degradation.
The insulation must be peck-proof and rodent-proof. Internal
pipework, especially through unheated spaces such as a loft
space, should also be insulated with high temperature resistant
materials. Mark the outside of any insulation to identify the flow
and return pipes. The collectors are supplied with 2x2m pre
insulated flexible stainless steel tubes. Additional lengths (30m)
of stainless steel flexible tubes and high temperature insulation
can be supplied.
7.0
Installation of hydraulic station
Fig. 13
7.5
Installing the hydraulic station - positioning
1. It is usual to install the hydraulic station and solar differential
temperature controller near to the solar cylinder. However this
does not have to be the case, the hydraulic station can be
installed anywhere convenient on the solar primary pipework
although adequate access will be necessary for commissioning
and maintenance (See also comments regarding system static
head given in Section 7.4).
2. The solar differential controller should also be accessible for
system operational monitoring. If not in close proximity to the
solar cylinder it will be necessary to extend the solar cylinder
temperature sensor cable, refer to section 9.6 for details of how
to do this.
3.It is recommended that the upper mounting bracket
of the hydraulic station is positioned approx. 1600 to 1700mm
above the floor level for ease of access and operation of the
controls, see Fig. 13.
4. When choosing the site for the hydraulic station provision of a
discharge pipe from the safety group and the location of the
solar expansion vessel must be considered.
Fig. 14
7.6
Installing the wall brackets and hydraulic station
1. Remove the front insulation moulding (Fig 14. Item 1) by
pulling forward whilst holding the solar differential controller
moulding (Fig 14. Item 2) in place, carefully remove the solar
differential controller mounting by pulling forward and
disconnect the pump cable connector (Fig 14. Item 3).
1
2
4
6
5
2. Place the hydraulic assembly on the wall at the desired
location and mark the fixing positions through the holes in the
mounting brackets.
3. Remove the hydraulic assembly from the mounting brackets
(Fig 14. Item 4) and remove rear insulation moulding (Fig 14.
Item 5).
4. Drill and plug the mounting positions and screw the mounting
brackets into position.
5. Push the rear insulation moulding over the wall brackets and
refit the hydraulic assembly (Fig 14. Item 6) to the mounting clips
on the wall brackets.
4
3
© Baxi Heating UK 2012
15
Fig. 15
1
3
7.0
7.7
Installation of hydraulic station
Installing the safety group
2
1. Connect the safety group (Fig 15 Item 1) to the connection
on the hydraulic station return isolating valve assembly (Fig 15
Item 3). Ensure that the pre-fitted gasket is securely in place on
the safety group prior to connection.
7.8
Fig. 16
4
5
3
1
2
1. Mount the solar expansion vessel (Fig 16 Item 1) adjacent to
the hydraulic station (Fig 16 Item 2) so that the vessel can be
connected to the vessel connection of the safety group (Fig 16
Item 3) using the flexible pipe (Fig 16 Item 4) supplied. (Note:
Solar expansion vessel, mounting bracket, self sealing connection
and flexible pipe are supplied in the Ancillary Components kit).
2. The vessel must be mounted as shown (connection to top)
and securely supported using the wall bracket supplied. The self
sealing vessel connection should be screwed onto the vessel
connection before connecting the flexible pipe (Fig. 16 Item 5).
3. DO NOT replace the solar expansion vessel with either a
potable water expansion vessel or boiler sealed system vessel.
Return
to
panel
Flow
from
panel
Fig. 17
Connecting the solar expansion vessel
4. The charge pressure of the solar expansion vessel must be
adjusted (when the fluid circuit is empty or de-pressurised) to a
pressure equal to the static head + 0.4 bar, or a minimum of 1.2
bar. (NOTE: the static head is the height difference between the
highest point in the pipework (collector) and the hydraulic
station in metres x 0.1 bar. The charge pressure should not
normally exceed 1.9 bar - see also Section 7.4.
3
2
7.9
1. Connect the flow and return pipes to the pump station via
compression fittings (Fig 17 Item 1). Fittings are for 22mm o/dia
pipe. Support the hydraulic assembly when tightening
connections.
1
Flow
to
cylinder
Fig. 18
Return
from
cylinder
4
To a suitable container
(e.g. Solar fluid discharge vessel
Accessory No. 720294601)
Return to hydraulic station
Return from cylinder
Flow to cylinder
16
© Baxi Heating UK 2012
Connecting pipework
2. Installing a drain valve
It is recommended to install a device for draining the solar
heating system (tee piece with drain valve, Fig. 18) into the flow
and return at the lowest point in the solar heating system. The
drain and its rubber seal must be suitable for solar applications.
3. Connecting the solar cylinder
For detailed installation instructions refer to the
installation instructions supplied with the solar cylinder.
Fig. 19
8.0
Commissioning of system
3
45°
4
5
8.1
Air Test
1. An air test may be used on the pipework to detect any gross
leakage prior to flushing and filling with solar heat transfer fluid.
Pressurise the system to a maximum of 1 bar to check for leaks.
1
2. Ensure that the solar expansion vessel pre-charge pressure
has been set prior to flushing and filling.
6
2
8.2
7
Read at top
of float
Fig. 20
Flushing and Filling the pipework
1. Before the system is commissioned the pipework must be
flushed to remove any contaminants. This must be done using
the solar heat transfer fluid as it will be impossible to fully
drain all parts of the system.
2. Connect the flushing pipes to the fill & drain valve on the
safety group (Fig. 19 Item 1) and to the fill & drain valve on the
flow meter (Fig. 19 Item 2).
3. Open the fill & drain valves.
Filling pump
4. Turn the slot of the adjusting screw (Fig. 19 Item 3) in the
return so the slot is vertical to open the non-return valve.
5. Turn the left hand isolating valve with integral thermometer in
the flow (Fig. 19 Item 4) in the direction indicated by the arrow
(to a 45° position) to open the non-return valve.
Filter
6. Ensure that the right hand isolating valve with integral
thermometer in the return (Fig. 19 Item 5) is open indicated by
the dot on the thermometer bezel being at the top.
Solar fluid
7. Turn the slot of the flow meter adjusting screw (Fig. 19 Item
6) in the return vertically to open the flow limiter (Fig. 19 Item
7).
8. Flush the solar primary pump by pumping the fluid into the
system via the fill and drain valve on the safety group (Fig. 19
Item 1).
Fig. 21
1
3
9. Close right hand isolating valve (dot on thermometer bezel at
9 o’clock position). Flush solar primary pipework and collector
via the fill and drain valve on the safety group. If reusing flushed
fluid ensure this is filtered before re-introducing into the
system. (see Fig. 20). Use a suitable container of a large enough
volume to collect the fluid.
10. When satisfied that all pipework and component parts have
been thoroughly flushed, the system can be filled.
2
© Baxi Heating UK 2012
17
8.0
8.3
Commissioning of system
Flushing and Filling the pipework (cont)
11. Pour an amount of the solar heat transfer fluid into the filling
pump.
12. Close the fill and drain valve - safety group (Fig. 19 Item 1) and
the fill and drain valve - flow meter (Fig. 19 Item 2) and pressurise
the pump slightly prior to filling the system. If an electric pump is
being used follow the instructions with the pump.
13. Fully open the fill and drain valve on the safety group (Fig 19,
item 1) and pump fluid into the system. Whilst pumping, open the
flow meter drain valve (Fig 19, item 2) slightly to allow the air to
vent out of the system.
14. When the pump is down to approximately 1 litre isolate the
fill and drain valves. Vent the filling pump and refill with solar heat
transfer fluid.
15. Re-pressurise the filling pump and repeat steps 3 and 4 above
until fluid is seen discharging from the drain valve on the flow
meter. (Fig 19, item 2). Close the drain valve.
16. Continue filling at the fill and drain valve on the safety group
(Fig 19, item 1) until the system pressure reaches 2 bar.
17. At this point the circulation pump should be vented. If the
system pressure drops, repressurise using the procedure above.
18. After venting the pump and checking that the system pressure
is 2 bar, close the fill and drain valve on the safety group (Fig. 19
Item 1), and check the system for leaks.
19. Turn the left hand isolating valve (Fig 19, item 4) back 45°
clockwise until the dot on the bezel is back at 12 o’clock.
20. Turn the right hand isolating valve (Fig. 19 Item 5) back 90°
clockwise until the dot on the bezel is back at 12:00 O’clock.
21. Turn the slot of the adjusting screw (Fig. 19 Item 3) back to
the horizontal position.
18
© Baxi Heating UK 2012
9.0
Installation of solar controller
Fig. 22
Hydraulic Station
Solar panel
sensor
Solar
differential
controller
9.1
Terminal block
for extending
collector sensor
Solar Coil
over-temp
cut-out
Double pole
isolating switch
L
N
E
230V/240V~
Mains supply
The collector panel temperature sensor should be installed in
the sensor pocket at the collector array flow connector as
part of the first fix process. Ensure that the cable from this
sensor can be identified for connection to the pump station
wiring centre. Use the 13m extension cable supplied if
required.
Pump
pre-wired
(mounted on
hydraulic station)
Cylinder
sensor
Appliance installation
1. Always disconnect from the mains before opening the
controller cover. The solar differential temperature controller
is designed to be mounted on the front of the hydraulic
station. Alternatively it can be removed from the insulation and
be wall mounted (see panel below). In the case of wall
mounting the pump cable may need to be lengthened.
Alternative mounting option
In the case of wall installation proceed in the
following way:
Drill installation holes according to the dimensions
shown below. Screw in two upper screws up to 6 mm
distance. Open the appliance as described in section 10.2
and hang it onto two screws. Now two lower screws can be
mounted. Tighten all screws. Do not overtighten to avoid
damage to the controller backplate.
126mm
84mm
118mm
9.2
Opening the controller
1. Always disconnect from the mains before opening the
controller cover.
2. No tools are required to open the controller. The front of
the controller is secured by two latches which engage with the
controller backplate.
3. It can be opened by gently pulling the lower side edges
outwards and then hinging the front upwards.
© Baxi Heating UK 2012
19
9.0
Installation of solar controller
Fig. 23
9.3
1. Always disconnect from the mains before opening the
controller cover. The electrical installation must conform to all
current Wiring Regulations and be carried out by a competent
electrician.
240 Volts
Fuse rating T 2A L 250V
FUSE
PE
PE
PE
A2
A3
PE
N
A1
N
L
N
T1
N
T2
T3
T4
M1 M2 M3
T5
M4
T6
Terminal
Reference
M5 M6 M7
2. The connection of all electrical cables is to the terminal block
located on the backplate of the controller. The
terminals on the right side of the terminal block are for extra
low voltage connections (temperature sensors and flow
transmitters). The terminals on the left side of the
terminal block are for 230/240 V~ connections.
General connection guidelines.
3. In the case of all connecting wires the outer sheath should
be stripped back to 80mm. The individual conductor sleeving
should be stripped approx. 10mm.
Description
L
240V Supply Live
N
240V Supply Neutral
A1
Switched Output to Solar Pump
N
Solar Pump Neutral
A2
Switched Output - Live 2 (For East West Array or Dual Tanks)
N
Switched Output 2 Neutral
A3
Switched Output - Live 3 (For Auxiliary Heat Control)
N
Switched Output 3 Neutral
PE
T7
Low Voltage (SELV) connections
Mains 230/240V connections
Electrical connection overview
4. Cables are inserted in the controller through knockouts
provided in the controller backplate.
5. Flexible cables must be secured against straining by
suitable strain relief bushes or devices.
6. The controller must be earthed.
9.4
Earth Connection
230/240V~ connections
1. For 230V connections you must follow the following points:
T1 & M1
Temperature Sensor Collector 1 (Tc1)
T2 & M2
Temperature Sensor Storage Tank 1 (Ts1)
T3 & M3
Temperature Sensor Collector 2/Storage Tank 2 (Tc2 / Ts2)
T4 & M4
Temperature Sensor Collector Return (Tret)
T5 & M5
Temperature Sensor for 2nd temperature differential controller (Tth)
T6 & M6
Frost Protection or 2nd temperature differential controller
T7 & M7
Flow Meter (Optional)
2. The mains supply to the controller should be via a suitable
double pole isolating switch with a contact separation of at
least 3mm in both poles. Additionally the controller should be
wired via the solar coil over temperature cutout such that
power is interrupted to the controller and hydraulic station in
the event of the cylinder overheating (see Fig. 24).
3. Controllers are intended for the operation in 230/240V~
/50Hz mains. Any motorised valves connected must be suitable
for this voltage.
Fig. 24
Hydraulic Station
4. All earth wires must be connected to terminals marked with
PE. Any bare wire earth conductors must be sleeved with
green/yellow sleeving.
5. The neutral terminals (N) are electrically connected and are
not switched.
Solar
differential
controller
Double pole
isolating switch
L
N
E
230V/240V~
Mains supply
20
© Baxi Heating UK 2012
Solar coil
over-temp
cut-out
6. All switch outputs (A1, A2 and A3) are 230/240V~ closers. If
potential-free contacts are needed, appropriate accessories are
required.
Fig. 25
Type 0:
1 collector, 1 storage tank
9.0
9.5
Tc1
Installation of solar controller
Solar Gain measurement
Collector
Storage tank
1. For solar gain (energy productivity) measurement in System
type ‘0’, it is necessary to fit the collector return sensor as shown
in the diagram in Fig. 25. and input the correct flow value.
Tth
Tret
P1
Tret
Ts1
2. For System types 2 and 4, the collector return sensor must
be securely attached to the common return pipework using the
securing tiles supplied and then covered by insulation. Use cable
ties (not supplied) to ensure good attachment and accurate
readings.
FM
Type 2:
1 collector, 2 storage tanks
with 2 pumps
3. The solar gain of the system is calculated on the basis of the
temperature difference between the collector flow and return
and the solar primary circulation flow rate.
Tc1
Storage tank1
4. The function is factory set-up as ‘on’ in the Solar Differential
Temperature Controller.
Storage tank2
Tth
Collector
Ts2
Ts1
FM
5. For System Type 2 the additional pump (P2) can be ordered
as an accessory, Part No. 7202943 together with appropriate
sensor for cylinder 84515063.
P2
P1
Tret
6. For System type 4 use the East/West kit accessory as required
(See Sales Brochure).
Type 4:
2 collectors, 1 storage tank
with 2 pumps
Key
Collector 1
Tc2
Tc1
Description
Tc1
Temperature Sensor - Collector 1
Tc2
Temperature Sensor - Collector 2
Tth
Temperature Sensor - Thermostat
Ts1
Temperature Sensor - Storage 1
Ts2
Temperature Sensor - Storage 2
Tret
Temperature Sensor - Collector Return
Storage tank1
Tth
P2
Ts1
P1
Tret
FM
P1
Circulation Pump 1
P2
Circulation Pump 2
FM
Flow Meter
Tfr *
Temperature Sensor - Frost Protection
* not shown
System type
Output terminal designation (see Fig. 23)
Type
Description
A1
A2
A3
0
1 collector array, 1 storage cylinder
P1
-
Cooling or thermostat or diff. controller
2
1 collector array, 2 storage cylinder (pump-pump)
P1
P2
Cooling or thermostat or diff. controller
4
2 collector array, 1 storage cylinder (pump-pump)
P1
P2
Cooling or thermostat or diff. controller
System
Type
System Description
T1
T2
T3
T4
T5
T6
T7
0
1 collector array, 1 storage cylinder
Tc1
Ts1
-
Tret
Tth
Tfr
FM
2
1 collector array, 2 storage cylinders
Tc1
Ts1
Ts2
Tret
Tth
Tfr
FM
4
2 collector arrays, 1 storage cylinder
Tc1
Ts1
Tc2
Tret
Tth
Tfr
FM
NOTE: The solar gain flowmeter must be connected to sensor terminals marked T7 where fitted (see Fig. 23).
© Baxi Heating UK 2012
21
Fig. 26
9.0
Block Wiring Schemes
A. In conjunction with auxiliary heating by boiler - no reheat control
9.6
Installation of solar controller
Connection of temperature sensors
by solar controller.
3A Fused Supply
Boiler Terminal Strip
L
N
E
1
2
3
1
2
3
7
10
1
2
3
L
PL
N
1
1. The controller uses precise platinum temperature sensors
type PT1000. The controller is supplied with 3 sensors ready
wired. The sensor with black silicone sheathing (supplied with
the first fix kit) must be used for the solar panel sensor.
Programmer
SL
L
N
E
1
2
3
1
4
2
3
5
5
6
7
8
9
10
3
3
2
10
1
5
E
G/Y
BL
BR
GR
OR
9
1
5
4
BR
GR
OR
L
4
Cylinder Auxiliary Controls
6
E
DHW ON CH ON
7
6
Terminal Box (Not supplied)
2. Installation / cabling of temperature sensors:
a) Mount the sensors in the pockets provided in the collector
and storage tank. When installing into the collector panel
sensor pocket the sensor should be secured by sealing with
UV resistant High Temperature Silicone sealant.
DHW 2 Port Valve
9
2
3
2
2
N
G/Y
BL
Room Stat
CH 2 Port Valve
2
3
N
E
CH Pump
3
2
2
11
12
See Fig. 23
PE
L
N
A1
N
1
Solar
Controller
L
3
A1
1
2
E
11
A2
N
T1
T2
T4
T7
A1
N
PE
11
12
E
Solar Differential Controller
b) The wires of the temperature sensors can be lengthened.
Up to 15m long you need a 2 x 0,5mm2 cross-section, up to
50m 2 x 0,75mm2. In the case of long connections (collector)
shielded extension lead must be used. DO NOT run sensor
leads adjacent to mains carrying voltage conductors (at least
50mm separation is recommended).
Solar Pump
N
PE
12
E
Solar Pump 2
Solar O/Temp Cutout
Note: For Boilers without Pump over run CH Pump Live Supply to 5
c)Temperature sensors are supplied connected to the
appropriate terminals, refer to Fig 26. The sensors are polarity
free.
B. In conjunction with auxiliary heating by boiler - reheat control
via solar controller.
3A Fused Supply
Boiler Terminal Strip
L
N
E
1
2
3
1
2
3
7
10
1
2
3
L
PL
N
E
Programmable Room Stat
SL
L
N
1
2
1
2
1
6
1
4
2
3
5
5
6
7
8
9
10
3
3
2
10
1
5
E
G/Y
BL
BR
GR
OR
3
2
6
1
5
4
G/Y
BL
BR
GR
OR
L
4
Cylinder Auxiliary Controls
d) Sensors MUST NOT be connected to the 230/240V~
terminals.
Terminal Box (Not supplied)
9.7
DHW 2 Port Valve
2
3
N
E
CH 2 Port Valve
CH Pump
See Fig. 23
1. When using the reheat function the operation of the
auxiliary heat input device can be controlled via output A3
from the controller (see fig. 23(c)).
3
8
2
11
12
7
2
PE
L
N
A1
N
A3
N
1
8
3
A1
1
2
E
11
A2
N
T1
T2
T4
T5
T7
A1
N
PE
11
12
E
Solar Differential Controller
Solar Pump
Solar O/Temp Cutout
N
PE
12
E
Solar Pump 2
C. Solar Cylinder with auxiliary heating by immersion heater.
Boiler
Immersion
3 Amp Fused Supply
13 Amp Fused Supply
L
N
E
L
N
2
3
4
5
6
1
2
3
4
5
6
7
3
8
2
11
12
PE
L
N
A1
N
8
9
10
Terminal Box (Not supplied)
Relay
A3
See Fig. 23
N
A2
N
T1
T2
T4
A1
T5
T7
11
Solar Differential Controller
1
8
3
1
2
E
Solar O/Temp Cutout
22
N
4
7
7
5
6
A1
1
5
CoM
No
L
N
E
11
Auxiliary Immersion Heater Relay
N
PE
12
E
Solar Pump
A3
© Baxi Heating UK 2012
2. The reheat sensor cable is connected to terminals T5 of the
solar controller (see page 20) and the sensor element be
inserted into the controls pocket at the auxiliary heater level.
3. N.B. The maximum switching current of the controller
is 2A so if switching an electrical immersion heater this MUST
be done via a relay (see Fig. 26 Block Wiring Scheme C) order
accessory code No. 5122765.
4. If using a boiler for auxiliary input, the output from the
reheat function should be integrated into the boiler control
circuit.
E
1
Control of Auxiliary heat input
Immersion Heater
N
PE
12
E
Solar Pump 2
Fig. 26
9.0
Installation of solar controller
9.8
D. Auxiliary heating by boiler with 3 port mid position valve system
- no reheat control by solar controller.
3A Fused Supply
Boiler Terminal Strip
N
E
L
PL
N
E
SL
L
N
E
1
2
3
1
4
2
3
5
1
2
3
1
2
3
4
5
6
7
8
8
5
7
3
3
2
10
NOT USED
1
2
3
E
G/Y
BL
BR
GR
Cylinder Auxiliary Controls
6
1
2
3
2
N
G/Y
Room Stat
PE
L
9
10
DHW ON DHW OFF CH ON
8
7
Terminal Box (Not supplied)
OR
2
9
7
5
4
BL
WH
GR
OR
L
3 Port Mid Position Valve
2
11
12
N
A1
N
See Fig. 23
A2
N
T1
2
3
N
E
CH Pump
T2
T4
A1
11
T7
Solar Differential Controller
N
PE
12
E
1
3
A1
N
PE
1
2
E
11
12
E
4. Baxi accept no liability for any loss or damage arising from
any errors or omissions that may be inadvertently contained
within these diagrams.
E. Auxiliary heating by boiler with 3 port mid position valve system
- reheat control by solar controller.
Boiler Terminal Strip
3A Fused Supply
N
E
L
1
2
3
1
2
3
4
8
5
7
1
2
3
PL
N
E
1
4
2
3
5
5
6
7
8
9
3
3
2
5
NOT USED
E
G/Y
BL
BR
GR
Cylinder Auxiliary Controls
5. The various ancillary equipment manufacturers should be
consulted to confirm the correct operation of their products
within the system.
Programmable Room Stat
SL
10
L
N
1
2
1
2
1
9
Terminal Box (Not supplied)
6. The Warranty only applies to equipment and controls
supplied with the system.
OR
DHW 2 Port Valve
3
G/Y
2
9
7
5
4
BL
WH
GR
OR
L
3 Port Mid Position Valve
3
6
2
11
12
PE
L
N
A1
N
A2
N
8
2
A3
N
2
3
N
E
CH Pump
See Fig. 23
T1
T2
T4
A1
T5
T7
11
Solar Differential Controller
6
3
A1
1
2
E
11
© Baxi Heating UK 2012
N
PE
12
E
Solar Pump
1
Solar O/Temp Cutout
Live
Neutral
Earth
Pump Live
Switched Live
Green and Yellow
Blue
Brown
Grey
Orange
White
3. These diagrams are presented for guidance only, terminal
numbers may differ between different manufacturers
equipment.
Solar Pump 2
Solar O/Temp Cutout
-
2. The wiring schemes assume the use of an unvented Solar
DHW cylinders.
Solar Pump
Solar
Controller
L
L
L
N
E
PL
SL
G/Y
BL
BR
GR
OR
WH
6
2 Port Valve
9
3
1. Key to abbreviations:
Programmer
L
N
PE
12
E
Solar Pump 2
23
10.0
10.1
Commissioning of hydraulic station
Ensure the solar primary system is free from air
1. Switch on the power supply to the solar differential
temperature controller.
2. Manually switch the circulation pump ON and OFF via the
solar differential temperature controller (see section 11.5) to
pump fluid around the solar primary system.
3. Turn the pump off and open the airbleed screw on the air
separator (Fig. 27 Item 1). Bleed any air from the air separator.
If the system pressure drops top up by opening the fill and
drain valve (Fig. 27 Item 2) on the safety group and pumping in
more solar fluid to restore the pressure. This must be repeated
until the pressure remains stable.
Fig. 27
10.2
2
1
Setting the system pressure
1. During commissioning, the system pressure should be 0.7
bar above the static pressure (1 metre height differential
equals 0.1 bar). However, it must be at least 1.5 bar and no
higher than 2.2 bar.
2. Determine the system pressure when the system is cold
(20°C). This should be recorded on the Commissioning
Record Sheet.
3. If the pressure is too low you should pump additional heat
transfer fluid into the system; the fill & drain valve on the safety
group (Fig. 27 Item 2) needs to be opened for this purpose.
When system pressure is correctly set, ensure the fill and drain
valve is closed and remove filling hose from safety group.
24
© Baxi Heating UK 2012
Fig. 28
Diagram of all possible symbols
11.0
Main Menu
On completion of commissioning the Solar Controller, note all the
required information in the Solar Commissioning Record Sheet at
the end of Section 12.
11.1
1
Sub-Menu
Commissioning of solar controller
Main Menu
To make the operation of the controller clear, operating and display
functions are divided into 4 main menus.
Info
Indication of current measured values.
Indication of system condition.
Indication of error messages.
Indication of operating hours and energy
productivity (if installed).
Programming
Changes to programmable values
(parameters).
Display Screen
Manual operation Switching on and off connected pumps
and auxiliary devices.
WARNING - During manual operation
there is no automatic regulation of the
system. Temperature control is isolated.
System temperature could be
extremely high.
1
2
3
5
4
Basic adjustment
Control Button
2
4
Scroll upwards
Scroll downwards or select required main menu
Each active menu is shown in the upper line of the display by its
corresponding icon.
11.2
3
5
Scroll left or exit to main menu
Scroll right or select to edit function
Example Screen - Programming Menu
Information about basic adjustment for
system function. To carry out any
changes to this menu it must be
selected within the first minute after
switching the appliance on.
IMPORTANT: Adjustment and changes
in this menu must only be carried out
by a competent installer or service
engineer.
Control Button
When in the Main Menu the control button functions are as follows:
Item 2 - Scroll upwards- no function in this menu
Item 3 - Scroll left
- moves left through the main menu
options
Item 4 - Scroll down - selects the menu option currently
flashing and gives access to the submenu
Item 5 - Scroll right
- moves right through the main menu
options
Once the sub-menu has been accessed, the flashing symbol
becomes static and the button functions are then as follows:
Item 2 - Scroll upwards- moves up through the available
functions of the sub-menu
Item 3 - Scroll left
- return to main menu
Item 4 - Scroll down - moves down through the available
functions of the sub-menu
Item 5 - Scroll right
- select to edit the function displayed.
The selected function will flash if it is
available for editing. Use 2 to increase the
required value and 4 to reduce it.
Use 5 to OK.
© Baxi Heating UK 2012
25
Fig. 29
Press
or
11.0
to scroll
Commissioning of solar controller
up or down to the required sub function.
The icon will flash, press
11.3
to
select the function. Reset by pressing
or
In this menu mode all measured values and operating states
are shown.
for
increase/decrease values. Press
and
ok?
press
If the values are marked as “reset possible”, they may be reset
in the following way:
appears,
to confirm and
disappears.
Menu “Info”
Choose the value with buttons
ok?
Reset value by means of the button
Message “OK?” confirm with
Indication
e.g.
Meaning
Reset
possible?
Indication of current collector(s)
temperature.
75 °C
No
Indication of minimum collector(s)
temperature.
Resettable to current temperature.
min
12°C
Indication of maximum collector(s)
temperature.
Resettable to current temperature.
max
105°C
Indication of current temperature storage
tank(s).
52 °C
Indication of minimum temperature
storage tank(s).
Resettable to current temperature.
min
40°C
Indication of maximum temperature
storage tank(s).
Resettable to current temperature.
max
65°C
Yes
Yes
No
Yes
Yes
Displays current return temperature
60°C
No
Heating, Cooling, Temperature difference
controller T1…T6
* Only displayed when activated
60°C
Temperature difference controller for heat
consumer
* Only displayed if temperature sensor
fitted (not supplied as standard).
35°C
Antifreeze sensor
Indication of universal temperature
measuring points (T6).
* Only displayed if temperature sensor
fitted (not supplied as standard).
25 °C
1234 h
1
2
1
2
Operating hours for charging storage
tank(s).
Resettable to 0 h.
No
No
No
Yes
Energy productivity for storage tank(s).
Resettable to 0 h.
927 kWh
26
© Baxi Heating UK 2012
and
Yes
= no or
= yes
Fig. 30
Press
or
to scroll
11.0
Commissioning of solar controller
up or down to the required sub function.
The icon will flash, press
to
select the function. Reset by pressing
or
for
increase/decrease values. Press
and
ok? appears,
press
to confirm and
disappears.
Indication
Meaning
Storage tank 1 or 2
Maximum permissible
temperature
max
65 °C
dT max
7K
dT min
3K
Min
100
2
13:21
40 °C
dT
10 K
dT max
7K
© Baxi Heating UK 2012
ok?
11.4
Menu “Programming”
1.All adjustable parameters can be checked in this menu and, if
necessary, changed. The default factory setting will usually give
efficient and problem free operation. However Baxi recommend
the following parameters marked * must be left at the default
settings. Any change to the Baxi recommended settings will
invalidate the warranty.
2. For more information or guidance please contact the Technical
Enquiries.
Typical
Value range adjustment
Indication
Meaning
Temperature difference
controller.
Hysteresis dT min
15 - 65°C
(15 - 95°C
Tank 2)
65°C*
MAX
dT min
3K
Storage tank 1 or 2:
switch-on differential (dTon)
7K
min
00:00
1(2,3)
Timeframe 1(2,3): Start
3 - 40K
Storage tank 1 or 2:
switch-off differential (dToff)
3K
max
23:59
1(2,3)
Timeframe 1(2,3): Stop
2 - 35K
30% - 100%
100%
min
06:00
4
0:00 - 23:59
12:00
max
20:00
4
Switch-on temperature for
Heating/Cooling function
20 - 90°C
40°C
Hysteresis for Heating/Cooling
function
1 - 30K
10K
Temperature difference
controller. Hysteresis dT max
3 - 40K
7K
Adjustment of pump rotational
speed.
100% = rotational speed
regulation set to 'off'
Time
Typical
Value range adjustment
2 - 35K
3K
0:00 - 23:59
00:00
0:00 - 23:59
23:59
Timeframe 1(2,3): Start for the
collector function
0:00 - 23:59
06:00
Timeframe 1(2,3):
Stop for the collector function
0:00 - 23:59
20:00
27
Fig. 31
Press
or
to scroll
11.0
Commissioning of solar controller
up or down to the required sub function.
The icon will flash, press
to
select the function. Reset by pressing
or
for
increase/decrease values. Press
and
ok? appears,
press
to confirm and
disappears.
ok?
11.5
Menu “Manual operation”
1. For commissioning, service and test purposes the solar primary
system can be manually operated. For this purpose the switch
outputs may be disconnected or connected.
WARNING - During manual operation there is no automatic
regulation of the system. Temperature control is isolated.
System temperature could be extremely high.
2. To avoid inadmissible operating states this mode of operation
changes into “Indication” after approximately 8 hours and the
automatic regulation is activated again.
NOTE: Exiting this menu will automatically return the system to
normal operation.
Indication
Meaning
Value range
Switching on/off switch output A1 (solar
circulation pump) by hand.
0 = off
1 = on
Switching on/off switch output A2
(pump2/valve1) by hand.
0 = off
1 = on
Switching on/off switch output A3 (cooling,
thermostat or 2nd temperature difference
controller function) by hand.
3
28
© Baxi Heating UK 2012
0 = off
1 = on
Fig. 32
Press
or
to scroll
11.0
Commissioning of solar controller
up or down to the required sub function.
The icon will flash, press
to
select the function. Reset by pressing
or
for
increase/decrease values. Press
and
ok? appears,
press
to confirm and
disappears.
Indication
ok?
Value range
Factory
set - up
Collector protection function
0 = off
1 = on
0
Collector protection function
110..150°C
120°C
Description
11.6
Menu “Basic adjustment”
1. Adjustment and changes in this menu must be carried out
only by a competent installer or service engineer.
Incorrect adjustments may adversely affect the function of
controller and solar primary system.
2. To avoid accidental changes in menu “Basic adjustment”, it is
not editable in normal functioning but has only a display
function. To be able to carry out any changes, this menu must
be chosen within the first minute after switching on the
appliance. The basic adjustment menu is ‘blocked’
automatically one minute after switching on if the menu is
not accessed.
Line / value
0 --
0
1 -- 120 °C
2 -3 --
0
Recooling function
(only if the collector protection is on)
0 = off
1 = on
0
40 °C
Recooling storage tank temperature
30..90°C
40°C
0 = off
1 = on
0
4 --
0
Tube collector function - time-controlled
5 --
2
Energy yield measurement 'Off'
0
Energy yield measurement
with flow meter
1
Energy yield measurement
without flow meter
2
Note: This Solar Controller has
the ability to calculate the
energy yield without the use
of a flow meter. The Flow
Meter is now available as an
accessory - Code no. 5122979.
6 --
Energy yield measurement sets glycol type
Energy yield measurement glycol mixture
11
7 -- 100
0…11
No value shown, when item 5 is set to 0
8…
10
2
Adjustment value when item 5 is set to 1
11
0 ... 100%
5% - steps
-----
100
0.5 – 25Litres
per impulse
10
Adjustment value when item 5 is set to 2 0.1 – 75Litres
per minute
9 --
10 --
240
Multiple tank storage systems.
Controller response time in seconds
1
First priority storage tank selection
30 - 480
240
1-2
1
0
11 --
0
Antifreeze function
0 = off
1 = on
12 --
6
Anti-freeze function.
Reference sensor selection
1-6
6
-20 °C ... +7 °C
3
13 --
3°C
Anti-freeze function start temperature
0 = off
14 --
Independent controller function
2
2
1 = cooling
2 = thermostat
0
1
2
3
4
5
15 --
5
16 --
0
Independent controller reference sensor
System diagram
Anro
IIexan E, Glythermin
Antifrogen L
Antifrogen N
IIexan E
IIexan P
© Baxi Heating UK 2012
6
7
8
9
10
11
1-6
5
0-4
0
Tyfocor L5.5 - supplied
Dowcal 10
Dowcal 20
Dowcal N
Tyfocor LS
Fernox S1
For correct operation of the system, Baxi
recommend the settings shown above.
29
11.0
11.7
Commissioning of solar controller
Overview of display and operating elements
Fig. 33
Graphic symbol
Description
Indication in operation
Measuring points assignment
Temperature measuring point collector array 1
Temperature measuring point collector array 2
Temperature measuring point storage tank 1 solar
(storage tank 1 charging)
Temperature measuring point storage tank solar
(storage tank 2 charging)
Temperature measuring point collector - return
Temperature measuring point storage tank
(auxiliary heating)
Antifreezing sensor or universal temperatures
measuring point (T6) (no sensor monitoring)
Auxiliary heating temperature
Operating hours, energy productivity measurement
Status indication
30
Solar circulation pump
Symbol revolves when solar circulation pump is on
Switch output 1 is active
Appears when switch output 1 is active (on)
Switch output 2 is active
Appears when switch output 2 is active (on)
Switch output 3 is active
Appears when switch output 3 is active (on)
!
Reference to system fault
Display flashes when a fault occurs in the system
ok?
Safety query for value changes which are to be stored
© Baxi Heating UK 2012
Input value can be either
rejected or
accepted
11.0
11.8
Commissioning of solar controller
Overview of display and operating elements
(cont)
Fig. 34
Graphic symbol
Description
Indication in operation
Indicator values
dT
Temperature difference
min
Min value
Appears when minimum values are indicated
max
Max value
Appears when maximum values are indicated
min
0:00
1
Time period 1 start
Appears when the differential controller is active
(timeframe 1-3) or tube collector is active (timeframe 4)
Max
23:59
1
Time period 1 stop
Appears when the differential controller is active
(timeframe 1-3) or tube collector is active (timeframe 4)
5 x 7 segment display.
Presentation of figures 00000 to 99999
Display of all values, display flashes when
a value is changed
ºC
Temperature in Celsius
K
Temperature difference in Kelvin
h
Operating hours
kWh
Productivity indication in kWh
© Baxi Heating UK 2012
31
11.0
11.9
Commissioning of solar controller
Controller functions
1. The differential temperature controller contains many
functions to regulate and monitor the solar primary system.
Including
- controller functions for heating the solar cylinder
- functions for system protection and system monitoring
- additional functions (other accessories may be required to
achieve these functions).
11.10
General controller functions
1. The controller collects the temperatures from various
measuring points and determines the right time to charge the
storage tank on account of programmed (additional) functions
and controller parameters.
11.11
Cylinder heating by solar primary system
1. Switching action can be adjusted through dTmax (dTon) and
dTmin (dToff). The solar cylinder is heated by operating the
solar pump on output A1 up to the set maximum storage
temperature (65°C). Pump operation starts when the
collector temperature exceeds the cylinder temperature by
more than dTon and continues while the collector
temperature is above cylinder temperature + dToff, as set in
the programming menu. dTon cannot be set lower than dToff
+ 1K.
Corresponding values in menu
“Programming”
Maximum temperature
dT max (dT on)
Switch-on temperature difference
dT min (dT off)
Switch-off temperature difference
11.12
Systems with two storage cylinders
1. For systems with more than one storage cylinder (System
Type 2) the cylinder heating can be optimised depending on
the energy supply. Usually the cylinder with lower priority will
have a lower temperature than that with the higher priority.
Re-directing the energy to the lower priority cylinder will
lower the temperature in the collector array.
2. To check the collector temperature the heating of the lower
priority cylinder will be interrupted for a short while at fixed
intervals. If the heating requirement for the higher priority
cylinder is fulfilled then the lower priority cylinder will be
heated.
3. The higher priority cylinder can be selected in the
“Basic Adjustment” menu point no. 10.
32
© Baxi Heating UK 2012
11.0
11.13
Commissioning of solar controller
Rotational speed regulation
1. The solar circulation pump on 230V-outputs A1 and A2 can
be operated either in switch-mode (two-point controller) or in
a rotational speed regulated way. If the rotational speed
regulation is activated the pump power is adjusted by a
controller so that switch-on temperature difference “Storage
tank dTmax” is kept constant as much as possible. At lower
deviation of “Storage tank dTmax” the pump is operated with
the lowest power till the switch-off wave is reached.
Corresponding values in menu
“Basic adjustment”
“Programming”
---
Rotational speed min <100%
T[ºC]
11.14
Thermostat
(Storage top)
dT
10k
TTh
40ºC
on
A3
off
t
Heating on (A3)
Fig. 35
Thermostat (heating)
1. The thermostat is an independent control circuit from the
storage loading. Thus, auxiliary heating of the top area of the
storage cylinder is made possible.
The output A3 will be:
• Switched on, when the temperature falls below the adjusted
start level.
• Switched off, when the temperature reaches the adjusted
start level + hysteresis.
Corresponding values in menu
“Basic adjustment”
“Programming”
14 -- 2
Start temperature max ºC
15 -- 5
Hysteresis dT in K
Time period (1…3) Start: min time
Time period (1…3) Stop: max time
11.15
Thermostat (cooling)
1. In order to optimise the energy yield, it could be useful to
“redirect” the solar energy, or to take it away from the storage
when the storage temperature reaches a pre-set level.
When the sensor reaches the start temperature, output A3
will be switched on. When the temperature level falls below
the start temperature hysteresis, the output A3 will be
switched off.
Corresponding values in menu
“Basic adjustment”
“Programming”
14 -- 1
Start temperature max ºC
15 -- 5
Hysteresis dT in K
Time period (1…3) Start: min time
Time period (1…3) Stop: max time
© Baxi Heating UK 2012
33
11.0
11.16
Commissioning of solar controller
Tube collector
1. The function “tube collector” can be switched off/on in the
“Basic setting” menu – point 4. Timeframe 4 in the “Program”
menu makes it possible to activate this function during certain
periods of the day. When activated, the solar pump will be
switched on every 30 minutes for a period of 30 seconds to
check for any heat gain in the collector.
Corresponding values in menu
“Basic Setting”
“Programming”
4 -- 1
Time period (4) Start: min time
Time period (4) Stop: max time
11.17
Sensor monitoring
1. The sensors and their connecting cables are constantly
monitored for any break or short circuit. If a faulty sensor is
detected by the controller, the symbol ! is shown. By
scrolling up and down you can detect the source of the error.
!
The use of the wrong type of temperature sensors
can also give to an error message
Indication
Meaning
X
Short circuit on temperature sensor of the current measuring point
Break on temperature sensor of the current measuring point,
circulation error at activated energy productivity measurement
34
© Baxi Heating UK 2012
11.0
11.18
Commissioning of solar controller
Flow monitoring
1. If during normal operation the flow temperature rises above
90°C a warning indication will be shown.
2. If the energy productivity measurement option is
deactivated, the temperature difference between collector and
storage tank is checked. If the temperature differential exceeds
60K + dTmax an error message will occur, as under normal
system operation where the pump is running, large
temperature differences would not normally be seen.
3. If the energy productivity measurement option is activated,
the flow rate is checked, if no flow is detected for 15 minutes
an error message will be seen (Applicable if Flow Meter
fitted).
NOTE: these error conditions will automatically reset after a
short period of operation once normal flow/temperature
conditions are restored.
Indication
+
Meaning
!
Fluid flow is above 90°C (indication) / Missing circulation in solar circuit
11.19
System protection function
1. The system protection function switches the system off if the
“maximum collector temperature” is exceeded by 10K. As
soon as the temperature drops below the “maximum collector
temperature”, the system restarts. This function has priority
and is always active, regardless of whether the collector
protection is on or off.
11.20
Frost protection
1. This function can be switched on or off by using item 11 in
the “Basic adjustments” menu. The start temperature can be
adjusted with item 13. Furthermore, a frost protection sensor
can be selected (T1-T6, point 12).
2. If the measured value is lower than the start temperature,
the solar pump is activated until the adjusted frost protection
start temperature +5K is reached. The minimum runtime of
the pump is 5 minutes.
3. For safety reasons the function is deactivated if the
temperature of the priority storage falls below 5ºC.
© Baxi Heating UK 2012
35
11.0
11.21
Commissioning of solar controller
Energy productivity measurement
1. For the purposes of energy productivity measurement (solar
gain), a sensor on the collector return line and an optional flow
meter are required. The yield value is calculated from the
values of the temperature difference between the collector
and collector return line and the value measured by the flow
meter. This function is switched on and off in the “Basic
settings” menu.
Corresponding values in menu
“Basic Setting”
“Programming”
“info”
5 -- 1
---
XXXX kWh
11.22
Operating hours meter
1. When the storage tank is being charged by a pump, the
operating hours meter records for each separate pump. The
number of operating hours can be read in the “info” menu.
This may be reset to ‘0’.
Corresponding values in menu
36
“Programming”
“info”
---
XXXX h
© Baxi Heating UK 2012
12.0
Fig. 36
1
12.1
Setting the system flow rate
Checking and adjusting the flow rate
1. Adjust the flow rate when the system is cold (approx 20°C)
(see Fig. 36).
2
2. The flow rate should be adjusted to give the optimum flow
rate depending on the number and type of collector(s)
connected.
5
3. Manually operate the solar pump (See Section 11.5).
4. Set the solar pump speed selector (Fig. 36 Item 5) so that
the required flow rate is achieved or exceeded with the
lowest possible setting. The flow limiter adjusting screw (Fig. 36
Item 3) can be used to fine-tune the flow rate.
3
5. Depending on the number and type of collectors installed,
set the required flow rate from table (See Table 1).
4
6. The float in the flow meter will indicate the circulation flow
rate through the flow meter sight glass (Fig. 36 Item 4).
Table 1
7. Adjust screw of the flow limiter (Fig. 36 Item 3) with a
screwdriver, until the upper edge of the float in the sight glass
indicates the required flow rate (Fig. 36 Item 4). Turn the screw
anticlockwise to increase the flow.
Flow rate
(when system is cold)
Area
2m2
3m2
4m2
5m2
6m2
l/min
2-4
3-6
4-8
5 - 10
6 - 12
8. Ensure that the float is stable when the pump is running.
9. Set manual pump operation to off (See Section 11.5).
12.2
Fig. 37
Installation of the thermal insulation
1. Refit the controller mounting moulding (Fig. 37 Item 1)
onto the rear moulding.
2. Push the front thermal insulation (Fig. 37 Item 2) against the
rear thermal insulation section (Fig. 37 Item 3) until it clips into
place.
3
1
2
© Baxi Heating UK 2012
37
Commissioning record
The following chart should be completed during Commissioning of the system.
Installer:
_______________________________ BPEC No.:
_______________________________
Contact details:
_______________________________ Serial Nos. Cylinder
_______________________________
Original commissioning date: _______________________________ Collector _________________
Pump Station Serial Number: ___________________________
General Commissioning
Solar differential temperature controller - operational parameters
All pipework correctly installed, identified and
earth bonded
❑
Solar expansion vessel charge pressure checked
and set before filling the system
❑
Solar primary system filled with heat transfer
fluid supplied
❑
System pressure test carried out
Storage tank1:
switch-on difference (dTon)
7K
❑
Air vented from system
❑
Storage tank1:
switch-off difference (dToff)
3K
Exposed pipework insulated using high-temp and
weather resistant insulation (bird/rodent-proof)
❑
Storage tank2:
Maximum storage temperature
collector installation weatherproof
❑
Collector fixings checked and secure
❑
If any factory values are changed please enter the new values in the
table below.
bar
Storage tank1:
Maximum storage temperature
Hydraulic Station
System pressure when cold
bar
Solar primary flow when cold
l/min
Isolating/non-return valves (flow and return) in
operating position
❑
Adjustable in menu
"Programming"
65°C
90°C
Storage tank2:
switch-on difference (dTon)
7K
Storage tank2:
switch-off difference (dToff)
3K
Minimum pump power on
rotational speed regulation
100%
Switch-on temperature of
thermostat function
40°C
Hysteresis of thermostat function
10 K
2nd temperature differential
controller maximum temperature Tmax
65°C
2nd temperature differential controller
hysteresis dTmax
7K
Adjustable in menu
"Basic adjustments"
Solar Collectors
Typical
Current
adjustment adjustment
*
*
Typical
Current
adjustment adjustment
Switching on or off the function
collector protection
0 = off
*
Temperature at which the collector
protection function is active
120°C
*
Collector visually inspected for defects
❑
Collector temperature sensors correctly installed
and secured
❑
Switching on or off the function
recooling (only when the collector
protection is on)
0 = off
*
Pipe entry points to building weatherproof
❑
Temperature to which the storage
tank is recooled when collector
protection function is on
40°C
*
Solar Differential Temperature Controller
Function for time-controlled
circulation in operation with
tube collectors
0 = off
Switching on or off the function
energy productivity measurement
2 = on
Record all operational parameters set
(see separate table)
❑
Pump operation tested in automatic and manual
modes
❑
Litres per min
10 l/m
All cables correctly installed and secured
❑
Switching on or off the function
antifreezing
0 = off
Suitably fused isolating device installed
❑
Controller earthed
Temperature at which the antifreezing
is active
❑
Alternative choice of the cooling,
thermostat function or the 2nd
temperature differential controller
Choice of glycol types used
Solar Cylinder
Cylinder installed and commissioned in
accordance with cylinder installation instructions
Mixture ratio of coolants
System type
❑
Time control in secs
Storage priority
0 = Anro
50%
3°C
2
type 0
240
1
* Baxi recommends these settings are left at the default value.
38
© Baxi Heating UK 2012
© Baxi Heating UK 2012
39
❑
❑
❑
❑
❑
❑
Check sensor operation
(use resistance/temperature table. See page 43)
Check solar cylinder in accordance with
manufacturer's instructions
Ensure system is free of air
Visually check condition of solar collector mountings
KWh recorded (if applicable)
Visually check condition of any waterproofing
(around pipe entries to roof and roof fixings)
BPEC Number
____
❑
Check discharge vessel fluid level
Engineer’s initials
❑
l/min
bar
bar
Check operation of PRV
Check solar primary system flow rate
Check solar primary system pressure (cold)
Check solar expansion vessel charge pressure
____
____
____
____
❑
Check condition of mountings
Check frost protection of solar fluid (every 2 years)
Concentration
Check pH (7.0 - 9.5)
Protection to ºC
Next check date
❑
Check condition of all pipework + insulation
Date
/ /
____
❑
❑
❑
❑
❑
❑
❑
❑
l/min
bar
bar
____
____
____
____
❑
❑
Date
/ /
____
❑
❑
❑
❑
❑
❑
❑
❑
l/min
bar
bar
____
____
____
____
❑
❑
Date
/ /
____
❑
❑
❑
❑
❑
❑
❑
❑
l/min
bar
bar
____
____
____
____
❑
❑
Date
/ /
____
❑
❑
❑
❑
❑
❑
❑
❑
l/min
bar
bar
____
____
____
____
❑
❑
Date
/ /
____
❑
❑
❑
❑
❑
❑
❑
❑
l/min
bar
bar
____
____
____
____
❑
❑
Date
/ /
____
❑
❑
❑
❑
❑
❑
❑
❑
l/min
bar
bar
____
____
____
____
❑
❑
Date
/ /
____
❑
❑
❑
❑
❑
❑
❑
❑
l/min
bar
bar
____
____
____
____
❑
❑
Date
/ /
____
❑
❑
❑
❑
❑
❑
❑
❑
l/min
bar
bar
____
____
____
____
❑
❑
Date
/ /
____
❑
❑
❑
❑
❑
❑
❑
❑
l/min
bar
bar
____
____
____
____
❑
❑
Date
/ /
____
❑
❑
❑
❑
❑
❑
❑
❑
l/min
bar
bar
____
____
____
____
❑
❑
Date
/ /
____
❑
❑
❑
❑
❑
❑
❑
❑
l/min
bar
bar
____
____
____
____
❑
❑
Date
/ /
Please complete the following record after any Servicing or Maintenance of the system. Refer to the Commissioning Record charts for details of the original system for reference. Refer to Maintenance section for recommended Maintenance periods
Servicing and maintenance record
____
❑
❑
❑
❑
❑
❑
❑
❑
l/min
bar
bar
____
____
____
____
❑
❑
Date
/ /
40
© Baxi Heating UK 2012
❑
❑
❑
❑
❑
❑
Check sensor operation
(use resistance/temperature table. See page 43)
Check solar cylinder in accordance with
manufacturer's instructions
Ensure system is free of air
Visually check condition of solar collector mountings
KWh recorded (if applicable)
Visually check condition of any waterproofing
around pipe entries to roof and roof fixings
____
❑
Check discharge vessel fluid level
Engineer’s initials
❑
l/min
bar
bar
Check operation of PRV
Check solar primary system flow rate
Check solar primary system pressure (cold)
Check solar expansion vessel charge pressure
____
____
____
____
❑
Check condition of mountings
Check frost protection of solar fluid (every 2 years)
Concentration
Check pH (7.0 - 9.5)
Protection to ºC
Next check date
❑
Check condition of all pipework + insulation
Date
/ /
____
❑
❑
❑
❑
❑
❑
❑
❑
l/min
bar
bar
____
____
____
____
❑
❑
Date
/ /
____
❑
❑
❑
❑
❑
❑
❑
❑
l/min
bar
bar
____
____
____
____
❑
❑
Date
/ /
____
❑
❑
❑
❑
❑
❑
❑
❑
l/min
bar
bar
____
____
____
____
❑
❑
Date
/ /
____
❑
❑
❑
❑
❑
❑
❑
❑
l/min
bar
bar
____
____
____
____
❑
❑
Date
/ /
____
❑
❑
❑
❑
❑
❑
❑
❑
l/min
bar
bar
____
____
____
____
❑
❑
Date
/ /
____
❑
❑
❑
❑
❑
❑
❑
❑
l/min
bar
bar
____
____
____
____
❑
❑
Date
/ /
____
❑
❑
❑
❑
❑
❑
❑
❑
l/min
bar
bar
____
____
____
____
❑
❑
Date
/ /
____
❑
❑
❑
❑
❑
❑
❑
❑
l/min
bar
bar
____
____
____
____
❑
❑
Date
/ /
____
❑
❑
❑
❑
❑
❑
❑
❑
l/min
bar
bar
____
____
____
____
❑
❑
Date
/ /
____
❑
❑
❑
❑
❑
❑
❑
❑
l/min
bar
bar
____
____
____
____
❑
❑
Date
/ /
____
❑
❑
❑
❑
❑
❑
❑
❑
l/min
bar
bar
____
____
____
____
❑
❑
Date
/ /
____
❑
❑
❑
❑
❑
❑
❑
❑
l/min
bar
bar
____
____
____
____
❑
❑
Date
/ /
13.0
13.1
Maintenance
Check heat transfer fluid
1. The heat transfer fluid must be checked every year with
regard to its antifreeze and pH value. (7.0 - 9.5)
Check antifreeze using antifreeze tester. Target value is
approximately -21 deg C (40% concentration).
Replace fluid if necessary.
13.2
Maintenance of the collector
1. The collector or the collector array must be
checked/serviced annually to check for any damage, leaks or
contamination.
2. In areas where there may be a build up of dirt on the
collector, only non-abrasive cleaning materials and methods
should be used to clean the collectors and mounting system
components.
13.3
Cylinder
1. Refer to manufacturer’s documentation.
© Baxi Heating UK 2012
41
14.0
14.1
Fault finding
Failures with error message
1. Some system failure modes can be recognised by the solar
differential temperature controller and will be indicated by an
error message on the controller display. Refer to the table
below for details of possible errors and suggested measures to
rectify.
NOTE: These error messages wil automatically reset when
the fault has been rectified. In the case of the circulation error
this may take a few minutes to clear once normal flow has
resumed.
Error representation on display Possible reasons
!
!
flashing
flashing
Circulation error: no flow
+
!
• Sensor wire broken
• Check wire
• Sensor defect
• Check sensor resistance, if necessary exchange sensor
• Sensor missing
• Check parameter settings and sensor installation
requirements
• Short circuit in sensor wire
• Check wire
• Sensor defect
• Check sensor resistance, if necessary exchange sensor
• Error in pump connection
• Check cabling
• Pump defect
• Exchange pump
• Air in the system
• Check the float of the flow meter moves
when the system runs (if visible)
• Connection with flow
meter defect
• Check wire
• Sensor wire broken
• Check wire
• Sensor defect
• Check sensor resistance, if necessary exchange sensor
• Sensor missing
• Check parameter settings and sensor installation
requirements
flashing
Additionally at energy
productivity measurement:
42
© Baxi Heating UK 2012
Measures
14.0
Resistance table PT1000.
The correct function of temperature sensors can be
checked on the basis of the following temperature
resistance table with a resistance measuring instrument:
No display at solar differential
temperature controller
Is the 230/240V~ power
supply correctly wired
NO
NO
Switch on power supply
YES
Has thermal cutout
on cylinder operated
(unvented systems only)
YES
Reset thermal cutout.
Investigate cause of operation
and rectify
Note: Allow the cylinder to cool
or draw off the hot water before
resetting
NO
Is the 230/240V~
power supply at the controller
terminal block
NO
Temperature in ºC
Resistance in Ohm
-30
882
-20
921
-10
960
0
1000
10
1039
20
1077
30
1116
40
1155
50
1194
60
1232
70
1271
80
1309
90
1347
100
1385
120
1461
140
1535
200
1758
Correct any wiring faults
YES
Is the 230/240V~ power
supply switched on
Fault finding
Check wiring and rectify
YES
Is internal
fuse operational
NO
Replace internal fuse
YES
Controller fault
Replace controller
© Baxi Heating UK 2012
43
14.0
Fault finding
Pump symbol on controller rotates
but pump does not operate
Is controller to
pump connection correct
and secure
NO
Check connections and
rectify as necessary
YES
Is the pump siezed
YES
NO
Can the impeller be
revolved using a screwdriver
after removing the air
bleed screw
YES
Free impeller and replace
air bleed screw
NO
Pump fault
Replace pump
Displayed temperatures on controller
vary greatly over short time intervals
Are sensor cables
laid alongside mains
voltage cables
YES
Seperate sensor cables from
mains cables (Min. 50mm
recommended) or use
shielded cable
NO
Have sensor cables
been lengthened with
unshielded cable
YES
Use shielded cable to extend
sensor cable lengths
NO
Are sensor
connections correctly
made
NO
Do sensors give
correct temperature
v
resistance readings
YES
Controller fault
Replace controller
44
© Baxi Heating UK 2012
YES
Sensor fault
Replace sensor
NO
Rectify sensor connections
15.0
Spares
J1
1
15.1
F1
E1
G1
D1
Spare parts and Accessories
1. A number of Spare Parts are available should any part of the
system require replacement. Use only genuine parts obtained
from Baxi, use of other non Baxi parts may cause system
malfunctions and will invalidate the warranty. Fitting of any
spare parts must be carried out by a competent installer or
authorised service engineer or agent.
Short Parts List
C1
A1
Key
No.
Description
No.
Manufacturer’s
Part No.
A1
Connection Washer
5119535
B1
Temperature Sensor
720224801
C1
Solar Differential Temperature Controller
720709001
D1
Insulation
720689701
E1
Insulation Insert
720689901
F1
Safety Group
720690901
G1
Solar Primary Circulating Pump
720688101
J1
Temperature Gauge
720689101
K1
Solar Expansion Vessel 24Litres
5119548
L1
Expansion Vessel Self-sealing Connection
5119779
K1
L1
© Baxi Heating UK 2012
45
16.0
16.1
Warranty
Standard Warranty Terms & Conditions
Flat Plate Solar Collectors 10 Years
Evacuated Tubes Collectors 5 Years
Solar Control Station 2 Years
To receive your free warranty please complete the form
supplied with the system within 30 days of installation, or
simply call heateam, the service division of Potterton on 0844
871 1568
Our promise to you
If you experience a fault with your new Solarflo system, we
aim to provide a safe and high quality repair service supported
by our dedicated national network of highly skilled engineers. If
your installer can't resolve the problem for you, we will do
everything we can to get an engineer out to you as quickly as
possible. Nothing in this warranty will affect your statutory
consumer rights.
What you need to do if you experience a problem with your
system.
You should always contact your installer first because the fault
may not be related to the Solarflo installation. If your installer
confirms that the fault is within the Solarflo system itself and
he/she decides they cannot repair it our friendly customer
service team is on hand to help. Simply call our service division
heateam on 0844 8711568 informing the operator that you
are a Solarflo customer. They will be able to provide you with
technical help or assist with booking an engineer visit if
required. Our contact centre is open Monday to Friday 8am 5pm, excluding Christmas Day and New Years Day.
When calling heateam you must have the following
information to hand: Solarflo serial number (Affixed to Solar controller)
Solarflo system model number (Affixed to Solar controller)
Your Postcode and House Number
Your installer name, address details and contact details
Proof of purchase (if you do not have the Solarflo serial
number or model number)
What this warranty covers
1. Free of charge repair or replacement of components found
to be faulty from manufacture.
2. Free of charge replacement of the complete assemblies
provided always that the failure is related to a manufacturing
fault that cannot be repaired or is beyond repair.
3. The warranty runs from the date your product is installed.
What this warranty does not cover
4. Solarflo collectors that are installed damaged or damaged
during installation. If a Solarflo collector is found to be
damaged on delivery then it must not be installed, simply
return it to your supplier for replacement under warranty.
5. Correctly specified solar fluid will protect the installation
down to outside temperatures of -20°C. System failure
resulting from incorrect fluid (thereby resulting in freezing fluid
in the system) is not covered under warranty.
6. The warranty will become invalid if the failure is due to frost
damage (see point 5), transient voltages, lightning strikes or any
act of vandalism or misuse.
46
© Baxi Heating UK 2012
16.0
16.1
Warranty
Standard Warranty Terms & Conditions (cont)
7. This guarantee does not cover the effects of scale.
8. Tampering or modification will invalidate this warranty.
9. The installation must be in an appropriate location and its
use is restricted to potable water.
10. Baxi Heating UK Ltd will only carry out warranty
repair/replacement to Solarflo collectors which have safe
access and that meet current Health & Safety working at
heights requirements. The customer will cover the cost of any
safety equipment e.g. scaffolding and lifting equipment etc. that
is required to meet this standard and will appoint a contractor
to carry this work out. heateam accepts no liability for any
third party damage.
11. Repairs to Solarflo system that haven't been installed and
commissioned properly, as set out in the installation and
commissioning instructions.
12. Any other defects or failures, either in the connected
system or outside of the Solarflo system itself
13. Installations within commercial settings for which this
Solarflo system was not designed.
14. Reimbursement of any third party repair or replacement
costs that we haven't been told about and agreed with you in
advance.
15. Compensation for consequential losses (e.g. loss of
earnings, business losses, stress and inconvenience) arising from
a product breakdown, including repair delays caused by factors
outside our reasonable control.
16. heateam will not be liable for failures resulting from fair
wear and tear, willful or accidental damage, negligence,
abnormal working conditions, failure to comply with
instructions (whether oral or in writing), misuse or alteration of
the product without heateam’s approval.
17. Defects which are reported out with the warranty period
will not be covered by this warranty.
18. Installations which have not been carried out by fully
trained and competent person(s) will not be covered by this
warranty.
19. Products that have been subjected to the following
conditions will not be covered by the warranty:
a) prolonged stagnation conditions or products that exhibit
signs of extreme temperature exposure
b) acts of god, explosions, floods, tempests, inclement weather,
fire or accident
c) war, sabotage, insurrection , civil disturbance or requisition
d) acts, restrictions, regulations, by-laws, prohibitions or
measures of any kind on the part of any Governmental,
Parliamentary or Local Authority
e) theft or malicious damage
© Baxi Heating UK 2012
47
All descriptions and illustrations provided in this leaflet have been carefully prepared but
we reserve the right to make changes and improvements in our products which may affect
the accuracy of the information contained in this leaflet. All goods are sold subject to our
standard Conditions of Sale which are available on request.
B AXI
A Trading Division of Baxi Heating UK Ltd (3879156),
Brooks House, Coventry Road, Warwick. CV34 4LL
Technical Enquiries 0844 871 1568
Our contact centre is open Monday to Friday 8am to 6pm,
Weekends and Bank Holidays 8.30am to 2pm.
We are closed Christmas Day and New Years Day.
Website www.baxi.co.uk
e&oe
Comp No 720669102 (5/12)
© Baxi Heating UK 2012