1
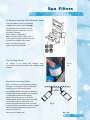
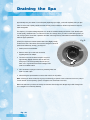
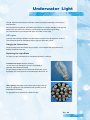
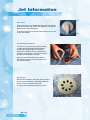
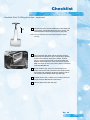
Checklist
Checklist Prior To Filling Your Spa ...continued
UP
Check shut-off valve. Valve (if installed) are located either side
of the pump/s. The handles should be in the up position. This
allows the water to travel through the pipes to your pump.
Note: T
he only time these are closed (down position) is during
servicing.
Fill your Spa with clean water. Remove one filter and place
hose directly into skimmer box to fill. This will help to alleviate
air locks being created in the pumps or heaters. Fill till all
jets are covered or at level shown on the skimmer/filter box
faceplate. Replace filter once correct water level is achieved.
Make sure all jets are in the open position (Refer to Jet Section
of this Operating Manual).
Do not overfill the Spa, as this can cause damage to the
blower. Drain excess water if the bather load increases. Refill
the Spa after use. (Damage to the blower caused by water is
not covered by SCS Industries Water Tight Warranty)
Fit plastic locks to side of cabinet so as to hold the hard cover.
(as per Hardcover Manufacturer’s instructions.)
Check for leaks around and under Spa.
Pg. 18
Start Up
• Plug the power cord into the power point and switch the power on. If the Spa is hard wired, turn power on at the
main isolator. When the unit is powered up, it is normal operation that the Spa pumps may turn on and run for
up to 4 minutes depending on the type of controller.
• Chemical addition. Contact your Dealer or local Pool and Spa shop in relation to the best chemical selection for
your Spa.
• To heat your Spa adjust the Temperature Button up, or to decrease heat simply adjust the Temperature Button
down, depending on the model of the Spa (Refer to your control instructions).
• Check for leaks, replace service access panels.
Note: D
epending on water capacity, heater size and ambient temperature, it can take up to 12 hours to heat the
Spa to approximately 38°C. Swim Spas will take possibly twice as long.
Spa Maintenance
You are responsible for the maintenance of your Spa.
Hygiene
The ‘home’ environment can affect the condition of your Spa water. You should always shower prior to
entering your Spa. Good personal hygiene assists with water maintenance.
Our bodies need to adapt to the Spa. Body oils will expel from your skin at a faster rate until your body
adjusts to the Spa environment. The same will occur when your friends come over to enjoy your new Spa.
This may mean your filters will need cleaning more frequently in these instances.
Cleanliness
Your Spa should be kept free from dirt and grit at all times. This will minimize the likelihood of particles
being lodged in the jets or your Spa’s operating equipment.
It is wise to have a mat or foot wash near your Spa, so that the Spa users can wipe their feet before
they enter the Spa.
Dirt and grit in your plumbing system is not covered by Warranty, and can cause damage to your Spa.
Pg. 19
Spa Maintenance
Chemical Management
It is extremely important to maintain your water chemistry of your Spa, not only for health reasons, but also for
the protection of Spa components. The pH level should read between 7.2 and 7.8 to ensure clean water. The total
alkalinity should read between 80 and 120 parts per million. Making sure all these requirements are correct will
ensure your spa is clean and free of dirty water. If you don’t maintain your water within these requirements you
are risking voiding your Warranty as well as making your Spa a breeding ground for disease. Your Dealer can best
guide you on the use of chemicals and what they would recommend.
Bromine Dispenser:
(if fitted) – With a top loading Skimmer box, your
Spa comes with a built in Bromine Dispenser.
The variable release for the Bromine can be
found at the back side of the floating skimmer
door. By removing the small grate on the top
of the skimmer door, Bromine tablets can be
inserted into the dispenser.
By simply turning the dial on the back of the
Skimmer door you can increase or decrease the
amount of bromine being released in the Spa.
Pg. 20
Spa Filters
Cleaning Your Spa Filter Cartridges
Filter cartridges are made from fine polyester paper like material, specifically designed to filter out body
oil and grime.
Your Portable Spa is equipped with easy access skimmer cartridge filters. The average life expectancy of
a filter element is approximately 12-18 months, (with proper care and correct water maintenance).
It is recommended that the filters need to be cleaned every week to remove all body oils and grime from
the surface (cleaning intervals dependent on usage)
Replacement filter cartridges may be purchased from your SCS Industries Dealer. (It is recommended
that you purchase a second set of filters.)
To Remove Cartridge Filter Elements
1. Turn power off to Spa from circuit breaker or isolation switch.
Note: E
nsure power is turned off during cleaning of filters as foreign matter can make its way into the pumps,
heater and plumbing system while filters are removed.
2. Slide faceplate (1) upwards.
Fig A
3. Slide filter basket (2) out.
4. Unscrew filter cartridges (3 & 4)
(unscrew anti-clockwise) (Fig A)
5. Clean with the high-pressure nozzle to remove all
debris clinging to the element.
6. Soak filter in a recommended Filter cartridge cleaner
to remove all body oils and grime.
Check with cartridge cleaner instructions.
7. Thoroughly rinse cartridge with clean water using a
high-pressure nozzle again.
8. Replace filters - be careful not to over tighten
9. Replace filter basket and faceplate
Note: Deep clean and soak the filter cartridges in special filter cleaners on a monthly basis, rotate with
extra set of cartridges if possible. (Filter cleaner is available from your local SCS Dealer.)
Pg. 21
Spa Filters
To Remove Cartridge Filter Elements (Swim Spa)
Swim Spa (portable) This has 4 x 50sq2/ft filter
cartridges, two on top of one another (Fig B)
The cleaning process is conducted in exactly
the same way as the Portable Spa, except for
the insertion of the filters
(refer to replace / re-install Filters).
Note: The washing of filters in water does not
remove grease and grime, this must be removed
by soaking the cartridges in Filter Cleaner.
Dirty or worn filters are the single
biggest causes of Spa malfunction.
Top Loading Filters
For removal of top loading filter cartridges simply
lid off Skimmer enclosure and remove filter cartridges turning
clockwise.
remove
anti-
Replacing / Inserting Filters
Prior to replacing filters in the Spa following cleaning,
thoroughly rinse cartridge to remove all soap residue
(foaming may occur if not correctly rinsed).
When installing cartridge, submerge filter cartridge into
the Spa top first, to allow all trapped air to escape prior
to inserting filter into Skimmer Box. (Fig C)
Failure to do this can induce an airlock into the
plumbing system, this will cause the pump and heater
to not operate correctly. To ensure there are no
airlocks, simply loosen the barrel unions to the pump
and heater to release any trapped air and then re-tighten.
(when conducting the mentioned procedure ensure
Spa power is turned off.)
Be sure not to over tighten filter.
Trapped
Air
Bubbles
Fig C
Pg. 22
Draining the Spa
Approximately every 8-12 weeks, or more frequently depending upon usage, you should completely drain your Spa.
About 1/3 of the water capacity should be drained off every month in addition to the above procedure to keep the
water manageable.
The frequency of complete drainage depends on a number of variables including the amount of use, attention paid
to water quality, maintenance etc. You will know it is time for a change, when you cannot control foaming and/or you
can no longer get the normal feel or sparkle to the water even though the key water balance measurements are all
within the proper parameters.
Fig D
(if fitted) Your Spa has a recessed external drain valve (Fig D), usually
located on the front of the cabinet. This has been designed as the most
practical and easiest way to empty your Spa pool.
1. Isolate power at Circuit Breaker.
OFF
2. Remove center cap on drain and connect the
supplied garden hose adaptor.
3. Turn the lock nut anti-clockwise and pull it out (10mm
approximately) (Fig D). Allow the water to drain from
the Spa pool. This would generally take 5-6 hours to
drain, so it is a good idea to let it drain overnight. Drain
|water to a suitable location
ON
4. Use a bucket and a sponge to remove any remaining water from
seats / foot well of Spa.
5. After draining the Spa remember to turn the drain valve to the off position.
Note: If draining for winter and the Spa is going to be left empty for periods of time, loosen barrel unions to pump to
remove all water from the plumbing system, and tighten once all the water is removed.
Make sure hardcover is put back over the Spa as continous direct sunlight can damage acrylic shell. Damage from
UV or sunlight is not covered by Warranty.
Pg. 23
Acrylic Shell Maintenance
Ensure Spa is not continually exposed to the elements, the acrylic shell can reach very high temperatures if Spa is
located without shading or cover. Damage due to sunlight or extreme temperatures is not covered by
the SCS Industries Water Tight Warranty. Exposure to the elements while not filled with water, while hardcover is
removed or by simply no shading of the pool may cause damage to the acrylic shell.
With normal use of your Spa, oils, lotions and hairsprays will build up on the surface of the water sometimes
leaving a scum line around the perimeter of your Spa shell.
Use a recommended cleaner or simply wipe down with a soft cloth and a non-abrasive cleaner. (eg methylated
spirits). Clean while Spa is drained for servicing or water change-over.
For hard water stains consult your SCS Industries Dealer for an acceptable Spa cleaner/polish.
• Never allow your Spa surface to come in contact with acetone (nail polish remover), nail polish, dry cleaning
solution, lacquer thinners, gasoline, pine oil, abrasive cleaners, citrus cleaners or any other harsh chemical.
These chemicals can damage your Spa shell and void your Warranty.
• Do not use cleaning agents that will leave suds in your Spa water.
• Adjustable jets should be removed and washed thoroughly to remove any dirt and grit build up.
(Removal of jets is outlined in the ‘jet’ section)
Note: Minor scratches can be removed by using fine wet & dry sandpaper and car polish.
Please consult your Spa Dealer before attempting this method.
Spa Hardcover
Using a Hardcover any time when the Spa is not in use will significantly reduce your operating costs,
heat up time and maintenance requirements.
Getting The Most From Your Spa Cover
1. When cleaning your cover, use a mild soap and water.
2. Do not walk, jump or lie on cover.
3. When moving your cover, LIFT at all times, do not drag, drop or slide cover.
4. Do not lay cover on rough surfaces.
5. Approximately every four weeks, use a vinyl conditioner on top of the cover. Your Dealer can best
advise you of an appropriate cleaner.
6. Remove foam liner from Hardcover every 12 months and rotate to eliminate saging of the Hardcover.
It is most important that you connect the lockdown clips to the cabinet, to ensure safety for your family.
Ensure hardcover is fitted on Spa at all times when not in use.
Note: Damage to Spa caused by the elements due to hardcover not being used correctly will void Warranty
Pg. 24
Maintenance
Maintaining Your Timber Cabinet
Your Spa Cabinet is manufactured from Western Red Cedar.
With time and exposure to the elements, your Spa Cabinet may tend
to loose its original appearance. Protecting the timber surface is a fairly
simple process.
Firstly, sand the Cabinet with fine grade sandpaper to smooth down
any roughness on the surface of the cedar.
Regular applications of Signature Shield Stain will enhance and protect
the richness of the timber. Signature Shield Coat is available from your
SCS Industries Dealer. It is recommended to re-stain your Spal every
12 months to ensure original lustre of Cabinet.
Headrests
Removing Your Headrests
Most Spa models have 2-7 moulded comfort pillows / headrests. These
headrests are designed for comfort to the Spa user.
We recommend removing these headrests periodically to clean behind
them. We also recommend removing the headrests if your Spa is not
going to be used for a long period of time, as consistent exposure to
Chemicals, ozone and moisture may damage the product over time.
Every 3-6 months the headrests should be removed for cleaning. The
headrests are secured to the shell by small snap in lugs, or are simply a
slide fit, this prevents the headrest from falling into the Spa.
Headrests can be wiped with methylated spirits, then coated with a high
grade vinyl rejuvenator to rejuvenate the faded, powdered look.
Pg. 25
Underwater Light
The light, if fitted can be operated by an air button or electronic touch pad, depending on the model you
have purchased.
You may have been supplied with extra plastic coloured lenses for your light, depending on the type and
model of your Spa (colours and numbers of coloured lenses vary according to type of fitting).
The coloured lenses may be changed while Spa is full of water or when empty.
LED Lights
If your Spa has a LED light installed no coloured lenses are required. Your LED light has a number of
colour sequences which are obtainable by simply toggling the light button, (on/off).
Changing the Coloured Lens
Grip around edge of the coloured lens with your fingers, or tool if supplied and slowly ease lens off.
Replace with desired colour lens.
Replacing the Light Globe
The light in your Spa could either be an incandescent type lamp or a LED type.
Incandescent Lamps should be as follows:
12v 12w for the main Spa light and 12v 6w for the waterfall (if
applicable) and/or illuminated handrail.
If incorrect lamps are fitted, this can interfere with the operation of your
Spa lighting. One of the symptoms can be that the lights will not turn off.
LED Lighting These lights can be ordered with your Spa. They can
also be an upgrade from your incandescent units. (Contact your local
SCS Dealer for information)
The light globe can be replaced from outside of the Spa.
Pg. 26
Underwater Light
Inground Spa Pools - Front Load Model
1. Isolate power for Spa at circuit breaker.
2. Empty Spa to below light (refer to draining your Spa).
3. Remove coloured lens (as stated in ‘Changing the Coloured Lens’)
4. Position black relamping tool over light lens in Spa (position in grooves).
5. Turn black re-lamping tool clockwise to open. Unscrew completely.
6. Remove light globe with two (2) fingers. Replace faulty globe with the new globe
(new globes or LED Upgrade can be purchased from your Spa Dealer).
7. Replace parts, refill Spa and restore power.
Inground Swim Spa - Front Access
1. Isolate power for Spa at circuit breaker.
2. Remove 2 screws from front of light fitting.
3. Remove fitting from housing (fitting has enough length to proceed to 4 above
water level of Swim Spa).
4. Remove 6 screws from backside of fitting.
5. Remove glass cover to globe.
6. Replace globe.
7. Replace parts and restore power.
Portable Spa and Portable Swim Spa - Back Load Model
1. Isolate power for Spa at circuit breaker.
2. Remove access panel behind where the light is situated.
3. Locate lampholder with two (2) wires (black and white) entering the back of the light.
4. Remove lampholder, by turning anti-clockwise with two (2) fingers only.
5. Replace faulty light globe with new one.
6. Replace parts, including service access panel, restore power.
Pg. 27
Jet Information
Ozonator
If fitted to your Spa, the purpose of an Ozonator is to break down bacteria, yeast moulds and viruses leaving
your Spa water clear.
There are 2 types of ozone units which SCS Industries use:
1. 24hr Ozone, which as it states ozonates 24hrs a day.
The 24hr Ozone Generator pumps ozone into the Spa via a delivery head encasing a small blue stone
mounted in a housing either in the bottom or side of the Spa shell.
For the ozone to operate the water level must be at correct operating level (refer to filling your Spa). A small
amount of sanitiser is required to be used with your ozone generator to help with water purification. Contact
your local SCS Dealer for information on chemicals to be used in your Spa.
This type of ozone generally has a blue stone that the ozone gas is injected through into the Spa. Ozone
takes the form of tiny air bubbles.
Should this flow of ozone reduce or stop you may need to remove the blue stone from delivery head and
clean (eg: clean with steel wool). Stone must be repostioned into the delivery head prior to operating Spa.
2. The more widely used ozonator is the unit which ozonates during filter cycles.
If your Ozonator is in a cylindrical unit manufactured by Balboa, this type of ozone operates on a venturi
principle relying on water flow. The specially designed ozone jet is generally mounted in the footwell of
your Spa.
By simply removing the service access panel on the side of your Spa you will be able to locate the ozone
generator. When in operation the end of this type of generator will be illuminated and small ozone bubbles
will be injected into your Spa. As with the 24hr unit.
Depending on the concentration ozone has a scent ranging from a slightly sweet to moderately antiseptic smell.
If leaving Spa without use for long periods of time remove headrests as prolonged exposure to chemicals may
cause headrests to discolour.
Contact your Local Dealer in relation to extra chemicals that may be used in conjunction ozone.
Pg. 28
Jet Information
On
Air Control
These controls allow you to regulate the amount of air that is mixed
with water entering through the jets. This significantly increases the
jets performance and massage effect.
Air Control’s should be in the closed position when Spa is not in use,
to aid in heat retention.
Aromatherapy Dispenser
On the lip of your spa there is a screw cap (if fitted),
by adding specially formulated Aroma beads into
the dispenser, beautiful scents are infused into
the Spa via the bubbles, enhancing relaxation and
overcoming chemical smells. The scent is drawn into
the water when the blower is activated.
When the scent becomes faint simply replace the
Aroma beads, these can be purchased through your
SCS Industries Dealer.
Air Injectors
When the Blower button on the control pad is pressed, an
air blower pumps air directly to individually plumbed air
injectors located in the seats and foot well.
Air injectors further massage and caress your body.
Pg. 29
Off
Jet Information
Your new Spa has several different types of jets, with different massage actions. Follow the diagrams for
correct operation of your jets.
Note: T
urning off too many jets may cause water to syphon out of the Air Venturi’s.
Hurricane Jets:
The large Hurricane Jets are
interchangeable with each other. Move
them around to suit your massage type.
MINI HURRICANE
HYDROTHERAPY JET
Simply turn jet clockwise / anti-clockwise
to turn water flow on or off through jet.
To remove jet face, turn jet face until the
face clicks out.
HURRICANE
HYDROTHERAPY
MASSAGE
Hurricane Swirl & Twin Swirl:
Designed for maximum relaxation by
constant rotating of the jet. Move them
around to suit your massage type.
Can be turned on/off.
HURRICANE
TWIN SPIN
HURRICANE
SWIRL
Storm Jet:
Designed for a pulsating effect with
the ability to turn on/off.
Pg. 30
Jet Information
Butterfly Jet:
Butterfly Jet is a high flow jet allowing large amount of water to pass
through. This creates a very turbulant action in the Spa.
This jet can be turned on/off by simply turning jet face
clockwise / anti-clockwise.
BUTTERFLY JET
(Not interchangeable)
Duo Jet:
The Duo Jet is designed for a fixed pressure point
(These jets are not able to be turned off).
DUO JET
Fixed Pressure
Duo Pulsator Jet:
Designed to spin causing a pulsating effect
(These jets are not able to be turned off).
Adjustable Neck Jet:
Designed for fixed direction which by simply rotating the jet can be
turned on or off.
Verta’Ssage Jet:
Is a slow rotating jet designed for the ultimate massage (These jets
are not able to be turned off).
Pg. 31
Hurricane & Swirl Jet Maintenance
To keep your jets performing at their best, you should regularly remove adjustable jets and clean them (approximately
once every 3 months).
Clean the jet face in hot soapy water. Make sure all fittings are moving freely before re-inserting. (Sand and grit in jet
will not be covered by Warranty)
Ensure all soap residue is removed prior to re-installation of jet face.
If you are having trouble removing the jet face a tool can be purchased through your SCS Dealer.
Massage Selector / Diverter Valve
Some models are fitted with a Massage Selector or Diverter Valve. This valve is designed to change the flow of the
water from one seat to another.
It is normally designed to divert the jets the following ways:
1. To the lounges/recliners (Position 1) or
2. To the hot seat in the corner (Position 2) or
3. The entire Spa working simultaneously (Position 3)
Do not force the selector handle. If the handle becomes hard to turn, consult your Spa Dealer.
When heating the Spa, leave the massage selector in (Position 1) to the Lounge area, or the hot seat area
(Position 2). Do not leave selector valve in the center position (Position 3) with all the jets working, as the Spa may
not heat due to low flow at the heater.
3
2
1
Neck Jet Diverter:
If the Spa is fitted with reverse molded neck jets, a small diverter will be fitted adjacent the neck jets. Used to divert
water to and from neck jets. This componet serves purely as a diverter not an on / off control. When water is diverted
away from neck jets a small amount of water may expell from the jets.
Pg. 32
Blower & Pumps
The pump and/or blower will turn on automatically at various times of the day. This function is to eliminate the water
becoming stagnant and allowing build up of bacteria.
The pumps and blowers will automatically turn off after approximately 20 minutes of operation. This is normal operation,
designed to protect the pumps and blower.
If pumps and blower do not turn on, simply switch off power supply to the Spa and then turn back on (portables only).
During routine maintenance, it is important to ensure that the barrel unions to the pump are tight, as continued use may
cause loosening through vibration.
Note: Pumps and Heaters:
Pumps and heater elements can be affected by corrosion if the balance of your water is not at the correct levels. You MUST
maintain your total alkalinity and ph levels at the recommended levels at all times or you will void your Warranty on these
items. Speak with your local SCS Spa Dealer about Alkalinity and pH.
Air Locks LF or DRY Messages
Airlocks are a common cause of problems on initial start up of your Spa or after reinstallation of filters after cleaning.
When reinserting filter after cleaning please ensure the correct procedure is followed as set out in this manual
(replacing / inserting filters).
The term LF, Dr or Dry means that the pump/heater on your Spa creating the flow and filtering the water through the
heater tube has an obstruction. Obstruction meaning dirty filters, a build up foreign matter on the suction side of the pump
or an airlock.
Corrective action: if one of the above messages appears on the touch panel the following action is recommended:
Remove filters
Does message disappear
Yes Filters need cleaning or replacing.
No
See next step.
Has Spa been left running while cleaning filters
Yes Probable blockage in pump.
No
Probable airlock in filtration system.
Isolate power to Spa.
Loosen barrel union to filtration pump allow air to expel.
Should only be water escaping, no air.
Once all air is purged re-tighten barrel union to pump.
Reset power to Spa.
If problem persists contact your SCS Industries Dealer.
Make sure when cleaning your filter cartridges that the power is isolated from your Spa. If you continue to run the Spa foreign
matter can obstruct the operation of the pump.
Pg. 33
Trouble Shooting
Problem
Cause
Procedure
Spa does not operate
1. Power not connected
1. Check power is connected
2. Power supply fault
2. Check fuse or safety switch at
meter box/switchboard
Power available, but pump 1. Air lock in plumbing work
1.
Does not run
Loosen barrel union situated
above pump to release build up
of air. Release a small amount of
water as well
Reduced water flow from jets
1. Shut off valves, closed/off
1
position
Open up the shut off gate valves
to let water through
2. Insufficient water levels
2. Add more water to Spa
3. No flow through jets
3. Jets in off position, turn jet
clockwise to on
3
4. Pulsating jets
Kink in delivery hose, remove
access panel and check hoses
4. Check water level
Air blower not operating
1. Blower not plugged in
1. Make sure blower plugged into
socket on control box
Underwater light not 1. Light not plugged in
1. Make sure light is plugged into
operating
power point or control box which
ever is applicable
2. Blown globe
2
Replace globe
Spa will not heat
1. Thermostat turned 1. Turn thermostat up to
down low
increase heat
2. Air blower on all the time
2. Turn blower off, heating
does not occur with blower
load sharing
3. Excessive heat loss all the time
3. Fit hard cover to Spa
4. Clean cartridge
4. Filter cartridge dirty
5. Spa set on economy 5. Increase time clock
or sleep mode
cycles or set to standard mode
(as per controller instructions)
Spa turns on by itself
1. Normal automatic daily
Filtration or anti freeze cycle
1. No action required
Pump or Blower shuts off 1. Automatic timer has 1. Push JETS button again down
Unexpectedly while in use shut pump off
to start another cycle
2. Motor overheated and 2. Leave for 10 minutes push JETS
automatic protective device button to restart
has shut down pump(s).
If any of the above procedures fail to rectify the listed problems, contact your local Spa Dealer for assistance.
Pg. 34
SCS Dealer Contact: