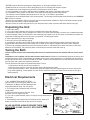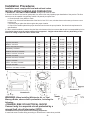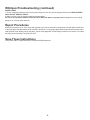
1
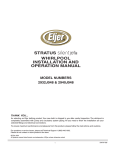
INSTALLATION, OPERATING & MAINTENANCE
INSTRUCTIONS FOR PREMIERE SERIES
WHIRLPOOLS
SAVE THIS MANUAL - LEAVE WITH WHIRLPOOL OWNER FOR FUTURE USE
Date Purchased __________________
Purchased From ________________________________________________________
Installed by ________________________________________ Model Name and Number _________________________________
READ THESE INSTRUCTIONS COMPLETELY BEFORE INSTALLING THE PRODUCT. IF YOU
HAVE ANY QUESTIONS CALL 1-800-423-5537.
YOU MUST FOLLOW ALL INSTRUCTIONS IN THIS MANUAL. FAILURE TO FOLLOW AND
COMPLY WITH ALL INSTRUCTIONS WILL RESULT IN YOUR ASSUMPTION OF LIABILITY AND
CAN RESULT IN PRODUCT DAMAGE, PROPERTY DAMAGE AND/OR PERSONAL INJURY.
THIS PRODUCT COMPLIES WITH MANY NATIONALLY RECOGNIZED STANDARDS SUCH AS
ANSI Z124.1- 9, ASME A112, IAPMO AND UL 1795. YOU ARE RESPONSIBLE FOR ANY LOCAL
CODES THAT MAY APPLY.
THIS PRODUCT IS DESIGNED TO BE INSTALLED BY A LICENSED TRADESMEN.
LICENSED PLUMBERS AND ELECTRICIANS SHOULD BE EMPLOYED TO ENSURE PROPER
INSTALLATION. INSTALLERS ASSUME ALL LIABILITY FOR THE CORRECT INSTALLATION
PROCEDURES.
ONLY ACCESSORIES AUTHORIZED BY THE MANUFACTURER SHOULD BE USED WITH THIS
PRODUCT.
THIS PRODUCT IS DESIGNED FOR RESIDENTIAL USE AND USE BY HEALTHY INDIVIDUALS.
WARNING: TO REDUCE THE RISK OF INJURY, DO NOT PERMIT CHILDREN TO USE THIS
PRODUCT UNLESS THEY ARE CLOSELY SUPERVISED AT ALL TIMES.
IMPORTANT SAFETY INSTRUCTIONS:
WARNING! WHEN USING THIS PRODUCT, BASIC PRECAUTIONS
SHOULD ALWAYS BE FOLLOWED. READ AND FOLLOW ALL
INSTRUCTIONS PERTAINING TO RISK OF FIRE, ELECTRIC SHOCK,
OR INJURY TO PERSONS
WARNING: RISK OF ACCIDENTAL INJURY OR DROWNING; CHILDREN SHOULD NOT USE HYDROMASSAGE BATHTUB WITHOUT ADULT SUPERVISION.
-1-
REV. 07-16-2008
WARNING: RISK OF ACCIDENTAL INJURY OR DROWNING; DO NOT USE HYDROMASSAGE BATH-
TUB UNLESS ALL SUCTION GUARDS ARE INSTALLED TO PREVENT BODY AND HAIR ENTRAPMENT.
WARNING: TO AVOID INJURY, EXERCISE CARE WHEN ENTERING OR EXITING THE HYDROMASSAGE BATHTUB.
WARNING: RISK OF ACCIDENTAL INJURY OR DROWNING; DO NOT USE DRUGS OR ALCOHOL
BEFORE OR DURING THE USE OF A HYDROMASSAGE BATHTUB EQUIPPED WITH HEATER TO AVOID
UNCONSCIOUSNESS AND POSSIBLE DROWNING.
WARNING: RISK OF FETAL INJURY; PREGNANT OR POSSIBLY PREGNANT WOMEN SHOULD CONSULT A PHYSICIAN BEFORE USING A HYDROMASSAGE BATHTUB EQUIPPED WITH HEATER.
WARNING: RISK OF HYPERTHERMIA AND POSSIBLE DROWNING; DO NOT USE A HYDROMASSAGE BATHTUB EQUIPPED WITH HEATER IMMEDIATELY FOLLOWING STRENUOUS EXERCISE.
WARNING: RISK OF ELECTRIC SHOCK; DO NOT PERMIT ELECTRIC APPLIANCES (SUCH AS A
HAIR DRYER, LAMP, TELEPHONE, RADIO, OR TELEVISION) WITHIN 1.5 M (5 FT) OF THIS HYDROMASSAGE BATHTUB.
CAUTION: TEST THE GROUND FAULT CIRCUIT INTERRUPTER PROTECTING THIS APPLIANCE PERIODICALLY IN ACCORDANCE WITH THE MANUFACTURER’S INSTRUCTIONS.
WARNING: RISK OF HYPERTHERMIA AND POSSIBLE DROWNING; WATER TEMPERATURE IN
EXCESS OF 38°C (100°F) MAY BE INJURIOUS TO YOUR HEALTH. CHECK AND ADJUST WATER TEMPERATURE BEFORE USE.
WARNING: RISK OF HYPERTHERMIA; PEOPLE USING MEDICATIONS AND/OR HAVING AN AD-
VERSE MEDICAL HISTORY SHOULD CONSULT A PHYSICIAN BEFORE USING A HYDROMASSAGE
BATHTUB EQUIPPED WITH HEATER. PROLONGED IMMERSION IN WATER HOTTER THAN NORMAL
BODY TEMPERATURE MAY INDUCE HYPERTHERMIA. TEST THE WATER TEMPERATURE AND ADJUST THE TEMPERATURE-REGULATING CONTROL TO REACH A WATER TEMPERATUR IN THE TUB
NO HIGHER THAN 38°C (100°F) AND NECESSARY PRECAUTIONS MUST BE FOLLOWED IN ADJUSTING THE THERMOSTAT. WARNING: THE USE OF ALCOHOL OR DRUGS CAN GREATLY INCREASE
THE RISK OF FATAL HYPERTHERMIA IN HOT TUBS AND SPAS. THE CAUSES, SYMPTOMS, AND
EFFECTS OF HYPERTHERMIA MAY BE DESCRIBED AS FOLLOWS. HYPERTHERMIA OCCURS WHEN
THE INTERNAL TEMPERATURE OF THE BODY REACHES A LEVEL SEVERAL DEGREES ABOVE THE
NORMAL BODY TEMPERATURE OF 98.6ºF (37ºC). THE SYMPTOMS OF HYPERTHERMIA INCLUDE
DROWSINESS, LETHARGY, AND AN INCREASE IN THE INTERNAL TEMPERATURE OF THE BODY. THE
EFFECTS OF HYPERTHERMIA INCLUDE:
1) UNAWARENESS OF IMPENDING HAZARD;
2) FAILURE TO PERCEIVE HEAT;
3) FAILURE TO RECOGNIZE THE NEED TO EXIT HYDROMASSAGE BATHTUB;
4) PHYSICAL INABILITY TO EXIT HYDROMASSAGE BATHTUB;
5) FETAL DAMAGE IN PREGNANT WOMEN; AND
6) UNCONSCIOUSNESS AND DANGER OF DROWNING.
PRECAUTIONS
• Use this unit only for its intended purpose as described in this manual. Do not use attachments that are not recommended by the manufacturer.
• Never drop or insert any objects into any openings.
• The unit must be connected to a supply circuit that is protected by a ground fault circuit interrupter (GFCI). Such a
GFCI should be provided by the installer and should be tested on a routine basis. To test the GFCI, push the test button.
The GFCI should interrupt power. Push the RESET button. Power should be restored. If the GFCI fails to operate in this
manner, there is ground current flowing, indicating the possibility of an electrical shock. Do not use this unit. Disconnect
the unit and have the problem corrected by a qualified service representative before using.
• Traction enhanced, textured tub bottom must remain clean to minimize slippage.
• DANGER: RISK OF ELECTRICAL SHOCK. All pumps and heaters must be connected to a ground fault circuit
interrupter (GFCI) protected outlets. Standard Line Total Massage units can be operated on a single service. In line heater
must always be connected to a dedicated service.
• DO NOT use liquid soap or bubble bath in whirlpool tub during operation since excessive foam may result.
-2-
• NEVER consume alcoholic beverages or drugs before or during the whirlpool tub use.
• ALWAYS fill the tub to at least 3” above the highest jet prior to activating the whirlpool system.
• The whirlpool tub is not designed to hold water continuously like pools or spas.
• It is recommended not to use the whirlpool bath immediately after eating, particularly large meals.
• It is advisable to keep a glass of cold water or non-alcoholic beverage near the whirlpool bath.
• The maximum recommended water temperature is 104° (40° C) for adults in good health.
• Prolonged use of the whirlpool bath is not recommended. The average recommended whirlpool bathing time SHOULD
NOT exceed 30 minutes.
• Women who are pregnant, elderly or persons who have heart disease, diabetes or high or low blood pressure should
consult a physician before using the whirlpool bath.
• Be sure to allow for a safe entry and exit of your whirlpool bath in order to prevent falls and avoid serious injury.
Unpacking the Unit
1. Inspect the carton.
2. If you notice carton damage, take a picture if possible and contact the deliverer.
3. Immediately inspect the unit for damage even if there is no visible carton damage. Once the unit is installed and there
is surface damage visible, we will assume it was caused by the installer if you do not report it immediately. Installers are
responsible for damage that occurs once the unit is placed in its assigned location.
4. Inspect the plumbing for any loose fittings.
5. Never lift, pull or bump whirlpool piping.
5. On whirlpool units the unions on the suction and discharge sides of the pump have been marked to indicate the
alignment that was present at the factory water test. If these are not aligned, retighten and test for water tightness.
6. Remove all packaging material except for the protective plastic. It was placed on the tub at the factory to eliminate
abrasions from handling. The protective plastic should only be removed at the final clean up.
Testing the Bath
Failure to perform these tests immediately after the tub is installed will make the installer liable for future repair
costs.
Installation is not complete until the bath has been water tested. All baths are operationally tested at the factory and
certified to be free of leaks. Transportation and handling may result in leaks developing. It is important and necessary to
test the bath while there is access to all sides of the bath. If power is not available, then a hose should be used to fill the
tub with water and a static test inspection performed.
The unit should be both static and operationally tested. To test:
1. Seal the drain and fill the tub to a normal level.
2. Allow the tub to stand for 5 minutes and then inspect all plumbing for leaks.
3. After performing steps 1 and 2, operate each pump and inspect for leaks. Again inspect the unions around the
pump. After tightening, if leaks persist from the unions, loosen the unions and check to be sure that the O-ring is
seated properly.
Electrical Requirements
1. ALL CONNECTIONS MUST BE GFCI
(Ground Fault Circuit Interrupter) PROTECTED
2. Whirlpool, Air Baths, and Total Massage units
require dedicated 20 amp, 120 volt service.
3. You must provide a receptacle with a 20 amp
configuration.
4. See local codes for proper wire size. If not
specified, use #12 copper only wire.
5. If you use an optional heater, then it will require its own dedicated 20
amp service.
6. Total Massage units require only one 20 amp service. However if
heater is used then a second 20 amp service is required.
Illustration A
Illustration B
a
IN LINE HEATERS ALWAYS REQUIRE THEIR OWN
DEDICATED 20 AMP, 120 VOLT, GFCI PROTECTED
CIRCUIT.
-3-
Illustration C
Installation Procedures
Installation must comply with local and national codes.
INSTALLATION PLANNING AND PREPARATION
1. NEVER LIFT THE TUB BY THE PLUMBING. Doing so can result in leaks.
2. Check if the floor is level and of good quality. An uneven floor may impede proper installation of the product. The floor
structure must be capable of supporting at least 100 pounds per square foot.
a. Clean the area of any debris or trash.
b. Use a 5 or 6 foot level and determine if the floor is level. If it is not, calculate how much mortar you have to use to
level the tub.
c. Ensure that you place the drain rough at the proper location.
d. Check if the installer placed the proper electrical service near the pump location. See electrical requirements for
specifications.
3. If this is a deck installation, measure from the floor to the bottom of the rim to ensure that the tub is not suspended by its rim.
You should always have the entire tub floor fully supported. *Heights shown below will vary depending on the
amount of settng compound and/or mortar used.
LENGTH
MODEL
WIDTH
OVERALL
HEIGHT
HEIGHT*
TO LIP*
“A”
“B”
Cypress 015-0005
60”
32”
20”
18 1/2”
10 1/4”
16”
Madison 015-0015
60”
32”
20”
18 1/2”
10 1/4”
16”
Patriot 015-0105, 015-0109
60”
32”
19 3/4”
18 3/4”
9 1/2”
16”
Canterbury 015-0025
60”
36”
19 3/8”
17 7/8”
10 1/4”
18”
Emblem 015-0074, 015-0075
72”
36”
19”
17 1/2”
10 1/2”
18”
Preston 015-3704, 015-3705
69”
38”
23”
22”
9 1/8”
34 1/2”
Sheridan 015-0035
58”
38”
20 1/2”
19”
7 3/8”
19”
Genesis 015-5404, 015-5405
71 1/2”
42”
22”
20”
10”
35 3/4”
Laguna 015-0045
60”
42”
20”
18 1/2”
9 3/8”
21”
Venice 015-2504, 015-2505
72”
42”
23”
21 1/2”
10 3/4”
36”
Triangle 015-0065
60”
60”
21”
19 1/2”
35 1/2”
35 1/2”
Casanova 015-4804, 015-4805
60”
60”
21”
19 1/2”
36”
36”
Illustration F
Illustration D
WARNING: When installing Whirlpools, Air, or Total
Massage Baths, observe basic precautions, including the
following:
• DANGER: RISK OF ELECTRICAL SHOCK!
Connect only to a separate circuit protected by a
ground fault circuit interrupter (GFCI)
• Installation must provide access for servicing pump/motor.
1. Install tub waste/ overflow fitting according to manufacturer’s instructions provided.
-4-
2. Construct support framing (see WARNING next to diagram below) for the tub, allowing for a 16” X 20” access opening
for servicing the pump/motor on whirlpool models.
3. DECK / PENINSULAR INSTALLATION - Deck surface can be any width. Allow for the thickness of the wall board and
tile or other surface material between the deck (see “Height to Lip” illustration D & F above) and underside of the tub lip.
4. ALCOVE / CORNER INSTALLATION - Wooden 1” X 4” support stringers must be attached to surrounding walls at the
recommended height. If you use a skirt, refer to the specific skirt installation instructions provided with that product.
NOTE: Alcove and corner installations may require the use of a Tile Flange Kit (Part# 494-0060) to prevent water from
pentrating the wall board. After the framing is complete, set the product in place to check the fit and make certain that it
can be properly leveled. (Caution: if the tub is not level - use the deck surface for checking the level - water will not drain
properly.)
WARNING: Never support the tub by its deck-lip or stringers, as this could result in product failure and will void
the Warranty. Level and fill the tub with water and test it for proper operation and drainage or possible water leaks due to
transit-handling damage. Remove the tub from its framing.
5. The tub MUST be supported from the tub bottom and not the tub lip. The lip should only rest on the finished deck
surface or support stringers. The tub bottom must be supported by a setting compound (fast cure materials are not
WARNING:
Framing may need to be adusted after
setting the unit in leveling compound.
The height to lip and overall height
will be increased depending on the
amount of setting compound used.
recommended due to excessive shrinkage). Tubs with a pre-leveled base (wood or Co-Ex) must also be supported by
setting compound, although tubs with a Co-Ex base require less setting material. A sheet of plastic film, both under and
on the top of compound is recommended as a barrier. The tub should be set in place (do not handle the whirlpool by the
piping) while the compound is still soft and the compound will conform to the tub bottom. The tub should be worked down
into the compound so the lip of the tub just barely makes contact with the finished deck surface or support stringers. It
may be necessary to partially fill the tub with water to aid in properly setting the tub.
6. Verify that the product is level by checking the tub deck surface.
7. Place the fill spout and supply lines at your desired location. If you are installing the spout and supply lines on the deck
of the tub, mark the location first and drill pilot holes from the acrylic side (top) of the product. Use a properly sized hole
saw, and drill the spout and supply line holes from the acrylic side of product.
8. Connect the water supply lines and the waste overflow.
9. Plug the pump cord into specified dedicated 120V/20A GFCI outlet to supply electrical power to the system. The cord
and the plug are shipped with your system.
10. After plumbing and electrical connections have been made the tub should be cleaned of dirt and debris. Follow
“Cleaning and Maintenance” instructions in this manual.
11. In finish-out of Corner/Alcove installation, be certain to allow for an expansion gap between wall board and tub deck as
well as between tile or other water material and tub deck.
Installing an Oval Tub with Template
Our oval tubs have a template printed on the carton box. The template is one inch smaller all around than the actual rim of
the tub. This provides the tub rim with sufficient margin for an overlap with the platform.
1. Cut out the template with scissors or another suitable tool.
2. Place the template on to the desired location of your tub platform and use it to trace the shape with a pencil or marker.
3. Cut a hole in the platform according to the tracing.
4. Place the tub carefully in the cut out hole of the platform. Take special care that you do not to drop the tub in the
platform cutout, because the tub might break and the ensuing warranty limitations would become effective.
5. Read and follow installation procedures above.
Installing an In Line Heater
IN LINE HEATERS ALWAYS REQUIRE THEIR OWN DEDICATED 20 AMP, 120 VOLT, GFCI
PROTECTED CIRCUIT.
-5-
1.To install an in line heater, simply saw or cut out the center portion of the red heater blank at the breaking lines. The
threaded pieces should remain on both sides of the pipe section.
2. Insert the in line heater and tighten the unions of the in line heater to the remaining threaded portion of the heater blank.
Cleaning and Maintenance
Pump and pipe circulation system should be flushed before first use and on a monthly basis when product is under normal
use. Below are the recommended procedures for cleaning:
• DO NOT RUN WHIRLPOOL DRY. Fill the tub with hot water 2-3 inches above the jets and add 2-3 teaspoons of low
foaming detergent such as dishwashing machine detergent. Make certain the air controls are turned completely clockwise
and are off.
• Switch on whirlpool and run for 10 minutes.
• Drain tub completely.
• Fill tub with cold water above jets.
• Switch on whirlpool and run for 15 minutes.
• Drain tub completely.
DO NOT USE ABRASIVE CLEANERS as they will scratch and dull the surface of the acrylic.
Plaster can be removed using a sharpened wooden stick. DO NOT USE METAL SCRAPERS, WIRE BRUSHES OR
OTHER HARSH ABRASIVE TOOLS. Usually a mild detergent will remove construction debris. More stubborn debris may
be removed with denatured alcohol, or Clorox Soft Scrub® cleaner. Light scratches and dulled areas may be restored to
original luster by rubbing with an automotive type cleaning compound such as DuPont White Polishing Compound®.
Air Baths and Total Massage Units are equipped with an Automatic Cleaning and Purge Cycle
Air Baths have a preprogrammed cleaning and purge cycle built in to expel the remaining water in the air channels. It
activates within 20 minutes after the bath is drained, blows for about 2 to 3 minutes and then shuts off automatically.
There is nothing to be alarmed about if you hear a blowing noise coming from the tub after the tub has been turned off.
The noise you hear is the cleaning cycle in operation.
Safety Features
Most models in the Eljer Premiere Series whirlpool line are provided with a suction system that releases the vacuum of the
pump when the suction face becomes obstructed. This provides an extra margin of safety. The pump responds instantly
when the suction system detects an obstruction and goes into a “standby” mode allowing the obstruction to be safely
removed. The pump instantly attains full flow when the obstruction is removed. The suction system is a mechanical device
that does not require springs or moving parts, resulting in service-free, durable operation.
Operating Instructions
1. Fill the bath at least to 3 inches above the jets before activating the pump.
2. The pump is activated by an on/off switch. Each depression of the button switches the power either on or off. Do not
repeatedly depress the switch in rapid order if you do not see the whirlpool function right away, as it may take a few
seconds before you can see it fully operating.
3. If any factory installed fittings are removed do not operate the unit. A safety hazard may occur.
4. Do not use bubble bath when you operate the whirlpool pump. This might cause excessive foaming.
5. Bath oils may be used; however their frequent use will require more frequent purging and cleaning
of the systems.
6. Both air and whirlpool systems are plumbed in a way that water will drain from the plumbing easily.
7. There are no user serviceable parts located under the tub.
ON-OFF SWITCH
The whirlpool bath pump is activated by a on-off switch. Each depression of the switch will
actuate the pump. If off, one depression will turn the pump on. If on, the next depression will turn it
off.
JET OPERATION AND ADJUSTMENT
The jets can be easily adjusted by pointing the jet-nozzle in the desired direction. For units with
Hydro Jets, the strength of the waterflow and air induction can be regulated through twisting the
jet-nozzle. Twisting the nozzle clockwise will decrease the water flow and finally completly turn
off the water flow of that particular jet. If the nozzle is twisted counter- clockwise then the water
flow will increase up to its maximum flow.
-6-
TOTAL MASSAGE AND AIR BATH CONTROL PAD
Total Massage units are a combination of a whirlpool and air bath. The Total Massage control pad contains six (6) buttons.
The top three controls on the “Therapy Control Center” operate the whirlpool and the bottom three controls operate the air
system. The whirlpool and air massages systems may be used at the same time if desired.
The air bath is controlled by a three button control:
1. The first button switches the blower on or off. The other features will not operate unless the blower is turned on.
2. The second button sets the power level of the blower. Holding the button depressed will cycle the blower power from
low to high in a continuous cycle. When the desired level is reached, remove your finger quickly from the button to
maintain that power setting.
3. The third button is a three step wave action button. Once activated, the air holes expell air in a slow pulsating flow
called wave action. There are 3 steps or positions for wave strength.
a. Position #1 operates the blower at a steady flow.
b. Position #2 operates the blower at a quick wave action.
c. Position #3 operates the blower at a slower wave action.
Switches the
jet-pump
on or off
Switches the
air blower
on or off
Adjusts the variable
water flow of the jets
Adjusts the variable
air flow of the blower
Switches from
continuous to wave
action water flow
Switches the
air blower
on or off
Adjusts the variable
air flow of the blower
Switches from
continuous to wave
action air flow
Switches from
continuous to wave
action air flow
Air Bath Control Pad
Total Massage Control Pad
Whirlpool Troubleshooting
MOTOR WILL NOT START:
1. Check circuit breakers.
2. Check for incorrect or loose wire connections.
3. Make sure the correct power supply is being used.
4. On/Off switch should be in the “On” mode.
5. Make sure that the jets are fully opened and water is flowing.
MOTOR OVERHEATING AND CYCLING ON AND OFF:
1. Check for incorrect or loose wire connections.
2. Check for low voltage supply (frequently caused by undersized wire).
3. Make sure the motor gets a fresh air supply and the vents are kept unclogged.
MOTOR MAKES HUMMING NOISE BUT WON’T START:
1. Open jets
2. Make sure that the motor shaft turns free.
3. Check for jammed impeller or an obstruction on the (volute) casing.
4. Check for low voltage and undersize wire.
LOW WATER FLOW:
1. Check for clogged plumbing lines.
2. Check for low voltage.
-7-
Whirlpool Troubleshooting (continued)
WATER LEAKS:
1. Check compression fittings (union connectors) making sure they are properly aligned and secured. HAND TIGHTEN
ONLY. DO NOT USE ANY TOOLS.
2. Make sure the O-ring is properly seated and not damaged.
Do not run any pumps or heaters unless the tub is filled with water to a proper level. Damage due to dry running
pumps is not covered under warranty.
Repair Procedures
Most minor scratches (up to 1/64” deep) and cigarette burns can be removed by sanding the area with #180 or #240 wet
or dry sand paper and progressing down to #600 or #1200 grit. Finally, apply light buffing compound and buff area with a
clean stitched cotton buffing pad or equivalent. Use an extra application of fine buffing compound if necessary. For cracks
and major surface damage, call (800) 423-5537.
Save These Instructions
This product and its components are ETL listed and IAPMO approved.
-8-
LIMITED WHIRLPOOL WARRANTY
ELJER, INC. (“Eljer”, “we”, “us”, “our”) warrants to the original consumer/purchaser that the products covered below are free from defects in material and
workmanship limited by time, remedy and the disclaimers indicated below. The Eljer, Inc. Limited Warranty will be effective upon receipt by Eljer, Inc.,
within 30 days of purchase, of a properly completed warranty registration card and a copy of the sales receipt. This warranty is not transferable and shall
be effective as long as the unit is owned by the original consumer purchaser under normal residential use.
PRODUCTS (commences upon date purchased)
Premiere Series acrylic whirlpool, shell only
Premiere Series acrylic whirlpool, factory installed equipment including, but not
limited to, motor/pump, piping, electrical, jets, controls, heater
WARRANTY PERIOD
Lifetime to the original consumer purchaser
Two (2) years on all factory installed equipment to the original consumer
purchaser
IMPLIED WARRANTIES OF MERCHANTABILITY OR FITNESS FOR A PARTICULAR PURPOSE ARE DISCLAIMED
ALTOGETHER, OR TO THE FULL EXTENT PERMITTED BY LAW.
This limited warranty does not cover:
(a) damage to the finish of fittings or accessories caused by the use of cleaning solvents/chemicals or improper cleaning methods.
(b) damage to any products based on or resulting from installation or repair, misuse or abuse (including, but not limited to excessive
operating conditions), or alteration or adjustment, whether performed by a contractor, service company or yourself.
(c) damage resulting from failing to reasonably clean, care for or maintain a product.
(d)
(e)
(f)
any products we sell that have been moved or removed from their original installation site.
damage resulting from the use of chloramines, excessive concentrations of chlorine in public water supplies. Eljer, Inc. is not responsible
for damage to the unit caused by improper or lack of testing of the public water supply prior to installation.
damage in shipping, handling or transportation. Inspecting the unit prior to installation to ensure the unit is free of any defect or damage
is the responsibility of the installer, and the unit should not be installed if damage or defects are found.
(g) deterioration through normal wear & tear
(h) commercial application
If you believe that a product fails to meet the above limited warranty, you must notify us at 1-800-898-4048 (selection #3) prior to expiration of the
applicable warranty period set forth above. Notification should include a description of the product, model number and how the product fails to
meet the above warranty. Upon receipt of your claim under this limited warranty and evidence of the date of purchase, and after inspection by an
authorized Eljer representative, at our option and in our sole discretion, we will either repair or replace the product with an Eljer product of the same
or similar type and size; provided, however, that we will not pay any costs (labor or otherwise) associated with either removing a previously installed
product, installing a replacement product, or transportation or return of a product. Eljer, Inc. will not be responsible for the cost or repair of tile,
marble, or any other construction/installation material removed during installation or repair. If, as determined by Eljer, repair or replacement of the
product is not commercially practical or cannot be completed in a timely manner, we will refund the actual purchase price paid for the product upon
verification by providing a copy of your invoice, receipt or bill of sale. The total Eljer liability will never exceed the actual purchase price paid for
the product. Knowledge of any local code requirements are the responsibility of the dealer and/or the installer and Eljer, Inc. is not responsible for
any costs involved to modify the product or installation area to meet such requirements. NOTE: There could be variation in color between catalog
images, color chips, and actual plumbing fixtures. These images and color chips should never be used as a basis for color confirmation, as they are
provided only as approximate representatives of colors to be used in a general way to establish the color decor desired.
ELJER WILL NOT BE LIABLE FOR ANY OTHER LOSS OR EXPENSE(S) NOT SPECIFICALLY DESCRIBED ABOVE, AND DISCLAIMS ANY
LIABILITY FOR CONSEQUENTIAL OR INCIDENTAL DAMAGES.
SOME STATES DO NOT ALLOW THE EXCLUSION OR LIMITATION OF INCIDENTAL OR CONSEQUENTIAL DAMAGES, SO
THE ABOVE EXCLUSION MAY NOT APPLY TO YOU.
THIS WARRANTY GIVES YOU SPECIFIC LEGAL RIGHTS AND YOU MAY ALSO HAVE OTHER RIGHTS WHICH VARY FROM
STATE TO STATE.
ELJER WHIRLPOOL WARRANTY
Effective September 15, 2007