1
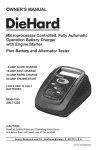
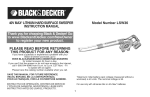
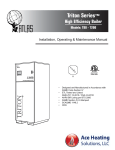
OPERATOR'S
MANUAL
®
Portable Power 950
Jump Starter and
DC Power Source
Model No.
200.71987
CAUTION:
Read all Safety Rules and Operating Instructions,
and follow them with each use of this product.
Sears, Roebuck and Co., Hoffman Estates, IL 60179 U.S.A.
00-99-000864/0808
SECTION
PAGE
1.
IMPORTANT SAFETY INSTRUCTIONS
1
2.
PRODUCT FEATURES
2
3.
CHARGING THE INTERNAL BATTERY
2
4.
JUMP-STARTING
3
5.
DIGITAL DISPLAY FUNCTIONS
4
6.
POWERING A 12V DEVICE
4
7.
USING THE USB PORT
5
8.
USING THE BUILT-IN LIGHT
5
9.
INTERNAL BATTERY REPLACEMENT
5
AVEHICLE
ENGINE
I0.STORAGE AND MAINTENANCE
6
11. SPECIFICATIONS
7
12. ACCESSORIES
AND REPLACEMENT
PARTS
7
DIEHARD ONE-YEAR FULL WARRANTY
When operated and maintained according to all supplied instructions,
if this DieHard product fails due to a defect in material or workmanship
within one year from the date of purchase, return it to any Sears store
or other DieHard outlet in the United States for free replacement.
This warranty does not include light bulbs, which are expendable parts.
This warranty gives you specific legal rights, and you may also have
other rights which vary from state to state.
Sears, Roebuck
and Co., Hoffman
Estates,
IL 60179
FOR CUSTOMER ASSISTANCE OR REPLACEMENT PARTS,
CALL TOLL-FREE BETWEEN 7 AM TO 4:30 PM CT
MONDAY THROUGH FRIDAY: 1-800=SEARS-64 (1-800=732-7764)
CONTAINS SEALED NON=SPILLABLE
LEAD-ACID
BATTERY. MUST BE DISPOSED OF PROPERLY.
WARNING: Possible explosion hazard. Contact with
battery acid may cause severe burns and blindness.
Keep out of reach of children.
iMPORTANT:
CHARGE
iMMEDiATELY
AFTER PURCHASE
IMPORTANT: READ AND SAVE THIS SAFETY AND INSTRUCTION
MANUAL.
1.1
Charge the 950 internal battery immediately upon purchase, every 30
days and after every use.
1.2
Use in a welt ventilated space.
1.3
Contains a sealed, non-spitlable lead-acid battery. Must be disposed of
properly.
1.4
WARNING: Possible explosion hazard. Contact with battery acid may
cause severe burns and blindness. Keep out of reach of children.
1.5
WARNING: Pursuant to California Proposition 65, this product contains
chemicals known to the State of California to cause cancer and birth defects or other reproductive harm.
1.6
WARNING: Failure to follow instructions may cause damage or an explosion. Read entire instruction manual before use. Always wear safety glasses to protect your eyes during use.
.1.
5
1.
JUMP START ON/OFF Switch. Turn
on to activate clamps and USB.
2.
3.
Digital Display percentage of charge
Plastic lens cover
4.
Two, Light bulbs
5.
Two, 12V DC power outlets
6.
Rear charger plug (not shown)
7.
8.
Clamps and Cables
USB Port
9.
Power Switch (LIGHTS, OFF, and
DISPLAY). This power switch turns
on the light or the internal battery
status digital display.
10. Wal! charger
IM PORTANT:
'_CHARGE iMMEDiATELY AFTER PURCHASE
'_KEEP FULLY CHARGED.
This Portable Power 950 comes with a sealed, non-spillable DieHard
maintenance-free lead-acid battery. This internal battery is specifically
designed to deliver high power jump-starting as well as repetitive deep
cycling performance.
To charge the Portable Power 950 internal battery:
.2.
3.1 Check
theinternal
battery's
charge
levelbypressing
theswitchmarked
DISPLAY.
TheDigital
Display
wiltshowthebattery's
percentage.
Charge
if
under100%
NOTE:
Internal
battery's
percentage
is mostaccurate
whenthePortable
Power
950hasbeendisconnected
fromalldevices
andcharging
sources
for1-24hours.
3.2 Tocharge,
plugthe(external)
wallcharger
cordintothesocket
onthe
backofthe950.Then,plugthewallcharger
intoa 120VAC
source.
CAUTION:
Operating
thePortable
Power
950whiletheinternal
battery
is
beingcharged
maycausepermanent
damage
totheunit.
3.3 Whilethe950ischarging,
thebattery's
percentage
ofcharge
willbe
displayed.
Whentheinternal
battery
isfullycharged,
thedisplay
wiltshow
100.Complete
charging
maytakeupto48hours.The950isthenready
touse.
3.4 Oncethebatteryisfullycharged,
theinternal
charging
circuitry
automaticallyswitches
tofloat-mode
monitoring,
whichkeepsthebattery
fully
charged
without
overcharging.
Theinternal
batterymayalsobecharged
whileyoudriveusingthemaleto-male
accessory
cable(available
separately,
see"Accessories
andReplacement
Parts"
section
ofthismanual).
Insertoneendoftheaccessory
cableintothe12VDCpoweroutletandtheotherendintothevehicle's
accessory
outlet(lighter
socket).
Completely
disconnect
theaccessory
cablewhentheengine
isnotrunning.
Useinawell-ventilated
area.Keephands,
hair,clothing
andjewelryclear
offanblades,
belts,pulleys
andotherpartsthatmaycause
injury.
4.1 Turnignition
offbeforemaking
cableconnections.
4.2 Place
the950onaflat,stable
surface
nearthevehicle
battery
andaway
frommoving
engine
parts.
4.3 Connect
theredclamp
tothepositive
(+)terminal
d the vehicle battery.
NOTE: In the rare case of jump-starting a vehicle that has a positivegrounded vehicle electrical system, connect the black clamp to the
negative terminal of the vehicle battery. Then connect the red clamp to
an unpainted and unmoving part of the vehicle chassis or engine block. If
you are unsure of the nature of the vehicle's electrical grounding system,
check the owner's manual of the vehicle or call the Customer Technical
Assistance number: 1-800-SEARS-64.
4.4
Connect the black clamp to an unpainted and unmoving part of the vehicle
chassis or engine block. Do not connect to the carburetor, fuel lines or
sheet-metal body parts. The Digital Display displays the vehicle's voltage.
.3.
CAUTION:
Ifyouhaveconnected
theclamps
backwards,
anaudioalarm
willsound.
DONOTturntheON/OFF
switchtotheONposition.
Thiscould
causeserious
damage.
Reverse
theconnections
andtheaudioalarmwilt
stop.
4.5 TurnONtheJUMPSTART
ON/OFF
switchandthenturnkeyandcrank
theengine.
Iftheengine
doesnotstartwithin5-8seconds,
stopcranking
andwaitatleast1 minute
before
attempting
tostartvehicle
again.This
permits
thebattery
tocooldown.
4.6 Aftertheengine
starts,makesuretoturnOFFtheJumpStartswitch.
Thendisconnect
theblackclamp(-)andthentheredclamp(+)inthat
order.
4.7 Recharge
the950assoonaspossible
afteruse.
CAUTION:
Toprevent
sparking
whilethe950jumpstartswitchisinthe
ONposition,
NEVER
allowtheclamps
totouchtogether
ortocontact
the
samepieceofmetal.Never
attempt
tocharge
afrozenbattery.
5.1 Tocheckthe950'sinternal
battery
status,
pushthePOWER
switch
onthe
frontofthe950totheDISPLAY
position.
Thedisplay
wiltshowthecharge
percentage
oftheinternal
battery.
5.2 Whenconnected
tothevehicle,
thedisplay
shows
thevehicle's
battery
voltage.
Whenconnected
andintheONposition,
thedisplay
shows
the
equalized
voltage
between
thevehicle's
battery
andinternal
battery.
If
thedisplay
button
ispressed,
thebattery
percentage
isshown
(instead
of
voltage).
ThePortable
Power
950isa power
source
forall12voltDCaccessories
thatareequipped
witha 12Vaccessory
plug.TheDCaccessory
outlet
hasa 15-amp
automatic
overload
protection
circuitbreaker.
Thebreaker
wiltautomatically
resetafteranoverload
occurs.
6.1
To Operate
a 12V DC Device:
• Open the protective cover of the DC power outlet on the front panel of the
Portable Power 950.
• Plug the 12V DC device into the DC power outlet, and turn the 12V DC
device "ON" (if required).
If the 12V DC device draws more than 15A, the internal circuit breaker of
the Portable Power 950 wilt momentarily disconnect power to the device.
If this occurs, unplug the device and the circuit breaker will automatically
reset after several seconds.
• The DC power outlet is internally wired directly to the internal battery.
Extended operation of a 12V DC device may result in excessive battery
drain. Recharge immediately after unplugging the device.
.4.
12V DC Electrical
Device
Appliance
Type
Fluorescent
Lights, Cellular
Radios,
Electrical
Electric
Phones
Fans
DVD Players,
Spotlights
Tools, Bilge Pumps
Coolers
Air Compressors,
Chart
Estimated
Depth Finders,
Camcorders,
Run=Time
Car Vacuums
Power
Estimated
Time*
4 Watts
40 Hours
9 Watts
21 Hours
15 Watts
12 Hours
24 Watts
7 Hours
48 Watts
3 Hours
80 Watts
1.5 Hour
*NOTE: Estimated run-times. Actual time may vary. Times are based on
the internal battery being new, fully charged and operated at room temperature.
The USB port on the 950 provides up to 500mA at 5VDC
7.1
Turn the JUMP START ON/OFF switch to the ON position.
7.2
Plug the device into the USB port on the front panel of the 950.
7.3
Turn USB device ON.
7.4
Reverse these steps when finished using the USB port.
8.1
Position the 950 on a flat, stable surface near the intended work area.
8.2
Push the power switch to the LIGHT position. The light will turn on and
illuminate your work area.
NOTE: With a fully charged internal battery, the built-in light should provide 18 to 30 hours of continuous, useful light.
8.3
Push power switch to the OFF position when work is completed.
8.4
Charge the 950 as soon as possible after using the buitt-in light.
The 950 is equipped with a built in door, located on the back of the unit, to
make replacing the internal battery easy and efficient.
To order a replacement battery, call: 1-800-SEARS-64
9.1
Be sure that all switches are in the OFF position.
9.2
Remove clamps from storage pegs on the back of the 950.
9.3
Remove eight screws from the door.
9.4
Slide door out.
.5.
9.5
Remove the negative (first) and positive nuts and bolts securing the cable
to the battery.
9.6
Push cables to the side and carefully slide battery out of the 950.
9.7
Reverse steps for assembly. Make sure that the nuts and bolts securing
the cables are tight.
IMPORTANT:
CHARGE IMMEDIATELY AFTER PURCHASE
KEEP FULLY CHARGED.
Charge the 950 internal battery immediately upon purchase, every 30
days and after every use.
All batteries are affected by temperature. The ideal storage temperature is
between 40 and 70 degrees Fahrenheit. The internal battery will gradually
self-discharge (lose power) over time, and more quickly in warm environments. Leaving the battery in a discharged state may result in permanent
battery damage. To ensure satisfactory performance and avoid permanent
damage, charge the internal battery every month.
When the JUMP START ON/OFF switch is ON, the clamps are live and
will produce arcing or sparking if they come in contact with each other. To
prevent accidental arcing, always keep the clamps on the storage holders
and the JUMP START ON/OFF switch in the OFF position when not using
it to jump start a vehicle.
10.1
Replacing
the built-in
light
To replace the built-in light bulb:
1. Turn the light off.
2. Insert a standard (flat-blade) screwdriver into one of the two slots along
the bottom of the plastic tens and GENTLY pop the tens out. Repeat for
the other side.
3. Insert a replacement bulb of the same type and rating, and twist clockwise one quarter-turn to screw in the new bulb.
4. Replace the tens cover.
5. Test the light by switching the light on and off.
10.2
Customer Technical Assistance
Customer technical assistance is available Monday-Friday,
pm Central Time by phoning 1-800-SEARS-64.
,6,
7 am to 4:30
Internal Battery Type
DieHard Maintenance-free
Nominal Voltage
12v DC
Capacity
AGM Lead-acid
18 Ah
DC Power Outlet (Max. Continuous
Load)
15A With Automatic
Circuit Breaker Reset
Built-in Light Bulb (Replaceable)
5w/12v DC (Base type BA9S)
Jumper Cables
4-gauge AWG, 24 Inches
Dimensions (H xW x D)
12 H x 11 x 10.5 Inches
Product Weight
18.9 Lbs.
Parts and customer technical assistance is available Monday-Friday,
to 4:30 pm Central Time at 1-800-SEARS-64.
7 am
Male-to-Male Accessory Cable: 38-99-000834 (Use for charging Portable Power 950 from a vehicle's 12V accessory outlet.)
Replacement
Light Bulb: 0000000722
Lens Cover: 3799003820
Wall Charger: 93026687
Replacement
Battery
Kit: 2299001765
.7.