1
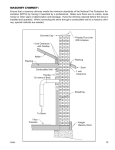
Operation LIGHTING INSTRUCTIONS CAUTION: DO NOT USE CHEMICALS OR FLUIDS TO START THE FIRE HOT WHILE IN OPERATION. KEEP CHILDREN, CLOTHING AND FURNITURE AWAY. CONTACT MAY CAUSE SKIN BURNS. Before lighting your heater for the first time, make sure that all items are out of the hopper, ash pan and firebox area. Press the “On” button and allow your heater to run for at least 4 minutes, to check for proper operation. Once your heater is started, you will notice that the draft fan starts immediately. If you press the “Heat Setting” button up, you will increase the heat setting as well as the draft fan speed. After 3 minutes, the auger and agitator will start rotating. Note: The room fans will not operate until your furnace reaches preset operating temperatures. If proper operation of your heater is confirmed, you can add fuel to the hopper and allow the auger to purge the fuel to the firepot. DAILY OPERATION The hopper and furnace top will be hot during operation; therefore, you should always use some type of hand protection when refueling your furnace. Never place your hand near the auger while the furnace is in operation. In the event of a power outage, the furnace will not function. It is very important that unit be vented properly, as the natural draft is needed to clear the smoke from the furnace during a power outage. In case of power outage, remove any installed air filters from the duct system. This will help circulate air through your system and not overheat the appliance. If the unit was “ON” when the power outage occurred, one of the following will take place when power is restored: START-UP PROCEDURE 1.) If the furnace is still warm, it will resume feeding fuel and continue to operate normally. If the fire has gone out, you will have to press the “OFF” button and then the “ON” button again to begin a new start-up sequence. • Turn the Heater to the “OFF” position and place a small handful of wood pellets or fire starting pellets (Pellets that already contain fire starter) in the firepot. 2.) If the furnace has cooled-off, it will reset to its “OFF” condition. At this point, you may press the “ON” button to begin a new start-up sequence. NOTE: Even if you are burning corn or other fuels in your unit, wood pellets make an excellent source of starter fuel. Corn can be very difficult to properly ignite. • Squirt only a small amount of fire starter gel on top of the wood pellets (NOT necessary if using fire starting pellets). • Light the fire starter and wait approx. 1-minute for it to start actively burning. • Press the “On” button, adjust the heat range to read “Cr-3” or “Pr-3” depending on fuel setting. Pull the damper out approximately 1 inch. This will automatically match your feed rate with the proper combustion air. As you increase the heat setting, your feed rate and combustion air increase together. Once the unit reaches operating temperature, you may reduce the heat setting. • Three minutes after turning the stove “On”, the auger will begin feeding fuel into the firepot along with the agitator turning. You should have the starting fuel completely burning in the firepot as the agitator rotates. NOTE: If the starting fuel is not burning hot enough, you may see the fire begin to go out as new fuel is being added. If this occurs, pressing the “Auger Delay” button will allow the auger to pause for 1 minute. Pressing the “ON” button will resume the auger if 1 min. is too long. If not enough fuel is the reason for not burning, pressing and holding the “ON” button will allow the auger to run continuously until you release the button. • Once the fuel starts burning aggressively, you can adjust the heat setting to your desired range. Make sure that you pull the damper out approximately 1 inch. It may need to be pulled out more for higher heat settings. Try opening a 1/4 inch at a time. NOTE: The unit will also shut down in the event of an draft fan failure; if this is the case, the unit will not re-start and you must contact Customer Service at (800) 750-2723. safety and Convenience features Your King incorporates a safety pressure switch that helps ensure proper operating conditions before feeding fuel to the burn pot. Because the furnace works using an induced draft pressure, the furnace will not continue to operate if the viewing door is left open, if the draft fan fails or if the exhaust system is blocked. The temperature limit control will prevent your furnace from operating at abnormally high temperatures. Should the furnace temperature begin to approach the factory pre-set limit, the temperature limit control will automatically slow down the auger feed rate until the temperature returns to a normal condition. Both room air fans will also operate at full speed until the furnace returns to normal operating temperatures. If your furnace continues to cut back because it is reaching the temperature limits, reduce the “heat setting” to the next lower setting. Maintenance Failure to clean and maintain this unit as indicated can result in poor performance and safety hazards. • As you begin to have better understanding of how the heater operates and the amount of heat you require, you can adjust the heat settings up or down to your satisfaction. Unplug your stove’s electrical cord prior to removing the back panel or opening the exhaust system for any inspection, cleaning, or maintenance work. • Never use gasoline, gasoline-type lantern fuel, kerosene, charcoal lighter fluid, or similar liquids to start or “freshen up” a fire in this heater. Keep all such liquids well away from the heater while it is in use. Never perform any inspections, cleaning, or maintenance on a hot furnace. • Overfire Protection - If the heater is being overfired, (burned too hot), the heater will automatically shutdown to avoid damage to components in the heater. Refer to “Lighting Instructions” for proper use. SHUT-DOWN PROCEDURE WARNING: Never shut down this unit by unplugging it from the power source. Press the “OFF” button on the control panel to put the furnace in shut down mode. At this time, the red light above the “OFF” button will illuminate. Once this is done, the auger will stop feeding fuel, but the room air fan(s) and draft fan will continue to operate. When the internal temperature of the unit drops below the factory preset temperatures, the room air fans and draft fan will cease to operate. The red light will then shut off and the unit will be completely shut down. Never shut down this unit by unplugging it from the power source. Doing so can cause damage to the appliance or cause a fire. The hotter the unit is during its operation, the longer it will take for the furnace to complete the shut down cycle. If the furnace stays on for more than 2 hours after pressing the “OFF” button and you are 100% sure that the fire is out, the furnace can be unplugged from the outlet. After approximately 10 seconds, the unit can be re-connected to the power source and the control board will be reset. 14USSC Do not operate furnace with broken glass , leakage of flue gas may result. Establish a routine for the storage of fuel, care of the appliance, and firing techniques. Check daily for creosote buildup until experience shows how often cleaning is necessary. Exhaust System The by products of combustion contain small particles of fly ash. Fly ash will collect in the exhaust venting system and restrict the flow of flue gases. Incomplete combustion during startup, shutdown, and/or incorrect operation of the furnace can lead to soot formation which will collect in the exhaust system. Therefore, it is important that the exhaust system be inspected and cleaned at least monthly during the burning season. Be aware that the hotter the fire, the less creosote is deposited, and that weekly cleaning can be necessary in mild weather, even though monthly cleanings can be enough in the coldest months. Check the clean out tees periodically to determine the required cleaning schedule. 3 or 4-inch chimney brushes are available for chimney cleaning. If the exhaust system or outside air pipes have screens on them, frequently clean the screen. A plugged or partially plugged screen will reduce combustion air and cause a fire to die or burn poorly. USSC15 Maintenance Parts Diagram Interior Chambers 64 6 Open the Ash Cleanouts and scrap all ash into the ash pan. Open the damper and allow the ashes to fall into the ash pan. The damper may need to be slid in and out several times to clear any ash build-up. This may need to be done daily depending on fuel consumption. Be sure the ash cleanouts located on either side of the damper are completely closed before operating. 62 7 32 Periodically remove and clean the burnpot and the area inside the burnpot housing. In particular it is advisable to clean out the holes in the burnpot to remove any build up that may prevent air from moving through the burn pot freely. Placing the Burnpot and the Agitator in a bucket of water and allowing it to soak will help with the removal of clinker build-up. 13 Remove the two cleanout slides on each side of the burnpot at the rear of the burn chamber to clean out all ash. 50 9 30 18 23 11 4 Check and Clean the Hopper 57 52 28 25 49 21 26 Also, be careful not to damage the gaskets on the backside of the cleanouts on the front of the unit. If gaskets become torn or damaged, they must be replaced. 61 12 65 Inspect the main door and glass window gaskets periodically. The main door may need to be removed to have frayed, broken, or compacted gaskets replaced by your Authorized “King” Dealer. 29 28 46 48 37 34 FALL START UP 16 17 20 We recommend using a high quality glass cleaner. Should a build up of creosote or carbon accumulate, you may wish to use 000 steel wool and water to clean the glass. In the event you need to replace the glass, only high temperature ceramic glass of the correct size and thickness may be used. Contact your Authorized “King” Dealer to obtain this glass. 33 38 40 60 43 2 SPRING SHUTDOWN 27 36 42 After the last burn in the spring, remove any remaining fuel from the hopper and the auger feed system. Scoop out the fuel and then run the auger until the hopper is empty and fuel stops flowing (this can be done by pressing the “ON” button with the viewing door open). Vacuum out the hopper. Thoroughly clean the burnpot, and firebox. It may be desirable to spray the inside of the cleaned hopper with an aerosol silicone spray if your furnace is in a high humidity area. The exhaust system should be thoroughly cleaned. 47 45 GLASS Prior to starting the first fire of the heating season, check the outside area around the exhaust and air intake systems for obstructions. Clean and remove any fly ash from the exhaust venting system. Clean any screens on the exhaust system and on the outside air intake pipe. Turn all of the controls on and make sure that they are working properly. This is also a good time to give the entire furnace a good cleaning throughout. 1 44 35 Painted Surfaces 41 50 Replace the customer supplied air filter on the back of the furnace on a regular basis if installed. Painted surfaces may be wiped down with a damp cloth. If scratches appear, or you wish to renew your paint, contact your Authorized “KING” Dealer to obtain a can of suitable high-temperature paint. 28 29 16 53 26 FAN Motors Clean the air holes on the motors of both the draft fan and room air fans annually. Remove the draft fan from the exhaust duct and clean out the internal fan blades as part of your fall start-up. A new gasket may be purchased from United States Stove’s Parts Department. 54 Gaskets 58 56 51 24 39 Check the hopper periodically to determine if there is any fuel or fuel matter that is sticking to the hopper surface. Clean as needed. 10 63 19 31 29 Ashes should be placed in a steel container with a tight fitting lid. The closed container of ashes should be placed on a noncombustible floor or on the ground, well away from all combustible materials, pending final disposal. If the ashes are disposed of by burial in soil or otherwise locally dispersed, they should be retained in the closed container until all cinders have been thoroughly cooled. 22 Ash Disposal 8 If a vacuum is used to clean your furnace, we suggest using a vacuum designed for ash removal. Some regular vacuum cleaner (i.e. shop vacs) may leak ash into the room. 59 3 Remove the exhaust clean out plate located behind the ash pan and clean the exhaust duct of all ash. YEARLY SERVICING 16USSC 5 CAUTION! CLEANOUT OF THE HEAT EXCHANGER, FLUE PIPE, CHIMNEY, AND DRAFT FAN IS ESPECIALLY IMPORTANT AT THE END OF EACH HEATING SEASON TO MINIMIZE CORROSION DURING THE SUMMER MONTHS. A yearly inspection, servicing and cleaning by your Authorized “King” Dealer or a qualified person is recommended. A fee may be charged for this service. USSC17 Parts List Key Part No. Description Qty. Key Wiring Diagram Amendment Part No. Description Qty. 1 23786 Door Latch (C000022) 1 34 891331 Spring Handle-Brushed Nickel 1 2 24179 Feed Door Handle 1 35 891364 Hearth Plate 1 3 25427 Retainer, Agitator Motor 1 36 891374 Access Panel, Plenum 1 4 40501 Agitator, Cast 1 37 891423 Pin, Door Hinge 2 5 69679 Assembly, Feed Door (Blank) 1 38 891445 Ash Pan Assembly 1 6 80461 Power Supply Cord 1 39 891455 Weldment, Burnpot 1 7 80462 Receptacle, 3 Prong 1 40 891461 Cover, Exhaust Cleanout 1 8 80488 Drive Motor (1.5 RPM CCW) 1 41 891471 Lid Weldment 1 9 80495 120 CFM Blower Assembly 1 42 891440 Cleanout, Ash 2 10 80530 Blower, Room 800CFM 2 43 891262 Baffle 1 11 80531 RTD, Platinum 1 44 891457 Cleanout, Ash Lower 2 12 80549 Pressure Switch 1 45 891485 Weldment-Damper 1 13 80554 Assembly, Controller PCB 1 46 89586 Auger Nipple 1 14 80616 Wiring Harness, Main 1 47 80501 Thermistor, Long Lead 1 15 80617 Wiring Harness, Room Blowers 1 48 892066 Top Cover Weldment 1 16 83045A Washer, 3/8”ID x 7/8” OD x 1/16” THK 2 49 25496 Cover, Auger 1 17 83274 3/8-16 Lk Nut, Black 2 50 891338 Assembly, Mounting Bracket, Lid Switch 1 18 83529 Hairpin 1 51 25495 Bracket, Drive Motor 1 19 83533 Roll Pin 1/8” Diameter x 7/8” 1 52 891189 Plate, Top Bushing 1 20 83551 1/4-20 Wing Nut, Brass 2 53 80529 Auger Motor 1 21 83564 Clamp, Hose-1/2, Self-Compen. 2 54 891141 Auger 1 22 86620 Agitator Drive Shaft 1 55 891164 Weldment, Auger Housing 1 23 88111 Gasket, Agitator Bracket 1 56 891190 Plate, Bottom Bushing 1 24 88123 Gasket, Blower 120CFM 1 57 891169 Hose, Heater 2 25 88127 Blower Gasket 2 58 891248 Weld., Bot. Plate Retainer 1 26 891121 Hose, Silicone 2 59 892079 Side Panel, Left 1 27 891135 Handle, Spring (LG-Nickel) 1 60 892080 Side Panel, Right 1 28 891187 Bracket, Pressure Switch/PCB 1 61 892081 Transition, Exhaust Duct 1 29 25422M Mounting Bracket for 3/4” Bushing 1 62 892084 Access Panel, Back 1 30 83534 Retaining Ring 3 63 892086 Blower Mount 1 31 891132 Agitator Bushing 3 64 892087 Access Panel, Blower 1 32 891284 Access Panel, Agitator Motor 1 65 89603 Brass Connector 1 33 891296 Transition Duct, 10” Round 1 To order repair parts, you may visit the U. S. Stove website or call (800) 750-2723 18USSC USSC19 Trouble Shooting Error Codes Disconnect the power cord before performing any maintenance! NOTE: Turning the ON/OFF Switch to ”OFF” does not disconnect all power to the electrical components of the furnace. Below is a chart describing the Error Codes that might be displayed if an error occurs with your furnace. Error Code Error Description Possible Causes Err1 The high limit temperature sensor has tripped. • • • • Inadequate ventilation. Room fan failure. Exhaust Blockage. Electrical Open in the over temperature switch or wiring. Err2 Furnace ran out of fuel during normal operation. • • • • Hopper Empty. Auger output failure or jam. Flame of fuel quality caused fire to burn too slowly or go out. Electrical Open in low temperature switch or wiring. Err3 The furnace was unable to reach the Room Fan On temperature within the startup time. • Flame or Fuel quality caused the fire to burn too slowly or go out. • Auger output failure or jam Hopper empty on startup. • Hopper is empty, refill the hopper. Err4 • Loss of draft pressure. Make sure that the viewing door is closed and sealed properly. Check that all outside connections are clear of any obstructions. Check the exhaust system; clean as needed. The power failed while the furnace was hot, and when power was restored, the fire was out. • Electrical Open in low temperature switch or wiring. • Power loss • Electrical Open in low temperature switch or wiring. Err5 The Auger output fuse has blown. • Auger motor jammed or bad. • Check that the pressure switch connection to the firebox is free of ash or clear of obstructions. Err6 The Agitator output fuse has blown. • Agitator motor jammed or bad. Err7 The Draft Fan (Exhaust Fan) output fuse has blown. • Draft Fan motor jammed or bad. Err8 The Room Fan blower output fuse has blown. • Room fan motor jammed or bad. Never try to repair or replace any part of the furnace unless instructions for doing so are given in this manual. All other work should be done by a trained technician. PROBLEMCAUSE: Too rich air/fuel mixture Orange, lazy flame, excessive fuel • Clean out the burnpot and burnpot housing build-up in the burnpot • Adjust the air damper on the front of the furnace to an open position. • Make sure that the viewing door is closed and sealed properly. If not, check door gasket.. • Check that all outside connections are clear of any obstructions. • Check the exhaust system; clean as needed. PROBLEMCAUSE: Burnpot burns out of fuel Fire goes out or furnace shuts down. • Auger system is jammed or there is a “bridging” of the fuel in the hopper, preventing fuel from flowing into the auger feed system. • Stove may be shutting down due to an over temperature condition. PROBLEMCAUSE: Not enough combustion air; Fuel has too much moisture. Viewing window becoming black • Adjust the air damper to a more open position. shortly after start-up. • Use a fuel with less moisture content PROBLEMCAUSE: Not enough combustion air; Fuel has too much moisture. “Black Popcorn” is present in the burn chamber. • Adjust the air damper to a more open position. • Use a fuel with less moisture content • Stove might be cycling excessively due to temperature cut backs. • Reduce heat setting PROBLEMCAUSE: Chemical reaction between the starch in corn and the heat. “Clinkers” form in burnpot. • Add calcium carbonate (aka chicken scratch or oyster shell). • Adjust air mixture • Use corn with less moisture or starch. PROBLEMCAUSE: Unit is reaching the “Almost Over-temp” preset. Unit cycles up and down when on the “HIGH” heat setting. • Adjust the heat range to lower setting. • Fuel burns hot causing the furnace to cycle between high setting and lower settings. Flashing Indicators Several situations or events are indicated in normal operation by blinking display indicators or segments in the display: Flashing On Indicator : This means that the furnace is in the “Lighting” state waiting for either a 3 minute timeout to begin burning or for the furnace to reach the pre-set temperature whichever comes first. Flashing Off Indicator : This indicates that the furnace is in the “Shutdown” state waiting for the OFF button, or for a 15 minute period after the furnace was turned off, or for the furnace to cool down, or for the door to be closed. Flashing dash “-“ in Heat Range Display : This indicates that the furnace is in the normal run mode and is ramping from the current heat range setting to the target heat range setting. Once the ramp is complete, the “-“ will stop flashing. For ramping from heat range 1 to 3, the default time is 90 seconds between internal settings. Flashing Automatic Mode Indicator : This indicates that the furnace is in normal operation and is running in the automatic mode. However, either the Draft Fan or Auxiliary setting is manually configured. Flashing Draft Fan Setting Indicator : This indicates that the furnace is in normal operation and that the vacuum sensor detects a loss of pressure either because the door is open or because there is a negative pressure in the room with respect to the exhaust. Flashing Heat Range Setting Indicator : This indicates that the furnace is in normal operation and that an overtemperature condition exists causing the fuel to stop. Flashing Auger Delay Indicator : This indicates that th e furnace is in normal operation and that the hopper lid is open. PROBLEMCAUSE: Corn is wet or it has a very high moisture content. Corn builds up and is not burning completely. Steam is coming from the corn. • Use corn with a moisture content of 11% or less for best results. 20USSC USSC21 This manual will help you obtain efficient, dependable service from your KING OR ASHLEY, and enable you to order repair parts correctly. CUT HERE " How to order repair parts WARRANTY INFORMATION CARD Name__________________________________________ Telephone #: (_____)_____________ City____________________________________________ State_______ Zip_________________ Email Address __________________________________________________________________ Model # of Unit________________________________ Serial #___________________________ Keep this manual in a safe place for future reference. Fuel Type: qWood When writing, always give the full model number which is on the nameplate attached to the heater. qCoal qPellet qGas qOther _________________________ Place of Purchase (Retailer)______________________________________________________ City____________________________________________ State_______ Zip_________________ If internet purchase, please list website address___________________________________ When ordering repair parts, always give the following information as shown in this list: Date of Purchase _______________________________________________________________ 1. The part number Reason for Purchase: 2. The part description 3. The model number: 8500 What was the determining factor for purchasing your new appliance?_______ 4. The serial number:____________________ qDecoration qAlternative Heat qCost qMain Heat Source qOther _________________________ I have read the owner’s manual that accompanies this unit and fully understand the: Installation q Operation q and Maintenance q of my new appliance. Print Name Signature Date Please attach a copy of your purchase receipt. Warranty not valid without a Proof of Purchase. Warranty information must be received within 30 days of original purchase. CUT HERE United States Stove Company 227 Industrial Park Road P.O. Box 151 South Pittsburg, TN 37380 (800) 750-2723 " WWW.USSTOVE.COM 22USSC Detach this page from this manual, fold in half with this page to the inside and tape together. Apply a stamp and mail to the address provided. You may use an envelope if you choose. You may register online by going to www.usstove.com All information submitted will be kept strictly confidential. Information provided will not be sold for advertising purposes. Contact information will be used solely for the purpose of product notifications. USSC23 CUT HERE " Ê Fold Here Fold Here É Place Stamp Here " CUT HERE United States Stove Company P.O. Box 151 South Pittsburg, TN 37380 24USSC