1
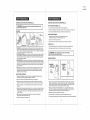
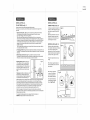
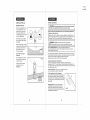
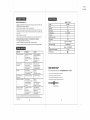
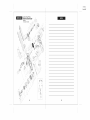
Operator's IVlanual
CRRFrSMNH °
15 Amp/4.0 Peak HP Motor
lectri
Model No.
172.34120
18-in.
Chain
Bar
CAUTION:
Read, understand and follow all
Safety Rules and Operating Instructions in this
Manual before using this product.
Sears Brands Management Corporation,
Hoffman Estates, IL 60179
See the full line of Craftsman ®products
at craftsman,corn
•
•
•
•
•
•
•
•
WARRANTY
SAFETY
UNPACKING
ASSEMBLY
OPERATION
MAINTENANCE
PARTS LIST
ESPAI_OL
3/14/12
Final ART
Warranty ............................................................................................
Safety Symbols ...................................................................................
Safety Instructions ................................................................................
Unpacking ........................................................................................
Description .........................................................................................
Page
Page
Pages
Page
Pages
Assembly and Adjustments ..................................................................
Operation Terms....................................................................................
Operation ..............................................................................................
Pages 16 - 18
Pages 19
Pages 20 - 28
Maintenance/Trouble Shooting ...............................................................
Specifications .........................................................................................
Parts Lists ............................................................................................
Pages 29 - 30
Pages 31
Pages 32 - 34
CRAFTSMAN®
2
3
4 - 13
13
14 - 15
TWO YEAR FULL WARRANTY
For warranty coverage details or to obtain free replacement,
visit the web site: www.craftsman.com
SYMBOL SIGNAL MEANING
,_ SAFETY ALERT SYMBOL: Indicates DANGER, WARNING, OR
CAUTION. May be used in conjunction with other symbols or pictographs.
&
,_, WARNING: Indicates a hazardous situation which, if not avoided, could
result in death or serious injury. Always follow the safety precautions to
reduce the risk of fire, electric shock, and personal injury.
parts that
This warranty is void if this product is ever used while providing commercial
or if rented to another person.
services
,_ CAUTION: Indicates a hazardous situation which, if not avoided, could
result in minor or moderate injury.
This warranty gives you specific legal rights, and you may also have other rights
which vary from state to state.
Sears Brands Management
,_ WARNING: Be sure to read and understand all safety instructions in this
manual, including all safety alert symbols such as "DANGER,"
"WARNING," and "CAUTION" before using this rotary tool. Failure to follow
all instructions listed in this manual may result in electric shock, fire and/or
serious personal injury.
,_ DANGER: Indicates a hazardous situation which, if not avoided, will
result in death or serious injury. This signal word is to be limited to the most
extreme situations. Always follow the safety precautions to reduce the risk of
fire, electric shock, and personal injury.
FOR TWO YEARS from the date of purchase, this product is warranted against any
defects in material or workmanship. Defective product will be replaced free of charge.
This warranty does not cover the bar and chain, which are expendable
can wear out from normal use within the warranty period.
The purpose of safety symbols is to attract your attention to possible
dangers. The safety symbols and the explanations with them deserve your
careful attention and understanding. The symbol warnings do not, by
themselves, eliminate any danger. The instructions and warnings they give
are no substitutes for proper accident prevention measures.
Corporation, Hoffman Estates, IL 60179
NOTE:
do
not forget
Chain toand
purchase
Bar Oil Craftsman
is not included.
Bar &BEFORE
Chain Oil,using
SAE30.
this Chain Saw,
]
Damage Prevention and Information Messages
These inform the user of important information and/or instructions that could
lead to equipment or other property damage if they are not followed. Each
message is preceded by the word "NOTE," as in the example below:
NOTE: Equipment and/or property damage may result if these instructions
are not followed.
,_ WARNING: To ensure safety and reliability, all repairs
should be performed by a qualified service technician.
contains
chemicals
known to the State of California
to cause cancer and birth
i defects
Z_ WARNING:
Some dust created
by using lawn and garden power tools
or other reproductive
harm.
SAVE THESE INSTRUCTIONS!
READ ALL iNSTRUCTiONS!
2
i
,_ WARNING: The operation of any power tools can
result in foreign objects being thrown into your eyes,
which can result in severe eye damage. Before beginning
power tool operation, always wear safety goggles or
safety glasses with side shield and a full face shield when needed. We
recommend a Wide Vision Safety Mask for use over eyeglasses or standard
safety glasses with side shields. Always use eye protection which is marked
to comply with ANSI Z87.1 shields.
3
3/I 4/I 2
Final ART
•
Heartng
/-----
Safety Helmet
Protection
Protection
z_ WARNING
: if correctly used, this electric Chain Saw is an efficient tool to use;
if used improperly or without the due precautions it could become a dangerous tool.
For pleasant and safe work, ALWAYS strictly comply with the safety rules that are
contained in this manual
Z_ WARNING:
BE SURE to read and understand all instructions in this manual
before using this electric Chain Saw. Failure to follow aU instructions listed below
may result in electric shock, fire and!or serious personal injury.
A WARNING:
To avoid mistakes that could cause serious injury, DO NOT
connect the Chain Saw to the power source until the following instructions have been
read and understood.
WORK
AREA
SAFETY
WARNING:
Consider the work area environment. Use extreme caution
when cutting small size brush and saplings because the slender material may catch
the saw chain and be whipped toward you or pull you off balance. DO NOT operate
a chain saw in a tree unless specifically trained to do so. When cutting a limb that is
under tension be alert for spring back so that you wilt not be struck when the tension
in the wood fibers is released.
1. ALWAYS avoid dangerous conditions. DO NOT use in wet, damp areas or expose to rain.
2. DO NOT operate in the presence of flammable liquids, gases, or dust. Electric
tools create sparks which may ignite dust or fumes.
3. ALWAYS keep bystanders and visitors at a safe distance while operating
this Chain Saw. NEVER allow children or pets near the tool. Flying objects can
injure anyone in the area.
4. CHILDPROOF your tools with padlocks and master switches. Lock tools away when
not in use. This Chain Saw is not a toy.
5. DO NOT use the Chain Saw without adequate lighting. ALWAYS make sure that you
can see what you are cutting.
6. BEFORE using the Chain Saw, remove any debris or objects that could be entangled
in or thrown by the Chain Saw.
PERSONAL
SAFETY
OBJECTS BEING THROWN, which can result in personal injury or property
damage. ALWAYS use proper safety equipment.
1. KNOW your toot. Read the operator's manual carefully. Learn the electric Chain Saw's
applications and limitations, as well as the specific potential hazards related to this tool.
2. STAY ALERT, watch what you are doing and use common sense when operating this tool.
3. DO NOT use tool while tired or under the influence of drugs, alcohol or medication.
A moment of inattention while operating this tool may result in serious personal injury.
4. DRESS PROPERLY, USE SAFETY EQUIPMENT. Always wear safety goggles with side
shields (non-fogging and vented) or full face shield, proper work shoes, steel-toe with
rubber non-slip soles, heavy-duty non-slip rubber gloves, dust mask or respirator and
hearing protection. Regular users should have hearing checked regularly, as chain saw
noise can damage hearing. Wear tong protective pants and tong sleeves to protect arms
and legs.
4
PERSONAL
SAFETY
cont.
4. (cont.) DO NOT wear loose clothing or jewelry.
Keep your hair, clothing, and gloves away from
moving parts. Loose clothing or long hair can be
caught in moving parts.
5. DO NOT overreach. Keep proper footing and
balance at all times. Proper footing and balance
enables better control of the tool in unexpected
situations.
6. Keep all parts of the body away from the saw
chain when the motor is operating.
TOOL
USE AND CARE
Eye
Snug Fitting
Clothing _
f,,_,_[r"_
_---/t %
}
/11
Safety Shoes _
I:
_
_
Protection
Heavy Duty
yes
fety Chaps
SAFETY
this tool. Failure
totofollow
all
listed
below may before
result in
i operating
_ WARNING:
SURE
readpersonal
andinstructions
understand
all instructions
electric
shock, fire BE
and/or
serious
injury.
1. DO NOT use the tool if switch does not turn it "On" or "Off". Any tool that cannot be
controlled with the switch is dangerous and must be repaired.
2. DISCONNECT the plug from the power source before making any adjustments or storing
the tool. Such preventive safety measures reduce the risk of starting the toot accidentally.
3. STORE idle tools out of the reach of children and other untrained persons. Children
MUST NOT operate the tool. Tools are dangerous in the hands of untrained users.
4. MAINTAIN tools with care. ALWAYS keep cutting tools clean and in good working order.
5. CHECK for misalignment or binding of moving parts, breakage of parts, and any other
condition that may affect the tool's operation. If damaged, have the toot serviced
before using. Many accidents are caused by poorly maintained tools.
6. USE ONLY chains that are recommended for this Chain Saw. Chains that may be
suitable for one Chain Saw may become hazardous when used on another Chain Saw.
ELECTRiCAL
SAFETY
Z_ WARNING:
Do not permit fingers to touch the terminals
installing or removing the extension cord from the plug.
of plug when
• Double insulated tools are equipped with a polarized plug
(one blade is wider than the other and will require the use
of a polarized extension cord, The Chain Saw's plug will fit
into a polarized extension cord only one way. If the plug does
not fit fully into the extension cord, reverse the plug. If the plug
still does not fit, obtain a correct polarized extension cord.
A polarized extension cord will require the use of a polarized
walt outlet• This plug wilt fit into the polarized wall outlet only
one way. If the plug does not fit fully intothe wall outlet,
reverse the plug. If the plug still does not fit, contact a qualified
electrician to install the proper outlet• Do not change or alter
the equipment plug, extension cord receptacle, or extension cord plug in any way.
2. Double insulation [] eliminates the need for the three-wire grounded power cord and
grounded power supply system. Applicable only to Class Jl (double-insulated) tools.
This Chain Saw is a double insulated toot.
5
i
J
3/I 4/I 2
Final ART
ELECTRICAL
SAFETY cont.
Z_ WARNING:
GFCI (Ground Fault Circuit Interrupter) protection should be
provided on all circuits or outlets to be used for electric chain saws and
lawn and garden power tools. Receptacles are available having built-in GFCl
protection and should be used for this measure of protection.
SAFETY SYMBOLS FOR YOUR TOOL
The label on your tool may include the following symbols.
V ................ Volts
Double insulation DOES NOT take the place of normal safety
precautions when operating this tool.
A ................ Amps
Hz.............. Hertz
W ............... Watts
min ............ Minutes
Z_ WARNING:
"-4. ............ Alternating current
_:
.......... Direct current
z_ WARNING:
grounded
Guard against electric shock: Prevent body contact
surfaces. For example: metal pipes, wire fences.
with
3. BEFORE plugging in the tool, BE SURE that the outlet voltage supplied is within the voltage
marked on the tool's data plate. DO NOT use "AC only" rated tools with a DC power supply.
4. DO NOT expose tools to rain or wet conditions or use electric tools in wet or damp
locations. Water entering an electric tool will increase the risk of electric shock.
5. If operating an electric tool in damp locations is unavoidable, ALWAYS USE a
Ground Fault Circuit Interrupter to supply power to your tool. ALWAYS WEAR
electrician's rubber gloves and footwear in damp conditions,
no ............ No-load speed
.../rain ....... Revolutions or Strokes per minute
Z_ ............. Indicates danger, warning or caution.
It means attention! Your safety is
involved.
8. DO NOT abuse the extension cord. NEVER use the cord to carry the tool by or to
pull the plug from the outlet. Keep cord away from heat, oil, sharp edges or moving parts.
Replace damaged cords immediately. Damaged cords increase the risk of electric shock.
EXTENSION
Use a proper extension cord. ONLY use cords listed by Underwriters Laboratories (UL).
Other extension cords can cause a drop in line voltage, resulting in a loss of power
and overheating of tool.
For this tool an AWG (American Wire Gauge) size of a least 14-gauge is recommended
for an extension cord of 25-ft. or less in length. Use 12-gauge for an extension cord
of 50-ft. Extension cords 100-ft. or longer are not recommended,
Remember, a smaller wire gauge size has greater capacity than a larger number
(14-gauge wire has more capacity than 16-gauge wire; 12-gauge wire has more capacity
than 14-gauge). When in doubt use the smaller number.
When operating a power tool outdoors, use an outdoor extension cord marked "W-A" or "W'.
These cords are rated for outdoor use and reduce the risk of electric shock.
Z_ CAUTION:
Keep the extension cord clear of the work area. Position the
cord so that it will not get caught on bushes, hedges, tree trunks, lawnmowers
or other obstructions
while you are working with the Chain Saw.
Gloves with saw protection.
......... Boots with saw protection,
steel-toe cap and non-slip sole.
[_
......... operating
Do not usethe
one
handed
chain
saw. when
[_
......... Always use two hands when
operating the chain saw.
.......... Class
II construction,
Double-Insulation.
When servicing,
use only identical replacement parts.
........The chain saw kickback angle
is 10 °, with a chain stop.
......... Contact of the guide bar tip with
any object should be avoided.
(_
......... precautions
Read and follow
safety manual
in theallowner's
Failure to follow to instruction
could result in serious injury to user.
......... Correct Direction of Cutting-Teeth.
_/=_ ......... Chain Stop
o\(o)
SERVICE SAFETY
1.
CORDS
(_0
......... Tip contact may cause the guide
bar to move suddenly upward
and backwards, which may cause
serious injury to user.
6. When operating a power tool outside, ALWAYS use an outdoor extension cord marked
"W-A" or "W". these cords are rated for outdoor use and reduce the risk of electric shock.
7. INSPECT tool cords for damage. Have damaged tool cords repaired at a Sears Service
Center. BE SURE to stay constantly aware of the cord location and keep it well away
from the cutting blade.
......... Protective goggles/visor,
helmet & hearing protection.
If any part of this Chain Saw is missing or should break, bend, or fail in any way;
or should any electrical component fail to perform properly: SHUT OFF the
power switch and remove the power cord from the Chain Saw and have the missing,
damaged or failed parts replaced BEFORE resuming operation.
2. Tool service should be performed at a qualified service dealer or repair center.
Service or maintenance performed by unqualified personnel could result in a risk of injury.
3. When servicing a tool, use only identical replacement parts. Follow instructions
in the maintenance section of this manual. Use of unauthorized parts or failure to
follow maintenance instructions may create a risk of electric shock or injury.
SAFETY RULES FOR ELECTRIC CHAIN SAWS
1. KNOW your electric Chain Saw. Read operator's manual carefully. Learn the
applications and limitations, as well as the specific potential hazards related to this tool.
Following this rule will reduce the risk of electric shock, fire or serious injury.
2. DO NOT use the Chain Saw without adequate lighting. ALWAYS make sure that you can
see what you are cutting.
3. Use Chain Saw ONLY when wood is dry.
/_ WARNING:
Check extension cords before each use. If damaged replace
immediately. Never use tool with a damaged cord since touching the damaged
area could cause electrical shock, resulting in serious injury.
6
4. ALWAYS stand to the left of the Handle. Any debris thrown by the Chain Saw would be
coming from the Blade Guard area on the right of the Chain Saw.
3/14/12
Final ART
SAFETY RULES FOR ELECTRIC CHAIN SAWS cont.
SAFETY RULES FOR ELECTRIC CHAIN SAWS cont.
5. ALWAYS remove objects such as sticks and debris from the cutting path that could
become entangled in, or thrown by the Chain Saw.
6. MAINTAIN chain saw with care.
6. DO NOT start cutting until you have a clear work area, secure footing, especially if you
are felling a tree, a retreat path. Keep work area clean.
7. KEEP unit sharp and clean for better and safer performance.
8. FOLLOW INSTRUCTIONS
for lubricating and changing accessories.
7. DO NOT operate with one hand. Serious injury to the operator, helpers, or bystanders
may result from one handed operation. A chain saw is intended for two-handed use.
9. UNPLUG the chain saw from the power source when not in use, before servicing,
and when changing accessories and attachments, such as saw chain and guard.
8. DO NOT operate saw from a ladder or in a tree.
10. CHECK FOR DAMAGED PARTS. Before further use of the chain saw, a guard or other
part that is damaged should be carefully checked to determine that it will operate properly
and perform its intended function. CHECK for alignment of moving parts, binding of
moving parts, breakage of parts, mounting and any other conditions that may affect its
operation. A guard or other part that is damaged should be properly repaired or replaced
by a qualified service dealer or repair center unless otherwise indicated elsewhere in the
operator's manual.
9. MAKE SURE the chain will not make contact with any object while starting the saw.
NEVER start the saw when the guide bar is in a cut.
10. DO NOT force chain saw. It will do the job better and safer at the rate for which it was
intended.
11. DO NOT put pressure on the saw, especially at the end of the cut. Doing so can cause
you to lose control when the cut is completed.
12. STOP the saw before setting it down.
13. Hand carry saw ONLY when motor is stopped. Carry the chain saw by the front handle
with the saw stopped, finger off the switch, the guide bar and saw chain to the rear.
11. WHEN NOT IN USE, chain saws should be stored in a dry, high or locked-up place out
of the reach of children.
12. WHEN STORING SAW, unplug and use a bar sheath or carrying case.
14. Use the right tool, CUT WOOD ONLY. Don't use chain saw for purpose not intended;
for example, don't use chain saw for cutting plastic, masonry, non-wood building materials.
unplugged Chain Saw and the Chain has come to a complete stop. The Chain
/k WARNING:
NEVER to
reach
Saw after
(chainit is
area)
until you
Saw's
chain will continue
rotateunder
for athe
fewChain
seconds
switched
off. have
15. DO NOT operate a chain saw that is damaged, improperly adjusted, or not completely
and securely assembled. Always replace bar, chain, hand guard, or other parts
immediately if they become damaged, broken, or are otherwise removed.
16. Tool service should be performed at a Sears Parts and Repair Center or other
qualified service dealer. Service or maintenance performed by unqualified personnel
could result in a risk of injury.
iN. WARNING:
Some dust particles created by lawn and garden tools
contain chemicals known to the state of California to cause cancer, birth defects
or other reproductive harm. Some examples of these chemicals are:
• Compounds in fertilizers, herbicides, pesticides, and insecticides.
• Arsenic and chromium from chemically treated lumber.
Your risk from these exposures varies, depending upon how often you do this
type of work. To reduce your exposure to these chemicals:
• Work in a well-ventilated
area
• Work with approved safety equipment, such as those dust masks
that are specially designed to filter out microscopic
particles.
1. Have all chain saw service performed by a qualified service dealer or repair center
except the items listed in the MAINTENANCE section of this manual.
2. MAKE CERTAIN saw chain stops moving when trigger switch is released.
3. KEEP the handles dry and clean and free from oil and grease.
4. KEEP oil cap and fasteners securely tightened.
5. Nonconforming replacement components or the removal of safety devices may cause
damage to the unit and possible injury to the operator or bystanders. Use only Craftsman
accessories and replacement parts as recommended. Never modify your saw.
8
ADDiTiONAL RULES FOR SAFE OPERATION
i
follow all instructions
listed below may result in electric shock, fire and/or
/_ WARNING:
BE SURE to read and understand all instructions.
Failure to
serious personal injury.
1.
ALWAYS wear safety goggles or safety glasses with side shiemds, and a full-face shield
when using this Chain Saw. We recommend a Wide Vision Safety Mask for use over
eyeglasses or standard safety glasses with side-shield, available at Sears Stores or other
Craftsman Outlets.
2.
PROTECT your lungs. Wear a face mask, dust mask or respirator if the operation is dusty.
3.
PROTECT your hearing. Wear appropriate personal hearing protection during use.
Under some conditions noise from this product may contribute to hearing loss.
4.
5.
WEAR protective clothing and hard/safety helmet.
ALL VISITORS AND BYSTANDERS MUST wear the same safety equipment that the
operator of the tool wears.
6.
ALWAYS check the tool for damaged parts. Check for misalignment or binding of moving
parts, breakage of parts, and any other condition that may affect the tool's operation. Before
further use of the tool, a guard or other part that is damaged should be carefully checked to
determine if it will operate properly and perform its intended function. A guard or other part
that is damaged should be properly repaired or replaced at a qualified service dealer or
repair center service dealer.
3/I 4/I 2
Final ART
ADDiTiONAL
RULES
FOR SAFE
OPERATION
ADDiTiONAL
cont.
Z_ WARNING:
Follow injury.
all safety rules to help prevent Kickback
cause
serious personal
which can
]
HELP
RULES FOR SAFE OPERATION cont.
PREVENT
KICKBACK
cont.
8. Do not attempt cuts starting with the tip of the bar (plunge cuts).
9. Watch for shifting logs or other objects that could close a cut and pinch or fall onto chain.
KICKBACK
10. Use the specified Reduced-Kickback
AVOID
Guide Bar and Low Kickback Chain.
PINCH-KiCKBACK
1. Be extremely aware of situations or obstructions that can cause
material to pinch the top of or otherwise stop the chain.
2. Do not cut more than one tog at a time.
3. Do not twist the saw as the bar is withdrawn from an undercut when bucking.
AVOID
PULL-IN
1. Always begin cutting with the saw at full speed and the saw housing against wood.
1. KICKBACK is the backward, upward or sudden forward motion of the guide bar occurring
when the saw chain near the upper tip of the guide bar contacts any object such as a tog or
branch, or when the wood closes in and pinches chain in the cut. Contacting a foreign object
in the wood can also result in toss of chain saw control.
2. Use wedges made of plastic or wood. Never use metal to hold the cut open.
2. ROTATIONAL KICKBACK can occur when the moving chain contacts an object at the upper
tip of the guide bar. This contact can cause the chain to dig into the object, which stops the
chain for an instant. The result is a lightning fast, reverse reaction which kicks the guide bar
up and back toward the operator.
i which
_ WARNING:
Follow all
safety injury.
rules to help prevent Kickback
can cause serious
personal
3. PINCH=KICKBACK can occur when the wood closes in and pinches the moving saw chain
in the cut along the top of the guide bar and the saw chain is suddenly stopped. This sudden
stopping of the chain results in a reversal of the chain force used to cut wood and causes the
saw to move in the opposite direction of the chain rotation. The saw is driven straight back
toward the operator.
MAiNTAiN CONTROL
AWARNING:
AWARNING:
STAND TO THE
underside
HELP PREVENT KICKBACK
of handlebar___ _./
....
NEVER
o =.w
4. PULL-IN can occur when the moving chain contacts a foreign object in the wood in the cut
along the bottom of the guide bar and the saw chain is suddenly stopped. This sudden
stopping pulls the saw forward and away from the operator and could easily cause the
operator to lose control of the saw.
1. Recognize that kickback can happen. With a basic understanding of kickback, you can
reduce the element of surprise which contributes to accidents.
i
_'\
'
HAND
Elbow
___.,jL_._
/
POSITIONS
-
ii
2. Never let the moving chain contact any object at the tip of the guide bar.
3. Keep working area free from obstructions such as other trees, branches, rocks, fences,
stumps, etc. Eliminate or avoid any obstruction that your saw chain could hit while cutting.
4. When cutting a branch, do not let the guide bar contact another branch or other objects
around it.
5. Keep saw chain sharp and properly tensioned. A loose or dull chain can increase the chance
of kickback. Follow manufacturer's chain sharpening and maintenance instructions. Check
tension at regular intervals, but never with engine running. Make sure bar clamp nuts are
securely tightened.
6. Begin and continue cutting at full speed. If the chain is moving at a slower speed,
there is greater chance of kickback occurring.
1. A good, firm grip on the saw with both hands will help you maintain control. Don't let go.
Grip the rear handle with your right hand whether you are right or left handed. Wrap the
fingers of your left hand over and around the front handlebar, and your left thumb under
the front handlebar. Keep your left arm straight with the elbow locked.
2. Position your left hand on the front handlebar so it is in a straight line with your right
hand on the rear handle when making bucking cuts. Stand slightly to the left side of the
saw to keep your body from being in a direct line with the cutting chain.
3. Stand with your weight evenly balanced on both feet.
4. Do not overreach. You could be drawn or thrown off balance and lose control.
5. Do not cut above shoulder height. It is difficult to maintain control of saw above shoulder height.
7. Use extreme caution when re-entering a cut.
lO
11
3/I 4/I 2
Final ART
ADDITIONAL
KICKBACK
RULES FOR SAFE OPERATION cont.
ADDITIONAL RULES FOR SAFE OPERATION cont.
CHAIN BRAKE cont.
SAFETY FEATURES
Z_ WARNING:
The following features are included on your saw to help
reduce hazard of kickback; however, such features will not totally eliminate this
danger. Do not rely only on safety devices. Follow all safety rules to help avoid
kickback and other forces which can result in serious injury.
z_ WARNING:
1. Hand Guard: designed to reduce the chance of your left hand contacting the chain
if your hand slips off the front handlebar.
2. Position of Front and Rear Handle Bars AVOID KICKBACK: designed with distance
between handles and "in-line" with each other. The spread and "in-line" position of the hands
provided by this design work together to give balance and resistance in controlling the pivot
of the saw back toward the operator if kick back occurs.
3. Reduced-Kickback
Guide Bar: designed with a small radius tip which reduces the size of the
kickback danger zone on the bar tip, see Fig. A below. This type of bar has been demonstrated
to significantly reduce the number and seriousness of kickbacks when tested in accordance
with ANSI B175.1.
Reduced
Kickback Guide Bar
Fig. A
Low Kickback
_
t
Small
Radius
Tip
Guide
Bar
Chain
Fig. B
Contoured
Depth Gauge
Elongated Guard Link
deflects kickback force
and allows wood to
_" L.argeRadius
2. PUSH hand guard forward to activate the chain brake MANUALLY.
RELEASE the trigger switch to activate chain brake AUTOMATICALLY.
IMPORTANT: Please see page 21, figures 8 and 9 for detailed instructions.
gradually ride into cutter
• Tip contact in some cases may cause a lightning fast REACTION,
kicking the guide bar up and back toward the operator.
• Pinching the saw chain along the tip of the guide bar may push the guide bar
rapidly back towards the operator.
• Either of these reactions may cause you to lose control of the saw which could
result in serious injury. Do not rely exclusively
upon devices built into your saw.
z_ CAUTION:
Exposure to vibrations through prolonged use of hand tools could
cause blood vessel or nerve damage in the fingers, hands, and joints of people
prone to circulation disorders or abnormal swelling. Prolonged use in cold weather
has been linked to blood vessel damage in otherwise healthy people. If symptoms
occur such as numbness, pain, loss of strength, change in skin color or texture, or
loss of feeling in the fingers, hands, or joints, discontinue
the use of this tool and
seek medical attention. An anti-vibration
system does not guarantee the avoidance
of these problems. Users who operate power tools on a continual and regular basis
must closely monitor their physical condition and the condition of this tool.
SAVE THESE INSTRUCTIONS.
Refer to them frequently and use them to instruct others
who may use this tool. If someone borrows this tool, make sure they have these instructions also.
4. Low Kickback Chain has met kickback performance requirements when tested on the
representative sample of these chain saws specified in ANSI B175.1. See Fig. B above.
z_
as
b.)
c.)
CAUTION:
Do not use a replacement saw chain unless: a.) It has been designated
meeting the ANSI B175 kickback performance requirements on that specific power head;
It has been designated as "Low- Kickback" saw chain in accordance with ANSI B175.1; or
It is the saw manufacturer's replacement catalogue (or equivalent) number.
CHAIN BRAKE
(Built-in, Automatic and Manual Systems) See page 21, Figs. 8-9
1. Chain Brake: This Chain Saw is designed to stop tile chain in the event of kickback.
Both built-in, Automatic and Manual Chain Brake Systems reduce kick-back.
z_ WARNING:
WE DO NOT REPRESENT AND YOU SHOULD NOT ASSUME THAT
THE CHAIN BRAKE WILL PROTECT YOU IN THE EVENT OF A KICKBACK. Kickback
is a lightning fast action which throws the bar and rotating chain back and up toward the
operator. Kickback can be caused by allowing contact of the bar tip in the danger zone with
any hard object. Kickback can also be caused by pinching the saw chain along the top of the
guide bar. This action may push the guide bar rapidly back toward the operator. Either of these
events may cause you to lose control of the saw which could result in serious injury or even
death. DO NOT RELY UPON ANY OF THE SAFETY DEVICES BUILT INTO YOUR SAW.
YOU SHOULD USE THE SAW PROPERLY AND CAREFULLY TO AVOID KICKBACK.
Reduced-Kickback guide bars and low-kickback saw chains reduce the chance and magnitude
of kickback and are recommended. Your saw has a low kickback chain and bar as original
equipment. Repairs on a chain brake should be made by a qualified service dealer or repair
center. Take your unit to the place of purchase if purchased from a servicing dealer,
or to your nearest qualified service dealer or repair center.
12
1. The Chain Saw comes fully assembled, including the Chain/Chain
2. Included is an extra Chain.
Bar Assembly.
3. Remove the Chain Saw from the carton. Inspect your Chain Saw.
4. Do not discard box or packing material until all parts are examined.
5. Remove Plastic Protective Chain and Bar Cover before use.
NOTE: Chain and Bar Oil is not included. BEFORE using this Chain Saw,
do not forget to purchase Craftsman Bar & Chain Oil, SAE30.
i
z_ WARNING:
If any part of the Chain Saw is missing or damaged, do not connect !
the Chain Saw to the power source until the damaged part is repaired or replaced.
!
Extra Chain Included
Fig 1.
13
3/I 3/I 2
Final ART
KNOW
YOUR
-
CHAIN SAW
I NOTE: Before
_operating features
to
this
and safety rules.
°'°°°°"
familiarize
with all
i
Your Chain Saw has a precision built electric motor and it should only be connected
to a 120-volt, 60 Hz AC ONLY power supply (normal household current). The electric
Chain Saw should always be used with a GFCI (Ground Fault Circuit Interrupter) outlet.
DO NOT operate this Chain Saw on direct current (DC). The large voltage drop would cause
a toss of power and the motor would overheat.
If the Chain Saw does not operate when plugged into correct 120-volt, 60 Hz AC ONLY outlet,
check the power supply. The Chain Saw comes with an electric plug and should be plugged
into a proper extension cord (See page 6).
CHAIN SAW FEATURES:
• Power: 4.0 HP, 15 Amp motor
• Bar length: 18"
• Chain brake - Auto and manual
KNOW YOUR CHAIN SAW cont.
CHAIN
SAW CALL-OUTS
cont.
(Figures
Fig 2.
TECHNICAL
DATA:
Voltage: 120V
Rated power: 4.0 HP, 15 Amp
Bar length: 18"
Chain speed: 12m/s
Oil tank capacity: 200mt
Chain pitch: 3/8"
Number of chain links: 63
Chain gauge: 0.05"
Saw chain type: Oregon ®, 18" (91 PX063X)
Extra chain: E&S, ES91VS63E
• Bar type: Oregon ®, 18" (180SDEA041)
• Weight (chain & bar included): 10.5 Ibs
• Protection class: I'_/II
• Automatic lubrication system
• 2 in 1 TooHess chain tension
and blade change with over
tensioning protection
• Large oil tank with visible gauge
• Oregon ® chain and bar
• Extra chain - non-Oregon®
• Front metal bumper
• Weight 11.68 LBS
(when filled with oil)
CHAIN SAW CALL-OUTS
(See Figures
2 and 3 on page 15)
1. Rear handle (See Fig. 2)
2. On/Off switch (See Fig. 2)
3. Lock-off button (See Fig. 2)
4. Oil filler cap (See Fig. 2)
5. Front handle (See Fig. 2)
6. Activation lever for kickback brake (front Hand Guard) (See Fig. 2)
7. Chain Guide bar (See Fig. 2)
8. Chain (See Fig. 2)
9. Spiked bumper (See Fig. 2)
10. Plastic Chain/Bar/Blade
protection cover (See Fig. 2)
11. Locking knob/Chain
tensioning
adjustment knob (See Fig. 2)
12. Cover plate (See Fig. 2)
13.
14.
15.
16.
17.
18.
Drive sprocket (See Fig. 3)
Guide fins for chain bar (See Fig. 3)
Symbol for rotation and cutting direction
Chain tensioning
catch (See Fig. 3)
Chain catcher (See Fig. 3)
Fastening bolt (See Fig. 3)
19. Oil level gauge (See Fig. 3)
2 and 3)
14
____Chain
(See Fig. 3)
Cover Plate
15
Rotation
3/14/12
Final ART
iNTENDED USE
TENSiONiNG
The chain saw is intended for wood: sawing of trees, tree trunks, branches, wooden beams,
planks, etc. Cuts can be sawed with or across the grain. This product is not suitable
for sawing mineral materials, plastics or non-wood building materials.
BarAssembly.
l
]
i before
Z_ WARNING:
Do not
connect the
cha,nuse
sawgloves
to extens,on
cord andthepower
it is completely
assembled.
Always
when handling
chain.source ]
CHAIN AND CHAIN BAR ASSEMBLY/REPLACEMENT
(See Figs. 4a, 4b, 4c, 4d and Pgs 14-15 for part reference)
1. Place the chain saw on any suitable flat surface.
2. (See Fig. 4a) Slide the chain (8) in the slot around the guide bar (7). Ensure chain is in
correct running direction by comparing with chain symbol (15). Ensure the chain tensioning
catch (16) is facing outwards.
3. (See Fig. 4b) Fit the chain onto the drive sprocket (13) and guide the guide bar (7), so that
the fastening bolt (18) and the two guide fins (14) fit into the keyway of the guide bar (7).
Fig. 4a
8 16
KNOB
Fig. 4d
Always check the chain tension before use,
after the first cuts and regularly during use.
Upon initial operation, new chains can lengthen
considerably.
ASSEMBLY
i Included
NOTE: This
Chain
comes
including
Chain/Chain
is an
extraSaw
Chain.
See fully
belowassembled,
for Chain/Chain
Bar the
Replacement.
CHAIN/LOCKING
i
i
z_ WARNING:
Unplug chain saw from
power source before adjusting saw chain
tension.
z_ WARNING:
Cutting edges on chain
are sharp. Use protective gloves when
handling chain.
i
i
z_ WARNING:
ALWAYS Maintain proper chain tension. A loose chain will
increase the risk of kickback. A loose chain may jump out of guide bar groove.
This may injure operator and damage chain. A loose chain will cause chain, chain
bar, and sprocket to wear rapidly. The chain life of the saw chain mainly depends
upon sufficient lubrication and correct tensioning. Avoid tensioning the chain if it
is hot, as this will cause the chain to become over tensioned when it cools down.
Fig. 4b
7
1. Place the chain saw on any suitable flat surface.
13 14
18
.... "o:
4. Check to make sure all parts are seated
properly and hold chain and guide bar in
a level position. (See Fig. 4c)
5. Fit cover plate, ensure that the chain
catcher (17) fits into the groove of the
cover plate (12). (See Figs. 2 & 3, pg.15)
6. Press the cover plate firmly onto the
machine and screw on the cover plate (12)
with the locking knob (11). (See Fig. 2, pg.15)
Fig. 4c
_(
2. Turn the locking knob/chain tensioning knob
clockwise until the locking knob is screwed tightly,
(See Fig. 4d). The correct chain tension will be
reached automatically. The ratchet mechanism
prevents the chain tension from loosening.
3. The correct chain tension is reached when the chain
can be raised approx. 3-6 mm (1/8 to 1/4-in.) from
the chain bar in the centre. This should be done by
using one hand to raise the chain against the
weight of the machine. (See Fig. 5)
4. When the chain looses, unscrew the locking
knob/chain tensioning knob absolutely and then
Screw on the cover plate with the locking knob
tightly again.
Tensioning the chain applies as described
NOTE: "Tensioning
The chain ischain".
not yet tensioned.
under
16
17
Fig. 5
NOTE: Use one hand
to raise chain.
approx.
3-6 mm
(1/8 to 1/4-in.)
3/I 4/I 2
FinalART
LUBRICATION
z_ CAUTION:
The chain saw is NOT supplied filled with oil. It is essential to fill with oil
before use. Never operate the chain saw without chain oil or at an empty oil tank level, as
this wilt result in extensive damage to the product. Chain life and cutting capacity depends on
optimum lubrication. Therefore, the chain is automatically oiled during operation via oil outlet
Filling oil tank: (See Fig. 6)
1. Set chain saw on any suitable surface with oil filler cap facing upward.
2. Clean area around the Oil Filler Cap with cloth and unscrew the cap by turning
it counter clockwise.
3. Add bar and chain oil (Craftsman Bar & Chain Oil, SAE30) until reservoir is full.
4. Avoid dirt or debris entering oil tank, re-screw oil filler cap and tighten.
Bucking - The process of cross cutting a felled tree or log into lengths.
Chain Stop Lever - A device used to stop the chain saw.
Chain Saw Power Head - A chain saw without the saw chain and guide bar.
Drive Sprocket
or Sprocket
- The toothed part that drives the saw chain.
Felling - The process of cutting down a tree.
Felling Back Cut - The final cut in a tree felling operation made on the opposite side of
the tree from the notching undercut.
Front Handle - The support handle located at or toward the front of the chain saw.
Front Hand Guard - A structural barrier between the front handle of a chain saw and
the guide bar, typically located close to the hand position on the front handle and sometimes
employed as an activating lever for a chain brake.
Guide Bar - A solid railed structure that supports and guides the saw chain.
Kickback - The backward or upward motion, or both of the guide bar occurring when the
saw chain near the nose of the top area of the guide bar contacts any object such as a log
or branch, or when the wood closed in the pinches the saw chain in the cut.
Fig. 6
Kickback, Pinch - The rapid pushback of the saw which can occur when the wood closes
in and pinches the moving saw chain in the cut along the top of the guide bar.
Kickback, Rotational - The rapid upward and backward motion of the saw which can occur
when the moving saw chain near the upper portion of the tip of the guide bar contacts an
object, such as a log or branch.
Low-Kickback
Chain - A chain that complies with the kickback performance requirements
of ANSI B175.1-1991 when tested on a representative sample of chain saws.
Normal Cutting Position - Those positions assumed in performing the bucking and felling
cuts.
Notching Undercut - A notch cut in a tree that directs the tree's fall.
Oiler Control - A system for oiling the guide bar and saw chain.
CAUTION:
To allow venting of the oil reservoir, small breather channels are
provided between the oil filler cap and the strainer. To prevent leakage, ensure machine is
left in a horizontal position (oil filler cap uppermost) when not in use.
It is important to use only the recommended oil to avoid damage to the chain saw.
Never use recycled/old oil. Use of non approved oil will invalidate the warranty.
Rear Handle - The support handle located at or toward the rear of the saw.
Reduced Kickback Guide Bar - A guide bar which has been demonstrated
kickback significantly.
to reduce
Replacement Saw Chain - A chain that complies with the kickback performance
requirements of ANSI B175.1-1991 when tested with specific chain saws. It may not meet
the ANSI performance requirements when used with other saws.
Saw Chain - A loop of chain having cutting teeth, that cut the wood, and that is driven by
the motor and is supported by the guide bar.
Spiked Bumper (Gripping Teeth) - The pointed tooth or teeth for use when felling or bucking
to pivot the saw and maintain position while sawing.
Switch - A device that when operated wilt complete or interrupt an electrical power circuit
to the motor of the chain saw.
Switch
Linkage - The mechanism that transmits motion from a trigger to the switch.
Lock-off Button - A movable stop that prevents the unintentional operation of the switch
until manually actuated.
18
19
3/I 4/I 2
Final ART
SWiTCHiNG
ATTACHING EXTENSION CORD
Remove Plug safety cap as shown (Fig. 7a) Insert extension cord socket into
Chain Saw's Plug (Fig. 7b).
2 An Extension Cord Retainer is attached to the Handle to reduce strain on the cord
To use this feature, simply double the extension cord as shown, about a foot from
the end, and insert it into the end of the Retainer Place the loop formed by
doubling the cord over the Hook (Fig. 7c) Gently tug on the cord to ensure that it
is firmly situated in the Retainer (Fig. 7d)
3 Keep extension cord clear of operator, unit and any obstacles at all times
Do not expose the cord to heat, oil, water, or sharp edges
ON AND OFF (Fig. 8)
1
Fig. 7a
Fig. 7b
1
i Z_
voltage
supp'y:
The vo'tage
and WARN'NG:
current supplyCheck
must the
comply
withand
thee'ectric
ratings current
on the data
plate.
1 To switch the Chain Saw ON, pressthe
lock-off button, then fully press the on/off
switch (2) and hold in this position
The lock-off button (3) can now be released
2 To switch the Chain Saw OFF, release the on/off
switch (2) Do not stop chain saw after sawing
by activating the front hand guard
(manual chain brake)
THE CHAIN BREAK (Built-in, Manual and Automatic
Fig. 8
Lock-off
On/Off switch
(3)
(2)
(trigger)
and Systems)
i
L
(Figs. 8 and 9)
The MANUAL chain brake is a safety mechanism activated through the front
hand guard (5) when kickback occurs. Chain stops immediately.
Fig. 7c
The following function check should be carried out at regular intervals.
1. MANUAL CHAIN BRAKE (See Fig. 9): PUSH front hand guard (5) forward (position 2 )
and try starting the chain saw. The chain must not start. To deactivate the kickback brake,
pull hand guard (5) backwards (position 1), and release On/Off (trigger) switch (2),
(See Fig. 8 for On/Off switch location).
Fig. 7d
Completed
2. AUTOMATIC CHAIN BRAKE:
chain brake AUTOMATICALLY,
RELEASE the On/Off (trigger) switch to activate
(See Fig. 8 for On/Off switch location).
m
Cord locked in Extension Cord Retainer
Fig. 9
20
21
3/I 4/I 2
Final ART
CUTTING
Check oil level gauge prior to starting and regularly during operation. Refill oil when oil
level is tow. The oil tank filling wilt last approx. 16 minutes, depending on sawing intensity
and stops. (See Fig. 6 on page 18)
GENERAL CUTTING
Confirm the chain tension is in working order and the chain sharp.
Check new replaced chain tension during operation.
Upon initial operation, new chains can lengthen considerably. The condition of the chain
influences the cutting performance. Only a sharp chain protects from overload.
Never operate chain saw using only one hand. Ensure power cord is located to the rear,
away from the chain and wood and so positioned that it will not be caught on branches or the
like during cutting. (see THE CHAIN BREAK, page 21)
Make sure you are wearing the necessary protective equipment.
Wear safety glasses/goggles/visor-safety
helmet and hearing protection.
Further protective equipment for head, hands, legs and feet is highly recommended.
Adequate protective clothing wilt reduce personal injury by flying debris or accidental
contact with saw chain.
Fig. 11
Always hold the chain saw firmly with both hands. Front grip with the left hand and rear grip
with the right hand. Fully grip both handles at all times during operation. (See Figs.ll and 12)
Fig. 12
STAND TO THE
LEFT OF SAW
Proper functioning of the automatic oiler can be checked by running the chain saw and
pointing the tip of the chain bar towards a piece of cardboard or paper on the ground.
Do not touch the ground with the chain. Ensure safety clearance
of 20 cm. (7-7/8 inch.) if an increasing oil pattern develops, the automatic oiler is
operating fine. if there is no oil pattern, despite a full oil reservoir,
see "Troubleshooting".
(Fig. 10a, 10b)
Fig. 10a
Fig. 10b
_/_
A/IOductuons
yj,._
_lJ_
Kickback
J"
Path
,,:ij,i,,ij
-'-=/
J_
KICKBACK is the backward, upward or sudden forward motion of the guide bar occurring
when the saw chain near the upper tip of the guide bar contacts any object such as a log or
branch, or when the wood closes in and pinches chain in the cut. Contacting a foreign object
in the wood can also result in loss of chain saw control.
When kickback occurs the chainsaw reacts unpredictably and can cause severe injuries
to the operator or bystanders. Particular attention must be given when sawing sideward,
slanted or during length cuts, as the spiked bumper usually can not be applied.
To avoid kickback:
Saw with guide bar at a flat angle.
Never work with a loose, widely stretched or the heavily worn out chain.
Ensure chain is sharpened correctly.
Never saw above shoulder height.
Never work with the tip of the guide bar.
Always hold the chain saw firmly with both hands.
Always use a low kickback chain.
Apply the metal gripping teeth for leverage.
Ensure correct chain tension.
22
'
_
_
Thumb on
underside
Z_ CAUTION:
KICKBACK
_
of handlebar
_
I
Use the chain saw only with secure footing.
Hold the chain saw at the right-hand side of your body. (See Figs. 11 and 12)
The chain must be running at full
speed before it makes contact
with the wood.
Fig. 13
Use the metal gripping teeth to
secure the saw onto the wood
before starting to cut.
}
Use the spiked bumper (9) as a
leverage point while cutting.
(See Fig. 13)
23
3/I 4/I 2
Final ART
GENERAL CUTTING cont.
GENERAL CUTTING cont.
Reset the gripping teeth at a low point when sawing thicker logs by pulling the chain saw
slightly backwards until the gripping teeth release, and reposition at lower level to continue
sawing. (See Fig. 13)
CUTTING LOGS
• Do not remove the saw completely
from the wood.
Observe the following safety instructions:
Support togs so that the face sides at the cut do not close in against each other,
which would result in the chain being jammed or pinched. (See Figs. 15 and 16)
Fig. 14
• Do not force the chain while cutting,
let the chain do the work, using the
gripping teeth to apply minimal
leverage pressure.
• Do not operate the chain saw with
arms fully extended or attempt to saw
areas which are difficult to reach,
or on a ladder. Never use the chain
saw above shoulder height.
(See Fig. 14)
Fig. 15
Fig. 16
I
I
Z
Z
LJ
height.
NOTE: Sawing is optimized when
the chain speed remains steady
during cutting.
CAUTION"
Beware when reaching the end
of the cut. The weight of the saw
may change une×pectedly as it
cuts free from the wood.
Position and set short togs safety prior to sawing. Saw only wood or wooden objects.
When sawing, always take care to avoid hitting stones, nails, ect, as these could be
thrown up or cause damage to the chain or serious injury to the operator or bystanders.
Accidents can occur to the legs
and feet.
Use of the saw to thin out branches or bushes is not approved.
Keep a running saw clear or wire fencing or the ground.
Length cuts must be carried out with care, as leverage with the spiked bumper is
not possible. Saw at a flat angle to avoid kickback.
Always remove the saw from
a wood cut while the saw is
running.
When working on a slope, operate above or to the side of the trunk or laying tree.
Be careful not to trip over tree stumps, branches, roots, etc.
NOTE: Do not
specifically
trained
attempt
to do
a pruning
so.
or limbing operation
NOTE:
cutting a limb that is under tension
be
alert When
for springback.
24
in a standing tree unless
or compression,
i
CUTTING
WOOD
UNDER
TENSION
(See Fig. 16)
There is a high risk of accidents when sawing wood, branch or trees under tension.
Be extremely careful. Leave saw jobs like these to professionals.
When sawing togs supported on both ends, start the cut from above (Y) about 1/3 of the
diameter into the tog and then finish the cut (Z) from below, in order to avoid contact of the
chain saw with the ground. When sawing logs supported on only one end, start the cut
from below (Y) about 1/3 of the diameter into the log and finish the cut from above (Z) in
order to avoid log splitting or jamming of the chain saw.
25
3/I 4/I 2
Final ART
GENERAL CUTTING cont.
GENERAL CUTTING cont.
FELLING
LIMBING
TREES
(See Fig. 17)
Always wear hard hat to protect head against falling branches.
The chain saw can only be used to felt trees smaller in diameter than the length of the
guide bar.
1. Secure work area (See 1, Fig. 17). Ensure no persons or animals are in the vicinity
of the falling tree. Never attempt to free a jammed saw with the motor running.
Use wooden wedges to free chain and guide bar.
When cutting and felling operations are being performed by two or more persons,
at the same time, the felling operations should be separated from the cutting operation by
a distance of at least twice the height of the tree being felled. Trees should not be felled in
a manner that would endanger any person, strike any utility line or cause any property
damage. If the tree does make contact with any utility line, the company should be
notified immediately.
The chain saw operator should keep on the uphill side of the terrain as the tree is likely to
roll or slide downhill after it is felled.
2.
An escape path (See 2, Fig. 17) should be planned and cleared as necessary before cuts
are started. The escape path should extend back and diagonally to the rear of the expected
line of fall.
3.
Before felling is started (See 3, Fig. 17), consider the natural lean of the tree,
the location of larger branches and the wind direction to judge which way the tree wilt fall.
Remove dirt, stones, loose bark, nails staples, and wire from the tree.
A TREE
(See Fig. 18)
Limbing is removing the branches from
a fallen tree. When timbing leave larger
lower limbs to support the log off the
ground.
Remove the small limbs in one cut as
illustrated. Branches under tension
should be cut from the bottom up to
avoid binding the chain saw.
BUCKING
Fig. 18
A LOG (See Fig. 19)
Bucking is cutting a log into lengths.
It is important to make sure your footing
is firm and your weight is evenly
distributed on both feet. When possible,
the log should be raised and supported
by the use of limbs, logs or chocks.
Fig. 19
c
Follow the simple directions for easy
cutting.
Fig. 17
Notching undercut: Make the notch (x-w)
1/3 the diameter of the tree, perpendicular
to the direction of fails as make the lower
®
horizontal notching cut first. This wilt help to
avoid pinching either the saw chain or the
gma
uidde.
e bar w he n the s econd notc h is being
Felling back cut: Make the felling back cut (Y)
at least 50 notching
horizontal
mm (2-Inches)
cut. Keep
higher
the than
fellingtheback
cut parallel to the horizontal notching cut.
rn
x
When the log is supported along its
entire as illustrated, it is cut from the
top (overbuck).
i! !!!!!i iiiiii iiii iiiiiiiiiiiiiiiiiiiiiiiiiiiiiiiiiiiiiiiiiiiiiiiiiiiiiiiiiiiiiiii
b_
,,',._,,,__€
w_
_
L .........
0mrnA1_d/
:
i ii iiiiiiii iiiiiiiiiiiiiiiiiiiiiiiiiiiiiiiiiiiiiiiiiiiiiiiiiiiiiiiiiiiiiii
@)
Make the felling back cut so enough wood is left to act as a hinge. The hinge wood keeps
the tree from twisting and falling in the wrong direction. Do not cut through the hinge.
As the felling gets close to the hinge the tree should begin to fall. If there is any chance
that the tree may not fall in desired direction or it may rock back and bind the saw chain,
stop cutting before the felling back cut is complete and use wedges of wood, plastic,
or aluminum to open the cut and drop the tree along the desired line of fall.
When the log is supported
on one end, as illustrated,
cut 1/3 the diameter from
Fig. 20
the underside (underbuck).
Then make the finished cut
by overbucking to meet the
first cut. (See Fig. 21)
When the tree begins to fall remove the chain saw from the cutting, stop the motor,
put the chain saw down, and then use the retreat path planned. Be alert for overhead limbs
falling and watch your footing.
To complete the felling operation, drive a wedge (Z) into the horizontal cut.
BEWARE of falling branches when the tree starts to move.
26
27
3/I 4/I 2
Final ART
GENERAL
GENERAL CUTTING cont.
BUCKING A LOG cont.
When the log is supported on both
ends, as illustrated, cut 1/3 the
diameter from the top overbuck.
Then make the finished cut by
underbucking the lower 2/3 to meet
the first cut. (See Fig. 21)
Fig. 21
@_
When bucking on a slope always
stand on the uphill side of the log,
as illustrated.
MAINTENANCE
/_ WARNING:
Before performing any work on the Chain Saw, disconnect
Chain Saw's power plug from the extension cord and power source.
NOTE: To ensure long and reliable service, carry out the following
regularly and before each use:
the
maintenance
Regularly check for obvious defects such as loose, dislodged or damaged chain and
guide bar, loose fixings and worn or damaged components. Inspect the switch and cord
for damage. Check that covers and guards are undamaged and correctly fitted.
A WARNING:
DO NOT use the Chain Saw if it has any broken parts.
ALWAYS have damaged, missing, worn or broken parts replaced before using.
When "cutting through", to maintain
complete control release the cutting
pressure near the end of the cut
without relaxing your grip on
the chain saw handles.
NOTE: WHEN SERViCiNG a tool, use only identical replacement parts.
Use of unauthorized parts or failure to follow maintenance instructions may create
a risk of electric shock or injury.
Don't let the chain contact
the ground.
After completing the cut, wait for
the saw chain to stop before you
move the chain saw.
Fig. 22
Carry out necessary maintenance or repairs before using the chain saw. If the chain saw
should happen to fail despite the care taken in manufacturing and testing, repair should be
carried out by an authorized, qualified service dealer or repair center.
Before returning, ensure all oil in the oil tank has been emptied.
Replacing/Changing
Chain And Guide Bar
Fit the chain and guide bar as described in "Assembly and Tensioning Chain",
(See pages 16 and 17). The circular groove of the guide bar wilt wear particularly on the
lower edge with time. When replacing the chain turn the chain bar 180 ° to allow even wear,
thus extending chain bar life.
Always stop the motor before
moving from tree to tree.
(See Fig. 22)
Check Drive Sprocket. If it is worn out or damaged due to strain,
have it exchanged by an authorized service dealer.
If The Chain Bar Is Worn Out Or Damaged,
take the chain tensioning catch off the bar by loosing
the screw counter-clockwise. Then fit the tensioning
catch into the new bar by tightening the screw clockwise.
The catch protrude (1) must be fitted into the bar hole.
(See Fig. 23)
Sharpening Chain. Have your chain sharpened
professionally at your approved service dealer or
repair center or sharpen the chain yourself using
the sharpening kit. Follow the sharpening instructions
supplied with the sharpening kit.
28
29
I
Fig. 23
3114112
Final ART
GENERAL MAINTENANCE
Model 71=34120
cont.
120VNBOHz
• Clean the moulded plastic housing of the chain saw using a soft brush and clean cloth.
DO NOT use water, solvents or polishes.
• Remove all debris, especially from the motor cooling vents.
• Remove and brush clean the cover plate, chain and chain bar after 1 to 3 hours of use.
• Clean the area under the cover plate, the drive sprocket and chain bar assembly using
a soft brush.
• Clean oil outlet with a clean cloth.
Voltage
• If the chain saw is to be stored for a longer period of time, clean chain and chain bar.
Number
STORE iN A SECURE, DRY PLACE OUT OF THE REACH OF CHILDREN.
• Do not place other objects on the chain saw.
• To prevent oil leakage, ensure machine is left in a horizontal position.
• When storing machine in original packaging the oil tank must be completely emptied.
Chain gauge
Amps
15A
Bar length
18"
12m/s
Chain speed
Oil tank capacity
6,76 oz, (200ml)
3/8"
Chain pitch
of chain links
63
0.05"
Chain
Oregon@:
Extra Chain Included
E&S: ES91VS63E
Bar
Weight
SYMPTOM
POSSIBLE
CAUSE
Chain saw fails to operate
Kickback brake is activated
Pull hand guard back in
position 1 (See Figure 9)
Check power
Use another socket
No power
Mains socket faulty
Extension cord damaged
Fuse faulty
Chain saw operates
intermittently
Extension cord damaged
Loose connection
Internal wiring defective
On/Off defective
18" (91PX063X)
Oregon ®: 18" (180SDEA041)
10,5 Ibs
(chain & bar included)
Protection
class
FD1/ ii
Check cord, replace
Replace fuse
Check cord, replace
Contact service agent
Contact service agent
Contact service agent
NEED MORE HELP?
No oil in reservoir
Refill oil
You'll
findtheanswerand moreon managemyhome.com - for free!
Vent in oil filler cap clogged
Oil passage clogged
Clean cap
Clean oil passage outlet
• Find this and all your other product manual.s online.
Kickback Brake/Run
Down Brake
Brake does not stop chain
Contact service agent
• Get answers from our team of home experts.
Chain/chain
No oil in reservoir
Refill oil
• Find information
Vent in oil filler cap clogged
Oil passage clogged
Chain is over tensioned
Dull chain
Clean cap
Clean oil passage outlet
Adjust locking knob
Sharpen chain or replace
manage
Chain tension too loose
Dull chain
Chain worn out
Adjust locking knob
Sharpen chain or replace
Replace chain
Reassemble with chain in
correct direction
Dry chain
bar overheats
Chain saw rips, vibrates,
does not saw properly
• Get a personalized
Chain teeth are facing in the
wrong direction
Never use tools with defective On/Off switches or defective Kickback brake (Hand Guard).
In the case of all other types of technical faults, please contact helpline or qualified service dealer
or repair center.
30
maintenance
plan for your home.
and tools to help with home projects.
home
brought
to you
by Sears
31
15 Arnp/4.0
Peak HP Motor
The modelnumberwill be foundon the nameplateof the ChainSaw.
Alwaysmentionthe modelnumberwhenrequestingparts and service
for yourtool. To order parts, call 1°800°469-4663
Electric Chain Saw
Model No.
172.34120.00
Position No.
201
1
2
3
4
5
6
8
9
10
11
12
13
13
14
15
16
17
19
2O
21
22
Parts No.
Part Description
GCS450U. 1-201
GCS450U.1-1
GCS450U. 1-2
Motor set
Nut
1
2
28
Torsional Spring
Carbon Brush(pair)
Rear Bracket
2
1
1
30
Bearing
Rotor
1
1
33
Bearing
Stator
Front Bracket
1
1
1
Screw
Bracket
2
1
GCS450U.
GCS450U.
GCS450U.
1-3
1-4
1-5
GCS450U.
GCS450U.
GCS450U.
GCS450U.
1-6
1-8
1-9
1-10
GCS450U.1-11
GCS450U.1-12
GCS450U.1-13
GCS450U. 1-13
GCS450U.1-14
GCS450U. 1-15
GCS450U. 1-16
GCS450U. 1-17
GCS450U.1-19
GCS450U. 1-20
GCS450U, 1-21
GCS450U. 1-22
Self Tapping Screw
Self Tapping Screw
Brake Bracket
Switch
Pinion
Qty.
4
22
1
1
1
Retaining Ring
Power Cord
Cable Protector
Terminal Port
2
1
1
1
25
GCS450U.
GCS450U.
GCS450U.
GCS450U.
1-203
1-23
1-24
1-25
Cord Clamp
Inner Wire
Inner Wire
Inner Wire
Inner Wire
1
1
1
1
1
27
GCS450U.
1-27
Front Handle Assembly
1
203
23
24
15 Amp/4.0
Electric
Model No.
172,34120,00
Position No.
Peak HP Motor
Position No.
29
31
32
34
35
36
37
38
39
4O
204
41
42
43
44
45
46
47
48
49
5O
2O5
51
53
Parts No.
Part Description
Qty.
Protect Plate
Rated Label
Decorative Cover
1
1
1
GCS450U.1-31
GCS450U.1-32
Houshin_
Tube I
1
1
GCS450U.
GCS450U.
Rotating Plate
Washer
1
4
GCS450U.1-35
GCS450U. 1-36
GCS450U. 1-37
Torsional Spr!ngTrigger
Button
1
1
1
GCS450U. 1-38
GCS450U.1-39
Torsonial SpringOil Bottle Cap
1
1
GCS450U.
GCS450U.
GCS450U.
Extension Spring
Connecting Pole Set
Rivet
1
1
2
GCS450U.1-42
Ring
1
GCS450U. 1-43
GCS450U. 1-44
GCS450U. 1-45
GCS450U.1-46
GCS450U. 1-47
GCS450U. 1-48
Linkage
Extension Spring
Belt
Duck Bill
Rubber Washer
Oil Bottle
1
1
1
1
1
1
GCS450U.
GCS450U.
GCS450U.
GCS450U.
1-28
1-29
1-30
1-33
1-34
1-40
1-204
1-41
Oil Tube II
1
GCS450U. 1-50
GCS450U. 1-205
GCS450U.1-51
1-49
Self tapping screw
Pump Assembly
Oil Exit
1
1
1
GCS450U.
Compression Spring
1
1-53
The modelnumberwill be foundon the nameplateof the ChainSaw.
Alwaysmentionthe modelnumberwhenrequestingparts and service
for yourtool. To order parts, call 1-800-469-4663
Chain Saw
18-1n, Bar
Parts No.
Parts No.
Part Description
GCS450U.
1-54
Steel ball
1
82
GCS450U.1-82
Chain Wheel
1
55
GCS450U.
GCS450U.
GCS450U.
GCS450U.
1-55
1-56
1-57
1-58
O Ring
Pump Housing
1
1
83
85
1
1
1
1-59
1-60
1-61
1-62
1
1
1
Self Tapping`Screw
Oil Seal
Chain Catcher
GCS450U.
GCS450U.
GCS450U.
GCS450U.
Pump
O Rin_i
Washer
GCS450U.1-83
GCS450U.1-84
GCS450U.1-85
GCS450U.1-86
GCS450U.1-87
Ring
Spiked Bumper
1
1
Compress!on Spring
Pump Rod
Oil Tube I
1
1
1
89
GCS450U.1-89
GCS450U.1-90
Compression Block
Cam
1
1
GCS450U.
GCS450U.
GCS450U.
1-63
1-64
1-65
Tube
Washer
1
1
92
GCS450U.1-91
GCS450U.1-92
Chain Guard Housing
Brand Lable
1
1
GCS450U.1-208
GCS450U.1-93
Clutch Assembly
Clutch Drum
1
1
1-66
1-206
1-67
1-68
1-69
1
1
1
93
GCS450U.
GCS450U.
GCS450U.
GCS450U.
GCS450U.
Self Tapp!ng Screw
Chain
Guide Bar
94
GCS450U.1-94
Compression Spring
1
95
Self Tapping Screw
Guide Bar
1
1
96
98
1
1
1
1
1-70
1-71
1-72
1-73
1
1
Clamping Plate
Stater Bowel
Brake Disc I
Brake Disc II
GCS450U.
GCS450U.
GCS450U.
GCS450U.
Press Block
Chain Sheath
GCS450U.1-95
GCS450U.1-96
GCS450U.1-97
GCS450U.1-98
99
GCS450U.1-99
Clamping Plate I
1
Torsional Sprin9
Tube
1
1
100
209
3
1
1
1-74
1-75
1-207
1-76
1
1
1
Self ta_screw
Spring
Tension Knob
GCS450U.
GCS450U.
GCS450U.
GCS450U.
Rotating_Block I
Needle Bearinq
Washer
GCS450U.1-100
GCS450U.1-101
GCS450U.1-209
Output Shaft
Gear
1
1
104
GCS450U. 1-102
GCS450U.1-103
GCS450U.1-104
Self tapping, screw
Pwal
Tube
3
3
3
GCS450U.
GCS450U.
GCS450U.
GCS450U.
1-77
1-78
1-79
1-80
Spindle
Washer
1
1
106
GCS450U.1-105
GCS450U.1-106
Torsional Spring
Knob
3
1
BearingSelf Tapping Screw
1
2
108
GCS450U.1-107
GCS450U.1-108
Ring I
Washer
1
1
301
GCS450U.1-301
Self Tapping Screw
1
57
58
59
60
61
62
63
64
65
66
206
67
68
69
70
71
72
73
74
75
207
76
77
78
79
8O
Part Description
Qty.
Position No.
54
56
¢o
¢o
18-1n. Bar
84
86
87
90
91
208
97
101
102
103
105
107
Qty.
-i"1
m_
::::5
L,_
3/I4/12
Final ART
15
Amp/4,0 Peak
HP MotorSaw
Electric
Chain
Model No.
172.34120.00
18=1n. Bar
\\
\
\
/
34
35
®