1
ABOUT THIS USER GUIDE
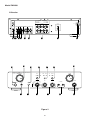
Refer to the Figures on the pages at the rear of this user guide.
The callout numbers on the Figures correspond to those found in
the text. All references to the connections and controls that are
printed in BOLD type are as they appear on the unit.
This section must be read before any connection is made to the
mains supply.
English
WARNINGS
PRECAUTIONS
Do not expose the equipment to rain or moisture.
The following precautions should be taken when operating the
equipment.
Do not remove the cover from the equipment.
Do not insert anything into the equipment through the
ventilation holes.
GENERAL PRECAUTIONS
When setting the equipment ensure that:
— the ventilation holes are not covered
— air is allowed to circulate freely around the equipment
— it is on a vibration free surface
— it will not be exposed to interference from an external source
— it will not be exposed to excessive heat, cold, moisture or dust
— it will not be exposed to direct sunlight
— it will not be exposed to electrostatic discharges
In addition, never place heavy objects on the equipment.
If a foreign body or water does enter the equipment, contact your
nearest dealer or service center.
Do not pull out the plug by pulling on the mains lead, hold the plug.
It is advisable when leaving the house, or during a thunder-storm,
to disconnect the equipment from the mains supply.
Do not handle the mains lead with wet hands.
Do not cover the ventilation with any items such as
tablecloths, newspapers,curtains,etc.
No naked flame sources,such as lighted candles,should
be placed on the equipment.
When disposing of used batteries, please comply with
governmental regulations or environmental public
instruction’s rules that apply in your country or area.
EQUIPMENT MAINS WORKING SETTING
Your Marantz product complies with the household power and
safety requirements in your area.
“N”or “UK” Version product can be powered by 230 V AC only.
CONNECTIONS
(Figure 1)
CONNECTION OF TUNER
Connect the output jacks of your stereo tuner to the TUNER jacks
of this unit.
COPYRIGHT
Recording and playback of any material may require consent. For
further information refer to the following:
— Copyright Act 1956
— Dramatic and Musical Performers Act 1958
— Performers Protection Acts 1963 and 1972
— Any subsequent statutory enactments and orders
CONNECTION OF COMPACT DISC PLAYER
Connect the output jacks of your CD player to the CD jacks of this
unit.
CONNECTION OF TURNTABLE
Connect the L (Left) output cord of the turntable to the “L”
PHONO jack of this unit, and connect the R (Right) output cord
to the “R” PHONO jack. Also be sure to connect the turntable’s
grounding wire to the GND jack of this unit. The GND jack does
not have to be connected if the turntable is not provided with a
grounding wire.
CONNECTION OF MD/TAPE DECK
Connect the IN (recording input) jacks of the tape deck to the
TAPE OUT jacks of this unit, and connect the OUT (playback
output) jacks of the tape deck to the MD/TAPE IN jacks of this unit.
CONNECTION OF CD recorder
Connect the IN (recording input) jacks of the CD recorder to the
CD-R OUT jacks of this unit, and connect the OUT (playback
output) jacks of the CD recorder to the CD-R IN jacks of this unit.
4
CONNECTION OF SPEAKER SYSTEMS
This unit is equipped with two sets of SPEAKER SYSTEM
terminals––SYSTEM 1 terminals and SYSTEM 2 terminals.
Usually connect your speaker system to the SYSTEM 1 terminals.
¡ The speakers in the speaker system should have an impedance between 8 and 16 ohms. If speakers with an impedance
of less than 8 ohms are connected, the protection circuitry may
be activated during play.
¡ Connect the Right channel speaker to the R terminals, and the
Left channel speaker to the L terminals.
¡ The output terminals have positive (+: Red) and negative
(–: Black) polarity, and each speaker also has the same
polarity (+ and –). When connecting the speaker, be sure to
connect the terminals with the same polarity (+ with +, –
with –).
English
FOREWORD