1
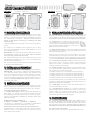
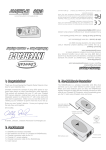
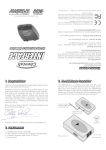
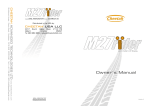
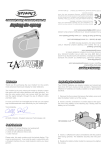
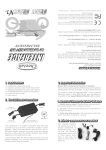
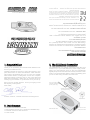
© 2009 Cheetah Advanced Technologies Ltd, Scotland.
All rights reserved.
This device complies with Part 15 of the FCC Rules. Operation
is subject to the following two conditions: (1) this device may not
cause harmful interference, and (2) this device must accept any
interference received, including interference that may cause
undesired operation.
THIS INTERFACE IS COMPATIBLE WITH
Cheetah Advanced Technologies Ltd. declares that this product
is in compliance with the essential requirements and other
relevant provisions of Directive 1999/5/EC.
If any problems persist, or to arrange a product return, please
email [email protected]
Europe & Rest of World - visit www.SpeedCheetah.com
USA & Canada - visit www.GPSdetector.com
Service & Support
If for any reason your Cheetah product develops a fault,
please check our Customer Service page on:
Limited Warranty
Cheetah Advanced Technologies Ltd. warrant our products
against all defects in materials and workmanship for a period
of one year from the date of the original purchase. Full
warranty terms and conditions available online at:
www.SpeedCheetah.com
Warranty Registration
Register online at www.SpeedCheetah.com
Thank you for purchasing the Cheetah Radar Detector Interface for your Valentine One.
Cheetah invented the concept of using GPS speed to suppress false alarms on other manufacturers’ radar detectors.
This product will wirelessly link your V1 with your Cheetah
GPS camera detector, making them work as one complete,
integrated system to enhance the V1 with voice alerts and
false alarm suppression. Make sure you read the section on
“Setting up your Cheetah” to get the most out of your set up.
Enjoy your new “quieter” detector. I know you’re going to love
the way they work together.
Drive safely,
The RADARnode is a wireless transmitter (433 Mhz) that
connects up to your radar detector’s power supply socket.
When your radar detector gives an alert, the RADARnode
digitally analyzes the alert data and instantly transmits a radio
code to your Cheetah GPS detector, which immediately gives
you the V1 alert using Cheetah voice and tones.
Over-ride cable for
Cheetah LASERnode
(motorcycles only)
VizAlert Test button
(motorcycles only)
Al Smith, Director, Cheetah Advanced Technologies Ltd
1 x RADARnode wireless transmitter
1 x RDI software card for the V1 (inserted in RADARnode)
1 x Cheetah connector cable for the V1
1 x User manual
RDI Software card
Power socket
Detector socket
OPTION 1
V1
power cord
POWER IN
Jammer
over-ride
DETECTOR
RADARnode
transmitter
Before you begin installation, double check that the RDI
software card and connector cable are correct for your radar
detector. The RDI software card is pre-installed in the side of
the RADARnode transmitter. Always ensure that the
power is OFF before removing or inserting your RDI
software card.
Instal the RADARnode according to one of the wiring options
above.
4.1 Remove your Valentine power cord from your V1. Plug
the end of the Cheetah connector cable labelled “V1” into
your Valentine detector.
IMPORTANT - the Cheetah connector cable for the V1 must
be installed the correct way round. If the cable is inserted
the wrong way round it will not work.
4.2 Safely route the RDI connector cable from your V1 to the
RADARnode transmitter and plug it into the RADARnode
socket marked DETECTOR.
4.3 Plug your existing Valentine power cord into the POWER
IN socket on the RADARnode.
V1 menu items can be set according to personal preference.
IMPORTANT - If you add in a Valentine Concealed Display
or a Valentine Remote Audio Adapter, this standard pack
does not enable these Valentine remote displays to function
correctly. To make them work, you can purchase an extra
component called the Cheetah V1 Remote Adapter from our
website at www.SpeedCheetah.com and click on Accessories in the main menu.
Use Button 1 on your Cheetah to cycle through the main
menu. Use button 2 (+) and button 3 (-) to adjust the settings
of any menu item and press button 4 to save your changes.
False Alarm Suppression (Button 1)
1. Audible Alert Speed - set the speed limit threshold for
radar alerts, e.g. 35mph. Drive slower and radar alerts are
automatically muted, drive faster and you hear them again.
There is an automatic override for serious alerts (KA
OPTION 2
Jammer
over-ride
DETECTOR
RADARnode
transmitter
V1
power cord
7.1 Start-up tones - When you switch on your V1, it’s
start-up tones will trigger a brief K band and laser alert on
your Cheetah to confirm that the wireless link is operational.
To avoid this, switch on the V1 first, before your Cheetah.
7.2 Wireless link - A short time after you switch
on your detectors, you will see a small red wireless
symbol appear on the Cheetah GPS detector. This
shows that the wireless datalink is active and V1
alerts will be provided instantly.
7.3 Radar detector alerts - When your Valentine One picks
up a signal, a voice alert from your Cheetah will announce the
radar band being picked up.
Warning tones are also given for the duration of an alert.
There are different warning tones for each radar / laser band.
The Cheetah detector will continue alerting for as long as the
V1 does. A confirmation "chirp" signals the end of an alert.
7.4 Ku band users (Europe) -Please note the V1 uses the
same audio tone for K and Ku bands. The RADARnode
listens to the audio, so therefore it will transmit a K band
warning for both K and Ku alerts.
7.5 Signal strength - Radar alerts on the Cheetah will ramp
up in 5 stages as the signal strength increases, from 1 tone
per second, up to 5 tones per second:
V1 display strength 1-2 is transmitted as signal strength 1
V1 display strength 2-4 is transmitted as signal strength 2
V1 display strength 4-5 is transmitted as signal strength 3
V1 display strength 5-6 is transmitted as signal strength 4
V1 display strength 7-8 is transmitted as signal strength 5
The actual alert given by your Cheetah may vary occasionally
from the V1 display as the RADARnode responds to the V1’s
AUDIO signal and NOT the display.
7.6 Radar Mute - During a radar alert, press button 3 to
mute the remainder of an alert.
7.7 City Mute during an alert - If you want to swap from
VOICE+TONE alerts to VOICE ONLY alerts (or vice versa)
during an alert, you still need to press button 4, but hold it
down for a little longer than normal, until you hear the voice
confirmation that the mode has changed.
band and laser).
Radar Band Selection (Button 1)
5. X Band 6. K Band 7. KA Band 8. KU Band
Use button 2 (+) and button 3 (-) to enable or disable alerts
for these radar bands, then press button 4 to save.
Voice Only alerts or Voice plus Alert Tones (Button 4)
Pressing button 4, outside of the main menu, swaps the alerts
between “Voice + Tone” alerts (city mute OFF) and “Voice
Only” alerts (city mute ON).
8.1 Constant KU Band radar alert - RDI software card is
not correctly installed. It must be fully inserted into the slot on
the side of the RADARnode. Switch off power, then remove
the card and re-insert flush. Always ensure the power is
OFF before removing or inserting your RDI software card.
8.2 No wireless link symbol
Check the power connections to the RADARnode and V1.