1
Plastic card solutions for a changing world
User's Guide for
ImageCard® and
UltraGrafix® Series Printers
Express and Select Classes
January 1999
Part No. 526945-001
ii
Contents
Please note and heed the WARNING and CAUTION labels that have been placed on the
equipment for your safety. Please do not attempt to operate or repair this equipment without
adequate training.
Liability statement
This DataCard product has been built to the high standards of DataCard Corporation. See
Appendix A for the statement of liability.
Regulatory compliance
This DataCard product conforms to regulatory requirements as specified in North America
and Europe. Please see Appendix A for detailed regulatory compliance information.
Trademark acknowledgments
Trademark, service mark, and copy right acknowledgments appear in Appendix A.
Proprietary notice
All drawings and information herein are the property of DataCard Corporation. All
unauthorized use and reproduction is prohibited. Copyright © 1999. All rights reserved.
Revision Log
User’s Guide for ImageCard and UltraGrafix Series Printers
(Express and Select Classes)
Revision
A
Date
Jan. '99
Affected Pages
All
Description of Changes
First version of this manual.
DataCard Corporation
11111 Bren Road West
Minnetonka, MN 55343-9015
612.933.1223
Fax: 612.933.0418
© 1997, 1998, 1999 DataCard Corporation.
All rights reserved. Printed in United States of America.
Contents
iii
Contents
Declaration of conformity
Chapter 1: Introduction
About this manual
Required skills
The printer and its features
Parts of the printer
Printer software requirements
Card quality guidelines
Card surface
Card handling
Card storage and maintenance
Supplies
Chapter 2: Getting started
Choosing a site
Environmental requirements and specifications
Electrical requirements
General requirements and intended use
Connecting cables
Loading supplies
Loading blank cards
Loading and replacing the ribbon
Installing the printer driver for the first time
Magnetic stripe encoding
Printing test cards
Printing magnetic stripe test cards
The basics of printing from an application
Chapter 3: Day-to-day printer use
Accessing printer features
Using the printer properties dialog box
Using the default document properties dialog box (Windows NT only)
Using the status monitor
Opening and using the status monitor
Viewing status monitor information
Starting a printer cleaning cycle
Cleaning the magnetic stripe head
Cleaning the duplex module
Starting or quitting diagnostics
Creating a magnetic stripe test card
Suspending or resuming the status monitor
Exiting the status monitor
Using What’s This help (Windows 95/98 only)
Performing a cleaning cycle
Cleaning the printhead
Cleaning the magnetic stripe head
Cleaning the duplex module
Reconfiguring the printer driver
v
1-1
1-2
1-2
1-2
1-5
1-9
1-10
1-10
1-10
1-10
1-11
2-1
2-2
2-2
2-2
2-3
2-4
2-5
2-5
2-8
2-10
2-15
2-18
2-23
2-25
3-1
3-2
3-2
3-5
3-6
3-7
3-7
3-8
3-8
3-9
3-9
3-9
3-10
3-10
3-11
3-12
3-16
3-17
3-19
3-20
iv
Contents
Chapter 4: Troubleshooting
Understanding messages
General troubleshooting
Making repairs and obtaining service
Chapter 5: Advanced information
Confirming the ECP parallel port configuration and assignment
Re-installing the printer driver
Installing a second printer (Windows 95/98 only)
Replacing the printhead cartridge
Printing on both sides of a card
Printing on thick cards
Printing bar codes
Moving the printer from Windows 95/98 to NT
Encoding magnetic stripe data from an application
Notes on NTT magnetic stripe encoding
Printing over a network (Windows 95/98 only)
Security key issues
Other tips, hints and information
Writing software for ImageCard/UltraGrafix series printers
Appendix A: Safety and compliance
Emissions
FCC notice (USA)
Canada
Europe
Liability statement
Proprietary notice
Safety
Safe environment
Safe human interface
Acknowledgments
Appendix B: Supplies
List of supplies
Card requirements
Printhead cartridge
Ribbon
Cleaning supplies
Ribbon cartridge
Card cartridge
Interface cable
Power cable
Power receptacle fuse
Carrying case (Express & S models only)
Publications
Printer driver
I Index
4-1
4-2
4-3
4-11
5-1
5-2
5-5
5-11
5-13
5-16
5-17
5-18
5-19
5-19
5-21
5-22
5-23
5-23
5-24
A-1
A-2
A-2
A-2
A-2
A-2
A-3
A-3
A-3
A-4
A-4
B-1
B-2
B-3
B-3
B-5
B-6
B-7
B-7
B-8
B-8
B-9
B-9
B-10
B-10
I-1
Contents
Declaration of conformity
v
Chapter 1: Introduction
This chapter contains introductory information on this manual
and on the ImageCard® and UltraGrafix® series photo ID
printers.
Contents
About this manual
1-2
Required skills
1-2
The printer and its features
1-2
Parts of the printer
1-5
Printer software requirements
1-9
Card quality guidelines
Card surface
Card handling
Card storage and maintenance
Supplies
1-10
1-10
1-10
1-10
1-11
1
1-2
Introduction
About this manual
This manual describes the ImageCard/UltraGrafix print series. It contains
procedures for basic operation of the printer, performing routine
maintenance on it and troubleshooting problems.
Required skills
To perform the procedures in this manual, you must have the following
skills:
•
Ability to read and understand written and graphical instructions
•
Ability to operate a personal computer
•
Experience with Microsoft Windows®
•
Ability to load supplies
•
Ability to perform simple troubleshooting using written and graphical
instructions
The printer and its features
The ImageCard/UltraGrafix printer is a low-cost desktop printer that
delivers high-quality, full-color IDs including photos, text, logos, bar codes,
digitized signatures, encoded magnetic stripes, and personalized smart card
data storage chips. It requires the use of the ImageCard/UltraGrafix printer
driver on a PC running Microsoft Windows 95, Windows 98 or Windows
NT. For optimal performance, an enhanced communications port (ECP)
parallel port is recommended for fast data transfer from the PC. The printer
also requires the use of a card printing application, such as QuikWorks™, to
capture and organize information into a card format.
This printer is part of a series of DataCard printing products. Various
models have different names, depending on what optional features they
contain. (There are also price differences between models.) These are the
available features and options in the product line:
•
Color or monochrome printing — Printers in the ImageCard series can
print a full range of colors using three-color ribbon. Printers in the
UltraGrafix series do monochrome printing with 1-color ribbon.
ImageCard/UltraGrafix (Express and Select Classes) User’s Guide
1-3
•
Magnetic stripe encoding — This option offers the ability to record
information on a card's magnetic stripe. This is available as an option on
any ImageCard or UltraGrafix model.
•
Smart card encoding — ImageCard and UltraGrafix printers can record
information on smart cards, which are plastic cards containing computer
chips. This is available as an option on most ImageCard or UltraGrafix
models.
•
Enhanced printing speed — Some printers print at higher speeds for
applications that require fast card printing.
•
Automatic dual-sided printing — All ImageCard and UltraGrafix machines
allow duplex printing, or printing on both sides of a card. On some
models, the printer automatically turns the card over to print the other
side. With other models, the operator turns the card over by hand.
An existing ImageCard or UltraGrafix printer cannot have a different set
of options added.
Use Table 1:-1 and your printer's product name (which appears on the box or
the front of the printer) to learn what features are included in your machine:
Table 1:-1 Features available with various printer models
Model name
Magnetic
stripe (MS)
available?
Smart card
(SC)
available?
MS & SC
in same
printer?
Colors
printed
Printing
speed
Duplex
print
method
ImageCard Express
Yes (optional)
Yes (optional)
No
Standard
Manual
ImageCard S
Yes (optional)
No
No
Enhanced
Manual
ImageCard S2
Yes (optional)
Yes (optional)
Yes
Enhanced
Auto
UltraGrafix Express
Yes (optional)
Yes (optional)
No
Standard
Manual
UltraGrafix S
Yes (optional)
No
No
Enhanced
Manual
UltraGrafix S2
Yes (optional)
Yes (optional)
Yes
Full color
or mono.
Full color
or mono.
Full color
or mono.
Mono.
only
Mono.
only
Mono.
only
Enhanced
Auto
1-4
Introduction
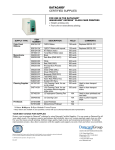
Figure 1:-1 shows what the different versions of the printer look like: Express
and S models for both the ImageCard and UltraGrafix lines, and the S2
model for both lines.
ice0001
Express and S models
S2 models
Figure 1:-1 ImageCard/UltraGrafix printer models
The S and S2 models are both part of the Select class.
ImageCard/UltraGrafix (Express and Select Classes) User’s Guide
1-5
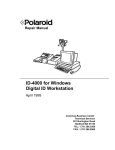
Parts of the printer
This section describes the basic components of the printer.
Top cover
Printhead
Swing arm
Printhead cartridge
Ribbon cartridge
Manual card feed knob
74030d23
Figure 1:-2 Printer internal part names (Express and S models shown)
Top cover – The top cover protects the internal parts of the printer from dust
and debris.
Printhead – The printhead, contained in the printhead cartridge, uses heat and
pressure to transfer dye and other material from the ribbon to the card.
Swing arm – The swing arm opens to give you access to the printhead
cartridge and ribbon cartridge.
Printhead cartridge – The printhead cartridge holds the printhead.
Ribbon cartridge – The ribbon cartridge holds the ribbon.
Manual card feed knob – The manual card feed knob turns the rollers so you
can move jammed cards along the card transport track manually.
1-6
Introduction
Top cover
Status light
Card cartridge
Exception card slot
Card output stacker
Ready button
Power button
74030s1
Figure 1:-3 Printer front part names (Express and S models shown)
Status light – The status light indicates that the printer is processing data,
ready to receive data, or in an error condition.
•
When the status light is green, the printer is on.
•
When the status light blinks green, the printer is paused, or it is
printing or receiving data from the PC.
•
When the status light blinks yellow, an error has occurred.
•
The status light can turn red on rare occasions. If this happens,
contact your DataCard-authorized service provider for assistance.
Card cartridge – The card cartridge holds blank cards to print.
Exception card slot – The exception card slot allows you to insert a single
card that is different from the cards in the card cartridge. For example, use
the exception card slot when you use the printer to manually print on both
sides of a card. The printer prints one side, and then ejects the card. To print
the other side, you can remove this card, flip it over, and insert it into the
exception card slot. (Note: Some printer models can perform this card flip
automatically. See The printer and its features on page 1-2 for more
information.)
Card output stacker – The card output stacker holds the cards after they
have been printed.
Ready button – The Ready button allows you to pause the printer while
printing a card, to cancel a print job and delete all data for the job, or to
create a printer test card:
ImageCard/UltraGrafix (Express and Select Classes) User’s Guide
1-7
•
To pause the printer, press and hold the Ready button for three seconds
or less. The status light continues to blink green while the printer is
paused. Press the Ready button again to resume printing.
•
To halt the current print job, first press the Ready button to pause the
printer. When you hear an audible sound, press and hold the Ready
button for between three and ten seconds. When the sound changes
tone, release the Ready button.
•
You can verify that the printer is working correctly by making a printer
test card. See Printing test cards in Chapter 2 for more information.
Power button – The power button allows you to power on or power off the
printer.
ECP parallel
port
Power supply fan
ice0008
Power receptacle
Smart card data
port (used only
on printers with
the smart card
option)
Figure 1:-4 Printer back part names (Express and S models)
ECP parallel port – The ECP parallel port is the port for connecting the
printer's interface cable to the PC.
Power receptacle – This is the receptacle for connecting the power cable.
Power supply fan – The power supply fan cools the power supply
components in the printer.
Smart card data port — On printers equipped with the smart card option,
this connector is for the cable from the PC that carries the data to encode on
the smart card chip.
1-8
Introduction
Duplex module — On ImageCard S2 and UltraGrafix S2 printers, the duplex
module contains the hardware for automatic dual-sided printing (see Figure
1:-5). This module is not present in the Express or S printers.
Duplex module
ECP parallel port
Smart card data port
(below parallel port -used only on printers
with the smart card
option)
Power receptacle
ice0007
Figure 1:-5 Printer back part names (S2 models)
ImageCard/UltraGrafix (Express and Select Classes) User’s Guide
1-9
Printer software requirements
The printer must be connected to a PC that provides data to print on a card.
The operator creates the card design on the PC, and the PC sends the
information to the printer. The PC must have the following software:
•
Microsoft Windows 95, Windows 98 or Windows NT 4.0, Service Pack 3
or higher (not supplied with the printer). With NT 4.0, the printer driver
is not supported for PCs with Alpha, MIPS, or PowerPC processors.
•
A Microsoft Windows card printing application, such as DataCard's
QuikWorks products (not supplied with the printer)
The card printing application is responsible for creating the card
format and correctly preparing data (including magnetic stripe and
smart card data) for printing.
•
The ImageCard/UltraGrafix photo ID printer driver. Two versions
come with the printer — one for Windows 95/98 and another for
Windows NT.
The printer driver runs on the Microsoft Windows platform. It requires the
following PC hardware configuration for optimal performance:
•
RAM: 16 MB or more recommended for Windows 95/98; 32 MB or more
recommended for Windows NT
•
Connection: An ECP parallel port. ECP stands for extended capabilities
port. This type of port allows two-way (bi-directional) communication
between the PC and the printer. ECP ports are also capable of much
faster data transfer, depending on the communication method being
used.
For hardware requirements of your card printing application, see the
documentation that came with the application.
1-10
Introduction
Card quality guidelines
Your cards must meet the following card quality guidelines for the printer to
successfully print high quality graphics on them.
Card surface
Card stock must meet the following surface guidelines.
•
The card surface must be smooth and free of irregularities (such as
bumps and scratches) so that the printhead and ribbons can maintain
contact with the print surface. Surface irregularities can cause loss of
contact, resulting in printing voids or damage to the printhead.
•
The printing surface must be glossy. It cannot have a matte finish (see
Card requirements in Appendix B for more information).
Card handling
These guidelines apply to unprinted cards. Any debris or particles on an
unprinted card’s surface can reduce printing quality and damage the
printhead. Grease or oils, such as oils from your fingers, also reduce printing
quality.
•
Keep cards in their box until ready for use.
•
Keep cards completely clean.
•
Do not touch the printing surface of a card with your fingers or hands.
•
Do not use a rubber band to bind blank cards together.
•
If you drop a card on the floor, do not insert it into the printer.
Card storage and maintenance
These guidelines apply to both printed and unprinted cards.
•
Cards must be stacked so that they will not shift and rub against each
other.
•
When storing cards, make sure that no two cards contain images or
blocks of color that will come in contact with each other.
ImageCard/UltraGrafix (Express and Select Classes) User’s Guide
•
Make sure that the magnetic stripe on one card does not come into
contact with the magnetic stripe on another card.
•
Make sure that cards with magnetic stripes are stored away from
magnets and other magnetic objects.
1-11
Supplies
See Appendix B for information on the supplies to use with the printer.
2
Chapter 2: Getting started
This chapter contains information on installing the printer
driver for the ImageCard or UltraGrafix photo ID printer,
loading initial supplies, setting up the magnetic stripe
encoding (on printers with the magnetic stripe option), and
printing test cards.
Contents
Choosing a site
Environmental requirements and specifications
Electrical requirements
General requirements and intended use
2-2
2-2
2-2
2-3
Connecting cables
2-4
Loading supplies
2-5
Loading blank cards
Loading and replacing the ribbon
2-5
2-8
Installing the printer driver for the first time
2-10
Magnetic stripe encoding
2-15
Printing test cards
2-18
Printing magnetic stripe test cards
2-23
The basics of printing from an application
2-25
2-2
Getting started
Choosing a site
When choosing a location for the printer, consider the following
environmental and electrical requirements.
Environmental requirements and specifications
The printer requires the following environmental conditions for optimal
performance:
•
Operating relative humidity: 20% to 80% non-condensing
•
Storage relative humidity: 20% to 80% non-condensing
•
Operating temperature range: 55° F to 80° F (13° C to 27° C)
•
Storage temperature range: 0° F to 100° F (-18° C to 38° C)
•
Physical space requirements:
•
Width: 17.75 inches (450.85 mm) for Express and S models, 24
inches (650.16 mm) for S2 models
•
Depth: 8.75 inches (222.25 mm)
•
Height: 10 inches (254 mm)
•
Weight: 21.4 lbs. (9.71 kg) for Express and S models, 26.25 lbs. (11.9
kg) for S2 models
Electrical requirements
The printer requires the following electrical conditions for optimal
performance:
•
A dedicated outlet
•
90-254 VAC 50/60 Hz (the printer will adjust to any power within this
range)
•
Single phase, 3-wire grounded receptacle only
The machine's maximum input current is 1.4 amps at 100 VAC applied.
ImageCard/UltraGrafix (Express and Select Classes) User’s Guide
2-3
General requirements and intended use
Consider the following general printer installation guidelines:
•
Keep all dust, dirt, food, liquids, etc. away from the printer at all times.
•
Keep the top cover closed at all times, except when changing supplies.
•
Store all supplies (ribbons, cards, etc.) in their original packaging until it
is time to load them.
•
Do not use contaminated supplies.
•
Store all supplies in a clean, cool, dry location.
•
Keep paper and foreign materials off the printer.
•
Do not block the air vents or power supply fan on the back of the
printer.
•
Place the printer on a stable platform; keep it off the floor.
•
Place the printer away from air vents (heat ducts, blowers, etc.).
•
Do not use the printer for purposes other than its intended use.
•
When cleaning around the printer, cover it to prevent debris from
entering the printer.
•
Place the printer in a clean office environment, protected from any type
of construction.
2-4
Getting started
Connecting cables
Once you have chosen a location for the printer, you will need to connect
various cables to it. Figure 2:-1 shows the locations of the printer's cable
connectors for different printer models.
ice0008
ice0007
Figure 2:-1 General locations of cable connectors
Make the following cable connections (see Figure 2:-2 if your printer does not
have the smart card option, or Figure 2:-3 if it does):
•
The power cable connects the printer to a power outlet.
•
The interface cable connects the printer's ECP parallel port to the PC's
parallel port.
•
On machines with the smart card option only: The smart card cable connects
the PC to the printer's smart card data port.
PC
Interface Cable
Power Cable
iSEL005u
Figure 2:-2 Connections for printers without the smart card option
ImageCard/UltraGrafix (Express and Select Classes) User’s Guide
2-5
Interface Cable
PC
Smart Card Cable
Power Cable
74030v21
Figure 2:-3 Connections for printers with the smart card option
Loading supplies
These are the printer supplies you will need to replace most often:
•
Blank cards
•
Ribbon
You can also replace the printhead cartridge. See Replacing the printhead
cartridge in Chapter 5 for instructions.
Loading blank cards
The printer has a translucent card cartridge so that you can easily see how
many cards are loaded. When it is empty, reload it. To order additional
cards, contact your DataCard-authorized service provider or your card
vendor. For information on card requirements, see Appendix B.
Load blank cards
1. Lift the card cartridge up and out of the card cartridge cavity (see
Figure 2:-4).
2. Place blank cards into the card cartridge. Do not touch the surface of
the cards.
For magnetic stripe cards, the magnetic stripe must be facing down
and positioned toward the right side of the printer (see Figure 2:-5).
2-6
Getting started
3. Replace the card cartridge into the card cartridge cavity, setting the
top in place and pushing the bottom toward the printer until it clicks
into place (see Figure 2:-6).
!
74030d6
Figure 2:-4 Remove the card cartridge (Express and S models shown)
Magnetic stripe
74030d7
Figure 2:-5 Load cards into the card cartridge
ImageCard/UltraGrafix (Express and Select Classes) User’s Guide
2-7
1
2
iSEL007u
Figure 2:-6 Replace the card cartridge (Express and S models shown)
2-8
Getting started
Loading and replacing the ribbon
The printer uses ribbon with color panels or continuous color. To order new
ribbon, contact your DataCard-authorized service provider. See Appendix B
for ordering information.
Replace ribbon
1. Lift open the top cover.
2. Press down on the swing arm. The push latch releases the swing arm.
Lift the swing arm until it is fully open.
3. Grasp the ribbon cartridge handle, and lift up to remove the ribbon
cartridge (see Figure 2:-7).
4. Remove the used ribbon and used ribbon core from the ribbon
cartridge shafts.
5. Slide the new supply ribbon and ribbon core onto the left ribbon
cartridge shaft (see Figure 2:-8).
6. Slide the new take-up ribbon core onto the right ribbon cartridge
shaft, leaving very little slack in the ribbon between the ribbon
cartridge shafts (see Figure 2:-9).
7. Place the ribbon cartridge onto the ribbon cartridge supports, and
press down until it clicks into place (see Figure 2:-9).
8. Close the swing arm, pressing it down until the push latch clicks into
place.
9. Close the top cover.
10. Print a Windows test page card to verify that the ribbon cartridge is
installed properly. (See Printing test cards on page 2-18 for more
information.)
!
In the printer properties window, you can set the ribbon type to
match the ribbon being used, or you can enable the printer's ribbon
type autodetect feature. For information on the printer properties
window, see Using the printer properties dialog box in Chapter 3.
ImageCard/UltraGrafix (Express and Select Classes) User’s Guide
Ribbon take-up
Ribbon supply
74030c8a
Figure 2:-7 Remove the ribbon cartridge
Ribbon take-up
Ribbon supply
740030c8b
Figure 2:-8 Replace ribbon on the ribbon cartridge
Ribbon supply
Ribbon take-up
74030c8c
Figure 2:-9 Replace the ribbon cartridge
2-9
2-10
Getting started
Installing the printer driver for the first time
A printer driver is software that prepares data for the printer and manages the
communication between it and a PC application. The printer driver requires
a PC running Microsoft Windows 95/98 or Windows NT. You can obtain the
latest copy of the printer driver from the DataCard Internet Web site
(www.datacard.com) or by calling your DataCard-authorized service
provider.
If you now want to install an Express or Select class driver on an NT
PC and you had previously installed an Express class or ImageCard
IV printer on this PC, see Re-installing the printer driver in Chapter 5.
To install a second printer driver of the same class on a Windows
95/98 system, see Installing a second printer in Chapter 5. (You cannot
install a second printer driver of the same class on a Windows NT
system.)
Do not install two copies of the driver unless you connect two
ImageCard/UltraGrafix series printers to your PC. You can connect
two ImageCard/UltraGrafix printers to a PC running Windows
95/98 only.
Before you start the installation process, there are a few things to keep in
mind:
•
You should have received two sets of installation diskettes: one for
Windows 95/98 and the other for Windows NT. Be sure to use the
correct set during the installation.
•
If you move the printer from a PC running Windows 95/98 to a PC
running Windows NT 4.0, make sure the Ribbon type setting is set to
autodetect (using the Properties window) before moving the printer. See
Moving the printer from Windows 95/98 to NT in Chapter 5 for more
information on this.
•
If the installation process halts before finishing, look in the Windows
Start menu to see if there is an ImageCard/UltraGrafix icon. (See your
Windows documentation for instructions.) If there is an
ImageCard/UltraGrafix icon, delete it before re-running the installation
procedure.
For optimal performance, the printer should be connected to an ECP parallel
port. The communications method used for ECP ports is compatible with
Windows 95/98 and Windows NT.
ImageCard/UltraGrafix (Express and Select Classes) User’s Guide
2-11
For information on verifying your parallel port configuration and
assignment, see Chapter 5. For computer configuration requirements, see
Chapter 1.
Install the printer driver on Windows 95/98
The following procedure applies only to Windows 95/98 systems. To
install the driver on a PC running Windows NT, see Install the printer
driver on Windows NT on page 2-12.
Upon reboot, most PCs running Windows 95/98 automatically detect
that new hardware was attached to the computer. If you power off
the PC before attaching the printer and then power it back on, it
should display a message asking if you want to install the printer
driver as new hardware. Use the following procedure to install the
printer driver.
1. If you power up the PC and it displays a message asking if you want
to install the printer driver as new hardware, answer yes, insert the
first printer driver diskette into the disk drive of the PC, and skip to
step 5 below.
2. Insert the first printer driver diskette into the disk drive of the PC.
3. Select Settings and then Printers from the Windows Start menu (see
Figure 2:-10). The Printers window appears.
4. Double-click on the Add Printer icon.
5. Follow the instructions on your screen and the guidelines below to
complete the installation:
•
Click on the Have Disk button when it appears. If needed, click on
the Browse button to select the printer driver diskette location.
•
In the Printer Name box, change the printer name to match the
name on the front of your printer. For example, you might
change "DataCard Select Class" to "ImageCard S2" or "UltraGrafix
S". Do not use the <>:"/\ and | characters in the name.
•
Remove the diskette and insert the next diskette when prompted.
•
A Version Conflict dialog might appear as the installer copies
files. Select Yes to keep the existing files on your PC.
•
A Code Page Mismatch dialog might appear. Select Yes to keep
the existing files on your PC.
6. Reboot the PC and print a Windows test page card to verify that the
printer is working. See Print a Windows test page card on page 2-20 for
more information.
2-12
Getting started
!
See Reconfiguring the printer driver in Chapter 3 for more information
on setting up the driver.
Select Settings and then
Printers from the Start
menu to display the
Printers window.
Figure 2:-10 Display the Printers window
Install the printer driver on Windows NT
The following procedure applies only to Windows NT. If you are
installing the printer driver on a PC running Windows 95/98, see
Install the printer driver on Windows 95/98 on page 2-11.
To use the driver with NT, your PC must run Windows NT 4.0 with
Service Pack 3 or higher. The printer driver is not supported for PCs
with Alpha, MIPS, or PowerPC processors.
One ImageCard/UltraGrafix Express, Select or S2 printer can be
installed on the PC at a time. If you have a printer driver for another
DataCard printer installed on this PC, do the procedure called Reinstall the printer driver in Windows NT in Chapter 5 instead of this
procedure.
1. Be sure you are logged in to the Windows NT system as the
administrator before starting this procedure.
2. Close all open applications. Do not close Windows NT.
3. Select Settings and then Printers from the Start menu.
4. In the Printers window, double-click on the Add Printer icon. (Only
the administrator can use this icon to install the printer driver on the
PC.)
5. Follow the instructions on your screen and the guidelines below to
complete the installation.
ImageCard/UltraGrafix (Express and Select Classes) User’s Guide
2-13
•
Select the "My computer" choice, and not the "Network" choice. If
the "My computer" choice is not available, make sure you have
logged on as the administrator.
•
Select the port to which you have connected the printer.
•
Do not select the "Enable printer pooling" choice when installing
the printer driver.
•
When the Manufacturers list appears, insert driver diskette 1 and
select the Have Disk button. If needed, select the Browse button to
specify the location of the printer driver diskette.
•
When the Printer Name box appears, change the printer name to
match the name on the front of your printer. For example, you
might change "DataCard Select Class" to "ImageCard S2" or
"UltraGrafix S". Do not use the <>:"/\ and | characters in the
name. The PC will not be able to enable the driver if you use those
characters.
•
Printer sharing is not supported by the current version of the
printer driver.
•
Do not print a test page as part of the installation. You must select
the ribbon type before printing a test page, as explained below.
•
Remove the current diskette and insert the next diskette when
prompted.
•
A Version Conflict dialog might appear during the installation. If
so, select Yes to keep the existing files on your PC.
6. Remove the diskette and restart Windows NT when prompted after
the printer driver is installed.
Note: If you earlier asked to print a test page, test page messages
might appear at the same time as the prompt to restart Windows NT.
Even if the test page does not print, select "Yes" when the message
appears. Restart Windows NT and continue to follow this procedure.
7. When the PC restarts, log in as the administrator again, and follow
instructions to update the printer firmware if prompted.
8. If a message appears about updating the printer firmware, follow the
on-screen instructions to do this.
9. If the PC attached to the printer has other users, set user permissions
to support printing or to prevent access to the printer. To change
access for other users, make sure you have restarted Windows NT
and then do the following:
a) From the Windows taskbar, select Start, then Settings, and then
Printers. The Printers window appears.
2-14
Getting started
b) Highlight the printer driver icon by clicking on it once. The printer
driver icon has the name you entered earlier when installing the
printer driver.
c) From the menu bar, select File and then Properties. The printer's
Properties window appears.
d) Select the Security tab.
e) Click the Permissions button to open the Printer Permissions dialog
box.
f) For users or groups listed on the Printer Permissions dialog box,
select the type of access for each user or group.
g) Select the Add button to open the Add Users and Groups dialog
box.
h) Select the Show Users button.
i) Select the name of the user (or group) to add to the printer and click
the Add button.
j) From the Type of Access list, select the access. For users who
should not print to the printer, select No Access. For those who will
use the printer, select Full Control. These users will have the same
access level as the administrator. They will be able to see all messages
and perform other actions, such as deleting the printer driver.
(Messages inform users when they need to change the ribbon, load
cards, and fix problems.)
k) Repeat steps g to j to add other users or groups.
l) Select OK to save the changes and close the window.
m) Select OK to save the changes and close the Printer Permissions
window. You can leave the Properties and Printers windows open.
10. Enable printer features by setting the values for the following
document default settings listed below. These items are in the
Default Document Properties dialog box. To open this window, see
Using the default document properties dialog box (Windows NT only) in
Chapter 3.
Be sure to set these items in the order listed:
•
Printing on both sides (duplex printing)
ImageCard/UltraGrafix (Express and Select Classes) User’s Guide
•
Duplex method (automatic or manual)
•
Ribbon type
•
Other values based on your card design
2-15
11. Print a Windows test page card from the PC to verify that the driver
is installed correctly. See Print a Windows test page card on page 2-20
for instructions.
!
See Reconfiguring the printer driver in Chapter 3 for more information
on setting up the driver.
If you downloaded the driver from the Internet, you can delete the
folder and the disk1 and disk2 folders from your hard drive after
installing the driver. You can also delete the downloaded file.
The printer settings just made in the driver controls can be
overridden by your card-printing application.
Magnetic stripe encoding
Three formats of magnetic stripe encoding are available:
•
IAT
•
NTT, a card standard commonly used in Japan. (See Notes on NTT
magnetic stripe encoding in Chapter 5 for important information about
magnetic stripe encoding in the NTT format.)
•
binary, for those who do not wish to use IAT or NTT
If your printer is equipped with the magnetic stripe option, there are three
settings you might need to address:
•
Its encoding format
•
The number of encoding attempts that will be made in case the first
attempt at encoding fails
•
The magnetic stripe unit’s encoding current level, or coercivity:
•
High-coercivity cards — the stripe on these cards is usually black
or nearly black.
•
Low-coercivity cards — the stripe on these cards is usually
brown.
•
NTT cards — see Notes on NTT magnetic stripe encoding in Chapter
5 for more information on working with these cards.
2-16
Getting started
A higher electrical current is used to encode the high-coercivity cards
than the low-coercivity cards. You cannot use high-coercivity cards
with a card-printing application that uses the low-coercivity format, and
you also cannot use low-coercivity cards with a high-coercivity
application.
Set the magnetic stripe values
1. Use the information above to determine the coercivity rating for the
magnetic stripe cards you will be using.
2. Click on the Windows Start button and select Settings.
3. Select Printers and click on the printer icon. (The icon has the name
chosen during installation.)
4. Open the magnetic stripe settings:
Windows 95/98 users: Go to the File menu, select Properties, and click
on the Mag Stripe Settings tab in the dialog box (see Figure 2:-11).
Windows NT users: Go to the File menu and select Document Defaults.
Click on the Advanced tab if necessary. Scroll down to the bottom of
the list (see Figure 2:-12). Click on the plus signs (+) for Document
Options and Printer Features to open up the entries beneath these
headings.
5. Select the encoding format you will use. If the format you want to
use is anything other than IAT or NTT, select Binary.
6. Select the coercivity needed for the magnetic stripe cards you will be
using.
7. Raise or lower the number of encoding attempts by clicking on the up
or down arrow at the bottom of the Mag Stripe Settings tab box.
8. Click OK.
!
ImageCard/UltraGrafix (Express and Select Classes) User’s Guide
Figure 2:-11 Magnetic stripe settings tab in Windows 95/98
Figure 2:-12 Magnetic stripe settings in Windows NT
2-17
2-18
Getting started
Printing test cards
You can print three types of test cards on your ImageCard/UltraGrafix
machine:
•
Printer test card – You can print a printer test card on the printer to
confirm that it is working properly (see Figure 2:-13 and Figure 2:-14).
•
Windows test page card – You can print a Windows test page card to
confirm that the printer driver is communicating correctly with the
printer and that the printer is working properly (see Figure 2:-16).
•
Magnetic stripe test card – On printers equipped with the magnetic stripe
option, you can run one of these cards to confirm that the printer is
recording magnetic stripe data correctly. See Printing magnetic stripe test
cards on page 2-23 to learn how to create a magnetic stripe test card.
Print a printer test card
The printer need not be connected to a PC to print this type of test
card.
1. Power off the printer.
2. Confirm that all supplies are loaded: cards, ribbon, and the printhead
cartridge. If your printer is equipped with the magnetic stripe option,
be sure that you have magnetic stripe cards in the card cartridge.
3. Power on the printer while pressing and holding the Ready button
(see Figure 2:-15). Release the Ready button when you hear a series of
tones. Allow 30 to 60 seconds for the printer to begin printing the test
card. The status light will flash green while the printer works.
!
ImageCard/UltraGrafix (Express and Select Classes) User’s Guide
74030s6
Figure 2:-13 Printer test card — Express class only
ice0016s
Figure 2:-14 Printer test card — S and S2 classes
2-19
2-20
Getting started
Ready button
Power button
74030s1
Figure 2:-15 Locating the power and Ready buttons (Express and S models
shown)
Print a Windows test page card
The printer must be connected to a PC to print this type of test card.
1. Select Settings and then Printers from the Windows Start menu (see
Figure 2:-10 on page 2-12). The Printers window appears.
2. Click once on the printer driver icon. The icon has the name chosen
during installation.
3. Select Properties from the File menu. The printer's Properties dialog
box appears (see Figure 2:-18 if you are using Windows 95/98 or
Figure 2:-19 for Windows NT).
4. Select the Print Test Page button on the General tab. The printer
prints a Windows test page card.
This card is created by Microsoft Windows and looks similar to the
top of the Windows test page. Because of the small size of a card as
compared to a sheet of paper, it is normal for only the top part of the
test page to appear and for some of the text to appear to be going off
the card. For examples, see Figure 2:-16 and Figure 2:-17.
!
ImageCard/UltraGrafix (Express and Select Classes) User’s Guide
Microsoft
2-21
95
Congratulat
If you can
read this
information
you have
74030s7
Figure 2:-16 Windows test page card, portrait orientation (Windows 95
version)
Microsoft
Windows 9 5
Win
95
Print
74030s97
Figure 2:-17 Windows test page card, landscape orientation (Windows 95
version)
The Windows 98 and Windows NT test page cards look similar to
these examples.
2-22
Getting started
Click on the Print
Test Page button
on the General
tab to print a
Windows test
page card.
Figure 2:-18 Print a Windows test page card in Windows 95/98
Click on the Print
Test Page button
on the General
tab to print a
Windows test
page card.
Figure 2:-19 Print a Windows test page card in Windows NT
ImageCard/UltraGrafix (Express and Select Classes) User’s Guide
2-23
Printing magnetic stripe test cards
If your printer is equipped with the magnetic stripe option, you can create a
magnetic stripe test card to verify that the magnetic stripe option is working
correctly.
Print a magnetic stripe test card
The printer must be connected to a PC to create this type of test card.
Be sure to use only magnetic stripe cards to create this type of test
card.
1. Insert a blank magnetic stripe card into the printer's exception slot,
with the magnetic stripe facing down and to the right.
2. Open the printer's status monitor by double-clicking on the status
monitor icon in the lower-right corner of the screen.
3. Click on the status monitor's Mag stripe card button. See Figure 2:-20.
The printer encodes data on the card's magnetic stripe. At the same
time, it also prints this data on the face of the card.
4. When the printer ejects the completed test card, you can use a
magnetic stripe card reader to read the magnetic stripe data recorded.
If the data read by the reader is the same as what is printed on the
face of the test card, the printer's magnetic stripe option is working
correctly.
!
2-24
Getting started
Click here to start
a magnetic stripe
test card.
Figure 2:-20 Creating a magnetic stripe test card
ImageCard/UltraGrafix (Express and Select Classes) User’s Guide
2-25
The basics of printing from an application
You can use the printer to print cards from many applications. If you use
DataCard's QuikWorks, see the user information for the application to learn
how to do it. If you use an application in which you can save the result and
edit it again, such as Windows WordPad, follow these guidelines to print
cards:
•
In the application, select the ImageCard/UltraGrafix printer as the
current printer.
•
Using the application's page setup feature, set the paper size to CR80
Card 2.13" x 3.38" and set all the margins to 0.10", 0.05" or "edge to edge"
if the application supports this. Select the orientation for the card
design—either portrait or landscape.
•
Format the text to print using a TrueType (
•
See Chapter 5 for information on advanced operations such as encoding
magnetic stripe data or printing on both sides of a card.
) font.
Applications in which you can save the results in a graphic format
only, such as Windows Paint, will require experimenting to get an
image size that prints on one card only.
Chapter 3: Day-to-day printer use
This chapter contains information on checking the ImageCard
or UltraGrafix photo ID printer's status or changing its
settings, cleaning and maintaining the printer, and
configuring the printer driver.
Contents
Accessing printer features
Using the printer properties dialog box
Using the default document properties dialog box
(Windows NT only)
Using the status monitor
Opening and using the status monitor
Viewing status monitor information
Starting a printer cleaning cycle
Cleaning the magnetic stripe head
Cleaning the duplex module
Starting or quitting diagnostics
Creating a magnetic stripe test card
Suspending or resuming the status monitor
Exiting the status monitor
3-2
3-2
3-5
3-6
3-7
3-7
3-8
3-8
3-9
3-9
3-9
3-10
3-10
Using What’s This help (Windows 95/98 only)
3-11
Performing a cleaning cycle
3-12
Cleaning the printhead
3-16
Cleaning the magnetic stripe head
3-17
Cleaning the duplex module
3-19
Reconfiguring the printer driver
3-20
3
3-2
Day-to-day printer use
Accessing printer features
You can check the status of the printer and change settings that affect how
the printer works from the following windows:
•
Printer properties window
•
Default document properties window (Windows NT only)
•
Status monitor
This section describes how to open and use these windows.
Using the printer properties dialog box
The printer properties dialog box contains many of the controls for the
printer, including card-printing parameters and settings for magnetic stripe
and smart card encoding.
1. Click on the Start button in the Windows taskbar.
2. Select Settings and then Printers (see Figure 3:-1). The Printers
window appears.
3. Click once on the printer driver icon (see Figure 3:-2 or Figure 3:-3).
(The icon has the name chosen during installation.)
4. Select File from the Printers menu, and then select Properties (see
Figure 3:-2 if you are using Windows 95/98 or Figure 3:-3 for
Windows NT). The printer's Properties window appears.
5. Select values and change settings as you wish.
6. When you are done, click on the OK button to save your changes, or
on the Cancel button to exit without saving.
!
ImageCard/UltraGrafix (Express and Select Classes) User’s Guide
Select Settings and
then Printers from the
menu to display the
Printers window.
Figure 3:-1 Open the Printers dialog box
Select the
ImageCard/
Ultragrafix printer
driver icon.
Select File and then
Properties to display
the Properties
window.
Figure 3:-2 Display the Properties dialog box (in Windows 95/98)
3-3
3-4
Day-to-day printer use
Select the
ImageCard/Ultragrafix printer
driver icon.
Select File and
then Properties to
display the
Properties window.
Figure 3:-3 Display the Properties dialog box (in Windows NT)
ImageCard/UltraGrafix (Express and Select Classes) User’s Guide
3-5
Using the default document properties dialog box
(Windows NT only)
This dialog box contains additional printer controls not found in the
Windows NT printer properties window.
Windows 95/98 has no default document properties dialog box.
1. Click on the Start button in the Windows taskbar.
2. Select Settings and then Printers (see Figure 3:-1 on page 3-3). The
Printers window appears.
3. Click once on the printer driver icon. The printer driver icon has the
name chosen during driver installation. Select Document Defaults
from the File menu (see Figure 3:-4). The Default Document
Properties window appears. Most of the items you will want to use
are in the Advanced tab.
4. Select values and change settings as you wish.
5. When you are done, click on the OK button to save your changes, or
on the Cancel button to exit without saving.
!
Select the
ImageCard/Ultragrafix printer
driver icon.
Select File and
then Document
Defaults to
display the
Document
Defaults window.
Figure 3:-4 Display the Defaults Document Properties window (Windows
NT only)
3-6
Day-to-day printer use
Using the status monitor
The status monitor displays the status of the communication between the
printer and its printer driver. It also allows you to perform cleaning
operations and diagnostic tests. The status monitor icon — which usually
appears in the lower-right corner of the screen — gives some information
about the state of the driver-printer communication:
Table 3:-1 Status monitor icons
Status
icon
Description
Indicates
This status monitor icon is
white with a green card
cartridge and output
stacker.
The status monitor is active and
communicating with the printer.
This status monitor icon is
gray.
The status monitor is suspended and not
monitoring the printer for status, including
errors. The status monitor automatically
suspends when the printer has not printed a
card for 30 seconds or more. When the
status monitor is suspended, you can
connect another printer to the ECP parallel
port that the printer uses or run PC
maintenance tools, such as ScanDisk,
CheckDisk or Disk Defragmenter.
This status monitor icon is
white with a green card
cartridge and card output
stacker and a white
exclamation point in a red
circle.
The status monitor is active but is not
communicating with the printer. The printer
might be off, cables might be loose, or a
problem might exist.
This status monitor icon is
white with a green card
cartridge and card output
stacker and a blue
magnifying glass.
The status monitor is in diagnostics mode.
Use diagnostics only when your
DataCard-authorized service provider asks
you to do so to help in solving problems with
the printer.
You can click on the Help button to display further information on the status
monitor.
ImageCard/UltraGrafix (Express and Select Classes) User’s Guide
3-7
Opening and using the status monitor
You can use the status monitor window to do the following:
•
View detailed status monitor information
•
Start a cleaning cycle
•
Suspend and resume the status monitor
•
Exit the status monitor
•
Start or quit diagnostics
You can do one of the following to display the status monitor window:
•
Right-click on the status monitor icon in the lower-right corner of the
screen, and then select Display status from the popup menu. The status
monitor window appears.
or
•
Double-click on the status monitor icon in the lower-right corner of the
screen. The status monitor window appears.
Viewing status monitor information
The three lines in the status monitor window display the following detailed
information (see Figure 3:-5):
•
Line 1 displays the current state of the status monitor or printer.
•
Line 2 shows any status monitor error messages.
•
Line 3 displays the current parallel port mode.
3-8
Day-to-day printer use
Line 1
Line 2
Line 3
Figure 3:-5 The status monitor and its status information
Starting a printer cleaning cycle
To begin a cleaning cycle, select the Printer button in the Cleaning section of
the status monitor window, or right click on the status monitor icon and
select Clean printer now from the popup menu. For further information see
Performing a cleaning cycle on page 3-12.
In diagnostics mode you cannot select the Printer button to perform a
cleaning cycle.
Cleaning the magnetic stripe head
Click on the Clean mag stripe button to clean the magnetic stripe hardware
in the printer. See Cleaning the magnetic stripe head on page 3-17 for
instructions.
ImageCard/UltraGrafix (Express and Select Classes) User’s Guide
3-9
Cleaning the duplex module
If you have an ImageCard S2 or UltraGrafix S2 printer, you can clean the
printer's duplex module. To do this, select the Duplex button in the Cleaning
section of the status monitor window, or right click on the status monitor
icon and select Clean duplex from the popup menu. For further information,
see Cleaning the duplex module on page 3-19.
Starting or quitting diagnostics
Start diagnostics only when a DataCard-authorized service provider
asks you to do so.
The Start Diagnostics button on the Status tab switches the printer driver
from printing mode to diagnostics mode. When you select this button, a
message appears informing you that printing of your cards will stop in
diagnostics mode.
The Quit Diagnostics button on the Status tab switches the printer driver
from diagnostics mode to printing mode. When you select this button, a
message appears informing you that the printer will reset; you can resume
printing cards. The ribbon and internal components will move into the
position for printing cards.
If you have entered diagnostics mode and selected the Close button
in the status monitor, a message appears that allows you to quit
diagnostics before closing the status monitor window.
Creating a magnetic stripe test card
Click on the Mag stripe card button to create a magnetic stripe test card.
Depending on what type of magnetic stripe encoding you use, the test card
should look like the one in Figure 3:-6 (IAT encoding) or Figure 3:-7 (NTT
encoding). For more information on this, see Printing magnetic stripe test cards
in Chapter 2.
3-10
Day-to-day printer use
DataCard
Magnetic Stripe Test Card
Track 1 (IATA data, max. 76 chars):
!"#$%&'()*+,-./0123456789:;<=>@ABCDEFGH
IJKLMNOPQRSTUVWXYZ[]^_ !"#$%&'()*+,
Track 2 (ABA data, max. 37 chars):
0123456789:;<=>0123456789:;<=>0123456
Track 3 (TTS data, max. 104 chars):
0123456789:;<=>0123456789:;<=>0123456789
:;<=>0123456789:;<=>0123456789:;<=>01234
56789:;<=>0123456789:;<=
m agstrip
Figure 3:-6 Magnetic stripe test card (IAT encoding)
DataCard
Magnetic Stripe Test Card
Track 3 (NTT data, max. 69 chars):
!"#$%&'()*+,-./0123456789:;<=>?@ABCDEFW
XYZ
[ ]^_ abcdewxyz{|}~
nttstrp
Figure 3:-7 Magnetic stripe test card (NTT encoding)
Suspending or resuming the status monitor
When the status monitor Suspend button is available, you can click on it to
suspend the status monitor. When it is suspended, the status monitor does
not communicate with the printer or display printer messages.
If a Resume button is visible, the status monitor is currently suspended. If
you click on Resume, the status monitor tries to restore communications and
display printer messages. If the printer is powered off or not working
correctly, the status monitor will remain suspended.
Exiting the status monitor
To exit the status monitor and close its window, right click on the status
monitor icon and select Exit. You should exit the status monitor when you
receive instructions to do so, such as when you run PC maintenance tools.
You cannot exit the status monitor while printing a card.
ImageCard/UltraGrafix (Express and Select Classes) User’s Guide
3-11
Using What’s This help (Windows 95/98 only)
What’s This help provides information about specific items or areas of the
printer driver without interrupting your work (see Figure 3:-8).
Press the What's
This help button,
and then select
the field you want
help on.
The system displays
What's This help
about the element
you chose on the
screen: in this case,
the Portrait field.
Figure 3:-8 What's This help
What’s This help provides basic information about what an item or element
does. It does not include step-by-step procedures or detailed conceptual
information.
In Windows NT, What's This help is not available for all printerrelated items. If you cannot get What's This help for a field, there
might be a Help button to click on.
Access What’s This help
1. Click on the What’s This help button (see Figure 3:-8). Notice that the
mouse pointer now has a question mark attached to it.
2. Click on the item or area you have questions about. A popup window
displays information about the item or area you selected.
3-12
Day-to-day printer use
3. To close What’s This help, click anywhere on the screen or press the
ESC key
on your keyboard.
!
Performing a cleaning cycle
The rollers on the printer should be cleaned whenever the print quality
decreases. Typically this will be after printing from 5 to 50 cards, depending
on the environment in which the printer is used. For ImageCard and
UltraGrafix Express printers, the default is 20 cards; for the S and S2 models,
it is 40 cards. You might want to clean more frequently if:
•
The cards, especially magnetic stripe cards, have particles on them
•
A monochrome ribbon is used
•
The printer is operated in a relatively dirty environment
Use a standard cleaning card (part number 557297-001) for cleaning (see
Figure 3:-9). To order cleaning cards, contact your DataCard representative.
Clean the rollers
1. Remove the card cartridge.
2. Remove the ribbon cartridge.
a) Lift open the top cover.
b) Press down on the swing arm. The push latch will release the
swing arm. Lift the swing arm until it is fully open.
c) Grasp the ribbon cartridge handle and lift up to remove the
ribbon cartridge (see Figure 3:-11).
If you do not remove the ribbon cartridge and the ribbon sticks to
the cleaning card, remove the cleaning card and repeat this
procedure with a new cleaning card.
3. Peel the protective paper backing from both sides of the cleaning
card.
4. Orient the cleaning card:
•
If your printer has the smart card option and it is an Express or S
model, orient the cleaning card so that the side facing up shows a
picture of a plastic card with a smart card chip (see Figure 3:-9).
•
Otherwise, orient the card so that the side showing only an arrow
faces up (as shown in Figure 3:-10).
ImageCard/UltraGrafix (Express and Select Classes) User’s Guide
3-13
5. Insert the cleaning card near the bottom of the card cartridge cavity
(see Figure 3:-13).
6. Start a cleaning cycle by doing one of the following:
•
Click the OK button when the printer driver displays a message
requesting that you clean the printer. (If you do not click OK at
this point, the message will redisplay before printing each card
until you run a cleaning cycle.)
•
Click the Clean printer now button in the printer driver status
monitor window. (Right-click on the printer icon in the lower
right corner of the screen and select Display status to see the
status monitor window.)
7. Remove the cleaning card from the card output stacker after the
printer has completed the cleaning cycle.
8. Replace the card cartridge.
9. Replace the ribbon cartridge.
a) Lift open the top cover.
b) Press down on the swing arm. The push latch will release the
swing arm. Lift the swing arm until it is fully open.
c) Place the ribbon cartridge onto the ribbon cartridge supports and
press down until it clicks into place (see Figure 3:-12).
d) Close the swing arm, pressing it down until the push latch clicks
into place.
e) Close the top cover.
10. Discard the used cleaning card. The rollers are clean, and the printer
is ready to resume normal operation.
!
3-14
Day-to-day printer use
scclean
Figure 3:-9 Cleaning card, oriented for printers with the smart card option
and no duplex module
clean
Figure 3:-10 Cleaning card, oriented for all printer models except those
with the smart card option and without the duplex module
Ribbon take-up
Ribbon supply
74030c8a
Figure 3:-11 Remove the ribbon cartridge
ImageCard/UltraGrafix (Express and Select Classes) User’s Guide
Ribbon supply
3-15
Ribbon take-up
74030c8c
Figure 3:-12 Insert the ribbon cartridge
Figure 3:-13 Insert the cleaning card: All models except those with the
smart card option and without the duplex module
Figure 3:-14 Insert the cleaning card: Only for models with the smart card
option and no duplex module
3-16
Day-to-day printer use
Cleaning the printhead
A decrease in print quality indicates the printhead may be dirty. Use
isopropyl alcohol and a lint-free cloth to clean the printhead. Do not use a
cotton swab. The fibers from the cotton can stick to the printhead.
Clean the printhead
1. Power off the printer, and disconnect it from the power source.
2. Moisten a lint-free cloth with isopropyl alcohol.
3. Press down on the swing arm. The push latch will release the swing
arm. Lift the swing arm until it is fully open.
4. Dab isopropyl alcohol on the printhead. Do not touch the printhead
with your fingers. The oils on your fingers can damage the printhead.
5. Close the swing arm, pressing it down until the push latch clicks into
place.
6. Connect the power cable to the power source and power on the
printer.
7. Print a Windows test page card to verify image quality. If card quality
is still inadequate, see Chapter 4. Call your DataCard-authorized
service provider for assistance if the problem persists.
!
ImageCard/UltraGrafix (Express and Select Classes) User’s Guide
3-17
Cleaning the magnetic stripe head
The printer's magnetic stripe head should be cleaned whenever you receive
multiple read errors or rejected cards while attempting to encode a magnetic
stripe. Generally, you should clean the magnetic stripe head once every 2000
cards. Use the magnetic stripe head cleaning card (part number 590408-002;
see Figure 3:-15) to do this.
ice0014s
Figure 3:-15 Magnetic stripe head cleaning card
Clean the magnetic stripe head
!
Do not peel off the strip on the back of the card. Unlike some other
cleaning cards, the magnetic stripe cleaning card does not use an
adhesive to clean. The strip is the part of the card that cleans the
magnetic stripe head.
ice0015s
Figure 3:-16 Strip on back of magnetic stripe cleaning card
1. Insert a magnetic stripe head cleaning card into the exception card
slot. (You can also remove the card cartridge and insert a card
directly between the input card rollers.)
2. Open the status monitor window. To do this, either double-click on
the status monitor icon in the lower right corner of the screen, or
right-click on the status monitor icon and then select Display status
from the popup menu. The printer status dialog box in See Figure 3:17 appears.
3. Click on the Clean mag stripe button (see Figure 3:-17).
3-18
Day-to-day printer use
4. Remove the cleaning card from the card output stacker after the
printer has completed the cleaning cycle.
5. Discard the used magnetic stripe head cleaning card.
!
Click here to clean
the magnetic stripe
head.
Figure 3:-17 Using the status monitor to clean the magnetic stripe head
ImageCard/UltraGrafix (Express and Select Classes) User’s Guide
3-19
Cleaning the duplex module
This procedure applies only to ImageCard S2 and UltraGrafix S2 printers. If you
have an S2 printer, you might want to clean the printer's duplex module if
you have problems with jammed cards.
Clean the duplex module
1. Remove the card cartridge.
2. Remove the ribbon cartridge.
a) Lift open the top cover.
b) Press down on the swing arm. The push latch will release the
swing arm. Lift the swing arm until it is fully open.
c) Grasp the ribbon cartridge handle and lift up to remove the
ribbon cartridge (see Figure 3:-11).
If you do not remove the ribbon cartridge and the ribbon sticks to
the duplex cleaning card, remove the duplex cleaning card and
repeat this procedure with a new one.
3. Peel the protective paper backing from both sides of the duplex
cleaning card (Figure 3:-18).
4. Insert the duplex cleaning card near the bottom of the card cartridge
cavity (see Figure 3:-13).
5. Right-click on the printer icon in the lower right corner of the screen
and select Display status to see the status monitor window. Start a
duplex cleaning cycle by clicking the Duplex button in the Cleaning
section of the printer driver status monitor window.
6. Remove the duplex cleaning card from the card output stacker after
the printer has cleaned the duplex module.
7. Replace the card cartridge.
8. Replace the ribbon cartridge.
a) Lift open the top cover.
b) Press down on the swing arm. The push latch will release the
swing arm. Lift the swing arm until it is fully open.
c) Place the ribbon cartridge onto the ribbon cartridge supports and
press down until it clicks into place (see Figure 3:-12).
3-20
Day-to-day printer use
d) Close the swing arm, pressing it down until the push latch clicks
into place.
e) Close the top cover.
9. Discard the used duplex cleaning card.
!
dupclcrd
Figure 3:-18 Duplex cleaning card
Reconfiguring the printer driver
Upon installation, the printer driver is automatically configured to fit your
system. When you have completed your card design or if you change your
system, you may need to reconfigure the printer driver. You may view or
change the following types of settings:
•
Card design
•
Port
•
Printer supplies and cleaning intervals
•
Magnetic stripe (if the magnetic stripe option is installed)
•
Smart card (if the smart card option is installed) — you can view smart
card configuration information but you cannot change it.
Windows 95/98 users can also get the following read-only information from
the printer driver (this information is not available in Windows NT):
•
Printer version
•
Printhead manufacture date
•
Print cycles, since last reset and total cards printed
•
The type of magnetic stripe option (available only if a magnetic stripe
option is installed)
For information on specific fields, see the online help provided with
the printer driver (F1 or What’s This help in Windows 95/98).
ImageCard/UltraGrafix (Express and Select Classes) User’s Guide
3-21
Reconfigure the printer driver
1. Open the appropriate window:
Windows 95/98 users: See the instructions in Using the printer properties
on page 3-2.
Windows NT users: See Using the default document properties dialog box
(Windows NT only) on page 3-5. If necessary, click on the plus sign (+)
next to Document Options and Printer Features to display the entries
beneath these headings.
2. Change the following settings as needed to these frequently-used
adjustments (note that your card creation application can override
these setting):
•
You can set the card image orientation. In Windows 95/98, select
the Card tab; in the Orientation area, click Portrait or Landscape
to select the orientation that matches your card design. In
Windows NT, select Orientation and then choose Portrait or
Landscape.
•
If you use a print ribbon that contains topcoat, you can also
specify where on the card to apply topcoat. Do not apply topcoat
to a magnetic stripe or a smart card chip, for example. Follow
these instructions to specify where to apply topcoat:
Windows 95/98 users: In the Card tab, use the Top coat pattern area
to specify the areas of both sides of the card you want the printer
to apply protective topcoat to.
Windows NT users: In the Windows NT Default Document
Properties window, specify the pattern you want for both sides in
Top coat pattern - Front and Top coat pattern - Back.
•
If you will not change ribbon type frequently, specify the ribbon
type:
Windows 95/98 users: Go to the Graphics tab and set Ribbon type
to the type of ribbon you use. See the notes below.
Windows NT users: Click on Ribbon Type and select a ribbon type
below.
If you are using Windows 95/98 and you frequently change
the type of ribbon you print with, set Ribbon type to Autodetect.
3-22
Day-to-day printer use
(Any time you change the ribbon in the printer, you must power
off and power on the printer.) You may find that the printer uses
more print ribbon with the auto-detect feature, since the printer
advances the ribbon for several panels at power-up until it has
identified the ribbon type. This may not be much of a problem
unless you frequently power the printer on and off.
If you are using Windows 95/98 and you plan to use a onecolor ribbon, uncheck Always auto-detect ribbon type and set the
Ribbon type to "K" (if the ribbon has no topcoat) or "KT" (if the
ribbon has topcoat). (See Ribbon in Appendix B for a list of
supported ribbons.)
•
If you are using Windows 95/98 and you plan to print with a onecolor ribbon, select a dithering option in the Graphics tab. The
sample image changes to show the effect of the option you
choose. This is available in Windows 95/98 only.
•
In Windows 95/98, you can click and drag the Intensity pointer to
change the print darkness. This is available in Windows 95 only.
•
The printer is installed with a default spool setting of "Spool
printing so program finishes printing faster." Use this setting, not
"Print directly to printer." The default setting is required to print
multiple copies of the same card, print two-sided cards, and
enable the Retry button in messages boxes on the PC. You can
find this setting by opening the printer Properties dialog box (see
Chapter 3). In Windows 95/98, select the Details tab and click on
the Spool Settings button. In Windows NT, click on the Scheduling
tab.
3. When you finish viewing or changing settings, click OK to save the
settings or Cancel to discard them. This closes the Properties window
(Windows 95/98) or Default Document Properties window
(Windows NT).
For information on specific screen items, see the online help provided
with the printer driver (F1 or What’s This help). If you do not know
how to use What's This help, see Using What’s This help (Windows
95/98 only) on page 3-11.
!
4
Chapter 4: Troubleshooting
This chapter contains information on troubleshooting the
ImageCard or UltraGrafix photo ID printer, identifying and
fixing errors, and obtaining service for the printer.
Contents
Understanding messages
4-2
General troubleshooting
4-3
Making repairs and obtaining service
4-11
4-2
Troubleshooting
Understanding messages
The printer driver displays a message when the printer is unable to process
and print a card correctly. If a condition occurs that you can fix, the message
displayed will contain brief instructions on how to fix it (for an example of
this type of message, see Figure 4:-1). You can also click on the Help button
in the message window for more detailed instructions on fixing the problem.
Click on this button
for help with the
problem.
Figure 4:-1 Example message (ribbon break)
If a condition occurs that requires service, the message will begin with the
words “Service required." If the printer driver displays a "Service required"
message, contact your DataCard-authorized service provider for assistance.
Do not attempt to fix the problem without the assistance of your DataCardauthorized service provider because you may cause damage to the printer.
Before you call your DataCard-authorized service provider, write
down the message (including the code number in parentheses) and
then locate the serial number of your printer. For more information,
see Making repairs and obtaining service on page 4-11.
Figure 4:-2 Service required message
ImageCard/UltraGrafix (Express and Select Classes) User’s Guide
4-3
General troubleshooting
The purpose of this section is to help you fix print quality problems. Often
print quality problems result from dirty or dusty equipment. To diagnose
and fix print quality problems, follow the troubleshooting procedure below.
In your troubleshooting, it may help to look in Chapter 5 to see if
there is a section that discusses the problem you're having.
Troubleshoot and fix print quality problems
1. Remove the ribbon, printhead cartridge and card cartridge and blow
out any visible dust or debris.
2. Perform a cleaning cycle using a cleaning card to clean the printer.
(For more information on performing a cleaning cycle, see Performing
a cleaning cycle in Chapter 3.)
3. Run a printer test card. (For more information on printing a printer
test card, see Printing test cards in Chapter 2.) If this test card prints
correctly, the printer itself is probably working.
4. Run a Windows test page card. (For more information on printing a
Windows test page card, see Printing test cards in Chapter 2.) If this
test card prints correctly, the communication between the printer and
PC is functioning.
5. If the problem persists, use Table 4:-1 to diagnose and solve it.
After attempting each solution in the table, run a Windows test page
card to see if the problem is fixed and the printer is working correctly.
If you cannot fix the problem using the solutions in the table, contact
your DataCard-authorized service provider for further assistance.
!
Table 4:-1 Print quality troubleshooting
Symptom
One or more
unprinted lines run
across the entire
length of the card.
(For example, if the
unprinted cards are
white, the unprinted
line will be white.)
Possible Cause
Printhead may be dirty
or worn.
Solution
Clean the printhead (see
Performing a cleaning cycle in
Chapter 3). If cleaning does not
solve the problem, contact your
DataCard-authorized service
provider.
Part of the printed
The printhead cartridge
Replace the printhead cartridge
4-4
Troubleshooting
Symptom
card is blank.
No image is printed
on the card.
Printed cards look
faded.
Possible Cause
may not be installed
properly.
Solution
(see Replacing the printhead
cartridge in Chapter 5).
Cards may not meet
specifications or may be
dirty.
Obtain and use a different supply
of cards (see Card requirements
in Appendix B).
The swing arm may not
be latched properly.
Open the swing arm fully and
then close it. Be sure that the
swing arm latch clicks into place.
The rollers may be dirty.
Clean the rollers using the
cleaning card two or three times.
Print a Windows test page card
between each cleaning (see
Performing a cleaning cycle in
Chapter 3).
The ribbon is loaded
improperly (upside
down).
Remove and replace the ribbon.
(see Loading and replacing the
ribbon in Chapter 2).
The swing arm may not
be latched properly.
Open the swing arm fully and
then close it. Be sure that the
swing arm latch clicks into place.
Printhead cartridge
cable may be loose.
Power off the printer and make
sure the printhead cartridge
cable is securely connected to
the printer (see Replacing the
printhead cartridge in Chapter 5).
Power on the printer and print a
Windows test page card. If the
problem persists, contact your
DataCard-authorized service
provider.
Cards may not meet
specifications or may be
dirty.
Obtain and use a different supply
of cards (see Card requirements
in Appendix B).
Ribbon may have been
stored improperly or
damaged.
Change the ribbon and print a
Windows test page card (see
Loading and replacing ribbon and
Printing test cards in Chapter 2).
The cards may not meet
specifications.
Obtain and use a different supply
of cards (see Card requirements
in Appendix B).
The printhead may be
dirty or worn.
Clean the printhead (see
Performing a cleaning cycle in
ImageCard/UltraGrafix (Express and Select Classes) User’s Guide
4-5
Symptom
Possible Cause
Solution
Chapter 3). If cleaning does not
solve the problem, contact your
DataCard-authorized service
provider.
Part or all of the
printed image is
expanded (see Figure
4:-3).
The printhead is not
properly installed.
Remove and replace the
printhead cartridge (see
Replacing the printhead cartridge
in Chapter 5).
The printer driver is not
properly installed.
Re-install the printer driver (see
Re-installing the printer driver in
Chapter 5).
The card path may be
obstructed.
Check the card transport track
and duplex module (if the printer
has one) for jams. See the
procedures in this chapter for
removing torn or jammed ribbon
and for removing jammed cards).
The rollers may be dirty.
Clean the rollers using the
cleaning card two or three times.
Print a Windows test page card
between each cleaning (see
Performing a cleaning cycle in
Chapter 3).
The cards may not meet
specifications.
Obtain and use a different supply
of cards (see Card requirements
in Appendix B).
Cards may be dirty or
may have been
mishandled.
Obtain and use a different supply
of cards (see Card requirements
in Appendix B).
The rollers may be dirty.
Clean the rollers using the
cleaning card two or three times.
Print a Windows test page card
between each cleaning (see
Performing a cleaning cycle in
Chapter 3).
Part or all of the
printed image is
compressed (see
Figure 4:-4).
Part of the printed
image is streaked,
smeared, or
discolored
4-6
Troubleshooting
74030s95
Figure 4:-3 Expanded test card
74030s96
Figure 4:-4 Compressed test card
ImageCard/UltraGrafix (Express and Select Classes) User’s Guide
4-7
Remove torn or jammed ribbon
Do not place the ribbon cartridge on a dirty surface, such as a table top,
floor, or chair. Particles from such a surface may stick to the ribbon and
damage the printhead in the printhead cartridge.
1. Lift open the top cover.
2. Press down on the swing arm. The push latch will release the swing
arm. Lift the swing arm until it is fully open.
3. Grasp the ribbon cartridge handle, and lift up to remove the ribbon
cartridge (see Figure 4:-5).
4. Work any jammed part of the ribbon free from the printer.
5. Wind the ribbon off the supply ribbon core and onto the take-up
ribbon core until the damaged section of the ribbon is completely
rolled onto the take-up ribbon core.
If the supply ribbon core is almost empty, discard it and slide the new
supply ribbon and ribbon core onto the right ribbon cartridge shaft
(see Figure 4:-7).
6. Place the ribbon cartridge onto the ribbon cartridge supports, and
press down until it clicks into place (see Figure 4:-7).
7. Close the swing arm, pressing it down until the push latch clicks into
place.
8. Close the top cover.
9. Resume printing.
If the problem persists, contact your DataCard-authorized service
provider for assistance.
!
4-8
Troubleshooting
Ribbon take-up
Ribbon supply
74030c8a
Figure 4:-5 Remove the ribbon cartridge
Ribbon take-up
Ribbon supply
740030c8b
Figure 4:-6 Replace ribbon on the ribbon cartridge
Ribbon take-up
Ribbon supply
74030c8c
Figure 4:-7 Replace the ribbon cartridge
ImageCard/UltraGrafix (Express and Select Classes) User’s Guide
4-9
Remove jammed cards
!
In this procedure, you may have to remove the ribbon cartridge. When
you do this, do not place it on a dirty surface, such as a table top, floor,
or chair. Particles from such a surface may stick to the ribbon and
damage the printhead.
1. ImageCard S2 and UltraGrafix S2 printers only: Open the duplex
module cover (see Figure 4:-8) and look for a jammed card in the
duplex module. If you find one, there should be a message on your
screen. Click on the message's Help button and use the message help
to solve the problem. Skip the rest of this procedure.
2. Lift open the top cover.
3. Press down on the swing arm. The push latch will release the swing
arm. Lift the swing arm until it is fully open.
4. Grasp the ribbon cartridge handle, and lift up to remove the ribbon
cartridge.
5. Turn the manual card feed knob to move the card along the card
transport track until you can remove it (see Figure 4:-9).
6. Remove all cards from the card transport track.
7. Place the ribbon cartridge onto the ribbon cartridge supports, and
press down until it clicks into place.
8. Close the swing arm, pressing it down until the push latch clicks into
place.
9. Close the top cover.
10. Resume printing.
!
4-10
Troubleshooting
iSEL001u
Figure 4:-8 Opening the duplex module cover
74030d14
Figure 4:-9 Remove a card jammed on the card transport track
ImageCard/UltraGrafix (Express and Select Classes) User’s Guide
4-11
Making repairs and obtaining service
For repair assistance, contact your DataCard-authorized service provider.
Before contacting the representative, get the serial number for your printer. It
is located on a sticker shown in Figure 4:-10.
Serial number
sticker
74030d23
Figure 4:-10 Location of serial number on printer (Express and S models
shown)
When you contact your DataCard-authorized service provider, you may be
asked to access the printer's diagnostics for help in solving problems with the
printer.
You cannot print personalized cards on the printer while you are
using its diagnostics.
Chapter 5: Advanced information
This chapter contains advanced information on working with
the ImageCard or UltraGrafix photo ID printer and its driver.
To perform the procedures in this chapter, you should know
how to use the printer to print cards.
Contents
Confirming the ECP parallel port configuration and
assignment
5-2
Re-installing the printer driver
5-5
Installing a second printer (Windows 95/98 only)
5-11
Replacing the printhead cartridge
5-13
Printing on both sides of a card
5-16
Printing on thick cards
5-17
Printing bar codes
5-18
Moving the printer from Windows 95/98 to NT
5-19
Encoding magnetic stripe data from an application
5-19
Notes on NTT magnetic stripe encoding
5-21
Printing over a network (Windows 95/98 only)
5-22
Security key issues
5-23
Other tips, hints and information
5-23
Writing software for ImageCard/UltraGrafix series
printers
5-24
5
5-2
Advanced information
Confirming the ECP parallel port configuration
and assignment
For optimal performance, the printer should be connected to an ECP parallel
port. ECP stands for extended capabilities port. It differs from a "standard"
parallel port in that it enables two-way (bi-directional) communication
between the PC and the printer. It is also capable of much faster data
transfer depending on the particular communication method being used.
This ECP communication method is compatible with Windows and
conforms to the IEEE 1284 standard, an industry specification that deals with
standard signaling methods for bi-directional communication. The cable
provided with the printer also conforms to the 1284 standard (specifically,
the hardware requirement of this standard).
Verify the ECP parallel port assignment — Windows
query (Windows 95/98 only)
This procedure does not apply to Windows NT. If you use Windows
NT, see Verify the ECP parallel port configuration — system query on
page 5-4.
1. Select Settings and then Control Panel from the Windows Start menu.
The Control Panel dialog box appears.
2. Double-click on the System icon. The System Properties dialog box
appears.
3. Select the Device Manager tab.
4. Click on the View devices by type option.
5. Double-click on Ports (COM & LPT) to show the available ports. An
ECP parallel port should be included in this list. If it is not, attempt to
change the port setting to ECP. If you cannot change the port setting
to ECP, see the following procedure on verifying the ECP parallel
port configuration.
!
ImageCard/UltraGrafix (Express and Select Classes) User’s Guide
Select Settings and
then Control Panel
from the Start menu to
display the Control
Panel window.
Figure 5:-1 Display the Control Panel dialog box
If you see ECP
Printer Port here,
your ECP
parallel port is
available.
Figure 5:-2 View the available ports
5-3
5-4
Advanced information
Verify the ECP parallel port configuration — system
query
1. Close all open applications.
2. Reboot the PC.
3. Enter the PC BIOS setup program following the instructions that
display early in the reboot sequence (or see the documentation that
came with your PC for information on entering this program).
4. In the PC BIOS setup program, check to see that the parallel port
mode is set to ECP. If it is not, set it to ECP.
5. Exit the PC BIOS setup program, following the instructions on the
screen.
If you cannot change the parallel port mode to ECP in the PC
BIOS setup program, call your DataCard-authorized service
provider for assistance.
!
ImageCard/UltraGrafix (Express and Select Classes) User’s Guide
5-5
Re-installing the printer driver
You can get the most current copy of the printer driver from DataCard’s
Internet Web site (www.datacard.com) or from your DataCard-authorized
service provider.
When you re-install the printer driver, be sure to read the installed read-me
file for information on the latest changes and for any new installation
instructions.
Re-install the printer driver in Windows 95/98
The following procedure applies only to Windows 95/98. If you are
using Windows NT, see Re-install the printer driver in Windows NT on
page 5-7.
If you make use of user profiles, do one of the following to allow all
users to access the printer:
•
Install the printer before setting up user profiles.
•
If user profiles are set up already, view the user profiles tab of the
Passwords Properties dialog box. Make sure "Include Start Menu
and Program groups in user settings" is not selected while you are
installing the printer.
1. Look in the Windows Start menu for an ImageCard/UltraGrafix icon.
(See your Windows documentation for instructions.) If there is an
ImageCard/UltraGrafix icon, delete it.
2. Close all applications. Do not close Windows.
3. Select Settings and then Printers from the Windows 95/98 Start
menu. The Printers dialog box appears.
4. In the Printers dialog box, click once on the printer icon to select it.
The icon has the name chosen during printer driver installation.
5. Press the Delete key.
If a message appears at this point asking if you want to restart the
computer, select Yes and skip to step 7 below.
6. When the confirmation prompt appears, select Yes to delete the
printer driver.
7. Close the Printers dialog box and all open applications.
5-6
Advanced information
8. Restart the PC by selecting Shut Down from the Windows 95/98 Start
menu, then selecting Restart the computer and clicking Yes.
9. If the printer driver you want to install is on diskettes, insert the first
diskette into the disk drive of the PC to which the printer is connected
after the PC and Windows 95/98 have restarted.
10. Select Settings and then Printers from the Windows 95/98 Start
menu. The Printers dialog box appears.
11. Double-click on the Add Printer icon.
12. Follow the instructions on your screen and the guidelines below to
complete the installation.
•
Select the Have Disk button when it appears. Insert diskette 1 at
this point and click OK. Click Next to begin installation. Remove
diskette 1 and insert diskette 2 when prompted.
•
When you are updating, select the "Replace existing driver"
choice in the Add Printer wizard, and not the recommended
"Keep existing driver" choice.
•
When the Printer Name box appears, change the printer name to
match the name on the front of your printer. For example, you
might change "DataCard Select Class" to "ImageCard S2" or
"UltraGrafix S". Do not use the <>:"/\ and | characters in the
name.
•
If you are attaching two ImageCard/UltraGrafix series printers
(Express, S or S2 models) to the same PC, Windows 95/98 will
add the copy number to the name of each printer driver. See
Installing a second printer (Windows 95/98 only) on page 5-11 for
more information on installing two printers.
•
Remove the diskette and insert the next diskette when prompted.
•
The Version conflict dialog might display as files are copied.
Select Yes to keep the existing files on your PC.
•
The Code Page Mismatch dialog might display as files are copied.
Select Yes to keep the existing files on your PC.
•
If you downloaded the driver from the Internet, you can delete
the folder and the disk1 and disk2 folders from your hard drive
after installing the printer driver. You also can delete the
downloaded file.
13. If you used diskettes to install the printer driver, remove the diskette
after the printer driver is installed.
14. If you see messages instructing you to restart Windows 95/98 or to
update the printer firmware, follow them.
!
ImageCard/UltraGrafix (Express and Select Classes) User’s Guide
5-7
If the installation procedure does not finish without error and you
want to remove the DataCard files installed, use Windows Explorer
to go to the c:\windows\system directory and delete all dcci*.dll
files.
Re-install the printer driver in Windows NT
The following procedure applies only to Windows NT. If you are
using Windows 95/98, see Re-install the printer driver in Windows 95/98
on page 5-5.
To use the driver with Windows NT, your PC must run Windows NT
4.0 with Service Pack 3 or higher. The printer driver is not supported
for PCs with Alpha, MIPS, or PowerPC processors.
Make sure all print jobs from DataCard printers have been printed or
have been deleted from the print spooler before removing the existing
printer driver.
1. Look in the Windows Start menu for an ImageCard/UltraGrafix icon.
(See your Windows documentation for instructions.) If there is an
ImageCard/UltraGrafix icon, delete it.
2. Select Settings and then Printers from the Windows NT Start menu.
3. In the Printers dialog box, click once on the printer icon to select it.
The icon has the name entered when the printer driver was installed.
4. Press the Delete key.
5. When the confirmation prompt appears, select Yes to delete the
existing version printer driver.
6. Close the Printers window and close all applications.
7. Remove the status monitor from the startup group.
•
Right-click the Start menu button. Select Open All Users from the
pop-up menu.
• From the Start Menu list, open the Programs list.
• From the Programs list, open the Startup list.
• From the Startup list, select the printer you are removing.
• Press the Delete key to delete the printer from the Startup group.
• Close windows as needed.
8. Close all applications and restart the PC and Windows NT.
9. When Windows NT restarts, log in as the administrator.
10. Close all open applications. Do not close Windows NT.
11. Select Settings and then Printers from the Windows NT Start menu.
5-8
Advanced information
12. In the Printers dialog box, double-click on the Add Printer icon. (Only
the administrator can use this icon to install the printer on the PC.)
13. Follow the instructions on your screen and the guidelines below to
complete the installation.
•
Select the "My computer" choice, not the "Network" choice. If the
"My computer" choice is not available, make sure you have
logged on as the administrator.
•
Select the port to which you have connected the printer.
•
Do not select the "Enable printer pooling" choice when installing
the printer driver.
•
When the Manufacturers list appears, insert driver diskette 1 and
select the Have Disk button. If needed, select the Browse button to
specify the location of the printer driver diskette.
•
When the Printer Name box appears, change the printer name to
match the name on the front of your printer. For example, you
might change "DataCard Select Class" to "ImageCard S2" or
"UltraGrafix S".
•
When you make changes to the printer driver name, do not use
the <>:"/\ and | characters. The PC will not be able to enable the
driver if you use those characters.
•
Printer sharing is not supported by the printer driver for
Windows NT 4.0.
•
If you are updating the driver, select the "Replace existing driver"
choice in the Add Printer wizard (not the Windows NTrecommended "Keep existing driver" choice).
•
Do not print a test page as part of the installation. You must select
the ribbon type before printing a test page, as explained below.
•
Remove the current diskette and insert the next diskette when
prompted.
•
A Version Conflict dialog box might appear during the
installation. If so, select Yes to keep the existing files on your PC.
14. Remove the diskette and restart Windows NT when prompted after
the printer driver is installed.
Note: If you earlier asked to print a test page, test page messages
might appear at the same time as the prompt to restart Windows NT.
Even if the test page does not print, select "Yes" when the message
appears. Restart Windows NT and continue to follow this procedure.
15. When the PC restarts, log in as the administrator again.
16. Follow instructions to update the printer firmware if prompted.
ImageCard/UltraGrafix (Express and Select Classes) User’s Guide
5-9
17. If the PC attached to the printer has other users, set user permissions
to support printing or to prevent access to the printer. To change
access for other users, make sure you have restarted Windows NT
and then do the following steps.
a) From the Windows NT task bar, select Start, then Settings, and then
Printers. The Printers dialog box appears.
b) Highlight the printer driver icon by clicking on it once. The printer
driver icon has the name you entered when installing the printer
driver.
c) From the menu bar, select File and then Properties. The printer's
Properties dialog box appears.
d) Select the Security tab.
e) Click the Permissions button to open the Printer Permissions dialog
box.
f) For users or groups listed in the Printer Permissions dialog box,
select the type of access for each user or group.
g) Select the Add button to open the Add Users and Groups dialog
box.
h) Select the Show Users button.
i) Select the name of the user (or group) whose access you want to set
and click the Add button.
j) From the Type of Access list, select the access. For users who
should not print to the printer, select No Access. For users who will
use the printer, select Full Control. These users will have the same
access level as the administrator. They will be able to see all
messages, and perform other actions, such as deleting the printer
driver. (Messages inform users when they need to change the ribbon,
load cards, and fix problems.)
k) Repeat steps g to j to add other users or groups.
l) Select OK to save the changes and close the Add Users and Groups
dialog box.
m) Select OK to save the changes and close the Printer Permissions
dialog box. You can leave the Properties and Printers windows open.
5-10
Advanced information
n) Follow instructions to update the printer firmware if prompted.
18. Select the correct value for the following document default settings to
enable printer features. These items are in the Default Document
Properties dialog box. See Using the default document properties dialog
box (Windows NT only) in Chapter 3 to find out how to open this
window.
Be sure to set these items in the order listed:
•
Printing on both sides (duplex printing)
•
Duplex method (automatic or manual)
•
Ribbon type
•
Other values based on your card design
19. Print a test page from the PC to verify that the driver is installed
correctly.
a) With the printer Properties dialog box open, select the General tab.
b) Make sure the printer is connected to the parallel port and is
powered on.
c) Click the Print Test Page button. Windows NT prepares a test page
and the driver sends part of it to the printer.
d) If the card prints, you have successfully re-installed the printer
driver.
!
If you downloaded the driver from the Internet, you can now delete
the folder and the disk1 and disk2 folders from your hard drive after
installing the driver. You can also delete the downloaded file.
If the installation procedure does not finish without error and you
want to remove the DataCard files installed, use Windows Explorer
to go to the c:\windows\system directory and delete all dcci*.dll
files.
The printer settings just made in the driver controls can be
overridden by your card-printing application.
ImageCard/UltraGrafix (Express and Select Classes) User’s Guide
5-11
Installing a second printer (Windows 95/98 only)
On a PC running Windows 95 or Windows 98, you can connect two
ImageCard/UltraGrafix printers (Express, S and S2 models) to the same
machine.
You cannot connect two ImageCard/UltraGrafix printers to a PC that runs
Windows NT 4.0.
Look for a file called README.RTF on your installation diskettes for
important information on which types of printers can be connected to
the same PC.
The current version of the printer driver requires that you follow these
additional guidelines to install the second printer driver.
•
If you plan to connect two ImageCard or UltraGrafix printers to the
same computer, keep in mind that each of them will require its own
port. You will have to install the hardware for a second parallel port if
the PC is not equipped with two of them.
•
Exit the status monitor before installing the second driver. To do this,
right-click the icon for the printer and then select Exit from the popup
menu.
•
After installing the driver for the first printer, install the driver for the
second printer. Be sure to select the correct port for the second printer.
•
The default name for the printer is "ImageCard Express." If you attach
two ImageCard/UltraGrafix printers to the PC, Windows will add the
copy number to the name.
•
In the Add Printer wizard, select "Replace existing driver" (not the
recommended "Keep existing driver" choice).
If you have two printers installed, view the title bar of messages for
the name of the printer to which the message applies.
You can use the DataCard QuikWorks Printer Fanout Controller to
print to multiple ImageCard/UltraGrafix series printers. This
requires QuikWorks V 2.5 or higher software. Only QuikWorks V 2.5
or higher is compatible with the Printer Fanout Controller.
5-12
Advanced information
Configure the PC for a second printer
The hardware settings must match the settings you choose in the
Resources tab.
1. See the documentation that came with the port hardware to set the
jumpers.
2. Right-click on the My Computer icon on the desktop and then select
Properties from the popup menu.
3. Select the Device Manager tab.
4. Select View devices by type.
5. Click the + next to Ports (COM and LPT) to display the entry for
LPT2.
6. Click the entry for LPT2 and select the Properties button to display
the Properties dialog box.
7. Click the Resources tab.
•
If you are trying to use a DMA channel for the second printer, the
Resource settings list should show Direct Memory Access and its
channel setting.
•
The Conflicting device list should show No conflicts.
If the Resources tab does not show these settings, make sure Use
automatic settings is not selected and change the Resources settings
and Conflicting device lists.
8. Click OK twice to save the settings and close the Properties and the
System Properties windows.
!
ImageCard/UltraGrafix (Express and Select Classes) User’s Guide
5-13
Replacing the printhead cartridge
The ImageCard/UltraGrafix series printers use an operator-replaceable
printhead cartridge. To order a replacement printhead cartridge, contact
your DataCard-authorized service provider. For more information on the
cartridge, including its part numbers, see Printhead cartridge in Appendix B.
Replace the printhead cartridge
!
Do not touch the printing edge of the printhead in the printhead
cartridge. If you do, clean it with isopropyl alcohol and a lint-free cloth.
(See Printhead cartridge in Appendix B to learn where this edge is.)
1. Power off the printer.
2. Lift open the top cover.
3. Push down on the swing arm. The push latch will release the swing
arm. Lift the swing arm up until it is fully open.
4. Press the printhead cartridge latch lever down and lift the printhead
cartridge up and off the swing arm (see Figure 5:-3 and Figure 5:-4).
5. Detach the printhead cable from the printhead cartridge (see Figure
5:-5).
6. Attach the printhead cable to the new printhead cartridge (see Figure
5:-5 and Figure 5:-6).
7. Slide the new printhead cartridge onto the swing arm so that the
printhead cartridge pins slide into the printhead cartridge slots on the
swing arm (see Figure 5:-5).
8. While holding the printhead cartridge latch lever down, press the
printhead cartridge toward the swing arm. Be sure that the tabs on
the back of the printhead cartridge fit into the notches on the swing
arm spring bar securely (see Figure 5:-5 and Figure 5:-7). Release the
latch lever when the printhead cartridge is in place.
9. Close the swing arm, pressing it down until the push latch clicks into
place.
10. Gently pull the excess printhead cartridge cable out of the rear of the
swing arm.
11. Close the top cover.
12. Power on the printer.
5-14
Advanced information
13. Print a Windows test page card to verify that the printhead cartridge
is installed properly. (See Printing test cards in Chapter 2 for more
information.)
!
Printhead cartridge
latch lever
74030d23
r
Figure 5:-3: Printhead cartridge latch lever
74030s40
Figure 5:-4 Release the printhead cartridge
ImageCard/UltraGrafix (Express and Select Classes) User’s Guide
Printhead
cartridge
5-15
Printhead
cartridge slots
Printhead
cartridge cable
74030d4
Printhead
cartridge pins
Figure 5:-5 Printhead cartridge and related components (Express and S
models shown)
ice0012
Figure 5:-6 Attach and detach the printhead cable
5-16
Advanced information
Printhead cartridge tab
Swing arm notch
74030s42
Figure 5:-7 Replace the printhead cartridge
Printing on both sides of a card
ImageCard S2 and UltraGrafix S2 printers support automatic duplex
(double-sided) printing. If you have one of these models, the automatic
double-sided printing is the most effective and reliable method for duplex
printing.
If you have an ImageCard/UltraGrafix Express or S printer, the way to print
on both sides is to manually remove the card from the card output stacker
when the first side is finished, turn it over and re-insert it into the exception
slot. Flip the card as shown in Figure 5:-8. Be very careful to touch only the edge
of the card when doing this.
Figure 5:-8: Flipping over a card manually
ImageCard/UltraGrafix (Express and Select Classes) User’s Guide
5-17
Whether you will have automatic or manual duplex printing, keep data on
one page if you want to print on just the front of the card. For a two-sided
card, send a two-page document and enable a setting in the printer driver
Properties dialog box to print on both sides:
•
Windows 95/98 users: Select Settings and then Printers from the Windows
95/98 Start menu. Select the printer. (The icon has the name chosen
during printer driver installation.) Then choose File and Properties. The
printer's Properties dialog box opens. Click on the Card tab and then
select "Enable printing on two sides." Click OK to close the Properties
dialog box.
•
Windows NT users: Select Settings and then Printers from the Windows
NT Start menu. Select the printer. (The icon has the name chosen
during printer driver installation.) Then choose File and Document
Defaults. Click on the Advanced tab if necessary, and then set Print on
Both Sides (Duplex Printing) to Long Side. Set Duplex Method to
manual or automatic, and then choose a ribbon type. Click OK to close
the Default Document Properties dialog box.
Always test your card design to make sure it works properly before
you put it into production.
Printing on thick cards
The printers in the ImageCard/UltraGrafix line normally print on plastic
cards that are 0.030" thick, but you can configure them to print cards as thick
as 0.050". (If you want to encode data on smart card chips, however, you
cannot use cards thicker than 0.030".) These are the steps to setting up the
printer for thick cards:
•
If your printer does not already have one, order and install a printhead
cartridge for thick cards. The cartridge you need depends on whether
you want to print in full color or in monochrome (using one color only).
You can tell which type of cartridge is already in your printer by looking
for a special sticker on the existing cartridge, as shown in Figure 5:-9.
Type of printing to do
on thick cards
Description of sticker
on required cartridge
Printhead cartridge
part number needed
Color
Monochrome
Green dot
Picture of a 3-color
ribbon
557656-001
557655-001
5-18
Advanced information
A sticker on this surface
indicates the type of
printhead cartridge.
ice0006
Figure 5:-9 Printhead cartridge and sticker
•
Use the user diagnostics portion of the driver's status monitor to alter
the printing voltages. (To learn how to open the status monitor, please
see Using the status monitor in Chapter 3.) You will need to experiment
by repeatedly changing voltages, printing a test card, and evaluating the
resulting print quality, until you are satisfied with the quality. For help
with this, contact your authorized service provider.
Printing bar codes
If you want to have bar codes on your cards, test them for readability using a
scanner.
•
Print a test card with your bar code and test it on your bar code reader.
•
Use ribbon that includes a K panel (true black) for bar codes that must
be read by an infrared scanner. Only visible light sensors can read bar
codes that are printed using three-panel ribbon (ribbon that does not
include a K or true black panel).
ImageCard/UltraGrafix (Express and Select Classes) User’s Guide
5-19
Moving the printer from Windows 95/98 to NT
If you want to take an ImageCard/UltraGrafix printer connected to a
Windows 95/98 PC and connect it to a PC running Windows NT, do so
carefully. The Windows 95/98 printer driver can control settings inside the
printer that are not available using the Windows NT 4.0 driver. If you have
used an ImageCard or UltraGrafix printer with a PC running Windows
95/98, you must make sure that the ribbon type is set to Autodetect (using
the Windows 95 driver) before moving the printer to a PC running Windows
NT 4.0. Follow this procedure:
1. Open the Windows 95/98 printer Properties dialog box. To do this,
first select Start, then Settings, and then Printers. Click once on the
printer icon to select it, and Select File and then Properties. (The
printer icon has the name chosen during printer driver installation.)
2. On the Graphics tab, make sure that "Always auto-detect ribbon type"
is selected, and click the Apply button to send the value to the
printer.
3. Click OK to close the Properties dialog box.
Encoding magnetic stripe data from an
application
The printer allows you to encode magnetic stripe data on cards using many
applications. If you use a DataCard QuikWorks product or a card-printing
application from a DataCard reseller, see the user information for your
application to find out how. If you use another application, follow the
guidelines below to encode magnetic stripe data. This section describes how
to encode magnetic stripe data in a general application not geared toward
card printing, such as Microsoft Word.
Make sure that you use an application in which you can save the text to
encode and edit the text again.
The printer driver for Windows NT does not support the magnetic
stripe encoding method of formatting data in special magnetic stripe
fonts. To encode magnetic stripe data in NT, use an application with
magnetic stripe encoding via the DataCard application programming
interface (API).
5-20
Advanced information
With any application, test your card design to make sure you get the
results you expect.
Whenever you are encoding magnetic stripe data or programming
smart cards, some cards may not be printed completely. Be sure to
process incomplete cards according to your policy for handling the
confidential data that might be on the card.
Follow this procedure to encode magnetic stripe data in a general-purpose
Windows 95/98 application:
1. Select the encoding format and topcoat pattern.
a) From the Windows 95/98 Start menu, select Settings and then
select Printers.
b) Select the printer icon. (The icon has the name chosen during
printer driver installation.) Choose File and then Properties. The
printer's Properties dialog box opens.
c) In each tab, select the settings that apply to your application and
card design, and then click Apply to accept the settings you selected.
d) In the Mag Stripe Settings tab, select the encoding format and
coercivity. The encoding format you select corresponds to the fonts
that you apply. To find out which characters are allowed for a format,
click the question mark and then click the selected encoding
format.
e) Set the pattern for protective topcoat in the Top coat pattern area.
You generally would not want to apply topcoat to a magnetic stripe.
f) Click OK to accept the settings you selected and close the Properties
dialog box.
2. In the application, select the ImageCard/UltraGrafix printer as the
current printer.
3. Using the application's page setup feature, set the paper size to CR80
Card 2.13" x 3.38" and set all the margins to 0.1". Select the orientation
for the card design—either portrait or landscape.
4. Format the text to print using a TrueType ( ) font.
5. Follow these general guidelines:
•
On the front of the card, enter the information to be encoded on
the magnetic stripe and format the text using one of the following
fonts:
ImageCard/UltraGrafix (Express and Select Classes) User’s Guide
5-21
♦ Track 1--Magnetic Stripe
♦ Track 2--Magnetic Stripe
♦ Track 3--Magnetic Stripe
♦ Track NTT--Magnetic Stripe (See Notes on NTT magnetic stripe
encoding on page 5-21 for important information about using
this font.)
•
The recommended size for Magnetic Stripe fonts is 3.5 or 4 points
to allow characters to remain on the same line. Use this
recommended point size.
•
Do not use typographic features, such as character spacing, on
magnetic stripe text.
•
The magnetic stripe text, along with graphics and text to print on
the front of the card, must be on the first page, as shown in Figure
5:-10.
!
Graphics & text to print on the front
of the card
Tracks 1, 2, and 3 magnetic stripe data
Figure 5:-10 Magnetic stripe data placement
Notes on NTT magnetic stripe encoding
To encode magnetic stripe data in the Japanese NTT format, you will need to
format it in the Track NTT—Magnetic Stripe font. Some things to keep in
mind about using this font:
5-22
Advanced information
•
Each time you start using Japanese-language characters, or stop using
them, the driver adds a hidden character. Each hidden character
reduces, by one, the number of characters you can encode.
•
Spaces between characters can be Japanese-language spaces or Englishlanguage spaces. Make sure that spaces are in the same language as the
surrounding characters.
•
If you need to encode Kanji characters, please contact your DataCard
Japan representative for more information.
•
When the printer driver is installed and the ImageCard/UltraGrafix
printer is the selected printer, the Track NTT--Magnetic Stripe font
appears in the font list. This font encodes all the supported characters in
the font only from a PC running Japanese Windows. PCs running otherlanguage versions of Windows do not have Japanese-language
characters available.
Printing over a network (Windows 95/98 only)
This section does not apply to Windows NT users. The printer driver for
Windows NT does not support printing over a network.
If you are using Windows 95/98, you can use the printer with Microsoft File
and Print Sharing so that more than one PC can send card data to the printer.
This feature is not fully supported, however.
•
To install the printer with Microsoft File and Print Sharing, do the
following:
1. Install the printer driver on the PC to which the printer is
attached.
2. See Windows help for information on enabling file and printer
sharing. Select the "I want to be able to allow others to print to my
printer(s)." choice.
3. See Windows help for information on sharing your printer with
other people. Select "Shared As" and provide a share name and a
comment or password, if desired.
4. On the network-connected PC, install the printer as a network
printer.
5. After installing the printer and before sending any card data from
the network-connected PC, use the Graphics tab of the Printer
Properties dialog box to uncheck "Always auto-detect ribbon
type" and then select the ribbon type. (The ribbon type must
match the ribbon installed in the printer.) Set the ribbon type at
the PC connected to the printer and at each remote PC printing
over the network.
ImageCard/UltraGrafix (Express and Select Classes) User’s Guide
•
5-23
When you use the printer with a network-connected PC, be aware of the
following:
♦ Look at the printer Properties dialog box for the PC with the
printer directly attached to see current printer values. Also look at
that PC for printer messages. The network-connected PC (the one
without the printer directly connected) does not display messages
or show current printer values.
♦ Smart card data cannot be sent from the network-connected PC to
the printer.
♦ Your application might support features from the networkconnected PC that are not directly supported by the printer
driver.
♦ IAT high-coercivity encoding is the only encoding format
supported for printing with a network-connected PC.
♦ To change the settings on a network-connected PC, follow the
steps in Using the printer properties dialog box (Chapter 3) to go to
the printer Properties window. Do not change settings from within
an application!
Security key issues
The card creation application you use might require a security key on the
parallel port. You might receive "security key not found" messages or
"parallel port data error" messages, or you might notice that the card creation
application slows. If this happens, do one of the following:
•
Put the security key on a different parallel port, if available. The security
key can be on a compatible-mode (IBM AT-mode) port. The interface
cable should remain on the ECP parallel port (usually LPT1).
OR
•
Keep the security key on the ECP port with the interface cable attached.
Find the configuration utility for the security key in the folder for the
card creation application. See the information for the application that
uses the security key for recommended settings.
Other tips, hints and information
Some other things to keep in mind about using the printer:
•
Whenever you are encoding magnetic stripe data or programming smart
cards, some cards may not be printed completely. Be sure to process
5-24
Advanced information
incomplete cards according to your policy for handling the confidential
data that might be on the card.
•
The printer is installed with a default spool setting of "Spool printing so
program finishes printing faster." Use this setting, not "Print directly to
printer." The default setting is required to print multiple copies of the
same card, print two-sided cards, and enable the Retry button in
messages boxes on the PC. You can find this setting by opening the
printer Properties dialog box (see Chapter 3). In Windows 95/98, select
the Details tab and click on the Spool Settings button. In Windows NT,
click on the Scheduling tab.
•
Be sure to look at a file called README.RTF for more information on
using and working with the printer. This file is on disk 1 of the driver
installation diskettes.
Writing software for ImageCard/UltraGrafix
series printers
To create software that works with an ImageCard/UltraGrafix series printer,
you can order DataCard Raster Printer Application Programming Interface
(API). This kit contains a manual on customizing software to work with the
printer, which includes sample code, libraries, and the DataCard Software
Developer's Manual for Desktop Raster Printers (part number 526720-002). This
is an electronic document that you can view with the Adobe Acrobat™
reader.
Appendix A: Safety and
compliance
This appendix contains regulatory compliance information,
safety information, and trademark acknowledgments for the
ImageCard or UltraGrafix photo ID printer.
Contents
Emissions
FCC notice (USA)
Canada
Europe
Liability statement
Proprietary notice
Safety
Safe environment
Safe human interface
Acknowledgments
A-2
A-2
A-2
A-2
A-2
A-3
A-3
A-3
A-4
A-4
A
A-2
Safety and compliance
Emissions
FCC notice (USA)
This equipment generates, uses, and can radiate radio frequency energy. If it
is not installed and used in accordance with this instruction manual, it may
interfere with radio communications. This equipment has been tested and
found to be within the limits for Class A computing devices, pursuant to
Subpart J of Part 15 of FCC rules, designed to provide reasonable protection
against radio interference in a commercial environment. Operation of this
equipment in a residential environment may possibly cause interference. In
the event of interference, the user, at his/her own expense, will be required
to take whatever measures are necessary to correct the problem.
Canada
This digital apparatus does not exceed the Class A limits for radio noise for
digital apparatus set out in the Radio Interference Regulations of the
Canadian Department of Communications.
Le présent appareil numérique n'émet pas de bruits radioélectriques
dépassant les limites applicables aux appareils numériques de la classe A
prescrites dans le Règlement sur le brouillage radioélectrique édicté par le
Ministère des Communications du Canada.
Europe
We hereby certify that this equipment complies with the Class A limits of
EN55022 and the Immunity requirements of EN50082-1, IEC 801-2, 801-3,
801-4.
Liability statement
This DataCard product has been built to the high standards of DataCard
Corporation. Please note and heed the WARNING and CAUTION labels that
have been placed on the equipment for your safety. Please do not attempt to
operate or repair this equipment without adequate training. Any use,
operation or repair in contravention of this document is at your own risk. By
ImageCard/UltraGrafix (Express and Select Classes) User’s Guide
A-3
acceptance of this system you hereby assume all liability consequent to your
use or misuse of this equipment. DataCard Corporation assumes no liability
for incidental, special or consequential damage of any kind. Equipment
specifications, applications and options are subject to change at the sole
discretion of DataCard Corporation without notice.
Proprietary notice
All drawings and information herein are the property of DataCard
Corporation. All unauthorized use and reproduction is prohibited.
Copyright © 1997, 1998, 1999. All rights reserved.
Safety
All DataCard products are built to strict safety and reliability specifications
in accordance with Underwriters Laboratories Inc. and Canadian Standards
Association requirements. Therefore, safety issues pertaining to operation
and repair of DataCard equipment are primarily environmental and human
interface.
The following basic safety tips are given to ensure safe installation, operation
and maintenance of DataCard equipment and are not to be considered as
comprehensive on all matters of safety.
Safe environment
•
Connect equipment to a grounded facility power source. Do not defeat
or bypass the ground lead.
•
Place the equipment on a stable surface (table or floor), and ensure floors
in the work area are dry and non-slip. Insulated rubber floor mats are
preferred.
•
Know the location of equipment branch circuit interrupters or circuit
breakers and how to turn them on and off in case of emergency.
•
Know the location of fire extinguishers and how to use them. Only ABC
type extinguishers may be used on electrical fires.
•
Know local procedures for first aid and emergency assistance at the
customer facility.
•
Use adequate lighting at the equipment.
•
Maintain the recommended range of temperature and humidity in the
equipment area.
A-4
Safety and compliance
Safe human interface
•
Use proper lifting techniques when moving or installing the equipment.
•
Use standard moving parts safety procedures when working on
equipment with parts in motion or potential motion.
•
Obtain specific certified training before working on any piece of
equipment.
•
Keep safety interlocks on covers or panels functioning.
•
Disconnect the equipment from facility power when performing
procedures which require no power input.
Acknowledgments
DataCard is a registered trademark of DataCard Corporation. ImageCard,
UltraGrafix and QuikWorks are trademarks of DataCard Corporation.
Windows, Windows 95, Windows 98, Windows NT, and WordPad are
trademarks or registered trademarks of Microsoft Corporation.
All other product names are trademarks of their respective owners.
B
Appendix B: Supplies
This appendix shows the various supplies used with an
ImageCard or UltraGrafix photo ID printers. It also has
ordering information.
Contents
List of supplies
B-2
Card requirements
B-3
Printhead cartridge
B-3
Ribbon
B-5
Cleaning supplies
B-6
Ribbon cartridge
B-7
Card cartridge
B-7
Interface cable
B-8
Power cable
B-8
Power receptacle fuse
B-9
Carrying case (Express & S models only)
B-9
Publications
B-10
Printer driver
B-10
B-2
Supplies
List of supplies
Contact your DataCard-authorized service provider for information on
ordering any of these supplies.
•
Cards (CR80 type)
•
Ribbon
•
Cleaning cards and cleaning supplies
•
Printhead cartridges — see Printhead cartridge on page B-3 for
information on ordering replacement printhead cartridges
You can also order the following items from your DataCard-authorized
service provider:
•
Extra ribbon cartridges
•
Extra card cartridges
•
Interface cables
•
Power cables
•
Power receptacle fuses
•
Carrying cases (for some printer models)
•
Publications
•
Extended warranty
You can get additional or new copies of the printer driver by contacting your
DataCard-authorized service provider or by visiting the DataCard Internet
Web site (www.datacard.com).
Before contacting your DataCard-authorized service provider to order
supplies or parts, have your printer's serial number available. You
can find this number on the bottom of the printer.
ImageCard/UltraGrafix (Express and Select Classes) User’s Guide
B-3
Card requirements
Card stock for printing should meet the following requirements.
Size: CR80, 3.375 in. (85.725 mm) x 2.125 in. (53.975 mm)
Type: PVC with glossy surface or composite with glossy PVC surface
Thickness:
•
0.020 in. (0.508 mm) to 0.050 in. (1.27 mm) plus or minus 10 percent,
for regular or magnetic stripe cards when the smart card module is
not installed
•
0.020 in. (0.508 mm) to 0.030 in. (0.762 mm) plus or minus 10 percent,
for all cards when a smart card module is installed
Card bow must be less than the thickness of the card (see Figure B:-1).
Card bow must be less
than the thickness of
the card.
74030c10
Figure B:-1 Card bow requirement
Printhead cartridge
There are three types of printhead cartridges. You can tell which type is in
your printer by looking for a sticker on the cartridge, as shown below:
A sticker on this surface
indicates the type of
printhead cartridge (see
table below).
Printhead -- do not
touch this surface
ice0006
Figure B:-2 Printhead cartridge
B-4
Supplies
The sticker is either a green dot or a decal that looks like either a color or
monochrome ribbon. (Other stickers on this surface of the cartridge have bar
codes or an illustration showing how to install the cartridge.) Use this table
to determine the type of printhead cartridge in use:
Description of sticker
Type of printhead
cartridge
Part number for reordering
Single-color ribbon
Standard cartridge for
monochrome printing
Standard cartridge for
color printing
Standard cartridge for
printing thick cards
557654-001
3-color ribbon
Green dot
557655-001
557656-001
If you do not see any stickers matching these descriptions on that surface of
the printhead cartridge, contact your authorized service provider for help.
If you want to print on thick cards — cards thicker than the standard
0.030" thickness — disregard the table above and see Printing on thick
cards in Chapter 5 for printhead cartridge information.
!
Do not touch the printing edge of the printhead in the printhead
cartridge. If you do, clean it with isopropyl alcohol and a lint-free cloth.
ImageCard/UltraGrafix (Express and Select Classes) User’s Guide
B-5
Ribbon
Order from among the following types of ribbons for the printer.
Name
Description
You can use the following color ribbons with ImageCard printers:
YMCKT
three colors, true black, and topcoat (a clear film
that protects the printing on the card)
YMCKTKT
three colors, true black, and topcoat on one side of
the card; black and topcoat on the other side
YMCT
three colors and topcoat
YMCK
three colors and true black
YMC
three colors
You can use the following ribbons with ImageCard or UltraGrafix printers:
KT
true black and topcoat
K
true black
Tonal black ribbon
Red
Process blue
Green
Silver
Gold
Part Number
806124-104
806124-106
806124-105
806124-102
806124-101
806124-109
596230-001
597568-101
596230-104
596230-105
596230-106
596230-107
596230-108
If you change the type of ribbon you use, remember to make the appropriate
changes in the printer driver. See Reconfiguring the printer driver in Chapter 3
for more information on this.
74030d24
Figure B:-3 Print ribbon
B-6
Supplies
Cleaning supplies
•
Cleaning card (part number 557297-001)
clean
Figure B:-4 Cleaning card — side 1
scclean
Figure B:-5 Cleaning card — side 2
•
Magnetic stripe head cleaning card, if the printer has the magnetic stripe
option (part number 590408-002)
ice0014s
Figure B:-6 Magnetic stripe cleaning card
•
Duplex cleaning card (part number 557668-001), if the printer has
automatic two-sided printing
dupclcrd
Figure B:-7 Duplex option cleaning card
•
Isopropyl alcohol and a lint-free cloth for cleaning the printhead in the
printhead cartridge
ImageCard/UltraGrafix (Express and Select Classes) User’s Guide
Ribbon cartridge
•
Ribbon cartridge (part number 555545-999)
555545
Figure B:-8 Ribbon cartridge
Card cartridge
•
Card cartridge (part numbers appear in table below)
Figure B:-9 Card cartridge
Printer model
Cartridge color
Part number
ImageCard Express
ImageCard S
ImageCard S2
UltraGrafix Express
UltraGrafix S
UltraGrafix S2
Green
Smoked gray
Smoked gray
Green
Smoked gray
Smoked gray
555540-002
555540-003
555540-003
555540-002
555540-003
555540-003
B-7
B-8
Supplies
Interface cable
•
Interface cable (part number 806797-001)
The printer uses an ECP parallel port interface cable.
74030c6
Figure B:-10 Interface cable
Power cable
•
North American power cable (part number 556766-001)
74030c7
Figure B:-11 U.S. power cable
•
Continental European power cable (part number 556766-003)
•
Australian power cable (part number 556766-002)
•
United Kingdom power cable (part number 556766-010)
•
Danish power cable (part number 556766-004)
•
Indian power cable (part number 556766-005)
•
Israeli power cable (part number 556766-006)
•
Italian power cable (part number 556766-007)
•
Swiss power cable (part number 556766-008)
•
Japanese power cable (part number 556766-009)
ImageCard/UltraGrafix (Express and Select Classes) User’s Guide
B-9
Power receptacle fuse
•
Power receptacle fuse (part number 804960-017)
Power receptacle
fuse
74030c93
Figure B:-12 Power receptacle fuse
The power receptacle fuse is a 2.5 amp. slow blow fuse.
Carrying case (Express & S models only)
•
Carrying case (part number 556741-001)
556741
Figure B:-13 ImageCard/UltraGrafix Express & S series carrying case
No carrying case is available for ImageCard/UltraGrafix S2 printers.
B-10
Supplies
Publications
•
ImageCard Express Operator's Tutorial CD-ROM (part number 555413-001)
•
If you want to develop PC software that works with the
ImageCard/UltraGrafix series, you can order the DataCard Raster
Printer Application Programming Interface (API). This contains the
DataCard Software Developer's Manual for Desktop Raster Printers (526720002). (The document was formerly called the ImageCard Express Software
Developer’s Kit, with the part number 526720-001.)
Printer driver
•
ImageCard/UltraGrafix series Windows 95/98 and Windows NT 4.0
printer driver diskettes (various part numbers, as shown below)
You can get the most current copy of the printer driver from
DataCard’s Internet Web site (www.datacard.com).
These are the drivers available for the Express and Select printer classes (the
Select class includes S and S2 models):
Printer class
Windows 95/98 driver
Windows NT driver
Express class
Version: 1.4
Part number: 557630-001
Version: 2.0
Part number: 557629-001
Version: 1.0
Part number: 557631-001
Version: 2.0
Part number: 557665-001
Select class
I Index
A
AC receptacle, 1-7
acknowledgments (copyright, etc.), A-4
B
bar codes, 5-18
C
cable, interface, B-8
cables (connecting), 2-4
Canadian regulations, compliance with, A-2
card cartridge
description of, 1-6
loading and replacing, 2-5
part number of, B-7
card output stacker, 1-6
card quality guidelines, 1-10
cards
exception cards, 1-6
jammed cards, 4-9
loading and replacing, 2-5
maintenance of, 1-10
printing on both sides of, 5-17
requirements for, B-3
smart cards. see smart card option
carrying case, B-9
chip cards. see smart card option
cleaning cards, 3-12
cleaning cards and supplies, B-6
cleaning cycle, 3-7, 3-8, 3-9, 3-12
cleaning the printhead, 3-16
color printing, 1-2, B-5
communication methods (PC to printer), 1-5
compliance, with government regulations, A-1
configuring the printer driver, 3-20
connecting cables, 2-4
context-sensitive help, 3-11
copyright information, A-4
D
data communication methods (PC to printer), 1-5
default document properties window (in Windows), 3-5
deleting driver files, 5-10
diagnostics program, 3-7
dual-sided printing, 1-3
duplex module, 1-8
duplex printing, 1-3, 3-19, B-6
E
ECP parallel port
cable for, B-8
configuring and assigning, 5-2
description of, 1-7
verifying configuration of, 5-4
electrical requirements, for printer, 2-2
emissions, from printer, A-2
enhanced printing speed feature, 1-3
environmental conditions, for printer, 2-2
errors
card jammed, 4-9
error messages, 4-2
fixing problems, 4-2
ribbon jammed, 4-7
service-required errors, 4-2
European regulations, compliance with, A-2
exception card slot, 1-6
F
faded cards, 4-4
fan, for power supply, 1-7
FCC notice (compliance statement), A-2
features, of ImageCard/UltraGrafix printers, 1-2
fuse, in power receptacle, B-9
G
gray printer icon, 3-6
green dot, on printhead cartridge, B-4
guidelines, for card printing
bar codes, 5-18
card handling, 1-10
card quality, 1-10
card storage, 1-10
encoding magnetic stripe data, 5-19
printing from an application, 2-25
printing on both sides of a card, 5-17
printing over a network, 5-22
H
handling cards, 1-10
help, using, 3-11
hi-coercivity cards, 2-15
I
icon, for the status monitor, 3-6
image quality problems
I-2
Index
faded image, 4-4
ImageCard/UltraGrafix printers
cable connections for, 2-4
connecting two printers to same PC, 5-11
enhanced printing speed feature, 1-3
error messages from, 4-2
explanation of names, 1-2
features of, 1-2
getting repair assistance, 4-11
options available for, 1-2
parts of, 1-5
printer driver for. see printer driver
status icon for, 3-6
troubleshooting on, 4-1
using over a network, 5-22
writing software to work with, 5-24
installing a printer driver update, 5-5
installing the printer driver for the first time, 2-10
installing two printers on same PC, 5-11
interface cable, B-8
Internet address, for DataCard, 2-10
J
jammed cards, 4-9
jammed ribbon, 4-7
K
keys, security, 5-23
L
LED, on printer's front panel, 1-6
lo-coercivity cards, 2-15
M
magnetic stripe fonts, 5-19, 5-21
magnetic stripe option
and topcoat application, 3-21
cleaning card for, B-6
cleaning the magstripe head, 3-17
description of, 1-3
NTT encoding, 5-21
setting up, 2-15
software setup for, 3-20
test cards for, 2-18, 2-23
tips for encoding, 5-19
magstripe. see magnetic stripe option
manual card feed knob, 1-5
monochrome printing, 1-2
moving printer from Windows 95/98 to NT, 5-19
N
networks, and card printing, 5-22
NTT (magnetic stripe encoding method), 2-15, 5-21
O
options available for the printer, 1-2
P
parallel port. see ECP parallel port
parallel port cable, B-8
parallel port data error (message), 5-23
parts, of the printer
card cartridge, 1-6
card output stacker, 1-6
ECP parallel port, 1-7
exception card slot, 1-6
manual card feed knob, 1-5
power button, 1-7
power receptacle, 1-7
power supply fan, 1-7
printhead, 1-5
printhead cartridge, 1-5
ready button, 1-6
ribbon cartridge, 1-5
status light, 1-6
swing arm, 1-5
top cover, 1-5
plastic cards. see cards
port, communication, 2-4, 5-2, 5-4
power button, 1-7
power cable, B-8
power consumed by printer, 2-2
power receptacle, 1-7
power supply fan, 1-7
print quality problems
blank cards, 4-4
fading image, 4-4
troubleshooting, 3-12, 4-3
printer driver
configuring, 3-20
diskette for, B-10
first-time installation of, 2-10
how to get latest version of, 2-10
part number of, B-10
reconfiguring, 3-20
reinstalling, 5-5
test card from, 2-18, 2-20, 2-21
updating, 5-5
printer properties window (in Windows), 3-2
printer test card, 2-18, 2-19
printhead cartridge
cleaning the printhead, 3-16
description of, 1-5
loading and replacing, 5-13
part number for, 5-17, B-3
picture of, B-3
stickers on, 5-17, B-3
printing on both sides of a card, 5-17
printing speed enhancement, 1-3
publications shipped with the printer, B-10
Q
quality, of cards, 1-10
quality, of printing, 4-3
QuikWorks program, 1-9
ImageCard/UltraGrafix (Express and Select Classes) User’s Guide
R
README.RTF file, 5-24
ready button, 1-6
reconfigure, printer driver, 3-20
removing driver files, 5-10
repairing the printer, 4-11
requirements
card quality, 1-10
cards, 4-4, B-3
electrical requirements, 2-2
environmental, 2-2
operating system, 1-9
site issues, 2-2
software requirements, 1-9
requirements, cards, 4-5
ribbon
jammed ribbon, 4-7
loading and replacing, 2-8
topcoat, 3-21
ribbon cartridge, 1-5, B-7
rollers, cleaning, 3-12
S
safety guidelines, A-1, A-3
security issues, 5-20, 5-23
security keys, 5-23
serial number, 4-11
service, obtaining, 4-11
service-required errors, 4-2
single card slot, 1-6
site requirements, 2-2
smart card option, 1-3, 2-4, 3-21. see also options
software development kit (SDK), 5-24
software requirements, 1-9
stacker, 1-6
status information, 3-6
status information display, 3-7
status light, 1-6
status monitor
exiting from, 3-7, 3-10
quitting from, 3-9
resuming operation of, 3-7
starting, 3-9
suspending operation of, 3-7
using, 3-6
viewing details in, 3-7
stickers, on printhead cartridge, 5-17, B-3
storage, of cards, 1-10
supplies
cards, 2-5
for printer cleaning, B-6
printhead cartridge, 5-13
ribbon. see ribbon
swing arm, 1-5
T
test cards
magnetic stripe, 2-18, 2-23
printer, 2-18
printer test card, 2-18, 2-19
I-3
Windows test page card, 2-18, 2-20, 2-21
thick cards, printing on, 5-17
tonal black ribbon, B-5
top cover, 1-5
topcoat, 3-21, B-5
troubleshooting, 3-12, 4-3
U
UltraGrafix printers. see ImageCard/UltraGrafix printers
W
Web site, for DataCard, 2-10
What's This help, 3-11
Windows 95/98, 2-10, 5-19
Windows NT, 2-10, 5-19
Windows version required, 1-9