1
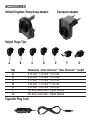
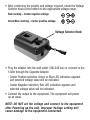
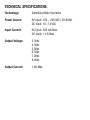
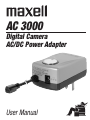
AC 3000
Digital Camera
AC/DC Power Adapter
User Manual
INTRODUCTION
Congratulations! You have purchased one of the most innovative
products on the market today. It is designed to output DC voltage
from 3.3 to 8.4v by applying input voltage 100-240Vac or 12Vdc.
• Compatible to a wide range of DC camera adapters refer to the compatibility list.
• Wall plug-in operation from 100 – 240Vac (50 / 60 Hz).
• Car Cigarette Adapter operation 10 – 14 Vdc.
• Dedicated output tips (DC plug) are suited for different IT equipment.
• Voltage and polarity selection knob for pre-setting voltage.
• Polarity indication by use of different color LED indication.
• Over and under voltage protection.
• Built-in reverse polarity detection, short circuit detection and
timer protection.
• Over current and short circuit protection.
• Compact size and lightweight.
Please read this manual before using your Charger.
It explains how to operate this product. Figure 1 illustrates
the components.
Figure 1
A
B
C
E
D
F
AC 3000 Parts and Components
A. Voltage Indicator
D. Car Cigarette Plug input (12Vdc )
B. Power and polarity indicator E. AC input blades (100-240Vac )
C. Output Cord and Tips
F. Voltage and polarity selector
ACCESSORIES
United Kingdom/Hong Kong adapter
European adapter
Output Plugs Tips
A
B
Tips
A
B
C
D
E
F
G
C
D
E
F
G
Dimension : Outer diameter * Inner Diameter * Length
4.75 mm * 1.70 mm * 10.8 mm
4.00 mm * 1.70 mm * 10.8 mm
3.75 mm * 1.10 mm * 10.8 mm
3.00 mm * 1.10 mm * 11.6 mm
2.35 mm * 0.70 mm * 9.40 mm
For Sony Camcorder / Digital Camera
For Sony Camcorder / Digital Camera
Cigarette Plug Cord
OPERATING INSTRUCTIONS
IMPORTANT: The following instructions must be read before using
the adapter for the first time.
This section explains how to select the output Tips and set the output
voltage / polarity and power up the Adapter.
Select the output Tips
• Select the appropriate adapter tip for your digital camera. Choose
the tip with correct dimension specified in the compatibility list,
or checked by direct fitting the tip direct to the equipment without
connecting to the output cable.
• Before selecting the voltage setting, please refer to compatibility list
to confirm the polarity
- Center Positive output or
- Center Negative output
** For Sony adapter (Tips F & G ) the polarity should be Positive.
Note: Special care should be taken at this point. Double
verification is suggested to check voltage and polarity
marking on the equipment.
• After confirming the polarity and voltage required, rotate the Voltage
Selector Knob at the bottom to the appropriate voltage range.
Red marking – Center negative voltage
Green/Blue marking – Center positive voltage
Voltage Selector Knob
• Plug the adapter into the wall outlet (100-240 Vac) or connect to the
12Vdc through the Cigarette Adapter.
- Center Positive selection, Green or Blue LED indication appears
and selected voltage value will be indicated.
- Center Negative selection, Red LED indication appears and
selected voltage value will be indicated.
• Connect the output to the equipment. The equipment will power
up as usual.
NOTE: DO NOT set the voltage and connect to the equipment
after Powering up the unit. Improper Voltage setting will
cause damage to the equipment connected.
LED STATUS INDICATOR
LED
Blue / Green
RED
LED Dim
No Light
Status
Power up with Positive Output DC Voltage
Power up with Negative Output DC Voltage
Output over current
NO Power or Output short circuit
ADAPTER FITTING
Installing the Adapter
Insert the Adapter in the direction indicated by Arrow A until it snaps
into the Main Housing. Push the adapter in the direction indicated by
Arrow B until you hear a click.
Uninstalling the Adapter
Press the Release Lock in the direction indicated by Arrow A. Flip
the adapter in the opposite direction of Arrow B. The Adapter can
be released.
A
B
Release Lock
SAFETY PRECAUTIONS & MAINTENANCE:
• DO NOT use this Adapter unit inside a drawer, closed cabinet,
or cover with a cloth. The heat generated from operation may
damage Adapter or equipment connected.
• DO NOT attempt to open the unit. Doing so will void
your warranty.
• DO NOT short-circuit the output terminal.
• DO NOT allow moisture of any kind to come in contact with
the Adapter. Never immerse in water for any reason.
• DO NOT store in an area which may expose the Adapter to
extreme temperatures. Avoid placing in direct sunlight. High
temperatures will shorten the life of electronic devices;
damage batteries and warp or melt plastics.
• DO NOT drop the unit. A severe jolt may cause permanent
damage and is not covered by the warranty.
TECHNICAL SPECIFICATIONS:
Technology:
Switching Mode Operation
Power Source:
AC Input: 100 – 240 VAC ( 50-60Hz)
DC Input: 10 –14 VDC
Input Current:
AC Input: 300 mA Max.
DC Input: 1.4 A Max.
Output Voltage:
3.3Vdc
4.3Vdc
5.0Vdc
6.5Vdc
7.0Vdc
8.4Vdc
Output Current:
1.6A Max.
Maxell Limited Warranty
Maxell Corporation of America warrants this product to the original purchaser
against defects in material and workmanship for a period of one year from the
date of purchase. Maxell will, at its option, repair or replace the defective product
at no cost to you during the warranty period. The warranty will not apply if the unit
has been subject to accident, misuse, abuse, disassembly, alteration or opened
contrary to the instructions contained in the accompanying manual. To obtain warranty service, proof of purchase in the form of retailer’s bill of sale or invoice must
be presented as evidence that the unit is within the warranty period. The product
must be packaged either in its original packaging or in such as way as to reasonably protect it from shipping damage. Product should be sent prepaid to: Maxell
Corporation of America, P.O. Box 900, Fair Lawn, NJ 07410-0900.
All trademarks and/or brands are the property of their respective owners.
MAXELL CORPORATION OF AMERICA
22-08 ROUTE 208
FAIR LAWN, NEW JERSEY 07410
MADE IN CHINA