1
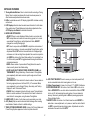
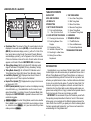
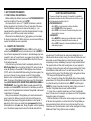
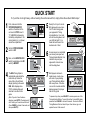
QUICK START
To try out the clock right away, without reading the entire manual first, simply follow these Quick Start steps!
1
First, make sure that the
STOP/GO/SOUND OFF
switch on the bottom of the
unit is set to STOP. Insert 2
“C” (AM2/R14) batteries into
the battery compartment. The
correct polarity (+/–) is shown
inside the compartment.
2
Set the STOP/GO/SOUND
switch to GO.
3
Next, set the MODIFY/LOCK
switch (located above the GO
switch) to MODIFY.
5
SOUND OFF
GO
STOP
2x
C/AM2/R14
SOUND OFF
GO
STOP
6
LOCK
MODIFY
Ready? Let’s try a 5-minute
Blitz game where you move
first! To start timing, press
your opponent’s Timing
Activator Button. Your clock
will start counting down, and
your LED will light. Try to
make the best move in the
least amount of time!
As soon as you’ve completed
your move, press your own
Timing Activator Button! Your
clock will stop, and your
opponent’s clock will now
start counting down.
HOUR GLASS
BLITZ
BONUS TIMER BRONSTEIN
PRIMARY
GAME
SECONDARY
TERTIARY
TOURNAMENT
HOUR GLASS
BLITZ
BONUS TIMER BRONSTEIN
GAME
PRIMARY
SECONDARY
TERTIARY
TOURNAMENT
USER
HOUR GLASS
BLITZ BONUS TIMER BRONSTEIN
GAME TOURNAMENT
NEXT/MOVE NO.
PAUSE
ADJUST
GAME CLOCK II
D I G I TA L G A M E T I M E R
4
The Blitz Timing Option is
automatically selected at the
initial start-up. Notice the
arrow (%) on the left-hand
display, pointing to the word
Blitz. Both displays show
05.00, indicating that each
side has 5 minutes for this
game.
7
HOUR GLASS
BLITZ
(Note: If you don’t see the above
displays, press BLITZ. If the displays still
don’t match, you’ll need to reset the unit!
Press PAUSE for at least 3 seconds, and
then press BLITZ.)
BONUS TIMER BRONSTEIN
PRIMARY
GAME
SECONDARY
TERTIARY
TOURNAMENT
BLITZ
PAUSE
BLITZ
Both players continue to
make moves, one by one—
with each of you pressing
your Timing Activator Button
after every move. If the time
runs out for one side and this
display appears, that player
has lost the game!
HOUR GLASS
ACL
BLITZ
SET
BONUS TIMER BRONSTEIN
GAME
To pause at any time, press PAUSE. To resume, press one of the
Timing Activator Buttons. To reset for another 5-minute Blitz game,
press and hold PAUSE for at least 3 seconds. To select a different
Timing Mode and find out about all your other choices, go on to
explore the rest of the manual!
KEYS AND FEATURES
1
1. Timing Activator Buttons: Press to start clock after selecting a Timing
Mode. Press to restart countdown after clocks have been paused, or
after time/move adjustments have been made.
2. LEDs: Located above each LCD display; lighted LED indicates currently
active clock.
3. LCD Displays: Used to show time and move information for both sides.
Also used to select Timing Modes and make timing adjustments. See
LCD Displays at a Glance for detailed information.
4. MODE AND OPTION KEYS:
• ADJUST: Press to enter Adjustment Mode. Used in conjunction with
SET to adjust time and number of moves during a game, or to create
user-defined Timing Options; within Adjustment Mode, ADJUST
changes the currently flashing digit.
• SET: Used in conjunction with ADJUST to adjust time and number of
moves during a game, or to create user-defined Timing Options; within
Adjustment Mode, SET confirms the modification of a displayed digit
and moves on to the next digit to be adjusted. Also used in conjunction
with USER Key to store final User Mode settings. For any display from
5 to 60 minutes, press SET to toggle between showing hours/minutes
and minutes/seconds.
• USER: Allows creation of personalized Timing Mode. Also used to
check currently stored User Mode setting.
• HOUR GLASS, BLITZ, BONUS TIMER, BRONSTEIN, GAME, and
TOURNAMENT: Timing Mode Keys. Press to select a Timing Mode.;
press repeatedly within each mode to cycle through various Preset
Timing Options.
• NEXT/MOVE NO.: Press and hold to check number of moves made so
far during a game (shown on left-hand LCD). In Tournament Mode,
press repeatedly to cycle through Primary, Secondary, and Tertiary
displays for each Tournament Preset.
• PAUSE: Press to temporarily stop both clocks; press Timing Activator
Button to restart countdown. Press and hold for at least 3 seconds to
reset clocks for a new game, using the same Timing Mode.
5. NAME PLATE: On back of unit; allows you to personalize your clock.
6. ACL (Reset): May be used to eliminate static discharge after inserting
new batteries. Resets unit back to default settings.
7. TIMER OPTIONS REFERENCE GUIDE: Listing of all Timing Modes and
Preset Timing Options appears on bottom for quick reference!
2
HOUR GLASS
BLITZ
BONUS TIMER BRONSTEIN
GAME
PRIMARY
SECONDARY
3
TERTIARY
TOURNAMENT
6
USER
HOUR GLASS
BLITZ BONUS TIMER BRONSTEIN
GAME TOURNAMENT
NEXT/MOVE NO.
PAUSE
ADJUST
GAME CLOCK II
5
D I G I TA L G A M E T I M E R
ACL
4
SET
LOCK
MODIFY
11
7
SOUND OFF
GO
STOP
10
9
8
8. ANTI-THEFT BRACKET: Used to secure your clock and prevent theft;
can be concealed inside clock housing when not in use.
9. Battery Compartment: In base of unit. Uses 2 “C” (AM2/R14) batteries.
10.STOP/GO/SOUND OFF: On bottom of unit. Slide to GO to turn unit on.
Slide to SOUND OFF to use clock without sound effects. Slide to STOP
to turn unit off, with remaining time and number of moves retained in
memory. Resume by switching back to GO and pressing appropriate
Timing Activator Button.
11.MODIFY/LOCK: On bottom of unit. Switch must be set to MODIFY to
make time or move adjustments, or to pause or reset the clocks. Switch
to LOCK to prevent tampering during a game. Adjustments cannot be
made when this switch is set to LOCK.
2
LCD DISPLAYS AT A GLANCE!
g
ADD BEFORE
f
e
d
ADD BEFORE
ADD AFTER
ADD AFTER
MOVE
MOVE
HOUR GLASS
QUICK START
KEYS AND FEATURES
LCD DISPLAYS
INTRODUCTION
1. GET TO KNOW THE BASICS
1.1 First, Install the Batteries…
1.2 …Then Try Out the Clock!
2. CLOCK OPTIONS TO EXPLORE
2.1 Checking the Move Number
2.2 Switching Between Time
Displays
2.3 Stopping the Clocks
2.4 Indication of Expired Time
2.5 Resetting For a New Game
2.6 Making Time and Move
Adjustments
BLITZ
BONUS TIMER BRONSTEIN
GAME
PRIMARY
SECONDARY
TERTIARY
TOURNAMENT
c
b
a. Countdown Time: The amount of time left on each player’s clock is
displayed in hours and minutes (HH:MM), or minutes and seconds
(MM.SS). Hours/minutes display a colon (:), with no 0 in front of the
hour (except when cycling through Tournament Presets). Minutes/
seconds display a period (.), and a 0 appears in front of the minutes
if there are 5 minutes or less on the clock. Current number of moves
appears on left-hand LCD when NEXT/MOVE NO. is held down.
b. Timing Stage Arrows (%): On right-hand LCD. Indicates current
stage in Tournament Timing Mode (Primary, Secondary, Tertiary).
c. Timing Mode Arrows (%): On left-hand LCD. Indicates current
Timing Mode (Hour Glass, Blitz, Bonus Timer, Bronstein, Game).
d. Low Battery Symbol (@): Displayed when about 20 hours of
operating time are left. Time to replace the batteries!
e. Expired Time Symbol (!): Displayed when a player’s time has run
out, along with -0.00.
f. MOVE Symbol (&): Appears in various clock displays involving
move information, e.g., time added before or after moves, time per
game (Game Mode), or number of moves (Tournament Mode). Also
displayed when NEXT/MOVE NO. is pressed to show current move
number during game.
g. #/$: In certain Timing Modes, used to show whether
time is added to your opponent’s clock after you’ve made your move,
i.e., before his move (#), or to your own clock after you have
made your move ($).
3. THE TIMING MODES
3.1 Hour Glass Timing Mode
3.2 Blitz Timing Mode
3.3 Bonus Timer Mode
3.4 Bronstein Timing Mode
3.5 Game Timing Mode
3.6 Tournament Timing Mode
4. USER MODE
5. TECHNICAL DETAILS
5.1 The ACL Function
5.2 Care and Maintenance
5.3 Technical Specifications
TROUBLESHOOTING GUIDE
INTRODUCTION
Congratulations on your purchase of Saitek’s Game Clock II, a multifunction digital clock with a wide variety of capabilities! Choose from 6
different Timing Modes and 23 Preset Timing Options, or create your
own personalized timing method! This clock will not only monitor and
enhance your performance in chess—it will also add a new dimension
to many of your other favorite games. Try using the Game Clock II for
checkers, word games, trivia games, and more—and watch how the
introduction of a time factor adds an extra challenge and makes your
games more exciting! After all, trying to make the best possible move in
the shortest amount of time can only sharpen your skills!
IMPORTANT: We recommend that you first familiarize yourself with
the operating concepts described in Sections 1 and 2 of this manual,
before going on to investigate all the different modes and presets the
Game Clock II has to offer! If you spend just a little time learning about
the basic operation and features first, you’ll have a much easier time
understanding the Timing Modes later!
3
ENGLISH
TABLE OF CONTENTS
a
1. GET TO KNOW THE BASICS
KNOW YOUR SWITCH SETTINGS!
To use your Game Clock correctly, it’s important to understand
how these two switches function! Take a quick look at this now, and
you’ll avoid possible confusion later on!
STOP/GO/SOUND OFF:
• Set to GO for normal operation, with sound effects.
• Set to SOUND OFF for silent operation.
• Set to STOP to turn the unit off, while retaining the current
time controls in memory.
LOCK/MODIFY:
• Set to MODIFY to make any type of adjustment, including
pausing the clocks, checking the move number, etc.
• Set to LOCK, if desired, to prevent adjustments from being
made during a game.
1.1 FIRST, INSTALL THE BATTERIES…
Before installing the batteries, make sure the STOP/GO/SOUND OFF
switch on the bottom of the unit is set to STOP.
Your Game Clock II runs on 2 “C” (AM2/R14) batteries. Locate the
battery compartment on the bottom of the unit, and slide off the cover.
Insert the batteries, making sure to observe the polarity (+/–), as
marked inside the compartment. Use fresh alkaline batteries for longer
battery life—up to 600 hours under normal conditions!
Whenever the Low Battery Symbol (@) appears, you have about
20 hours of playing time left. When this occurs, we recommend that you
replace the batteries as soon as possible!
1.2 …THEN TRY OUT THE CLOCK!
Slide the STOP/GO/SOUND OFF switch to GO to turn the unit on.
Locate the LOCK/MODIFY switch, and make sure it is set to MODIFY. If
the unit fails to respond when first turned on, static discharge may have
caused it to lock up. To reset the unit, use a paper clip or another sharp
object to press down into the hole marked ACL on the front of the unit
for at least one second.
At the first start-up, the Game Clock II automatically defaults to the
Blitz Timing Mode. Take a look at the left-hand LCD, and you’ll see an
arrow (%) pointing to the word BLITZ. Both displays show 5 minutes
(05.00), which is the default Blitz Mode setting (5 minutes a game). You
now have 2 choices: You can (a) press one of the Timing Activator
Buttons to start a 5-minute Blitz game; or, (b) select a different Timing
Mode. To choose a Timing Mode, simply press one of the Timing Mode
Keys (HOUR GLASS, BLITZ, BONUS TIMER, BRONSTEIN, GAME, or
TOURNAMENT). Even though Blitz Mode is already selected for this
example, we included BLITZ in the above list to familiarize you with the
names of all 6 Timing Modes. Each individual Timing Mode is discussed
in detail later in the manual.
After you have selected a Timing Mode, you’ll need to decide who’s
going to move first. Whoever moves first will then start the game by
pressing the other player’s Timing Activator Button. In other words, if
you are the first to move, you should press your opponent’s Timing
Activator Button to start your clock. During the game, note that pressing
one of the buttons always stops the clock for that side and starts the
opposite clock. The LED above the active clock display lights up to
indicate which side is currently moving. Your clock will continue to count
down while you are thinking about your move. As soon as you have
completed your move, immediately press your Timing Activator Button!
The opposite clock will then start counting down, as your opponent’s
turn begins. Continue the game, with both players pressing their Timing
Activator Buttons after each move. If one side runs out of time, that
player has lost the game. The LCD display for the losing side will show
-0.00, along with the Expired Time symbol (!).
Note: If you want to change the Timing Mode after you have already
pressed one of the Timing Activator Buttons to begin a game, first make
sure that the switch on the bottom is set to MODIFY, and then press
PAUSE for at least 3 seconds to reset the clocks. Finally, press one of
the other Timing Mode Keys to select a different Mode.
If, at any time, you press an invalid key, you’ll hear a high double
beep. This may occur, for example, if you press one of the Timing Mode
Keys while a game is in progress.
With the information in this section, we’ve now given you a good idea
of the basic clock operation, no matter which of the Timing Modes you
have selected. But there’s still a lot more to find out about! For more
information on all the clock options, and to further investigate the Timing
Modes and Preset Timing Options, keep on reading!
4
2.1 CHECKING THE MOVE NUMBER
To use this feature, the MODIFY/LOCK switch on the bottom of the
unit must be set to MODIFY.
You can easily check the number of moves made so far in the game
at any time! Simply press and hold down NEXT/MOVE NO., and the
current move number will be shown on the left-hand LCD, along with
the & display. The game clock will keep ticking while the move
number is displayed, and the countdown display will return as soon as
you release the NEXT/MOVE NO. Key.
Note: The number of moves will only change after 2 individual moves
have been made, i.e., after both you and your opponent have moved.
2.4 INDICATION OF EXPIRED TIME
As soon as one side runs out of time, -0.00 shows on that player’s
display, along with the Expired Time symbol (!). If the sound is on, you
may also hear beeps. Who’s the winner? The player who still has time
on the clock!
2.5 RESETTING FOR A NEW GAME
To use this feature, the MODIFY/LOCK switch on the bottom of the
unit must be set to MODIFY.
To reset the clocks for a new game, or to reset and select a different
Timing Mode, press and hold PAUSE for at least 3 seconds. The
displays will flash, you’ll hear a series of beeps, and the clocks will then
reset for a new game using the previously selected Timing Mode. If you
would rather choose a different Timing Mode, simply press one of the
other Timing Mode Keys. To start the clock for the new game, the player
to move first should press the opposite Timing Activator Button.
2.2 SWITCHING BETWEEN TIME DISPLAYS
Whenever the time on a clock is between 5 and 60 minutes, the
display will normally show this as hours and minutes (HH:MM). If you
would rather see minutes and seconds (MM.SS) displayed, press SET.
For example: Let’s say the display is counting down and is currently
showing 0:15 for 15 minutes. If you press SET, the display will then
change to show minutes and seconds (e.g.,14.53 for 14 minutes and 53
seconds).
Note: To differentiate between the two time displays more easily,
notice the colon (:) between the hours and minutes display, and the
period (.) between the minutes and seconds display.
2.6 MAKING TIME AND MOVE ADJUSTMENTS
To use this feature, the MODIFY/LOCK switch on the bottom of the
unit must be set to MODIFY.
At some point, you might want to change the time and/or number of
moves during a game. This feature may come in handy, for example, if
you have just taken back an illegal move!
To make a change like this during a game, first press PAUSE to stop
the clocks. Next, press ADJUST to enter Adjustment Mode, where you’ll
be able to make changes, first for the left-hand player, and then for the
right. When you enter Adjustment Mode, you’ll notice that the digit on
the far left is flashing. To change the currently flashing digit, press
ADJUST repeatedly (or hold the key down) until your desired number
shows, and then press SET to confirm the change and move on to the
next digit. If you come to a digit that you don’t want to change, simply
press SET to go on to the next digit. Start with the hours and minutes
2.3 STOPPING THE CLOCKS
To use this feature, the MODIFY/LOCK switch on the bottom of the
unit must be set to MODIFY.
To stop the clocks temporarily during a game, press PAUSE. The
displays will flash to indicate that the clocks are stopped.
Pressing either of the Timing Activator Buttons will restart the clocks.
However, the way timing resumes will be based on which of the buttons
is pressed! Remember that the lighted LED indicates the clock that was
active when the clocks were paused. Knowing that, you can do either of
the following: (a) If you press the button for the clock under the lighted
LED, the countdown will switch to the other clock, as if the previouslyactive side had just made its move. (b) If you press the button for the
inactive clock, under the unlit LED, the countdown will continue on the
5
ENGLISH
previously-active clock, by simply picking up where it left off!
You can also stop the clocks by sliding the STOP/GO/SOUND OFF
switch to STOP. The game times and move numbers will be stored in
memory until the switch is set back to GO. When the unit is turned back
on, the clock displays will be in Pause Mode. Press one of the Timing
Activator Buttons as described above to resume timing where it left off.
2. CLOCK OPTIONS TO EXPLORE
(HH:MM), and work your way down through the minutes and seconds
(MM.SS).
After adjusting the time for both players, the right-hand display will
change to show the current move number. If desired, you can modify
the move number just as you did the time. Note that the move number
is the number of moves played for both sides. To change this number,
start with the flashing hundreds digit, then the tens, and then the ones.
As above, press ADJUST, followed by SET, for digits you want to
change, or simply press SET for digits that are not to be changed. To
return to the active countdown clock display at any time, press one of
the Timing Activator Buttons.
THE TIME DISPLAYS SUMMARIZED!
• Hours and minutes are displayed with a colon (HH:MM).
• Minutes and seconds are displayed with a period (MM.SS).
• A display showing between 5 and 60 minutes usually shows as
hours and minutes. Pressing SET will make the display show
minutes and seconds!
• HOUR GLASS TIMING MODE: PRESET OPTIONS
Pressing HOUR GLASS repeatedly cycles through the following
options:
3. THE TIMING MODES
Preset Option
Your Game Clock II offers 6 different Timing Modes, with a total of 23
unique Preset Timing Options. You’ll find all the information you need in
this section!
Note: You also have a special User Mode at your disposal, which will
allow you to be creative and make up your very own time controls! See
Section 4 for details.
Initial Time Limit
Displays
(a) ......................... 1 minute .................. 01.00 / 01.00
(b) ....................... 10 minutes ................. 0:10 / 0:10
For Preset option (a), each player has 1 minute on the clock. Don’t
forget that your opponent’s thinking time is proportionally increased as
your time runs out. You’ll notice that, as the time on your clock decreases, the time on your opponent’s display increases, and vice versa.
If the time runs out for either side (i.e., if the difference between the two
clocks reaches 2 minutes), the game is over.
Preset (b) is essentially the same as (a), above, except each side has
10 minutes on the clock. If either side’s time runs out (i.e., if the difference between the two clocks reaches 20 minutes), the game is over.
3.1 HOUR GLASS TIMING MODE
Hour Glass Mode is a unique timing method, where your opponent’s
thinking time actually increases as your own thinking time is being used
up! This makes for a doubly exciting game, since you have to make
your best moves in the fastest times possible to avoid giving more time
to your opponent!
Press HOUR GLASS to enter this mode, and an arrow (%) on the
left-hand LCD points to HOUR GLASS. By pressing HOUR GLASS the
first time, you have automatically selected the default Hour Glass
Preset Timing Option (a). The displays show the amount of time both
players have on the clock (01.00 for 1 minute). To start the clock using
this default setting, the person who is going to move first simply presses
the other player’s Timing Activator Button.
Pressing HOUR GLASS repeatedly will cycle through the Hour Glass
Presets, as noted below. When your desired Preset is displayed, press
the appropriate Timing Activator Button to start the clock. If game time is
exceeded, that player has lost and the display will show -0.00 and the
Expired Time symbol (!).
3.2 BLITZ TIMING MODE
In Blitz Mode, you set the total time for the whole game, and players
must make all of their moves before the time runs out. In a 5-minute
Blitz game, for example, each player has to make all the moves in 5
minutes or less.
Press BLITZ to enter this mode, and an arrow (%) on the left-hand
LCD points to BLITZ. By pressing BLITZ the first time, you have automatically selected the default Blitz Preset Timing Option, and the
displays show the amount of time both players have on the clock (05.00
for 5 minutes). To start the clock using this default setting, the person
who is going to move first simply presses the other player’s Timing
Activator Button.
6
Pressing BLITZ repeatedly will cycle through all the Blitz Presets, as
shown below. When your desired Preset is displayed, press the appropriate Timing Activator Button to start the clock. If game time is exceeded, that player has lost and the display will show -0.00 and the
Expired Time symbol (!).
TRYING TO MAKE ADJUSTMENTS?
If you’re trying to pause the clocks, adjust the time, or check the
move number and the unit won’t respond, the LOCK/MODIFY
switch is probably set to LOCK. The solution? Simply switch it back
to MODIFY!
• BLITZ TIMING MODE: PRESET OPTIONS
Pressing BLITZ repeatedly cycles through the following options:
Time per Game
Displays
Blitz ......................... 5 minutes ................. 05.00
Rapid .................... 15 minutes ................. 0:15
PCA Active ........... 25 minutes ................. 0:25
US Active ............. 30 minutes ................. 0:30
Action ..................... 1 hour ...................... 1:00
/ 05.00
/ 0:15
/ 0:25
/ 0:30
/ 1:00
Pressing BONUS TIMER repeatedly will cycle through the Bonus
Timer Presets, as shown below. When your desired Preset is displayed,
press the appropriate Timing Activator Button to start the clock. If game
time is exceeded, that player has lost and the display will show -0.00
and the Expired Time symbol (!).
3.3 BONUS TIMER MODE
Bonus Timer Mode offers special time controls that can help alleviate
problems sometimes encountered in Blitz and Tournament Modes
(where you have a fixed amount of time for each game and the time
decreases as you think). In those modes, players often find themselves
running out of time towards the end of the game—struggling to make
good moves in a hurry, and often ending up making inferior moves
instead.
Bonus Timer Mode helps out by providing a certain amount of time to
complete all the moves, plus an amount of bonus time (free time) for
each individual move. Your remaining time for the whole game is only
reduced if you go over the free time allocation for each individual move.
Players can also gain more overall thinking time by completing a move
faster than the time allowed for each move.
Press BONUS TIMER to enter this mode, and an arrow (%) on the
left-hand LCD points to BONUS TIMER. By pressing BONUS TIMER
the first time, you have automatically selected the default Bonus Timer
Preset Timing Option (a). The displays show the amount of time you
have on the clock (03.00 for 3 minutes), and the amount of free time
added for each individual move (& 00.02, for 2 seconds per
move). Both displays also show the # symbol, to indicate when
the free time is added for this particular Preset. See below for an
explanation of the # and $ symbols. To start the clock
using this default setting, the person who is going to move first simply
presses the other player’s Timing Activator Button.
• BONUS TIMER MODE: PRESET OPTIONS
Pressing BONUS TIMER repeatedly cycles through the following
options:
Preset
Time per Game +
Free Time per Move
Time Added
Displays
(a) .......... 3 min + 2 sec/move ............ Before ........... 03.00 / 00.02
(b) ........ 50 min + 2 sec/move ............ Before ........... 0:50 / 00.02
(c) .......... 1 min + 1 min/move ........... Before ........... 01.00 / 01.00
(d) .......... 1 min + 1 min/move ........... After .............. 01.00 / 01.00
(e) ........ 5 min + 12 sec/move ............ After .............. 05.00 / 00.12
For Presets (a), (b), and (c), ADD BEFORE (#) also appears
on the displays. This means that the free time for each individual move
will be added to your opponent’s clock as soon as you have made
your move and pressed your Timing Activator Button, i.e., before your
opponent makes a move. If your opponent then makes a move in less
than the allocated free time per move, he or she will make a net gain in
time on the clock. Let’s say, for example, that you have chosen Preset
(a). You have 3 minutes showing on your clock, and your opponent
presses the Timing Activator Button to start the clock. Your clock now
shows 3 minutes and 2 seconds. If you complete your move and press
your Timing Activator Button in 1 second, your clock will now show 3
minutes and 1 second, because you made the move in a faster time
than was allocated! In this way, by completing your move in less than 2
seconds each time, you can accumulate free time as you play! On the
7
ENGLISH
Preset Option
each individual move (& 00.03, for 3 seconds per move). To start
the clock using this default setting, the person who is going to move first
simply presses the other player’s Timing Activator Button.
Pressing BRONSTEIN repeatedly will cycle through the Bronstein
Presets, as shown below. When your desired Preset is displayed, press
the appropriate Timing Activator Button to start the clock. If game time is
exceeded, that player has lost and the display will show -0.00 and the
Expired Time symbol (!).
other hand, however, if you go over the allocated 2 seconds, your
remaining time will be proportionally reduced by the amount of time it
takes you to complete your move.
For Presets (d) and (e), ADD AFTER ($) appears on the LCD
displays. This means that the time available for each individual move
will be added to your clock as soon as you have made your move and
pressed your Timing Activator Button, i.e., after you have made a move.
If you make a move in less than the allocated free time per move, you
will make a net gain in time on the clock.
• BRONSTEIN TIMING MODE: PRESET OPTIONS
Pressing BRONSTEIN repeatedly cycles through the following
options:
3.4 BRONSTEIN TIMING MODE
Bronstein Mode is similar to Bonus Timer Mode, in that you are given
a fixed amount of time at the beginning of the game, and the time
remaining decreases as you think. Here, the maximum amount of free
time is always allocated after each move is made, and the free time is
only added to the remaining time if the time used to make a move is
equal to or more than the maximum amount of free time. Unlike Bonus
Timer Mode, however, it is not possible to increase the time remaining
by playing each move more quickly than the free time. If the time used
for a move is less than the maximum free time, only the exact time used
for the move will be added to the remaining time after the move is
made. This means that the remaining time will be the same as before
the move was made if the time used was the same as or less than the
free time.
Here’s an example: Let’s say you’re using Bronstein Preset (b),
described below, where you have a total of 20 minutes for the whole
game. You’ll also get an extra 10 seconds per move (added after you
make your move). Note that you cannot gain extra time or increase
overall thinking time by playing each move more quickly, since:
• If you make a move and press your Timing Activator Button in 7
seconds, only 7 seconds will be added to your total time after the
move is made (not 10 seconds).
• If you make a move and press your Timing Activator Button in 10
seconds or more, only 10 seconds will be added to your total time
after the move is made.
Press BRONSTEIN to enter this mode, and an arrow (%) on the lefthand LCD points to BRONSTEIN. By pressing BRONSTEIN the first
time, you have automatically selected the default Bronstein Preset
Timing Option (a). The displays show the amount of time you have on
the clock (05.00 for 5 minutes), and the amount of free time added for
Preset
Time per Game +
Free Time per Move
Time Added
Displays
(a) .......... 5 min + 3 sec/move ............ After .............. 05.00 / 00.03
(b) ..... 20 min + 10 sec/move ............ After .............. 0:20 / 00.10
Note that, even though time is always added after in Bronstein Mode,
the $ indicator will not appear in the displays.
For Bronstein Preset (a), each player has 5 minutes to complete all
the moves and a maximum free time of 3 seconds for each individual
move. For Preset (b), each player has 20 minutes to complete all the
moves and a maximum free time of 10 seconds for each individual
move.
3.5 GAME TIMING MODE
Game Mode provides a fun and exciting way to time yourself against
your opponent! The premise is simple—each player is given a certain
amount of time to complete each move!
Press GAME to enter this mode, and an arrow (%) on the left-hand
LCD points to GAME. By pressing GAME the first time, you have
automatically selected the default Game Preset Timing Option (a). The
displays show the amount of time both players have on the clock (00.05
for 5 seconds). The displays also show &, to indicate that the
times shown are per move. To start the clock using this default setting,
the person who is going to move first simply presses the other player’s
Timing Activator Button.
Pressing GAME repeatedly will cycle through all the Game Presets,
as shown below. When your desired Preset is displayed, press the
appropriate Timing Activator Button to start the clock. If move time is
exceeded, the display will show -0.00 and the Expired Time symbol
8
(!). You may continue to play by pressing the Timing Activator Button,
and the expired clock display will automatically reset back to the original
time per move display.
• GAME TIMING MODE: PRESET OPTIONS
Pressing GAME repeatedly cycles through the following options:
Preset Option
Time per Move
Displays
(a) ......................... 5 sec/move .............. 00.05 / 00.05
(b) ....................... 10 sec/move .............. 00.10 / 00.10
(c) ......................... 1 min/move .............. 01.00 / 01.00
Note: After your time has run out, your opponent’s countdown clock
will be reactivated as soon as you press your Timing Activator Button.
exceeded, that player has lost and the display will show -0.00 and the
Expired Time symbol (!).
IMPORTANT: Please also note the following points pertaining to
Tournament Mode:
• If, at any point in the game, a player fails to make the required
number of moves in the designated time, that player has lost the
game. The appropriate LCD will show the Expired Time display.
• A player can make more than the required number of moves within
any given time frame.
• During a game, the clock display will not indicate the Secondary
stage, nor will the Secondary time be added to the remaining clock
display, until the Primary time limit has been used up. Similarly, the
Tertiary stage will not be indicated on the display, nor will the
Tertiary time be added to the remaining clock display, until each
side has used up both the Primary and Secondary time limits.
3.6 TOURNAMENT TIMING MODE
In Tournament Mode, each player has a certain amount of time to
complete a fixed number of moves. Whenever a player fails to meet the
required number of moves within the set amount of time, that person
has lost the game.
Tournament games require players to complete more than one timing
stage, with some games offering as many as 3 different timing stages
(Primary, Secondary, and Tertiary). Each stage of the game has its own
separate time control, in which players must make the required number
of moves in the specified amount of time. If, for example, the first stage
of a game requires that 40 moves be made in 2 hours, and one of the
players does not complete 40 moves within that time, that player loses.
If, however, both players make 40 or more moves and there’s still time
left over from the first stage, the game will continue and the leftover
time will be added to the next stage of the game.
All of the Tournament settings are summarized in the Tournament
Preset Chart, and each individual Mode is also discussed in detail in
this section.
Press TOURNAMENT to enter Tournament Mode and automatically
select the default Preset (Standard Timing). Pressing TOURNAMENT
repeatedly will cycle through all the Tournament Presets, as described
in this section. Within each of the 6 Tournament Presets, pressing
NEXT/MOVE NO. repeatedly will cycle through the Primary, Secondary,
and Tertiary displays, where applicable, with an arrow (%) indicating the
current stage. When your desired Tournament Preset is displayed,
press the appropriate Timing Activator Button to start your own or your
opponent’s clock (depending on who is playing first). If game time is
• TOURNAMENT TIMING MODE: PRESET OPTIONS
Pressing TOURNAMENT repeatedly cycles through the Preset
Timing Options described individually in this section. Consult the
Tournament Preset Chart for a complete overview of all choices and
displays at a glance.
a. Standard Timing .......... 40 moves in 2 hours; remaining moves in
1 hour
Standard Timing is the default Tournament Preset, automatically
selected when you first press TOURNAMENT. Note that the left-hand
LCD shows the amount of time you have on the clock (2:00 for 2 hours),
and the right-hand display shows the number of moves to be made in
that time (& 40, for 40 moves). An arrow (%) on the right-hand
display points to PRIMARY to show that the Primary Time Control is
9
ENGLISH
CHECKING THE MOVE NUMBER!
It’s easy to check the move number during a game! Simply hold
down NEXT/MOVE NO., and you’ll see & in the left-hand display,
along with the current move number. Remember that the number of
moves only changes after 2 individual moves have been made, i.e.,
after both you and your opponent have made a move.
being displayed. To see the Secondary Time Control, press NEXT/
MOVE NO., and the arrow (%) now points to SECONDARY. The left
display indicates 1 hour, and the right display shows ALL, signifying that
all remaining moves must be made within 1 hour.
To start the clock using the Standard setting, the person who is going
to move first simply presses the other player’s Timing Activator Button.
During the Primary stage of the game (% points to PRIMARY), each
player has 2 hours to complete 40 moves. After the players have both
made their first 40 moves within their designated 2 hours, they enter the
Secondary stage (% points to SECONDARY). The players then each
have 1 hour, in addition to the remaining time left over from the Primary
stage, to complete the game.
TOURNAMENT PRESETS: AN OVERVIEW!
Press TOURNAMENT repeatedly to cycle through the main Presets.
Within the Presets, press NEXT/MOVE NO. to cycle through the Primary,
Secondary, and Tertiary settings.
PRESET
MOVES/TIME
DISPLAYS
STANDARD Timing:
% Primary .................. 40 in 2 hrs ...................... 2:00 / 40
% Secondary ............. Rest in 1 hr .................... 01:00 / ALL
AMATEUR Timing:
% Primary .................. 30 in 1 hr/30 min ............ 1:30 / 30
% Secondary ............. Rest in 1 hr .................... 01:00 / ALL
b. Amateur Timing ........... 30 moves in 1 hour, 30 minutes; remaining moves in 1 hour
Press TOURNAMENT again to switch to the second Tournament
Preset (Amateur Timing). During the Primary stage of the game (%
points to PRIMARY), each player has 1 hour and 30 minutes to complete 30 moves. After the players have both made their first 30 moves
within their designated 1 hour and 30 minutes, they enter the Secondary
stage (% points to SECONDARY). They then each have 1 hour, in
addition to the remaining time left over from the Primary stage, to
complete the game. To select the Amateur Preset and start either your
own or your opponent’s clock, press the appropriate Timing Activator
Button.
c. FIDE Timing .................. 40 moves in 2 hours; followed by 20
moves in 1 hour; remaining moves in 30
minutes
Press TOURNAMENT again to switch to the third Tournament Preset
(FIDE Timing). During the Primary stage of the game (% points to
PRIMARY), each player has 2 hours to complete 40 moves. After the
players have both made their first 40 moves within their designated 2
hours, they enter the Secondary stage (% points to SECONDARY).
They then each have 1 hour, in addition to the remaining time left over
from the Primary stage, to complete the next 20 moves. After each
player has made 20 more moves without using all the allocated time
(time remaining), they enter the Tertiary stage. They then each have 30
minutes, in addition to the time remaining from the Secondary stage, to
complete the game. As noted earlier, remember that the clock display
FIDE Timing:
% Primary .................. 40 in 2 hrs ...................... 2:00
Free time* ...................... 02:00
% Secondary ............. 20 in 1 hr ........................ 01:00
Free time* ...................... 01:00
% Tertiary .................. Rest in 30 min ................ 00:30
Free time* ...................... 00:30
/
/
/
/
/
/
40
0.00
20
0.00
ALL
0.00
WORLD Timing:
% Primary .................. 40 in 1 hr/40 min ............ 1:40
$ 30 sec ............ 01:40
% Secondary ............. 20 in 50 min ................... 00:50
$ 30 sec ............ 00:50
% Tertiary .................. Rest in 10 min ................ 00:10
$ 30 sec ............ 00:10
/
/
/
/
/
/
40
0.30
20
0.30
ALL
0.30
TRADITIONAL Timing:
% Primary .................. 40 in 2 hrs .................... 2:00 /
40
% Secondary ............. 20 in 1 hr (repeat) ........ 01:00 / r 20
CLUB Timing:
% Primary .................. 30 in 30 min ................. 0:30 /
30
% Secondary ............. 30 in 30 min (repeat) ... 00:30 / r 30
*Free time per move can be adjusted as desired
10
will not indicate the Secondary stage nor add the Secondary time until
the Primary time limit has been used up. The same goes for the Tertiary
stage, which will not be indicated nor time added until each side has
used up both the Primary and Secondary time limits. To select the FIDE
Preset and start either your own or your opponent’s clock, press the
appropriate Timing Activator Button.
Confused? Here’s an example! Let’s say that you complete the 40
moves in the Primary stage in 1 hour and 50 minutes, and your opponent has used up the full 2 hours after the 40th move. The hour from the
Secondary stage is then added to the remaining clock display, i.e., the
Secondary stage becomes 1 hour and 10 minutes for you and 1 hour for
your opponent. If you should complete the 20 moves of the Secondary
stage in 50 minutes, the remaining 20 minutes of this stage is then
carried over to the Tertiary stage, and you now have 50 minutes to
complete the game.
Note: When pressing NEXT/MOVE NO. to cycle through the FIDE
displays before starting a game, the free time for each individual move
is displayed between each stage. You can adjust the amount of time
and the way that time is added, if desired (see Section 2.6).
e. Traditional Timing ....... 40 moves in 2 hours; each subsequent
set of 20 moves in 1 hour (repeat to end
of game)
Press TOURNAMENT again to switch to the fifth Tournament Preset
(Traditional Timing). During the Primary stage of the game (% points to
PRIMARY), each player has 2 hours to complete 40 moves. After the
players have both made their first 40 moves within their designated 2
hours, they enter the Secondary stage (% points to SECONDARY).
They then each have 1 hour, in addition to the remaining time left over
from the Primary stage, to complete the next 20 moves. The Secondary
stage is then repeated until the game is over. To select the World Preset
and start either your own or your opponent’s clock, press the appropriate Timing Activator Button.
d. World Timing ............... 40 moves in 1 hour, 40 minutes; followed
by 20 moves in 50 minutes; remaining
moves in 10 minutes. 30 seconds added
after each individual move.
Press TOURNAMENT again to switch to the fourth Tournament
Preset (World Timing). During the Primary stage of the game (% points
to PRIMARY), each player has 1 hour and 40 minutes to complete 40
moves. After the players have both made their first 40 moves within
their designated 1 hour and 40 minutes, they enter the Secondary stage
(% points to SECONDARY). They then each have 50 minutes, in
addition to the remaining time left over from the Primary stage, to
complete the next 20 moves. After each player has made 20 more
moves without using all the allocated time (time remaining), they enter
the Tertiary stage. They then each have 10 minutes, in addition to the
time remaining from the Secondary stage, to complete the game. To
select the World Preset and start either your own or your opponent’s
clock, press the appropriate Timing Activator Button.
For the World Timing Preset, you’ll also notice that ADD AFTER
($) appears on the displays. In these games, 30 seconds of free
time will automatically be added to your clock as soon as you have
f. Club Timing ................... 30 moves in 30 minutes (repeat to end of
game)
Press TOURNAMENT again to switch to the sixth Tournament Preset
(Club Timing). During the Primary stage of the game (% points to
PRIMARY), each player has 30 minutes to complete 30 moves. After
the players have both made their first 30 moves within their designated
30 minutes, they enter the Secondary stage (% points to SECONDARY). In this case, the Secondary stage repeats the first time control,
which is repeated as often as required until the game is over. To select
the Club Preset and start either your own or your opponent’s clock,
press the appropriate Timing Activator Button.
11
ENGLISH
made your move and pressed your Timing Activator Button, i.e., after
you have made your move. Additionally, the amount of time for the
whole game is only reduced if you go over this fixed amount of time.
Therefore, if you make your move in less than 30 seconds, you’ll make
a net gain in time on the clock!
Note: When pressing NEXT/MOVE NO. to cycle through the World
Timing displays before starting a game, the free time for each individual
move (30 seconds) is displayed between each stage. You can adjust
the amount of time and the way that time is added, if desired, as described in Section 2.6).
mode you have selected (except for Tournament Mode, where the
arrow will initially point to PRIMARY).
c. After pressing the desired Timing Mode Key, you may select one
of that Mode’s Preset Timing Options, if you wish. To do so,
simply press that same Timing Mode Key repeatedly to cycle
through the Presets. For example, if you have chosen Blitz Mode,
press BLITZ repeatedly to cycle through the 5 Blitz Presets.
d. Once you have decided on a Preset option and that Preset is
displayed, the ADJUST and SET Keys are used to adjust and
store the new times, first for the left-hand display, and then for the
right. Note that, for Tournament Mode, you can also change the
number of moves on the right-hand LCD after adjusting the time.
• To make adjustments: Press ADJUST to enter Adjustment
Mode, and the left-most digit will start flashing. Press ADJUST
repeatedly, as necessary, to change that digit to another number.
If ADJUST is held down, the digits will change rapidly. When your
desired number shows, press SET to confirm the change and go
on to the next flashing digit. If you come to a digit you don’t want
to change, simply press SET to go on to the next digit. Start with
the hours and minutes (HH:MM), and work your way down
through the minutes and seconds (MM.SS).
• For Bronstein and Bonus Timer Modes, use the same method
to set both the time for the game and the maximum free time per
individual move.
• For Tournament Mode, use the same method to set both the
time for the game and the number of moves. Note that the number shown is the number of moves to be played by both sides.
You can use the same setting method to adjust the time and
number of moves for the Secondary and Tertiary stages, if desired. For the FIDE and World Presets, after setting the number of
moves for the Primary stage, you can use the same method to
adjust the maximum free time per individual move and the type of
free time.
e. After making all desired changes, store your personalized Timing
Option by pressing and holding SET and USER together for at
least 3 seconds. The display will stop flashing to confirm the new
setting. From this point on, whenever you press USER, your new
custom Timing Mode will be displayed! To start using your new
setting, simply press one of the Timing Activator Buttons to start
one of the clocks, as usual.
3.7 USER TIMING MODE
One of the unique features offered by your Game Clock II is the
ability to create and store your own personalized timing methods!
Before going through the steps below to learn how to use this feature,
please note the following regarding User Mode:
• Only one personalized option can be stored in memory at one time.
However, the stored option can be changed whenever desired.
• Different times can be set on the two individual displays for all
modes except Tournament Mode.
• We do not recommend setting different whole game and maximum
free times for the left and right-hand players in Bronstein or Bonus
Timer Modes. If you do so, only the left-hand player’s time control
will be displayed when you select User Mode or reset the clocks.
• We do not recommend setting the time control or move number to
zero in any stage of a Tournament game.
• When your turn the clock on the first time and you haven’t yet
stored a personalized option, pressing USER automatically shows
that the FIDE Tournament Preset is stored by default. You can
adjust this setting for your own use, if desired.
• After a personal timing option has been stored, pressing USER will
bring up that stored option each time, until changed. If a Tournament setting has been stored, pressing NEXT/MOVE NO. will cycle
through the stages of the stored setting.
• If the batteries are changed or the unit is reset via the ACL function,
User Mode will revert back to the default FIDE Preset setting.
Note that User Mode setup will be much easier if you are already
familiar with the basic Mode selection process, as detailed previously in
this manual. In fact, in steps (a) through (c), below, you are simply
selecting a Timing Mode and/or a Preset. User Mode adjustments come
in at step (d).
Follow these steps to store an option in User Mode:
a. If the displays are still showing time from a previous game, reset
the clocks by pressing PAUSE for at least 3 seconds.
b. Next, decide which type of timing method you’d like to store.
Choose any of the Timing Modes by pressing the appropriate key
for that mode—HOUR GLASS, BLITZ, BONUS TIMER, BRONSTEIN, GAME, or TOURNAMENT. You’ll see the default time
display for that particular mode, and an arrow (%) will point to
12
5. TECHNICAL DETAILS
ENGLISH
5.1 THE ACL FUNCTION
Computers sometimes “lock up” due to static discharge or other
electrical disturbances. If this happens, reinstall the batteries and use a
paper clip or another sharp object to press into the hole marked ACL on
the front of the unit for at least one second. This clears the memory and
resets the clock back to the default Blitz Timing Mode setting. Note that
User Mode will also return to the default FIDE Preset setting after a
complete reset.
5.2 CARE AND MAINTENANCE
Your Game Clock is a precision electronic device, and should not be
subjected to rough handling or exposed to extreme temperatures or
moisture. Do not use chemical agents to clean the unit, as these may
cause damage.
Weak batteries should be replaced promptly, since they can leak and
damage the unit. Please also note the following points regarding use of
batteries. Use only alkaline or zinc carbon batteries. Do not mix
different types of batteries or new and used batteries. Do not
recharge non-rechargeable batteries. Use only the recommended
batteries or equivalent. Be sure to observe the correct polarity
when inserting batteries. Worn out batteries should be removed
from the unit promptly. Do not short circuit the supply terminals.
5.3 TECHNICAL SPECIFICATIONS
Keys:
11 keys, 2 buttons, 2 slider switches
LCDs:
(2) 62mm x 22.7mm panels
LEDs:
(2)
Buzzer:
Piezo electric buzzer (27mm)
Batteries:
2 x C/AM2/R14 (1.5V each)
Battery life:
600 hours (normal conditions)
Low battery detection voltage: 2.42 ± .02V
Dimensions:
195 x 118 x 80mm
Please retain this information for future reference.
Saitek reserves the right to make technical changes without notice in the interest
of progress.
13
TROUBLESHOOTING GUIDE
SYMPTOMS
Unit doesn’t react or behaves
erratically.
POSSIBLE CAUSES
• Batteries are not installed correctly.
• Batteries are weak or bad.
• Poor battery contacts.
• Static discharge or an electrical disturbance has caused a
lock-up.
ACTION TO TAKE
• Reinstall batteries (see Section 1.1).
• Replace batteries (see Section 1.1).
• Ensure that contacts on batteries and unit are clean. Make
sure unit contacts have not been bent.
• Press into the hole marked ACL to reset unit (see Section
5.1).
Display is difficult to read or shows
nonsensical segments.
• Batteries are weak or bad.
• Replace batteries. If problem persists, use ACL feature to
reset unit (see Section 5.1).
Low battery symbol (@) is still on,
after replacing batteries.
• Batteries are weak or bad.
• Electrostatic discharge has caused a malfunction.
• Make sure you are using fresh batteries.
• Use ACL feature to reset unit (see Section 5.1).
Unit is silent.
• Switch on bottom of unit is set to SOUND OFF.
• Slide switch to GO.
No response or improper response
when keys are pressed.
• Electrostatic discharge has caused a malfunction.
• Batteries are weak or bad.
• Use ACL feature to reset unit (see Section 5.1).
• Replace batteries. If problem persists, use ACL feature to
reset unit, as described in Section 5.1.
No response when the Timing
Activator Button is pressed.
• It’s not your turn.
• The Timing Activator Button on the opposite side is being
held down by your opponent.
• The game has ended.
• Verify which side is to move.
• Make sure that the opposite button is not being depressed.
• The game clock is still running.
• Switch on bottom of unit is set to LOCK.
• Press PAUSE to stop clocks; use ADJUST and SET to
adjust time (see Section 2.6).
• Set switch to MODIFY before adjusting time.
Pressing PAUSE for more than 3
seconds does not reset the clocks.
• Switch on bottom of unit is set to LOCK.
• Set switch to MODIFY before attempting to reset clocks.
Pressing and holding NEXT/MOVE
NO. during a game doesn’t display
the current move number.
• Switch on bottom of unit is set to LOCK.
• Set switch to MODIFY before trying to view the move
number during a game.
A high double beep sounds when
you press a key, and nothing else
happens.
• You are pressing an invalid key, e.g., pressing PAUSE
before a game starts or pressing a Timing Mode Key during
the game.
• Check appropriate section of manual for what you’re trying to
do. Make sure MODIFY/LOCK switch is not set to LOCK.
You cannot adjust the time during
the game.
14
• Start a new game by pressing PAUSE for more than 3
seconds.