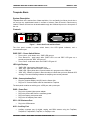
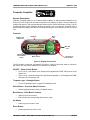
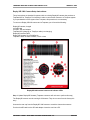
1
Traqmate
GPS Data Acquisition System
User Manual
Version 3.40
March 27, 2013
Copyright © 2005 - 2012 Track Systems Technologies, LLC
Traqmate basic and classic User Manual V3.40
March 27, 2013
Traqmate, Traqview, TraqData, TraqTach, TraqCam, TraqStudio, TraqSync, the
Traqmate logo, and the Track Systems logo are trademarks of Track Systems
Technologies, LLC
ChaseCam, PDR100, and SS1000 are trademarks of Chase Product
Development, Inc.
Sony, HDR-CX100, HDR-CX110, and LANC are registered trademarks of Sony
Corporation.
GoPro and GoPro HD are registered trademarks of Woodman Labs, Inc.
Replay and Replay XD are trademarks of Stable Imaging Solutions, LLC.
AEM is a trademark of AEM Electronics, Inc.
Microsoft, Windows, XP, Vista, Windows 7, and Windows 8 are trademarks of
Microsoft Corp.
Velcro is a trademark of Velcro Industries B.V.
TraqData HD is manufactured with RaceCam Technology licensed from
Northeast Microelectronics.
Copyright © 2005 - 2013 Track Systems Technologies, LLC
Page 2
Traqmate basic and classic User Manual V3.40
March 27, 2013
Table of Contents
WELCOME TO TEAM TRAQMATE ......................................................................................................... 5
QUICK REFERENCE GUIDE ................................................................................................................. 6
VIDEO HELP .................................................................................................................................................. 6
SYSTEM OVERVIEW............................................................................................................................ 7
TRAQMATE FEATURES .................................................................................................................................... 7
TRAQMATE SYSTEM COMPONENTS .................................................................................................................. 8
Sensor Unit ............................................................................................................................................. 8
Display Unit............................................................................................................................................. 8
Traqview ................................................................................................................................................. 9
TRAQMATE SYSTEM PACKAGES......................................................................................................................10
Traqmate Basic ......................................................................................................................................10
Traqmate Complete ...............................................................................................................................10
Accessories............................................................................................................................................10
QUICK GUIDE – LET’S COLLECT SOME DATA .................................................................................... 11
TRAQMATE INSTALLATION ................................................................................................................ 12
SENSOR UNIT INSTALLATION ..........................................................................................................................12
Traqmate Basic Installation....................................................................................................................13
Traqmate Complete Installation .............................................................................................................13
GPS ANTENNA PLACEMENT AND INSTALLATION ...............................................................................................13
CONNECTING A SENSOR UNIT TO A DISPLAY UNIT ............................................................................................13
POWER CONNECTION ....................................................................................................................................14
Cigarette Lighter Adapter .......................................................................................................................14
TraqPaq Rechargeable Li-ion Battery Pack ...........................................................................................14
Permanent Wiring Harness Installation ..................................................................................................14
TraqAC Power Supply (Traqmate Basic Only).......................................................................................15
TRAQMATE DISPLAY UNIT INSTALLATION .........................................................................................................15
Mounting ................................................................................................................................................15
Connecting to the Sensor Unit ...............................................................................................................16
TRAQMATE BASIC ............................................................................................................................ 17
SYSTEM DESCRIPTION...................................................................................................................................17
CONTROLS ...................................................................................................................................................17
PWR / REC – Power Switch Button .......................................................................................................17
LED Light Displays.................................................................................................................................17
COM – Communications Port ................................................................................................................17
PWR – Power Port .................................................................................................................................17
GPS – GPS Antenna Port ......................................................................................................................17
AUX – Auxiliary Port...............................................................................................................................17
TRAQMATE COMPLETE ..................................................................................................................... 18
SYSTEM DESCRIPTION...................................................................................................................................18
CONTROLS ...................................................................................................................................................18
ON/OFF – Power Switch Button ............................................................................................................18
Traqmate Logo – Backlight Button.........................................................................................................18
Select Button – Executes Menu Functions.............................................................................................18
Back Button – Exits Menu Functions .....................................................................................................18
Up Button ...............................................................................................................................................18
Down Button ..........................................................................................................................................18
MENU SYSTEM .............................................................................................................................................19
DISPLAY UNIT ICONS .....................................................................................................................................22
AUTOON ......................................................................................................................................................23
AUTOSTART .................................................................................................................................................23
FEATURES....................................................................................................................................................24
Lap Timing .............................................................................................................................................24
Autocross / Rally Mode ..........................................................................................................................26
1/8 Mile and 1/4 Mile Drag Race and Performance Modes....................................................................27
Segment Timing Mode ...........................................................................................................................29
Using for Closed Circuit Feedback.........................................................................................................29
Other Recording Modes .........................................................................................................................29
Non Recording Modes ...........................................................................................................................30
Copyright © 2005 - 2013 Track Systems Technologies, LLC
Page 3
Traqmate basic and classic User Manual V3.40
March 27, 2013
ADDING DATA INPUTS ...................................................................................................................... 31
CONNECTING VIDEO CAMERAS ......................................................................................................... 32
CONNECTING A GOPRO HERO HD CAMERA ..................................................................................................32
GoPro HERO Camera Setup Instructions: .............................................................................................33
CONNECTING A REPLAY XD 1080 CAMERA .....................................................................................................35
Replay XD 1080 Camera Setup Instructions:.........................................................................................36
CONNECTING A SONY HD CAMCORDER ..........................................................................................................39
Sony HDR-CX100 , CX-110, and CX-150 Camcorder Operation ..........................................................40
Mounting ................................................................................................................................................40
Combining Video Files ...........................................................................................................................40
Converting Video Files ...........................................................................................................................40
Optimizing Video ....................................................................................................................................41
Optimizing Audio ....................................................................................................................................41
Powering the Camcorder .......................................................................................................................41
CONNECTING A CHASECAM PDR100 DIGITAL VIDEO RECORDER ......................................................................42
ChaseCam PDR100 Digital Video Recorder Operation .........................................................................44
ChaseCam SS1000 Split-Screen Processor Operation .........................................................................45
TROUBLESHOOTING GUIDE .............................................................................................................. 46
Traqmate Complete ...............................................................................................................................46
Traqmate Basic ......................................................................................................................................46
Scheduling a Repair...............................................................................................................................46
APPENDICES.................................................................................................................................... 47
TABLE OF FIGURES .......................................................................................................................................47
WARRANTY INFORMATION ..............................................................................................................................47
GLOSSARY ...................................................................................................................................... 48
ABOUT GPS DATA ACQUISITION ...................................................................................................... 49
GPS Frequently Asked Questions .........................................................................................................50
Copyright © 2005 - 2013 Track Systems Technologies, LLC
Page 4
Traqmate basic and classic User Manual V3.40
March 27, 2013
Welcome to Team Traqmate
Thank you for purchasing the Traqmate System, the powerful but easy-to-use Data Acquisition System. You
will be amazed at the depth of information available without modifying your vehicle or learning to decipher
complicated data tables.
Traqmate was designed by racers and is great for getting the first or last second out of your lap times. It is
also great for the track day enthusiast who wants to record their day, play it back with their video, analyze
their performance to get the most out of their car, and do a little bench racing with their friends. With the
addition of this small device to your track bag, you will be able to better tune car and driver for maximum
performance. While it is very easy to learn, please take a moment to read this manual so you can discover
all the capabilities and get the most out your Traqmate.
As a Traqmate owner, you really are a member of Team Traqmate. Use the traqmate.com website to ‘Share
and Compare’, trading laps and videos with thousands of other Traqmate enthusiasts around the world. This
site contains a Google Earth database of tracks worldwide. You can ‘fly’ to them, see the layout, and read
some history of the track.
We at Track Systems are continually improving Traqmate and Traqview by adding additional innovative
features that are available to download so make sure you check traqmate.com frequently for the latest
software. The 3.00 and 3.15 releases are large steps in ease-of-use and capability. Many of the new
features were directly a result of customer feedback so please continue to help us make the product better
with your comments in the Traqmate Support Forum at traqmate.com.
Traqmate User Manual
We have made some significant improvements to this User Manual in order to make it easier to use. One
new feature is the Quick Reference Guide, immediately following this section, which provides links to
common topics and also links to online videos explaining that feature.
Other User Manuals
We have broken the Traqmate User Manual into multiple separate manuals. The different publications are:
Traqmate User Manual covering Traqmate Basic and Traqmate Complete installation and operation.
Traqview / TraqStudio User Manual, TraqData Application Guide which explains how to connect data inputs
to the Traqmate, and TraqDash User Manual.
See you at the track,
Glenn Stephens
President
Track Systems Technologies, LLC
Copyright © 2005 - 2013 Track Systems Technologies, LLC
Page 5
Traqmate basic and classic User Manual V3.40
March 27, 2013
Quick Reference Guide
Click on start page number to jump within this document.
TOPIC
Installation
Collect Data/Video
FEATURE
PAGE
System Packages
12
Traqmate System
12
Connect GoPro Camera
32
Connect Replay Camera
35
Connect Sony HD Camcorder
39
Connect ChaseCam PDR Recorder
42
Display Unit Controls
18
Display Unit with Video
22
Start Lap Timing
24
Stop Lap Timing
24
Video Help
Here are some links to videos that will help with configuration and operation of
the Traqmate.
Connecting a Traqmate Classic System to a PC
http://youtu.be/y_A8E_dm0D0
Updating Firmware in Traqmate Classic
http://youtu.be/4x0cen6of8I
Copyright © 2005 - 2013 Track Systems Technologies, LLC
Page 6
System Overview
The Traqmate is a vehicle data acquisition device that uses a high-speed GPS receiver and highresolution accelerometers to track and record the speed of a vehicle, its absolute location, and
forces acting on the vehicle.
The Track Systems Traqview analysis program uses advanced mathematical algorithms to
translate this data into visual form where it is easy to spot differences between drivers, vehicles,
and sessions.
Traqmate Features
Drop and Go – Stick a Traqmate in your car, turn it on, and collect data all day long. No sensors
required.
Replay Your Day – Upload the data into Traqview. See your car on the track and your
performance on the virtual dashboard.
Instant Gratification – See your lap times as they happen on the in-car display.
Share and Compare – Create virtual races with friends or with yourself from different sessions.
Trade laps with your friends. Learn from them.
Easy to Use – No engineering degree required. The Traqmate Basic Unit has one button. What
could be easier? The Traqmate Complete Display Unit is menu-driven with prompts in English.
Just pick what you want – no typing, no memorizing buttons.
Analyze – Zoom in on your lap. Single step to see G loads and speed. Compare braking and
acceleration points between cars and drivers. Graph data vs. time and distance.
Share Your Toys – Loan your Traqmate to a friend or loan your car to a faster driver. Then
compare their laps against your own. Even two drivers with equal laptimes can both learn from
one another.
Rugged – Traqmate was designed to withstand the tough environment of a race car to give you
years of service.
Grow – Want even more information? Add sensors for digital, analog, and tachometer inputs.
It Gets Better – Traqmate’s heart is a very powerful microprocessor so new features and
functionality will be made available over time. Download new software from traqmate.com,
reprogram the unit, and you are good to go.
Traqmate basic and classic User Manual V3.40
March 27, 2013
Traqmate System Components
The Traqmate System has three main components – the Sensor Unit (SU) contains the sensitive
electronics to measure location and G-forces. The Display Unit (DU) contains a graphical display
for viewing laptimes as they happen. The final component is Traqview, the innovative Windows
software that allows you to view your performance in many different ways.
Sensor Unit
In addition to the GPS receiver to measure position and the
accelerometers to measure forces, the Sensor Unit has digital,
analog, and frequency inputs for measuring individual aspects
of vehicle performance such as RPM or steering wheel
position. These are recorded alongside the position and force
data for easy graphing.
Four LEDs indicate power, data collection mode, GPS signal,
and data communications activity. The Sensor Unit can be
used standalone or in conjunction with a Display Unit, in which
case it is entirely remotely controlled. When used alone (Traqmate Basic), the Sensor Unit has a
single red button on the front panel for ON/OFF and for entering and exiting data recording mode.
The Sensor Unit can be customized using the Traqview Analysis Program. You can enter Drivers,
Tracks, and Vehicles and all data is date and time-stamped so there is never any confusion.
Traqview lets you customize the unit with name and contact information in case it is lost or stolen.
There are two models of Sensor Unit. The original Sensor Unit (SU1) has a red label and the
power and GPS connectors are adjacent. The updated model (SU2) has a black label and the
power and GPS connectors are separated by the AUX connector. Both units are fully supported
by firmware but the SU2 has these additional capabilities; 3 axis accelerometer, more sensitive
GPS receiver, AutoOn capability, and high-speed serial bus for future expansion.
Sensor Units have one of two types of connector on the front panel, a 6 pin female DIN connector
or a 6 pin male locking connector. Both function the same but they cannot be interchanged.
Display Unit
The Display Unit (DU) is a major leap in low-cost data
acquisition providing in-car lap timing without a need for
external beacons. The graphical and menu-driven user
interface makes data collection easy and fun. Even more
innovative, the DU is a USB-powered data storage device.
Unclip it from your car and plug it into your PC’s USB port.
The Display Unit powers up and transfers your data right into
Traqview where your sessions are listed by Driver, Track,
and Vehicle.
The DU has a backlit bitmapped screen for easy reading day
or night. The membrane switch has large buttons so it can
be accessed with gloves and is resistant to moisture, dirt,
and grease. Mount it anywhere with Velcro or the accessory quick clip.
With the Traqmate DU, in-car lap timing has never been easier. For each track, press the
SELECT button at the start/finish line to permanently store that information in the DU. The unit
will remember that track in the future. Place the unit in Lapping Mode and watch your laps click
off. The display shows Lap Number, Lap Time, Best Lap, and whether the lap was faster or
slower that the previous lap. Lap Timing continues even if GPS signal is lost or spotty. Review
laps for any session and delete the ones you don’t want.
Display Units can have one of two types of connector on the cable, a 6 pin female DIN connector
or a 6 pin female locking connector. Both function the same but they cannot be interchanged.
Copyright © 2005 - 2013 Track Systems Technologies, LLC
Page 8
Traqmate basic and classic User Manual V3.40
March 27, 2013
Traqview
A data acquisition system is only
as good as the analysis program.
Traqview is a new approach that
merges hard-core data analysis
with the fun of a video game. The
track mapping is accurate and
gives an instant read on what is
happening
where.
Multi-car
playback lets you see graphically
who is faster where.
Record several cars in a race and
replay the entire race in real-time,
slow-mo, or fast forward. See their
speed, G loads, braking and
acceleration for every car on the
virtual dashboard.
Traqview has all the tools you
need to optimize the performance
of both car and driver. For
example, you can display graphs
like Velocity vs. Distance to see who is faster in which corners and then define a sector on the
map and zoom in to see braking points, instantaneous velocities, acceleration points, and transfer
speeds through a corner.
For an added dimension, the optional TraqStudio allows simultaneous synchronized playback of
data and video.
Traqview is your single point of contact for everything in the Traqmate System. Use it to upload
data from Traqmate, analyze the data, configure Tracks, Drivers, Vehicles and optional Sensors,
change the Sampling Rate, and even download future software and feature upgrades into your
Traqmate.
Copyright © 2005 - 2013 Track Systems Technologies, LLC
Page 9
Traqmate basic and classic User Manual V3.40
March 27, 2013
Traqmate System Packages
This diagram will help you identify the
Traqmate Components. Traqmate
comes as two bundled packages.
Each includes everything you need to
collect and analyze your data.
Traqmate Basic
The Traqmate Basic package consists
of a Sensor Unit (SU), GPS antenna,
serial cable, power cable, carrying
box, and compact data disc containing
the Traqview Analysis software and
manual.
Traqmate Complete
The Traqmate Complete package
consists of a Sensor Unit (SU), a
Display Unit (DU), GPS antenna, USB
cable, SU-DU connection cable,
power cable, carrying box, and
compact data disc containing the
Traqview Analysis Software and User
Manual.
Figure 1 - Traqmate System Components
Accessories
Accessories include a TraqPaq Li-ion battery pack and charger, optional power connections,
Display Unit mounting brackets, TraqData analog/digital/RPM input device, TraqTach RPM input
device, Li-ion Rechargeable TraqPaq battery packs, video products, extra antennas for
convenient vehicle swapping, and the SU mounting tray.
TraqPaq
Li-ion
Pack
SU Mounting Tray
DU
Bracket
Mounting
TraqAC Power
Supply
Copyright © 2005 - 2013 Track Systems Technologies, LLC
Permanent Power
Cable
Page 10
Traqmate basic and classic User Manual V3.40
March 27, 2013
Quick Guide – Let’s Collect Some Data
You just bought a Traqmate Complete and you want to try it out. This is as simple as it gets.
First, install the software. Put the CD in your drive and follow the directions. For most users it is
seamless. If not, refer to the more detailed instructions elsewhere in this manual.
Put the Traqmate on the floor of your car. Plug in the cigarette lighter cable. Plug the SU-DU
connection between the Display Unit (DU) and Sensor Unit (SU). Screw the GPS antenna into the
SU and place it on your roof.
Press the leftmost round button on the DU to turn on the unit. The DU should light up and display
the startup screen, followed by the menu. Select ‘Record Data’ and ‘Drive’.
The unit will search for GPS and lock on within a minute or so. As you start moving, you should
see your direction, the time, and your speed on the display.
Go drive somewhere.
Press the rightmost red button to stop recording.
Turn off the Traqmate with the leftmost button (Press and hold for 3 seconds).
Unplug the SU-DU connection cable and take your DU to your PC.
Plug the USB cable between the DU and PC and the DU should start up.
Launch Traqview and select ‘Connect to Traqmate’. You should see the session that is stored on
the DU listed on the Traqview screen.
Click ‘Download Selected Sessions’ and your session will be saved on your computer.
Click on the open file folder at the upper left of the screen. You should see the session you just
saved. Select it and click ‘OK’.
You should now see your route and the dashboard on the screen.
Click on the Play control at the bottom of the screen and ‘Replay Your Day’.
With Traqmate, Data Acquisition is just that easy. Enjoy.
Copyright © 2005 - 2013 Track Systems Technologies, LLC
Page 11
Traqmate basic and classic User Manual V3.40
March 27, 2013
Traqmate Installation
These diagrams show the overall connections for the Traqmate Basic and Traqmate Complete
Systems.
Figure 2 - Traqmate Basic Connections
Figure 3 - Traqmate Complete Connections
Sensor Unit Installation
The Traqmate sensor unit may be mounted using a variety of methods depending on the
following factors: 1) How permanent is the desired
mount, 2) where is the preferred mounting point, 3) will
the SU be connected to a Display Unit (DU).
CHOOSE A LOCATION WHERE THE UNIT WILL
NOT BE SUBJECTED TO WATER. EXCESSIVE
MOISTURE EXPOSURE WILL DAMAGE THE UNIT.
The Sensor Unit must be mounted as flat as possible
in the vehicle and such that the arrow on the top label
points in the direction of travel.
This is to ensure the accelerometers are the most accurate and have the
best range for making measurements. It is also a good idea to place the
unit as close to the vehicle’s center of gravity as possible. While not
required, especially with connection to the DU, it may be desirable to
mount the SU in a location that allows the indicator lights to be viewed
easily by the driver. Given these considerations, a position on the floor of
the front passenger footwell may work well. Other good locations include
the trunk floor and on the transmission tunnel.
Copyright © 2005 - 2013 Track Systems Technologies, LLC
Page 12
Traqmate basic and classic User Manual V3.40
March 27, 2013
The mounting of the SU may be accomplished in a variety of ways, but the most desirable and
secure method is to use the Sensor Unit Mounting Tray (shown here), offered as a separate
accessory from Track Systems. The mounting tray can be attached permanently to the vehicle,
and by placing Velcro on the SU enclosure, and the mounting tray, the SU is securely fastened,
while at the same time being easily removable. Once the mounting tray is aligned in the vehicle,
the SU can be easily placed in the mounting tray and the alignment is set.
Another method for mounting the SU is to apply Velcro directly to the SU and the mating piece
directly to the vehicle. Care should be taken when placing the SU on the Velcro that it is properly
aligned in the vehicle and that the SU is securely attached.
Traqmate Basic Installation
If the SU is going to be used in a configuration without the DU (Traqmate Basic), it is desirable to
have access to the SU for downloading the data once it has been stored. Similarly, if a laptop is
going to be used to download the stored data without removing the SU, the unit should be placed
in a convenient and accessible location. In the case where the SU will be removed to download
the data, the mounting should take into account replacing the SU in a secure and aligned
manner.
Traqmate Complete Installation
If the SU is going to be connected to a DU, the mounting of the SU is not as critical with respect
to operator access. In this configuration, the DU stores the data and is the focal point for
downloading to a PC.
GPS Antenna Placement and Installation
The supplied GPS antenna has a magnetic mount,
which allows a variety of mounting options to the metal
body of the vehicle. In the case where the desired
location is not metal, double stick tape is a viable option
for mounting the antenna. The placement of the antenna
can have a great effect on the performance of the data
collection system. Ideally, the antenna should be placed
on the highest part of the exterior of the vehicle. Placing
the antenna inside the vehicle can cause “blind spots”
where the antenna is not able to see as many of the
GPS satellites that may be available to it. The system works best when the antenna has the least
restricted view of the sky. Once a location has been determined for the antenna placement, the
wire connecting the antenna and the SU should be routed in a manner such that it is not placed
under stress, and the wire will not be exposed to frequent bending or crimping. After routing the
wire to the SU, connect the antenna to the SU by screwing the antenna wire to the GPS
connector indicated on the end panel of the SU.
Connecting a Sensor Unit to a Display Unit
With Traqmate Complete a 6’ connection cable is
provided. This is a male-to-male DIN or male-to-female
locking cable, which allows a great deal of flexibility in
the placement of the SU and DU. 6’ extension cables
can add additional length if necessary. The cable should
be routed to be securely protected from damage during
normal vehicle operation.
Copyright © 2005 - 2013 Track Systems Technologies, LLC
Page 13
Traqmate basic and classic User Manual V3.40
March 27, 2013
Power Connection
In all installations, the SU must be supplied with a power source at all times it is in operation. For
Traqmate Complete, the DU can receive power via the SU-DU connection cable from the SU or
via the USB cable when connected to a PC for uploading sessions.
The SU was designed to be powered from a +12 VDC battery supply in four different ways; a
permanent wiring harness in the vehicle, a cigarette lighter adapter, a battery pack, and a wall
charger. Each of these will be discussed
separately.
Cigarette Lighter Adapter
For installations where a permanent power supply
connection is not required or desired, the cigarette
lighter adapter offers a quick and convenient solution. This adapter can be secured to the SU by
inserting the plug into the power connector (PWR) on the SU and tightening the threaded nut to
the power (PWR) socket. Once the SU and the power connector have been secured, the
cigarette lighter adapter can be plugged into one of the cigarette lighter sockets located in the
vehicle. It should be noted that many automobiles have cigarette lighter sockets that are always
ON and do not turn the power off when the ignition switch has been turned to the OFF position.
The cigarette lighter adapter has a RED LED to indicate that vehicle battery power is presented to
the adapter. During extended vehicle idle periods, the cigarette lighter adapter should be
removed from the vehicle socket to prevent vehicle battery drain.
TraqPaq Rechargeable Li-ion Battery Pack
The TraqPaq Rechargeable is very convenient and has the
advantage of reusability. The TraqPaq Rechargeable Battery
Pack is capable of powering a Traqmate for 7-10 hours on a
full charge.
If not handled properly Li-ion batteries can be dangerous.
Traqmate Li-ion packs have a protection circuit for
overcharge and excessive discharge and should provide
years of service under normal circumstances. If the pack
ever starts to overheat or swell, discontinue use immediately.
To recharge the pack, just plug it into the Traqmate Li-ion charger. It will recharge in
approximately 2 hours, at which time the LED on the charger will change from red to green.
Only use the Traqmate charger with Traqmate Li-ion Rechargeable battery packs. Never charge
any other types of batteries using the Li-ion charger. This includes alkaline or NiCd or NiMH
batteries in a non-rechargeable TraqPaq.
Permanent Wiring Harness Installation
The power cable is a 13 foot, two conductor, red and black zip
cable that has a plug on one end and is not terminated on the
other end. The power plug contains a threaded nut for
securing the plug to the power jack (PWR) on the Traqmate
Sensor Unit (SU). The other end of the cable is intended to
connect to either the automobile battery or a junction box.
Since the SU mounting location can vary widely (trunk, under
seat, floorboard, etc.) the required cable length will also vary.
Consequently, the cable can be cut to an appropriate length suitable for your automobile, once
the mounting location is selected.
Copyright © 2005 - 2013 Track Systems Technologies, LLC
Page 14
Traqmate basic and classic User Manual V3.40
Vehicle +12V
March 27, 2013
3A 3AG Slow Blow Fuse
Posi-Lock Screw-on
Fuse Holder
13' cable - cut to length
Vehicle GND
Power
Connector
Figure 4 - Permanent Wiring Harness
The red wire is to be connected to the positive (+) side of the battery and the black lead to the
negative (-) or chassis side. A fuse holder has also been included with the power cable. The red
conductor of the zip power cable should be cut and stripped about ¼ inch on both ends. Each
end should be inserted into the Posi-Lock fuse holder and screwed down tight. The bare end of
the wire should be inserted / crimped into a crimp lug or other suitable connector (not included).
The lug should be connected to the positive (+) battery terminal or a switched positive (+)
terminal.
If the SU is connected directly to the positive (+) battery terminal, the SU will continue to be
powered when the ignition switch has been turned to the OFF position. Extended vehicle idle
periods may drain the vehicle battery if the unit is not turned off using the front panel button. If this
is a concern for your installation, efforts should be made to connect the positive (+) terminal to a
switched supply.
The black conductor should be stripped and a crimp lug or other suitable connector applied (not
included). The lug on the black conductor should then be connected to the negative (-) battery
terminal or chassis ground.
TraqAC Power Supply (Traqmate Basic Only)
The TraqAC can be utilized to power the SU during periods in which
the SU has been disconnected from the vehicle power and operation is
still required. That is, the SU can be powered by the TraqAC during
periods in which the SU data is being downloaded to a computer
containing the Traqview software.
The TraqAC is attached to the SU by inserting the power plug into the power connector socket
(PWR) on the SU. Once the TraqAC has been connected to the SU, it is ready to plug into the
110VAC wall outlet.
Traqmate Display Unit Installation
Mounting
It is important to mount the Display Unit so that it can be easily seen by the driver but does not
interfere with the operation of the vehicle. You may use the Velcro strip provided to attach the unit
to your gauge cluster or center console as shown below. This is a very flexible approach to
mounting the DU and works well for most applications. Care should be taken however, such that
the DU does not come loose during the anticipated operation of the vehicle. The DU has been
designed with the standard AMPS cellular-phone mounting pattern on the back cover. This allows
many cellular and satellite-radio mounting options to be used. These include goosenecks,
articulated arms, as well as the Display Unit Mounting Bracket and Suction Cup Window Mount
which are sold as accessories. With the Display Unit Mounting Bracket, the DU can be snapped
quickly and securely into the mating portion of the bracket, which remains permanently affixed to
the vehicle. Care should be taken to avoid strain on the DU cable.
Copyright © 2005 - 2013 Track Systems Technologies, LLC
Page 15
Traqmate basic and classic User Manual V3.40
Figure 5 - DU Gauge Cluster Mount
March 27, 2013
Figure 6 - DU Console Mount
Connecting to the Sensor Unit
After connecting the DU to the SU using the SU-DU
connection cable, turn the display unit on by
pressing the power button. The DU will briefly
display the Firmware revision number of the SU and
the DU. If instead,
* SU NOT CONNECTED *
is displayed, there is no communication between the
SU and DU and the system will not work for data
collection. You can still upload sessions and
download configuration to the DU.
Possible Remedies:
•
•
•
•
•
Ensure SU has power.
Ensure SU-DU Connection cable is firmly plugged into both the DU and SU.
Ensure SU is in operable state. Cycle power on SU.
Ensure SU has proper firmware.
Ensure DU has proper firmware.
If you see the message
SW Mismatch, Reload
then the firmware in the DU and SU are incompatible. Reload the firmware of both the SU and
DU with the latest downloads available on the traqmate.com website and try again.
Copyright © 2005 - 2013 Track Systems Technologies, LLC
Page 16
Traqmate basic and classic User Manual V3.40
March 27, 2013
Traqmate Basic
System Description
Traqmate Basic is the easiest form of data acquisition. You can literally just Velcro the unit into a
car and get very sophisticated results in a matter of minutes. Data is stored in Flash memory
inside the Sensor Unit and can be downloaded through the COM serial port on the front panel of
the unit.
Controls
pwr / rec
pwR r e c
com
aUX
pwr gPS
cO m gPS
Figure 7 - Sensor Unit Front and Rear Panel
The front panel contains a power switch button, four LED lighted indicators, and a
communications port.
PWR / REC – Power Switch Button
•
•
•
Turns unit on - push button once, “PWR” LED goes on
Turns Record on - push button while “PWR” LED is on and “REC” LED goes on; a
second push and the “REC” LED goes off
Turns unit off - hold button down until “PWR” LED goes off
LED Light Displays
•
•
•
•
“PWR” LED - lights green when power is on
“REC” LED - lights red when Record is turned on
“COM” LED - lights yellow when Communications is in progress on the COM port
“GPS” LED - flashes red (when in Record mode) to indicate that you have obtained GPS
coverage. The rate of flashing indicates the sampling rate currently selected.
COM – Communications Port
•
•
Plug the Traqmate Display Unit (DU) into the Sensor Unit
Plug in a PC communications cable to download into Traqview
The back panel contains an auxiliary port, a GPS port, and a power port.
PWR – Power Port
•
•
•
•
Plug in the cigarette lighter power adapter
Plug in the power cable from the car battery power
Plug in the battery pack power cable
Plug in the AC adapter power cable
GPS – GPS Antenna Port
•
Plug in the GPS antenna
AUX – Auxiliary Port
•
Auxiliary connector port for digital, analog, and RPM sensors using the TraqData,
TraqData II, TraqData HD, TraqTach, or TraqSync units.
Copyright © 2005 - 2013 Track Systems Technologies, LLC
Page 17
Traqmate basic and classic User Manual V3.40
pwR rec
Traqmate Complete
March 27, 2013
com
track
systems
cO m gPS
System Description
Traqmate Complete builds on the Traqmate Basic simplicity to add immediate feedback to the
driver in the form of lap times and other information on a Display Unit (DU). It also provides more
visibility and control of the collected data and useful tools for vehicle performance tuning. The DU
provides complete control capability allowing the Sensor Unit to be remotely mounted. Data is
stored inside the Display Unit and can be extracted using the mini-USB port on the end of the
unit.
Controls
Indicates Top
of Menu List
Backlight
Menu
Title
Main Menu
Record Data
View Sessions
Change Settings
Indicates More
Choices Below
Screen
Menu Choices
Mini USB
Port
Connection to
Sensor Unit
Figure 8 - Display Unit Controls
The DU contains six buttons, a graphical LCD screen, a SU-DU connection cable to connect to
the Sensor Unit, and a mini-USB port for connection to a computer.
ON/OFF – Power Switch Button
•
•
Turns unit on - push button once, startup screen appears and “PWR” LED goes on in the
Sensor Unit
Turns unit off - hold button down until signoff screen appears on LCD display and “PWR”
LED goes off in the Sensor Unit
Traqmate Logo – Backlight Button
•
Turns LCD backlight on/off – toggles LCD backlight on/off
Select Button – Executes Menu Functions
•
Selects highlighted items on the LCD display screen
Back Button – Exits Menu Functions
•
•
Goes up one level in menus
Exits a mode such as lap timing and returns to menu
Up Button
•
Press to go up one item in a list
Down Button
•
Press to go down one item in a list
Copyright © 2005 - 2013 Track Systems Technologies, LLC
Page 18
Traqmate basic and classic User Manual V3.40
March 27, 2013
Menu System
All of the Display Unit features are accessible through a text menu system. To access a feature
use the UP and DOWN buttons to highlight the item you want on the screen. Press SELECT to
activate that item. Some items actually perform a function while others go to other menus. This
chart shows the menu tree.
Main Menu
Record Data
Laps – Enters lap timing mode with historical Predictive Lap Timing
Choose Start / Finish – Unit is waiting for driver to choose a Start / Finish
location
Looking for Start / Finish – Unit waiting for vehicle to cross Start / Finish
Erase Start / Finish – Erases Start / Finish for chosen track
Qualifying – Enters lap timing mode with single session Predictive Lap Timing
Choose Start / Finish – Unit is waiting for driver to choose a Start / Finish
location
Looking for Start / Finish – Unit is waiting for vehicle to cross Start /
Finish Line
Erase Start / Finish – Erases Start / Finish for chosen track
Autocross/Rally – Enters auto-launch mode with separate finish line
Select to Stage – User presses select on starting line
Ready to Launch – Timing starts automatically when vehicle launches
Erase Start / Finish – Erases Start / Finish for chosen track
1/8 Mile Car Test
Select to Stage – User presses select on starting line
Ready to Launch – Timing starts automatically when vehicle launches
1/4 Mile
Select to Stage – User presses select on starting line
Ready to Launch – Timing starts automatically when vehicle launches
Drive – Enters data recording mode with GPS compass and digital clock 1
Tach & Speedo – Enters data recording mode with tach and speedometer
onscreen1
Gauges – Enters data recording mode with analog/digital/rpm gauges
onscreen1
G-Forces – Enters data recording mode with G meter onscreen1
Segment Timing – Enters segment timing mode with separate start and finish
Choose Start – Unit is waiting for driver to choose a Start location
Looking for Start – Unit is waiting for vehicle to cross Start Line
Erase Start / Finish – Erases Start & Finish for chosen track
Gs & Location – Enters data recording mode.
Shows x, y G-forces, GPS precision (<250 good), date and time, GPS
location in lat/lon, heading, speed, temperature, and # of satellites in use
(>5 good).
Inputs – Enters data recording mode with analog, digital inputs, and RPM
onscreen
<continued on next page>
1
Note: ▲(UP) or ▼(DN) cycles through the other screens in any of these modes.
Copyright © 2005 - 2013 Track Systems Technologies, LLC
Page 19
Traqmate basic and classic User Manual V3.40
March 27, 2013
View Sessions
List of Recorded Sessions
View Laps - Steps through recorded lap times
Erase Data - Erases selected session
Session Detail – Information about the selected session. Displays driver,
car, track, session memory usage, start date/time, end date/time, laps
recorded, sampling rate, and temperature at start.
Change Settings
Driver - Pick from list of drivers entered in Traqview
Vehicle - Pick from list of vehicles entered in Traqview
Track - Pick from list of tracks entered in Traqview
Sampling Rate
10 Hz - Selects 10 samples per second
20 Hz - Selects 20 samples per second ** BEST ALL AROUND CHOICE **
40 Hz - Selects 40 samples per second
Erase Sessions - Erases all sessions but retains drivers, vehicles, tracks
Pack Sessions – Reclaims memory for more recording
GMT Offset – Changes time offset from Greenwich Mean Time
Contrast – Changes LCD contrast
Units
UP or DOWN
US Standard – Shows speed in MPH and distance in feet
Metric – Shows speed in KPH and distance in meters
Lap/Qualifying Settings – User selectable parameters related to lap timing
LapTime Hold – in seconds. Changes length of time laptime is held at
Start/Finish.
UP or DOWN
Graph Scale - Changes the scaling of the graph for Lap Timing mode
-0.5 to 0.5s – Full scale left is –0.5s. Full scale right is 0.5s
-1 to +1s
-2 to +2s
-5 to +5s
-10 to +10s
Track Length – Selects the length of track. This affects the time between
updates of the predictive lap graph in Lap and Qualifying Modes.
Short (less than 1 mile)
Med (1 mile to 5 miles)
Long (greater than 5 miles)
Factory Defaults - Erases all sessions, drivers, vehicles, and tracks
<continued on next page>
Copyright © 2005 - 2013 Track Systems Technologies, LLC
Page 20
Traqmate basic and classic User Manual V3.40
March 27, 2013
AutoOn – Enable or Disable powerup when power applied (SU2 only)
Start Screen – Select which screen the unit will start on
Main Menu - “Normal Mode” starts at Main Menu
Laps – Starts recording on Laps Screen
Qualifying – Starts recording on Qualifying Screen
Drive – Starts recording with Drive Screen
Tach – Starts recording with Tach & Speedo Screen
Gauges – Starts recording on Gauges Screen
Compass – Starts on non-recording GPS Compass Screen
Instruments – Starts on non-recording Instruments Screen
GPS Location – Starts on non-recording GPS Location Screen
Current Status
Shows record time available at the current settings, number of sessions
available, battery power level, and which TraqData inputs are selected.
Other Features
GPS Compass - Enters non-recording GPS compass mode.
Shows time, speed, and heading.
Instruments – Enters non-recording mode with tachometer and speedometer
onscreen.
GPS Information - Enters non-recording GPS information mode.
Shows x, y G-forces, GPS precision (smaller is better), date and time, GPS
location in latitude/longitude, heading, speed, temperature, and number
of satellites in use (larger is better).
Check Inputs – Non-recording. Shows voltage for all analogs, signal level for
digitals, and RPM.
Copyright © 2005 - 2013 Track Systems Technologies, LLC
Page 21
Traqmate basic and classic User Manual V3.40
March 27, 2013
Display Unit Icons
When Traqmate Complete is used with a video recorder and the TraqSync cable, or a TraqData II
or TraqData HD interface module, the video recorder status is shown on the display in the form of
icons whenever the Traqmate is in the menu system. The icons are shown in the upper right
corner of the display.
Upon startup, a Waiting for Camera screen will appear
while the camera system is initializing. This screen
ensures that data recording is not started before the video
system is ready in order to guarantee synchronization.
This screen will time out after a few seconds if the camera does not become ready. If you are not
using a camera and do not wish for this screen to appear, unselect all cameras using Traqview
on the IO Data screen while connected to the Display Unit.
The READY icon (open circles) indicates the
camera is ready to record. This is shown
when the camera has started up
successfully with a flash card in place. The
unit should be in this state before attempting
to record.
Main Menu
Record Data
View Sessions
Setup
Main Menu
The NOT READY icon (broken circles)
indicates the camera is not ready to record.
This is usually due to the flash card being
out of the recorder.
Record Data
View Sessions
Setup
The RECORDING icon (closed circles)
indicates the camera is recording. This icon
will only be seen if recording is started on
the camera manually.
Main Menu
Record Data
View Sessions
Setup
Figure 9 - DU Status Icons
The Menu system allows the user to select items from lists. The selection bar is a reverse video
line. It can be moved up and down using the ▲ and ▼ buttons to highlight a selection. The
location of the selection bar within a list is indicated by icons along the left edge of the screen.
▬ indicates the selection is either at the top or bottom of the list
▲ indicates there are more selections above those shown
▼ indicates there are more selections below those shown
Copyright © 2005 - 2013 Track Systems Technologies, LLC
Page 22
Traqmate basic and classic User Manual V3.40
March 27, 2013
AutoOn
The AutoOn function will only operate when the Traqmate system has a Sensor Unit 2. This
feature allows the Traqmate to turn on automatically whenever power is applied. This is useful if
the Traqmate is being used as a gauge cluster, when the driver cannot reach the Traqmate, or
purely for convenience. This feature should not be used with unswitched power because it will
drain the vehicle battery.
This feature can be used in conjunction with AutoStart to fully automate recording with a
Traqmate Complete system. Note that when AutoOn is enabled, the power button on the Display
Unit is disabled.
AutoStart
The AutoStart function allows the user to designate what screen or mode the Traqmate will
initiate when it turns on. After the screen or mode is selected initially, the unit operates normally
so the user can navigate manually from that point forward. The default is Main Menu which is
normal operation.
If the user selects Laps, Qualifying, Drive, Tach, or Gauges the Traqmate will enter recording
mode shortly after it is turned on and display the chosen screen. Note that this could cause the
Traqmate memory to fill more quickly.
If the user selects Compass, Instruments, or GPS Location the Traqmate will not record but will
display the appropriate informational screen.
Copyright © 2005 - 2013 Track Systems Technologies, LLC
Page 23
Traqmate basic and classic User Manual V3.40
March 27, 2013
Features
Lap Timing
The lap timing feature measures the interval of time between passes of a chosen spot (Start /
Finish Line). It uses both location and heading to determine the exact spot to 1/10th second
accuracy. It is best to set the Start/Finish on the racing line and you must be heading in
approximately the same direction as the reference lap for the timing to work.
Start / Finish
Line
Valid positions
for lap timing
Bad heading
Too far away
Initial position
Figure 10 - Lap Timing
The Start/Finish Location is stored on the Display Unit for each track, so once you enter it you
should not have to enter it again unless you delete the track from memory or upgrade your DU
software.
To use the lap timing feature Select “Record Data” from the Main Menu and then Select “Laps”.
You will see
Figure 11 - Acquiring GPS Screen
until GPS signal is acquired. If this takes more than a minute, check your antenna connection and
ensure that the antenna has a clear view of the sky.
Once Traqmate has GPS signal, it will check to see if there is a Start/Finish position stored for the
current track. If not, you will see
Copyright © 2005 - 2013 Track Systems Technologies, LLC
Page 24
Traqmate basic and classic User Manual V3.40
March 27, 2013
Figure 12 - Recording a Start / Finish Location
Proceed around the track until you reach the Start/Finish line. Make sure you cross the line the
same way that you will when driving at full speed. As you reach the line press the SELECT button
to record the Start / Finish line and save it in permanent memory. At this time the Timing Screen
will appear.
If you have already recorded a Start / Finish location for the chosen track, the following screen
will appear. The selected track is shown on the screen.
Figure 13 - Searching for Start / Finish Line
This will stay onscreen until you cross the Start / Finish line at which time the Lap Timer Screen
will appear. The difference between Lap and Qualifying Mode is that Lap mode will use stored
predictive lap timing information and compare against it. Qualifying mode assumes you are only
interested in the current session and will not use historical information. Best predictive lap
information from either mode is stored for future use.
Lap counter
'-' indicates
behind pace
Indicates lap time of
1 hour, 20 minutes,
54.9 seconds
Flag indicates
best lap so far.
Graph shows lap progress
compared to best lap of session.
Faster to right, slower to left.
Scale is settable in DU.
'+' indicates
ahead of pace
by 0.3 seconds.
Figure 14 - Lap / Qualifying Timer Screen
To stop Timing, press the red << (Back) button.
NOTE: To clear a Start/Finish line, press SELECT while the “Looking for Start” screen is
displayed. That will erase the Start/Finish line from permanent memory and transfer to the “Press
SELECT at Start/Finish” screen.
On either timing screen, the numbers will start over whenever the Start / Finish line is crossed
and the lap counter will increment. The lap time from the previous lap will be held onscreen for 1
minute to allow time for viewing, and then the counting will resume. The lap hold time is
configurable through the Display Unit menu system.
In the Lap Timer example shown, the graph is approximately 30% of full positive range.
Therefore, if the graph scale is set to –1.0 to +1.0 seconds, this screen would indicate that the
driver is ahead of his best lap so far by 30% of 1 second = 0.3 second. At a typical track, the
graph will update every few seconds.
If no reference lap is available in memory, the graph will be blank except for a – and + sign until
you complete a lap that can be used as a reference.
Copyright © 2005 - 2013 Track Systems Technologies, LLC
Page 25
Traqmate basic and classic User Manual V3.40
March 27, 2013
Using the Predictive Lap Timer
If you are like many Traqmate users, once you have the graph, you will wonder how you did
without it. The real-time feedback on your driving is there whenever you need it and can be used
in several ways. Needless to say, you should concentrate on driving, not the Traqmate screen,
but if the Display Unit is well-positioned, you can pick up the graph at a glance and get very
useful information.
The most obvious use is Qualifying Mode. If you are trying to put down your best lap and you get
slightly held up by another car, the Predictive Lap Timer will tell you if you lost too much time and
should slow down and find a gap in traffic or whether you should put your head down and finish
the lap.
In Lap Mode, you can use the graph and numbers as a general reference. Say you enter Turn 3
and the PLT says +0.3. If you exit Turn 3 at +0.4 you picked up some time. This can be useful for
trying out new lines or just working on braking less and carrying speed.
Sometimes there is an opportunity to have a pro driver put down a reference lap in your car. With
that information stored, you can use the Predictive Lap Timer for real-time feedback and
improvement. This can also work by swapping Traqmate DUs with a friend to see who is faster
where.
Sometimes, when you return to a track it is difficult getting down to the lap times that you have
done there previously. Unless you have cleared the data, your reference lap will still be there for
the track. Of course overlaying your data in Traqview will show you where you are slow, but the
Predictive Lap Timer will provide that information while still on the track while you can correct it.
Predictive Lap Timer Settings
There are three settings available to fine-tune the Predictive Lap Timer to a particular situation,
Lap Time Hold, Track Length, and Graph Scale. These are accessible on the Display Unit under
the Change Settings – Lap/Qual Settings.
The default settings work fine for most situations.
At some tracks it might be difficult to look at the timer right at Start/Finish. You can change the
amount of time the Lap Time is held after passing the Start/Finish before resuming the counting
timer. This is set in seconds. If you set this to 0, it will not hold the time at all. If you set it to a time
greater than the lap time, the time will be held until the Start/Finish is passed the next time.
On most tracks, the Predictive Lap Timer will update the graph and numbers every 6-10 seconds.
When racing on short courses (< 1 mile), you can get more frequent updates on the Predictive
Lap Timer. For very long courses (> 5 miles), you may want to spread out the updates. If you
choose the wrong setting, Traqmate will run out of intermediate storage and your Predictive Lap
Timing will not be accurate at the end of the lap. The default MED setting is good for any lap
under 5 miles in length.
Depending on the variability in lap times that you expect, you can expand or contract the graph
scale. If you are working on that last tenth, you might choose the –0.5 to 0.5 scale. If you are
running the Nürburgring, you might expand the scale to –10s to 10s. Once again, for most
applications the default setting is fine.
Autocross / Rally Mode
This mode is intended for non-circuit applications with a separate Start and Finish line such as
Autocross, Rally stages, and Hillclimbs. It will set the start line automatically and the user can set
the finish line. When analyzed in Traqview, the data will automatically appear in Separate
Start/Finish line (Rally) mode. It can also be used to time an autocross.
Copyright © 2005 - 2013 Track Systems Technologies, LLC
Page 26
Traqmate basic and classic User Manual V3.40
March 27, 2013
Select Record Data / Autocross Rally Mode on the Display Unit. After GPS signal is acquired, you
will be presented with the Stage Screen.
Figure 15 - Autocross/Rally Stage Screen
When the vehicle is positioned on the starting line, press the SELECT button to enable the launch
trigger. The following screen will appear. Data and video recording will begin.
Figure 16 - Autocross/Rally Launch Screen
When the vehicle is launched, the Start location will be recorded and timing will start
automatically. If no Finish Line has been set, the user will be prompted to hit SELECT at the finish
line. Otherwise, timing will automatically stop when the vehicle crosses the Finish Line.
If a Finish Line exists for the chosen track, it can be cleared by pressing SELECT button when
the Ready to Launch screen is displayed.
Timing an Autocross
To time an autocross, set up the course and run it at a moderate speed with a vehicle using
Traqmate Autocross mode. Set the Finish Line as precisely as possible. By placing the Traqmate
in each vehicle on the starting line and recording the time displayed on the DU at the finish line,
you can effectively practice an autocross or even use Traqmate for the timing. You can employ
multiple Traqmates by transferring the Finish Line coordinates from unit to unit using Traqview.
1/8 Mile and 1/4 Mile Drag Race and Performance Modes
These modes operate the same but show different information upon completion of a run. This can
be used at a drag strip or in any suitable and safe driving area. For either mode, to achieve
proper results, the run must be level and straight and must be completed at full throttle until the
checkered flag appears.
The 1/8 Mile mode will time a 1/8 mile run, calculate average horsepower over the run, measure
reaction time, 60’ and 330’ times, and show the speed at the end of the 1/8 mile.
The 1/4 Mile mode will time a 1/4 mile run, calculate average horsepower over the run, measure
reaction time, 1/8 mile, 60’, and 330’ times, and show the speed at the end of the 1/4 mile.
Select Record Data / 1/8 Mile Car Test or Record Data / 1/4 Mile on the Display Unit. After GPS
signal is acquired, you will be presented with the Stage Screen.
Figure 17 - Drag Race Stage Screen
When the vehicle is positioned on the starting line, press the SELECT button to enable the launch
trigger. The following screen will appear. Data and video recording will begin.
Copyright © 2005 - 2013 Track Systems Technologies, LLC
Page 27
Traqmate basic and classic User Manual V3.40
March 27, 2013
At this point, the timing lights will advance. The vehicle can launch at any time to begin timing but
a “Red-light” will occur. If you wish to test reaction time, wait until the GO! graphic is displayed to
launch.
Figure 18 - Drag Race Launch Screens
When the vehicle launches, a timing screen will appear. Traqmate will continue timing until either
1/8 mile or 1/4 mile has been traversed, depending on the mode chosen. At that point, a
checkered flag will appear in the upper right corner of the screen and timing will halt. The time
displayed is the Elapsed Time of the run.
Figure 19 - Drag Race Timing Screen
To view the vehicle timing and performance data press SELECT. A screen will appear that shows
the following information.
1/8 Mile Mode
0-60: 6.5
RT: 0.33
1/8: 8.21
Gs: 0.60
HP: 262.8
@ 67.8
60’: 2.34 330’:5.49
1/4 Mile Mode
0-60: 6.5
RT: 0.33
1/8: 8.21
1/4: 13.44
HP: 262.8
@ 107.5
60’: 2.34 330’:5.49
0-60 is time in seconds from launch to 60 mph.
RT is reaction time in seconds.
1/8 is eighth mile ET in seconds.
1/4 is quarter mile ET in seconds.
Gs is launch force in Gs.
@ is speed in mph achieved at end of run for either 1/8 or 1/4 mile.
HP is average horsepower across first 1/8 mile.
60’ is time in seconds to reach 60’ distance.
330’ is time in seconds to reach 330’ distance.
All this information is recorded so it can be analyzed using Traqview or TraqStudio. The
horsepower numbers calculated in the Traqmate may differ from those shown in Traqview. This is
because Traqmate calculates an aggregate horsepower over the entire run, whereas Traqview
shows instantaneous horsepower throughout the run. The red ◄◄ (Back) button will exit this
recording mode.
Copyright © 2005 - 2013 Track Systems Technologies, LLC
Page 28
Traqmate basic and classic User Manual V3.40
March 27, 2013
Segment Timing Mode
This mode has several possible applications, a rolling start autocross or hillclimb, timing a slalom
course, or detailed in-car feedback on a circuit track. When analyzed in Traqview, the data will
automatically appear in Separate Start/Finish line (Rally) mode.
The concept for this mode is very similar to Lap Timing except that there is a separate Start and
Finish. Once you have set the Start and Finish, Traqmate retains those positions for future use at
that track and Traqview will use them for analysis.
When the mode is selected, you will be presented with
either the “Looking for Start” screen or a “Press Select at
Start” screen depending on whether a Start Position has
been created. After passing the Start location, timing will
begin.
If no Finish location is stored, you will be prompted to press the Select button at the Finish. If a
Finish is present, the timing will stop at that point.
On subsequent passes, timing will start at the Start location and stop at the Finish location. The
Predictive Lap Timer will show intermediate progress against the best reference lap. Note that the
reference lap is stored from session to session as in Lap Mode.
If a Start and/or Finish Line exist for the chosen track, they can be cleared by pressing the
SELECT button when the “Looking for Start” screen is displayed. Clearing the Start and Finish
will also erase the stored intermediate times used for Predictive Lap Timing.
Using for Closed Circuit Feedback
Perhaps you wish to really work on just one section or turn on a racetrack. You can enter
Segment Timing mode and set the Start before the turn and the Finish after the turn. This will
allow you to concentrate the timer on just that small segment by changing the Predictive Lap
Timer to Short Course and expanding the graph scale. Every time you pass through the segment
you will get detailed feedback on how well you and your vehicle are performing.
Other Recording Modes
Any mode listed after selecting RECORD DATA is a recording mode and will produce Traqmate
Data that can be analyzed. These can be
Tach & Speedo can be used to view GPS speed and RPM while driving. When the RPM warning
level is reached, the display will turn reverse image to indicate that it is time to shift.
Gauges will show any data input that has been configured. The ▲ and ▼ buttons will change
between gauges. The gauge will turn reverse image if the Warning limit is exceeded.
G-Forces will show acceleration, braking, and lateral G-forces in real time.
Gs & Location will show a text screen with the following information:
SU1
X +0.25 Y -0.15 207
2010-05-12 11:58:33
34.199,-84.272,1189
H 125, V 52, T 75 9
SU2
X +0.25 Y -0.15 207
2010-05-12 11:58:33
34.199,-84.272,1189
H 125, V 52, Z+1.0 9
X is G force along long axis. Y is G force along short axis.
Number in upper right is DOP. This indicates satellite signal quality and lower is better. Anything
below 300 is considered good. 200 or lower is excellent.
Copyright © 2005 - 2013 Track Systems Technologies, LLC
Page 29
Traqmate basic and classic User Manual V3.40
March 27, 2013
Third line is latitude, longitude, and elevation in feet or meters.
For first generation Sensor Units, the fourth line shows compass heading, velocity in mph or kph,
temperature in F or C and number of satellites.
For second generation Sensor Units, the Z axis (up/down) is substituted for temperature.
Inputs shows the raw data of the various analog, digital, and RPM inputs, all at one time. This is
useful to check a sensor’s voltage input or to verify a tach input when connected to a TraqData,
TraqData II, or TraqData HD module.
A0 1.25V A1 2.76V
A2 10.3V A4 9.83V
D4: 1 D5: 0 R: 2141
A0 through A4 show the voltages on the analog inputs. D4, D5 indicate the level of the digital
inputs or outputs. R indicates the engine RPM.
Inputs shows the raw data of the various analog, digital, and RPM inputs, all at one time. This is
useful to check a sensor’s voltage input or to verify a tach input.
Non Recording Modes
When Other Features is chosen from the Main Menu, several modes are available for on-screen
display that do not record data.
GPS Compass is the same as Drive mode.
Instruments is the same as Tach & Speedo mode.
GPS Location is the same as Gs & Location recording mode.
Check Inputs is the same as the Inputs recording mode.
Copyright © 2005 - 2013 Track Systems Technologies, LLC
Page 30
Traqmate basic and classic User Manual V3.40
March 27, 2013
Adding Data Inputs
Traqmate systems are expandable with TraqData input modules that allow the connection of
cameras, analog and digital inputs, and RPM signals. For information on connection of TraqData
modules, please see the TraqData Application Guide.
Copyright © 2005 - 2013 Track Systems Technologies, LLC
Page 31
Traqmate basic and classic User Manual V3.40
March 27, 2013
Connecting Video Cameras
Connecting a GoPro HERO HD Camera
The GoPro camera connection through a TraqData Pro, TraqData HD, or TraqSync Pro module
must be selected using the Traqview PC program, version 3.40 or later. Select Camera and then
GoPro HERO1 & HERO2 on the pulldown menu.
GoPro HD
Camera
(rear)
Traqmate
Sensor Unit
Switch inside enclosure
for Electronic or Coil
Operation. Default is
Electronic.
TraqData Pro
Module
TraqData Pro Connection
RJ45 Plug
TraqData / GoPro
Interface Cable
Figure 20 – GoPro Camera Connection - TraqData Pro
GoPro HD
Camera
(rear)
Traqmate
Sensor Unit
RJ45 Coupler
TraqData / GoPro
Interface Cable
TraqSync Pro
GoPro Camera
Interface
Switch inside hood
for Electronic or Coil
Operation. Default is
Electronic.
RJ45 Plug
RJ45 Plug
Blue Wire to Tach
Use Included
Crimpless Connector
Figure 21 – GoPro Camera Connection - TraqSync Pro
Copyright © 2005 - 2013 Track Systems Technologies, LLC
Page 32
Traqmate basic and classic User Manual V3.40
March 27, 2013
GoPro HERO Camera Setup Instructions:
1. Determine if your Traqmate has the latest firmware.
Update Traqmate Sensor Unit and Display Unit to V3.30 or later. TraqDash to V2.00 or later.
Instructions and firmware updates are available at this link:
http://store.traqmate.com/Latest-Software-Firmware-Downloads-s/286.htm
2. Determine if you have a GoPro HERO 1080 (HERO1) or HERO2 camera.
The HERO2 has the text “HERO2” in the lower right corner of the camera face. If you have a
HERO2, your firmware is up to date so skip to step 5.
3. Determine if your GoPro HERO1 HD camera has the latest firmware.
a. If your camera was purchased before June 2011, you will need an upgrade. so go to step
4.
b. Power on the camera by pressing the POWER/MODE button. If the camera immediately
enters recording mode (flashing LED) you have the latest firmware and are in One Button
Mode. Press and hold the POWER/MODE button to turn off the camera and go to Step 6.
c. If the camera displays a number on the LCD display and one of the small icons is
displayed, you are now in Mode Selection.
d. Press the POWER/MODE button repeatedly until “Set” is displayed.
e. Press the SHUTTER/SELECT button.
f. If onF is displayed you have the latest firmware. Go to step 5d (HERO1). Otherwise you
will need a firmware upgrade. Press and hold the POWER/MODE button to turn off the
camera and go to step 4.
4. GoPro HERO1 HD Camera Firmware Update Instructions
a. Download the firmware.bin file to your computer. Go to this link to download.
http://traqmate.com/downloads/gopro/firmware.bin
b. Place an SD card into your computer slot or into an SD card reader connected to your
computer. Place firmware.bin in the main (root) level folder of your SD card.
c. Make sure camera is unplugged from the computer USB port.
d. Insert SD card into camera.
e. While camera is off, press and hold down the SHUTTER/SELECT (top button). NOTE:
The SHUTTER/SELECT button must be pressed for the entire installation process. Do
not release until process is complete at step 4g.
f. Still holding SHUTTER/SELECT button down, press POWER/MODE (front button)
ONCE. Camera will power on.
g. While still holding SHUTTER/SELECT button down, when the file counter registers the
SD Card, press the POWER/MODE button again (3 times) until the display reads “UP”.
The red light will flash for 5-10 seconds and the camera will automatically shut itself OFF.
IMPORTANT! If the flashing red light & Up indicator stops after 1-2 seconds, repeat
process from step 4e of the install. For additional help, watch the video at this link:
http://www.youtube.com/v/cwdu4e9bIOA?fs=1&hl=en_US
Your new firmware is now installed and the camera is reset to factory settings.
5. Turn on One Button Record Mode
“One Button Mode On” forces the camera to automatically begin recording video once the
camera is turned on. In “One Button Mode On” the camera is either on and recording or
powered off. The SHUTTER/SELECT button is disabled in “One Button Mode On” and will
not start or stop the recording while the camera is on.
Copyright © 2005 - 2013 Track Systems Technologies, LLC
Page 33
Traqmate basic and classic User Manual V3.40
March 27, 2013
HERO1
a.
b.
c.
d.
Press the POWER/MODE button to power up the camera.
Press the POWER/MODE button repeatedly until SEt is displayed on the camera LCD.
Press the SHUTTER/SELECT button. onF should be displayed on the LCD.
Press the SHUTTER/SELECT once so that onO (One Button Mode On) is showing on
the screen.
e. Press and hold the POWER/MODE button for 3 seconds until the camera turns off.
HERO2
a. Press the POWER/MODE button to power up the camera.
b. Press the POWER/MODE button repeatedly until a wrench icon is displayed on the
camera LCD.
c. Press the SHUTTER/SELECT button. The mode menu should be displayed on the LCD.
Make sure the video camera icon is shown indicating video mode.
d. Press the POWER/MODE button seven times so that One Button menu is showing on
the screen.
e. Press the SHUTTER/SELECT button once to display OFF / ON.
f. Press and release the POWER/MODE button to select ON.
g. Press and hold the POWER/MODE button for 3 seconds until the camera turns off.
The GoPro HD camera is now ready for connection to the Traqmate. The camera will
retain these settings so steps 1-5 should not be required in the future.
6. Operation of the Traqmate and GoPro HERO camera
NOTE: It is the user’s responsibility to ensure the GoPro camera battery is charged and the
SD card is inserted and has sufficient free space to record your video.
a. Turn on the Traqmate
b. On Traqmate Complete systems an icon will indicate the camera is properly connected to
the TraqData Pro or TraqSync Pro interface module.
c. Select a recording mode
Traqmate Complete – Record Data / Laps
Traqmate Basic – Press Red button or AutoRecord
d. When GPS signal is acquired and the data starts recording, the GoPro camera will turn
on and start recording.
e. When the on-track session is finished, stop the data recording on the Traqmate.
Traqmate Complete – Press red << Back button
Traqmate Basic – Press Red button or AutoStop
f. When the Traqmate stops recording data, the GoPro camera will stop recording video
and turn off.
Copyright © 2005 - 2013 Track Systems Technologies, LLC
Page 34
Traqmate basic and classic User Manual V3.40
March 27, 2013
Connecting a Replay XD 1080 Camera
The Replay XD camera connection through a TraqData HD2 or TraqSync Pro must be selected
using the Traqview PC program, version 3.40 or later. Select Camera and then Replay XD on the
pulldown menu.
Replay
XD 1080
Rear Cap
Remote Control Button
unit. (not needed for
Traqmate operation)
Rear side has HDMI and
microphone jacks.
Camera
TraqData / Replay
Interface Cable
Traqmate
Sensor Unit
TraqData HD2
Module
Switch inside enclosure
for Electronic or Coil
Operation. Default is
Electronic.
RJ45 Plug
Figure 22 – Replay XD Camera Connection – TraqData HD2
Replay
XD 1080
Rear Cap
Traqmate
Sensor Unit
Remote Control Button
unit. (not needed for
Traqmate operation)
Rear side has HDMI and
microphone jacks.
Camera
TraqData / Replay
Interface Cable
RJ45 Coupler
TraqSync Pro
Replay Camera
Interface
Switch inside hood
for Electronic or Coil
Operation. Default is
Electronic.
RJ45 Plug
RJ45 Plug
Blue Wire to Tach
Use Included
Crimpless Connector
Figure 23 – Replay XD Camera Connection - TraqSync Pro
Copyright © 2005 - 2013 Track Systems Technologies, LLC
Page 35
Traqmate basic and classic User Manual V3.40
March 27, 2013
Replay XD 1080 Camera Setup Instructions:
These instructions are intended for persons with an existing ReplayXD camera that purchase a
TraqData HD2 or TraqSync Pro interface in order to connect their camera to a Traqmate system.
If you purchased the entire system from Traqmate, this procedure is not necessary.
To connect a Replay XD1080 camera and a Traqmate you will need the following:
ReplayXD camera, charged
microSD card
microSD - SD card adapter
TraqData HD2 (charging) or TraqSync cable (non-charging)
ReplayXD interface cable
Replay XD firmware file, XD1080fw.bin
Traqmate Classic or Basic firmware, V3.40 or later
ReplayXD 1080 camera buttons and indicator LEDs
Step 1. Update ReplayXD firmware (Traqmate customers will not have to perform this step)
The ReplayXD camera must be running 0.48 firmware. They do not come from the factory this
way.*
Unscrew the rear cap from the ReplayXD 1080 camera to reveal the slots and connectors.
Put the microSD card into the SD card adapter. Insert the card into a PC.
Copyright © 2005 - 2013 Track Systems Technologies, LLC
Page 36
Traqmate basic and classic User Manual V3.40
March 27, 2013
Copy the firmware file, XD1080fw.bin, to the top level directory in the microSD card.
Place the microSD card into the camera and hold the MODE button (P) while pressing and
holding the power button (A). Eventually the red LED (A) should flash while updating the
firmware.
Step 2. Reformat the microSD card (Traqmate customers will not have to perform this step)
Stand the camera on a table, lens down.
Press and hold buttons (K) and (P) simultaneously until red LED (J) is displayed solid. This will
reformat the microSD card.
Wait until the camera powers off.
Step 3. Change the camera settings (Traqmate customers will not have to perform this step)
Remove the microSD card from the camera, place it into the SD card adapter, and then into a
PC.
Open the XD1080.txt file using the Notepad program on a PC. Change the following items to put
the camera into OneTouch mode.
UPDATE: N
OT: 0
-> change to ->
-> change to ->
UPDATE: Y
OT: 1
Save the file.
Put the microSD card back into the camera and power up again. It should flash LEDS (E) and (F)
briefly and power off.
Test the camara by pressing and holding the power button (A) until the camera powers up. LEDs
(E) and (F) should remain lit to indicate recording.
Power down the camera by pressing and holding the power button (A). The camera is now ready
to use.
Step 4. Update the Traqmate Display Unit and/or Sensor Unit firmware to V3.40
See Traqmate support forum for firmware and update instructions.
Step 5. Update Traqview / TraqStudio and program the Traqmate for the Replay camera
See Traqmate support forum for Traqview / TraqStudio software update. Install on your PC.
Connect to the Display Unit (Traqmate Complete) or to the Sensor Unit (Traqmate Basic). Go to
the IO Data tab and choose Camera and Replay XD. Save the Data into the Traqmate.
Step 6. Install hardware
Plug the Traqdata HD2 or TraqSync cable into the Sensor Unit AUX connector.
Plug the ReplayXD interface cable into the Traqdata HD2 or TraqSync cable.
Carefully plug the ReplayXD interface cable into the camera. First line up and insert the two shiny
connectors and push the cable into the slots. Then screw down the threaded cap.
Step 7. Power up and Test
Power up the Traqmate system. On a Basic system, press the red button to record.
Copyright © 2005 - 2013 Track Systems Technologies, LLC
Page 37
Traqmate basic and classic User Manual V3.40
March 27, 2013
On a Complete system, the camera icon in the upper right of the screen should be present and
solid. If this does not happen, cycle power on the Traqmate system twice. Select Record Data /
Laps on the Display Unit.
When GPS signal is acquired, the camera should power on and start recording (LEDs (E) and (F)
lit).
Stop recording on the Traqmate.
The camera should stop recording and power off.
* If you want to check the firmware level, follow this procedure.
Insert microSD card into camera.
Power up camera by pressing and holding button (A)
If red LED (E) on top of camera stays lit, you are in OneTouch mode and are running 0.48
firmware. No other camera changes are required.
If only the blue LED (F) on top of the camera stays lit, the camera is not in OneTouch mode.
Stand the camera on a table, lens down.
Press and hold buttons (K) and (P) simultaneously until red LED (J) is displayed solid. This will
reformat the microSD card.
Wait until the camera powers off.
Remove the microSD card and open the XD1080.txt file on a PC. Check the firmware level in the
file.
Copyright © 2005 - 2013 Track Systems Technologies, LLC
Page 38
Traqmate basic and classic User Manual V3.40
March 27, 2013
Connecting a Sony HD Camcorder
The Traqmate can be used to control the recording on most Sony camcorders, including the
HDR-CX110 unit shown here. This requires a TraqData HD interface. When used with the
TraqData HD, the recorder will be automatically powered up and down and will start and stop
video recording in sync with the data recording.
to Traqmate
Sensor Unit
TraqData HD
LAN-C
Interface
Sony HDR-CX110
camcorder
Switch inside enclosure
for Electronic or Coil
Operation. Default is
Electronic.
2.5mm to
Sony LAN-C
adapter cable
2.5mm M-M
cable
Figure 24 - TraqData HD Connection to Sony HD Camcorder
After making the physical connections, you must set up a digital output on the Traqmate using
Traqview as shown below. Note that you do not have to check ‘Input Enable’ if you do not have
any digital inputs. This will maximize recording time.
Figure 25 - Enabling Sony HD Camcorder Control
Copyright © 2005 - 2013 Track Systems Technologies, LLC
Page 39
Traqmate basic and classic User Manual V3.40
March 27, 2013
Sony HDR-CX100 , CX-110, and CX-150 Camcorder Operation
To operate, make sure the camcorder is ready to record (power and flash card). On some
camcorders, you will need to keep the LCD open in order for the Traqmate to control the device.
In those cases, open, rotate, and close the LCD so that the screen is facing outward. Disable
“Power On with LCD” if possible.
When used with a TraqData HD interface, the camcorder will power up shortly after the Traqmate
is turned on. It will turn off shortly after the Traqmate is powered down. If you manually power off
the camcorder, Traqmate will power it back up again to ensure readiness. If the Traqmate does
not recognize the camcorder, cycle power on the Traqmate. You may need to cycle power
twice upon first installation or after changing settings.
On most HD camcorders, there are four HD quality levels, FH, HQ, SP, and LP. The SP (default)
setting works well and provides a good compromise of quality video with reasonable storage
requirements. In addition, there is usually an SD video setting. If you find your computer is not
fast enough to play HD or if you wish to create output videos with TraqStudio, the SD setting is
still quite good and provides an alternative.
Record Time by Quality Setting
HD FH = 17 minutes per 2 Gbyte file
HD HQ = 30 minutes per 2 Gbyte file
HD SP = 38 minutes per 2 Gbyte file
HD LP = 54 minutes per 2 Gbyte file
SD HQ = 30 minutes per 2 Gbyte file
SD SP = 45 minutes per 2 Gbyte file
SD LP = 90 minutes per 2 Gbyte file
Mounting
The Sony HDR-CX110 and HDR-CX150 cameras have the card slot on the bottom where it can
interfere with the camera mount. This does not hinder performance but requires removal of the
camera to take out the card. The Traqmate Camera Platform Mount allows the camera to be
mounted on a standard mount and still insert and remove the card. It has the added benefit of
stabilizing the camera due to the wider contact surface.
Combining Video Files
The Sony camcorders have a file limit of 2 Gbytes. Beyond that, a new file is opened on the flash
card with no loss of video. For long recordings, the files must be combined in order to play back
the entire session with video. A free utility called tsmuxer is included on the Traqmate CD. It can
also be found online at:
http://www.smlabs.net/tsmuxer_en.html
To use it, extract it from the zip. Click on tsMuxerGUI to execute.
Click Add and select the first file to combine.
Click Join and select second file to combine.
Click Join and select third...
Then Click Start Muxing to join the files.
Output filename is placed in same folder as input file with the same name and a .TS extension.
For TraqStudio to see the file, you will need to rename it to something.MTS.
Converting Video Files
TraqStudio V3.00 can create output video files with gauges from SD video only. To create a video
from an HD video, it must be converted to SD using a commercially available converter program.
Copyright © 2005 - 2013 Track Systems Technologies, LLC
Page 40
Traqmate basic and classic User Manual V3.40
March 27, 2013
For instructions, see the section entitled Creating TraqStudio HD Videos from Sony
Camcorder HD Video Files.
Optimizing Video
For the best picture, change these settings:
Label
AUTO SLW SHUTTER
DIGITAL ZOOM
EXPOSURE
FOCUS
POWER ON BY LCD
REC MODE
STEADY SHOT
ZOOM
WHITE BALANCE
Setting
OFF
OFF
MANUAL
MANUAL
OFF
HD HQ
OFF
WIDE
OUTDOOR
Notes
CX100
Set to Low for Closed Vehicles
Set to Infinity
Good trade, size to quality
White Balance and Exposure – Open vehicles should be fine in Automatic mode. Depending on
mounting location and outside brightness, closed vehicles will want to manually adjust the
exposure down to get the best contrast outside the vehicle. Some camcorders have manual and
automatic Spot Meters that will automatically adjust contrast for the light level at the center of the
viewing area (auto) or at a chosen point (manual) which perform well in most cases.
Wide Angle – If you need to get more view into the picture, wide angle attachments are readily
available for Sony camcorders.
Optimizing Audio
The lower level Sony camcorders do not have the capability to add an external microphone. This
is not a problem for closed vehicles but open cars will pick up excessive wind noise. To cut wind
noise, place a piece of clear packing tape over the microphone.
On some camcorders, the microphone level can be adjusted to Normal or Low. The proper
setting will depend on the vehicle and mounting location.
Powering the Camcorder
The TraqData HD will control a Sony camcorder on battery power but the Sony DC adapter (sold
in Traqmate store through Amazon.com) is recommended. It will allow the camcorder to operate
from vehicle power. When using the DC adapter, remove the battery.
Copyright © 2005 - 2013 Track Systems Technologies, LLC
Page 41
Traqmate basic and classic User Manual V3.40
March 27, 2013
Connecting a ChaseCam PDR100 Digital Video Recorder
The Traqmate can be used to control the recording on a ChaseCam digital video recorder. This
requires either a TraqSync or TraqData II ChaseCam interface or a TraqCam cable that connects
the ChaseCam PDR100 to a TraqTach or TraqData digital input/output device. With TraqSync /
TraqData II, the recorder will be automatically powered up and down. Either connection will start
and stop video recording in sync with the data recording.
to Traqmate
Sensor Unit
ChaseCam
PDR100
TraqSync
ChaseCam
Interface
RJ45 Plug
Switch inside hood
for Electronic or Coil
Operation. Default is
Electronic.
Blue Wire to Tach
Use Included
Crimpless Connector
Integrated
Network Cable
Figure 26 - TraqSync Connection to ChaseCam PDR100
to Traqmate
Sensor Unit
ChaseCam
PDR100
Switch inside enclosure
for Electronic or Coil
Operation. Default is
Electronic.
TraqData II
ChaseCam
Interface
RJ45 Plug
Network Cable
Figure 27 - TraqData II Connection to ChaseCam PDR100
Copyright © 2005 - 2013 Track Systems Technologies, LLC
Page 42
Traqmate basic and classic User Manual V3.40
March 27, 2013
TraqCam cables have been discontinued in favor of the more robust and capable TraqSync
interface but the connection method is shown here in support of legacy users. For a TraqTach,
use the ALT connection point and for the TraqData use the D4 connection point
to Traqmate
Sensor Unit
TraqTach or
TraqData
ChaseCam
PDR100
RJ11 Plug
Green
on
GND
D4 or D5 on TraqData
ALT on TraqTach
TraqCam Cable
Figure 28 - TraqCam Cable to ChaseCam PDR100
After making the physical connections, you must set up a digital output on the Traqmate using
Traqview as shown below. This is the default for Traqmates released after V2.10. Note that you
do not have to check ‘Input Enable’ if you do not have any digital inputs. This will maximize
recording time.
Figure 29 - Enabling ChaseCam PDR100 Control
Copyright © 2005 - 2013 Track Systems Technologies, LLC
Page 43
Traqmate basic and classic User Manual V3.40
March 27, 2013
ChaseCam PDR100 Digital Video Recorder Operation
To operate, make sure the ChaseCam PDR100 is ready to record (power, compact flash card,
and camera). When used with a TraqSync cable or TraqData II or TraqData HD interface, the
PDR-100 will power up shortly after the Traqmate is turned on. It will turn off shortly after the
Traqmate is powered down. If you manually power off the ChaseCam, Traqmate will power it
back up again to ensure readiness.
When you enter a recording mode on the Traqmate, it will automatically start recording on the
ChaseCam when GPS lock is obtained. This will ensure synchronization between the data and
video for use in TraqStudio. When recording is stopped on the Traqmate, the ChaseCam
recording will also stop.
NOTE: If you are using a TraqTach or the original TraqData module, Traqmate will not
power on or off the ChaseCam PDR. You must do that manually.
Settings on the ChaseCam PDR are done through the PDR on-screen menus. On some models,
Auto Record is set with a small red switch inside the Compact Flash access door.
Ensure that G-Force launch is OFF, Auto Power On is OFF, Auto Record is OFF.
To eliminate the on-screen G-meter, use the Features menu to Disable on screen displays.
Copyright © 2005 - 2013 Track Systems Technologies, LLC
Page 44
Traqmate basic and classic User Manual V3.40
March 27, 2013
ChaseCam SS1000 Split-Screen Processor Operation
If you wish to add a second camera angle, you will need a ChaseCam SS1000 Split-screen
Processor. This unit will combine two camera inputs as either a Split-Screen or a Picture-inPicture. The SS1000 operates all the time and its video output goes to the video input on the
ChaseCam PDR100 recorder.
To operate, make sure the ChaseCam SS1000 has power. It is always on when power is applied
so you may wish to connect it to a switched power source to avoid draining the vehicle battery.
NOTE: Do not power the SS1000 from the PDR100 output connection – damage to the
PDR100 will result.
ChaseCam
SS1000
ChaseCam
PDR100
Vehicle +12V
3A 3AG Slow
Blow Fuse
DO NOT USE
OUTPUT TO
POWER
SS1000.
20 AWG or larger wire
Vehicle GND
Figure 30 - Adding a Second Camera - ChaseCam PDR100 & SS1000
Planet Traqmate is located at http://planet.traqmate.com.
Copyright © 2005 - 2013 Track Systems Technologies, LLC
Page 45
Traqmate basic and classic User Manual V3.40
March 27, 2013
Troubleshooting Guide
Problem
Can’t get GPS signal or
Patchy GPS Reception
Won’t Turn On
Until Starts Recording, Then
Stops
Solution
This is most likely antenna placement or the antenna has failed.
The antenna should be placed OUTSIDE THE VEHICLE with a
good view of the sky. Double-sided Velcro can be used to attach
the antenna to a non-steel body shell.
If the antenna is over 2-3 years old or the wire has been wound
tightly or kinked, it might be time to replace the antenna.
For Traqmate Complete systems No GPS Signal can also be
caused by a bad connection or cable between the Display Unit
and Sensor Unit. Check to make sure the cable is plugged into
the Sensor Unit all the way. Replacement DIN and locking
cables are available at the Traqmate web store. If the pigtail
cable attached to the Display Unit has failed the unit must be
returned for service. This is a moderately priced repair.
If the ON button is held and all 4 LED lights on the front of the
Sensor Unit light dimly, the Sensor Unit has failed and must be
returned to the factory for repair. Otherwise, it could be a bad
pigtail cable, membrane switch, or button.
Unit memory may be full. It can record 21 separate sessions or
5.5 to 22 hours depending on recording rate. Make sure that
memory is not full.
Traqmate Complete
Problem
Display LCD is flickering
Display LCD backlight won’t
turn on
Display has lost lines
Display has lost area of
screen
Unit Turns Off By Itself
Losing Data or Losing Lap
Times on Display Unit
Solution
The LCD has failed and will need to be replaced. This is a
moderately priced repair.
This may be caused by a bad membrane keypad on the Display
Unit or possibly a bad power cable, Display Unit pigtail cable, or
Sensor Unit to Display Unit cable. This is a moderate cost
repair.
Hit the red << Back button at the end of the session to stop
recording and save the lap times.
Traqmate Basic
Problem
Red button has broken
Solution
If the red button cover has come off, the unit will often still
operate until you can schedule repair. This is a moderately
priced repair.
There may be other tips that are posted on our web forum at this link:
http://store.traqmate.com/TraqTips-and-FAQ-s/283.htm
Scheduling a Repair
If a failure requires a return to factory repair, you may start a repair ticket by visiting traqmate.com
and choosing Support / Service & Repair.
Copyright © 2005 - 2013 Track Systems Technologies, LLC
Page 46
Traqmate basic and classic User Manual V3.40
March 27, 2013
Appendices
Table of Figures
Figure 1 - Traqmate System Components .................................................................................... 10
Figure 2 - Traqmate Basic Connections ........................................................................................ 12
Figure 3 - Traqmate Complete Connections ................................................................................. 12
Figure 4 - Permanent Wiring Harness........................................................................................... 15
Figure 5 - DU Gauge Cluster Mount.............................................................................................. 16
Figure 6 - DU Console Mount........................................................................................................ 16
Figure 7 - Sensor Unit Front and Rear Panel................................................................................ 17
Figure 8 - Display Unit Controls..................................................................................................... 18
Figure 9 - DU Status Icons ............................................................................................................ 22
Figure 10 - Lap Timing .................................................................................................................. 24
Figure 11 - Acquiring GPS Screen ................................................................................................ 24
Figure 12 - Recording a Start / Finish Location............................................................................. 25
Figure 13 - Searching for Start / Finish Line.................................................................................. 25
Figure 14 - Lap / Qualifying Timer Screen .................................................................................... 25
Figure 15 - Autocross/Rally Stage Screen .................................................................................... 27
Figure 16 - Autocross/Rally Launch Screen.................................................................................. 27
Figure 17 - Drag Race Stage Screen ............................................................................................ 27
Figure 18 - Drag Race Launch Screens........................................................................................ 28
Figure 19 - Drag Race Timing Screen........................................................................................... 28
Figure 20 – GoPro Camera Connection - TraqData Pro ............................................................... 32
Figure 21 – GoPro Camera Connection - TraqSync Pro............................................................... 32
Figure 22 – Replay XD Camera Connection – TraqData HD2...................................................... 35
Figure 23 – Replay XD Camera Connection - TraqSync Pro........................................................ 35
Figure 24 - TraqData HD Connection to Sony HD Camcorder ..................................................... 39
Figure 25 - Enabling Sony HD Camcorder Control ....................................................................... 39
Figure 26 - TraqSync Connection to ChaseCam PDR100............................................................ 42
Figure 27 - TraqData II Connection to ChaseCam PDR100 ......................................................... 42
Figure 28 - TraqCam Cable to ChaseCam PDR100 ..................................................................... 43
Figure 29 - Enabling ChaseCam PDR100 Control........................................................................ 43
Figure 30 - Adding a Second Camera - ChaseCam PDR100 & SS1000...................................... 45
Warranty Information
Track Systems warrants to the owner of this Traqmate GPS Data Acquisition System that it is
free from defects in materials and workmanship for a period of 180 days from the original date of
consumer purchase. This warranty does not cover damage to the product as a result of misuse or
accident, including but not limited to shock or water damage.
Remedies shall be limited to repair or replacement of the defective unit at Track Systems
discretion. IN NO EVENT SHALL TRACK SYSTEMS BE LIABLE FOR INCIDENTAL OR
CONSEQUENTIAL DAMAGES. Some states do not allow for limitation of incidental or
consequential damages, so this limitation may not apply to you.
To arrange for service, check the Traqmate website at http://traqmate.com and click the Service
and Repair button to create a repair ticket. This applies to both in and out of warranty service.
For technical support, call 1-877-289-0312 (9 AM to 5 PM EST M-F).
Copyright © 2005 - 2013 Track Systems Technologies, LLC
Page 47
Traqmate basic and classic User Manual V3.40
March 27, 2013
Glossary
Accelerometer
Analysis
A sensor that measures the G-forces on the vehicle
The effort of examining recorded data for useful information or the results of
such an examination
Analysis File
File with extension of “.tqs” that contains an analysis. May contain one or
AutoOn
Feature to allow Traqmate to automatically turn on with power
AutoStart
Feature to designate automatic starting mode for Traqmate
AutoPan
A Traqview feature that causes the AutoPan Vehicle to remain in the Track
more sessions
window regardless of Zoom level
AutoPan Vehicle
The vehicle selected in Traqview menu to be followed during AutoPan
Data Acquisition
Measuring and recording of information
Display Unit
Lap Timer component of the Traqmate Complete System
DU
Display Unit
Firmware
Software that is embedded into the SU and DU that controls their operation
GPS
Global Positioning System, a satellite-based location method
Post Roll
Video recorded after the selected Laps
Predictive Lap Timer
Display Unit timer that compares current lap progress with a stored
reference lap
Pre Roll
Video recorded before the selected Laps
Reference Vehicle
In Traqview, first vehicle selected for map display
Segment
portion of the track that is being analyzed in Segment Analysis
Segment Separator
bent line on Track Map that separates segments
Sensor Unit
Silver box containing GPS receiver and accelerometers
Session
One group of continuous recording, typically a single trip or series of laps
Session File
File with extension of “.tqm” that contains one recorded session
Slider
Slide control at bottom of screen for positioning vehicle on track
Start/Finish Line
Place on track where a lap starts
SU
Sensor Unit
Theoretical Best Lap (TBL)
Best combinations of segment times from a session
TraqData
Analog, Digital and RPM input module
TraqData II
Analog, Digital and RPM input module with 4-wire ChaseCam interface
TraqData HD
Analog, Digital and RPM input module with LANC camera interface
TraqData PRO
Analog, Digital and RPM input module with GoPro Camera interface
TraqPaq
Traqmate Battery Pack
Traqmate Basic
GPS Data Acquisition system without a Display Unit (Sensor Unit only)
Traqmate Complete
GPS Data Acquisition system with both Sensor Unit and Display Unit
TraqSync
RPM input module with 4-wire ChaseCam interface
TraqSync PRO
RPM input module with GoPro Camera interface
TraqTach
RPM input module
Traqview
Windows data playback and analysis program
TraqStudio
Windows data and video playback and analysis program
Copyright © 2005 - 2013 Track Systems Technologies, LLC
Page 48
Traqmate basic and classic User Manual V3.40
March 27, 2013
About GPS Data Acquisition
Several events converged recently to make GPS Data Acquisition viable. First, the US
government removed the artificial errors in the GPS signal to improve accuracy. Second, the
advent of high-speed single-chip GPS receivers made the technology both affordable and even
more accurate. Third, the power of portable PCs increased to the point where they can process a
large amount of mathematical and graphical data quickly. And finally, the popularity and
increasing sophistication of racing and track enthusiasts created a market for the product.
The primary advantages of GPS Data Acquisition over more traditional sensor-based systems
are:
Easy Installation – Using just the GPS positioning and accelerometers, you can collect an
incredible amount of information, enough to compare drivers and cars. This makes the system
accessible to street cars, vintage cars, and racecars that run in classes that do not permit sensorbased systems. It also makes it easy to swap the unit between vehicles. This is ideal for driving
instructors and people with multiple vehicles. Of course, adding sensors is always an option if you
wish to collect even more in-depth information.
Easy to Use – By starting with the track map and placing one or more vehicles on it, you have a
visual reference for all the rest of the data that can be examined. This makes data analysis faster
and much easier.
Driving Line Comparisons – By mapping each run, comparisons can be made of driving lines,
braking points, and other track-dependent points.
Cost – There is no installation cost and no expensive sensors are required.
Copyright © 2005 - 2013 Track Systems Technologies, LLC
Page 49
Traqmate basic and classic User Manual V3.40
March 27, 2013
GPS Frequently Asked Questions
What is GPS?
The Global Positioning System is a constellation of 24 satellites that orbit the earth twice a day,
transmitting precise time and position (latitude, longitude and altitude) information. With a GPS
receiver, users can determine their location anywhere on the Earth. The complete system
consists of 24 satellites orbiting about 12,000 miles above the Earth, and five ground stations to
monitor and manage the satellite constellation. These satellites provide 24-hour-a-day coverage
for both two-and three- dimensional positioning anywhere on Earth.
Development of the $10 billion GPS satellite navigation system was begun in the 1970s by the
US Department of Defense, which continues to manage the system, to provide continuous,
worldwide positioning and navigation data to US military forces around the globe. However, GPS
has an even broader civilian, commercial application. To meet these needs, GPS offers two
levels of service, one for civilian access and the second encrypted for exclusive military use. The
GPS signals are available to an unlimited number of users simultaneously, and there is no charge
for using the GPS Satellites.
How Does GPS Work?
The basis of GPS technology is precise time and position information. Using atomic clocks and
location data, each satellite continuously broadcasts the time and its position. A GPS receiver
receives these signals, listening to three or more satellites at once, to determine the users
position on earth.
How Accurate is GPS?
Traqmate is equipped with a form of differential GPS known as WAAS. A WAAS-capable receiver
can give you a position accuracy of better than three meters (10 feet) in absolute terms over a
large span of time. In product testing on racetracks, which typically have a good view of the sky,
recordings done close together in time were shown to be repeatable to under one meter
accuracy.
Under normal conditions, the GPS signal will provide a civilian user an accuracy of better than 15
meters (50 feet). However, using a technique called differential GPS (DGPS), the user can
increase the overall accuracy of the GPS receiver to approximately 1-3 meters. With DGPS, one
GPS receiver unit is placed in a known location and the position information from that receiver is
used to calculate correction in the position data transmitted to other GPS receivers in the area.
The resulting real-time accuracy is in the 10 foot range. Sub-meter accuracy can be obtained by
using DGPS and post-processing calculations in static positioning.
WAAS stands for Wide Area Augmentation System, which is a system of satellites and ground
stations that provide GPS signal corrections, giving you even better position accuracy. A WAAScapable receiver can give you a position accuracy of better than three meters, 95 percent of the
time. Currently, WAAS satellite coverage is only available in North America.
Copyright © 2005 - 2013 Track Systems Technologies, LLC
Page 50