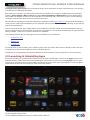
1
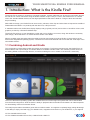
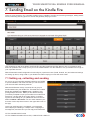
By Christian Cawley
http://www.cmcawley.co.uk/
Edited by Justin Pot
This manual is the intellectual property of MakeUseOf. It must only be published in its original form. Using
parts or republishing altered parts of this guide is prohibited without permission from MakeUseOf.com
Think you’ve got what it takes to write a manual for MakeUseOf.com? We’re always willing to hear a pitch!
Send your ideas to [email protected]; you might earn up to $400.
YOUR UNOFFICIAL KINDLE FIRE MANUAL
Table Of Contents
1. Introduction: What Is the Kindle Fire?
5
1.1 Combining Android and Kindle
5
1.2 Differences Between the Kindle Fire and Kindle
6
1.3 LCD vs E Ink
6
2. Setting Up the Kindle Fire
7
2.1 Managing Your Kindle Account
7
2.2 Buying Books with the Kindle Fire
8
2.4 Finding Free Titles to Read
8
3. The Kindle Fire User Interface
9
3.1 Menus, Icons and Gestures
9
3.2 Browsing the Newsstand
9
3.3 A Focus on Reading
10
3.4 Reading Books and Documents
10
3.5 Using Search
11
3.6 Removing Books from Your Kindle Fire
12
3.7 Using the Keyboard
12
4. Installing and Launching Apps
14
4.1 Installing New Apps from the Amazon App Store
14
4.2 Other Resources for Installing Apps
14
4.3 Launching & Uninstalling Apps
15
4.4 Suggested Apps for the Kindle Fire
16
5. Music, Video and Amazon Prime
17
5.1 What Is Amazon Prime?
17
5.2 Syncing Media to Your Kindle Fire
17
5.3 Playing Music on Your Kindle Fire
18
5.4 Finding and Downloading Videos
18
5.5 Advanced Media Player Settings
19
5.6 I Can’t Access Amazon Prime! 20
6. Accessing the Web on Your Kindle Fire
21
6.1 The Silk Browser
21
HTTP://MAKEUSEOF.COM
HTTP://WWW.CMCAWLEY.CO.UK, CHRISTIAN CAWLEY
3
share:
YOUR UNOFFICIAL KINDLE FIRE MANUAL
6.2 Configuring the Silk Browser
22
7. Sending Email on the Kindle Fire
24
7.1 Setting up, collecting and sending 24
7.2 Further Email Settings
25
8. Kindle Fire Settings & Connectivity
27
8.1 The Kindle Fire Menu Bar
27
8.2 Battery Management
27
8.3 Configuring Wireless Networking on the Kindle Fire
27
8.4 Display Settings
28
9. Kindle Fire Security
29
9.1 The Lock Screen Password
29
9.2 Credential Storage
29
9.3 Parental Controls
30
9.4 Changing the Device Owner and Resetting Your Kindle Fire
30
9.5 Updating the Kindle Fire Software
31
10. Troubleshooting the Kindle Fire
32
10.1 Restart the Device!
32
10.2 Tracing and Dealing with Problem Apps and Games 32
10.3 Dealing with Synchronization Issues
33
10.4 I’ve Lost My Password!
33
Conclusion: Get Reading!
Appendix
34
35
1. Accessing Amazon Prime from Overseas
35
2. What You Should Know About Rooting the Kindle Fire
36
HTTP://MAKEUSEOF.COM
HTTP://WWW.CMCAWLEY.CO.UK, CHRISTIAN CAWLEY
4
share:
YOUR UNOFFICIAL KINDLE FIRE MANUAL
1. Introduction: What Is the Kindle Fire?
The Kindle Fire is Amazon’s centrepiece consumer hardware, a quality tablet that can be used to read emails, browse
the web and of course read books using the Kindle software. At just 7.5 by 4.7 inches, the Kindle Fire is of a similar
size to the standard Kindle devices, but has high specifications that make it ideal for a range of tasks and activities
beyond reading.
With 8 GB of storage, your Kindle Fire can store music, podcasts, video clips and other data. An impressive 512 MB of
RAM enables the tablet to run perfectly with the dual core, 1GHz processor.
A 1024x600 multi-touch Gorilla Glass display displays 169 ppi (pixels per inch) and a choice of 16 million colours, with
graphics provided by a PowerVR SGX540 chip.
The Kindle Fire offers a 3.5 mm headphone socket and a micro-USB 2.0 connector, along with wireless connectivity
(802.11b/g/n). Note that there is no mobile Internet variant of this tablet.
What is probably most interesting about the tablet, and what sets it apart from other Kindles, is the presence of the
Android 2.3 Gingerbread operating system, customized to feel less like Android and fit more with the visual style of the
other Kindle devices.
1.1 Combining Android and Kindle
This combination of approaches makes this device most intriguing. To all intents and purposes, the Kindle Fire is an
Android tablet, with a special layer of software added to resemble a Kindle reader. This software provides access to
an existing Kindle account through Amazon, as well as enabling the user to create a new account if necessary.
The use of the Android operating system also enables the use of various apps and games that can be downloaded
from the Amazon App Store, while the device’s ability to playback video and audio media makes it an ideal receptacle
for downloading content from Amazon Prime.
This dual purpose makes the tablet a great choice of eBook reader. You might be completely happy taking advantage
of the ability to simply read and enjoy your Kindle books, magazines and comics on your Kindle Fire, or you might be
HTTP://MAKEUSEOF.COM
HTTP://WWW.CMCAWLEY.CO.UK, CHRISTIAN CAWLEY
5
share:
YOUR UNOFFICIAL KINDLE FIRE MANUAL
excited by its Internet access, provision of emails and apps and games.
Of course, this is nothing new – a Kindle application is available on Android phones and tablets that does essentially
the same thing – but with the Kindle Fire, you get the focus on the library, rather than the apps, and this makes a considerable difference.
And of course, the relatively low price point of the Kindle Fire helps as well!
1.2 Differences Between the Kindle Fire and Kindle
So how does the Kindle Fire really differ from a standard Kindle device?
Currently there are three Kindle eBook readers available; the Kindle Fire, the fourth generation of the basic Kindle and
the Kindle Touch, a touch-screen variant of the latter. These devices both have Wi-Fi connectivity, while the Kindle
Touch also has a 3G variant although web browsing isn’t available without Wi-Fi.
These devices lack the high specification of the Kindle Fire. They’re not optimised for playing music and video, they
don’t have as much storage space or a fast processor and they don’t have all the colour displays.
On the other hand, standard Kindle readers are small, light and can easily slip into a pocket. With millions of fans, the
Kindle is a popular eBook reader, recognisable by its striking graphite frame.
What really sets the traditional Kindle and Kindle Fire tablets apart, however, is the differences between the displays.
1.3 LCD vs E Ink
One key difference between the two main versions of the Kindle is the way in which content is displayed.
A traditional Kindle e-reader uses E Ink, a proprietary electronic ink solution that looks like paper, meaning it can display books on a screen without the use of a backlight. If you’re familiar with LCD display, you might have noticed that
these can produce negative effects such as headaches – this is due in part to the backlight. E Ink devices don’t have
this issue, allowing the user to enjoy hours of comfortable reading.
Conversely, the Kindle Fire uses a touchscreen LCD display, similar to that seen on any mobile phone or tablet. While
this can result in some discomfort while reading, it also enables the device to be used as a portable media delivery
device, as intended by Amazon.
HTTP://MAKEUSEOF.COM
HTTP://WWW.CMCAWLEY.CO.UK, CHRISTIAN CAWLEY
6
share:
YOUR UNOFFICIAL KINDLE FIRE MANUAL
2. Setting Up the Kindle Fire
When you first receive your Kindle Fire from Amazon, you should find that your details are already present, courtesy of
the online retailer. They really want you to use the device to access their services, after all!
If, however, you have bought the device as a gift you can easily remove the already-present details. Do this via Settings > More > More > My Account and tap the Deregister button. This will remove the credentials of the person that
purchased the tablet, and a moment later new details can be input using your existing Amazon account. Should you
be the recipient of a Kindle Fire and not yet have an Amazon account, you can use the device to sign up.
When creating an account, you will need to provide various pieces of personal information and an email address. Note
also that Amazon will require you to associate a credit or debit card with the account if you plan to purchase books,
video and music to view on the Kindle Fire.
Of course, to get this far, you should have already connected to a local wireless network. We’ll look at the various
options for this later in the guide (7.4 Configuring Wireless Networking on the Kindle Fire); getting online is straightforward, activated via Settings > More > Wi-Fi and switching Wireless Networking to On.
2.1 Managing Your Kindle Account
While it is easy to set up, add or register an account for use with a Kindle Fire, more detailed account management
isn’t possible without logging into the Amazon website.
Via the Your Account button, sign in to the website and look along the left-hand column for the “Your Kindle” link. From
here, you will be taken to a page listing all eBooks associated with your account. Using the options on the left of the
page you can view the various different Kindle product types that can be downloaded (for instance, books, magazines
and documents) as well as use the “Manage Your Device” option to rename your device.
The Kindle Payment Settings option, meanwhile, enables you to add and remove payment cards to and from your
Kindle account.
After all, you’ll need to make sure you have a valid card when you start adding books!
HTTP://MAKEUSEOF.COM
HTTP://WWW.CMCAWLEY.CO.UK, CHRISTIAN CAWLEY
7
share:
YOUR UNOFFICIAL KINDLE FIRE MANUAL
2.2 Buying Books with the Kindle Fire
The real reason for owning any Kindle device is to read books, and the Kindle Fire is no different.
So just how do you get started? By this point, you should have three things:
1. A wireless network connection
2. An Amazon account
3. A credit or debit card associated with that account
Within seconds you can be reading a new book on your Kindle Fire. This is done by tapping the Books option on the
virtual bookshelf that is the Kindle Fire’s homescreen. From here, tap Store – your tablet’s browser will open to display
the Kindle store, enabling you to begin browsing the vast library of well over 1 million titles.
Once you have found the book or magazine you wish to read use the Buy now with 1-Click button (this may require
“activating” in your account settings) to instantly purchase and download the title to your Kindle Fire!
It’s easy to get carried away buying books for your tablet, so remember to spend some time reading rather than shopping…
2.4 Finding Free Titles to Read
Thanks to the actions of Amazon, publishers and authors, you won’t be limited only to paying for books on your Kindle
Fire. Many titles – good and bad – are available free from time to time.
That’s right – free.
Of course, the main problem with downloading free books from Amazon to your Kindle Fire is finding them.
The simplest way is to use the search tools in the Kindle Store, but the downside with this is that you might spend
hours browsing through the free titles. Various websites offer updates when new ebooks are available free, while
some Kindle users even maintain Amazon wishlists of free titles [http://www.amazon.com/Totally-Free-kindle-Books/
lm/R27UG52OAM3TFX]!
HTTP://MAKEUSEOF.COM
HTTP://WWW.CMCAWLEY.CO.UK, CHRISTIAN CAWLEY
8
share:
YOUR UNOFFICIAL KINDLE FIRE MANUAL
3. The Kindle Fire User Interface
While based on Android 2.3, the default user interface on the Kindle Fire is very different than most Android systems.
Gone is the desktop-like styling of the Android Gingerbread UI, replaced by an interface known as the Newsstand.
Here, books and apps are listed, easily navigated by a few swipes of your finger (or, if you prefer, a stylus) and offering
a search tool which can be considered an important part of the Kindle Fire experience, much like a library index.
The focus is clearly on reading books rather than browsing the web and using apps, but these tasks can also be enjoyed on the Kindle Fire.
3.1 Menus, Icons and Gestures
While the initial user interface of the Kindle Fire differs from other Android devices, once you get behind this front you
will see that there are many similarities.
For instance, a Home button is almost ubiquitous, present in the lower-left corner, while the Settings menu can be
opened by pressing the appropriate cog-like icon in the top-right of the display. Opening this will enable you to toggle
the rotation lock, adjust volume, brightness and connect to Wi-Fi, as well as syncing books with Amazon and providing
access to a whole host of additional advanced settings.
Using the Kindle Fire on a day-to-day basis, however, you will find the Home button and the Back button (found in the
middle of the bottom edge of the display) are the most regularly used, while an app-specific context menu and search
button can also be accessed.
Like any touch-sensitive device, a number of gestures enable you to interact with your Kindle Fire. First and foremost
is the basic tap, the tablet version of a left-mouse click on a computer. Following this is the tap-and-hold which offers
a context menu of additional options in some scenarios. The swipe will enable you to browse your device contents –
particularly useful in the Newsstand view and when browsing – while the pinch-to-zoom gesture uses the forefinger
and thumb and is used to zoom in and out of images and web pages.
Across the top of the device is a narrow bar, displaying your name, the time and information such as wireless connectivity and battery life. Importantly, this is affords access to the Notification Area, where you will find information about
apps, new emails, etc. The notifications are displayed as a number in a grey disc; tap this to expand the view – you’ll
find the information displayed, often these can be tapped to take you to the appropriate app. When you’re done checking the notifications, tap the Clear All button and then Home.
To wake your Kindle Fire from sleep mode, tap the button on the lower edge of the device. This is also the power button, and can be used to switch your Kindle Fire off and on.
3.2 Browsing the Newsstand
When you press the Home button you will the Newsstand, a virtual bookshelf onto which your books and any regularly
used apps are placed.
HTTP://MAKEUSEOF.COM
HTTP://WWW.CMCAWLEY.CO.UK, CHRISTIAN CAWLEY
9
share:
YOUR UNOFFICIAL KINDLE FIRE MANUAL
Swiping left and right through the shelves will offer a carousel-like browsing experience, enabling you to (hopefully)
find the item you’re looking for. Failing this, there are other shelves below as well as the search tool at the top of the
screen.
Across the stop of the Newsstand view you will find a menu offering alternative views. These are split into Books, Music, Video, Docs, Apps and Web, each grouping the content appropriate to those headings.
Tapping an item in the Newsstand will launch it; apps will launch, web pages will browse and books will open.
3.3 A Focus on Reading
With 8 GB of storage available on your Kindle Fire, you could easily spend the rest of your life enjoying books downloaded to the device. Although sporting a different look and feel to the more recognizable Kindle devices, the Kindle
Fire remains at heart an eBook reader.
This is why the Newsstand is so crucial to the platform – it offers an immediate route into new and recently read titles
on your device. Via the Newsstand or the Books menu, you can find titles to read that are either stored locally or in
your account but stored in the Amazon cloud – the latter can be checked via Books > Cloud, where books can be
sorted By Author, By Recent and By Title.
Launching a book for the first time is usually a two-step process. The first is to download the publication, which you
can do by tapping once. A few moments later the book will be present on your device (or at least enough of it to begin
reading) and you will be able to tap the cover illustration once again.
Any books that you want to ensure are easily accessible when you switch on your Kindle Fire can be set as a favourite. This is done by finding the item, using the tap and hold gesture to display a context menu and selecting Add to
Favorites, prompting the item to be set as a permanent item in the Newsstand view.
3.4 Reading Books and Documents
With the book open on your device, the pages can be turned by swiping your finger from right to left, or by tapping. By
tapping at the bottom edge of the display you can reveal the menu, which provides a Home button, Back button, Font
Size option, a menu to jump to key points through the book and even an Annotation button for adding your thoughts
about a particular passage. This menu is completed with a Search tool which can be used to jump to specific phrases
HTTP://MAKEUSEOF.COM
HTTP://WWW.CMCAWLEY.CO.UK, CHRISTIAN CAWLEY
10
share:
YOUR UNOFFICIAL KINDLE FIRE MANUAL
in the book.
In addition to all of this, a progress bar displaying which page you’re currently reading is provided. This features a
slider that can be used to wind back and forth through the current book.
Finally, in the top-right corner of the page you will see a greyed-out bookmark. If you wish to return to this page at a
later time, tap this to activate the bookmark (it will be coloured blue).
In addition to Kindle eBooks, documents in other formats can be read on your Kindle Fire. While there might be fewer
menu options reading these files can be made easier by using the pinch-to-zoom gesture – this is useful for magazines in PDF format (note that double-tapping to zoom also works in some documents, depending on the file type).
EBooks in the following file formats can be read on the Kindle Fire:
•
Kindle Format 8 (KF8)
•
Kindle Mobi (.azw)
•
TXT
•
PDF
•
MOBI
•
PRC
As a result, you can enjoy not only books but magazines, documents and even comics on your Kindle Fire, presented
in full colour for your enjoyment!
If you have any magazines and books saved on your computer in a suitable format, these can be copied to your device by connecting a USB cable. See 5.2 Syncing Media for more information.
3.5 Using Search
The Search tool on the Kindle Fire can be used in a variety of ways. While used outside of a book, Search is capable
HTTP://MAKEUSEOF.COM
HTTP://WWW.CMCAWLEY.CO.UK, CHRISTIAN CAWLEY
11
share:
YOUR UNOFFICIAL KINDLE FIRE MANUAL
of finding books by file format, title and topic. This is done by tapping into the Search box, which will open the Search
page. Results will be displayed here when the search term is entered.
In addition, the tool can be used to search the web, by tapping the Web button in the top right corner and entering a
search term. Tapping the Library button will turn the search focus back to your device, where apps and games can
also be searched for in addition to books and documents.
Another search tool can be found on the Kindle Fire. While reading a book, you might want to jump to a particular
chapter or find a certain word. This can be done in book view by tapping the magnifying glass Search button and
inputting your search term. Note that successful results might take a while to return; the longer and more accurate the
search phrase, the better!
3.6 Removing Books from Your Kindle Fire
Although your Kindle Fire has a lot of space (for storing books, at least) you might decide that a book that you have
purchased from the Kindle Store isn’t suitable or just isn’t very good.
After downloading and reading the title, your only choice is to remove it from the tablet/reader, something that is easy
enough to do.
Open Books and find the title, using the Search tool if necessary. Once you have found the disappointing book, tap
and hold, selecting Remove from Device. This will then prompt the book to be deleted from your Kindle Fire, although
note that it will remain available in your Amazon Cloud.
3.7 Using the Keyboard
After getting to grips with the gestures and other basics of your Kindle Fire, it’s time to spend some time on that other
important user interface tool – the keyboard!
HTTP://MAKEUSEOF.COM
HTTP://WWW.CMCAWLEY.CO.UK, CHRISTIAN CAWLEY
12
share:
YOUR UNOFFICIAL KINDLE FIRE MANUAL
Don’t look confused; the Kindle Fire comes with a software keyboard that appears on the device display at the appropriate time rather than the physical hardware keyboard built into the casing of older Kindles.
By default, the keyboard is switched off, and this remains the case until you are required to enter information. This
might happen automatically when you are required to complete a form for setting up email or connecting to Wi-Fi, or it
might happen when you tap into a text field. A good example is the Search box.
When it appears you will see a standard QWERTY keyboard with the numbers 1 to 0 available as alternatives to the
letters Q to P. Numbers can be entered by long-pressing the key or tapping the 123!? button to the left of the Space
bar, where a separate keyboard for numbers and punctuation is displayed. From here, a third keyboard of options
displaying math symbols is available in the position of the left shift key, while the main alphanumeric keyboard can be
reinstated via the ABC key.
Entering information is easy – just type with your fingers – and any mistakes can be dealt with using the backspace
key on the right-hand side. If you need to make any changes to the text you have entered tap your finger in the text
entry field and add or delete more text. You can drag the cursor into position, if necessary.
Copy and paste is also available. To select text on a web page or book or in a field you have completed, double tap to
select the word and then tap it once again to display the Edit text menu, where the options Cut and Copy are available. To paste cut or copied text, long tap the text field once again, and select the Paste option. You will also see an
option for Input Method in this menu – this is for switching between the Kindle Fire keyboard and any alternatives that
you might install, available via the Amazon App Store.
Using the keyboard can prove difficult at times due to the size of the Kindle Fire display. In both portrait and landscape
modes, using it results in half of the screen being dedicated to the keyboard. To get around any problems reading the
information you’re entering you can use your finger to scroll the web page or field, or simply use the close keyboard
button, found in the lower-left corner.
When you’re done use the submit key (which changes its label depending on purpose), found in the lower-right corner.
HTTP://MAKEUSEOF.COM
HTTP://WWW.CMCAWLEY.CO.UK, CHRISTIAN CAWLEY
13
share:
YOUR UNOFFICIAL KINDLE FIRE MANUAL
4. Installing and Launching Apps
With your high speed, full colour 7 inch eBook reader and tablet all set up, you can spend all of your free time enjoying
books, magazines and occasionally browsing the web at your leisure.
Additionally, you can also install and launch apps courtesy of the Amazon App Store, an online marketplace providing
apps for your Kindle Fire. This can be reached by connecting to the Internet, although you should note that there are
international restrictions.
So how can you get around this?
Fortunately there are many other places from which you can download and install suitable apps for your Kindle Fire!
Keep reading to learn more.
4.1 Installing New Apps from the Amazon App Store
To find and add new apps to your Kindle Fire, tap Apps > Store and browse the available selection.
When you see an app with an interesting title, tap to open the description page. Here you will find details about the
product, screenshots and reviews from other users and recommendations for other similar (and perhaps better) apps.
To install an app, you must first have a credit card associated with your account, just as with purchasing books. You
will see a price listed on the app or game description page, so tap this, then Get App.
In the background, the transaction will complete; in the foreground, you will be informed of the app’s imminent download, complete with a progress bar indicating the current status.
Note that if you are using a US-bought Kindle Fire overseas you will be unable to purchase apps without a US-registered credit card. This can prove complicated to setup if you don’t have access to such a thing, but don’t worry – there
are other marketplaces offering Kindle Fire app downloads…
4.2 Other Resources for Installing Apps
HTTP://MAKEUSEOF.COM
HTTP://WWW.CMCAWLEY.CO.UK, CHRISTIAN CAWLEY
14
share:
YOUR UNOFFICIAL KINDLE FIRE MANUAL
Not everyone who owns a Kindle Fire is situated in the US. As a result there are other services that you can call upon
to enable you to install apps and games.
Before doing this, however, you will need to ensure that your Kindle Fire is setup for installing apps from third party
locations. Open Settings > More > Device and switch Allow Installation of Applications from the default setting
OFF to ON. Your Kindle Fire will let you know that this isn’t necessarily safe – the choice is yours, but the following
resources can be trusted (there are many more that cannot be).
Most popular for this platform is the Opera App Store, available by visiting apps.opera.com in the Kindle Fire Browser.
Using common credit cards and PayPal you can purchase apps from this location, simply by selecting an app and tapping the Download button.
Once you have done this, tap the Menu button in the middle of the browser toolbar and select Downloads. Here you
will see a progress bar for the download; once this has completed you can tap the downloaded app to begin the installation procedure – follow the on-screen instructions for guidance.
The following locations also provide apps that can be installed on your Kindle Fire:
•
andappstore.com
•
slideme.org
•
m.getjar.com
It would be wise (for device safety) not to install any apps from any location that cannot be already found in the Amazon App Store or the official Google Play store for Android devices.
Google Play is not supported on the Amazon Kindle Fire, at least officially. See the appendix for more information.
4.3 Launching & Uninstalling Apps
There are two places on your Kindle Fire where you will find your installed apps. The first is the Apps screen on the
Newsstand menu, where native and newly installed apps can be found. These can be listed By Title or by the most
recently used, and the Search tool is provided to find any that you can’t track down. Apps appear on their own Newsstand shelves in this view and scrolling up will provide more shelves.
HTTP://MAKEUSEOF.COM
HTTP://WWW.CMCAWLEY.CO.UK, CHRISTIAN CAWLEY
15
share:
YOUR UNOFFICIAL KINDLE FIRE MANUAL
The second way of launching apps is via the main Newsstand screen; this displays all of your most recently-accessed
books, documents, games, apps and media files, making it pretty easy to track down commonly used items.
From time to time you will probably decide that you no longer wish to keep an app on your Kindle Fire. If this is the
case, you can uninstall it easily by opening the Apps screen, long-tapping the app icon and selecting Remove from
Device.
If you prefer to simply tidy up the Newsstand, however, rather than delete apps, tap and hold the items you’re unhappy
with and select Remove from Carousel, thereby hiding said book or app.
4.4 Suggested Apps for the Kindle Fire
In most cases you should be able to manage with the apps provided free as part of the operating system. However,
if you wish to take advantage of the various free apps in the Amazon App Store, there are several that you shouldn’t
miss.
•
Skype – use your existing Skype details to login and chat with friends. Voice and video chat are
unavailable, sadly.
•
Pulse – an amazing newsreader app which you can tailor to find updates based on your interests.
•
Evernote – the popular note-taking app is available for the Kindle Fire, as is a useful, more
stripped-down alternative, AK Notepad.
•
Read It Later – if you’ve ever come across an article on the web that you would like to read but
don’t have time for right now, this app will help you out.
•
Wi-Fi Analyzer – a top app for making sure you connect to the fastest Wi-Fi network in your
vicinity.
In addition to these, the usual Facebook, Twitter and LinkedIn social networking apps are available, along with alternative browsers, email clients and even eBook reading software and media players! Explore and you’ll find something
you like.
HTTP://MAKEUSEOF.COM
HTTP://WWW.CMCAWLEY.CO.UK, CHRISTIAN CAWLEY
16
share:
YOUR UNOFFICIAL KINDLE FIRE MANUAL
5. Music, Video and Amazon Prime
With your Kindle Fire in your hand you can read books, browse the web, even access email (see 7 Sending Email on
the Kindle Fire) and enjoy apps and games from the comfort of your living room, office or on the train.
But did you know that this device is also a portable multimedia device?
While 8 GB might not seem like a lot of space (the typical size of a Blu-ray Disc is 25 GB!) you don’t need to worry too
much. Amazon Prime is designed to provide your Kindle Fire with a marketplace and digital distribution over Wi-Fi,
streaming content directly to your device for your enjoyment.
As a result, the Kindle Fire is equipped with a media player capable of playing back music and video stored on your
device and streamed to it from the web.
5.1 What Is Amazon Prime?
Let’s not forget that the Kindle Fire is a product that comes straight from Amazon. It is designed not only as an eBook
reader but also as a receiver for digital distribution. This means that several Amazon services are integrated, such as
Amazon Prime.
Initially launched as a subscription-based two-day free shipping service (also offering a one-day shipping discount),
Amazon Prime has been expanded by Amazon to include Amazon Instant Video, enabling instant streaming of movies
and TV shows to your computer – or your Kindle Fire!
In addition, Amazon Prime membership affords access to the Kindle Owners’ Lending Library, enabling popular books
to be “borrowed” for free, like a bricks-and-mortar lending library. There is no due date to these titles, although lending
is limited to one book per month.
If you don’t already have an Amazon Prime membership you can set one up by logging into the Amazon website,
opening My Account and following the instructions via the appropriate link.
5.2 Syncing Media to Your Kindle Fire
Most of us enjoy listening to some good tunes and using the USB
cable that shipped with your tablet you can sync tracks. Alternatively,
you can use the Amazon Cloud Drive to provide the music.
Syncing is easy. Once your device is connected you will see a new
screen reading “You can now transfer files form your computer to
your Kindle”, accompanied by a graphic of a USB cable. This feature
isn’t limited to music – videos and books can also be copied to your
device.
On your computer, open My Computer (or the file manager of your
non-Windows operating system) and find the tablet listed as a new
drive. Typically it will appear as KINDLEFIRE followed by the next
available drive letter.
With the drive open you will see several folders. Key among these is
the Books, Documents, Music, Pictures and Video directories – these
are the locations where you will copy the appropriate media. The
best way of doing this is to open another My Computer window and
find the folder where the data you wish to sync to your Kindle Fire
is stored, and right-click, selecting Copy. Switch back to the original
window, open the corresponding folder and then right-click in the
empty space, selecting Paste.
To enjoy your media, return to the Kindle Fire and tap the Disconnect button. You can then remove the USB cable and start enjoying
the synced content!
HTTP://MAKEUSEOF.COM
HTTP://WWW.CMCAWLEY.CO.UK, CHRISTIAN CAWLEY
17
share:
YOUR UNOFFICIAL KINDLE FIRE MANUAL
5.3 Playing Music on Your Kindle Fire
Once music has been copied to your device from your PC, you will be able to play it back in the Music section of the
Newsstand. Music is sorted by Playlists, Artists, Albums and Songs, while a Search tool is also provided.
To play a song, tap the title or album art. The player will display a progress bar (which you can use to jump through the
track), options to pause and skip back and forth through your collection as well as a volume control, continuous/repeat
play and random mode.
To continue working on your Kindle Fire – perhaps you want to listen to a good album while reading a truly great book
– tap the Hide button. You can then return to the Newsstand and your book!
Of course, this isn’t the only way to enjoy music on your Kindle Fire. If you have ever purchased MP3s from Amazon,
these can be added to your Cloud Drive, where they will then be synced to your tablet. The best way of doing this
is visiting www.cloudplayer.com, signing in with your Amazon account and following the instructions for loading your
Amazon-purchased music collection into the Cloud Drive.
You will then be able to play these back in the Music screen of your tablet – the tracks will be listed under Cloud.
Files in the AAC, MP3, MIDI, OGG and WAV formats can be played on your Kindle Fire.
5.4 Finding and Downloading Videos
The above instructions cannot be used to sync video clips to your Kindle Fire, however.
This is due to the specific video format that the tablet demands. In order to sync your video clips from your computer
you will need a third party conversion tool. For Windows, the best option is the open source Miro media player, available from www.getmiro.com.
Similar to iTunes, this media player will convert your video clips into a suitable format for viewing on the Kindle Fire. To
do this, connect your Kindle Fire to your computer with the USB cable, open Miro and you should see the tablet listed
on the left-hand pane.
Using the Videos view in the app, select the files that you wish to sync (for larger items it is preferable to do this one at
a time) and drag them to the Kindle Fire > Video folder listed on the left.
HTTP://MAKEUSEOF.COM
HTTP://WWW.CMCAWLEY.CO.UK, CHRISTIAN CAWLEY
18
share:
YOUR UNOFFICIAL KINDLE FIRE MANUAL
When converting and syncing, be wary of the comparatively small 8 GB of storage on your Kindle Fire – don’t copy too
many videos! The Kindle Fire will play MP4 and VP8 format videos.
Using Amazon Prime, meanwhile, you can stream movies and TV shows with the Prime Instant Video service, choosing from thousands of videos. Unlimited streaming is offered, while choices can be made based on what people
nearby are watching. The typical Amazon recommendations are also provided. Note that in addition to the instant
video option there are movies and videos – typically new and popular titles – that you will need to pay for.
To start watching, open Video > Store, choose the title you’re interested in (checking the reviews and ratings if necessary) and tap the Rental button on the right-hand side. You can also use Add to Watchlist to come back to it another
time, while More Purchase Options offers a 24 Hour HD Rental and a Buy option to keep the video in your Amazon
Cloud.
Once the purchase is made, you can begin enjoying the film or TV show of your choice!
5.5 Advanced Media Player Settings
While using the native media player app on your Kindle Fire you might feel the need to alter some settings. Separate
advanced options are provided for the Music and Video players.
HTTP://MAKEUSEOF.COM
HTTP://WWW.CMCAWLEY.CO.UK, CHRISTIAN CAWLEY
19
share:
YOUR UNOFFICIAL KINDLE FIRE MANUAL
To access the advanced settings, tap the menu button at the foot of the player window and open Settings. For video,
you will see the option to Disable HD purchase warning; when high definition videos are purchased on the Kindle
Fire by default a pop-up window is displayed, intended to prevent accidental purchases of videos that are more expensive than their standard definition alternatives. Place a check in the box and click Back to disable this warning.
Meanwhile you can also Clear search history. This is effective for video searches only.
In the music player, meanwhile, the Settings screen offers a few more options. You can Enter a claim code from an
Amazon gift card and Clear cache – a useful option for speeding up search and playback of tracks. While music is
playing the Lock-screen controls will display playback controls on the Kindle Fire lock screen when checked while
Enable equalizer modes offers various presets for playing back music with the optimum settings.
Amazon Cloud Drive settings are also presented here, enabling you to decide whether to save purchases to Cloud
Drive or your tablet (the former is usually recommended) with Delivery preference or to use the Automatic Download option to have everything downloaded.
Finally, Refresh Cloud Drive will update the display of what is currently in your Cloud Drive. Note that by default this
occurs every ten minutes.
Away from the advanced settings, you can also manage media files on your device from the Video and Music players.
With the tap-and-hold gesture you can display a context menu, enabling you to find more information about the music
or video, find similar items in the store and also remove the track from your device.
5.6 I Can’t Access Amazon Prime!
At the time of writing, the current status of Amazon Prime is that the Prime Instant Video service and the Cloud Drive
are unavailable to users outside of the USA.
This clearly presents problems when attempting to stream video to your tablet!
In order to successfully use these services you will need a US-based postal address and US-registered credit card.
Further information and tips on circumventing this restriction is available via the appendix.
HTTP://MAKEUSEOF.COM
HTTP://WWW.CMCAWLEY.CO.UK, CHRISTIAN CAWLEY
20
share:
YOUR UNOFFICIAL KINDLE FIRE MANUAL
6. Accessing the Web on Your Kindle Fire
We’ve already mentioned that the Kindle Fire is part-eBook reader, part-media player and part-tablet, and nowhere is
this more obvious than in the device’s Internet connectivity.
While previous Kindle models omitted browsing (at least by default) the Kindle Fire positively embraces it, providing a native browser so users can enjoy the basic portable computing experience that has become synonymous with
tablets.
6.1 The Silk Browser
Described as a “split-browser”, the native means of accessing the World Wide Web on your Kindle Fire is designed to
be as fast as possible, something achieved by using the Amazon cloud servers to process some of the requested web
page information.
Accessible via the Web link on the Newsstand, the browser presents you with a new tab at launch, an address bar
and some regularly-visited shortcuts including Facebook and Google.
The address bar at the top can be used to enter a full URL or simply a search term; a number of search engines can
be set as the default choice (see below). You will also see a Refresh button in the right-most side of the address/
search bar; above this a + symbol allows you to open new tabs.
Silk Browser makes the most of the available screen real estate. At the foot of the screen you will see the Back button,
used for returning to the previously-visited page, and in the lower-right corner you will find a Full Screen button, for
maximum browsing pleasure.
While using the browser you will notice that the address bar scrolls up as you make your way down a page. When
you’re ready to visit a new URL or perform a new search, scrolling back to the top will restore the address/search bar.
To the right of the Back button you will find the Bookmarks screen, where your favourite websites have been saved.
New bookmarks can also be added here by tapping the Add bookmark option.
HTTP://MAKEUSEOF.COM
HTTP://WWW.CMCAWLEY.CO.UK, CHRISTIAN CAWLEY
21
share:
YOUR UNOFFICIAL KINDLE FIRE MANUAL
Finally, the menu button found in the center of the toolbar on the lower edge of your Kindle Fire screen offers various additional features. First of all there is the Add bookmark button, a faster way of setting the currently-viewed
webpage as one of your favourites. Share page, meanwhile, enables sharing of the URL with others via email, chat,
Facebook – whatever suitable apps you have installed. Find in page is a search tool designed to aid in finding text on
a particular web page, while History displays a list of all websites visited for the past month. The Clear All button at
the top of this page will delete your history.
The Downloads button displays a list of files that are currently downloading through your browser, while Settings
opens a new screen where a range of advanced configuration options can be found…
6.2 Configuring the Silk Browser
There are various advanced settings that can be applied to the Silk Browser to ease your browsing experience.
Via the Settings screen you can clear the cache, change the default search engine and even enable and disable
Flash and JavaScript code in webpages – ideal for faster browsing!
The Settings screen is split up into various sections where similar options are grouped. Under General, the Set
search engine option gives you the choice of Google, Bing and Yahoo!, for instance, while there are also settings
for Text size, zoom and whether the browser should Auto-fit pages to the display dimensions, as well as whether to
display images on web pages. Disabling this option can speed up page load times in some scenarios.
Saved Data concerns everything you have downloaded to your device. Here you can Accept cookies (pretty important when using an Amazon-focused device!) as well as Clear all cookie data, Clear cache (discards temporary files
and databases) and Clear history to delete your archive of visited web pages. If you expect to be completing a lot of
forms which browsing the web the Remember form data setting will save you having to type the same things in each
time – you might prefer to disable this for security reasons, however, which is where Clear form data comes in handy
for deleting any saved form information. Similarly you can have your Kindle Fire Remember passwords, but this isn’t
necessarily the most secure thing to do with a small, portable device that could easily be stolen. If you choose to disable that option, Clear passwords can be used to empty out any stored passwords in the Silk Browser.
Grouped together under Behaviour are settings concerning security. Problems with a website’s security will be flagged
up by default but if you prefer not to see these (not usually a wise choice) the Show security warnings checkbox can
be cleared. Flash and JavaScript both enhance the browsing experience considerably, providing the framework for evHTTP://MAKEUSEOF.COM
HTTP://WWW.CMCAWLEY.CO.UK, CHRISTIAN CAWLEY
22
share:
YOUR UNOFFICIAL KINDLE FIRE MANUAL
erything from how a webpage looks to streaming video. However they are also used by advertising networks, so you
can opt to disable either. Another key option in this section is Block pop-up windows, which has three options (Ask,
Never, Always).
The Advanced section, finally, offers options to Accelerate page loading, although this can be countered by using the
Optional encryption. Webpages can be displayed in Desktop or mobile view, depending on your preference, while
Text encoding will probably only need to be changed should you use your Kindle Fire to display websites in languages that use different alphabets.
Website settings are for adjusting the behaviour of certain regularly-used webpages, typically by emptying the
amount of data they are storing on your tablet.
HTTP://MAKEUSEOF.COM
HTTP://WWW.CMCAWLEY.CO.UK, CHRISTIAN CAWLEY
23
share:
YOUR UNOFFICIAL KINDLE FIRE MANUAL
7. Sending Email on the Kindle Fire
Have you ever wanted to own a portable emailing device capable of sending and receiving messages, adding attachments, forwarding amusing photos to friends and generally staying in touch?
Like smartphones and other tablets, the Kindle Fire provides email functionality. Want to drop your friends a quick
hello? No problem! Like to keep your eye on work-related matters over the weekend? Use your Kindle Fire to login to
your corporate account!
With full automatic email configuration functionality for popular accounts (Gmail, Hotmail, etc) and advanced settings
for setting up others, using email on your Kindle Fire makes staying in touch that much easier.
7.1 Setting up, collecting and sending
So you’ve got your favourite websites loaded up and added
to your bookmarks, and made sure that you can view all of
your favourite video streaming services.
With the Silk Browser setup, it must be time to get your
emails loaded onto your Kindle Fire. The tablet has a native
Email app available in the Apps screen, capable of supporting multiple accounts. When you first launch the app
you will be prompted to input your email account name and
password – the app will do the “heavy lifting” of configuring the correct settings for you (additional accounts can be
added via Menu > Accounts. You can switch between your
accounts via the drop-down menu in the upper-left corner of
the app).
Once your email account is configured, your messages
will be displayed. Reading is a simple case of tapping the
message title, and from here you can reply and forward the
HTTP://MAKEUSEOF.COM
HTTP://WWW.CMCAWLEY.CO.UK, CHRISTIAN CAWLEY
24
share:
YOUR UNOFFICIAL KINDLE FIRE MANUAL
message.
Sending messages is just as easy. Begin by tapping the Compose button on the email app menu and entering the
email address of your intended recipient. Multiple recipients can be added using the Cc/Bcc button. When writing an
email on your Kindle Fire, remember to enter a Subject and also be aware that you can Save Draft as you write the
message, useful when writing longer emails. Note also that the Attach button enables the sending of files with your
message.
(To write an email on your Kindle Fire you will need to become familiar with the device’s on-screen keyboard. See 3.7
Using the Keyboard for further details.)
When you’re happy with your email message, tap Send!
7.2 Further Email Settings
There are various additional settings that you should be aware of in the Kindle Fire email app. The first is the Check
for messages button, found in the center of the menu bar, which overrides the default email checking period to collect
new messages from your email server. You will also notice that there is a Search tool on the menu bar, specifically for
finding particular messages in your inbox. Also don’t miss the sorting options in the top-right corner, which by default
displays Newest but enables you to sort your inbox by many other headings such as Sender, Subject and even by Attachments.
On the menu bar you will also see the menu button. Here you will find a list of Contacts associated with the account
(typically for Gmail, Hotmail and similar web-based email accounts) which has been synced to your device and a Folders button to display locations such as your Outbox and Sent Items.
The Settings button, meanwhile, displays some advanced choices for the currently viewed account. You can change
the Account name if necessary, and toggle whether or not it is the Default account.
Elsewhere, you can decide whether your emails should Always show images – No is a useful option if you’re prone
to receiving the occasional spam message, although From contacts and From anyone can also be selected.
Under the heading Fetching mail you will find a range of options concerning how your messages should be treated.
You can choose to Fetch new messages either Manually, Hourly, Every 15 minutes or Every 30 minutes, and
HTTP://MAKEUSEOF.COM
HTTP://WWW.CMCAWLEY.CO.UK, CHRISTIAN CAWLEY
25
share:
YOUR UNOFFICIAL KINDLE FIRE MANUAL
take advantage of synchronization to delete messages from the tablet when they are deleted on the server. Similarly,
the When I delete a message option has two choices – specifically concerned with deleting messages on your Kindle
Fire, you can choose between Do not delete on server and Delete from server. Additionally, settings for your Incoming mail server can be configured here, useful for switching from standard to encrypted email collection.
The Sending mail section, meanwhile, features some useful formatting options, such as Composition defaults. Here
you can set a signature for email messages as well configure the default fields for From and Bcc. Message format,
meanwhile, enables you to switch between HTML and Plain text. Note that the second option will remove formatting
and images from all messages sent and received. Quote original message when replying, meanwhile, will include
the previous message in your reply, and can be toggled on and off. Finally for this section, the Outgoing server can
be configured as required.
Elsewhere in the Settings screen, the Folders section enables you to specify which email folder should be used for
what purpose (such as spam, trash, etc), while Notifications can be silenced or given a different sound from the
largish selection.
HTTP://MAKEUSEOF.COM
HTTP://WWW.CMCAWLEY.CO.UK, CHRISTIAN CAWLEY
26
share:
YOUR UNOFFICIAL KINDLE FIRE MANUAL
8. Kindle Fire Settings & Connectivity
As you become more familiar with your Amazon Kindle Fire tablet you may decide that you want to make some
changes to the way the device behaves.
Although quite “locked-down” when compared to other Android tablets, the Kindle Fire has plenty of options for the
average user, accessed via the hidden settings menu. These options enable you to manage aspects such as screen
rotation and adjusting the way the device connects to wireless networks and even its battery use.
8.1 The Kindle Fire Menu Bar
Throughout the Kindle Fire’s user interface there are two key menus. We’ve looked at one of these in various guises
throughout the guide so far; each app and book on the device has a menu across the bottom edge of the screen, used
for navigating within the app and within the device itself. This menu – sometimes referred to as the toolbar – is virtually
ubiquitous on the tablet.
In addition, however, is a settings menu largely hidden from accidental access. Displaying it is easy however – just
tap the Settings cog in the top-right of the Kindle Fire display (next to the battery and Wi-Fi symbols) and you will be
presented with the following options:
•
Locked – determines whether the screen rotate is locked or not.
•
Volume – a finger-controlled slider can adjust this up and down.
•
Brightness – a brighter screen can be achieved by dragging the slider from left to right. Note
that a brighter screen means faster battery drain.
•
Wi-Fi – here you can setup and configure connectivity options.
•
Sync – synchronizes your Kindle Fire with your Amazon account. Note that this occurs every 10
minutes by default.
8.2 Battery Management
Like many portable devices, the Amazon Kindle Fire relies on a built-in rechargeable battery for power. When left, a
full charge can last over a day, but intensive activity – using the tablet for streaming Amazon Instant Video, for instance – the charge can be severely curtailed.
So how can you make the most out of your Kindle Fire’s battery life?
First of all, charging your e-reader/tablet correctly is important. While it is quite safe to charge with a USB cable connected to a PC, for optimum charging use the charger supplied with the device. You should aim to use this at least
once a week. A full recharge will take four hours with the correct charger.
There are various reasons why the charge might appear to be drained quicker than expected. Intensive use and high
brightness and volume settings can contribute to this, as can problems with wireless networking. If the signal your
device is attempting to connect to is weak, you should disable Wi-Fi – battery power can be depleted if the tablet is
repeatedly trying to connect to a router. Similarly, downloading or syncing large files can drain the battery.
In general, battery life should last around 8 hours for continuous reading and 7.5 hours for video playback, although
this is with Wi-Fi disabled (see below).
8.3 Configuring Wireless Networking on the Kindle Fire
Available in the Settings menu, wireless networking should be pretty painless to use for most users.
After switching Wi-Fi On, your device should do a quick scan for local wireless networks. To join an open network
(identified by a Wi-Fi symbol with no padlock) simply tap and wait for your Kindle Fire to connect.
Connecting to a secure network, meanwhile, is slightly more detailed. In this situation, you will need a password,
which can only be acquired from the network administrator or the side of the wireless router. Once again, tap the netHTTP://MAKEUSEOF.COM
HTTP://WWW.CMCAWLEY.CO.UK, CHRISTIAN CAWLEY
27
share:
YOUR UNOFFICIAL KINDLE FIRE MANUAL
work name to begin, using the keyboard to enter the password. Note that the Show password checkbox will help you
check that the passphrase has been entered correctly. Once done, tap Connect and wait for confirmation.
After connecting to a network you can check some further details about it, if required. To do this, tap the network
name, where you will see a status, information about security and signal strength and the speed of the link, as well as
your device’s IP address (useful if you’re attempting to troubleshoot local networking issues).
Due to the various configurations that can be used for setting up and connecting to wireless networks, the Kindle Fire
offers some advanced options. Under the Advanced Settings option you can opt to Use static IP, a useful option if
you have problems connecting with your router, or perhaps attempting to use a Wi-Fi hotspot device or app. Several
fields are available, from specifying your device’s IP to adding that of the preferred router, Subnet Mask and two DNS
numbers.
It is also possible to use the Add Network option to connect to a hidden or undetected network. This requires the
correct Network SSID (the name displayed by a wireless network in other cases) and a selection of the corresponding
security types. Six options are available, from Open to WPA2 EAP. When you’re happy, click Save to connect.
Note that if you connect to a large number of wireless networks when using your Kindle Fire, you will eventually end
up with a long list of them – this is maintained to make reconnection easy. In order to tidy this up, simply tap on the
entries and then choose Forget to remove it from the list.
8.4 Display Settings
Minimal options are provided for adjusting the Kindle Fire display.
As mentioned above, the Brightness can be altered via the hidden Settings menu; the same slider can be found via
Settings > More > Display, alongside the important Screen Timeout. This allows you to specify the delay between
your last tap and the Kindle Fire screen switching off. Many options are available, from 30 Seconds all the way up to
1 Hour. In addition, you can also set the Screen Timeout to Never – useful for watching video files!
HTTP://MAKEUSEOF.COM
HTTP://WWW.CMCAWLEY.CO.UK, CHRISTIAN CAWLEY
28
share:
YOUR UNOFFICIAL KINDLE FIRE MANUAL
9. Kindle Fire Security
With a portable Internet-connected device that contains access to some personal data and potentially credit card and
other payment details, keeping your Kindle Fire safe and secure is paramount.
Fortunately there are various options. The lock screen can have a password assigned, while usernames and passwords can be encrypted, although this makes for slower use in some cases. In addition, parental controls are available
to prevent misuse by mischievous youngsters!
9.1 The Lock Screen Password
Whenever you start up your Kindle Fire or tap the power button to “wake” it up from standby mode, you will be presented with a lock screen, complete with one of several default images that are displayed randomly.
The lock screen protects your from accidental contact with the Newsstand and other menus, apps, games, books –
basically anything running on your tablet – while stored in a pocket or bag (although a dedicated case for your Kindle
Fire is recommended).
Two variations on the lock screen are available. By opening Settings > More > Security and switching Lock Screen
Password to On you can toggle between the standard “tap and drag” swiping of the orange chevron to unlock or combine this with a password of at least four characters.
The password option is quite flexible, as it allows you to use a word, a combination of characters, numbers and
punctuation or the more user-friendly four-digit numerical PIN. After adding your password and confirming, you can
test it by tapping the power button to switch into standby, waiting a moment and then tapping power again to wake the
device. Disabling the password will require you to enter your code or phrase to confirm.
Note that four failed login attempts will lock the device, forcing you to attempt a factory reset.
9.2 Credential Storage
Also available via the Security screen, the Credential Storage option is provided for users who are connecting their
HTTP://MAKEUSEOF.COM
HTTP://WWW.CMCAWLEY.CO.UK, CHRISTIAN CAWLEY
29
share:
YOUR UNOFFICIAL KINDLE FIRE MANUAL
Kindle Fire to a Microsoft Exchange-based account.
While this won’t apply to many users it is nevertheless a useful feature, but you will require the assistance of your
network administrator to assist in the correct configuration of Install Secure Credentials, Set Credential Storage
Password and Use Secure Credentials. Note that you can reset these options with Clear Credential Storage.
9.3 Parental Controls
More and more prominence is being given to parental controls on consumer computers of different types and the
Kindle Fire is no different.
After all, with a credit card assigned to your account you could end up running up huge bills if the device fell into the
wrong hands!
While desktop parental control tools will enable you to setup and configure behaviours for your computer based on
a wide variety of possibilities, things are a lot more basic on the Kindle Fire. Here, via Settings > More > Parental
Controls you can simply toggle the option On or Off. Despite this overarching policy, however, this is a useful feature
not only for protecting your device from children but also from potential thieves. Parental Controls restricts purchases,
certain content types, inappropriate web pages and more, and when activated you can set a secure password that will
make your device pretty useless to anyone who has immoral aims.
9.4 Changing the Device Owner and Resetting Your Kindle Fire
However regularly you use your Kindle Fire, there may well come a time at which you decide that you need to make
some changes.
These changes might be severe – you might opt to give the device away, for instance – or they might be more functional, such as applying an update.
Changing the account on your Kindle Fire means deregistering the device, which can be done via Settings > More
> My Account. Once an account is deregistered, a new Amazon account can be entered, or setup as described in 2
Setting Up the Kindle Fire. This will then prompt the device to sync the new owner’s purchased content – books, music, videos, etc. – while the previous owner is forgotten.
HTTP://MAKEUSEOF.COM
HTTP://WWW.CMCAWLEY.CO.UK, CHRISTIAN CAWLEY
30
share:
YOUR UNOFFICIAL KINDLE FIRE MANUAL
However, when changing device owners you should be aware that any data you have downloaded or synced to the
device from your computer or the web (but not Amazon) should be removed. Opening Settings > More > My Account
> Device displays your Application Storage and Internal Storage levels, the first limited to 1.17 GB, the second to 5.36
GB (due to the way in which storage is partitioned). Not only does this give a good idea of the space you’re using up,
you can appreciate that whoever takes your device over from you won’t necessarily want all of your files cluttering up
the Kindle Fire!
As such, the best solution is to restore your device to the factory settings. In the Device screen, scroll down to Reset
to Factory Defaults and tap; this is a pretty definitive step to take, so the device will ask you to confirm that you wish
to proceed (and when battery is low will advise you that it needs at least 40% charge). Resetting the device doesn’t
take too long, and when complete your personal data will be removed. If you’re concerned about any additional files
and folders still being present, simply connect the tablet to your computer (as described in 5.2 Syncing Media to Your
Kindle Fire) and manually delete the contents of the Video, Music, Books, Pictures and Documents folders.
9.5 Updating the Kindle Fire Software
Whether you intend on getting the maximum functionality from your device or you want to make sure that the new
recipient has a device running the latest version of the Kindle Fire software, you should be aware of the regular OTA
updates that Amazon sends out.
Over the Air basically means that the updates are distributed to devices while they are connected to wireless networks
(although some networks may be unsuitable for this). Often the Kindle Fire will prompt you to update when it receives
notification that a new version of the operating system is available.
This isn’t always the case, however. Fortunately there is a way of checking for updates via Settings > More > My Account > Device. Look for System Version and use the Update your Kindle button to prompt for a check – if updates
are available the device will download and install them.
Usually the process takes just a few minutes, enabling you to return to reading/browsing/watching movies etc. while
you go and make a hot drink!
9.6 Is Your Kindle Fire Lost or Stolen?
Should the worse come to the worse and your Kindle Fire is sadly no longer in your possession, you should take immediate steps to disassociate your account from the device.
In order to this, you will first need to head to http://www.amazon.com/manageyourkindle and Deregister your device.
This is important: any activity by a thief even on a previously-locked Kindle Fire will be attributed to your account and
credit card. Cancelling any book/magazine subscriptions on the same page is also a good idea – this will save you
money for items that you may not get to enjoy.
HTTP://MAKEUSEOF.COM
HTTP://WWW.CMCAWLEY.CO.UK, CHRISTIAN CAWLEY
31
share:
YOUR UNOFFICIAL KINDLE FIRE MANUAL
10. Troubleshooting the Kindle Fire
From time to time you might run into a few problems running your Amazon Kindle Fire. You might experience slow
transition between screens, perhaps, or have problems running particular apps, games or even videos.
While battery management is a vital aspect of troubleshooting problems (many issues can be fixed with a full charge)
there are plenty of other tips and tricks that you can use to overcome any issues that you might face as a Kindle Fire
user.
10.1 Restart the Device!
Should your Kindle Fire freeze or lock up, or if apps fail to respond correctly and you cannot return to the Newsstand
then there is only one thing that you can do – turn it off and back on again! There are two ways of doing this, the “normal” way and the “desperate” way.
However, before performing this step, you will need to ensure that your Kindle Fire has enough charge to cope. If the
device is frozen it could be attempting to perform a lot of processing in the background, something that will drain battery life. As such, you should charge the Kindle Fire for around 30 minutes before performing a Hard Reset.
The normal sequence in this procedure is that when the power button is held, the Kindle Fire displays a Shut Down
button for you to tap by way of confirmation. However this might not happen if the device has frozen, so in this situation you should use the Hard Reset procedure: hold the power button down (for about 20 seconds) until the device
powers off.
Powering the device back on, you should find that the majority of issues are now resolved.
10.2 Tracing and Dealing with Problem Apps and Games
Many issues on the Kindle Fire can be app related. As a result you should take a look at the settings for the app you
suspect to be causing the problem.
This is something you should first investigate by opening the app itself and checking the settings. If there are any opHTTP://MAKEUSEOF.COM
HTTP://WWW.CMCAWLEY.CO.UK, CHRISTIAN CAWLEY
32
share:
YOUR UNOFFICIAL KINDLE FIRE MANUAL
tions you think could be causing the problem, disable them.
Should this result in no change, open Settings > More > Applications where you will be able to find the app in question (using the Filter by drop down menu) and check how much Storage it is using, the size of the app’s Cache, and
any Defaults and Permissions.
To check for an immediate improvement in performance, use the Force Stop button. This usually has a good effect,
but if things are still problematic afterwards then think about using the Clear Data, Clear Cache and Clear defaults
buttons.
Failing success here, of course, you should Uninstall the app completely.
10.3 Dealing with Synchronization Issues
Probably the most frustrating problems that you will encounter on your Kindle Fire will be related to syncing books and
other data from the Amazon Cloud.
These can manifest in different ways. For instance, if you have multiple Kindle devices – or you use a Kindle app on
a smartphone – then problems returning to the correct page of a book can be attributed to this. On the other hand,
problems with missing pages are often down to the Kindle service the book’s author. In this situation, you can use the
Report option on the book’s Kindle Store product listing.
Issues downloading a book can be fixed by restarting the Kindle Fire and disconnecting/reconnecting Wi-Fi. Meanwhile problems opening a book are often due to a fault while downloading. This should be dealt with by opening your
Books list, long-tapping the item in question and selecting Remove from Device. Once this has been done, switch
to Cloud view, find the book and tap the cover illustration to download properly. Restarting the tablet can also help if
problems persist, and these solutions can also be used for problems syncing magazines or newspapers.
10.4 I’ve Lost My Password!
If you’ve taken steps to secure your device with a lock screen password, you will need to make sure that you don’t
forget the code – otherwise your Kindle Fire will force you to restore the device to its default factory settings.
In this event, your Kindle Fire will restart, delete all personal data and content and you will be unable to use it properly
until you register again. Once this is done, you can begin downloading your favourite books from the Amazon Cloud.
Should you still require a password to be set, try and use one that you won’t forget!
HTTP://MAKEUSEOF.COM
HTTP://WWW.CMCAWLEY.CO.UK, CHRISTIAN CAWLEY
33
share:
YOUR UNOFFICIAL KINDLE FIRE MANUAL
Conclusion: Get Reading!
The Kindle Fire is a great alternative to the basic E-Ink Kindle e-readers, while offering compelling new features more
akin to a tablet.
It’s small size and flexibility makes it the top choice in a market where competitor devices such as the Nook and Kobo
are also available.
All in all, your Kindle Fire offers an enjoyable user experience, direct access to your Kindle books and all of the joy of
being able to carry thousands of books around in your pocket!
HTTP://MAKEUSEOF.COM
HTTP://WWW.CMCAWLEY.CO.UK, CHRISTIAN CAWLEY
34
share:
YOUR UNOFFICIAL KINDLE FIRE MANUAL
Appendix
1. Accessing Amazon Prime from Overseas
There is one drawback when using the Amazon Kindle Fire – head overseas and you could find yourself having difficulty accessing Amazon Prime and the streamed video service.
While the Kindle Fire remains a US-only device, these problems will persist, and users can only attempt to resolve
them by using proxy servers (many of which are unreliable) or third party apps (again unreliable; although the World
Wide Kindle Fire (http://www.androidzoom.com/android_applications/media_and_video/world-wide-kindle-fire_bwynm.
html) app has had its fans, it is seemingly useless now).
The most popular way around this is to use the Dolphin Browser HD app and a service called Unblock-US.com. Full
details on this strategy can be found at http://www.makeuseof.com/tag/secret-kindle-fire-north-america/; it is worth
adding to this that if you are not the holder of a US street address or credit card there are online services that make
it possible for you to setup an online pre-payment credit card. EntroPay is one of the most popular, making it easy to
create a nation-free payment card that you can load with money ready to spend on Prime Instant Video!
There is light at the end of the tunnel for users, however. While all you need for successful use is a US credit card and
a suitable proxy to fool the Amazon Prime service into thinking you’re still home, the wider roll-out of the Kindle Fire to
Europe in 2012 should overcome all regional issues.
What this means for Europeans using the original Kindle Fire is another matter entirely, of course. Amazon continues
to duck and dive with device updates, breaking workarounds to prevent unauthorised access to its streamed video
service overseas, so there can never be a definitive fix for this problem.
HTTP://MAKEUSEOF.COM
HTTP://WWW.CMCAWLEY.CO.UK, CHRISTIAN CAWLEY
35
share:
YOUR UNOFFICIAL KINDLE FIRE MANUAL
2. What You Should Know About Rooting the Kindle Fire
Although there are steps listed in this guide explaining how to add software from alternative locations to the Amazon
App Store, you will have noticed that the Google Play store is not among the options.
This is because of the security that Amazon imposes on Kindle Fire tablets. Fortunately, this can be undone using a
process known as rooting.
(Full details on rooting the first generation Kindle Fire can be found on the MakeUseOf website: http://www.
makeuseof.com/tag/root-kindle-fire-access-google-play/.)
There are several things that you should be aware of when rooting your Kindle Fire, however.
It makes your device less secure.
Subsequent Amazon updates can undo the rooting process.
Additionally, the idea of rooting (similar to jailbreaking an iPhone) is to lower the security settings on system files and
folders on the Android operating system. This can be very useful in many cases – it enables the installation of the
Google Play store – but also poses a security risk, as other apps can gain access to these files and folders and potentially wreak havoc.
As such, you should spend some time considering whether you consider it to be worth the risk. Be aware that there
are many Android device users who have rooted their phones or tablets, just as there are many that have had problems with particular apps. If you choose to root your Kindle Fire, make sure that you have first done as much research
as possible into the implications, and when you have done so get a good account of each app that you plan to install
by checking reviews and ratings in the Google Play store and further afield.
HTTP://MAKEUSEOF.COM
HTTP://WWW.CMCAWLEY.CO.UK, CHRISTIAN CAWLEY
36
share:
Did you like this PDF Guide? Then why not visit MakeUseOf.com for daily posts on
cool websites, free software and internet tips?
If you want more great guides like this, why not subscribe to MakeUseOf and receive
instant access to 50+ PDF Guides like this one covering wide range of topics. Moreover, you will be able to download free Cheat Sheets, Free Giveaways and other cool
things.
Home: http://www.makeuseof.com
MakeUseOf Directory: http://www.makeuseof.com/dir
MakeUseOf Answers:
http://www.makeuseof.com/answers
Geeky Fun: http://www.makeuseof.com/tech-fun
PDF Guides: http://www.makeuseof.com/pages/
Tech Deals: http://www.makeuseof.com/pages/hot-tech-deals
Follow MakeUseOf:
RSS Feed:
http://feedproxy.google.com/Makeuseof
Newsletter:
http://www.makeuseof.com/join
Facebook:
http://www.facebook.com/makeuseof
Twitter:
http://www.twitter.com/Makeuseof
Think you’ve got what it takes to write a manual for MakeUseOf.com? We’re always willing
to hear a pitch! Send your ideas to [email protected]; you might earn up to $400.
Download Other MakeUseOf PDF Guides!
http://makeuseof.com/pages