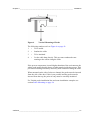
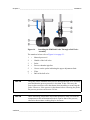
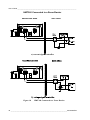
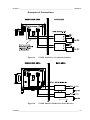
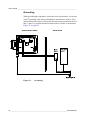
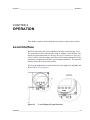
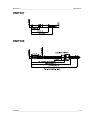
1
USER’S GUIDE
Vaisala HUMICAP® Humidity and
Temperature Transmitter Series HMT360
M010056EN-J
PUBLISHED BY
Vaisala Oyj
Phone (int.):
+358 9 8949 1
P.O. Box 26
Fax:
+358 9 8949 2227
FI-00421 Helsinki
Finland
Visit our Internet pages at www.vaisala.com
© Vaisala 2013
No part of this manual may be reproduced, published or publicly displayed
in any form or by any means, electronic or mechanical (including
photocopying), nor may its contents be modified, translated, adapted, sold
or disclosed to a third party without prior written permission of the
copyright holder. Translated manuals and translated portions of
multilingual documents are based on the original English versions. In
ambiguous cases, the English versions are applicable, not the translations.
The contents of this manual are subject to change without prior notice.
This manual does not create any legally binding obligations for Vaisala
towards customers or end users. All legally binding obligations and
agreements are included exclusively in the applicable supply contract or
the General Conditions of Sale and General Conditions of Service of
Vaisala.
________________________________________________________________________________
Table of Contents
CHAPTER 1
GENERAL INFORMATION . . . . . . . . . . . . . . . . . . . . . . . . . . . . . . . . . . . . . . . . . . . . . . . . . . . . . . . . . . 9
About This Manual . . . . . . . . . . . . . . . . . . . . . . . . . . . . . . . . . . . . . . . . . . . . . . . . . . . . . 9
Contents of This Manual . . . . . . . . . . . . . . . . . . . . . . . . . . . . . . . . . . . . . . . . . . . . . . . 9
Version Information . . . . . . . . . . . . . . . . . . . . . . . . . . . . . . . . . . . . . . . . . . . . . . . . . . 10
Related Manuals . . . . . . . . . . . . . . . . . . . . . . . . . . . . . . . . . . . . . . . . . . . . . . . . . . . . 10
Documentation Conventions . . . . . . . . . . . . . . . . . . . . . . . . . . . . . . . . . . . . . . . . . . . 11
Safety . . . . . . . . . . . . . . . . . . . . . . . . . . . . . . . . . . . . . . . . . . . . . . . . . . . . . . . . . . . . . . . 11
ESD Protection . . . . . . . . . . . . . . . . . . . . . . . . . . . . . . . . . . . . . . . . . . . . . . . . . . . . . . . 12
Recycling . . . . . . . . . . . . . . . . . . . . . . . . . . . . . . . . . . . . . . . . . . . . . . . . . . . . . . . . . . . . 12
Regulatory Compliances . . . . . . . . . . . . . . . . . . . . . . . . . . . . . . . . . . . . . . . . . . . . . . . 13
EU Declaration of Conformity . . . . . . . . . . . . . . . . . . . . . . . . . . . . . . . . . . . . . . . . . . . 13
Certifications . . . . . . . . . . . . . . . . . . . . . . . . . . . . . . . . . . . . . . . . . . . . . . . . . . . . . . . . 13
Trademarks . . . . . . . . . . . . . . . . . . . . . . . . . . . . . . . . . . . . . . . . . . . . . . . . . . . . . . . . . . 14
Software License . . . . . . . . . . . . . . . . . . . . . . . . . . . . . . . . . . . . . . . . . . . . . . . . . . . . . . 14
Warranty . . . . . . . . . . . . . . . . . . . . . . . . . . . . . . . . . . . . . . . . . . . . . . . . . . . . . . . . . . . . . 14
CHAPTER 2
PRODUCT OVERVIEW . . . . . . . . . . . . . . . . . . . . . . . . . . . . . . . . . . . . . . . . . . . . . . . . . . . . . . . . . . . . 15
Introduction to HMT360 . . . . . . . . . . . . . . . . . . . . . . . . . . . . . . . . . . . . . . . . . . . . . . . . 15
Output Quantities . . . . . . . . . . . . . . . . . . . . . . . . . . . . . . . . . . . . . . . . . . . . . . . . . . . . . 16
Probe Options . . . . . . . . . . . . . . . . . . . . . . . . . . . . . . . . . . . . . . . . . . . . . . . . . . . . . . . . 17
CHAPTER 3
INSTALLATION . . . . . . . . . . . . . . . . . . . . . . . . . . . . . . . . . . . . . . . . . . . . . . . . . . . . . . . . . . . . . . . . . . 19
General Installation Instructions . . . . . . . . . . . . . . . . . . . . . . . . . . . . . . . . . . . . . . . . . 19
Mounting the Probe Cable in Gas Group IIC Spaces . . . . . . . . . . . . . . . . . . . . . . . . . 19
Selecting Location . . . . . . . . . . . . . . . . . . . . . . . . . . . . . . . . . . . . . . . . . . . . . . . . . . . 20
General Instructions for Probes with Cable . . . . . . . . . . . . . . . . . . . . . . . . . . . . . . . . 20
Checking the Temperature Reading . . . . . . . . . . . . . . . . . . . . . . . . . . . . . . . . . . . . . 22
Mounting the Transmitter Housing . . . . . . . . . . . . . . . . . . . . . . . . . . . . . . . . . . . . . . . 23
Probe Mounting . . . . . . . . . . . . . . . . . . . . . . . . . . . . . . . . . . . . . . . . . . . . . . . . . . . . . . . 24
HMP363 for Confined Spaces . . . . . . . . . . . . . . . . . . . . . . . . . . . . . . . . . . . . . . . . . . 25
HMP363/365/367 Duct Installation Kit . . . . . . . . . . . . . . . . . . . . . . . . . . . . . . . . . 25
HMP364 for High-Pressure Applications . . . . . . . . . . . . . . . . . . . . . . . . . . . . . . . . . . 26
HMP365 for High Temperatures . . . . . . . . . . . . . . . . . . . . . . . . . . . . . . . . . . . . . . . . 29
HMP367 for High Humidities . . . . . . . . . . . . . . . . . . . . . . . . . . . . . . . . . . . . . . . . . . . 29
HMP368 for Pressurized Pipelines or Moisture in Liquids . . . . . . . . . . . . . . . . . . . . . 30
Tightening the Clasp Nut . . . . . . . . . . . . . . . . . . . . . . . . . . . . . . . . . . . . . . . . . . . 31
Installing the HMP368 Probe Through a Ball Valve Assembly. . . . . . . . . . . . . . . 32
VAISALA ________________________________________________________________________ 1
________________________________________________________________________________
Electrical Connections . . . . . . . . . . . . . . . . . . . . . . . . . . . . . . . . . . . . . . . . . . . . . . . . . 35
Installation in Hazardous Locations . . . . . . . . . . . . . . . . . . . . . . . . . . . . . . . . . . . . . . 36
US and Canadian Requirements . . . . . . . . . . . . . . . . . . . . . . . . . . . . . . . . . . . . . 36
European Requirements. . . . . . . . . . . . . . . . . . . . . . . . . . . . . . . . . . . . . . . . . . . . 36
CATEGORY 1 (Zone 0). . . . . . . . . . . . . . . . . . . . . . . . . . . . . . . . . . . . . . . . . . 36
CATEGORY 2 or 3 (Zone 1 or 2) . . . . . . . . . . . . . . . . . . . . . . . . . . . . . . . . . . 36
Maximum Cable Resistance Calculation for the Barrier (Vaisala Order Code:
210664) . . . . . . . . . . . . . . . . . . . . . . . . . . . . . . . . . . . . . . . . . . . . . . . . . . . . . . . . 37
HMT360 Connected to a Galvanic Isolator. . . . . . . . . . . . . . . . . . . . . . . . . . . . . . 39
HMT360 Connected to a Zener Barrier . . . . . . . . . . . . . . . . . . . . . . . . . . . . . . . . 40
Examples of Connections. . . . . . . . . . . . . . . . . . . . . . . . . . . . . . . . . . . . . . . . . . . 41
Grounding. . . . . . . . . . . . . . . . . . . . . . . . . . . . . . . . . . . . . . . . . . . . . . . . . . . . . . . 42
CHAPTER 4
OPERATION . . . . . . . . . . . . . . . . . . . . . . . . . . . . . . . . . . . . . . . . . . . . . . . . . . . . . . . . . . . . . . . . . . . . 43
Local Interface . . . . . . . . . . . . . . . . . . . . . . . . . . . . . . . . . . . . . . . . . . . . . . . . . . . . . . . . 43
Power ON/OFF . . . . . . . . . . . . . . . . . . . . . . . . . . . . . . . . . . . . . . . . . . . . . . . . . . . . . . 44
HMT360 with Display . . . . . . . . . . . . . . . . . . . . . . . . . . . . . . . . . . . . . . . . . . . . . . . . . 44
HMT360 without Display . . . . . . . . . . . . . . . . . . . . . . . . . . . . . . . . . . . . . . . . . . . . . . . 44
DIP Switch Functions . . . . . . . . . . . . . . . . . . . . . . . . . . . . . . . . . . . . . . . . . . . . . . . . . 45
Display/Keypad Commands . . . . . . . . . . . . . . . . . . . . . . . . . . . . . . . . . . . . . . . . . . . . 46
Setting the Pressure for Calculations . . . . . . . . . . . . . . . . . . . . . . . . . . . . . . . . . . 46
Selecting Output Quantities . . . . . . . . . . . . . . . . . . . . . . . . . . . . . . . . . . . . . . . . . 47
Upper Half of Display . . . . . . . . . . . . . . . . . . . . . . . . . . . . . . . . . . . . . . . . . . . 47
Lower Half of Display . . . . . . . . . . . . . . . . . . . . . . . . . . . . . . . . . . . . . . . . . . . 47
Selecting Analog Outputs . . . . . . . . . . . . . . . . . . . . . . . . . . . . . . . . . . . . . . . . . . . 48
Scaling Analog Outputs . . . . . . . . . . . . . . . . . . . . . . . . . . . . . . . . . . . . . . . . . . . . 49
Serial Interface . . . . . . . . . . . . . . . . . . . . . . . . . . . . . . . . . . . . . . . . . . . . . . . . . . . . . . . . 50
Serial Communication Settings . . . . . . . . . . . . . . . . . . . . . . . . . . . . . . . . . . . . . . . . . 50
Setting the Analog Outputs . . . . . . . . . . . . . . . . . . . . . . . . . . . . . . . . . . . . . . . . . . . . . 51
ASEL Selecting Analog Outputs. . . . . . . . . . . . . . . . . . . . . . . . . . . . . . . . . . . . . . 51
S Scaling Analog Outputs. . . . . . . . . . . . . . . . . . . . . . . . . . . . . . . . . . . . . . . . . . . 52
Adjustment Commands . . . . . . . . . . . . . . . . . . . . . . . . . . . . . . . . . . . . . . . . . . . . . . . 53
CRH Relative Humidity Adjustment . . . . . . . . . . . . . . . . . . . . . . . . . . . . . . . . . . . 53
CT Temperature Adjustment . . . . . . . . . . . . . . . . . . . . . . . . . . . . . . . . . . . . . . . . 53
Output Commands . . . . . . . . . . . . . . . . . . . . . . . . . . . . . . . . . . . . . . . . . . . . . . . . . . . 54
ITEST Testing Analog Outputs. . . . . . . . . . . . . . . . . . . . . . . . . . . . . . . . . . . . . . . 54
SEND Outputting Measurement Values . . . . . . . . . . . . . . . . . . . . . . . . . . . . . . . . 55
R Activating Continuous Output . . . . . . . . . . . . . . . . . . . . . . . . . . . . . . . . . . . . . . 55
S Stopping Continuous Output . . . . . . . . . . . . . . . . . . . . . . . . . . . . . . . . . . . . . . . 55
INTV Setting Output Interval. . . . . . . . . . . . . . . . . . . . . . . . . . . . . . . . . . . . . . . . . 55
PRES Setting Ambient Pressure for Calculations . . . . . . . . . . . . . . . . . . . . . . . . 56
FILT Output Filtering. . . . . . . . . . . . . . . . . . . . . . . . . . . . . . . . . . . . . . . . . . . . . . . 57
Resetting the Transmitter . . . . . . . . . . . . . . . . . . . . . . . . . . . . . . . . . . . . . . . . . . . . . . 57
RESET Transmitter Reset . . . . . . . . . . . . . . . . . . . . . . . . . . . . . . . . . . . . . . . . . . 57
CHAPTER 5
MEASURING AT OVERPRESSURE . . . . . . . . . . . . . . . . . . . . . . . . . . . . . . . . . . . . . . . . . . . . . . . . . 59
Pressure Regulator Recommended . . . . . . . . . . . . . . . . . . . . . . . . . . . . . . . . . . . . . . . 59
2 _______________________________________________________________________________
________________________________________________________________________________
CHAPTER 6
CALIBRATION AND ADJUSTMENT . . . . . . . . . . . . . . . . . . . . . . . . . . . . . . . . . . . . . . . . . . . . . . . . . 61
Calibration Interval . . . . . . . . . . . . . . . . . . . . . . . . . . . . . . . . . . . . . . . . . . . . . . . . . . . . 61
Factory Calibration and Adjustment . . . . . . . . . . . . . . . . . . . . . . . . . . . . . . . . . . . . . . 61
User Calibration and Adjustment . . . . . . . . . . . . . . . . . . . . . . . . . . . . . . . . . . . . . . . . 61
Removing the Electronics Unit . . . . . . . . . . . . . . . . . . . . . . . . . . . . . . . . . . . . . . . . . . 62
Connections . . . . . . . . . . . . . . . . . . . . . . . . . . . . . . . . . . . . . . . . . . . . . . . . . . . . . . . . . . 63
Calculating Correspondence of Current Values and Output Quantities . . . . . . . . . 64
Relative Humidity Adjustment . . . . . . . . . . . . . . . . . . . . . . . . . . . . . . . . . . . . . . . . . . . 65
Automatic Two-Point Adjustment (Only HMT360 with Display) . . . . . . . . . . . . . . . . . 65
Manual Adjustment . . . . . . . . . . . . . . . . . . . . . . . . . . . . . . . . . . . . . . . . . . . . . . . . . . . 67
Low End Adjustment (HMT360 without Display) . . . . . . . . . . . . . . . . . . . . . . . . . 67
High End Adjustment (HMT360 without Display) . . . . . . . . . . . . . . . . . . . . . . . . . 68
Low End Adjustment (HMT360 with Display) . . . . . . . . . . . . . . . . . . . . . . . . . . . . 68
High End Adjustment (HMT360 with Display) . . . . . . . . . . . . . . . . . . . . . . . . . . . 69
One-Point Temperature Adjustment . . . . . . . . . . . . . . . . . . . . . . . . . . . . . . . . . . . . . . 69
ACAL Analog Output Calibration . . . . . . . . . . . . . . . . . . . . . . . . . . . . . . . . . . . . . . . . . 70
CHAPTER 7
MAINTENANCE . . . . . . . . . . . . . . . . . . . . . . . . . . . . . . . . . . . . . . . . . . . . . . . . . . . . . . . . . . . . . . . . . 71
Periodical Checking and Cleaning . . . . . . . . . . . . . . . . . . . . . . . . . . . . . . . . . . . . . . . 71
Transmitter Housing and Probe . . . . . . . . . . . . . . . . . . . . . . . . . . . . . . . . . . . . . . . . . 71
CHAPTER 8
TROUBLESHOOTING . . . . . . . . . . . . . . . . . . . . . . . . . . . . . . . . . . . . . . . . . . . . . . . . . . . . . . . . . . . . 73
Diagnostics . . . . . . . . . . . . . . . . . . . . . . . . . . . . . . . . . . . . . . . . . . . . . . . . . . . . . . . . . . 73
Operation Errors . . . . . . . . . . . . . . . . . . . . . . . . . . . . . . . . . . . . . . . . . . . . . . . . . . . . . 73
Analog Output Test . . . . . . . . . . . . . . . . . . . . . . . . . . . . . . . . . . . . . . . . . . . . . . . . . . 74
Technical Support . . . . . . . . . . . . . . . . . . . . . . . . . . . . . . . . . . . . . . . . . . . . . . . . . . . . . 74
Product Returns . . . . . . . . . . . . . . . . . . . . . . . . . . . . . . . . . . . . . . . . . . . . . . . . . . . . . . 74
CHAPTER 9
TECHNICAL DATA . . . . . . . . . . . . . . . . . . . . . . . . . . . . . . . . . . . . . . . . . . . . . . . . . . . . . . . . . . . . . . . 75
Performance . . . . . . . . . . . . . . . . . . . . . . . . . . . . . . . . . . . . . . . . . . . . . . . . . . . . . . . . . 75
Relative Humidity . . . . . . . . . . . . . . . . . . . . . . . . . . . . . . . . . . . . . . . . . . . . . . . . . . . . 75
Temperature (+ Operating Pressure Ranges) . . . . . . . . . . . . . . . . . . . . . . . . . . . . . . 76
Water Activity in Jet Fuel Applications . . . . . . . . . . . . . . . . . . . . . . . . . . . . . . . . . . . . 77
Calculated Variables (Typical Ranges) . . . . . . . . . . . . . . . . . . . . . . . . . . . . . . . . . . . 77
With HMP361 Probe. . . . . . . . . . . . . . . . . . . . . . . . . . . . . . . . . . . . . . . . . . . . . . . 77
With HMP363, HMP364, HMP365, HMP367 and HMP368 Probes. . . . . . . . . . . 77
Outputs . . . . . . . . . . . . . . . . . . . . . . . . . . . . . . . . . . . . . . . . . . . . . . . . . . . . . . . . . . . . . . 78
General . . . . . . . . . . . . . . . . . . . . . . . . . . . . . . . . . . . . . . . . . . . . . . . . . . . . . . . . . . . . . . 78
Classification with Current Outputs . . . . . . . . . . . . . . . . . . . . . . . . . . . . . . . . . . . . . . 79
Options and Accessories . . . . . . . . . . . . . . . . . . . . . . . . . . . . . . . . . . . . . . . . . . . . . . . 81
Accuracy of Calculated Variables . . . . . . . . . . . . . . . . . . . . . . . . . . . . . . . . . . . . . . . . 83
Accuracy of Dewpoint Temperature °C . . . . . . . . . . . . . . . . . . . . . . . . . . . . . . . . . . . . 83
Accuracy of Mixing Ratio g/kg . . . . . . . . . . . . . . . . . . . . . . . . . . . . . . . . . . . . . . . . . . . 83
Accuracy of Wet Bulb Temperature °C . . . . . . . . . . . . . . . . . . . . . . . . . . . . . . . . . . . . 84
Accuracy of Absolute Humidity g/m3 . . . . . . . . . . . . . . . . . . . . . . . . . . . . . . . . . . . . . 84
VAISALA ________________________________________________________________________ 3
________________________________________________________________________________
APPENDIX A
DIMENSIONS . . . . . . . . . . . . . . . . . . . . . . . . . . . . . . . . . . . . . . . . . . . . . . . . . . . . . . . . . . . . . . . . . . . 85
HMP361 . . . . . . . . . . . . . . . . . . . . . . . . . . . . . . . . . . . . . . . . . . . . . . . . . . . . . . . . . . . . . . 85
HMP363 . . . . . . . . . . . . . . . . . . . . . . . . . . . . . . . . . . . . . . . . . . . . . . . . . . . . . . . . . . . . . . 86
HMP364 . . . . . . . . . . . . . . . . . . . . . . . . . . . . . . . . . . . . . . . . . . . . . . . . . . . . . . . . . . . . . . 86
HMP365 . . . . . . . . . . . . . . . . . . . . . . . . . . . . . . . . . . . . . . . . . . . . . . . . . . . . . . . . . . . . . . 86
HMP367 . . . . . . . . . . . . . . . . . . . . . . . . . . . . . . . . . . . . . . . . . . . . . . . . . . . . . . . . . . . . . . 87
HMP368 . . . . . . . . . . . . . . . . . . . . . . . . . . . . . . . . . . . . . . . . . . . . . . . . . . . . . . . . . . . . . . 87
Mounting Plate . . . . . . . . . . . . . . . . . . . . . . . . . . . . . . . . . . . . . . . . . . . . . . . . . . . . . . . . 88
Rain Shield . . . . . . . . . . . . . . . . . . . . . . . . . . . . . . . . . . . . . . . . . . . . . . . . . . . . . . . . . . . 88
Protection Cover . . . . . . . . . . . . . . . . . . . . . . . . . . . . . . . . . . . . . . . . . . . . . . . . . . . . . . 89
APPENDIX B
WIRING FOR INTRINSICALLY SAFE OPERATION, FM . . . . . . . . . . . . . . . . . . . . . . . . . . . . . . . . . . 91
APPENDIX C
WIRING FOR INTRINSICALLY SAFE OPERATION, CSA . . . . . . . . . . . . . . . . . . . . . . . . . . . . . . . . 93
4 _______________________________________________________________________________
________________________________________________________________________________
List of Figures
Figure 1
Figure 2
Figure 3
Figure 4
Figure 5
Figure 6
Figure 7
Figure 8
Figure 9
Figure 10
Figure 11
Figure 12
Figure 13
Figure 14
Figure 15
Figure 16
Figure 17
Figure 18
Figure 19
Figure 20
Figure 21
Figure 22
Figure 23
Figure 24
Figure 25
Figure 26
Figure 27
HMT360 and Probe Types . . . . . . . . . . . . . . . . . . . . . . . . . . . . . . . . . . . . . 15
Probe Options for HMT360 . . . . . . . . . . . . . . . . . . . . . . . . . . . . . . . . . . . . . 17
Horizontal Mounting of Probe . . . . . . . . . . . . . . . . . . . . . . . . . . . . . . . . . . . 20
Vertical Mounting of Probe . . . . . . . . . . . . . . . . . . . . . . . . . . . . . . . . . . . . . 21
Measurement Error at 100 %RH . . . . . . . . . . . . . . . . . . . . . . . . . . . . . . . . . 22
Transmitter Mounting . . . . . . . . . . . . . . . . . . . . . . . . . . . . . . . . . . . . . . . . . 23
Parts of the Transmitter . . . . . . . . . . . . . . . . . . . . . . . . . . . . . . . . . . . . . . . 24
Installation of HMP363 Probe in Duct with Flange and Supporting Bar . . . 25
HMP364 Probe Mounting . . . . . . . . . . . . . . . . . . . . . . . . . . . . . . . . . . . . . . 27
Marking Nut and Fitting Screw . . . . . . . . . . . . . . . . . . . . . . . . . . . . . . . . . . 27
Cleaning the Tightening Cone . . . . . . . . . . . . . . . . . . . . . . . . . . . . . . . . . . 28
Mounting HMP365 Probe in Duct or Channel . . . . . . . . . . . . . . . . . . . . . . . 29
HMP368 Probe . . . . . . . . . . . . . . . . . . . . . . . . . . . . . . . . . . . . . . . . . . . . . . 30
Sealing of Fitting Body into Process . . . . . . . . . . . . . . . . . . . . . . . . . . . . . . 31
Tightening the Clasp Nut . . . . . . . . . . . . . . . . . . . . . . . . . . . . . . . . . . . . . . 32
Installing the HMP368 Probe Through a Ball Valve Assembly . . . . . . . . . . 33
HMT360 Connected to Galvanic Isolator . . . . . . . . . . . . . . . . . . . . . . . . . . 39
HMT360 Connected to a Zener Barrier . . . . . . . . . . . . . . . . . . . . . . . . . . . . 40
STAHL 9160/13-11-11 (Galvanic Isolator) . . . . . . . . . . . . . . . . . . . . . . . . . 41
STAHL 9001/51-280-091-141 (Zener Barrier) . . . . . . . . . . . . . . . . . . . . . . 41
Grounding . . . . . . . . . . . . . . . . . . . . . . . . . . . . . . . . . . . . . . . . . . . . . . . . . . 42
Local Display/Keypad Interface . . . . . . . . . . . . . . . . . . . . . . . . . . . . . . . . . 43
DIP Switch Functions . . . . . . . . . . . . . . . . . . . . . . . . . . . . . . . . . . . . . . . . . 45
Detaching the Electronics Unit with Probe for Calibration and Adjustment 62
Connecting Power Supply and Multimeter for Calibration . . . . . . . . . . . . . 63
Display Chart of the Automatic Adjustment Procedure . . . . . . . . . . . . . . . . 66
Accuracy over Temperature Range . . . . . . . . . . . . . . . . . . . . . . . . . . . . . . 76
VAISALA ________________________________________________________________________ 5
________________________________________________________________________________
6 _______________________________________________________________________________
________________________________________________________________________________
List of Tables
Table 1
Table 2
Table 3
Table 4
Table 5
Table 6
Table 7
Table 8
Table 9
Table 10
Table 11
Table 12
Table 13
Table 14
Table 15
Manual Revisions . . . . . . . . . . . . . . . . . . . . . . . . . . . . . . . . . . . . . . . . . . . . 10
Related Manuals . . . . . . . . . . . . . . . . . . . . . . . . . . . . . . . . . . . . . . . . . . . . . 10
Output Quantities for HMT360 . . . . . . . . . . . . . . . . . . . . . . . . . . . . . . . . . . 16
HMP368 Probe Dimensions . . . . . . . . . . . . . . . . . . . . . . . . . . . . . . . . . . . . 31
Serial Communications Settings . . . . . . . . . . . . . . . . . . . . . . . . . . . . . . . . . 50
Pressure Conversion Chart . . . . . . . . . . . . . . . . . . . . . . . . . . . . . . . . . . . . . 56
Error Codes . . . . . . . . . . . . . . . . . . . . . . . . . . . . . . . . . . . . . . . . . . . . . . . . . 74
Relative Humidity Specifications . . . . . . . . . . . . . . . . . . . . . . . . . . . . . . . . . 75
Temperature Specifications . . . . . . . . . . . . . . . . . . . . . . . . . . . . . . . . . . . . 76
Water Activity in Jet Fuel Applications Specifications . . . . . . . . . . . . . . . . . 77
HMP361 Calculated Variables Specifications . . . . . . . . . . . . . . . . . . . . . . . 77
HMP363, HMP364, HMP365, HMP367& HMP368 Probes Calculated
Variables Specifications . . . . . . . . . . . . . . . . . . . . . . . . . . . . . . . . . . . . . . . 77
Output Specifications . . . . . . . . . . . . . . . . . . . . . . . . . . . . . . . . . . . . . . . . . 78
General Specifications . . . . . . . . . . . . . . . . . . . . . . . . . . . . . . . . . . . . . . . . 78
Options and Accessories . . . . . . . . . . . . . . . . . . . . . . . . . . . . . . . . . . . . . . 81
VAISALA ________________________________________________________________________ 7
________________________________________________________________________________
8 _______________________________________________________________________________
Chapter 1 ________________________________________________________ General Information
CHAPTER 1
GENERAL INFORMATION
This chapter provides general notes for the manual and the product.
About This Manual
This manual provides information for installing, operating, and
maintaining the Vaisala HUMICAP® Humidity and Temperature
Transmitter Series HMT360.
Contents of This Manual
-
-
Chapter 1, General Information: This chapter provides general notes
for the manual and the product.
Chapter 2, Product Overview: This chapter introduces the features,
advantages, and the product nomenclature.
Chapter 3, Installation: This chapter provides you with information
that is intended to help you install this product.
Chapter 4, Operation: This chapter contains information that is
needed to operate this product.
Chapter 5, Measuring at Overpressure: This chapter provides you
with important information concerning measurement in conditions
with pressure higher than the normal atmospheric pressure.
Chapter 6, Calibration and Adjustment: This chapter contains
instructions for checking the calibration and adjusting this product.
Chapter 7, Maintenance: This chapter provides information that is
needed in basic maintenance of the product.
Chapter 8, Troubleshooting: This chapter describes common
problems, their probable causes and remedies, and contact
information.
VAISALA ________________________________________________________________________ 9
User’s Guide ______________________________________________________________________
-
-
-
Chapter 9, Technical Data: This chapter provides technical data of the
product.
Appendix A, Dimensions: This appendix contains parts drawings of
the transmitter housing, probes and some transmitter mounting
accessories with metric and nonmetric dimensions specified.
Appendix B, Wiring for Intrinsically Safe Operation, FM: This
appendix contains the wiring diagram for intrinsically safe operation
approved by Factory Mutual (FM).
Appendix C, Wiring for Intrinsically Safe Operation, CSA: This
appendix contains the wiring diagram for intrinsically safe operation
approved by the Canadian Standards Association (CSA).
Version Information
Table 1
Manual Revisions
Manual Code
Description
M010056EN-J
This manual. November 2013.
-
Removed Appedix D, Certificates. Copies of
certificates are included in HMT360 Safety Guide
from version M210483EN-E onward.
-
Added table of error codes, see Table 7 on page
74.
-
M010056EN-I
Updated section Options and Accessories on
page 81.
Previous version.
Related Manuals
Table 2
Related Manuals
Manual Code
Manual Name
M210185EN
M210483EN
Humidity Calibrator HMK15 User's Guide
Vaisala Transmitter Series HMT360 Safety Guide
10 ___________________________________________________________________ M010056EN-J
Chapter 1 ________________________________________________________ General Information
Documentation Conventions
Throughout the manual, important safety considerations are highlighted as
follows:
WARNING
Warning alerts you to a serious hazard. If you do not read and follow
instructions very carefully at this point, there is a risk of injury or even
death.
CAUTION
Caution warns you of a potential hazard. If you do not read and follow
instructions carefully at this point, the product could be damaged or
important data could be lost.
NOTE
Note highlights important information on using the product.
Safety
The HMT360 series transmitter delivered to you has been tested for safety
and approved as shipped from the factory. Note the following precautions:
WARNING
Ground the product, and verify outdoor installation grounding
periodically to minimize shock hazard.
CAUTION
Do not modify the unit. Improper modification can damage the product or
lead to malfunction.
VAISALA _______________________________________________________________________ 11
User’s Guide ______________________________________________________________________
ESD Protection
Electrostatic Discharge (ESD) can cause immediate or latent damage to
electronic circuits. Vaisala products are adequately protected against ESD
for their intended use. However, it is possible to damage the product by
delivering electrostatic discharges when touching, removing, or inserting
any objects inside the equipment housing.
To make sure you are not delivering high static voltages yourself:
-
-
Handle ESD sensitive components on a properly grounded and
protected ESD workbench.
When an ESD workbench is not available, ground yourself to the
equipment chassis with a wrist strap and a resistive connection cord.
If you are unable to take either of the above precautions, touch a
conductive part of the equipment chassis with your other hand before
touching ESD sensitive components.
Always hold component boards by the edges and avoid touching the
component contacts.
Recycling
Recycle all applicable material.
Dispose of batteries and the unit according to statutory regulations.
Do not dispose of with regular household refuse.
12 ___________________________________________________________________ M010056EN-J
Chapter 1 ________________________________________________________ General Information
Regulatory Compliances
EU Declaration of Conformity
The HMT360 series transmitters are in conformity with the provisions of
the following EU directive(s):
-
ATEX Directive
EMC Directive
ROHS Directive
Conformity is shown by compliance with the following standards:
-
EN 60079-0
EN 60079-11
EN 60079-26
EN 61326-1: Electrical equipment for measurement, control and
laboratory use - EMC requirements - for use in industrial locations.
EN 55022: Information technology equipment - Radio disturbance
characteristics - Limits and methods of measurement.
Certifications
The certifications that have been granted to the HMT360 series, and the
accompanying safety factors, are listed in section Classification with
Current Outputs on page 79.
Copies of the certificates and wiring diagrams are provided in the HMT360
Safety Guide (from version M210483EN-E onward). You can download
updated certificates from the HMT360 product page at the Vaisala website:
www.vaisala.com/hmt360.
VAISALA _______________________________________________________________________ 13
User’s Guide ______________________________________________________________________
Trademarks
HUMICAP® is a registered trademark of Vaisala Oyj.
All other trademarks are the property of their respective owners.
Software License
This product contains software developed by Vaisala. Use of the software
is governed by license terms and conditions included in the applicable
supply contract or, in the absence of separate license terms and conditions,
by the General License Conditions of Vaisala Group.
Warranty
Visit our Internet pages for more information and our standard warranty
terms and conditions: www.vaisala.com/warranty.
Please observe that any such warranty may not be valid in case of damage
due to normal wear and tear, exceptional operating conditions, negligent
handling or installation, or unauthorized modifications. Please see the
applicable supply contract or Conditions of Sale for details of the warranty
for each product.
14 ___________________________________________________________________ M010056EN-J
Chapter 2 __________________________________________________________ Product Overview
CHAPTER 2
PRODUCT OVERVIEW
This chapter introduces the features, advantages, and the product
nomenclature.
Introduction to HMT360
Vaisala HUMICAP® Humidity and Temperature Transmitter Series
HMT360 contains reliable, microprosessor-based two-wire instruments
for measuring relative humidity and temperature in hazardous areas.
Figure 1
0606-003
WARNING
HMT360 and Probe Types
In hazardous environments, the transmitters must always be connected
via galvanic isolators or Zener barriers.
VAISALA _______________________________________________________________________ 15
User’s Guide ______________________________________________________________________
Output Quantities
Vaisala HUMICAP® Humidity and Temperature Transmitter Series
HMT360 is available either with or without a local display and with one or
two current output channels.
Available output quantities are listed in the table below:
Table 3
Output Quantities for HMT360
Character
Quantity
Abbreviation
Availability
0
1
2
relative humidity
temperature
dewpoint
temperature
absolute humidity
mixing ratio
wet bulb
temperature
mass
concentration of
water
water activity
relative humidity
of saturation
saturation
temperature
RH
T
Td
A, D
A, D, F, H
D
a
x
Tw
D
D
D
ppmw
H
aw
RS
H, F
H
Ts
H
3
4
5
6
7
8
9
The characters used to indicate availability in the table above:
A
=
Available for HMT360 standard version
D
=
Available for HMT360 with optional calculations
F
=
Available for HMT360 Moisture and Temperature in oil
transmitter
H
=
Available for HMT360 Moisture and Temperature in Jet Fuel
transmitter
16 ___________________________________________________________________ M010056EN-J
Chapter 2 __________________________________________________________ Product Overview
Probe Options
The HMT360 series has various options for probes and cable lengths (2 m,
5 m and 10 m). The available probe types are presented in the figure below.
Figure 2
0603-036
Probe Options for HMT360
The following numbers refer to Figure 2 on page 17:
1
=
HMP361 probe for wall mounting
2
=
HMP363 probe for tight spaces
3
=
HMP364 probe for pressurized spaces up to 100 bars
4
=
HMP365 probe for high temperatures up to 180 °C *) Flange
for HMP365 available as an option
5
=
HMP367 probe for high humidities
6
=
HMP368 probe for installations in pressurized pipelines up to
40 bars; features a pressure-tight sliding clasp nut
VAISALA _______________________________________________________________________ 17
User’s Guide ______________________________________________________________________
18 ___________________________________________________________________ M010056EN-J
Chapter 3 _______________________________________________________________ Installation
CHAPTER 3
INSTALLATION
This chapter provides you with information that is intended to help you
install this product.
General Installation Instructions
Mounting the Probe Cable in Gas Group
IIC Spaces
NOTE
The following applies only to installation within the EU!
The following instructions shall be followed to fulfil the specifications of
the EN50284 for nonconductive layer of the probe cable:
- Never mount or handle the probe cable when hazardous gases are
present.
- For achieving a conductive shield, cover the probe cable with
conductive material like metal or conductive tape or mount the probe
cable in a metal conduit.
- Assure that the conductive shield fulfils requirements of the standard
EN50284 (resistance less than 1 GΩ) and make sure that it can not come
loose in any operation situation.
WARNING
During the installation work of the probes in gas group IIC areas
(requiring category I devices), it has to be guaranteed that even in fault
cases sparks generated by impacts or friction on the surface of the housing
can never occur.
VAISALA _______________________________________________________________________ 19
User’s Guide ______________________________________________________________________
Selecting Location
Select a place with stable conditions for mounting the transmitter. Do not
expose the transmitter to direct sunlight or rain. A rain shield is available
and it is recommended for direct outdoor installations. When mounting the
probe, select a place representing the process conditions.
General Instructions for Probes with
Cable
Mount the probes with a cable horizontally; this way, any water
condensing on the tube cannot flow onto the sensor.
Figure 3
0507-024
Horizontal Mounting of Probe
The following numbers refer to Figure 3 on page 20:
1
=
To be sealed
2
=
To be insulated
3
=
Insulate the cable
4
=
Let the cable hang loosely. This prevents condensed water
running to the sensor along the cable.
When there is no alternative but to install the probe in the process
vertically, the point of entry must be carefully insulated. The cable must
also be allowed to hang loosely as this prevents any condensed water from
running onto the probe along the cable.
20 ___________________________________________________________________ M010056EN-J
Chapter 3 _______________________________________________________________ Installation
Figure 4
0507-022
Vertical Mounting of Probe
The following numbers refer to Figure 4 on page 21:
1
=
To be sealed
2
=
Insulate the cable
3
=
To be insulated
4
=
Let the cable hang loosely. This prevents condensed water
running to the sensor along the cable
If the process temperature is much higher than that of the environment, the
whole probe and preferably plenty of cable must be inside the process. This
prevents measuring inaccuracy caused by heat conduction along the cable.
When mounted on the side of a duct or channel, the probe must be inserted
from the side of the duct. If this is not possible and the probe must be
inserted from the top, the point of entry must be carefully insulated.
For Vaisala probe installation kits and some installation examples see
section Probe Mounting on page 24.
VAISALA _______________________________________________________________________ 21
User’s Guide ______________________________________________________________________
Checking the Temperature Reading
The actual temperature of the process can be measured with a reference
instrument to be compared with the transmitter reading. The heat transfer
is less evident if you remove the protective filter of the sensor for a shortterm test. However, never use the sensor long periods without the filter as
this may cause a faster contamination of the sensor. The transmitter fulfils
the specified EMC regulations with the protective filter on the probe.
In humidity measurement and especially in calibration and adjustment it is
essential that temperature of the probe and measuring environment is the
same. Even a small difference in temperature between the environment and
the probe causes an error. As the curve below shows, if the temperature is
+20 °C and the relative humidity 100 %RH, a difference of ±1 °C between
the environment and the probe causes an error of ±6 %RH.
The graph below illustrates the measurement error at 100 %RH when the
difference between the ambient and sensor temperature is 1 °C.
Figure 5
0507-036
Measurement Error at 100 %RH
22 ___________________________________________________________________ M010056EN-J
Chapter 3 _______________________________________________________________ Installation
Mounting the Transmitter Housing
1.
2.
3.
Attach the mounting plate to the wall with 4 screws.
Press down the transmitter so that it slides along the rails of the
mounting plate.
Fasten the transmitter to the mounting plate with the Allen screw
(3 mm Allen key provided).
The probe can be detached and replaced when needed by simply
unfastening the two Allen screws.
Figure 6
0603-037
Transmitter Mounting
The following numbers refer to Figure 6 on page 23:
1 = Mounting plate
2 = Transmitter housing
3 = Allen screw
4 = Allen screws
VAISALA _______________________________________________________________________ 23
User’s Guide ______________________________________________________________________
Figure 7
0603-038
Parts of the Transmitter
The following numbers refer to Figure 7 on page 24:
1
=
Electronics unit
2
=
Probe; including a part of the measurement electronics (for
example, calibration memory)
3
=
Flat cable
4
=
Transmitter base
5
=
Grounding terminal
6
=
Protective covers
7
=
Cable glands
8
=
Probe
9
=
RS232C connector
Probe Mounting
CAUTION
Do not unsolder and then resolder the probe cable from and to the printed
board during installation.
Do not shorten or lengthen the probe cable.
These procedures may alter the humidity calibration of the transmitter.
24 ___________________________________________________________________ M010056EN-J
Chapter 3 _______________________________________________________________ Installation
HMP363 for Confined Spaces
The HMP363 is a small size (ø = 12mm) general-purpose probe suitable
for ducts and channels with the installation kit available from Vaisala.
The HMP363 provides for two measuring range options. The first probe
version is equipped with a flexible cable and can be used when measuring
in environments up to 80 ºC. The second version is suitable for measuring
in environments up to 120 ºC.
Section HMP363/365/367 Duct Installation Kit on page 25 shows
mounting of HMP363/367 with the optional duct installation kit.
HMP363/365/367 Duct Installation Kit
Figure 8
0508-021
Installation of HMP363 Probe in Duct with Flange and
Supporting Bar
The following numbers refer to Figure 8 on page 25:
1
=
Duct wall
2
=
Flange
3
=
Sealing ring
4
=
Supporting bar
5
=
Probe attaching part (to be fixed with supporting bar)
6
=
RH probe
VAISALA _______________________________________________________________________ 25
User’s Guide ______________________________________________________________________
HMP364 for High-Pressure Applications
The probe is provided with a nut, a fitting screw and a sealing washer.
Keep the fitting screw and the nut in place on the body of the probe during
handling to prevent damage to the highly polished surface of the probe.
Follow the instructions below to achieve a leak-tight assembly.
CAUTION
In pressurized processes it is essential to tighten the supporting nuts and
screws very carefully to prevent loosening of the probe by the action of
pressure.
1.
2.
3.
4.
5.
6.
NOTE
Remove the fitting screw from the nut and the probe.
Fasten the fitting screw to the chamber wall with a sealing washer.
Tighten the fitting screw into the threaded sleeve with a torque
spanner. The tightening torque is 150 ± 10 Nm (110 ± 7 ft-lbs).
Insert the body of the probe into the fitting screw and tighten the nut
manually to the fitting screw.
Mark both the fitting screw and the nut hex.
Tighten the nut a further 30º (1/12) turn or if you have a torque
spanner tighten it with a torque of 80 ± 10 Nm (60 ± 7 ft-lbs).
Clean and grease the tightening cone of the fitting screw after every
tenth detachment. Change the sealing washer every time the fitting
screw is detached. Use high-vacuum grease, for example Dow
Corning, or a similar grease.
When retightening the nut after detachment the nut must be tightened
without increased effort.
26 ___________________________________________________________________ M010056EN-J
Chapter 3 _______________________________________________________________ Installation
Figure 9
0505-272
HMP364 Probe Mounting
The following numbers refer to Figure 9 on page 27:
1
=
Tightening cone
2
=
Nut
3
=
Fitting screw, M22×1.5 or NPT 1/2"
4
=
Sealing washer
5
=
Probe; ø12 mm
Figure 10
0505-273
Marking Nut and Fitting Screw
VAISALA _______________________________________________________________________ 27
User’s Guide ______________________________________________________________________
Figure 11
0505-274
Cleaning the Tightening Cone
The following numbers refer to Figure 11 on page 28:
1
=
Fitting screw
2
=
Sealing washer
3
=
Tightening cone
4
=
Clean cotton stick
CAUTION
In pressurized processes it is essential to tighten the supporting nuts and
screws very carefully to prevent loosening of the probe by the action of
pressure.
NOTE
When HMP364 is installed in a process with a pressure differing from
normal atmospheric pressure, please enter the pressure value of the
process (in bara) into the transmitter memory, see sections PRES Setting
Ambient Pressure for Calculations on page 56 and Setting the Pressure for
Calculations on page 46.
28 ___________________________________________________________________ M010056EN-J
Chapter 3 _______________________________________________________________ Installation
HMP365 for High Temperatures
HMP365 is installed similarly to the HMP363 probe but without the
supporting bar. Refer to HMP363/365/367 Duct Installation Kit on page 25
for more information on the duct installation kit for HMP365.
To avoid incorrect humidity readings, there must not be significant
temperature differences between the inside and outside of the duct.
Figure 12
0505-271
Mounting HMP365 Probe in Duct or Channel
The following numbers refer to Figure 12 on page 29:
1
=
A plugged hole for reference measurements
2
=
Probe
3
=
Mounting flange
HMP367 for High Humidities
The HMP367 is for environment where relative humidity is very high, near
saturation.
Section HMP363/365/367 Duct Installation Kit on page 25 shows
mounting of HMP363/367 with the optional duct installation kit.
VAISALA _______________________________________________________________________ 29
User’s Guide ______________________________________________________________________
HMP368 for Pressurized Pipelines or
Moisture in Liquids
Due to the sliding fit the HMP368 is easy to install into and remove from
a pressurized process. The probe is especially suitable for measurements
inside pipelines. See section Installing the HMP368 Probe Through a Ball
Valve Assembly on page 32.
CAUTION
In pressurized processes it is essential to tighten the supporting nuts and
screws very carefully to prevent loosening of the probe by the action of
pressure.
NOTE
When HMP368 is installed in a process with a pressure differing from
normal atmospheric pressure, please enter the pressure value of the
process (in bara) into the transmitter memory. See sections PRES Setting
Ambient Pressure for Calculations on page 56 and Setting the Pressure for
Calculations on page 46.
Figure 13
0603-013
HMP368 Probe
The following numbers refer to Figure 13 on page 30:
1
=
Clasp nut, 24 mm hex nut
2
=
Fitting body, 27 mm hex nut
30 ___________________________________________________________________ M010056EN-J
Chapter 3 _______________________________________________________________ Installation
The following two fitting body options are available:
-
Fitting Body ISO1/2 solid structure
Fitting Body NPT1/2 solid structure
Table 4
CAUTION
HMP368 Probe Dimensions
Probe Type
Probe Length
Adjustment Range
Standard
Optional
178 mm
400 mm
120 mm
340 mm
Take care not to damage the probe body. A damaged body makes the
probe head less tight and may prevent it from going through the clasp nut.
Figure 14
0507-025
Sealing of Fitting Body into Process
Tightening the Clasp Nut
1.
2.
3.
4.
Adjust the probe to a suitable depth according to the type of
installation.
Tighten the clasp nut first manually.
Mark the fitting screw and the clasp nut.
Tighten the nut a further 50 ... 60° (ca. 1/6 turn) with a fork spanner.
If you have a suitable torque spanner, tighten the nut to 45 ± 5 Nm (33
± 4 ft-lbs).
VAISALA _______________________________________________________________________ 31
User’s Guide ______________________________________________________________________
Figure 15
0505-276
Tightening the Clasp Nut
The following numbers refer to Figure 15 on page 32:
NOTE
1
=
Probe
2
=
Clasp nut
3
=
Fitting screw
4
=
Pen
Take care not to tighten the clasp nut more than 60° to avoid difficulties
when opening it.
Installing the HMP368 Probe Through a Ball Valve
Assembly
The ball valve installation kit (Vaisala order code: BALLVALVE-1) is
preferred when connecting the probe to a pressurized process or pipeline.
Use the ball valve set or a 1/2" ball valve assembly with a ball hole of ø14
mm or more. If you install the probe (ø12 mm) in a process pipe, please
note that the nominal size of the pipe must be at least 1 inch (2.54 cm). Use
the manual press handle to press the probe into the pressurized (< 10 bar)
process or pipeline.
32 ___________________________________________________________________ M010056EN-J
Chapter 3 _______________________________________________________________ Installation
Figure 16
0505-277
Installing the HMP368 Probe Through a Ball Valve
Assembly
The numbers below refer to Figure 16 on page 33:
1
=
Manual press tool
2
=
Handle of the ball valve
3
=
Probe
4
=
Process chamber/pipeline
5
=
Groove on the probe indicating the upper adjustment limit
6
=
Filter
7
=
Ball of the ball valve
NOTE
The probe can be installed in the process through the ball valve assembly
provided that the process pressure is less than 10 bar. This way, the
process does not have to be shut down when installing or removing the
probe. However, if the process is shut down before removing the probe,
the process pressure can be max. 20 bar.
NOTE
When measuring temperature dependent quantities make sure that the
temperature at the measurement point is equal to that of the process,
otherwise the moisture reading may be incorrect.
VAISALA _______________________________________________________________________ 33
User’s Guide ______________________________________________________________________
Follow the steps below to install the HMP368 probe through a ball valve
assembly. After the installation, the probe should be sitting in the process
chamber or pipeline as shown in Figure 16 on page 33.
1.
Shut down the process if the process pressure is more than 10 bars. If
the pressure is lower there is no need to shut down the process.
2. Close the ball valve.
3. Seal the threads on the fitting body; refer to Figure 14 on page 31.
4. Attach the fitting body to the ball valve and tighten it.
5. Slide the clasp nut of the probe toward the filter, as far as it will go.
6. Insert the probe to the fitting body, and manually tighten the clasp nut
to the fitting body.
7. Open the ball valve.
8. Push the probe through the ball valve assembly into the process. If the
pressure is high, use the pressing handle that is provided with the
probe. If you push the probe hard without using the handle, you may
damage the cable.
Note that the probe must be pushed so deep that the filter is
completely inside the process flow.
9. Mark the fitting screw and the clasp nut.
10. Tighten the clasp nut with a fork spanner a further 50 ... 60º (ca. 1/6
turn). If you have a suitable torque spanner, tighten the nut to max 45
± 5 Nm (33 ± 4 ft-lbs). Refer to Figure 15 on page 32.
NOTE
Take care not to tighten the clasp nut more than 60° to avoid difficulties
when opening it.
If you wish to remove the probe from the process, note that you have to pull
the probe out far enough. You cannot close the valve if the groove on the
probe body is not visible.
34 ___________________________________________________________________ M010056EN-J
Chapter 3 _______________________________________________________________ Installation
Electrical Connections
Refer to local requirements regarding cabling, grounding and galvanic
isolator or barrier connections.
WARNING
Connect the transmitter always via galvanic isolators or Zener barriers in
hazardous environments.
WARNING
Be sure that the main power switch of the transmitter is set off before
making any electrical installations in hazardous areas.
1.
2.
3.
4.
5.
NOTE
Open the transmitter cover and remove the protective cover of the
transmitter base.
Thread the power supply wires through the cable gland, see Figure 7
on page 24.
Connect the unpowered power supply wires to the connectors: Ch 1
(humidity) and Ch 2 (temperature). Both channels require an own
power supply.
Replace the protective cover. Turn the transmitter on ON with the
ON/OFF switch, see Figure 24 on page 62.
Close the cover. The transmitter is ready for use.
As Ch 1 is a main output, the transmitter does not operate if only Ch 2 is
connected (Ch 2 is optoisolated from transmitter electronics).
When using the transmitter in hazardous locations, the use of galvanic
isolators or barriers is essential. The following barrier & isolator are
available in Vaisala: barrier No. 210664 (STAHL 9001/51-280-091-141)
and galvanic isolator No. 212483 (STAHL 9160/13-11-11). Examples of
connections and more information on installation in hazardous locations is
given in section Examples of Connections on page 41.
VAISALA _______________________________________________________________________ 35
User’s Guide ______________________________________________________________________
Installation in Hazardous Locations
US and Canadian Requirements
USA (FM): Wiring for intrinsically safe operation is shown in Appendix
B, Wiring for Intrinsically Safe Operation, FM, on page 91.
Canada (CSA): Wiring for intrinsically safe operation is shown in
Appendix C, Wiring for Intrinsically Safe Operation, CSA, on page 93.
European Requirements
CATEGORY 1 (Zone 0)
HMT360 has to be connected to Exia-certified associated apparatus with
galvanic isolation, gas group IIB or IIC.
NOTE
If both analog outputs are in use, the Ch 1 (-) and Ch 2 (-) must be short
circuited (see Figure 19 on page 41).
CATEGORY 2 or 3 (Zone 1 or 2)
HMT360 has to be connected either to a Zener barrier or galvanic isolator
NOTE
If both analog outputs are in use with a galvanic isolator, the Ch 1 (-) and
Ch 2 (-) must be short circuited (see Figure 19 on page 41).
Figure 17 on page 39 and Figure 18 on page 40 present examples of
galvanic isolators and Zener barrier connections (only Ch 1 connected).
36 ___________________________________________________________________ M010056EN-J
Chapter 3 _______________________________________________________________ Installation
Maximum Cable Resistance Calculation for the
Barrier (Vaisala Order Code: 210664)
General specifications of HMT360:
Supply voltage
Uin = 24 V (12 ... 35 V)
Maximum current
Iout = 20 mA
Minimum operating voltage for
HMT360
Umin = 12 V (15 V with serial port)
Stahl 9001/51-280-091-141 (values taken from the specifications):
Rated operating voltage
UN = 20 ... 35 V
Transmitter supply voltage
US = UN - 9.5 V, when
UN ≤ 23.5 V
or US = 14 V, when UN ≥ 23.5 V
Maximum load
RL ≤ 350 Ω
Calculation of the maximum cable length from barrier to transmitter:
Cable resistance (as an example)
Rcable = 0.085 Ω/m/core (2 ×
0.085 Ω/m/pair)
VAISALA _______________________________________________________________________ 37
User’s Guide ______________________________________________________________________
If assuming that the operating voltage would be ≥ 24 V, the maximum
acceptable voltage drop Udrop in cables is:
Udrop = US - Umin
Udrop = 14 V - 12 V = 2 V
We also know that:
Iout = 20 mA
and that total resistance of the cable Rcabletot is cable resistance Rcable
multiplied with the total maximum length of the cables lmax:
Rcabletot = Rcable × lmax
From these facts the following equation can be formed:
Udrop = Rcabletot × Iout
2 = 2 × 0.085 Ω/m × lmax × 20 mA
lmax = 2 V / (20 mA × 2 × 0.085 Ω/m)
lmax = 588 m = 1930 ft, maximum cable length.
NOTE
If longer cable length is required, use of the galvanic isolators is
recommended if possible.
38 ___________________________________________________________________ M010056EN-J
Chapter 3 _______________________________________________________________ Installation
HMT360 Connected to a Galvanic Isolator
HAZARDOUS AREA
SAFE AREA
I
a) current signal controller
0505-278
HAZARDOUS AREA
SAFE AREA
b) voltage signal controller
Figure 17
0505-279
HMT360 Connected to Galvanic Isolator
VAISALA _______________________________________________________________________ 39
User’s Guide ______________________________________________________________________
HMT360 Connected to a Zener Barrier
HAZARDOUS AREA
SAFE AREA
a) current signal controller
0505-280
Figure 18
0505-281
HMT360 Connected to a Zener Barrier
40 ___________________________________________________________________ M010056EN-J
Chapter 3 _______________________________________________________________ Installation
Examples of Connections
0505-282
Figure 19
STAHL 9160/13-11-11 (Galvanic Isolator)
Figure 20
STAHL 9001/51-280-091-141 (Zener Barrier)
0505-283
VAISALA _______________________________________________________________________ 41
User’s Guide ______________________________________________________________________
Grounding
When grounding the transmitter, follow the local requirements. Use at least
4 mm2 grounding cable when grounding the transmitter or barrier. Note
that the allowed resistance between barrier and system ground must be less
than 1 ohm. Use ground terminal located inside or outside of transmitter
Figure 21 on page 42:
HAZARDOUS AREA
Figure 21
0505-284
SAFE AREA
Grounding
42 ___________________________________________________________________ M010056EN-J
Chapter 4 ________________________________________________________________ Operation
CHAPTER 4
OPERATION
This chapter contains information that is needed to operate this product.
Local Interface
HMT360 transmitter has four pushbuttons located on the housing cover.
The transmitter can be ordered either with or without a local display. The
display/keypad commands (see Display/Keypad Commands on page 46)
can be used to scale the outputs and select special output quantities (if the
transmitter configuration includes special output quantities). The optional
display shows the measurement results.
The keypad pushbuttons are indicated (from left to right) as C, Up, Dn, and
E (see Figure 22 on page 43):
Figure 22
0603-039
Local Display/Keypad Interface
VAISALA _______________________________________________________________________ 43
User’s Guide ______________________________________________________________________
Power ON/OFF
Open the transmitter cover and flip the internal power switch to position
ON (up), see Figure 24 on page 62.
WARNING
Avoid static discharge. Always use a wet cloth for wiping the display.
HMT360 with Display
Measurement readings appear on the display after switching power ON.
The analog output signals can be read from the system or load resistor.
WARNING
Avoid static discharge. Always use a wet cloth for wiping the display.
HMT360 without Display
If the transmitter does not have a display, the red LED indicator on the
cover indicates various phases of calibration and possible errors. In normal
operation it is not lit. If the LED is lit and all calibration or test DIP
switches are disabled, it is an indication of an internal error.
Otherwise, the LED indicates the following:
-
NOTE
LED blinking = calibration of the dry end (offset).
LED lit = calibration of the wet end (gain).
If calibration is concluded but DIP switch settings are not restored, the
LED indicator keeps blinking.
44 ___________________________________________________________________ M010056EN-J
Chapter 4 ________________________________________________________________ Operation
DIP Switch Functions
The table below is also printed on the protection board:
Figure 23
0505-285
DIP Switch Functions
1: Analog output test on/off
If you turn the switch to on position (up), you can force the outputs to states
4 mA, 12 mA and 20 mA by pressing buttons Up and Dn on the cover.
Outputs return to normal mode when switch is turned down.
2: Calibration Disabled/Enabled
The EEPROMs are write protected. If this switch is in the disabled position
(down), it does not allow any calibrations or scalings.
NOTE
Keep this switch always in the disabled position during normal use of the
transmitter.
3 and 4: Calibration rh, t, analog
With these combinations you can perform relative humidity, temperature
or analog output calibrations with a multimeter or with the transmitter
display unit. Turn the DIP switches to the desired position according to the
table printed on the protective cover.
5: Output quantities
Determines whether the output units are metric (down) on non-metric.
VAISALA _______________________________________________________________________ 45
User’s Guide ______________________________________________________________________
6, 7 and 8: Select output quantities
With the three DIP switches on the right, you can select the output
quantities according to the table printed on the right side of the protective
cover. Note that only the ordered quantities can be selected. The special
option gives you the choice of setting any ordered quantity to each channel.
NOTE
Always restore the DIP switch settings after having tested the analog
outputs or performing the calibration.
Display/Keypad Commands
NOTE
Chapter 6, Calibration and Adjustment, on page 61 describes separately
display/keypad commands for calibration and adjustment.
Setting the Pressure for Calculations
In humidity transmitters, ambient pressure is used for the mixing ratio and
wet bulb calculations.
To modify the pressure settings, turn the internal Calibration Enabled/
Disabled DIP switch of the transmitter to position Enabled (up). Press
button C on the display cover: text "SCAL" appears on the display. Then
press button E until the following display appears (the numeric value is
always the existing setting, in this example 1.0):
Adjust the pressure reading with buttons Up and Dn. Acknowledge the
value with button E. To complete the pressure setting, turn the dip switch
back to position disabled (down).
0505-087
See the pressure conversion table on page Table 6 on page 56.
46 ___________________________________________________________________ M010056EN-J
Chapter 4 ________________________________________________________________ Operation
Selecting Output Quantities
Upper Half of Display
To modify the displayed quantity, turn the Calibration Enabled/Disabled
DIP switch of the transmitter to position Enabled (up). Select the required
quantity with button Up on the display cover, and acknowledge the value
with button E. To complete the selections, turn the DIP switch back to
position disabled (down).
Character
Quantity
Abbreviation
Availability
Metric Unit
Nonmetric Unit
0
1
2
relative humidity
temperature
dewpoint
temperature
absolute humidity
RH
T
Td
A, D
A, D, F, H
D
%RH
°C
°C
%RH
°F
°F
a
D
mixing ratio
wet bulb
temperature
mass
concentration of
water
water activity
relative humidity
of saturation
saturation
temperature
x
Tw
D
D
g/m3
g/kg
°C
gr/ft3
gr/lb
°F
ppmw
H
ppmw
ppmw
aw
RS
H, F
H
0 ... 1
%RS
0 ... 1
%RS
Ts
H
°C
°F
3
4
5
6
7
8
9
The characters used to indicate availability in the table above:
A
=
Available for HMT360 standard version
D
=
Available for HMT360 with optional calculations
F
=
Available for HMT360 Moisture and Temperature in oil
transmitter
H
=
Available for HMT360 Moisture and Temperature in Jet Fuel
transmitter
Lower Half of Display
The output quantities metric/non metric DIP switch can be used to select
between °C and °F.
It is possible to check the pressure setting of the transmitter by pressing
button Dn. To return to the temperature reading, press button Dn again.
VAISALA _______________________________________________________________________ 47
User’s Guide ______________________________________________________________________
Selecting Analog Outputs
You can select the output quantities for channels 1 and 2 by turning the
Calibration Enabled/Disabled DIP switch of the transmitter to position
Enabled (up) and the three output selection DIP switches to position
special (all up).
Press button C on the display cover: text "SCAL" appears on the display.
Then press button E until the following display appears:
The characters on the second line of the display in this menu correspond to
the quantities according to the table in section Selecting Output Quantities
on page 47.
0505-288
Select the quantity for Ch 1 with buttons Up and Dn and acknowledge the
selection with button E.
If the transmitter is equipped with two analog channels, select the quantity
for Ch 2 in the same way, for example:
Press button C to exit the display command mode or continue by setting
the pressure.
0505-289
NOTE
Remember to restore the DIP switch settings.
48 ___________________________________________________________________ M010056EN-J
Chapter 4 ________________________________________________________________ Operation
Scaling Analog Outputs
Turn the internal Calibration Enabled/Disabled DIP switch of the
transmitter to upward position (on). Press button C on the display cover
and a text similar to the following appears:
Numbers on the second line indicate the low end scaling of Ch 1 currently
stored in the transmitter memory. The text "Set Lo" on the lower left corner
indicates that you can now change the low end scaling with buttons Up and
Dn. Acknowledge the value with button E and a text similar to the
following appears:
0505-290
Numbers on the second line indicate the high end scaling of Ch 1. The text
"Set Hi" on the lower left-hand corner indicates that you can now change
the high end scaling with buttons Up and Dn. Acknowledge with button E.
0505-291
If there is another channel available, the display shifts to the scaling menu
of Ch 2. You can now scale the analog outputs for the Ch 2 in the same way
as described above.
Press button C to exit the display command mode or continue by selecting
the output quantities. This menu starts automatically after the scaling menu
only if the output selection DIP switches are on the position special (all up)
from the beginning.
NOTE
Remember to restore the DIP switch settings.
VAISALA _______________________________________________________________________ 49
User’s Guide ______________________________________________________________________
Serial Interface
WARNING
The serial interface MUST NOT be used in hazardous areas.
Use the serial interface for calibration and testing purposes in safe areas
only. Always use the serial interface cable (optional accessory, Vaisala
order code: 25905ZZ). Connect one end of the cable to the serial port of
your computer and the other to the connector marked "RS232C" on the
electronics unit of the transmitter (see Figure 7 on page 24).
NOTE
With serial communication the current consumption increases
approximately to 7 mA and the transmitter is not able to operate with
4 mA. Therefore, it is recommended to use serial communication only
temporarily for changing settings or for calibrating the transmitter in a
safe area. With serial port, the minimum supply voltage is 15 VDC.
NOTE
The transmitter incorporates a serial interface detector. However, not all
terminals or PC serial ports (for example, optoisolated or ports not
meeting RS232C standards) recognize this standard. If the
communication is not possible via a serial interface, use a forced
activation by pressing simultaneously buttons Up and E on the
transmitter cover. To deactivate the forced activation, press these buttons
again or reset the transmitter. If the transmitter does not receive any
commands for half an hour, it automatically closes the serial
communication.
Serial Communication Settings
Table 5
CAUTION
Serial Communications Settings
Parameter
Value
bauds
parity
data bits
stop bits
2400
none
8
1
When using the serial interface, be sure that power supply and serial
interface are not connected to the same ground (use a floating power
supply or hand-held serial interface device).
50 ___________________________________________________________________ M010056EN-J
Chapter 4 ________________________________________________________________ Operation
To start issuing commands, make sure that HMT360 is connected to a
serial port of your computer and that the terminal session is open. Issue
commands by typing them on your computer according to the following
instructions. In these commands, <cr> stands for pressing Enter (on your
computer keyboard).
Setting the Analog Outputs
ASEL Selecting Analog Outputs
Syntax: ASEL [xxxyyy]<cr>
where
xxx =
Quantity of Ch 1
yyy =
Quantity of Ch 2
Turn the internal DIP switch Calibration Enabled/Disabled to position
ON before the selecting the analog outputs and return it to position OFF
after making the selection. Output quantities and their abbreviations are
listed in the table below:
Character
Quantity
Abbreviation
Availability
Metric Unit
Nonmetric Unit
0
1
2
relative humidity
temperature
dewpoint
temperature
absolute humidity
RH
T
Td
A, D
A, D, F, H
D
%RH
°C
°C
%RH
°F
°F
a
D
mixing ratio
wet bulb
temperature
mass
concentration of
water
water activity
relative humidity
of saturation
saturation
temperature
x
Tw
D
D
g/m3
g/kg
°C
gr/ft3
gr/lb
°F
ppmw
H
ppmw
ppmw
aw
RS
H, F
H
0 ... 1
%RS
0 ... 1
%RS
Ts
H
°C
°F
3
4
5
6
7
8
9
VAISALA _______________________________________________________________________ 51
User’s Guide ______________________________________________________________________
Example:
>asel rh t
Ch1 RH lo : 0.00 %RH
Ch1 RH hi : 100.00 %RH
Ch2 T lo: -40.00 ’C
Ch2 T hi: 100.00 ’C
>
S Scaling Analog Outputs
Syntax: S [zz aa.a bb.b]<cr>
where
zz
= Quantity (RH, T, Td, x, a, Tw, ppm, aw, RS, Ts)
aa.a = Lower limit of the quantity
bb.b = Upper limit of the quantity
Turn the internal DIP switch Calibration Enabled/Disabled to position
ON before the scaling the analog outputs and return it to position OFF
after scaling.
Example:
>srh 0 100
RH lo: 0.00 %RH
RH hi: 100.00 %RH
>
52 ___________________________________________________________________ M010056EN-J
Chapter 4 ________________________________________________________________ Operation
Adjustment Commands
Turn the internal DIP switch Calibration Enabled/Disabled to position
ON before the adjustment and return it to position OFF after the
adjustment.
CRH Relative Humidity Adjustment
NOTE
Read also the calibrator, for example HMK15, manual and refer to page
19 of that manual for more detailed instructions on salt bath calibration
and adjustment.
Syntax: CRH<cr>
The transmitter asks and measures relative humidity and calculates the
calibration coefficients.
Example:
>crh
RH : 1.82
1. ref ? 0
Press any key when ready ...
RH : 74.222 2. ref ? 75
OK
>
The OK indicates that the adjustment was succesful.
CT Temperature Adjustment
Syntax: CT<cr>
The transmitter asks and measures temperature readings and calculates the
calibration coefficients.
Example:
>ct
T : 0.811
1. ref ? 0.5
Press any key when ready ...
T : 99.122 2. ref ? 99.5
OK
>
The OK indicates that the adjustment was succesful. When performing
one-point adjustment press only Enter for the second reference.
VAISALA _______________________________________________________________________ 53
User’s Guide ______________________________________________________________________
Output Commands
ITEST Testing Analog Outputs
NOTE
Before giving command ITEST, reset the transmitter with command
RESET, see section RESET Transmitter Reset on page 57.
Syntax: ITEST [aa.aaa bb.bbb]<cr>
where
aa.aaa =
Current value to be set for Ch 1 (mA)
bb.bbb =
Current value to be set for Ch 2 (mA)
This command outputs the current value of each channel and the
corresponding control signal of the digital-to-analog converter.
Example:
>itest 8 12
8.00000
403
>itest
7.00150
30A
>
12.00000
7DF
11.35429
73E
The set current values remain valid until you issue the command ITEST
without readings or reset the transmitter. With this command the desired
outputs of the transmitter are shown.
NOTE
When outputting low currents from Ch 1, remember to remove RS232Ccable while reading the current output, because of the increased current
consumption for using RS port.
54 ___________________________________________________________________ M010056EN-J
Chapter 4 ________________________________________________________________ Operation
SEND Outputting Measurement Values
Syntax: SEND<cr>
This command outputs the measured values in one point.
R Activating Continuous Output
Syntax: R<cr>
With the command R the transmitter outputs measured values
continuously.
S Stopping Continuous Output
Syntax: S<cr>
The continuous outputting is stopped with the command S. If outputting is
active, this command is not echoed.
INTV Setting Output Interval
Syntax: INTV [n xxx]<cr>
where
n
=
xxx =
1 ... 255
S, MIN or H
Sets the output interval when the transmitter outputs measurement
readings. The time interval is used when the continuous output is active.
Example, the output interval is set to 10 minutes:
>intv 10 min
Output interval:
>
10 MIN
VAISALA _______________________________________________________________________ 55
User’s Guide ______________________________________________________________________
PRES Setting Ambient Pressure for Calculations
Syntax: PRES [aaaa.a]<cr>
where
aaaa.a =
Pressure (bara)
Turn the internal DIP switch Calibration Enabled/Disabled to position
ON before setting the pressure and return it to position OFF after making
the setting.
Example:
>pres 12
Pressure
>
Table 6
FROM
hPa/
mbar
TO mmHg/
Torr
inHg
atm
bar
psi
:
12.0 bara
Pressure Conversion Chart
hPa/mbar
mmHg/Torr
inHg
atm
bar
psi
1
1.333224
33.86388
1013.25
1000
68.94757
0.7500617
1
25.40000
760
750.0617
51.71493
0.02952999
0.00098692
0.001
0.01450377
0.03937008
0.00131597
0.001333224
0.01933678
1
0.033422
0.03386388
0.4911541
29.921
1
1.01325
14.6962
29.52999
0.98692
1
14.50377
2.036021
0.068046
0.06894757
1
Example:
29.9213 inHg = 29.9213 × 33.86388 = 1013.25 hPa / mbar
NOTE
Conversions from mmHg and inHg are defined at 0 °C.
56 ___________________________________________________________________ M010056EN-J
Chapter 4 ________________________________________________________________ Operation
FILT Output Filtering
Syntax: FILT [a.aaa]<cr>
where
a.aaa =
0.1 ... 1
1
=
No filtering
0.5 =
Average of last two measurements
0.1 =
Average of ca. 16 measurements
This commands sets the measurement result filtering.
Example:
>filt 1
Filter
>filt 0.5
Filter
>filt 0.1
Filter
>
:
1.0000
:
0.5000
:
0.1000
Resetting the Transmitter
RESET Transmitter Reset
Syntax: RESET<cr>
This command resets the device.
VAISALA _______________________________________________________________________ 57
User’s Guide ______________________________________________________________________
58 ___________________________________________________________________ M010056EN-J
Chapter 5 __________________________________________________ Measuring at Overpressure
CHAPTER 5
MEASURING AT OVERPRESSURE
This chapter provides you with important information concerning
measurement in conditions with pressure higher than the normal
atmospheric pressure.
The probes HMP364 and HMP368 are designed for humidity
measurement at overpressure. The maximum measurement pressures
depend on the probe as follows:
HMP364:
0 ... 100 bar (10 MPa), for pressurized rooms and
processes, probe is provided with a nut, fitting screw
and sealing washer
HMP368:
0 ... 40 bar (4 MPa), for pressurized pipelines, ball
valve set available
The accuracy of the dewpoint measurement is affected by pressure in the
measurement chamber. The actual pressure in the sampling cell is required
to be set to the transmitter by using the serial line command PRES (see
section PRES Setting Ambient Pressure for Calculations on page 56 or by
using the keypad commands, see section Setting the Pressure for
Calculations on page 46).
Pressure Regulator Recommended
When sampling pressurized processes exceeding the maximum
measurement pressure of the probe, the pressure in the measurement
chamber must be regulated to the acceptable level or below. It is
recommended to use pressure regulator before the measurement chamber
to prevent remarkable pressure variations.
VAISALA _______________________________________________________________________ 59
User’s Guide ______________________________________________________________________
60 ___________________________________________________________________ M010056EN-J
Chapter 6 __________________________________________________ Calibration and Adjustment
CHAPTER 6
CALIBRATION AND ADJUSTMENT
This chapter contains instructions for checking the calibration and
adjusting this product.
In this User's Guide the term "calibration" refers to comparing the device's
reading against a reference concentration. "Adjustment" refers to changing
the device's reading to correspond to the reference concentration.
Calibration Interval
HMT360 is calibrated as shipped from the factory. Typical calibration
interval is one year. In demanding applications it may be advisable to make
the first calibration check earlier.
Factory Calibration and Adjustment
The device (or the probe only) can be sent to Vaisala Service Centers for
calibration and adjustment. See section Technical Support on page 74 for
contact information.
User Calibration and Adjustment
Calibration and adjustment is carried out by using the keypad or by using
serial commands. The following additional equipment is needed in
adjustment of HMT360:
-
a power supply for the channel(s) to be calibrated (12 ... 24 VDC),
a multimeter for HMT360 without a display, and
the calibrated references.
VAISALA _______________________________________________________________________ 61
User’s Guide ______________________________________________________________________
First, the electronics unit is removed from the transmitter base to perform
the calibration and adjustment in safe area. Second, the power supply and
a multimeter is connected to the electronics unit according to the following
instructions.
Removing the Electronics Unit
Figure 24
0603-040
Detaching the Electronics Unit with Probe for
Calibration and Adjustment
1.
2.
Unfasten the screws and open the cover.
Switch the transmitter off with the ON/OFF switch.
3.
Disconnect the flat cable by lifting it carefully, for example with a
screwdriver.
Remove the two screws holding the hinge support. Remove the hinge
support.
Turn the electronics unit slightly upwards to release it from the hinges.
Leave the transmitter base with the cable connections on place. When
putting the electronics unit back to place, attach the upper hinge first.
Remember to attach the hinge support.
4.
5.
62 ___________________________________________________________________ M010056EN-J
Chapter 6 __________________________________________________ Calibration and Adjustment
Connections
On
Off
B1
C1
B2
C2
A1
A2
Figure 25
0505-293
1.
2.
3.
Connecting Power Supply and Multimeter for
Calibration
Connect a power supply (12 ... 24 VDC, with a serial port the
minimum supply voltage is 15 VDC ) to the terminals B1 (-) and C1
(+) (Ch 1) with banana plugs, see Figure 25 on page 63.
Connect the multimeter in series with the supply, B1 (-) and A1 (+).
Follow the same procedure with Ch 2 using the terminals B2 (-) and
C2 (+). When calibrating both channels at the same time, use two
galvanically separated power supplies.
You can now calibrate or check the humidity and temperature or the analog
outputs according to the instructions given in this chapter.
If the current measurement is needed in a hazardous area, the multimeter
is connected to the terminals A1/A2 (+) and B1/B2 (-). Use only an
approved multimeter.
WARNING
The power supply connectors (C1 and C2) MUST NOT be used in
hazardous areas. For calibration and adjustment in a hazardous area use
only an approved multimeter, which fulfills the safety factors printed on
the protective cover.
VAISALA _______________________________________________________________________ 63
User’s Guide ______________________________________________________________________
Calculating Correspondence of Current Values
and Output Quantities
When using HMT360 without a display, calibration and adjustment is
carried out by using a multimeter. Use the following equations to calculate
the current values corresponding to the reference output quantities.
Q ref – Q min
I = 4 mA + 16 mA ⋅ ----------------------------Q max – Q min
0605-015
where
Qref
=
Reference value of the calibrated quantity
Qmin =
Reference value of the calibrated quantity
Qmax =
Value corresponding to 20 mA
Example 1:
Relative humidity scaling 0 ... 100 %RH, reference 11.3 %RH:
11.3 %RH – 0 %RH
I = 4 mA + 16 mA ⋅ ------------------------------------------------- = 5.808 mA
100 %RH – 0 %RH
Example 2:
0605-016
Temperature scaling -40 ... +120 °C, reference 22.3 °C:
22.3° C – 40° C
I = 4 mA + 16 mA ⋅ -------------------------------------- = 10.230 mA
120° C – 40° C
0605-017
64 ___________________________________________________________________ M010056EN-J
Chapter 6 __________________________________________________ Calibration and Adjustment
Relative Humidity Adjustment
Automatic Two-Point Adjustment (Only
HMT360 with Display)
The automatic adjustment procedure is a user friendly way to adjust the
HMT360 with salt solutions; you do not have to feed the reference values
to the HMT360. The transmitter displays the accurate value based on the
measured temperature and the Greenspan table stored into the transmitter
memory. The display chart of the adjustment procedure is presented in
Figure 26 on page 66.
1.
2.
3.
4.
5.
NOTE
Set the internal DIP switch Calibration Enabled/Disabled to
position ON and select RH calibration by using switches 3 and 4 (see
section DIP Switch Functions on page 45).
Remove the filter and insert the probe into a measurement hole of the
LiCl salt chamber in the humidity calibrator. Acknowledge by
pressing button E. Alternatively select the 0.1 (humidity in nitrogen)
with buttons Up and Dn. Acknowledge with button E.
You must now wait for the measured reading to stabilize (10 ... 15
min). When the transmitter detects that the reading is stable, it
automatically stores the correction. When the text "Auto" is displayed
on the screen, continue with the next step.
Insert the probe into a measurement hole of the NaCl salt chamber in
the humidity calibrator. Acknowledge by pressing button E.
Alternatively you can select K2SO4 value with buttons Up and Dn.
You must again wait for the measured reading to stabilize (10 ... 15
min). When the transmitter detects that the reading is stable, it
automatically stores the correction. The text "Cal Pass" is displayed
after the adjustment is performed.
Remember to restore the DIP switch settings.
VAISALA _______________________________________________________________________ 65
User’s Guide ______________________________________________________________________
Calibration enabled
RH calibration on
RH
RH
Set Lo
Set Lo
RH
RH
Set Lo
Set Lo
Wait
RH
RH
RH
Set Lo
Set Lo
Set Lo
RH
Set Lo
Wait
Restore swit ches
Figure 26
0604-061
Display Chart of the Automatic Adjustment Procedure
66 ___________________________________________________________________ M010056EN-J
Chapter 6 __________________________________________________ Calibration and Adjustment
Manual Adjustment
This section contains separate manual adjustment procedures for
transmitters with and without display. You can perform the low-end
adjustment only (one-point adjustment), or adjust both low and high end of
the measurement (two-point adjustment).
NOTE
If you use serial commands, please refer to section Adjustment
Commands on page 53.
Low End Adjustment (HMT360 without Display)
1.
2.
3.
4.
5.
6.
7.
Connect the power supply and multimeter as instructed in section
Connections on page 63.
Remove the filter and insert the probe into a measurement hole of the
reference chamber (for example LiCl: 11 %RH) in the humidity
calibrator.
Power up the transmitter.
Set the internal DIP switch Calibration Enabled/Disabled to
position ON and select RH calibration by using switches 3 and 4 (see
section DIP Switch Functions on page 45).
The LED indicator will start blinking. According to the calibrator
used, wait at least 10 ... 15 minutes for the sensor to stabilize; use a
multimeter to monitor the stabilization.
Press buttons Up and Dn to adjust the multimeter reading to
correspond the reference value (calculate the current value
corresponding to the reference humidity by using the equations
presented in Calculating Correspondence of Current Values and
Output Quantities on page 64). Press button E to conclude the
adjustment.
To continue with the high end (two-point) adjustment follow the
instructions in the next section.
If the low end adjustment is sufficient, press button E again to
conclude the calibration. Also restore the DIP switch settings; set the
calibration DIP switch to position disabled (down).
VAISALA _______________________________________________________________________ 67
User’s Guide ______________________________________________________________________
High End Adjustment (HMT360 without Display)
1.
2.
3.
4.
5.
After having made the low end adjustment, insert the probe into a
measurement hole of the NaCl (75 %RH) salt chamber in the
humidity calibrator. Please, note that the difference between the two
humidity references must be at least 30 %RH.
The LED indicator lights up. Wait at least 10 ... 15 minutes for the
sensor to stabilize; use a multimeter to monitor the stabilization.
Press buttons Up and Dn to adjust the multimeter reading. Calculate
the current value corresponding to the reference humidity by using the
equations presented in Calculating Correspondence of Current Values
and Output Quantities on page 64.
Conclude the adjustment with button E.
Restore the DIP switch settings. Set the calibration DIP switch to
position disabled (down).
Low End Adjustment (HMT360 with Display)
1.
2.
3.
4.
5.
6.
7.
8.
Connect the power supply as instructed in section Connections on
page 63. The measurement readings will be visible on the display
during calibration, but you can also connect a multimeter to check the
analog output readings.
Remove the filter and insert the probe into a measurement hole of the
dry end reference chamber (for example LiCl: 11 %RH) in the
humidity calibrator.
Power up the transmitter.
Set the internal DIP switch Calibration Enabled/Disabled to
position ON and select RH calibration by using switches 3 and 4 (see
section DIP Switch Functions on page 45).
Press button C to ignore the automatic adjustment procedure. The
humidity reading measured by the transmitter appears on the display
and on the lower left corner you can see the text "Set Lo".
According to the calibrator used, wait at least 10 ... 15 minutes for the
sensor to stabilize; use the transmitter display to monitor the
stabilization.
Press buttons Up and Dn to adjust the display reading. Press button E
to conclude the low end adjustment.
To continue with the high end (two-point) adjustment follow the
instructions in the next section.
If the low end adjustment is sufficient, press button E again to
conclude the calibration. Also restore the DIP switch settings; set the
calibration DIP switch to position disabled (down).
68 ___________________________________________________________________ M010056EN-J
Chapter 6 __________________________________________________ Calibration and Adjustment
High End Adjustment (HMT360 with Display)
1.
2.
3.
4.
5.
After having made the low end adjustment, insert the probe into a
measurement hole of the NaCl (75 %RH) salt chamber in the
humidity calibrator. Please, note that the difference between the two
humidity references must be at least 30 %RH.
The readings measured by the transmitter appear on the display, as
well as the text "Set Hi" on the lower left hand corner.
Wait at least 10 ... 15 minutes for the sensor to stabilize; use the
transmitter display to monitor the stabilization.
Press buttons Up and Dn to adjust the display and conclude the
adjustment with button E.
Restore the DIP switch settings. Set the calibration DIP switch to
position disabled (down).
One-Point Temperature Adjustment
NOTE
Always use a high quality standard for adjusting the temperature.
NOTE
If you use serial commands, please refer to section Adjustment
Commands on page 53.
1.
2.
3.
4.
5.
Set the internal DIP switch Calibration Enabled/Disabled to
position ON and select T calibration by using switches 3 and 4 (see
section DIP Switch Functions on page 45).
The temperature value measured by the transmitter appears on the
display as well as the text "Set Lo" on the lower left corner. If the
transmitter has no display, the LED indicator starts to blink.
Let the sensor stabilize; use a multimeter or the transmitter display to
monitor the stabilization.
Press buttons Up and Dn to adjust the display or multimeter reading
to correspond to the reference value (when using a multimeter
calculate the current value corresponding to the reference humidity by
using the equations presented in Calculating Correspondence of
Current Values and Output Quantities on page 64).
Conclude the one-point adjustment by pressing button E twice.
VAISALA _______________________________________________________________________ 69
User’s Guide ______________________________________________________________________
ACAL Analog Output Calibration
Syntax: ACAL<cr>
Connect HMT360 to a multimeter. Issue the ACAL command:
1.
2.
3.
Disconnect the serial cable from the transmitter while reading the
multimeter value for the Ch 1 (I1).
Reconnect the serial cable. Type the multimeter reading and press
Enter.
Type the higher current multimeter reading and press Enter.
Example:
>acal
Ch1 I1 ( mA
Ch1 I2 ( mA
>
)
)
? 4.846
? 19.987
70 ___________________________________________________________________ M010056EN-J
Chapter 7 ______________________________________________________________ Maintenance
CHAPTER 7
MAINTENANCE
This chapter provides information that is needed in basic maintenance of
the product.
Periodical Checking and Cleaning
Transmitter Housing and Probe
WARNING
Avoid static discharge. Always use a wet cloth for wiping the display.
The electronics unit of the transmitter, as well as the probe, can be removed
and replaced in the field. See section Removing the Electronics Unit on
page 62 for detailed information.
All other maintenance must be performed by qualified Vaisala personnel.
If a transmitter is damaged, contact your nearest Vaisala Service Center.
See section Product Returns on page 74 for contact information.
VAISALA _______________________________________________________________________ 71
User’s Guide ______________________________________________________________________
72 ___________________________________________________________________ M010056EN-J
Chapter 8 ___________________________________________________________ Troubleshooting
CHAPTER 8
TROUBLESHOOTING
This chapter describes common problems, their probable causes and
remedies, and contact information.
Diagnostics
Operation Errors
The following symptoms indicate an operation error of the HMT360:
-
The analog output(s) current drops below 4 mA.
Transmitters with display: Display shows an error code; see Table 7
on page 74.
Transmitters without display: The LED on the cover is lit when no
calibration is going on.
Serial command ERRS reports an error; see Table 7 on page 74.
Serial port outputs asterisks "*" instead of measurement readings.
In the case of error:
-
Check that the probe is undamaged.
Check that the probe module is connected properly. If it is not,
reconnect the probe module and reset the transmitter.
Check that the humidity and temperature sensors are undamaged and
dry. If there is condensed water on the sensors, let it dry.
In case of constant error, contact the Vaisala Helpdesk. See section
Technical Support on page 74 for contact information.
VAISALA _______________________________________________________________________ 73
User’s Guide ______________________________________________________________________
Table 7
Error Codes
Error Code
on Display
Error Code
on Serial Line
Typical Cause
RH error
RH error
T error
T error
HUMICAP® humidity sensor open
circut or short circut. Can be
caused by condensed water, or
damage to sensor or probe.
Pt100 temperature sensor open
circut or short circuit. Can be
caused by condensed water, or
damage to sensor or probe.
Probe module disconnected.
Hardware failure in transmitter.
Hardware failure in probe module.
ADC error
Prb error
CPU EEPROM error EE error
PRB EEPROM error EEP error
Analog Output Test
Analog outputs can be tested with dip switch 1, see DIP Switch Functions
on page 45 for details.
Technical Support
For technical questions, contact the Vaisala technical support by e-mail at
[email protected]. Provide at least the following supporting
information:
-
Name and model of the product in question
Serial number of the product
Name and location of the installation site
Name and contact information of a technically competent person who
can provide further information on the problem.
Product Returns
If the product must be returned for service, see
www.vaisala.com/returns.
For contact information of Vaisala Service Centers, see
www.vaisala.com/servicecenters.
74 ___________________________________________________________________ M010056EN-J
Chapter 9 ____________________________________________________________ Technical Data
CHAPTER 9
TECHNICAL DATA
This chapter provides technical data of the product.
Performance
Relative Humidity
Table 8
Property
Relative Humidity Specifications
Description / Value
Measurement range
0 ... 100 %RH
Accuracy (including non-linearity, hysteresis and repeatability)
for typical applications
with HUMICAP® 180
for typical applications
and HUMICAP® 180R
±1 %RH (0 ... 90 %RH)
at +15 ... 25 °C
±1.7 %RH (90 ... 100 %RH)
±(1.0 + 0.008 × reading) %RH
at -20 ... +40 °C
±(1.5 + 0.015 × reading) %RH
at -40 ... +180 °C
for applications with demanding
with HUMICAP®180L2
chemical environment
±(1.0 + 0.01 × reading) %RH
at -10 ... +40 °C
±(1.5 + 0.02 × reading) %RH
at -40 ... +180 °C
Factory calibration uncertainty
±0.6 %RH (0 ... 40 %RH)
(+20 °C)
±1.0 %RH (40 ... 97 %RH)
(Defined as ±2 standard deviation
limits. Small variations possible, see
also calibration certificate.)
8 seconds with grid filter 20 seconds
Response time (90 %) for
HUMICAP® 180 and HUMICAP®
with grid + steel netting 40 seconds
180L2 at +20 °C in still air
with sintered filter
Response time (90 %) for
17 seconds with grid filter
HUMICAP® 180R at +20 °C
50 seconds with grid + steel netting
in 0.1 m/s air flow
60 seconds with sintered filter
VAISALA _______________________________________________________________________ 75
User’s Guide ______________________________________________________________________
Temperature (+ Operating Pressure
Ranges)
Table 9
Temperature Specifications
Property
Description / Value
HMP361
HMP363 80 °C
HMP363 120 °C
HMP364
-40 ... +60 °C
-40 ... +80 °C
-40 ... +120 °C
-70 ... +180 °C, 0 ... 10 MPa
(0 ... 100 bar)
-70 ... +180 °C
-70 ... +180 °C
-70 ... +180 °C, 0 ... 4 MPa
(0 ... 40 bar)
± 0.2 °C
See graph below
Pt 1000 RTD 1/3 Class B IEC 751
HMP365
HMP367
HMP368
Accuracy at +20 °C
Accuracy over temperature range
Sensor
Figure 27
0507-021
Accuracy over Temperature Range
76 ___________________________________________________________________ M010056EN-J
Chapter 9 ____________________________________________________________ Technical Data
Water Activity in Jet Fuel Applications
Table 10
Water Activity in Jet Fuel Applications Specifications
Property
Description / Value
Measurement range
0 ... 1 aw at -40 ... +180 °C (40 ... +356 °F)
Accuracy when calibrated against high
quality, certified humidity standards
± 0.01 (0 ... 0.9)
± 0.02 (0.9 ... 1.0)
salt solutions (ASTM E104-85)
Response time (90 %) at +20 °C in still oil
(stainless steel filter)
Humidity sensor
Calculated variables available
Accuracy of the water content
± 0.02 (0 ... 0.9)
± 0.03 (0.9 ... 1.0)
10 min
Vaisala HUMICAP®
mass concentration of water
relative humidity of saturation
saturation temperature
better than ± 15 % of the
reading
Calculated Variables (Typical Ranges)
With HMP361 Probe
Table 11
HMP361 Calculated Variables Specifications
Property
Description / Value
Dewpoint temperature
Mixing ratio
Absolute humidity
Wet bulb temperature
-40 ... +60 °C
0 ... 160 g/kg d.a.
0 ... 160 g/m³
0 ... +60 °C
With HMP363, HMP364, HMP365, HMP367 and
HMP368 Probes
Table 12
HMP363, HMP364, HMP365, HMP367& HMP368
Probes Calculated Variables Specifications
Property
Description / Value
Dewpoint temperature
Mixing ratio
Absolute humidity
Wet bulb temperature
-40 ... +100 °C
0 ... 500 g/kg d.a.
0 ... 600 g/m³
0 ... +100 °C
VAISALA _______________________________________________________________________ 77
User’s Guide ______________________________________________________________________
Outputs
Table 13
WARNING
Output Specifications
Property
Description / Value
Two analog outputs (one standard, one
optional)
Typical accuracy of analog outputs at
+20 °C
Typical temperature dependence of analog
outputs
RS232C serial output for service use only
in safe area
two wire 4 ... 20 mA
± 0.05 %/°C full scale
± 0.005 %/°C full scale
connector type RJ45
Output connections are made via safety barriers.
General
Table 14
General Specifications
Property
Description / Value
Operating voltage
with serial port (service mode)
Connections
12 ... 28 V
15 ... 28 V
Cable bushings
Conduit fitting
Operating temperature range for
electronics
with display
screw terminals, 0.33 ... 2.0 mm2 wires
(AWG 14-22)
M20×1.5 (7.5 ... 12 mm) M20×1.5
(10.5 ... 15 mm)
M20×1.5 / NPT 1/2"
-40 ... +60 °C
-20 ... +60 °C
-40 ... +70 °C
Storage temperature range
Housing material
Housing classification
Housing dimensions
Housing weight
Probe material
Fully electromagnetically compatible
according to standards
NOTE
G-AlSi 10 Mg (DIN 1725)
IP 66 (NEMA 4X)
164 × 115 × 62 mm
950 g
Stainless steel (AISI 316L)
EN 61326-1: Electrical equipment for
measurement, control and laboratory
use - EMC requirements; Industrial
environment
IEC 1000-4-5 complies only when using external EXi approved surge
arrester on safe area.
78 ___________________________________________________________________ M010056EN-J
Chapter 9 ____________________________________________________________ Technical Data
Classification with Current Outputs
Europe (VTT)
EU (94/9/EC)
II 1 G Ex ia IIC T4 Ga
VTT 09 ATEX 028 X
Safety factors
Ui = 28 V, Ii = 100 mA, Pi = 700 mW
Ci = 1 nF, Li negligibly low
Environmental specifications
Tamb = -40 ... +60 °C
Dust classification
(with protection cover 214101)
II 1 D Ex ta IIIC T500 80 °C Da
-40 °C ≤ Tamb ≤ +60 °C
VTT 04 ATEX 023X
IECEx (VTT)
Ex ia IIC T4 Ga
IECEx VTT 09.0002X
Safety factors
Ui = 28 V, Ii = 100 mA, Pi = 700 mW
Ci = 1 nF, Li negligibly low
Environmental specifications
Tamb = -40 ... +60 °C
Dust classification
(with protection cover 214101)
Ex ta IIIC T500 80 °C Da
IECEx VTT 12.0016X
USA (FM)
Safety factors
Japan (TIIS)
Safety factors
Classes I, II, III
Division 1, Groups A - G
Division 2, Groups A - D, F and G
FM Project ID: 3010615
Vmax = 28 VDC, Imax = 100 mA
Ci = 1 nF, Li = 0, Pi = 0.7 W
Tamb = 60 °C (140 °F), T5
Ex ia IIC T4
Code number: TC17897
Ui = 28 VDC, Ii = 100 mA, Ci = 1 nF
Pi = 0.7 W, Li = 0, Tamb = 60 °C (140 °F)
VAISALA _______________________________________________________________________ 79
User’s Guide ______________________________________________________________________
Canada (CSA)
Class I
Division 1 and Division 2
Groups A, B, C, D
Class II
Division 1 and Division 2
Groups G and Coal Dust
Class III
CSA File No: 213862 0 000
CSA report: 1300863
Safety factors
Tamb = 60 °C, T4,
Intrinsically safe when connected as per
Installation Drawing DRW213478
China (PCEC)
Ex ia II CT4
Certificate No. CE092145
Standard GB3836.1-2000 and
GB3836.4-2000
Russia (GOST)
1Ex ia IIC T4
Certificate No. ROSS FI.GB05.V03489
Safety factors
Ui = 28 V, Ii = 100 mA, Pi = 700 mW,
Ci = 1 nF, Li = 0 H, Tamb = -40 ... +60 °C
80 ___________________________________________________________________ M010056EN-J
Chapter 9 ____________________________________________________________ Technical Data
Options and Accessories
Table 15
Options and Accessories
Item
Description / Order Code
SENSORS
HUMICAP®180
15778HM
HUMICAP 180R
HUMICAP180R
HUMICAP®180L2
HUMICAP180L2
®
FILTERS
Sintered Stainless Steel Filter
Stainless Steel Filter
Stainless Steel Filter with Membrane
PPS Plastic Grid with Stainless Steel
Netting
PPS Plastic Grid Filter
HM47280SP
HM47453SP
214848SP
DRW010281SP
DRW010276SP
TRANSMITTER MOUNTING ACCESSORIES
Wall Mounting Kit
HM37108SP
Rain shield
215109
Protection cover (for use in the
214101
presence of combustible dust, ATEX)
PROBE MOUNTING ACCESSORIES
HMT363/HMP363
Duct Installation Kit
210697
Cable Gland M20×1.5 with Split Seal HMP247CG
Swagelok for 12mm Probe 3/8" ISO SWG12ISO38
Thread
Swagelok for 12mm Probe 1/2" NPT SWG12NPT12
Thread
HMT364/HMP364
Fitting Body M22×1.5
Fitting Body NPT1/2
17223SP
17225SP
HMT365/HMP365
Mounting Flange
210696
Cable Gland M20×1.5 with Split Seal HMP247CG
HMT367/HMP367
Duct Installation Kit
210697
Cable Gland M20x1.5 with Split Seal HMP247CG
Swagelok for 12mm Probe 3/8" ISO SWG12ISO38
Thread
VAISALA _______________________________________________________________________ 81
User’s Guide ______________________________________________________________________
Table 15
Options and Accessories (Continued)
Item
Description / Order Code
Swagelok for 12mm Probe 1/2" NPT SWG12NPT12
Thread
HMT368/HMP368
Fitting Body ISO1/2 Solid Structure
Fitting Body NPT1/2 Solid Structure
Fitting Body Set ISO 1/2
Fitting Body Set (ISO 1/2 + NPT 1/2)
Leaking Screw with Allen Key
Thread Adapter ISO1/2 to NPT1/2
Sampling Cell with Female
Connectors
Sampling Cell with Swagelok
Connectors
Ball Valve ISO1/2 with Welding Joint
Installation Flange ISO1/2
Manual Press
BALLVALVE-1
DM240FA
HM36854SP
CONNECTION CABLES
Serial Interface Cable
25905ZZ
CABLE BUSHINGS
Cable Gland M20×1.5 for 7.5...12mm
Cable
Cable Gland M20×1.5 for 10...15mm
Cable
Conduit Fitting M20×1.5 for NPT1/2
Conduit
Dummy Plug M20×1.5 for transmitter
body
OTHER
Calibration Adapter for HMK15
Galvanic isolator
Barrier
DRW212076SP
NPTFITBODASP
ISOFITBODASP
THREADSETASP
216027
210662SP
DMT242SC
DMT242SC2
216587SP
216588SP
214780SP
214672SP
211302SP
212483
210664
82 ___________________________________________________________________ M010056EN-J
Chapter 9 ____________________________________________________________ Technical Data
Accuracy of Calculated Variables
Accuracy of the calculated variables depend on the calibration accuracy of
the humidity and temperature sensors; here the accuracy are given for ±2
%RH and ±0.2 °C.
Accuracy of Dewpoint Temperature °C
Relative humidity
Temp. 10
20
30
40
50
60
70
80
90
100
-40
1.86
1.03
0.76
0.63
0.55
0.5
0.46
0.43
—
—
-20
2.18
1.19
0.88
0.72
0.62
0.56
0.51
0.48
—
—
0
2.51
1.37
1
0.81
0.7
0.63
0.57
0.53
0.5
0.48
20
2.87
1.56
1.13
0.92
0.79
0.7
0.64
0.59
0.55
0.53
40
3.24
1.76
1.27
1.03
0.88
0.78
0.71
0.65
0.61
0.58
60
3.6
1.96
1.42
1.14
0.97
0.86
0.78
0.72
0.67
0.64
80
4.01
2.18
1.58
1.27
1.08
0.95
0.86
0.79
0.74
0.7
100
4.42
2.41
1.74
1.4
1.19
1.05
0.95
0.87
0.81
0.76
120
4.86
2.66
1.92
1.54
1.31
1.16
1.04
0.96
0.89
0.84
140
5.31
2.91
2.1
1.69
1.44
1.26
1.14
1.05
0.97
0.91
160
5.8
3.18
2.3
1.85
1.57
1.38
1.24
1.14
1.06
0.99
Accuracy of Mixing Ratio g/kg
(Ambient pressure 1013 mbar)
Relative humidity
Temp. 10
20
30
40
50
60
70
80
90
100
-40
0.003
0.003
0.003
0.003
0.003
0.004
0.004
0.004
—
—
-20
0.017
0.018
0.019
0.021
0.022
0.023
0.025
0.026
—
—
0
0.08
0.09
0.09
0.1
0.1
0.11
0.11
0.12
0.13
0.13
20
0.31
0.33
0.35
0.37
0.39
0.41
0.43
0.45
0.47
0.49
40
0.97
1.03
1.1
1.17
1.24
1.31
1.38
1.46
1.54
1.62
60
2.68
2.91
3.16
3.43
3.72
4.04
4.38
4.75
5.15
5.58
80
6.73
7.73
8.92
10.34
12.05
14.14
16.71
19.92
24.01
29.29
100
16.26
21.34
28.89
40.75
60.86
98.85
183.66 438.56 —
—
120
40.83
74.66
172.36 —
—
—
—
—
—
—
VAISALA _______________________________________________________________________ 83
User’s Guide ______________________________________________________________________
Accuracy of Wet Bulb Temperature °C
Relative humidity
Temp. 10
20
30
40
50
60
70
80
90
100
-40
0.2
0.2
0.2
0.2
0.2
0.2
0.2
0.2
—
—
-20
0.21
0.21
0.22
0.22
0.22
0.22
0.23
0.23
—
—
0
0.27
0.28
0.28
0.29
0.29
0.29
0.3
0.3
0.31
0.31
20
0.45
0.45
0.45
0.44
0.44
0.44
0.43
0.43
0.42
0.42
40
0.84
0.77
0.72
0.67
0.64
0.61
0.58
0.56
0.54
0.52
60
1.45
1.2
1.03
0.91
0.83
0.76
0.71
0.67
0.63
0.6
80
2.23
1.64
1.32
1.13
0.99
0.89
0.82
0.76
0.72
0.68
100
3.06
2.04
1.58
1.31
1.14
1.01
0.92
0.85
0.8
0.75
120
3.85
2.4
1.81
1.48
1.28
1.13
1.03
0.95
0.88
0.83
140
4.57
2.73
2.03
1.65
1.41
1.25
1.13
1.04
0.97
0.91
160
5.25
3.06
2.25
1.82
1.55
1.37
1.24
1.13
1.05
0.99
Accuracy of Absolute Humidity g/m3
Relative humidity
Temp. 10
20
30
40
50
60
70
80
90
100
-40
0.004
0.004
0.005
0.005
0.005
0.006
0.006
0.006
—
—
-20
0.023
0.025
0.027
0.029
0.031
0.032
0.034
0.036
—
—
0
0.1
0.11
0.12
0.13
0.13
0.14
0.15
0.15
0.16
0.17
20
0.37
0.39
0.41
0.43
0.45
0.47
0.49
0.51
0.53
0.55
40
1.08
1.13
1.18
1.24
1.29
1.34
1.39
1.44
1.49
1.54
60
2.73
2.84
2.95
3.07
3.18
3.29
3.4
3.52
3.63
3.74
80
6.08
6.3
6.51
6.73
6.95
7.17
7.39
7.61
7.83
8.05
100
12.2
12.6
13
13.4
13.8
14.2
14.6
15
15.3
15.7
120
22.6
23.3
23.9
24.6
25.2
25.8
26.5
27.1
27.8
28.4
140
39.1
40
41
42
43
44
45
45.9
46.9
47.9
160
63.5
64.9
66.4
67.8
69.2
70.7
72.1
73.5
74.9
76.4
84 ___________________________________________________________________ M010056EN-J
Appendix A ______________________________________________________________ Dimensions
APPENDIX A
DIMENSIONS
This Appendix contains parts drawings of the transmitter housing, probes
and some transmitter mounting accessories with metric and nonmetric
dimensions specified.
HMP361
0603-042
VAISALA _______________________________________________________________________ 85
User’s Guide ______________________________________________________________________
HMP363
0603-015
HMP364
0603-016
HMP365
0603-017
86 ___________________________________________________________________ M010056EN-J
Appendix A ______________________________________________________________ Dimensions
HMP367
0603-018
HMP368
0603-019
VAISALA _______________________________________________________________________ 87
User’s Guide ______________________________________________________________________
Mounting Plate
Rain Shield
0603-041
88 ___________________________________________________________________ M010056EN-J
Appendix A ______________________________________________________________ Dimensions
Protection Cover
0505-304
VAISALA _______________________________________________________________________ 89
User’s Guide ______________________________________________________________________
90 ___________________________________________________________________ M010056EN-J
Appendix B ______________________________________ Wiring for Intrinsically Safe Operation, FM
APPENDIX B
WIRING FOR INTRINSICALLY SAFE
OPERATION, FM
This appendix contains the wiring diagram for intrinsically safe operation
approved by Factory Mutual (FM).
VAISALA _______________________________________________________________________ 91
User’s Guide ______________________________________________________________________
REV
QTY
DESIGN
DESCRIPTION / INFO / ECO No.
CHECKED / Reviewed
ACCEPTED / Approved
HMT360 connection board
-Ch1+
-Ch2+
General tolerance
Design
Material
Weigh t
Supplier
code
Title
DOCUMEN T CRE ATION D ATA
YYY Y-MM-DD
INITIAL
Finish
S
Creator
Review
FIRST ANGLE PROJECTION
DIMENSIONS ARE IN
MILLIMETERS, UNLESS
OTHERWISE SPECIFIED
Size
Code
Rev
Approved
Archive ID
Scale
Sheet
of
0505-305
92 ___________________________________________________________________ M010056EN-J
Appendix C _____________________________________ Wiring for Intrinsically Safe Operation, CSA
APPENDIX C
WIRING FOR INTRINSICALLY SAFE
OPERATION, CSA
This appendix contains the wiring diagram for intrinsically safe operation
approved by the Canadian Standards Association (CSA).
VAISALA _______________________________________________________________________ 93
User’s Guide ______________________________________________________________________
0505-306
94 ___________________________________________________________________ M010056EN-J
www.vaisala.com
*M010056EN*