1
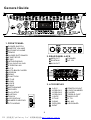
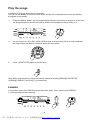
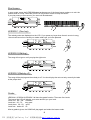
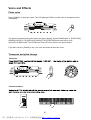
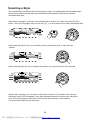
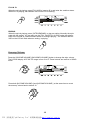
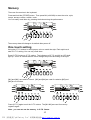
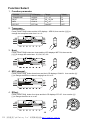
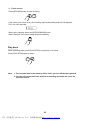
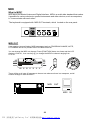
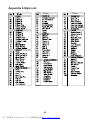
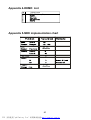
6
R E SP ON S E
PDF 文件使用 "pdfFactory Pro" 试用版本创建 www.fineprint.com.cn
Content
General Guide
1. Front Panel
2. Rear Panel Jack
3. LCD Display
Introduction
Care of your electronic keyboard
Power supply
Connections
-The headphone jack
- The sustain jack
- The Aux. Out jack
- The MIDI OUT jacks
Play demo songs
Play the songs
Lesson
- start lesson
- lesson 1
- lesson 2
- lesson 3
Selecting & Playing a Voice
Voices and Effects
- Piano voice
- Transpose and pitch change
- Sustain voice
- Touch
Selecting a Style
Playing a Style
- Playing a selected Style
- Set the tempo
- Style control
- Accomp volume
Memory
One touch setting
Function select
- Transpose
- Beat
- MIDI channel
- Effect
Metronome
3
3
3
3
4
4
4-5
5-6
5
5
6
6
7
8
8-9
9
9
9
9
10
11-12
11
11
12
12
13
14-16
14
15
15
16
17
17
18
18
18
18
18
19
1
PDF 文件使用 "pdfFactory Pro" 试用版本创建 www.fineprint.com.cn
Record and play back
-Record
-Play back
Chord dictionary
MIDI
-What is MIDI?
-MIDI OUT
Specifications
Appendix 1-Voice List
Appendix 2-Style List
Appendix 3-Song List
Appendix 4-DEMO List
Appendix 5-MIDI Implementation Chart
Appendix 6-Chord Table
19-20
19
20
21
22
22
22
23
24
25
26
27
27
28
2
PDF 文件使用 "pdfFactory Pro" 试用版本创建 www.fineprint.com.cn
General Guide
6
R E S P O N S E
1. FRONT PANEL
1
2
3
4
5
6
7
8
9
10
11
12
13
14
15
16
17
18
19
20
21
22
23
24
25
26
27
POWER SWITCH
MASTER VOLUME
ACCOMP VOLUME
TEMPO
CHORD DICTIONARY
START/STOP
SYNC
INTRO/ENDING
FILL-IN A/FILL-IN B
STORE/M1-M6
O.T.S.
AUTO BASS CHORD
LESSON
DEMO
FUNCTION
STYLE
SONG
VOICE
PIANO
METRONOME
RECORD
PLAY/STOP
SUSTAIN
TOUCH
LCD DISPLAY
NUMERIC KEYPAD
PITCH BEND
2. REAR PANEL JACK
MIDI OUT
SUSTAIN
AUX.OUT
4 PHONES
5 DC 12V
3. LCD D ISPLAY
1
2
3
4
5
6
7
27
8
9
A.B.C.
LESSON 1
LESSON 2
LESSON 3
VOICE
STYLE
SONG
RECORD
BEAT
3
PDF 文件使用 "pdfFactory Pro" 试用版本创建 www.fineprint.com.cn
10
11
12
13
14
15
16
17
TEMPO/COUNT
VOICE NUMBER
CHORD
TREBLE CLEF
BASS CLEF
O.T.S.
M1-M6
KEYBOARD
Introduction
Thank you for purchasing the electronic keyboard. This electronic keyboard provides you the
following features and functions.
128 Voices (121 PCM voices,6 Chinese voices and one set of drum kit).
100 auto accompany styles.
100 songs of different style.
The song lesson mode can be used in three status (Lesson 1,Lesson 2,Lesson 3)
Chord dictionary for beginners.
6 memory storage
MIDI compatibility
Song recording
Care of your electronic keyboard
Your keyboard will give you much pleasure if you follow the simple rules given below:
Do not expose the electronic keyboard to the high temperature, direct sunlight, and excessive
dust places.
Avoid physical shocks caused by dropping , bumping, or placing heavy objects on the electronic
keyboard.
Never use cleaners such as alcohol or thinner to clean the electronic keyboard.
Always turn power off when making any connections.
Power supply
This electronic keyboard can be powered by current from a standard household wall outlet
(using the specified AC adaptor) or by batteries.
Using the AC adaptor
DC 12V
Make sure that only the AC specified adaptor for this
electronic keyboard is used. The adaptor shall be 12V
DC output, 800mA, and center positive type.
Make sure to turn off the electronic keyboard before you
connect the adaptor into the AC wall outlet.
Cautions:
Use only the specified AC adaptor. Use of another type of adaptor has a danger of fire and
electrical shock.
For safety sake, make sure to unplug the AC adaptor from the wall outlet whenever leaving the
electronic keyboard unattended for a long time.
Using batteries
Always make sure to turn the keyboard off before inserting new batteries or replacing old ones.
To insert the batteries
1. Open the battery compartment underneath the keyboard.
4
PDF 文件使用 "pdfFactory Pro" 试用版本创建 www.fineprint.com.cn
2. Insert 6 "D" size batteries into the battery compartment by following the polarity markings on the
cabinet.
3. Close the battery compartment and make sure the battery compartment cover locks firmly.
Low battery indications
Any of the following symptoms indicate low battery power. Replace the batteries as soon as
possible whenever any of the following occurs.
A dim and difficult-to-read LCD display.
Abnormally low speaker/headphone volume.
Distortion of the sound output.
Sudden power failure when playing at high volume.
Abnormal playing of the rhythms or demo songs.
Dimming of the display when playing at high volume.
Cautions:
Improper handling of the batteries can cause them to burst or leak, creating the danger of
personal injury or damage of the keyboard. Make sure to take the following important
precautions when using batteries:
Never use batteries of different types.
Never mix old batteries with new ones.
Always make sure to remove the batteries from the keyboard's battery compartment.
When the keyboard is not expected to be used for a long period of time, remove the batteries
from the keyboard.
Replace the batteries as soon as possible after any sign of discharge.
Connections
The headphone jack
A pair of stereo headphones can be plugged into the PHONES jack for private practice or late
night playing. The internal speaker system is automatically turned off when the headphones is
plugged into the PHONES jack.
The sustain jack
An optional foot switch can be plugged into the SUSTAIN jack for sustain control. The footswitch
function is like the sustain pedal on a piano-press for sustain. Return to normal sound when releasing it.
5
PDF 文件使用 "pdfFactory Pro" 试用版本创建 www.fineprint.com.cn
The Aux. Out jack
The AUX. OUT jack delivers the output of the keyboard for connection to an external amplifier.
Using an audio cord to plug into AUX. OUT jack located on the rear panel. Then plug the other
end of the cord into LINE IN or AUX. IN of the amplifier.
Stereo
System
The MIDI OUT jacks
The MIDI OUT connector transmit MIDI data generated by the electronic keyboard to an external
MIDI device.
6
PDF 文件使用 "pdfFactory Pro" 试用版本创建 www.fineprint.com.cn
Play demo songs
A selection of 6 demo songs are built-in for the player.
They will give you a good idea of what your keyboard can do.
1.
Connect the DC power correctly and then press [POWER] to turn it on.
2.
Adjust the volume to a appropriate level by turning the [VOLUME] switch.
3.
Press the [DEMO] button at any status to enter demo mode. All 6 demos will play
from the first in sequence. The LCD displays d-xx.
Use the [0-9] or the [-/NO]/[+/YES] button to select demo song. When a song is selected,
the song number of the selected song will flash for 3 seconds before the demo song starts.
6
4.
To play a specific demo song in loop, hold the [DEMO] button for 3 seconds while the demo song
is playing.
5.
To stop the demo song, press the [DEMO] or the [START/STOP] button.
7
PDF 文件使用 "pdfFactory Pro" 试用版本创建 www.fineprint.com.cn
Play the songs
A selection of 50 songs are built-in for the player.
You can use the Melody Off function to turn off the melody of the song and learn to play by following
the signals on the display.
1.
Press the [SONG] button. All 100 songs will play from the current song in sequence. At this time,
the Song indicator on the LCD will light up, and the LCD displays the song number s-xx.
2.
You can use the [0~9] or the [-/NO]/[+/YES] buttons to select a song. When a song is selected,
the song number will flash for 3 seconds before the song starts.
6
3.
Press [START/STOP] again to stop the song.
Note: When song is playing, all keys are inactive, except for pressing [DEMO],[START/STOP],
[LESSON],[TEMPO+/-] and [0-9],[+],[-] number keys.
Lesson
In song mode, press the [LESSON] to enter the lesson mode. Three lesson mode LESSON
1,2,3 are provided for users learning
8
PDF 文件使用 "pdfFactory Pro" 试用版本创建 www.fineprint.com.cn
Start lesson:
In song mode, press the [LESSON] button to choose one of the three lesson modes or to exit the
lesson mode in a loop. Press the [START/STOP] button to start or stop the lesson.
If you play wrong or miss a note, you score will be deducted.
LESSON 1 (One key):
The melody notes are displayed on the LCD .If you press any keys when there is a note in song,
the note will sound out correctly no matter what keys you have pressed.
LESSON 2(Waiting):
The song will not go on until you play the right note.
LESSON 3(Melody off):
The song will be playing and the melody is off. You should play the note not only correctly but also
at the proper time.
Grade:
LESSON1 ,LESSON 2,LESSON 3 all have the grade function. There are four levels.
The lesson the LCD will display your score and tell you your level.
Level one:80-100 excellent
Level two:60-79
very good
Level three:30-59 good
Level four:below 30 ok
After a grade is given, the SONG will play again and retain the lesson mode.
9
PDF 文件使用 "pdfFactory Pro" 试用版本创建 www.fineprint.com.cn
Select & Playing Voices
The keyboard has 128 voices that you can select and play on the keyboard. Before you select a
voice, make sure you have selected VOICE mode. Press the [VOICE] button to select the VOICE
mode.
The[ +/YES] and [-/NO] buttons:
6
Press [VOICE] button to enter voice mode.
Press [+/YES]/[-/NO] button to choose your desired voice.
The selected voice number will show on the display.
The number buttons:
The number buttons can be used to directly press the number of the desired voice.
1.
When selecting voice 01-99,you can directly use the number key [0-9] to input the
voice number.
6
2.
To select voice 100-128,press the number key [1] and hold it for few seconds.
The LCD will then display 1 which indicates one hundred. After that, use the key
number to input 00-28 for voice 100-128.
6
10
PDF 文件使用 "pdfFactory Pro" 试用版本创建 www.fineprint.com.cn
Voice and Effects
Piano voice
Press [PIANO] to the piano mode. The LCD displays PIANO, and the voice is changed to piano
immediately.
The piano mode does not function when the style is playing. Press [PIANO] again or [FUNCTION],
[DEMO],[VOICE],[O.T.S],[REPLAY],[SONG],[STYLE],[RECORD] and the memory keys
will exit the PIANO mode. The LCD and the voice will revert back to the former status.
If you don't use the [ PIANO] to exit , the voice will retain as the piano voice.
Transpose and pitch change
Transpose:
6
Pitch bend wheel:
11
PDF 文件使用 "pdfFactory Pro" 试用版本创建 www.fineprint.com.cn
Sustain voice
After power is turned on, the Sustain function is automatically set to off.
Press the [SUSTAIN] button to shift the SUSTAIN ON/OFF status and the SUSTAIN
indicator on the LCD will light on or off in this status.
You can also control the sustain effect by a sustain pedal.
Touch
There are 16 velocity levels. After power is turned on, the touch function is automatically set to on.
Press the [TOUCH] button and the LCD displays “TC On”.
To turn off the touch function, press the [TOUCH] button again and the LCD displays: "TC OFF".
12
PDF 文件使用 "pdfFactory Pro" 试用版本创建 www.fineprint.com.cn
Selecting a Style
The keyboard has 100 different auto-accompaniment styles. Its sophisticated Auto Accompaniment
system can provide automatic bass and chord backing that perfectly match to the selected
accompaniment style.
After power is turned on, the style is automatically set to number one. When you press [STYLE]
button, the STYLE flag lights ,and you can use [+]/[-] or the number keys to select the desired style.
6
When selecting style 01-99, you can directly use the number key [0-9] to input the style
number.
6
When selecting style 100, you must press the number key [1] and hold it for a few seconds.
6
When a style is playing, you can select a new style at any time. The number of the new style
will display on the LCD immediately. If the style changes at beat one, the new style will play at
once; if the style changes at the other beats, the new style will start in next measure.
The new style will play with the old tempo.
13
PDF 文件使用 "pdfFactory Pro" 试用版本创建 www.fineprint.com.cn
Playing a Style
Playing a selected Style
Start a style
Press [START/STOP ] button, the drum part of the style will play at once. When the ABC
is turned on, you can hear the drum part as well as the bass and chord after you play a chord .
Sync start
Press [SYNC] button and the beat indicator will flash at the speed of current tempo. You can
start playing the song by tapping any keys on the keyboard when the ABC is off.
When ABC is turned on, you can only start the style with the chord and bass by tapping a chord in
the chord range of the keyboard.
self-mo tion acco many
Press the [INTRO/ENDING] before start the style:
The style will enter NORMAL or VARATION after playing an intro. You can insert a fill in and
enter two different status , NORMAL and VARATION by using [FILL-IN A] and [FILL-IN B]
respectively.
You can also use the [INTRO/ENDING] to stop the style after the style is playing at the end.
The remark is flashing
To insert an introduction, press [INTRO] before pressing [START/STOP] button.
To stop playing a style, press [START/STOP].
14
PDF 文件使用 "pdfFactory Pro" 试用版本创建 www.fineprint.com.cn
Set the Tempo
Press [TEMPO +] and [TEMPO-] button to change the style tempo.
(Ranging from 30-280)
When style stops, the tempo will change with the style's default tempo.
When style is playing, the tempo will not change with the style.
To revert back the default tempo of a style, press both [TEMPO+] and [TEMPO-]
button simultaneously.
Style control
INTRO:
When the style stops, press [INTRO/ENDING] , then press [START/STOP] or [SYNC]
to select different kind of starting mode. If you press a valid chord, you can hear a wonderful
intro which will lead you to the main style. The indicator either NOR or VAR on the LCD will
flash when an intro is playing.
The remark is flashing
FILL -IN A:
When the style is playing, press [FILL-IN A] to insert a fill in and enter the normal status.
When fill in is playing ,the indicator NOR on the LCD is flashing.
15
PDF 文件使用 "pdfFactory Pro" 试用版本创建 www.fineprint.com.cn
FILL-IN B:
When the style is playing, press [FILL-IN B] to insert a fill in and enter the variation status.
When fill in is playing, the indicator VAR on the LCD is flashing.
ENDING:
When the style is playing, press [INTRO/ENDING] to play an ending. Normally the style
ends with the ending. You can also use the [FILL -IN A]/[FILL-IN B] to make the style go
back to the normal or variations status when an ending is playing. The indicator NOR or
VAR on the LCD will flash when an ending is playing.
Accomp Volume
Press the [ACCOMP.VOLUME+]/[ACCOMP.VOLUME-] button to change the style volume.
The LCD will display ACP XX.The range is from 0 to 15.These buttons are inactive in SONG
mode.
Press both [ACCOMP.VOLUME+] and [ACCOMP.VOLUME-] at the same time to revert
the accomp volume back to default 12.
16
PDF 文件使用 "pdfFactory Pro" 试用版本创建 www.fineprint.com.cn
Memory
There are 6 memories in the keyboard.
Press and hold the [STORE] button. Then press M1(or M2-M3) to store the voice ,style,
tempo, accomp volume, sustain, touch.
You can easily recall them by pressing the button during the performance.
The memory data will change to its default after power off.
One touch setting
Using the O.T.S. buttons to select proper voice to match the style. Each style has 4
sets of O.T.S. setting. You can only recall them .
Press [O.T.S.] button to O.T.S. setting. The indicators of O.T.S. and M1 on LCD both
light up. A fill in is inserted and the voice changes as pre-set according to the style.
[M1] and [M2] are used for normal. [M3] and [M4 ]are used for variation,[M5] and
[M6] do not function.
Press [O.T.S.] again to exit the O.T.S. status. The [M1-M6] are used for memory
registers again.
Note:you can not use the memory in O.T.S. Status.
17
PDF 文件使用 "pdfFactory Pro" 试用版本创建 www.fineprint.com.cn
Function Select
1. Function parameter:
Contents
TRANSPOSE
BEAT
MIDI
EFFECT
LCD display
XPS 00
MET 04
CHA 01
EFF ON
Range
-6 - +6
00 02 09
01 16
ON/OFF
Default
0
04
01
OFF
2. Transpose:
Press [FUNCTION] button and the LCD displays : XPS 00, then use the [+]/[-] to
change the transpose value from 6 to + 6.
6
3. Beat:
Press [FUNCTION] button two times and the LCD displays: MET 04, then use the
[+]/[-] to change the metro beat , 0,2,3,4,5,6,7,8,9.
6
4. MIDI channel:
Press [FUNCTION] button three times and the LCD displays: CHA XX,then use the [+]/
[-] to change the MIDI out channel ranging from 01 to 16.
6
4. Effect:
Press [FUNCTION] button four times and the LCD displays: Eff Off,then use the [+]/
[-] to change the effect to on or off.
6
18
PDF 文件使用 "pdfFactory Pro" 试用版本创建 www.fineprint.com.cn
Metronome
Press the [ METRO] button, then the metronome will work as the current tempo, and the
beat dot will flash one by one. The tempo can be changed. Press the [METRO] again to
turn the metronome off.
The beat count follows as the style when style is playing.The value is in beat when the
style stops.
The metro is inactive in SONG mode and DICT mode.
Note: When recording, you can turn the metronome on but it isn't being recorded.
Record and play back
Record
1. Ready record:
Press [RECORD], and the RECORD indicator on the LCD lights up. Four beat dots flash
together indicating it is in the record ready status. You can change the voice, style and so
on before recording.
2. Start record:
In record ready status ,press [START/STOP] to start the style and enter recording mode.
You can use the [START/STOP] to start or stop the style during recording.
In record ready status,you can enter the recording mode by pressing the keyboard.
Meanwhile when ABC is on ,pressing the keys on the left hand area can start the style directly.
(When ABC is off, you can start the style only by [START/STOP] button.)
Auto - accopm animent
In record ready status, the [SYNC] button is inactive.
19
PDF 文件使用 "pdfFactory Pro" 试用版本创建 www.fineprint.com.cn
3. Finish record:
Press [RECORD] button to stop recording.
If the memory for record is full, the recording stops automatically and the LCD displays:
FULL for a few seconds.
When style is playing, press the [INTRO/ENDING] button .
When ending is over, the recording stops automatically.
Play back
When recording stops, press [PLAY/STOP] to play back your record.
Press [PLAY/STOP] again to stop it.
Note: 1.The recorded data in the memory will be lost if you turn off the the keyboard.
2.You can only record one track and the re-recording operation will cover the
previous record.
20
PDF 文件使用 "pdfFactory Pro" 试用版本创建 www.fineprint.com.cn
Chord Dictionary
You can use this function to learn how to play chords.
You can not enter the DICTIONARY mode when metro, song or style is on.
Operation guide:
1. Press the [CHORD DICTIONARY] button,and the LCD displays DICT.
The default chord is CM.
2. Press any keys on chord area or press the corresponding keys according to the label
showing the chord root and chord type. Then the LCD will show you the right keys you
should play.
C hord n ame
Choice the M7
Ke yboar d
Staff
3. Press the keys according to the LCD. If you play right, the keyboard will give you a sound.
Chord name
Aut o-accopm animen t
Staff
If you play right,it will give you a right sound
21
PDF 文件使用 "pdfFactory Pro" 试用版本创建 www.fineprint.com.cn
MIDI
What is MIDI?
MIDI stand for Musical Instrument Digital Interface. MIDI is a world wide standard that makes
it possible for various electronic musical instruments and other devices, such as computers,
to "communicate with each other".
The keyboard is equipped with MIDI OUT terminals, which located on the rear panel.
MIDI OUT
It can send out several kinds of MIDI messages (such as: PROGRAM CHANGE, NOTE,
PITCHBEND and so on).Please refer to the MIDI Chart list.
You can change the MIDI out channel. Press [FUNCTION] button two times and the LCD
displays :CHA XX,then use the[+]/[-] to change the MIDI out channel ranging from
01 to 16.
6
There will be an all note off message to be sent out whenever there is a transpose, a midi
channel change or start the demo.
MIDI
OUT
MIDI
22
PDF 文件使用 "pdfFactory Pro" 试用版本创建 www.fineprint.com.cn
IN
Specifications
Keys:
61 keys with Touch Response
LCD Display:
Multi-functional LCD
Voices:
128 voices, including 121 PCM voices,6 Chinese voices
and one of drum kit
Styles:
100 styles
Song:
100 songs of different style, 3 lesson modes for user
learning
DEMO Song:
6 demo songs
Overall Control:
Transpose, Beat, Split Point, Pitch Bend, Effect, MIDI
Channel, Metronome, Lesson, O.T.S, Touch, Sustain Pedal ,
Store, Chord Dictionary, Piano
Accompaniment Control:
Sync, Start/stop, Fill in A/Fill in B, Intro/Ending
Other Control:
Record & Playback
Connectors:
DC 12V, Phones, Aux. Out,Sustain, MIDI OUT
Weight:
5.3 kg(without batteries)
Dimensions:
990(W) x 350(D) x 150(H)mm
23
PDF 文件使用 "pdfFactory Pro" 试用版本创建 www.fineprint.com.cn
Appendix 1-Voice List
PC GENERAL MIDI
PC GENERAL MIDI
PC GENERAL MIDI
PC GEN ER AL MIDI
1
(Gran d) P iano 1
33
Aco ust ic Ba ss
65
Soprano Sax
97
FX 1 (ra in)
2
(Bright) P iano 2
34
Fin ger Bass
66
Alto Sax
98
FX 2 (so und track)
3
(El. G rd) Pian o 3
35
Pic ked Bas s
67
Tenor Sax
99
FX 3 (crdystal)
4
H onk y-tonk Piano
36
Fre tless Ba ss
68
Baritone Sax
100
FX4 (atmosphere)
5
E l. Piano 1
37
Sla p Ba ss 1
69
Obo e
101
FX 5 (br ightness)
6
E l. Piano 2
38
Sla p Ba ss 2
70
English Horn
102
FX 6 (go blin s)
7
H arpsichord
39
Syn th B ass 1
71
Bassoon
103
FX 7 (echoes)
8
C lavi
40
Syn th B ass 2
72
Clarinet
104
FX 8 (sc -i fi)
9
C elesta
41
Vio lin
73
Piccolo
105
Sita r
10
G lockens piel
42
Vio la
74
Flut e
106
Ban jo
11
M usi c Box
43
Cello
75
Recorder
107
Sha misen
12
Vibra pho ne
44
Contrab ass
76
Pan Flute
108
Koto
13
M arim ba
45
Tremol o Strings
77
Blown Bottle
109
Kali mba
14
X ylop hon e
46
Piz zica to S tring s
78
Shakuhachi
110
Bag pipe
15
Tubular Bells
47
Orc hes tral H arp
79
Whistle
111
Fiddle
16
S ant ur
48
Timpani
80
Ocarina
112
Sha nai
17
D raw bar Orga n
49
String E nse mble 1
81
Lead 1 (square)
113
Tink le B ell
18
P ercussi ve O rgan
50
String E nse mbl e 2
82
Lead 2 (sawtooth)
114
Ago go
19
R ock Org an
51
Syn th S tring s 1
83
Lead 3 (calli ope)
115
Steel Drums
20
C hurch O rgan
52
Syn th S tring s 2
84
Lead 4 (chiff)
116
Woo dblo ck
21
R eed Org an
53
Choir A ahs
85
Lead 5 (charang)
117
Taik o Drum
22
A ccordion (fre nch )
54
Voi ce O ohs
86
Lead 6 (voice)
118
Mel odic Tom
23
H arm onic a
55
Syn th Voice
87
Lead 7 (fifths)
119
Syn th D rum
24
Tango Ac cord ion
56
Orc hes tra H it
88
Lead8 (bass+lead)
120
Gt. Fret Noise
25
A c. G uita r (ny lon)
57
Trumpet
89
Pad 1 (f antasia)
121
Bre ath Noise
26
A c. G uita r (st eel)
58
Trombone
90
Pad 2 (warm)
122
Qud i
27
E l. Guitar (jaz z)
59
Tub a
91
Pad 3 (polysynth)
123
Xiao
28
E l. Guitar (cle an)
60
Mu ted Trum pet
92
Pad 4 (cho ir)
124
Erh u
29
E l. Guitar (mu ted)
61
Fre nch Hor n
93
Pad 5 (bowed)
125
Guz hen g
30
O verdrive n G uitar
62
Bra ss S ecti on
94
Pad 6 (metallic)
126
Pipa
31
D isto rtion Gu itar
63
Syn th B rass 1
95
Pad 7 (halo)
127
Son a
32
G uita r ha rmonics
64
Syn th B rass2
96
Pad 8 (sweep)
128
Dru m Set
24
PDF 文件使用 "pdfFactory Pro" 试用版本创建 www.fineprint.com.cn
Appendix 2-Style List
Style
25
PDF 文件使用 "pdfFactory Pro" 试用版本创建 www.fineprint.com.cn
Style
Appendix 3-Song List
Son g name
Song name
26
PDF 文件使用 "pdfFactory Pro" 试用版本创建 www.fineprint.com.cn
Appendix 4-DEMO List
DEMO name
Appendix 5-MIDI implementation chart
Level
27
PDF 文件使用 "pdfFactory Pro" 试用版本创建 www.fineprint.com.cn
Appendix 6-Chord Table
28
PDF 文件使用 "pdfFactory Pro" 试用版本创建 www.fineprint.com.cn


![G]TEREX](http://vs1.manualzilla.com/store/data/006245901_1-38c91cca64c791aafa0f550b7b577e4d-150x150.png)