1
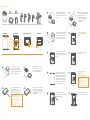
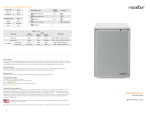
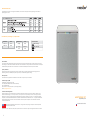
Disk Volume Over 2TB
The RAID System supports and recognizes 2+TB HDDs, but the actual 2+TB support will vary depending on the different
operating systems used.
LED Indicators / LED Anzeigen / Les Voyants LED
Power LED
Color
RAID Alert LED
Power on
Green
Healthy
None
RAID 0 (Striping)
Power off
None
Danger
Blink Red
RAID 1 (Mirroring)
Error
Red
Color
RAID Mode Switch
RAID 5
General Notices
• Consistently make multiple backup copies of your data for your protection. Hard disk drives are subject to failure at any time.
• Rocstorage, Inc. shall not be held liable for loss of data or the restoration or recovery of data on the device. Please see complete
Limited Warranty Information in the User’s Manual or on the Rocstor website (www.rocstor.com) for further details.
Capacity Disclaimer
Actual accessible hard drive capacity will indicate up to 10% lower than stated under different Operating Systems and
formatting. Therefore, a 500GB capacity drive may show up as a 450GB drive (approximately.)
Warranty Period
The Limited warranty period for Airhawk external hard drives is two years for parts and labor.
Technical Support / RMA
Tel: (888) 877-7716 (USA and Canada)
Tel: +1 (818) 449-2000 (Domestic and Internationals)
Fax: +1 (818) 884-8777
Hours: 9:00 am - 5:00 pm PST, Mon - Fri (excluding holidays)
Email: [email protected]
Trademarks Acknowledgements
© 2011, Rocstor, Rocsecure and Rocpower are registered trademarks of Rocstorage, Inc. Rocpro, Rocport, Rocbit, are the
trademarks of Rocstorage, Inc. "store your future", "secure your future" and “power your future” are the slogan marks of
Rocstorage, Inc. Apple, the Apple logo, Mac, Power Macintosh, FireWire, and Mac Pro, Leopard ... are trademarks of Apple
Computer, Inc. Microsoft, MS-DOS, Windows CE, Windows NT, Windows 98, Soft Windows, Vista ... are registered trademarks
of Microsoft Corporation. All other names are trademarks of their respective companies in the United States and other
countries. © 2000 - 2011
Designed/assembled/integrated in the U.S.A. using domestic and/or foreign components. Enclosure (without
hard drive) is made in China
Specifications, terms, warranties, descriptions, product and services herein are subject to change without notice. Ver.1207H
4
ARCTICROC 2T
2-Bay RAID System
Quick Installation Guide
Package Contents
8 HDD screws
Quick Start Guide
5
Hold the HDD with the metal
cover side facing you and the
handle attached on the upward
position.
6
Align the handle with the guide
rails and slide the HDD into the
indicated slot. Firmly push
downward until a “thump”
sound is heard. Repeat the
same procedures for the
second HDD.
7
Place with its front view facing
you and the top lid on. Position
both hands on the back edge of
the top lid. Push the lid firmly
downward and back to front.
8
Connecting to the Host
9
Insert both ends of the chosen
cable(s) into the corresponding
port of the RAID System and
the host.
10
When connected, the System
LED light will turn green; the
HDD LED lights will turn white
and flash 15 seconds. If there
are HDDs, the HDD LED lights
will stay white. If there are no
HDDs, the HDD LED lights will
turn off after flashing.
12
Use a small, flat-blade
screwdriver to select the RAID
Mode (RAID Switch).
14
RAID system unit 2 spare HDD screws 2 handles FireWire 400 & 800 cables USB cable eSATA cable External power supply
Cover View (Exposed)
Top View
“Front” Indicator
eSATA
RAID
Power Switch
DC IN
2 Spare
HDD Screws
Lock Slot/Port
HDD Slots
(indicates HDD 1
through HDD 2)
Turn the power switch to the
“on” position.
ON
eSATA
DC IN
DC IN
eSATA
RAID
RAID
DC IN
eSATA
HDD1
HDD2
Power
RAID Mode
Switch
FireWire 400
FireWire 800
(2 ports)
USB 2.0 Type B
eSATA Port
Connect the AC/DC power
adapter.
RAID
Rear View
DC IN
Front View
2
Finally, test sliding the handle to
make sure that the holes glide
smoothly on the screw guides.
Repeat the same procedures for
the rest of HDDs.
13
RAID
Setting/Changing the
RAID Mode
Power “off” the RAID System.
eSATA
DC IN
RAID
OFF
Setting/Changing the RAID
Mode deletes all data stored
on the device. If you have
saved data in the drives,
backup all data before setting/
changing the RAID Mode.
After setting the new RAID
mode, power the RAID System
“on”.
RAID
Some HDD makers
manufacture both "Desktop"
and "RAID" (or also called
"Enterprise") hard drive
editions. It is highly
recommended to use their
"RAID" edition.
4
11
ON
DC IN
Right
Left
Fasten the handle onto the
HDD by inserting and
tightening the screws, the left
one first, then the right one.
Lift the top lid up to remove
the handles from the enclosure
itself and locate the HDD
screws in the packaging box.
eSATA
3
2
DC IN
Place its front view facing you.
Position both hands on the
front edge. Push the lid front to
back, using your thumbs.
eSATA
Installing Hard Drives
1
3