1
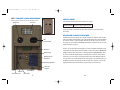
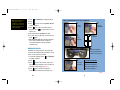
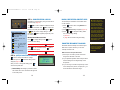
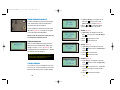
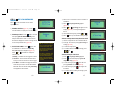
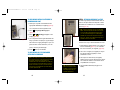
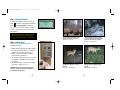
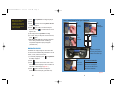
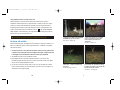
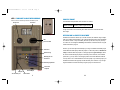
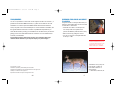
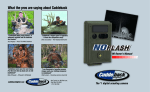
Excite06OwnerManual
6/27/06
2:38 PM
Page 1
What the pros are saying about Cuddeback
“Cuddeback takes great pictures, is
extremely reliable and the batteries
last forever!”
“Cuddeback‘s trigger speed is legendary
... it blows the competition away!”
Dick Scorzafava – The Radical Bowhunter
Jay Gregory – Host, The Wild Outdoors
‘06 Owner’s Manual
“Cuddeback saves you time and money.
Find the trails the big bucks are on with
Cuddeback!”
“I see thousands of scouting camera
images each year. Nothing compares
to Cuddeback!”
Mike Wheeler – Wheeler’s Whitetails
Walt Larsen – Scouting camera columnist
cuddebackdigital.com
Non Typical, Inc. 860 Park Lane,
Park Falls, WI 54552
1-715-762-2260
The #1 digital scouting camera
Excite06OwnerManual
6/27/06
2:38 PM
Page 2
~ 2005 Contest Winner ~
Make sure a bear doesn’t damage your Cuddeback.
Use our exclusive Bear Safe!
This heavy duty metal cage
fits over your Cuddeback
and lag-bolts to the tree.
Digital Buck Hunt Photo Contest
We want to see your images and videos. Prizes are awarded for best
images and videos. Visit www.cuddebackdigital.com for details and to
enter your images into our Digital Buck Hunt.
Thank you for purchasing a Cuddeback Excite! We are sure you will
enjoy getting images of deer, birds and other animals for years to come. We
encourage you to read through this manual as it will quickly acquaint you with
Cuddeback’s easy operation. And, please be sure to email us your best images for
entry into our annual photo contest!
2
BEAR
Installation is as easy as 1...2...3...
SAFE
BEARSAFE
BEARSAFE
To get your Bear Safe,
Contact us at 715-762-2260 or visit
www.cuddebackdigital.com
Excite06OwnerManual
6/27/06
2:38 PM
Page 3
OBTAINING SERVICE FOR YOUR PRODUCT
Excite
STEP 1: Call Non Typical at (715) 762-2260.
As a condition of the warranty coverage for your Product you are required to contact Non Typical by
telephone at (715) 762-2260 before returning your Product for service. Do not contact the dealer
from whom you purchased the Product. Returning your Product without first calling Non Typical will
void this Limited Warranty and will significantly delay service.
Table of contents
Service calls should be made during Non Typical normal business hours of Monday through Friday
from 8:00 a.m. to 4:30 p.m., Central Standard Time.
Cuddeback Stores Images on Compact Flash Cards . . . . . . . . . . . . . . . . . 5
STEP 2: Obtain a Return Material Authorization number from Non Typical.
Introduction . . . . . . . . . . . . . . . . . . . . . . . . . . . . . . . . . . . . . . . . . . . . . . . . 4
Step 1 Familiarize yourself with Cuddeback . . . . . . . . . . . . . . . . . . . . . . . . 6
Step 2 Turning Cuddeback ON/Installing batteries . . . . . . . . . . . . . . . . . 8 - 9
If Non Typical's staff instructs you to return your Product, you will be given a RMA number. Your
RMA number must be written on the outside of the carton in which you ship the Product to Non
Typical. Packages without a RMA number will incur significant service delays.
Step 3 Learn the Keypad & Display . . . . . . . . . . . . . . . . . . . . . . . . . . . . . 10
STEP 3: Package your product for shipping and include a copy of your sales receipt.
Step 5 (M KEY) is for controlling Cuddeback . . . . . . . . . . . . . . . . . . . . . . 12
Non Typical is not responsible for damage to your Product due to ineffective packaging or damage to
the Product while in transit to Non Typical. You should ship your Product in a sturdy carton with sufficient internal packaging materials to avoid damage. Do not include batteries within your Product
unless instructed to do so by a Non Typical technician.
Step 6 Attaching Cuddeback to a Tree . . . . . . . . . . . . . . . . . . . . . . . . . . . . 13
In order to qualify for service under this Limited Warranty, any Product returned to Non Typical for
service must be accompanied by a copy of or, if requested by Non Typical, the original dated
sales receipt.
Step 4 (S KEY) is for setting up Cuddeback . . . . . . . . . . . . . . . . . . . 10 - 11
Step 7 Checking Cuddeback . . . . . . . . . . . . . . . . . . . . . . . . . . . . . . . . . . 14
Step 8 Viewing Images . . . . . . . . . . . . . . . . . . . . . . . . . . . . . . . . . . .14 - 17
Turning Cuddeback On and Off . . . . . . . . . . . . . . . . . . . . . . . . . . . . . . . . 18
Motion/Heat Detector Sensitivity Level . . . . . . . . . . . . . . . . . . . . . . . . . 19
STEP 4: Return your product to the factory.
Formatting the Compact Flash Card . . . . . . . . . . . . . . . . . . . . . . . . .19 - 20
Ship your product to the factory:
Non Typical, Inc.
Attn: RMA <write your RMA number here>
860 Park Lane
Park Falls, WI 54552.
Diagnostics Display . . . . . . . . . . . . . . . . . . . . . . . . . . . . . . . . . . . . . . . . 20
Technical Information . . . . . . . . . . . . . . . . . . . . . . . . . . . . . . . . . . . .21 - 23
Detection Zone & Sensitivity Adjustment . . . . . . . . . . . . . . . . . . . . . . . . 23
STEP 5: Non Typical will send you a Post Card.
TV Requirements . . . . . . . . . . . . . . . . . . . . . . . . . . . . . . . . . . . . . . . . . . 24
After we receive your product we will send you a post card with an estimated return date.
You do not need to call us for confirmation that your package has arrived at the factory. If your
product is out of warranty an estimate will be sent to you for approval before repairs are conducted.
Warranty Information . . . . . . . . . . . . . . . . . . . . . . . . . . . . . . . . . . . . . . . 25
26
Service . . . . . . . . . . . . . . . . . . . . . . . . . . . . . . . . . . . . . . . . . . . . . . . . . . 26
3
Excite06OwnerManual
6/27/06
2:38 PM
Page 4
LIMITED WARRANTY
Introduction
1. Limited Warranty. Non Typical, Inc. (“Non Typical”) warrants the Product to be free from malfunctions and
The Cuddeback Excite gives you the fast trigger speed and long battery life Cuddeback is
famous for! It features a custom 2.0 megapixel digital camera and a premium strobe
flash that illuminates out to 40 feet! You can adjust the delay and the sensitivity. The
Excite will give you years of reliable performance!
What You Need...
Before you can use your Cuddeback you
will need the following items:
“This picture was taken under
one of my tree stands.”
– Glen Stark, Magnolia, OH
TIP - We do not recommend
attaching Cuddeback to a tree
with a strap or bungee.
Rodents may chew the strap
causing the camera to fall off
the tree. If you do not use
the security screw we recommend that you use wire to
secure Cuddeback to a tree.
1) One or more Compact Flash Cards. We recommend a size of 256MB or bigger. The higher
the number on the card the more images that
can be saved on the card.
2) Four D Cell Batteries (we recommend
Duracell or Energizer).
3) A #25 Torx screwdriver if you want to attach
the camera to a tree with the supplied screw.
4) A bungee, strap, or wire if you want to attach
Cuddeback to a tree without the Torx screw.
The following items are optional:
5) A small padlock if you want to prevent
tampering.
6) USB cable if you want to attach Cuddeback to
your computer's USB port.
7) Video cable & TV if you want to view images
with a TV.
defects in both materials and workmanship for one (1) year from the date of purchase (“Warranty Period”).
Non Typical will repair or replace, at its option, the Product if it fails to function properly during the Warranty
Period, subject to the conditions and/or limitations stated herein. Such repair or replacement is your sole remedies under this Limited Warranty.
2. Limitations. Limited Warranty service will not be provided unless the Product, returned in the manner set forth
below, is accompanied by a copy of your original dated sales receipt. Non Typical reserves the right to require
you to provide your original dated sales receipt.
This Limited Warranty does not cover the following:
a. Any defect in or damage to the Product that occurs due to mishandling of the Product;
b. Any defect in or damage to the Product that occurs due to repair, modification, or other similar activity performed by anyone other than Non Typical;
c. Any defect in or damage to the Product that occurs due to transport, dropping, shock, or other similar activity
after your purchase of the Product;
d. Any defect in or damage to the Product that occurs due to careless or improper storage, or improper use or
maintenance of the Product;
e. Any defect in or damage to the Product that occurs due to exhausted batteries;
f. Any defect in or damage to the Product that occurs due to sand, mud, or other foreign objects entering the
inside of the Product; or
g. Any defect in or damage to the Product related to accident, misuse, abuse, use with incompatible accessories
or attachments, your failure to follow proper operating instructions provided by Non Typical, claims made after
the duration of the Warranty Period, or your failure to follow the instructions set forth below with respect to
return of the Product to Non Typical.
3. ALL OTHER EXPRESS AND IMPLIED WARRANTIES FOR THE PRODUCT, INCLUDING THE IMPLIED WARRANTIES OF MERCHANTABILITY AND FITNESS FOR A PARTICULAR PURPOSE ARE HEREBY DISCLAIMED.
NON TYPICAL EXPRESSLY DISCLAIMS ALL WARRANTIES NOT STATED IN THIS WARRANTY. ANY IMPLIED
WARRANTIES THAT MAY BE IMPOSED BY LAW ARE LIMITED IN DURATION TO THE TERMS OF THIS
EXPRESS LIMITED WARRANTY. SOME JURISDICTIONS DO NOT ALLOW THE EXCLUSION OF IMPLIED WARRANTIES OR LIMITATIONS ON HOW LONG AN IMPLIED WARRANTY LASTS, SO THE ABOVE EXCLUSIONS
OR LIMITATIONS MAY NOT APPLY TO YOU. IN NO EVENT WILL NON TYPICAL BE LIABLE TO YOU, OR ANY
THIRD PARTY, FOR ANY DAMAGES IN EXCESS OF THE PURCHASE PRICE OF THE PRODUCT. IN ADDITION,
NON TYPICAL SHALL IN NO EVENT BE LIABLE TO YOU, OR ANY THIRD PARTY, FOR ANY DIRECT OR INDIRECT DAMAGES OR OTHER SPECIAL, INCIDENTAL, EXEMPLARY OR CONSEQUENTIAL DAMAGES ARISING
OUT OF THE USE OF OR INABILITY TO USE THE PRODUCT. SOME JURISDICTIONS DO NOT ALLOW THE
EXCLUSION OR LIMITATION OF INCIDENTAL OR CONSEQUENTIAL DAMAGES FOR SOME PRODUCTS, SO
THE EXCLUSIONS OR LIMITATIONS MAY NOT APPLY TO YOU. THIS LIMITED WARRANTY GIVES YOU SPECIFIC LEGAL RIGHTS, AND YOU MAY ALSO HAVE OTHER RIGHTS WHICH MAY VARY FROM JURISDICTION
TO JURISDICTION.
4. Notwithstanding any terms of this Limited Warranty to the contrary, no warranty coverage shall be provided for
any Product purchased from, through or with the assistance or involvement of any Internet auction web site.
4
25
Excite06OwnerManual
6/27/06
2:38 PM
Page 5
TV REQUIREMENTS
You can use a portable TV or Camcorder to view images in the field. You will need: 1) a
portable TV with a built in video-in connector, 2) a patch cord to attach the TV to the
Cuddeback's TV connector (both are available at Radio Shack and other electronic
stores). The patch cord must have an RCA jack on one end to attach to Cuddeback, and
the opposite cable end must have a connector compatible with the portable TV you
select. We recommend you bring your Cuddeback to the TV retailer so they can assist in
getting you the correct cable. Radio Shack has a selection of TVs and cables that will
work with your Cuddeback.
Images displayed on the TV/camcorder will be at a low resolution. Best image
resolution will be obtained on your computer display or on printed images.
CUDDEBACK STORES IMAGES ON COMPACT
FLASH CARDS
Images are stored on a Compact Flash card (not
included). The Compact Flash card slot is located
on the bottom of the camera.
• Install the card. There is a small lip on the
card. The lip needs to be pointed down
(towards the batteries). Slide the card in firmly.
• Remove the card by pulling the card out.
Figure 1
• You can use any type of Compact Flash Card
of size up to 1 GB.
LEARN - We suggest you have your
Cuddeback and batteries with you as
you read this manual and perform the
steps described. In short time you
will have mastered your Cuddeback.
“Cuddeback not only helps me
hunt smarter, it makes me
hunt harder! Thanks for a
great product!!”
– Steve Barker, Ostrander, OH
© Non Typical, Inc. 2006
Cuddeback is protected by United States patent # 6,744,980.
Cuddeback and Cuddeback logo are registered trademarks of Non Typical, Inc.
TheftStop is a trademark of Non Typical, Inc.
Specifications and features subject to change without notice.
24
5
Excite06OwnerManual
6/27/06
2:38 PM
Page 6
STEP 1 - FAMILIARIZE YOURSELF WITH CUDDEBACK
IMAGE FILE FORMAT
Take a moment to familiarize yourself with Cuddeback's parts.
Fresnel Lens
The Cuddeback Compact Flash folder structure is as follows:
Flash Lens
\DCIM\100CUDDY
Directory where images are saved
Images are named in the format CDY_0001.JPG. The number will increment with
each image.
Figure 3
LED
Camera window
LCD screen
Operation keys
Mounting hole for
wood screw
Sensitivity adjustment
DETECTION ZONE & SENSITIVITY ADJUSTMENT
Cuddeback can detect an animal up to 100 feet. However, this detection range is dependant upon ambient air temperatures. The cooler the temperatures the farther Cuddeback
can sense an animal. In very hot weather (above 80° F) the sensor may only sense up
to 20 feet. You can change the sensitivity of Cuddeback's motion/heat sensor using the
method described on page 19.
However, you can also adjust the sensitivity by moving a small black removable jumper
located below the LCD display. When this jumper is in the lower position, standard sensitivity is selected. When this jumper is in the upper position, high sensitivity is selected. We recommend leaving the jumper in the lower position. However, in hot weather
(above 80° F) you may want to use the upper position to increase detection distances.
You may need to use a small tweezers to access the jumper. If you lose the jumper your
Cuddeback will still function properly with the sensitivity set to standard. If you are getting false detections lower the sensitivity using the jumper or software menu.
Cover screw
receptacle
Flash Card port
USB port
TV connection port
On/off switch
6
Figure 2
23
Excite06OwnerManual
6/27/06
2:38 PM
Page 7
Using Cuddeback without a Compact Flash card
When Cuddeback is used without a Compact Flash Card images are stored in
Cuddeback's internal image memory. Approximately 10 images can be saved. Image
resolution is reduced when Cuddeback is operated without a Compact Flash Card.
Images will be transferred from the internal image memory to a Compact Flash card.
Insert a Compact Flash card into Cuddeback and press
until “DO NOT REMOVE
CARD” appears on the LCD display. The image files will automatically be copied from
internal memory to the Compact Flash card.
TIP - This means that if you forget to install a card your Cuddeback will still record images.
“Cuddeback is the WAY TO GO FOR GREAT
PICTURES when you can't be there.”
“Some of our pictures are so vivid that
people can't believe they were taken
with a scouting camera! Nice job
Cuddeback! ”
Rocky Retzer – Ridgway, PA
File System - FAT and FAT32
Jim Jager – Oskaloosa, IA
Personal Computers (PCs) and digital cameras will either use a FAT (also referred to as
FAT16) or a FAT32 file system on the Compact Flash Card. Cuddeback is compatible
with both file systems.
1) You should not have to worry about the file system unless you have problems with
a digital camera reading the card. If this happens format your Compact Flash Card
in the digital camera first and then install the card into your Cuddeback.
2) The default file system for the Cuddeback is FAT32.
3) Some digital cameras use the FAT or FAT16 file system. If you want to read
Cuddeback images with these cameras you should format the CF card in the digital
camera and not with the Cuddeback camera.
4) You can also format your CF cards with your PC. You can use either FAT or FAT32
formats. We recommend you use FAT32 unless you need to view your images on a
device that does not support FAT32.
22
“This 13 point buck made for some nice
conversation....Thanks to Cuddeback we
have proof.”
“The Cuddeback took “the perfect picture”
of “the perfect 10” and for this I'll always
be joyful. Your product is truly outstanding
and boat loads of fun. Thanks.”
Donnie McCullough – Odon, IN
Chris Moore – Cedarburg, WI
7
Excite06OwnerManual
6/27/06
2:38 PM
Page 8
STEP 2 - TURNING CUDDEBACK ON
1) Slide the On/off Switch to the OFF position
(figure 4).
Figure 4
Figure 5
2) Remove the Compact Flash Card if it is installed
(figure 5).
3) Install 4 brand new alkaline D cell batteries.
(figure 6).
We recommend Duracell or Energizer brand
batteries only! The red LED will light when
batteries are installed.
4) Slide switch to ON. Do not press any key at
this time.
5) In a few seconds the battery level will be
displayed (figure 7) 1 is weak, 4 is strong. In a
few seconds the date & time will be displayed
(figure 8).
Battery
4
Figure 7
6) Install the Compact Flash Card.
TIP - Always remove the Compact Flash Card when removing or installing batteries. This will make it easier to remove
the battery plate and prevent damage to the card.
4/05/06
11:13 AM
Figure 8
TIP - Don't be afraid to press the keys to learn
Cuddeback operation. You can not damage your
Cuddeback by pressing keys. If you need to start
over slide the power switch to OFF, and then back to
ON to restart Cuddeback.
8
The M number is a 3 digit number that will change
as activity is sensed. A reading around 125 indicates
no activity, readings above and below 125 indicates
activity.
The A number is a 3 digit number that indicates the
amount of ambient light - 0 indicates dark and 255
indicates full light.
The B number is a 3 digit number that indicates the
condition of the batteries, the larger the number the
stronger the batteries. Range is 90 to about 140.
The T number is a 3 digit number that represents the
internal temperature of the electronics.
M117A034
B141T013
Figure 31
M - motion sensor field
A - ambient sensor field
B - battery level field
T - temperature field
DISPLAYING THE MODEL OF CUDDEBACK
Cuddeback model and version is displayed. The top
line of the display shows Cuddebacks model. The
bottom line shows the software version (figure 32).
Press
to continue.
TECHNICAL INFORMATION
How Cuddeback Saves Images
Images taken with your Cuddeback camera are
stored in Cuddeback's internal memory or on a
Compact Flash Card. Cuddeback does not include a
Compact Flash card. Cards are readily available from
most stores that sell digital cameras.
21
C2000
D71 A37
Figure 32
6/27/06
TIP - If after formatting a card
the card does not work in
Cuddeback, you should format
the card in your PC. If the card
still does not function the card
needs to be replaced.
2:38 PM
Page 9
1) Press
until [Utilities? C = Yes] is displayed.
2) Press
.
3) Press
numerous times until [Format Card? C
= Yes] is displayed.
4) Press
if you want to format the Compact
Flash Card. Press
to continue without formatting the card.
5) The display will show [Confirm? C = Yes].
6) To confirm that you really want to format the card,
press
again.
7) [Do not remove card] will be displayed while the
card is being formatted. When formatting is
complete the diagnostic display will appear
(described next).
How to install batteries into your Cuddeback
1.
2.
Pull out
blue tab.
Remove
metal plate.
Battery
orientation
3.
Insert
batteries.
4.
DIAGNOSTICS DISPLAY
Bottom
Lip
➤
Cuddeback can display diagnostic information that
can assist when troubleshooting Cuddeback. You will
seldom, if ever, need this information.
1) If not already displayed, press
until [Utilities?
C = Yes] is displayed.
2) Press
.
3) Press
numerous times until a series of numbers and letters are displayed. Those numbers are
described on the next page (figure 31).
4) Press
again to cancel this display and
advance to the model display (described next).
➤
Excite06OwnerManual
Center
Lip
Replace metal plate.
Securing firmly behind
center and bottom lips.
5.
To remove batteries
Push blue
tab back in.
1. Pull out blue tab.
2. Remove metal plate.
3. Push blue tab back in.
4. Remove batteries.
Figure 6
20
9
Excite06OwnerManual
6/27/06
Figure 9
What each key does!
Enables/disables camera;
also used to view
information
Set key – sets date, time,
delays, etc.
Up key
}
Down key
used to change
settings, view
information
General purpose key
2:38 PM
Page 10
STEP 3 - LEARN THE KEYPAD & DISPLAY
MOTION / HEAT DETECTOR SENSITIVITY LEVEL
Cuddeback is programmed by using a 2 line LCD display and 5 keys (Figure 9).
The sensitivity of Cuddeback's motion/heat sensor
can be changed.
1) Press
numerous times until [Utilities? C =
Yes] is displayed.
2) Press
[Sense Level] is displayed (figure 74).
3) Press
or
to change the setting. Select
one of the following settings.
a) Standard.
b) High. We recommend using this setting.
The
KEY is used to enable or disable the camera
and to view information. The
KEY is used to set
the date, time, delay and other settings. The
KEY
&
KEY are used to change settings or view
information.
KEY is a general purpose key used
for various tasks.
Moving from One Menu to the Next
Press
to change settings. Press
move to the next setting.
LEARN - To see how this works press
Press
to view information. Press
move to the next display.
LEARN - To see how this works press
again to
multiple times.
again to
multiple times.
STEP 4 - (S KEY) IS FOR SETTING UP CUDDEBACK
is used to change Cuddeback's settings.
With each press of
a different setting will be
displayed (Figure 10).
After you view or change the setting press
view the next parameter.
to
1) Camera Delay. After taking a picture the camera
will wait this amount of time before arming itself
for the next picture.
10
Delay
01 min
Figure 10
TIP - Detection performance
varies with air temperatures and
animal size. If you photograph
more small animals than you
would like, or see more blank
images, lower the sensitivity.
Blank images are typically caused
by very fast moving animals and
birds. Setting a sensitivity level of
standard will reduce these occurrences. However, because a digital image does not cost anything,
we recommend using the high
setting and allow for the few blank
images that may occur.
FORMATTING THE COMPACT FLASH CARD
Cuddeback will automatically format the Compact
Flash Card if required. However, you can also
manually format the card.
When to format a Compact Flash Card
1) Format your card when you want to erase all
images and other files on the card.
2) If you experience problems with a Compact Flash
Card formatting the card will generally correct
the problem.
3) If you are using a card that was previously used in
some other product (camera, computer, etc.) you
should format the card before using it.
19
TIP - Formatting will completely
erase all files from the Compact
Flash card and all IMAGES &
VIDEOS CAN NEVER BE
RECOVERED.
Excite06OwnerManual
6/27/06
2:38 PM
Page 11
a) If [Camera Delay] is not displayed on the
LCD, press
numerous times until
[Camera Delay] is displayed (figure 11).
b) Press
or
to change the setting.
c) The range is 1 minute to 60 minutes.
TURNING CUDDEBACK ON AND OFF
To disarm Cuddeback and prevent it from taking pictures, slide the On/off switch to the OFF position.
The date and time will be maintained.
Figure 29
To turn Cuddeback on slide the On/off switch to the
ON position (figure 29). If messages do not appear
on the LCD replace the D Cell batteries.
When you slide the On/off switch to OFF, there may
be a delay before Cuddeback turns off.
Delay
01 min
Figure 11
Set Date
4/05
Figure 12
Battery
4
Figure 30
Viewing the Battery Level
When you start Cuddeback the display shows the
battery level of the 4 D Cell batteries. Battery level
reading is a number 1, 2, 3, or 4 (figure 30). Fully
charged batteries are 4, weak batteries are 1. Replace
your batteries when the reading is 1.
Set Year
2006
Figure 13
TIP - Batteries fail sooner in cold temperature. When temperatures are below 30 degree Fahrenheit you may want to
replace the batteries when the battery level is 2.
STORING CUDDEBACK
If you intend to store your Cuddeback for more than
a month or two, we recommend that you remove the
batteries to eliminate any chance of battery leakage.
18
Set Time
11:16 AM
Figure 14
2) Set Date (figure 12)
a) If [Set Date] is not displayed on the LCD,
press
numerous times until [Set Date] is
displayed.
b) Press
to advance the month.
c) Press
to advance the day.
3) Set Year (figure 13)
a) If [Set Year] is not displayed on the LCD,
press (S) numerous times until [Set Year] is
displayed.
b) Press
to reduce the year.
c) Press
to advance the year.
4) Set Time (figure 14)
a) If [Set Time] is not displayed on the LCD,
press
numerous times until [Set Time]
is displayed.
b) Press
to advance the hour. The AM/PM
indicator will change to indicate an AM or
PM hour.
c) Press
to advance the minutes.
11
Excite06OwnerManual
6/27/06
2:38 PM
Page 12
STEP 5 KEY IS FOR CONTROLLING
CUDDEBACK
Press
to view information and to set the
operating mode.
4/05/06
11:13 AM
Figure 15
1) View Date and Time (figure 15) - Press
until the date/time is displayed on the LCD display.
2) View Images Saved - Press
again. The LCD
will display [DO NOT REMOVE CARD] as the
Compact Flash Card is read. In a few seconds
the LCD will display the number of images saved
on the Compact Flash Card (figure 16).
3) Set the Camera Mode - Press
again. One
of Cuddeback's 3 camera modes (Standby,
Test, and Live) will be displayed (figure 17).
Press
or
as needed to change the
camera mode.
a) Standby - Cuddeback will not trigger the camera.
b) Test Mode - The red LED will illuminate when
activity is sensed but the camera will not trigger.
c) Live Mode - Cuddeback will trigger the camera
when activity is sensed. The red LED will NOT
illuminate. About 45 seconds after [Live Mode]
is displayed the LCD will clear.
Images
19
Figure 16
TIP - After Live Mode is displayed
there is a 45 second delay before
the motion sensor starts. This
gives you time to install the cover
and move out of the area without
triggering the camera.
After setting up Cuddeback, install
the cover and leave the area. You
can leave the Camera Mode in
Standby or Test and Cuddeback
will automatically arm itself within
12 minutes.
TestMode
Figure 17
12
1) Attach a TV or camcorder to the TV connector on
Cuddeback.
2) Press
until [Images Saved] appears
(figure 24).
3) Press
or
. [Viewing] will appear on the
display (figure 25). An image will appear on
the TV.
4) View additional images by pressing
or
.
5) Press
when you are finished viewing images.
To Erase an Image that is being Viewed on the TV
1) View an image with the TV as described above.
2) Press (C). The LCD will prompt [Clear Image C
= Yes] (figure 26).
3) To clear the image press
.
4) To continue without clearing the image, press
,
, or
.
To Erase All Images on the Card
1) Press
until [Images Saved] appears.
2) Press
. The LCD will prompt [Clear All
Images C = Yes] (figure 27).
3) To clear all images press
. The LCD will
prompt [Confirm? C = Yes] (figure 28).
4) To clear all images press
. All images will
be cleared.
5) To continue without clearing the images, press
,
, or
.
17
Saved
18
Figure 24
Viewing
Figure 25
Clear
C = Yes
Figure 26
All Ima
C = Yes
Figure 27
Confirm?
C = Yes
Figure 28
Excite06OwnerManual
6/27/06
2:38 PM
Page 13
STEP 6 - ATTACHING CUDDEBACK TO A TREE
TO VIEW IMAGES WITH A PC ATTACHED TO
CUDDEBACK USB PORT
For best image quality install Cuddeback about 10
feet from the place animals are expected. Attach
Cuddeback to a suitable tree 3 to 4 feet above the
ground (figure 18).
1) Attach your computer to Cuddeback with the
appropriate USB cable (not supplied)(figure 23).
Your computer must be using Windows XP.
2) Press
TIP - To determine the detection area you can enable TEST
MODE. Then walk slowly back and forth in front of the camera. The red LED will illuminate when the camera senses
you. The camera will NOT trigger when in TEST MODE.
until [Images Saved] appears
(figure 24).
3) Press
or
. [Viewing] will appear on the
Figure 18
display (figure 25).
4) Your computer should recognize Cuddeback and
Figure 23
Cuddeback can sense and record images at distances of 50
feet or more. However, you will get the best image quality if
Cuddeback is set closer to the animals.
bring up a window to display or copy the images.
There are four ways to attach Cuddeback to a tree.
We recommend copying the images to your computer hard disk. Use the software on your comFigure 19
puter to view and print the images.
5) Press
when you are finished.
2) Use a cord or bungee (not supplied) in conjunction with the eyebolt (supplied) to secure
Cuddeback to a tree.
TO VIEW IMAGES ON A TV/CAMCORDER
ATTACHED TO CUDDEBACK
TIP - To view images with this method you need a portable
TV or camcorder. Your TV or camcorder must have a VIDEO
IN connector. Connect the TV or camcorder to the
Cuddeback with a video cable. Cuddeback uses an RCA plug,
your TV will have its own style. Radio Shack can supply you
with the correct cable for your TV or camcorder. We recommend you bring your Cuddeback with you to Radio Shack if
you elect to purchase a cable.
16
1) Attach with the supplied Torx® screw (stored on
back of Cuddeback)(figure 19). You will need a
#25 Torx screwdriver (not supplied) (figure 20).
Figure 20
TIP - We recommend using a
padlock (not included) to secure
the battery cover. This will assure
that nobody tampers with your
Cuddeback Digital Camera.
3) Use a tripod or other device (not supplied)
attached to the socket on the back of the camera.
The socket has standard 1/4-20 threads and is
compatible with most tripods.
4) Use Cuddeback Bear Safe (see page 27 for
details).
13
Excite06OwnerManual
6/27/06
2:38 PM
Page 14
STEP 7 - CHECKING CUDDEBACK
To field-check Cuddeback, remove the cover and
press
. A series of messages will be displayed.
Press
until [Images Saved] is displayed
(figure 21). This is how many images are saved on
the card (or internal memory if you do not have a
card installed).
Saved
26
Figure 21
TIP - When checking Cuddeback the camera may activate
and take a picture of you. You can cancel this image by
pressing (C) when the message [Picture!] is on the display.
“Thanks Cuddeback for such a high
quality, easy camera to operate.”
Matt Brown – Custer, SD
“The Cuddeback is the best scouting
camera on the market and makes scouting an area 10 times more exciting!”
John Scola – Hammonton, NJ
STEP 8 - VIEWING IMAGES
There are 4 ways to view the images that
Cuddeback has taken.
1) Replace the Compact Flash Card with a different
card. Take the original card home and view the
images on your computer or other device.
2) Attach a computer to Cuddeback's USB port
(described later in this section).
3) You can view images in the field or at home with
a TV attached to Cuddeback (described later in
this section).
4) You can view images in the field with a portable
field viewer or camera (figure 22).
Cuddeback videos can only be viewed with a
computer. You will need to copy the videos to
your computer to view them.
14
“I purchased my Cuddeback for myself
as a Christmas present.. I love it!!!
Flawless.”
“...I have not seen photo quality like this
with any of the other digital scouting
cameras....”
Brian Thorpe – Columbus, IN
Mike Zukovsky – Hannibal, NY
Figure 22
15
Excite06OwnerManual
6/27/06
2:38 PM
Page 13
STEP 6 - ATTACHING CUDDEBACK TO A TREE
TO VIEW IMAGES WITH A PC ATTACHED TO
CUDDEBACK USB PORT
For best image quality install Cuddeback about 10
feet from the place animals are expected. Attach
Cuddeback to a suitable tree 3 to 4 feet above the
ground (figure 18).
1) Attach your computer to Cuddeback with the
appropriate USB cable (not supplied)(figure 23).
Your computer must be using Windows XP.
2) Press
TIP - To determine the detection area you can enable TEST
MODE. Then walk slowly back and forth in front of the camera. The red LED will illuminate when the camera senses
you. The camera will NOT trigger when in TEST MODE.
until [Images Saved] appears
(figure 24).
3) Press
or
. [Viewing] will appear on the
Figure 18
display (figure 25).
4) Your computer should recognize Cuddeback and
Figure 23
Cuddeback can sense and record images at distances of 50
feet or more. However, you will get the best image quality if
Cuddeback is set closer to the animals.
bring up a window to display or copy the images.
There are four ways to attach Cuddeback to a tree.
We recommend copying the images to your computer hard disk. Use the software on your comFigure 19
puter to view and print the images.
5) Press
when you are finished.
2) Use a cord or bungee (not supplied) in conjunction with the eyebolt (supplied) to secure
Cuddeback to a tree.
TO VIEW IMAGES ON A TV/CAMCORDER
ATTACHED TO CUDDEBACK
TIP - To view images with this method you need a portable
TV or camcorder. Your TV or camcorder must have a VIDEO
IN connector. Connect the TV or camcorder to the
Cuddeback with a video cable. Cuddeback uses an RCA plug,
your TV will have its own style. Radio Shack can supply you
with the correct cable for your TV or camcorder. We recommend you bring your Cuddeback with you to Radio Shack if
you elect to purchase a cable.
16
1) Attach with the supplied Torx® screw (stored on
back of Cuddeback)(figure 19). You will need a
#25 Torx screwdriver (not supplied) (figure 20).
Figure 20
TIP - We recommend using a
padlock (not included) to secure
the battery cover. This will assure
that nobody tampers with your
Cuddeback Digital Camera.
3) Use a tripod or other device (not supplied)
attached to the socket on the back of the camera.
The socket has standard 1/4-20 threads and is
compatible with most tripods.
4) Use Cuddeback Bear Safe (see page 27 for
details).
13
Excite06OwnerManual
6/27/06
2:38 PM
Page 12
STEP 5 KEY IS FOR CONTROLLING
CUDDEBACK
Press
to view information and to set the
operating mode.
4/05/06
11:13 AM
Figure 15
1) View Date and Time (figure 15) - Press
until the date/time is displayed on the LCD display.
2) View Images Saved - Press
again. The LCD
will display [DO NOT REMOVE CARD] as the
Compact Flash Card is read. In a few seconds
the LCD will display the number of images saved
on the Compact Flash Card (figure 16).
3) Set the Camera Mode - Press
again. One
of Cuddeback's 3 camera modes (Standby,
Test, and Live) will be displayed (figure 17).
Press
or
as needed to change the
camera mode.
a) Standby - Cuddeback will not trigger the camera.
b) Test Mode - The red LED will illuminate when
activity is sensed but the camera will not trigger.
c) Live Mode - Cuddeback will trigger the camera
when activity is sensed. The red LED will NOT
illuminate. About 45 seconds after [Live Mode]
is displayed the LCD will clear.
Images
19
Figure 16
TIP - After Live Mode is displayed
there is a 45 second delay before
the motion sensor starts. This
gives you time to install the cover
and move out of the area without
triggering the camera.
After setting up Cuddeback, install
the cover and leave the area. You
can leave the Camera Mode in
Standby or Test and Cuddeback
will automatically arm itself within
12 minutes.
TestMode
Figure 17
12
1) Attach a TV or camcorder to the TV connector on
Cuddeback.
2) Press
until [Images Saved] appears
(figure 24).
3) Press
or
. [Viewing] will appear on the
display (figure 25). An image will appear on
the TV.
4) View additional images by pressing
or
.
5) Press
when you are finished viewing images.
To Erase an Image that is being Viewed on the TV
1) View an image with the TV as described above.
2) Press (C). The LCD will prompt [Clear Image C
= Yes] (figure 26).
3) To clear the image press
.
4) To continue without clearing the image, press
,
, or
.
To Erase All Images on the Card
1) Press
until [Images Saved] appears.
2) Press
. The LCD will prompt [Clear All
Images C = Yes] (figure 27).
3) To clear all images press
. The LCD will
prompt [Confirm? C = Yes] (figure 28).
4) To clear all images press
. All images will
be cleared.
5) To continue without clearing the images, press
,
, or
.
17
Saved
18
Figure 24
Viewing
Figure 25
Clear
C = Yes
Figure 26
All Ima
C = Yes
Figure 27
Confirm?
C = Yes
Figure 28
Excite06OwnerManual
6/27/06
2:38 PM
Page 11
a) If [Camera Delay] is not displayed on the
LCD, press
numerous times until
[Camera Delay] is displayed (figure 11).
b) Press
or
to change the setting.
c) The range is 1 minute to 60 minutes.
TURNING CUDDEBACK ON AND OFF
To disarm Cuddeback and prevent it from taking pictures, slide the On/off switch to the OFF position.
The date and time will be maintained.
Figure 29
To turn Cuddeback on slide the On/off switch to the
ON position (figure 29). If messages do not appear
on the LCD replace the D Cell batteries.
When you slide the On/off switch to OFF, there may
be a delay before Cuddeback turns off.
Delay
01 min
Figure 11
Set Date
4/05
Figure 12
Battery
4
Figure 30
Viewing the Battery Level
When you start Cuddeback the display shows the
battery level of the 4 D Cell batteries. Battery level
reading is a number 1, 2, 3, or 4 (figure 30). Fully
charged batteries are 4, weak batteries are 1. Replace
your batteries when the reading is 1.
Set Year
2006
Figure 13
TIP - Batteries fail sooner in cold temperature. When temperatures are below 30 degree Fahrenheit you may want to
replace the batteries when the battery level is 2.
STORING CUDDEBACK
If you intend to store your Cuddeback for more than
a month or two, we recommend that you remove the
batteries to eliminate any chance of battery leakage.
18
Set Time
11:16 AM
Figure 14
2) Set Date (figure 12)
a) If [Set Date] is not displayed on the LCD,
press
numerous times until [Set Date] is
displayed.
b) Press
to advance the month.
c) Press
to advance the day.
3) Set Year (figure 13)
a) If [Set Year] is not displayed on the LCD,
press (S) numerous times until [Set Year] is
displayed.
b) Press
to reduce the year.
c) Press
to advance the year.
4) Set Time (figure 14)
a) If [Set Time] is not displayed on the LCD,
press
numerous times until [Set Time]
is displayed.
b) Press
to advance the hour. The AM/PM
indicator will change to indicate an AM or
PM hour.
c) Press
to advance the minutes.
11
Excite06OwnerManual
6/27/06
Figure 9
What each key does!
Enables/disables camera;
also used to view
information
Set key – sets date, time,
delays, etc.
Up key
}
Down key
used to change
settings, view
information
General purpose key
2:38 PM
Page 10
STEP 3 - LEARN THE KEYPAD & DISPLAY
MOTION / HEAT DETECTOR SENSITIVITY LEVEL
Cuddeback is programmed by using a 2 line LCD display and 5 keys (Figure 9).
The sensitivity of Cuddeback's motion/heat sensor
can be changed.
1) Press
numerous times until [Utilities? C =
Yes] is displayed.
2) Press
[Sense Level] is displayed (figure 74).
3) Press
or
to change the setting. Select
one of the following settings.
a) Standard.
b) High. We recommend using this setting.
The
KEY is used to enable or disable the camera
and to view information. The
KEY is used to set
the date, time, delay and other settings. The
KEY
&
KEY are used to change settings or view
information.
KEY is a general purpose key used
for various tasks.
Moving from One Menu to the Next
Press
to change settings. Press
move to the next setting.
LEARN - To see how this works press
Press
to view information. Press
move to the next display.
LEARN - To see how this works press
again to
multiple times.
again to
multiple times.
STEP 4 - (S KEY) IS FOR SETTING UP CUDDEBACK
is used to change Cuddeback's settings.
With each press of
a different setting will be
displayed (Figure 10).
After you view or change the setting press
view the next parameter.
to
1) Camera Delay. After taking a picture the camera
will wait this amount of time before arming itself
for the next picture.
10
Delay
01 min
Figure 10
TIP - Detection performance
varies with air temperatures and
animal size. If you photograph
more small animals than you
would like, or see more blank
images, lower the sensitivity.
Blank images are typically caused
by very fast moving animals and
birds. Setting a sensitivity level of
standard will reduce these occurrences. However, because a digital image does not cost anything,
we recommend using the high
setting and allow for the few blank
images that may occur.
FORMATTING THE COMPACT FLASH CARD
Cuddeback will automatically format the Compact
Flash Card if required. However, you can also
manually format the card.
When to format a Compact Flash Card
1) Format your card when you want to erase all
images and other files on the card.
2) If you experience problems with a Compact Flash
Card formatting the card will generally correct
the problem.
3) If you are using a card that was previously used in
some other product (camera, computer, etc.) you
should format the card before using it.
19
TIP - Formatting will completely
erase all files from the Compact
Flash card and all IMAGES &
VIDEOS CAN NEVER BE
RECOVERED.
6/27/06
TIP - If after formatting a card
the card does not work in
Cuddeback, you should format
the card in your PC. If the card
still does not function the card
needs to be replaced.
2:38 PM
Page 9
1) Press
until [Utilities? C = Yes] is displayed.
2) Press
.
3) Press
numerous times until [Format Card? C
= Yes] is displayed.
4) Press
if you want to format the Compact
Flash Card. Press
to continue without formatting the card.
5) The display will show [Confirm? C = Yes].
6) To confirm that you really want to format the card,
press
again.
7) [Do not remove card] will be displayed while the
card is being formatted. When formatting is
complete the diagnostic display will appear
(described next).
How to install batteries into your Cuddeback
1.
2.
Pull out
blue tab.
Remove
metal plate.
Battery
orientation
3.
Insert
batteries.
4.
DIAGNOSTICS DISPLAY
Bottom
Lip
➤
Cuddeback can display diagnostic information that
can assist when troubleshooting Cuddeback. You will
seldom, if ever, need this information.
1) If not already displayed, press
until [Utilities?
C = Yes] is displayed.
2) Press
.
3) Press
numerous times until a series of numbers and letters are displayed. Those numbers are
described on the next page (figure 31).
4) Press
again to cancel this display and
advance to the model display (described next).
➤
Excite06OwnerManual
Center
Lip
Replace metal plate.
Securing firmly behind
center and bottom lips.
5.
To remove batteries
Push blue
tab back in.
1. Pull out blue tab.
2. Remove metal plate.
3. Push blue tab back in.
4. Remove batteries.
Figure 6
20
9
Excite06OwnerManual
6/27/06
2:38 PM
Page 8
STEP 2 - TURNING CUDDEBACK ON
1) Slide the On/off Switch to the OFF position
(figure 4).
Figure 4
Figure 5
2) Remove the Compact Flash Card if it is installed
(figure 5).
3) Install 4 brand new alkaline D cell batteries.
(figure 6).
We recommend Duracell or Energizer brand
batteries only! The red LED will light when
batteries are installed.
4) Slide switch to ON. Do not press any key at
this time.
5) In a few seconds the battery level will be
displayed (figure 7) 1 is weak, 4 is strong. In a
few seconds the date & time will be displayed
(figure 8).
Battery
4
Figure 7
6) Install the Compact Flash Card.
TIP - Always remove the Compact Flash Card when removing or installing batteries. This will make it easier to remove
the battery plate and prevent damage to the card.
4/05/06
11:13 AM
Figure 8
TIP - Don't be afraid to press the keys to learn
Cuddeback operation. You can not damage your
Cuddeback by pressing keys. If you need to start
over slide the power switch to OFF, and then back to
ON to restart Cuddeback.
8
The M number is a 3 digit number that will change
as activity is sensed. A reading around 125 indicates
no activity, readings above and below 125 indicates
activity.
The A number is a 3 digit number that indicates the
amount of ambient light - 0 indicates dark and 255
indicates full light.
The B number is a 3 digit number that indicates the
condition of the batteries, the larger the number the
stronger the batteries. Range is 90 to about 140.
The T number is a 3 digit number that represents the
internal temperature of the electronics.
M117A034
B141T013
Figure 31
M - motion sensor field
A - ambient sensor field
B - battery level field
T - temperature field
DISPLAYING THE MODEL OF CUDDEBACK
Cuddeback model and version is displayed. The top
line of the display shows Cuddebacks model. The
bottom line shows the software version (figure 32).
Press
to continue.
TECHNICAL INFORMATION
How Cuddeback Saves Images
Images taken with your Cuddeback camera are
stored in Cuddeback's internal memory or on a
Compact Flash Card. Cuddeback does not include a
Compact Flash card. Cards are readily available from
most stores that sell digital cameras.
21
C2000
D71 A37
Figure 32
Excite06OwnerManual
6/27/06
2:38 PM
Page 7
Using Cuddeback without a Compact Flash card
When Cuddeback is used without a Compact Flash Card images are stored in
Cuddeback's internal image memory. Approximately 10 images can be saved. Image
resolution is reduced when Cuddeback is operated without a Compact Flash Card.
Images will be transferred from the internal image memory to a Compact Flash card.
Insert a Compact Flash card into Cuddeback and press
until “DO NOT REMOVE
CARD” appears on the LCD display. The image files will automatically be copied from
internal memory to the Compact Flash card.
TIP - This means that if you forget to install a card your Cuddeback will still record images.
“Cuddeback is the WAY TO GO FOR GREAT
PICTURES when you can't be there.”
“Some of our pictures are so vivid that
people can't believe they were taken
with a scouting camera! Nice job
Cuddeback! ”
Rocky Retzer – Ridgway, PA
File System - FAT and FAT32
Jim Jager – Oskaloosa, IA
Personal Computers (PCs) and digital cameras will either use a FAT (also referred to as
FAT16) or a FAT32 file system on the Compact Flash Card. Cuddeback is compatible
with both file systems.
1) You should not have to worry about the file system unless you have problems with
a digital camera reading the card. If this happens format your Compact Flash Card
in the digital camera first and then install the card into your Cuddeback.
2) The default file system for the Cuddeback is FAT32.
3) Some digital cameras use the FAT or FAT16 file system. If you want to read
Cuddeback images with these cameras you should format the CF card in the digital
camera and not with the Cuddeback camera.
4) You can also format your CF cards with your PC. You can use either FAT or FAT32
formats. We recommend you use FAT32 unless you need to view your images on a
device that does not support FAT32.
22
“This 13 point buck made for some nice
conversation....Thanks to Cuddeback we
have proof.”
“The Cuddeback took “the perfect picture”
of “the perfect 10” and for this I'll always
be joyful. Your product is truly outstanding
and boat loads of fun. Thanks.”
Donnie McCullough – Odon, IN
Chris Moore – Cedarburg, WI
7
Excite06OwnerManual
6/27/06
2:38 PM
Page 6
STEP 1 - FAMILIARIZE YOURSELF WITH CUDDEBACK
IMAGE FILE FORMAT
Take a moment to familiarize yourself with Cuddeback's parts.
Fresnel Lens
The Cuddeback Compact Flash folder structure is as follows:
Flash Lens
\DCIM\100CUDDY
Directory where images are saved
Images are named in the format CDY_0001.JPG. The number will increment with
each image.
Figure 3
LED
Camera window
LCD screen
Operation keys
Mounting hole for
wood screw
Sensitivity adjustment
DETECTION ZONE & SENSITIVITY ADJUSTMENT
Cuddeback can detect an animal up to 100 feet. However, this detection range is dependant upon ambient air temperatures. The cooler the temperatures the farther Cuddeback
can sense an animal. In very hot weather (above 80° F) the sensor may only sense up
to 20 feet. You can change the sensitivity of Cuddeback's motion/heat sensor using the
method described on page 19.
However, you can also adjust the sensitivity by moving a small black removable jumper
located below the LCD display. When this jumper is in the lower position, standard sensitivity is selected. When this jumper is in the upper position, high sensitivity is selected. We recommend leaving the jumper in the lower position. However, in hot weather
(above 80° F) you may want to use the upper position to increase detection distances.
You may need to use a small tweezers to access the jumper. If you lose the jumper your
Cuddeback will still function properly with the sensitivity set to standard. If you are getting false detections lower the sensitivity using the jumper or software menu.
Cover screw
receptacle
Flash Card port
USB port
TV connection port
On/off switch
6
Figure 2
23
Excite06OwnerManual
6/27/06
2:38 PM
Page 5
TV REQUIREMENTS
You can use a portable TV or Camcorder to view images in the field. You will need: 1) a
portable TV with a built in video-in connector, 2) a patch cord to attach the TV to the
Cuddeback's TV connector (both are available at Radio Shack and other electronic
stores). The patch cord must have an RCA jack on one end to attach to Cuddeback, and
the opposite cable end must have a connector compatible with the portable TV you
select. We recommend you bring your Cuddeback to the TV retailer so they can assist in
getting you the correct cable. Radio Shack has a selection of TVs and cables that will
work with your Cuddeback.
Images displayed on the TV/camcorder will be at a low resolution. Best image
resolution will be obtained on your computer display or on printed images.
CUDDEBACK STORES IMAGES ON COMPACT
FLASH CARDS
Images are stored on a Compact Flash card (not
included). The Compact Flash card slot is located
on the bottom of the camera.
• Install the card. There is a small lip on the
card. The lip needs to be pointed down
(towards the batteries). Slide the card in firmly.
• Remove the card by pulling the card out.
Figure 1
• You can use any type of Compact Flash Card
of size up to 1 GB.
LEARN - We suggest you have your
Cuddeback and batteries with you as
you read this manual and perform the
steps described. In short time you
will have mastered your Cuddeback.
“Cuddeback not only helps me
hunt smarter, it makes me
hunt harder! Thanks for a
great product!!”
– Steve Barker, Ostrander, OH
© Non Typical, Inc. 2006
Cuddeback is protected by United States patent # 6,744,980.
Cuddeback and Cuddeback logo are registered trademarks of Non Typical, Inc.
TheftStop is a trademark of Non Typical, Inc.
Specifications and features subject to change without notice.
24
5
Excite06OwnerManual
6/27/06
2:38 PM
Page 4
LIMITED WARRANTY
Introduction
1. Limited Warranty. Non Typical, Inc. (“Non Typical”) warrants the Product to be free from malfunctions and
The Cuddeback Excite gives you the fast trigger speed and long battery life Cuddeback is
famous for! It features a custom 2.0 megapixel digital camera and a premium strobe
flash that illuminates out to 40 feet! You can adjust the delay and the sensitivity. The
Excite will give you years of reliable performance!
What You Need...
Before you can use your Cuddeback you
will need the following items:
“This picture was taken under
one of my tree stands.”
– Glen Stark, Magnolia, OH
TIP - We do not recommend
attaching Cuddeback to a tree
with a strap or bungee.
Rodents may chew the strap
causing the camera to fall off
the tree. If you do not use
the security screw we recommend that you use wire to
secure Cuddeback to a tree.
1) One or more Compact Flash Cards. We recommend a size of 256MB or bigger. The higher
the number on the card the more images that
can be saved on the card.
2) Four D Cell Batteries (we recommend
Duracell or Energizer).
3) A #25 Torx screwdriver if you want to attach
the camera to a tree with the supplied screw.
4) A bungee, strap, or wire if you want to attach
Cuddeback to a tree without the Torx screw.
The following items are optional:
5) A small padlock if you want to prevent
tampering.
6) USB cable if you want to attach Cuddeback to
your computer's USB port.
7) Video cable & TV if you want to view images
with a TV.
defects in both materials and workmanship for one (1) year from the date of purchase (“Warranty Period”).
Non Typical will repair or replace, at its option, the Product if it fails to function properly during the Warranty
Period, subject to the conditions and/or limitations stated herein. Such repair or replacement is your sole remedies under this Limited Warranty.
2. Limitations. Limited Warranty service will not be provided unless the Product, returned in the manner set forth
below, is accompanied by a copy of your original dated sales receipt. Non Typical reserves the right to require
you to provide your original dated sales receipt.
This Limited Warranty does not cover the following:
a. Any defect in or damage to the Product that occurs due to mishandling of the Product;
b. Any defect in or damage to the Product that occurs due to repair, modification, or other similar activity performed by anyone other than Non Typical;
c. Any defect in or damage to the Product that occurs due to transport, dropping, shock, or other similar activity
after your purchase of the Product;
d. Any defect in or damage to the Product that occurs due to careless or improper storage, or improper use or
maintenance of the Product;
e. Any defect in or damage to the Product that occurs due to exhausted batteries;
f. Any defect in or damage to the Product that occurs due to sand, mud, or other foreign objects entering the
inside of the Product; or
g. Any defect in or damage to the Product related to accident, misuse, abuse, use with incompatible accessories
or attachments, your failure to follow proper operating instructions provided by Non Typical, claims made after
the duration of the Warranty Period, or your failure to follow the instructions set forth below with respect to
return of the Product to Non Typical.
3. ALL OTHER EXPRESS AND IMPLIED WARRANTIES FOR THE PRODUCT, INCLUDING THE IMPLIED WARRANTIES OF MERCHANTABILITY AND FITNESS FOR A PARTICULAR PURPOSE ARE HEREBY DISCLAIMED.
NON TYPICAL EXPRESSLY DISCLAIMS ALL WARRANTIES NOT STATED IN THIS WARRANTY. ANY IMPLIED
WARRANTIES THAT MAY BE IMPOSED BY LAW ARE LIMITED IN DURATION TO THE TERMS OF THIS
EXPRESS LIMITED WARRANTY. SOME JURISDICTIONS DO NOT ALLOW THE EXCLUSION OF IMPLIED WARRANTIES OR LIMITATIONS ON HOW LONG AN IMPLIED WARRANTY LASTS, SO THE ABOVE EXCLUSIONS
OR LIMITATIONS MAY NOT APPLY TO YOU. IN NO EVENT WILL NON TYPICAL BE LIABLE TO YOU, OR ANY
THIRD PARTY, FOR ANY DAMAGES IN EXCESS OF THE PURCHASE PRICE OF THE PRODUCT. IN ADDITION,
NON TYPICAL SHALL IN NO EVENT BE LIABLE TO YOU, OR ANY THIRD PARTY, FOR ANY DIRECT OR INDIRECT DAMAGES OR OTHER SPECIAL, INCIDENTAL, EXEMPLARY OR CONSEQUENTIAL DAMAGES ARISING
OUT OF THE USE OF OR INABILITY TO USE THE PRODUCT. SOME JURISDICTIONS DO NOT ALLOW THE
EXCLUSION OR LIMITATION OF INCIDENTAL OR CONSEQUENTIAL DAMAGES FOR SOME PRODUCTS, SO
THE EXCLUSIONS OR LIMITATIONS MAY NOT APPLY TO YOU. THIS LIMITED WARRANTY GIVES YOU SPECIFIC LEGAL RIGHTS, AND YOU MAY ALSO HAVE OTHER RIGHTS WHICH MAY VARY FROM JURISDICTION
TO JURISDICTION.
4. Notwithstanding any terms of this Limited Warranty to the contrary, no warranty coverage shall be provided for
any Product purchased from, through or with the assistance or involvement of any Internet auction web site.
4
25
Excite06OwnerManual
6/27/06
2:38 PM
Page 3
OBTAINING SERVICE FOR YOUR PRODUCT
Excite
STEP 1: Call Non Typical at (715) 762-2260.
As a condition of the warranty coverage for your Product you are required to contact Non Typical by
telephone at (715) 762-2260 before returning your Product for service. Do not contact the dealer
from whom you purchased the Product. Returning your Product without first calling Non Typical will
void this Limited Warranty and will significantly delay service.
Table of contents
Service calls should be made during Non Typical normal business hours of Monday through Friday
from 8:00 a.m. to 4:30 p.m., Central Standard Time.
Cuddeback Stores Images on Compact Flash Cards . . . . . . . . . . . . . . . . . 5
STEP 2: Obtain a Return Material Authorization number from Non Typical.
Introduction . . . . . . . . . . . . . . . . . . . . . . . . . . . . . . . . . . . . . . . . . . . . . . . . 4
Step 1 Familiarize yourself with Cuddeback . . . . . . . . . . . . . . . . . . . . . . . . 6
Step 2 Turning Cuddeback ON/Installing batteries . . . . . . . . . . . . . . . . . 8 - 9
If Non Typical's staff instructs you to return your Product, you will be given a RMA number. Your
RMA number must be written on the outside of the carton in which you ship the Product to Non
Typical. Packages without a RMA number will incur significant service delays.
Step 3 Learn the Keypad & Display . . . . . . . . . . . . . . . . . . . . . . . . . . . . . 10
STEP 3: Package your product for shipping and include a copy of your sales receipt.
Step 5 (M KEY) is for controlling Cuddeback . . . . . . . . . . . . . . . . . . . . . . 12
Non Typical is not responsible for damage to your Product due to ineffective packaging or damage to
the Product while in transit to Non Typical. You should ship your Product in a sturdy carton with sufficient internal packaging materials to avoid damage. Do not include batteries within your Product
unless instructed to do so by a Non Typical technician.
Step 6 Attaching Cuddeback to a Tree . . . . . . . . . . . . . . . . . . . . . . . . . . . . 13
In order to qualify for service under this Limited Warranty, any Product returned to Non Typical for
service must be accompanied by a copy of or, if requested by Non Typical, the original dated
sales receipt.
Step 4 (S KEY) is for setting up Cuddeback . . . . . . . . . . . . . . . . . . . 10 - 11
Step 7 Checking Cuddeback . . . . . . . . . . . . . . . . . . . . . . . . . . . . . . . . . . 14
Step 8 Viewing Images . . . . . . . . . . . . . . . . . . . . . . . . . . . . . . . . . . .14 - 17
Turning Cuddeback On and Off . . . . . . . . . . . . . . . . . . . . . . . . . . . . . . . . 18
Motion/Heat Detector Sensitivity Level . . . . . . . . . . . . . . . . . . . . . . . . . 19
STEP 4: Return your product to the factory.
Formatting the Compact Flash Card . . . . . . . . . . . . . . . . . . . . . . . . .19 - 20
Ship your product to the factory:
Non Typical, Inc.
Attn: RMA <write your RMA number here>
860 Park Lane
Park Falls, WI 54552.
Diagnostics Display . . . . . . . . . . . . . . . . . . . . . . . . . . . . . . . . . . . . . . . . 20
Technical Information . . . . . . . . . . . . . . . . . . . . . . . . . . . . . . . . . . . .21 - 23
Detection Zone & Sensitivity Adjustment . . . . . . . . . . . . . . . . . . . . . . . . 23
STEP 5: Non Typical will send you a Post Card.
TV Requirements . . . . . . . . . . . . . . . . . . . . . . . . . . . . . . . . . . . . . . . . . . 24
After we receive your product we will send you a post card with an estimated return date.
You do not need to call us for confirmation that your package has arrived at the factory. If your
product is out of warranty an estimate will be sent to you for approval before repairs are conducted.
Warranty Information . . . . . . . . . . . . . . . . . . . . . . . . . . . . . . . . . . . . . . . 25
26
Service . . . . . . . . . . . . . . . . . . . . . . . . . . . . . . . . . . . . . . . . . . . . . . . . . . 26
3
Excite06OwnerManual
6/27/06
2:38 PM
Page 2
~ 2005 Contest Winner ~
Make sure a bear doesn’t damage your Cuddeback.
Use our exclusive Bear Safe!
This heavy duty metal cage
fits over your Cuddeback
and lag-bolts to the tree.
Digital Buck Hunt Photo Contest
We want to see your images and videos. Prizes are awarded for best
images and videos. Visit www.cuddebackdigital.com for details and to
enter your images into our Digital Buck Hunt.
BEAR
Installation is as easy as 1...2...3...
SAFE
Thank you for purchasing a Cuddeback Excite! We are sure you will
enjoy getting images of deer, birds and other animals for years to come. We
encourage you to read through this manual as it will quickly acquaint you with
Cuddeback’s easy operation. And, please be sure to email us your best images for
entry into our annual photo contest!
2
BEARSAFE
BEARSAFE
To get your Bear Safe,
Contact us at 715-762-2260 or visit
www.cuddebackdigital.com
Excite06OwnerManual
6/27/06
2:38 PM
Page 1
What the pros are saying about Cuddeback
“Cuddeback takes great pictures, is
extremely reliable and the batteries
last forever!”
“Cuddeback‘s trigger speed is legendary
... it blows the competition away!”
Dick Scorzafava – The Radical Bowhunter
Jay Gregory – Host, The Wild Outdoors
‘06 Owner’s Manual
“Cuddeback saves you time and money.
Find the trails the big bucks are on with
Cuddeback!”
“I see thousands of scouting camera
images each year. Nothing compares
to Cuddeback!”
Mike Wheeler – Wheeler’s Whitetails
Walt Larsen – Scouting camera columnist
cuddebackdigital.com
Non Typical, Inc. 860 Park Lane,
Park Falls, WI 54552
1-715-762-2260
The #1 digital scouting camera