1
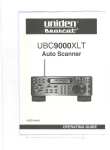
UBC3000XL
.....
T
400 Channel, 20-Bank
Scanning Radio with
25MHz to 1.3GHz
Scanning Range
OPERATING GUIDE
,
,
j
-......
---I
,
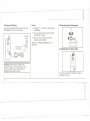
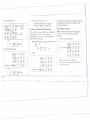
Precautions
Before you use this scanner, please read
and observe the following:
This may be particularly true of the type of
earphone that is placed in the ear canal.
Earphone Warning!
WARNING!
Uniden does not represent this unit to be
waterproof. To reduce the risk of fire or
electrical shock, do not expose this unit to
rain or moisture.
Be sure to use only the recommended
optional monaural earphone (EPOO9). You
may also use a 320 stereo headset. Use of
an incorrect earphone or stereo headset
may be potentially hazardous to your
hearing. The output of the Phone jack is
monaural, but you will hear it in both
headphones of a stereo headset.
Set the Volume to a comfortable audio level
coming from the speaker before plugging in
the monaural earphone or a stereo headset
of the proper impedance (320). Otherwise
you might experience some discomfort or
possible hearing damage if the Volume suddenly becomes too loud because of the Volume Control or Squelch Control setting.
General Battery Warning!
Do not short circuit any Battery.
Do not discard Batteries in a fire; they may
explode.
Nickel-Cadmium Battery Warning!
When using Nickel-Cadmium Batteries with
this product, take note of the following
warnings:
Do not charge Nickel-Cadmium Batteries with
any charger other than the one supplied with
this product. Using another charger may damage the Batteries, or cause them to explode.
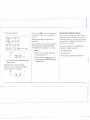
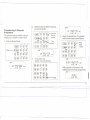
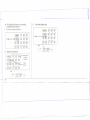
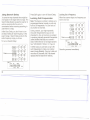
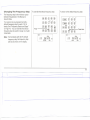
Controls
and Indicators
35 7 9
214161 8
1
;';---"'.."i"I.."'..."':
-@-~ -@)iQ!9
N
"'
...
'.0"'"
-@) -@) -@) N@
~ ... n~:"'"
~~...~~..~~
f1
0r.
12 114116
13 15
118120
17 19 21
10
~
~
~
~
~
~
~
~
~
~
~
~
~
~
~
~
~
~
~
~
~
~
~
~
~
~
~
~
~
~
~
~
~
~
~
)
C
aJ
'C
C
=
1.
2.
3.
4.
5.
6.
7.
8.
9.
10.
11.
12.
13.
14.
15.
16.
17.
18.
19.
20.
21.
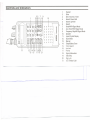
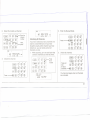
Keypad
Enter
ShiftI DecimalI Clear
Search Down/Limit
Search Up/Hold
Search
Send/WFMSignal Mode
Auto Store/NFMSignal Mode
Frequency Step/AMSignal Mode
Speaker
LiquidCrystal Display
Scan Mode
Manual
Delay/Battery Save
Turbo Search
Lock out
Priority
Signal Attenuation
Data Skip
Key Lock
LCD Display Light
\
\
\
'":":---
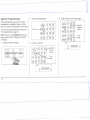
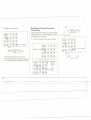
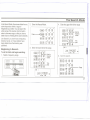
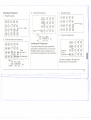
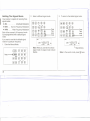
Controls
~
1
2
3
and Indicators
4
1 2
14
13
12
r~~~~:
= :~::
!8881!
"-'--" "
00_00_"
HOLD LIO
3
4
'
~1'~:t::t:lt~ ti £~1i'~~ ~,~,~, ~v~ j~
~
-'--
8FT
5
8 8 8 .8 8 8 Si--M-ii-z]
n
n
n_-.J
n..n
n_n_nhn
[i::2~§ij: ~KB ii AM_: :N:f=.:M~W :f=.:MJ
00
0000_0000_'
6
5
11 10
1.
2.
3.
4.
5.
i]
:
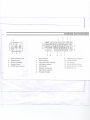
External Speaker Jack
Earphone Jack
Antenna Connector
Squelch Control
On/OffVolumeControl
1.
2.
3.
4.
5.
6.
7.
8.
Bank Indicators
Search Indicator
Signal Attenuation Indicator
Low Battery Indicator
Shift Indicator
Keypad Lock Indicator
Signal Mode Indicators
Frequency Display
9
8
7
9.
10.
11.
12.
13.
14.
Frequency Step Indicators
Lockout Indicator
Hold Indicator
Priority Channel Indicator
Channel Number Indicator
Mode Indicators
r,
~
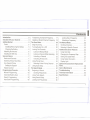
Contents
Introduction.. . . . . . . . . . . . . . 2 TransferringA Channel Frequency. . 17
LockingOuta Frequency. . . . . . 30
Included
withyourScanner.. . . . . . 4 DeletingA Stored Channel Frequency 18
Unlockinga Frequency. . . . . . . 31
GettingStarted. . . . . . . . . . . . . . 5 TheScanMode. . . . . . . . . . . . . 20 The ManualMode. . . . . . . . . . . . 32
Power
Installing/Removingthe Battery. . .
Charging the Battery. . . . . . . . .
Attachingthe Antenna. . . . . . . . .
Installingthe Belt Clip. . . . . . . . . .
5
5
6
6
6
Banks and Channels. . . . . . . .
Scanning Versus Searching. . . .
HowSquelch Works. . . . . . . .
Setting the Squelch.
. . . . . .
KeypadLockout
7
7
8
8
9
ScannerBasics. . . . . . . . . . . . . 7
ProgrammingChannels. . . . . . ..
ManualProgramming.. . .
AutomaticBatterySave. .
Search Programming. . . .
Auto-StoreProgramming. .
.
.
.
.
.
.
.
.
.
.
.
.
..
..
..
..
.
.
.
.
.
.
.
.
10
10
11
12
15
BeginScanning
Turning Banks On or Off . . . . . . .
LockingOut Channels. . . . . . . . .
LockoutinManual Mode. . . . . .
Lockinga Channel WhileScanning
Unlockinga Channel. . . . . . . .
UnlockingAllChannels. . . . . . .
Using PriorityScan. . . . . . . . . .
Selecting A New PriorityChannel.
Using Scan Delay
20
20
21
21
22
22
23
24
24
25
BeginningASearch. . . .
ScrollingFrequencies. .
UsingTurboSearch. . . .
UsingSearchDelay. . . .
LockingOutFrequencies.
27
28
29
30
30
ScrollingChannels. . . . . . . . . .
Selecting A SpecificChannel. . . .
Additional Scanner Features.
. . .
Using Data Skip
Changing the Frequency Step. . . .
Setting the Signal Mode. . . . . . .
Using Signal Attenuation. . . . . .
~isplayLight
Optional Accessories & Replacement
. 32
. 33
. 34
34
. 35
. 36
. 37
37
Parts. . . . . . . . . . . . . . . . . . .
39
TheSearchMode. . . . . . . . . . . . 27 Care&Maintenance. . . . . . . . . . 40
.
.
.
.
.
.
.
.
.
.
.
.
.
.
.
.
.
.
.
.
.
.
.
.
.
.
.
.
.
.
.
Troubleshooting.. . . . . . . . . . . 41
Technicallnformation
42
Specifications.. . . . . . . . . . . . . 44
1
I
-:--
Introduction
Your UBC3000XLT Scanner is a
sophisticated information radio that allows
you to monitor 16 different frequency bands.
These bands include radio information
sources such as
.
.
.
Police and Fire Departments
Aircraft
Business and Industrial
. Utility
.
.
.
Trucks, Buses, Taxis, and Trains
You can program the UBC3000XL T with up
to 400 channels that are divided into 20
banks.
This arrangement of banks and channels
allows you to easily select which
frequencies you want to scan at any time.
See "Scanner Basics" on Page 7.
Additional
You can also contact a local scanning club
or go to your local library for more
information about interesting frequencies in
your area.
Twin TurboH.1 ScanlSearch-Delivers
Marine and Amateur (ham) radio
Motion Picture and Press Relays
a
maximum scan rate of 100 channels-par-second,
and lets you increase the search rate from the
normal 100 frequencies-par-second
to 300
frequencies-par-second
when searching by 5
kHz steps. See "Using Turbo Search" on Page
29.
. Public Service
25 MHz - 1.3 GHz Rang~Provides
you
with almost limitless scanning possibilities.
. Analogue Cellular Telephone Band
. And Many More
UnidedEi and Bearcat@ are registered
trademarks of Uniden Corporation.
Twin Turbo TM is a trademark of
Uniden Corporation.
2
Features
The UBC3000XL T has so many features, it
might take you a while to become familiar
with them all. But the following summary lets
you know what's available and directs you
to the appropriate section of this Operating
Guide for more detailed information.
Note: This range is not continuous. See
"Frequency Bands and Steps" on Page 42.
-
Automatic Battery Save Switches the unit
to standby to conserve battery life.
~.
1'-
1--
Auto-Store-Lets
you automatically store
active frequencies in empty channels. See
"Auto-Store Programming" on Page 15.
Auto-Sort-In
the Scan Mode, sorts the
channels in each bank by frequency to
increase scanner efficiency.
Priority Channels-Designates
one
channel in each of the first 10 banks for
special scanning access. See "Using
Priority Scan" on Page 24.
Scan/Search Delay-In the Scan or Search
Mode, causes the scanner to remain on a
frequency two seconds after the last
transmission to wait for a possible reply.
See "Using Scan Delay" on Page 25 and
"Using Search Delay" on Page 30.
Direct Channel Access-Allows
you to
manually select a specific channel without
scanning. See "Selecting a Specific
Channel" on Page 33.
Direct Frequency Programming-Allows
you to program a specific frequency into a
channel withoutsearching. See "Manual
Programming"on Page 10.
Frequency Transfer-Lets you transfer a
frequency into an empty channel. See
"Transferringa Channel Frequency" on
Page 17.
Variable Frequency Steps
(Increments)-In the search or Manual
Mode, lets you change the steps between
frequencies. See "Changingthe Frequency
Step" on Page 35.
Channel/Frequency Lockout-Lets you
temporarilyremove channels or frequencies
fromthe scanning or search cycle. See
"LockingOut Channels" on Page 21 and
"LockingOut Frequencies" on Page 30.
Signal Attenuation-Reduces the
scanner's sensitivityfor unusuallystrong
signals often found on the WFM(wide
frequency modulation)bands. See "Using
Signal Attenuation"on Page 37.
Data Skip-Lets you set the scanner to
automaticallycontinue searching or
scanning (after three seconds) when it
encounters an unmodulated or data signal.
See "Using Data Skip" on Page 34.
Keypad Lockout-Temporarily
disables
the keypad to prevent accidental pressing of
keys. See "Keypad Lockout" on Page 9.
Battery-Free Memory-The stored
channels are retained in memory when the
Battery Pack is removed from the scanner.
External Speaker & Earphone
Jacks-Allow you to connect an external
speaker or earphone for custom listening.
See "included with your Scanner" on Page
4 and "Optional Accessories &
Replacement Parts" on Page 39.
Display LIght-Lets you view the display
more easily in dark or Iow-light conditions.
.See "Display Light" on Page 38.
3
I
r
Included
It
with your Scanner
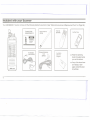
Your UBC3000XL T Scanner comes with the following standard equipment. (See "Optional Accessories & Replacement
Operating Guide
(OMUBC3000XL T)
t£:I
""" """"
; ...
UBC8C>-.T'
(I
UBC3000XL
11
D
(0"") 0' (f/ @"
(o...,,~@' @"@/
880'
@J°@"
El8 cr@/ @
El8"EI~
t>
t>
t>
t>
I
'
t>t>t>t>t>t>t>
t>
t>
t>
t>
t>
t>
t>t>t>t>t>t>t>
I8'MI!n
4
Leather Case
Australian
Warranty
Prog ram
.
Read this Operating
Guide thoroughly before
you use the scanner.
.
If any of the above items
are missing or damaged, contact the place
of purchase.
t>
t>t>t>t>t>t>t>
t>
Monaural Earphone
64Q
(EPOO9)
t>
Belt Clip
(BCK300)
T
AC Adaptor
(AAD-2500U)
88888
t>
"-_m-, ....
~MH(~"""
, .....
Rubber Antenna
(AT218)
---
Parts" on Page 39.)
't
1r
Getting
Power
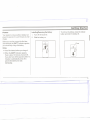
Your scanner's nickel-cadmium battery can
power the scanner for up to 5 hours on a full
charge.
Installing/Removing the Battery
1. Turn off the scanner.
2. Slidethe batteryon.
Started
To remove the..battery, press the release
button and slide the battery off.
I
Before you use the scanner the first time,
and whenever the [BA TT] indicator appears,
you should fully charge the battery.
Notes:
~
~
. Install the battery before you charge it.
.
When the [BATT] indicator appears,
there is about 10 minutes of power left.
If you don't turn off the scanner within 10
minutes, it automatically turns off to
prevent the battery from fully
discharging.
.
5
~
Notes:
Charging the Battery
Use the AC Adaptor/Charger to power the
UBC3000XLT from an AC outlet.
.
AC 240V
Outlet
8
t:J
CJ
AAD-2500U
AC Adaptor
the Antenna
You can operate the scanner while
the battery charges.
. Disconnect the adaptor/charger
during a power failure.
m~1U8)
See also, "Battery Maintenance" on
Page 40.
8
Warning! Use only the supplied AC
adaptor/charger. Other external power
sources could cause overheating or
damage the scanner circuits.
6
Attaching
. It takes 14 - 16 hours to fully charge
the battery.
~T
D:
Installing
the Belt Clip
[Z]
To remove, lift where marked.
direction of arrow.
Push in
'":":--.
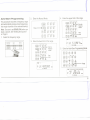
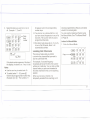
Scanner Basics
To use your scanner with confidence, it's
extremely helpful to understand the
following scanner basics.
Banks
and Channels
Banks and channels are the way stored
frequencies are organized in your scanner.
.
.
A channel is a memory location where
you store a frequency. The channels in
the UBC3000XL T are numbered 1 - 400.
A bank is a group of channels. The
UBC3000XL T has 20 banks with 20
channels in each.
You can turn each bank on or off to control
whether its channels are included during
scanning. When you turn off a bank, its
channels are not erased, but are only
temporarily excluded from scanning. This
allows you to customise your scanning
without constantly deleting and
re-programming the channel frequencies.
You can also temporarily lock out
individual channels within a bank during
scanning. This lets you further
customise your scanning without
deleting channel frequencies. See
"Locking Out Channels" on Page 21.
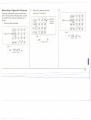
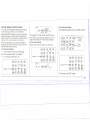
Scanning
Searching
Versus
Scanning and searching are similar in
that they both involve finding active
frequencies within a group of
frequencies. The difference is Scanning
looks only at a group of programmed
frequencies that are stored in the scanner's
channels and grouped into banks.
....
- - - - - -S"CAN- - - - - -..
1
I'
"'...
,
------
v..r-0.~0.~
12 3 4 5 6 7 8 9 10
I
~HANNELS
I
Frequency
Locked Out
(UO)
"---y-"
Frequency
Not
Entered
Searching looks at all the frequencies within
a pre-selected range of frequencies.
If you find an interesting frequency while
searching, you can store it in a channel for
easier access later. See "Search
Pr<;>gramming"on Page 12.
7
r
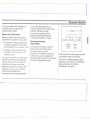
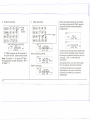
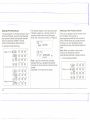
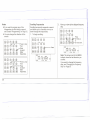
How Squelch
Works
The squelch circuit in your scanner is like a
gate. If it is too Iow, everything gets through
... noise, weak signals, and strong signals.
Strong Signals
.
MediumSignals
:
Weak
Signais:::::::::
........................................................................
u
u
......--........-....--..--..
Noise-...........-..---..--..
-......-..-..............--..
......
If the gate is set too high, nothing gets
through ... not even the strong signals.
When the gate is correctly set, strong
signals get through, but weaker signals and
noise are blocked.
StrongSignalsMediumSignals-
...
..
..
Setting the Squelch
Adjust VOLUME to a comfortable listening
level.
To set the Squelch, you must be in the
Manual Mode. No signal should be present
when adjusting Squelch.
1.
Press (.MANUA~until
you do not hear a
signal.
WeakSignals
+.
---..---....-.......
Noise. -- . . -- - . . --...
-.....--..--........
11
(OIlANUA~
@ @ @
BSAVE
Medium Signals---':
.
WeakSignals
:
15
17
18
SFT
20
880@@
Strong Signals
13
0 @ @
14
?ress
12
(OSCAN')
18
19
880@@
m
,..
---..---..-.....-...
Noise. - - . . - - - . . - . ...
---..---..--....-...
8
l-VI
I
r
Turn until hiss heard.
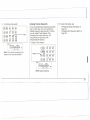
Keypad
Lockout
To unlock the keypad.
Keypad lockout lets you disable all keypad
) to prevent accidental
keys (except
pressing of a key.
880@@
To lock the keypad:
880@@
B
This lowers the squelch gate so that
everything gets through.
Turn just until hiss stops.
Press and
hold until
w-C
appears.
8FT
Pressand
hold until
w-C
disappears.
88
B8
20
B 8] " 81~
AM
---a 01 (3
NFM
WFM
[8 18
ANK 1I14;~'f
SCAN
888
E
SCR n
I
.
BANK 1U ~~f7
SCAN
888
SCAn
t)
This raises the "squelch gate" allowing
only strong signals to get through.
9
'""::--.
'!I
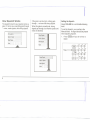
Programming
Before
more
you
can scan,
frequencies
you
must
store two
into the scanner's
or
2.
Enter the Manual
4.
Mode.
Enter
the frequency.
channel
r
memories.
new
There
are three ways
frequencies
Programming,
Programming,
Auto-Store
Programming.
Manual
Programming
1.
Select
to program
and
Press
H
.::
SFT 20
MOBILE
:
.
155.490
POCATELLO
154.725
~18~19
B[30@@
----
PINEHURST
@~~
Q
5 ~7
OJ~0~~
BASE
--------
~'2 ~13
. 0 IIAN~ €f @15 @18
a frequency.
LOCATION
~1
(0SCAN)
into channels-Manual
Search
'
------
: :g
***.***
*** ***
3. Select the channel.
i - -11-(OSCAN):
@ @ @~Enterthe
-12-
14
:
0 MANUA I (@)
BSAVEI 17
15
16
:
@ 18 @:
191
B (3 d:@f:@
channel
number.
Then,
press
1- - __I
BANK I
p
1 000.000
uo
10
-
-
1'-
(OSCAN):@
I
~
I
:
~wl
-
-12
14
15
@) @
I
I
I
~
@:
- -
-'31
@ @
17
18
7
[3(3 0
@8 @9
oc
:
SFT
I
Enter the
I
18I
frequency
M/II
b
nurn er.
I
191
I
I
20 -- -:
13 (3 :_Q--€)_:@
The channel number begins to flash.
BANK
1
- -'31
(38:--0--~ @ r-@:
-- -L
Channels
p
n~
/..
.,'-160.150
uo
.
--:--..
5.
Further press @ to store the frequency in
the selected channel, or press <!) twice to
cancel.
Store the frequency.
11
12
13
6) @ @
(OSCAN)
14
15
Repeat these steps to program more
channels.
18
@@@
8
BE 07 @18@19
8FT 20
B80@@
Press
p
Notes:
.
1
BANK
Use the banks to store similar frequencies
(e.g., local police frequencies) together.
This helps the UBC3000XL T scan faster.
1 lf50.150
12.5 IOta
11Hz
NFII
The channel number stops flashing and
a beep sounds.
.
If you make a mistake, press <!)
twice and start over.
Automatic
Battery
Save
If you let the UBC3000XL T sit idle while you
are programming channels (as you look up
more frequencies, for example), the scanner
may switch to the Battery Save Mode. The
display does not change.
To conserve batteries, the UBC3000XL T
switches to Battery Save when:
In Manual Mode
.
. Delay is OFF
. No signal is received for 60 seconds
If you enter an invalid frequency, a
beep sounds and ERROR appears.
Repeat Step 4.
If the frequency is stored in another
channel, you hear a beep and the other
channel appears in the display.
BANK
1
p
~.n
CH 3lf
12.5 IOta
NFM
11
-:--
2.
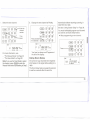
Programming
This procedure lets you search for active
frequencies in a selected range and store
any or all of those frequencies into channels.
For more information about searching, see
"The Search Mode," page 27.
Enter the Manual Mode.
11
12
14
Press
OMANUA
BSAVE
13 [3
15
18
@) @ @
(eJ @18@19
8FT
20
r380@@
--------
PINEHURST
POCATELLO
155.490
***.***
154.725
***.***
""""~~lm,iiii\.)
(OSCAN):
OMANUA
1
1
I
@
@
14
@~Enterthe
channel
1
15
18)
@ @ @:
BSAVE I
17
88:€)@@:
- -- -~
18
19'
r
- - --
number.
Then,
press
Ba d:@f:@
1-- __I
BANK
1
11 000.000
UO
12
- -11-- - if - -131
~@;
0
(OSCAN]:
1
~4
~'5
(OIlAH~:~
E3
BSAVE1
1
oc 1 7
I
~
11Hz
fI'::'t.'81
~
:
17
'8
8FT
2Ot-----
19)
a
9
[3 0 @
@
1
(38]:01______-@:@
BE3~B~
3. Select a channel.
j"- - 1'-- - ir - -'31
MOBILE
BASE
LOCATION
r
13
@ @ @
(OSCAN)
Note: Be sure to set SQUELCH before you
begin a search. See "Setting the Squelch"
on Page 8.
1. Select a frequency range.
4. Enter the lower limit of the range.
BANNNNNNNNNNNNNNNNNNNNNNNNNNNNNNNNNNNNNNNNNN
Search
1
1
1
Enterthe
frequency
number.
Then,
press
-:--.
5. Enter the upper limit of the range.
- - 1'- - - 12-- - ;31
r
~:0 :
(OIlANUA~
The scanner stops on the first active
frequency it finds.
14
~
15
@):
16;
: @J@ @:
BSAVE 1
17
18
E3r3:€))@@:
19'
: SFT 20,----B 8J,-------0 @: @
BB ~[3 ~
I
BANK
DLY
~rn
.
Then,
press
.
88888
NFM
If you do not want to store the frequency,
12
BSAVE
17
88€)@@
9FT
B80@@
Press
18
E]8"8~
AM
NFM
WFM
8 B 8J 8 le-,- -
~,
13
20
880@@
(0 SCAN)
- 11- - - 12- - - ;3'
~
'
Presstwice.
Enter the
: 6) @ @2 ,channel
,
14
~0@@
14
15
16
(OMAN~
@) @ @
20
8(3(7)@@
9FT
To store the frequency, stop searching.
Then, proceed to Step 6A, 68, or 6C.
11
88(7)@@
AM
J
MHz
6A.Store the frequency in the currently
displayed channel.
6. Start the search.
r380@@
[E]8"~
120.500
press EJ to continue searching.
U 1~ 135.987SMHzI
uo
)
9FT
SRCU.
12.5 KHz AM
I
1
1.
BANK'
Enter the
frequency
number.
68. To store the search frequency in
another selected channel:
15
~:@@@:
BSAVE'
17
18
16,
b
numer.
19'
E3 8: €) @ @ :
19
---SFl
20
Press
(BANK 1
'
I
20:----
8 (3 O:-@-:@
DlY
'I
BANK 1
WFM
I
I
'--
I
KHz AM
~[~ 12.5120.500
MHzj
11 12~
~H~~50 O~
13
-'
_J-
Note: For channels 1 9, you can enter just
a single digit.
2.
Press ~ . The display alternates
between the search frequency and the
new channel/frequency.
wo
3.
88€)@@
8E30@@
MHz
AM
DLY
120.500
MHz
3. Enter the new frequency.
14
E3
130/
1S
2.
16
DLY
@16
@19
..
20
Press
9
DLY
P 151 120.500
12.5 KHzAM
1
1
- -131
14
1S
~
17
16
I
1
161
: @ @ @:
( 0 IlANUA~
&SAVE'
1S
16
17
18
19
8FT
20
88)@@
MHz
r BANK
Press
I
DLY
~P
AN»:6) @ @
13
14
B80@@
r - -11- - -1£
880@@
BANK
Press
Select the bank.
~SC
8FT
BSAVE
WFM
12.5 KHz All
@@@
12
6) @ @
(@)@@
11 120.500
13
6) @ @
(OSCAN)
MHz
Store the search frequency.
11
KHz AM
12
~~ 120.500
((oscAN)
NFM
)AN){ 1
11
DLY
20
BE3 ~ E] ~
88 (3 8 B
12.5KHzAM
12.5
iP
I
12.5 KHz AM
8FT
P 151 000.000
I
1.
9
BANK
BANK
6C. To store the search frequency in the first
empty channel in another bank:
21 12~~H~~500 MHz
Press
Bank
number
19'
8l3:€)@@: r---13l3 d:-@2O:@
- __I
F7
MHz
14
T
----
Auto-Store
Programming
This procedure searches a frequency range
and automatically stores active frequencies
into empty channels of the selected bank(s).
Note: Be sure to set SQUELCH before you
begin a search. See "Setting the Squelch"
"
~---"-'-
2.
4. Enter the upper limit of the range.
Enter the Manual Mode.
11
0
(OSCAN)
12
r--"---'2
13
15
(OSCAN):{D
: 14
16
@ @ @
(OIlAN
BSAVE
17
18
IlSAVE1
8FT
(380@)@
B8
LOCATION
BASE
3. Enter the lower limit of the range.
p
r - -,,- - -'2- - - -'3'
~
f!WWfik'~~.'\~
PINEHURST
155,490
"','"
(OSCAN):
POCATELLO
"','"
<23 : @ @ @:
Enterthe
frequency
813:0@@:
1
8FT 20,-- - - 13El:0 @:@
Then,
a 8 '-~-8-
press
154,725
:0
IlSAVEI
BANK
p
14
15
17
@ :;
18
18
,9'
~
18
18
19 I
@20,--@:
- - -
5.
Enter the
frequency
number.
8FT
~EJ ~
Then,
press
2
~n
5 11.98 7511Hz
12.5 KHz All
Enter the Auto-Store Programming Mode.
number.
88
0@@
8FT
20
(3[3O@)@
BB"
2
~n LfOO.OOO
11Hz
12.5 KHz All
15
13 13:,______-0 @: @
20
BANK
MOBILE
17
813:01
19
880@@
on Page8.
1. Selectthe frequencyrange.
'31
~
@: ;
<23 : @ @ @:
@ @
14
Press
"--..
[3~
Press
B88~
BANK WI4sl7',,',o'i1'\i'1s'14isli17'liiiF.
DMA-"""')~'(Qj"""'.""
P
21
120.500
.,.""
11Hz
12.5 KHz All
15
--
-
6. Select the bank(s).
r
- - 11-- -12- - -'31
(OSCAN):@
1
1
(OIlAN~
~~I
E3
(3
DC
7. Begin searching.
@ @ '
14
15
~
181
: @ @ @:
7
S
9
@
@
€)
1
17
18
1
1
I
Press
Bank
number
1
1111
1
1
- - - -"., ,-- -[3 (3 d,@)20:@
,-- __I
8FT
AM
88888
BANK
H€2ifii'iii'iiiiim'I"'iii"I'r'iiiiIE
BANK ~s
Di.K
," """""I.~'~"""'ii..""""'"
DIr?JI(
~'~
P 21 120.500
f3130@@
(3(30@@
B8~~
11Hz
12.5 KHz All
If "FULL" appears, all 20 channels of
the bank are full. Select another bank.
Note: For banks 11 - 20, press SFT then
the appropriate number. (Example - SFT-1
for Bank 11.)
When all empty channels in the bank(s)
have been programmed, FULL appears
along with the last channeVfrequency
programmed.
20
NFU
BAtIK
Press
60
)~
60 '153.025
SRCH'"
NRI
12.5 KHz
If there are not enough active frequencies
fol,Jnd to fill the available empty channels,
the scanner continue:..ssearching until you
press ~ , or E3 to manually stop
AUTO SRCH'"
22 '108.33
12.5KHz
NFII
7511Hz
~31
)~
SRCH'"
888.888
12.5 KHz
NRI
Auto-Store.
During Auto Store, you don't hear audio
from the signals received and stored.
Search continues.
~
11Hz
NFII
11Hz
Active frequency stored.
BAtIK ;i(s
NFII
BANK
~~ 12.5ItHz
888.888
BAtIK 2
DAM
FULL
12.5 KHz
WFM
11Hz
Auto Store will store every received
transmission. Be sure to review the
channels and delete any unwanted
frequencies.
16
-~---
i 11
,
\
I
=
2.
Transferring
Frequency
A Channel
(OSCAN):
0
I
(OSCAN)
':OIlAN~
~
5
o~0~~
0 IlANUA
12
13
15
@ @ @:
17
59
11Hz
452.115
12.5 KHz
3.
12.& KHz
4.
r - -,,- - -12- -
Then,
(OIlANUA~
SFT
AM
81388
15
~'
NFM
1
181
:@,7 @'8 @:
'
138 0 @ @
Press
Bank
number
'91 I
I
,----
Ft
813 d:@f:@
- - __I
IIAIIK
I
(3(3€)@@
B80@@
B8"[3~
14
11&:17891
1
Press [SND] key.
"BANK" icon starts blinking.
NFII
-131
@ @
I:0
(OSCAN)
I
11Hz
11Hz
NFM
Select the desired bank. The selected
bank's lowest empty channel flashes.
191
press
I
59 452.115
~~I
20
IIAIIK
18
number.
IIAIIK
td,7 tt:;\'8 ~'9
B[30@@
16,
16
@ @ @
SFT
12.& KHz
I
15
[3 13: 0 @ @:
----~ ' ---[3 E] d: 1--@f:@
__I
0 @ @
5'1 442.500
I
14
BSAVE'
14
Press
@ @,r-Enterthe
channel
I
Enter the Manual Mode.
11
=~~
j"- -,,- - -12-- -131
This procedure lets you transfer a stored
frequency to a channel in another bank.
1.
Select the channel with the frequency
you want to transfer.
P~Q J~
452.175
12.& KHz
11Hz
NFM
FULL appears if all channels in the
selected bank are already programmed.
20
BANK
NFM
WFM
B
Press
FfU LtNFM
12.5 KHz
17
\
I
I
I
Deleting
A Stored Channel
Frequency
Use this procedure when you want to delete
a frequency from a channel withoutstoring a
new frequency in its place.
1. Find the frequency you want to delete.
5. Transfer the frequency.
(:OSCAN)
0'
@'2@'3
(:0 IIIANUA @f @'5@'6
BSAVE
7 @'6@'9
8 @J
8)(3 07
88
BANK
"
I
Press
i/15
BSAVE
17
Channel & Frequency blinks twice
followed by a beep, indicating frequency
has transferred to the selected channel.
13
19
i!i! '-108.33
12.5KHz
2.
OMANUA
: 0) @ @,;rI
14
15
161
@) @ @:
I
I
I
BSAVE1
17
16
19'
E3(3:€)@@:
---s~
r---B (3 O:@20:@
1--__I
number.
Then,
press
7SMItI
11
12
13
0) @ @
(OSCAN)
15
16
@@@
BSAVE
17
88)@@
16
19
Press
B (3 dFT@T'@
BANK
Enter the
channel
NFM
Press [ 0 ] key.
20
i"- -1'- - -12- - -131
(0 SCAN)
--
16
E380@@
880@@
SFT
18
'2
~0)@@
14
15
16
4(0 IlANUA~ @ @ @
'p"\I
,...10 u4\S21
1.../
.
, ,'"Miii:
,,'....nll"
(i., kill' 'MF.!\,' "'"
~
Z
14
Press
dFT@2O@
BANK
-
/
z
'
0
'"
12,5 :tHz
NFM
I
\
I
I
3. Press [ E) key.
11
12
13
(OSCAN)
6) @ @
(OIlAN~
@j @ @
14
E3
8
07
15
18
@18 @19
8FT
20
Press
BI30@@
BANK
2
22 000.000
11Hz
UO
For more information, see
-
"The Scan Mode"on Page 20
"The Manual Mode"on Page 32
Note: Ifyou use the Scan Mode to
display the channel, press ~
to
enter the Manual Mode before
proceeding to Step 2.
,~
19
--
-::-..
The Scan
Mode
Begin Scanning
There are two ways to begin scanning.
. Turn on the scanner. Scanning begins
each time you turn the UBC3000XL Ton.
While in the Manual Mode:
.
11
Press
4(OSCAN)
14
(01lAN~
12
13
6) @ @
15
16
@ @ @
BSAVE
17
18
8FT
20
E380@@
B80@@
19
In the Scan Mode, the UBC3000XL T cycles
through all the channels you have
programmed in the banks that are currently
active.
For more information see
-
The scanner stops on each channel that is
broadcasting a signal and automatically
resumes scanning when the signal stops.
Or, you can press (esCAN)tOresume
scanning.
.,
50 120.025
Press
4(0 SCAN)
11Hz
12.5 KHz All
SCRn
-
"Using Scan Delay" on Page 25
"Using Data Skip" on Page 34
01
@12 @13
( 0 IIAN~ @/
BSAVE
@15 @18
E38J
07
@18 @19
8FT
l3l30@@
BANK 1I!'~4I'
For more information see
20
After you have programmed channels in
several of the scanner's banks you can
customise which channels you scan by
turning the banks on or off.
1.
SCAN
BANK I U ~$1t
SCAN DIo1'A"
888
"Scanner Basics" on Page 7
"Programming Channels" on Page 10
"Turning Banks On or Off" on Page 20.
Turning Banks On Or Off
BANK I 2 I c)$1t
SCAN DAWi
'
888
SCRn
20
-
2. Select the bank you want to turn on or
off. Example - 1,2 and 3.
r
- - 1'- - - 1£ - - 13'
~
:0 @ @
~
: @j @ @:
' '7 '8
S
~
l3 (3 07 @
@
(OSCAN)
I
I
14
1
181
15
~~I
'91
1)1,;
'
number
.
I1
F'{
Press
Bank
,----
Locking
45 I
SCAN DIo'M
5[ RN
. Use the zero key to select bank 10.
To select banks 11
- 20,
If you try
press
0
followed by the appropriate number key.
(Example: 0 G) The numbers 11 -
remains programmed so that you can easily
unlock it for scanning later.
You can select a locked out channel using
the Manual Mode. See "The Manual Mode"
Lockout in Manual Mode
1. Enter the Manual Mode.
11
(OSCAN)0
For example, if a stored frequency
broadcasts almost all the time, the scanner
will stop on it and stay. You can lock out that
channel when you are more interested in
the other channels for the current scanning
session.
Press
.
0 IlANUA~
BSAVE
14
12
13
@ @
15
16
@j @ @
~
01
~7
a~0J~@
~'8
8FT
B80@@
~
19
20
When you lock out a channel, it is
temporarily excluded from scanning, but it
21
\
\
JI
I
on Page 32.
Out Channels
The lock-out feature lets you further
customise the channels that you want to
scan at a particular time.
If the bank number appears at the top of
the display, the bank is on. If not, it is off.
Notes:
.
. One bank must always be on.
to turn off all 20 banks, Bank 1 will
automatically activate.
1
1
(3 (3 d.@2O:@
,- - __I
BANK
.
20 appear next to the corresponding
number keys.
You can turn on a bank wheth9r or not
you have stored frequencies in any of its
channels. The scanner still only scans
programmed channels.
~
2. Select the channel.
j" - -'1-
- - 12- - - 131
(0 SCAN) :1 6)
I
OMANUA
1
@ @.:
Enter
the
channel
1
14
15
16,
@ @ @:
BSAVE 1
17
E3 (3: 0
18
Locking a Channel While Scanning
number.
19 I
@ @:
If the scanner keeps stopping on a particular
channel due to noise or too-frequent
transmissions, you may want to keep that
channel from scanning.
Then,
n
r
@)2O:@
1-__I
press
(3 (3 d:
BANK
12.5 KHz
BANK
SCAN
NFM
Unlocking a Channel
Note: Empty channels are automatically
locked. You cannot unlock an empty
channel.
1. Enter the Manual Mode.
12.5 KHz
11
12
13
6) @ @
8130@@
€Jao@@
9FT
UO
12.5KHz
NFM
~
t 0 IIAN~
01
@12 @13
@/
@15 €f
07
@18 @19
BSAVE
88
9FT
11
12
13
14
15
16
~@@@
8 l3E 079FT@1820@19
Press
93 Ll5L1.162SIIHzI
MHz
NFM
~6)@@
20
BANK
Press
2. Then:
<:0 IIAN~
@f @15 @16
BSAVE 17
18
19
Press
(0 SCAN)
~1
BD Ll5L1.725
Lockout the channel.
(OSCANJ
22
The scanner immediately resumes scanning
because that channel is no longer in the
scanning sequence.
1. Wait until the scanner stops at the channel.
93 Ll5L1.162sMHz
3.
For more information, see
- "The Manual Mode" on Page 32.
- "The Scan Mode" on Page 20.
€][30@@
20
B80@@
Note: Because the channel is
locked-out, you cannot use the Scan
Mode to select it.
~
2. Select the locked-out channel.
80 '-15'-1.725
j' - -'1- - - 12- - - -131
(0 SCAN)
OIotANUA
:0 @
1
1
1
14
@,;r-
Enterthe
channel
1
161
15
@ @ @:
agAVE I
17
18
19 I
B E] d: 1--@20:@
__I
BANK
80 '-15'-1.725
12.5 KHz
3. Unlock the channel.
(OSCANJ
13
0 @ @
14
15
16
17
18
19
8FT
20
813€)@@
Press
~
:0 @ @
~@))@@
BSAVE
14
Press
- - 12- - - -'31'
.- ~,,-
(0 sCAN)1
12
€J80@@
11
I
14
~:@
15
I
161
@ @:
BSAVE1
17
16
88:€)@@:
---sF,
BANK
SCAN
1 21 .;~'6
DA'I"'ti
13
15
18
@))
@ @
§01; 07
S
9
@'8@'9
01lAN
8.
7
8FT
20
l3[30@@
3. Unlock all channels.
11
Press
Bank
(01lAN~ @)) @
number
14
Press and
hold
19'
forabout
2 seconds.
20'----
12
13
0 @ @
(OSCAN)
B 8J 0: -@
- - _I:@
(
12
0@@
1. While scanning, turn on each bank that
contains channels you want to unlock.
11Hz
NFII
11
11Hz
NFII
If you have locked out many channels and
want to unlock them all, or if you have
forgotten exactly which channel you have
locked out, you can simply unlock all
channels at once.
Then,
press
r
12.5 KHz
Unlocking AllChannels
number.
E38:€)@S:
- - - -~
----
UO
2. Enter the Manual Mode.
BANK
15
18
@
~ ~7
~'8
~ 19
{V ~ @
E3 ~
8FT
20
--{3 [3 0 @ @
You hear two beeps when all channels
are unlocked.
-
I
L~8~ SCAN
,
]
" ~'I
23
11
--
--
-....
Using Priority Scan
You can program one Priority Channel in each
of the first 10 banks. During Priority Scanning,
your scanner checks these special channels
every two seconds, whether or not the
scanner has located an active channel.
11
4(OSCAN)
12
(OIlAN~
~
~~
15
18
~7
~
~
~
11
20
12
13
6) @ @
14
Press
SCAN
li~l. 51
PRI
~ ~ 120.500
12.5
11Hz
KHz All
~18~19
880@@
(OIlAN~
BSAVE
lANK
SCAN
P
@ @ @
8FT
(OSCAN)
1 U ~$it
13
6) @ @
14
0
lANK
SCAN
888
To activate Priority Scanning:
Press
The scanner begins normal scanning, but if
it detects a signal on a priority channel, it
remains on that channel until the signal
ends. See "Using Scan Delay" on Page 25.
15
Note: I~you have more than one bank
selected that has a programmed priority
channel, the lower channel number has top
priority .
Data Skip is not active in this mode.
18
@ @ @
E3 (3
07 @18@19
§'EJ
dFT(§)2O@
Selecting
A New Priority
Channel
There is one priority channel in each of the
first 10 banks. The scanner is
pre-programmed with the first channel of
each of these banks as a priority channel.
However, you can change the priority
channel to be any other channel within the
bank.
Note: When you select a new priority
channel, the old priority channel
automatically becomes a regular channel.
1. Enter the Manual Mode.
~11
(OSCAN)
Press
4(OIlAN~
aa~e;~~
~
12
0
13
@ @
14
15
16
@ @ @
~7
~18~19
8FT
B80@@
20
24
~
---
'"':":---
I
Select the new channel.
3. Change the new channel to Priority.
.- - 1'- - -'2- - - -'31
(OSCAN)
OMANUA
-
: 6) @ @r-Enter
the
channel
@ @ @:
number.
I
I
14
15
I
BSAVE:
17
E38:0@@:
---sf"r
'8
19'
20;----
Then,
press
B E)) 0: 1-@__I'@
lANK
BANK
( 0 IIAN~
BSAVE
@4 @'5 @i'
"The Manual Mode" on Page 32
"The Scan Mode" on Page 20
Note: If you use the Scan Mode to select
the channel, press (.~
to enter the
Manual Mode before proceeding to Step 2.
You must individually program each channel
you want to use Scan Delay feature.
.
After programming a new channel:
11
NFM
Using
Scan
Delay
On some two-way channels there might be
short lapses in the signal while waiting for a
reply.
r
13
15
11
(01lAN~
@ @ @
§t3E
0/ @'8 @'9
Press
8FT
You hear two beeps and P appears at
the left of the display.
12
6) @ @
14
PRI
12.5 KHz
NFM
For more information, see
Z
See also "Using Search Delay" on Page 30.
(OSCAN)
P 31 486.987SMttz
31 486.987SMttz
-
~' ~12 ~'3
0~~
8)(3 (lj7 @'8 @19
8FT 20
Press and hold ~
for2 seconds ~ ~ O@@
Z
12.5 KHz
(0 SCAN)
I
16 I
transmission before resuming scanning, in
case there is a reply.
20
880@@
BANK
162
.
DLY
252.900
Mttz
12.5 KHz AM
The Scan Delay feature causes the scanner
to wait two seconds after the end of a
25
-:-:--
.
To add Scan Delay to an existing
3. Turn Scan Delay ON.
programmed channel:
1. Enter the Manual Mode.
11
11
(OSCAN)
12
1~
Press
4(0 IlANUA~
15
18
E3E
07
Press
@ @ @
17
BSAVE
18
19
880@@
20
@18 @'9
SFT 20
880@@
8r3€))@@
SFT
13
(OIlAN
13
0 @ @
12
0 @ @
1
15
16
@ @ @
(OSCAN)
BANK
5
DLY
91
'-15 1.'-100
12.5 KHz
2. Select the channel.
11Hz
NFII
j'" - -11- - - 12- - - -131
: 0 @ @~
OMANUA @ @ @:
G:> SCAN)
1
1
14
15
1
16 I
17
18
19'
I
BSAVE 1
88:0
@ @:
---s~ 20;---B [3 0: 1--__I
@ I@
Enter the
channel
number.
Then,
press
BANK
91
1~~J.~gO~
26
II1
!
\
~.
The Search
In the Search Mode, the scanner looks for any
active frequencies within a range of
frequencies you select. You can search the
entire range of the scanner, but it is best to
select a narrower range, so that you have a
better chance of finding all the active channels.
2. Enter the Manual Mode.
(OMAN~
@ @ @
~:
~7
138:€>
@ @:
1
8FT 200----
~
~
~18~19
~
~
~
8FT
(OIlCAN):
1. Select a frequency range.
~
:@ @) @:
MOBILE
:::i:r:::'::.:::.:i::I~; ::':T:::
': ~:
PINEHURST
155.490
***.***
POCATELLO
154.725
***.***
17
18
18 1
E38J:€)@@:
,
BSAYE:
20
138W"EJ~
BANK
15
18
17
'8
18 I
Enter the
frequency
number.
13 [3:,______-0 @):@
Then,
El 8 ~ E] CA
press
BANK I
11Hz
5. Start the search.
number.
88€))@@
Then,
press
8FT
13 7.000
12.5 KHz
NFII
11Hz
20
8(30@@
88
2
~?:~
14
~?:~12.5KHz
144.000
NFII
Enter the
frequency
8FT 200----
1313:0
@):@
,______--
: G) ~ @ ;:
@ @ @:
(OSCAN):
- - ;1-- -12- - -131
: 6)14 ~15 @)'8;:
BSAYE:
Bm.
18
3. Enter the lower limit of the range.
A Search
BASE
~
~
15
C380@@
r
--------
r--;'---lf--131
13
0 @ @
14
To set the limits and begin searching:
LOCATION
12
(OSCAN)
Use Search if you don't have a frequency
directory handy, or if new stations have
been added since the directory was
published.
Beginning
4. Enter the upper limit of the range
11
Press
Mode
~
AM
88888
~
NFM
Press
WFM
27
,
-'
r
--
Notes
Scrolling Frequencies
. Ifyou want toprogram any ofthe
frequencies
you
see
"Search
You
can
find
during
Scrolling
a search,
Programming"
on
Page
and
12.
temporarily
allows
down
you
through
2.
suspends
to manually
the
a search
move
up
or
frequencies.
Move
up
or down
880@@
(3(30@@
SFT
.
change
the
direction
of the
1.
To
begin
scrolling:
search.
t':":'t ~
f::i)
~
65FT
.
~2O @
~
~
B 8] ~ 8
AM
NFM
~
Press [.] key
Then
Press
IMC
to search
WFM
higher
(3 13 (3 8 8
AM
frequencies.
88€)@@
B (3 (jFT@/@
AM
813888
28
NFM
lANK I
DA't'K
HOLD
Press
B 8 ~8
1380@@
SFT 20
(380@@
EJ8J
[3
813888
~
WFM
[.]
key
Then
Press
to search
lower
frequencies.
:
NFM
DLY
freque~'
20
Press
lE]8
Id- toor moveup
1313 [3 18 8 to movedown.
~
AM
Press
lANK
WFM
I
DA't'K
HOLD
SRCH.
137.640
&KHz NFM
IIIC
NFM
WFM
DLY
SRCH.
~:~ 137.645
Note:Thearrowsnexttttttttttttttttttttttttttttttttttttttttttttttttttttttttttttttttttttttttttttttttttttttttttttttttttttttttttttttttttttttttttttttttttttttttttttttttttttt
813(?)@@
by the displayed
step.
11Hz
I KHz
NFM
11Hz
-:--.
3. To continue the search:
Using
880@@
8FT
20
(3(30@)@
88"
AM
(38888
BANK
~
NFM
Press
"wi=M
Turbo
For more information, see
Search
If you are searching a frequency band that
has a 5 kHz step, or if you override the
default frequency step and set it to 5 kHz,
you can select Turbo Search. This
increases the search rate from 100
frequencies-per-second
to 300
f req u en cies-
pe r-seco
-
"Frequency Bands and Steps" on
Page 42.
"Changing the Frequency Step" on
Page 35.
nd.
To select Turbo Search:
I
DATK DLY
SRCH...
~:8€888.888
I KHz NFM
11
MHz
Note: The search resumes in the
direction that you last scrolled.
12
6) @ @
(OIlAN
@) @ @
14
8
Press
13
(OSCAN)
07
15
18
@18 @18
8FT
20
t3 t3 0, @) @
I
BANKI
DATK DLY
:8
)I...
8 8.8 8 8
1KHz
MHz
NFM
SRCH begins flashing.
29
--
7r
Jsing
Search
Delay
)n some two-way channels there might be
;hort lapses in the signal before a reply. The
Search Delayfeature causes the scanner to
Nait two seconds after the end of a
transmission before resuming searching, in
:ase there is a reply.
Unlike Scan Delay, you don't have to turn
on Search Delay for each frequency in the
search range. Search Delay works for the
entire frequency range you chose.
To turn on Search Delay:
(OSCAN]
@1
@12 @13
( 0 IIAN
@4
@15 @18
813
07
@18 @19
813
dFT@2O@
Press
BANK 2
DAft"
/.
DLY
Locking Out a Frequency
Locking Out Frequencies
When the scanner stops on a frequency you
want to lock out:
Note:
This feature
is similar
to locking
out a
programmed channel, except you can only
lock out 50 frequencies. You can lock out
any number of channels.
During a search, you might repeatedly
encounter frequencies that you are not
interested in. Also, all scanners are subject
to receiving internally generated frequencies
(called birdies) that stop your scanner's
search when there is no real signal present.
See "UBC3000XL T Birdies" on Page 43.
In either case, you can lock out up to 50
such frequencies to make your scanner
search more efficiently. If you try to lock out
more than 50 channels, the 51st channel
replaces the first channel in memory.
SRCH.
?'888.888
.."5 KHI
Press DLV again, to turn off Search Delay.
11Hz
NFII
30
---
11
12
0 @ @
(OIlAN~
@ @ @
14
8
§ 0/
8FT
Press
15
@18@19
20
€](30@@
BANK 2
DAft"
13
(OSCAN]
DLY
SRCH.
~?:~888.888
& KHI
NFII
Searching resumes immediately.
11Hz
18
'"':':---
3. Unlock the frequency.
Unlocking a Frequency
1. Stop the search.
1. Stop the search.
11
14
E3[3€)@@
SFT
B80@@
88 ~ [3~
AM
NFM
BSAVE
88888
lANK
88J)@@
SFT
8(30@@
El
8
AM
20
Press
WFM
8 [3 (3 e3 8
lANK 2
DM'K
'
HOLDUO
HOLD
Unlocking
NFM
DLY
or
up
B80@@
18
19
B8"8
SFT
20
AM
DLY
5 KHI
20
NFM
Press
~
WFM
88888
2. Unlock all frequencies.
SRCHA
11Hz
"FII
[0 SCAN)
All Frequencies
01
@12 @13
~4
~15
[ 0 MANUA~~@~
If you have locked out many frequencies
and want to unlock them all, or if you have
forgotten which ones you locked out, you
can unlock all frequencies at the same time.
rt;:;\16
BSAVE
Press and
hold
E3
8
for
~7
0~~
~18
SFT
~19
20
I
---€] [3 O@@
2 seconds.
to move down.
You hear two beeps. All locked out
frequencies are now unlocked.
SRCH.
139.845
5 KHI
\O move
2
DM'1(
~2'8~139.845
2. Find the locked out frequency.
SFT
16
€JE]O@@
Press
WFM
15
17
88€)@@
Press
E3i3€)@@
13
@ @ @
~MANUA~
20
12
0 @ @
[OSCAN)
11Hz
"FM
31
"'--
"'-.
..
_..-
--------
j
--~'KI
~
Ii
The Manual Mode
-
Scrolling
Channels
When you
scroll through the channels in the
manual mode, you see every channel, even
ones that are empty or locked out.
There are two ways to scroll through all the
scanner channels.
.
To step through all channels one at a
time in ascending order:
11
12
0 @ @
.OIlAN
@ @ @
15
11
13
0 @ @
.OIlAN~
@ @ @
14
Press
12
(OSCAN)
16
BSAVE
8
up or down through all
channels:
13
(OSCAN)
14
Press
. To scroll
BSAVE
[3 07 @18@19
8FT 20
17
18
880@@
880@@
20
8FT
B[30@@
15
18
19
BANK
P 61 '-150.3 12 511Hz
12.5KHz
E3130@@
NFII
8FT
20
(380@@
BANK
62 '-15 1.225
12.1 KHz
NFII
11Hz
B8
88
Press
~ [8 c.- to moveup
~~or§ ~
(3
to movedown.
32
f
-------Selecting
A Specific
--- - -- -- -- ,.
Example: Channel 75
Using this procedure, you can select any
one of the scanner's 400 channels. It does
not matter if the channel is locked out or
empty.
1. Enter the Manual Mode.
11
(OSCAN) 6)
12
Press
.OIlAN~
~
.
16
@ @ @
BSAVE
17
18
SFT
20
88J0@@
:6) @ @erI
I
I
14
15
~@ @ @:
DL: I 7
8
9
l3
0 @
@
BSAVE I
I
.
.
17
Enter
the
channel
.
Press
181
18
I
OIlAN
12
I
4
@4
5 @i8
6
@15
BSAVE
SFT
B80@@
I
I
13
6) @ @
f3 13 rzj7@i8
number.
181
8
---s?, 20'---B 8J 0 ,-@
- __I:@
13
15
11
(OSCAN")
- - ,,- - - 12-- - 131
i
(0 SCAN")
@ @
14
3.
Select the desired channel.
2.
Channel
@19
20
BANK
I
15 450. 1
BANK
19
12.5 KHz
~b2§
/.
(380@@
75
,",
12.5 KHz
12 !;IIHzj
NFII
.
NFII
BANK
62 45 1.225
12.5 KHz
11Hz
NFII
I
33
~
'
,--- -
-
,_.'°_'" - -,,-
~A>I
,
-
-
i
-
\~
Additional
rl
Using
Data
Skip
1.
BANK1IS':51"
SCANDAft{ ,"
I
Some frequencies carry un-modulated
signals or data signals (such as pager
preamble signals). If your scanner detects
such a signal during scanning or searching,
it remains on the channel or frequency and,
after three seconds, resume SCAN or
SEARCH.
11
Press
{OSCAN)
(OIlAN
8
13
888
@ @ @
15
@j @ @
E 07
SCAN
16
The scanner defaults to Data Skip in the
Search Mode.
@16@19
BANK Z
DAft
SFT 20
8(30@)@
SRCH.
~~~~888.888
5 KHz
BANK1U';R
SCAN
'"
888
Note: Data Skip is not available for the AM
11Hz
NFII
If you want to disable Data Skip during search:
SCAN
8130@@
L
2.
SFT
I
$FT
Press
B80@@
88888
Eta " EJ~
20
AM
B"13
"AM8J
NFM
WFM
20
r3(30@@
Press
E38))@@
To turn on Data Skip while scanning:
34
12
14
You can set the scanner to continue
scanning after a 3-second delay, when it
encounter such signals.
band and is not active during Priority scan.
Note: You can turn Data Skip on or off at
any time during scanning.
Scanner Features
88
BANK
NFM
Z
SRCH.
~~~~888.888
5 KHz
WFM
(3 [8 E3
NFII
11Hz
Changing
I-
The Frequency
Step
To override the default frequency step:
The frequency step is the minimum space
between frequencies in the Manual or
Search Mode.
880@@
(380@@
B8"E]~
8FT
Your scanner is pre-programmed with a
default frequency step for each of its 16
bands. See "Frequency Bands and Steps"
on Page 42. You can override the default
frequency step to search in larger or smaller
increments.
Press
[38~ 8 8
BANK
Note: For the Bands with 30 kHz default
frequency step, the frequency step
will not be shown on the display.
20
To return to the default frequency step:
(0 SCAN) @1
@12 @13
( 0 IIAN~
@15 @18
~18 ~19
BSAVE
@4
~7
E3r3 .e;;~@
88
BANK
2
2
SRCtIA
~~
,..
55.520
~Hr.~
WFII
Press twice.
(fjFT@2O@
SRCtIA
11Hz
~ii
56.520
50KHz
11Hz
WFII
35
;
\
\
I
'"':':--
Setting
The Signal
Mode
2. Select a different signal mode.
Your scanner is capable of receiving three
signal modes:
. AM. . . . . . . . . . ..
. NFM. . ..
. WFM . . . ..
Amplitude Modulation
Narrow Frequency Modulation
Wide Frequency Modulation
Each of the scanner's 16 frequency bands
is pre-programmed with a default signal
mode.
13
OIlAN
@ @ @
&SAVE
t3BODe
8J
8FT
8 (3 ~S--8-- ~
18
20
8[3 ~@
88"8J~
Press
Then,
press
mode.
r AM. - - IIIFM- - 1IIEM..
@
r AM.- - IIIFM-
-
Press
Then,
press
mode.
1IIEM..
[3 (3 ~S--8--8t.
BANK
12.5KHz
6) @ @
15
l3r3€)@@
20
89 452.875
(OSCAN)
14
Press
12
8FT
To return to the default signal mode:
BANK
If you want to override the default signal
mode for a particular frequency:
1. Enter the Manual Mode.
11
t313€)@@
8[3 ~@ @
BJ8~(3~
3.
89 452.875
11Hz
12.5 KHz
§WF"~
Note: When you override the default
signa! mode, the signal mode indicator
flashes.
11Hz
NFII
Stop blinking
Note:
In the search
mode,
press
@ twice.
789 @18@18
(i)7
8FT
20
B80@@
36
--------
-_.~
I
;~'I'"
II,
'"::---
Using
Signal
Attenuation
SRCHAATT
When the ATT indicator is on, the incoming
signal strength is attenuated (reduced) by
about 14 dB. This prevents unusually strong
signals from over-loading the scanner.
In the Scan Mode, you must individually
program each channel you want to use the
Signal Attenuation feature.
In the Search Mode
1.
Set the search
limits
In the Manual Mode:
BANK
You can use the Signal Attenuation feature
in the manual, search, or Scan Mode.
and press
138
12.& KHz
8FT
Press
20
B[30@@
E]8"8J~
AM
8138
NFM
1
OMANUA
1
14
@.r-Enterthe
channel
I
16 I
15
@ @ @:
17
18
number.
191
Then,
press
§38:€)@@:
---57 20'---[3 l3 0 1-@
- __I:@
When the scanner stops on a channel:
88€)@@
1
8FT
BI30@@
E]8"8~
88888
11- - -'2- - - 131
0 @
(OSCAN):
1
BSAVE 1
AM
f313€)@@
1--
~
Press
on for a specific channel.
1.
Press
again during search to turn off
Signal Attenuation for the Search Mode.
In the Scan Mode
See "The Search Mode" on Page 27.
2. Turn Signal Attenuation on.
11Hz
NFII
All signals are reduced during the search.
.
EJ
888.888
Tum Signal Attenuation
20
2.
NFM
E313€)@@
WFM
8FT
20
(3(30@@
BANK 2
E]E3"E]~
Press
ATT
P 31 '-186.981
AM
11Hz
80J
NFM
WFM
[3 8] E3
WFM
(8 8
To.change,
press
~
again.
37
,
'"
1 ---1l11
I
"1~
I
+
"':':---
Display
Light
The display light lets you view the display in
dark or Iow-light conditions.
To turn on the light:
11
8!30@)@
SFT
20
(380@@
Press
88"r3~
8"a888
The light stays on for about 15 seconds.
again as necessary. Holding
Press
does not extend the lighted time.
8
8
38
--
-
.--------------....
-~--~ll
'":':--
\~
Qptional
Accessories
I
& Replacement
Parts
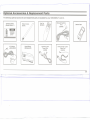
The following optional accessories and replacement parts are available for your UBC3000XL T scanner.
Operating Guide
(OMUBC3000XLT)
Rubber Antenna
(AT218)
MonauralEarphone
64Q
(EPOO9)
Belt Clip
(BCK300)
Leather Case
""'-_..---""""""
UBC3000XLT
"""'~U""
--.,.-
AC Adaptor
(AAD-2500U)
Spare Battery
BP2500(AUS)
Cigarette Lighter
Power Cord
(UA502)
Coiled Cigarette Lighter
Power Cord
(UA502A)
39
---
------------------.-
-~II
~.
r
Care & Maintenance
Battery
Maintenance
Rechargeable nickel-cadmium batteries
typically suffer from a memory effect that
gradually reduces their capacity over time.
I
After two or three months of use, if you
notice that the battery provides power for a
slightly shorter time on each charge, do the
following.
1. Leave the scanner on until the Iow
battery warning sounds and the [Iow
batt] indicator appears.
2.
Recharge the battery for 14-16 hours to
ensure a full charge.
General
.
Use
Turn off the scanner before removing
the battery.
. Always write down the programmed
channels/frequencies in case of a
memory loss.
.
Always firmly press each scanner key
so that you hear the entry tone.
Location
.
.
.
If strong interference or electrical noise
is received, move the scanner. A higher
location usually results in better
reception.
Do not use the scanner is high-moisture
environments, such as a kitchen or
bathroom.
Avoid placing the scanner in direct
sunlight or near heating elements or
vents.
Cleaning
. Disconnect the AC adaptor/charger
while you clean the scanner.
. Clean only the outside of the scanner
I'
with a mild detergent.
. To prevent scratches, do not use
abrasive cleaners or solvents to clean
the scanner.
..
Do not rub the display window.
Do not use excessive amounts of water.
Repairs
.
Do not attempt any repairs. The scanner
contains no user-serviceable parts.
Contact the Uniden Customer Service
Division, or take the scanner to a
qualified repair technician.
40
T
-'{(
I~
r
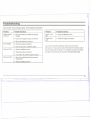
Troubleshooting
If your scanner is not working properly, try the solutions listed below.
Problem
Possible Solutions
Problem
Possible Solutions
Scanner doesn't
work at all
.
Be sure the battery is installed and properly
charged.
Search won't
start
.
Adjust the SQUELCHcontrol.
.
Check the AC adaptor/charger
Keypad won't
work
.
Check the Keypad Lock feature
.
Be sure the scanner is turned on.
Poor reception
Scan won't stop
Scan won't start
.
.
.
.
.
.
.
connections.
Check the antenna connection.
If you still cannot get satisfactory results, and want more
information, or if you want to return the scanner for service, call or
write to Uniden Service Division. The address and phone number
are listed in the Warranty at the end of this Operating Guide.
Move the scanner to a different location.
Adjust the SQUELCH control.
Check the antenna connection.
Try a search. All channels might be inactive.
-
Be sure the selected banks have channels
programmed.
Adjust the SQUELCH control.
41
;
,-~._--~~A'II
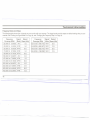
-Technical
Information
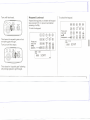
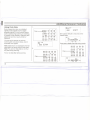
Frequency Bands And Steps
The followingtable shows the 16 bands you can monitorwithyour scanner. The signal modes and the steps are default settings that you can
override. See "Settingthe Signal Mode"on Page 36, and "Changingthe Frequency Step" on Page 35.
Frequency
Signal
Mode
Coverage (MHz)
25.0000 to 28.9950
AM
29.0000 to 55.9950 NFM
56.0000 to 69.9500 WFM
70.0000 to 87.9950 NFM
88.0000 to 107.9500 WFM
AM
108.0000 to 136.9875
137.0000 to 173.9950 NFM
174.0000 to 221.9500 WFM
222.0000 to 399.9875
AM
400.0000 to 519.9875 NFM
520.0000 to 549.9500 WFM
760.0000 to 823.9875 NFM
Default
Steps (kHz)
5.0
5.0
50.0
5.0
50.0
12.5
5.0
50.0
12.5
12.5
50.0
12.5
Frequency
Coverage (MHz)
824.0100 to 848.9700
849.0000 to 868.9875
869.0100 to 893.9700
894.0000 to 1300.0000
Default
Signal
Mode Steps (kHz)
NFM
30.0
NFM
12.5
NFM
30.0
NFM
12.5
42
--
--
~--
1
;
- ~rl
'":":---
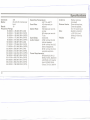
UBC3000XLT Birdies
Birdies are internally generated frequencies that cause the scanner to stop during search or scan. If you have problems with these
frequencies,
use the lockout features to keep the scanner from stopping.
Frequency (MHz)
28.6350
35.7950
Frequency (MHz)
159.2900
159.2950
37.0950
161.0800
37.1000
161.0850
42.4000
169.3750
74.2000
230.4750
110.9625
288.1000
115.2375
312.4625
132.2750
312.4750
132.4500
134.2375
350.8000
368.7000
136.0250
137.6400
377.6500
403.3375
137.6500
428.6125
Frequency (MHz)
137.8150
139.6050
141.3950
143.1850
144.9750
146.7650
148.5550
150.3450
152.1350
153.6000
153.9200
153.9250
155.7100
155.7150
Frequency (MHz)
428.6250
434.1500
455.3500
497.7500
820.7000
850.0875
908.4500
937.7000
967.8000
967.8375
1083.9500
1083.9875
1114.0500
1260.3000
1290.4000
43
--------------------
--~-=-~A'I
.-
\
\
11
'"'::--
~
SE!ecifications
Channels:
Banks:
Bands:
Frequency
400
20 with 20 channels per
bank
16
Range:
25.0000 to 28.9950 MHz (AM)
29.0000 to 55.9950 MHz (NFM)
56.0000 to 69.9500 MHz (WFM)
70.0000 to 87.9950 MHz (NFM)
88.0000 to 107.9500 MHz (WFM)
108.0000 to 136.9875 MHi: (AM)
137.0000 to 173.9950 MHz (NFM)
174.0000 to 221.9500 MHz (WFM)
222.0000 to 399.9875 MHz (AM)
400.0000 to 519.9875 MHz (NFM)
520.0000 to 549.9500 MHz (WFM)
760.0000 to 823.9875 MHz (NFM)
824.0100 to 848.9700 MHz (NFM)
849.0000 to 868.9875 MHz (NFM)
869.0100 to 893.9700 MHz (NFM)
894.0000 to 13».0000 MHz (NFM)
Operating Temperature:
-20°C to +60°C
Scan Rate:
100 channels per
second
Search Rate:
100 steps per second normal
300 steps per second Turbo
Scan Delay:
2 seconds
Audio Output:
0.5W nominal into 8Q
internal speaker;
3mW nominal into 32Q
stereo headphone;
8mW nominal into 64Q
supplied earphone.
Power Requirements:
BP2500(AUS) Ni-Cd
Battery 6VOC, 600mAH
AA02500U AC Adaptor
Input AC240V 50Hz,
Output OC12V, 200mA
Antenna:
External Jacks:
Size:
Weight:
Rubber antenna
(included)
External earphone,
External speaker,
DC 12V power jack.
69.0(W) x 38.5(0)
x 187.0(H) (mm)
(Without Antenna)
370 (g)
44
,
~-
'~1'\11
)
""::---
One Year Limited Warrant~
UNIDEN UBC 3000XLT 1 YEAR WARRANTY
Note: Please keep your sales docket as it provides evidence of warranty.
WARRANTOR:
Uniden Australia Pty. Limited ACN 001 865498
ELEMENTS OF WARRANTY:
Uniden warrants to the original retail owner for the duration of this warranty, its UBC 3000XL T Scanner (hereinafter
'
referred to as the Product), to be free
from defects in materials and craftsmanship with only the limitations or exclusions set out below.
WARRANTY DURATION:
This warranty to the originattetail owner only, shall terminate and be of no further effect ONE (1) Year after the date of original retail sale. This warranty will
be deemed invalid if the product is; (A) Damaged or not maintained as reasonable and necessary, (B) Modified, altered or used as part of any conversion kits, subassemblies, or any
configurations not sold by Uniden, (C) Improperly installed, (D) Repaired by someone other than an authorised Uniden Repair Agent for a defect or malfunction covered by this warranty,
(E) Used in conjunction with any equipment or parts or as a part of a system not manufactured by Uniden, (F) Installed, programmed or serviced by anyone other than an authorised Uniden
Repair Agent, (G) Where the Serial Number label of the product has been removed or damaged beyond recognition.
PARTS COVERED: This warranty covers for One year, the UBC 3000XL T Scanner unit only. Antenna, Belt Clip, NICAD Battery, AC Adaptor/Charger, Leather Case, Monaural Earphone,
and other accessories are covered for 90 days.
STATEMENT OF REMEDY: In the event that the product does not conform to this warranty at any time while this warranty is in effect, the warrantor at its discretion, will repair the defect
or replace the product and return it to you without charge for parts or service. THIS WARRANTY DOES NOT COVER OR PROVIDE FOR THE REIMBURSEMENT
OR PAYMENT OF
INCIDENTAL OR CONSEQUENTIAL
DAMAGES.
WARRANTY CARD: If a warranty card has been included with this product then please fill it in and return to us within 14 days of purchase. Your name and the Serial number of the product
will then be registered in our database and this will help us process your claim with greater speed and efficiency should you require warranty service.
PROCEDURE FOR OBTAINING PERFORMANCE
OF WARRANTY:
In the event that the product does not conform to this warranty, the Product should be shipped or delivered, freight
pre-paid, with evidence of original purchase
(eg/ a copy of the sales docket), to the warrantor at:
UNIDEN AUSTRALIA
SERVICE DIVISION
PTY LIMITED
345 Princess Highway, Rockdale, NSW 2216
Ph (02) 599 3100 FAX (02) 599 3278
Customers in other States should ship or deliver the Product
freight pre-paid to their nearest Uniden Authorised Repair Centre
(Contact Uniden for the nearest Warranty Agent to you)
"""',"-,
,,-,......
'
"---"-"
"'-""'--
---; 1'
\
11
\
-~--
-:-:-..
UBZZO1247AZ
Printed in the Philippines.
@1995 Uniden Corporation.
All rights reserved.
---
~~.~.
~ -
.-. --~.-~~~~.~.
-'~I
11
I
III
i