1
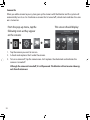
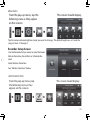
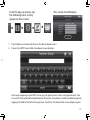
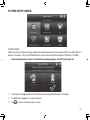
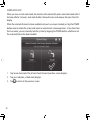
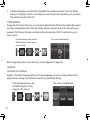
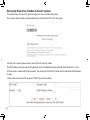
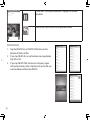
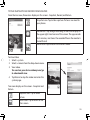
G24/27 Series VIDEO SURVEILLANCE SYSTEM For more exciting new products please visit our website: Australia: www.uniden.com.au New Zealand: www.uniden.co.nz 1 IMPORTANT SAFETY INSTRUCTIONS This manual contains important information about this product’s operation. If you are installing this product for others, you must leave this manual or a copy with the end user. 2 •• When using your equipment, always follow basic safety precautions to reduce the risk of fire, electric shock and injury to persons, including the following: •• This equipment is NOT waterproof. DO NOT expose it to rain or moisture (for the weatherproof video camera: DO NOT expose it to excessive water or moisture). •• DO NOT immerse any part of the product in water. Do not use this product near water, e.g., near a bathtub, wash bowl, kitchen sink or laundry tub, in a wet basement or near a swimming pool. •• To avoid any risk of electric shock from lightning, avoid handling any electronic devices (except battery powered ones) during an electrical storm. •• Use only the power cord and/or batteries indicated in this manual. Never dispose of any batteries in a fire: they may explode. Check with local codes for possible special disposal instructions. •• Never tug or pull on any power cord: be sure to leave some slack in the cord when placing your equipment, and always use the plug to unplug cord from the wall outlet. •• Never leave power cords where they can become crushed, cut, or frayed; when running power cords, avoid letting them rub against any sharp edges or lie across any high traffic areas where people might trip over them. •• Do not use the device if the adaptor cords or plugs have been damaged, the unit has been exposed to liquids, or the unit has been dropped or is damaged. Warnings to Parents and Other Users Failure to follow these warnings and the assembly instructions could result in serious injury or death. This product is not designed or intended for use as a medical monitor, nor should this product be used as a substitution for medial or parental supervision. Always be sure that both the transmitter and Monitor are working properly and are within range of each other. • STRANGULATION HAZARD. Keep the adaptor cords out of the reach of children. • WARNING: KEEP OUT OF THE REACH OF CHILDREN. Allow for proper ventilation when units are in use. Do not cover the camera or Monitor with any object such as a blanket. Do not place it in a drawer or in any location which would muffle the sound or interfere with the normal flow of air. SAVE THESE INSTRUCTIONS! For best results: To avoid damage to your equipment, follow these simple precautions: • Do not drop, puncture or disassemble any part of the equipment. There are no user-serviceable parts inside. • Do not expose the equipment to high temperatures, and avoid leaving the equipment in direct sunlight for more than a few minutes. Heat can damage the case or electrical parts. • Do not place heavy items on top of the equipment or expose the equipment to heavy pressure. • Remove the power adaptor during long periods between usages. • Clean only with a dry cloth. Failure to follow the instructions in this operating manual will void the warranty. Uniden assumes no liability for damages to property or injury to persons caused by improper handling or failure to comply with these safety instructions. 3 CONTENTS IMPORTANT SAFETY INSTRUCTIONS.......................................2 SYSTEM SETUP SCREEN......................................................................... 35 Quick Tips.................................................................................................. 41 Getting started......................................................................5 What’s in the Box?.................................................................................5 Remote Access...................................................................... 42 GETTING TO KNOW THE MONITOR AND THE CAMERAS............6 Overview................................................................................................... 42 What the Lights Mean?.........................................................................7 System Requirements......................................................................... 42 Connecting to the Internet............................................................... 42 SETTING UP THE EQUIPMENT................................................................8 Connecting to the Intranet (HOME NETWORK)......................... 43 Set Up the Monitor.................................................................................8 Mount the Camera Stand.....................................................................8 REMOTELY VIEW YOUR G SERIES SYSTEM..................................... 44 Attach The Outdoor Camera............................................................ 10 Record Video.......................................................................................... 45 Attach The Indoor Camera................................................................ 11 Take a Snapshot.................................................................................... 45 Zoom........................................................................................................ 45 SETTING UP YOUR SYSTEM.................................................................. 12 Camera Settings................................................................................... 12 DOWNLOADING APPS........................................................................... 46 System Settings.................................................................................... 12 Android.................................................................................................... 46 Recording Settings.............................................................................. 12 iPhone...................................................................................................... 51 G Series Software Operation Overview..................... 13 Maintaining Your System................................................ 56 LIVE SCREEN............................................................................................... 13 UPGRADING YOUR G Series FIRMWARE ....................................� 56 What The Icons Mean......................................................................... 14 TAKING CARE OF YOUR HARDWARE .............................................56 Changing How the Live Screen Displays..................................... 17 Monitor .................................................................................................. 56 Using the Pentazoom™ Feature...................................................... 17 Cameras ................................................................................................� 58 USING YOUR SYSTEM ............................................................................ 18 SOLVING PROBLEMS .............................................................................57 Recording Live Video.......................................................................... 18 Playing Back Recorded Video.......................................................... 18 Additional Information.................................................. 59 Adding New Cameras......................................................................... 19 PRODUCT SPECIFICATIONS................................................................. 59 G Series Screen Descriptions.......................................... 21 INDEX........................................................................................ 61 OVERVIEW................................................................................................... 21 ONE-YEAR LIMITED WARRANTY............................................ 62 G Series SETTINGS SCREEN ............................................................... 21 Main Screen............................................................................................ 22 Sub Screens............................................................................................ 22 What it does........................................................................................... 22 CAMERA SETUP SCREEN ...................................................................... 23 Pairing...................................................................................................... 23 Camera On.............................................................................................. 24 Recorder Setup Screen................................................................... 25 Email Alert............................................................................................... 26 For Gmail................................................................................................. 28 Network Setup Screen.................................................................... 30 Alarm Setup Screen.......................................................................... 33 4 What’s in the Box? MODEL Getting started 7” Monitor 4.3” Monitor Outdoor Camera Indoor Camera 1x Monitor 1x Cradle 1x AC adaptor 1x Ethernet Cable 1x SD Card 1x Monitor 1x Cradle 1x AC adaptor 1x Ethernet Cable 1x SD Card 1x Camera 1x Antenna 1x AC adaptor 1x Stand 4x Mounting Screws 4x Expansion Anchors 1x Camera 1x AC adaptor 1x Stand G2701 1 G2710 Quantities Of Each 0 1 1 1 0 G2711 1 1 1 G2720 1 2 0 G2401 1 0 1 G2410 1 1 0 G2411 1 1 1 G2420 1 2 0 Need Help? Get answers at our website: www.uniden.com.au for Australian model or www.uniden.co.nz for New Zealand model. If any items are missing or damaged, contact your place of purchase immediately. Never use damaged products! 5 GETTING TO KNOw THE MONITOR ANd THE CAMERAS Monitor (back/side) Antenna Cradle Reset MonitorPower Dock Power On/Off Ethernet Cable Connection SD slot AC Power Connection AC Power Connection Pull-Out Stand OUTDOOR CAMERA Front View Back View Back view Power status Antenna connector Link status Pair button Light sensor Microphone Power pigtail 6 Power jack INDOOR CAMERA Antenna (flip up) Antenna (flip up) Light sensor Swivel stand receiver Camera lens POWER LINK AC adaptor power jack Microphone POWER LED LINK LED CHARGE LED LINK what the lights Mean? Light Power Status Link Status Charge Status State On Off Flashing On Off What it means? The camera is on. The camera is off. The camera is in pairing mode. The camera is connected to the Monitor. The camera is in standby. On (Green) The battery is charging. Off The battery has charged. 7 SETTING UP THE EQUIPMENT Set Up the Monitor 1. If you are using the Monitor as a stand-alone unit, flip out the stand on the back of the Monitor, and extend the antenna. Connect an AC adaptor to the power input on the side of the Monitor. If you are using the Monitor in the cradle, insert the Monitor into the cradle and connect an AC adaptor to the input on the back of the cradle. 2. Connect the other end of the adaptor to a 240 volt AC (standard indoor) power outlet. 3. Press and hold the Power button on the top of the Monitor for 3 - 4 seconds to power it up. 4. The Monitor displays the Uniden Welcome screen for a few seconds and then transitions to the LIVE view. The screen remains dark until the cameras are powered up. Mount the Camera Stand General Guidelines The G Series outdoor camera is weatherproof and has an IP66 rating. Water can be sprayed on them and they will still work; however, the cameras cannot be submerged underwater. Although the outdoor cameras can be exposed directly to the rain, it is recommended that, if they are used outdoors, they be mounted under some type of cover like a patio overhang or eave. As rainwater drops start to dry on the camera glass, it can create spots that will reflect the light from the infrared LEDs used for night vision, thus lowering the quality of the video. The G Series indoor camera is not weatherproof. Also, as dust, grime, and cobwebs accumulate on the camera glass, they can reflect light from the infrared LED and might lower video quality. Periodically clean the lens glass with a soft cloth. 8 Placement Considerations Consider the following when placing cameras: • The clearest line-of-sight between the camera and monitor is best. –– Walls, especially brick and concrete, shorten the transmission distance. –– Placement next to windows allows better transmission. • Optimized motion detection range is 1.8 - 5.5 metres for the outdoor camera. The farther away an object is, the less accurate the motion detection. • Avoid having a direct light source in the view of the camera, including street lights, ceiling or floor lamps, spotlights in the driveway, etc. • Rainfall, pool water ripples/reflections, tree/shrub leaves blowing in the wind - and the shadows they create - can generate motion detection false alarms. You can mount the outdoor camera with the stand on the bottom (on a wall or table-top) or on the top (on the ceiling). The indoor camera can be mounted with the stand on any flat surface. When you are positioning the camera, you might want to bring the Monitor along; it’s much easier to get the camera into the right position when you have the display handy. 1. Hold the base of the camera stand where you want to mount it and mark the location of the screw holes. 2. Use the included screws and anchors to attach the base to the wall or ceiling. 3. Before attaching the camera, tug gently on the stand to make sure it is securely in place. 9 Attach The Outdoor Camera 1. For each camera, attach the camera bracket to the mounting screw. You can attach the stand to the top or the bottom of the camera as needed.Tighten it a few turns, then turn the camera to face the direction you want. 2. Tighten the camera brace up against the camera to secure it into place. 2 1 Tighten the brace against the camera to secure it in place. Attach the camera to the mounting screw and turn it to the desired direction. 3 Loosen the wingnut to unlock the mounting post. 4 Adjust the post to the correct angle, then tighten the wingnut to lock the post into place. 3. Unlock the mounting post by turning the wingnut to the left a few turns. 4. Set the mounting post to the correct angle, then tighten the wingnut until the post is locked into place. 5. Attach the antenna to the rear of the camera. Antenna 6. Connect one end of an AC adaptor to the camera’s power pigtail and plug the other end into a 240 volt AC (standard indoor) power outlet. (If necessary, connect the extension cord to the camera’s pigtail and connect the AC adaptor to the extension cord.) Be sure the power plug and the connector are tightly twisted together to avoid water leaking in. 7. Make sure the Power status light turns on. If it doesn’t, try reconnecting the AC adaptor, and make sure the power outlet isn’t controlled by a wall switch. 10 Attach The Indoor Camera Slide the camera on to the stand swivel mount until it clicks in place. 1. Connect one end of an AC adaptor to the camera and plug the other end into a 240 volt AC (standard indoor) power outlet. 2. Make sure the Power status light turns on. If it doesn’t, try reconnecting the AC adaptor, and make sure the power outlet isn’t controlled by a wall switch. LINK AC adaptor power plug 11 SETTING UP YOUR SYSTEM You can now set your cameras and system to your preferred settings. Camera Settings • Brightness (“G Series Settings Screen” on page 25) • Motion Detection (“G Series Settings Screen” on page 25) • Schedule Recordings (“Schedule Record” on page 29) System Settings • Power Saving (“Power Saving” on page 35) • Screen Auto Lock (“Screen Auto Lock” on page 36) • Time (“Time” on page 37) • Security code (“Security Code” on page 32) • Language (default language is English; “Changing the Language” on page 40) Recording Settings • Motion Detection (“Motion Detection” on page 25) • Schedule Recordings (“Schedule Record” on page 29) 12 G SERIES SOFTwARE OPERATION OvERvIEw Your Monitor’s G Series software operates through a series of screens that let you choose groups of operations. For example, when you tap on the camera icon in the Pop-up menus, you can set how you want the main viewing screen - called the Live screen - to display images from the paired cameras. You can scan between cameras, show all cameras on a single screen (Quad view), or only display a specific camera. The Live screen lets you view the camera transmissions. It also lets you set up your screen display and make adjustments to it. Icons on the screen itself let you monitor power and camera status. The G Series system always defaults to the Live screen in Quad mode after being idle for 2 minutes while in any other system screen. This default ensures that the system is ready to record video even if you forget to return to the Live screen. The system can only start a recording while in Live screen mode. The operation of the G24 or G27 monitor is identical. The only difference between the two systems is the physical size of the monitor/receiver and how you extend the antenna. lIvE SCREEN SD card status Battery status Internet connection status Record status Camera number/ Signal strength Motion status Pop up menu tab Pop up menus 13 what The Icons Mean Icon CAMERA MODE What does it mean Select how you want the Live screen to display camera input: •Scan between cameras (5 seconds) •Quad view (all paired cameras display) •Full view (1 camera displays on full screen) VOLUME Adjust the volume level. G SERIES SYSTEM SETTINGS Access the G Series Software Operation screens or view recorded events. SD CAPACITY Indicates memory capacity remaining. BATTERY CAPACITY Displays battery capacity. This graphic shows battery at nearly full. INTERNET/INTRANET STATUS Appears in LIVE view. Indicates connection to the internet is in progress. Appears in LIVE view and Pop-Up Menu. Indicates internet connection is established. 14 Icon What it does Appears in LIVE view. Indicates remote viewing in progress. Appears in LIVE view. Indicates system not connecting to internet. Appears in LIVE view. Indicates the intranet connection is established. CAMERA NUMBER Displays the camera number and signal strength through the status lines to the left of the number. RECORD STATUS •Tap to start or stop recording for that camera •Steady on - Not recording •Flashing - Recording MOTION System indicates motion detection recording in progress. SCHEDULED System indicates scheduled recording in progress. 15 Icon POP UP MENU TAB NO SD CARD INDICATOR 16 What it does Opens and closes the pop up menu display. Displays red when the SD card is not present or is damaged. Changing How the Live Screen Displays The Live screen displays in 2 views - Quad View or Full View. Quad View divides the screen’s image area into 4 quadrants and displays camera video in each quadrant. If less than 4 cameras are on, only those cameras’ video will display on the Live screen. Full view displays a single camera’s video on the entire screen. If you are in Quad View, tap on the camera quadrant you want to expand to Full View. Tap on that image to return to Quad View. Using the Pentazoom™ Feature While in any camera’s full screen view, selecting the + icon on the right side of the screen enables the PentaZoom feature. PentaZoom lets you select from 5 sections of the video image. Tap on a section and it will digitally zoom to full screen. Tap on the video to return to full screen mode or to go back to the PentaZoom screen, tap . 17 USING YOUR SYSTEM Recording live video Recordings are saved to the SD card (approximate recording time per GB is 225 minutes). The SD card must be installed for recording to begin. for the camera to begin recording. 1. On the Live screen, tap 2. Tap it again to stop recording. You can record from all cameras at the same time. Playing Back Recorded video From the pop-up menus, tap the following icons as they appear on the screens: The Record List screen displays. 1. Tap on the highlighted day containing the recording you want to view or on a specific camera to only view that camera’s recordings. The Record List screen displays those recordings listed in a folder. If you tap on a day that is not highlighted, a folder displays with no recordings listed. 2. Tap on the recording you want to view. It displays on the screen. 3. Tap on any area of the screen that does not have control icons to bring up the playback progress bar. Tap that area again to close it. 4. While playback progress is visible, you can fast forward/rewind by dragging the playback bar forwards or backwards. On the playback progress bar, tap the double arrow to skip forward or backwards about 10 seconds. Tap the arrow and bar to skip to the next or previous video. 5. When playback ends, tap to return to the Record List. You can delete a recording by tapping X, next to the camera icon. 18 deleting Recorded Files You can delete a single recorded file or a folder containing all recorded files for a specific day. 1. On the Record List screen (see previous Record List screen), tap the day with recorded files you want to delete. The list of recorded files displays. 2. Tap the x on the right-hand side of the entry. If you are deleting a folder, a confirmation screen displays. If you are deleting a single recorded file, that file deletes without a confirmation required. Adding New Cameras Your Monitor supports a total of four active cameras at a time. When you add a camera, you have to pair it to the Monitor (that is, you have “introduce” the camera and Monitor so they can communicate). SOME THINGS TO KNOW ABOUT PAIRING CAMERAS • If a camera is already assigned to the selected channel, the Monitor overwrites that camera link with the new one. • Only pair one camera at a time! The Monitor links to the first camera it detects. If two or more cameras are in pairing mode, you can’t control which camera the Monitor will detect first. PAIR CAMERA 1. From the Pairing Camera screen (see “Pairing” on page 23), tap the camera image you want to pair. A processing icon displays for a 60 second countdown. 2. During the 60 second countdown, quickly press and release the Pairing button on that camera’s power cord (see ”Pairing” on page 23). 3. The system automatically adjusts the Camera On screen accordingly. 4. If you have any trouble, consult the the table on page 20. 19 TROUBLESHOOTING CAMERA PAIRING Consult the following table for camera pairing troubleshooting suggestions: If... the camera’s signal status icon shows no bars the camera’s signal status icon shows one or two bars or the video quality is poor the camera won’t pair with the Monitor 20 Try... •making sure the camera is plugged in and the red LED is on. •making sure that the camera’s antenna is attached and the Monitor’s antenna is extended. •making sure the camera is paired to the correct channel •re-pairing the camera and Monitor See “General Guidelines” on page 8 for tips on improving video quality. •making sure the camera is plugged in and the red LED is on. •pressing and releasing the pairing button quickly. Do not press and hold the pairing button. G Series Screen Descriptions OVERVIEW This section describes the G Series screens in detail. It provides a path to the screen being viewed. G Series SETTINGS SCREEN From the pop-up menu, tap the following icons as they appear on the screens: This screen should display: The G Series Settings screen highlights the Camera Setup option as the default. Main Screen Camera Setup Recorder Setup Sub screens Pairing Camera on Brightness Motion Detection Email Alert Schedule Record What it does Pairs new cameras to the Monitor. Makes the cameras visible to the monitor. Brightens or darkens the video of that camera. Records when something moves in front of the camera. Continues recording for 2 minutes. Motion detection is on by default. Sends email notification to user’s PC and/or mobile when Motion Detection senses motion in front of the camera. Set up a schedule for pre-determined recording times and lengths. 21 Main Screen Sub Screens What it does Network Setup Internet Setup Select the type of internet connection to be used. (DHCP is most common.) Set a security code for remote access. Displays information about your network and the Monitor’s unique DID number. Set a length of time for the alarm to sound. Select a melody to play for the alarm. Temporarily turns off the LCD after the system is idle for 2 minutes to conserve power. Locks the screen from further activity until the screen is unlocked. Clock Alarm. Set an alarm. Security Code Network Information Alarm Setup Period System Setup Melody Power Saving Screen Auto Lock Time Time Setting. Set the current time. Storage Management System Upgrade Language Quick Tips 22 NA Timer. Time countdown. •Formats/erases all the data on the microSD card. •Permits new records to overwrite old records when the microSD card is full. Upgrades the Monitor firmware. Changes default language setting for the Monitor (English, French or Spanish). Provides a list of 10 common questions. CAMERA SETUP SCREEN Pairing Your cameras are paired to the Monitor at the factory to channels 1 and 2. When you add a new camera to your system, you have to pair it to the Monitor (that is, you have “introduce” the camera and Monitor so they can communicate). SOME THINGS TO KNOW ABOUT PAIRING CAMERAS • If a camera is already assigned to the selected channel, the Monitor overwrites that camera link with the new one. • Only pair one camera at a time! The Monitor links to the first camera it detects. If two or more cameras are in pairing mode, you can’t control which camera the Monitor will detect first. From the pop-up menus, tap the following icons as they appear on the screens: This screen should display: 1. Tap the camera image you want to pair. A processing icon displays for a 60 second countdown. 2. Press and release the Pairing button on that camera’s power cord. The 60 second countdown will end when the pairing process is complete. Tap button, X icon comes up, tap that to stop processing 3. The system will automatically adjust the Camera On screen. Use this procedure to move a camera from one channel to a different channel. 23 Camera On When you add a camera to your system, pair up the camera with the Monitor and the system will automatically turn it on. An x indicates a camera that is turned off ; a check mark indicates the camera is turned on. From the pop-up menu, tap the following icons as they appear on the screens: This screen should display: 1. Tap the camera you want to turn on. 2. A check mark replaces the x under the camera. 3. To turn a camera off, tap the camera icon. An x replaces the checkmark and indicates the camera is turned off. Although the camera is turned off, it is still powered. The Monitor will not receive video signals from that camera. 24 BRIGHTNESS From the pop-up menu, tap the following icons as they appear on the screens: This screen should display: Tap the camera whose brightness level you want to change. The default brightness is 0, and the range is from -2 through 2. Recorder Setup Screen Use the Recorder Setup screen to select betweenMotion Detection, Email Alert or Schedule Record. Select Motion Detection. See “Motion Detection” below. MOTION DETECTION From the pop-up menus, tap the following icons as they appear on the screens: This screen should display: 25 1. Each camera’s motion detection sensitivity can be set independently. You can set the motion detection level to Off, Low, or High. Tap on the camera to cycle through these choices. 2. Tap to return to the main Motion Detection screen. The Motion Detection default setting is Low. The system records for 2 minutes when motion is detected. Email Alert The G Series system can notify you when it detects motion from any camera by sending you an e-mail alert. The email alert contains information such as, the time that motion was detected and by which camera. In order to enable the G Series system, you must enter both incoming and outgoing email addresses. Uniden recommends you set up and use Gmail as the outgoing mail server. The outgoing email server (SMTP server) is responsible for sending out the email notification to tell users when the G Series system detects motion from any camera (Motion Detection must be activated). The incoming mail server (Email To) receives the email notification sent from the SMTP server. The user must be able to receive email on Windows PC or on mobile devices (such as iPhone, iPad, or Android smartphone or tablet) to receive e-mail alerts from the G Series system. When you receive an email alert, you can view live video from your Windows PC, an iPhone, iPad, Android smartphone or Andriod tablet through apps. Free apps are available through the iTunes App store or the Android Market. 26 From the pop-up menus, tap the following icons as they appear on the screens: This screen should display: 1. Tap Enable to activate Email Alert or Disable to deactivate it. 2. Tap on the SMTP Server field. A keyboard screen displays. Enter your outgoing e-mail SMTP server (e.g. for gmail server, enter: [email protected]). You can switch the keyboard from alphabetical characters to numbers/symbols and back again by tapping the field to the left of the space bar. Tap Enter. The Email Alert screen displays again. 27 3. Tap on the STMP Port field and enter the port number (e.g. for gmail server, enter: 465). Tap Enter. 4. Tap on the Username field and enter the email account you want to send alert messages from (e.g. for gmail server, enter the gmail account in full). Tap Enter. 5. Tap on the Password field and enter your email password (the password will always remain hidden). Tap Enter. The password entered here must be the password for the outgoing email account. 6. Tap on the Email To field and enter the email account you want to receive email alert messages. Tap Enter. The incoming email account can be the same as, or different from, the outgoing email account. If a different email account is used then the outgoing email account serves as a relay for the alert messages. Only one incoming email account will be accepted by the G Series system. 7. Tap OK to save the settings, then tap < to return to the previous screen. If you are using Gmail as the outgoing SMTP server, check SSL and use the data in the following table: For Gmail 28 SMTP Server SMTP Port User Name smtp.gmail.com 465 [email protected] Password XXXXXXXXXXX Email To [email protected] Enter this. Enter this. Enter your gmail address in full, including ‘@gmail.com’. Enter the password for this gmail account. Enter the email address where you want the alerts sent. SCHEDULE RECORD You can schedule up to 5 recording sessions. You are limited to the size of the SD card for how long a total recording time you have. These recording sessions must begin and end within a single 24-hour period. They cannot cross into the next day. From the pop-up menus, tap the following icons as they appear on the screens: This screen should display: 1. Tap the camera number you want to record (1 - 4). You can select up to all 4 cameras to record. 2. Set the recording start time. Tap the hour and number boxes separately and use the UP and DOWN arrows to scroll through the times. 3. Tap the AM/PM block to toggle between them. 29 4. Tap on the blank DATE box. The Recorder Setup calendar screen displays. 5. Tap on the date you want the recording. The previous screen displays. 6. Set up the recording and then tap Save. You can select another recording session to schedule, return the previous screen, or return to the LIVE screen. Scheduled recordings are broken up into 15 minute file sizes. For example, if you record a 50 minute event, you will have three 15-minute recordings plus one 5-minute recording. It is important to set the correct time to ensure that the recorded video files and the scheduled record times are correct. CLEAR A SCHEDULED RECORDING 1. Access the Schedule Record screen. 2. Tap recording you want to clear (1-5). The screen displays the settings for that schedule. 3. Tap CLEAR. The screen resets to the default values for that recording slot. Network Setup Screen The Network Setup screen allows you to select your internet connection type and security code. You can also display system default configuration. From the pop-up menu, tap the following icons as they appear on the screens: 30 This screen should display: INTERNET SETUP 1. Tap Internet Setup icon to display the Internet Setup screen. 2. Tap on your selection and fill in the fields requested. Tap OK. Selection Fields Static IP •IP Address •Subnet Mask •Default Gateway •DNS Server DHCP None 3. Tap OK at the system reboot prompt. The Network Setup screen displays. DCHP is the most common connection. Your router will automatically assign an IP address to your G Series system. Static IP is for those that have the ability to specify an IP address for the G Series system. 31 SECURITY CODE Set up your security code to limit who can have access to the system from a remote location. 1. Tap Security Code icon to display the Security Code screen. 2. If you have not entered a security code, you can enter it here. If you have previously entered a security code, your current security code displays. The default security code is set to 123456. We recommend that you change this code to something you will remember. You will need the code to access your video from a remote device such as a smart phone or PC. 3. Tap on the Change Code field. A keyboard screen displays. 4. Enter your security code. You can switch the keyboard from alphabetical characters to numbers/symbols and back by tapping the field to the left of the space bar. Tap Return. The Security Code screen displays again. You must enter a security code to monitor your video from a PC or other device. 5. Tap OK on the system reboot prompt. The Network Setup screen displays. 6. Turn your G Series monitor off then back on for the security code change to take effect. 32 NETWORK INFORMATION SCREEN 1. Tap the Network Information icon to display the Network Information screen. 2. Tap to return to the previous screen. The DID is a unique code specific to your monitor and is required (along with the security code) to gain remote access to your cameras over the internet. The information in the DHCP setting is assigned to your monitor from your home router. Alarm Setup Screen From the Alarm Setup screen, you can: •• Set the length of time the alarm sounds •• Select a melody for the alarm. 33 PERIOD SCREEN This selection allows you to select the length of time the alarm will sound for the alarm clock. 1. Tap Period. The Set Siren Duration screen displays. 2. Tap the duration you want the siren to last (2, 10, or 30 seconds) or tap None to turn sirens off. 3. Tap to return to the previous screen. MELODY This selection allows you to select a melody for the siren. 1. Tap Melody. The Change Siren Melody screen displays. 2. A check mark appears on the melody you tap and the Monitor briefly plays a sample of the selected melody. 3. Tap to return to the previous screen. 34 SYSTEM SETUP SCREEN POWER SAVING When you turn on Power Saving mode, the monitor goes into sleep mode (LCD turns off ) after it is idle for 2 minutes. Press the POWER button once to reactivate the monitor. (Default = Disable). If a motion detection event or scheduled recording begins, the LCD turns back on. 1. Tap Power Saving Enable to activate Power Saving mode (Default = Disable). 2. A check mark appears on your selection. 3. Tap to return to the previous screen. 35 SCREEN AUTO LOOK When you turn on Auto Lock mode, the monitor will automatically enter screen lock mode after it has been idle for 2 minutes. Auto Lock disables the touchscreen and removes the icons from the display. When the auto-lock feature has been enabled and your Live screen is locked, just tap the POWER button once to unlock the screen and return to normal touch screen operation. At any time from the Live screen, you can manually lock the system by tapping the POWER button, whether or not the auto-lock feature has been enabled. 1. Tap Screen Auto Lock. The Activate Touch Screen Operation screen displays. 2. Tap your selection; a check mark displays. 3. Tap to return to the previous screen. 36 TIME The Time screen lets you set up clock alarms, set the system time, and set a timer. The following following screen screen displays: displays: The From the pop-up menu, tap the following icons as they appear on the screens: Clock Alarm This feature operates as an independent alarm clock. It does not affect the operation of live video or recording video. 1. Tap to display the Clock Alarm screen. 2. Tap on an alarm button (total of 5 to select from). 3. 4. 5. 6. Tap on the hour block. The UP/DOWN arrows move to the hour block. Set the hour. Tap on the minute block. The UP/DOWN arrows move to the minute block. Set the minute. Tap on AM/PM to toggle between the two. Tap SAVE when you are finished. 37 Time Setting This screen contains fields to set the Month, Day, Year, Hour, Minute, and AM/PM. 1. Tap to display the Time Setting screen. 2. Tap on each field to set it. The UP/DOWN arrows shift to that field. Use UP/DOWN to set the field. 3. Tap on the AM/PM block to switch between the two. 4. Tap Daylight Saving to set Daylight Savings Time. 5. Tap SAVE when you are finished. It is important to set the correct time to ensure that the recorded video files and the scheduled record times are correct. Time Zone Time Zone allows you to set the time zone your monitor is in. This is especially useful if you are using the app in another time zone and you want to remotely access your recorded files. You can set a filter for how far back you want to view files (the past hour, past 6 hours, etc - see page 49). Your system will know that your request refers to the time zone the monitor is in. [Default = (GMT+10:00) Australia] to display the Time Zone screen. 1. Tap 2. Scroll through the time zone lists to find your time zone. Tap on that time zone when you find it. 3. Tap SAVE when you are finished. The Time Zone screen displays. 38 STORAGE MANAGEMENT Storage Management lets you reformat your microSD card (erasing all records) or allow new video records to copy over older records when the microSD card is full. Overwrite erases the oldest record to free space for the new file. More than one record may be erased depending on the new file’s size. The Uniden Guardian System supports up to a 32 GB microSD Card. From the pop-up menu, tap the following icons as they appear on the screens: This screen should display: 1. Tap Storage Management on the System Setup screen. The Storage Management screen displays. 2. You can tap either Format or Overwite from this screen. FORMAT Formatting the microSD card erases all data. If there are files you need to keep, transfer those files from the microSD card to your computer. 1. Tap the Format portion of the Storage Management screen. A confirmation screen displays, asking if you wish to continue. 2. Tap OK. Reformat your microSD card every 4 - 6 weeks for optimum performance. OVERWRITE Overwrite lets the system delete the oldest records in order to record new records when the microSD card is full. It might be necessary to delete more than one record to save the new record, depending on size. 1. Tap the Overwrite portion of the Storage Management screen. 39 2. A checkmark displays to indicate that the oldest files will be overwritten. If you turn off this feature, an x displays and the system displays an out of space message when you ty to record files and the microSD card is full. SYSTEM UPGRADE To upgrade the G Series firmware, you will need to download the file from the Uniden Video portal site (www.unidenvideo.com) or from the Uniden website (see front cover of this manual) to your computer. This file must then be transferred to the root directory of the SD card used in your G Series system. From the pop-up menu, tap the following icons as they appear on the screens: This screen should display: Refer to Upgrading Your System Software, (“System Upgrade” on page 56). LANGUAGE CHANGING THE LANGUAGE English is the default language. When you change languages, all system settings default to the original factory settings. You will have to reenter any specialized settings. From the pop up menus, tap the following icons as they appear on the screens: 40 This screen should display: 1. Select a language to change to that language. The Restore Default Settings screen displays. 2. Tap OK to continue with the language reset. The system will reboot in about 5 seconds. If you do not want to reset the language, tap CANCEL and return to the previous screen. Changing the language will reboot the system and ask you to recalibrate the touch screen. Follow the instructions on the screen. Quick Tips The Quick Tips screen provides more detail into 10 common areas. Tap on a subject to display the information. 41 Remote Access Overview G Series lets you view live video from your Windows® PC, an iPhone®, iPad®, or Android® smartphone or tablet. Free apps are available through the iTunes® App Store or the Android Market. This system uses P2P remote access technology and does not require configuring your router, port forwarding or a remote DDNS service. You must set up a free portal account to remotely view your system. Multiple users can access live video at the same time as long as they have the User ID (DID) code and security code. The number of remote viewers is determined by the amount of “available upload bandwidth” on your home network. Each remote viewer requires ~350kbps of bandwidth on the network. System Requirements • Microsoft® Windows XP, Vista, or 7 • Internet Explorer® 8 or greater. • iPhone® 3GS or above, or • iPad® or • Android® 2.3 smartphone or above, with 1 GHz processor or greater and 256 MB of memory, or greater, or tablet. Connecting to the Internet The G Series cradle charges your monitor as well as provides an internet connection. When you are connected to the internet, live video will display on the monitor. For this procedure, the AC adaptor must be connected to the cradle and not to the monitor. Reconnect the AC adaptor if necessary. 42 1. Connect one end of the Ethernet cable into the back of the cradle. 2. Connect the other end into your primary router (typically, the router from your service provider). 3. Before placing the monitor into the cradle, make sure all video recordings are stopped, otherwise, the system may lock up. Place cradle maximum distance away from your router. 4. Insert the monitor into the cradle. A screen asks if you want to connect to the internet or to only charge the monitor. 5. Tap Connect. The Internet Connection Status Indicator appears on the upper left of the LIVE screen indicating that the system is connected to the internet. While the system is connected to the internet: •• The LIVE screen display rate may reduce to 2-3 frames per second. •• The touch screen’s control operation will be limited. To return to full control of the touch screen, disconnect from the internet. Tap on the Pop Up menu and select Charge Only. 6. When you connect remotely to the monitor, the Internet Connection Status Indicator shows that remote view in progress. Connecting to the Intranet (HOME NETWORK) When the monitor is placed in the cradle and “charge only” is selected, you can still access your live video from a PC or smart phone or tablet as long as those devices are also connected to the same network as the monitor. For example your smart phone or tablet is connected to your home network via WiFi. In this case, live video will still be displayed on the monitor as well as on the smart phone or tablet. 43 Remotely View Your Uniden G Series System To remote view via your PC, please log on to www.unidenvideo.com. The screen shown below will be displayed. Click on the link ‘Start Viewing’. On the next screen, please enter your DID and security code. The DID code can be found on the back of your handheld monitor behind the kickstand. It is the 20 characters underneath the barcode. You also can find the DID code on the Network Information screen. Choose the camera and then press START to view live video. 44 In order to view live video from your PC, you must download and install the OCX plug in. Click on the link near the bottom of the page and it will ask you to Run or Save the file. If you choose to Save, remember where the download location on your computer. After the download is complete, find that file and click on it to install. Record Video The Portal lets you record live video and save it to your PC. 1. Click Record to start recording. 2. Click Stop Record to stop recording. Take a Snapshot The Portal lets you take snapshots of video and save to your PC. Click Snapshot. You specify the Data Storage Location for all video and snapshots. Select Data Storage Location and then browse to the location where you want to save them. ZOOM The Portal lets you zoom in or out of the live video. Click 1X and 2X. 45 dOwNlOAdING APPS Android You can use a Google® Android® smart phone or tablet with your G Series System to remotely connect to and view live camera video. Follow these steps to download, add, and use the app. 1. From your AndroidTM smart phone or tablet device, search the Android Market for Uniden Guardian 2. Download and install this app to your device. 2. Launch the app; tap PRESS TO Add CAMERAS to add your system information to the app. Enter a name for your system in the System Name field. Enter the same DID code from your Uniden Guardian monitor in the DID field. Enter the security code. Tap the Email Alert box to have the system send you e-mails when motion triggers the camera; tap SAVE. A message displays, verifying that you want to save the system you just entered. Tap OK. 3. A message displays, recommending that you change the security code from the default. Tap OK. 4. The Uniden Guardian 2 system Main screen displays. A globe displays for each system you connect to the Uniden Guardian 2 app. If only one system is connected, the app will display the globe screen momentarily and then display the last image from that system. 46 5. Tap on the globe to view live video from that system. G755 Home APP Operation When you open the APP on your Android phone, the image displayed on the main screen is the last camera image, captured automatically, from your previously established session. Tap to add an additional G Series system. Tap to enter System Setup page. Tap to refresh the system. Main Screen Tap to enter the APP Information page. There is also an option to enable/disable the PIN lock 47 SYSTEM SETUP ICONS These icons display when you tap the icon from the Main screen. • Edit System. Tap this icon to change settings and enable email alerts and event notifications. • Delete System. Tap this icon to delete the Uniden Guardian system. • View Recorded Files. Tap this icon to display a list of recorded file (see page 51). INFORMATION OPTIONS These options display when you tap the • • icon. Set up PIN Lock. Activating this function prevents others from activating the app and viewing your camera images. Enter a unique 4-digit code and check the “Enable lock when starting” box if desired. Enter this code when you activate the app. About. Tap this icon to display the APP version number and the API version number. TO ENABLE EVENT NOTIFICATION You can set your smartphone or device to notify you when there is a new recorded file. 1. Tap Settings on your device. 2. Tap Notifications. A list of apps displays. 3. Tap Uniden Guardian 2. 4. The Uniden Guardian 2 setting screen displays. Turn the notification ON or OFF as desired. TO VIEW RECORDED FILES FROM YOUR MOBILE DEVICE Before you can view recorded files from your mobile device, you must connect your system to the internet (see page 42). 1. Launch the Uniden Guardian 2 app and select your system. The main screen displays. 2. Tap the 48 icon. The Edit System, Delete System, and View Recorded Files icons display. 3. Tap VIEW RECORDED FILES. A list of recorded files (Event List) displays.You also have the following options available: • Across the bottom of screen is a camera selection field with a drop-down menu; you can select which camera’s Event List you want to view. • Tap the pencil icon to select recorded files to delete. Tap the box on the right side of the entry to select it for deletion. • You can set a filter to display all files recorded within the past hour, past 6 hours, etc. Tap SEARCH (magnifying glass icon) to display the filter selections. Select a filter and then tap YES. The Event List displays again, filtered accordingly. When you set a filter, be sure the Time Zone feature is set accurately in the monitor to reflect the current time zone for the system, not the time zone where you are. 4. Tap on a file to play it. Two icons display on the screen below the image: Pause icon. Tap to pause playback. Tap again to resume playback. Return icon. Tap to return to the previous screen. 49 TO TAKE SNAPSHOTS AND RECORD FROM LIVE VIEW: From the Live view, three icons display on this screen - Snapshot, Record, and Return. Snapshot icon. Tap to take a picture. Pictures are saved to your phone. Record icon. Tap to begin recording. A red circle displays in the upper right-hand corner of the screen. The app records for 2 minutes, and stores the recorded file on the monitor’s microSD card. Return icon. Tap to return to the Main screen. If you have multiple systems, scroll down and tap on the system image you want to view. To View Video: 1. Select a system. 2. Select a camera from the drop-down menu. 3. View video. You can turn your device sideways and go to a horizontal view. 4. Tap Return to stop the video and enter the system page. 50 iPhone In a similar fashion to the Android smart phone, you can use the Apple® iPhone® smart phone or iPad® tablet with your G Series System to remotely connect to and view camera videos. Follow these steps to download the G Series iPhone® App and set it up to work with your G Series system. 1. From your iPhone® or iPad®, go to the Apple App Store and search for Uniden Guardian Download and install this App to your device. 2. Launch the app; tap PRESS TO ADD CAMERAS to add your system information to the app. Enter a name for your system in the System Name field. Enter the same DID code from your Uniden Guardian monitor in the DID field. If your phone is connected via WiFi to the same network as the Uniden Guardian system, tap SEARCH. The app will look on your network and find your Uniden Guardian system’s DID code. Enter the security code. Tap SAVE. 3. The Uniden Guardian 2 system Main screen displays. A globe displays for each system you connect to the Uniden Guardian 2 app. If only one system is connected, the app will display the globe screen momentarily and then display the last image of that system. 4. If you have more than one system on the app, tap your desired system’s globe to view live video from that system. 51 APP Operation When you open the APP on your iPhone or iPad, several icons display on the bottom task bar. Tap to add an additional G Series system. Tap to enter System Setup page. Tap to refresh the system. Main Screen Tap to enter the APP Information page. There is also an option to enable/disable the PIN lock. SYSTEM SETUP ICONS These icons display when you tap the icon from the Main screen. • Edit System. Tap this icon to change settings and enable email alerts and event notifications. • Delete System. Tap this icon to delete the Uniden Guardian system. • View Recorded Files. Tap this icon to display a list of recorded file (see page 51). INFORMATION OPTIONS These options display when you tap the • • 52 icon. Set up PIN Lock. Activating this function prevents others from activating the app and viewing your camera images. Enter a unique 4-digit code and check the “Enable lock when starting” box if desired. Enter this code when you activate the app. About. Tap this icon to display the APP version number and the API version number. TO ENABLE EVENT NOTIFICATION You can set your smartphone or device to notify you when there is a new recorded file. 1. Tap Settings on your device. 2. Tap Notifications. A list of apps displays. 3. Tap Uniden Guardian 2. 4. The Uniden Guardian 2 setting screen displays. Turn the notification ON or OFF as desired. TO VIEW RECORDED FILES FROM YOUR MOBILE DEVICE Before you can view recorded files from your mobile device, you must connect your system to the internet (see page 42). Launch the Uniden Guardian 2 app and select your system. The System Setup screen displays. 1. Tap the icon. The Edit System, Delete System, and View Recorded Files icons display. 2. Tap VIEW RECORDED FILES. A list of recorded files (Event List) displays.You also have the following options available to help you find the files you want: - Change cameras. In the upper right-hand corner of the screen is a camera selection field. Tap on it and the bottom of the screen displays your camera options. Select the camera whose Event List you want to view. - Set display filter. You can set a filter to display all files recorded within the past hour, past 6 hours, etc. Tap SEARCH to display the filter selections. Select a filter and then tap CLOSE. The Event List displays again, filtered accordingly. When you set a filter, be sure the Time Zone feature is set accurately in the monitor to reflect the current time zone for the system, not the time zone where you are. See page 38. 3. Tap on a file to play it. Two icons display below the image: 53 Pause icon. Tap to pause playback. Tap again to resume playback. Return icon. Tap to return to the previous screen. TO DELETE FILES 1. Tap the DELETE ALL or DELETE ONE button on the bottom of the list of files. 2. If you tap DELETE ALL, a confirmation message display. Tap YES or NO. 3. If you tap DELETE ONE, the Event List displays again with red and white circles. Tap the circle on the file you want to delete and then tap DELETE. 54 TO TAKE SNAPSHOTS AND RECORD FROM LIVE VIEW: From the Live view, three icons display on this screen - Snapshot, Record, and Return. Snapshot icon. Tap to take a picture. Pictures are saved to your phone. Record icon. Tap to begin recording. A red circle displays in the upper right-hand corner of the screen. The app records for 2 minutes, and stores the recorded file on the monitor’s microSD card. Return icon. Tap to return to the Main screen. To View Video: 1. Select a system. 2. Select a camera from the drop-down menu. 3. View video. You can turn your device sideways and go to a horizontal view. 4. Tap Return to stop the video and enter the system page. Two icons display on the screen - Snapshot and Return. Snapshot icon. Tap to take a picture. Return icon. Tap to return to the Main screen. 55 Maintaining Your System UPGRADING YOUR G Series FIRMWARE Check your system firmware version on the Network Information screen. Go to www.uniden.com. au to check the current firmware level. Compare it to your system firmware level. If you need to update your G Series firmware, download the most current firmware version to your system’s SD card and then upload that firmware to the Monitor. 1. 2. 3. 4. 5. 6. Eject the SD card from the Monitor. Insert the SD card into your PC. Go to www.uniden.com. au Copy the current firmware to the SD card. Remove the SD card and reinsert it into the Monitor. Upgrade the firmware (see “System Upgrade” on page 40). TAKING CARE OF YOUR HARDWARE Monitor: As you use your monitor keep the screen clean by wiping it with a microfibre cloth to remove fingerprints, dust, etc. Cameras: When dust and grime builds up on the camera lens and glass, it affects night vision capability. The infrared light reflects off of the dust and grime, limiting the camera’s “vision.” Use a microfibre cloth to regularly clean the cameras or when night vision video is cloudy or unclear. 56 SOLVING PROBLEMS If you have any trouble with your system, try these simple steps. If you still have a question, visit the customer support page of our website listed on the front cover. If... The motion sensor won’t respond to movement. Try... •Increasing the sensitivity of the motion sensor (see page 25). •Checking the settings on the Record screen (see page 25). The motion sensor goes off when there’s •Decreasing the sensitivity of the motion sensor (see nothing there. page 26). •Refer to “Placement Considerations” on page 9. I can’t play my video clips in another •The video files play with a Quicktime® player. Downprogram load this free player from www.apple.com. •Video will play in players such as Windows Media® Player if an H.264 CODEC plug-in is installed. I schedule a recording, save the schedule, and the recording does not happen at the scheduled time. •Ensure that the system time is set to the current time. •Make sure that the SD card is inserted into the Monitor and there is still memory available on that card. The camera’s signal status icon shows no bars •making sure the camera is plugged in and the red LED is on. •making sure the camera is paired to the correct channel •re-pairing the camera and Monitor •moving the camera closer to the monitor; it might be out of range. •make sure the camera setting is turned on in Camera Setup (see “Camera On” on page 24). 57 If... The camera’s signal status icon shows one or two bars or the video quality is poor Try... See “General Guidelines” on page 8 for tips on improving video quality. The camera won’t pair with the Monitor •making sure the camera is plugged in and the red LED is on. •pressing and releasing the pairing button quickly. Do not press and hold the pairing button. When I power up my Monitor and cameras for •If the Power Saving feature has been turned on, the monitor’s LCD screen will power off. Tap the the first time, they seem to be on but there is no picture on the screen power button to turn the LCD back on. I have my regular LIVE screen but there are no •tapping the Power button on top of the Monitor. icons. Screen lock may be on and tapping the Power button will unlock the screen. The monitor picture has frozen. •Using a blunt object like an unbent paper clip to press RESET and reset the monitor. The monitor turns off. Press POWER to turn it back on. I cannot remotely access my recorded files. •Verify that the monitor is connected to the internet. •Verify that the time zone is set correctly for the monitor. If you are away from your system, you will need someone to verify these items for you. 58 Additional Information PRODUCT SPECIFICATIONS Radio Frequency Transceiver RF Frequency Modulation Spread spectrum Anti Interference Selectable camera channel Data rate Transmitting range Image Specification Output Image resolution Image processing Exposure White balance System Specifications Weight Dimension 2.4 GHz GFSK Frequency Hopping Clean Channel Dynamic Select 4 2 Mbps 500 feet (152 metres) in an open area (line of sight) 480 X 272 (HD) / 320 x 240 (QVGA) H.264 Auto Auto Camera Outdoor: 13 oz (370g) Indoor: 4.1 oz (118g) Outdoor: 5.94 x 2.9 x 1.9” (151 x 74 x 49 mm) Monitor 4.3” Model: 7 oz (198g) 5 x 3 x 0.9” (132 x 79 x 24 mm) Operating temperature Indoor: 3.5 x 2.9 x 0.8” (90 x 49 x 20 mm) +14° F (-10° C) to 122° F ( +50° C) Battery charging temp. 0° C (32° F) to +45° C (113° F ) 7” Model: 1lb 1 oz (468g) 7.2 x 5 x 1.1” (184 x 128 x 28 mm) 59 System Specifications Camera Input voltage Operating voltage Power consumption Low light solution 100-240 V AC @ 60 or 50 Hz 5 V DC @ 1 Amp 650 mA max Outdoor: 20 IR LEDs, 1 Low light sensor Indoor: 12 IR LEDs, 1 Low light sensor Low light sensitivity Picture sensor Lens 1-8 lux OV7725 1/4’ Color CMOS Outdoor: F3.6mm H:55 V:44 Indoor:F3.6mm H:53 V:40 Lithium-Polymer Battery Warning This equipment contains a rechargeable lithium-polymer battery. A.Do not charge the battery in temperatures below 23° F (0° C) or higher than 113° F (45° C). B.Do not open or mutilate the battery. C.The rechargeable batteries contained in this equipment may explode if disposed of in a fire. D.Do not short-circuit the battery. E. Do not charge the rechargeable battery pack used in this equipment with any charger other than the one designed to charge this battery pack as specified in the owner’s manual. Using another charger may damage the battery pack or cause the battery pack to explode. CAUTION! Rechargeable Batteries Must Be Recycled or Disposed of Properly. Recycling and Disposal Information A.Do not dispose of electronic devices or any of their components (especially batteries and LCD displays) in your municipal trash collection. B.Consult your local waste management authority or a recycling organization to find an electronics recycling facility in your area. 60 INDEX A P Alarm 33 Android App (See Remote Access) Apple App (see Remote Access) Pairing (see camera) 23 Playback 18 B R Battery Information 60 Record Schedule 29 Remote Access 42 C S Camera Add new camera 19 Brightness 25 Indoor Camera 11 Mount the Camera 8 Outdoor Camera 10 Schedule 29 SD Card Display Indication 14 Formatting 39 Recording Live Video 18 Security Code 32 Setup 35 Specifications 59 System Upgrade 40 D Date&Time 29,37 Display 17 E T Timer 37 Email Alert 26 I Icons 14 M Menus 21 Motion Detect 25 N Network 30 61 ONE-YEAR LIMITED WARRANTY IMPORTANT Satisfactory evidence of the original purchase is required for warranty service. Please refer to our Uniden website for any details or warranty durations offered in addition to those contained below. Warrantor The warrantor is either Uniden Australia Pty Limited ABN 58 001 865 498 (“Uniden Aust”) or Uniden New Zealand Limited (“Uniden NZ”) as the case maybe. Terms of Warranty Uniden Aust/NZ warrants to the original retail purchaser only that the G2701, G2710, G2711, G2720, G2401, G2410, G2411 and G2420 (“the Product”), will be free from defects in materials and craftsmanship for the duration of the warranty period, subject to the limitations and exclusions set out below. Warranty Period This warranty to the original retail purchaser is only valid in the original country of purchase for a Product first purchased either in Australia or New Zealand and will expire one (1) year from the date of the original retail sale. If a warranty claim is made, this warranty will not apply if the Product is found by Uniden to be: A.Damaged or not maintained in a reasonable manner or as recommended in the relevant Uniden Owner’s Manual; B.Modified, altered or used as part of any conversion kits, subassemblies or any configurations not sold by Uniden Aust or Uniden NZ; C.Improperly installed contrary to instructions contained in the relevant Owner’s Manual D.Repaired by someone other than an authorized Uniden Repair Agent in relation to a defect or malfunction covered by this warranty; or E. Used in conjunction with any equipment, parts or a system notmanufactured by Uniden. Parts Covered This warranty covers the Product and included accessories. 62 User-generated Data This warranty does not cover any claimed loss of or damage to user-generated data (including but without limitation phone numbers, addresses and images)that may be stored on your Product. Statement of Remedy If the Product is found not to conform to this warranty as stated above, the Warrantor, at its discretion, will either repair the defect or replace the Product without any charge for parts or service. This warranty does not include any reimbursement or payment of any consequential damages claimed to arise from a Product’s failure to comply with the warranty. Our goods come with guarantees that cannot be excluded under the Australian Consumer Law. You are entitled to a replacement or refund for a major failure and for compensation for any other reasonably foreseeable loss or damage. You are also entitled to have the goods repaired or replaced if the goods fail to be of acceptable quality and the failure does not amount to a major failure. This warranty is in addition to and sits alongside your rights under either the COMPETITION AND CONSUMER ACT 2010 (Australia) or the CONSUMER GUARANTEES ACT (New Zealand) as the case may be, none of which can be excluded. Procedure for Obtaining Warranty Service Depending on the country in which the Product was first purchased, if you believe that your Product does not conform with this warranty, you should deliver the Product, together with satisfactory evidence of your original purchase (such as a legible copy of the sales docket) to Uniden at the addresses shown below. You should contact Uniden regarding any compensation that may be payable for your expenses incurred in making a warranty claim. Prior to delivery, we recommend that you make a backup copy of any phone numbers, images or other data stored on your Product, in case it is lost or damaged during warranty service. UNIDEN AUSTRALIA PTY LTD UNIDEN NEW ZEALAND LTD Service Division Service Division 345 Princes Highway, 150 Harris Road, East Tamaki Rockdale, NSW 2216 Auckland 2013 Phone number: 1300 366 895 Phone number: (09) 273 8377 Email address: [email protected] Email address: [email protected] 63 © 2012 Uniden Australia Pty. Limited. Uniden New Zealand Limited. Printed in PRC. 64