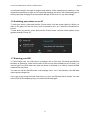
1
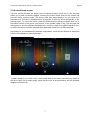
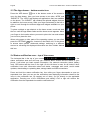
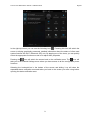
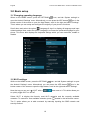
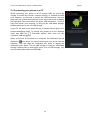
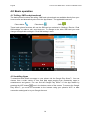
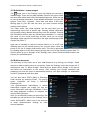
Point of View Mobii 5045- Android 4.2 Mobile Phone
English
4.3 Administer / remove apps
The
‘Apps’ item in the ‘Settings’ menu will display an overview of
installed apps. There are four tabs available (Scroll to the right to make
the other tabs visible) which filter the displayed apps list. Select an app
to view its detailed information. In the detailed information you have the
options ‘Force Stop’, ‘Uninstall’, ‘Clear data’ and ‘Move to SD card’.
Moving apps to your SD card can save you some internal storage
memory on the phone.
The ‘Clear cache’ and ‘Clear defaults’ can be used when you are
experiencing issues with a specific app. Clearing cached information
and (possibly wrong) default settings may solve the problem. Clearing
this information will also wipe any stored login information. I.e. clearing
the cache of your social media app will also force you to re-login
afterwards. Apps may also be removed in the apps content page of the
Google Play Store™.
Apps can be installed on both the internal memory or on a SD card.
Installing apps on the internal memory can, at some point, cause the
phone to run out of memory and become slow. This can be prevented
by installing apps on a SD card, keeping enough free room for the operating system itself. To
set this option up, go to ‘Storage’ in the ‘Settings’ menu, press ‘Preferred install location’ and
choose your preferred option.
4.4 Add an account
The best way to fully make use of your Android phone is by linking your Google / Gmail
account or other e-mail account to your device. Open the ‘Settings’ menu and choose the ‘+
Add account’ item. To add a Google / Gmail account, please select ‘Google’ in the pop-up
and follow the instructions on the screen. After entering your Google username and
password you have the option to automatically back-up your apps, settings (i.e. bookmarks
and Wi-Fi passwords) and other data.
You can also add a POP3, IMAP or Exchange
email account by selecting ‘Email’. The pop-up
option ‘Corporate’ will setup a ‘Microsoft
Exchange’ link.
Your system/network administrator or mobile
subscription supplier can supply you with the
server information and login credentials. Follow
the steps displayed on-screen to complete the
account linking process.
After you successfully linked your account(s) with
the tablet you will see them in the ‘Settings’ menu
under ‘ACCOUNTS’. Select one of the accounts
to setup synchronization settings for each
account separate.
15