1
Satellite
User's
Changing Entertainment.
ain.
Receiver
G ide
Important
Information
WARNING
Caution: To reduce the risk of electric shock, do
not remove cover (or back). No user serviceable
parts inside. Refer servicing to qualified service
personnel.
To reduce the risk of fire or
electric shock, do not expose
this product to rain or moisture,
_I_,
Cautions
This
symbol indicates
"dangerous
voltage" inside
the product that presents a
risk of electric shock or
personal injury.
_[_IL This symbol indicates
important instructions
accompanying the product.
Do not stack electronic components
or other objects on top of the
Digital Satellite Receiver. The slots on top of the receiver must be left
uncovered to allow proper airflow to the unit. Blocking the airflow to the unit
could impair performance or damage your receiver and other components.
Remove any sales or promotional materials attached to the product.
Do not stack the digital satellite receiver on top of a "hot component"
an audio power amplifier.
FCCRegulations state that unauthorized
equipment may void the user's authority
changes or modifications
to operate it.
such as
to this
Note to Cable TV Installer:
This reminder is provided to call your attention to article 820-40 of the
National Electrical Code (Section 54 of the Canadian Electrical Code, Part I
which provides guidelines for proper grounding and, in particular, specifies
that the cable ground shall be connected to the grounding system of the
building as close to the point of cable entry as practical.
Note to Satellite
This reminder is provided to call your attention to articles 810 and 820 of the
1999 National Electrical Code. Refer to article 810, in particular to 810-1 and
810-15, for required grounding of the metal structure of the Dish Antenna.
Refer also to the 810-2 which, by reference to article 820, requires that the
satellite dish coaxial cable shield be connected to the grounding system of the
building as close to the point of cable entry as practical.
Dish Installer:
IMPORTANT NOTICE:
This device incorporates an anticopy process technology that is protected by
U.S. patents and other intellectual property rights. The anticopy process is
licensed for non-commercial, home use only. Reverse engineering or
disassembly is prohibited.
Care and Cleaning:
Use a soft cloth or dusting attachment of your vacuum cleaner to dust your
digital satellite receiver. Remove dust from the ventilation holes on the top and
bottom.
Plastic surfaces are easily scratched and can be marred by alcohol and various
solvents. Avoid excessive use of oil-based furniture polishes since the materials
used in the cabinet will accumulate more dust. A non-abrasive, anti-static
cleanerlpolisher is recommended.
Product
Registration
Please fill out the product
contact you if needed.
Product
registration
card (packed separately) and return
it immediately.
Returning
the card allows us to
Information
Keep your sales receipt to obtain warranty parts and service and for proof of purchase. Attach it here and record the serial
and model numbers in case you need them. These numbers are located on the product.
Model No.
Serial No.
Purchase Date:
Dealer/Address/Phone:
I
Introduction
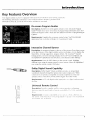
Key Features Overview
Your digital
satellite
receiver
is equipped
,.\ith
fcattLreS flint \,.ill add
to yotu
The folk)wing
infomlation
sumnmrizcs
a lew (7[ these tuatLIl+eS. (:hal)tCl"
infommtion
about the rest of the TV's features and how to use then1
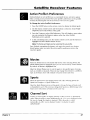
On-screen
vie\_,ing
"_ provides
Program
expcncnc.c
more
Guides
Description:
Avaihlble on screen guides indude a new Advanced Program
Guide TM ,,vhid_ stores up to seven days of programming inforinatkm and a new
Advanced Program Guide _ which lists five diflerent channels of programming at
a glance.
Requirements:
Complete
the on-screen
assisted setup. You'll find
instructions
how to do this in Chapter
l, Con._,ctio_ts
& Setup.
Interactive
Channel
detailed
Banner
Description:
A transparent banner at the top of the picture allows direct access
to tile key features of the digital satellite receiver including a way to display the
Main Menu. viewing suggestions, program details, The Guardian
channel
locking system, on-screen message display, the Scout/_ keyword/phrase
and
the AlphaSorV Malphabetical search features, and alternate audio offerings.
TM
Requirements:
Press the INFO button on the remote control. Highlight
different icons using the remote controFs arrow buttons. Select the highlighted
icon using the remote control's OK button
Dolby Digital Sound Capability
Description:
Dolby I)lgltal- ,,',,hen awu! fl)le) provides six independent
soundmtck channels through the optical and coaxia! output jacks. When
connected to an optional, conlpatible
six channel amplifier/receiver
and
speakers, these connections provide I)olbv DigitaV Surround Sound.
Requirements:
decoder
>Oq
I
k_'&&
i
a
J J
jr0
k) k)
Universal
Remote
Control
Description:
Ih_ ides _l]]l_lc'l_' s:ncllitc s\slcm (>l_elalion, and pntnm_.
lunctioi_
cc>ntlol
ol m<>sllmlnclsol
mln_Ic _>ntr<>lhdHc
IX>.\CRs. and Cable
J__J
J
o
,j
A l_.' xxith digital audio input jacks, or a digital audio receiver/
Ix Ix(:s
,
Requir('In('nts:
i'Ut/]I)IU
\
JilL'
IL+Ill()[L. (1)nll()I
il
not
_ol_ltoll:il+lt
lll_l} IL{\ u' I() hL"
,c1L_, c2>
Is
1_( ,\
(;l:
()l"
I>II)St'Zlll
+ _lcx
Itc
",tt_
pI()LtlLIIlllI]L%I
h
as
:l
(Ix. _:d+lc
t() (>['_.'T;llc}()U{
Ix)x.
ck
t()lllp()llen[
il
Introduction
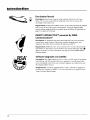
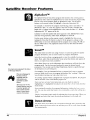
VCR
One-button
Record
Description:
Records any program being watched with the touch of one
button. The receiver sends infrared commands to the VCR to execute the
recordings
at the proper time.
Requirements:
Connect the satellite receiver to the VCR and attach the infrared
cable on top of the VCR's remote control sensor. Set up the digital satellite
receiver system using the first-time assisted setup and follow the directions on
page 19 to select the VCR type.
DIRECTV INTERACTIVE
Communications
®
TM
powered
by WINK
Description:
An interactive television service that lets you access up-to-theminute news, sports, financial information, weather, program trivia, and
respond to free offers and even shop- all while you watch 'IV.
Requirements:
Establish a free, secure Interactive TV account, then press the
OK/i button on the remote control whenever you see the Interactive logo ((_)
appear on-screen. For more information, see page 32 in the Satellite System
Features chapter.
RSR"
Software
Upgrades via Satellite
Description:
The digital satellite receiver is able to modify some of its features
and functions with downloaded
RSA-secure upgrades or modifications. RSAsecure downloads ensure that only authorized upgrades are delivered to your
RCA digital satellite receiver.
Requirements:
Consult the Upgrade Menu to find a schedule of upgrades or
modifications planned by DIRECTV. For more information, see page 62 in the
Using On-screen Menus chapter.
2
Table
Key Features
Connections
Overview
& Setup
of
............................................................................................
1
................................................................................................
5
Things To Consider Before You Connect Components .............................................
Choose Your Connection ...........................................................................................
Jacks and Cables .......................................................................................................
Satellite Receiver Rear Panel ...................................................................................
Locating the VCR's Infrared Remote Control Sensor .............................................
Connect the VCR Controller ....................................................................................
Using Highlight and Select ................................................................................
Selecting a VCR Type .........................................................................................
Complete the Assisted Setup ...................................................................................
6
7
15
16
17
18
18
19
19
Order Programming .................................................................................................
20
Using the
Remote
Control
....................................................................................
Remote Control Buttons ..........................................................................................
Top of the Digital Satellite Receiver ........................................................................
Programming the Remote Control .........................................................................
Testing the Remote Control ..............................................................................
Using Automatic Code Search ...........................................................................
Using Direct Entry ..............................................................................................
Operating Other Components ..........................................................................
Remote Control Codes .......................................................................................
Using the Satellite
Receiver's
Features
...........................................................
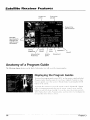
Anatomy of a Program Guide .................................................................................
Displaying the Program Guides ........................................................................
Using The Channel Banner ................................................................................
Buttons of the Channel Banner ..................................................................
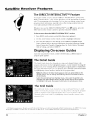
The DIREa_/INTERACTIVE TM Feature ..............................................................
Displaying On-screen Guides ...................................................................................
The Detail Guide ................................................................................................
The Grid Guide ...................................................................................................
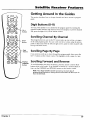
Getting Around In the Guides .................................................................................
Scrolling Channel By Channel ...........................................................................
Scrolling Page By Page ......................................................................................
Scrolling Forward and Reverse ..........................................................................
Tuning to a Program ..........................................................................................
More Details .................................................................................................
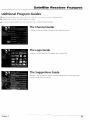
Additional Program Guides .....................................................................................
The Channel Guide ............................................................................................
The Logo Guide ..................................................................................................
The Suggestions Guide ......................................................................................
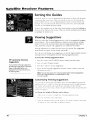
Sorting the Guides ...................................................................................................
Viewing Suggestions .........................................................................................
Active Profile's Preferences ...............................................................................
Movies ................................................................................................................
Sports ..................................................................................................................
Channel Sort .......................................................................................................
Alp haSortTM ........................................................................................................
ScoutTM
...............................................................................................................
Down Arrow .......................................................................................................
Contents
21
22
24
25
25
25
26
26
27
29
30
30
31
31
32
32
32
32
33
33
33
33
34
34
35
35
35
35
36
36
37
37
37
37
38
38
38
3
Table
of
Contents
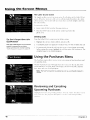
Using the Menu System .........................................................................................
Using the Menu System ...........................................................................................
On-screen Buttons and Context Help ...............................................................
Main Menu Items ...............................................................................................
Program Guides ...........................................................................................
Messages ......................................................................................................
Purchases ......................................................................................................
Timers ...........................................................................................................
Profiles ..........................................................................................................
Personal Settings .........................................................................................
System Setup ................................................................................................
Interactive ....................................................................................................
41
41
41
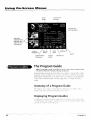
The Program Guide ..................................................................................................
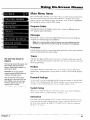
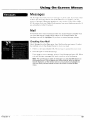
Messages ...................................................................................................................
Mail .....................................................................................................................
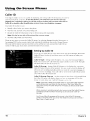
Caller ID ..............................................................................................................
42
43
43
44
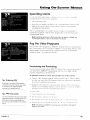
Using the Purchases Menu .......................................................................................
Reviewing and Canceling Upcoming Purchases ...............................................
Spending Limits ..................................................................................................
Pay Per View Programs ......................................................................................
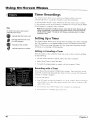
Timer Recordings ...............................................................................................
Setting Up a Timer .......................................................................................
Schedule a Timer with the RECORD Button ...............................................
User Profiles ..............................................................................................................
Creating and Editing User Profiles ....................................................................
Locking the System ............................................................................................
ProgramNideo
Unlock ................................................................................
Choosing Your Profile ........................................................................................
Personal Settings ......................................................................................................
System Setup ............................................................................................................
Assisted Setup
.................................................................................................
System Index ......................................................................................................
System Options ..................................................................................................
Dish Pointing ......................................................................................................
System Test .........................................................................................................
System Info .........................................................................................................
Upgrades ............................................................................................................
New Access Card ................................................................................................
Alternate Data ...................................................................................................
Interactive .................................................................................................................
46
46
47
47
48
48
49
49
49
52
53
54
54
56
56
57
57
60
62
62
62
62
62
62
Other
4
39
40
40
41
41
41
41
41
41
Information
...................................................................................................
63
Troubleshooting .......................................................................................................
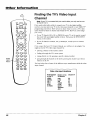
Finding the TV's Video Input Channel ....................................................................
64
66
Running the System Test ..........................................................................................
Fine-Tuning the Signal .......................................................................................
Limited Warranty .....................................................................................................
FCC Registration Information ..................................................................................
Radio Interference ...................................................................................................
67
67
68
70
70
Accessory Order Form ..............................................................................................
Glossary .....................................................................................................................
Index .........................................................................................................................
71
73
74
Chapter
Connections
Chapter
& Setup
Overview:
•
Things to Consider Before You Connect
•
Choose Your Connection
•
Place Batteries in the Remote Control
•
Assisted Setup
•
Order Programming
Changing
Graphics
contained
within
1
this publication
Entertainment.
are fiJr
repr_,sentation
Again.
only
5
Connections
&
Setup
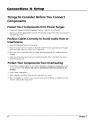
Things To Consider Before You Connect
Components
Protect Your Components from Power Surges
•
Connect
all components
before
plugging any power cords into the wall outlet.
•
Always turn off the digital satellite receiver, TV and other components
disconnect any cables.
Position Cables Correctly
Interference
before you connect
to Avoid Audio Hum or
•
Insert all cable plugs firmly into their jacks.
•
Place the Audio/Video (ATV) cables to the sides of the TV's back panel instead of straight
down the middle after you connect your components.
•
Try not to coil any twin-lead
possible.
•
Make sure all antennas and cables are properly
packed with your unit.
cables and keep them away from the ATV cables as much as
Protect Your Components
•
Do not block ventilation
holes
air can circulate freely. Remove
product.
•
Do not stack
•
Allow
•
Place an amplifier or receiver
on the top sheIf
not flow around other components.
6
adequate
or
grounded.
Refer to the Safety Tips sheet
from Overheating
in any of the components.
any sales
or promotional
Arrange the components
materials
attached
so that
to the
components.
ventilation
when
placing
components
in a stand.
of the stand
so heated
air rising
from it will
Chapter
1
Connections
&
Setup
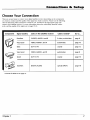
Choose Your Connection
There are several ways to connect your digital satellite receiver depending on the components
you want to connect and the quality of the signal you want to achieve. Please use the following
chart to determine which connection is best for you. Proceed to the appropriate page and
connect your satellite receiver. For more information about the relationship between cables,
jacks, and the quality of the signal, go to pages 15-16.
Component
Signal Quality
Jacks on the satellite
receiver
Cables needed*
Go to...
Excellent
S-VIDEO, AUDIO L and R
S-video, audio/video
page 8
VIDEO, AUDIO L and R
audio/video
page 10
Basic
OUT TO TV
coaxial
page 12
Very Good
VIDEO, AUDIO L and R
audio/video
page 8
Good
OUT TO TV
coaxial
page 10
Excellent
DIGITAL AUDIO
optical (SPDIF)
page 18
* Pictures of cables are on page 15.
Chapter
1
7
Connections
&
Setup
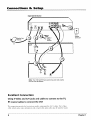
Digital Satellite Receiver
RJll
modular
_
Cable or
Off-air
Antenna
atellite Dish
VCR
phone jack
Antenna
CH3
CH4 _
If
ANI
OUT
ro _
_V
L
IN
AUDpO
FRCM
V_DEO
S.Video
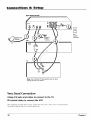
Note: Your VCR and TV back panels may not look exactly
like the ones illustrated.
Excellent
Connection
Using S-Video
RF coaxial
and A/V
jacks and cables to connect
cables to connect
to the TV0
the VCR
This connection provides the best picture quality, surpassing that of A/V cahles. The S-Video
cable, whicil carries video infkmnation only, requires that audio cables also be used for sound.
8
Chapter
1
Connections
&
Setup
What you will need:
Two (2) RF coaxial cables
•
Two (2) A/V cables
One (1) S-Video cable
•
One (1) telephone
line cord
•
Coaxial cable lines fed from a digital satellite antenna
and a standard TV antenna
(or cable line)
Making the Connection
1. Connect the satellite dish antenna feed (RG-6 coaxial cable) to the SATELLITEIN jack on the satellite
receiver.
2. Connect one end of an RF coaxial cable to the OUT TO TV jack on the satellite receiver, and the other end
to the antenna input jack on the VCR.
Note: If your VCR has AN input jacks, you can use A/V cablesto connect the satellite receiver's second
AN jacksto the AN jacksof the VCR instead of using the RF coaxialcable.
3. Connect one end of an RF coaxial cable to the antenna
TV's antenna input jack.
4.
Connect
receiver.
the cable
or off-air antenna
feed
(RF coaxial
output jack on the VCR, and the other end to the
cable)
to the IN FROM ANT jack on the satellite
5. Connect one end of the supplied telephone line cord to the PHONE JACK on the back of the satellite
receiver, and the other end to an RJ11-type modular phone jack (the most common type of phone jack).
6. Connect two ends of the supplied A/V cables to AUDIO R and L jacks on the satellite receiver, and the
other ends to the corresponding audio input jacks on the TV.
Note: Make sure you connect jacks by their labels. For example, AUDIO R on the digital satellite receiver
should be connected to TV's right audio input jack, L Audio to L Audio, etc.
If your TV only has one audio input jack, use the satellite
connection.
7. Connect one end of the supplied
S-Video input jack on the TV.
receiver's AUDIO L jack to make the
S-Video cable to the satellite receiver, and the other end to the
Go to Page
15
Using Your Components
To watch DIRECTV* programming:
Tune the TV to its S-Video line input (if you have difficuhy finding your TV's S-Video line input, see your
TV's User'sManualor
page 66 in this manual). Then tune the satellite receiver to the desired channel.
To record DIRECTV* programming:
Tune the satellite receiver to the desired channel. Then set your VCR to record on the proper input
channel (video line input if using A/V cables to connect the VCR to the satellite receiver, channel 3 or 4 if
using RF coaxial cable).
To view VCR recordings:
Tune the TV to channel 3 or 4 (whichever
as usual.
Chapter
1
is set on the VCR as its output channel).
Begin VCR pktyhack
9
Connections
&
Setup
Digital Satellite Receiver
SateJlite Dish
Antenna
Gable or
Off-air
Antenna
VCR
CH3
CH4
RJll
modular
phone jack
u
JN
ANT
OUT
TO
TV
rN
FROM
ANT
VrDEO
Note: Your VCR and TV back panels may not look
exactly like the ones shown.
Very Good Connection
Using A/V jacks and cables to connect
RF coaxial
cables to connect
to the TV,
the VCR
This connection proxides better picture
quality than RF coaxial cables and is rccotnmended
use with TVs that do not ha\'e S-Vicleo input jacks.
10
for
Chapter
1
Connections
&
Setup
What you will need:
•
Two (2) RF coaxial cables
•
Three (3) Audio/Video
•
One (1) telephone
cables
line cord
Coaxial cable lines fed from a digital satellite antenna
Making
and a standard
TV antenna
(or cable line)
the Connection
1. Connect the satellite dish antenna feed (RG-6 coaxial cable) to the SATELLITEIN jack on the satellite
receiver.
2. Connect one end of an RF coaxial cable to the OUT TO TV jack on the satellite receiver, and the other
end to the antenna input jack on the VCR.
Note: If your VCR has A/V input jacks, you can use AN cables to connectthe satellite receiver's
secondset of A/V output jacksto the AN jacksof the VCR insteadof usingthe RFcoaxial cable.
3. Connect one end of an RF coaxial cable to the antenna output jack on the VCR, and the other end to
the TV's antenna input jack.
4. Connect the cable or off-air antenna feed (RF coaxial cable) to the IN FROM ANT jack on the satellite
receiver.
5. Connect one end of the supplied telephone line cord to the PHONE JACK on the back of the satellite
receiver, and tire other end to an RJll-type m_×lular phone jack (the most common type of phone jack).
6. Connect the ends of the supplied A/V cables to the satellite receiver's AUDIO and VIDEO jacks, and
the other ends to the corresponding AUDIO and VIDEO input jacks on the TV.
Notes: Make sure you connect jacks and cables corresponding to their labels. For example, AUDIO R
output on the digital satellite receiver should be connected to AUDIO R input on the TV, VIDEO OUT to
VIDEO IN, etc.
If your TV only has one audio input jack, use the satellite receiver's AUDIO L jack to make the
connection.
Go to Page
15
Using Your Components
To watch
DIRECTV* programming:
Tune the TV to its video line input (if you have difficulty finding your TV's video line input, see your
TV's U_er_"Manualor
refer to the instructions on page 66 in this manual). Then tune the satellite
receiver to the desired channel.
To record
DIRECTV _ programming:
Follow tim steps in the pre_ ious step, then tune the satellite receiver to the desired channel.
VCR to record on its proper input channel (channel 3 or 4).
Set your
To view VCR recordings:
Tune the TV to channel
playback as usual.
Chapter1
3 or 4 (whichew_r is set on the VCR as its output channel).
Begin VCR
11
Connections
&
Setup
Digital Satellite Receiver
RJll
modular
phone jack
_N
FROM
ANT
Note: Your VCR and TV back panels may not look exactly
like the ones shown.
Basic Connection
Using RF Coaxial
cables for all connections
This coilncction
provides
standard
with TVs that do not have S&qdco
12
[)icttJre (Iulalit},'. This connection
or A V input jacks.
is only r(_+comn]ellded
for ttsc
Chapter
1
Connections
&
Setup
What you will need:
• Two (2) RF coaxial cables
•
One (1) telephone
line cord
•
Coaxial cable lines fed from a digital satellite antenna
and a standard
TV antenna
(or cable line)
Making the Connection
1. Connect the satellite dish antenna feed (RG-6 coaxial cable) to the SATELLITEIN jack on the satellite
receiver.
2. Connect one end of an RF coaxial cable to the OUT TO TV jack on the satellite receiver, and the other
end to the antenna INPUT jack on the VCR.
3. Connect one end of an RF coaxial cable to the antenna OUTPUT jack on the VCR, and the other end
to the TV's anteni_a INPUT jack.
4. Connect the cable box or off-air antenna feed (RF coaxial cable) to the IN FROM ANT jack on the
satellite receiver.
5. Connect one end of the supplied telephone line cord to the PHONE JACK on the back of the satellite
receiver, and the other end to an RJ11-type modular phone jack (the most common type of phone
jack).
Go to Page
15
Using Your Components
To watch
Tune
DIRECTV*
programming:
the TV to the satellite
receiver's
output
channel
(either
channel
3 or 4).
Note: You can change the satellite receiver's output channel by pressing the remote control's SAT
button, then the MENU button, then select System Setup, then System Options, and finally select
Output Channel. Use the remote control's arrow and OK buttons to highlight and select the desired
output channel. Tune the TV to that channel to see the satellite receiver's picture.
To record
DIRECTV* programming:
Follow the directions in the previous step, then set your VCR to record on its proper input channel
(channel 3 or 4 if using RF coaxial cable to make the connection, Video Line Input if using A/V cables
to connect the VCR to the satellite receiver).
To view VCR recordings:
Tune the TV to channel
playback as usual.
Chapter
1
3 or 4 (whichever
is set on the VCR as its output channel).
Begin VCR
13
Connections
&
Setup
Receiveror Decoder
withOpticalInput
DIGfTAL
AUDIO
INPUT
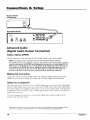
Advanced Audio
(Digital Audio Output
Cables:
Optical
Use this connection
(SPDIF)
to take advantage
Notes: Your digital
Connection)
of Dolby DigitaF quality sound, when available.
receiver back panel may not look exactly like the one pictured.
This satellite receiver's optical digital output jack fully complies with the international
standard
governing this type of jack (IEC958), and is designed for connection to a Dolby Digital (AC-3 or
PCM) receiver or Dolby Digital (AC-3 or PCM) decoder. Older equipment, some of which is not
fully compliant with IEC958, may not be compatible with the Dolby Digital bitstream. Such a
connection using anything other than a PCM, Dolby Digital, or Dolby Pro Logic receiver or
decoder could create a high noise level, causing damage to headphones or speakers.
Making the Connection
Connect
satellite
one end of the optical (SPI)IF) cable to the DIGITAL AUDIO OUTPUT jack* on the
receiver,
and to the digital audio input jack on a Dolby Digital receiver/decoder.
Using Your Component
After you connect
ynur satellite receiver
to a Dolby Digital receiver, you must select Dolbv Dz_,_tal
flom the S3,xtem Options menu (press the remote control's
MENU button, then select S_stem Setup,
then Syswm Options, then highlight
Dolby Digital. Use the remote control's arrow and OK buttons
to highlight
and select AIm_select, PCM, or Dolk_I, Digilalin
order Ik)r the receiver
to recognize
the
digital audio connection.
For more inlk)rmation on this !i:aturc, see the Dolby Digital entry starting on page 59 in the
section, Using The Menu System
*
ManlcJil_'lutl,
Labo_ttoriex.
14
d une&,r licellseJY_mz
(.'oqfidential
1)o11),
_ :11ptlblisl_e_l
Labr*reztr_ries.
_*rks
"l)oll_),'atul
©/992-1997
Dolby
the double*O
sFmbol
czte trademarlz$
La&omttories.
lnc.AII
r_hts
of Dolt,,
resettled.
Chapter
1
Connections
&
Setup
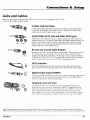
Jacks and Cables
Below is a description of the jacks and cables you can use to make connections.
come with your digital satellite receiver.
Not all cables
S-Video Jack and Cable
S-Video jacks/cables provide this receiver's best picture quality. Remember to
connect the left and right audio cables to the TV because the S-Video cable
carries only the picture signal, not the sound.
S-VIDEO
Audio/Video
000
L
VIDEO
(A/V)
Jack and Cable
Audio/Video (A!V) cables provide good picture
should be used if your TV has no S-video jacks.
jacks are color coded (yellow for video, red for
audio). If your TV has only one input for audio
(white) audio jack on the satellite receiver.
R
AUDIO
(RCA-type)
quality and stereo sound, and
The digital satellite receiver's A/V
right audio, and white for left
(mono), connect it to the left
RF Jack and Coaxial Cable (F-type)
ANTENNA
RF jacks provide good picture and mono sound quality. They should be used if
A/V connections are not available on your TV. RF jacks are used for off-air
antenna and cable feed connections. The RF jacks on the receiver are labeled
IN FROM ANT and OUT TO TV. The coaxial cable supplied with your system is
used to connect the receiver to your TV/VCR's antenna input jack.
IN
VCR Controller
VCR
@
The VCR Controller plugs into the VCR jack on the satellite receiver's back
panel. Attach the other end of the cable to your VCR's remote control sensor.
Digital Audio Output (SPDIF)
DIGITAL
AUOIO
If you own a Dolby Digital receiver that uses an optical cable-type input, use an
optical (SPDIF) cable to connect the satellite receiver to your Dolby Digital
receiver or decoder for the best sound quality.
Telephone
%
DIRECTV
pr_gramming
DIRECTOr, the _chme
Chapter
1
is subject
Desigll
logo
and
The telephone line cord is required to connect your satellite receiver to a
telephone line if you choose to subscribe to *DIRECTV_ programming. The
phone line connection is used to periodically call out to DIRECTV. You will
need an RJll-type modulator jack (the most common type of phone jack)
which might look like one of those pictured here. If you don't have a modular
jack, call your local telephone company to find out how to get one installed.
PHON
to the ternzs and
Advanced
Jack and Cord
conditions
Progrom
of the DIREC IV Customer
Guide
are
lr_ulemarks
Ag_.emetlt.
_f l)IRh'CT_
a coi_r is pr_mided
DIc. a unit
of Itughes
at I)lRECl_dco.l
ElectrYmics
Corp.,
and u'flh.l_mr
aml
are used
flrst
bill
with permission.
15
Connections
&
Setup
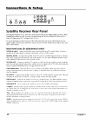
Satellite Receiver Rear Panel
This diagram illustrates each of the back panel jacks found on your digital satellite receiver. When
working with cables, be sure to connect corresponding
OUTPUTS and INPUTS (Video OUT to
Video IN, Right Audio OUT to Right Audio IN, etc.).
For more information on the function of the back panel jacks and many other features of your
digital satellite receiver, press the MENU button and select System Sett_p from the Main menu, then
select System Index.
Back Panel Jacks (in alphabetical
order)
AUDIO (R and L) Audio cables offer better sound quality than RF coaxial cables. Connect
second set of audio cables to another component, such as a VCR or stereo.
a
DIGITAL AUDIO
Connects the satellite receiver's audio to a Dolby Digital receiver or decoder.
This audio connection provides the best sound quality. Use the optical DIGITAL AUDIO output
cable (SPDIF) for this receiver's best possible sound.
IN FROM ANT Connect a standard TV antenna or cable f_eed to the satellite receiver using this
jack. You can then switch between the satellite receiver's signal and the TV/cahle feed using the
remote control's ANTENNA button to toggle between the two.
LOW SPEED DATA This port allows you to connect your digital satellite receiver to future
services and accessories as they become available. A shielded cable and additional hardware
may be required.
OUT TO "IV Connects the satellite receiver to your TV or VCR using RF coaxial cable. This jack
provides the most basic connection, canting average sound and video quality.
PHONE JACK Connects the satellite receiver to a telephone line. The digital satellite receiver
requires a telephone line connection to periodically coramunicate with ),our progranl provider.
SATELLITE IN
Use to connect
the satellite receiver to the satellite dish antenna.
S-VIDEO
Provides better picture quality than VIDEO or RF coaxial cable lacks. If your TV has
an S-Video jack, use it along with the audio jacks (S Video only carries picture information, not
sound) to connect to your TV.
VCR This jack allov,,s the satellite r_:ceivcr to control the VCR usi_lg an IR cable. The cable is
attached above the VCR's remote conlrol sensor. This c_mnection is required Ik)r One Totlch
Record and Timer recoI'0ing
[_'atures.
VIDEO Provides better picture quality than the OI T TO "I__ jack. C(mnect the second VIDEO
jack to another device, such as a VCR "_k_unmst also c()llnect the AUDIO cables when using the
VIDEO connection.
16
Chapter
1
Connections
&
Setup
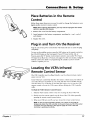
Place Batteries in the Remote
Control
Follow these steps whenever you need to install or change the batteries
digital satellite receiver's remote control.
in your
Note: When replacing old batteries, you may need to reprogram the remote
control to operate other devices.
1. Remove the cover from the battery compartment.
2. Insert batteries in the battery compartment,
each battery.
matching
the + and - end of
3. Replace the cover.
Plug in and Turn On the Receiver
Plug the end of the power cord into the wall outlet. Be sure to insert the plug
completely.
To turn on the satellite receiver, press the SAT button on the remote control or
the ON*OFF button on the front panel. If your TV brand is RCA, GE, or
Proscan, press the TV button on the remote control to turn on the TV. If your
TV brand is not RCA, GE, or Proscan, see page 25 in the next section, Using the
Remote Control, for details on programming the satellite receiver's remote
control to operate your TV.
Locating the VCR's Infrared
Remote Control Sensor
The VCR Controller must be affixed directly over the infrared remote control
sensor on your VCR.
Some VCRs have a label that identifies the remote control sensor, but others do
not. If the IR sensor is labeled on your VCR, affix the VCR Controller directly
over the sensor. For VCRs that do not label the sensor, you can use the VCR's
remote control to locate the VCR's sensor before affixing the VCR Controller
cable.
To Find
the VCR's
Remote
Control
Sensor:
1. Hold the VCR's remote ccmm_l so that it is touching the tront of the VCR.
2. Slowly move the remote control over the front of the VCR while repeatedly
pressing the remote control's power button.
3. When your VCR turns on/off, you have locateci tile remote control sensor.
Note: To test the VCR controller's position, use a piece of vinyl tape to
temporarily attach the VCR controller to the spot where you think the sensor
is located. Then see Selecting a VCR Type on page 19 to see if the VCR
Controller is positioned correctly.
Chapter
1
17
Connections
&
Setup
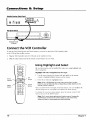
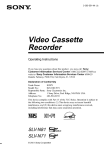
Satellite Receiver(Back Panel)
VCR (Front Panel)
Remonte Control
IR Sensor
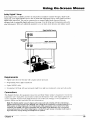
Connect the VCR Controller
To use the One-Touch Record and Timer features,
to the VCR and the satellite receiver.
1. Plug the VCR Controller
you need to attach the VCR Controller
cable
into the VCR jack on the satellite receiver.
2. Affix the other end in front of the remote
control sensor on your VCR.
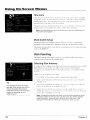
Using Highlight and Select
MU_
O
All on-screen menus can be handled
select navigation.
S,,p
°"" O
Highlight
Ere
Arrow
buttons
MENU
button
¢_
_'_
OK
button
"-'"
J
,O_O,O
'O +O'O
'0 +O'O
and
select
navigation
has
two steps:
1. Use the arrow buttons (up, clown, left, and right) on the remote
control to highlight different choices on the screen.
2. Press OK to select the highlighted
item.
Note: When a highlighted
on-screen menu choice has a number
beside it, you can also press the corresponding
number button on the
remote control to select it.
CLEAR
button
Once you know how to navigate on-screen menus, you can complete
AsststedSettlp(see
the next page) and explore the menu system.
To
_
the same way, using highlight and
111_+ oll-s,.;recll
display
button,
then
lllenu sys[enl,
[)tess the MENU button.
press
the renlote
control's
the
SAT
Note: Don't worry about getting stuck inside a menu. Pressing the
CLEAR button on the remote control takes you out of the menu
system and back to the program you were watching.
18
Chapter
1
Connections
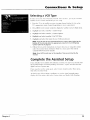
Selecting
&
a VCR Type
I11o['(+I(+rt() use the+ ()ne [()tlch Rcc(>t+(_l:ulcl 'I inlt+i
satellite recchel _,,hich VCR brand yOtt ate ttsing_
1.
Trine tile TV to its satellite receiver
TV's appropriate
Setup
input
channtq
vic,,ving
del)ending
l_+?;iltIIC",,
chann('l
on }()tit
2.
Press MENU on tile i('mote
2.
Highlight
and select nunlber
3.
Highlight
and select ntunl),er 3, 3_7-<;t_-'m
Optfo#zs.
4.
Highlight
and select
number
5.
Highlight
and select
the name
yl)tl nccd
(either
to tell the
03, 04, or the+
conn(.ctions).
control to disI+la7 the satellite r{'ot+iver's Main menu.
7, .Si',)s/+'m<ST>f
HI;.
2, Set VCR 7)7)_,.
of your
VCR manufacturer.
Note: If you do not see your VCR manufacturer's
name, select Other (at the
bottom of the list) and enter the appropriate
code from the VCR Remote
Control code list on page 27.
6. Follow
the on-screen
instructions
code (if you need more assistance
control's 1NFO button t_)r details).
to ensure
while
that yol.i :it(" using
in a i/lentl,
press
the remote
Note: Some VCR brands may not be capable of being controlled
receiver.
Complete
the Assisted
the correct
by the
Setup
If you installed your satellite dish antenna yourself, you may have already used
the Assisted Setllp to find dish-pointing coordinates, acquire and fine-tune the
signal, and FLirta system test.
If you need to run tilt' setup again, select
then select Assfsted &,ttqJ.
,_t,stenl
,<,kqtq_
fionl the Main menu,
To check your disll-pointing
coordhlates or run the signal
strength meter,
displa T the Main tl_enu, tl/en select ,Sl',stw#1/,_W/Iq), dlld linall) l)tsb Poilztt'ttg.
Chapter
1
19
Connections
&
Setup
Order Programming
After you have installed your DIRECTV System, you should contact D1RECTVto
order DIRECTV ® programming.
When you order programming, you
need to know your accesscard number
To get the number, selectSystem Setup
from the Main menu, then System Test.
Wait for the systemto run all of its
tests. The accesscard number is
displayed at the end of the system test.
Write the access card number in the
space below for easy reference:
20
With this receiver and the proper satellite dish antenna, you may be able to
subscribe to local channels from DIRECTV in certain areas. Additional
equipment may be required in some markets. Check with your retailer or visit
DIRECTV.com for information on availability of local channels from DIRECTV in
your area.
Activation of programming may be subject to credit approval and requires valid
service address, social security number and/or major credit card. Programming
subject to change. You must be physically located in the U.S. to receive DIRECTV
service. DIRECTV services not available outside the U.S. DIRECTV ® programming
is sold separately and independently of DIRECTV System hardware. A valid
programming subscription is required to operate DIRECTV System hardware.
Activate your DIRECTV ®programming today at 1-800-DIRECTV (1-800-347-3288).
Chapter
1
Chapter
2
Using the
Remote Control
Chapter
Overview:
•
Remote
Control
•
Buttons
on Top of the Digital
•
Programming
•
Using the Remote
Another
the Remote
•
Modes
•
Controlling
•
Remote
contained
within
Control
Satellite
Receiver
Control
to Operate
Component
of Operation
a Second
Control
Changing
Graphics
Buttons
this publication
Satellite
Receiver
Codes
Entertainment.
are fi_r mpresetttation
Again.
only
21
Using
the
Remote
Control
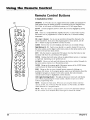
Remote Control Buttons
in Alphabetical
Order
ANTENNA. In TV mode, lets you toggle between the satellite and standard TV/
cable signals when the satellite receiver is connected to the TV using the OUT
TO TV jack. In VCR mode, ANTENNA functions as a TV/VCR input button.
LED
Arrows
Use the navigation
left, or right.
MUTE
SKIP
arrows to move the on-screen highlight up, down,
A.Lrx Turns on a compatible RCA amplifier/receiver
or audio/video
receiver.
This button can be programmed to control an RCA, GE, or Proscan auxiliary
component.
(2I-I+ (up)/- (down)
Use to scan up and down through the channels in the
current channel list. If you are in the program guide or menu system, use the
CH +/- buttons to page up and down a screen at a time.
CLEAR
FETCH
GO P_CK
GUIDE
INFO
O/' O
Removes the on-screen
displays and returns you to normal viewing.
Digit Buttons (0 - 9) Used to tune directly to a specific channel. If you are in
the menu system, use the digits to select menu items. In the menu system, use 0
to return to the previous menu screen.
DVI) Tells the remote to operate the DVD player. Note that this button is only
functional with RCA, GE, and Proscan DVD players.
_ENU
CLEAR
,O O O
'O 00 00
,O 0000
o'00
REVERSE
RECORD
o
A_E_NA
pLAy
[ORWARD
STOP
PAUSE
FETCH Displays the Fetch menu with up to eight different actions, or executes
a single task- depending on the preferences set.
GO BACK Moves you back and forth between the last two selected channels.
the menu system, returns you to the previous screen.
GUIDE Brings up the program guide. Subsequent
switch between the Detail and Grid guide formats.
In
presses of the GUIDE button
INFO Brings up the on-screen channel banner, password challenge, or
purchase offer screen. In the program guides, press to get information about the
highlighted program or channel. In the menu system, this button displays
context-sensitive
help for highlighted control elements.
LED (Light-Emitting Diode)
This light is illuminated with each valid button
press. When programming the remote control, it flashes or turns on or off to
indicate programming status.
MENU Displays the Main menu. When you are using the remote control to
operate an RCA, GE, or Proscan VCR (the remote is in VCR mode), the MENU
],utton functions as a Program button.
MU'I_
When the remote is programmed to control a TV, this button reduces
the TV's volume to its minitutllll level. Press again to restore the volume.
22
Chapter
2
Using
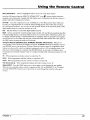
OK/t
(interactive)
Selects
a highlighted
choice
if you
the
are in the menu
Remote
Control
system.
Press the OK button when the DIRECTV INTERACTIVE"
icon ('l_) appears
during interactive
programs
and commercials.
Pressing OK will display more information
and offer the chance
interact with what is displayed
on screen.
to
ON-OFF
Turns the component you are controlling on or off. When pressed twice within two
seconds, all components that are on will be turned off (this feature only works with most RCA,
GE, and Proscan products). You can also use the ON-OFF button on the top (front panel) of the
digital satellite receiver to turn the receiver on or off.
SAT
Tells the remote to control the digital satellite receiver.
SKIP Used to activate the commercial skip mode on RCA. GE, and Proscan products that offer
Commercial Skip feature. Commercial Skip activates an on-screen timer. This feature allows you
to change channels (during a commercial break, for example), then be returned to the original
channel that was active when skip was first pressed when the timer reaches zero. Each press of
the SKIP button increases the timer by 30 seconds.
Transport
Buttons
(REVERSE,
PLAY, FORWARD,
RECORD,
STOP, PAUSE)
When
in on-
screen guides, PLAY advances
the display two hours, FORWARD advances
the display 12 hours
and REVERSE moves time backward
12 hours. When the remote control is programmed,
these
buttons are also used to control an auxiliary component,
such as a VCR or laserdisc player. Note
that ff your VCR Controller
is connected,
the RECORD button can he used to schedule
a timer
recording
mode).
'IV
when
using
the Program
When programmed,
Guide
or to begin
recording
while
watching
When programmed,
tells the remote to control the VCR.
VCR2
When programmed,
tells the remote to control a second VCR.
and
up
When
programmed,
WHO-INPLrr
Press the WHO
When you are using the remote
press the WHO,,INPUT
sources.
Chapter
2
(in VCR
tells the remote to control the TV.
VCR1
VOL down
a program
button
button
control
adjusts
the audio
volume
of your TV.
one or more times to scroll through the user profiles.
to operate an RCA, GE, or PROSCAN TV (in TV mode),
one or more
times
to scroll
through
the available
video
input
23
Using
the
Remote
Control
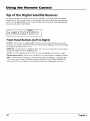
Top of the Digital Satellite Receiver
This diagram illustrates the buttons on the top (also referred to as the front panel) of the digital
satellite receiver. For more information on the function of the front panel buttons and many other
features of your digital satellite receiver, press the MENU button and select System Setup from the
Main menu, then select System Index.
f
--CHANNEL--
Front Panel Buttons (Left to Right)
ON-OFF
Use to turn your digital satellite receiver on for viewing or off when you are not
viewing it. Your receiver will still be able to download software upgrades and receive messages
from program providers when it is off'.
MENU°OK
Use this button to display the Main menu. If you are already in the menu system,
pressing this button selects the highlighted item.
_L_OWS
Use the navigation
Channel
Down and Up
arrows to move the on-screen
When you're watching
highlight up, down, left, or right.
TV, use these buttons to change the channel.
INI_O Use this button to display the channel banner, password challenge, or purchase offer
screen. Press twice to display additional program information, when available. While in the
menu system INFO also summons context sensitive help about a highlighted menu item.
24
Chapter
2
Using
LED
Component
buttons and
ON,OFF
button
the
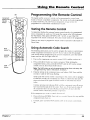
Programming
The digital
satellite
Remote
Control
the Remote Control
receiver's
r(*nlote
carl
be
progr_Elnlned
to
control
I]IOSt
brands of remote controllable components. The remote is already programmed
to control lnost RCA, OR and Proscan components:
it may need to he
programmed to control other manufacturers'
brands.
Testing the Remote Control
To determine whether the universal remote control needs to be programmed,
turn a component on, such as a VCR, point the remote at the VCR, and press
the VCR button. Then press ON-OFF or CH + or CH - to see if the VCR
responds to the remote commands. If not, the remote needs to be programmed.
There are two ways to program
Direct
the remote control: Automatic
Code Search or
Entry.
PLAY
Using Automatic
REVERSE
button
The following instructions can be used to program the remote to control many
of the components connected to your TV. If you want to exit the automatic
code search without programming any of your components, press the CLEAR
button until the LED (red light) turns off.
Turn on the component
1,
Code Search
you want to control (VCR, satellite receiver, etc.)
2. Press and hold the button you want to program. While holding the
component button, press and hold ON*OFF until the LED on the remote
control turns on, then release both buttons.
STOP
button
Note: The AUX button can only be programmed
using direct code entry. See
"Using Direct Entry," later in this section, for details.
.
Point the remote at the component, press and release PLAY, then wait five
seconds or until the LED stops flashing.
At this point the remote control is searching for tile correct code to program.
If, after five seconds, the component you want to control does not turn off,
press and release PLAY again to tell the remote to search tt_e next set of
codes.
Continue pressing and releasing PLAY until the component turns off or you
have searched through all of the codes. There are 20 total sets of codes. If
tile compnnent does not turn off after pressing PI.AY 20 times, then the
remote cannot c<)ntrol that particular
conlpol3Cllt,
If the component
yon
v, ant
to control
d(_('s ltl/'[1
O{'1:
1. Press and rdease REVERSE, then wait txxo seconds.
component turns back on.
Repeat this step until the
2. TO finish, press and hold ST()I_ until the LEI) on the rcmot,: control turns
ofh
Chapter
2
25
Using
the
Remote
Control
Using Direct Entry
1. Turn on the component
to be programmed.
2. Look up the brand and code number(s)
section.
3. On your remote
4. While pressing
for the component
control, press and hold the component
the component
on the code list at the end of this
button you want to program.
button, enter a code from the code list.
5. Release the component button, and then press ON-OFF to see if the component responds
the remote control commands. If it doesn't, try pressing the component button and then
ON • OFF again.
to
6. If you get no response, repeat these steps using the next code listed for your brand, until the
component responds to tile remote control commands.
Operating
One Button Recording
If your remote is programmed
to
operate a VCR, and the VCR is
properly connected to the satellite
receiver, you only need to press
the RECORD button to begin
recording from video.
Other Components
Once the remote has been programmed
operate your components.
To Operate
successfully,
you are ready to use it to
the Component:
1. Press the component button (TV, VCR1, SAT, VCR2, or A[PX) to set the
remote to control the component.
2. Press ON-OFF
to turn the component
on or off.
3. Use the remote control buttons that apply to that component.
Modes of Operation
Because this universal remote can control several diflerent components (DVD
player, VCR, cable box, etc.) it uses operational modes triggered by the
component buttons. For example, if you want the remote control to operate the
TV, press the TV button to put the remote into TV mode. If you want to play a
videotape, press VCR1 then PLAY (pointing the remote at the VCR).
Controlling
a Second
Satellite
Receiver
remote
can
control
two
satellite
recei\,el-s,
l_'roln
[tic, Mail]
ill{,nl.[,
select
System Setup then System Options, then R_,mote .S>tlq_.Then l}_llo\'_ the onscreen instructions and enter the appropriate code from the Satellite Receiver
list at the end of this section. By default, the SAT button is tt_,ec]to control the
first satellite receiver and the AI.JX button
is usec] u) tonHoJ
the se_o0d
satellite
receiver.
The
If your second receiver is an RCA, GE. or Ploscan :rod 3_nl want to _ontt-o[ it
using the AUX button, use code 5001. Code -_0()0is used ])V the SAT bulton.
26
Chapter
2
Using
the
Remote
Control
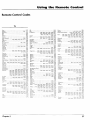
Remote Control Codes
TV
Aix:x
.........................................................................
1172
Admiral
.............................................................
Adventura
.........................................................
Aiko ............................................................................
1001,
1173
1174
1016
Akai ............................................................................
Aileron
.........................................................................
1002
1046
Amtron
1038
........................................................................
Anam
National
...............................................
AOC ...........................
1004, 1005,
Audiovox
....................................................
l_h:or
1006,
1007,
1003,
1038
1175,
1176
1038
...................................................................
1004
Bell & Howell
..................................
Bradford
......................................................................
Brokw_x'vJ
........................................................
1001,
Candle
1006,
............................................
Capehart
1004,
1083,
1008,
......................................................
Celebrity
Centurion
...........
1004,
Clairtc_ne
1006,
1008,
......................................
Colortyme
Concerio
1002
1009
1016,
1038, 1105.
1171.1174,1177
1176
........................................................
...................................................
Contec/Cony
.........
1174
1175
..................................................................
.....................................................................
Citizen
1162
1038
1004
1012,
1013,
1014,
1004,
1004,
1006
1006
1038,
1176
C_llg
..................................................
Crown
................................................................
Curtis Mathes
• 1000, 1004, 1006, 1015,
1!05,
1038,
1162,
1038
1171
1171
CXC ..............................................................................
I)aewoo
1004, 1005, 1006, 1016, 1017,
1018,
1127,
1038
1171
1004,
1006,
1171
1000
1004,
1151
| 178
Daytron
I}imensia
....................................................
.....................................................................
I)_lml>nt
Dynatech
................................................
...................................................
Electrohand
....................................
Electro,home
Emerson
...............
1004, 1006,
1026,
1033,
1027,
1034,
1176
1003, 1004, 1006, 1019,
1012., 1014, 1023, 1024,
1022
1025¸
1028,
1035,
1032¸
1039¸
1029,
1036,
1030,
1037,
I:isher
.........................
1048,
!049,
1050,
1051,
......................................................
.....................................................
Futur_lec
GE
..............................................
1000.
1003, 1004,
10"35, 1087, 1164, 1165,
GibralI_r
1006,
1166,
•
1004,
10_7
1162,
ll_q0
1038.
1046
10_6
I[X]4,
](/05,
1006, 1012. I(}19.
1058. 11-3-3, 1156, 117!,
Grtmdy
..............................
I lalLmalk
..............................................
t{arvard
...................................................
1123.
1191
1006
1038
1022. 10_2, 105_
1167. 116X, 1181
.................................
G_>hlstar
llil_l_lli
1031,
1038,
1041, 1042, 1043, 1044, 1046, 1047,
1124, 1162, 1171, 1176, 1177, 1179,
........................................
1004,
Envision
Fuiils_
Funai
1002,
1038.
1151
1056¸
1172
10-t6,
1(104.
11_1
I{RK_
1038
1135¸
l_}CI-t, 10{_
i012,
1[}[3,
11159, I0(_0,
ll)6L
1136,
l13g,
II4_,
1139.
114_
I1-_0,
11_6
1[_2,
IIt_
11-3{I, II -_)
1137_
Ilil
Ili_
[MA
................................................
1038
lanei/
.........................................
I 1-
Chapter
2
JBL ...............................................................................
1062
JCB ........................................................................
1002
JC Penney ...........
1000, 1004, 1005, 1006 1008,1022,
1052, 1054,1058, 1063, 1064, 1072,
10_7, 1105,1128, 1171,1172, 1181
Jensen ................................................................
1004, 1006
JVC ............................
1012, 1013, 1054, 1060, 1065, 1066,
1067, 1089, 1157, 1158, 1159, 1182
Kawasho ................................................
1002, 1004, 1006
Kaypani ................................................
1175
Kenwood .................................................
1004, 1006, 1019
Kloss Novabeam
...........................
1068, 1069, 1174, 1183
KTV ....................................
1038, 1070, 1171, 1176, 1177
Loewe ..............................................
1062
Logik
................................................................
1083
Luxman ......................
1004, 1006
LXI .............
1000, 1006, 1049, 1062, 107!. 1072, 1073,
1162, 1181
Magnavox ....
1004, 1006, 1008, 1019, 1062, 10(_8, 1069,
1074, 1075, 1076, 1077, 10&8, 1089, 1131,
1130, 1132, 1133, 1134, 1183, 1184
Majestic ..........................................
I083
Marants ......................................................................
1062
Marantz .............................
1004, 1006, 1062, 1078
Megalron ...........................................................
1006, 1059
MEI
........................................................................
1176
Memorex .............................
1001, 1006, 1082, 1083, 1162
MGA ..........................
1004, 1005, 1006, 1019, 1022, 1051,
1079, 1080, 1092
Midland ................................
1054, 1151, 1171, 1172, 1181
Minulz ...................................................................
10_2
Mitsubishi ...............
1004, 1005, 10416 1019. 1022, 1051,
1079, 1080, 1081, 1082, 1083, 1125
Montgomery
Ward ....................
1083
MotoroLa ....................................
1(103, 1173
MTC .........................
!004. 1005, 1006, 1105, 1176, 1178
Multitech ........................................................
1038, 1178
Muhivision ...........................................................
1084
NAD .....................................
1006, 1071, 1072, 1185
NEC
.......................
1{)03, 10{]4, 1005. l{R)6, 1089
Nikko .................................................................
1[)06, 1016
NTC ...................
1016
On_a
........................
103_
Optimus ..........................................................
1185
Optcmlca ....................................................
1095, 1173
Orion ..............................................................
103_, 1191
Panaslmlc ................................
1{)03, 10_4 1062, 1170
Philco
1003¸ 1004, I(R)_, 1[)06¸ 1008¸ 1{)12. 1019, 1(_2,
I{)68, 1069¸ 1074¸ 107_, 1077. 1183, I IH-t
Philips
1003, 1004, 1008. 1012¸ 1019, I_2,
I0(_, 1069_
1074_ 107_ 1076¸ 1086 10H7, 1[>88, I0_ L)
Pih_l
..........
10(_. 1171
Pioneer
_00_ 10[_ 1/)91/ 11191, 1[_)2, 1179. 11_5
p_r_klnd
...............
1[)0_ l[l/)_, 1006¸ 1016. 1171
Price Club
11{)5
Pri*nl
...........
I0_;
PRO'_CAN
1{_00, I181
I>r_ll/_i_
IOIl_ IO(_ 1{112¸ 11_)3, 117_
Pulsar
1151
Pul_.er
...............................................
1004
Quasar
.....................
Radio Shack!Realistic
RCA .......
1000,
1003, 1054, 1070, 1094
1004, 1006, 1012, , 1038,
1000,
1003,
1004,
1049, 1095, 1162, 1171, 1172
1005, 1006, 1007, 1019, 1096,
1098,
1099,
1100,
liB1,
1101,
llf17,
1102, 1103, 1129, 1179,
118_, 1190, 1198, 1199
Rhapsody
.................................
Ru[ico
...........................................
Sampo
Samsung
.....
...................
1176
1151
1004,
1005,
1104,
....................................................
....................................
Samsu×
Sansui
Sanyo
.........................................
10_0.
Scratch
1006, 1171,
1006, 1012,
1105, 1106,
1004,
1172, 1175
1015, 1019,
1!71,
1172
1171
1191
1107
1004,
1108¸
1048,
1162,
1049¸
I180,
1050
!189
1006,
1012,
102"1_ 1035,
1038.
1046
1004,
1050,
lIRI6,
1051¸
1046,
1072,
1048,
1109,
1004.
1006,
!112,
..................................
Scotl
.................
1004,
Sears
.............
Sharp
...................
1000,
1049,
1006
1013¸
1[)66.
1110¸
Shogun
Signature
1t62,
1019,
1071,
1180,
1181.
........................
..................................................
1001,
1083,
_impson
...........................................................
Y,onic ....................................................................
Starllre
I_6
1008.
1038¸
....................................................
Suprenlt:
_;_lvania
1038
.....................
.............
....................
1174
1CA)i, 10(_
11/69, IO7-t
1/10H. 1(119,
l/l_.
1076
111(_,
Symphonic
....................................
......
T_knika
![_{]t,
1(}16,
IO(1_
103_
100(_.
111_6
1183.
11_4
103_q
1 lg9
1003¸
1173
11_8
10_4
m
11-0
......................
.....
I_shiba
I0i9
I_ _Ie\'isi<_fl
..............................
111-_
1072¸
II1-
/ ni_e_al
Vi_tl>r ....
I1_)6.
I_R]_q, 1012¸
11176, 1082
I111_,
I_lecaptil
I_.IK
1089¸
1118.
.........................................
1[10;
110_
11{_(/
1054
1013
1083¸
1171
1117
1[)06
1109,
1162
1171
10-_2. I(hSIO(_l_ 11H2
Viking
I 17 i
1[]33
I01(_
11)_2
1_2
IOI_H lll(_ _) 11)7t.
112(I
'_ullall:l
I(X)2
llkgS,
10g,8
1161_
11_)4.
.......
1(/62¸
10_-
1033,
Tandy
.............................................
l_tung
Technics
..............................................................
Techw_>od
1(_)_
1046
11 H9
..................
Supre-macy
1004
1115
1008
1176
Sony ............................................................
Soundesi_n
..............
1004,
Squareview
1189
1012, 1029, 1095¸ 111l,
1113¸ 1122, 1171¸ 1173
....
I[_lll
ll_l_5
IIg_
_(lI)(_ 1019
27
Code
List
Remote Control Codes (Cont.)
VCR
Admiral .....................................................................
2131
Zaiko .......................................................................
2027
Aiwa ..............................................................
2002, 2026
Akai .......... 2003, 2004, 2005, 2007, 2/)O8, 2111,2112, 2113
American High ........................................................
2021
Asha .........................................................................
2013
Audio Dynamics .............................................
2009, 2010
Audiovox ....................................................................
2014
Bell & Howell .............................................................
2011
Beaumark ....................................................................
2013
Broksonic ..........................................................
2012, 2025
Calix ............................................................................
2014
Candte ............. 2013, 2014, 2015, 2016, 2017, 2018, 2019
Canon .................................................
2021, 2022, 2114
Capehart .......................................................
2020, 2110
Carver .........................................................................
2062
CCE ..................................................................
2027, 21361
Citizen¸ 2013,
2014, 2015, 2016, 2017, 2018,2019,2027
Co[ortyme ....................................................................
2009
Colt .............................................................................
2061
Craig ..............................................
2013, 2014, 2023, 2061
Curtis Mathes ...:,
2000, 2002, 2009, 2013, 2016. 2018,
2021, 2022, 2024, 2115
Cybernex ...............................................................
2013
Daewoo
2015, 2017, 2019,2025, 2020, 2027, 2028, 21 IO
DaCron ....................................................................
2110
DBX ............................................................
2009+ 2010
I)imensia ...............................................................
2000
Dynatech
.......................................................
2002. 2026
EIectrohome
.................................................
2014, 2029
Elect rophonic .........................................................
2014
Emerson
......... 2002, 2012,2014, 2015, 2021, 2024, 2025+
2026, 2029, 2030, 2032, 2033, 2034, 2035,
2036, 2037, 2038, 2039, 2040, 2{)41, 2042,
2044, 2045, 2047. 2065, 2105, 2113, 2116.
2117, 2130
Fisher ...
2011, 2023, 2048, 2049, 2050, 2051, 2052,2118
Fuji ..................................................................
2021, 2119
Funai ..............................................................
2002, 2026
Garrard .................................................................
2026
GE ......... 2000, 2001. 2013, 2021, 2022, 2053, 2115, 2120
Goldstar ............................
2009, 2014, 2018, 2054, 2121
Gradiente
.........................................................
2026
Harley Davidson ..............................................
2020
Harman Kard()n ..................................................
2009
Harwood ..........................................................
206!
Headquarter
......................................................
201 I
Hitachi
2002, 2055. 2056, 2057, 2107, 211 I, 2120, 2122
HI-Q ..................................................................
2023
Instant Replay .................................................
2021
JCL .................................................................
2021
JC Penney
2009, 2010. 2011, 2013, 2014, 2021, 2022.
2055, 2056, 2058, 2059, 2060, 2107, 2118
Jonson .........................................
2055. 2056, 2111
IVC ............
2009, 2010. 20tl, 2018, 205_4, 211 I. 2123
Kenw_x)d ............
2009, 2010. 201 I. 2010. 2018, 205&
2111. 2123
KI_t ..................................................
2001
Ktxlak .......................................
20i4, 202/
Lh)yd ........................................
21_)2. 202i)
Logik ...........................................
2001
LXI ......................................
2111
Magnav()x
.... 202I. 2022. 2062, 2063. 2111t, 210_4, 212¸)
Magnin ......................................
2013
Maraillz ........
2009. 2010, 2OI I, 2{110¸ 2018 2021, 21)_X
2062¸ 2OO_
Marta .....................................
2OI
Masushita ..................................
2{121
MEI ...........................................
202]
Menlort_x ................................
21XI2, 21}1I.
2013. 2014. 2021, 2{)23, 2026. 2111t. 2131
MGA ...................................
2{}29. 2005¸ 2113
MGN Tcclmc_h)gy .............................
2oi3
Midland ........................................
20_3
Minolla ..........................
21)_5, 2056. 2 Hr
Mitsuhishi
........
2{)29, 2055. 20_6. 21_, 2O4_), 2007.
2009, 20_O 20_1 2_)72 20"3¸ 20 _l
2100. 2113. 2123
28
Montgomery
Ward .....................................
2075, 2131
Motorola .....................................................
2021,2131
MTC
....................................................
2002, 2013, 2026
Mulftech .................
2002, 2013, 2016, 2026, 2053, 2061
NEC ........................
2009, 2010. 2011, 2016, 2018, 2058,
2064, 2076, 2078, 2079, 2111, 2123
Nikko .....................................................................
2014
Noblex .....................................................................
2013
Olympus .....................................................................
2021
Optimus ............................................................
2014, 2131
Optonica .....................................................................
2096
Orion ...........................................................................
2035
Panasonic .................. 2021. 2022, 2109, 2125, 2126, 2127
Pentax ..................................
2016, 2055, 2056, 2107, 2120
Pentex Research ..........................................................
2018
Phi]co .............................................
2021, 2022, 2062, 2063
Philips ..........................................
2021, 2062, 2096, 2124
Pilot .......................................................................
2014
Pioneer ...............................
2010. 2055, 2080, 208l, 2123
Portland ........................................
2016, 2017, 2019, 2110
ProScan ............................................................
2000, 2001
Protec .........................................................................
2061
Pulsar ...........................................................................
2104
Quarter
......................................................................
2011
Quartz ....................................................................
2011
Quasar ................................................
2021. 2022, 212_
RCA ...............
2000, 2001, 2003, 2013, 2021, 2055, 2056,
2082, 2083, 2084,2085, 2086,2087, 2088,
2089, 2090, 2091, 2107, 2115, 2120, 2125
Radioshack/Realistic
........ 2002, 2011, 2013, 2014, 2021,
2022, 2023, 2026, 2029, 2049_
2050. 2096, 2131
Radix ......................................................................
2014
Randex ...................................................................
2014
Ricoh .......................................................................
2128
Runco .................................................................
2104
Samstmg ...................
2005, 2013. 2015, 2033, 2053, 2112
Sank,; ...........................................................
2131, 2104
Sansui ..................................
2010, 2092, 2111, 2123
Sanyo .....................................................
2011, 2013, 2023
Scott .........................
2012, 2015, 2025, 2032, 2035, 2038,
2065, 2093, 2116
Sears ...........
2011, 2014, 2021, 2023, 2048, 2049, 2050,
2051. 2055, 2056+ 2107, 2118
Sharp ..........
2002, 2017, 2029, 2094, 2095, 2096 2131
Shintom
....................................
2004, 2056, 2061, 2098
Shogun ................................................................
2013
5ig)aat u rc ................................................
2002, 2131
Singer .............................................
2021, 2061, 2128
Sony ........................
2002, 2004, 2098, 2099, 2119, 2128
STS .........................................................
2021, 2107
Sylvania
2002. 2021, 2022, 2026, 2062, 2063, 2065, 2124
Symphonic ...............................................
2002, 2026
_nd_ ¸
•............................................
2002, 201 l
Tashiko ......................................................
2014
I_tung
......................................
2058, 2111
TEAC
......................
2002, 2026, 2058, 2085, 21 ll
5_ hnics ...................................
2021. 2109
leknika
............
2002¸ 2()14, 2021, 2026, 2100, 2129
fMK .......................................
2013. 2024. 2047
l_)shiba .......
2015, 20-)9, 2051¸ 2055, 2065, 2093, 2116
_tc\ri?q(m
..................................
2013, 2014
[!nitecJ/ ..........................................
2013
Vc"ct_)rResearch ................
20(_, 2010, 2015, 2010
Vi_ lot
.................................
2010
Video C<mcepts ......
2009, 2010¸ 201q 2010. 2113
Vidc_)sonk ..................................
2013
_0_ls
2002, 2013, 201_ 2015. 2021. 2023¸ 2026,
2029, 21)_5, 2050. 2001¸ 2090. 210!. 2102,
2103. 210_. 2116, 2131
XR lllO0
....................
2(}21, 2026, 2061
Y;unah:l .........
21_)9 2010¸ 2011, 201_ 2058, 2t 11
Zcnilh
..............
21R)_ 2(_& 21(_.2119
212_4
Cable Boxes
A[IC .......
5(R)2.
Anmmix
........................
Archer ...................
(Jal)l_ICnna
_()()4
...........................
5{R)q, 500g
Cableview ..................................................................
Century ......................................................................
Citizen ..........................................................................
Colour Voice ......................................................
5012,
Comtronics ........................................................
5014,
Contec .......................................................................
Eastern .........................................................................
Garrard ........................................................................
GC Electronics .............................................................
Gemini ....................................................
5018, 5019,
General Instrument .....................................................
Hamlin .................................
5020, 5021, 5022, 5035,
Hitachi .........................................................................
Hytex ...........................................................................
Jasco ............................................................................
Jerrold .... 5003, 5005, 5007,5018, 5023, 5024, 5046,
Magnavox ....................................................................
Memorex ...................................................................
Movie Time .............................................
5002, 5027,
NSC ..........................................................
5002, 5027,
Oak ...........................................................
5002,5016,
Panasonic .........................................................
5048,
Faragon .......................................................................
Fhilips ... 5011, 5012. 5013, 5019, 5025, 5030, 5031,
Fioneer ...........................................................
5053,
Fulsar .........................................................................
RCA .........................................................
5047, 5049,
Realistic ..............................................................
5009,
Regal ..............................................................
5022,
Regency .......................................................................
Rembrandt .................................................................
Runco ..........................................................................
Samsurtg ..........................................................
5014,
Scientific Atlanta ...........................
5006, 5036, 5037,
Signal ...............................................................
5014,
Signature ....................................................................
SL Marx ...................................................................
Sprucer .......................................................................
Starcom ...................................................
5007, 5018,
Stargate ..............................................................
5014,
Starquest .....................................................................
Tandy ...........................................................................
Teleview ..................................................................
Tocom ....................................................
5004, 5023,
Toshiba ..................................................................
Tusa ............................................................................
TV86 .........................................................................
Unika ...................................................
5008, 5009.
United Artists ..............................................................
United Cable ...............................................................
Unive_al ....................................
5008, 5009. 5010.
Videoway ................................................................
Viewstar .......................................
5015, 5025, 5027,
Zenith ................................................
5026, 5050.
Satellite
5008
5011
5011
5013
5015
5016
5017
5011
5009
5049
5003
5045
5003
5002
5011
5053
5025
5026
5028
5028
5029
5052
5026
5032
5034
5026
5052
5049
5035
5017
5003
5026
5034
5038
5018
5003
5014
5052
5053
5018
5018
5040
5014
5041
5026
5018
5027
5011
5002
3053
5011
5044
5040
5051
Receivers
Chapparal ................................................
Drake .....................................................
GE ..............................................................
General Instruments
.........................
])al_asonic ...................................................
Primestar ..........................................
Proscan
..............................................
RCA ......................................................
Realistic
...............................................
Sony .....................................................
Sq);l
....................................................
STS2 ..................................................
SIY,3 ......................................................
STS4 .....................................................
"l_)shil_a .....................................
Umden .....................................................
5056, 5057
5038, 5059
5001
5060, 5o61, 5062
5075
5076
5001
5001
5063
5072
5064
5O65
5O4-,6
5O67
5068 50"r3
50(_9
501_),
5(R)7 5053
_(Y08, _009
5008¸5009¸5010,5011
_(R)_
Chapter
2
Chapter
3
Using the Satellite
Receiver's Features
Chapter
Overview:
•
What is a Program Guide?
•
The interactive
•
The Channel Banner and other on-screen displays
•
How to use the on-screen programming
Changing
Graphics
contaitted
within
this
publication
programming
Entertainment,
aru for
representation
feature
schedule
Again.
ott,{l'
29
Satellite
Receiver
Features
Current
user
Current
profile
time
and date
Program titles
and information
Selectable
Advertisements
(highlight
and
select for more
information).
Viewing
Suggestions
Sorts by
Movies
Scroll
down
AlphaSortT
M
Scout
Active Profile's
Preferences
Anatomy
The following
diagram
Sorts by
Sports
of a Program
sho'+',.s you the' kind
you
',',ill scc in the progr;ml
Displaying
[k) ;l¢ccss
'l()Cl (:Ul
I_Ll[[()ll
(;/lid(<_.
(ILfi( kl_
<I]1
I}IL'
[k) ( h;lng,.'
I_LlIl(_;/',
30
grades,
then
plcss
g_uidc
+\lENt
ol youn
tccci\cl
Guides
on
the
remote
( Ii(fic. c / I)L:](uI//.
(;uklc
_, ])cl;in]t
b_
c<>ntrol
_md select
(7_/Iz_/e/+
[)l('?,3dl/_L
ol
//4_(J)
{he (IUII)i-
]'_.'ln()lL'
/l_,Cl. plCt, s the i'cII/<llu
l_l'(_l':l]1111/lllg.
L(_ '_clc_I
I_utl_lL
the
;l(cc>_, the
(he ( {I]'IL'Ilt
\ic\\h/g
guides.
the Program
th,_: pri)gt:tm
/_r_4_r_H;t
'ql_X.(
sort
Guide
of infiIlm;itio]_
',',hi]c
Channel
TM
Ihcl/
[I]_' d_ _.h_.(I p]_lilc'
then
-,ck'(t
/'F_!_lwJl/
(ist. lilt
1_()1/(1(_1s \\1 i()"iN];q
I_'IIl_E('
"l_tL (;Jl/ ;l!"._
_,llh/(:_.
;u_l
_()l_[I()l ¸_,;uT()\\
l_I'. "_,', lhc
I_lcn
_'/_'_/
"t
t/1111()1/
:ki/(I ()Ix
lcnl()t_. ' _()U/tl()l '_
[_'/
l(_lli>l_];I
_, [hc
Chapter
3
Satellite
Active
Dolby Digital
and alternate
audio
Main
indicators
Profile
Program titles
and information
menu
AlphaSort
Interactive
indicator
Viewing
suggestions
ScoutTM
Features
content
Mailbox
TM
System lock/unlock
Receiver
Caller
Alternate
ID
Program
audio
details
Using The Channel Banner
The channel
banner appears
whenever
you do one of the following:
Tune to a channel.
•
Press the remote control's
•
Press UP, DOWN, or INFO on the satellite receiver's front panel.
INFO, SAT, or GO BACK buttons while watching
•
Exit the on-screen
programming.
menu system.
On-screen icons represent frequently-used
menu items. Some icons also change appearance to show the item's
stares. Use the arrow buttons to highlight an on-screen item, and the OK button to select it. Some of the items
you select in the channel banner can also be selected in the program guides.
Buttons
reMain
_
of the Channel
Menu
Locked
icon
icon
Banner
Takes you to the Main menu.
The system is locked. Spending,
Selecting this icon displays
a password
viewing
and other limits cannot be accessed
menu. Enter the correct system password
to override
gUnlock
icon
The system is unlocked. Spending, viewing and other limRs can be accessed
Selecting this icon in the channel banner displays the l.ock System control panel.
or changed.
settings.
or changed.
_
Video Unlock icon
A password has been entered to temporarily override
remain unlocked until the satellite receiver is turned off or re locked.
_
Program Unlock icon
A password has been entered to override limits for a single i)l-ogram. After the
program ends, or when the channel is changed,
lilnits are restored.
_
AlphaSort
_
Scout rMicon
_Mail
_
icon
TM
icon
the limits. The system will
Enables you to SOl't titles alphal_ctically
Alk)\vs you 1o search for progranls
using key \xords
l)isplays the Mail screen. The icon ,,,,'illbe white if you have an unread mail.
Telephone
icon
Displays the Caller I1) list screen The icon will hc \vhiic if you have received :t new call
but have not accessed the Caller I1) List screen. It \xill bc gray il you ha\c :Lccesscd the Caller 11) List
screen.
_
Viewing
_
Program
Details
_
Alternate
Audio
Chapter
3
Suggestions
icon
Displays
icon
I)isplays
a dcscliption
Cycles
through
the
I?_,wiH_ ,S'tlt_esllcms
of the current
the
iI en
tc_ t c
metro.
prognun
(il axailable).
choices
31
Satellite
Receiver
Features
The DIRECTV
INTERACTIVE
Feature
TM
Yore digital salcllitc rc_civcr includes
I)IRE(-TV INTERACIIVI "r_, pow'elcd
by
Wink ('o[ntnunications',
a free service that giw_'s you the oppom.mity
to interact
wit]T TV prograu/ming
and advertising.
You can use your re[note contro] to get
program
related inlk}mlation,
respond
to free offers during commercials
and
even make purchases
whi]e you watch TV.
Whenever you see tile DIRECTV INTEP,ACT1VE TM icon ('_) appear, press the
OK/i button on tile remote control to open tile interactive window.
To learn
more
about
the DIREC'IW INTI_]I{AC'FI_
service:
TM
1. Press MENU on the remote control (the Main menu appears).
2. Use tile arrow buttons on the remote control to highlight Interactive.
3. Press tile OK/i button to tune directly to the DIRECTV INTERACTIVE TM
Center (channel 499) to get more information about the R_llowing: Getting
Started, Interactive Channels. Shopping Sign Up, Order History, Messages,
Iielp & Settings, and About DIRECTv.
Displaying
On-screen Guides
Each time you press tile remote control's GUIDE button, a diff_erent wpe of
program guicle appears:
The Detail Guide
Tile I)etail Guide sho_,vs five channels in a time-and channel format, with
program informatio0 h)r the highlighted program. A small window showing the
program you were watching heR)re entering the program guides is displayed in
the upper left hand comer (you can preview other channels in the Detail Guide
by highlighting channel numbers instead of the program titles).
Notes: By default, the Detail Guide appears when you press GUIDE on the
remote control. You can change the default guide from the Detail Guide to
the Grid Guide.
Select Personal Settings from the Main menu, then select the profile to be
changed, then select Default Guide. Use the remote control's arrow buttons
to highlight Grid Guide, then press the OK button to activate your choice.
The Grid Guide
Ihc (hid (;uidc >hoxxs so\co
\\ illtl{)\\ 5h()\\il_
£l_klc>
_h:mnc'ls in a lhnc<md
{l_.' I)I(}_IAIll
is _fi>pl;I}Cd
in
{he
tq_pt.,[
_hannelsinthel)cl:liI
{;uiclc
_,(}tl \\_/I(" \\dI_llhlg
Ich
h:{l/d
(()ll_Ci
b_, hiMhli/h{inM
channel
lblma{
))_'Jkllc c'llb.qn1_
(\()tl
t:Ul
\ small
t]Ic
[)ie_,iL'\\
[)lO_l;Ull
(l[hcr
<h:umclnunflxqsinstead
ol die
I_l<)_l:llll Iillcs)
'
2till
I)_'s_ll
32
I II ill_ • ( t*lllllllllllllllll_ll_
o_J
d I)11_1"(
71
III ll_lIl_
I \IIA
'
( II
'a "rl'_'d
_,
II Ill/,'
I_l_l_,_t_l_'_
Illld
t/_(" _1 il _" I_o
r_/ I)IRI:(
I l
V
_ll{'
*l'gl_l
"tl'll
_ il o/
Iltl_l)
_
" I*l "k'S
"s I/i,(tr_*
/ _171 _• (t)*l
s (_._'_
illd
_ II*l i
_'
s '
I
o
_ Ill
'illl
I)lRl:(T1
Ib " ( )'doll
"
p ,1._ is_tcJ_l
Chapter
3
Satellite
Receiver
Getting Around
This section describes
guide.
Features
In the Guides
how to change channels
and move arounda
program
Digit Buttons (0-9)
CH +/Bu_ons
You can point quickly to any channel in the program guide by entering the
channel number with the digit buttons (0-9). For example, to point to channel
228, press the digits 2-2+8, on the remote control.
Scrolling Channel
Arrow
Buttons
+0 +0 o0
,0 +0 o0
Digit
Buttons
By Channel
The programs that you see on the TV screen make up one section--or
page-of the total program guide. You can scroll one line at a time using the arrows:
point to other times with the left and right arrows; point to other channels with
the up and down arrows.
Scrolling Page By Page
If you want to scroll up or down through the program guide faster, press the
CH +/- buttons on the remote control. The highlight scrolls a page at a time.
REWIND/
FORWARD
Buttons
Scrolling Forward
and Reverse
To scroll forward in two-hour increments, press the remote control's PLAY
button while in SAT mode. To go forward or reverse by a 12-hour block of
time, use the FORWARD and REVERSE buttons on the remote control.
Note: Your digital satellite receiver can store up to seven days of
programming
information. Getting all this information can take up to 12
hours to download.
Chapter
3
33
Satellite
Receiver
Features
Tuning
To
tune
and
To
to a Program
dit,::cfly
t<> a cunc'nt
l+rogtam
li,,tt:d
in the
?uidc+
guide,
point
point
n> the
p+%qram
to the
pr(_gram
and
p]es',OK
SOL" inI(>m/ation
alx)ut
a pro/,ram
in the
press INF()
'I']IL'R, yOU
call
S<.+Ic+ct:
View Chamml to rune to that channe]
RPCO?'(I
Pl++_l'a/'ll
10
re_old
[Pie
program
Remand Meto set up a Watch Timer. This ,.viii display a prompt allowing you
to quickly change the channel when the program is about to begin•
rip
Other Times to see what other times the program
For information
on tuning
to a PPV
•
More Details opens another
is available.
display with detailed information
(if available).
program, see pages 47.
Tile options
select•
available to yot.i may va W according
to tile type of program
you
More Details
Thel-e's
a vaI+iety
of
pl+ogl'all]
infoFnlation
sent
signals, and ".,our digital satellite receiver
along
wit]l
standard
broadcast
can dispkty much of it (if available).
The More Details menu can offer ini}.mnation (if available)
about Actors and
Roles, the I)irector, the \Vriter, Original Materials. the Production Studio,
Awards, Ke}.words associated with the program, and the original release l)ate
and Run Length Just use the remote control's arrow aod OK buttons to
highlight and select the desired button, and to display more inR>rmation.
You can even use the displayed infommdon in the More Details menu to look
for matching information in the stored guide programs, or to create search
critelia for use with the Scout TM search feature of your digital satellite receiver•
To Access
It can take
up to 12 hours
download
all seven
information
on after the
been
when
Guide
[ ghlight a desired program
control's
[NFO button.
2
llighlight
days
of
and
3
I lighlight
d_'l;lil_
,l/ore
:rod
i
lost
s,..lect
fk)r ()tiler
I li_hlighl
in the on-screen
the
file dc,qlwd
with
I)tttl()n
c>n the
this
5h;Ii¢ '_, the
To
save
your
Criteria;
S
.\It_.'l
totllplctin_
;is Scout
till',
pt+ess the remote
Details
I+unol]
menu
to diNfl:b,
tlw
inl_,)rlnatioll:
right
\\ill
disl)l;I
>idc
ot the: nlcnu
_, :11/} ()lh£'I
hip, blighted
_t()tl '+;ill bC ,_
and
p[()gl;lln
im.",s
Sl(>l['d
inlolnlalt(>n
I. U_,<., tiiL' I_'Ill(>lt + _.(>ult1"()l> ;ItlO,a
tiil + S;I\L + 215 5t_<)tl[ I)ttlh)ll
t (llllplt'tc
Program
int})tTnation
similar
itfl_unl_Hi_>tl
()K
_tt.' l)
in the
on-sclcen
desired
in tiiL' ()11 '+,Lit?t21_ gtli_+it'>, that
search
and
sic]t.' ()_ the _( I('t'!l
progranls
the' IC'l//()tc+ Li)l_nols
guide
l)etails.
button
is displayed
is available.
1_11the ()pl_O_itC
1'o search
_,ulc_I
34
select
Note: The More Details
only if more information
to
turning
the system
information
has
Details:
l
Tip
Your digital satellite receiver can
store up to seven days of information,
so retrieving data can take a little
time.
More
and
()K
]_ult_)r15 t_)
Cn _)u N_ IL'C]/ ill',Ittltli()11,,
It)
I;mk
Chap ter 3
Satellite
kdditional
Receiver
Features
Program Guides
._._kiu_the_:
l)(_'t;fi]
;rodGEi(I(;ui&*'_,
tll_-'l_.'
:tt'u
:tf(:',_,'
m<)ru t(><.I_<)<>_.'
horn: t]__
+(:l_:tnnul
(]ukI_,
•l_,u Logo (;ui(]c',
_LL
L';lll
[K'CL+SS
:m(I the Viu,,;in_
II]¢'SL'
_LIKI(z_;
h'(>ll/
_u_ustiun,,
[ix
+ _];Ii[1
(;ui&*
I]/(Ll]tl
])y
SL'IL'(:(iFI_
]_l+Oql'dlTZ
The Channel
(,'ll/dqs".
Guide
])ispl_tys tht + l_ro_]ammi[lg
sch_,dule for the s_lect_d
channc,].
The Logo Guide
!l
:hapter
3
Displays
channel
Iogos
_br the current
user's
The Suggestions
Guide
[)ispl_lys
_1list ()1 lZOg]ams
orl
\\:_tc'h('cl
un(]c]
th_!
user
I)as_'d
channel
lzo_r_lnl]l/itlg
list.
theft I'_ts ])_'(m t0revi(_usty
pro_i!_',
35
Satellite
Receiver
Features
Sorting the Guides
5(>ttin_
the
()l (>t_anixing
_tticlc + is a ,,\ay
()Jptogl;itt1_that Jntt:le',I
you
guicl,.+' in ditfuiunt
ways
_+ti
cxan+plc.
Yot.i (-an customize
can
its own
havct
default
the
"]'hc'rLP
are
hflorn+atiOil
_uvural
+_:in list progt-anls
tliL' themes
progranl
to _,l+o\v only
hy sports
t<) t+]eet
or
your
movie
tastes,
tile' types
tllatsot_ the
OI]-,",UI'(2L'IIic()n_,
thcnles+
and
for
profile
each
sorting.
"I'o get to the sorting icons, use the down arrow button to move the highlight
to
the icons at d;e I'_ottoln of the screen
"l'hen, use the left and right arrc, w buttons
to highlight
the desired icon.
Viewing
Suggestions
When you select the Viewing Sttggestions icon, a list of recommended
program
events appears. Tile rec,:)mmendations are based on your previous viewing
habits in terms of the amotLnt of time spent watching programs that match a
topic and theme catego_ T. Tile st.lggestions are ordered by best match.
Vie',\ ing suggestions arc created for each active user profile. The suggestions
being shown are always for the current user profile+
You can view and change your suggestions, or turn the digital satellite receiver's
learning behavior off altogether from the Viewing 5"uggestionsmenu.
To Access the Viewing
TIP: Accessing
Suggestions
Viewing
You can select Viewing Suggestions
by selecting Suggestions in the Main
menu, or by pressing the icon
displayed in the channel banner or
on-screen guides.
1
Suggestions
Meno:
Press the Fc.nlote ¢Olltrol's MENU bLitton to display tile Main menu.
2+ F+ress 1 to select t)#TJ_P'glI_I
Guides.
the
3,
Press
1.
Access
to choose
_ ]_utton
5'u,ggestlo*_s.
(leshed
viewing st. ggest
OK ht.lttons to select
ons
LIS lg the
control's
retllote
arrow and
Note: You can also accessthis menu by selecting the Viewing Suggestions
icon in the Channel Banner or at the bottom of the
on-screen guides.
Customizing
Viewing
Suggestions
"tot._can edit the thcll]CS that x\ ill appeal
:i!_pl) in_
dilfciunt
'\\ci£hts'
to the
in die Vicxvmg
topics.
Increasing
Suggestions
nlenLi
a topic"s,aeigl/t
hy
increases
the"oh:into +that plogianls \,,ith such thctnes will appear in the" l'ieu'mg
_l/,771"._lt_ll._
lhc>nlc's
\\
IllCl]tl
ill
T() ('hali_12
",,.eigM xtill less,.+n tlt.e
;I lhemc"s
tilt"
Weight
of Thenles
,,t_,p_> t "_ ah()_e
and/or
chance
+ that
sttch
Iolh)t\
2
l)lc'hs fill 2 I)tlll()ll 1(I selc'_t I:dst 7i>/)#{._.
A
>;de'el
Ilk'
hHII()EI',
iltllltht'rt'd
Io
Sdccl
t_) displa)
I(>ptc
:lllcl
tilL'
Tol)i¢.',;:
1
! )K
36
])c'crc;t_in_
;i!)pc'al.
It) edit,
:tcljtl>,t
Ihen
\\ci_hl
i( > '
_ _l _f_ )q[lf)
tl>c' dte
pc'it
lel/t()le
",
t'I t.I
contlol's
alio\v
and
t+i/ta_t's
Chapter
3
Satellite
Receiver
Features
Active Profile's Preferences
Each individual can edit preferences so customized themes and topics appear
when a sorting icon is pressed. The Active profile's preferences can be quickly
accessed by selecting this icon at the bottom of all on-screen guides.
To Change
the Active Profile's
Preferences:
1. Press the GUIDE button on the remote
control to display the default guide.
2.
Use the remote control's arrow and OK buttons
Preferences icon at the bottom of the guide.
to select the Active Profile
3.
Press the 2 button to select Edit Preferences. This will display a menu where
you can customize the themes to appear when the Active Profile's
Preferences icon is selected.
4. In the customizing menu, use the remote control's
highlight and select/deselect
theme choices.
arrow and OK buttons to
Note: The themes and topics can be customized for any profile.
Once finished customizing the themes, only topics that match your choices
should appear when you select the active profile's preferences icon in the
on-screen guides.
Movies
Select the Moviesicon to sort and list only movies. After selecting Movies, the
Movies Themes menu is displayed. Here you can sort movies by various themes.
By default, AllMovies is highlighted first.
Select the Movies Themes icon to sort the guide to list specific types of movies,
such as comedies or musicals. This icon may change from Movies to a different
topic in the future, but it will continue to function in the same way.
Sports
Select the Sports icon to list sporting events only. After selecting
Sports icon changes to a Sports Themes icon.
Sports', the
Select the Sports Themes icon to sort the guide to list specific types nf sports, such
as basketball or soccer. This icon may change from Spo(ts to a clifferent topic in the
future, but it will continue to function in the same way.
Channel
Sort
Sort the on screen guides to display channels in either numeric or alphabetical
order. When the guide is sortecl alphabetically, the 1-2-3 icon is displayed (select
the icon to change the display to numeric). When the guide is sorted
numerically, an A B-C icon is dispklyed (select it to display the guide
alphabetically).
Chapter
3
37
Satellite
Receiver
Features
AlphaSort
TM
The AlphaSort feature lists all the program titles stored in the cun'ent guide in
alphabetical order. Select the AlphaSort icon to search for specific program titles
that are in the stored program guide in alphabetical order. Use the arrow
buttons on the remote control to highlight a character, then press OK.
For example, to search for the program Auto Racing, point to and select "A."
(Words like "The," "A," and "An" appear at the end of a title.) All titles that
begin with "A" appear in the AlphaSort list. Next, enter the letter "U." All titles
beginning with "AU" appear in the list.
Continue to enter the specific title until it appears in the AlphaSort list. If you
enter the wrong character, select either Backspace or ClearAll.
Use the arrow buttons on the remote control to highlight the title you are
looking for. Press the OK button to select it (if the program is airing), or the
INFO button to see more information (if the program is not airing, OK will act
like the INFO button). The AlphaSort feature looks for titles from all stored
programming.
Scout
TM
The Scout system icon lets you assign "Scouts" to search the guide ior specific
program information, such as actors' names or program descriptions.
Select the Scout icon from a program guide to view the available Scout menu
items. Then, select New Scout from the Scout menu (this button only appears if
there is an empty Scout menu available).
On-screen icons represent
of the Scout feature:
the status
This icon (displayed
the Scout menu)
indicates that the
information
you
specified has been
found.
in
The Scout icon in the
Channel Banner and the
on-screen guides will
have a white outline
when a Scout search
returns information.
Select Enter Text to set up the information the Scout feature will look for in the
program guide. Use the on-screen keyboard to enter the desired search
parameters. You can also use the Select Fields menu button to specify the type
of information you are looking for.
For example, if you are interested in how to prepare
term you think would occur in program infornlation,
have finished entering your topic select Run Scout.
If "cooking" appears within a program title or program
will be included in the Scout Results program list.
food, enter a common
like "cooking." When you
description,
the program
Once you have set up a Scout menu item, you can check its status by
highlighting it. A highlighted binoculars icon means that a Scout menu item has
found results.
Scout continually searches for requested information whether the box is on or
off. You can also select Run Scout to do an imnlediate search illtc'r setting tip a
scout.
Check a Scout menu item's results by selecting that Scout menu item. When you
highlight and select that Scout, the results are displayed on the right side.
Down Arrow
The down arrow icon allows you to scroll down through
other channels
guide. Point to the down arrow icon and then press OK t() scroll down
the program guide.
38
in the
through
Chapter
3
Chapter
4
Using the
Menu System
Chapter
Overview:
•
Using the Menu
System
•
Program
•
Messages
•
Using the Purchases
•
Recording
•
User Profiles
•
Personal
•
System
Guides
with
Menu
Timers
Settings
Setup
ain.
Changing
(;raphi_'s
contained
u'itbill
this pttblictltiott
ar_, for
t_'l)r_,setttatiott
onl
'
39
Using
On-Screen
Menus
Using the Menu
To (lisp]a_
"to
tilt, Main
LI_,C the
hib_hli_h[
that
I11(.'Iltl
your
on
systc[I/,
screen
tls_2 ntllltbercd
_,('lc'ct
;i11 itelll
If the Main menu doesn't appear
when you press MENU, the remote
control might not be in SAT mode.
Try pressing the SAT button on the
remote, and then MENU.
prcs_, *[ENU
_OLI
need
c]/oic(_,
choices,
yoLI
t()
lhcn
call
on
u5(2
rise
use
Ihc
the
r_:tnot("
tile
[h(2
rt,nl(>tc,
OK
contro]'s
button
r(:nlotc
connol.
arrow
to sc]ect
control's
number
Buttons and Context
Exiting
to
There are three ways to exit a menu:
Select the on-screen
control.
preceding
40
bLlttons
a Screen
Go Back button and press the OK button on the remote
Press the GO BACK button on the remote
Pressthe remote control's INFO
button at any time for more
information.
ro
menus
Help
Press the CLEAR button on the remote control. The on-screen
from the screen and you return to TN' viewing.
Help
buttons
In
The on-screen menu system offers you l'nore than one way to get more
information or to navigate within the system using the on-screen Go Back and
ttelp buttons at the top of most menus.
•
Tip: Using On-screen
it.
quickly.
On-screen
Tip: No Menus?
menu,
System
Getting
Fol
control. This returns the TV to its
display.
Help
an o'_ei'vi_,w
buttons
display clears
of a displayed
to select the on-screen
menu,
use
the
renlote
control's
arrow
and
OK
Help button (?).
For details about a highlighted ntenu item (in what context an on-screen button
is used, for example), press the remote conn-ol's INFO button and a popup
window will tell you iltore.
Chapter
4
Using
On-Screen
Menus
Main Menu Items
This section briefly describes each of the optkms available from the Main menu.
More inl_mmation about each menu and its features is included later in this
chapter, and you can always get more in[k)rmation when an item is highlighted
by pressing the remote control's INFO button.
3
Program Guides
4 iliinlil
Selecting this button will display a menu with a wu'iety of different ways to
view program guide information.
Messages
This button is used to access the Caller ID information
company and mail messages from DIRECTV.
6
7
from your telephone
Note: You must subscribe to Caller ID service from your telephone service
provider in or der for the on-screen Caller ID information
to be displayed.
8
Purchases
Use this button to review or cancel upcoming
and set spending limits for saved profiles.
purchases,
review past purchases,
Timers
Tip: Don't Be Afraid
Explore
to
Schedule the digital satellite receiver to tune to a specific channel at a specific
time. If a VCR has been properly connected to the receiver, you can also record
future programming.
Once you've learned the basics, feel
free to poke around the menu
system- exploring this system is a
great way to learn!
Remember to use you remote
control's arrow and OK buttons
maneuver
through
to
Profiles
This button displays a menu where you can set system and user passwords,
ratings limits, spending limits, viewing hours, :is well as create favorite channel
lists.
menus.
And, so you don't worry about
getting lost in the menus, you can
press CLEAR at any time to leave
the menu system and return to
regular system viewing.
Personal
Settings
I)o you want to set tip an individual profile's personal settings or alter the look
and feel of an existing profile? This button will take you to a menu where you
can alter or set personal prel>rences of your diRital s ire e receiver.
System
Setup
Allows
to adjust
you
to the
way
your
systcnt
works,
about system [__'atures, get dish pointing coordin
to get
n]ol-e
inl()rmatlon
tcs. u c
Interactive
Television
broadcasts
typically carry a x\cahh of inlormation
and now you can
access and interact with it sta[ting \,,ith this buttol3
Selecting
Interactive
fiom
the Main lnentl dispklys the I)IRECT\
IN'I'!'RACI'IVE '_' Center for setting up
intcracti\ c "I_i scr\ kc.
Chapter
4
41
Using
On-Screen
Menus
Active
Current
profile
and date
time
Program titles
and information
Selectable
Advertisements
(highlight
and
select for more
information).
Viewing
Sorts by
Suggestions/
Scroll
Movies
AIphaSort
TM
down
Active Profile's
Preferences
Scout
Sorts by
Sports
The Program
Channel
TM
sort
Guide
Note: The program guide is described in detail in the previous chapter,
the Satellite Receiver's Features, starting on page 29.
_ulc'c'[itl_
Pfo_FCllll
Using
the Main
I//cntl
clislbk q.,_ a menu with a "_ariu[_.
_/Itl can sulc_l a specific [ sol ]hofilc, thu sysitnn
or tile Grid Guidu
acco_clin_, to $otll plcfc, lcnc'csL
Gui¢lc. Vicwin£ SugMcsfions, {)r ch;ln£u
{l/c' acti\c
(;zlJ_l_{_
from
of display opHons a\ailal)D
default <_,uidc (Detail Guide
()[ the Logo or Channel
pr,ffilu
Anatomy
Ihc
cli_l_Ualll
!)ui:dl
Guklc
of a Program
;th_)\c
_h()\\'< _!)tl Ihu killcl {_l i;/h)llll;lli(Hl
;llld (;lid
Guide' ((;T'icl (;tliclc" '_h_\\ I/ ]l_'rc)
Displaying
h/ addUi_)n
_,;1 tl)l!
1o
!_UIl_l/
Program
>clctlin-
_1/
/)ll{_J_lfll
Ihc
:rod (tilc't II), tli_pla)>
42
Guide
Ic'lii{Hc
II_c' tlt,l:ltlll
',',ill
nu'u m lltv'
\(itl
t;ll/
Guides
(,lllll('s
' tt)l_ll_!
\{)tl
ill
Ihi_
tll_
NLtin
I_\l_;i_t'>
iIIt'lltl
lli_'
I_l_l:illi
[)lt
t_tticlc'_
,'_<, Ihw
lll_'ilu
_tlitlt'
Chapter
4
Using
On-Screen
Menus
Messages
The Messages
menu lets }r_)t] L_'tCSS ]//_$_1_U_ __ phone calls. 11 }ou sdccl Mail.
it shows you messages that are sent trom I)II,_E(TIV. I:ot UXalllplc you may
receive a nlussagu calling your attention
to a nu\_ scl_,icc. If you scluct Caller
ID, this menu shows you Caller II) information
hom your telephone
prl)vidur (if
you subscribe
to Caller II) service).
Mail
To tell if you
have
mail, you need
to check
file channel
hanner
available
e,'hun
you press the remote control's
1NFO button. In tile channel
banner, the
messages
icon will be highlighted
i! you have an unread
message
waiting,
Checking
Your Mail
Select Messages from the Main menu, then Mail from tile next
tile maill)ox icon on the channel
banner to view your nlai].
menu.
1.
l_oint to a message
lor }ou to read
2
Press
OK again
ancl press
to dose
OK. The muss:tgc
is opened
Or select
the message.
If you want to erase a message,
point to F.ras{, Message and press OK. When
yoLI exit ,_leSS(lg(,s, messages
that aren't erased al-e saved in IlqelqX)Pf,
Note: The quickest way to check for messages is to press the INFO button on
the remote control. This will display the channel banner. With the channel
banner displayed, use the remote control's arrow buttons to highlight the
mail icon, then press the remote control's OK button to access the Mail
menu.
Chapter4
43
Using
On-Screen
Menus
Caller ID
Your digital _<ttellit<: it:ct:i,.cr is _.apabl,.: ol displa) ing and sti,.mg Calk.r ll) inlorn+:ttJon
pit>,+ided hy
your local telul+h(me _ompany
To use this feature,
you must have your receiver
directly
plugged
into a telephone
outlet (or a RC930 wireless
ulodelll)
and you must subscribe
to
Caller ID or similar
caller identification
services
from your telephone
company.
Your CallerII)enables you to:
•
Identify
•
View the time and date of each
•
Record
Note:
•
callers
betk_re you answer
the Caller
ID inRJrmation
the
phones.
incoming
of up to 20 incoming
Only the last ten calls will be retained
See who
called
while
you
were
call.
after
a power
calls sequendaliy.
outage.
away.
There are two ways to access the Caller ID menus: hy selecting
Message, s from the Mare menu, or
by pressing
INFO on the renrote control anti selecting
tire telephone
icon in the Channel
Banner.
Tire icon will be white if you have received
a new call but have not accessed
the Caller I1) List
screen
It will be gray if you have accessed
the Caller ID List screen.
Setting Up Caller ID
To set up your Caller ID, go to the Main menu and select Messages, then select
CallerlD Setup. Use tbe up and down arrow and OK buttons to select your
preferences.
Caller ID Light
Setting CW/ler/D Ltg,l)t to ()J_ causes the front panel light to
flash if you receive new calls while the digital s Rclli e ]cceiver is off. The light
\viii flash ,al-Jti]you turn the receiver on.
Caller ID Message
Setting Caller 1D Mc<ssageto ()Jz displays the on screen
Caller ID hanner when a call is received. You may want to turn this feature off
when you are recording nranually and tin not \vant the on-screen messages to
appear on your recordings. "_k)urcalls ,,,,ill he stored in tire Caller ID List screen
even when Caller 11) is turned off.
Caller
ID Message
Time-out
Set the amount
of dine
(front
the Caller II) hanner will display when yOLI ha\e :to incoming
fc:lture to woIk, Itlake st]re (?l//d]+ll) Ilt<_sg qc) t_, s_+t t<) ()JI
1-30 seconds)
that
call. For this
Note: If you have a timer set to either watch or record, the Caller ID banner
will be temporarily
overridden for the duration of that timer. When the
timer event is over, the Caller ID banner will display as selected under Caller
ID Message.
When viewing or recording manually (not using a timer) the Caller ID banner
will display (and be recorded if recording) as selected under CallerlD
Message.
At all times Caller ID messages will be stored in the
(unless a call arrives when you are on the telephone
Type II box or Type II service).
44
Caller ID List screen
and you do not have a
Chapter4
Using
Receiving
When
The
your
and
telephone
The Caller
the
tim('.
phone
nLlt311)ct
]+he banner
company
11) banner
3/uxsaqu i_, _;ct Io <+)_t,a t):ulncr-
ol the _,cr,++en.
includ,u
bam1+++r may
date,
t\vi+.'t_'and C_d/er//)
rings
at the bottom
nunlber,
Menus
Calls
_Z()Ll[
1pl/<mt.'
appears
On-Screen
1,
d:tt,=,
inJolnlatiotl
and
time:
depends
orthe
on
the
tlam,t. L phone
type
ol service
provides.
will override
closed
captioning
at the bottom
of the screen
and will appear
for the amount
of time selected
in the C?dler lD.S2_lttp screen.
The Caller II) banner
will not be displayed
if you are in the menu system or a
timer is active when you receive a call.
Note: If using your telephone and another call arrives, the new call's
information
won't appear in the banner or be recorded in the Caller ID List
screen unless you have type II service and a type II Caller ID box in your
house.
If you have a timer set to either watch or record, the Caller ID banner will be
temporarily
overriden for the duration of that timer. When the timer event is
over, the Caller ID banner will display as selected under Caller ID Message.
Tip: When you have unread
Caller ID calls:
When viewing or recording manually (not using a timer) the Caller ID banner
will display (and be recorded if recording) as selected under Caller ID
Message.
The front panel light will flash (when
the digital satellite receiver is off)
At all times Caller ID messages will be stored in the Caller ID List screen
(unless a call arrives when you are on the telephone and you do not have a
Type II box or Type II service).
The telephone icon in the channel
banner will be highlighted
white
Message
The
list.
Indicators
following
is text that
may appear
Out of Area
The name and/or
from outside the local area.
If you'd like more information
to
appear in your Caller ID banner
and call list, or if you'd like to
subscribe to Caller ID, check with
your local phone company about
the availability of different
types
of Caller ID service,
phone
number
Private Name
The name of the incoming
phone company.
Private
Number
from die phone
The pllone
COlnpany.
number
Calh'r ID banner
ancl ('all
of the incoming call is coming
call is sent as "I_]ocked" fllon] the
of the incoming
call is sent
Unknown
telel)hone
Name
(lotnpany
The n:unc of the incotning
call is not
or t]lc information
is ulnic:tdablc.
Unknown
teluphotle
Number
company
The number
t)f the incoming
call
oi the ill[ornlation
is unte:tcl:dHc
Note: To clear the Caller ID banner
remote control.
hapter4
in the incoming
)to,+ idcd
as "Blocked"
hy the
not provided
by the
from the screen, press CLEAR on the
45
Using
On-Screen
Menus
The Caller
+Ihc
_,att.'ilit{:
_lii_il;l]
_,_ruun.
ID List Screen
When
+.all in mt.'it+i+l_
+lhc
the _+amu ]lUI//l+(J+
To access
t]tc
the
Press the CLEAR button on the remote
control to remove the on-screen
menus and return to normal viewing.
3
automatically
i+ you
have
thu
+u++'uivud
]D [.Jst
C]HII£+[
r,uplace_,
the
multq+]c
oldu_,t
cal[s
from
Li._t horn
the
+\lcssages
INFO
])llttOll
the
remote
on
or
menu,
control
at/d
select
the
Calls
From the Caller ID List screen, you can delete entries:
1+ Highlight
the call you wish to delete and press OK.
2
A crumpled
3
"1"ol)ermancntly delete the call. exit the sc+een If you change your mind
before exiting the' street'J, highlight the call thctl press OK to restore it. The
crumpled paper icon shouM disappear.
paper icoz+Jappears
to indicate that you wish to delete the call.
Using the Purchases Menu
The Putcllases
menu
set spe-Jding
limits.
allox\s
The
ma_+
list of purchases
arrow
date,
I_tfftons
tii_le,
atld
to >ee l_lote
cost
of eac]l
Note: The Past Purchases
viewed.
Reviewing
Upcoming
I lighlight
46
tu+l'+ you
call
icon
Deleting
About
h',t also
C_zll++r/7)
phone
Tip: Don't Forget
CLEAR Button
i_ lull+ a nuv,
the _al] list:
Select
Press
to 20 _:tll <_,ntue_, in
ic<+c+,,_'r +.an -,ti>t+t.+ up
tl+u met+l(>t\
_I_tl
_An
l_ttl_
h:i_._.
_,'c)t.ito rexiex\
be
longer
items.
than
The
kq+collling
ot+te s_.rccn:
display
also
a[ld past
use
shows
purchases
the
up
th_
title,
and
down
and
channel+
[)rogra111.
list is updated
as soon
as a purchased
program
is
and Canceling
Purchases
and
"+cTc_I
Iv'\i_\\
th£
An
ttl+{{)lllill
])i_)_i:t111
_
])tll£
d_.'>Ulil_tl<lll
h;t-,c
II{>ttl
:t'+
\\ull
lh_'
_t>
Ill/Ill'I'
_;iiic_'I
]'III(_TCIgt'_
:111
'% 1<.%+11
tIi_I)111111
_
Chapter
4
Using
Spending
('St'
lilt'
/.illlilt)pliInl
limil
Mr P;ly
I'cr
t
Sole, it ,S_u_/dn q L
i,
2.
Selec-t
the
digits
{>r the
u_,c,r profile
i[lro\v
spending-limit
After
Menus
Limits
,S/)('IIdIH_
H_cnclin_
On-Screen
h> hltlit;llc
\'k'\_
;I ptl
t'_t HI
;ll/d
{_l :t II1Ul/lhl\
limit
I{)[ thc, n use, the,
pr{}_i;ilii_
you'd
like
bul|OlqS
o11
Io _et ;i Hx.ndin!4
[he
]'UI])OIL'
L'{)l_h'()l
1()
L'iqR'r
l)ro_tiil]/
irtfoml:ltion,
tl spending
limit
p_lssword
to purcktse
spending
limit
is set
alldthc
a I:'¢iy Per
system
Vie,.,:
is locked.
progianl
}oci
must
t[/_{l cost:-;
more
enter
than
:i
your-
:lllows.
Note: Spending limits are in effect only when the system is locked. See
"Locking the System," later in this section, for details.
Pay Per View
P;q" Per
like
View
:l movie
digital
(PPV)
Sttltting
on
if you
ruceiver
ptlge
_)u
car,
you
sul_scril)e
Tip: Ordering
•
TLIIle
PPV
I li_hli_ht
])e[;li]5
_1( )[I
You may
need
password
to enter
to order
L_llq
your
fou_digit
¢'h_lnllt_']
thu
1{} l_tU{ h;Isc
:t PPV
_md ha,.c
y{}ur
[ht: ii_';tructions
you
can
using
the
remote
INFO
htltt{}n
tl]c
Per
h;lvc
take
Inovies
vour
one
of
c{}ntlol
t{} lind
in :l i'_l{>£4r:lm guictc.
:llso
¢LII]
\:ie,,,.
digital
al_(.I e\eilts
i[
s_/tellitc,
two
_, (ill
actions:
+ - btmol_s.
\\'hc, l_
inl{)l I11_ltiOI] LIIKI dct;lJls
i//or{:
ploMi:lm.
:t]3pC'tll ;tl]cl _i\t'
)(}El
Pay
;ind
line.
event,
;ind
pie>>
IXF{ ) Ihc
_{}tl II]{H'L' inI2rnm:ttit+I_
pUIL}ILINU
[IR'
Pl{)[4+:tnl
;Iht>ctt t]ic
pl{)_lttll]
plOM_:m_
_L'Ic{'[:
1_III' ]9"q_l'm_l
h) \ it',\
I}I:H c h;ImR'l
I{} pLIR h;l',C Ihc
Hl(l'
_t_l([ ]¢c1 or(/
pi{}_r:tl]/
/¢Plqi!ll[
I/{'h)
hc
h} i_tlt( II:l'_c' the
[}iol}lpIcd
Note: The options
available
program
you select•
4
(sc'u
if it
costs more than the spending
limit
you set up in the Profiles
or Purchases
menu•
?hapter
I)[Rt'CTV"
progr;imlning
pt{}giuin
\\il]
XC'lC{.'n
I 1{'11 (_}tlllth'[
a PPV program
or
{}no, press
%LICCI]
}:1Oil1 this
Nne
{_zm purch:lse--
dcttli]s)
to ;i telephone
1{} _t P]}V
;ll){}l.l[ how
If you want to order PPV programs
using the on-screen menus, you need
to connect your digital satellite
receiver to a telephone line.
you
" piofii:mmain_
[o ;i te]ephonc
purchase
a Ulovie
}{}u Nnd
Tip: PPV Passwords
;Ind
to I)IRECTV"
connected
purchase
connected
pro L_rzims tlmt
to I)II{ECI'X
and Purchasing
preview
To
_lre I)]RI{CI'V'
all)scribe
"_ _{}l connectiorl
Previewing
receiver
progranls
tick,2,t
stltellite
Programs
i}t{}Mt:llll
iu_,l huh}iu
to you
;lnd
_,L'[ :1 linlcn
l}ic "di{}\\
lo Ic't {>Td it
i', -.{ h_ deled
may vary according
I<} "q.tll
to the type
of
47
Using
On-Screen
Menus
Timer Recordings
,1
The Timers
l_'aturc'
atLtomaticaL]y
To
use
(1-16)
the
Key
On-screen
understand
icons are a quick
the timers:
Indicates
that
the
way
timer
the
Timers
and
then
in[()rulation
you
to pleset
to a particular
channt,
[_mture,
use
the
select
arrow
is COUlplete,
7bners
buttons
select
your
digital
_,atcllite
receiver
I at :i prcdctcrn]in_d
time.
from
S_'[ect
the Mare
to complete
the
menu.
on+screen
to
a Timer
details.
When
ConlJ_lue.
Note: If you subscribe to Caller ID service, note that the Caller ID banner will
neither be displayed or recorded during a timer (watch or record). However,
all calls will be logged. The banner will display as selected when the timer
recording is over.
to
is set.
Indicates that the timer is set
for a PPVprogram.
Indicates a timer conflict.
Indicates Interactive
allows
tun_,
content.
Setting
Up a Timer
The Timers feature allows you to set up timer recordings if you have connected
the VCR Controller to your digital satellite receiver and told the receiver what
type of VCR you are using. See page 19 in the Setup and Connections section
for details on connecting a VCR Controller.
Editing or Canceling
a Timer
From the Timers screen, select the Timer you want to edit or cancel, and then
do the following:
•
Use the arrows buttons
•
Select Clear 77met to cancel the timer.
•
To watch the program
Recording with
to edit the Timer, then select Continue.
daily or weekly, edit that program's
Timer.
a Timer
If you choose Record instead of Watch when setting a Timer/and
have set up
your VCR as previously cliscussecl), the Timer will turn on your VCR. then start
and stop recording a program.
To record with timers:
Your VCR must be tuu{'d to channel 3 or 4 (fl the VCR is connected with iust
to the \'idco input channel (if the \+CR is connected _\ith
coaxial
cab[es). Ol
a d
,_lcle ) _ablcs)
You must tmn your VCR off prior to the scheduled
You must hax u a icc()tdahIc
48
rccolding
time
tape in tht: \'CI,L
Chapter
4
Using
Schedule
On-Screen
a Timer with
Menus
the RECORD
Button
You _an s¢ hudule :t ]c_oMing dir_'ctly h'lm/ the guide
1. With a program hi.vhlightcd, press tile I{ECORI) Imtt<m on the remote
control. The Progrgtm l)_,tail,_ screen appears.
2. To schedule
Record
a timer to record, select:
l°ro_ral_z
t{}
set a timer to record tile plogram,
!_l(y and Record to purchase
program.
tile program
or
anti set up a timel t,:) record the
Note: Programs bought to be recorded may have a different purchase price
than those bought for viewing only.
User Profiles
Profiles allows you to set up difl_rent channel lists and limits for the different
members of your family A main profile (the Fallli{); Pr({/'ile) and up to fk_clr
separate profiles can be created. Individual settings that can be changecl in the
F'rofile Menu include the profile name, viewable cbarmcl lists, ratings limits for
TV and movies, viewing hours, spending limits, an¢l profile l(:,cking.
Creating
and Editing
User Profiles
When you select PnJiles flom tile Main menu, the fir:-;tscreen you see presents
a menu listing all user pcofiles (the Family Profile and up to four individual
profiles). You can creole a new profile (if a blank profile exists), or edit an
exiting one.
To persomdize
an indi: idual User Profile:
1. Press the _emote ciql[i-ol's MENU button to display the Main menu
2. Press tl;e -_button t_ select Pro/iles
3. [Iighlight the desilud l:ser Profile
Note: The highlighted User Profile's settings are displayed in the panel on
the right side of the screen.
t
7hapter
4
PI_'ss the lei//i)tc,
editing in_>dc
_qltt<>i
s ()K
I_tllton
to select
that
pt<>lilu antI cntur i_[(ffil_.
•
49
Using
On-Screen
Menus
Setting
the
Profile
Name
Ihv lirst _,lep ",,+hc'nC I'C':ililll4
I1HII/t'
ih:ll
:l[)[)c':llS
17) set the' prolilc'
[ist'
the
tell/oil,
different
Copying
i/C'Wprl_lile i_,!o sc't :t milliC. Ibis will hv the
ple_,in<<d
Ihc
\\"1 I()*INP[I'I
1 I)ullon.
Ilail/C:
1. In tiae Profiles lilt'till,
2
a
rel_eaic, dly
\\ ht,l_
prt.ss thv 1 hi.ittOl] to sulect ,\7imp,.
coniilols
:lrrow
and
()K
buttons
higl/light
1o
anti
select
tile
lett/qlSof the prof]h" tl;tlllt_.
Profile
Settings
To make creating or editing a profile t.asicr. ),otlr cligila! satellite receiver giw_'s
you the ability to use the settings of a pleviousty set prolile.
To copy the settings of :in existing profile:
1, In the Profiles menu, press the 2 I)uttl)n to select Cop3, SettDl<gs.
2
Use the remote control's
settings from.
arrow )'Juttons to select the proper profile to copy
3. Press the remote control's
4
OK button to select the clesimd profile.
Use the remote control's arrow and OK buttons
COPY button at the bottom of the scleen
Creating a Profile Channel
to highlight ancl select the
List
1, Select Edi! dT";anm,/s.
2, Use the arrow buttons to highlight a channel, and press OK to remove (or
replace) the check mark. Checknlarkecl items appeal in the channel list.
Add or Delete All Channels
You might be able to sa_c time _\ hc'n creating a channel list by using the Acid
All C[.lgllllle].g
option ol the Delete All (]/l(lll*!_,/,g_)ption bcl{xe removing or
adding inclividual channels
Also.
prognun
ile\\
channels
(,'/)(IHitw]._
proxich_.rs
fr()ln
Ill:ty
:ipl)u:ning
:libel checlcmaik
(>hi\
make
aclcliti(>n:ll
in :1 ploiilv
flw
+_h:ii/nels
channvl
t hanllc'['+
a',:tilahlc,
]isl, cll_sc,
To plexcnI
I)(,leleAII
1() :tpl)C'_iI
\()it\\_lll[
ill thu
list
Subscriptions
the channel list :ill ch:mn,.,ls that ',ou <.ton_t stll_sclil_v
c_ntil)i's
Note:
50
air()\\
itl/(l
()1 _. l_tlt!_)i/,,l_>
This step may
take several
su'lccl
minutes
tllu'
clt'-,iit-tl
t<_
I '_c'the+IC'lll()lc"
_m ",(Tu'c'n
mt>nu
I_ttlh)n,,
to complete.
Chapter
4
Using
Setting
Ihu
the Rating
inll\
illO'+ic.>
ic.+ (l_a_,ed
and
1.
Ill
Ihc
2
I lighlight
Rat_'d
TV
Profiles
the
After you lock the system, you need to
enter the system password to edit the
limits. See "Locking the System, " later
in this section, for details.
on
Ihc
MPAA
Call
nl__.ntl,
st'loci
]'_gtil#/f_
rating
leature
desired
also
iHtil]_
I)e
systen/J
restricwd
rating viewing
cind
froill
TV
programs.
incliviclucil
limit for
IJnratc.d
prolih.s.
Littlll.<;
to set (Movie
Ratings,
TV
ratings,
or Not
Events).
controls
OK button.
[ Jse tile up and down arrow buttons to move the rating selector to the
highest desired rating to be viewed by all profiles.
Notes: In the TV Ratings menu, you can customize aspects of certain ratings.
For example, the TV-14 rating has four check boxes beside it. Each of these
boxes can be checked or unchecked for greater customizing.
t
You need to lock the system in order
for rating limits, channel limits,
viewing hours, and spending
limits to
go into effect.
Limit
pr%!4r_llilS
"_ Press the remote
Importan
Menus
Ralin<q I.imi[ IllCq/tl enal)les you 1(i st.t a i/laxilllUll]
latc'd
-t
On-Screen
The boxes beside certain TV ratings boxes stand for Fantasy Violence (FV),
Dialogue/Adult
Situations (D), Language (L), Sex (S), and Violence (V).
,\her the Rating Limit is set andthe
system is locked, ynu mtlst enter
passw(_icl t(> e, atch programs \_,ith a rating higher than ),()tit limit
Viewing
Hours
I,, e the 17ewm<g HoHrs ol)tion to limit the total amount
time of day, that ;t riser ean watch programming.
rs
1
the system
of time,
as well as the
In the Profiles menu, select Viewing/-tours.
[se tl_e digits on the remote control or point to the + or - buttons and press
OK to complete the on screen sentence. Choose the days to view, how
111anyhour> can I)e viewed each day (0 24 hours) anti when programming
can bcx iewecl. Be sure to lock the system for these limits tel take effect.
Setting
Up Spending
Limits
<%'lust Ihc .',/Jml:lnz<_ Lm_l! option
t_ inclicatc a pet cxunt and,'ot
",!_c'llclillg limit for Pa\ PuI \let\
pll)gl;nns
I
Iq>h/I Io .',l_'nU_ss<.,Im;il
pless ()K
2
[ ".c"Ihu ntJlli])c'l I)tllhH/s I)11the' ic'iI/()ie contlol to C+lllc'I a single'
spcq/clhlg Ihnii and :l monthl,, Sl_c,llcling liinit (if dushed)
plOglalll
\\ hell all liclds ;lie" ".c'l
plt,X it)u,+ disl)l;t\
1o the'
;llld
tip
t ()llt2tli)
,
the' _atcliitc
a inonilfl)
ic'cei\ ui iUt/lln5
Note: After Spending Limits are set and the system is locked, the system
password will be required to purchase a Pay Per View program that costs
more than the set Spending Limits allow.
;hapter
4
51
Using
On-Screen
Menus
Locking
I scr_,
a User's Profile
_all
I_L, :i_,_,igncd
:I i_']_,onal
l_a>,s,,vord
is assign_.'d,
te, crs
pr+)_l_ttlls
tt_,ing
<>t. th,' ploli]c
Note:
th;It
Ihnits
p)<>lilc
(you
Each profile
Pl()lilt.
n/ust
that
p:p,_,\_¢>r¢]
to
Intp, t +,iTIcr t]]e
+ l_;iss',\
c_nlct
l<_'k
otds
eli)
the system
can be easily
t]_(.'i]
pa_,_,,,,,ord
ptofi]_
[i¢1t aIlo',v
passx_old
accessed
using
_. \Vbc'tl
b(.'I<>te they
a
can
accc+ss
to edit
vic,',v
to,
or
pro[i]e
the WHO.INPUT
editing
limits).
button
on the remote control.
To lock an individual
profile:
1
In the specilic pr<)file cdit mode. scl+,<_tLock _/,+,-u,++
2
Use the arrow <)r digit I+uttons to select tacit digit of the password.
Locking the System
I.ocking the system puts the ratings, spencling, x iewing, and channel limits you
have set up _:oreach profile into et'l_'ct. When you lock the system, no one can
modify any of these settings without first entering the four digit system
ixtsswor(]
I.
In the F'rofiles menu, select Locl._S'l,stc**l.
2
Use the arrows or the digit butt<ms
systel_l
p_lssword
3
Enter the pass_,'+ord a second time to confirm it. The lock icon should be
displa_,ecl in the channel 13annel
t+>enter
:+ four digit
Notes: After the system has been locked, you must
password
in order to access the Edit Profiles
control
If you forget
a USER password,
you need
assign a new user password.
If you forget
DIRECTV authorization
center.
enter the
panel.
correct
to unlock the system and then
the SYSTEM password,
contact
the
!o<./,+z_.<+//:All limits :ue in t_qte+.l N() limits ,.an bc a+_+.ussed <}tel/ aged
\\itJl/)tll
lillliIs
52
tilst
{)1
&>t7lUlil)_
i1_(_'>5
thu
p;l',+,\\()ld
_,\ 4k'111
\
pil'+4',\<)ld
is I'+:'(Itlilt:'d
1o
ovt:'rlJde
'+\ _,l_'ll/
Chapter
4
Using
Unlocking
On-Screen
Menus
the System
When the systenr is unlocked, the channt, I, ",pending, viev, ing, and latings limit_, that you set al,_'
no longer in effect. To unlock:
1. Highlight and select Unlock._l_stem in the Pr_files mcnu
2. Highlight and select Yesto confirm that you want to unlock the system
should be displayed in the channel banner.
The unk)ck icon
When you attempt to access a channel that is blocked by one or more limits (and the system is
locked), you will be asked to override limits by entering the four-digit system password.
If you enter the password to override a limit, all limits are unlocked until you turn off the digital
satellite receiver. When you turn on the receiver again, the system will be locked, and the
Family profile channel list will be selected. If you want to re-lock the system without turning off
the receiver, you can select the lock icon in tire channel banner.
Program/Video
Unlock
If the system is locked and you want to access ;I. blocked program without
unlocking all settings, press tire remote control's INFO button and highlight the
Lock icon in the channel banner. Make sure to check the box beside Unlock this
program only, and enter the system password. This program is no longer
blocked, but all other settings remain in effect. The unlock icon with a P should
be displayed in the channel banner.
Use the Lock and Unlock icons in the Channel
Banner to lock or unlock the
system. To access the Lock/Unlock Menu. press the INFO hutton on the
remote control and use the arrow buttons to select the Lock icon. Use the
remote control's number
on-screen instructions.
buttons to enter the proper
password
and follow
Unlock icon: The system is unlocked. No limits are in effect. Spending,
viewing and other limits can be accessed and changed.
Unlnck
(with a P)icon:
The system
is locked,
but no limits are in effect
for
the cluration of the current program
because
a pass',\'(>rd has been entered
to override
the cunent
programs
[in/its No limits can bc accessed
or
chal'Jgcd. After the program cncts, the s_,,st_.}inwill leu.iln t(> lock statns.
{)Hock gu'itb a T) icoll: The systcn/ is tcmp(>lari! 3 unloO, ud \\ith no limits in
cfft'ct until the receiver
is placed in stan{.Iby i//oclc A p;tss\\ord
has been
entered
to ovenide
the system limits N(_ limits can be :lc_ css_.+(I ()I chunged
\\:ith(>ut entering the syslc]n p;is,,\x_)id
\\hen
Ihe sxslcm is tult]cd {)ll, the it
,,,,ill return to Lock stalus.
Chapter
4
53
Using
On-Screen
Menus
Choosing
Your Profile
[_ath timv
}'(_u (tun
on
hy dc,hluh.
_,() this
should
cnlolccd
Press
2.
USe
hc the
",at,t,llitc
p]olik"
rc(vi_.er,
\,. ith the
t]lc Family
most
plolilc
i(,_,[licliv(.,
i., sc.lc,:te(I
Imfits
you
\_ant
across all pt()lik's
To select
1.
die dig{i[:fl
another
the
the
profile:
WtI()-INI_tJT
button
to display
control's
arrow
anti
tile {k)ur-,.ligit password
relllOte
"Filer[ enter
Note: If the profile
activate it.
a list of prolilcs.
()K
I)uttons to select tile desired
to activate tile profile.
is not password protected,
The channels,
spending,
rating and viewing
profile ,,,,ill be active only when the system
profile
you can just press OK to
limits associatecl
is locked.
with the chosen
The active profile also affects what you see in the program guides. Selecting the
tJsel Prd;erences icon sorts the guide to sho_._,only programs meeting the
c'urrent user profile criteria and which personal settings are used.
To cllange
6
dle current
Personal
profile, press the \vEIO*INPUT
button,
Settings
"file Personal Settings nlenu, accessed by piessing the 6 button in the Main
menu, lets you customize the look ancl feel of the active profile. Each of the
satellite system's profiles can have indiviclualized personal settings.
Note: If a personal profile is password protected, then that password must
be entered before changing any of the profile's settings.
Once you have accessecl the personal settings
111enu, sdeet the desired profile.
You vdll use the remote control's arrow afd OK buttons to make your
selections.
The folk)wing
sections
explain your options
when changing
your pcrson:d
ple[crences
Follow the on-screen
instlq.tctions to nlake changes
to the system
Name
[sod
to
I)mtiIes
change
mVIlUS
the profile (lisf, la>
as \\rcl]
as
wl/cn
t]lc
name
This name
I'Clnotk' ((>lltfO]'S
,,,.ill he
\_'1 ]()"
displa_,cd in
INP[ T htLtton
tile
is
pressed.
Note: A profile's
name can be changed
either
Settings
in the Main menu, and then selecting
menu.
Default
edit
Guide
Icl>, \Otl _l>osc \,, hk h gtlkk'
:lpp(.'_llS
(_1/ Ihv I_'lll(_lc (_ntl()l
Ihc ch()iccs
:tic
54
by selecting
the Personal
Name, or in the Profiles
titsl
t;_id
\\ hL'n \()tl
(;tli_h:_)]
pi(.'ss Ill(-' ill
[)etail
(;uidc
[[)1_ hwli(lll
Chapter4
Using
On-Screen
Menus
Guide Sorting
L,-'ts
you choose whether tilL'
dciauh guide is:-,ortcd
munelically by (hannc] numhet-_,or
alphabetically
by (hallnL, I n:t111(%
Color Scheme
Lets you
pick
which
colors
appear
in the
guide
inentl
and
systems.
Translucency
Lets you choose how see-through the channel
banner,
the Fetch iI/enLl, and the Main f_lenu are
when displayed. Use the remote control's arrow buttons to access and slide the indicator bar to
make the screens more or less opaque.
Animation
Lets you select which graphics are displayed
lets you select the animation time-out.
when you tune to an audio-only
channel
and also
Edit Fetch
a single function for the FETCH button on the remote control,
nlentl
of up
to 8 different features to choose
from.
Lets you choose
or
bring
to
up
To create
a custom
a custom
Fetch menu:
1. Press MENU to bring up the Main tnenu.
2. Select Pet5o_lal Settings,
3
Select the desired profile (each profile can have a different
4.
Select Edit Fetch
Fetch Menu).
5. Select t:etcb CotztroL
i
Select Show t:etcb Metzu
6. Select I'g'tcb L*xIfrom the Edit Verdi IneI3LC
-
N
Choose
up
_ hc_l,
nlalking
I)lk'_s
l/Ik'll
_*_ht*ll
()ll
Chapter4
lht.'
tilt"
Io eight
them
loll
HIIII'_\
menu
wilh
items
the
I)till(>n
to
to
OK
include
in your
customized
n/Cl3kl
b}"
button.
C(Hllirlll
_,()lll
sel_:ctions
alld
rU[tllll
Io
tile
tl
\[)kl
lelll()Ik'
\\'o/lld
like
t<) access
,, otH
c tlstol//ized
tllC!ltl,
press
The> I:H'(21 I button
c()l_ll'(ll
55
Using
On-Screen
Menus
To assign
TIP: Getting
function
1
Press
2
SulccI
Pm:_oHal,S'ettm_s,
3
Select
the desired
4.
Select
Edit
5.
Select
Pk, tch
4.
Select
As._ig_l
S.
Select
Fetch
6.
Choose
which
menu
pointing
and
selecting.
Help
If you ever have a question about the
menu you are in, select the on-screen
help button (7). If you have a questions
about a highlighted
menu item, press
the remote control's INFO button.
one
7.
Press
You
may
assigned
MENU
the
it) bring
to
the
FETCH
up
tile
Main
profile
(each
button:
menu.
prol]lc
can
llavc
:l different
Fetch
MemO.
FETCH
button
Fetch.
Control.
One
List fron't
left
press
t.Ttnction.
item
arrow
the
function
tile
Edit
you
button
FETCH
at any
Fetch
menu
would
like
to confirm
button
time
on
while
to assign
your
the
selectkm
remote
viewing
to the
control
DIRECTV
and
return
to tire
and
exectite
by
menu.
the
® programming.
INFO Help
A text block saying Press INFO to learn lrrore pops tips by defacflt whenever
there is a brief period of inactivity in a menu. This INFO Help menu allows you
to turn this feature on or off.
Reset
This button
7
allows
you to reset all personal
settings
back
to the factol T defaults.
System Setup
The System Setclp menu allows yocl to get details about _'()[I11system and is used
to configure system options that are not profile specific. Setup items that are
global to the digital satellite receiver include system options and dish pointing
Assisted Setup
lleatl.l[e
walks you d_rough a series
get the system detecting
a signal.
o[ Clticstions
l:olto\\
the
This
menu
[)ointing
on the
56
the2
on-sOl+Cell
navigation,
c'oordinalcs.
satellite
illSlrtlt
sclc_t
;ind
ileCetvcl
(iol_s
to
su{
tile t_,pe ol satellite
]un
system.
_1 systeln
test
You t]a\e
NkSIL'III
and is designed
]HI]_LI:t_C,
dish antcnn:i
[]]_il
initi;IteS
lhc opfi(m
L{et
used,
oil
II/Sl['tlctioi/S
find \oui
di;tgn()Sli(.
I(_ skip
to quickly
dish
[_l()cedtllUS
an,, ol the steps
Chapter
4
Using
On-Screen
Menus
System Index
The System Inclc.x Ic.altlle
receivc.r.
_ll]o\_,s ).(itl to ,R_.,IOc'l:liled
Dr.tails thai c:ln be' vie_..c.d fr_)m willlin the
informatioil,
tic>tails al)()til the Illc'nu
systc'lil>
back ptine] ()! the' receiver,
satellite' rt.c(,ivc'i s.
inl<_im:iti_i_
:il_cil
y()tlr tligita]
lnclc'x i//erltl illc]ude pro lli;llll
cJxplanati_)trs _1 the ielllOti +control,
pl.iitltpand,
_,y_,lem
;111(1c\ c'11:1 g!<)ss_ity ()1 \_+'()lClSc()ml/l()i/
w]len
salellitc
_lncl
lrorlt
discussing
cligit:tl
System Options
The System Options te:_iitlre allows you t{) set :l clefatlit on-screen display language, identify the
type of VCR to I)e controlled by the receiver, choose a receiver output channel (the chatmel that
the TV views satellite I_roadc:lsting), set tip the rem()te c(mtrol, select :l default picttire size,
select a Dolby Digital option, _lnct set the time zone,
Use the remote
use
the
digit
control's
btltt_)llS
()n
aric)w
the
anti OK buttons
lelll()te
colltrol
to
to nll'_'igate thr¢)ugh these menus,
select a nullll_erecl _)n screen item.
or yol.i can
Languages
This
mentl
_l][[)\x,s
you
to s_'lect
nle0u
all(]
atldio
langtiltg_'s.
Yotl
ca0
c]loose
bet',vet*n English iincl Spanish for tile nlenn language,
You c;tn ch()ose
fiom _l variety of ;luciio I_lnguages to !)e hearcl if a progranl is
sinlulcast
in that [:mguage. If th_lt l:lngu:lge is not avctilahle for that broadcast.
tile progr_tmming
will I)e heard in its clefault language.
Set VCR Type
Use the_"aiiow, OK, ;incl number I)uttons of tile remote control to follow the
menu {)ptions clisplayed xx,hen y_cl select the Set VCR Type menu button. These
streellS _,\ill allox',, tile digit:l] stltellite receiver to control a properly att:lchecl
g(:l{
5clcctil_g this ]+tttt(_n traoslers }()tt to a Set VCR "l'ype menu with a scr¢)ll;tl)le list
{!1 ill:llltll;tcttileis
clisl+layecl in alph:ibetic:il
_>l-_.lcl.Scr<)ll to tile proper
i/l_mtllacttli_.,t,
anti a list (If codes
appears.
Use the remote control's arr()w a0cl
()Ix <_tthe_+c<_ticsp{_ncli_
i/tlnll_et button t<) select one of tile options.
Notes: If you select Code Search from the list of codes, the satellite system
will automatically
try every code in the list until the proper one is used.
If you do not see your VCR manufacturer's
name, select Other (at the bottom
of the list) and enter the appropriate code from the "Using the Remote"
section.
t'_ll{>_x
Chapter
4
lhc'
(tn-stic't'n
iliSlltlClillos
tlniil
llle
Sc'l
VCR
Type
feattire
is
pl()perly
set
57
Using
On-Screen
Menus
Output
'l'his
Channel
IZmtule
l+toadcasts
alio\vs
)ou
it', si,_nal.
to Orange
"[ht.+ d+..'lault
the
st:tting
_l_anncl
to x_hich
is channt+q
d_c satelhtc
n'c_'iv_._r
+
Note: If you used A/V cables to connect your digital satellite receiver to your
TV, then you must use the TV's video line input to see the satellite broadcast.
Remote
Setup
This allows you to choose which remote control button will control the digital
satellite receiver. You can choose between SAT and AUX buttons. The default is
SAT
Use the remote
control's arrow and OK buttons
to make your choice.
RF Remote Setup
This/_ature
allows you to configure the RF remote control's privacy code. This
is the best way to avoid interference between your satellite receiver's remote
control and other Thomson RF remote controls. This is helpful if you are using
two satellite receivers, each with RF remote controls.
Use the remote control's arrow and OK buttons to make your choice. Follow
the on-screen instructions for details.
Picture
Size
Selecting Picture Size allows you to select the type of +1_7 connected to the
receiver. You can choose between Normal (4X3) or Cinema (16X9). The default
is Normal.
Dolby Digital
This mc+ntt ft..atLircallo\xs thu systum s audio output to use. l)olhy l')igital quality
SI>LIr/(.I "ll>tt IIltlSt h:{\L' tht +diaitat s it(+'tlitc' tt'Cc'i\Cl H[t:iL'hL'd t() :1 I)olhy [)i£Jt:t]
L'tl31)lc'cl
I'L'_t't\<'t
[IIL + 5_ltL+llilL+ lu'_t'i\L'l
58
(ir c]ut odL'r
in
Ol(fL'l
\ia
h)l
tilL" I)IGIT.\I,
lhi
_, Ic3nll_.
At :I)IO
+ t()
()tltpUI
ia(.ks
on
txtck
of
\\()tk
Chapter
4
Using
Dolby Digital*
On-Screen
Menus
Setup
Dolby Digital (when available) provides six independent
soundtrack channels through a digital audio
output jack. Your digital satellite receiver has an SPDIF [1EC-958] digital PCM or l)olby Digital-encoded
digital audio output jack. This can be connected to an external Digital Audio Receiver/Decoder
equipped with a compatible digital audio input (see page 14 in the Setup and Connections section for
more information). With such additional equipment, you can enjoy more dynamic and realistic sound.
DigitalSatelliteReceiver
i,
OPTICAL
DIGITAL
I
(SPDIF)
AUDIO
CAeLe
Digital AN Receiver
[
]
Requirements
• Digital Audio Receiver/Decoder
•
Programming
•
Optical (SPDIF) cable.
•
Six speakers:
with a digital optical input jack.
with a digital soundtrack
left front, left rear (surround).
right front, right rear (surronnd),
center and suh-woo_;er.
Connections
This diagram illustrates the equipment connections and home theatre speaker arrangements. Check your
equipment's
user's manual R_r more detailed connection information. (Note: older digital equipment may
not be compatible with the Dolby Digital bitstream and could cause damage to ears, headphones, or
speakers. Please read the note below for more informaticm.)
Note: This digital satellite receiver's digital audio output jack fully complies with the international
standard governing this type of jack (IEC958), and is designed for connection to a Dolby Digital (AC-3 or
PCM) receiver or Dolby Digital (AC-3 or PCM) decoder. Older equipment, some of which is not fully
compliant with IEC958, may not be compatible with the Dolby Digital bitstream. Such a connection
using anything other than a PCM, Dolby Digital, or Dolby Pro Logic receiver or decoder could create a
high noise level, causing damage to headphones or speakers.
Chapter
4
59
Using
On-Screen
Menus
Time
[ Isin,u
Zone
tiff+ feature
_axing
ai3d
li01c
l._clllind
g+dneraliy
Setthlg
tile
not
titllt+'
tithes
Note:
menu
)ou
i_t_tlt:IIt+
to ',c[
lhllc
I_.,_iItlle,_, l)tll st'Iliil_
doffs
program
ai]+)\v>
option
icquire
Mloukl
zone
aru
you
",vr(mg
It}( _11till]l. '
{illlU + z<)nc
to do
an_,thin+v.
l',,u don,.,
till + system
You must select an entry
items are displayed.
Multi-Switch
J
lhc
()ill',
after
d]L
Is Jlctt.*s'.:u "_, I_t
ill
;lll(i
IHtt+
Choose
If) <.']];i(t
linlLq ¸ I_t'(_>idin_
i,, t1(_illl_illy
Catd
in the
/{)]ll.'
t il(
your
\V:ll+.h
;ltlI()111_iti+.¸, :rod
tlIllNt_II]tL'S,
ha_, l)ccn
:t l)ayli,_ht
', and
'+tiI_J}
_IS
il
the. +
:tclivatL, d
time
zone
field
before
all
Setup
This feature allows the satellite system tt> knov, ilI yotl h:lv+_
' Lt multi-switch
connected to the system and to determine k,+hat type of multi-switch is used
This feature should only be used in rare ch+.unlstal/ccs.
to clo so by I)IREC'IN'.
St.lch LISWheI1 instructed
Dish Pointing
The Dish Pointing menu helps you set up your digital satellite receiver and
optimize your reception of tile satellite signal.
Selecting
Dish Antenna
It is important to complete each of the follo',\ in_ steps ]cquit+..+dIor your satellite
dish antenna, it you do not. you will not receive proper clish poin n_
coordinates and will not be abh, to take kill ad_amagc of _ul digiud satellite
receiver
Spec'it} tilt + type ()f dish _+oua]c using:
1.
Press
MENU (m tile lemote
2. 5;C](+Ct
,S)'SIUIII
<_'('lll]),
control
t<>bring
up the 5+kti0 menu
thL'o /+)q,/1t_oi*lt_ _. tht.m press ()l,. tt> a<Lcs'+ the dish
[)OlllI i{]_ S( I LJUn.
3.
It is important
dish
type.
to select
If you
do not,
the correct
you
will
not
receive the proper
dish pointing
coordinates
and you will not be able
to take
DIRECTV
full
advantage
of your
S'_'/ccl I)i+/_ is highlighted
:ic+.es:-, tilL' iilli)tllKtti(ll_
I+'_ dcktttlt
(Ill {hv + t'i_ht
Pt<+ss the
skit:
t)l,+ (>n tight
aHo\\
I+utton
t()
i'+:tnL+i.
4. Spc(il\
the typt+ ()i dish _()tl ;lie ttsiil_ A lOtllld s:tlt+llile dish <>I :in ()X:l]
s:m.+llit,: dish ',', ith t,+',_+(>t tlnu'c INB<, I I_>\\ N<_i',c I+i<+_l<,.<+n',cltel)
sX'hcn the
l',_<>pcr dish i', hi,_IHightt+d
plc',',
t )Ig
System.
Note: Changing the dish type will delete all stored Guide information
while
the digital satellite receiver gets the updated Guide data. While updating
Guide information,
advanced search features such as the Scout TM and
AlphaSort TM will only have a few hours of data from which to work.
60
Chapter4
Using
On-Screen
Menus
Enter Zip Code
LNBs
This feature allows you to find dish-pointing
code.
coordinates
1. In the Dish Pointing menu, use the remote control's
Enter Zip Code.
2. Use the numeric buttons
code.
from your local zip
arrow buttons to select
on the remote control to enter in the proper zip
3. After entering the final digit, the receiver displays the dish-pointing
coordinates. For convenience,
record the numbers in the spaces below.
An oval satellite dish with two LNBs
(not provided with all systems).
Note: If you have a round satellite antenna, you will not see numbers for
Tilt. Tilt applies only for satellite antennas with more than one LNB.
Tip
Azimuth is the side- to-side
direction that the satellite dish
antenna is pointed.
Dish-pointing
Coordinates
Elevation
Azimuth
Tilt (oval satellite dish only)
Elevation is the upldown angle that
the satellite dish antenna is
pointed. Tilt is the circular rotation
of the dish itself, like the motion of
a steering wheel
Select by City
Allows you to choose major cities from selected
coordinates.
states to find dish-pointing
Enter Lat/Long
Allows you to find dish-pointing coordinates from latitude and longitude
entries. Latitudes between 20 and 55 can be entered, and longitudes bem, een
65 and 125 can be entered.
Signal Meter
This feature allows you to determine the strength of all available signals, one at
a time. There is a separate test for each satellite from which your antenna
receives information.
Chapter4
61
Using
On-Screen
Menus
System Test
If your system fails a test, run the
system test several times before
concluding that there is a problem.
Occasional fluctuations
in the phone
line or satellite signal can give
temporary false readings.
This function allows you to perfi)rm a system-level diagnostic test on the
satellite receiver. There are four sub-tests within this system test. Each one will
display results after the testing for that area is complete. The receiver's access
card number is also displayed in this menu.
Note: While the system is testing the signal, the video will temporarily
out. When the tests are complete, a summary display appears.
blank
System Info
This function displays the model and serial numbers
display the brand name and display a features list.
of the receiver. It will also
Upgrades
The "RSA Secure" logo ensures that only
authorized upgrades or modifications are
delivered to your digital satellite receiver.
Your digital satellite receiver is able to receive upgrades or modifications to
some of its features and functions. These modifications will occur automatically,
usually at times when your receiver would likely be turned off. If your receiver
is on when an upgrade or modification is sent, you may experience a
disruption in reception for a minute or two. Your reception should return to
normal after the modification is complete.
Note: Your receiver must be plugged in to receive any updates. Do not
unplug your receiver while an update is in progress. Please consult the
Upgrades Menu to find a schedule of upgrades or modifications planned
DIRECTV.
by
New Access Card
Selecting the New Access Card function allows you to update the digital satellite
receiver with a new access card. This is necessary on occasion when DIRECTV
sends out a new card.
Alternate
Data
Selects from among the available data channels.
Interactive
8
This function allows you to [earn lnore about I)IRECTV INTERACTIVE TM. It also
allows you to se[up an account fi)r the free sep,'ice, review transactions and
messages, and to change settings.
*RSATM
62
Secure
a* d the RSATM
Secure
logo
are
trademarks
of RSM Data
,_ecuritF
Inc.
Chapter4
Chapter
5
Other
Information
Chapter
Overview:
•
Troubleshooting
•
Finding the TV's Video Line Input
•
Running the System Test
•
Limited Warranty
•
Accessory Order Form
•
Index
ain.
Changing
Graphics
contai_led
within
this publication
are for
repre.¢entatiot*
on{},
63
Other
Information
Troubleshooting
Many problems
you experience
can be corrected
the following:
• Image freezes
• Blank screen
by performing
• Audio freezes
• Won't respond
a simple reset of the digital satellite receiver. If
to front panel or remote
try this: press and hold the INFO and right arrow buttons for at least three seconds. If the
problems persist, try unplugging the digital satellite receiver for 15 seconds to 2 minutes and
then plug it in again.
Running the System Test (later in this section) can also help you diagnose
common problems.
Digital
Wrong
Satellite
Receiver
and solve many
Problems
picture
The digital satellite receiver and most VCRs let you toggle between signals. If you don't see the
signal you think you should be seeing, try using these buttons to toggle between the signals:
•
Press the TV/VCR button on the VCR remote or on the VCR's front panel.
•
Press the ANTENNA button on the remote
control.
Taking either of the above actions lets you switch the source of the video signal from satellite
signals to the off-air antenna or cable signal, and vice versa.
•
You may not have installed your satellite dish antenna
properly.
Refer to the dish pointing instructions in the Menu section of this book and the installation
guide that came with your satellite dish antenna.
Problems with
•
Caller ID
Most wireless phone jacks will function properly with Caller ID. However to verify proper
Caller ID operation, directly connect the phone line to a standard wall-mount phone jack.
Light flashes on front
panel
You have unread Caller ID messages. Highlight and select Messages from the Main menu,
and then select CallerlD List to see a list of sequential Caller ID information.
Once you
access your messages, the L.E.D. flashing will stop.
Receiver will not turn on
•
Check to make sure it is plugged
•
Check the wall receptacle
something else.
(or extension
•
Maybe batteries
control are "dead."
Maybe remote
•
64
cord) to make sure it is "live" by plugging in
control is not aimed at remote
Unplug the receiver. Wait five minutes.
Turns off while
•
in remote
in.
sensor.
Plug it in again.
playing
Electronic protection circuit may have been activated because of a power surge. Wait 30
seconds and then turn on again. If this happens frequently, the voltage in your house may
be abnormally high or low.
Chapter
5
Other
Information
Satellite receiver turns on or changes channels unexpectedly
• Scheduled Watch or Record timer has been activated.
Blank screen
•
Your satellite receiver may be hooked incorrectly to the TV. Change channels using the
satellite receiver's front panel buttons to see if the channel banner appears. If it does not,
check the Setup and Connections section for instructions about connecting your satellite
receiver.
Partial programming
loss
• Your multiple LNB satellite antenna may be incorrectly configured. Change the dish type set in
your receiver's preferences. Press the MENU button on the remote control, then select System
Setup. In the next menus, select Dish Pointing, and then Select Dish. From the Select Dish
display, make sum the proper antenna is selected (round, or oval with 2 LNBs, or oval with 3
LNBs.
Remote
Control
Problems with
Problems
the remote
is between
control
•
Maybe something
tire remote control and the remote sensor.
•
Maybe the remote control is not in SAT mode. Press the SAT (or, if your remote is older,
SAT1 or DIRECTV) button so the remote will control the digital satellite receiver.
Remember to press the OK button after entering
digits long.
a channel
number that is less than four
Maybe batteries in the remote control are weak, dead or installed incorrectly. Try replacing
batteries. (Note that when you replace the batteries you may have to reprogram your remote
to control other devices.)
Remove batteries; press and hold the 1 button for at least 60 seconds to drain the
microprocessor
inside the remote control. Release number 1, replace the batteries,
necessary) reprogram the remote.
and (if
If you are trying to operate a device other than the digital satellite receiver that you have
programnred the remote to control, make sure you press the corresponding
device button
(DVD, VCR2, etc.) first.
TV
or VCR
Problems
Blank screen
•
Maybe the component
•
Try another
connected
to the input jacks is not turned on.
channel.
1"3/turns
on or changes
channels
unexpectedly
• A scheduled Watch or Record Timer has been activated.
VCR turns on or off unexpectedly
•
A timer may be set to record. The timer will automatically
Chapter
5
turn the VCR on and off.
65
Other
Information
Finding the TV's Video
Channel
TV
Button
Input
Note: If your TV is connected with just coaxial cables, you only need to tune
to channel 3 or 4.
DVD
VCR2
AUX
SAT
&A °& &
MUT E
SKiP
FETCH
GO BACK
GUIDE
INFO
If you used audio/video cables to connect your TV to the digital satellite
receiver, you must tune your TV to the video input channel to view DIRECTV_
programming and menus. There are just as many ways to access a TV's video
input channel as there are brands and models of TVs. Below are some things
you can try.
•
If your TV brand is RCA, GE, or PROSCAN, press TV on the remote control
that came with your digital satellite receiver. Then press the WHO*INPUT
button on the remote.
•
If your TV brand is not RCA, GE, or PROSCAN, consult your TV Owner's
Manual.
O/_O
If you cannot find your TV Owner's Manual, you will have to investigate. You
might access the TV's video input channel by:
MENU
WHO*
INPUT
Button
CLEAR
,O _O 00
,O 0000
b 00.6
REVERSE
pLAy
FORWARD
,¢1C>C_
RECORD
STOP
•
pressing
a button on the remote control
•
finding it through
the TV's menu system
tuning directly to it by pressing
•
going through all channels
buttons on the TV.
a specific channel
in the list by pressing
The box below lists of some of the different
input channel.
number
the channel
ways manufacturers
up or down
label the video
PAUSE
(D(D_
Video
66
Line Input Variations
Button/switch
on the TV
Button on the
TV Remote
Channel #
VIDEO
SIGNAL
VID 1
VID 2
S-VID
S-VIDEO
VID 1
LINE
VID
VIDEO
S-VID
INPUT
SOURCE
AUX
00
90
91
92
VID 1
VID 2
Chapter5
Other
Information
Running the System Test
The System Test allows you to run a basic diagnostics check on your digital satellite receiver. If
you are experiencing any trouble with your receiver, run the system test. It will also allow you to
get your access card ntmlher or to initiate diagnostic procedures on your digital satellite receiver.
First lnake sure that:
all connections--jacks,
cables, etc.--are
Connections, for more information.
correctly in place. See Chapter One, Setup and
•
There are batteries in the remote control, and they are working
•
The access card is installed in the digital satellite receiver.
Follow these steps to run the diagnostics
correctly.
system test on your digital satellite receiver.
1. Turn on your TV and the digital satellite receiver.
2. Press the SAT button to put the remote control in satellite receiver-controlling
MENU to bring up the Main menu.
mode, then press
3. Select System Setup.
5. Select System Test.
6. If your system does not pass the system test, check any of these potential
cabling, pointing the satellite dish, phone connection, and access card.
7. If you continue
to have problems,
trouble areas:
call RCA Customer Service at 1-800-679-4776.
You should run a system test several times before concluding that there is a problem.
fluctuations in the phone line or satellite signal can give temporary false readings.
Fine-Tuning
Occasional
the Signal
If you self-installed your satellite dish antenna, you may have already used the Assisted Setup to
find the dish-pointing coordinates, acquire and fine-tune the signal, and run a system test.
If you need to run the Assisted Setup again, select System Setup from the Main menu, then select
Assisted Setup.
If you just want to check your dish-pointing coordinates or run the signal strength
System Setztp from the Main menu, then select Disl9 Pointillg.
Chapter5
meter, select
67
Other
Information
Limited Warranty
What
your warranty
covers:
Defects in materials or workmanship.
For how long after your purchase:
•
90 days from date of purchase
•
•
91 days to 1 year from date of purchase - Unit exchange, which includes parts only; you pay the labor.
The warranty for rental units begins with the first rental or 45 days from date of shipment to the rental firm, whichever
comes first.
What
- Unit exchange,
which includes
parts and labor.
we will do:
During the initial 90 days:
Exchange the defective receiver with a new or, at our option,
After the 90 days and within one year:
Exchange
to replace
the defective
receiver
a defective
receiver.
refurbished
unit.
with a new or, at our option, refurbished
unit.
This charge covers the labor cost for its repair.
We will charge
you
a fiat exchange
cost
How you get service:
•
Call 1-800-679-4776 and have your unit's date of purchase
information is on the back of your receiver.
•
A representative
•
If the representative
determines that you should receive a replacement receiver you will be provided with a Service
Request (SR) number and the location of a nearby exchange point if one exists. No returns will be accepted without the
SR number.
•
Proof of purchase in the form of a bill of sale or receipted invoice which is evidence that the product is within the
warranty period must be presented to obtain warranty service. For rental firms, proof of first rental is also required.
Option
will troubleshoot
your problem
and model/serial
number
ready.
The model/serial
number
over the phone.
I:
1. Provide your Discover, MasterCard or Visa account number and expiration
security purposes only and your account will not be charged at this time.
2. We will send you a replacement unit.
date to your phone
representative.
This is for
3. If you return the unit to us within 14 days from the date you were provided a SR number, only items not covered by
warranty will be charged to your account. If your unit is not received within 14 days, the suggested retail value of the
receiver will be charged to your credit card. This amount will be credited, less a $10 handling fee, if the unit is
subsequently received.
4. Ship your defective unit back to us using the replacement unit's carton. Shipping instructions will be included on the
carton along with your SR number which will allow you to easily ship the unit back to us. Make sure you insure your
shipment in case of damage or loss. Include with the shipment:
Evidence of purchase date such as a bill of sale.
•
A brief note describing your receiver problem.
•
Your name, address and phone number.
Option
I1:
I. For a fee of $10.00, we will send a replacement unit to our exchange
2. The exchange location will notify you of its arriwd.
point.
3. Take your unit and evidence of purchase date, such as a bill of sale, to the exchange location and you will be provided
the new or refurbished unit. Please retain all accessnries such as the remote control hand unit and access card.
4. If the repairs are covered by your warranty, you will not be billed.
Thomson
assumes
no responsibility
the manner
prescribed
by Thomsom
68
for
warranty
shipments
from
the customer
to the factory
if not shipped
Chapter
in
5
Other
Information
To receive a replacement
receiver after we have received your unit:
• Write the SR number on the outside of the carton used to return tile unit. Make sure you insure your shipment in case
of damage or loss.
• Carefully pack the unit using the original box and packing material if possible. Please retain all accessories that were
included with your unit such as the remote control hand unit and access card.
Include with the shipment:
1.
Evidence of purchase date such as a bill of sale.
2.
3.
•
•
A brief note describing your receiver problem.
Your name, address and phone number.
The representative
will advise the address to mail a cashier's check or money order for payment
warranty labor or parts charges, and you elect not to use your credit card.
After we receive your product, a new or refurbished unit will be shipped to you.
What your warranty does not cover:
• Customer instruction.
(Your Owner's Manual describes how to install, adjust, and operate
information should be obtained from your dealer.)
• Acts of nature, such as but not limited to lightning damage.
if there are any out of
your unit. Any additional
•
•
•
Adjustment of customer controls.
Damage from misuse or neglect.
A unit that has been modified or incorporated
purposes.
Batteries.
•
•
•
Units purchased, serviced or operated
Loss of programming.
Installation.
•
•
Shipping damage if the unit was not packed and shipped in the manner prescribed by Thomson.
Storage fees may be charged by the exchange point if you fail to pick up the replacement unit in a timely manner.
into other products
outside the continental
or is used for institutional
or other commercial
U.S.A. and Alaska.
Product Registration:
•
Please complete and mail the Product Registration Card packed with your unit. It will make it easier to contact you
should it ever be necessary.
The return of the card is not required for warranty coverage.
Limitation
of Warranty:
• THE WARRANTY STATED ABOVE IS THE ONLY WARRANTY APPLICABLE TO THIS PRODUCT.
ALL OTHER
WARRANTIES,
EXPRESS OR IMPLIED (INCLUDING
ALL IMPLIED WARRANTIES
OF MERCHANTABHATY
OR FITNESS
FOR A PARTICULAR PURPOSE) ARE HEREBY DISCLAIMED.
NO VERBAL OR WRrITEN
INFORMATION
GIVEN BY
THOMSON
MULTIMEDIA
INC., ITS AGENTS OR EMPLOYEES
SHALL CREATE A GUARANTY OR IN ANY WAY
INCREASE THE SCOPE OF THIS WARRANTY.
•
REPAIR OR REPLACEMENT AS PROVIDED UNDER THIS WARRANTY IS THE EXCLUSIVE REMEDY OF THE
CONSUMER.
THOMSON MULTIMEDIA INC. SHALL NOT BE LIABLE FOR INCIDENTAL
OR CONSEQUENTIAL
DAMAGES RESULTING FROM THE USE OF THIS PRODUCT OR ARISING OUT OF ANY BREACH OF ANY EXPRESS
OR IMPLIED WARRANTY ON THIS PRODUCT.
THIS DISCLAIMER OF WARRANTIES
AND LIMITED WARRANTY ARE
GOVERNED BY THE LAWS OF THE STATE OF INDIANA.
EXCEPT TO THE EXTENT PROHIBrl_D
BY APPLICABLE
LAW, ANY IMPLIED WARRANTY OF MERCHANTABHXFY
OR FITNESS FOR A PARTICULAR PURPOSE ON THIS
PRODUCT IS LIMITED TO THE APPLICABLE
WARRANTY PERIOD SET FORTH ABOVE.
HOW state law relates to warranty:
• Some states do not allow the exclusion nor limitation of incidental or consequential
damages, or limitations on how long
an implied warranty lasts, so the above limitations or exclusions may not apply to you.
This warranty gives you specific legal rights, and you also may have other rights that vary from state to state.
If you purchased
•
This warranty
Chapter
5
your product
does not apply.
outside
the United
States:
See your dealer for warranty
information.
69
Other
Information
FCC Registration
Information
Your digital satellite receiver is registered
and 68, FCC Rules and Regulations.
1.
Notification
to the
Local
with tile Federal Communications
Telephone
Commission
and is in compliance
with parts 15B
Company.
On the back of this equipment is a label indicating among other information, the FCC Registration number and Ringer
Equivalence Number (REN) for the equipment. You must, upon request, provide this information to your telephone
company.
The REN is useful to determine the number of devices you may connect to your telephone line and still have all these
devices ring when your telephone number is called. In most (but not all) areas, the sum of the RENs of all devices
connected to one line should not exceed 5. To be certain of the number of devices you may connect to your line as
determined by the REN, you should contact your local telephone company.
Note: This
tariffs, and
your local
equipment
equipment may not be used on coin service provided by the telephone company. Party lines are subject to state
therefore you may not be able to use your own telephone equipment if you am on a party line. Check with
telephone company. Notice must be given to the telephone company upon permanent disconnection of your
from your line.
2.
of the Telephone
Rights
Company.
Should your equipment cause trouble on your line which may harm the telephone network, the telephone company shall,
where practicable, notify you that temporary discontinuance
of service may be required.
Where prior notice is not
practicable and the circumstances warrant such action, the telephone company
may temporarily discontinue service
immediately.
In case of such temporary discontinuance,
the telephone company must: (1) promptly notify you of such
temporary discontinuance
(2) afford you the opportunity to correct the situation and (3) inform you of your right to bring
a complaint to the Commission pursuant to procedures set forth in Subpan E of Part 68, FCC Rules and Regulations.
The telephone company may make changes in its communications
facilities, equipment, operations of procedures where
such action is required in the operation of its business and not inconsistent with FCC Rules and Regulations.
If these
changes are expected to affect the use or performance of your telephone equipment, the telephone company must give you
adequate notice, in writing, to allow you to maintain uninterrupted
service.
Radio Interference
This equipment has been type tested and found
the specifications in Part 15 of FCC Rules. These
television interference in a residential installation.
and, if not installed and used in accordance with
However, there is no guarantee that interference
to comply with the limits for a Class B Digital Device in accordance with
rules are designed to provide reasonable protection against radio and
This equipment generates, uses and can radiate radio frequency energy
the instructions, may cause hamfful interference to radio communications.
will not occur in a particular installation.
If this equipment does cause interference to radio or television reception (which you can determine
equipment off and on), try to correct the interference by one or more of the following measures.
•
Reorient or relocate the receiving antenna
•
Change the position of the satellite receiver
interference.
•
Move the satellite receiver away from equipment
•
Plug the satellite receiver
different branch circuits.
into a different
(that is, the antenna
for radio or television
with respect to the radio or television
receiving
by turning the
that is "receiving"
equipment
the interference).
that is receiving
interflerence.
wall outlet so tile receiver and equipment
receiving interference
are on
If these measures do not eliminate interlerencc, please consult your dealer or an experienced radio/television
technician for
additional suggestions.
Also, tile Federal Comnmnications
Commission has prepared a helpfffl booklet, "How To Identity"
and Resolve Radio/TV lntcrfl:rence l_rohlems ". This booklet is availahle from the U.S. Government Printing Office,
Washington, D.C. 20402. Please specify stock number 004-000 00345-4 when ordering copies
70
Chapter
5
Other
Information
Accessory
Order
Part No.
Description
RG-6 Coaxial
RG-6 Coaxial Burial
Cable with
weatherproof
"F"
connectors comes in a
variety of lengths.
S-Video Cable comes
12 foot lengths.
Total
Cable
12 feet
DT12C
$14.95
25 feet
DT25C
$24.95
50 feet
DT50C
$39.95
DT12S
$19.95
S-Video Cable 12 feet
Weatherproof
in
Form
"F" Connector
(2)
D905
$5.95
Optical/SPDIF
Cable (3-_)
DV3
$15.95
Optical/SPDIF
Cable (6-ft)
DV6
$19.95
TYRO Bullet Amplifier
D903
$22.95
Self-lnstaller's
DKIT96
$69.95
247047
$33.10
SCTV1650
$49.95
RC930
$99.95
Kit
Remote Control
CRK76SG3
Surge Protector
Wireless Modem
Jack
Self-Installer's Kit
contains all the cable
and hardware needed
to install the dish and
connect
,4__
9_Q
ooo
ooo
6o_
the system.
Remote Control
Total Merchandise
replaces a lost remote.
Or, order a second
remote for convenience.
$
Sales Tax
We are required
by law to collect the appropriate
sales tax for each individual
state, country,
locality to which the merchandise
Shipping,
__I
T.,Vl
$
............................................................
Eight outlet surge
protection for cable TV,
satellite systems and
other electronics.
Comes with a $50,000
equipnlent guarantee.
Handling,
Total Amount
and Insurance
and
is being sent.
$
.................................
$
Enclosed ....................................................
Use VISA, MasterCard,
5.00
or Discover preferably.
Money order or check must be in U.S. currency
only.
No COD or CASH.
All accessories are subject to availability.
Prices are subject to change without
"r
a=
u
Chapter
5
notice.
.....
P|easecomplete
O_her
:
: ....
:
71
Other
Information
Charge your order on your VISA,
MasterCard, or Discover Card
by filling in below
IUMSpE
YTOLR: C_oomum_l_
a_rr
_ unt number _
Placing
an Order
To place your order by phone, have your Visa, MasterCard or
Discover Card ready and call the toll-free number listed below.
Use this number onlF to place on order for accesso_ items listed
on this order form.
1-800-338-0376
My card expires:l_[_
IMPORTANT:
Copy complete account number
from your MasterCard
r-FT- r- -N
Copy Number
above your
name on
MasterCard
IMPORTANT:
rTr-r
To place your order by mail, detach and mail the completed
order form with credit card information, money order or check
in US currency (made payable to Thomson multimedia, Inc.) to
the following address:
N-T-N
My card _
expires:
Video Accessories
PO Box 8419
Ronks,
PA 17573
Copy complete account number
from your Discover Card
FTI-
F-N-r3 F- -T7
My card expires:l_r--
]
AUTHORIZED SIGNATURE
(Credit card order will not be processed without signature)
Prices are subject to change without notice.
Print or type your name and
address clearly,
A complete and correct
order will save you days
of waiting.
Name"
Street"
Apt:
City:
State:
Zip:
Daytime Phone Number:
Please make sure that both sides of this form
have been filled out completely.
• Allow 4 weeks for delivery.
• All accessories are subject to availability.
• Prices are subject to change.
72
Chapter
5
Other
Information
Glossary
Automatic
Code Search
A method to program the remote control by using a series of preset codes. Programming
remote control is necessary to operate other components.
Channel
the
Banner
A transparent banner at the top of the picture allows direct access to the key features of your
digital satellite receiver including viewing suggestions, The Guardian TM channel locking system,
on-screen message display, and the Scout TM keyword/phrase
and the AlphaSort TM alphabetical
search features. Press the INFO button on the remote control while watching normal
programming to display the Channel Bannec Highlight and select the desired icon using the
remote control's arrow and OK buttons.
Direct Entry
A method to program
manual. Programming
Interactive
the remote control by using codes from a list provided in the instruction
the remote control is necessary to operate other components.
TV
A service that lets you use the satellite receivers remote control to access up-to-the-minute
news,
sports, financial information, weather, program trivia, free offers, and shopping- all while you
watch TV.
Program
Guides
A list of available programming shown on-screen when you press the remote control's GUIDE
button. Program guides display information that is contained in broadcaster signals. Your digital
satellite receiver can display several types of program guides including an Advanced Program
Guide TM which stores up to three days of programming information and an information guide
which lists five different channels of programming at a glance.
RSA Software
Upgrades
via Satellite
The digital satellite receiver is able to modify some of its features and functions with
downloaded
RSA-secure upgrades or modifications. RSA-secure downloads ensure that only
authorized upgrades are delivered to your RCA digital satellite receiver.
Universal
Remote
Control
Description:
A remote control that provides complete satellite system operation, and prima W
function control of most brands of remote-controllable
TVs, VCRs, and cable boxes.
Chapter
5
73
Index
A
D
M
R
Access card
number 20
Accessories 71
Deleting calls 46
Deleting purchases
46
Detail Guide 32
DIRECTV INTERACTIVE TM
2, 32
Dish Pointing 60
Dolby Digital 1, 14
DVD button 22
Mail
checking 43
deleting 43
icon 31
MENU button 22
Rating limit 51
RECORD button 26, 49
Recording 9, 11, 13
with timers 48
Remote Control 1
universal 1
Remote control
buttons 22
codes 27
m(x.tes 26
Reviewing purchases
46
RF jacks/cables
15
RSA-secure downloads
2
Accessory Order Form 71
AlphaSort button 3l, 38
Arrows on remote 22
Assisted setup 19, 67
Attractions Guide 35
Audio Hum 6
Audio/Video
jacks/cables
E
22
Exiting
menus
F
Program Guide 42
Timers 48
Messages 43
Caller ID 46
Movies icon 37
MUTE button 22
Fetch 55
button 22
O
15
AUX button
B
Batteries 17
Buttons 22
40, 46
C
Front panel light
Cable Box
code list 28
Caller ID
banner 45
list 46
G
receiving calls 45
Cancelling purchases
46
Cautions i 2
Channel Banner 1
Channel banner 31
Channel Guide 35
Channel lists 50
add channels 50
delete channels 50
CLEAR button 22
Code list
Cable Box 28
Satellite Receiver 28
VCR 28
Codes
remote control 27
Connections
16, 24
jacks and cables 15
74
Menu system 40
icons 48
Menus
Profiles 49
45
6
P
Glossary 73
GO BACK button 22
Grid Guide 32
GUIDE button 22, 32
I
I icon. See DIRECTV
INTERACTIVE
Icons 30, 31, 37, 48
INFO button 22
Interference
6
K
Key Features
Overheating
1
L
LED light 22
Locking
a profile 52
the system 51, 52
Logo Guide .35
Look and feel 54
Power Surges 6
Problems, solving 64
Profiles
channel lists 50
menu 41, 49
rating limit 51
spending limits 51
viewing hours 51
Program guides
anatomy 42
anatomy of 30
Attractions Guide .35
Channel Guide .35
Detail Guide 32
Grid Guide .32
Logo Guide .35
scrolling 33, 38
sorting .36
tuning to a program .34
Programming
remote control 27
Purchases
S
S-Video 15
Satellite Receiver
code list 28
Scout 38
Scrolling 33, 38
Set VCR type 18
SKIP button 23
Software Upgrades
2, 73
Sorting by
AlphaSort icon 38
Movies icon 37
Scout icon 38
Sports icon 37
Spending limits 47, 51
Sports icon 37
System
lock 52
options 56
test 56, 67
unlock 53
T
Telephone icon
Timers 48
31
Troubleshooting
64
Tuning to a program
TV button 23
34
cancelling 46
menu 41, 46
previewing 47
reviewing 46
spending limits 47
Chapter
5
Index
U
Universal
Remote Control
1, 73
Unlocking
the system 53
User Preferences
36
V
VCR
code list 28
Controller 15
recording 23, 26, 48
remote button 23
set type 19
Video input channel 9, 11
Viewing hours limit 51
W
WHOoINPUT button 23
Wink. See DIRECTV
INTERACTIVE
WINK Communications
2
Chapter5
75
This page left
intentionally
blank
This page left intentionally
blank
If your digital satellite receiver needs service, please contact
your dealer or the nearest Service Center from the Yellow
Pages. Please do not send any products to the Indianapolis
address listed in this manual or on the carton. This will only
The software used to display images in this
product is based in part on the work of the
Independent JPEG Group.
add delays in service for your product.
Thomson
multimedia
Inc.
10330 North Meridian Street
Indianapolis, IN 46290
02001 Thomson multimedia
Trademark(s)® Registered
Marca(s) Registrada(s)
Inc.
DIRECTV, and the Cyclone Desiign logo are trademarks of
DIRECTV, Inc., a unit of Hughes Electronics Corp., and is used
with permission.
"n.IOMSON
Printed in the USA
TOCOM
THOMSON
15660900
IB-IDRD450RG