1
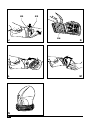
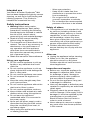
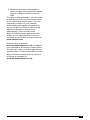
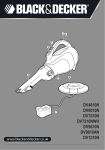
www.blackanddecker.co.uk 4 3 2 1 UK Ireland Australia New Zealand 1 14 15 16 A B C 2 10 9 13 5 12 6 11 7 8 6 5 17 D E 19 20 10 18 F G 21 H 2 4 I 3 22 J L N 4 23 24 K M - Wear eye protection. - Keep the air intake free from obstructions to prevent the motor from overheating. - Do not point the air outlet at yourself, bystanders or animals. - Do not exceed the recommended pressure of the item to be inflated. Intended use Your Black & Decker Dustbuster® Mini Vac has been designed for light dry vacuum cleaning, as well as for light blowing and inflating purposes. This product is intended for household use only. Safety instructions Warning! When using mainspowered appliances, basic safety precautions, including the following, should always be followed to reduce the risk of fire, electric shock, personal injury and material damage. Read all of this manual carefully before using the appliance. The intended use is described in this manual. The use of any accessory or attachment or the performance of any operation with this appliance other than those recommended in this instruction manual may present a risk of personal injury. Retain this manual for future reference. Safety of others After use Using your appliance Do not use the appliance to pick up liquids or any materials that could catch fire. Do not use the appliance to pick up sharp objects that could damage the filter or other parts. Do not use the appliance near water. Do not immerse the appliance in water. Keep the motor draught away from your eyes and face. Do not use the appliance without the dust bowl or filters in place. Do not use the appliance outdoors. Keep children and animals at a safe distance when using this appliance. Do not leave the appliance unattended while it is connected to the power supply. Never pull the power supply cord to disconnect the plug from the socket. Keep the cord away from heat, oil and sharp edges. When using the appliance for blowing or inflating purposes: This appliance is not intended for use by persons (including children) with reduced physical, sensory or mental capabilities, or lack of experience and knowledge, unless they have been given supervision or instruction concerning use of the appliance by a person responsible for their safety. Children should be supervised to ensure that they do not play with the appliance. Unplug the appliance before cleaning. When not in use, the appliance should be stored in a dry place. Children should not have access to stored appliances. Inspection and repairs Before use, check the appliance for damaged or defective parts. Check for breakage of parts, damage to switches and any other conditions that may affect its operation. Do not use the appliance if any part is damaged or defective. Have any damaged or defective parts repaired or replaced by an authorised repair agent. Regularly check the power supply cord for damage. If the supply cord is damaged, it must be replaced by the manufacturer or an authorised Black & Decker Service Centre in order to avoid a hazard. Never attempt to remove or replace any parts other than those specified in this manual. 5 Electrical safety # This tool is double insulated; therefore no earth wire is required. Always check that the power supply corresponds to the voltage on the rating plate. If the supply cord is damaged, it must be replaced by the manufacturer or an authorised Black & Decker Service Centre in order to avoid a hazard. Do not use the appliance to vacuum any electrical appliances while they are plugged in. Features 1. 2. 3. 4. On/off switch Release button Clogged filter indicator Dust bowl Fig. A 5. 6. 7. 8. 9. 10. 11. 12. 13. 14. 15. 16. Brush tool Crevice tool Bowl adaptor Floor head Hose Blow adaptor Tubes Tool adaptor Blow diffuser Small inflator adaptor Medium inflator adaptor Large inflator adaptor f. Vacuuming carpeted floors g. Vacuuming hard floors The brush tool (5) and the crevice tool (6) are stored at the underside of the appliance. To fit an accessory, proceed as follows (fig. D): Take the accessories from the appliance. Insert the appropiate accessory into the front of the appliance. Fitting the accessories for blowing and inflating The accessories provided can be used in various combinations, depending on the task (fig. C): a. Blowing b. Inflating To increase your working range, it is also possible to fit the tubes to the end of the hose. Warning! Make sure that the appliance is switched off and unplugged. To fit the accessories, proceed as follows (fig. E & F): Open the exhaust filter holder (17). Insert the blow adaptor (10) into the opening (18). Make sure it fits snug against the rear of the appliance. Insert the other accessories as shown. For inflating purposes, fit an inflator adaptor to the hose (fig. G): Align the tab (19) on the adaptor with the hole (20) in the hose end. Push the adaptor on the hose until it clicks into place. To remove the adaptor, lift up the tab and pull the adaptor off the hose. Fitting the accessories (fig. A - G) Use Assembly Fitting the accessories for vacuuming The accessories provided can be used in various combinations, depending on the task (fig. B): a. General vacuuming / dusting b. Vacuuming in confined spaces c. Vacuuming stairs d. Vacuuming upholstery e. Vacuuming in corners 6 Warning! Before connecting to the power supply, make sure that the appliance is switched off. Switching on and off To switch the tool on, set the on/off switch (1) to position I. To switch the tool off, set the on/off switch to position O. Warning! Make sure the accessories are securely attached before switching on. Keep a firm grip on the appliance, and especially the hose, when switching on and during use. Using the inflator adaptors (fig. H) Choose the appropiate adaptor for the item to be inflated. During inflation, the airflow can be adjusted by covering the hole (21) with your thumb. Do not over-inflate or exceed the recommended pressure of the item to be inflated. Warning! The hole in the inflator adaptor acts as a relief valve to prevent overinflating. Do not permanently cover the hole. Resetting the motor thermal safeguard The motor of the appliance is fitted with a thermal safeguard. This device automatically switches the appliance off in case of overheating. If this occurs, proceed as follows: Switch the appliance off and remove the plug from the wall socket. Allow the unit to cool. When the unit has cooled down, check and clean the filters. Re-insert the plug in the wall socket and switch the appliance on. Cleaning and maintenance Warning! Regularly clean the filters. Cleaning the dust bowl and filters (fig. E & I - M) When the dirt bowl is full or the filters are clogged, a coloured indicator becomes visible in the looking glass (3). When this happens, check the appliance for clogs, empty the dirt bowl and clean the filters. The filters are re-usable and should be cleaned regularly. Press the release button (2) and remove the dust bowl (4) (fig. I). Empty the dust bowl. Depress the latch (22) and remove the filter holder (23) (fig. J). Remove the filter (24) from the filter holder (fig. K). Brush any loose dust off the filter. Wash the filter in warm, soapy water. The bowl and the filter holder can also be washed if necessary. Do not immerse the appliance in water. Make sure the dust bowl, filter holder and filter are completely dry. Refit the filter and the filter holder (fig. L). Refit the dust bowl onto the appliance. Make sure the dust bowl clicks into place (fig. M). Cleaning the exhaust filter (fig. E) Open the exhaust filter holder (17). Remove the filter from the filter holder. Wash and dry the filter as described above. Refit the filter and close the exhaust filter holder. Warning! Never use the appliance without the filters. Optimum dust collection will only be achieved with clean filters and an empty dust bowl. If dust begins to fall back out of the appliance after switching it off, this indicates that the dust bowl is full and must be emptied. Replacing the filters The filters should be replaced every 6 to 9 months and whenever worn or damaged. Replacement filters are available from your Black & Decker dealer (cat. no. VHF70). Remove the old filters as described above. Fit the new filters as described above. Storage (fig. N) Wrap the power supply cord around the appliance and clip the plug to the cord. Store the appliance in a dry location. Protecting the environment Z Separate collection. This product must not be disposed of with normal household waste. 7 Should you find one day that your Black & Decker product needs replacement, or if it is of no further use to you, do not dispose of it with household waste. Make this product available for separate collection. EC declaration of conformity Separate collection of used products and packaging allows materials to be recycled and used again. Re-use of recycled materials helps prevent environmental pollution and reduces the demand for raw materials. LpA (sound pressure) 66 dB(A) LWA (acoustic power) 79 dB(A) Hand/arm weighted vibration 3.6 m/s2 z Local regulations may provide for separate collection of electrical products from the household, at municipal waste sites or by the retailer when you purchase a new product. Black & Decker provides a facility for the collection and recycling of Black & Decker products once they have reached the end of their working life. To take advantage of this service please return your product to any authorised repair agent who will collect them on our behalf. You can check the location of your nearest authorised repair agent by contacting your local Black & Decker office at the address indicated in this manual. Alternatively, a list of authorised Black & Decker repair agents and full details of our after-sales service and contacts are available on the Internet at: www.2helpU.com 8 VH780 Black & Decker declares that these products conform to: 98/37/EC, 89/336/EEC, 73/23/EEC, EN 55014, EN 60335, EN 61000 The undersigned is responsible for compilation of the technical file and makes this declaration on behalf of Black & Decker. _ Kevin Hewitt Director of Consumer Engineering Spennymoor, County Durham DL16 6JG, United Kingdom 1-8-2008 Guarantee Black & Decker is confident of the quality of its products and offers an outstanding guarantee. This guarantee statement is in addition to and in no way prejudices your statutory rights. The guarantee is valid within the territories of the Member States of the European Union and the European Free Trade Area. If a Black & Decker product becomes defective due to faulty materials, workmanship or lack of conformity, within 24 months from the date of purchase, Black & Decker guarantees to replace defective parts, repair products subjected to fair wear and tear or replace such products to ensure minimum inconvenience to the customer unless: The product has been used for trade, professional or hire purposes; The product has been subjected to misuse or neglect; The product has sustained damage through foreign objects, substances or accidents; Repairs have been attempted by persons other than authorised repair agents or Black & Decker service staff. To claim on the guarantee, you will need to submit proof of purchase to the seller or an authorised repair agent. You can check the location of your nearest authorised repair agent by contacting your local Black & Decker office at the address indicated in this manual. Alternatively, a list of authorised Black & Decker repair agents and full details of our after-sales service and contacts are available on the Internet at: www.2helpU.com Please visit our website www.blackanddecker.co.uk to register your new Black & Decker product and to be kept up to date on new products and special offers. Further information on the Black & Decker brand and our range of products is available at www.blackanddecker.co.uk 9 10 11 Australia New Zealand United Kingdom 90541833 Black & Decker (Australia) Pty. Ltd. 20 Fletcher Road, Mooroolbark, Victoria, 3138 Black & Decker 5 Te Apunga Place Mt Wellington Auckland 1060 Black & Decker 210 Bath Road Slough, Berkshire SL1 3YD Tel. Fax 03-8720 5100 03-9727 594065 Tel. Fax +64 9 259 1133 +64 9 259 1122 01753 511234 Tel. Fax 01753 551155 Helpline 01753 574277 T-08/08