1
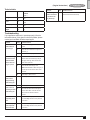
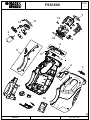
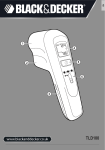
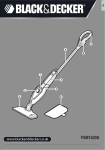
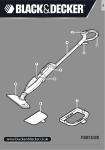
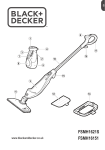
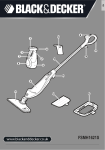
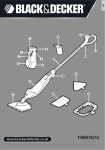
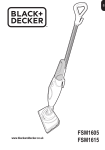
FSS1600
A
B
D
2
C
(Original instructions)
Intended use
ENGLISH
Small brush (Green)
Your Black & Decker steam cleaner has been designed for
sanitising and cleaning tiles, work tops, kitchen surfaces and
bathroom surfaces. This appliance is intended for indoor
household use only.
For cleaning toilets.
Warning! Read all of the 'Safety, Maintenance,
Service' manual carefully before operating
this appliance.
Read all of this manual carefully before operating
the appliance.
Large Squeegee
For cleaning glass doors and windows.
Warning! Do not use the window squeegee on cold
glass. It may cause the glass to break.
Detail tile cleaner
Features
This appliance includes some or all of the following features.
1. ON/Off switch
2. Lock off button
3. Trigger switch
4. Filler cap
5. Water tank
6. Jug
Accessories
This appliance includes some of the following accessories
others are available to purchase from the Black & Decker
website.
The performance of your appliance depends on the accessory
used. Black & Decker accessories are engineered to high
quality standards and designed to enhance the performance
of your appliance. By using these accessories you will get the
very best from your appliance.
Flexible hose and handle
For convenient use of all accessories.
Variable stem jet nozzle
For higher pressure steam bursts, twist to change
the spray pattern of the steam burst.
Small brush (Blue)
For cleaning bathrooms.
Small brush (Yellow)
For cleaning kitchens.
For cleaning grouted areas between tiles.
Large scrub brush cleaner with scraper
For cleaning heavily soiled object such as BBQ's.
Assembly
Warning! Before attempting any of the following operations,
make sure that the appliance is switched off and unplugged
and that the appliance is cold and does not contain any water.
Attaching the hose and accessories (Fig. A & B)
Warning! Inspect the seal (7) on the steam nozzle (11) and
hose (8) before each use. If the seal is missing or damaged
then please contact your nearest authorised repair agent. Do
not use the appliance.
Attaching the hose (Fig. A)
u Press in the clips (9) on either side of the hose (8).
u Press the hose (8) onto the steam nozzle (11) and release
the clips (9).
Important! Ensure that the hose (8) is securely fastened
before using the hand held steam cleaner. If steam escapes
from the joint then the hose is not correctly fit, allow the unit to
cool then remove and re-fit the hose.
Attaching the variable steam jet nozzle (Fig. B)
u Press in the clips (13) on either side of the variable steam
jet nozzle (12).
u Press the variable steam jet nozzle onto the steam nozzle
(11) or the hose (8) and release the clips (13).
Important! Ensure that the variable steam jet nozzle (12) is
securely fastened before using the hand held steam cleaner.
If steam escapes from the joint then the variable steam jet
nozzle is not correctly fit, allow the unit to cool then remove
and re-fit the variable steam jet nozzle.
3
ENGLISH
(Original instructions)
Attaching other accessories (Fig. A)
u Align the lugs on the hose (8) with the recesses on the
accessory.
u Press the accessory (10) onto the hose (8) and twist anticlockwise until the accessory clicks into place.
Note! The variable steam jet nozzle may be used without the
hose by fitting them directly to steam nozzle. All other accessories must be connected to the hose for use.
Removing the hose and accessories(Fig. A & B)
Warning! The Steam nozzle, variable steam jet nozzle, hose
and accessories become hot during use. Allow the unit and all
accessories to cool before removing any accessories.
Removing an accessory (Fig. A)
u Twist the accessory (10) clockwise then pull away from
the hose (8).
Removing the hose (Fig. A)
u Press in the clips (9) on either side of the hose (8) and pull
away from the steam nozzle (11).
Removing the variable steam jet nozzle (Fig. B)
u Press in the clips (11) on either side of the variable steam
jet nozzle (12) and pull away from the steam nozzle (11).
Filling the water tank (Fig. C)
This Steam cleaner incorporates an anti-calc system to help
prolong the life of the system.
Note: Fill the water tank with clean tap water.
Note: In areas of very hard water, the use of de-ionised water
is recommended.
u Switch off the unit and disconnect from the mains supply.
u Open the filler cap (4) by flipping it down.
u Using the jug (6), fill the water tank (5) with water.
Warning! Your water tank has a 0.35 litre capacity.
u Re-fit the filler cap (4).
Note: Ensure the filler cap is firmly secured.
Note: Do not use chemical cleaners with your steam mop..
Use
Switching on and off
To switch the appliance on, press the ON/OFF button (1).
It takes approximately 15 seconds for the hand held steam
cleaner to heat up.
Note: When the hand held steam cleaner is first turned on
the water reservoir will glow red. Once the hand held steam
cleaner is ready to use the water reservoir will glow blue.
u Lift the lock off switch (2) and pull the trigger switch (3).
After a few seconds steam will be produced.
u To switch the appliance off, release the trigger switch (3)
then press the ON/OFF button (1).
4
u
Caution! Always empty the hand held steam cleaner after
use.
Note: When first filled or after running dry it can take up to 45
seconds for steam to be produced.
Caution! Steam may continue to be produced for a short time
after the trigger switch (3) is released, this is normal. Switch
off and allow the unit to cool before removing any accessories.
Hints for optimum use
General
u For optimal cleaning results never use the hand held
steam cleaner without first attaching an accessory.
u Do not use chemical cleaners with your hand held steam
cleaner. To remove stubborn stains from vinyl or linoleum
floors, you can pre-treat with a mild detergent and some
water before using the steam mop.
Hand held steam cleaning
u Attach the required accessory.
u Connect the hand held steam cleaner to the mains.
u Press the ON/OFF button (1). It takes approximately 15
seconds for the hand held steam cleaner to heat up.
u Lift the lock off (2) and pull the trigger switch (3) to activate
the steam pump. After a few seconds steam will start to
come out of the accessory.
Note: When first filled or after running dry it can take up to 45
seconds for steam to be produced.
Note: During use you may turn off the steam pump by releasing the trigger switch, this convenient feature will allow you to
place the hand held steam cleaner down for a short time so
that you may move items of furniture, then continue cleaning
without the need to switch the appliance off.
u When you have finished using the hand held steam
cleaner, release the trigger switch (3), turn it ‘OFF’ and
disconnect from the mains supply. Wait until the steam
mop cools down before storing. (approximately five
minutes)
Caution! It is important to monitor the water level in the water
tank. To refill the water tank and continue to sanitise/clean,
turn the hand held steam cleaner ‘OFF’. Unplug the unit from
the electrical wall outlet, refill the water tank (5).
After use
u Unplug the hand held steam cleaner from the electrical
wall outlet.
u Allow the hand held steam cleaner to cool completely.
(approximately five minutes)
u Empty the water tank (5).
u Remove the accessories and store in the storage bag
provided.
(Original instructions)
Technical data
Voltage
Vac
Power
W
Tank capacity
ml
Weight
kg
ENGLISH
Problem
Step
Possible solutions
FSS1600
Where can I get
12
www.blackanddecker.co.uk/steammop
(Type 1)
further information
230
www.blackanddecker.ie/steammop
/ accessories for
my steam mop.
1600
350
2.5
Troubleshooting
If your appliance seems not to operate properly, follow the
instructions below. If this does not solve the problem, please
contact your local Black & Decker repair agent.
Problem
Step
Possible solutions
The hand held
1
Check the unit is plugged in at the wall
socket.
steam cleaner is
not turning on.
2
Check the unit is switched on using the on/
off switch (1).
No steam is being
3
Check the fuse in the plug.
4
The hand held steam cleaner has a lock off
produced from the
feature. Lift the lock off switch (2) and pull
hand held steam
the trigger switch (3). After a few seconds
cleaner when the
steam will be produced.
trigger is pulled.
5
Check that the water tank (5) is full.
NOTE: When first filled or after running dry it
can take up to 45 seconds for steam to be
produced.
The hand held
6
Check steps 1, then 2, then 3.
7
Check steps 5, then3.
8
Check step 5.
9
The hand held steam cleaner will begin to
steam cleaner
stops producing
steam during use.
The hand held
steam cleaner is
producing too little
produce steam after 15 seconds and will
steam during use.
reach maximum steam flow after 45
seconds.
The accessories
10
accessories.
unit.
Steam is escaping
Refer to the assembly chapter of the manual
for correct fitting instructions of all parts and
keep falling off the
11
Refer to the assembly chapter of the manual
from unexpected
for correct fitting instructions of all parts and
areas of the unit.
accessories.
5
TYPE
FSS1600
1
7
12
14
11
3
16
8
4
9
5
6
2
10
E16756
www.2helpU.com
01 - 10 - 12
1
TYPE
FSS1600 - Accessories
1
1
4
2
5
7
9
6
E16769
8
www.2helpU.com
02 - 10 - 12
Australia
Black & Decker (Australia) Pty. Ltd.
20 Fletcher Road, Mooroolbark, Victoria, 3138
New Zealand
Black & Decker
5 Te Apunga Place
Mt Wellington
Auckland 1060
United Kingdom
Black & Decker
210 Bath Road
Slough, Berkshire SL1 3YD
Tel. 03-8720 5100
Fax 03-9727 5940
Tel. +64 9 259 1133
Fax +64 9 259 1122
Tel. 01753 511234
Fax 01753 551155
ENGLISH
Do not forget to register your product!
www.blackanddecker.co.uk/productregistration
Register your product online at www.blackanddecker.co.uk/productregistration or send your name, surname and product
code to Black & Decker in your country.
90598586 REV-0
05/2013