1
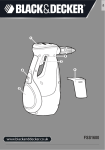
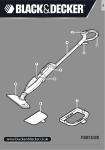
TLD100
A
B
C
D
E
2
(Original instructions)
Intended use
Your Black & Decker Thermal Leak Detector has been
designed to easily detect energy leaks in your home. This
product is intended for consumer use only.
Safety instructions
General power tool safety warnings
@
Warning! When using battery-powered
appliances, basic safety precautions, including
the following, should always be followed to
reduce the risk of fire, leaking batteries, personal
injury and material damage.
Read all of this manual carefully before using the
appliance.
u The intended use is described in this manual. The use of
any accessory or attachment or the performance of any
operation with this appliance other than those
recommended in this instruction manual may present a
risk of personal injury.
u Retain this manual for future reference.
u
Using your appliance
Always take care when using the appliance.
u Do not immerse the appliance in water.
u Do not open body casing. There are no user-serviceable
parts inside.
u Do not operate the appliance in explosive atmospheres,
such as in the presence of flammable liquids, gases or
dust.
u Never look directly into the light or shine the light into
another persons eyes.
Safety of others
This appliance is not intended for use by persons
(including children) with reduced physical, sensory or
mental capabilities, or lack of experience and knowledge,
unless they have been given supervision or instruction
concerning use of the appliance by a person responsible
for their safety.
u Children should be supervised to ensure that they do not
play with the appliance.
u
After use
When not in use, the appliance should be stored in a dry,
well ventilated place out of the reach of children.
u Children should not have access to stored appliances.
u When the appliance is stored or transported in a vehicle it
should be placed in the boot or restrained to prevent
movement following sudden changes in speed or
direction.
u
u
ENGLISH
The appliance should be protected from direct sunlight,
heat and moisture.
Inspection and repairs
Before use, check the appliance for damaged or defective
parts. Check for breakage of parts, damage to switches
and any other conditions that may affect its operation.
u Do not use the appliance if any part is damaged or
defective.
u Have any damaged or defective parts repaired or replaced
by an authorised repair agent.
u Never attempt to remove or replace any parts other than
those specified in this manual.
u
Additional safety warnings
If liquid crystal comes in contact with your skin: Wash
area off completely with plenty of water. Remove
contaminated clothing.
u If liquid crystal gets into your eye: Flush the affected
eye with clean water and then seek medical attention.
u If liquid crystal is swallowed: Flush your mouth
thoroughly with water then seek medical attention.
u
Additional safety instructions for non-rechargeable
batteries
@
Warning! Batteries can explode, or leak, and
can cause injury or fire, to reduce this risk:
Make sure that the on/off switch is in the off position
before inserting the battery(s). Inserting batteries into
power tools and appliances that have the switch on invites
accidents.
u Under abusive conditions, liquid may be ejected from
the battery, avoid contact. If contact accidentally occurs,
flush with water. If liquid contacts eyes, additionally seek
medical help. Liquid ejected from the battery may cause
irritation or burns.
u Carefully follow all instructions and warnings on the
battery label and package.
u Always insert batteries correctly with regard to polarity (+
and -), marked on the battery and the equipment.
u Do not short battery terminals.
u Do not charge batteries.
u Do not mix old and new batteries. Replace all of them at
the same time with new batteries of the same brand and
type
u Keep batteries out of the reach of children.
u Remove batteries if the device will not be used for several
months.
u Never attempt to open for any reason.
u Do not store in locations where the temperature may
exceed 40 °C.
u
3
ENGLISH
(Original instructions)
When disposing of batteries, follow the instructions given
in the section “Protecting the environment”.
u Do not incinerate the batteries.
u Do not expose the batteries to water.
u
Warning Symbols
The following symbols are found on the tool:
;
Warning! To reduce the risk of injury, the user
must read the instruction amnual.
Features
This tool includes some or all of the following features.
1. LED spot projector
2. Infrared sensor
3. Battery Compartment
4. LCD screen
5. ON/OFF button
6. Threshold setting
Fig. A
LCD Display.
7. Reference temperature
Shows the temperature of the area where the instrument
was initially pointed when you turned on the power. To
reset the reference, turn the power off, aim at a new
reference spot, and turn the power back on.
8. Scan temperature
Shows the average temperature across the area you're
aiming at.
Note: The Thermal Leak Detector compares these two
temperatures. When the difference exceeds the threshold
you've set, the projected LED spot will change to red or blue.
Assembly
Warning! Use 9V size (6LR61) alkaline batteries only.
Installing the battery (fig. B)
Open the battery compartment cover (3) by pressing the
tabs of the cover in towards the center and pulling the
cover out.
u Insert one 9V (6LR61) alkaline battery.
Note: Always insert batteries correctly with regard to polarity
(+ and –), marked on the battery and the equipment.
Note: Remove dead batteries immediately.
u
4
Changing the temperature display (fig. B)
Open the battery compartment cover (3) by pressing the
tabs of the cover in towards the center and pulling the
cover out.
u Slide the temperature selection switch to the desired
position.
Note:
Will set your thermal leak detector to the
Fahrenheit scale.
Note:
Will set your thermal leak detector to the
Centigrade scale.
u
Use
Switching On and Off
Press the ON/OFF button to turn the unit on.
Press the ON/OFF button to turn the unit off.
Note: The unit will automatically turn off after 10 minutes.
u
u
Setting the threshold for colour change (fig. C)
For detecting small temperature changes of 1º F (0.5º C),
move the slider to the 1º mark (9) on the back of the
detector.
u For detecting medium temperature changes of 5º F (3º C),
move the slider to the 5º mark (10) on the back of the
detector.
u For detecting large temperature changes of more than 10º
F (5.5º C), move the slider to the 10º (11) mark on the
back of the detector.
u If you do not want the LED spot to change color, move the
slider to the top position (12) where the color spots are
X-ed out.
Note: You can change the threshold setting while you are
scanning. If the color is changing erratically, try increasing the
threshold. If you see a temperature difference on the screen,
but the light is not changing color, try reducing the threshold.
u
Using the thermal leak detector (fig. D)
Hold the unit as shown. Aim near the location you want to
scan for a draft or thermal leak. This initial aim point will
be your reference target.
u Turn on the power.
u Keep the unit aimed at the reference target until the green
light shines on the target and a Reference Temperature
appears on the screen.
u Slowly scan the Thermal Leak Detector across the area of
interest. If the scanned temperature is hotter than the
reference temperature by more than the threshold, the
light will turn from green to red. If the scanned temperature
is colder than the reference temperature by more than the
threshold, the light will turn from green to blue.
u
(Original instructions)
Examples of Use:
Scan around a light fixture to determine if ceiling insulation
was removed during installation.
u Scan along window and door sills to see where to add
weather-stripping.
u Scan where a wall and the floor meet to find drafts that
should be caulked.
u Scan an attic door to see if you need to add insulation.
u
Note: Shiny or polished surfaces can give inaccurate
readings. To compensate for this, cover the surface with
masking tape or flat colored paint. When the tape or paint
reaches the same temperature as the target underneath,
measure the temperature of the item.
Note: The thermometer cannot measure through transparent
surfaces such as glass or plastic. It will measure the surface
temperature instead.
Note: Steam, dust, smoke, and other optical obstructions can
prevent accurate measurement. Hold the thermometer back
and at an angle for an accurate measurement.
Field of View (fig. E)
The Thermal Leak Detector measures temperature over an
area that may be larger than the LED spot, especially if you
are far away from the surface you are measuring. The
diameter of the measured area is 1/6 the distance from the
Detector. In other words, if you are 6 inches (152 mm) from
the target, the Detector will measure the average temperature
over a circle 1 inch (25mm) in diameter. As shown in the table
below, the farther the distance from the target, the larger the
measured area.
Position (fig. E)
13
14
15
16
Distance to target (mm)
152
305
457
610
25
51
76
102
Diameter of measurement
area (mm)
If you are just looking for hot and cold areas, it's OK if the
scanned area is larger than your target. However, if you want
to accurately measure the temperature of an object, move the
Detector close so that the scanned area is about half the size
of the object you want to measure.
Maintenance
Your Black & Decker corded/cordless appliance/tool has been
designed to operate over a long period of time with a minimum
of maintenance. Continuous satisfactory operation depends
upon proper appliance/tool care and regular cleaning.
ENGLISH
Warning! Before performing any maintenance on corded/
cordless appliance/tool:
u Switch off and remove the battery from the appliance.
u Regularly clean the appliance using a soft cloth. For
stubborn marks the cloth may be made damp using mild
soapy water.
u Do not use abrasive cleaners.
Protecting the environment
Z
Separate collection. This product must not be
disposed of with normal household waste.
Should you find one day that your Black & Decker product
needs replacement, or if it is of no further use to you, do not
dispose of it with household waste. Make this product
available for separate collection.
z
Separate collection of used products and
packaging allows materials to be recycled and
used again.
Re-use of recycled materials helps prevent
environmental pollution and reduces the demand
for raw materials.
Local regulations may provide for separate collection of
electrical products from the household, at municipal waste
sites or by the retailer when you purchase a new product.
Black & Decker provides a facility for the collection and
recycling of Black & Decker products once they have reached
the end of their working life. To take advantage of this service
please return your product to any authorised repair agent who
will collect them on our behalf.
You can check the location of your nearest authorised repair
agent by contacting your local Black & Decker office at the
address indicated in this manual. Alternatively, a list of
authorised Black & Decker repair agents and full details of our
after-sales service and contacts are available on the Internet
at: www.2helpU.com
Batteries
Z
At the end of their useful life, discard batteries
with due care for our environment:
Do not short-circuit the battery terminals.
Do not dispose of the battery(s) in fire, as this may result
in a risk of personal injury or an explosion.
u Run the battery down completely, then remove it from the
appliance/tool.
u
u
5
ENGLISH
u
(Original instructions)
Batteries are recyclable. Place the battery in suitable
packaging to ensure that the terminals cannot be
short-circuited. Take them to any authorised repair agent
or a local recycling station.
Technical data
TLD100 (H1)
Voltage
Battery required
V
DC
9
1 x 9V (6LR61)
Alkaline
Guarantee
Black & Decker is confident of the quality of its products and
offers an outstanding guarantee. This guarantee statement is
in addition to and in no way prejudices your statutory rights.
The guarantee is valid within the territories of the Member
States of the European Union and the European Free Trade
Area.
If a Black & Decker product becomes defective due to faulty
materials, workmanship or lack of conformity, within 24
months from the date of purchase, Black & Decker guarantees
to replace defective parts, repair products subjected to fair
wear and tear or replace such products to ensure minimum
inconvenience to the customer unless:
u The product has been used for trade, professional or hire
purposes;
u The product has been subjected to misuse or neglect;
u The product has sustained damage through foreign
objects, substances or accidents;
u Repairs have been attempted by persons other than
authorised repair agents or Black & Decker service staff.
To claim on the guarantee, you will need to submit proof of
purchase to the seller or an authorised repair agent. You can
check the location of your nearest authorised repair agent by
contacting your local Black & Decker office at the address
indicated in this manual. Alternatively, a list of authorised
Black & Decker repair agents and full details of our after-sales
service and contacts are available on the Internet at:
www.2helpU.com
Please visit our website www.blackanddecker.co.uk to
register your new Black & Decker product and to be kept up to
date on new products and special offers. Further information
on the Black & Decker brand and our range of products is
available at www.blackanddecker.co.uk
6
ENGLISH
Do not forget to register your product!
www.blackanddecker.co.uk/productregistration
Register your product online at www.blackanddecker.co.uk/productregistration or send your name, surname and product
code to Black & Decker in your country.
7
Australia
Black & Decker (Australia) Pty. Ltd.
20 Fletcher Road, Mooroolbark, Victoria, 3138
New Zealand
Black & Decker
5 Te Apunga Place
Mt Wellington
Auckland 1060
United Kingdom
Black & Decker
210 Bath Road
Slough, Berkshire SL1 3YD
90564182 REV-1
Tel. 03-8720 5100
Fax 03-9727 5940
Tel. +64 9 259 1133
Fax +64 9 259 1122
Tel. 01753 511234
Fax 01753 551155
Helpline 01753 574277
04/2010