1
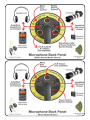
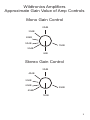
Wildtronics, LLC
Amplified
Parabolic Microphone
User Guide
Thank you for purchasing the versatile Wildtronics Amplified Parabolic
Microphone. This innovative built-in electronic amplifier system will add many
useful features including: a direct headphone output, a line level output allowing
low cost recorders to record with much better quality, an amplified microphone
output for DSLR and video cameras, and even mixing capability for the MonoStereo model. This User Guide will help you connect your equipment and offers
advice for several specific applications.
Controls and Connectivity
All of the Wildtronics Parabolic Microphones use standard XLR and 3.5mm
stereo connectors so you can source cables easily. The amplified outputs use the
3.5mm stereo connectors. For mono use, the left and right channels have equal
levels. 3.5mm is the most common connector for headphones, line inputs, and
cameras. For most applications, you would only need a common, stereo 3.5mm
male to male cable to connect your equipment. The XLR outputs are not
amplified, and are for those with low noise, balanced input XLR recorders. All of
the connectors can be used simultaneously to further increase your versatility.
To use the amplified outputs, you must install and use a 9-volt battery in the
parabolic microphone. Refer to the Parabolic Microphone Manual for
instructions on installing the 9-volt battery. The power must also be turned on,
using the power switch behind the handle. Up is on and down is off. The switch
center position is also off and is used during assembly of the microphone. When
using the amplified outputs, we recommend turning off the Phantom power in
your recorder to save it's battery life. If you use only the XLR connections, you
may use Phantom power to power the microphones, but Phantom power will not
power the amplifiers.
From the graphic below, you can see how different devices are connected to the
amplified outputs on a Amplified Mono-Stereo model. The headphone and line
level output connector is on the left, and the amplified microphone output is on
the right. The gain control for the mono dish microphone is on the left. The
stereo gain control is on the right, for the Amplified Mono-Stereo model. Rotate
the gain controls counter-clockwise to increase the gain. White markers on the
gain control knobs will give visual indication of the gain, with the 6 o'clock
position being minimum gain. There is a switch, on the Mono-Stereo model just
above the power on/off switch. Move this switch to the left for mono only
operation. Move the switch to the right to mix in the stereo microphones. The
center position is also mono only, and is used during microphone assembly.
The Amplified Mono back panel connectivity is similar to the Amplified MonoStereo model.
2
Applications
Headphone Use:
To use headphones, simply plug in your 3.5mm headphone cable into the left
3.5mm connector. Adjust the gain controls to obtain a suitable volume. Mono
signals will be heard in both ears. Point the microphone in the direction you want
to hear, and enjoy hearing much better than you could unaided. A parabolic
microphone is very directional, so you must accurately point the microphone at
the subject you wish to hear. If you have the Mono-Stereo model, you can
increase the stereo gain to give you better awareness of where sounds are coming
from. You may use the headphones at the same time you are using any other
outputs. Note, if the gain is turned up too high, you may hear a loud ringing. This
is called feedback. Feedback occurs when the microphones pick up sound from
the headphones and starts an oscillation. To prevent feedback, reduce the gain,
move further away and behind the dish, or use headphones with greater isolation
(larger ear cups). The headphone volume is limited to protect your ears from
damage. It is recommended not to listen to loud sounds for long periods of time.
Recording with Line Level:
The internal amplifiers are very low noise and will add no audible noise to the
already exceptionally low noise Wildtronics Parabolic Microphones. Using the
3.5mm line level output with low cost, hand-held recorders will dramatically
improve the recorders signal to noise ratio, often resulting in performance
comparable to that of recorders costing over $1000. The main weakness of low
cost recorders is high microphone input noise. This is because low noise parts are
expensive and they wouldn't fit into the design budget of a low cost recorder.
Using our line level output and selecting line input on your recorder, eliminates
this weakness. Turn the gain controls on your recorder all the way down, and use
the gain control on your Wildtronics microphone to adjust the level for best
results. If your recorder features limiters or automatic gain control, turn those
features off if you can. Those features can be handy in certain situations, but they
will cause distortion and other undesired effects. It is better to adjust your levels
so that the loudest sound recorded will not clip. If you are recording with the
purpose of submitting sounds to an accredited sound library, they will almost
always require recordings made without limiters or automatic gain control. With
a 24 bit recorder, you can record with your average signal level at -20 to -30dB.
Post processing, with computer audio editors, can normalize the audio to an
optimal level.
A very useful and popular recording technique is to record two mono signals, one
on the left channel and one on the right channel at different gain levels to insure
one unclipped recording. Wildtronics Parabolic Microphones have the mono
signal on both the right and left channel of the 3.5mm stereo connector. To use
this technique, set up your recorder to unlink the gain level between channels, set
one channel 20db less than the other, and you can easily use this valuable
4
recording technique.
Using low cost, hand-held recorders will not only reduce your total recording
budget, but will also reduce the weight and bulk of your gear. Wildtronics offers
a Mini Accessory Bar that connects to your microphone handle. With this Mini
Accessory Bar, you can directly mount your hand-held recorder to the
microphone for quick, easy, portable use.
DSLR / Video Camera Use:
DSLR and video cameras are great for taking video of distant subjects, but lack
audio quality for these subjects. The use of a parabolic microphone will greatly
increase the range for obtaining quality audio. The Amplified Wildtronics
Parabolic Microphones feature an amplified microphone output, on the right
side, that directly connects to the microphone input of DSLR and video cameras.
You can use the headphone output of your Amplified Wildtronics Microphone at
the same time. The amplified microphone output is 40dB below the gain of the
line output. This results in a maximum gain of 15db for mono and 24db for
stereo. The gain can also be reduced below normal microphone levels if your
signals are too strong. For very weak signals, you may even connect the
microphone input to the line level output for much more gain. If your camera has
microphone level controls, turn them all the way down and use your Wildtronics
microphone gain controls to adjust the level for best results. You may also use
the line or XLR outputs to connect to other recorders, allowing multiple
recordings and later synchronization during post editing. Adjust the microphone's
gain controls to avoid clipping with the highest possible signal level – use the
level meters in your camera. If you do not have level meters in your camera,
experiment and set the gain accordingly. Wildtronics offers an Accessory Bar that
mounts to your tripod. You can then mount your microphone to one end and your
camera to the other end, which will allow the two to track as you move the
tripod.
Mono-Stereo Mixing:
The Amplified Mono-Stereo model has a built-in audio mixer that allows you to
combine the mono and stereo signals in any proportion into one stereo output.
This feature can add great versatility to your microphone and opens many new
opportunities. You won't need to lug around a three or more channel mixer or
recorder. You can highlight the focused mono subject with little background
stereo, have full wide-field stereo with little focused mono, or anything in
between. This can be especially useful when connecting the microphone to a
camera, where the mix can be adjusted so the sound matches the scene.
There is a switch just above the power switch. Move this switch to the left for
mono only operation. Move the switch to the right to mix in the stereo
microphones. The center position is also mono only, and is used during
microphone assembly. The mix switch can remove the stereo signal, instantly 5
converting your microphone into a focused mono dish microphone without
affecting your stereo gain setting. This is great during a sudden opportunity to
record a single subject without wide-field stereo.
To change the mix proportions, adjust the gain controls of the mono and stereo
up and or down to obtain the desired mix and levels. You can use the headphone
output to monitor the mixed output. If you are using the headphone output as a
line output to a recorder, use the headphone output on your recording device to
monitor the mixed output.
Wireless Transmitter Use:
Sports broadcasting applications often require a wireless transmitter to be used
with a parabolic microphone. Headphones allow the operator to hear what is
being picked up by the microphone. With the Amplified Wildtronics Parabolic
Microphones, wireless transmitters and headphones can be directly connected to
the very lightweight parabolic microphone. There is no need to add a bulky and
expensive microphone preamp. Wildtronics offers an Accessory Bar that attaches
to your microphone handle. You can mount your wireless transmitter directly to
the Accessory Bar, and also use the included dual handles for extended hand held
use without tripods.
A Sennheiser SKP 100 G3, or equivalent XLR based transmitter, can be directly
connected to the XLR connectors. A wireless transmitter can also be connected to
the 3.5mm amplified microphone output with a custom cable. Some transmitters
from Sennheiser offer a simple 3.5mm wiring scheme, where connections to the
tip and ring determine if you are using a mic or line level input. Other
manufactures will require a custom cable to be made. You must consult with your
wireless transmitter manufacturer's data sheet to see how they are connected to a
microphone. Below is the Wildtronics 3.5mm connector wiring.
Tip = left signal (mono model = signal)
Ring = right signal (mono model = signal)
Barrel = ground
For sports broadcasting use, Wildtronics can customize the amplified models to
meet specific needs of inputs and outputs, for an added cost. For example, we
can provide a monitor input that will be heard in one ear, while the microphone
signal is heard in the other ear. Please inquire for more information.
Additional Use Notes:
You may encounter odd noises in the amplified outputs if you attempt to charge
your recorder during use. This is due to system ground loops. If this occurs, do
not charge the recorder or use external power while in use.
6
Amplifier Specifications:
EIN: -126dBA @ max gain
Gain:
Mono – Line/Headphone output = 3-55dB (less due to dish gain)
Stereo – Line/Headphone output = 12-64dB
Microphone output: (-)40dB referenced to line output
Output Signal to Noise Ratio:
115dBA @ Min. Gain – Mono
105dBA @ Min. Gain – Stereo
Headphone Output Power:
35mW with 32 ohm headphones
Frequency Response:
Line/Microphone output: 20-30KHz
32 Ohm Headphone: 75-30KHz
Output Connectors:
Line/Headphone output: 3.5mm stereo
Microphone output: 3.5mm stereo
Power: 6.0-11 Volts
9V Alkaline
Battery Life:
Model
With Headphone Use
W/O Headphone Use
Mono Mic
20 Hour
40 Hour
Mono-Stereo Mic
20 Hour
30 Hour
3.5mm rugged outputs are safe from accidental phantom power application.
Line level reference is 0.775Vrms
7
Wildtronics Amplifiers
Approximate Gain Value of Amp Controls
Mono Gain Control
20dB
30dB
40dB
50dB
10dB
55dB
2dB
Stereo Gain Control
30dB
40dB
50dB
60dB
20dB
65dB
12dB
8
Accessories are available to enhance the usefulness and performance of
your microphone. Visit the Wildtronics.com website for new accessories
that are available.
Secondary Windscreen: $40USD
We highly recommend using the Secondary Windscreen for all outdoor
applications. The Secondary Windscreen will give protection up to
20MPH winds, where the primary windscreens, that come with the
microphone, are good to about 12MPH winds. The Secondary Windscreen
stretches over the microphone assembly, attaches without clips, and still
allows you to see through the clear dish.
Mini-Accessory Bar: $40 USD
The Mini-Accessory Bar mounts on the accessory mount located on the
handle. This very lightweight bar allows mounting smaller hand-held
recorders directly to your microphone for quick, easy use, without
dangling/tangling cables.
Accessory Bar-1 Kit: $99USD
The Wildtronics Accessory Bar-1 Kit is designed to allow many mounting
options for mounting equipment to the Wildtronics Parabolic
Microphones. The bar attaches to the accessory mount on the back of the
parabolic microphone's handle. With all your equipment attached to the
accessory bar, everything you need is organized and ready to go in an
instant. 1/4-20, semi-captive allen head screws are included for
attachments. The center of the high strength bar can also be connected
directly to a tripod, with the camera and dish at opposite ends for
audio/video tracking. There are multiple threaded holes in the bar to
mount equipment in different ways. A universal, 1/4-20 threaded plate
mount is included for holding items without a tripod mount by using
velcro or double stick foam tape. Mount cameras, recorders, pre-amps,
wireless microphone transmitters, and more. If you need a special mount,
you can drill almost anywhere to customize your needs. The bar is made
of solid, 5/8-inch, lightweight, aluminum alloy, and powder coated for
durability. Two handles are included that can be mounted at the ends of
the bar. Two-handed grip will help you reduce fatigue during long
recording sessions, as well as offering perfect front to back balance of the
microphone. The handles have comfortable, foam grips. Smaller foam
segments are also included that can be slid on the bar to provide
comfortable rest stops for the top of your grip.
9
10
11
Wildtronics, LLC
PO Box 376
Newton Falls, OH 44444 USA
+1 (330)-577-8814
[email protected]
wildtronics.com