1
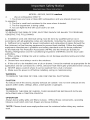
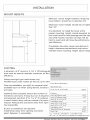
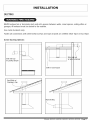
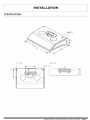
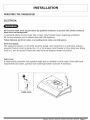
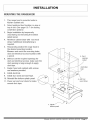
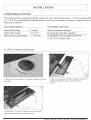
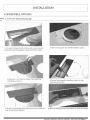
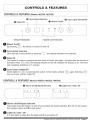
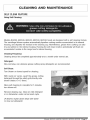
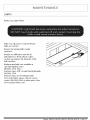
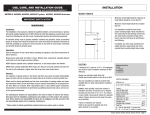
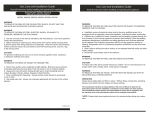
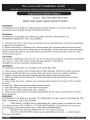
MODEL: AK2500, AK6500 series
READ AND SAVE THESE INSTRUCTIONS
WARNING
TO REDUCE THE RISK OF FIRE OR ELECTRIC SHOCK, DO NOT USE THIS
FAN WITH ANY SOLID-STATE CONTROL DEVICE.
WARNING
TO REDUCE THE RISK OF FIRE ELECTRIC SHOCK, OR INJURY TO
PERSONS, OBSERVE THE FOLLOWING:
a. Use this unit only in the manner intended by the manufacturer, if you have questions,
contact the manufacturer.
b. Before servicing or cleaning unit, switch power off at service panel and lock panel
to prevent power from being switched on accidentally. When the service disconnecting
means cannot be locked, securely fasten a prominent warning device, such as a tag,
to the service panel.
CAUTION
For general ventilating use only. Do not use to exhaust hazardous or explosive materials
and vapors. Take care when using cleaning agents or detergents.
Suitable for use in household cooking area.
WARNING
TO REDUCE THE RISK OF RANGE TOP GREASE FIRE:
a. Never leave surface units unattended at high settings. Boilovers cause smoking
and greasy spillovers that may ignite. Heat oils slowly on low or medium settings.
b. Always turn hood ON when cooking at high heat or when flaming food
c. Clean ventilating fans frequently. Grease should not be allowed to accumulate
on fan or filter.
d. Use proper pan size. Always use cookware appropriate for the size of the surface
element.
e. Keep fan, filters and grease laden surfaces clean.
f. Use high setting on hood only when necessary.
g. Don't leave hood unattended when cooking.
h. Always use cookware and utensils appropriate for the type of and amount of food
being prepared.
WARNING
TO REDUCE THE RISK OF INJURY TO PERSONS IN THE EVENT OF A RANGE TOP
FIRE, OBSERVE THE FOLLOWING:
a.
SMOTHER FLAMES with a close-fitting lid, cookie sheet, or metal tray, then
turn offthe burner. BE CAREFUL TO PREVENT BURNS. If the flames do not go out
immediately, EVACUATE AND CALL THE FIRE DEPARTMENT.
b.
NEVER PICK UP A FLAMING PAN - You may be burned.
c.
DO NOT USE WATER, including wet dishcloths or towels - a violent steam
explosion will result.
d.
MODEL:
AK2500,
AK6500
series
Useanextinguisher
ONLYif:
1. You know you have a Class ABC extinguisher, and you already know how
to operate it.
2. The fire is small and contained in the area where it started.
3. The fire department is being called.
4. You can fight the fire with your back to an exit
WARNING
TO REDUCE THE RISK OF FIRE, ELECTRIC SHOCK OR INJURY TO PERSONS,
OBSERVE THE FOLLOWING:
a. installation work and electrical wiring must be done by qualified person (s) in
accordance with all applicable codes and standards, including fire-rated construction.
b. Sufficient air is needed for power combustion and exhausting of gases through the
flue (chimney) of fuel burning equipment to prevent back drafting. Follow the heating
equipment manufacturer's guideline and safety standards such as those published
by the National Fire Protection Association (NFPA) and the American Society for
Heating, Refrigeration and Air Conditioning Engineers (ASHRAE) and the local code
authorities.
c. When cuttig or drilling into wall or ceiling, do not damage electrical wiring and other
hidden utilities.
d. Ducted fans must always vent to the outdoors.
e. If this unit is to be installed over a tub or shower, it must be marked as appropriate for the
application and be connected to a GFCL (Ground Fault Interrupter protected branch circuit).
g. NEVER place a switch where it can be reached from a tub or shower.
h. Make sure the power is off before installing, wiring or maintenancing.
WARNING
TO REDUCE THE RISK OF FIRE, USE ONLY METAL DUCTWORK.
CAUTION
To reduce risk of fire and to properly exhaust air outside - Do not vent exhaust air into
spaces within walls, ceilings, attics, crawl spaces or garages.
WARNING
TO REDUCE THE RISK OF SHOCK, THIS FAN MUST BE INSTALLED WITH AN
ISOLATING WALL CONTROL/SWITCH.
OPERATION
Always leave safety grills and filters in place. Without these components,
blowers could catch onto hair, fingers and loose clothing.
*NOTE: Please check www.zephyronline.com
work.
operating
for revisions before doing any custom
INSTALLATION
MOUNT
HEIGHTS
Minimum mount height between range top to
hood bottom should be no lessthan 24".
Maximum
than 32".
mount
height
should
be no higher
It is important to install the hood at the
proper mounting height. Hoods mounted too
low could result in heat damage and fire hazard; while hoods mounted too high will be
hard to reach and will loose its performance
and efficiency.
96"
If available, also refer range manufacturer's
height clearance requirements and recommended hood mounting height above range.
36"
DUCTING
ze
A minimum of 6" round or 3-1/4" x 10"rectangular _
duct must be used to ma nta n max mum a r f ow
eff c en cY.
,,
/4 _:::!
!!!!!!!!!!!!!!!!!!!!!!!!!!!!!!!!!!!!!!!!!!!!!!!!!!!!!!!!!!!!!!!!!!!!!!!!!!!!!!!
Always use rigid type metal ducts only,
Flexible ducts could restrict air flow by up to 50%.
Duct RunCalculation:
Also use calculation (on right) to compute total
Maximum run
available duct run when using elbows, transitions
6" or 3-1/4"x 10" duct
100 FT
and caps.
ALWAYS when possible, reduce the number or
transitions and turns. If long duct run is required
increaseduct sizefrom 6" to 7 or 8". If a reducer
Deduct:
each 90 Elbow used
each 45 elbow
used
15 FT
9 FT
each 6" to 3/14 x 10"
is used, install a long reducer instead of a panca
reducer. Reduceduct size asfar away from open
ing as possible.
transition
or transitions
Install asfar
apart,
are required:
away from
between
opening
and asfar
2, aspossible.
1 FT
each 3/14 x 10" to 6"
transition
If turns
used
each 3/14 x 10" to 6"
used
5 FT
Side Wall Cap w/damper
30 FT
Roof Cap
30 FT
e.g.- 1 roof cap, 2x90 elbows, 1 x 45 elbow used:
30' + 30' + 9' 69' used, 31' available for straight duct runs.
Models:
AK6500, AK6536, AK6542, AK2500, AK25B6ge
1
iNSTALLATiON
DUCTING
NEVER
exhaustair or terminateductwork intospacesbetweenwails,crawl spaces,ceiling,atticsor
garages.All exhaustmustbe ductedto the outside.
Usemetalductworkonly.
Fastenall connectionswith sheetmetalscrewsandtapeall joints w/certified SilverTapeor DuctTape.
Some DuctingOptions:
/
,L__J
Side NaI cap
w/gl _viy damper
Side wail cap
w/gravity damper
Soffit or crawl space
U
RoofPitchw/
Flashing& Cap
RearDucting
-wl ......
Models:AK6500,AK6536,AK6542,AK2500,AK2536 Page2
iNSTALLATiON
SPECIFICATIONS
ElecK,O,
22-1/4"
TOP
VIEW
REAR
VIEW
Elec K.O.
lo1,
f_/
Models:AK6500,AK6536,AK6542,AK2500,AK2536 Page3
iNSTALLATiON
MOUNTINGTHE RANGEHOOD
ELECTRICAL
All Electricalwork must by performedby qualifiedelectricianor personwith similar technical
know how and background.
Forpersonalsafety,removehousefuseor opencircuitbreakerbeforebeginninginstallation.
Donotuseextensioncordor adapterplug with this appliance.
FollowNationalelectricalcodesor prevailinglocalcodes and ordinances.
Electrical Supply:
This appliance requires a 120V 60Hz electrical supply., and connected to an individual, properly
grounded branch circuit, protected by a 15 or 20 ampere circuit breaker or time delay fuse.Wiring
must be 2 wire w/ground. Pleasealso refer Electrical Diagram labeled on product.
Cable Lock:
A cable locking connector (not supplied) might also be required by local codes. Checkwith local
requirements and codes, purchase and install appropriate connector if necessary.
]
CableLock
Models:AK6500,AK6536,AK6542,AK2500,AK2536 Page4
iNSTALLATiON
MOUNTINGTHE RANGEHOOD
1. This range hood is mounted under a
kitchen cabinet unit.
2. Select preferred duct location on rear or
top of unit. (See page 6 & 7 for ducting
conversion options)
3. Begin installation by temporarily
unscrewing and removing the bottom
splash panel.
4. Reinforce cabinet base with lx2 wood
strips if additional strengthening is
required.
5. Temporarily position the range hood in
the desired mounting location.
Measure and mark the mounting holes,
duct and electrical access locations with
6. Duct
a pencil.
opening
cutout
6. Drill/cut out the required openings for
duct and electrical access; make sure the
duct opening is large enough to apply
duct tape.
7. Fasten hood onto cabinet with screws
and washers provided.
8. Install electrical.
duct!silver
taps
9. Install duct work and duct-tape.
10. Reinstall the bottom splash panel.
:
11. Power up hood and check for leaks
around duct-tape.
;
I
4. Add lx2
wood strips
3. Splash
bottom panel
Models:AK6500,AK6536,AK6542,AK2500,AK2536 Page5
INSTALLATION
CONVERTIBLE OPTIONS
This range
hood
or 3 1/4"x10"
discharge
is equipped
rear discharge.
with
the option of a 6" vertical
Additional
accessories
Convertible
Options
Vertical
discharge
6" round
Round
Vertical
discharge
3 1/4"x10"
Rectangular
Horizontal
vertical
to either
disch
of the abe
rear discharge
3 1/4"x10"
3 1/4"x10"
Vertical
pre-mounted
Accesodes
transition
Rectangular
3 1/4"x10"
adapter
transition
adapter
rear cap (pre-mounted)
starting
collar
Discharge
6" transition
adapter
or duct
opening,
3. Mount
transition
3 1/4"x10"
to convert
methods.
Convertible
1. Remove
discharge,
are provided
2. Place rectangular
by first installing
section.
transition
adapter
as shown
4 screws on half round
the 3-1/4"xl 0" starting collar on top of
piece with remaining
screws.
Models:
AK6SO0, AK6536, AK6542, AK2SO0, AK2SB6ge
6
INSTALLATION
CONVERTIBLE OPTIONS
arge, 3 1/4"x10"
Rear Discharge
ve
2. Remove
1. At rear of range hood, remove all screws on premounted rear rectangular cap and remove plate.
top pre-mounted
transition
piece.
%
3. Remove 2 air diverter blocks throuc n lop
opening asshown.
5. Mount rectangular
plate (previously
top of transition
adapter.
removed)
4. Mount rectangular transition piece to top
opening asshown.
on
6. Mount
Models:
starting
collar
(provided)
at rear discharge.
AK6SO0, AK6536, AK6542, AK2SO0, AK2SB6ge
7
CONTROLS
& FEATURES
CONTROLS& FEATURES(ModelsAK2500,AK2536)
CycleSpeedSelection
O Blower Onliff
DelayOff -©
©
DelayOff Indication
_1 Blower On/Off
By pressing@,
0
0
Q Cycle Lights On/Dim/Off
II
©
III
©
I
3 SpeedLevelIndication
the bloweris turnedOnandOff.
CycleSpeed Selection
Cyclethrough3 speedlevelsby pressing(_,
thedisplayindicateslevelselected.
Delay Off
This switch is usedfor programmedshutdownof blowerand lights5 minutesafter the functionis
activated.Press
once,the flashingindicatorto the left indicatesthefunctionis on.Thehood
will completely
in 5 minutes.
Cycle Lights On/Dim/Off
SwitchlightsOn @ by selectingthis switch.ToDim lights,activate@
one moretime,will turn lights Off
again.Selecting
CONTROLS& FEATURES(ModelsAK6500,
AK6536,AK6542)
O BlowerOn/Off/Speed
Selection
_ LightsDim/ High/ Off
0
Blower On/Off/SpeedSelection
Thisswitch turnsthe bloweron andoff and controlsthe speedselection.0 is off, I is lowspeed,
U is mediumspeedand Ul is high speed.
_
Lights On/ Dim / Off
I to turn lightson high,Uto dim lightsand0 to turnlights off.
NodeJs:AK6500,AK6536,AK6542,AK2500,AK2536 Page8
CLEANING
AND
MAINTENANCE
SELFCLEANFEATURE
Using Self Cleaning:
Models AK6500,AK6536, AK6542, AK2500, AK2536 hoods are designed with a self cleaning feature.
The centrifugal blower system automatically liquefies cooking residue accumulated in its internal
housing,and deposits the residue in the cleaning cup. Nevertheless,grease from cooking can also
dry and adhere in the internal housing. Running the self clean function periodically will flush out
accumulated residue in the range hood's internal housing.
CleaningFrequency:
Cleaningshouldbe completedapproximatelyoncea monthundernormaluse.
Detergent:
Non-corrosive, non-abrasive grease cutting spray detergents are recommended.
Self Clean:
Turnbloweron lowestspeedfor cleaning.
With nozzle on 'spray', squirt the grease cutting
detergent through the safety grill,directly onto
blower blades 10-15 times.
Allow self cleaning to complete for 5 minutes,
turn blower off.
Removecleaning cup. Clean w/mild detergent
or in dishwasher under normal wash cycle.
(if desired, repeat above steps with water
to rinse out detergent)
Models:AK6500,AK6536,AK6542,AK2500,AK2536 Page9
MAINTENANCE
LIC4ffS
Replacing Light Bulbs
Make sure all power is turned offand
bulbs are not hoL
Remove b/turning bulb counter
clockwise.
If bulbs are difficult to turn due to
prolonged use, firmly attach a glass
suc'doncup approx, the diameter of the
bulb and turn.
Replacement bulbs are available at
specialty lighting stores.
AK6500, 6536, 6542
Purchase type: 40R 14 mini flcod light bulbs
AK2500, 2536
Purchase type: GU 10 halogen bulbs
Or to order bulbs, please call our service
center: 888-880-8368 or online parts store:
www.zephyronline.com
rvbdels: AK6500, AK6536, AK6542, AK2500, AK2536
Page 10
WARRANTY
One Year Service Repair Warranty:
For one year from date of original purchase, we will provide free of charge, service labor to repair
any failed parts or components due to manufacturing defects.
Ten Years Parts/Lifetime
For ten years from
replacement
Motor
Warranty:
date of original purchase, we will provide free of charge, nonconsumable
parts or components
that failed due to manufacturing
Consumable parts not covered by this warranty
The motor will have liffeime warranty
Who is Covered:
This warranty
replacement
if it fails due to manufacturing
defects.
is extended to the original purchaser for products purchased for ordinary
home use in the 48 mainland states, Hawaii and Washington
In Canada and Alaska,
this warranty
the products to our designated
travel costs, to have _
This Warranty
defects.
include: Light Bulbs, Metal and Carbon Filters.
will
D.C.
There _ght
be costs associated with shipping
service locations or you might need to pay service technician's
appliance
be Voided
is Limited.
repaired in-home.
when:
Product damaged through negligence, misuse, abuse, accident.
Improper installation and failure to follow installa_on inslructions.
commercially
When product is used
or other than its intended purpose.
Damaged because of improper connection with equipment
Repaired or modified by anyone other _n
of other manufacturers.
Zephyr's Authorized Agents.
What is Not Covered:
Consumable parts such as light bulbs, filters, and fuses.
Services outside of service area and the labor cost incurred in connec'0on with the removal,
shipping and reinstallagon
cost, nor does it cover any other con'dngent expenses.
The natural wear of finish, and wear due to improper maintenance,
use of corrosive and
abrasive cleaning products, pads, and oven cleaner products.
Chips, dents or cracks due to abuse, misuse, freight damage, or improper installation.
Service trips to your home to teach you how to use the product.
Damage of product caused by accident, fire, floods or act of God.
This warrantyis valid intie UnitedStatesand Canada.It is r'_'r transferaldeand appliesonlyto the originalpurchaserand
does not extendto subsequentownersd this product Any applical_eimplied warranties,includingtie warrantyd r'nerchantaldlity,are lit'died in durationto a periodof expresswarrantyasprovidedhereinbeginnir'g_,iththe dated originalpurchaseat retail and,no warranties,whetherexpressor irqdied, shallapldyto this productthereafter.
M;xlels: AK6500, AK6536, AK6542, A1<2500, AK2536
Page 11
1-888-880-8368
Haveyour product proofof purchasewith date readyfor warrantyissues.
Or write to:
Zephyr Corporation
Service and Warranty Department
395 IVlendellStreet
San Francisco, CA 94124