1
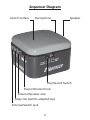
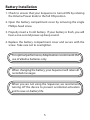
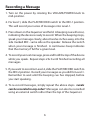
Sequencer
Instruction Manual
Contents
Introduction .....................................................................................3
Features .............................................................................................3
Sequencer Diagram........................................................................4
Battery Installation..........................................................................5
Recording a Message.....................................................................6
Playing a Message ..........................................................................7
Relay (Toy) Operation ....................................................................8
External Speaker Jack ....................................................................9
Mounting Options...........................................................................9
Trouble-Shooting ......................................................................... 10
Insider Secrets & Cheats............................................................. 12
Sequencing Ideas......................................................................... 14
Warranty .......................................................................................... 16
2
Introduction
Multiple digitized messages can be recorded and played back by
pressing the Sequencer on the top surface or by plugging in an
external switch such as Adaptivation’s Taction Pads or Pal Pads.
Features
- A beep cue is heard when installing a new battery, verifying
the integrity of the battery. See section, Battery Installation,
for details.
- 90 seconds of high-quality digitized speech for each level.
Two levels of operation. There is no Short Play / Long Play
selection as in some previous models. Serial #’s SE90-????
and higher offer the long record time of Long Play operation (90 sec) and the high fidelity of Short Play operation.
Messages for Level-1 & Level-2 are recorded independently of one another. That means you may re-record
messages on one level without affecting the messages
on the other level.
3
Sequencer Diagram
Switch Surface
Microphone
Speaker
Play/Record Switch
Power/Volume Knob
External Speaker Jack
Relay Out (switch-adapted toy)
External Switch Jack
4
Battery Installation
1.Check to ensure that your Sequencer is turned ON by rotating
the Volume/Power knob to the full ON position.
2.Open the battery compartment cover by removing the single
Phillips-head screw.
3.Properly insert a 9-volt battery. If your battery is fresh, you will
hear a one-second power-up beep sound.
4.Replace the battery compartment cover and secure with the
screw. Take care not to overtighten.
For optimal performance, Adaptivation recommends the
use of alkaline batteries only.
When changing the battery, your Sequencer will retain all
recorded messages.
When you are not using the Sequencer, we recommend
turning off the device to prevent accidental activation
and to save on battery life.
5
Recording a Message
1.Turn on the power by rotating the VOLUME/POWER knob to
mid-position.
2.For level 1, slide the PLAY/RECORD switch to the REC-1 position.
This will record your series of messages into Level-1.
3.Press down on the Sequencer and hold. A beeping cue will occur,
indicating the device is ready to record. When the beeping stops,
speak your message clearly, about twelve inches away, into the
side marked MIC - same side as the speaker. Release the switch
when your message is finished. A continuous beep indicates
that the memory if full for a given level.
4.To record your next message, press and hold the top of the device
while you speak. Repeat steps 2 & 3 until finished recording all
messages.
5.If you want to record on Level-2, slide the PLAY/RECORD switch to
the REC-2 position. Record your messages as you did for Level-1.
Remember to wait until the beeping cue has stopped, before
you start speaking.
6.To re-record messages, simply repeat the above steps. Levels
can be recorded in any order! Messages can also be recorded
using an external switch rather than the top of the Sequencer.
6
Playing a Message
The Sequencer plays recorded messages in sequential order
(great for books, steps and tasks).
1.When finished recording messages, slide the PLAY/RECORD
switch to the PLAY-1 position. Press down on the Sequencer, and
your message will play back. Press down again, and your next
message will play.
2.To access the second level of messages, slide the PLAY/RECORD
switch to the PLAY-2 position.
3.Optionally access your Sequencer by inserting any external switch
with a standard 1/8” (3.5mm) plug into the jack labeled Ext Switch.
4.To reset the sequence back to the first message, slide the Play/
Record switch to the other level, then back. Play a message, and
it will resume with message one.
Please refer to the section, Sequencing Ideas at the end
of this manual for example uses of sequencial messaging.
7
Relay (Toy) Operation
The Sequencer has an internal relay that allows battery-operated
devices such as switch-adapted toys to be activated simultaneously
with each message. The toy will activate for the entire duration of
the recorded message.
Example 1: For this example, use the relay to activate a toy for
the duration of the message. You will need a standard cable connector with 1/8” (3.5mm) male jacks on both ends (available from
Adaptivation). One end of the cable connector is plugged into the
adapted toy (if your battery operated toy is not already commercially adapted for switch use, try adapting with a Battery Interrupter
available from Adaptivation). The other end of the cable connector
is then plugged into the jack marked RLY OUT on the Sequencer.
Record a message. To activate, simply press the Sequencer, and the
toy will activate for the duration of the message.
Example 2: This example may be useful when you want an adapted
device to stay on for longer than the message length.
Option 1: Record messages as described earlier, but continue
to press the Sequencer after you are done speaking (record
silence). Release. Repeat for each message. When messages
are played, the adapted toy will be activated for the duration of the entire message, including the silence at the end.
Option 2: A commercially available switch-latch-timer, such
as Adaptivation’s Linkswitch allows for customizing time
lengths and modes of operation.
8
External Speaker Jack
This jack allows you to plug in an external speaker or headphones.
A speaker that amplifies (such as desktop computer speakers) is
appropriate for situations when very loud volume is needed. Headphones are appropriate when the device is being used to relay messages to the listener (i.e. giving directions). The Sequencer’s internal
speaker will automatically shut off when an external speaker is used.
Mounting Options
The Sequencer comes with rubber feet to help keep it from sliding.
When mounting on a table or other flat surface, Velcro® or DualLock® can be used as an alternate mounting method. If necessary,
remove the rubber feet to help secure the Velcro®. Adaptivation
recommends that when using mounting methods such as Velcro® or
Dual-Lock®, you not cover the serial number location. Adaptivation
carries an extensive range of mounting systems that can greatly
improve the utility of your device by allowing optimal placement
for your client, child or student.
9
Trouble-Shooting
Does not play back.
--Make sure the volume knob is turned up.
--Battery may be too low.
--If an external speaker is used, make sure the cable is plugged
into the EXT SPK jack.
--If an external speaker is used, does it need its own power
supply?
--Make sure the Sequencer is in Play mode.
--If using an external switch, does it work?
Relay does not activate.
--Make sure the cable connector is working.
--Make sure the cable connector is plugged into the RLY OUT
jack.
--Make sure the adapted device you are trying to operate
works. Try plugging a switch directly into the adapted
device.
The Sequencer is not recording.
--Make sure the Sequencer is in the REC mode.
--Battery may be too low.
--If using an external switch, make sure it works.
--If using an external switch, make sure it is plugged into the
EXT SWITCH jack.
Poor sound quality.
--Speak clearly into the side marked MIC, holding the Sequencer about 12 inches away. Don’t speak too loudly.
10
--Battery may be too low.
--The mic is very sensitive and might pick up electrical noise
such as air conditioners, electric motors, power lines, etc.
--Some older models have a Short Play / Long Play (SP/LP)
mode. Make sure the device is in Short Play mode.
A mechanical sound is heard at the end of a message.
--Record using an external switch such as an Adaptivation Pal
Pad or any other switch with no moving parts.
Messages are garbled on mid or high volumes, but the sound
is good on very low volume.
--Replace the battery with a fresh battery.
No power-up beep, or poor sound.
--Battery may be dead or too weak. Remove battery, wait 2
minutes and try again. If there is no beep, replace the battery with a fresh battery.
11
Insider Secrets & Cheats
To remove the mechanical sound from the end of a recording
on the Sequencer, record your message using an Adaptivation
Pal Pad or any other switch with no moving parts.
After time, you might accumulate many adapted-books and
adapted-toy applications for use with your Adaptivation equipment. Keep your applications well organized by placing each
one of them in its own re-sealable bag. Then, hang these bags
on the wall on a peg board. Place into each bag very detailed,
step-by-step instructions for how to reconstruct the application.
This is useful for others who are not familiar with your application. Be very explicit and comprehensive in your instructions.
Include such things as: for whom the application is intended;
the assistive device that is needed; the actual words to be spoken (in quotes) for each message; alternative activities, words
or equipment; etc.
To make your device more tolerant of spilled liquids, place it
in a sealable plastic bag. You can still access the switch surface
through the plastic.
Pocket Overlays, available from Adaptivation, are clear adhesive-
backed pockets into which overlays or pictures can be inserted. The
Pocket Overlay is adhered to the Switch Surface of your Sequencer.
Such overlays and pictures can improve the functionality of your
Sequencer by providing greater symbolic meaning.
12
The External Speaker jack is used to connect an amplified speaker such as those used with desk top computers. External, amplified
speakers can significantly increase the quality and volume of your
messages. You can even connect your Sequencer to a school’s P.A.
system for announcements or for amplifying lines in a play.
Record your cheats here -
13
Sequencing Ideas
-Ordering at a restaurant
-Giving a book report
-Show-and-Tell
-Singing Songs
-Reading books
-Telling a joke
-Cheering at a game/event
-Giving announcements
-Packing bookbag or lunch
-Sorting laundry
-Lines of a play
-Reciting days of the week
-Saying Pledge of Allegiance
-Delivering a message
-Complaining
-Requesting assistance
-Daily schedule
-Announcing the lunch menu
-Introducing family/friends
-Giving recipe instructions
-Telling about a trip/vacation
-Greeting people
-Playing games
-Grocery shopping
-Buying a movie ticket
-Giving address or phone #
14
Notes:
15
1-Year Limited Warranty
Your Adaptivation Sequencer was carefully tested and inspected before it was shipped from the factory. We warrant this
product to be free from defects in materials and workmanship
under normal use and service for one (1) year from the date of
purchase. In the event of a defect in materials or workmanship,
we will either repair or replace without charge, at our option,
any part which in our judgment shows evidence of such defect
within one (1) year of purchase.
This warranty does not apply if the Sequencer has been
misused, abused, altered, or tampered with. At the end of
the warranty period, Adaptivation shall be under no further
obligation expressed or implied.
4/5/2012
This warranty gives you specific rights, and you may also have
other rights which vary from state to state.