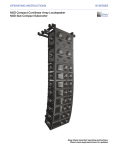
1
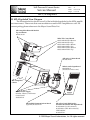
Self-Powered Concert Series
Service Manual
Doc #:
Rev.:
Date:
Page:
05.033.040.01
A
08/31/98
1 of 26
MP-2/4 Amplifier
Self-Powered Concert Series
MP-2/4 Amplifier
Service Manual
© 1998 Meyer Sound Laboratories, Inc. All rights reserved.
Self-Powered Concert Series
Service Manual
Doc #:
Rev.:
Date:
Page:
05.033.040.01
A
08/31/98
2 of 26
MP-2/4 Amplifier
TABLE OF CONTENTS
INTRODUCTION
3
SECTION I: MP-2/4 AMPLIFIER SYSTEM DESCRIPTION
A) MP-2 Exploded view diagram and parts list
B) MP-4 Exploded view diagram and parts list
C) System block diagram.
D) Explanation of system block diagram.
5
6
7
9
SECTION II: TROUBLESHOOTING FLOW CHART
12
SECTION III: COMMON FAILURE MODES
A) Circuit breakers trip on power-up or during use2-channel versions.
4-channel versions.
B) Unit does not power up.
C) Unit powers up and immediately shuts off.
D) Unit powers up, but does not unmute (pass signal)
E) Unit powers up, but active LED does not light and signal does not pass.
F) Unit turns on and off in a cyclical fashion.
G) Unit turns on, but no signal passes or signal is intermittent.
H) Unit hums or has noise.
I) Unit's output degrades when paired with other units.
J) Unit has distorted output.
13
15
19
20
21
22
23
23
24
25
26
© 1998 Meyer Sound Laboratories, Inc. All rights reserved.
Self-Powered Concert Series
Service Manual
Doc #:
Rev.:
Date:
Page:
05.033.040.01
A
08/31/98
3 of 26
MP-2/4 Amplifier
Introduction:
From the very beginning, the Meyer Sound Self-Powered Concert Series products were
designed with the customer in mind. Not only are they easy to set up and use, but they are also
easy to service. You will find that the MP-2 and MP-4 Amplifiers used in the Self-Powered
Concert Series are completely modular. With the exception of the Control boards , all of the
modules are interchangeable with any of the Self-Powered Concert Series products. The MP2 and MP-4 Amplifiers have been designed with a modular layout to simplify troubleshooting
and repairs to the most basic level; just determine which module is at fault and replace that
module. This feature allows the user greater flexibility when dealing with problems in the field.
In order to perform service on the Self-Powered Concert Series, a knowledge of the amplifier
is required. Please read the following section carefully before attempting to service an
amplifier.
It is also recommended that you make use of the service procedures for replacing modules
included in the Meyer Sound Self-Powered Series Speaker Service Documentation Package
#17.033.083.01
The following service manual provides detailed information to allow the user to perform
modular assessment of their unit. With the exception of MOSFET short circuit evaluation,
component level troubleshooting will not be covered. As troubleshooting on a component
level requires advanced testing equipment, it is strongly recommended that all damaged
modules be returned to the nearest authorized Service Center for servicing.
There are three basic sections to this guide. The first section will provide an exploded view
of the amplifier, a modular parts list, a system block diagram, and a detailed description of the
block diagram. The second section will provide a flow chart to help you quickly determine
which part of the guide you should turn to for troubleshooting your self-powered unit. The
third section will detail how to troubleshoot for the most common failure modes.
Tools and Documentation Required:
Meyer Sound Tool Kit - # 40.010.100.03 or equivalent.
Meyer Sound Self-Powered Series Speaker Service Documentation Package #17.033.083.01
© 1998 Meyer Sound Laboratories, Inc. All rights reserved.
Self-Powered Concert Series
Service Manual
Doc #:
Rev.:
Date:
Page:
05.033.040.01
A
08/31/98
4 of 26
MP-2/4 Amplifier
Pre-Service Checks and Precautions:
1. When servicing any electronic assemblies, a clean low static bench should be used and
internal assemblies should be kept free of metallic debris.
2. AC power must be disconnected and the Power Supply module allowed to bleed for at
least 3 minutes before performing any work inside the chassis.
3. While individual electronic components are very sensitive to static electricity, the
completed subassemblies and boards used in the MP-2/4 are of relatively low static sensitivity.
It is always preferable to use a static control station, but in lieu of this, careful handling will
minimize the potential for static damage. When reaching for an assembly (this is when the
greatest static potential exists), never grab connector pins or component leads, pickup and
handle the assembly by its edges or mounting brackets. Always lay assemblies on the same
work surfaces as the other electronics which should be a low static or semi-conductive surface.
Avoid placing foam or plastic underneath objects as they hold capacitive/static charge.
4. Use caution not to bend any vertical components on the circuit boards as this stress to the
components can seriously shorten their life.
5. If there is any dirt, dust, or oil buildup in the chassis, it should be cleaned before
reassembling.
6. The low frequency drivers should always be checked for splashed ferro-fluid, aged
suspension, and DC resistance when servicing any of the electronics. A low oil or fatigued low
frequency driver will jeopardize the newly serviced electronics, possibly damaging the entire
amp/heatsink module. Refer to “Low Driver Inspection and Evaluation Procedure for Self
Powered Series Products” (# 17.010.120.01). A fatigued driver should always be replaced using
an HTS grade driver.
© 1998 Meyer Sound Laboratories, Inc. All rights reserved.
Self-Powered Concert Series
Service Manual
Doc #:
Rev.:
Date:
Page:
05.033.040.01
A
08/31/98
5 of 26
MP-2/4 Amplifier
I. MP-2/4 Amplifier System Description:
A) MP-2 Exploded View Diagram
The illustration below shows how all of the individual modules for the MP-2 amplifiers interconnect. Please note that some modules are used in MP-4 amplifiers as well. For
current pricing please reference to the Meyer Sound Price List.
MP-2 TPL Control Board
40.033.042.01 MSL-4
40.033.042.04 PSW-4
40.033.042.05 650-P/PSW-2
40.033.042.06 DS-2P
40.033.042.07 CQ-1
40.033.042.08 CQ-2
40.033.042.09 PSM-2
40.033.042.10 SB-1
40.033.042.15 750-P
MP-2 Amplifier/Heatsink Module
40.033.013.01
MP-2/4 A.C. Mains Board
40.033.022.02
MP-2/4 Audio Input Board
40.033.058.01
(Not Shown in this view)
MP-2 Amplifier
Chassis
MP-2/4 Power Supply
Includes: Chassis, Transformer
Circuit Board.
40.033.076.01
MP-2/4 RMS Communications Board
(Optional) 40.033.071.01
MP-2 User Panel (RMS ready)
(Includes the MP-2/4 XLR Input Board)
40.033.068.01 (L6-20 connector)
40.033.068.10 (IEC-309 connector))
LED Label Kit
40.033.077.01
© 1998 Meyer Sound Laboratories, Inc. All rights reserved.
Self-Powered Concert Series
Service Manual
Doc #:
Rev.:
Date:
Page:
05.033.040.01
A
08/31/98
6 of 26
MP-2/4 Amplifier
B) MP-4 Exploded View Diagram
The illustration below shows how all of the individual modules for the MP-4 amplifiers interconnect. Please note that some modules are used in MP-2 amplifiers as well. For
current pricing please reference to the Meyer Sound Price List.
MP-4 Amplifier/Heatsink Module
Top and Bottom
40.033.013.02
MP-4 TPL Control Board
40.033.042.02 MTS-4 Bottom
40.033.042.03 MTS-4 Top
40.033.042.11 MSL-6 Bottom
40.033.042.12 MSL-6 Top
40.033.042.13 PSW-6 Bottom
40.033.042.14 PSW-6 Top
MP-2/4 A.C. Mains Board
40.033.022.02
MP-2/4 Audio Input Board
40.033.058.01
(Not Shown in this view)
MP-4 Amplifier
Chassis
MP-2/4 Power Supply
Includes: Chassis, Transformer
Circuit Board.
40.033.076.01
MP-2/4 RMS Communications Board
(Optional) 40.033.071.01
MP-4 User Panel (RMS ready)
(Includes the MP-2/4 XLR Input Board)
40.033.068.02 (L6-20 connector)
40.033.068.11 (IEC-309 connector))
LED Label Kit
40.033.077.01
© 1998 Meyer Sound Laboratories, Inc. All rights reserved.
Self-Powered Concert Series
Service Manual
Doc #:
Rev.:
Date:
Page:
05.033.040.01
A
08/31/98
9 of 26
MP-2/4 Amplifier
D) Block Diagram Description:
1) (Rear) User Panel:
The user panel block is divided into two main sections: AC Power and Audio Signal Path.
The AC power is applied to the system via a L6-20 twist-lock connector or an IEC 309 connector.
The line voltage is fed thru an RF filter and then connected to circuit breakers. For 115 V
applications, both circuit breakers are used. For 230 V applications, only one circuit breaker is
employed in the path of current. Note also that MP-2 amplifiers use 6 Amp breakers while MP4 amplifiers use 8 Amp breakers.
The audio signal is introduced to the system via a 3-pin XLR jack. The signal is fed to a
polarity switch and then to an RF filter. The audio pair (pins 2 and 3) is transmitted on a 10pin ribbon cable to the control board. In addition, feedback lines returning from the control
board on the ribbon cable power the LED's. Pin 1 is connected using a Ground Loop Isolation
Network to Chassis Ground. All the audio circuitry in the user panel is on the Audio Input
board.
2) AC Mains Board:
The AC mains board is the heart of the Intelligent AC® system. This module is responsible
for the auto selection of line voltages. During a normal power-up procedure, the following
sequence of operations occur on the AC Mains module:
The AC input line from the user panel is fed to the "housekeeping supply" circuit (via a 125
mA fuse) and to the voltage auto-select circuit. The "housekeeping supply" generates 12 V DC
continuously (provided the AC line is within 80-270 V), which is used for powering components that monitor line conditions and properly select winding taps for the main high power
supply. The voltage auto-select circuit utilizes a peak voltage detector and voltage comparators
to determine the line voltage and select the correct tap of the toroidal transformer.
After tap selection, the thermistor limits the inrush current and allows the unit to power-up.
After 2-3 seconds, a "turn-on delay" circuit (located on the power supply board-see sheet 2)
sends an "unmute" signal via the sense cable to the AC mains module and to the TPL Control
board. This "unmute" signal triggers Relay 1 on the AC mains module to shunt the thermistor
out of the circuit and to trigger the "unmute" relays on the TPL Control board (see sheet 1).
A "fault shutdown latch" is also located on the AC mains module. If this latch receives a fault
signal (from the Amplifier/Heatsink module), it will trigger the shut down of the unit. This
circuit stays latched until the AC power is completely removed and the "housekeeping supply"
drops to 0 V DC.
3) RMS (Remote Monitoring System) Communications Board:
This option allows you to monitor remotely certain parameters of the amplifier while in use.
As this module is quite complex, no system block will be given at this time. However, a brief
explanation of the connections follows:
© 1998 Meyer Sound Laboratories, Inc. All rights reserved.
Self-Powered Concert Series
Service Manual
Doc #:
Rev.:
Date:
Page:
05.033.040.01
A
08/31/98
10 of 26
MP-2/4 Amplifier
The 10-pin ribbon cable from the XLR board widens to 16 wires where it interfaces with the
Communications module which then continues to the TPL Control Board. The extra 6 lines
feed signals, such as output voltage and power, from the Amplifier/Heatsink module and the
TPL Control board to the Communications module. The 10 lines which connect to the Audio
Input board are also monitored by the Communications module for limiter activity and
polarity switch positions.
In the case of the MP-4, the ribbon cable expands to 21 lines (staggered on the 26 pin
connector). Of those 21 lines, 5 lines split off to connect to the second TPL Control Board
(allowing the additional signals to be monitored).
Additionally, the Communications module has a 9 pin power cable connecting to the Power
Supply board which provides supply voltages and fan current monitoring for the network.
4) TPL Control Board:
The TPL Control Board contains a chain of signal processing stages which produce a
complex amplitude and phase response for each channel. The TPL Control Board also provides
TruPower™ Limiting voice coil protection. This module is unique to each product in the SelfPowered Concert Series. Amplifiers can be re-configured by simply changing this module with
another TPL Control Board (e.g. MSL-4 to a 650-P).
Audio signal from the Audio Input board is fed into a differential amplifier on the TPL
Control Board. Output from the differential amplifier is input into a Pre-Filter stage and is also
fed back to the Communications module (for monitoring input level). The Pre-Filter stage
filters "out-of-band" signals and on some versions includes pre-equalization prior to channel
separation. After filtering, the audio signal is fed to a Crossover stage to separate the signal into
its High and Low Channel components. Once separated, the signal goes thru a Phase Delay
Alignment stage (the MSL-4 and MSL-6 use an additional daughter board to provide a greater
amount of required phase delay). The signal is then passed to a Post Filter stage which sets the
complex response and overload parameters. After filtering and phase alignment, the signals
are fed to the TPL Limiter stage.
Note: On subwoofers, the low channel is fed into an Over Excursion Protection stage prior to the TPL
Limiter stage.
The TPL Limiter stage receives feedback from the TPL Detector (located on the TPL Control
Board), which monitors voltage and current on the Amplifier/Heatsink module (see sheet 2).
With this information, the TPL Limiter stage is able to provide very accurate limiting based on
the power absorbed by the voice coil. In addition, the TPL Limiter stage drives the limiter
LED's on the Audio Input board.
After the signal in each channel is fed thru the TPL Limiter stage, it passes thru an "unmute"
relay prior to being sent to Amplifier/Heatsink module. During normal power-up, these relays
pass the audio signal after receiving a signal from the "turn-on delay" circuit (see #2 - AC Mains
module).
© 1998 Meyer Sound Laboratories, Inc. All rights reserved.
Self-Powered Concert Series
Service Manual
Doc #:
Rev.:
Date:
Page:
05.033.040.01
A
08/31/98
11 of 26
MP-2/4 Amplifier
5) Power Supply Module:
The power supply provides the Amplifier/Heatsink module with ± 120 V DC and ± 45 V
DC, which is used for the Power MOSFET rails. This module also supplies ± 15 V DC to the
Amplifier/Heatsink module and the TPL Control Board for powering op-amps. Voltage is also
sent to the Communication Board via the Communication Board Power Cable although no
connection is shown in the diagrams.
This Module contains the circuitry for controlling the primary and secondary fans. Signals
from the temperature sensor (located on the heatsink) are fed into the fan control circuits. The
same signal is also sent to an over-temperature comparator. Output from the comparator is
joined with the fault signal line from the Amplifier/Heatsink module. The fault line is then
sent to the AC Mains "Fault Shut-Down Latch" via the sense cable.
The "un-mute" control for the amplifier is located on this board as well. A few seconds after
power-up, the "Turn-on Delay to Unmute" circuit sends a signal to the AC Mains module via
the sense cable. This signal closes Relay 1 on the AC Mains module, shunting the thermistor
out of the circuit. In addition, this same signal is looped back to the Power Supply board on the
sense cable. The return signal is then sent to the TPL Control Board via the 14-pin power cable
and the 15-pin header on the Amplifier/Heatsink module. This signal triggers the "un-mute"
relays on the TPL Control Board.
Note: If the sense cable is not connected properly, the amplifier will not unmute. This assures that the
thermistor is shunted before the audio signal is allowed to pass and the amplifier is allowed to draw high
current.
There is also a fan current sense circuit for each of the fans located on this board. Information
from the fan current sense circuit is sent to the Communication module via the Communication
Board Power Cable.
6) Amplifier/Heatsink Module:
Audio signal input from the TPL Control Board is first sent thru an Ultrasonic DIM filter to
remove unwanted high frequencies and harmonics. From there, the signal is sent to a summing
circuit, which introduces negative feedback and DC offset correction from the output. After the
signal has been corrected, it is input to the power MOSFET output stage via a pre-driver. The
multiple output transistors and supply voltages (typically known as Class H) provide high
power efficiency which allows the transistors to operate with low heat dissipation.
The output stage of the amplifier is connected to the drivers. In addition, feedback lines,
such as the DC Offset Corrector and Negative Feedback, monitor this output line. A DC Latchup Detector also monitors this output line. If this detector senses an offset of ±10 VDC for
greater than about 1 second, it sends a fault signal to the AC Mains "Fault Shut-Down Latch".
There is an output current sense circuit located on this board as well. It feeds off of the return
leg of the driver and sends the output current waveform to the TPL Detector circuit on the TPL
Control Board
SYSTEM BLOCK NOTE: Connector pin-outs may not match the illustration.
© 1998 Meyer Sound Laboratories, Inc. All rights reserved.
Doc #:
Rev.:
Date:
Page:
Self-Powered Concert Series
Service Manual
05.033.040.01
A
08/31/98
12 of 26
MP-2/4 Amplifier
II. Troubleshooting
Flow Chart:
See Section III,
Part G
See Section III,
Part H
See Section III,
Part I
See Section III,
Part J
No
Does signal
pass?
Start
Yes
Does the unit
power-up
normally?
No
Are the circuit
breakers tripped?
Yes
No
Does the
unit hum?
Does the unit
power up at all?
No
Yes
Does the unit's
output degrade when
paired with
another unit?
Does the unit
power up & then
turn off?
No
No
Does the unit
have distorted
output?
Does the unit
un-mute after
power-up?
No
Yes
If the unit exhibits some problem not
listed here, consult the system block
diagram or contact your nearest
Meyer Sound service representative.
When powered-up,
is the active LED off &
the signal muted?
Yes
Yes
Yes
Yes
See Section III,
Part A
No
See Section III,
Part B
Yes
See Section III,
Part C
No
See Section III,
Part D
Yes
See Section III,
Part E
Yes
See Section III,
Part F
No
Does the unit
turn on & off in a
cyclical fashion?
No
If the unit still does not power-up normally,
consult the system block diagram or
contact your nearest Meyer Sound
service representative.
© 1998 Meyer Sound Laboratories, Inc. All rights reserved.
Self-Powered Concert Series
Service Manual
Doc #:
Rev.:
Date:
Page:
05.033.040.01
A
08/31/98
13 of 26
MP-2/4 Amplifier
III. Common Failure Modes:
A. Circuit breakers trip on power-up or during use:
2-Channel Versions
1. Do not reset the circuit breakers. If the circuit breakers are reset without first determining
the cause, further damage to the electronics may result.
Caution: If the breakers are reset and power is applied, the AC mains board could be damaged causing
a popping sound and a small amount of smoke. This occurs because the thermistor on the AC mains
board, normally used for soft start operation, behaves as a 5000 W load. This damage is a normal
reaction. However, the AC mains board, will have to be replaced due to possible thermistor damage and
relay arcing.
2. If the amplifier is in the speaker cabinet, remove the eight (8) large head screws that attach
the amplifier to the cabinet. Remove the amplifier from the cabinet slowly, taking care to
unplug the green speaker connector on the top side of the amplifier.
3. With the amplifier sitting on a firm surface, remove the four (4) screws from the amplifier
chassis cover and remove the cover.
4. Lay unit on either side and remove the six (6) screws from the bottom of the amp chassis.
5. Return the unit to the upright position and disconnect the audio signal cable from the
Control board by unlocking the gray ribbon cable connector.
6. Lift up the Amp/heatsink module in order to remove the white DC power harness from
the connector on the Amp/heatsink module.
Caution: Be careful not to overflex the circuit board when removing the power harness connector.
7. Lift the Amp/heatsink module out of the chassis and set aside. Do not remove the Control
board from the Amp/heatsink assembly at this time.
8. With the Amp/heatsink removed, reset the breakers, and apply AC power to the power
supply. Verify the following conditions:
a) Audible power-up sequence (three clicks).
Note: This applies to AC supplies ranging from 110-130 V and 225-250 V. For AC supplies between 90105 V and 180-215 V, only two clicks will be heard.
b) Center fan turns on.
c) Power supply LED’s on (visible through the top of the chassis)
Note: The user panel LED will not light as the Amp/heatsink module is disconnected.
9. If the previous three conditions are met, the power supply circuits are probably functioning properly. It is most likely that the Amp/heatsink module is damaged and will
need to be replaced. Refer to Meyer Sound Self Powered Series MP-2 Amp/Heatsink
Service Procedure (# 17.033.013.01) for replacement procedures.
© 1998 Meyer Sound Laboratories, Inc. All rights reserved.
Self-Powered Concert Series
Service Manual
Doc #:
Rev.:
Date:
Page:
05.033.040.01
A
08/31/98
14 of 26
MP-2/4 Amplifier
If any of the previous three conditions (step 8) are not met, continue to step 11.
Note: If you are going to replace the Amp/heatsink module, make sure that the AC Mains board is in good
condition and not stressed, checking the thermistor for cracks or visible burns. If the thermistor is damaged the
AC Mains module should also be replaced. (Use steps 11 to 13 to gain access to the AC mains board). The drivers
should also be tested; refer to Driver Inspection and Evaluation Procedure for Self Powered Series Products
(Low Driver #17.010.120.01 and High driver #17.010.120.02).
10. You may perform the following procedure to determine if MOSFETs on the Amp/
heatsink module are shorted.
Caution: Never disassemble the amplifier PCB board from the heatsink.
MP-2 Amp/heatsink module evaluation:
a) Allow the Amp/heatsink module to discharge any residual voltage (about 3 minutes).
b) Remove the Control board from the Amp/heatsink module by disengaging the locking
standoffs and remove the 15 pin header from the header connector.
c) Locate the top side of the board MOSFETs Q4A, Q1A, Q2A, Q5A, Q4B, Q1B, Q2B, Q5B. They
are 8 large devices mounted on the heatsink sink each with 3 leads connecting to the board.
d) Using an ohmmeter (set to ohms, not diode check), measure the resistance between the drain
and source of each FET.
Note: Each FET will have three leads - Gate, Drain, and Source. The Gate is the one with the square pad
on the board, while the Drain and the Source are the ones with the round pads.
e) If any FET has a resistance of less than 5 ohms, the Amp/heatsink module will need to be
replaced.
f) If the Amp/heatsink module is found to be good, replace its Control board, and install the
Amp/heatsink module into the chassis.
Caution: When plugging the large white DC power connector into the amp board. Make sure the
connector is not shifted over one pin to the left or right. Also support the board to prevent bending.
g) Repeat the power up sequence as listed in step 8.
h) If the unit still will not power up, it is likely that the Amp/heatsink module has damage to
circuits other than the MOSFETs. Remove the Amp/heatsink module and replace it.
11. If any of the previous three conditions (step 8) are not met, the AC mains board or the
Power Supply could be damaged. If this is the case, continue to step 12.
12. To assess the power supply system, unplug the unit and allow the supplies to bleed
(about 3 minutes). Remove the eight (8) small head screws from the user panel and remove
the panel. Remove the audio signal cable from the audio input board by disengaging the
locking gray connector. Also remove the AC input cable from the AC mains board (4 wire
green connector).
13. Remove the sense cable (gray ribbon cable) and the transformer primary connector (8
wire green connector) from the AC mains board.
© 1998 Meyer Sound Laboratories, Inc. All rights reserved.
Self-Powered Concert Series
Service Manual
Doc #:
Rev.:
Date:
Page:
05.033.040.01
A
08/31/98
15 of 26
MP-2/4 Amplifier
14. While firmly holding the AC mains board, remove the three (3) screws on the top of the
chassis and remove the entire board.
15. Replace the AC mains board with a known good board (either new or from another unit).
Make sure to reconnect the sense cable and the transformer primary connector. Replace the
user panel and repeat the power up sequence as stated in step 8.
16. If the three conditions stated in step 8 are met this time, the Power Supply circuits are
probably functioning properly. It is most likely that the AC Mains Board is damaged and
will need to be replaced. You can refer to Meyer Sound Self Powered Series MP-2/4 AC
MainsService Procedure (#17.033.022.01) for replacement procedures for the AC Mains
board.
17. If the unit still does not power up properly, it is likely that the Power Supply module
is damaged. As Power Supply module failures are rare, it is recommended that you
return the unit to the nearest authorized service center for further evaluation.
4-Channel Versions
1. Do not reset the circuit breakers. If the circuit breakers are reset without first determining
the cause, further damage to the electronics may result.
Caution: If the breakers are reset and power is applied, the AC mains board could be damaged causing
a popping sound and a small amount of smoke. This occurs because the thermistor on the AC mains
board, normally used for soft start operation, behaves as a 5000 W load. This damage is a normal
reaction. However, the AC mains board, will have to be replaced due to possible thermistor damage and
relay arcing.
2. If the amplifier is in the speaker cabinet, remove the eight (8) large head screws that attach
the amplifier to the cabinet. Remove the amplifier from the cabinet slowly, taking care to
unplug both green speaker connectors on the top side of the amplifier.
3. With the amplifier sitting on a firm surface, remove the four (4) screws from the amp
chassis cover and remove the cover.
4. Disconnect the audio signal cable from the top control board by unlocking the gray ribbon
cable.
5. Remove the six (6) screws from the top Amp/heatsink module bracket (3 per side). Lift
up the Amp/heatsink module in order to remove the brown DC power harness from the
connector on the top Amp/heatsink module.
Caution: Be careful not to overflex the circuit board when removing the power harness connector.
6. Lift the top Amp/heatsink module out of the chassis and set aside. Do not remove the
Control board from the Amp/heatsink module at this time.
© 1998 Meyer Sound Laboratories, Inc. All rights reserved.
Self-Powered Concert Series
Service Manual
Doc #:
Rev.:
Date:
Page:
05.033.040.01
A
08/31/98
16 of 26
MP-2/4 Amplifier
7. Remove the eight (8) small head screws from the user panel.
8. While slowly removing the user panel, disconnect the audio signal cable from the input
board on the user panel by disengaging the locking gray connector. Also disconnect the AC
input connector (4 wire green connector) from the AC mains board.
9. Remove the sense cable (gray ribbon cable) and the transformer primary connector (8 wire
green connector) from the AC mains board.
10. While firmly holding the AC mains board, remove the three (3) screws on the top of the
chassis and remove the board.
11. Disconnect the white DC power harness from the Power supply module.
Caution: Be careful not to overflex the circuit board when removing the power harness connector.
12. Lay the unit on either side and remove the six (6) screws from the bottom of the amp
chassis.
13. Return the unit to the upright position and disconnect the audio signal cable from the
bottom Control board by unlocking the gray connector.
14. Remove the green four (4) pin male connector mounted on the edge of the amplifier
chassis.
Note: Two (2) nuts with lock washers secure the two (2) screws. Make sure to remove these nuts from
the chassis.
15. Lift up the bottom Amp/heatsink module in order to remove the white DC power
harness from the connector on the Amp/heatsink module. Disconnect the power harness
from the Amp/heatsink module.
Note: As you are lifting the Amp/heatsink module, thread the white DC power harness through
the chassis towards the Amp/heatsink module. This will allow you to lift the module clear of the amp
chassis.
16. Remove the bottom Amp/heatsink module, taking care to not disturb the position of the
fans. Do not remove the Control board from the Amp/heatsink module at this time.
17. Position the AC mains board inside the chassis and replace the three (3) screws into the
top of the chassis to reattach the AC mains board bracket.
18. Connect the sense cable and the transformer primary cable. Also replace the user panel.
© 1998 Meyer Sound Laboratories, Inc. All rights reserved.
Self-Powered Concert Series
Service Manual
Doc #:
Rev.:
Date:
Page:
05.033.040.01
A
08/31/98
17 of 26
MP-2/4 Amplifier
19. At this point the top and bottom amp/heatsink are disconnected but the AC mains board
is in place and connected. Reset the breakers, and apply AC power to the power supply.
Verify the following conditions:
a) Audible power-up sequence (three clicks).
Note: This applies to AC supplies ranging from 110-130 V and 225-250 V. For AC supplies between 90105 V and 180-215 V, only two clicks will be heard.
b) Top and bottom center fans turn on.
c) Power supply LED’s on (visible through the top of the chassis)
Note: The user panel LED will not light as the Amp/heatsink module is disconnected.
20. If the previous three conditions are met, the power supply circuits are probably
functioning properly. It is most likely that one or both of the Amp/heatsink modules is
damaged and will need to be replaced. If any of the previous three conditions are not met,
continue to step 21.
Note: If you are going to replace the Amp/heatsink module, make sure that the AC Mains board is in good
conditions and not stressed checking the thermistor for cracks or visible burns. If the thermistor is damaged the
AC Mains module should also be replaced. (Use steps 7 to 10 to gain access to the AC mains board). The drivers
should be also tested, refer to Driver Inspection and Evaluation Procedure for Self Powered Series Products
(Low Driver #17.010.120.01 and High driver #17.010.120.02).
To determine which Amp/heatsink module is damaged, perform the following short circuit
evaluation:
Caution: Never disassemble the amplifier PCB board from the heatsink.
MP-4 top and bottom Amp/heatsink module evaluation:
a) Allow the Amp/heatsink modules to discharge any residual voltage (about 3 minutes).
b) Remove the Control board from each Amp/heatsink module by disengaging the locking
standoffs and remove the 15 pin header from the header connector.
Caution: Make sure to keep the Control board paired with its respective Amp/heatsink module.
c) Select an Amp/heatsink module and locate the top side of the board MOSFETs Q4A, Q1A,
Q2A, Q5A, Q4B, Q1B, Q2B, Q5B. They are 8 large devices mounted on the heatsink sink each with
3 leads connecting to the board.
d) Using an ohmmeter (set to ohms, not diode check), measure the resistance between the drain
and source of each FET.
Note: Each FET will have three leads - Gate, Drain, and Source. The Gate is the one with the square pad
on the board, while the Drain and the Source are the ones with the round pads.
e) If any FET has a resistance of less than 5 ohms, the module will need to be replaced. Refer to
Meyer Sound Self Powered Series MP-4 Amp/Heatsink Service Procedure (#17.033.013.02).
© 1998 Meyer Sound Laboratories, Inc. All rights reserved.
Self-Powered Concert Series
Service Manual
Doc #:
Rev.:
Date:
Page:
05.033.040.01
A
08/31/98
18 of 26
MP-2/4 Amplifier
f) If one of the Amp/heatsink modules is found to be good, replace its Control board, and install
the Amp/heatsink module into the chassis.
Caution: Connect the brown DC harness to the module as the white DC harness is currently disconnected
When plugging the large brown DC power connector into the amp board. Make sure the connector is not
shifted over one pin to the left or right. Also support the board to prevent bending.
h) Repeat the power up sequence as listed in step 19.
g) If the unit still will not power up, it is likely that the Amp/heatsink module has damage to
circuits other than the MOSFETs. Remove the module and replace it as well.
21. If any of the previous three conditions (step 19) are not met, the AC mains board or the
Power Supply could be damaged. If this is the case, continue to step 22.
22. To assess the power supply system, unplug the unit and allow the supplies to bleed
(about 3 minutes). Remove the eight (8) small head screws from the user panel and remove
the panel. Remove the audio signal cable from the audio input board by disengaging the
locking gray connector. Also remove the AC input cable from the AC mains board (4 wire
green connector).
23. Remove the sense cable (gray ribbon cable) and the transformer primary connector (8
wire green connector) from the AC mains board.
24. While firmly holding the AC mains board, remove the three (3) screws on the top of the
chassis and remove the entire board.
25. Replace the AC mains board with a known good board (either new or from another unit).
Make sure to reconnect the sense cable and the transformer primary connector. Replace the
user panel and repeat the power up sequence as stated in step 19.
26. If the three conditions stated in step 19 are met this time, the Power Supply circuits are
probably functioning properly. It is most likely that the AC Mains Board is damaged and
will need to be replaced. You can refer to Meyer Sound Self Powered Series MP-2/4 AC
MainsService Procedure (#17.033.022.01) for replacement procedures for the AC Mains
board.
27. If the unit still does not power up properly, it is likely that the Power Supply module
is damaged. As Power Supply module failures are rare, it is recommended that you return
the unit to the nearest authorized service center for further evaluation.
© 1998 Meyer Sound Laboratories, Inc. All rights reserved.
Self-Powered Concert Series
Service Manual
Doc #:
Rev.:
Date:
Page:
05.033.040.01
A
08/31/98
19 of 26
MP-2/4 Amplifier
B. Unit does not power up:
1. Using a voltmeter, check the AC voltage supply to the amplifier. Make sure that the
voltage is within the specified operating range as listed on the user panel.
Note: If the AC voltage exceeds 270 VAC, the AC mains board may be damaged.
2. Verify that the breakers are not tripped. If the breakers are tripped, do not reset. See
section A for details.
3. If the amplifier is in the speaker cabinet, remove the eight (8) large head screws that attach
the amplifier to the cabinet. Remove the amplifier from the cabinet slowly, taking care to
unplug the green speaker connector(s) on the top side of the amplifier.
4. With the amplifier sitting on a firm surface, remove the eight (8) small head screws from
the user panel.
5. While slowly removing the user panel, disconnect the audio signal cable from the audio
input board on the user panel by disengaging the locking gray connector. Check the AC
input connector (4 wire green connector) on the AC mains board before disconnecting it.
6. Once the user panel is removed, check the following AC connections:
a). Transformer primary connector (green 7 pin on AC mains board)
b). Transformer secondary connector (green 8 pin on power supply board)
c). AC connections on user panel (breakers, filter, AC inlet).
7. Reconnect the user panel and apply power. Check to see if the following conditions are
met:
a) Audible power-up sequence (three clicks).
Note: This applies to AC supplies ranging from 110-130 V and 225-250 V. For AC supplies
between 90-105 V and 180-215 V, only two clicks will be heard.
b) Center fan(s) turns on.
c) Power supply LED’s on (visible through the top of the chassis)
If the unit still does not power up, unplug the unit and continue to step 8.
8. Remove the user panel and check the AC mains board for damaged components or a
burned electronics smell. Usual mode of failure is a damaged thermistor (the round disc next
to Relay 1). If the AC mains board is damaged, it will have to be replaced.
9. If the AC mains board appears undamaged, remove the Board. To do this, remove the
sense cable (gray ribbon cable) and the transformer primary connector (8 wire green
connector) from the AC mains board.
© 1998 Meyer Sound Laboratories, Inc. All rights reserved.
Self-Powered Concert Series
Service Manual
Doc #:
Rev.:
Date:
Page:
05.033.040.01
A
08/31/98
20 of 26
MP-2/4 Amplifier
10. While firmly holding the AC mains board, remove the three (3) screws on the top of the
chassis and remove the board.
11. If the unit was subjected to overvoltage conditions (> 270 VAC), the AC mains board fuse
could be damaged. Locate the fuse (F1) on the AC mains board (between Relay 1 and the AC
input connector) and check the continuity with an ohmmeter. If the fuse is open, the AC
mains board will have to be replaced. Refer to Meyer Sound Self Powered Series MP-2/4 AC
Mains Service Procedure (# 17.033.022.01).
12. If the AC mains appears to be fine, try replacing the board with a known good one (either
a new one or from another unit). Install the good board and repeat the power up sequence
described in step 7.
13. If the unit still will not power up, it is likely that the power supply sub-module is
damaged. As power supply sub-module failures are rare, it is recommended that you return
the unit to the nearest authorized service center for further evaluation.
C. Unit powers up and immediately shuts off:
This condition is typically an indication of partial MOSFET failure. Generally, when one side
of a two channel amplifier has shorted MOSFETs, a large DC offset is created on that side
from the voltage supply rails. The amplifier sensing circuits detect this condition on powerup, send a fault signal, and the amplifier shuts off. Please refer to Section A for troubleshooting information.
Note 1: If the unit is excessively hot (i.e. the heatsink > 80 °C), it will shut off. Let the unit cool
sufficiently and try again.
Note 2: If the unit exhibits this condition and the TELO number on the Amplifier/heatsink module
is between 4400 and 5000, there may be a resistive bridge due to contamination on the traces near C2
and Q9. This was corrected by a jumper wire between R27 and C16 on the Amp/heatsink module. If
the Amp/heatsink module is in the mentioned range and does not have the jumper, the module needs
to be replaced.
Note 3: If the unit only exhibits this condition occasionally, it may be a temperature sensor on the
Amp/heatsink sub-module. On older units, prior to June 1995, the temperature sensor occasionally
caused a false fault trigger on power up. This was corrected by a resistor change on the Amp/heatsink
module. Locate R38 on the circuit board (top left edge of the board) and check the value. It should be
1.5k (color code: Brown, green, black, brown, brown [1% tol.] ). If the value is incorrect, the Amp/
heatsink module should be replaced.
© 1998 Meyer Sound Laboratories, Inc. All rights reserved.
Self-Powered Concert Series
Service Manual
Doc #:
Rev.:
Date:
Page:
05.033.040.01
A
08/31/98
21 of 26
MP-2/4 Amplifier
D. Unit powers up but does not unmute (pass signal):
1. If the amplifier is in the speaker cabinet, remove the eight (8) large head screws that attach
the amplifier to the cabinet. As you slowly remove the amplifier from the cabinet, look at the
green speaker connector(s) on the top of the amp chassis. Make sure that the connector(s)
is fully seated. If it is not fully seated, seat the connector and push the amplifier back in the
cabinet. Apply power and signal. If the unit still does not pass signal, unplug the unit and
remove it from the cabinet.
2. Make sure to check the drivers in the cabinet for shorts or opens. Refer to Low Driver
Inspection and Evaluation Procedure for Self Powered Series Products (# 17.010.120.01) and
to High Driver Inspection and Evaluation Procedure for Self Powered Series Products (#
17.010.120.02) If the drivers are fine proceed to troubleshoot the amplifier.
Note: High drivers will have a capacitor in series making resistance measurements inaccurate. High
drivers can best be reached by removing the closest handlecup on the cabinet.
3. With the amplifier sitting on a firm surface, remove the eight (8) small head screws from
the user panel.
4. While slowly removing the user panel, disconnect the audio signal cable from the input
board on the user panel by disengaging the gray connector. Also disconnect the AC input
connector (4 wire green connector) on the AC mains board.
5. Check the sense cable (gray ribbon on AC mains board) connection. Make sure that it is
connected properly.
6. Replace the user panel and attach a load to the amplifier. If you are using a resistor as a
load, attach a voltmeter to the output as means to monitor the output. If you are using the
cabinet, simply connect the speakers. Apply power to the unit and input a signal.
7. If the unit still does not un-mute, the muting relay circuit on the control board or the
muting control circuit on the Power Supply module could be damaged.
8. Replace the control board with a known good board (make sure that it is the same type).
Refer to Meyer Sound Self Powered Series TruPower Limiting Upgrade Procedure (#
17.033.042.01 for MP-2 and # 17.033.042.02 for MP-4 ). If the unit still does not un-mute, the
Power Supply module is probably damaged. As Power Supply module failures are rare, it
is recommended that you return the unit to the nearest authorized service center for further
evaluation.
© 1998 Meyer Sound Laboratories, Inc. All rights reserved.
Self-Powered Concert Series
Service Manual
Doc #:
Rev.:
Date:
Page:
05.033.040.01
A
08/31/98
22 of 26
MP-2/4 Amplifier
E. Unit powers up but Active LED does not light and signal does not pass:
1. If the amplifier is in the speaker cabinet, remove the eight (8) large head screws that attach
the amplifier to the cabinet. Remove the amplifier from the cabinet slowly, taking care to
unplug the green speaker connector(s) on the top side of the amplifier.
2. With the amplifier sitting on a firm surface, remove the eight (8) small head screws from
the user panel.
3. While slowly removing the user panel, disconnect the AC input connector (4 wire green
connector) on the AC mains board. Check the audio ribbon cable connection on the Audio
Input board. If the connection is loose, reconnect the audio ribbon cable firmly. Reconnect
the AC input connector, reattach the user panel to the unit, and repeat the power up
sequence. If the connection is correct, disconnect the audio signal cable from the input board
on the user panel by disengaging the locking gray connector.
4. Remove the amplifier chassis cover and verify that the audio ribbon cable connection on
the control board is connected properly.
5. Using an ohmmeter, check the continuity of the audio ribbon cable from end to end or
replace the ribbon cable with a known good cable (either new or from another unit).
6. Replace the user panel and retry. If the unit still does not pass signal, the control board
could be damaged.
7. Replace the control board with a known good control board (make sure it is the same type)
and retry. Refer to Meyer Sound Self Powered Series TruPower Limiting Upgrade Procedure (# 17.033.042.01 for MP-2 and # 17.033.042.01 for MP-4).
8. If the unit still does not operate correctly, use a magnifying glass to inspect the solder joints
of the locking gray connector on the PCB of the Audio Input board for cold or broken solder
joints. If bad solder joints are found replace the user panel with a known good panel (either
new or from another unit) and try the power up sequence again.
Note: If the unit comes on and the audio signal passes, but the LED does not light, the Audio input
board probably has a bad LED.
9. If the unit still does not operate correctly, return it to the nearest authorized service center
for further evaluation.
© 1998 Meyer Sound Laboratories, Inc. All rights reserved.
Self-Powered Concert Series
Service Manual
Doc #:
Rev.:
Date:
Page:
05.033.040.01
A
08/31/98
23 of 26
MP-2/4 Amplifier
F. Unit turns on and off in a cyclical fashion:
1. Check the AC line for fluctuation or sag under load. This can be best achieved by using
a "Y" connector on your power cable. Connect one side of the "Y" to the amplifier and the
other side of the "Y" to a voltmeter. Monitor the voltage as the unit turns on and during use.
2. If the line voltage is stable, try replacing the AC mains board with a known good one. Refer
to Meyer Sound Self Powered Series MP-2/4 AC Mains Service Procedure (# 17.033.022.01).
3. If the unit still cycles on/off, return the unit to the nearest authorized service center for
further evaluation.
G. Unit turns on, but no signal passes or signal intermittent:
1. With the unit on, check the audio signal source for adequate input level. Also check that
signal passes with a known good unit.
2. If the signal level is adequate, check the signal cable for intermittent connections. This can
be accomplished by moving the signal cable back and forth at each end and at various places
within the cable length. Flip the input polarity switch two times and listen for any change
in level.
3. Check to see if the XLR jack is firmly locked in place and that it does not move inward when
engaged.
4. Turn the unit off and slowly remove the amplifier from the cabinet so that the output
harness is visible. Verify that the output harness is firmly seated within the mating
connector. Also check for loose wires within the output harness connector.
5. Verify that the output harness is firmly connected to the drivers. This can be done by
removing the driver from the cabinet or by using a ohmmeter to measure the resistance of
the drivers. Note: High drivers will have a capacitor in series making resistance measurements
inaccurate. High drivers can best be reached by removing the closest handlecup on the cabinet.
6. With the amplifier sitting on a firm surface, remove the eight (8) small head screws from
the user panel.
7. While slowly removing the user panel, disconnect the audio signal cable from the input
board on the user panel by disengaging the gray connector. Also disconnect the AC input
connector (4 wire green connector) on the AC mains board.
8. Using a magnifying glass, inspect the solder joints of the Audio Input board for broken
solder joints. Inspect the locking gray connector and the XLR connectors. Check if resistors
R2 and R3 (located in between the XLR connectors) are not burned.
© 1998 Meyer Sound Laboratories, Inc. All rights reserved.
Self-Powered Concert Series
Service Manual
Doc #:
Rev.:
Date:
Page:
05.033.040.01
A
08/31/98
24 of 26
MP-2/4 Amplifier
If broken solder joints or burned resistors are found, the Audio Input board will need to be
replaced.
Note: Ground loops carrying high voltages can burn some resistors and traces in the Audio Input
board. To replace the board remove the screw on top of the board and unlock the XLR connectors from
their shells turning the small self -locking pins on the center of the XLR counterclockwise.
9. Replace the Audio Input Board with a known good board (either new or from another
unit), power up the unit and test it again. If signal is still not present, remove the chassis cover
from the amplifier and verify that the audio ribbon on the control board is properly
connected.
10. If all else fails, try replacing the Control board. Replace the Control board with a known
good Control board (make sure it is the same type) and retry. Refer to Meyer Sound Self
Powered Series TruPower Limiting Upgrade Procedure (# 17.033.042.01 for MP-2 and #
17.033.042.01 for MP-4).
11. If the unit still does not operate correctly, return it to the nearest authorized service center
for further evaluation.
H. Unit hums or has noise:
1. Disconnect the audio signal from the source and see if the noise goes away. If the noise
goes away, there is a problem with the audio source.
2. If the noise does not go away, disconnect the audio cable from the amplifier. If the noise
goes away, check the wiring of the signal cable. The audio signal cable should be wired in
a "balanced" configuration; that is, the audio signal should be present between pins 2 & 3,
never between 1 & 2 or 1 & 3.
3. If the unit has hum or noise without a signal cable connected, turn the unit off and slowly
remove the amplifier from the cabinet.
4. With the amplifier sitting on a firm surface, remove the eight (8) small head screws from
the user panel.
5. While slowly removing the user panel, disconnect the audio signal cable from the input
board on the user panel by disengaging the gray connector. Also disconnect the AC input
connector (4 wire green connector) on the AC mains board.
6. Using a magnifying glass, inspect the solder joints of the Audio Input board for broken
solder joints. Inspect the locking gray connector, the XLR connectors and the Input polarity
switch. Check if resistors R2 and R3 (located in between the XLR connectors) are not burned.
© 1998 Meyer Sound Laboratories, Inc. All rights reserved.
Self-Powered Concert Series
Service Manual
Doc #:
Rev.:
Date:
Page:
05.033.040.01
A
08/31/98
25 of 26
MP-2/4 Amplifier
If broken solder joints or burned resistors are found, the Audio Input board will need to be
replaced.
Note: Ground loops carrying high voltages can burn some resistors and traces in the Audio Input
board. To replace the board remove the screw on top of the board and unlock the XLR connectors from
their shells turning the small self -locking pins on the center of the XLR counterclockwise.
7. Replace the Audio Input Board with a known good board (either new or from another
unit), power up the unit and test it again. If signal is still not present, remove the chassis cover
from the amplifier and verify that the audio ribbon on the control board is properly
connected.
8. If all else fails, try replacing the Control board. Replace the Control board with a known
good Control board (make sure it is the same type) and retry. Refer to Meyer Sound Self
Powered Series TruPower Limiting Upgrade Procedure (# 17.033.042.01 for MP-2 and #
17.033.042.01 for MP-4).
9. If the unit still does not operate correctly, return it to the nearest authorized service center
for further evaluation.
I. Unit's output degrades when paired with other units:
1. Check the polarity switch setting against the other cabinet.
2. Make sure that all the audio signal cables are wired the same.
3. If the drivers have been changed recently, check the driver wiring for correct polarity.
Refer to Driver Inspection and Evaluation Procedure for Self Powered Series Products ( Low
Driver #17.010.120.01 and High driver #17.010.120.02) for correct polarities and pinouts.
Note: All speakers shipped from Meyer sound are acoustically tested for phase accuracy.
4. Check to see that the units in question are either all TPL or all non-TPL. Using TPL and
non-TPL together may produce audible differences at the different limiting thresholds.
© 1998 Meyer Sound Laboratories, Inc. All rights reserved.
Self-Powered Concert Series
Service Manual
Doc #:
Rev.:
Date:
Page:
05.033.040.01
A
08/31/98
26 of 26
MP-2/4 Amplifier
J. Unit has distorted output:
1. Try running the same signal (individually, not looped) into two similar units. If both
units are distorted, check the signal source level for overload.
2. If only one unit has distorted output, perform driver evaluations. Refer to Driver
Inspection and Evaluation Procedure for Self Powered Series Products ( Low Driver
#17.010.120.01 and High driver #17.010.120.02).
3. Replace the Control board with a known good control board (make sure it is the same type)
and retry. Refer to Meyer Sound Self Powered Series TruPower Limiting Upgrade Procedure (# 17.033.042.01 for MP-2 and # 17.033.042.01 for MP-4).
4. If the unit still does not operate correctly, return it to the nearest authorized service
center for further evaluation.
© 1998 Meyer Sound Laboratories, Inc. All rights reserved.