1
[ ENGLISH
]
[ ESPAI_OL
DVD Camcorder
Videoc mara
SC-DC563/DC564/DC565
SC-DC563/DC564/DC565
]
con DVD
AF
Auto Focus
AF
Autofoco
CCD
Charge Coupled Device
CCD
Dispositivo
acoplado
porcarga
LCD
Liquid Crystal Display
LCD
Pantallade cristal liquido
Manual de instrucciones
Antes de utilizar la camara lea detenidamente
Owner's Instruction Book
Before operating the unit, please read this
instruction Book thoroughly, and retain it for
future reference.
[ US PATENT 4415844
este manual de instrucdones y conservelo para
consultas posteriores
J
Use only approved battery packs
Otherwise, there is a danger of overheating,
fire or explosion
Samsung is not responsible for problems
occurring due to using unapproved batteries.
Utilice Qnicamente baterias aprobadas
De Io contrario, existe peligro de
sobrecalentamiento, incendio o explosi6n.
Samsung no se hace responsable de
problemas que se produzcan debido al uso
de baterias no aprobadas.
r_w
Dvg÷R_W_it_b_e
OVD÷r
DL
AD68-01079B
[ ENGLISH
]
[ ESPANOL
Contents
o
-
-
Contents
_
o
+
+
_
-
+ _
_
+
•
[I
|
+ +
+
•
+-
00
+
.
.
_Q
.
+
+
•
II
I
.............................................................................. 11
Usable Discs ...................................................................... 12
Caracteristicas .................................................................... 11
Discos utitizables ................................................................ 12
Disc Type Description .........................................................
How to use the DVD Camcorder easily ..............................
Accessories Supplied with the DVD Camcorder ................
Front & Left View ................................................................
Left Side View .....................................................................
Descripci6n det tipo de disco .............................................. 13
C6mo utitizar la Videocamara con DVD ............................. 14
Accesorios incluidos con la Videocamara con DVD ........... 15
Features
13
14
15
16
17
Right & Top View ................................................................ 18
Rear & Bottom View ........................................................... 19
Remote Control (SC-DC564/DC565 only) .......................... 20
D
-o+
+
Q
Using the Hand Strap & Lens Cover .................................. 21
Lithium Battery Installation ................................................. 22
Using the Lithium Ion Battery Pack .................................... 23
Connecting a Power Source ............................................... 27
About the Operating Modes ............................................... 28
Using the Joystick .............................................................. 28
Using the QUICK MENU .................................................... 29
OSD (On Screen Display) in Camera Mode/Player Mode .. 30
OSD (On Screen Display) in MCam Mode/M Player Mode.. 31
Turning the OSD (On Screen Display) On/Off .................... 31
A
Vistas frontal y laterat izquierda .......................................... 16
Vista lateral izquierda ......................................................... 17
Vistas superior y lateral derecha ........................................ 18
Vistas posterior e inferior .................................................... 19
Mando a distancia (s61oSC-DC564/DC565) ...................... 20
+++
+
+
Utilizaci6n de la empuSadura y la tapa del objetivo ........... 21
lnstaiaci6n de la pita de Iitio ............................................... 22
Utiiizaci6n de la bateria de Jonesde litio ............................ 23
Conexi6n a una fuente de atimentaci6n ............................. 27
lnformaci6n sobre los modos de funcionamiento ............... 28
Utilizaci6n del Joystick ....................................................... 28
Uso de QUICK MENU ........................................................ 29
OSD(Presentaci6nen pantalla)en CameraMode/PlayerMode.. 30
OSD(Presentaci6nen pantalla)en M.OamMode/M.PlayerMode..31
Encendido / apagado de OSD (presentaci6n en pantalta). 31
]
[ ENGLISH
]
[ ESPANOL
Contents
Contents
i
Setting the Clock (Clock Set) .............................................
Setting the Wire{essRemote Control Acceptance
(Remote) (SC-DC564/DC565 on{y) ....................................
Setting the Beep Sound (Beep Sound) ..............................
Setting the Shutter Sound (Shutter Sound) ........................
Selecting the OSD Language (Language) .........................
Viewing the Demonstration (Demonstration)......................
•
]
-
a
I
o .
-
-
32
33
34
35
36
37
:
-
.
i
-
o-
-
-
Ajuste de{ reloj (Clock Set) .................................................
Ajuste de aceptaci6n de control remoto inalambrico
(Remote) (s61oSC-DC564/DC565) ....................................
Ajuste de{ sonido Beep (Beep Sound) ...............................
Ajuste de{ sonido del obturador (Shutter Sound) ...............
Selecci6n de{ idioma de OSD (Language) .........................
Visualizaci6n de la demostraci6n (Demonstration) ............
32
33
34
35
36
37
o
Adjusting the LCD Screen (LCD Bright/LCD Color) ........... 38
Ajuste de la pantalla LCD (LCD Bright/LCD Color) ............ 38
Displaying the Date/Time (Date/Time) ................................ 39
Visualizaci6n de la fecha y hera (Date/Time) ..................... 39
Using the Viewfinder ...........................................................
Various Recording Techniques ...........................................
Inserting and Removing a Disc ..........................................
Selecting the Record Mode (Rec Mode) ............................
Use del Visor ...................................................................... 40
It
II
.
•
e-
._.
°-
•
_
* ...................
40
41
42
44
,..t
Tecnicas diversas de grabaci6n ......................................... 41
lnserci6n y extracci6n de discos ........................................ 42
Selecci6n det modo de grabaci6n (Rec Mode) .................. 44
o-o
.
.
.
•
I
I
_o.
o_
_.
.
Making your First Recording .............................................. 45
Recording with Ease for Beginners (EASY.Q Mode) .......... 46
Using External Microphone ................................................ 47
Zooming In and Out ............................................................ 47
Primera grabaci6n .............................................................. 45
Grabaci6n con borrado para principiantes (Mode EASYQ)_. 46
Utilizaci6n del micr6fono externo ....................................... 47
Acercamiento y alejamiento de las imagenes .................... 47
Using the Fade In and Out (FADE) .................................... 48
Using Back Light Compensation Mode (BLC) .................... 49
Using the Color Nite ........................................................... 50
Utilizaci6n de aparici6n y desaparici6n gradual (FADE) .... 48
Utilizacbndelmodode compensaci6nde la luzde fondo(BLC)...49
Utilizaci6n de Color Nite ..................................................... 50
A
[ ENGLISH
]
[ ESPANOL
Indice
Contents
|
D
.
]
o
_
_o
.
-_
D
o
o
e
Cutting Off Wind Noise (Wind Cut) ..................................... 51
Setting the Shutter Speed & Exposure
(Shutter/Exposure) ............................................................. 52
Auto Focus / Manuat Focus ................................................ 53
Corte de ruido de{ viento (Wind Cut) .................................. 51
Ajuste de la exposici6n y la velocidad del obturador
(Shutter/Exposure) ............................................................. 52
Programmed Automatic Exposure Modes (Program AE) ... 54
Setting the White Batance (White Balance) ....................... 56
Enfoque autom. / Enfoque manual ..................................... 53
Modode exploraci6nautomatica programada(Program AE).. 54
Ajuste de balance de btanco (White Balance) .................... 56
Applying Digital Effects (Digital Effect) ............................... 56
Setting the 16:9 Wide mode (16:9 Wide) ........................... 60
Setting the Digital Image Stabilizer (DIS) ........................... 61
Zooming In and Out with Digital Zoom (Digital Zoom) ....... 62
Aplicaci6n de efectos digitales (Digital Effect) ....................
Ajuste del mode 16:9 Wide (16:9 Wide) .............................
Ajuste det Estabitizador digital de la imagen (DIS).............
Acercamiento
y alejamiento
delzoomconZoomDigital(DigitalZoom)..
|
D
.
•
o-
o
.
o-
.
0"
.
_
o-=
What is the thumbnail index? ............................................. 63
What's a Playlist? ............................................................... 63
|
|
.
•
o-
.
..................................
|
|
.
o 0-
"
.
-
0
, ,
_
|
|
o
- o-
,
.
_ _-
-g
_
Ij
•
,Que es el indice de miniaturas? ....................................... 63
Descripci6n de lista de reproducci6n ................................. 63
e-o
_,
Playing title scenes ............................................................. 64
Adjusting the Volume .......................................................... 64
Various Functions while in Player Mode ............................. 65
Zooming during Playback (PB ZOOM) ............................... 67
Deleting a title scene (Delete) ............................................ 68
Deleting a Section of a Title Scenes (Partial Delete) ......... 69
,
58
60
61
62
--
.
•
I
I
...........................
Reproducci6n de escenas del tituto ...................................
Ajuste del volumen .............................................................
Diversas funciones en mode Player ...................................
Aplicaci6n del zoom durante la reproducci6n (PB ZOOM).
Eliminaci6n de un titulo (Delete) ........................................
Eliminaci6n de la secci6n de un titulo (Partial Delete) ......
_
.
_
IP
.
o-
-o
00
o
o,
64
64
65
67
68
69
S
Creating a New Playiist (New Playlist) ............................... 70
Creaci6n de una nueva lista de reproducci6n (New Playlist). 70
Playing the Playlist ............................................................. 71
Deleting a Playlist (Delete) ................................................. 72
Reproducci6n de la {ista de reproducci6n .......................... 71
Eliminaci6n de una lista de reproducci6n (Delete) ............. 72
Adici6nde escenasa la listade reproducci6n(EditPlaylist-Add)..73
_
Scenes to Playlist (Edit Playlist-Add) ..................... 73
[ ENGLISH
]
[ ESPAI_OL
Contents
Indice
Changing the Order of Scene Playing within a Playlist
(Edit PIaytist-Move) ............................................................ 75
Deleting Scenes from Playlist (Edit Playiist-Delete) ........... 77
Deletinga Sectionof a Playlist (Edit Playlist - Partial Delete).. 78
Cambio del orden de reproducci0n de escenas dentro de
una lista de reproducci6n (Edit Playlist-Move) ................... 75
Biminaci6n
deescenasdelalistadereproducci6n
(EditPhylist-Delete)
.. 77
Eliminaci0nde la secci6n de una listade reproducci6n
(Edit Playlist - Partial Delete) ....................................................78
D
|
_
Q e_
--e-
-*J
Disc Information (Disc Info) ................................................
Editing the Disc Name (Disc Info-Rename) ........................
Formatting a Disc (Disc Format).........................................
Finalizing a Disc (Disc Finalize) .........................................
Playing Back on a PC with DVD drive ................................
Playing back a finalized disc on a DVD Player/Recorder...
Unfinalizing a Disc (Disc Unfinatize) ..................................
II
|
.
Q o-
_
•
.....................
80
81
82
83
84
84
85
_,
Setting the AV In/Out (SC-DC565 only) .............................. 86
Viewing Recordings on TV ................................................. 87
Copying a Disc onto a Tape................................................ 89
Recording(Copying)a TV Programor Video Tapeonto a Disc
(SC-DC565only) .................................................................. 90
Do
--
-
.
co-
Using a Memory Card (Usable Memory Card) (not supplied).. 91
Memory Card Functions ............................................... 91
Inserting a Memory Card .............................................. 91
Ejecting a Memory Card ............................................... 91
lnformaci0n de disco (Disc Info) .........................................
Edici6n del hombre del disco (Disc Info-Rename) .............
Formate de un disco (Disc Format) ....................................
Finalizaci6n de un disco (Disc Finalize) .............................
Reproducci6n en un PC con unidad de DVD .....................
Reproducci6n de un disco finalizado en un Reproductor/
Grabadora de DVD .............................................................
80
81
82
83
84
84
Anulaci6n de finalizaci6n de un disco (Disc Unfinaiize) _.. 85
Ajuste de AV In/Out (s6lo SC-DC165) ................................
Visualizaci6n de grabaciones en el TV ...............................
Copia de un disco en una cinta ..........................................
Grabaci6n(Copia) de un programa de TV o cinta de video en
un disco (s61o$0-DC565) ....................................................
Utilizaci6n de la tarjeta de rnemoria
(Tarjeta de memoria utilizable) (no suministrada) ..............
Funciones de la tarjeta de memoria .............................
lnserci6n de una tarjeta de memoria ............................
Expulsi6n de una tarjeta de memoria ...........................
86
87
89
90
91
91
91
91
]
[ ENGLBH
]
[ ESPAI_OL
Contents
Indice
Structure of Folders and Files on the Memory Card .......... 92
Selecting the Photo Quality (Photo Quality) ....................... 93
Selecting the Photo Size (Photo Size) ............................... 94
Setting the File Number (File No.) ...................................... 95
Using the Built-In Flash (SC-DC564/DC565 only) .............. 96
Taking a Photo Image (JPEG) on a Memory Card ............. 97
Viewing Photo Images (JPEG) ........................................... 98
Protection from accidental Erasure (Protect) ................... 100
Deleting Photo images and Moving images (Delete) ....... 101
Formatting the Memory Card (Format) ............................. 103
Recording Moving images (MPEG) on a Memory Card
104
Playing Moving Images (MPEG) on a Memory Card .......... 105
Recording Still images onto a Memory Card during DVD
playback ........................................................................... 106
Marking images for Printing (Print Mark) .......................... 107
Estructura de carpetas y archivos en la tarjeta de memoria .. 92
Selecci6n de la calidad fotografica (Photo Quality) ............ 93
Selecci6n del tamafio de foto con (Photo Size) ................. 94
Ajuste det n0mero de archive (File No.) ............................. 95
Utilizaci6n del flash incorporado (s61oSC-DC564/DC565).. 96
Capturade imagen de fete (JPEG) en la tarjeta de memoria_ 97
Visualizaci6n de imageries fotograficas (JPEG) ................. 98
Protecci6n frente a borrado accidental (Protect) .............. 100
Biminaci6n
de imagenes
fotograficas
y secuencias
devideo(Delete)..101
Formato de la tarjeta de memoria (Format) ..................... 103
Grabaci6n
desecuencias
devideo(MPEG)enlatarjetadememoria.104
Reproducd6n
desecuencias
devideo(MPEG)
enlatarjetadememoda105
Grabaci6n de fotografias en una tarjeta de memoria durante
la reproducci6n de DVD ................................................... 106
Marcaci6n de imageries para impresi6n (Print Mark) ....... 107
Printing Your Pictures-Using the PictBridge TM .................. 109
Connecting To a Printer (USB Connect) ..................... 109
Setting the Number of Prints ........................................ 110
Setting the Date/Time Imprint Option ........................... 110
Printing images ............................................................ 110
Canceling the Printing .................................................. 110
lmpresi6n de imagenes: Use de PictBridge TM .................. 109
Conexi6n a una impresora (USB Connect) ................ 109
Ajuste del n0mero de copias ....................................... 110
Ajuste de la opci6n Date/Time Imprint ......................... 110
lmpresi6n de imagenes ............................................... 110
Cancelaci6n de la impresi6n ........................................ 110
Using USB Interface .......................................................... 111
Selecting the USB Device (USB Connect) ........................ 113
installing DV Media PRO Program .................................... 114
Utilizaci6n de la interfaz USB ............................................ 111
A
Seleaci6n de{ dispositivo USB (USB Connect) .................. 113
lnstataci6n del programa DV Media PRO ......................... 114
]
[ ENGLISH
]
[ ESPAI_OL
]
Contents
Indice
Ulead Video Studio ............................................................ 115
Ulead Video Studio ............................................................ 335
Conexi6n a un PC ............................................................. 116
Desconexi6n del cabte USB ........................................ 336
Dtilizaci6n de la funci6n PC Camera ........................... 137
Connecting to a PC ........................................................... 116
Disconnecting the USB Cable ..................................... 116
Using the PC Camera Function ................................... 117
Using the USB Streaming Function ............................. 118
Using the removable Disk Function ............................. 118
Using Your DVD Camcorder Abroad ................................. 119
Q -
Qo
_
.................
J
Troubleshooting ................................................................ 120
Setting menu items ........................................................... 125
o-
•
Utiiizaci6n de la funci6n USB Streaming ..................... 118
Utilizaci6n de la funci6n de disco extraible .................. 118
Utilizaci6n de la Videocamara con DVD en et extranjero_ 119
=-_o
•
_-
Ha
-
_
...................
0
ResoIuci6n de probtemas ................................................. 120
Ajuste de opciones de menO ............................................ 125
®
A
[ ENGLISH
]
[ ESPANOL
Notes and Safety instructions
+ -
-_.
o
o
- +o .
+
•
-
|
Notas e instrucciones deeguridad
--
+ ._
- - -
-_ .
_
• +-
Please rotate the LCD Screen
carefully as illustrated.
Over-rotation may cause damage
to the inside of the hinge that
connects the LCD Screen to the
DVD Camcorder.
1 Openthe LCD Screen 90
degrees with your finger.
2 Rotate it to the best angle to
record or play.
• If you rotatethe LCD
Screen 180 degrees to the lens side, you can close the LCD
Screen with it facing out
• This is convenient during playback operations.
Refer to page 38 to adjust brightness and color of the LCD Screen.
1
2
3
4
]
. +.
.
.
|
Gire cuidadosamente la pantalla
LCD como se indica en la figura
Si se gira demasiado se puede
estropear la blsagra interior de
union de la pantalla LCD con la
Videocamara con DVD
1 Abra con el dedo la pantalla
LCD formando 90 grados con
la videocamara.
2 Girela ai mejor angulo para
grabar o reproducir
. Si gira la pantalla LCD 180
grades hacia el lade de la
I
lente+puedecerrar la pantalla LCD con el frente hacia afuera.
• Esto resulta practico durante las operaciones de reproduccion
Consulte la pagina 38 para ajustar el brillo y el color de la pantalla LCD
+ +_+ o o
J
-++
-j
Direct sunlight can damagethe
LCD Screen, the inside of the
Vlewfinder or the Lens Take
pictures of the sun only in low
light conditions, such as at dusk.
The LCD Screen has been
manufactured using high
precision technology
However, there may be tiny
dots (red, blue or green in
color) that appear on the LCD Screen. These dots are normal and
do not affect the recorded picture in any way.
Do not pick up the DVD Camcorder by holding the Viewfinder, LCD
Screen or Battery Pack.
Applying excessive force to the Viewfinder may damage it.
+ _
--_.
.
._/,///'J&//
-..-
_'r_t_,_
f_..
( F'_ +
_
_
_
|
|
_
•
1
.
|
-+
o+
-
o
La luz directa del sol puede
daOar la pantalta LOD, el
interior.del visor o et objetivo.
Tome _magenes del sol
s61ocon condiciones de luz
_+
,_
/
escasa, como a, anochecer.
_")4_-x__
2 Para la fabricacion de la
" _'_.-"_,_'z_--_
_
I
pantalla LCD se ha empleado
._
_._T_ _
I
tecnologia de alta precision.
_/f_
i "_
)
Sin embargo, pueden
/t_/('k+ _)
aparecer en ella puntitos
,1.___'_/
rojos, azules o verdes. Esta situacion ee normal y no
_--..._"_.
_[.7 afecta en mode alguno a la grabacion
3.__No agarre la Videocamara con DVD sujetando el visor,
La aplicaciOn de fuerza excesiva en el visor puede da_arlo.
4.
la pantalla LCD o la bateria
[ ENGLISH
]
[ ESPAI_OL
Notes and Safety instructions
Notas e instrucciones de seguridad
=
Take care not to touch the recording side (the rainbow colored side)
of the disc with your fingers. Discs contaminated by fingerprints or
foreign substances may not play propedy.
•
=
Use a soft cloth to clean the disc.
]
Tenga cuidado de no tocar con los dedos e{ lado de grabad6n (el
lade con colores del arco iris) del disco. Los discos marcados con
huellas dactilares o sustancias extraSas pueden impedir que los
discos se reproduzcan correctamente.
Utilice un paso suave para limpiar los discos.
Clean lightly from the center of a disc to the
outside edge. Circling or cleaning too hard may
create scratches on the disc and further cause
the disc to play abnormally.
Limpielos levemente desde el centre del disco
hacia el borde exterior. Limpiar en circulo o con
demasiada fuerza puede rayar el disco e impedir
que se reproduzca con normalidad.
Do not use benzene, thinner, detergent, alcohol
or anti-static spray when cleaning the disc.
it may cause a malfunction.
No utilice benceno, disolvente, detergente,
alcohol ni pulverizadores antiestaticos al limpiar
el disco.
Puede hacer que el disco funcione de forma
defectuosa
=
Press the supporting holder in the center of the
disc case for easy removal of the disc
=
Handle discs by the edges and the center hole to
avoid finger marks on the recording side.
=
Do not bend or apply heat to the disc.
Sujete los discos por los bordes y e! orificio
central para evitar marcas de dedos en el lado
de grabacion del disco
=
Always store discs vertically in their plastic cases
when not in use.
No doble ni aplique calor al disco
=
Store discs away from direct sunlight, heating
elements, moisture or dust
Presione el soporte de sujecion del centre de la
caja del disco para extraer el disco con facilidad.
Guarde siempre los discos verticalmente en sus
fundas de plastico cuando no se utilicen
Guarde los discos fuera del alcance de la luz
directa de! sol, de generadores de calor, de la
humedad y del polvo
A
[ ENGLISH
]
[ ESPAI_OL
Notes and Safety instructions
_ ,
-_.
a
o |
II
.
• o-
•
• ._
•
-
-o.
e
_
o_
o
|
•
,
•
•
- - -
-_ .
.
=-_
. .
•
|
|
NO deje la Videocamara con DVD expueeta a aitas temperaturas
(por encima de 60 °C o 140 °F)
Por ejemplo, en un vehiculo aparcado al sol o expueeto a la luz
directa del sol
No permita que la Videocamara con DVD se moje. Mantenga la
Videocamara con DVD alejada de la Iluvia, del agua de mar y de
caalquier otro tipo de humedad.
Si la Videocamara con DVD se moja puede estropearse. En
algunas ocasionee, los daSos causados por liquides no pueden
repararse.
Una subida repentina de la temperatura puede producir
condensaci6n en el interior de la Videocamara con DVD
- Cuando traslade la Videocamara con DVD desde un lugar frio a
uno calido (p. ej. desde el exterior at interior en invierno.)
- Cuando se traslada la Videocamara con DVD de un sitio
temp_ado a uno caliente (por ejemplo, de un espacio irrterior a
uno exterior en verano).
•
Television programs, video tapes, DVD titles, films, and other program
materials may be copyrighted.
Unauthorized copying of copyrighted material may be against the law.
All the trade names and registered trademarks mentioned in this
manual or other documentation provided with your Samsung product
are trademarks or registered trademarks of their respective holders.
,
•
Notas e instrucciones de seguridad
Do not leave the DVD Camcorder exposed to high temperatures
(above 60 °C or 140 °F).
For example, in a parked car in the sun or exposed to direct
sunlight.
Do not let the DVD Camcorder get wet. Keep the DVD Camcorder
away from rain, sea water, and any other form of moisture.
The DVD Camcorder may get damaged if it gets wet. Sometimes a
malfunction due to exposure to liquids cannot be repaired
A sudden rise in atmospherictemperature may cause condensation
to form inside the DVD Camcorder.
- When you move the DVD Camcorder from a cold location to a
warm location (e.g. from outside to inside during the winter.)
- When you move the DVD Camcorder from a cool location to a
hot location (e.g. from inside to outside during the summer.)
•
Do not attempt to service this DVD Camcorder yourself.
Opening or removing covers may expose you to dangerous voltage
or other hazards.
Refer all servicing to qualified service personnel.
When replacement parts are required, be sure the service technician
has used replacement parts specified by the manufacturer that have
the same characteristics as the original parts.
Unauthorized substitutions may result in fire, electric shock or other
hazards
]
6
_
e
.Oe
_
e=
O
t
•
_
,
Es probable que los programas de television, las cintas de video, los
DVD, las peliculas y otros materiales audiovisuales tengan registrados
sus derechos de reproduccion.
La copia no autorizada de material protegido por dichos derechos
puede quebrantar la ley.
Todos los nombree de marcas y marcas comerciales registradas
mencionados en este manual o el resto de documentacion facilitada
con el producto Samsung son marcas comerciales o mamas
registradas de sus respectivos propietarios.
-
t
6 -
.
o-
-6
-
•
No intente reparar la Videocamara con DVD pot si solo.
La apertura o retirada de cubiertas puede exponerle a sedos
voitajee u ofros peligros.
Confie las reparaciones a personal tecrico califlcado.
Cuando se neceeiten piezas de repueeto, aseg_rese de que el
tecnico utiliza piezas especificadas por el fabricante o que tengan
las mismas caractertsticas que la pieza original.
Los repuestos no autorizados pueden producir incendios,
descargas electricas u otros peligros
[ ENGLISH
]
Getting to Know Your DVD Camcorder
=
•
•
•
•
=
•
=
•
•
•
•
•
•
DVD Disc Camcorder
DVD-VIDEO Recording with 3 I/2inches (8cm) DVD-RW/+RW/-R/+R DL
(Dual Layer) discs
High Power Zoom Lens
Offers you 26x High Power Zoom Lens.
UBB Interface for Digital Image Data Transfer
You can transfer images to a PC using the USB interface without an add-on
card
Photo Capture
The Photo Capture function lets you capture the scene you want while the disc is
in play, and save as a still image on a Memory Card
12O0x Digital Zoom
Allows you to magnify an image up to 1200 times itsodginal size.
Color TFT LCD
A high-resolution color TFT LCD gives you clean, sharp images as well as the
ability to review your recordings immediately
Digital Image Stabilizer (DIS}
The DIS compensates for any handshake, reducing unstable images,
particularly at high magnification.
Various Digital Bffects
The Digital Effects allow you to give your recordings a special look.
Back Light Compensation (BLC)
The BLC function compensates for the bright background behind a subject
youre recording
Program AE
The Program AE enables you to alter the shutter speed and aperture to suit
the type of scene/action to be recorded
Digital Still Camera Function
- Using a Memory Card, you can easily record and playback standard photo
images
- You can transfer standard photo images on a Memory Card to your PC
using the USB interface
Moving Image Recording
Moving image recording makes it possible to record video onto a Memory
Card.
Multi Memory Card Slot
Multi Memory Card slot that is compatible with Memory Stick (Duo),
Memory Stick PRO, MMC and SD
Multi OSD Language
You can select the desired OSD language from OSD list
[ ESPANOL
Introduccibn
]
a la Videoc_,mara con DVD
Videoc_mara con disco DVD
Produccion de tituDs DVD-VIDEO con discos DVD-RW/+RW/-R/+R DL
(Doble capa) de 3 1/2puig (8cm).
Objetivo con zoom de gran potencia
Ofrece una ]ente de zoom de gran potencia de 26x
Interfaz USB para transferencia de datos de imageries digitales
Es posib]e transferir imageries al ordenador pot medic de la interfaz USB
sin necesidad de una tarjeta adicionaL
Captura de foto
La funci6n Photo Capture permite capturar la escena que desee mientras
se reproduce el disco y guardaba como una imagen fotografica en la tarjeta
de memoria.
Zoom digital 1200x
Permite ampliar la imagen hasta 1200 veces su tamaSo original
LCD TFT en color
El sistema de color de alta reso]uci6n TFT de la pantalla LCD proporciona
imagenes claras y nitidas a la vez que permite ver Ins grabaciones
inmediatamente
Estabilizador digital de la imagen (DIS)
El DIS compensa los movimientos de la mano reduciendo la inestabilidad
de ins imagenes, especialmente cuando estas Qltimas se graban con una
gran ampliaci6n
Efectos digitales diversos
Los efectos digitales permiten dara la grabaci6n un aspecto especial al
permifir aSadir diversos efectos especiales.
Compensaci6n
de luz de fondo (BLC)
La funci6n BLC compensa el bbllo que puede aparecer detras del objeto
que se graba.
Program AE
El programa AE permite modificar ]a velocidad y la apertura del obturador
para que se ajuste a la escena que se vaya a grabar
Funcion de camara fotogr&fica digital
- Con la tarjeta de memoba, puede f&cilmente grabar y reproducir
fotografias estandar
- Puede transferir imagenes fijas est&ndar de su tarjeta de memoria a su
PC utilizando ]a interfaz USB
Grabaci6n de secuencias de video
La grabacion de secuencias de video posibilita la grabacion de video en
una tarjeta de memoria.
Ranura para diversas tarjetas de memoria
Ranura para varias tarjetas de memoria compatible con Memory Stick (Duo),
Memory Stick PRO MMC y SD.
OSD en varios idiomas
Puede seleccionar el idioma de la OSD en la fista de OSD
_.
[ ENGLISH
]
[ ESPANOL
Getting to Know Your DVD Camcorder
IntroducciSn a la Videoc_,mara con DVD
|
DVD R _ DVD RW (3/Qinch
•
._
-
DVD R _ DVD RW (3 _2 pulg (8 cm))
(Scll))
_rw
_w
D//D+RW
DVD+RW (31 '2 pullg (8 ca))
(3 E2inch (Scm))
Dw_r_w_i_ar,_
_vg+r_w_r_'le
DVD+R DL (Calla dobie) (31 '2 pulg (8 cn/))
DVD+R DL (Dua] Layel) (3 _2inch (Scm))
D_+r DE
You may not use 5inch
Unusable
CD
(12cm)
3 1/2inch (8cm)
CD/DVD
discs.
discs
CD-R
CD-RW
DVD-ROM
DVD+R (Single
DVD-RAM
DVD-R
Floppy
•
(Dual
Layer)
Layer)
Disk, MO, MD, iD, LD
We are not responsible
]
for data loss on a disc.
You may not be able to play discs recorded from a PC or DVD
recorder. When such a case occurs, the message, Bad Disc! may
be displayed
We do not warranty any damage or loss incurred due to recording
and playback failure caused by disc or card malfunction.
We take no responsibility and offer no compensation for any
recording failure, loss of recorded or edited material and/or damage
to the recorder arising from the misuse of discs
DVD+_L
No es posible utilizar discos CD/DVD de 5 pulg. (12 cm)
Discos inutilizables de 31/2 pulg. (8 cm)
CD
CD-R
CD-RW
DVD-ROM
DVD+R (Una capa)
DVD-RAM
DVD-R (Doble capa)
Disquete, MO, MD, iD, LD
No nos hacemos responsables de perdida de datos en un disco.
Es posible que no pueda reproducir discos grabados desde un
PC o una Grabadora con DVD. Cuando se produce este caso, es
posible que aparezca el mensaje Bad Disc!.
No garantizamos los dafios o perdidas producidos por un fallo de
grabaci6n o reproduccion causados por un funcionamiento erroneo
del disco o de la tarjeta.
No nos responsabilizamos ni ofrecemos compensacion alguna por
cualquier fallo de grabacion, perdida de material grabado o editado
o daSos en la grabadora corno consecuencia del uso inadecuado
de discos.
[ ENGLBH
]
[ ESPAKIOL
Introducci6n
Getting to Know Your DVD Camcorder
II
_
_
|-
•
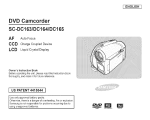
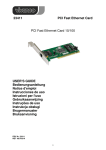
Disc Type
Mode
•
|-
DVD R
DVD+RDL
(3 1/2inch
(8cm))
(3//2inch
(8cm))
'
'
_
i
DVD:RW (3 1/2inch _Scm))
(3//2inch
(8cm))
Tipo de disco
I 4G
2 6G
Formatting a new disc
I) _F_age 43
ALrtu
Auto
o
Fo_mateo de un nuevo
disco _'_ _pagina 43
Recording _page 45
o
o
o
o
o
G_baci0n
Rewr te
x
x
o
o
o
Playback on o;her DVD
Players 4
(Finalize _!) _page 83
O
o
x
o
o
o
o
O
/ 4G
O
X
O
O
O
o®
Reproducci6n en otis
_p_ducto_s
de DVD _
(Finalizar@) _pagina 83
O
O
X
O
O @
o _
Reproducci6n en otis
G_badoms de DVD ®
O
O
O
O
O®
la finalizaci0n (Anu_r
finalizaci0n) _pagina 85
X
X
O
O
@
Edici6n _ p_gil7as 73¸-74
X
X
O
X
X
Reutilizaci6n de un
disco _rmateandolo
X
X
O
O
O
Editing _pages 73 74
X
x
x
®
Reus ng a dsc by
turmaaing
<: (Format} _page 82
X
x
o
o
o
, O uoss}ble / X not Possible /
disc
before
recording
guarantee
manufacturer's
PC's.
g)
For
device
you
Discs
must
that
DVD
compatibility
wish
you
will
Camcorders,
information,
to
play
be finalized
back
before
he able
DVD
not needed
(Forma_)
Refer
to the
DVD+RW
_?
page
14 for
play back
finalizing them.
You can
, O posible/X
to play
back
in all
refer
other
@
or
to the
manual
discs
do not need
be
played on
disc
standard
@
DVD
compatibility
Players/Recorderswithout
disc
no posib_e /
no necesano
pueda
discos
en el que
deben
desea
finalizarse
reproducir
de DVD
de compatibilidad,
en todos
los Grabadoras
de otros
fabricantes
o en
consulte
el manual
reproducir.
antes
de quepuedan reproducirse en
estandar
le compatibilidad de un disco
finalizado
¢_)
Puede reproducir discos DVD+RWen Reproductores Grabadorasde
DVD sin finalizarlos.
El disco
DVD+RW
finalizeci0n
to be FinalizediUnfinalized
on the disc is deleted
Los
que
Reproductores,Grabadorasde DVD
Consulte
la pagine 14 pare canocer
on DVD
formattinga recorded disc, the data recorded
disccapacityis restored, enablingyou to re-use the
When
garantizar
DVD, Reproductores/Grabadoras
Pare obtener
informacion
del dispositivo
they can
discs
No podemos
con
PC.
of the
on.
Finalized
DVD+RW
82
@ Debe formatear un nuevo disco antes de grabarlo.
@ AIcergarun disco DVD-RWdebeformateadoen modoVideo o VR
@ N cergar an disco DVD+RW,debe formatearlo.
Players/Recorders
(G)
_pagina
@
on it
Players/Recorders,
please
84
Gl_baci6rt adicional tras
O) Whenloadinga DVD-RWdiscyou mustformatit inVideo or VR mode
@ When loading a DVD+RW disc you must format it.
We cannot
45
O :_
X
o
_pagina
O ;
Rescritu_
o
_)
Automatico
O
o
a new
At tomatico
DVD÷RW
(31/2 pulg
(8 cm))
DVD RW (31/2 Pu!g (8 cln))
O
x
format
•
O
x
YOU must
a
DVD+R DL
{31/2 pulg
(8 cm))
O
X
,_)
®-
I / ,1G
O ('
_pagina
Addit onal Tecordil7g after
fi_Talization (U_Tfinaiize)
_page 85
_o
DVD R
(3112 pulg
(8 cm))
VR (Video Recording) I Video
Capacity
P_ayl_ck on othe_ DVD
Recorders 4 _page 84
a la Videoc_,mara con DVD
o-
DVD+RW
]
and
,z)
A] formatear
t se recupera
isco
la
no necesita
la funcion
de finalizeci0nianulaci6n
grebade, los datos grabedosen el disco
capacidaddel disco permitiendola reutilizacion
un disco
de
se borran
del
[ ENGUSH
]
[ ESPAI_OL
Getting to Know Your DVD Camcorder
Q
•
-
- i
|
.
• a-
Introducci6n
-.
YOUcan record any desired image and edit and playback the disc on a
DVD Camcorder most DVD players, and PCs after finalizing the disc.
•
•
.
]
a la Videoc_,mara con DVD
.
o-o
.
. .
Q
m
|
Puede grabar la imagen que desee asi come editar y reproducir el
disco en una Videocamara con DVD, en la mayoria de reproductores
de EVD yen PCs tras finalizar el disco
Selecting the desired disc and disc formatting _page 43
Selecci6n del disco que desea y formateo del disco
_pagina 43
You may edit only in DVD-RW (VR Mode) '-,page 69
S61opuede editar en DVD-RW (mode VR). _pagina 69
Los discos deben finalizarse antes de que puedan
reproducirse en Reproductores/Grabadoras de DVD
estandar.
Puede reproducir discos DVD+RW en otros
dispositivos sin finalizarlos.
Discs must be finalized before they can be played
on standard DVD Players/Recorders.
You may play back DVD+RW discs on other
devices without finalizing them.
DVD-RW (modo VR): Puede reproducir s61oen
Grabadoras de DVD que admitan e! modo DVD-RW VR
=pagina 84
DVD-RW(VR mode): You may play back only on DVD
Recorders that support DVD-RW VR mode "-page 84
PlayedReeorder
de disco
Modo
DVDR_+RDL
DVDRW
l/l/leo
//R
Tipo
DVD Player DVD Recolder
DVD Prayer DVD Recolder
DVD Recolder that supports DVD RW VR mode
=P]aybackis not guaranteedin all DVDPlayers/RecordersFor compatibility
details referto yourDVDPlayers/Recorder's
owner'smanual.
=Youcanplay backDVD+RWdiscson otherDVDPlayers/Recorders
without
finalizingthem.
•
•
La reproducci6n no esta garantizada en todos los Reproductores/Grabadoras
de DVD Para obtener informaci6n sobre compatibilidad, consulte el manual de
instrucciones del Reproductor/Grabadora de DVD
Puede reproducir discos DVD+RW en otros Reproductores/Grabadoras de DVD
sin finalizarlos
[ ENGLBH
]
[ ESPANOL
Getting to Know Your DVD Camcorder
-
•
-
,_g
_
L
l
-
|
D
.
®
a-
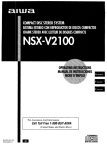
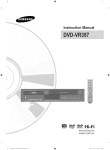
Make sure that the following basic accessories are supplied with your
DVD Camcorder.
Introducci6n
-
•
•
a la Videoc_,mara con DVD
ot
•
.
_-Q
.
.
Accessories
Lithium Ion Battery Pack
(SB-LSM80)
2 AC Power Adapter
(AA-E8 TYPE)
3. AC Cord
4 Multi-AV Cable
5 instruction Book/
Quick Guide
6 Lithium Batteries for
Remote Control (SCDC564/DC565 only) and
Clock (TYPE: CR2025)
7 Remote Control
(SC-DC564/DC565 only)
8. USB Cable
9 Software CD (DV Media
PRO, Ulead Video Studio)
10. Lens Cover
11. Lens Cover Strap
12. 3 1/2inch (8cm) DVD-RW
Disc (SC-DC565 only)
(SB-LSM80)
1
Optional
Accessory
13. Carrying Case
Parts and accessories
are available at your local
Samsung dealer
I I
Lithium bn Battery
Pack
]
2_
. •
|
|
Asegurese de que los siguientes accesorios basicos le hayan side
entregados junto con la Videocamara con DVD
Accesorios
Basic
J3AC_
]
b&sicos
1. Bateria de iones de litie
(SB-LSM80)
2. Adaptader de CA
(TIPO AA-E8)
3. Cable de CA
4. Cable Multi-AV
5. Manual de instrucciones
6. Bateria de litie para el
mando a distancia (solo
SC-DC564/DC565) y
reioj. (TIPO: CR2025)
7. Mando a distancia
(sdlo SC-DC564/DC565)
8. Cable USB
9. CD de software
(DV Media PRO,
Ulead Video Studio)
10. Tapa del objetivo
11. Correa de tapa del
objetivo
12. Disco DVD-RW de
3 l/2pulg. (Scrn)
(s61oSC-DC565)
Accesorios
ojocionales
13. Funda de transporte
Los componentes y
acceeorios se encuentran
disponibles en e! Servicio
tecnico de Samsung.
[ ENGLISH
]
[ ESPAi_OL
Getting to Know Your DVD Camcorder
Introduccibn
-
.
•
.
a la Videoc_mara con DVD
.
_
-
e
6.
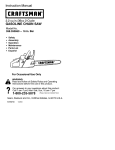
7. QUICK MENU Button
1. ACCESS Indicator
8. Joystick
2. OPEN Switch
(UplDownlLefllRightlOK)
g. EASY.Q Button
3. Lens
10, TFT LCD Screen
4. Built-In F_ash
(
5. Remote Sensor
(SC-DC5641DC565 only)
6. Internal MIC
1.
ACCESS Indicator =page42
1.
MdicadorACCESS
2.
3.
OPEN Switch =page 42
Lens
2.
Interruptor
3.
Objetivo
4.
Built-M Flash (SC-DC564/DC565 only) _page 96
4.
Flash incorporade (s61o SC-DC564/DC565) -,p_gina 96
5.
6.
Remote Sensor (SC-DC564/DC565 only)
Internal MIC
5.
Sensor de mando a distancia (sSIo SC-DC564/DC565}
6.
MIC interno
7.
QUICK MENU Button =page 29
7.
BotSn QUICK MENU =p_gina 29
8.
9.
Joystick(Up/Down/Left/Right/OK)
EASY,Q Button =page 46
8.
Joystick(arriba/abajo/izquierda/dereehalOK)
9.
Bot6n EASY.Q _p_gina 46
10.
TFT LCD Screen
10.
Pantalia
=page 28
]
=p_gina 42
OPEN =p_gina
LCD TFT
42
=p_gina 28
[ ENGLISH
]
[ ESPAI_OL
Introduccibn
Getting to Know Your DVD Camcorder
-
0-
1
a la Videoc_mara con DVD
-
1. MENU Sutton
2. DISPLAY Sutton
3. Mode Switch (DISC/CARD)
4. Built-In Speaker
it;t:::;
-- --8.
7. Charging
Jack CoverIndicator
--
10. Multi cable Jack
i
--
11. DO IN Jack
g. USB Jack
_UTIDISP.
!!'=![}!!
5. MF/AFIMULTI DISP. button
6. C.NITE/z_ (SC-DC564/DC565 only)
6. COLOR NITE (SC-DC563 only) --
_;_
12. VOL (-/+) Button
_13.
MENU Sutton
Mode Switch
9.
(DISC/BARD)
DISPLAYSpeaker
Built-In
Sutton
MF/AF/MULT]
_pages
6.
_page
DISP. Sutton
7.
8.
1.
11.
BB iN Jack
10.
12.
VOL
Multi (-/+)
cabteSutton
Jack
13.
Function
Bot6n MENU
Interruptor
12'
Buttons
de Mode
Bot6n DISPLAY'.=pagina
(DISC/BARB)
Aitavoz
5.
Boton MF/AF/MULTI
6.
_pagina
C.N]TE/_
incorporado
6.
C.NITE/_
• M Player
only)
_Mode Mode
B._on _
COLOR NITE
(SC-DC563 onZy) _,page 50
f,_,q
Charging
Indicator
Jack Cover
_1_i
B
<PJayerMode>
<CameraMode>
BackwardSearchSkip
FolwardSearchSkp
Play'Sti_l
FADE
Stop
BLC
i
Mode:
Memory
Player
Mode
<M.PlayerMode>
Photoimage
#,bvirlgirr/age
Backward
Backw_rrd
Skip
Search
Fo_,_ardSkp
SS_-0WfSLIOE
S 0_, ForwardSearch
Play'StII
Stop
DISE
53/98
(s6io SC-DC564/DC565)
_pagina
50
31
53/98
(SC-DC564/DD565
"page 50
61
31
USB Jack
Function Buttons (below)
7,
COLOR
NITE
(s6Zo SB-DC563)
Indicador
_pagina
de carga
8.
9.
Tapa de terminales
Terminal
USB
10.
Terrninal
de cable mt_ltiple
11.
12.
Terminal
DC IN
13.
Soton VOL (-/+)
Botones de funciones
_
50
[ ENGLISH
]
[ ESPANOL
Getting to Know Your DVD Camcorder
Introduccibn
a la Videoc_,mara con DVD
1. PHOTO Button,
2. Focus Adjustment
Knob
3. Viewfinder
4. External M[C Jack
5. Power Switch
6. Start/Stop
= 9. Hand Strap
Button
1.
PHOTO Button =page 97
1.
2.
3.
Focus Adjustment
Viewfinder
2.
Mando de ajuste de enfoque _p_gina
3.
Visor
4.
External MID Jack
4.
Terminal de micr6fono externo
5.
6.
7.
Power Switch (ON/OFF/I_
Start/Stop Button
Zoom Lever
5.
Interrupter
6.
7.
Bot6n StartlStop
Palanca delzoom
8.
Disc Cover
8.
Cubierta de disco
9.
Hand Strap
9.
Empui_adura
Knob =page 40
(Camera)/_(Player))
1
Bot6n PHOTO _p_gina 97
40
Power (ON/OFF/_(Camera)/_(Player))
[ ENGLISH
]
[ ESPAI_OL
Getting to Know Your DVD Camcorder
°_
; :Q
•
Introduccibn
-
.
g_
-
•
]
a la Videoc_mara con DVD
-
-
•
3. MULTICARDSLOT 4. Batter Releaseswitch
2.Tripod Receptacle
r
L
1. Lithium Batter
5. HandStra _Hook
1.
Lithium Battery Cover
2.
3.
Tripod Receptacle
MULTi CARD SLOT
4.
Battery Release switch
5.
Hand Strap Hook
Usable Memory Cards
1. Tapa de la pila de litio
2. Orificio para el tripode
3. RANURA MULTi CARD
SD
r_lr_lc
Memo_'J Stick
_,lemo_ Stick PRO
4. Interruptor
la bateria
de liberaoi6n de
5. Enganche de la empu5adura
[ ENGUSH
]
[ ESPANOL
Getting to Know Your DVD Camcorder
_-
•
-
•
•
|
,,
|
o
Introduccibn
•
•
oo
.
o
.
a la Videoc_mara con DVD
.
_e
o
II
o,_|
o
8. PHOTO
1. START/STOP
2. DISPLAY
9. WIT (Zoom)
3. i_1_/_1_1(Skip)
10. _l_ / _-1,(Search)
4. ! (Stop)
11. I11" (Slow)
5. _ H (Play/Still)
12. Q-MENU
6. MENU
7. Up(,,--)/Down(v)/Lef_(
< )lRight( >)/OK
--
SAMSUNG
1.
START/STOP
2.
DISPLAY -p_gina
t_ / _t,t(Skip)
3.
t_ I l_l,,I(Saltar)
4.
m (Stop)
4.
Ill (Parar)
5.
I_ll (Play/Still)
6.
MENU
5.
6.
I,II (Reproducir/Pausa)
MENU
7.
Up(^)lDown(v)lLeft(
8.
PHOTO
7.
8.
ArNba (^)/Abajo
PHOTO -p_gina
9.
W/T (Zoom)
9.
WIT(Zoom) =p_gina47
10.
,_._/ I,,_ (Buscar)
1.
START/STOP
2.
DISPLAY
3.
10.
-page
-page
12.
Q-MENU
< )/Right(
97
-page
,_.q / _-I,, (Search)
11. It_(Slow)
31
47
>)/OK
11. I1_(Lento)
12. Q-MENU
1
31
(v)/Izquierda (<)/Derecha
{)7
( >)/OK
[ ENGLISH
]
[ ESPAI_OL
Preparation
Preparacibn
It is very important to ensure that the Hand Strap has been correctly
adjusted before you begin your recording.
The Hand Strap enables you to:
Hold the DVD Camcorder in a stable, comfortable position.
Press the [Zoom] lever and [Start/Stop] button without having to
change the position of your hand.
Es muy importante asegurarse de que la empu_adura este
correctamente ajustada antes de empezar la grabacion.
La empuSadura permite:
Mantenga la Videocamara con DVD en una posicidn estable y
comoda.
Presionar la patanca [Zoom] y el boton [Start/Stop] sin tenet que
cambiar la posicion de la mano.
•
Hand
1
2
3
a
o-
.
-
e
.o
2
3
4
_the
.=.
®-
Qo
-
•
Inserte la empuSadura en su
r
'_ _'
2/
enganche.
1.
Tire y abra la empu_adura y liberela.
Em_u_adura
2.
Introduzca su mano en la empuSadura
y ajuste ta Iongitud.
3. Cierre la empu_adura
_1
I
Ta
1
.
Strap
Pull and open the Hand Strap and
release the Hand Strap
Insert the Hand Strap into the Hand
Strap Hook.
Insert your hand into the Hand Strap
and adjust its length.
Closethe Hand Strap.
Lens
.
]
a de1 o_Yetivo
Cover
Hook up the Lens Cover with the Lens
Cover Strap as illustrated.
Pull and open the Hand Strap and
release the Hand Strap
Hook up the Lens Cover Strap to the
Hand Strap and adjust it following the
steps as described for the Hand Strap.
Closethe Hand Strap.
Lens
Cover
after
O__[oeration
Press buttons on both sides of the Lens
Cover, then insert it so it covers the DVD
Camcorder Lens.
t
1. Enganche la tapa del objetivo con
su correa como se muestra en la
ilustraci6n
2. Abra la empuSadura y saque la
correa.
3. Enganche ta correa de la tapa del
objetivo y ajustela siguiendo los pasos
que se descdben para la empu5adura.
4. Cierre Faempu_adura
Colocaci6n de la ta_
tras utilizar la videoc_mara
Presione los botones de ambos lades
de la tapa del objetivo para que cubra el
objetivo de la Videocamara con DVD.
A
[ ENGLISH
]
[ ESPAI_OL
Preparacibn
Preparation
• .
Lithium Battery Installation
2
3
f
4
for the internal Clock
Open the Lithium Battery Cover on the
rear of the DVD Camcorder
Position the Lithium Battery in the
Lithium Battery Holder, with the positive
theRem°VeDvD
thecamcorder.Battery
Pack from the rear of
(+) terminal face up Be careful not to
•
2
3
___
\
_
f
2
3
4
. o-
3.
1.
_
_
x
4.
Turn the battery holder counterclockwise
(as indicated with [_] mark), using your
fingernail or a coin to open it The battery
Precautions
. o
de la bateria
2.
reverse the poIadty of the Battery.
Close the Lithium Battery Cover.
holderopens
Insert the battery with the positive (+)
terminal face down and press it firmly
until you hear locking sound.
Place the battery holder to match its
[_] mark with the [O] mark on the
remotecontrol, and turn the battery
holderclockwise to fix it
o-
Instalacion
InstallingtheLithiumBatteryintheRemoteControl(SC-DC564/DC565
only} _ila
f
]
f
I
Abra la tape de la bateria de litio en la
parte posterior de la Videocamara con
DVD.
Coloque la pila de fltio en su cornpartimento,
VideocamaraRetire
la bateriacondeDVDla
parte posterior de la
con el terminal posifivo (+) hacia arriba
Tenga cuidado de no invertir la poladdad
de la bateria.
Cierre la tape de la pila de litio
delitioenelmandoa distancias61oSC-DC564/DC565
1.
Gire el compartirnento de la bateria hacia
la izquierda (como indica la marca [_]),
utilizando la usa o una moneda pard-_brido
2.
Introduzca la pila con el terminal positivo
(+) hacia abajo y presionela firmemente
haste qua oiga un sonido de b{oqueo
Se abrira el compartimento de la pila
Coloqua el compartimento de la pila pare qua
su marca [_] coincide con la marca [O] del
mando a dis_ancia y gire el compartimento
3.
haciala derechapareoerrado
Precauciones
regarding the Lithium Battery
The Lithium Battery maintains the clock function and preset contents of
the memory; even if the Battery Pack or AC Power adapter is removed
The Lithium Battery for the DVD Camcorder lasts about 6 months under
normal operation from time of installation
When the Lithium Battery becomes weak or dead, the date/time
indicator will display 12:00 AM JAN.01.2006 when you set the
Date/Time to On When this occurs, replace the Lithium Battery
with a new one (type CR2025)
There is a danger of explosion if Lithium Battery is incorrectEy replaced
Replace only with the same or equivalent type
Warning: Keep the Lithium Battery out of reach of children,
battery be swallowed,
consult a doctor immediately.
•
de litio joara el relo_ interno
Should
a
1
referentes
a la pile
de litio
La pila de litiohace funcionar el reloj y los preajustesde la memoria.
induso aunqua retire la bateria principal o el adaptador de CA
2 La pila de litio de la Videocamere con DVD puededurer
aproximadamente6 meses en condiciones defuncionemiento normales
desde el momento de su instalacion.
3 Cuando la betaria de litio se debiflta o se egota, eparacera el indicador
de fecha hor 12:00 AM JAN.01.2006 cuando define Date/Time en
On. Cuando sucede, sustituya la beteria de litio por una nueva (tipo
CR2025)
4 Existe peligro de explosicn si la bateria se coloca de forma incorrecta
Cambie la pile solo pot une iguel o de espacificeciones equivelentes
Advertencia: Mantengata piIa de Iitio fuera del alcance de Ios nii_os.
En caso de que alguien se tragara una por accidente, arise inmediatamente
a un m_dico,
[ ENGLISH
]
[ ESPAI_OL
Preparation
Preparaci6n
÷;o Use SB-LSM80 or SB-LSM160(not supplied) Battery Pack only.
+ The Battery Pack may be charged a little at the time of purchase.
•;,
•
Char
1
2
in
the
Lithium
ion Batter
Turn the [Power] switch to [Off].
Attach the Battery Pack to the DVD
Pack
e
e"
,
e_
=
4
5
6
Connect the AC Power Adapter to an
AC Cord and connect the AC Cord to
a wall socket.
Open the LCD Screen and Jack
Cover.
Connect the DC cable to the DC IN
jack on the DVD Camcorder.
The charging indicator will start to
blink showing that the Battery is
charging.
When the Battery is fully charged,
disconnect the Battery Pack and the
k
AC Power Adapter from the DVD
Camcorder. Even with the power switched off, the _._
Onfor a secondandoff Error- Resetthe BatteryPack and
or a second
the DO Cable
=
e =
e
1, Coloque el interruptor [Power] en
[Off].
2, Conecte ia bateria a la Videocamara
con DVD,
3, Conecte el adaptador de CA a un
cable de CA y este a una toma de
corriente.
4, Abra la pantalla LCD y la _apa de
_erminales.
5, Conecte el cable de CC al terminal DC
IN de la Videocamara con DVD.
J
I
_'_-\
_
oi0__
Onceper second
Lessthan50%
Twiceper second
50% ~75%
Threetimes persecond 75% ~90%
Blinkingstopsandstays
90% ~ 100%
on
e
Carga de la bateria de iones de litio
f
Battery Pack will still discharge,
_=
Uti]ice _nicamente una bateria SB-LSM80 o SB-LSM160(no
suministrado).
,;, Es posiblequeb baterb este un pococargadaen el momentode b compra,
CamcordeL
3
,
]
<Chagi_/g
ndicator>
"_
El indicador de carga comenzara a
parpadear, mostrando que la bateBa
se esta cargando,
6, Cuando la bateBa este totalmente
cargada, desconecte la bateria y el
adaptador de CA de la Videocamara
con DVD. Incluso con la videocamara
apagada, la bateria se descargar&
Una vez por segundo
Menos de150%
Dos veces po_segundo
50% _ 75%
Tres veces pc1 segundo
75% _ 90%
Deia de palpadear
e_lcendido
90% _ 100%
y queda
u_lFrecuencia
segundo
de parpadeo
Encendido du_a_te un
segundo y apagado durante
de CC
VeJocidad de carga
Error - Reinicialice la batefia y el cable
[ ENGLISH
]
[ ESPANOL
Preparacibn
Preparation
Charging,
=
=
Recording
Times
based
on Battery
Type
Tiempos de carga, grabaci6n
If you close the LCD Screen, it switches off and the Viewfinder
switches on automatically
The continuous recording times given in the table below are
approximations
Actual recording time depends on usage.
The continuous recording times in the operating instructions are
measured using a fully charged Battery Pack at 77 °F (25 °C).
Even when the power is switched off, the Battery Pack will still
discharge if it is left attached to the device.
Ba_e_,Type
SB LSMS0 (AD43 00136A)
Charging time
O,,nti_uous
recording
t_me
Approx
Playback time
3hr
Mode
Appro× 45rain
_empo de
ca_a
Apro× 1 h 20 mn
Playback time
[_lodo
A_prox
/hr
XP
en el tipo de bateda
Si cierra la pantalla LCD, se apaga y el visor se enciende
automaticamente.
Los tiempos de grabaci,Sn continua que se facilitan en la tabta
siguiente son aproximados.
El tiempo real de grabaddn depende del uso de la videocamara.
Los tiempos de grabacion continua en las instruccionesde
funcionamiento se miden utilizando una bateria totalmente cargada
a 77 °F (25 °C)
Induso con la unidad apagada, la bateda se descargara si se deja
conectada al dispositivo
LCD ON
XP
bas_ndose
_pode
bateda
SB LSMI6O (not supplied)
Approx I hr 20rain
Mode
Appro× Ihr25min
Tiempo de
glabaci0n
cont_t_uada
Fempo de
_eproducci0n
Modo
Tiempo de
grabact0n
contin_ada
Tiempo de
_eproduccl0n
LeD
ViewfJnder
ENCENDIDA
LCD ON
XP
Aplo× 45 mln
Aprox
/ h
XP
Aprox _ h 25 rain
Aprox / h
40 rain
SP
Aplo× 50 mln
Aprox 1 h
5 rain
SP
Aprox _ h 35 rain
Aprox / h
50 rain
LP
Aptox 55 mill
LP
Aprox :l h 45 mJn
Aprox
Visor
SP
Applo×
50min
ViewfJnder
A_prox lhr
5min
SP
Appro× Ihr35mJn
LeD
ENCENDIDA
LCD ON
LP
Approx
]
55mil/
Vie_nder
• Measured
Approx lhr
/0n/in
times
shown
LP
Approx
Ihr45min
Approx
2h_
Visor
LeD
above
are
based
(Times for SC-DC564/DC565
on
model
are almost
SC-D0563.
the same)
The amount of continuous recording time available depends on;
The type and capacity of the Battery Pack you are using
Ambient temperature.
How often the Zoom function is used.
Type of use (DVD Camcorder/Camera/With
LCD Screen etc.)
It is recommended that you have several batteries available
ENCENDIDA
2h
Visor
= Las
cifras
que
se rnuestran
anteriorme_tte
(Los tiempos
est,_tt
basadas
en el
modelo
8C-DC563.
para SC-DC564/565 sot_ casi los mismos)
El tiempo de grabaci6n continua disponible depende de:
El tipo y la capacidad de la bateria que este utilizando.
La temperatura ambienta{
ha frecuencia con que se emplee el zoom.
Tipo de uso (Videocamara/Camara/Con pantalla LCD, etc).
Se recomienda tener disponibles varias batedas.
[ ENGLISH
]
[ ESPANOL
Preparation
Preparacibn
Battery
Indicador
Level
Display
The battery level display indicates the amount of
power remaining in the Battery Pack.
a Fully charged
b 20~40% used
c. 40~80% used
d
e
80~95% used(red)
Completely used (Blinking)
(The DVD Camcorder will turn off soon, change
the battery as soon as possible.)
I
a
b
$
Batter_ernent
=
=
=
=
=
de la bateria
El indicador de nivel de la bateria muestra la
The Finalize/Format functions are not available at battery level 'd'
and _e_,
• At battery level 'e'
The battery becomes low in capacity and the <_>
indicator
blinks on the display.
The screen will turn blue when the battery is almost completely
discharged.
=
de carqa
]
The Battery Pack should be recharged in an environment between
32 °F (0 °C) and 104 °F (40 °C).
The Battery Pack should never be charged in a room with a
temperature that is below 32 °F (0 °C)
The life and capacity of the Battery Pack will be reduced if it is used in
temperatures below 32 °F (0 °C) or left in temperatures above 104 °F
(40 °C) for a long period of time, even when it is fully recharged.
Do not put the Battery Pack near any heat source (i.s fire or a heater).
Do not disassemble, apply pressure to, or heat the Battery Pack
Do not allow the + and - terminals of the Battery Pack to be
short-circuited. It may cause leakage, heat generation, induce
overheating or fire.
cantidad de energia restante en la bateda.
a. Completamente cargada
b. 20~40% utilizada
c. 40~80% utilizada
d. 80~95% utilizada (rojo)
e. Completamente utilizada (Parpadeando)
(La Videocamara con DVD se apagara
inmediatamente, cambie la baterta Io antes
posible.)
Las funciones Finalize/Format no est_n disponibles en el nivel de
bateria 'd' y 'e',
En el nivet de bateria 'e'
La bateria baja de capaddad y el indicador<_>
parpadea en
pantalla.
La pantalla se pone azul cuando la baterta esta casi comptetamente
descargada
Gestibn de la bateria
La bateria debe recargarse a una temperatura ambiente de entre 0
' C (32 ° F) y 40 ° C (104 ° F)
La bateria nunca debe cargarse cuando la temperatura ambiente
sea inferior a los 0° C (32° F).
La vida t3tily la capacidad de la bateria se veran reducidas si se
utitiza en ambientes con temperaturas inferiores a 0 ° C (32° F) o si
se deja por largos periodos expuesta a temperaturas superiores a
los 40 ° C (104 ° F) incluso si esta cargada per compieto.
No ponga la bateria cerca de una fuente de calor (un fuego o un
catefactor, pot ejempto).
No desmonte la bateria ni la someta a manipulaciones, presiones
ni al calor.
No permita que se produzca un cortocircuito entre los polos + y de la bateria. Podrtan producirse pcrdidas o calentamiento, Io cual
podria ocasionar sobrecalentamiento o un incendio
A_
[ ENGLISH
]
[ ESPAI_OL
Preparation
Maintaining
,
,
.
•
•
•
•
•
•
,
the
Battery
]
Preparacibn
Pack
Please refer to the Table on page 24 for approximate continuous
recording time.
The recording time is affected by temperature and environmental
conditions.
The recording time shortens dramatically in a cold environment.
The continuous recording times in the operating instructions are
measured using a fully charged Battery Pack at 77 °F (25 ' C)
The remaining battery time may differ from the approximate
continuous recording times given in the instructions.
When replacing the battery pack, only use the same type as is
supplied with this camcorder and is available from your SAk4SUNG
retailer When the Battery reaches the end of its life, please contact
your local dealer.
The batteries have to be dealt with as chemical waste.
Make sure that the Battery Pack is fully charged before starting to
record.
A brand new Battery Pack is not charged. Before using the Battery
Pack, you need to charge it completely.
Fully discharging a Lithium ion Battery damages the internal cells.
The Battery Pack may be prone to leakage when fully discharged.
To preserve battery power, keep your DVD Camcorder turned off
when you are not operating it.
if your DVD Camcorder is in Camera Mode, and it is left in STBY
mode without being operated for more than 5 minutes with a
disc inserted, itwill automatically turn itself off to protect against
unnecessary battery discharge.
Make sure that the Battery Pack is fitted firmly into place
Do not drop the Battery Pack. Dropping the Battery Pack may
damage it,
MantenimJento
de la bateria
Consulte la tabla de la pagina 24 para obtener informaci6n sobre
el tiempo aproximado de grabacion continua.
El tiempo de grabaci6n seve afectado por las condiciones
ambientales y la temperatura
El tiempo de grabaci6n se acorta enormemente en un ambiente
frio. Los tiempos de grabacion continuada que se dan en este
manual de instrucciones estan medidos empleando una bateria
completamente cargada a 25 ° C (77° F)
El tiempo de la baterta restante puede difedr de los tiempos de
grabaci6n continuos facilitados en las instrucciones.
AI sustituir la bateria, utilice unicamente el mismo tipo que se
suministra con esta videocamara, disponible en los distribuidores
de SAMSUNG Cuando se termine la vida util de la bateria,
pongase en contacto con su proveedor habitual
Para desechar las baterias gastadas, estas deben tratarse como
residuos quimicos.
Aseg_:lresede que la baterta este completamente cargada antes
de empezar a grabar.
Las baterias nuevas no vienen cargadas. Antes de utilizar la
bateria es necesado cargarla por completo.
Descargar completamente la bateda de polimero de litio da_a las
c¢tulas internas
La bateria puede ser mas propensa a fugas cuando se deja
totalmente descargada.
Para ahorrar energia de la bateda mantenga la Videocamara con
DVD apagada cuando no se este usando
Si la Videocamara con DVD esta en la Camera Mode con un disco
cotocado y se deja en el modo STBY sin haceda funcionar durante
mas de cinco minutos, se apagara automaticamente para ahorrar
energia de la baterta.
AsegOrese de que la baterta este colocada correctamente en su
sitio.
No deje caer la bateria. Si se Ilegara a caer, podria estropearse.
[ ENGLISH
]
[ ESPANOL
Preparation
]
Preparacibn
•
-
•
*-*o There are two types of power source that can be connected to your
DVD Camcorder.
- The AC Power adapter and AC Cord: used for indoor recording.
- The Battery Pack: used for outdoor recording.
+
Using a Household
UtJlizaci6n
Power Source
Connectto a household
ConnecttheAC Power
adapter (AA-E8 Type] to
the AC Cord.
2
Connect the AC Cord to a
wall socket.
The plug and wan socket type may differ according to your resident
country.
3
Open the LCD Screen and Jack Cover.
4
Connect the DC cable to the DC IN jack of the DVD Camcorder.
5
Set the DVD Camcorder to each mode by holding down the Green
Tab on the [Power] switch and turning it to [On] or [Off].
.
-
-
o-
.
-
.
•
Hay dos tJpos de fuentes de alimentacion alas que se puede
conectar la VJdeocamara con DVD
- El adaptador de CA y el cable de CA: se emplean para
grabaciones en interiores
- La bateria: se emplea para grabaciones en exterJores.
de una fuente
de alimentacJ6n
domestJca
Conecte una fuente de
alimentaci6n casera para utHizar
la Videocamara con DVD sin
preocuparse sobre la energia
de la bated& Puede mantener
la bateda conectada; la energia
de la bateria no se consumir&
power source to use the DVD
Camcorder without having to
worry about the battery power
You can keep the Battery Pack
attached; the battery power will
not be consurned.
1
.
1. Conecte el adaptador de CA
(Tipo AA-E8) al cable de CA.
2. Conecte el cable de CA a
una toma de cordente.
Es posible que la clavija y la toma de cordente sean de distinto
tipo, dependiendo de su lugar de residencia.
3. Abra la pantaila LCD y la tapa de terminales
4.
Conecte el cable de CC al terminal DC IN de la Videocamara con
DVD
5. Ajuste la videocamara en cada modo manteniendo presionada la
pestaSa verde del interruptor [Power] y girandoio a [On] o [Off].
A
[ ENGLISH
]
[ ESPAI_IOL ]
Preparation
Preparaci6n
e
+
+
+
The operating modes are determined by the position of the [Power]
and [Mode] switches.
Set the Operation Mode by adjusting the [Power] and [Mode]
switches before operating any functions.
Each time you move the [Power] switch downward, it toggles
between [l_(Camera)]
and [[_(Player}]
mode,
Mode Name
<Camera Mode>
+
+
+
,
=
e_
=
o
Qe_
0-
e
,
-
o
Los modos de funcionamientos vienen determinados per la
posici6n del interruptor [Power] y el interruptor [Mode].
Ajuste el modo de funcionamiento ajustando el interruptor [Power]
y el intermptor [Mode] antes de utilizar cualquier funci6n.
Cada ve que mueva el interruptor [Power] hacia abajo, cambia
entre los modes [ _ (Camera)] y [l_(Player)].
<Player Mode>
<M,Cam Mode>
[Power] Switch
<M.Player Mode>
t,
[Mode] Switch
= MCam
+
The Joystick is used to make a selection and to move the cursor
left, right, up and down. Using the Joystick, you can
easily make your selection and navigate the menu.
1. Move to a previous menu item / Adjust the selected item
(to the left).
2, Move to a sub menu item / Adjust the selected item
(to the right).
3. Move to a lower menu item.
4.
5.
Move to an upper menu item.
Press to select the chosen item.
,A
+
Mode: Memory Camera Mode / M.Pteyer Mode: Memory Prayer Mode
El Joystick se utiliza para realizar una selecci6n y para mover el
2_
i
facilmente realizar la selecci6n y
desplazarse por el men&
ycursor
Con
el Joystick,
puedeanterior
1,abajo.
tra aun
de
menO
la elemento
izquierda,
derecha,
arriba /
Ajustar la opcion seleccionada
(a la izqaierda).
5_
i
3,
2,
4.
5.
seleccionada (a la derecha).
tra una opci6n de menQ inferior.
anterior
/ Ajastar
la opci6n
tr una
a un opci6n
elemento
de menO
de
subment_
superior.
Se pulsa para seleccionar la opci6n
elegida.
[ ENGLBH
]
[ ESPAI_IOL ]
Preparaci6n
Preparation
+
QUICK MENU is used to access
+
[QUICK MENU] button.
QUICK MENU provides easier access to frequently
using the [MENU]
DVD Camcorder
functions by using the
button.
Functions available using the QUICK MENU are as below:
D_S
Program AE
White Balance
Digital Effect
Shutter
_page 52
Delete
Part_al Delete
_page 68
_page
_page 52
69
New Playlist
Delete
_page 70
_Paee 72
_pages 73-79
Photo Size
WNte Ba]ance
Photo Quality
Exposure
Delete
Delete A,
Protect
Pnnt Mark
Fomlat
3
4
Balance>,
STBY []
0:O0:O0
(,/v_ i
mm []
I
utilizando
D,s
I
ProgramAE
....................
W_ite3al_,_o_
Dgtal Effect
Shutter
Exposure
QUICK
_pAgina
_p&ginas
_pAgina
_p&gina
_pAgina
_p_gina
61
54_-55
56
58
52
52
Po,,ia,Delete
Oeeto
_p&gina 68
_p_gina 69
New
I
@
'
/"
_
STBY []
,_
00ooo(_e,
30rain []
I
Pie)4
st
Delete
EditP ay ist
_p_gina 70
_p&gina 72
_p_gmas 73-79
Wh,
s,.....
eeOaP ° °
_p&gina g4
_p_gina 56
_p_eina 93
_p&gina 52
::P
o oOua,N
E_p
......
-page 00
-p_geg2
_Paee 07
| _
_page 103
x _
then press the [Joystick(OK)]
Las funciones
disponibles
MENU son las siguientes:
ProgramAE
_Pase 52
_Paee 93
_pae e 01
• The quick menu list will appear
Move the [Joystick] up or down to select
<White
E!
-page 56
94
_page
For example: Setting the White Balance
1. Press the ]QUICK MENU] button
2
'
_page61
_pases 54-55
page56
_pase 58
Ex£osure
Edit Playlist
i
÷t* QUICK MENU se utilize pare acceder alas funciones de la Videoc&mara
con DVD utilizando el boton [QUICK MENU]
÷to QUICK MENU proporciona un acceso mas sencillo a los menQs de uso
m_s frecuente sin tener que utilizar el bo{dn [MENU].
used menus without
Oe,e,o
DeleteAll
P,oteot
Ext
FT_/-
/
STBY []
LZJ r|_!1
|
|
Move the [Joystick] up or down to select desired
mode (Auto, Indoor, Outdoor, or Custom WB), then
|
|Q
press the [Joystick(OK)]
|
To exit, press the [QUICK MENU] button
|
\
0:00:00(RI_)
"_
30Ilir []
v
J
<WhentheWhte Balanceoptionin Camera
modewas selected>
PrintMark
Format
_p_gina
_p&glna
_p_gina
_p&gma
_p_gma
I01
102
100
107
103
Por ejemplo:
Ajuate
del balance
de blanco
1 Presione el botdn [QUICK MENU].
• Aparecer_ lista del men0 rapido.
2 Mueva el [Joystick]
hacia arriba o hacia abajo
para seleccionar <White Balance> y presione el
boton [Joystick(OK)].
3 Mueva el [Joystick]
hacia ardba o hacia abajo
para seleccionar el modo que desea (Auto,
Indoor, Outdoor, o Custom WB) y presione el
boton [Joystick(OK)].
4
Para salir, presione el botdn [QUICK MENU]
[ ENGLISH
]
[ ESPANOL]
Preparation
O
|
_
--
Preparaci6n
|
_ .
.
_
1.
Battery Level _page
25
2.
Manua{ focus _page
EASY.Q _page 46
53
3.
4.
DIS _page 61
Program AE -page
5.
6.
White Balance Mode -page
Digital Effects Mode -page
7.
16:9 Wide _page 66
Shutter Speed _page
8.
9.
Exposure _page 52
DatelTime _page 36
10.
11.
Color Nite _page
USB _page 113
12.
13.
Remote _page 33 (SC-DC564/DC565 onty)
Wind Cut _page 51
14.
15.
SLC (Back Light Compensation)
Title scene number
16.
17.
18.
Disc Format _page
Disc Type
Counter
oo _
.
-
co-
|
" -
-
=
0
-
,-1.
2.
22
2/
20 19 18
3.
4.
5.
6.
54
56
58
52
6
Sepia
[
50
_page 49
_
12 00A[/IJAN
6--/69
Wide
22--_=::::::::::::]g_
0/
2006
Color
9
N
/3
7.
8.
9.
10.
11.
12.
1'30_
_0
13.
14.
15.
82
.
-
.
_
e,-
16.
Remaining
Record Mode _page44
Operating Mode
Time
22.
Zoom Position-page
Digital Zoom Position
23.
24.
PB Zoom _page 67 ,_
Message Line _page 120
25.
26.
Volume Control-page
64
AVlN _page86
_(SC-DC565only)
27.
Playback Speed _page
19. Tiempo restante
20. Mode de grabaci6n _pagina
21, Mode de funcionarniento
47
-page
65
not marked with
22.
62
25
4_10 _;_i
"
Functions
.
Camcorder is powered on after turning it off.
OSD/On Screen Display) items shown here are based on model
SC-DC563.
2006
23.
24.
25.
26.
27.
" .
-
o,-
Nivel de bateria _p&gina 25
Enfoque manual -p_gina
53
Bot6n EASY.Q _p_gina
46
DIS -p_gina
61
ProgramAE
_pagina
54
Mode White Balance _pagina 56
Mode Efectos digitaZes _pagina
58
16:9 Wide -pagina
60
Velocidad de obturador
_pagina 52
Exposici6n
_pagina 52
Fecha/Hora
_pagina 39
Color Nite -p_gina
50
USB -pagina
113
Mando a distancia _pagina
33
(s61o SC-DCBB4/DCSBS)
Antiviento
_pagina
51
BLC (Compensaci6n
de luz de fondo)
_pagina
46
NQmero de escena de! titulo
16. Forrnato de disco_pagina
17. Tipo de disco
18. Contador
20.
21.
,,&
O
62
44
Position
de zoom-p_gina
47
Posicion deI zoom digitat _pagina 62
PB Zoom _p_gina
67
Linea de mensaje _p_gina
120
Control de volumen _pagina 64
AM IN _pagina 86 _ (s6lo SC-DC565)
Velocidad de reproducci6n
_pagina 65
* will be retained when tile DVD
•
•
Las funciones no marcadas con * se conservaran cuando ee
reiricie la Videocamara con DVD deepucs de apagada
Los elementos de la OSD (Presentacion en pantalla) aqui
rues rados son de modeo SC-DC563.
[ ENGUSH
]
[ ESPANOL
Preparation
0
1.
|
0
Preparacibn
--
2.
Photo Quality
=page 93
Photo Size
3.
=page 94
Flash Mode
m
_ -
I
U
-I_
U o_-
L
"
.
-
o0-
Turning
- e
o
F600
_i_
8rain
z/Am
=page 96
(SC-DC564/
/
"
No memory cardF
DC565 only)
4,
CARD (Memory
@ 20
Card) Indicator
0 AI_,IdAN 0/ 2006
5. Image Counter
(Total number of
resordable photo images)
6,
Slide Show =page 99
7.
Erase Protection Indicator '-'page 100
8.
Print Mark _page 107
9.
Folder Number-File Number _page 92
File number of the moving image
10. Image Counter (Current Image/Total number of recorded images)
_
]
|
e
--
I
= .
0
e
OSD On/Off
6
Slide
7
S
@
_
_ 5
NO memo_/card!
_
5/0
12 00AM JAN 01 2006
q[3
I_
1O0 0005
SMO\/00 _ AVI --9
(Nt_mero total de imageries fotogr_ficas
1. Ca]idad de foto
_p_gina g3
2. Tama5o de foto
-p_gina 94
3. Modo Flash
_p_gina 96
(s61o SC-DC564/
DC565)
4. Indicador CARD
(Tarjstadememoria)
5. Contador de
imageries
grabables)
6.
7.
8.
9.
Presentaci6n _'p_gina 99
Indicador de protecciTn contra borrado _p_gina 100
Marca de impresiTn "-p_gina 107
NSmero de carpeta-NSmero de archivo -p_gina g2
N_mero de arcMvo de ]a seeueneia de imageries
10. Contador de im_genes (Imagen actuallN_mero total de
im_genes grabadas)
-
o o6
.I.0.oe
Encendidolapafjado
o-
e
D
o
-
-
_
-
®.
.
.
de OSD
Press the [DISPLAY) button on the left side control panel.
= Each press of the button toggles the OSD function on and off.
Presione el boton [DISPLAY) en el panel de control det lado izquierdo
AI pulsar repetidas veces el boton, la funcion OSD cambiara
a_ternativamente entre activada y desactivada (On/Off).
Turning
ActivadTn/desactivaciTn
the
Date/Time
On/Off
To turn the Date/Time on or off, access the menu and change the
Date/Time mode. '-page 39
de la fecha y hora
Para activar o desactivar la fecha/hora, acceda al menu y cambie e!
modo Date/Time. _pagina 39
[ ENGUSH
]
[ ESPANOL
]
Initial Setting • System Menu Setting Ajuste inicial: Ajuste del men_ System
i
*:o Clock setup works in Camera Mode/Player Mode/M.Cam Mode/
M.Player Mode. -page 2B
*:o The date/time is automatically recorded onto a
disc. Before recording, please set the date/time.
1
2
3
4
5
B
7
8
9.
=
=
=
Bet the [Mode] switch to [DISC] or [CARD].
Setthe[Power]switchto[_(Camera)]or
[[_(Player)].
Pressthe [MENU] button.
. The menu list will appear.
Move the [Joystick] up or down to select
<System>, then press the [Joystick(OK)].
Move the [Joystick] up or down to select
<Clock Set>, then press the [Joystick[OK)].
. The month will be highlighted first.
Move the [Joystick] up or down to set current
month, then press the [Joystick(OK}].
. The day will be highlighted.
. To adjust the clock, select the Year Month,
Day, Hour, Min, or AM/PM by pressing the
[Joystick(OK)l, then move the [Joystick]
up or down to set respective values.
You can set the day, year, hour, minute, and
AM/PM following the same procedure after
setting the month
Press the [Joystick(OK)] after setting AM/PM.
= A message <Complete!> is displayed
To exit, press the [MENU] button.
_A@_st
_Move
After the Lithium Battery loses its charge (after
about 6 months), the date/time appears on the
screen as 12:00 AM JAN.01.2006.
You can set the year up to 2040.
If the Lithium Batteryis not installed,data inputtedwill not be backedup
=
-
_-
-
•
®
-
*:* La configuracfon del reloj esta operativa en los Camera Mode/Player
Mode/M.Cam Mode/M.Player Mode. '-,pagina 28
+
La fecha y hera se graba automaticamente en
un disco. Antes de grabar, ajuste la fecha y la hora.
1. Coloque el interrupter [Mode] en [DISC] o
[CARD]
2. Coloque e] interruptor [Power] en [ _ (Camera)]
o [[_(Player)]
3. Presione el bot6n [MENU]
, Aparece la lista del men{_.
4. Mueva el [Joystick] hacia arriba o hacia abajo
para seleccionar <System> y presione el
botdn [Joystick{OK)].
5. Mueva el [Joystick] hacia arriba o hacia abajo
para seleccionar <Clock Set> y presione el
bot6n [Joystick(OK)].
, Primero se resalta el rues.
6. Mueva el [Joystick] hacia arriba o hacia abajo
para fijar el rues actual y presione el botdn
[JoysUck[OK)].
, Se resalta el dia.
. Para ajustar el reloj, seleccione Year,
Month, Day, Hour, Min o AM/PM pulsando el
_Select
_Exit
/
bot6n [Joystick(OK)] y mueva el ]Joystick]
I
hacia arriba o hacia abajo para ajustar los
respectivos valores.
7. Fije el rnes, dia, aSo, hora, minutos y AM/PM
siguiendo el mismo procedimiento tras ajustar
el rues
B. Presione el bot6n [Joystick(OK)] tras ajustar
AM/PM
, Aparece el mensaje <Complete!>
9. Para salir, presione el bot6n [MENU].
_Select
_E×i_
.
.
.
Una vez que la bateria de litio pierda su carga
(despues de 6 meses aproximadamente), la
fecha y hera aparecen en pantalla coreD 12:00
AM JAN.01.2006.
Puede fijar el a_io hasta 2040
Si no esta instalada la bateria de litio, no se realizara ninguna copia
de seguridad de los dabs de entrada.
[ ENGLISH
]
[ ESPANOL
]
Initial Setting • System Menu Setting Ajuste iniciah Ajuste del men5 System
+
The Remote function works in Camera Mode/Player Model
M.Cam Mode/M.Player Mode. _page 28
*:o The Remote function allows you to enable or disable the remote
control for use with the DVD Camcorder.
1
Set the [Mode] switch to [DISC] or [CARD].
2
Set the [Power] switch to [_
[[_(Player)].
+
+
La funcion Remote esta operativa en los Camera Mode/Player
Mode/M.Cam Mode/M.Player Mode. _pagina 28
La fund6n Remote permite activar o desactivar el control remote
para utilizar la Videocamara con DVD.
1. Coloque el interrupter [Mode] en [DISC] o
[CARD].
Camera Mode
(Camera)] or
2 Coloquselintenuptor
[Power]en [_(Camera)]
o [[]_(Player)].
_On
3
Pressthe [MENU] button.
• The menu list will appear.
4
Move the [Joystick] up or down to select
<System>, then press the [Joystick(OK)]
5
Move the [Joystick] up or down to select
<Remote>, then press the [Joystick(OK)].
6
Move the [Joystick] up or down to select <On>
or <Off>, then press the [Joystick(OK)].
7
To exit, pressthe [MENU] button.
3. Presione el boron [MENU]
• Aparece la lista de! menQ
_ English
_On
,
_Move
_
*
_Select
4. Mueva el [Joystick] hacia ardba o hacia abajo
para seleccionar <System> y presione el
boron [Joystick[OK)]
_Ext
Camera MOde
5. Mueva el [Joystick] hada ardba o hacia abajo
para seleccionar <Remote> y presione el
boton [Joystick[OK)]
Beep Sound
6. Mueva el [Joystick] hacia ardba o hacia abajo
para seleccionar <On> u <Off> y presione el
boron [Joystick[OK)]
Del_onstration
Ill
_Move
_Select
_Exit
/
If you set the Remote to Off in the menu and try to use it, the remote
control icon ((/(_) will blJnk for 3 seconds on the LCD Screen and then
disappear.
7. Para salir, presione e! boron [MENU]
Si define Remote en Off en el menu e intenta utilizarlo, el icono de
control remoto (({{i"_)parpadeara por 3 segundos en la pantalla LCD y
desaparecer&
[ ENGLISH
]
[ ESPANOL
]
Initial Setting • System Menu Setting Ajuste iniciah Ajuste del men_ System
+
+
+ _-++
•
o
._+++
+
o
+
*:o The Beep Sound function works in Camera Mode/Player Model
M.Cam Mode/M.Player Mode. -page 28
*:o You can turn the Beep Sound on or off, when on, each press of a
button sounds a beep.
_
-
++
•
oe
_++o
_-++
•
u
+
La funci6n Beep Sound esta operativa en los Camera Model
Player Mode/M.Cam Mode/M.Player Mode _pagina 28
*:o Puede activar o desactivar Beep Sound, cuando esta encendido,
cada pulsaci6n de boton emits un pitido.
1
Set the [Mode] switch to [DISC] or [CARD].
1. Coloque el +nterruptor [Mode] en [DISC] o
[CARD].
2
Set the [Power] switch to [1_1 (Camera)] or
[[]_(Player)].
2.
3
4
5
Pressthe [MENU] button.
• The menu list will appear.
6
Move the [Joystick] up or down to select
<On> or <Off>, then press the [Joystick(OK)]
7
To exit, pressthe [MENU] button.
3. Presione el boron [MENU]
• Aparece la lista de! menO
_On
_On
Move the [Joystick] up or down to select
<System>, then press the [Joystick(OK)]
Move the [Joystick] up or down to
select <Beep Sound>, then press the
[Joystick]OK)].
Coloque el +nterruptor[Power] en [ I_1 (Camera)]
o [[_(Player)].
_English
_Move
_Selec:
_Exii
/
%
f ............................ I.......................................
4. Mueva el [Joystick] hacia arriba o hacia abajo
para sebccionar <System> y presione el
boton [Joystick(OK)]
5.
ml
Mueva el [Joystick[ hacia arriba o hacia abajo
para sebccionar <Beep Sound> y presione el
boton [Joystick[OK)[
6. Mueva el [Joystick] hacia arriba o hacia abajo
para seleccionar <On> u <Off> y presione et
boton [Joystick(OK)[
7. Para salir, presione e! boron [MENU]
[ ENGLISH
]
[ ESPAI_OL
]
initial Setting • System Menu Setting Ajuste inicial: Ajuste del men_ System
i
*:- The Shutter Sound function works only in M.Cam Mode
_page 28
*:. You can tum the Shutter Sound on or off, when on, with each
press of the [PHOTO] button the Shutter will sound.
1
Set the [Mode] switch to [CARD].
2
Set the [Power] switch to [l_l
3
Pressthe [MENU] button.
• The menu list will appear.
(Camera)].
[_}
o-
_
•
6
Move the [Joystick] up or down to select
<On> or <Off>, then press the [Joystick(OK)]
7
To exit, pressthe [MENU] button.
_SeJect
_Exit
/
/-
.oe
-
Q
o
4. para
Mueva
el [Joystick]
hacia arriba
o hacia
seleccionar
<System>
y presione
el abajo
boton
[Joystick(OK)].
5. Mueva el [Joystick]
hacia arriba o hacia abajo
el boton [Joystick[OK]].
J
_:_
'\
If Beep Sound is set to Off, you will not hear the
shutter sound even if it is set to On
oe
3. Presione el boron [MENU]
• Aparece la {ista del men&
2. Coloque el interrupter [Power] en
j
[_
a-
1. Coloque
elinterruptor [Mode] en [CARD].
[ _ (Camera)].
h
Move the [Joystick] up or down to select
<System>, then press the [Joystick(OK)]
Move the [Joystick] up or down to
select <Shutter Sound>, then press the
[Joystick(OK)].
ee
x,
_-o_
_-or,
_*Engh
_Move
5
-
*:- La funci6n Shutter Sound solo esta operativa en el M.Cam Mode.
=pagina 28
*:- Puede activar o desactivar Shutter Sound, cuando esta activado
con cada pulsaci6n del bot6n [PHOTO] sonata el obturador
F
4
_
Language
"
6. Mueva el [Joystick] hacia arriba o hacia abajo
para seleccionar <On> u <Off> y presione el
boton
[Joystick(OK)]
para seleccionar
<Shutter Sound> y presione
7. Para saD, presione e! boron [MENU]
J
_Move
_Se,ect
_Exit
.....................................................................................
J /
Si Beep Sound se define en Off, oira el sonido del
obturador aunque este definido en On
[ ENGLISH
]
[ ESPANOL
]
Initial Setting • System Menu Setting Ajuste inicial: Ajuste del men_ System
*:o The Language function works in Camera Mode/Player Mode/
M.Cam Mode/M.Player Mode. =page 28
*:o YoucanselectthedesiredJanguagetodispiaythemenuscreen
and the messages
%
f
*:o La funcion Language esta operativa en los Camera Mode/Player
Mode/M.Cam Mode/M.Piayer Mode. -pagina 28
*:o Puede seleccionar el idioma en el que desea que aparezca ta
pantalla det menu y los mensajes.
1 Coloque el interrupter [Mode] en [DISC] o
[CARD].
.......................................................................................
1
Set the [Mode] switch to [DISC] or [CARD].
2
Set the [Power] switch to [1_1 (Camera)] or
[[]_(Player)].
2 Coloq.u_el interrupter [Power] en [l_(Camera)]
o [L__J(Player)].
3
Pressthe [MENU] button.
• The menu list will appear.
3 Presione el boton [MENU]
= Aparece la lista de! menO.
4
Move the [Joystick] up or down to select
<System>, then press the [Joystick(OK)]
4 Mueva el [Joystick] hacia arriba o hacia abajo
para seleccionar <System> y presione el
boton [Joystick[OK)]
5
Move the [Joystick] up or down to select <Language>, then press
the [Joystick[OK)].
• The available language options are listed.
6
Move the [Joystick] up or down to select the desired OSD
language, then press the [Joystick(OK)].
• The OSD language is refreshed in the selected language.
7
To exit, pressthe [MENU] button.
5. Mueva el [Joystick] hacia arriba o hacia abajo para seleccionar
<Language> y presione el boton [Joystick(OK}].
= Aparece una Iista con las opciones de idioma disponib+es.
6. Mueva el [Joystick] hacia ardba o hacia abajo para seleccionar e!
lenguaje OSD que desea y presione el boton [Joystick(OK)].
= La OSD se actuatiza en el ldioma seleccionado.
7. Para salir, presione el boton [MENU].
La palabra Language del menu siempre se Jndica en ingles.
The word Language in the menu is always indicated in English.
[ ENGLISH
]
[ ESPANOL
]
initial Setting • System Menu Setting Ajuste iniciah Ajuste del men_ System
-
=
- |-
=
.
•
|-
•
-
.
Q
.
÷:" The Demonstration function may only be used in the Camera
Mode with no disc inserted in the unit. =page 28
÷:. Before you begin: Make sure that there is no disc inserted in the
DVD Camcorder. -page 42
÷:. Demonstration automatically shows you the major functions that
are included with your DVD Camcorder so that
you may use them more easily.
+ The Demonstration operates repeatedly until it
is switched off.
1
Set the [Mode] switch to [DISC].
2
3
Set the [Power] switch to [l_qCamera)].
Pressthe [MENU] button.
= The menu list will appear.
Move the [Joystick] up or down to select
<System>, then press the [Joystick(OK)]
4
5
6
7
8
_Move
When you press FADE, BLC, EASY.Q, MF/AF, or
COLOR NITE button during the Demonstration
operation, the Demonstration function will be
deactivated and the function of the button pressed
will be activated.
+
_Sebct
_Ex}t
m
_Move
L_
_Select
e
e-
.
o-
•
.
•
|-
•
.
•
La funci6n Demonstration s61opuede utilizarse en el Camera
Mode sin ning0n disco insertado en la videocamara.
_pagina 28
Antes de empezar: asegC_resede que no hay ninguna cinta dentro
de la Videocamara con DVD. _pagina 42
+ Esta funcion muestra de manera automatica
las funciones mas importantes de la
Videocamara con DVD.
+ La demostracion se realiza repetidamente
hasta que se desactive el modo de
demostracion
............................. j........................................
Move the [Joystick] up or down to select
<Demonstration>, then press the
[Joystick(OK)].
Move the [Joystick] up or down to select
<On>, then press the [Joystick(OK)].
Pressthe [MENU] button.
, The Demonstration will begin.
To quit the Demonstration, press the [MENU]
button
+
.
_Ext
/
1 Coloque el interruptor [Mode] en [DISC].
2 Ooloque el interrupter [Power] en
[ I_ (Camera)].
3 Presione el bot6n [MENU]
• Aparece la lista de! menQ
4 Mueva el [Joystick] hacia arriba o hacia abajo
para sebccionar <System> y presione el
boron [Joystick(OK)]
5 Mueva el [Joystick] hacia arriba o hacia abajo
para seleccionar <Demonstration> y presione
el boton [Joystick(OK)].
6 Mueva el [Joystick] hacia arriba o hacia abajo
para seleccionar <On>, y presione el boton
[Joystick(OK)].
7 Presione el boron [MENU]
• Comenzaralademostraci6n.
8
Para salir de la demostracion, presione el
bot6n [MENU].
Cuando presione el boton FADE, BLC, EASY.Q,
MF/AF, o COLOR NITE durante la operacion de
demostracion, dicha funcion se desactivara y la
funci6n del bot6n se activar&
[ ENGLISH
]
[ ESPAi_OL
]
initial Setting • DispJay Menu Setting Ajuste iniciah Ajuste del men_ Display
• o
_
-
i
--
I
,_ =
|
• •
=
*:° Adjusting the LCD Screen works in Camera Mode/Player Mode/
M.Cam Mode/M.Player Mode. =page 28
*:o Your DVD Camcorder is equipped with a 25 inches(SC-DC563 only)
/ 2 7 inches (3C-DC564/DC565 only) wide color Liquid Crystal Display
(LCD) Screen, which enables you to view what you are recording or
playing back directly.
_* DependingontheconditionsunderwhichyouareusingtheDVD
Camcorder (indoors or outdoors for example), you can adjust;
LCD Bright
LCD Color
1
Set the [Mode] switch to [DISC] or [CARD].
2
Set the [Power] switch to [_
[[]_(Player)].
3
Pressthe [MENU] button.
• The menu list will appear.
4
Move the [Joystick] up or down to select
<Display>, then press the [Joystick(OK)]
5
Move the [Joystick] up or down to select the
item you want to adjust (LCD Bright or LCD
Color), then press the [Joystick(OK)]
6
7
,,_
_ - 6-
.
I
|
_
_
I
• •
El ajuste de la pantalla LCD esta operative en los Camera Model
Player Mode/M.Cam Mode/M.Player Mode _pagina 28
+ La videocamara esta equipada con una pantalla de cdstal liquido
(LCD) en color de 2,5 pulg. (SC-DC563) / 2,7 pulg (SC-DC564/
DC565), que permite vet directamente Io que esta grabando o
reproduciendo.
_* SegOn las condiciones de grabaci6n (pot ejemplo exteriores o
intebores) es posible ajustar:
- LCD Bright
- LCD Color
1. Co]oque el interruptor [Mode] en [DISC] o
[CARD].
_, off
_Niove
@
_Se]ect
_Ext
Camera Mode
J
LCD Color
_#,love
To exit, press the [MENU] button.
• Adjusting the LCD Screen does not affect the brightness and
color of the image to be recorded,
.
+
(Camera)] or
Move the [Joystick] left or right to adjust the
value of the selected item (LCD Bright or LCD
Color), then press the [Joystick(OK)].
• You can set values for <LCD Bright> and
<LCD Color> between <00> ~ <35>
_.
_Se]ect
_Ext
2. Colo.£_q_e
el interrupter [Power] en [_(Camera)]
o [L_J(Player)]
3. Presione el boron [MENU]
• Aparece ]a lista de! menQ
4. Mueva el [Joystick] hacia arrJbao hacia abajo
para seleccionar <Display> y presJone el
bot6n [Joystick(OK)]
5. Mueva el [Joystick] hacia arrJbao hacia abajo
para seJeccionar la opci6n que desea ajustar
(LCD Bright o LCD Color) y presJoneel bot6n
[Joystick(OK)].
6. Mueva e] [Joystick] a la izquierda o la derecha
para ajustar el valor de la opci6n seleccionada
(LCD Bright o LCD Color) y presione el bot6n
[Joystick(OK)].
• Puede fijar valores para <LCD Bright> y
<LCD Color> entre <00> y <35>.
7. Para salir, presione el bot,Sn [MENU].
• El ajuste de la pantalla LCD no afecta al britlo ni al color de la
magen que se grabe
[ ENGLISH
]
[ ESPANOL
]
initial Setting • Display Menu Setting Ajuste inicial: Ajuste del men_ Display
*:o The Date/Time function works in Camera Mode/Player Model
M.Cam Mode/M.Player Mode. _page 28
+ The date and time are automatically recorded on a special data
area ofthe disc.
1
Set the [Mode] switch to [DISC] or [CARD].
2
Set the [Power] switch to [l_
[IJ_(Player)].
3
Pressthe [MENU] button.
• The menu list will appear.
4
Move the [Joystick] up or down to select
<Display>, then press the [Joystick(OK)]
5
Move the [Joystick] up or down to select
<Date/Time>, then press the [Joystick(OK)].
6
Move the [Joystick] up or down to select the
display type of the Date/Time, then press the
[Joystick(OK)].
• Display type of the Date/Time: <Off>,
<Date>, <Time>, <Date&Time>.
7
To exit, pressthe [MENU] button.
=
The Date/Time will read 12:00 AM JAN.01.2006 in the following
conditions.
During playback of a blank section of a disc.
If the disc was recorded before setting the Date/Time in the
DVD Camcorder
- When the Lithium Battery becomes weak or dead.
Before you use the Date/Time function, you must set the clock.
-page 32
+
+
Camera Ivlo_le
(Camera)] or
2 Colo_ el intenuptor [Power] en [1_
o [L_J(Player)].
(Camera]]
Presione el boron [MENU]
• Aparece la {ista de! menQ
_Move
_Select
=
=
La fund6n Date/Time esta operativa en los Camera Mode/Player
Mode/M.Cam Mode/M.Player Mode. _pagina 28
La fecha y la hora se graban automaticamente en una zona
especial del disco.
1. Coloque el interruptor [Mode] en [DISC] o
[CARD].
_Exit
Mueva el [Joystick] hacia ardba o hacia abajo
para seleccionar <Display> y presione el
boton [Joystick(OK)]
Mueva el [Joystick] hacia ardba o hacia abajo
para seleccionar <DatetTime> y presione el
boton [Joystick(OK)]
Mueva el [Joystick] hacia arriba o hacia abajo
para seleccionar el tipo de visualizacion de la
fecha/hora y presione el boton [Joystick(OK)].
= Tipo de visualizacion de la fecha y hora:
<Off>, <Date>, <Time>, <Date&Time>.
7. Para salir, presione e! boron [MENU]
Aparecera 12:00 AM JAN.01.2006 en Date/Time en las siguientes
condiciones.
- Durante la reproducci6n de una parte de! disco que no este
grabada.
- Si el disco fue grabado antes de ajustar Date/Time en la
Videocamara con DVD.
- Cuando la bateria de litio se debilita o se agota.
Antes de utilizar la fanci6n Date/Time, debe ajustar e! reloj.
_pagina 32
[ ENGLISH
]
[ ESPAI_OL
DVD Camcorder:
-
=
-
_
Before Recording
+-
_+ ln the [ t_j_ (Camera)] or [_(Player)]
work when the LCD Screen is closed.
Ad'ustin
the
Videoc mara con DVD: Antes de grabar
•
mode+the Viewfinder wlll
++
m
o,*+En el modo [ _ (Camera)] o [_(Player)],
cuando se cierre la pantalla LCD.
et visor funcionara
Focus
The focus adjustment knob of the Viewfinder enables
individuals with vision problems to see clearer images.
1
2
Close the LCD Screen and pull out the Viewfinder.
Use the Focus Adjustment Knob of the Viewfinder
to focus the picture
Viewing the sun or any strong light source through the Viewfinder for a
prolonged period may be harmful, or cause temporary impairment.
]
1. Cierre la pantalla LCD y saque el visor.
2.
Utilice el boton de ajuste de enfoque del visor
para enfocar la imagen.
La luz del sol o cualquier fuente de luz intensa a traves del visor
durante tiempo protongado puede ser perjudicial o causar problemas
de visi6n temporales
[ ENGLISH
]
[ ESPAI_OL
DVD Camcorder:
•
•
_-
Q
=
o
-
Before Recording
e
Videoc mara con DVD: Antes degrabar
-
•:o In some situations, different recording techniques may be required
for more dramatic results.
]
-
+
+_
_
•
++
+
+++
+
En algunos casos son necesarias distintas tecnicas de grabaci6n
para obtener mejores resultados.
1. General recording,
1. Grabaci6n en general.
2.
Downward recording.
Making a recording with a
top view of the LCD Screen.
2. Grabaci6n hacia abajo,
Grabacbn mirando {a
pantalla LCD desde arriba
3.
Upward recording.
Making a recording viewing
the LCD Screen from below.
4.
Self recording=
Making a recording viewing
the LCD Screen from the
front
3. Grabaci6n haeia arriba.
Grabacbn mirando {a
pantalla LCD desde abajo.
4.
Grabaci6n propia.
Grabacion mirando la
pantalla LCD desde e!
frente.
5. Grabaci6n empleando el
5. Recording with the
Viewfinder.
in circumstances where it
is difficult to use the LCD
Screen, the Viewfinder can
be used as a convenient
alternative.
Please rotate the LCD Screen
carefully as excessive rotation
may cause damage to the inside
of the hinge that connects the
LCD Screen to the DVD
Camcorder.
visor,
Er+casos en los que sea
dificil emplear la pantalla
LCD, el visor puede resultar
una altemativa de gran
utilidad.
Gire la pantalla LCD con cuidado,
ya que si la gira demasiado se
puede daMar el interior de la
bisagra que une la pantalla LCD
a la Videocamara con DVD.
[ ENGLBH
]
DVD Camcorder:
[ ESPANOL
Before
Recording
Videoc_mara con DVD: Antes de grabar
,**o When inserting a disc or dosing the disc cover, do not
apply excessive force It may cause a malfunction
,**o You cannot open the disc cover while loading.
,**° Set the [Mode] switch to [DISC] and the [Power]
switch to [l_(Camera)]
to view menus and
messages
f
Push the [OPEN] switch in the direction of the arrow
• The disc cover will partially open
Gently open the cover the rest of the way by hand
Push the disc into the disc compartment until a dick is
heard
•
•
4
+
°:,
+
displayed on the LCD Screen
2.
3
1
2
The recording side of the disc must face the inside
of the DVD camcorder
Do not touch the pickup lens.
3
Gently push the section marked [PUSH CLOSE] on the
disc cover to dose it
•
4
Once inserted, the disc is recognized and the
[ACCESS] indicator blinks Do not cut off the power
supply during this time Do not shake nor apply impact.
}t may cause a malfunction.
-
Move the Hand Strap so it does not interfere with
inserting or ejecting the disc.
The disc cover can be opened when the device is
connected to an AC power adapter or the battery
pock, even if the power is off.
AI inserter un disco o cerrar la cubierta de] disco, no
aplique excesiva fuerza Podda hacer que la
videocamara no funcionara bien.
No puede abdr la cubierta del disco al cargar,
Co]oque el interruptor [Mode] en [DISC] y el interruptor
Power en I_(Camera
para vet menOs y mensa es
en a panta a LCD.
Presione el interruptor [OPEN] en la dkecci6n de la
fiecha.
. La cubierta del disco se abdr_ parcialmente
Abra suavemente la cubierta con la mano el espacio
restante.
Introduzca el disco en el compartimento basra que se
oiga un clic.
• El lado de grabacidn de disco debe situarse hacia el
interior de la camara con DVD.
• No toque la lente de captaci6n
Empu e suavemente la secci6n marcada como
[PUSH CLOSE en la cuberta del d sco pare cerrafla.
• Una vez insertado el disco se reconoce con el
indicador [ACCESS] parpadeando. Durante este
proceso no corte el suministro electrico No la agite
ni la go{pee. Podda hacer que la videoc&mara no
funcionara bien
Mueva la empudadura para que no interfiera al insertar
o expuBar el disco
La tape del disco puede abdrse cuando el dispositivo
este conectado a un adaptador de CA o a la bateria,
incluso aunque este apagado
Caution
Precaucidn
This product utilizes a laser Use of controls or
adjustments or performance of procedures other than
those specified herein may result in hazardous radiation
exposure, Do not open covers and do not look inside the
product if interlock mechanism is damaged
Warning
Be careful not to damage the interlock
]
pickup lens
mechanism,
Este producto utiliza un laser El uso de contro_es o ajustes o
]a ejecucidn de procedimientos distintos a los especificados
en este documento pueden dar como resufiado la
exposicidn peligrosa a radiaciones, No abra ]as tapes ni
mire en el interior de la unidad si se daita el mecanismo de
interbloqueo
Tenga cuidado de no daitar el mecanismo de interNoqueo
Advertencia
[ ENGLISH
]
[ ESPAI_OL
DVD Camcorder:
Before Recording
Formatting may be required if a new disc is inserted.
Recognition of the disc will start
For a DVD-R/-,'-R DL disc:
Formatting
will automatically
For a DVD-RW disc: You are prompted with the <Disc
Format?> message.
Differences between
ideo and VR mode
_/
begin
is not formatted.
be able o play the disc on most DVD Players/Ree0rders
VR (VR Mode) : You can edit the disc on a DVD
Video Video but
Mode
: if the is
disc
been finalized,
you wil
Camcorder.
playback
onlhas
possible
on a DVD
Recorder that supports VR mo_e.
= Refer to page 14 for Finalized disc compatibility
Move the [Joystick]
left or right to select <Video> or <VR>I then press
[Joystick(OK)]
Please refer to page 13 for disc type descriptions and usage.
Videoc mara con DVD:Antes de grabar
Ser& necesado formatear un disco nuevo al introducido.
Se iniciara el reconocimiento del disco
Para un disco DVD-RI+R DL: Se iniciara autornaticamente el formateo.
Para un disco DVD-RW: A _arecerael mensaje <Disc is not formatted.
VR (Modo VR): Puede editar el disco en una
Video
(Modo Video):
Si el
disco
hafinalizado,
podra
Videocamara
con DVD,
pero
la se
reproducci6n
s61oes
osible en un Grabador de DVD que admita el modo VR
• Consulte la pagina 14 para conocer la compatibilidad de un disco finalizado
Mueva el [Joystick] a la izquierda o a la derecha para seleecionar <Video> o
<VR> y presione el bot6n [Joystick(OK)]
I.
The Finalize/Format functions are not available at battery level
and _.
Format?>
reproducir el disco en la mayorta de los Reproductores/
Diferencias entre el modo Grabadoras de DVD
Video y VR
Upon completion, the <Complete!> message will appear
If you select <Cancel> the <Not formatted!>
warning message will appear Formatting a new
disc is required to record on it To format later, use
the <Disc Manager> menu _page 82
For a DVD+RW disc: You are prompted with the
<Disc format? All files will be deleted!> message.
Move the [Joystick] left or right to select <Yes>, then
press [Joystick(OK)]
Upon completion the <Complete!> message will
appear.
If you select <No>, the <Not formatted!> warnfng
<When a DVD-RW disc is formatted.>
message will appear Formatting a new disc is
required to record on it To format later, use the <Disc Manager>
menu. '-page 82
1. Push the [OPEN] switch in the direction of the arrow
• The disc cover will partially open
2. Gently open the cover the rest of the way by hand.
3. Remove the disc
• While pushing down the center portion of the dfsc spindb, pick up
the disc by the edges to remove.
4. Gently push the section marked [PUSH CLOSE] on the disc cover
to close it.
N_te
]
2.
3.
4.
=
=
=
Consulte la pagina 13 para las apHcaciones pot modo
AI finalizar aparecer& el mensaje <Complete!>.
SJselecciona <Cancel>, aparecer& el mensaje <Not
formatted!>
Formatear un nuevo disco es necesado
para grabar en el. Para formateado posteriormente.
utJlice el menQ <Disc Manager>. -p&gJna 82
Para un disco DVD+RW: Aparecer& el mensaje
<Disc format? All files will be deleted!>
Mueva el [Joystick] a la izquierda o a la derecha para
seleccionar <Yes> y presione [Joystick(OK)]
=
AI finalizar aparecer& el mensaje <Complete!>.
=
Si selecciona <No>, aparecera el mensaje <Not formatted!>
Formatear un nuevo disco es necesado para grabar
en el Para formatearlo postebormente, uti]ice el menQ
<Disc Manager>. _p&gina 82
Presione el interruptor [OPEN] en la direccirtn de la flecha
• La cubierta del disco se abdra parciaimente.
Abra suavemente la cubierta con la mano el espacio restante
Retire el disco
• Mientras presiona la parte central de M pletina, sujete el disco por los
bordes para retirado.
Empuje suavemente M secci6n marcada corno [PUSH CLOSE] en la
cubJerta del disco para cerrada
La funci6n Format/Finalize (Formato/Finalizar)
de bateria _
o _.
no esta rtisponible
en el nivet
,_.
[ ENGLISH
]
[ ESPAI_OL
DVD Camcorder:
_
_
_
_ m
•
o
Before Recording
oo
_`
Videoc mara con DVD: Antes de grabar
oo-
+ +
•:o The Record Mode function works in both Camera Mode and
Player Mode _page 26
•:o This DVD Camcerder can film in the XP (extra play), the SP
(standard pray) and the LP (long play) modes.
The SP mode is set as the factory default
1
2
3
4
5
6
7
Set the [Mode] switch to [DISC].
Set the [Power] switch to [l_(Camera)] or
[[]_(Player)].
Pressthe [MENU] button.
• The menu list will appear.
Move the [Joystick] up or down to select
<Record>+ then press the [Joystick(OK)].
Move the [Joystick] up or down to select
<Ree Mode>, then press the [Joystick(OK)].
Move the [Joystick] up or down to select the
desired record mode (XP, SP or LP), then
press the [Joystick(OK)].
To exit, pressthe [MENU] button.
• The icon of the selected mode is displayed.
XP
DVD-RW/+RW/-R
(1 4G)
Approx. 2Omin
DVD+R
(2.6G)DL
Approx. 35rain
•SP
Approx. 3Omin
Approx. 53min
•LP
Approx. 6Omin
Approx.1O6min
* Recordedfilesare encodedwith VariableBit Rate(VBR)
, The recording times shown above are
approximate and depend on the recording
environment (i.e lighting conditions).
, VBR is an encoding system that automatically
adjusts the bit rate according to the recording
image.
(_
+
+-
e +
++ +++
+
o-
e=+
La funcidn de! modo de grabacion esta operativa en los Camera
Mode y Player Mode _pagina 28
o:÷ Esta Videocamara con DVD puede filmar en los modos
XP (reproduccion extra), SP (reproduccion estandar) y LP
(reproduccion larga). El modo SP se define come el valor
predeterminado de fabdca.
_
_Select
STB¥
1
2
Coloque el interrupter[Mode] en [DISC].
Coloque el interruptor[Power] en
[l_(Camera)]
o [[_J(Player)]
3 Presione el boton [MENU]
= Aparece la Iista del men&
4 Mueva el [Joystick] hacia arriba o hacia
abajo para seleccionar <Record> y pulse el
boron [Joystick(OK)]
5 Mueva el [Joystick] hacia arriba o hacia
abajo para seleccionar <Rec Mode> y pulse
e] boton [Joystick(OK)]
6 Mueva el [Joystick] hacia arriba o hacia
abajo para seleccionar el medo de grabacion
que desee (XP, SP o LP) y pulse el boton
[Joystick(OK)].
7. Para salir, presione el boron [MENU]
• Aparece el icono del mode seleccienado.
_Ext
_
I
_
++Q
+
_-
_,love
]
0_00_00 (_
_
DVD-RW/+RW/-R
(1,4 G)
DVD+R
(2,6 G)DL
XP
Aprox 20 raM.
Aprox 35 rain.
•SP
Aprox 30 rain.
Aprox 53 rain.
• LP
Aprox 60 raM.
Aprox 106 rain.
• Los archivos grabados se codifican con VBR
(Ve!ocidad variable de bits)
• Los tiempos de grabacion que se muestran
son aproximados y dependen de+entomo de
grabacion (p ej.: condiciones de luz).
• VBR es un sistema de codificacion que
ajusta automaticamente la velocidad en bits
de acuerdo con la imagen de grabacion.
I ENGLISH
1
[ ESPAI_OL
Videoc_mara con DVD: Grabaci6n b_sica
DVD Camcorder: Basic Recording
•
1
6
•
m
•
o
Connect a power source to the DVD
Camcorder. _pages 23.27
= (A Battery Pack or a AC Power
adapter)
2
Remove the Lens Cover
3
Open
=
Insert
the LCD
a disc-page
Screen 42
= Set the [Mode] switch to [DISC]
=
=
=
4
5
1
_S_7_
i.
J-_
I_l_:'_
_
Set the [Power] switch to [_(C
......
)]
__"_.
Mak .....
that <STBY> is displayed.
Mak .....
the image y.....
tto
f_
_,r 7qe"-_
or Viewftnder
Make sure the Battery Level
indicates that there is enough
remaining power for your expected
recording time
_"-_-f_
I _J_'_)__'t
I llP_'_J"_
To start recording, press the [Start/Stop[ button
<RECO> is displayed on the LCD Screen
The record mode recording time, the disc type, the
format mode and the title scene number are displayed
on the LCD Screen
I]
_
_'
]
I
[;_Zr_
I '_(
I !Ji_
I
I
0
F b
=-
_J'_"
4.
REC
• [] OO020
(*'_
30rain []
I_100/
To stop recording, press the [Start/Stop] button again.
<STBY> is displayed on the LCD screen after blinking
If you press the [StartlStop[ button to record again, a
new title scene will be created
The scene number vdfl not appear in the STBY mode
but in the REC mode
5.
J
=
=
]
Playing title scenes _page 64
Up to 253 title scenes can be created on DVD-R/+RW/+R DL/-RW (_Jldeo
Mode) discs, and up to 999 on DVD-RW (VR Mode)
Detach the Battery Pack when you have finished recording to prevent
unnecessary battery power consumption
if the power cable/batteries are disconnected, or recording is disabled during
recording an error message v4fl appear and the system is switched to the data
recovery mode. While data is being recovered, no other function is enabled After
data recovery, the system will be switched to the STBY mode.
Coneete la Videocamara con DVD a
una fuente de afimentacidn
_paginas 23, 27
• (Una bateda o un adaptador de CA.)
• InseRe un disco _p&gina42
2
Retire ]a tapa del objetivo
3
Abra la pantalla LCD
• Coloque elinterruptor [Mode] en
[DnSC]
• Coloque elinterruptor [Power] en
[t_ [Camera)]. Asegdrese de que
aparece <STBY>.
• AsegQrese de que la imagen que
desea grabar aparezca en la
pantafla LCD o en el visor
• AsegOrese de que el hive] de la
bateda indique que tiene suficiente
energia para grabar durante el
tiempo deseado
Pulse el botdn [StartlStop] para empezar a grabar.
= <RECO> aparece en ]a pantal[a LCD.
El modo de grabaeidn e] tiempo de grabaeidn, e]
tipo de disco, el modo de formato y el nQmero del
Btu[o aparecen en la pantal]a LCD.
Para detener la grabacJdn, pulse de nuevo el botbn
[StartlStop[.
= Aparece <STBY> en ]a pantal[a LCD
Si pulsa e] botdn [Start/Stop] para grabar de nuevo
se creara una nueva lista de tftulos
El nt_mero de lista de titu]os no aparecera en el
rnodo STBY pero si en eI modo REC
*
.
Reproduccidn de escenas del titulo _p&gina 64
Pueden crearse hasta 99 escenas de titulo en discos DVD-RW/-R y hasta 49
en discos DVD+RW/+R DL
.
Desconecte la bateria al terminar de grabar para evitar un eonsumo
innecesado de la bated&
.
Si estan desconectados el cable de afimentacidn y las batedas, o la grabaci6n
esta desactivada durante la grabacidn, aparecera un mensaje de error y el
sistema cambiara a] modo de recuperacidn de datos. Mientras se recuperan los
datos, ninguna otra funei6n permanece habilitada Tras la recuperaci6n de
datos el sistema cambiara al modo STBY
_.
[ ENGLISH
]
[ ESPANOL
DVD Camcorder: Basic Recording
Videoc_mara con DVD: Grabaci6n b_sica
+ The EASY.Q function works only in Camera Mode. "_page 28
*,,t* The EASY.Q function allows a beginner to easily make good recordings.
*,:* La funci6n EASY.Q s61o esta operativa en el Camera Mode.
_pagina 28
,,:* La funci6n EASY.Q permite a los principiantes obtener buenas
grabaciones con facilidad.
1, Set the [Mode] switch to [DISC].
2.
Set the [Power] switch to [i_
3,
By pressing the [EASY.Q] button, all functions
on the DVD Camcorder will be set to off and the
recording settings will be set to the following
basic modes (DIS, AF(Auto Focus) AWB(Auto
White Balance), AE(Auto Exposure)) ON:
• The word <EASY.Q> and DtS (_)
appear
on the display at the same time.
4,
Press the [Start/Stop] button to start recording.
• Recording will begin using the basic
automatic settings,
5,
Press the [EASY.Q] button again in the STBY
mode to turn the EASY.Q mode off,
• The EASY,Q function will not turn off wMle
you are recording,
. The DVD Camcorder will return to the
1. Coloque el interruptor [Mode] en [DISC].
2. Coloque el interruptor [Power] en
[ I_ (Camera)].
3. AI presionar el bot6n [EASY.Q] para que
se desactiven todas las funciones de la
videocamara, Los ajustes de grabaci6n se
acomodaran a los siguientes modos basicos
(DIS, AF (Enfoque automatico), AWB (Balance
de blanco automatico), AE (Exposici6n
automatica)) ON:
• Apareceran en pantalla las palabras
<EASY.Q> y DIS ('_) al mismo tiempo,
4. Pulse el botdn [StartlStop] para iniciar la
grabaci6n,
• La grabaci6n empieza con los ajustes
automaticos basicos.
5. Pulse de nuevo el botdn [EASY.Q] en e modo
STBY y se desactivara el modo EASY.Q.
• La funci6n EASY,Q se desactivara cuando
este grabando.
• La Videocamara con DVD volvera a los
ajustes hechos antes de activar el modo
EASY,Q,
(Camera)].
I
[_
settings that were set pdor to activating
EASY.Q mode.
ores
•
•
•
•
tn EASY,Q mode, certain functions are not
available, such as Menu, BLC, Manual focus,
Color Nite. If you want to use these functions,
you must first turn the EASY.Q mode off,
The EASY.Q mode settings are released when
the Battery Pack is removed from the DVD
Camcorder and must be reset when the Battery
Pack is replaced.
16:9 Wide is not available in the EASY.Q mode, (SC-DC563 only)
Digital Effect and Digital Zoom is not available in the EASY,Q mode.
]
•
•
•
En et modo EASY_Q,algunas fi._ncionesno estan
disponibles, como Menu, BLC y enfoque manual,
Color Nite. Si desea usar estas fi._nciones
pdmero debera desactivar el modo EASY Q,
• Los ajustes del modo EASY.Q se liberaran
cuando se quite la bateria de la Videocamara
con DVD y deberan ajustarse de nuevo al
volver a colocada,
16:9 Wide no esta disponibte en el Modo EASY.Q, (s6to SC-DC563)
Digital Effect y Digital Zoom no estan disponiblesen el modo EASY Q.
[ ENGLBH
]
[ ESPAKIOL
DVD Camcorder:
=
_
oo
Videoc rnara con DVD:Grabaci6nb sica
Basic Recording
•
-
•
Connect external microphone (not supplied) to the
external microphone jack of this DVD Camcorder.
Clearer sound cart be recorded.
+
The Zoom function works in both Camera Mode and M.Cam
+
+
+
+
the Zoom feature can lead to unprofessional looking results and a
reduction of battery usage time.
2
3
I
o-
•
•
•
-
-
•
Conecte el micrdeno exteme (no se suministra) al
terminal del microfene exteme de esta Videecamara
con DVD. Pedra grabarse un sonide mas claro
Mode. -page 28
*.*o Zooming is a recording technique that lets you change the size of
the subject in a scene.
+ You can zoom using variable zoom speeds.
*.*o Use these features for different shots. Please note that over-use of
1
]
La funcion Zoom esta operativa en los Camera Mode y M.Cam
Mode =pagina 28
El uso del zoom es una tecnica de grabacion que permite
modificar el tama5o det encuadre de ]as escenas.
El zoom se puede emplear con velocidades variables.
Utilice el zoom para obtener imageriesvariadas. Si abusa del
zoom el resultado sera imageries poco profesienales. Ademas, e!
tiempo de use de la bateria se reduce
Mueva la palanca det [Zoom]
lentamente para obtener
un efecto de zoom gradual.
Mu6valo mas rapido si desea
un efecto rapido
• El efecto del zoom se
WIDE
puede seguir por la
[T] (Telephoto) side: Subject
pantalla OSD.
appears closer.
2 [T] (Teleebjetivo): el objeto se
[W] (Wide angle) side: Subject
ve mas cerca.
appears farther away
3. [W] (Gran angular): el objeto se ve mas iejos
• You can record a subject that is about 10ram (about 0.5 inch)
= Puede grabar un objeto que se encuentre a unos 1gram (unas
away from the lens surface in the Wide position
0,5 pulgadas) de la superficie del objetivo en la posici6n W.
Move the [Zoom] lever slightly
for a gradual zoom, move it
further for a high-speed zoom.
• Your zooming is monitored
on the QSD
1
TELE
[ ENGLISH
]
[ ESPANOL
DVD Camcorder:
Basic Recording
Videocbmaracon DVD:Grabacibnbbsica
+
The Fade function works only in
Camera Mode. _page 28
4- You can give your recording a
professional look by using special
effects such as fade in at the
beginning of a sequence or fade out
at the end of a sequence
To Start Recording
{_
¢. Lafunci6nde aparicibngraduals61o
est&operativeen el CameraMode
pagina28
+ Puededara sus grabacionesun
aspeetoprofesionalempleandoefecfos
espeeialescomblaaparicibngradual
dela imagen(fade-in)al pdncipio
deuna secuenciao su desaparlci6n
gradual(fade-out)al finalde la
secuencia
1
2
3
Set the [Mode] switch to [DISC].
Setthe [Power] switchto [l_(Camera)]
Before recording, hold down the
[FADE] button
• The picture and sound gradually
disappear (fade out).
4 Press the [Start/Stop} button and atthe
sametime release the [FADE[ button
• Recording starts and the picture and
sound gradually appear (fade in)
To Sto
Recordin
6L_J
5
6
Comienzo
de la grabacibn
1 Coloqueelinterruptor[Mode] en
[D_SC].
2 CoJoqueelinterruptor
[Power]en
[_(Camera)]
3 Antesde grabar,mantengapulsadoel
bot6n[FADE]
= Lah'nagen
y elsonidodesaparecen
gradualmente
(fadeout)
4 Pulseel bot6n[Start/Stop]y al mismo
tiemposuelteel bot6n[FADE]
= EmpJeza
lagrabacibny la imagen
y elsonidoaparecengradualmente
(fade-in)
When you wish to stop recording,
hold down the [FADE]button.
• The picture and sound gradually
disappear (fade out).
When the picture has disappeared,
press the [Start/Stop] button to stop
recording.
Hold down the [FADE] button
]
a, Fade Out
Pare detener
la grabaci6n
5 Cuando quiera detener la grabad6n,
mentenge pulsedoel bot6n [FADE]
. Leimageny elsonidodeseperecen
graduelmente[fade out).
6 Cuando le imegen haye
desepereddo, pulse el botbn [Start/
Stop]pare detaner la grabecion
Gradual disappearance
a. Fade Out
(Approx 4 seconds)
(Aprox 4 segundos)
b. Fade In
(Approx 4 seconds)
B
Release the [FADE[ button
G_radua]appearance
b, Fade In
b Fade In
a Fade Out
(Aprox 4 segundos)
[ ENGLISH
]
[ ESPANOL
Videoc_mara con DVD: Grabaci6n b_sica
DVD Camcorder: Basic Recording
÷***BLC works in both Camera Mode
and M,Cam Mode. "*page 28
¢ Back lighting exists when the subject
is darker than the background:
- The subject is in front of a window.
- The person to be recorded is
wearing white or shiny clothes
and is placed against a bright
background; the person's face
<BLCOff>
is too dark to distinguish his/her
features.
- The subject is outdoors and the background is overcast,
- The light sources are too bright,
- The subject is against a snowy background,
&
BLC est& operativa en los Camera Mode
y M,Cam Mode _p_gina 28
Existe luz de fondo cuando el objeto que
se va a grabar es mas oscuro que el
fondo:
+
-
Cuando e] objeto est& deiante de una
ventana
=
Cuando se va a grabar a una persona
que lieva ropa blanca o briliante y
se encuentra frente a un fondo muy
<BLC On>
iluminado
En este caso su cara
estara demasiado oscura para que
se distingan sus facciones.
Cuando el objeto se encuentra en el exterior y el rondo esta
nublado
Cuando la fuente de luz es muy intensa
Cuando el objeto se encuentra delante de un fondo nevado
1, Set the [Mode] switch to [DISC] or [CARD].
1.
Coloque
el interruptor
[Mode]
e] interruptor
[Power]
en [DISC]
o
[CARD].
2,
Set the [Power]
switch
to [_
3,
Press the [BLC] button,
• BLC icon (_}) is displayed,
4,
To exit BLC mode, press the [BLC] button
again.
. Each press of the [BLC] button toggles:
Normal _ BLC _ Normal.
]
(Camera)].
2.
Cologue
[_
g.
Pulse
•
4.
el bot6n [BLC].
Aparece
el ieono de BLC (_,_).
Para salir del modo BLC, pulse
bot6n
I
•
en
(Camera)].
de nuevo
el
[BLC].
Cada puBacidn
Normal _ BLC
del botdn [BLC]
_ Normal.
cambia:
The BLC function will not operate in EASY.Q mode.
La funci6n
EASY.Q.
BLC no esta operativa
en ]a modalidad
[ ENGLISH
]
[ ESPANOL
DVD Camcorder:
o
-
_
e
Videoc_mara con DVD: Grabaci6n b_sica
Basic Recording
=
+ Color Nite function works only in Camera Mode. _page 28
4. You can make the subject recorded appear to be in slow motion by
controlling the shutter speed, or a brighter image
in dark places without a compromise in colors.
*:* Please disable 16:9 Wide mode to use the Color
Nite function. _page 60
@ La funci6n Color Nite solo esta operativa en el Camera Mode.
'- pagina 28
*.:* Puede disparar sobre un objeto a camara
lento controlando la velocidad del obturador o
una imagen mas brillante en lugares oscuros
sin que afecte a los colores.
_,:* Desactive el modo 16:9 Wide para utilizar la
funciOnColor Nite. _pagina 60
1, Set the [Mode] switch to [DISC].
2,
1. Coloque el interruptor [Mode] en [DISC],
Set the [Power] switch to [l_q (Camera)].
3,
Press the [COLOR NITE] (SC-DC563 only) or
[C.NITE/$] (SC-DC564/DC565 only) button.
4,
Each time you press the [COLOR NITE]
(SC-DC563 only) or [C.NITE/'_] (SC-DC564/
DC565 only) button, shutter speed is changed to;
<Color N. 1/30>, <Color N. 1/15> and off.
<SC-DC563only>
2.
Coloque el interruptor [Power] en
[ llt (Camera)].
3
Pulse el boron [COLOR NITE] (s0to SCDC563) o [C.NITE/_] (s61oSC-DC564/DC565),
4.
Cada pulsaci6n del bot6n [COLOR NITE]
(s61oSC-DC563) o [C,NITE/'_] (s01oSCDC564/DC565), se cambia la velocidad del
obturador; <Color N. 1/30>, <Color N. 1/15> y
desactivada.
.
AI utilizar Color Nite, la imogen toma un efecto
como de camara lento.
AI utilizar Color Nite, el enfoque se ajusta
lentamente y es posible que aparezcan
puntos blancos en la pantalia; esto no es
ningOn defecto.
Program AE, Digital Zoom, Shutter,
Exposure, Mosaic, Mirror, Emboss2,
Pastel2 o 16:9 Wide no estan disponibles en
el modo Color Nite.
Si se define DIS o EASY.Q, se liberara el
mode Color Nite.
i'!"::!
•
•
•
]
When using Color Nite, the image takes on a
slow motion like effect.
When using Color Nite, the focus adjusts slowly
and white dots may appear on the screen, this [_ SIm
is not a defect.
Program AE, Digital Zoom, Shutter, Exposure,
Mosaic, Mirror, Emboss2. Pastel2 or 16:9
Wide is net ava@ble in the Color Nite mode,
if DIS or EASY,Q is set. Color Nite mode will be
released.
<SC-DC564/DC565
only>
.
[ ENGLISH
]
[ ESPAI_OL
DVD Camcorder: Advanced Recording
Videoc&maracon DVD:Grabaci6n avanzada
-
+
+
+
The Wind Cut function works only in Camera Mode, _,,page 28
Use the Wind Cut when recording in windy places such as the
beach or near buildings,
The Wind Cut function minimizes wind noise or other noise while
+
recording.
- When the Wind Cut is on, some low pitched tones are
+
e_iminated along with the sound of the wind, (_
]
+
F-
e A
ee
_i
-
_
#
La funci6n Wind Cut s61o esta operativa en el Camera Mode.
_pagina 28
Use la funci6n Wind Cut cuando grabe en lugares donde sople el
viento, como en la pJaya o cerca de edificios,
La funcion Wind Cut minimiza e] ruido del viento y otros ruidos
durante ia grabaci6n.
- Cuando la funci6n Wind Cut esta activada,
a,
se eliminan algunos sonidos graves junto
con los del viento.
1. Coloque el interruptor [Mode] en [DISC],
2,
Set the [Power] switch to [1i_ (Camera)].
1. Set
the [Mode]
switch
to [DISC].
3,
Pressthe
[MENU]
button.
4.
5.
6,
Move the [Joystick] up or down to select
<Record>, then press the [Joystick(OK)].
P,off
2.
Coloque el interrupter [Power] en
[ _ (Camera)].
3. Presione el bot6n [MENU],
__sp
_TUove
_Select
_Exit
Move the [Joystick] up or down to select
<Wind Cut>, then press the [Joystick(OK)].
4.
Mueva el [Joystick] hacia arfiba o hacia
abajo para seleccionar <Record> y pulse el
bot6n [Joystick(OK)],
5. Mueva el [Joystick] hacia arriba o hacia
abajo pars seleccionar <Wind Cut> y pulse el
bot6n [Joystick(OK)I,
To activate the Wind Cut function, move the
[Joystick] up or down to select <On>,
then press the [Joystick(OK)].
6.
7. To exit, press the [MENU] button.
• Wind Cut icon ([p]) is displayed.
7.
STBY []
Para activar ]a funci6n Wind Cut, mueva el
[Joystick] arriba o abajo para se]eccionar
<On> y pulse el bot6n [Joystick(OK)].
Para salir, presione el boton [MENU].
. Aparece el icono Wind Cut ([}::_]).
0:00:00(R,¢"_
Make sure Wind Cut is set to Off when you want
the microphone to be as sensitive as possible.
Off cuando quiera que el micr6fono sea Io mas
sensible posible,
30rain_
Aseg0rese de que la funci6n Wind Cut este
[ ENGLISH
]
[ ESPAI_OL
]
DVDCamcorder: Advanced Recording
Videec&rnaracon DVD:Grabacibn avanzada
¢o The Shutter Speed function works only in Camera Mode _page 28
*:o The Exposure function works in both Camera Mode and M.Cam Mode
'-page 28
*:o The Shutter Speed and Exposure functions can be set in the QUICK
MENU
•;*
+
'
1
2
3
4
5
6
7
Set the Mode] switch to [DISC] or [CARD]
Se the Power sw chto
_, Camera
Pressthe [QUICK MENU] button.
• QUICK MENU fist will appear
Move the [Joystick] up or down to select <Shutter>
or <Exposure>,
then press the [Joystick(OK)]
Move the [Joystick] up or down to select
<Manual>, thenvessthe
Joystick(OK)]
Move the Joystick eft or r ght to se ect the des red
shutter speed or exposure value, then press the
[Joystick(OK)]
• Shutter speed can be set to <1/60>, <1/100>.
<1/250>, <11500>, <111000>. <112000>.
<114000> or <1/10000>
= Exposure value can be set between <go> and <29>
To exit, press the [QUICK MENU] button
• Selected settings are displayed
÷
- J- , - Jo
%
3
4
5
30 mill[]
6
[
[5_
L_
/_lm
] -
STBY []
00000(R'i._
7
•:*
Outdoor sports such as golf or tennis: 112000 or 114000
Moving cars or trains or other rapidly moving vehicles such
as roller coasters: b100O 1/500or 1'250
Indoor sports such as basketball: 1100
[fyousetExposuretoManualthedefaultseftingabpears
as the value adjusted automatically for changes according
to the environmental light conditions You can also adjust
the brightness using the Joystick
+
+
30ilir'
\ _
Ext
./.
Adjusting the ExposureWhen Recording
•:*
•
•
•
- _
_,0 I-
=0
,_
-
a=
-
Co]oque el
el interrupter
interrupter [Power]
[Mode] en
o [CARD]
Coloque
en[DISC]
[ _ (Camera)]
Presione el botdn [QUICK MENU]
= Aparecelalista QUICK MENU
Mueva el [Joystick] hac[a arriba o hacia abajo para
seleecionar <Shutter> o <Exposure> y pulse el boron
[Joystick(OK)]
Mueva el [Joystick] hac[a arriba o hacia abajo para
seleecionar <Manual> y pulse el botdn [Joystick(OK)]
Mueva el [Joystick] a la izquierda o a la derecha para
seleecionar la velocidad de obturador o el valor de
exposicidn que desea y pulse el botdn [Joystick(OK]]
= La velocidad del obturador puede definirse en
<1160>, <11100> <11250>,<11500>, <i/100O>,
<1/2000>, <114000>o <1110000>
• El valordeex_os}ci6n
se puededefinirentre<00>y<29>
Para sa]ir=pulse e] botdn [QUICK MENU]
• Aparecen los ajustes seleccionados
+
Deportes a[ aire I[bre come golf o tenis: 1_2000o 114000
Cocheso ttenes en movirnientou otros veMculos de
movimientorapido come una rnontaSarusa: 1i1000,1_500
o 1,250
Deportes en pista cubierta come baloncesto: 1/100
Ajuste de la exposicidn al grabar
[_
¢
_ote_:
•
,
Velocidadesdelobturadorrecomendadas
alraqrabar
Recommended
ShutterSpeedsWhen Recordinq
•:*
•:*
J
La func[dn Shutter Speed s61oesta operativaen e] Camera Mode =pagina 28
La funci6n Exposure esta operativa en los Camera Mode y M.Cam Mode
-pagina 28
Las funciones Shutter Speed y Exposure pueden definirse con QUICK MENU
if you manually change tile Shutter Speed and the
Exposure value when Program AE option is selected,
manual changes are applied first
The image may not seem as smooth when a high
Shutter Speed is set
The DVD Camcorder returns to the auto shutter and auto exposure
settings when you change to the EASY.Q mode
When recording with a Shutter Speed of 1,1000 or higher, make sure the
sun is not shining into the lens.
•
•
=
Si fija Exposure (Exposicidn) en Manual (Manual), e]
ajuste predeterrNnado apareee come el valor ajustado
automaticamente para realizar los cambios de acuerdo
con las condJciones de luz ambientales Tambien puede
ajustar el brillo uti]izando el Joystick
Si modificamanualmente los valores de Shutter Speed y
Exposure cuando esta seleecJonadala opcidn Program AE,
se aetivaran primero los cambios manuales.
Es posible que ]a imagen no se yea tan uniforme cuando
se defina la vMocidad del obturador
La Videocamara con DVD vue]ve a los ajustes de obturador y exposiciSn
automatieos cuando se define el cambio al mode EASY.Q
AI grabar con una velocidad de obturador de 1/100O o superior aseg0rese
de que el sol no se refleja sobre el objetivo
[ ENGLISH
]
[ ESPA_IOL
DVDCamcorder:Advanced Recording
=
=
,l
,
o
]
Videoc&maracon DVD:Grabaci6n avanzada
_1
-
. .
e
I
+
The Auto Focus/Manual Focus function
works in both Camera Mode and
M,Cam Mode, _page 28
@ tn most situations, it is better to use the
automatic focus feature, as it enables
you to concentrate on the creative side
of your recording,
@ Manual focusing may be necessa_j
under certain conditions that make
automatic focusing difficult or unreliable.
Auto Focus
•:,
•:,
•:,
Jl
-
j
,
__
La funci6n Enfoque automatico/Enfoque
manual esta operativa en los Camera Mode
y M,Cam Mode _pagina 28
En la mayoria de casos, es mejor usar e[ enfoque
automatico, ya que pemlite concentrarse en el
aspecto crea_Jvode ia grabad6n.
El enfoque manual puede ser necesano bajo
ciertas condiciones que hacen que el enfoque
autom_tico resulte diflcil o poco fiable
Enfoque automatico
•:,
*:, tf you are inexperienced in the use of
DVD Camcorders, we recommend that
you use Auto Focus.
Manual Focus
Si no posee experiencia en el uso de
Videocamaras con DVD, le recomendamos
que use el enfoque autom_tico.
Enfoque
manual
+
En las siguientes situaciones se pueden
obtener mejores resultados ajustando el
enfoque manualmente
a. Cuando una imagen contiene ratios objetos, algunos
situados cerca de la Videocamara con DVD y otros
lejos de ella
b. Cuando hay una persona entre la niebla o
rodeada de nieve,
+
tn the following situations, you may obtain better
results by adjusting the focus manually.
a. A picture containing several objects, some close
to the DVD Camcorder, others further away
b. A person envelopedin fog or surroundedby snow,
c. Very shiny or glossy surfaces like a car.
d. People or objects moving constantly or
quickly like an athlete or a crowd.
1, Set the [Mode] switch to [DISC] or [CARD].
2. Set the [Power] switch to [ tl_ (Camera)].
3, Pressthe [MF/AF] button,
• The manual focus icon (_R) will blink.
4, Focus with the [VOL-] and [VOL+] buttons,
• Pressing the [VOL-] button will focus on the
foreground image while pressing the [VOL+]
button will focus on the background image.
5, To exit, press the [MF/AF] button,
5
Manual Focus is not available in the EASY.Q mode.
El Enfoque manual no esta disponible en el modo EASYQ
c
Cuando se graban supedicies muy bli]lantes,
como un coche.
d. Cuando hay gente u objetos que se mueven
constantemente o con rapidez, como una multitud
o un atleta
Co_oque el interluptor [Mode] en [DISC] o [CARD]
Coloque el interruptor Power] en [l_4(Camera}].
Pu se el bot6n MF AF
= ParpadearA el icono de enfoque manual (M_)
Enfoque con los botones [VOL-] y [VOL+].
• Si se presiona el bot6n [VOL-] se enfecar&
la imagen de primer piano mientras que si se
presiona el bot6n [VOL+] se enfocarA ]a imagen
del fondo
Para salir, pulse el bot6n [MF/AF]
[ ENGLISH
]
[ ESPAI_IOL ]
DVD Camcorder: Advanced Recording
Videoc_maracon DVD:Grabaci6n avanzada
+ The Program AE function works only in Camera Mode. '-page 28
**** The Program AE mode allows you to adjust shutter speeds and
apertures to suit different recording conditions.
**** They give you creative control over the depth of field.
La funci6n Program AE s61oesta operativa en el Camera Mode.
-pagina 28
El modo Program AE permite ajustar las velocidades de
obturaci6n y aperturas para adaptarse a distintas condiciones de
grabaci6n,
Con ella se puede controlar de manera creativa la profundidad de
_:" campo.
• Modo <Auto [_)>
- Ba ance automat co entre el objeto y el
fondo.
- Se utiliza en condiciones normales.
- La velocidad de1obturador se ajusta
automaticamente entre 1/60 y 1/250 de
segundo, segOn la escena que se este
grabando.
<Auto ([] )> mode
-
Auto balance between the subject and the backc round.
To be used in normal conditions.
The shutter speed automatically varies from
1/60 to 1/250 per second, depending on the
scene.
<Sports ( _ )> mode
For recording people or objects moving quickly,
•
<Portrait (_)>
mode
For focusing on the background of the
subject, when the background is out of focus,
-
The Portrait
mode
is most effective
-
The shutter
second.
speed
automatically
when
varies
used outdoors.
from
•
1/60 to 1/1000 per
<Spotlight (_)> mode
For recording correctly when there is only light on the subject and
not the rest of the picture.
•
<Sand/Snow (_)>
mode
For recording when people or objects are darker than the
background because of reflected light from sand or snow.
•
<High
•
Speed
For recording
games,
,,&
(_)>
(High
fast-moving
Shutter
subjects
Speed)
mode
such as players
in golf or tennis
Modo <Sports ( _ )>
Se utiliza para grabar a personas u objetos que
se mueven rapidamente.
Modo <Portrait(_
>
- Enfoca e rondo de objeto cuando esta desenfocado,
- Este modo es mas eficaz cuando se emplea en exteriores,
- La velocidad del obturador se ajusta automaticamente entre
1/60 y 1/t000 de segundo.
Modo <Spotlight ( (_))>
Este modo se emplea para grabar correctamente cuando s61o
esta iluminado el objeto y el resto de la imagen no Io esta.
Modo <Sand/Snow ( 4_ )>
Este modo se emplea para grabar cuando las personas o los
objetos estan menos iluminados que el fondo debido a la luz
reflejada en la arena o en la nieve.
Modo <High Speed ( _ )> (Velocidad de obturador alta)
Este modo se emplea para grabar escenas en que el movimiento
es de gran velocidad, por ejemplo, jugadores de tenis o de golf,
[ ENGLISH
]
[ ESPAI_IOL ]
DVD Camcorder: Advanced Recording
Videocamaracon DVD:Grabaci6n avanzada
Setting
Ajustes
the Program
AE
1. Set the [Mode] switch to [DISC].
2.
Set the [Power]
3,
Press the [MENU] button,
• The menu list will appear.
4,
Move the [Joystick] up or down to select
<Camera>, then press the [Joystick(OK)].
5,
Move the [Joystick] up or down to
select <Program AE>, then press the
[Joystick(OK)].
• The available options are listed.
6,
Move the [Joystick] up or down to select the
desired program AE option, then press the
[Joystick(OK)].
7,
To exit, press the [MENU] button.
• The icon of the selected mode is displayed.
• When the <Auto> mode is selected, no
icon is displayed.
•
You can directly access the Program AE
function by using the [QUICK MENU] button.
-page 29
The Program AE function will not operate in
EASY.Q mode
•
switch
to [_
{_
de Program
_-
1. Coloque el interruptor [Mode] en [DISC],
2. Coloque el interruptor [Power] en
[ _ [Camera)].
3. Presione el bot6n [MENU].
• Aparece la lista del ment_.
4. Mueva el [Joystick] hacia arriba o hacia
abajo para seleccionar <Camera> y pulse el
boton [Joystick(OK)].
(Camera)].
_Move
_Select
AE
_Exit
/
J........................................ \
_l,,Iove
_Select
_Exit
/
........................... {..........................................
5. Mueva el [Joystick] hacia arriba o hacia
abajo para seleccionar <Program AE> y
pulse el bot6n [Joystick(OK)].
• Aparece una lista con las opciones
disponibles.
6. Mueva el [Joystick] hacia arriba o hacia
abajo para seleccionar la opci6n de
program AE que desea y puJse el bot6n
[Joystick(OK)I,
7. Para safir, presione el bot6n [MENU].
• Aparece el icono del modo seleccionado.
• Cuando se sefecciona el modo <Auto>,
no aparecera nlngun icono,
•
•
EFacceso directo a la funci6n Program AE
esta disponible simp]emente utilizando el
bot6n [QUICK MENU]. _pagina 29
La funci6n Program AE no estara operativa
en el modo EASY.Q.
[ ENGLISH
]
[ ESPAI_IOL ]
Videoc&maracon DVD: Grabaci6navanzada
DVD Camcorder: Advanced Recording
=
e
"
"
t,+
<
"
= t,.
.
"
=
÷t+ The White Balance function works in both Camera Mode and
M.Cam Mode. _page 28
÷t+ The White Balance is a recording function that preserves the
unique image color of the subject in any recording condition.
+ You may select the appropriate White Balance mode to obtain
good quality image color.
• Auto (h_J):This mode is generally used to
control the White
•
•
•
Balance
automaticafly.
according
¢
_
switch
Setthe
Power] switch to [_(Camera)].
Press the MENU button.
= The menu listwifl appear.
Move the [Jeystick]
up or down to select
<Camera>,
then press the [Joystick(OK)J,
Move the [Joystick]
up or down to
select <White Balance>,
then press the
[Joystick(OK)].
Move the [Joystick]
desired mode (Auto,
Move _
to [DBC]
or [CARD].
Select _
+
=
.
Indoor ( @ ): contro+a el balance de blanco
segQn el ambiente interior.
- Con habgeno o i]uminaci6n de estud o o video:
- El objeto tiene un color dominante;
- Cercano.
.
Outdoor
_
: controla el equiiibrio del
blanco segQn el arab en e exterior
- Durante el dia, especialmente
de cerca y
en casos en que el objeto tiene un color
dominante
.
Custom WB _
: controla el equilibrio
blanco segQn eq'en orno de grabaci6n
_Select
del
Cobque el interruptor [Mode] en [DISC[ o [CARD]
Coloque el interru_tor [Power] on [ _
(Camera)]
Pres one el bot6n [MENU]
• Aparece la flsta del men0_
Mueva el [Joystick] hacia arriba o hacia abajo
para seleccionar <Camera> y pulse el bot6n
[Joystick(OK)]
Mueva el [Joystick] hacia ardba o hacia aba/o
para seleccionar <White Balance> y pulse el bot6n
[Joystick(OK)]
Mueva el [Joystick] haca arriba o hacia aba/o para
sMeccionar e] modo que desea [Auto, Indoor, Outdoor
o Custom WB) y pulse el botdn [Joystick[OK)].
.
Consulte la p_gina 57 para obtener detalMs sobre
el ajuste de balance de blanco personal
Para salt, presione el botdn [MENU]
• Aparece e+icono del modo seleccbnado
• Cuando se se+eccona el modo <Auto>, no
_Exit
5
To exit, press the [MENU] button.
• The icon of the selected mode is displayed.
• When the <Auto> mode is selected,
no
icon is displayed.
_,+
1
up or down to select
indoor,
Outdoor
or
Custom
WB), then press the [Joystick(OK)].
• Refer to page 57 for details on setting
Custom WB,
"
_:
4
love
Q
Auto ( [] ): 6ste es el rnodo gue se utiliza
por Io general para controlar de manera
automatica el balance de blanco
Exit
ProgramAE
_P,
e +
.
to the recording
2.
3.
7.
= +=
La funci6n White Balance esta operativa en los Camera Mode y
M.Cam Mode. _pagina 28
White Balance es una funci6n de grabaci6n que conserva los
colores Qnicos de la irnagen de los objetos independientemente
de
Ins condiciones de grabaci6n
Se debe seleccionar la modalidad correcta de balance de blanco para
obtener ima anes con una buena calidad de color de imagen,
+
f
In daylight, especiafly for close up and
where the subject is of one dominant color.
Custom
WB (_): This controls the
Set the [Mode]
6.
,
- Subject is of one dominant color
- Close up
Outdoor
(_):
This controls the White
Balance according to the outdoor ambience.
1.
5.
g+
Indoor (_):
This controls the White
Balance according to indoor ambience.
Under halogen or studio/video
fighting
White Balance
environment.
4.
%
+
e"
6
7
aparece ning_Enicono
[ ENGLISH
]
[ ESPAI_IOL ]
DVDCamcorder: Advanced Recording
Videocamaracon DVD:GrabaciSnavanzada
Settin
Ajuste
9 the Custom
White
Balance
*1. You can adjust the white balance as you wish based on the
recording environment.
1, Set the [Mode] switch to [DISC] or [CARD].
2, Set the [Power] switch to [1_ (Camera)].
3, Press the [MENU] button.
• The menu list will appear.
4. Move the [Joystick] up or down to select
<Camera>, then press the [Joystick(OK)].
5. Move the [Joystick] up or down to
select <White Balance>, then press the
[Joystick[OK)].
6, Move the [Joystick] up or down to
select <Custom WB>, then press the
[Joystick(OK)].
• The <Set White Balance> will blink,
7, Place the subject under the desired lighting,
then press the [Joystick(OK)] button.
• The <Set White Balance> will disappear
and the white balance setting will
commence.
8,
To exit, press the [MENU] button.
• Custom WB icon (_z_) is displayed,
del balance
de blanco
personal
_:. Puede ajustar el balance de blancos como desee basandose en el
entomo de grabaci6n.
1. Coloque el interraptor [Mode] en [DISC] o
[CARD].
2. Coloqueelinterruptor[Power]en I_ Camera ,
3. Preslone el bo on [MENU].
• Aparece la lista dei ment_.
4. Mueva el [Joystick] hacia ardba o hacia
abajo para seleccionar <Camera> y pulse el
bot6n [Joystick[OK)].
5. Mueva el [Joystick] hacia arriba o hacia
abajo para seleccionar <White Balance> y
pulse el bot6n [Joystick[OK)].
6.
Mueva el [Joystick] hacia arriba o hacia
abajo para seleccionar <Custom WB> y
presione el [Joystick(OK)],
• <Set White Balance> parpadeara.
Coloque el objeto blanco bajo una
luz apropiada y presione el bot6n
[Joystick(OK)],
• <Set White Balance> desaparecera
y comenzara el ajuste de balance de
blancos.
8, Para sa_ir,pulse el boton [MENU],
. Aparece el icono de Custom WB (_).
I" 17
SetWhiteBalance
Seect
_
Exit
I
STBY
[]
0:00:00
_,_
30 min []
•
•
•
You can directly access the White Balance
function by using the [QUICK MENU] button.
-page 29
The White Balance function will not operate in
EASY.Q mode.
Turn the Digital Zoom off (if necessary) to set
a more accurate white balance,
Reset the white balance if lighting conditions change,
During normal outdoor recording, setting to Auto may provide
better results.
Puede acceder directamente a la funcion
White Balance uWizando el bot6n
[QUICK MENU], "_pagina 29
• La funci6n White Balance no esta operativa
en el modo EASY.Q.
• Si es necesario,desactive el Digital Zoom para
obtener un balance de blanco mas preciso,
J
• Reinicie el balance de blanco si las
condiciones de iluminaci6n cambian.
Si el equilibrio del blanco se ajusta en Auto en las grabaciones
normales en exteriores, se pueden obtener mejores resultados.
[ ENGLISH
]
DVDCamcorder: Advanced Recording
[ ESPAI_OL
Videec&mara
conDVD:Grabacibn
avanzada
i_
+ The Digital Effect function works only in Camera Mode -page 28
+ The Digital Effects enabbeyou to give a creative look to your recording.
*:o SetecttheappropriateDigitalEffectforthetypeofpicturethatyou
wish to record and the effect you wish to create
+ There are 10 Digital Effect modes.
1. <Art> mode
This mode gives the images a coarse effect.
2. <Mosaic> mode
This mode gives the imagesa mosaic effect.
3. <Sepia> mode
This mode gives the images a reddishbrown pigment.
4. <Negative> mode
This mode reverses the colors, creating a
negative image.
5. <Mirror> mode
This mode cuts the picture in half, using a
mirror effect.
6. <BLK & WHT> mode
This mode changes the images to black
and white.
7. <Emboss1> mode
This mode creates a 3D effect
(embossing).
8. <Emboss2> mode
This mode creates a 3D effect
(embossing) on the surrounding area of
an image.
9. <Pastel1> mode
This mode applies a pale pastel drawing
effect to an image.
10. <Pastel2> mode
This mode applies a pale pastel drawing
effect to surrounding area of an image.
]
.
•
o--
-
•
oe
.-
|_
.
-
+
La funcion Digital Effect s01oesta operativa en el Camera Mode.
_pagina 28
Los efectos digitales permiten dar un aspecto mas creative alas
grabaciones
4* Seleccione el efecto digital que necesite para el tipo de imagen
que desee grabar y el efecto que desee crear
+ Existen 10 modes de efectos digitales
1. Mode <Art>
Este mode le da a la imagen un aspecto
de grano grueso.
2. Mode <Mosaic>
Este mode le da a la imagen un aspecto
de mosaico
+
3.
4.
5.
6.
7.
8.
9.
10.
Mode <Sepia>
Este mode le da a la imagen un color
marten rojizo.
Mode <Negative>
Este mode invierte los colores, creando
una imagen en negative.
Mode <Mirror>
Este mode divide la imagen en dos,
empleando un efecto de espejo.
Mode <BLK & WHT>
Este mode cambia la imagen a blanco y
negro.
Mode <Emboss1>
Este mode crea un efecto 3D (relieve).
Mode <Emboss2>
Este mode crea un efecto 3D (relieve) en
el area alrededor de la imagen
Mode <Pastel1>
Este mode aplica un efecto pastel palido a
la imagen
Mode <Pastel2>
Este mode aplica un efecto pastel palido al
area alrededor de la imagen.
ENGLISH
]
[ ESPANOL
]
DVDCamcorder: Advanced Recording
Videec&mara
conDVD:Grabacibn
avanzada
SeJecting
Selecci6n
the
Digital
Effects
1. Coloque el interrupter[Mode] en [DISC].
2. Coloque el interrupter[Power] en
[_ (Camera)]
Pressthe [MENU] button.
3. Presione el boton [MENU]
• The menu list will appear.
• Aparece la {ista de! men&
4. Mueva el [Joystick] hacia arriba o hacia
<Camera>,
then press
[Joystick(OK)].
ProgramAE
'
Move the [Joystick]
upthe
or down
to select
abajo para seleccionar <Camera> y pulse el
boton [Joystick(OK]]
_Move
_Select
_Ext
5. Mueva el [Joystick] hacia arriba o hacia
Move the [Joystick] up or down to select
I......................................
abajo para seleccionar <Digital Effect> y
<Digital Effect>, then press the [Joystick(OK)]. [_ if ............................
pulse el boron [Joystick(OK)].
Move the [Joystick] up or down to select the
6. Mueva el [Joystick] hacia arriba o hacia
desired Digital Effect option, then press the
PEogramAE
abajo para seleccionar el efecto digital que
[Joystick[OK)].
desea y pulse el boton [Joystick(OK)].
" The display mode is set to the selected mode.
• El mode de pantalla se ajusta en el mode
seleccionado
To exit, press the [MENU] button.
7. Para salir, presione e! boron [MENU]
1
Set the [Mode] switch to [DISC].
2
Set the [Power] switch to [lt_ (Camera)].
3
4
5
6
7.
del efecto digital
(_ ,F
\
_Move
_Seiect
_Exit
Youcan directly access the Digital Effect function r_q/oo00o (@_
Puede acceder directamente a la funci6n Digital
STBY []
by using the [QUICK MENU[ button _page 29
LU _,11
so_r E_I
Effect utilizando el bot6n [QUICK MENU].
The Mosaic, Mirror, Emboss2, or Pastel2 mode is
|
'=pagina 29
not availablewhile DIS or Color Nite is in use
|
Los modes Mosaic, Mirror, Emboss2, o
Digital Effect modes are not available while EASY.Q _
.=i
Pastel2 no estan disponibles mientras se
is in use.
|
ufiliza DIS o Dolor Nite
Once DIS, EASY.Q, Color Nite is set, Mosaic,
|At,
Los modes Digital Effect no estan disponibles
Mirror, Emboss2, or Pastel2 mode will be released.
|
mientras se encuentre en use EASY.Q.
Digital Zoom is not available in the Mosaic, Mirror,
\
j
Una vez que se define DIS o EASY.Q, Color
Emboss2, or Pastel2 mode
Nite, se liberara el mode Mirror, Mosaic,
Mirror mode is not availabb in the 16:9 Wide mode
Emboss2 o Pastel2.
(SC-DC564/DC565 only)
Digital Effect modes other than Emboss2, PasteJ2, Mirror, or Mosaic • Digital Zoom no esta disponible en los modes Mosaic, Mirror,
Emboss2 o Pastel2
mode is availabb while DIS is in use
.
El mode Mirror no esta disponible en el mode 16:9 Wide
(s61oSC-DC564/DC565)
.
Los modes de Digital Effect que no sea Emboss2, Pastel2, Mirror o
Mosaic esta disponible mientras DIS esta en use
[ ENGLISH
]
[ ESPANOL
Videoc&mara
conDVD:Grabacibn
avanzada
DVDCamcorder: Advanced Recording
-
o
-
,
'
*-
_-
•
'
=-
i
÷:. The 16:9 Wide function works only in Camera Mode. _page 28
÷:. Select to record a picture to be played back on a 16:9 Wide TV.
¢ 16:9 Wide is the default setting for models SC-DC564/DC565
÷
¢
+
1
Set the [Mode( switch to [DISC(.
2
Set the [Power] switch to [1_ (Camera)].
3
Pressthe [MENU] button.
• The menu list will appear.
4
Move the [Joystick( up or down to select
<Camera>, then press the [Joystick(OK)].
5
Move the [Joystick] up or down to select
<16:9 Wide>, then press the [Joystick(OK)]
6
To activate the 16:9 Wide function, move the
[Joystick( up or down to select <On>, then
press the [Joystick(OK)(.
• If you do not want to use the 16:9 Wide
function, set the <16:9 Wide> menu to
<Off>
To exit, pressthe [MENU] button.
• The display mode is set to the selected
mode.
_
-
6-
o_
•
=
•
=
'
a-
o
'
e-
La funci6n 16:9 Wide s61oesta operativa en e! Camera Mode.
_pagina 28
Se selecciona para grabar una imagen que se va a reproducir en
un TV panoramico 16:9.
16:9 Wide es el ajuste predeterminado en los modelos SC-DC564/
DC565.
f
1. Coloque el interruptor [Mode] en [DISC]
2.
7
]
Program AE
1_
WNte
3. Presione el boron [MENU].
• Aparece la lista de{ men&
Ba_Jhce
_Move
The 16:9 Wide mode is not available while DIS, EASY,Q or Digital
Effect is in use. (SC-DC563 only)
Once Color Nite is set, 16:9 Wide mode will be released
(SC-DC563 only)
Digital Zoom is not available in the 16:9 Wide mode
Coloque e! interruptor [Power] en
[ I_ (Camera)].
_Select
•
•
•
4.
Mueva el [Joystick] hacia arriba o hacia
abajo para seteccionar <Camera> y pulse e!
boton [Joystick(OK)]
5
Mueva el [Joystick] hacia arriba o hacia
abajo para seleccionar <16:9 Wide>, y pulse
el boton [Joystick(OK)]
6.
Para activar la funcion 16:9 Wide, mueva el
[Joystick] arnba o abajo para seleccionar
<On> y pulse et boton [Joystick(OK}].
• Si no quiere utilizar la funci6n 16:9 Wide,
defina el ment_<16:9 Wide> en <Off>.
7.
Para saiir, presione el boton [MENU].
• El modo de visualizaci6n se ajusta en el
rnodo seleccionado.
_Exit
El modo 16:9 Wide no esta disponible mientras DIS, EAS¥,Q o
Digital Effect se encuentra en uso. (s61o SC-DC563)
Una vez definido Color Nite, se liberara el modo 16:9 Wide.
(S01o SC-DC563)
Digital Zoom no esta disponible en el modo 16:9 Wide.
[ ENGLISH
]
[ ESPANOL
]
DVDCamcorder: Advanced Recording
Videec&mara
conDVD:Grabacibn
avanzada
*t, The DiS functionworks only in Camera Mode _page 28
@ DIS (Digitaltmage Stabilizer)is a function that
r_
,r
compensatesfor any shakingor hand movement L2J
while holding the DVD Camcorder(within
reasonablelimits)
+ It providesmore stable pictures when:
Recording with the zoom dfthe DIS is set.
Digital Zoom mode will be released )
Recording a small object dose-up
Recording and walking at the same time
- Recording through the window of a vehicle
1 Setthe [Mode] switch to (DISC].
2 Set the [Power] switch to [1_ (Camera)].
3 Pressthe (MENU] button.
• The menu list will appear.
4 Move the [Joystick] up or down to select
<Camera>, then press the [Joyatick(OK)].
5 Move the [Joystick] up or down to select
<DIS>, then press the [Joystick(OK)].
6 To activate the DIS function, move the
[Joystick] up or down to select <On>, then
press the [Joystick(OK)].
• If you do not want to use the DIS function,
f
set the <DIS> menu to <Off>
7 To exit, pressthe [MENU] button.
. DIS icon ('_) is displayed.
+
@
La fundon DIS solo esta operativa en el Camera Mode _paginn 28
+ DIS (Estabilizndor digitat de la imagen)as
una fandon que compensa 1assncudidnso
los movimientosde la mane al sostenar la
videocamara,dentro de unos limites razonables.
+ Proporcionn imageries mas estables nh
- Grnbacioncon el zoom sise define DIS. se
berate e mode D g ta Zoom
- Se graba un objato pequeSomay de carca;
Se graba miantras se cnminn;
- Se grebe n trnvos dela ventnnilladeun vahiculo.
_r,
love _Select
_Exit
1 Coloque elinterruptor [Mode] en [DISC].
2 Coloque elinterruptor [Power] en
[1_ (Camera)]
Camera Moqe
3 Presioneelboton [MENU]
. Aparece la listn del meno
4 Mueva el [Joystick] hacia arriba o hada abajo
ijnra seleccionar <Camera> y pulse el boton
oystick(OK)]
5 Mueva el Joystick] hecia arriba o bade
abe o pare se ecc onnr <D S>y pu see be On
[Joystick(OK)]
_Move
_Select
_Exit
6 Para activnrla fancion DIS, mueva el Joystick
err ba o abn o pnrn se ecc onar <On> y pase e
.............................I.......................................... x
bot6n Joystick[OK)]
. S no dasea u zar n func 6n D S, a us e n
en el menL3<DIS> en <Off>
7 Pare salir,presione el bot6n [MENU]
.......• Apareca el icono de DIS ('_)
Youcandkectlyaccessthe DISfunctionby usingthe
[QUICKMENU]button _page 29
DigitalZoom, Color Nite,Mosaic, Mirror Emboss2
or Pastel2is notavailableinthe DIS mode.
It is recommendedthatyoudeactivatethe DISfunction
whenusinga tripod
If youusethe DISfunction,the picturequalitymay deteriorate
EASY.Qmodeautomatically
setsthe DISto On.
16:9Widemodeis not availableinthe DISmode ($0-D0563only)
DISfunctionin 16:9Widemodemay producebwer qualitythanin normal
mode (SC-DC564/DC565
only)
•
.
.
.
Puede acceder directamenteala funci6n DIS
utilizando el bot6n [QUICK MENU] '-pagina 29
DigitalZoom,Color Nite, Mosaic,Mirror,Embosa2,
o Pastet2noesf_ndisponibles
en elmodeDIS
• Se recomiendn desactivar esta fancion cunndo
se empieeun tripode
Si Ldilizala fancionDIS, puedequela celidadde la imagense veaafectada
EASY.Q establece nutomaticnmente DIS en On.
16:9 Wide no esta disponible en el Mode DIS (s61o$0-DC563)
La fancion DIS en mode 16:9 Wide puedeproducir una calidad menor
queen mode normal (sOloSC-DC564iDC565)
[ ENGLISH
]
[ ESPANOL
DVD Camcorder: Advanced Recording
Videoc_maracon DVD:Grabaci6n avanzada
•,t, The Digital Zoom works only M Camera Mode. -page 28
•,t, Zooming more than 26x is acMeved digitally, up to 1200x when
combined with opticMzoom.
•,.t, The picture quality may deteriorate dependMg on how much you
zoom in on the subject.
+
Selecting
the
Digital
Zoom
1, Set the [Mode] switch to [DISC].
2, Set the [Power] switch to [1_ (Camera)].
3, Press the [MENU] button,
• The menu list will appear,
4, Move the [Joystick] up or down to select
<Camera>, then press the [Joystick(OK)].
5, Move the [Joystick] up or down to
select <Digital Zoom>, then press the
[Joystick(OK)].
6, Move the [Joystick] up or down to select the
desired zoom value (Off, 100x, 200x, 400x or
1200x), then press the [Joystick(OK)].
7, To exit, press the [MENU] button,
• When using the zoom lever, an digital zoom
indicator appears on the screen,
•
•
•
•
Maximum zoomMg may result in lower picture
quality,
Digital Zoom is not available while DB,
EASY,Q, Color Nite. 16:9 Wide Mosaic,
Mirror, Emboss2, or Pastel2 is in use.
Once Color Nite, EASY.Q, 16:9 Wide, Mosaic,
Mirror, Emboss2, or Pastel2 is selected.
Digital Zoom mode will be re;eased,
(The Digital Zoom mode will be backed up.)
Once DIS is selected. Digital Zoom mode will
be released.
z&
+
La funci6n Digital Zoom s61o est_ operativa en el Camera Mode
_p_gina 28
E} zoom por encima de 26x se Iogra digitalmente hasta 1200x
cuando se combina con zoom 6ptico.
÷:* La calidad de la imagen puede deteriorarse
dependiendo
dei nivel de acercamiento
sobre
et objeto.
Selecci6n
1
2.
3
4
_Move
_Se/ect
_Exit
_/
%
I
z-
5
-\
6
7
_Move
_Select
_Ext
del
zoom
digital
Coloque el interruptor [Mode] on[DiSC].
Csloque el Mterruptor [Power] en [IW_ (Camera)].
Presione el bot6n [MENU],
• Aparece la Iista dM memO.
Mueva el [Joystick]
hacia arriba o hacia abajo
para seleccionar <Camera>
y pulse el bot6n
[Joystick[OK)[.
Mueva el [Joystick[
hacia arriba o hacia abajo
para seleccionar <Digital Zoom> y pulse el
bot6n [Joystick[OK)].
Mueva el [Joystick]
hacM arriba o hacia abajo
para seleccionar el valor de zoom gue desea
(Off, 100x, 200x, 400x o 1200x) y pulse el
bot6n [Joystick(OK)].
Para sMir, presione el bot6n [MENU]
• AI utilizar et Mterruptor dot zoom digital,
aparece en pantalla el indicador de] zoom
digital
I
•
•
•
•
El zoom m_ximo puede dar como resultado
una calidad de imagen m_s pobre,
Digital Zoom no est_ disponible mientrss DIS,
EASY.Q, Color Nde, 16:9 Wide, Mosaic, Mirror,
Emboss2, o Pastel2 se encuentran en uso
Una vez definido Color Nite, EASY, Q, 16:9
Wide, Mosaic, Mirror, Emboss2,
o Pastel2,
Digital Zoom se liberara (So hara una copM
de seguridad de los datos del modo Digital
Zoom.)
Una vez defiMdo DIS o Digital Zoom se _iberar&
]
[ ENGLBH
]
[ ESPAI_IOL ]
conDVD:
indice
deminiaturas
ylistadereproducci6n
DVDCamcorder:Thumbnailindexand Playlist Videoc_mara
+
+
The thumbnail index displays multiple title
scenes that have been recorded.
**** A title scene is created between the points
where you start and step a recording.
Once deleted, you cannot recover the title
scene
again.
+
El indice de miniaturas
muestra vadas escenas
del titulo grabadas
Un titulo se crea entre los puntos en los que se
inicia y se detiene una grabacion
Una vez eliminado, no puede recuperar de nuevo
e] titulo
Current title scene/Total title scenes
+
You can create a Playlist on the same disc by
gathering your favorite scenes from the recorded
title scene
You can edit the Playlist without changing the
origina} recordings.
o_* Even if the Playlist is deleted, the original title
scenes remain undeleted.
+
+
+
Up to 999 title scenes
on a Playlist
+
(chapters) can be registered
Example: You have recorded a few scenes on a
DVD-RW in VR mode You want to save the original
recording, but you also want to create a playlist by putting
Current playlist/Total playlists
your favorite scenes together,
In this case, you can create a Playlist by selecting your favorite scenes,
leaving the original recording as it is
JAN/2 2006_
_Tite
A title scene is created between
the points where you start and stop
a recording
Once deleted you cannot recover
the title scene again
sterne/
Tiresterne2
,_,
_
®_
1000AM
Tit_escene4
Tiresterne3
,_
Puede crear una lista de reproducd6n en el mismo
disco recopilando la escena favodta de los titulos
grabados (listas de titulos).
Puede editar la lists de reproducci6n sin cambiar las
grabaciones originales
Incluso aunque se elimine la lista de reproducci6n las
listas de titulos originales permanecen sin eliminarse
En una lista de reproducci6n pueden registrarse hasta
999 escenas de titulos (capitulos)
Ejemplo: Ha grabado algunas escenas en un DVD-RW
en modo VR Desea guardar la grabaci6n original, pero
tambien desea crear un compendio colocando juntas las
escenas favoritas En este caso, puede crest una lista
de reproducci6n seleccionando Onicamente las escenas
favodtas, dejando la grabacion original tal y como est&
JAN302006_
Tit_escene5 Tit_escene6
_
Tit_escene7 r,m
_
L
'_
1030AM
//30AM
0200 PM
.....
_
02/0 PM
_'"
0220PM
__ _.-
0230PM
_-
Un titulo se crea entre los
la
grabaci6n
puntos
de inicio y parada de
Una vez eliminado no podra
recuperar el titulo de nuevo
[ ENGLISH
]
[ ESPANOL
Videoc mara con DVD
DVD Camcorder
= .
o
-
-
-
5
insert the disc you want to view
Openthe LCD Screen.
Set the [Mode] switch to [DISC).
Setthe [Power] switch to [[]_(Player)].
• The thumbnail index screen appears.
• Use the [MENU] button to adjust brightness
or color of the LCD Screen. "=page 38
Use the [Joystick] to select a title scenes to
be played, then press the [Joystick[OK)] or
[1_-II] button.
• To stop playback, press the [il(Stop)] button.
During playback,
the next image
=-_
DY_RW +RW.R +RDL
The recordedtitle scenes are displayed as a thumbnail
index (multiple images) on the LCD Screen
You can find the desired scene quickly using this
convenient index If the TFT LCD screen is closed.
you can view the recording through the viewfinder.
Use the Playback related buttons on the DVD
Camcorder or on the remote control. -page 65
1
2
3.
4
a displayed
(_
+
When you use the LCD Screen for playback,
you can hear recorded sound from the built-in
speaker.
When you hear sound once the disc is in play,
use the [VOL -,+] buttons to adjust the volume
• A volume level display will appear on the LCD
Screen
• Levels may be adjusted from anywhere
between 00 to 19.
= If you close the LCD Screen white playing,
,_you
will not hear sound from the speaker.
•
F
.-
-
1
2
3
4
%
image may be paused for a while
to be shown.
Qa
-
.
o-
• DYD-RW+RW-R+RD_
Las escenas de los titulos grabados aparecen como
un indice de miniatures (redes imagenes) en le
pantalla LCD
Puede Ioce][zarrapidamente la escena que desea
uti][zandoeste practico indice Si la pantella LCD esta
cerrada, puede vet la grabecion e traves del visor.
Utilice los botones re]acionados con la reproducci(m
en la Videocamara con DVD o en el mando a
distancia _pagine 65
Inserte el disco que desee vet
Abrala pantalle LCD.
Co]oqueel interruptor [Mode] en [DISC]
Coloque elinterruptor [Power] en[[_(Player)]
, Aparece la pante]la dei indice de mniaturas
, Utilice el bot6n [MENU] pare ajustar el bdllo o
el color de la pante]la LCD _pagine 38
Utilice el [Joystick] pare seleccionar]a escene
de le lista de titulos que vaa reproduciry pulse el
bot(_n[Joystick[OK)] o [_-H ]
= Paredetenerla reproducci0n,presioneel bot6n
[lll(Stop)]
5
until
Durante la reproducci6n,
congelada
,
+
]
durante
- o -
es posible que la imagen en pantalta permanezca
un tiempo haste que aparezca ]a siguiente
•
-
DYD-R_I+n_U-R
imagen.
+IIDL
,1. Cuando se usa ]a pantalla LCD para la
reproduccion, se puede oir el sonido a travcs
del altavoz incorporados
*1, AI oir los sonidos una vez que la cinta este
en march& utilice los botones [VOL -,+] para
ajustar el volumen
LA_arecerael nivel de volumen en la pantalia
D.
,
Los niveles se pueden ajustar de 00 a 19.
Si cierra la pantaHaLCD mientras
reproduce, es posib]e que no escuche
ning0n sonido en el aitavoz.
[ ENGLISH
]
[ ESPANOL
DVD Camcorder
Videoc mara con DVD
J
+
+
These functions work only in Player Mode, '_page 28
Play, Still, Stop, Fast Forward, Rewind, Forward Skip, and Reverse
Skip functions are accessible using the remote control.
(SC-DC564/DC565 only)
Slow function is accessible only using the
remote
control,
(SC-DC564/DC565
÷:+
"
_
o==
_J
kJ_
+
only)
Search (Forward/Reverse)
Pressing
the [144 ]/[ _,_-I] button
once while
a disc is playing back will increase the play
speed to approximately
X2, and pressing
twice plays at approx x16.
When the number 1 appears on the OSD, it means
X2 speed, Number 2 = X16.
To resume normal playback, press the [1_ |1] button.
Same as [ 44 ]/[ _._ ] buttons on the remote control
;kip Playback
.......
t'2
E
® i.@,Q.@[email protected]
•
®O
•
O
.....
if you press and hold the [t44 ] button, it moves
to the beginning of the scene. One more press and hold makes it
move to the beginning of the previous scene. If you press and hold
the [ 144 ] button at a portion 3 seconds from the start of scene, it
moves to the beginning
of the previous
scene.
being
#ayed
back
r,_YD.R_+RW.R+RDL
La funci6n Slow sdlo esta accesible utilizando
mando a distancia (s61o SC-DC564/DC565)
el
......
Presione el bot6n [_ II ] para hacer una pausa durante la
reproduccidn
Para reanudar la reproducci6n, pulse el botdn [i_- II ].
Busqueda
•
(Forward/Reverse)
Potion
•
=
Press and hold the [ 14_ ]/[ _vl] buttons during
playback,
When playing a disc, if you press and hold the
[ I_11 hldfr_n if mn//_ fr_ fhA n_tf _¢'_rt_
"
Reproducir/Pausa
•
Press the [_- | J] button to pause daring p_ayback.
To resume playback, press the [)11]
button.
= *
Estas funciones s6to estan operativas en el Player Mode _pagina 28
Las funciones Reproducir, Pausa, Parar, Avarice r_pido, Rebobinar,
Salto adelante y Saito atr_s estan accesibles con el mando a distancia
(s61o SC-DC564/DC565)
'layback/Still
'icture
]
de imageries (Adelante/Atr_s)
Si se preeiona una vez el botdn [ 14.,_]/[ _._1]
mientras se reproduce un disco, aumentara la
velocidad de reproducci6n a aproximadamente
X2 y eise presiona dos veces ee reproduce a
aproximadamente
x16.
Cuando aparece el n0mero t en ]a OSD, representa
una velocidad X2 N0mero 2 = X16.
Para reanudar la reproduccidn normal, pulse el
botdn [_ II ]
Igual que los botones [ 4._ ]/[ _._.] del mando a
distancia
Saltar reproducci6n
=
•
(adelante/atras)
Mantenga pulsados los botones [ 14._]/[ p_-I]
durante la reproducci6n
AI reproducir un disco, si mantiene pulsado el
bot6n [ _,_-I], va a la siguiente escena Si mantiene pulsado el boton[ 14_ ],
se va al pdncipio de la eecena Otra pulsaci6n continua provocara que se
vaya al principio de la escena anterior Si mantiene presionado el bot6n
[ 14.,_] durante 3 eegundoe desde el inicio de la escena, va al principio de la
escena anterior
Patte que se va a reg_oducir
[ ENGLISH
]
[ ESPAI_OL
DVD Camcorder
Videoc_mara
con DVD
Slow
Reproducci6n
(Adelante/Atr&s}
Playback
(SC-DCS64/DC565
=
(ForwardlReverse)
only)
Press the [lit_] button on the remote control
during playback.
- To resume normal playback, press the [i, ql]
button.
lenta
]
(s61o SC-DC564/DC565)
_6
•
Pulse el botdn [],]
del mando a distancia
el boton [_ Ill.
--
®®®
S/IMSItN6
_
dur_nte_areprod_eo_6n.
normal, pulse
[ ENGLISH
]
[ ESPA_IOL
Videoc mara
DVD Camcorder
_
+
+
e o
_ " _
]
con DVD
_YD-_UJ+RWMR+RDL
ThePBZOOMfunctionworksonlyinPlayerMode._page28
The PB ZOOM function enables you to magnify the playback
scene.
_:* La funci6n PB ZOOM s61oesta operafiva en el Player Mode,
_pagina 28
+ La funcion PB ZOOM permite ampiiar Is reproduccion.
1. Coloque el interruptor [Mode] en [DISC].
1, Set the [Mode] switch to [DISC].
2.
Coloque el interruptor [Power] en
[()_(Player)].
• Aparece la pantalla del indice de miniaturas.
2,
Set the [Power] switch to [_(Player)].
• The thumbnail index screen appears.
3.
Use the [Joystick] to select a title scene to be
played, thee press the [Joystick(OK)] or [_ |l ]
button,
3. UtNiceel [Joystick] para seleccionar la escena
de la lista de titulos que va a reproducir y
presione el botdn [Joystick[OK)] o [_" II].
4,
Move the [Zoom] lever toward [T(Tele)] to
activate the PB Zoom during playback,
• The image is magnified starting from the
center of image.
4.
5.
You can zoom in from 2.0x to 8.0x by moving
the [Zoom] lever.
• It zooms 2,0x .4,0x .8,0xprogressively,
• Zoom ratio is displayed.
5. Puede acercar el zoom desde 2,0x a 8.0x
moviendo la palanca [Zoom].
• Aplica el zoom 2.0x -, 4.0x -, 8.0x
progresivamente,
= Aparece el indice de zoom.
6.
Use the [Joystick] to move the screen up.
down, right or left.
6. Utilice el [Joystick] para mover la pantalla
arfiba, abajo, a la derecha o a la izquierda.
7,
To cancel the PB Zoom function, move the
[Zoom] lever toward [W(Wide)].
7.
•
You cannot apply the PB ZOOM function to pictures which are
being input from an external video source.
The PB ZOOM images cannot be exported to a PC.
•
•
•
Mueva la palanca [Zoom] hacia [T(Teie)]
para activa PB Zoom durante la reproducci6n.
• La imagen se amplia desde el centro de la
imagen,
Para cancelar la funcion PB Zoom, mueva la
palanca [Zoom] hacia [W(Wide)].
No puede apiicar la funci6n PB ZOOM en imagenes introducidas
desde una fuente de video externa,
Las imagenes de PB ZOOM no se pueden exportar a una PC.
[ ENGLISH
]
[ ESPAI_OL
Videoc rnara
DVD Camcorder
D- -
a .
-
-
-
| --
-
DYD-RgJ+RW
•
+
+
Delete function works only in Player Mode --page 28
Individual or all title scenes can be deleted.
1
2
Set the [Mode] switch to [DISC].
(_ /Setthe (Power] switch to [[_(Player)].
• The thumbnail index screen appears.
Pressthe (QUICK MENU[ button.
Move the (Joystick] up or down to select
<Delete>, then press the (Joystick(OK)].
Move the [Joystick] up or down to select
<Select> or <Select All>, then press the
[Joystick(OK)].
• Select: Deletes individual title scenes.
To delete individual title scenes, use the
L_J
[Joystick] to select title scenes to delete,
then press the [Joystick(OK)]
The selected title scenes will be marked <'_>.
• Select All: Deletes all titM scenes.
To delete all title scenes, simply press the
[Joystick(OK[] after <Select All> is selected.
All title scenes will be marked with <'_>
Move the [Joystick] up to select <Execute>,
3
4
5
6
7
then press the [Joystick(OK)].
[_
• The <Delete?> message will appear.
Move the [Joystick) left or right to select <Yes>,
then press the [Joystick(OK)].
• All selected titles will be deleted.
• Related scenes in Playlist will be deleted.
(DVD-RW(VR mode only))
fDeJete
+
+
a
* -
con DVD
*
m-
-
-
DYD .Rig +RW
La funci6n Delete s61oesta operativa en el Player Mode =pagina 28
Es posible suprimJr escenas individuales o todas las escenas del
titulo.
"
1. Coloque el interruptor [Mode] en [DISC].
2. Coloque el interrupter [Power] en
[_(Player)].
= Aparece a pan a a de nd ce de miniaturas
3. Pulse el boton [QUICK MENU]
4. Mueva el [Joystick] hacia arriba o hacia abajo
para seleccionar <Delete> y pulse el boron
[Joystick(OK)].
5. Mueva el [Joystick] hacia arriba o hacia abajo
para seleccionar <Select> o <Select All> y
presione [Joystick(OK)].
= Select: Suprime archivos individuales
Para suprimir archivos individualmente,
utilice el [Joystick] para seleccionar los
archivos que va a suprimir y presione el
[Joystick(OK)].
Se marcaran los archives seleccionados <_>.
Select All: Suprime todos los archivos
Para suprimir todos los archivos, presione
simplemente el [Joystick(OK)] tras
seleccionar <Select AJI>.
Se marcaran todos los archivos con <_>.
6. Mueva el [Joystick] hacia arriba para
seteccionar <Execute> y presJone el
[Joystick(OK)].
• Aparecera el mensaje <Delete?>.
7. Mueva el [Joystick] a la izquierda o a la
derecha para seleccionar <Yes> y presione el
[Joystick(OK)].
Se suprimiran todos los titulos seleccionados.
. Se elJminaranlos archives relacionadosde la
listade reproducci6n (DVD-RW(s01omodeVR))
A deleted title scenes can not be recovered
Un titulo borrado no podra recuperarse.
z&
]
[ ESPANOL
Videoc mara
con DVD
_
*to Partial Delete function works only in Player Mode @
_page 28
+ ATitlescenecanbepartiallydeleted.
+ The editing function only works on a DVD-RW (VR
Mode). You should format the DVD-RW to VR
Mode before recording. -page 43
1.
2
3
4
Set the [Mode( switch to [DISC(.
Set the [Power( switch to [[_(Player)].
Pressthe [QUICK MENU( button
Move the [Joystick( up or down to select
_}
<Partial Delete>, then press the [Joystick(OK)].
5 Move the [Joystick( to select a title scene you
want to delete partially from the thumbnail index
screen, then press the [Joystick[OK)[.
• The selected title scene will be paused+ then
<Start> will be highlighted.
6 Search the start point of deletion by pressing the
[ 14_ / _'_'1] or [_ || ] button.
7 Press the [P,"!1] button at the start point to pause
the screen, then press the [Joystick(OK)].
L_J
• <End> will be highlighted.
8 Press the [ I_ / _,t ] or [_ tl ] button to search
the end point of deletion.
9 Press the [1_ !1] button at the end point to pause
the screen, then press [Joystick(OK)].
• <Execute> will be highlighted.
10. Press the [Joystick(OK)].
• The <Delete selected part ? Please
confirm.> message will appear
11. Move the [Joystick] left or right to select <Yes>, _}
then press the [Joystick(OK)].
• The selected part of the title scene will be
deleted.
• Use the [Joystick] to select <Back>, then
press the [Joystick(OK}] to return to the
thumbnail index
A deleted part of the title scene can not be recovered
]
- _D.RWmt+doYR
+t+ Partial Delete sdlo esta operstiva en el Player
Mode '-+pagina28
i:
1
:
4
5
6
7
8
9
Puede
eliminarse
parcialmente
]a escenaen
delun
titulo
La
funcidn
de edicidn
solo esta operatJva
DVD-RW modo VR) Debe formatearel DVD-RW
en modo VR an es de grabar _pag na43
Coloque el interrupter (Mode] en (DISC]
Coloque el interruptor [Power] en [(_)(Player}]
Pulse el bot6n [QUICK MENU]
Mueva el Joystick hacia arriba o hada abajo
para selecdonar <Partial Delete> y pulse el botdn
(Joystick(OK)]
Mueva el (Joystick] para seleccionar la escena
del titulo que desea borrar parcialmente de la
pantalla del indice de miniaturasy presione el
(Joystick(OK)].
, Se hara una pausa en el titulo seleccionado y
se resaltara <Start>.
Busque el punto inicJalde elJminacidnpulsando el
bot(m [1+_ /_€+1
]o [_- I I]
Pulse el boton [_ HI en el+puntoinitial para
hacer una pausa an la pamalla y pulse el boton
Joystick(OK)]
, <End> se resatar&
Pulseelbotdn[l++_i_¢+l o )11 parabuscarel
punto final de eliminacidn.
Pulse el botdn [1_H ] en elpunto final para
hacer una pausa enla pantalla y pulse el boton
[Joystick(OK)]
. <Execute> se resaltara
10. Pulse
el botonel[Joystick(OK)].
. Aparecera
mensaje <Delete seiected part '_
,
Please confirm.>.
11 Mueva el [Joystick] a la Jzquierdao a la
derechapara seleccionar <Yes> y pulse el boron
[Joystick(OK)]
. Se eliminara la parte seleccionadadel titulo
• Utiliceel Joystick]para seleccionar<Back> y
presione Joystick(OK)] paravolvera lalistade
titu os
Una parte borradadel titulo no podra recuperarse
/
[ ENGLISH
]
/
DVD Camcorder:
Playlist
[ ESPAI_IOL ]
[ Videoc&maracon DVD:Listade reproducci6n
I
-..,
-
" ,
-
",
I)YD-I_WYRmode
I
-_-
- _,_
-
",
_YI_,RiU
m0_oY_
I
*:* This function works only in Player Mode.
_}
_page 28
+ The editing function only works on a DVD-RW
(VR Mode),
You should format the DVD-RW to VR Mode before
recording. -page 43
1, Set the [Mode] switch to [DISC].
2. Set the [Power] switch to [_(Player)].
. The thumbnail index screen appears.
_}
3, Move the [Joystick] up to highlight the thumbnail
index screen icon (t_), then move the [Joystick[
right to highlight the playlist icon (_).
• The Piaylist scenes will be displayed in the form
of a thumbnail index.
• No thumbnail index is provided before creating
a Playlist,
4, Press the [QUICK MENU] button.
_}
5. Move the [Joystick] up or down to select
<New Playlist>, then press the [Joystick(OK)].
• The thumbnail index screen appears.
6, Use the [Joystick] to select a scene to create,
then press the [Joystick(OK)].
• Keep selecting in the order of your preference.
. The selected scene will be marked with <,/>,
7, Move the [Joystick] up to <Add>, then press the
[Joystick(OK)].
• A new Playlist will be created.
•
•
Up to 199 playlists can be created.
Up to 999 title scenes (chapters) can be registered
on a Playlist.
*:. Esta funei6n s61o esta operativa en eJ Player
Mode, _pagina 28
*:, La funci6n de edici6n s61o esta operativa en un
DVD-RW (modo VR). Debe formatear el DVDRW en modo VR antes de grabar. '-pagina 43
1. Coloque el interruptor [Mode] en [DISC].
2. Coloque et interruptor [Power] en [[_;_(Player)].
. Aparece la pantalla del [ndice de miniaturas,
3. Mueva el [Joystick] ardba para resaltar el
icono de la pantalla del indice de miniaturas
(_) y mueva el [Joystick] a la derecha para
resaltar el icono de la lista de reproduccion (_).
. Apareceran las escenas de la lista de
reproducci6n en forma de indice de
miniaturas.
. NOse proporciona ningun indice de
miniaturas antes de croat una lista de
reproducci6n.
4. Presione el bot6n [QUICK MENU].
5. Mueva el [Joystick] hacia ardba o hacia abajo
para seleccionar <New Playlist> y pulse el
bot6n [Joystick(OK)].
. Aparece la pantaHa del indice de miniaturas.
6. Utilice el [Joystick] para seleccionar la
escena que va a croat y presione el bot6n
[Joystick(OK)].
. Mantenga la selecci6n en el orden de
preferencia.
. La escena seleccionada se marcara con
<,/>
7. Mueva el [Joystick] hasta <Add> y pulse el
bot6n [Joystick(OK]].
. Se creara una nueva lieta de reproducci6n.
.
.
Pueden crearse hasta 199 listas de reproducci6n.
En una lista de reproducci6n paeden registrarse
hasta 999 escenas de titulos (capitulos).
[ ENGLISH
]
[ ESPAI_OL
DVD Camcorder:
=,
_
- " .
Piayiist
Videoc&maracon DVD:Listade reproducci6n
DYD-RW¥Rmode
" - Q oa
*:. This function works only in Player Mode. -page 28
*:. The PJay]istscenes are displayed in the form of a thumbnail index
on the LCD Screen.
if the LCD Screen is closed, you can view the recording through
the viewfinder,
+
]
Use the Playback related buttons on the DVD Camcorder or on the
remote control, '-page 65
r_ /
The editing function only works on a DVD-RW
L£J
(MR Mode), You should format the DVD-RW to
VR Mode before recording. _page 43
o
_-
_
- _, e a
o DYD-RW(modoYR)
*:o Esta funci6n s6]o esta operativa en el Player Mode. _pagina 28
+ Las escenas de la lista de reproducci6n aparecen en forma de
indice de miniaturas en la pantalla LCD.
Si se cierra la pantalla LCD, puede ver la grabaci6n a traves del
visor. Utiflce los botones refacionados con la reproducci6n en la
Videocamara con DVD o en el mando a distancia. _pagina 65
":* La funci6n de edicion s61o esta operativa en
un DVD-RW (modo VR). Debe formatear el
DVD-RW en mode VR antes de grabar,
-pagina 43
1. Insede el disco que desea ver.
1, insert the disc you want to view,
2,
Set the [Mode]
3,
Set the [Power] switch to [[_(Player)].
• The thumbnail index screen appears.
4,
Move the [Joystick] up to highlight the
thumbnail index screen icon (_"}j),then move the
[Joystick] right to highlight the playlist icon (_),
• The Playlist scenes will be displayed in the
form of a thumbnail index.
5,
Use the [Joystick] to select a Playlist to be
played, then press the [_|l]
button.
6,
switch
2.
to [DISC].
Press the [VOL -,+] buttons to adjust volume.
• The sound will be heard through the built-in
speaker.
Celoque el interruptor [Mode] en [DISC].
3. Co]oque el interrupter [Power] en
[[_(Player)].
• Aparece la pantalla de] indice de m[niaturas.
_Pays
%
4. Mueva el [Joystick] arriba para resaltar el
icono de la pantalla del indice de miniaturas
(_) y mueva el [Joystick] a }a derecha para
resa]tar el icono de la lista de reproducci6n (_),
• Apareceran las escenas de la lista de
reproducci6n en formato de indice de
miniaturas.
5. Utilice el [Joystick] para seleccionar la
lista de reproducci6n que va a repreducir y
presione el bot6n [_ II].
6.
Pulse losbotones [VOL -,+] para ajustar el
volumen.
• El sonido se oira a traves del altavoz
incorporado.
[ ENGLISH
]
[ ESPANOL
DVD Camcorder:
| - -
= . " .
IJ- - -
Playlist
DYD-_ YRmode
*t* Delete function works only in Player Mode _page 28
÷:o You can delete undesired playlists.
_* TheeditingfunctienonlyworksenaOVD-RW(VRMode).Youshouid
format the DVD-RW to VR Mode before recording _page 43
1
Set the [Mode] ewitch to [DISC[.
2
Set the [Power] switch to [[_(Player)]
L_jr_H_'ay}Jst
• The thumbnail index screen appears.
Move the [Joystick] up to highlight the thumbnail
index screen icon (_), then move the [Joystick]
right to highlight the p]aylist icon (_).
• The Playlist scenes will be displayed in the
form of a thumbnail index.
3
4
5
6
7
8
Pressthe [QUICK MENU] button.
Move the [Joystick] up or down to select
<Delete>, then press the [Joystick[OK)].
Move the [Joystick] up or down to select
<Select> or <Select All>, then press the
[Joystick(OK)].
• Select: Deletes an individualplaylist.
To delete a playlist, use the [Joystick] to
setect a playlist to delete, then press the
[Joystick(OK)].
The selected playlist will be marked with <_>.
•Select All: Deletes aHptaylists
To delete all p_aylists,simply pressthe
[_
[Joystick(OK)] after <Select All> is selected
All the selected playlists will be marked with <_>
Move the [Joystick] up to select <Execute>,
then press the [Joystick(OK)].
• <Delete?> message wit] appear.
Move the [Joystick] left or right to select <Yes>,
then press the [Joystick(OK)].
• All selected play]ists will be deleted.
]
Videoc maraconDVD:ListadereproducciSn
_ _
J - - " DvD.rIwmodeYR
*t* Delete sblo esta operative en el Player Mode. _pagine 28
¢ Puede borrar ]aslistas de reproduccion qua no desee.
¢ La funcion de edicbn s61oesta operative en un DVD-RW (modo VR).
Debe formeteer el DVD-RWen modo VR antes de greber _pagine 43
t
Co]oqueel interrupter [Mode] en [DISC]
2 Co]oqueel interruptor [Power] en [[_;_(Player)]
, Aparece la pantalla de] indice de miniataras
Mueva e] ]Joystick] arbba para resaltar e]
icono de la pantalla del indice de miniaturas
(_) y mueva el [Joystick] a la derecba para
resa]tar el icono de la lista de reproduccidn (_)
, Apereceranlosescenas de leIrstade
reproduccbnenformeto de indicede miniaturas.
4 Pulse el boton [QUICK MENU[
5 Mueva el [Joystick] hacia erbbe o hada abejo
hasta <Delete> y pulse el boton [Joystick(OK)[
6 Mueva el [Joystick] hacia emba o hacia abejo
pera seleccioner <Select> o <Select Ali> y
presbne ]Joystick(OK)].
= Select: eiimine una liste de reproduccibn
individual.
Pareeliminer une liste de reproduccibn, utilice
el [Joystick] pare seleccioner la lista de
reproduccionque vea eliminar y presione el
[Joystick(OK)].
La listade reproduccbn seleccionade se
marcaracon <_>
, Select AIh elimina todas ]aslistas de
reproduccibn
Pareeliminer todes ]as listasde reproduccbn,
presionesimpiemente e] [Joystick(OK)] tras
eelecdonar <Select AII>.
Todas loslistes de reproduccibnseleccionedas
se marcaran con <'_>.
7 Mueva el [Joystick] hecie erbba para selecc[oner
<Execute> y pulse el bet0n [Joystick(OK)]
, Aparecera e] menseje <Delete?>
8 Mueva el [Joystick] ale izquierda e e la
dereche pare seleccioner <Yes> y pulse el boton
[Joystick{OK)]
, Se suprimiran tedes las listas de reproduccbn
seieccionadas.
[ ENGLISH
]
DVD Camcorder:
[ ESPAI_OL
Videoc maraconDVD:ListadereproducciSn
Playlist
+ This function works only in Player Mode. '-page 28
*,1oYou can add more scenes in an existing Playlist.
*;, The editing function only works on a DVD-RW (VR Mode).
You should format the DVD-RW to VR Mode before
recording. "-,page 43
1. Set the [Mode] switch to [DISC].
2. Set the [Power] switch to [l_(Player)].
• The thumbnail index screen appears.
(_
3. Move the [Joystick] up to highlight the
thumbnail index screen icon (_), then
move the [Joystick] right to highlight the
playlist icon ([_]).
• The Playlist scenes will be displayed in
the form of a thumbnail index.
4. Press the [QUICK MENU] button.
5. Move the [Joystick] up or down to
select <Edit Playlist>, then press the
[Joystick(OK)].
• The screen wilt be switched to the Edit
Playlist mode.
6. Use the [Joystick] to select the Playlist
to which you wish to add scenes, then press the
[Joystick(OK)].
• The scenes inside the Playlist will appear.
7. Press the [QUICK MENU] button.
]
*,_,Esta funci6n s6to esta operativa en el Player Mode.
'=pagina 28
+ Puede a_adir mas escenas en una lista de reproducci6n
existente.
+ La funci6n de edici0n s61oesta operativa en un DVDRW (modo VR). Debe formatear el DVD-RW en modo VR
antes de grabar. ",pagina 43
1. Coloque el interruptor [Mode] en [DISC].
2. Coloque et interruptor [Power] en
[8E](Player)].
. Aparece la pantalta del indice de
miniaturas.
3. Mueva eI [Joystick] arriba para resaltar
el icono de la pantalla del indice de
miniaturas (_) y mueva el [Joystick] a
la derecha para resaltar et icono de la
lista de reproducci6n (_).
. Apareceran las escenas de la tista de
reproducci6n en formato de indice de
miniaturas.
4. Pulse el bot6n [QUICK MENU].
5. Mueva el [Joystick] hacia arriba o hacia
abajo para seleccionar <Edit Playlist>
y pulse el bot6n [Joystick(OK)]
. La pantalla cambiar& al modo Edit
Playlist.
6. Utilice et [Joystick] para seleccionar
la lista de reproducci6n en la que se
van a aSadir escenas y pulse el bot6n
[Joystick(OK)]
. Apareceran las escenas dentro de la
lista de reproducci0n.
7. Pulse el bot0n [QUICK MENU].._
A
[ ENGLISH
]
DVD Camcorder:
[ ESPAI_OL
Playlist
8. Move the [Joystick) up or down to setect
<Add>, then press the [Joystick(OK)].
= The title scenes to be added to the
Ptaylist will appear.
9. Use the [Joystick] to select the title
scenes to be added to the Playiist, then
press the [Joystick(OK)].
, The setected scenes will be marked with
<_>.
10. Move the ]Joystick] up to select
<Execute>, then press the
[Joystick(OK)].
• <Want to add?> message wilt appear.
11. Move the [Joystick] left or right to select
<Yes>. then press the [Joystick(OK)]
, The <Now adding...> message will
appear.
, The selected scenes wilI be added
to the Playiist. The new scene will be
added as the last scene.
]
Videoc&maracon DVD:Listade reproduccibn
_!
8. Mueva el [Joystick] hacia arriba o hacia
abajo para seleccionar <Add> y pulse el
bot6n [Joystick(OK)].
• Apareceran las escenas de la lista de
titulos que se van a aSadir a la lista de
reproducci6n.
9. Utilice ei [Joystick] para seleccionar
las escenas de la lista de titulos que se
van a aSadir a la lista de reproducci6n y
pulse el bot6n [Joystick(OK)]
• Las escenas seleccionadas se
marcaran con <¢>.
10. Mueva el [Joystick] hacia arriba para
seleccionar <Execute> y pulse el bot6n
[Joystick(OK)]
• Aparecera el mensaje <Want to add?>
11. Mueva el [Joystick] a la izquierda o a la
derecha para seieccionar <Yes> y pulse
et bot6n [Joystick(OK)]
• Aparecera el mensaje <Now adding...>
• Las escenas seleccionadas se
aSadiran a la lista de reproducci6n.
La nueva escena se aSadira como la
0itima escena.
[ ENGLISH
]
DVD Camcorder:
[ ESPAI_OL
Videoc maraconDVD:ListadereproducciSn
Playlist
+ This function works only in Player Mode. '-page 28
•:. You can change the order of scene playing within a
Playiist.
+ The editing function only works on a DVD-RW (VR Mode).
You shouid format the DVD-RW to VR Mode before
recording. ",page 43
1. Set the [Mode] switch to [DISC].
2. Set the [Power] switch to [ []E](Player)].
• The thumbnail index screen appears.
3. Move the [Joystick] up to highlight the
thumbnail index screen icon (C_),then
move the [Joystick] right to highlight the
playlist icon ([_3).
• The Playlist scenes will be displayed in
the form of a thumbnail index,
r$q
L_
4. Press the [QUICK MENU] button.
5. Move the [Joystick] up or down to select
<Edit Playlist>, then press the
[Joystick(OK)].
• The screen will be switched to the Edit
Playlist mode.
6. Use the [Joystick] to select the Playlist
which contains the scenes whose order you want to
change, then press the [Joystick(OK)]
• The scenes inside the Playiist will appear.
7. Press the [QUICK MENU] button.
]
+ Esta funci6n s6to esta operativa en el Player Mode.
'-pagina 28
+ Puede cambiar et orden de reproducci6n de escena
dentro de un a lista de reproducci6n.
+ La funcidn de edici0n s61oesta operativa en un DVDRW (modo VR). Debe formatear el DVD-RW en modo VR
antes de grabar. _',pagina 43
1. Coloque el interruptor[Mode] en [DISC].
2. Coloque et interruptor [Power] en
[l_Ei(Player)].
• Aparece la pantalta del indice de
miniaturas.
3. Mueva eI [Joystick] arriba para resaltar
el icono de la pantalla del indice de
miniaturas (_) y mueva el [Joystick] a
la derecha para resaltar et icono de la
lista de reproducci6n (_).
• Apareceran las escenas de la lista de
reproducci6n en formato de indice de
miniaturas.
4. Pulse el bot6n [QUICK MENU].
5. Mueva el [Joystick] hacia arriba o hacia
abajo para seleccionar <Edit Playlist>
y pulse el bot6n [Joystick(OK)]
• La pantalla cambiara al modo Edit
Playlist.
6. Utilice et [Joystick] para seleccionar
al lista de reproducci6n que contiene
las escenas para cambiar el orden
de reproducci6n y pulse et bot6n
[Joystick(OK)]
• Apareceran las escenas dentro de la
lista de reproducci0n.
7. Pulse el bot0n [QUICK MENU].
[ ENGLISH
]
DVD Camcorder:
[ ESPAI_OL
Videoc&rnara
conDVD:Listadereproduccibn
Playlist
8. Move the [Joystick] up or down to select
<Move>, then press the [Joystick(OK)]
[_
9. Use the [Joystick] to select the scene to
be moved, then press the [Joystick[OK)].
= The selected scene wilt be marked with
<,/>.
Atso a bar next to the scene wilt appear.
10. Use the [Joystick] to move the bar to the [1_
position of your choice, then press the
[Joystick(OK]].
= The selected scene wilt be moved to the
new position.
11. Move the [Joystick] up to select
<Execute>, then press the [Joystick(OK]]
= The <Want to move?> message wilt
appear.
12. Move the [Joystick] left or right to select
<Yes>, then press the [Joystick(OK}]
= The <Now moving...> message wilt
appear.
= Youcan move the scenes as many times
as you wish.
]
8. Mueva eie [Joystick] hacia arriba o
hacia abajo para seleccionar <Move> y
pulse el bot6n [Joystick(OK)]
9. Utilice el [Joystick] para seleccionar la
escena que va a mover y pulse el botdn
[Joystick(OK}]
• La escena seleccionada se marcara
con <,/>.
Tambien aparecera una barra al lado de
las escenes.
10. Utilice el [Joystick] para mover la barra
a la posicidn que elija y pulse et botdn
[Joystick(OK)]
• La escena seleccionada se movera a
la nueva posici6n.
11. Mueva el [Joystick} hasta seieccionar
<Execute> y pulse et bot6n [Joystick(OK)].
• Aparecera el mensaje<Wantto move?>.
12. Mueva el [Joystick] a la izquierda o a la
derecha para seleccionar <Yes> y pulse
el botdn [Joystick(OK}]
• Aparecera el mensaje<Now moving...>.
• Puede mover las escenas tantas veces
como desee.
[ ENGLISH
]
DVD Camcorder:
[ ESPANOL]
Playlist
4. This function works only in Player Mode
_page 28
Videoc; mara
conDVD:Listadereproducci6n
_
4. You can delete the title scenes inside the P]aylist.
4, The editing function only works on a DVD-RW
(VR Mode). You should format the DVD-RW to VR
Mode before recording. "_page 43
1. Set the [Mode] switch to [DISC]
2. Set the [Power] switch to [_(Player)]
• The thumbnail index screen appears
3. Move the [Joystick] up to highlightthe thumbnail [_
index screen icon (_), then move the [Joystick]
right to highlight the playlist icon (_)
• The Play]ist scenes will be displayed in the
form of a thumbnail index
4. Press the ]QUICK MENU] button.
5. Move the [Joystick] up or down to select
<Edit Playlist> then press the [Joystick(OK)]
• The screen will be switched to the Edit Playlist
mode.
6. Use the [Joystick] to select the Playlist which
[_
contains the scenes to be deleted, then press the
[Joystick(OK)]
• The scenes inside the Play]ist will appear.
7. Press the ]QUICK MENU] button.
8. Move the [Joystick] up or down to select
<Delete>, then press the [Joystick(OK)]
9. Use the [Joystick] to select the scenes to be
deleted, then press the [Joystick(OK)].
• The selected scenes wifl be marked with <./>
_
10 Move the [Joystick] up to select <Execute>, then
press the [Joystick(OK)].
• The <Delete?> message will appear
11. Move the [Joystick] ]eft or right to select <Yes>.
then press the [Joystick(OK)]
• The <Now deleting...> message will appear
• The selected scenes will be deleted
.to Este fundbn s61oesta operativa anel Piayer Mode.
'-.pagina 28
+ Puede suprimir las esceeas del titulo dentro de la
lista de reproduccibn
*t* La funcion de edJddnsbio esta operativa en un
DVD-RW (mode VR). Debe formatearel DVD-RW
ea modo VR antes de grabar '=pagina 43
1 Coloque el interruptor [Mode] en [DISC]
2 Coloque el interrupter [Power] en[[:_](Player)].
, Aparece la pantalla del inducede mmiaturas
3 Mueva el Joystick] arriba para resa]tar el icono
de a pan a a de ndce de m n auras _ y
mueva el Joystick a la derecha para resa]tarel
icono de la ][stade reproducc[on ([_h)
, Las esceeas e la lista de repro_r_ccibn
apareceran en formato de indice de miniaturas
4 Pulse el boton [QUICK MENU]
5 Mueva el Joystick] hacia ardba o hacia aba o
para se ecc bear <Ed t Pay st> y pu see bo on
Joystick(OK)]
, La panta a cambara a modo Ed Pay s
6 Utiflce el [Joystick] para seleccionar la ]ista de
reproduccionque contiene las escenas que se van
a eliminar y pulse el boton [Joystick(OK)]
, Apareceran las esceeas de la ]istade
reproducddn.
7 Pu]see]boton QUICK MENU]
8 Muevae Joystck hacaarrbaohacaabao
para se]eccionar <Delete> y pulse el boron
]Joystick OK
9 Ut _cee Joystck paraseecconar as
esceeas qua se van a eliminar y pulse el boron
[Joystick(OK)]
, ha escena seleccionada se marcara con <'/>
10 Mueva el ]Joystick] hacia ardba para seleccionar
<Execute> y pulse el botdn [Joystick(OK)].
, Aparecera el mensaje <Delete?>
11 Mueva el ]Joystick] a la izquierda o a la
derechapara se]eccioear<Yes> y pulse el boron
[Joystick(OK)]
, Aparecera el mensaje <Now deleting...>
Se supdmiran las escenas se]eccioaadas._
[ ENGLISH
]
DVD Camcorder:
[ ESPANOL
Playlist
Videoc_maracon DVD:Listade reproduccibn
+
+
+
This fanction works only in Player Mode. -page 28
A Playlist scene can be partiaNy deleted.
The editing function only works on a DVD-RW (VR Mode).
You should format the DVD-RW to VR Mode before recording.
_page 43
1
2
Set the [Mode] switch to [DISC].
Set the [Power] switch to [[_}(Player)].
• The thumbnail index screen appears.
Move the [Joystick] up to highlight the thumbnail
index screen icon (_), then move the [Joystick]
right to highlight the playlist icon ([_'_).
• The Playlist scenes will be displayed in the
form of a thumbnail index.
3
[_
4
5
Pressthe [QUICK MENU] button.
Move the [Joystick] up or down to select
[_
<Edit Playlist>, then press the [Joystick(OK)].
• The screen will be switched to the Edit Playlist
mode.
6
Use the [Joystick] to select the Playlist which
contains the scenes to be partially deleted, then
press the [Joystick(OK)].
• The scenes inside the Playlist will appear.
Pressthe [QUICK MENU] button.
Move the [Joystick] up or down to select
<Partial Delete>, then press the [Joystick(OK)].
Use the [Joystick] to select the scene to be
partially deleted, then press the [Joystick(OK)].
• The Partial Delete screen will appear The
scene will be paused and <Start> will be
highlighted.
7
8
9
]
[_
+ Esta fancion solo est& operativa en el Player Mode. _pagina 28
+ Puede eliminarse parcialmente la escena de una lista de reproduccion.
+ La funci6n de edici6n s61oesta operativa en an DVD-RW (modo
VR). Debe formatear el DVD-RW en modo VR antes de grabar.
_pagina 43
1. Coloque el interrupter [Mode] en [DISC].
2. Coloque el interrupter [Power] en [[]_E](Player)]
• Aparecera la pantalla de la lista de titulos.
3. Mueva el [Joystick] arriba para resaltar el
icono de la pantalla del indice de miniaturas
(_) y mueva el [Joystick] a la derecha para
resaRar el icono de la {ista de reproduccidn ([_h).
• Las escenas e la lista de
reproduccidnapareceran en formato de
indice de miniaturas.
4. Pulse el boton [QUICK MENU].
5. Mueva el [Joystick] hacia ardba o hacia abajo
para seteccionar <Edit Playlist> y pulse el
boton [Joystick(OK)].
• La pantalla cambiara al modo Edit Playlist.
6. Utilice el [Joystick] para seleccionar la lista
de reproduccion que contiene las escenas que
se van a borrar parcialmente y pulse el boton
[Joystick(OK)].
• Apareceran las escenas de la lista de
reproducci6n
7. Pulse et boton [QUICK MENU].
8. Mueva el [Joystick] hacia arriba o hacia abajo
para seteccionar <Partial Delete> y pulse el
boton [Joystick(OK)].
9. Utilice el [Joystick] para seleccionar la escena
que se va a borrar parcialmente y pulse el
bot6n [Joystick(OK)].
• Aparecera la pantalla Partial Delete. Se
interrumpira la escena y se resaltara <Start>.
[ ENGLISH
]
DVD Camcorder:
[ ESPAI_OL
Playlist
]
Videoc maraconDVD:Listadereproduccibn
10. Press the [ 14_/ _,1 ] or [_" I| ] to search the
starting point of deletion.
10. Pulse el boton [14_/_vl] o [_,-II] para buscar
el punte inicial de eliminacidn.
11. Press the [_,"H] button to pause the screen
at the starting point of deletion, then press the
[Joystick(OK)].
• <End> will be highlighted.
11. Pulse el boton [_ II] en el punto inicial para
hacer una pausa en la pantalla y pulse el botdn
[Joystick(OK)].
• Se resaltara <End>.
12. Press the [ t,=4/ _._1] or [_,"II] to search the end
point of deletion.
12. Pulse el boton [t44 / _,_,1]o [!_-H ] para buscar
el punto final de eliminaci6n.
13. Press the [1_ |J] button to pause the screen
at the end point of deletion, then press the
[Joystick(OK)].
• <Execute> will be highlighted
13. Pulse el boton [1_H] en el punto final para
hacer una pausa en la pantalla y pulse el bot6n
[Joystick(OK)].
• Se resaltara <Execute>
14. Press the [Joystiek(OK)].
• The <Delete selected part ? Please
confirm.> message will appear.
14. Pulse el boton [Joystick(OK)[.
• Aparecera el mensaje <Delete selected
part ? Please confirm.>.
15. Move the [Joystick] left or right to select <Yes>, then press the
[Joystick(OK)].
• The <Now deleting...> message will appear.
15. Mueva el [Joystick] a la izquierda o a la derecha para seleccionar
<Yes> y pulse el boton [Joystick(OK)]
• Aparecera el mensaje <Now deleting...>.
[ ENGLISH
]
[ ESPANOL
DVD Camcorder:
D
•
.
Q
D
Videoc_rnaracon DVD:Administradordediscos
Disc Manager
• DYD-RW+RW-R +R D_
•
•-*o This function works in both Camera Mode and Player Mode.
_page 28
1
2
+
_
- =
3
Pressthe [MENU] button.
• The menu list will appear.
4
Move the [Joystick] up or down to
select <Disc Manager>, then press the
[Joystick(OK)].
Camera Mode
[_
Move the [Joystick] up or down to select
<Disc Info>, then press the [Joystick(OK)].
• <Disc Name>, <Disc Type>, <Disc Format>,
<Used Space> and <Free Space> will be
displayed.
6
To exit, press the [MENU] button or
[Joystick(OK)].
@
Disc Format
_
D_sc _l_fo
_Move
_Select
_Extj
...........................
I ............................
_
5
Disc Finaiize
/"
/Disc
Info
•
|
,
DVD-RW+RI_ .R +R DL
Esta funci6n s61oesta operativa en los Camera Mode y Player
Mode. -pagina 28
Set the [Mode] switch to [DISC].
Set the [Power] switch to [1_ (Camera)] or
[[_(Player)].
]
1.
Coloque e! interruptor[Mode] en [DISC]
2.
Coloque e! interruptor [Power] en
[l_l(Camera]]
o [[_(Player)].
3.
Presione el boton [MENU].
• Aparece la fista de{ men&
4.
Mueva el [Joystick] hacia arriba o hacia
abajo para seteccionar <Disc Manager> y
pulse el boton [Joystick(OK]].
\
5. Mueva el [Joystick] hacia arriba o hacia
abajo para seteccionar <Disc Info> y pulse
el boton [Joystick(OK)]
• Aparecera <Disc Name>, <Disc Type>,
<Disc Format>, <Used Space> y <Free
Space>.
Para satir, presione el boton [MENU] o
[Joystick(OK)]
[ ENGUSH
]
DVD Camcorder:
o
[ ESPANOL]
Disc Manager
_
_
.
Videoc_maracon DVD:Administradordediscos
- DYD-RW+RW.R+RDL
o
.
o-
_ o - o- e
Camera
r.£,_
_ D
o _
_
DYD._W+RW.R+RDL
+
Player Mode. _page 28
You can specify a disc name.
1
Set the [Mode] switch to [DISC].
2
Set the [Power] switch to [1_,1 (Camera)] or
[[_(Player)].
3
Pressthe [MENU] button.
• The menu list will appear.
4
Move the [Joystick] up or down to select
<Disc Manager>, then press the [Joystick(OK}].
5
Move the [Joystick] up or down to select
<Disc Info>, then press the [Joystick(OK)].
5. Mueva el [Joystick] hacia arriba o hacia
abajo para seleccionar <Disc Info> y pulse el
boton [Joystick(OK)].
6
Move the [Joystick] left or right to select
<Rename>, then press the [Joyetiok(OK)].
6.
Mueva el [Joystick] a ta izquierda o a la
derecha para seleccionar <Rename> y pulse
el boton [Joystick(OK)].
• Aparece la pantalla Disc Name.
+
Disc Finalize
Mode y Player Mode. ",pagina 28
Puede especificar un nombre de disco.
Coloque el interrupter [Mode] en [DISC].
7
8
9
• Disc Name screen will appear
(6}
Use the [Joystick] to move the cursor to the first
character of the current disc name.
@
_..
D_s__e'mat
_Move
_Seecl
2.
_Exit
Coloque el interrupter [Power] en
[1_ (Camera)] o [[)_(Player)].
3. Presione el boron [MENU]
• Aparece la lista del men&
4.
Mueva el [Joystick] hacia arriba o hacia
abajo para seleccionar <Disc Manager> y
pulse el boron [Joystick(OK)].
7.
Use the [Joystick] to move the cursor to
<Delete>, then press the [Joystick(OK)] to delete
the existing disc name.
Utilice el [Joystick] para mover el cursor al
primer caracter de! titulo actual del disco.
8.
Use the [Joystick] to select the desired characters
and items, then press the [Joystick(OK)].
Utilice el [Joystick] para mover el cursor a
<Delete> y pulse el boron [Joystick(OK)]
para eliminar el titulo de disco existente
9.
Utilice el [Joystick] para selecdonar los
caracteres y opciones que desea y pulse el
boron [Joystick(OK)]
10. Use the [Joystick] to select <Done>, then press
the [Joystick(OK)].
• The Disc Name will be changed.
• Use the [Joystick] to select <Back>, then
press the [Joystick(OK)] to return to Disc
Manager menu.
10. Utilice el [Joystick] para seleccionar <Done>
y pulse el boron [Joystick(OK)].
• Se cambiara el nombre del disco.
• UtiEiceet [Joystick] para seleccionar
<Back> y presione [Joystick(OK)] para
volver al men8 del administrador de discos.
[ ENGLISH
]
[ ESPAkiOL
DVD Camcorder:
=
.
_
_
J
1
2
3
4
5
6
•
.
DVD-RW +RW
•
all
+
.
•
=-
=
•
• The menu fistwi[I appear
Movethe [Joystick] up or down ta select
<Disc Manager>, then pressthe [Joystick[OK[]
Movethe [Joystick] up or down to select
<Disc Format>, then pressthe [Joystick[OK)]
Movethe [Joystick] up or down to select
<Video Mode> or <VR Mode>, then press the
Joystick(OK)].(DVD-RW only) Set the mode
depend ng on the app catch.
• Ifyou
DVD-RW
<DiSCed!>format?
[Videoinsert
or VR)
All files disc,,the
will be delet
.
message will appear
If the disc has been finalized, it enables
the disc to be played backon other
DVDPlayers Recorders
Refer to page 14 for Finalized disc compatibility.
¢ideo
[Modo
Video)
VR
[Mode
CR)
7
Move the [Joystick]
left or right to select <Yes>.
then press the [Joystick(OK)]
1
= <Complete.>message
When formatting
w[]] appear
is complete, the
_te_
•
The Finalize/Format
available at battery
functions
level _
are not
and _.
•
Formatting w[]l delete all the recorded contents on
a disc Be careful not ta delete data by mistake,
•
Do not turn the power off in the middle of the formatting
,,_._ecorded
in disc may be damaged
F
@
If you insert DVD+RW disc <Disc format? All
files will be deleted!> message will appear.
•
.
DV_RW +RW
Esta funcidn sdlo esta operativa en el Camera Mode¸ _pagina 28
Puede formatear un disco grabado para usaflo de nuevo.
Ai forrnatear, se eliminaran todos los datos existentes
VR (VR Yaucan edit the disc on a DVD
Mode) Cemcarder, bat playback is only
_ossib[eon a DVDRecorder that
supports VR mode.
•
D
Co]oque el [nterruptor [Mode] en [DISC]¸
1
Co]oque el interruptor [Power] en [ _
[Camera)[
_"....................................................................................
"\
2
Presione el botch [MENU]
3
• Aparece la fista del menO
4. Mueva el [Joystick] hacia arfiba o hacia abajo
para seleccionar <Disc Manager> y pulse el bot6n
[Joystick[OK}]
5. Muevael [Joystick] haca arriba o hacia abajopara
seieccionar<Disc Format> y pulse el botch [Joystick (OK}]
6. Mueva el [Joystick] arfiba o abajo para seleccionar
<Video Mode> o <VR Mode> y presione e]
_#,love
[]Select
_Ext
[Joystick(OK}]
(solo DVD-RW) Ajuste el modo
dependiendo de ]a apficacibn
• Si inser[a un disco DVD-RW. aparecer& e]
mensaje <Disc format? ]Video o VR) All files
will be deleted!>
Set the [Mode] switch to [DISC]
Set the [Power) switch to [[_[Camera)[.
Press the [MENU[ button
Video
)Video
Mode)
Videoc_rnaracon DVD:Administradordediscos
Disc Manager
•:÷ This function works anly in Camera Mode _page 28
o:* You can format a recorded diac to be used again By formatting,
existing data vdl[ be deleted
]
_
STBY []
I
I
_,
0000oo ¢_,; i
30r,Ti_[]
I
I
.& Discfolmat'_(Vdeo)
A[]files willba deleted!
.
7
(aca not edit i cameode
Si se ha finelizado el disco, es
posible reprodacir e[ disco en otras
ReprodactoresGrabadoras de DVD.
Puedeeditare] discoan unaVideocamara
con DVD,paro ]a reproduccidns01oas
posib]een an Grabadorde DVDqua
admitae] modoVR
Consulte la pagina 14 para conocer [a
compatib[Iided de un disco finalizado.
S[ [nsertaun disca DVD+RW=aparecera el mensaje
<Disc format? All files will be deleted!>
Mueva el [Joystick]
a la izguierda o a la
[Joystick{OK)]derecha
para selecc[onar <Yes> y pulse el botch
.
mensaje <Complete!>
una vez finalizado el formata, aparecera
e]
_te_
The data
.
El formateo
La funcidn FormatlFinalize (Formato/Finafizar) no
esta disponib{e en el nivel de bateria _
o _.
e]iminara todo e] contenido grabado en el disco. Tenga
No apague
el aparato
elproceso
cuidado
de no
eliminar durante
datos pot
error.
daffen los datos grabedos en el disco
de formeto
Es posible que se
[ ENGLISH
]
[ ESPANOL
DVD Camcorder:
•
+ • II
m
Videoc_maracon DVD:Administradordediscos
Disc Manager
.
-
D¥_R_.R
+RDL
•
+:÷ This function works only in Camera Mode _.page 28
+:÷ To play the contents of a DVD-RW,-R +R DL on other DVD players,
recorders, you must finalize the disc if the AC Power adapter Js to be
used, make sure that the jack is properly connected A power cat dudag
finalizing may disrupt the disc from replaying
1
Set the )Mode] switcl_ to [DISC]
2
3
Set the Power] swRch to [ _(Camera)].
Press he MENU bu on
• The menu list will appear
Move the )Joystick]
up or down to select
<Disc Manager>, then press the )Joystick(OK)]
Move the )Joystick]
up or down to select
<Disc Finalize>, then press the )Joystick(OK)]
Move the )Joystick]
left or right to select <Finalize>,
then press the )Joystick(OK)]
• The <Finalizing,
please wait...> message
will appear When finalizing is complete the
<Complete!>
message will appear
4
5
6
[_
.
+
+ -
+
=
•
j
i
DiscFin I+ze
, ,
'Eiat
\
_Select
/_ ........................
4
j
j
j
ij
•
=
=
•
=
•
•
do not cause impact or vibration to your
This could cause a malfunction.
The Finalize/Format
functions
at battery
and _.
level (_J
|
.
-
DYD.F_W.1_+RDL
•_*
•_*
_Ext
/
• Aparece la lista del menQ
Mueva el ]Joystick] hacia ardba o hacia abajo
para seleccionar <Disc Manager> y pulse el bot6n
[doystick(OK}]
para seleccionar <Disc Finalize> y pulse el bot6n
[Joystick(OK}]
5 Mueva
6
Muevael[Joystick]alaizquierdaoaladerecha
el Joystick hacia ardba o hacia aba o
paraseleccionar<Finalize>ypulseelbot6n
• Aparecera <Finalizing, please wait...> Una vez
[Joystick(OK}]
termJnada la finalizaci6n, aparecer& eJ mensaje
<Complete!>
\
J
Dadag finalizing,
DVD camcorder
+
Esta funci6n s6M esta operativa en el Camera Mode¸ '-+pagina 28
Para reproducir el contenido de un disco DVD-RW/-R/+R DL en otros
reproductores/grabadores de DVD debe finalizar el disco¸ Si se va a utilizar
un adaptador de CA aseg_rese de que el terminal este correctamente
conectado Un code de corriente al finalizar podria impedir que el disco se
reprodujera
1 Coloque el interruptor [Mode] en [DISC]¸
/ ........................................................................................
_',
2 Coloque el interruptor [Power] en [1_ [Camera[[
I Camera _
i
3 Presione el boron MENU
|
[_)
]
j
j
Durante la finalizaci6n, no someta ta Videocamara con DVD
a impactos ni a vibraciones Esto podria causer avedas
j
•
are not available
Once finalized, the title scenesor Playlists inthe
disc cannot be deleted or edited
Timerequiredfor finalizingmay differ by disctype
Referto page 14 for final+zealdisc compatiMity
Playbackis not guaranteedinall gvg Players/
Recorders.For compatibility details,refer to your DVD
Players/Recordersowner'smanual.
Once the DVD-R/+R DLdisc is finalized, you cannot
re-record it in the DVDCamcorder
Youmay play back DVD+RW discs on other devices
without finalizing them.
Youcan not makean additionalrecordingon a
DVD-RWdiscwithoutunfinalizingitafter it is finalized
The finalized disc will not be supported in a Macintosh
,
,
La funcidn FormatlFinalize
Formato/Finalizar) no
esta disponible en el nivel de bater a _
o _.
Una vez finaJizado no se pueden eliminar ni editar las
Hstasde tituJos o tas Jistas de reproducci6n del disco
• El tMmpo necesado para fJnaHzarpodria difedr pot
tipo de disco.
• ConsuJte la pagina t4 pare conocer M cornpatibilidad
de un disco finalizado.
• La reproducci6n no est_ garantizada en todos los
Reproductores/Grabadoras de DVD, Para obtener
informaci6n sobre compatibilidad, consulte
el manual de instrucciones
del Reproductor/
Grabadora de DVD,
• Una vez finalizado el disco DVD-R/+R DL, no puede
votver a grabar en la Videocamara con DVD
• Puede reproducir discos DVD+RW en otros
dispositivos sin finalizados
No puede reatizar una grabaeJ6n adicional en un
disco DVD-RW sin ar_ular la finalizacJ6n tras flnalizado
El disco finalizado no se admJtira en Macintosh
[ ENGLISH
]
DVD Camcorder:
[ ESPANOL
Disc Manager
Videoc_rnaracon DVD:Administradordediscos
D
+
f
2
•
•
•
The DVD disc can be played on a PC with a
DVD running media (DVD drive)
Turn on your PC
Insert a finalized disc into the DVD drive of the PC
• Starts DVD playback ap¢cetion software
and the disc will play
• If DVD playback application does not
start automatically, run the application by
navigating through the Start menu
,,&
•
-
_
1
2
You canplayback finalized DVD-R/-RW (Video mode) +R DL discs on DVD
Players/Recorders.
Playback is not guaranteed in all DVD Players/Recorders.
For compatibility
details, refer to your DVD Player/Recorder
owner's manual
Most DVD Players'Recorders
can play back a
f-
DVD+RWdisc that has not been finalized
• Referto the page 14for finalized disc
compatibility
f
Turn onthe DVD Player/Recorder
2 Insert the finalized DVD disc into the tray of a
DVD Player Recorder
• It maystartplayingautomatically
or pressthe
PLAYbuttonto start
. Forfurtherdetailson playingbackDVDdiscs.
referto the DVDPlayer/Recorder
user'smanual
Qo
÷t÷
Use a DVD drive compatible to 31 2inch (Scm)
discs _.page 12
A DVD playback application software should have been installed before
_/laying back e disc
ideo and audio may be paused or skipped when you play back from a DVD
disc directly. In this case, copy the data into your hard disk drive
The finalized disc will not be supported in a Macintosh
A DVD-RW disc recorded in VR mode can not play back on your PC
DVD
ooooo@
]
,
,
=
•
Q
a.o
6-
|
|
E] disco DVD puede reproducirse en un PC con
un medio que utJ]ice un DVD (unidad de DVD)
Encienda el PC
Inserte un disco finalizado en la unidad DVD del PC
• Inicia el software de la aplJcaci6nde reproducc[6n
de DVD y se reproducira ]a pelicula
• SJno se inicia automatJcamente ]a aplicacidn
de reproduccion de DVD, ejecute la ap]icaci6n
desde Inicio
• Utilice una unidad de DVD compatible con discos
de 3 t/2pulg (8cm). _pagina 12
Debe haberse instalado un software de apficaci6n de reproducci6n de DVD
antes de la reproduccion.
Ei video y el audio pueden interrump[rse o sa[tarse al reproduc]r dftectamente
desde un disco DVD En este caso, copie los datos en la unidad del disco duro
E] disco finafizado no se admitira en Macintosh
No es posib]e reproducir en e] PC un disco DVD-RW grabado en modo VR
Puede reproducir discos DVD-R/-RW (modo Video)/+R DL en Reproductores/
Grabadoras de DVD
La reproducci6n no esta garantizada en todos los Reproductores/
Grabadoras de DVD. Para obtener informaci6n sobre compatibilidad,
consulte el manual de instrucciones deI Reproductor/Grabadora
de DVD.
La mayofia de Reproductores/Grabadoras de DVD
pueden reproducir un disco DVD+RW que no haya
sido fina]izado
= Consulte ]a pagina 14 para conocer la
compatibi]idad de un disco fina]izado
1
Enc[enda el reproductodgrabador de DVD
2
]nserteel disco DVD finalizado en ]a bandeja del
reproductor/grabador de DVD
= Puede comenzar la reproducci6nautorn&t[camente
o pulsar el bot6n PLAYpara comenzar
• Para obtener informaci6n adicional sobre la
reproduccion de discos DVD, consulte el manual
Un DVD-RW ftnalizado en modo VR se puede reproducir @]izando una Grabadora
de DVD que sea capaz de reproducir discos DVD-RW en rnodo VR
[ ENGLISH
]
[ ESPANOL
DVD Camcorder:
•
_ . D_
Videoc_rnaracon DVD:Administradordediscos
Disc Manager
m
.
-
DVD.RW
,
*:o This function works only in Camera Mode. -page 28
*:o If a DVD-RW disc had been finalized in the VR mode or V+deo
mode, you can unfinalize the disc for further recording.
+
+
_
_
+
,-
.
+
II
•
-
DYD=nW
Esta funcion s61o esta operativa en el Camera Mode '_pagina 28
S+un disco DVD-RW se ha finalizado en modo VR o en modo
Video, puede anu+arla finalizaci6n de+disco para poder seguir
grabando.
1
Set the [Mode] switch to [DISC].
1
Coloque el interruptor [Mode] en [DISC].
2
Set the [Power] switch to [1_ {Camera)].
2
Coloque el interruptor[Power] en
[ I_ (Camera}].
3
Pressthe [MENU] button.
• The menu list will appear.
3
Presione e! boton [MENU]
= Aparece la lista de! men&
4
Move the [Joystick[ up or down to select
<Disc Manager>, then press the [Joystick{OK[].
4
Mueva el [Joystick] hacia arriba o hacia
abajo para seleccionar <Disc Manager> y
pulse e! boron [Joystick(OK)].
....................................
I...................................................
[_ ,/
5 Mueva el [Joystick] hacia arriba o hacia
abajo para seleccionar <Disc Unfinalize> y
pulse el boron [Joystick(OK)].
_Move
5
Movethe [Joystick] up or down to select
<Disc Unftnalize>, then press the [Joystick(OK)].
6
Move the [Joystick] left or right to select
<Unfinalize>, then press the [Joystick(OK)].
• The <Unfinalizing, please wait...>
message will appear When unfinatizing is
complete, the <Complete!> message will
appear.
_,love
•
The Finalize/Format functions
•
available at battery level _
and _.
During unfinalizing+ do not cause impact or
vibration to your DVD camcorden This could
cause a malfunction.
are not
]
_Select
_Select
_Ex,t
/I
Mueva el [Joystick] a la izquierda o a la
derecha para seleccionar <UnfinaHze> y
pulse el boron [Joystick(OK)].
= Aparezca el mensaje <Unfinalizing,
please wait,,,> Una vez car_celada
la finalizaci6n, aparecera el mensaje
<Complete!>.
_Exit
%
+
•
•
La funci6n FormattFinalize(Formato/
Finalizar) no est_ disponible en el nivel de
bateria _
o _[_.
Durante la anulacion de finalizacion, no
someta la videocamara con DVD a impactos
ni a vibraciones. Esto podria causar averias.
[ ENGLISH
]
DVD Camcorder:
[ ESPAI_OL
]
Videoc mara con OVO: Cone×i6n
Connection
- **:- AV In/Out function works only in Player Mode. -page 28
*:- AV In/Out setting enables you to record signals from external
+
+
_
O
• *
B
•
AV In/Out s6to esta operativa en e! Player Mode _pagina 28
El ajuste AV In/Out permite grabar seBales desde fuentes
sources.
extemas.
Also, you can send your videos to external devices to record or
play back.
Asimismo, puede enviar sus videos a dispositivos extemos para
grabarlos o reproducidos.
f .....................................................................................
1
Set the [Mode] switch to [DISC].
2
Set the [Power] switch to IDa(Player)].
3
Pressthe [MENU] button.
• The menu list will appear.
_
i
1. Coloque el interruptor [Mode] en [DISC]
Rv_ToO_lte i: Spt
4
Move the [Joystick] up or down to select
<Record>, then press the [Joystick(OK)].
5
Move the [Joystick] up or down to select
<AV In/Out>, then press the [Joystick[OK)].
6
Move the [Joystick] up or down to select
<Out>, <AV In> or, <S-Video In>, then press the
[Joystick(OK)].
• If you want to see the DVD Camcorder videos
on a TV, set <AV In/Out> menu to <Out>.
• To exit, press the [MENU] button
2.3. en.pulse[[_(Player)].Apareceel
Coloque botOnla
el Jnterruptor
lista[MENU]del
[Power]
men&
4. Mueva el [Joystick] hacia arriba o hacia
abajo para seleccionar <Record> y pulse el
boton [Joystick(OK)]
%
_Move
_Select
_Exit
I
5.
Mueva el [Joystick] hacia arriba o hacia
abajo para seleccionar <AV In/Out> y pulse el
boton [Joystick(OK)]
6.
Mueva el [Joystick] hacia arriba o hacia abajo
para seleccionar <AV In>, <S-Video In> o
<Out>, y pulse el boron [Joystick (OK)]
• Si desea ver los videos de la Videocamara
con DVD en un televisor, ajuste el men=3
<AV In/Out> en <Out>.
Para salir, pulse el boton [MENU].
[]
AV In
J
[ ENGLISH
]
[ ESPANOL
DVD Camcorder:
_
+
D_
Q
o
Videoc rnara con DVD: Conexibn
Connection
o
•
+ The Playback function works only in Player Mode _page 28
Playing back on a TV Monitor
4+ To play back a disc, the television must be NTSC compatible.
_page 119
4+ We recommend that you use the AC Power adapter as the power
source for the DVD Camcorder.
Connecting
1
2
3
4
5.
=
=
=
=
to a TV which
has Audio/Video
]
Input Jacks
•
+
+-
+
+++
•
-
-
-
*.** La funcion de reproducci6n s61oesta operativaen el Player Mode
-pagina 28
R_roducci6n
en un monitor
de TV
*.** Para reproducir un disco, el televisor debe set compatible con
NTSC. _pagina 119
+ Recomendamos usar como fuente de alimentaci6n para la
Videocamara con DVD el adaptador de CA
Conexi6n
Connect the DVD Camcorder to your TV with the Multi-AV cable.
• The yellow jack: Video
• The white jack:
TV
Audio(L)-mono
• The red jack:Audio(R)
• If you connect to a
monaural TW,connect
the yellow jack (Video)
to the video input of
the TV and the white
jack (Audio L) to the
audio input of the TV.
Multi-AV Cable
Set the [Mode] switch to
[DISC]
Setthe [Power] switch to [[_(Player)].
Turn on the TV and set the TV/VIDEO selector on the TV to Video.
= Refer to the TV user's manual.
Play the disc. _page 64
1
You may use an S-Video connector on the cable to obtain better
quality pictures if you have a S-Video connector on your TV.
Even if you use an S-Video connector, you need to connect an
audio cable
if you connect the cable to the AVIS jack, you will hear sound from
the DVD Camcorder+s speakers.
tf only a mono audio input is available on the TV set, use the audio
cable with the white jack (Audio L)
.
a un TV clue dispone
de conectores
de audio/video
Conecte ]a Videocamara con DVD al TV mediante el cable Muiti-AV
• Elterminal amarillo: Video
DVDCamcorder
= Elterminal blanco:
Audio(L)-mono
= El terminal rojo: Audio(R)
• Si se trata de un televisor
monoaural, conecte la
clavija amarilla (video) a
la entrada de video del
televisor y la clavija blanca
(Audio L) a la entrada de
audio del televisor.
2. Coloque el interruptor
[Mode] en [DISC].
3. Coloque el interruptor [Power[ en [{]EJ{Player)].
4 Encienda el televisor y celoque el selector TV/ViDEO del mismo en
Video.
• Consulteel manualdel usuario.
5 Reproduzca el disco -pagina 64
.
.
.
Puede utilizar un conector S-Video en el cable para obtener imagenes
de mejor calldad si tiene un conector de S-Video en el TV
Incluso aunque utilice un conector de S-Video,tiene que conectar un
cable de audio
Si conecta el cable al terminal de AV/S+oira el sonido por el altavoz de
la Videocamara con DVD.
Si s61oesta disponible una entrada de audio monoaural en el equipo
de TV, utilice el cable de audio con el terminal blanco (Audio L).
[ ENGLISH
]
[ ESPANOL
DVD Camcorder:
Connecting
to a TV which
Videoc mara con DVD: Cone×ibn
Connection
has no Audio/Video
Input
Jacks
*:- You can connect your DVD Carncorder to a TV through a VCR.
1
2
3
4
5
6
Conexi6n a un TV que no dispone de conectores
de audio/video
•:. Es posible conectar la Videocamara con DVD a un televisor a
traves de un VCR.
1. Conecte la Videocamara con
DVD al VCR mediante el
VCR
cable Multi-AV.
, EIterminal amarillo: Video
DVD Camcorder
, EIterminal blanco:
Audio(L)-mono
El terminal rojo: Audio(R)
2. Conecte el televisor al
Connect a TV to the VCR.
aparato de video.
TV
3. Co!oque el interruptor [Mode]
Setthe [Mode] switch to
en [DISC].
[DISC]
4. Coloque el interruptor
Multi-AV Cable
[Power] en [_(Player)]
Setthe [Power] switch to
5. Encienda el televisor y e!
[[_(Player)].
aparato de video.
Turn on both the TV and
, Coloque el selector de
VCR.
entrada de! aparato de
video en Line
• Set the input selector on the VCR to Line.
• Select the channel reserved for your VCR on the TV set.
• Seleccione el canal reservado para el aparato de video en el
televisor.
Play the disc. _page 64
6. Reproduzca el disco _pagina 64
Connectthe DVD Camcorder
to your VCR with the MultiAV cable.
• The yellow jack: Video
• The white jack: Audio(L) Mono
• The red jack:Audio(R)
tf the VCR has an S-Video input terminal, you may use the S-Video
connector for better quality.
Even if you use an S-Video connector, you need to connect an
audio cable
If only a mono audio input is available on the VCR set, use the
audio cable with the white jack (Audio L).
•
•
•
Si el VCR tiene un terminal de entrada S-Video, puede utilizar el
conector de S-Video para obtener una mejor calidad.
Incluso aunque utilice un conector de S-Video, tiene que conectar
un cable de audio.
Si solo esta disponible una entrada de audio monoaural en el
equipo de video, utilice el cable de audio con el terminal blanco
(Audio L).
]
[ ENGLBH
]
[ ESPAi_OL
DVD Camcorder:
oo
o . II Q
• .
Connection
0-o
.o-
°:÷ The copying function works only in Player Mode "='page 28
o:÷ Connect your DVD Camcorder to a VCR using the AV/S jack to dub
the recording from a disc onto a VCR tape.
1. Set the [Mode] switch to
[DISC].
Videoc mara con OVO: Conexibn
o0
.
_-
o
•
-
.
Insert the disc you want to
copy in your DVD Camcorder
4.
Insert a new tape in your
VCR
5. Connectthe DVD Camcorder
MuEfl-AVCable
to your VCR with Multi-AV
cable
• Connect the Multi-AV cable to the input jack on your VCR.
• The yellow jack: Video
The white jack: Audio(L)-mono
The red jack: Audio(R)
6.
Press the Record button on your VCR to start recording
7.
Play the disc on your DVD Camcorder Please refer to page 64 for
Playing.
• Press the [DISPLAY] button so as not to display OSD.
Stop recording on your VCR, then press the [g(Stop)] button on your
DVD Camcorder.
You can also copy moving images onto another disc or HDD by
connecting to a DVD Recorder.
.
•1- La funci6n de copia s61oesta operativa en el Player Mode.
=pagina 28
•t* Conecte la Videocamara con DVD al VCR utilizando el terminal
AVIS para mezclar la grabaci6n de un disco en una cinta de video.
1. Coloque elinterruptor [Mode]
en [DISC].
2. Set the [Power] switch to
[[_(Player)].
3.
]
2. Coloque elinterruptor
[Power] en [C_(Player)l
3. Inserte el disco que desea
copiar en la Videocamara con
DVD
4. Inserte una nueva cinta en el
VCR.
5. Conecte la Videocamara con
DVD al VCR mediante el
cable Multi-AV.
Conecte el cable Molti-AV al terminal de entrada del aparato de
video.
Elterminal amarillo: Video
Elterminal blanco:Audio(L)-mono
Elterminal rojo:Audio(R)
_'
•
•
•
•
6. Pulse el boton Grabar deI video para iniciar la grabaci6n.
7. Reproduzca el disco en so Videocamara con DVD. Consulte la
pagina 64 para la reproduccion.
• Pulse el boron [DISPLAY] para qoe no aparezca la OSD
Detenga la grabacion en el VCR y presione el bot,Sn[l(Stop)]
Videocamara con DVD.
de la
Tambicn puede copiar secuencias de imagenes en otto disco o disco
doro conectando a una grabadora de DVD.
[ ENGUSH
]
[ ESPANOL
DVD Camcorder:
+
¢
1
2
3
4
5
6
4
5
Videoc mara con OVO: Conexibn
Connection
The Recording (Copying)function works only in Player Mode
_page 28
Connect your DVD Camcorderto a VCR or a TV using the AViS jack to
record a TV program or copy a video tape to a disc. Set the AV In/Out
before Recording (Copying) -page 86
Recordin
Co
in
onto
Get yourTV or VCR ready
Connectthe DVD Camcorder
to your VCR or TV with MultiAVcable.
• Connect the Multi-AVcabb
to the output jack on your
VCR or TV
• The yellowjack: Video
• The white jack: Audio (L) Mono
• The red jack: Audio (R)
Insert an empty discin your
DVD Camcorder.
• Please refer to page 13for
selecting end formatting
discs.
a Disc
+
La funcion de grabacion (Copia) solo esta operativeen el Player Mode.
_pagJna 28
Conecte la Videocamara con DVD a un VCR o a un TV utilizando el
terminal AViS para grabar un programade TV o copier une dnta de
video en un disco. Defina AV In/Out antes de grabar (copier).
_pagina 86
GrabaciOn
coco_
en un disco
¢
1
TV
2
DVDCamcorder
VOR
3
Multi-AV Cable
\
Insert the tape to be played in your VCR
• Pause at the starting point of playing
Startcopyingby pressingthe [Start/Stop] buttonon yourDVDCamcorder
Press the PLAY button on your VCR to play the tape
Selecta TV channelto be recorded
Start recording by pressing the [Start/Stop] button on your DVD
Camcorder
Press the [l(Stop)] button on your DVD Camcorderto stop
recording(copying).
]
"_
4
Prepare el TV o el aparato de
video
ConectelaVideocamaracon
DVD al VCR o al TV mediante
el cable MultPAV.
, Conecte el cable Multi-AV
alterminal de salida del
aparato de video o TV
, EIterminal amabllo:Video
, EIterminalb_anco:
Audio (L) - Mono
, El terminal rojo:Audio(R)
Inserte un disco vacio en la
Videocamara con DVD.
, Consultelapagina13para
sebccionar
y formateardiscos
6
Inserte la cinta que se va a reproducir en el aparato de video
, Interrumpa en el punto inicial de la reproducdOn.
Comiencea copiar presionandoel bot6n[Start/Stop] en la Videocamara
con DVD
Pulse el botch PLAY.del video pare iniciar la dnta
4
5
Sebccione el caner de TV que se vaa grabar
Comience
a grabarpresionando
eJbeten[Start/Stop]enlaVideocamara
conDVD
5
Presioneel botch [l(Stop)]
(copia)
de la videocamara paradetener la grabacion
[ ENGLISH
]
[ ESPAI_OL
Digital Still Camera Mode
o .
+
+
-
o
.
=
.=
-
-
=
.
Modo de c;_mara fotogr_fica
0
_
0e
or* La tarjeta de memoria guarda
y gestiona fotografias y videos
grabados con la Videocamara
con DVD
or* Antes de insertar o expulsar la
tarjeta de memoria, coloque el
interruptor [Power] en [Off] y
abra la pantal}a LCD
+
Recording/ViewingPhoto/Moving<MMC/SD>
Images
,:÷ Protecting Imagesfrom
accidental erasure (except
MemoryStick DuoiMMC).
+ The Memory Stick Duo/MMC
does not have e Protection Tab.
When using the Memory Stick
Duo/MMC,be careful not to edit
or delete data by mistake
+ Deleting Photo/MovingImages <ReMMC/Mini
SD>
MemoryStick Duo,RSMMCor Mini SDshould
stored in Memory Card
be inserted by using an Adapter (not supplied),
+ Marking Photo Imageswith
Print Information
,:÷ Formatting MemoryCards
1
2
3
4
5
_=jecting
1
2
3
4
a Mernor
a Memory
<Memory
Stick/Memory
Stick
PRO>
Funciones
de
de
la
tarjeta
rnemoria
*:,
Grabaci6nVisualizaci6n
de
fotosivideos
+
Protecci6n deimagenes frente
a borrado accidental (excepto
Memory Stick DuoiMMC)
+
El Memory Stick Duo/MMC no
tiene la leng_eta de protecci6n
AI utilizar el Memory Stick Duo/
MMC, tenga cuidado de no editar
<Memory
Stick
Duo>
o borrar los datos por error
MemoryStickDuo, RSMMCo MiniSD deben
+
Supresidn de fotografiasi
insertarse utiliz_ndo et adaptador
(r_ose
suministra).
secuencias almacenadas ea la
tarjeta de memorta
+
Indusi6n de marcas en las fotografias con
informaci6n de impresi6n
¢
Formato de tarjetas de memoria
Card
Openthe LCD Screen.
Openthe Memory Card Cover
Insertthe Memory Card
• Please insertthe Memory Card with its terminals
facing upward
Insertthe MemoryCardinto the slot until it softlyclicks.
CIosethe Memory Card Cover
digital
-_
The Memory Card stores end
managesPhoto/Moving images
recordedby the DVD Camcorder.
Beforeinsertingor ejectingthe
MemoryCard,setthe [Power] s,_vitch
to [Off] andopenthe LCDScreen.
Card Functions
Insertin
]
Inserci6n de una tar[eta de rnernoria
1
2
3
1
4
Card
5
Openthe LCD Screen.
Openthe Memory Card Cover
Slightly push the Memory Card inwards to pop it out
Pull the Memory Card out of the slot and close the
MemoryCard Cover.
Abra la pantalla LCD
Abra la tapa de la tarjeta de memorta.
Insertela tarjeta de memoria
• Inserte la tarjeta de memoda con sus terminales
hacia arriba
Inserte la tarjeta de memoria en la ranura hasta que
emita un chasquido suave
Cierre la tapa de la tarjeta de memorta.
Ex_ulsi6n
f
2
3
4
de una taffeta
de rnernoria
Abra la pantalla LCD
Abra la tapa de la tarjeta de memorta.
Presione ligeramente la tarjeta de memoria hacia
dentro para clue sarte.
Saque la tarjeta de memofia de la ranura y cierre la tapa
[ ENGLISH
]
[ ESPAI_OL
Digital Still Camera Mode
Mode de c; mara fotogr fica
Do not apply excessive force when you insert/eject the Memory Card
Do not turn the power off while recording, loading, erasing photo images
or formatting the Memory Card
Do not place the Memory Card near a strong electro-magnetic device
Do not allow metal substances to come in contact with the terminals on
=
the Memory Card
Do not bend, drop or apply strong shock to Memory Card
After removing the Memory Card from the DVD Camcorder, keep it in a
soft case to prevent static shock
The data stored on the Memory Card may be changed or lost as a result
of misuse, static electricity, electric noise or repair Save important images
separately Samsung is not responsible for data loss due to misuse
16:9 Wide mode is not avaliable in M.Cam Mode and M.Player Mode
Because wide LCD supports only 4:3 mode (SC-D0564 DC565 only)
- •
i
a-
_
m
-
•
-
-
•
.
o
+
The photo images thatyou recorded
are saved in JPEG file format on the Memory Card
The moving images thatyou
recorded are saved in MPEG4 file
format on the Memory Card
,';÷ Each file has a file number and all
DCIM
•
=
=
=
=
=
=
=
+
@
MSAMSUNG
image Format
Photo Image
Images are compressed in JPEG
(Joint Photographic Experts Group) format
The picture size is 80Ox60O or 1152x864 ',-'page 94
Moving image
•
Images are compressed in MPEG4 (Moving
Experts Group) format
•
The picture size is 720x480
<M.P/ayer Mode>
Las im&genesfijas grabadas se guardan
en la tarjeta de memoria enformate JPEG.
tarjeta de memoda an formate MPEG4
SSMOV
@
•t,
Cada archive tiene un n_rnero y todos los
El video est&n
grabado
se guarda
la
archives
asignados
a unaencarpets
- Acada imagen grabada sele
asigna un numaro de archive a
partir de DCAMO00f.
- Todas Ins carpetas se numeran a
partir de 100SSDVC y se graban en
la tarjeta
<Moving Image>
¢
Un nombre de archive se estipula
mediante DCF (Norma de diseSo para sistema de archives de camara) DCF as
un formate de archJvode imagen integradopara c&maras digitales Los archives
de imageries pueden utilizarse en todos los dispositivos digita]es qua esten en
conformidad con DCF
IOOSSMOV
Formate
Picture
digital
No apliqu6 excesiva fuerza al insertar o expulsar la farjeta de memoria
No apague ]a videocamara mienfras este grabando cargando, borrando
fotografias o dando formate a la tarjeta de memoria
No coloque]a tarjetade mernonacerca deun dispos_voelectro-magnetitepotente
Imgida que los termina]es de la tarjeta entren en contacto con objetos metal}cos
No doble deje caer ni golpee la farjeta de mernoria
Desgues de sacar la tarjeta de memofia de la Videocamara con DVD, guardela
en una funda blanda para evitar descargas electricas
Los dates almacenados en la tarjeta de mernofia se pueden estropear o perder
a causa de un use incorrecto de la electricidad estatica o del ruido electfico.
Guarde las imageries importantes aparte Samsung no se hace responsable de
los dates perdidos a causa del use incorrecto
La Videocamara con DVD admite SD/MMC de 2 GB y de inferior tamale
Es posible que Ins tarjetas SD/MMC que contengan mas de 2 GB no graben o
reproduzcan correctamente
En el M.CAM Mode MPlayer Mode, no esfa disponib]e 16:9 Wide
Y el mode panoramlco aparece s61ocon una relaci6n altura/anchura de 4:3
(s61oSC-DC564/DC565)
@
files are assigned to a folder
100SSDVC
- Afile numberfrom DCAM000f
DCAM000t
is sequentially assigned to each
DCAM0002
recorded image.
- Each folder is numbered from
!
1OOSSDVC and recorded on
101SSDVC
the Memory Card
A file name is stipulated by
<Photo Image>
DCF Design rule for Camera File system)
DCF s an n egra ed mage f e format for d g a cameras: mage f es can
be used on all digital devices conforming to DCF
]
de
ima
en
Imagenes fijas
Estas imageries se comprimen an formate JPEG (Joint
Photographic Experts Group).
,
El tamale de imagen as 800x600 o 1152x864 '-.page 94
Imagen en movimiento
Los videos se comprimen an formate MPEG4 (Moving
Picture Experts Group)
El tamaSo de ]a imagen as de 720x480
[ ENGLISH
]
[ ESPAI_IOL ]
Digital Still Camera Mode
_:"
*:,
Photo Quality function works in both Player Mode and r_
M.Cam Mode _"page 28
L_J
Yo_ can select the quality of a photo image to be recorded
Modo de c mara fotogr fica
f
+
,,,_-_..,...,
':"
Select the Photo Quality
1
2
3
4
5
6
7
.s_,_Je,
Fif,e
_1152x864
_,Series
Set the ]Mode] switch to ]DISC] or [CARD]
If the [Mode] switch is set to [DISC], set the ]Power]
switch to [[]E](Player)].
if the [Mode] switch is set to [CARD], set the [Power]
switchto[_(Camera)]
Press the [MENU] button
" The menu list will appear
Move the [Joystick] up or down to select <Memory>,
L_
then press the [Joystick]OK)]
Move the [Joystick] up or down to select
<Photo Quality>, then press the [Joystick]OK)]
Move the [Joystick] up or down to select the desired
photo quality ]Super Fine, Fine or Normal), then press
the [Joystick]OK)]
To exit, press the [MENU] button.
, The icon of the selected option is displayed.
_4ove
_Select
4
5
6
ou
,2 l,ty
MB
lOB
2GB
Number of Images that can be stored on a
Memory Card
<Super Fme> Approx
600
Approx
1200
Approx
2400
Approx
4960
Applox
9740
<Fine>
Approx
790
Approx
1580
Approx
3150
Approx
6520
Apl]rox
12800
<Normal>
Approx
1270
Approx
2540
Agprox
5070
Al)prox
10490
Apl]rox
20000
Move _
Sebct
=
7
_
Exit
de
la calidad
fetogr_fica
Coloque el interruptor [Mode] en [DISC[ o ]CARD]
Si el interruptor ]Mode] est_ en [DISC[, coloque el
interruptor [Power] en[[_(Player)]
Si el interruptor [Mode]esta en [CARD], eoloque el
interruptor ]Power] en[_(Camera)]
Pres one etbotdn ]MENU]
• Apareee la Ista del men0
Mueva el [Joystick] hada arfiba o haca abajo para
seleccionar <Memory> y presione el botdn ]Joystick
(OK)]
Mueva el [Joystick] hacia amba o hacia abajo para
seleccJonar<Photo Quality> y pres one el botdn
[Joystick[OK)]
Mueva el ]Joystick] hacia amba o hacia abajo para
selecdonar la calidad de imagen que desea ]Super
Fine, Fine o Normal] y presione el botdn
[Joystick(OK}]
Para salih presione el botdn [MENU[
" Aparece el icono de la opcidn seMccionada
- ...........................
I..........................................
N_mero de
images
(Lue pueden
almacenarse
/-
You can directly access the Photo Quality function by using the [QUICK
MENU] bulton _page 29
The above approximate figures are based on number of images under normal
recording conditions
The n_lmber of images shown above are based on normal recording
conditions
Up to 20,000 Photo images (JPEG) can be stored in a memory card
790 _'_
8mirr |
Z¢A|
en una tarieta
de mernoria
<Super
Calidad
Fine> 128MB
Aprox
600
<Fine>
Aprox
790
<Normal>
Aprox
/270
Aprox
256MB
/200
Aprox
/580
Aprox
512MB
2400
Aprox
3150
Aprox
IGB
4960
Aprox
6520
Al)rox
2GB
9740
Aplox
12800
Aprox
2540
Aprox
5070
Aprox
10490
Ap/ox
20000
• El nQrnero de im_genes antedores est_n basadas en
un tarnaSo de fob de 800X600
The number of images above are based oil 800Xd00 Photo Size
=
3
_Exit
La funcbn Photo QuMity est_ operativa en los Player
Mode y M.Cam Mode _p_gina 28
Se puedeselecconarb calJdaddela fob que se va agrabar
Selecci6n
1
2
digital
•
•
•
Puede acceder directamenM a la funcbn Photo Quality utilizando el botdn
QUICK MENU _pagina 29
Las cfras antedores aproximadas se basan en e n_mero de imagenes en
condiciones de grabacbn norrnales.
El nSmero de imageries mostradas antedormente esta basado en
condiciones de grabaciOn norrnales
En una tarjeta de mernoda pueden almacenarse hasta 20000
imagenes fotogr_ficas (JPEG)
[ ENGLISH
]
[ ESPAI_IOL ]
Digital Still Camera Mode
Modo de c mara fotogr fica
•:* Photo Size function works only in M.Cam Mode. "*page 28
+ You can select the size of a photo image to be recorded.
+
-
+
1, Set the [Mode] switch to [CARD].
2,
Set the [Power] switch to [l_(Camera)].
3,
Press the [MENU] button.
• The menu list will appear.
4.
Move the [Joystick] up or down to sebct
<Memory>, then press the [Joystick(OK]I,
5,
Move the [Joystick] up or down to sebct
<Photo Size>, then press the [Joystick(OK][,
6,
Move the [Joystick] up or down to select the
desired photo size (1152x864 or 800x600), then
press the [Joystick(OK)].
7,
To exit, press the [MENU] button,
= The icon of the selected option is displayed,
%
=
=
_-
_
e
e =
o
=
e
=
¢
digital
e _
-
La funci6n Photo Size s61o esta operativa en M.Cam Mode.
_pagina 28
Se puede seleccionar el tamaSo de la foto que se va a grabar.
f
1. Coloque el interruptor [Mode] en [CARD],
2. Coloque el interruptor [Power] en [(Camera]].
3. Presione el bot6n [MENU],
• Aparece la lista del menu.
_,,-/ 152x86,_
_,, Series
_,, Super
_,love
@
_Select
Fine
_Exit
5. Mueva el [Joystick] hacia arriba o hacia abajo
hasta sebccionar <Photo Size> y presione el
[Joystick(OK)I,
I
/
4. Mueva el [Joystick] hacia arriba o hacia abajo
para seleccionar <Memory> y presione el
[Joystick(OK)],
6. Mueva el [Joystick] hacia ardba o hacia abajo
hasta seleccionar el tamaSo de foto (1152x864
o 800x600) y presione el [Joystick(OK)I,
7. Para salir, presione el bot6n [MENU],
• Aparece el icono de la opci6n sebccionada.
_r,_ove
•
•
•
You can directly access the Photo Size function
by using the [QUICK MENU] button. _page 29 {3_ (
The number of images that can be stored on a
Memory Card depends on various conditions.
Photo images that are recorded at 1152X864 on
your DVD camcorder, may not playback properly
,A.
on other digital devices that do not support this
photo size,
_1s2
.,A
_Select
_Exit
8 rain
600 E) 1
Puede acceder directamente a la funci6n
Photo Size utilizando el boron [QUICK MEND].
_-'pagina 29
El nOmero de imagenes que se pueden
almacenar en una tarjeta de memoda depende
de diversas condiciones,
Las imageries fotograficas que se graban
en 1152X864 en la Videocamara con DVD
es posible que no puedan reproducirse
correctamente en otros dispositivos digitales
que no admitan este tamaBo de fotografia.
[ ENGLBH
]
[ ESPANOL
Digital Still Camera Mode
-
+
¢
¢
_
-
-
o-
-
Modo de c; mara fotogr fica
+
+
File Number setting works only in M.Cam Mode. _page 28
File Numbers are given to images in the order they were recorded
when they are stored on the Memory Card.
File numbers may be set as follows:
- <Series>: When there are existing files, the new image will be
named as the next number in the sequence.
- <Reset>: When there are no files stored on the Memory Card,
the file numbering starts from 0001
1.
Set the [Mode]
switch
2.
Set the [Power] switch to [l_t(Camera)]
+
+
¢
to [CARD].
_
-
+-
-
Press the [MENU] button
• The menu list will appear.
4.
Move the [Joystick] up or down to select
<Memory>, then press the [Joystick(OK)].
5.
Move the [Joystick] up or down to select
<File No.>, then press the [Joystick(OK)].
6.
Move the [Joystick] up or down to select the
desired option (Series or Reset), then press
the [Joystick(OK)].
= The selected option is applied.
•
-
Q
Los numeros de archivo se pueden definir de la siguiente forma:
<Series>: Cuando hay archivos a la siguiente imagen se le
asignara el numero siguiente de la secuencia.
<Reset>: Cuando no hay archivos almacenados en la tarjeta de
memoria, numeracion de archives empieza a partir de 0001.
1. Coloque e! interruptor [Mode] en [CARD].
'
2.
3.
+_
digital
El ajuste del numero de archive solo esta operativa en el M,Cam
Mode -pagina 28
Los numeros de archivo se asignan alas imagenes en el orden
en el que se grabaron cuando se almacenaron en la tarjeta de
memoria
/
[_
_
]
_ SuperFir;e
Coloque el interruptor [Power] en
[ _ (Camera]].
3. Presione el boton [MENU].
• Aparece la lista del men&
4.
,\
_Move
_Select
_Exit
[ .....................................................
X
Photo Size
5. Mueva el [Joystick] hacia arriba o hacia
abajo para seteccionar <File No.> y presione
el boton [Joystick(OK)]
6.
Mueva el [Joystick] hacia arriba o hacia
abajo para seteccionar la opcidn que
desea (SerGeso Reset) y presione el boton
[Joystick(OK)]
• Se aplica la opcidn seleccionada.
7.
Para salir, presione el boton [MENU].
7. To exit, press the [MENU] button.
_love
_Select
_Exit
Mueva el [Joystick] hacia arriba o hacia
abajo para seteccionar <Memory> y
presione el boton [Joystick(OK)]
/_
A
[ ENGUSH
]
[ ESPAI_IOL ]
Digital Still Camera Mode
Modo de c mara fotogr fica
•:*
•:*
•++. La funci6n Flash select s61o esta operativa en M.Cam Mode
_pagina 28
•:. Puede sacar fotos con flash de aspecto natural con la iluminaci6n
adecuada utilizando el flash integrado, ya se trate de escenas
nocturnas, fl_tedores o en otros lugares oscuros
_ §A (Automatico): El flash se acciona dependiendo
det brillo del
objeto. El flash se dispara en funci6n de la lurninosidad de la zona
donde se encuentra el objeto
- @ (Reducci6n autornatica de{ efecto ojos rojos):
El flash se acciona con antemano antes de que e[
fogonazo principal reduzca el efecto de ojos rojos El flash
se dispara previamente de manera autom_%a antes del
disparo principal para reducir el efecto ojos rojos
- _ (Flashactivado):EI flash sedisparaindependentemente
de la luminosidad de la zona donde se encuentra el obleto
- @ (Desactivado):
El flash no se dispara
The Flash function works only in M.Cam Mode. _page 28
You can take natural looking flash pictures with appropriate
illumination
using the built-in flash, whether they are night scenes,
indoors or in other dark places.
- _ (Auto): The flash comes on depending
on the brightness of
the subject. When there is sufficient light, the Auto flash icon will
blink and the flash does not fire.
- @ (Red-eye reduction auto): The flash
prefires automatically before the main firing to
reduce red-eye. When there is sufficient light,
the Red-eye reduction auto icon will blink and
the flash does not fire.
- _ (Flash on): The flash comes on regardless of
the brightness of the subject.
- @ (Off): The flash does not fire.
Flash Select
1,
2.
3.
4.
iiil
digital
oi I
Seteccion
I
Set the [Mode] switch to [CARD].
Set the [Power] switch to [l_b(Camera)].
Press the [C.NITE/'_'] button,
Each time you press the [C.NITE/'_] button,
Flash mode is changed to;
, <_A (Auto)>, <d:b (Red-eye reduction auto)>
<_ (Flash on)> and <@ (Off)>.
6oo_
/
8min _
1
2
3
4
'_*_1
de flash
Coloque elinterruptor
[Mode] en [CARD[
Coloque el interruptor [Power] en [1_ (Carnera)].
Pulse el bot6n [C.NITEt_ ]
Cadavezquepulseelbot6n[C.NITE/_],cambia
el modo Rash;
= <'_ (Automatico)>, <(_ (Reducci6n autom_tica
del efecto ojos rojos)>, <'_ (Flash acfivado)>
y
<_) (Desactivado)>.
•
•
Do not fire the flash with the flash bulb covered
with your hand.
Do not fire the flash close to people's eyes.
•
The Auto and Red-eye
•
while Exposure is in use.
When Red-eye reduction auto is set. the flash fires 3 times
•
perform red-eye reduction during 1,5 seconds,
The Effective flash range is 7-10 feet,
•
The battery power will be consumed faster with repeated
•
Public places
reduction
such as museums
auto functions
may prohibit
/
j
are not available
to
use of the flash,
flash use,
=
,
,
=
,
•
Si tapa la bornbilla
•
dispare,
No dispare el flash cerca de los ojos.
del flash con la mane. no Io
Las funciones automaticas y de reducd6n de ojos rojos no est_n
disponibles mientras se utiliza Exposure (Exposici6n).
Cuando se configura (reducd6n autom&tica de ojos rojos), el flash se
dispara dos veces: una para realizar la reducci6n de ojos rojos y otra
para sacar la imagen pdncipah Existe un desfase de aproximadamente
1,5 segundos entre los flashes.
El aMance efecfivo del Flash es de 4,5 a 6 metros.
La carga de la bateria se consumira mas r@idamente con el use repetido del flash
Lugares pOb[icos como los museos prohiben el uso del flash
[ ENGLISH
]
[ ESPANOL
Digital Still Camera Mode
Modo de c mara fotogr&fica
+
+
You may take photo images while in M,Cam Mode and store the
images on the Memory Card. _page 28
+ You can take photo images using the remote control,
(SC-DC564/DC565 only)
+ Audio will not be recorded with a photo image onto the Memory
Card.
÷,.t, Please check the protection tab setting on your memory card before
recording. You may not be able to record when it is set to lock.
+
+
digital
Puede hacer fotografias mientras se encuentra en el M.Cam
Mode y guarde las imageries en la tarjeta de memoria.
_pagina 28
Puede tomar fotografias utilizando el mando a distancia
(s61o SC-DC564/DC565).
Compruebe la colocaci6n de la lengSeta de protecci6n en la
tarjeta de memoria antes de la grabaci6n. No podra grabar con la
lengL)eta cobcada en bioqueo.
1. Inser[e la tarjeta de memoda.
1. }nsertthe Memory Card.
2. Cobque el interruptor [Mode] en [CARD].
2,
Set the [Mode] switch to [CARD].
3.
Set the [Power] switch to [1_ (Camera)].
3. Coleque el interruptor [Power] en
[ _ (Camera)],
4.
After framing your subject, fu{ly press the
[PHOTO] button to take the picture.
• The picture is taken and saved into the
Memory Card within a few seconds.
• Taking another picture within this interval is
not possible.
• The <Photo capture> indicator appears
daring the time it takes to save the
image.
4. Tras encuadrar el objeto que se va a grabar,
presione totalmente el boron [PHOTO] para
tomar la fmagen.
• La imagen se captura y se guarda en la
tarieta de memoria en pocos segundos.
• En este intervalo no es posiNe capturar otra
imagen.
= Aparece el indicador <Photo capture>
durante el tfempo que se tarda en guardar la
imagen.
•
•
•
f .................................................................
i'
AI tomar las fotos, las imagenes fotograficas
guardadas apareceran algo mas grandes que
como se muestran en la pantalla LCD.
the photos are taken.
• Las imagenes fotograficas se guardan en la
Photo images are saved in the Memory
s ........................................................................................
tarjeta de memoria con un formato 800x6OOo
Card in an 800x600 or 1152x864 format.
1152x864.
The number of photo images that can be stored depends on the
• El numero de imageries fijas que se paeden
quality of the image.
guardar depende de la calidad de la imagen.
Saved photo images will appear slightly larger
than what is shown on the LCD screen when
•
]
[ ENGLISH
Digital
]
[ ESPANOL
Still Camera
Mode
Modo de c_mara
•:. This function works only in M.Player Mode _',page 28
•:* Youcanplaybackandviewphotoimagesrecordedonthe MemoryCard
1
Set the [Mode]
2
Set the [Power] switch to [(_(Player)],
• The thumbnai] index of photo images
+
switch to [CARD]
appears If there are no recorded images
on the Memory Card, <No file!> is
3
displayed
Use the [Joystick]
to select a desired
photo
image, then press the [Joystick(OK)].
• To display the previous six images, press
the [ 144 ] button
=
To display the next six images, press the [ _._1]
button.
1
Use the [Joystick]
2
then press the [Joystick[OK)]
Use the [144 / _i] buttons to search for the desired
to select a desired
photo image,
photo image.
• To view the next image: press the [ _i]
button
•
To view the previous
button
image: press the [ 14,q]
•
Keep pressing [144 ] or [ _i,-I ] to search for an image quickly.
Holding the [ 144 ] or [ _-I ] buttons will not change the displayed
image, but the file number will change until the button is released
When the button is released, the selected file will be displayed
3.
To return to thumbnail
-
Loading time may vary depending on the image size.
Any large sized image taken with another device will be displayed as a
thumbnail
image
index, press the [I_;_(MULTI
DISP.)] button
fotogr_fica
]
digital
Esta funci6n s61o esta operativa en el M.Player Mode.
-pagina 28
*;* Es posible reproduck y verbs imagenes
grabadas en el la tarjeta de memoria.
Cobque el interruptor [Mode] en [CARD].
Coloque el interruptor [Power] en Ilia(Player)].
• Aparece el indice de fotografias en miniatura.
Sf no hay imagenes grabadas en la tarjeta
de memona, aparece <No file!>,
Utilice el [Joystick] para seleccionar la
imogen fotografica que desea y presione el
[Joystick[OK)].
• Para vet las seis imageries anteriores,
mantenga puBado el bot6n [ 14_],
• Para vet los seis imageries siguientes,
mantenga pulsado el boron [ _,_.1
],
Utilice el [Joystick] para sefecdonar la
imogen fotografica que desea y presione el
[Joystick(OK)].
Utilizando los botones [ t4_/_-_1], busque la
fotografia que desea.
• Para vet la imagen siguiente: presione el
boton [ _-_-I].
• Para vet la imagen anterior: presione el boton [14-_].
• Mantenga pulsado [14_ ] o [ !_,1] para buscar una imagen
rapidarnente.
Si se rnantienen los botones [1._] o [ _-_1]no carnbiara la
irnagen visualizada, pero el n_mero de archivo ira cambiando
hasta que se libere el bot6n. Cuando se libera el bot6n,
aparecera el archivo seleccionado.
3. Para volveral indicede miniaturas,presione el boton [_;;;;_(MULTI
DISR)].
•
•
El tiempo de cargo puede variar dependiendo del tarnaSo de la
imogen.
Cualquier irnagen grande tomada con otro dispositivo aparecera
como una imogen en rniniatura.
[ ENGLISH
]
[ ESPAI_IOL ]
Digital Stilt Camera Mode
Modo de c mara fotogr&fica
1, Use the [Joystick] to sebct a desired photo
image, then press the [Joystick(OK)].
2,
digital
1. Utilice el [Joystick] para sebccionar la
imagen fotograflca que desea y presione el
[Joystick(OK)].
Press the [_ t| (S.SHOW)] button in the singb
image display mode.
• All images will be played back consecutively
for 2-3 seconds each.
• The <Slide> is displayed. The Slide Show
will start from the current picture,
To stop the slide show, press the
[!_-|l (S.SHOW)] button again.
Slide
1152x864
100 0005
2. Presione el bot6n [_|l (S.SHOW)] en el estado
de pantaIFa_nica.
•Las
imagenes pasaran consecutivamente
y apareceran en la pantalla durante 2 6 3
segundos cada una.
• Aparece <Slide>, La presentacbn
comenzara desde la imagen actual
Para detener la presentacion, presione de
nuevo el bot6n [_ |l (S.SHOW)].
[ ENGLISH
]
[ ESPANOL
Digital Still Camera Mode
=
Q
-
•
Q
.
+-
.
+
-
_
Modo de c; mara fotogr fica
=
-
•
*:o The Protect function works only +nM.Player Mode. =page 28
*:o You can protect importantimages from accidental erasure
+fyou execute format, all images includingprotected images will be
erased
1
Set the [Mode] switch to [CARD].
2
Set the [Power] switch to [[_(Player)].
• The thumbnail index of photo images
appears. If there are no recorded images on
the Memory Card, <No file!> is displayed
Use the [Joystick] to select images to be
protected.
3
4
5
6
7
=
=
+
ph/p/p/p/p/p/p/p/_oto
__:_
Pressthe [MENU] button.
• The menu list will appear.
Move the [Joystick] up or down to select
<Memory>, then press the [Joystick(OK)]
Move the [Joystick] up or down to select
<Protect>+ then press the [Joystick(OK)].
Move the [Joystick] up or down to select <On>+
then press the [Joystick(OK)].
= To exit, press the [MENU] button
• The protection icon ([_]) is displayed.
_tes:
=
÷
You can directly access the Protect function by
using the [QUICK MENU]. _page 29
Protected images will show the ([_) mark when
they are displayed.
if the write protection tab on the Memory Card is
set to LOCK, you cannot set image protection.
_Move
_Select
-
+
-
-
+ +Q
_o+
+
+-
.
]
digital
_
•
--
La funci6n Protect solo esta operativa en el M,Player Mode.
_pagina 28
Puede proteger imagenes importantes contra el borrado
accidental. Si ejecuta la funci6n de formato, se borraran todas las
imagenes inciuidas las imagenes protegidas.
1. Coloque el interruptor [Mode] en [CARD]
2. Coloque el interruptor[Power] en
[[_(Player)].
= Aparece el indice de fotografias en
miniatura. Si no hay imagenes grabadas
en la tarjeta de memoria, aparece
<No file!>
3. Utilice el [Joystick] para seleccionar las
imagenes que se van a proteger.
4. Presione el boton [MENU]
= Aparece la lista de! men&
5. Mueva el [Joystick] hacia arriba o hada
abajo para seleccionar <Memory> y presione
el boton [Joystick(OK)].
6. Mueva el [Joystick] hacia arriba o hacia
abajo para seleccionar <Protect> y presione
el boton [Joystick(OK)]
7. Mueva el [Joystick] hacia arriba o hacia
abajo para seleccionar <On>, y presione el
bot6n [Joystick(OK)]
• Para salir, presione el bot6n [MENU].
_Ext
Aparece el icono de proteccion ([_)
•
.
.
Puede acceder directamente a la funcion
Proteger utilizando el boron [QUICK MENU].
_pagina 29
Las imageries protegidas mostraran la mama
([_)) cuando aparecen.
Si la pesta_a de protecci6n contra escrJtura en
la tarjeta de memoria esfa colocada en LOCK,
no puede definir la protecci6n de imagen
[ ENGLISH
]
[ ESPAI_OL
]
Digital Still Camera Mode
Modo de c; mara fotogr fica
*,*o The Delete function works onJyin M.Player Mode. _page 28
*,*o You can erase the photo images and moving images recorded on
the Memory Card.
+ Ifyouwanttodeleteprotectedimages,
youmustfirstdeactivate
the image protection.
+ An image which has been deleted cannot be recovered
*t* La funcJbnDelete sblo esta operative en el M.Player Mode.
'='pagina 28
+ Es posibie borrar las imageries fijas y las imageries de video grabados
en Is tarjeta de memoria
,to S[ desea borrar imageries protegidss, primero tendra que desactivar ]a
proteccibn de imagenes
+ Une imagenque se ha borrado no se puede recuperer
1 Co]oquee_interrupter [Mode] en [(
2
1
2
3
4
5
6
7
•
•
•
=
=
Setthe [Mode] switch to [CARD].
Set the [Power] switch to [[_E](Player)]
• The thumbnail index of photo images
appears, if there are no recorded images on
the Memory Card, <No fil!!> is displayed
Use the [Joystick] to select an image to be
deleted
Pressthe [MENU] button.
• The menu list will appear.
Move the [Joystick] up or down to select
<Memory>, then press the [Joystick(OK)]
Move the [Joystick] up or down to select
<Delete>, then press the [Joystick(OK)].
• The <Delete?> message will appear.
Move the [Joystick] left or right to select
<Yes>, then press the [Joystick(OK)].
. The selected image will be deleted.
• Press the [MENU] button to finish setting
You can directly access the Delete function by
using the [QUICK MENU]. _page 29
If an erroneous image file is found on the
Memory Card, the message Memory card read
error will be displayed. It may be caused by
copying images from different digital devices.
Formatting the Memory Card will delete all the
stored images. _page 103
Toprotect importantpicturesfrom accidental
deletion,activatethe image protection -page 100
Protectedimage cannotbe deleted
[_]
3
4
5
6
7
digital
Si no hayimagenes grabadas en la tar eta de
memoria,aparece <No file!>.
Mueva el [Joystick] pare seleccionar las
imagenes que se van a borrar
Pres[onee]bot6n[MENU]
. Aparece la lists de_ment_
Mueva el [Joystick] hacia arriba o hacia abajo
jara seleccionar <Memory> y presione e_boton
oystick(OK)]
Mueva el Joystick hacia arriba o hacia abe o
pare se ecc oner <De ere> y presone e boton
[Joystick{OK)]
. Aparecera e] mensaje <Delete?>
Mueva el [Joystick] ala izquierda e ala derecha
jara seleccionar <Yes> y presione el boton
oystick(OK)]
. Se borrera la imagen seleccionada.
Presionee; boron [MENU] para flnelizarel
ajuste
Puede acceder directamentea Is funci6n Delete
utilizando el beton [QUICK MENU] '-pagina 2g
Si se detects un formats de archive erroneo,
eparecera el mensaje Memory card read error
Puede haber sucedido a] copiar imagenes desde
diferentes disposRivosdigita]es
El formate de la tar eta de memoria borrara todas
as magenes a macenadas _pag na 03
Para proteger imagenes importantes frente
e borradoaccidental,activela proteccbnde
imagenes.-pagina 1%
No es pesible berrsr le imagen protegida_l
_
[ ENGLBH
]
[ ESPANOL
Digital Still Camera Mode
Modo de c mara fotogr fica
Deletin 9 All Images
Supresibn
at Once
6
Move the [Joystick] up or down to select
<Delete All>, then press the [Joystick(OK)]
• A message <Delete all?> is displayed.
7
Move the [Joystick] left or right to
select <Yes> or <No>, then press the
[Joystick(OK)].
8
To exit, pressthe [MENU] button.
=
You can directly access the Delete All function
by using the [QUICK MENU], '=page 29
Deleting all flies using the Delete All menu may
take a while. To delete all files much faster,
format the Memory Card after backing up the
files onto other storage device -page 103
=
[_
de todas
las im_genes
]
digital
de una vez
/ ...................................................................
6. Mueva el [Joystick] hacia arriba o hacia
abajo para selecdonar <Delete all?> y
presione el boton [Joystick(OK)]
Delete
= Aparece el mensaje <Delete all?>.
_Move
_Setect
_Exit
7.
Mueva el [Joystick] a ta izquierda o a la
derecha para seleccionar <Yes> o <No> y
presione el boton [Joystick(OK)]
8.
Para salir, presione e! boron [MENU].
Puede acceder directamente a la funci6n
Delete All utilizando el boton [QUICK MENU].
_pagina 29
El borrado de todos los archivos con Delete
All puede tardar an rato Para borrar todos
los archivos de una forma mas rapida, de
formato a la tarjeta de memoria tras hacer una
copia de seguridad de los archivos en otto
dispositivo de almacenamiento._pagina 103
[ ENGLISH
]
[ ESPAI_OL
Digital Still Camera Mode
.
=
-
-
Q
.
o
•
Modo de c; mara fotogr fica
•t*
+
•:*
,_,÷ IfyouexecutetheFormatfunctbn,
allimageswillbeerasedcompletely
and erased images cannot be recovered
3
4
5
6
7
=
=
=
digital
.
or÷ The Format function works only in M.Player Mode ',=page 28
ot÷ You cart use the Format functions to completely delete all images and
options on the Memory Card. including protected images
+
The Format function restores the Memory Card to its initial state
1
2
]
Set the [Mode]switch to [CARD]
Set the [Power] switch to [[]_;_l(Player)]
• The thumbnail index of photo images appears.
If there are no recorded images on the Memory
Card, <No file!> is displayed
Pressthe MENU]button
• The menu s w appear
Movethe Joystick[ up or down to select
<Memory>, hen press he Joyst ck OK
Movethe Joystick[ up or down to select
<Format>, thenpress the Joyst ck OK
• The <Format? All flies will be deleted!>
message will appear
Movethe [Joystick[ to the left or dght to select
<Yes>, then press the [Joystick(OK[[
• The <Complete!! message will appear when
formatting is completed
Toexit, pressthe [MENU] button.
Youcan directly access the Format function by
using the [QUICK MENU] _'pege 29
if you execute the Format function, all photo/
moving images will beerased completely and
erased photo moving images cannot be recovered.
Formattingthe Memory Card using a different
device wil/cause Memory Card read errors
Donot turnthe poweroffin the middleofthe formatting.
A Memory Card with the protection tab set to save
will not be formatted. ',,page 91
Donot formatthe MemoryCardon a PC
Not formatted! messagemay appearifa Memory
Cardformattedon a PC is inserted
+
La funci6n Format s61o esta operative en el M.Player Mode. _p&g[na 28
Pare borrar pot completo las imageries y las opciones de la tarjeta de
memofia incluJdas las imageries protegidas, se pueden emplear ]as
funciones de Format de memoda
La funci6n Format devuelve ]a tarjeta dememofia a su estado inicial
Si ejecuta la funcibn Format de memoda todas las imageries se borrar&n
comp]etamente y no se podran recuperar
1 Coloque el intermptor [Mode] en [CARD]
2 Co]oque el [ntermptor [Power] en [_(Player)].
• Aparece e] indice de fotografias en miniature
SJ no hay imagenes grabadas en la tarjeta de
memoda, aparece <No fil!!>.
3 Presione el botch [MENU]
• Aparece la fista del menO
4 Mueva el [Joystick] hacia ardba o hacia abajo
para seleccionar <Memory> y pres[one el bot6n
[Joystick(OK}]
5 Mueva e[ [Joystick] hacia ardba o hacia abajo
para seleccionar <Format> y presione el bot6n
[Joystick(OK}]
• Aparecera el mensaje <Format? All files will be
deleted!>.
6 Mueva el [Joystick] a la izqu[erda o a ]a derecha
para selecc[onar <Yes> y presione el bot6n
[Joystick(OK}]
• Aparecera el mensaje <Complete!> una vez
completado e] formato
7 Para sal[r, presione e] botch [MENU].
•
•
•
•
•
•
Puede acceder dkectamente a la funci6n Format
utilJzando el bot6n [QUICK MENU] _pagJna 29
Si ejecuta la func[6n Format se borraran todas las
Jmagenes fijas y secuencias y no podra recuperada.
Dar formato a ]a tarjeta de memoda uti]izando un
disposJtivo d[ferente puede causar errores de lectura
en la tarjeta de memofia
No apague el aparato durante el proceso de formato
No se dare formato a un Memory Stick con la pestaSa
de protecci6n en Lock._pagina 91
No de formate a la tarjeta de memoda en un PC
Es posible que aparezca el mensaje Not formatted[
si se introduce una tarjeta de memoda
forrnateada en un PC.
[ ENGLISH
I
[ ESPAI_OL
Digital Still Camera Mode
_-
+ ®
+
+
+
++-
,+
=
.
+
You can record moving images wMe in M.Cam
+
You can record moving images with audio on the
Memory Card
The screen format of the moving image to be
recorded is 720x480
+
Modo de c; mara fotogr fica
-
+
4
®
,_
+
+-
+
"
+
,- +-
+-=
_I_=
Press the [Start/Stop]
button, the moving
images
are recorded on the Memory Card in MPEG4
(I
=
-
,
,
digital
- _-
-
0
.
Puede grabar secuencias en el M.Cam Mode
_pagina 28
Puede grabar en la tarjeta de memoda secuencias de
video con audio
El formato de pantalla de la secuencia de video que se
grabara es 720x48g
Almacenamiento
Mode '=.page 28
Insertthe Memory Card
Set the [Mode] switcl_ to [CARD]
Set the [Power] switcl_ to [l_(Camera)]
de secuencias de video
en la tarjeta de memoria
J
I
REC _
00030
I_]_
1.
2.
3.
4.
•
5
-
+
Saving Moving images onto a Memory Card
1
2
3
.
/%:3Tmq_TZr--
]
You can record a photo image on a Memory
Card by pressing the [PHOTO] button instead of
the [Start/Stop]
button '=,page 97
Press the [Start/Stop]
button to stop the recordMg
A
_1_/6 mN/
Inserte tatarjeta de memoda
Coloque el Jnterruptor [Mode] en [CARD].
Coloque elinterruptor [Power] en
[1_ (Camera)]
Presione el botdn [Startletop], las secuencias se
graban en la tarjeta de memoria en MPEG4
• Puede grabar una fotografia en ]a tarjeta de
memoda pulsando el botdn ]PHOTO[ en vez del
botdn [Start/Stop] _pagina 97
Presione et botdn [Start/Stop] para detener ta grabacidn
Recording time available ona Memory Card
5.
! 112+ol2+ol.2Mel
Tiempodegrabacidn
disponible
enlatarjetademernoria
Moving
A_prox
Al?prox
I ,-- ! +++
!
=
=
=
=
=
=
=
•
=
Apf;rox
! ++I
I+B!2oB !
App_ox
!
Approx
I
The DVD Camcorder suppor_s memory cards ranging up to 2GB
Recording time is limded to one minute if 16MB memory card (or less) Js used
Moving images that you recorded are saved in _avi (avi 10) file format onthe
Memory Card
The moving images on a Memory Card are a smaller size and lower definition
than images on Disc.
The sound is recorded in stereo.
The fottowJng functions are not allowed in M.Cam Mode: DIS Digital Zoom,
Fade, Program AE, Digital Effect, Color Nite
While recording on a Memory Card, don't insert or eject the disc as it may
record no_se
While recording on a Memory Card, don't eject the Memory Card or it may
break the data on the Memory Card or Memory Card itself
Turning the power off while accessing the Memory Card may damage the data
stored on the Memory Card
I
.
.
=
=
=
=
=
=
Video
! ++,+
! +,+,! %'n"
!
Al?rox
Aprox
Ap_ox
Aprox
! '++ I
Aprox
La Videocamara con DVD admire tarjetas de memoba de hasta 2 GB
E] tiempo de grabacidn est& IJmitado a un minuto si se utiliza una tarjeta de
memoria de 16 ME (o menos)
Los videos que grabe se guardaran en formato *avi (avi 1O) en la tarjeta de
memorla
Las secuencias de video grabadas en una tarjeta de memoda son de menor
tama_o e inferior resolucidn que aqudllas grabadas en un disco
El sonido se graba en estereo.
Las siguientes funciones no estan disponibles en el modo M.Cam: DIS,
Digital Zoom Fade, Program AE, Digital Effect. Color Nite
Mientras se graba en una tarjeta de memoda, no introduzca ni exputse la
cinta ya que puede grabar ruido
Mientras graba en una tarjeta de memoria, no expulse la tarjeta de memoda
o puede daSar los datos de la tarjeta o la propia tadeta
Apagar el equipo mientras se accede a la tadeta de mernoda puede daSar
los datos almacenados en la misma.
[ ENGLISH
]
[ ESPA_IOL
Digital Still Camera Mode
o:* The moving images playback function works only in M.Player
page 28
o:* You can play the moving images stored on a Memory
Card Stereo audio is played back at the same time.
+
The moving images will look better when played
back on a PC
1
2
Modo de c mara fotogr&fica
Mode.
*:°
Set the [Mode] switch to [CARD]
Set the [Power] switch to [[_(Player)]
•
3
4
The thumbnail index of photo images appears.
If there are no recorded images on the Memory
Card, the <No file!> message will appear
Move the [Joystick]
up to highlight the photo
image icon (E_), then move it right to highlight the
moving image icon ([_)
Use the [Joystick] to select the moving image that
you want to play. then press the [Joystick(OK)].
• To display the previous six images, press the
[ I._,_] button
• To display the next six images, press the [ _._1]
button
•
-
-
You can control playback
[ I._,q/P._-I] and [re(Stop)]
using the [_" NI],
buttons
[MENU] and [QUICK MENU] buttons are not
available during moving image playback.
There may be broken or mosaic pictures while playing the moving
images, but it is not malfunction
The moving images that you recorded on a Memory Card in this
Camcorder may not play on other manufacturer's
devices
The moving images recorded by another DVD Camcorder may not play
on this DVD Camcorder,
To playback moving images on a PC, the Video Codec (in the CD
provided with the DVD Camcorder) should be installed.
- You need Microsoft Windows Media Player Version 9 or higher version in
order to play moving images on the Memory Card on your PC.
- You can download the Microsoft Windows Media Player applied each
languages on Microsoft Website, "http:flwwwmicrosoftcom/vdndows/
windowsmedia/download/default
asp"
Moving images recorded on memory card can not be played back on
Macintosh
]
digital
La funci6n de reproducci6n de secuencias s61o esta operativa en el
M.Player Mode. '=p_gina 28
*:° Puede reproducir las secuencias de la tarjeta de
memoda El audio estereo se reproduce al mismo
tiempo
*:* Los videos tendr_n un mejor aspecto si se
reproducen en un PC
1
Coloque elinterruptor
[Mode] en [CARD]
2
Coloque elinterruptor
Power] en []_
Player
. Aparece el indlce de fo ografias en miniatura
Si no hay imageries grabadas en la tarjeta de
memoda, aparece <No file!>
3
Mueva el [Joystick]
hacia ardba hasta resaltar el
icono de fotografia ([_3}._ mu_valo para resaltar
el icono de secuencia (C_)
4
Utilice el [Joystick]
para seleccionar el video que
desea reproducir y presione el [Joystick[OK]]
.
Para ver las seis imageries antedores,
mantenga pulsado el bot6n [ I._4 ]
.
Para ver las seis imagenes siguientes,
mantenga pulsado el bot6n [ _.i,,-I]
.
Puede controlar la reproducci6n utilizando los
botones liP- ml ], [ I._._/ _._1] y Ira(Stop)I,
Los botones [MENU] y [QUICK MENU] no
estan disponibles
durante la reproduccion
secuencias.
de
,
Es posible que. durante la reproducci6n de las secuencias, aparezcan
imageries cortadas o en forma de mosaico Esto no se debe a un
funcionarniento incorrecto
,
Es posible que las secuencias grabadas en la tarjeta de memoda no
puedan reproducirse en equipos de otros fabdcantes
Es posible que no se puedan reproducir en esta Videoc_mara con DVD
las secuencias de video grabadas con otra Videoc&mara con DVD
Para reproducir las secuencias en un PC, debe instalarse Video Codec
(en el CD que se suministra con la Videoc_mara con DVD).
Necesita Microsoft Windows Media Player Version 9 o superior para
reproducir secuencias de la tarjeta de memoda en el PC
Puede descargar Microsoft Windows Media Player en diversos
idiomas en la pagina Web de Microsoft, "http://www microsoft
com/windows/windowsmedia/download/default.asp'.
Las secuencias grabadas en la tarjeta de memoda pueden
._
reproducirse en el Macintosh
•
•
•
[ ENGLISH
]
[ ESPA_IOL
Digital Still Camera Mode
Modo de c mara fotogr fica
+
+
*;, Esta funci6n s61oesta operativa en el Player Mode. '-pagina 28
+ Si presiona el bot6n [PHOTO] durante la reproducci6n de disco
DVD, el disco se detieee y la imagen del DVD se guarda en la
This function works only in Player Mode. _.page 28
tf you press the [PHOTO] button during DVD disc playback, the
disc stops and the image on the DVD is saved on the Memory
Card.
1. Set the [Mode] switch to [DISC].
tarjeta
]
digital
de memoria.
1.
Coloque el interruptor [Mode] en [DISC].
2.
2.
Set the [Power] switch to [[_(Player)].
• The thumbnail index screen appears.
Coloque el interruptor [Power] en
[[_(Player)].
• Aparece la pantalla del indice de miniaturas.
3.
Use the [Joystick] to select a title scenes to
be played, then press the [Joystick(OK)] or
[)11] button.
• The selected scene will be played
continuously.
Utilice el [Joystick] para seleccionar
la esceea de la lista de fitulos que va a
reproducir y presione el bot6n [Joystick[OK)]
o [1_u].
• Se reproducira de forma continua la
escena seleccionada.
4.
Press the [PHOTO] button,
• The still image is recorded on the Memory
Card.
• During the time it takes to save an image,
the playback screen is paused and the OSD
is displayed.
Presione el bot6n [PHOTO].
• La imagen fi ja se graba en la tarjeta de
memoria.
• Durante el tiempo que tarda en guardarse
la imagee, la pantalla de reproducci6n se
interrumpe y aparece la OSD.
•
Still images copied from the DVD disc to the
Memory Card are saved in 640x480 format.
The number of images you can save varies
depending on the image resolution.
Las fotograftas copiadas desde el DVD a la
tarjeta de memoria se guardan en formato
640x480.
El nt_mero de imagenes que puede guardar
vada dependiendo de la resoluci6n de la
imagen.
•
[ ENGLISH
]
[ ESPANOL
Digital Still Camera Mode
•
o
•o-
e
=
o
_
Modo de c mara fotogr fica
]
digital
,
*.** The Print Mark function works only in M.Player Mode. _-,page 28
¢ This DVD Camcorder supports the DPOF (Digital Pdnt Order
Format) print format.
¢ You can automatically print images recorded on a Memory Card
with a printer supporting DPOR
*.*. Setting the Print Mark is only available when using a memory card.
+ There are 2 ways to make a Print Mark.
- <This File>: You can set a print mark on
the photo image displayed on the LCD
Screen. tt can be set up to 999.
- <All Files>: To print 1 copy each of all of
the stored images.
1, Set the [Mode] switch to [CARD].
2, Set the [Power] switch to [_(Player)].
• The thumbnail index of photo images
appears. If there are no recorded images on
the Memory Card, the <No file!> message
will appear.
3, Use the [Joystick] to search for the photo
image that you want to mark,
4. Press the [MENU] button.
. The menu list will appear.
5. Move the (Joystick] up or down to select
<Memory>, then press the [Joystick(OK)l.
6. Move the ]Joystick] up or down to select
<Print Mark>, then press the [Joystick(OK]].
7. Move the ]Joystick] up or down to select
desired option (All Off, All Files or This File),
then press the [Joystick(OK)].
8, tf you select <This File>. move the [Joystick]
up or down to select the quantity, then press
the [Joystick(OK]].
9, To exit, press the [MENU] button.
• Pdnt Mark icon(_) and number of prints
are displayed,
*;÷ La funci6n Print Mark s61o est_ operativa en e] M.Player Mode
_p_gina 28
¢Esta
Videocamara con DVD es compatible con el formato de impresi6n
DPOF (Digital Print Order Format),
¢
Es posible imprimir de manera autom&tica ira&genes grabadas en una
tarjeta de memoria con una impresora compatible con DPOR
_to La colocaci6n de la marca de impresi6n s61o est_
disponible al utilizar una tarjeta de memoria
4, Hay dos maneras de hacer una marca de
impresi6n
- <This File>: Se puede poner una marca de
impresidn en la imagen que aparece en la
pantalla LCD Se puede ajustar hasta 999
- <All Files>: Se impdme una copia de cada
una de ]as imageries guardadas
1
2
[_
Coloque el interruptor [Mode] en [CARD]
Coloque elinterruptor
[Power] en
_(Player)],
• Aparece e nd ce de otogra as en m n atura
Si no hay imageries grabadas en la tarjeta de
memoria, aparece <No fil!!>
Utilice el [Joystick]
para buscar la fotografia que
desea marcar
Presione el botdn [MENU],
• Aparece la lista del ment_
Mueva el [Joystick]
hacia arriba o hacia abajo
para seleccionar <Memory> y presione el botdn
[Joystick(OK)l,
Mueva el [Joystick]
hacia arriba o hacia abajo
para seleccionar <Print Mark> y presione el
boton [Joystick(OK)].
[_
8
9
Mueva el [Joystick]
hacia arriba o hacia abajo
para seleccionar la opcion que desea
(All Off, All Files o This File) y presione el bot6n
[Joystick(OK)]
Si selecciona <This File>, mueva el [Joystick]
hacia arriba o hacia abajo para seleccionar la
cantidad y presione el bot6n [Joystick(OK)]
Para salir, presione el bot6n [MENU]
• Aparece el icono de marca (_) y n0mero
impresiones
de
[ ENGLISH
]
[ ESPAI_OL
Digital Still Camera Mode
Modo de c; mara fotogr fica
Removinq
Elirninaci6n
the
Print
Mark
To remove all Print Marks, select <All Off>.
To remove an individual file's Print Mark, select the file and set
<This File> to <0O0>.
•
•
•
•
•
•
You can directly access the Print Mark function by using the
[QUICK MENU] button. _page 29
If the Print Mark is set to This File, you can set the number of
copies from 000 to 999.
If the Print Mark is set to All Files, you can set the number of
copies to 1
The All Files option may require extended operation time
depending on the number of stored images.
DPOF supporting printers are commercially available
Use the USB cable provided with the DVD Camcorder.
de la marca
]
digital
de impresi6n
Para borrar todas las mamas de impresi6n,seleccione <All Off>.
Para borrar una marca de impresi6n de un archive individual,
seleccione el archivo y defina <This File> en <000>
•
•
•
•
•
•
Puede acceder directamente a la funcion Print Mark utilizando e!
boton [QUICK MENU]. '='pagina 29
Si Print Mark se define en This File, puede definir el numero de
copJas de 000 a 999.
Si Print Mark se define en All Files, puede deflnir el nCimero de
copJas en 1.
Es posible que la opcion All Files requiera mas tiempo de
funcionamiento, dependiendo del n0mero de imagenes guardadas.
Existen en el mercado impresoras que soportan DPOF.
Utilice el cable USB que se facilita con la Videocamara con DVD.
[ ENGLISH
]
PictBridge
[ ESPANOL
PictBridge
TM
+
+
or, PictBridge function works only in M.Player Mode. _page 28
or, By connecting the DVD Camcorder to printers with PictBridge
support (sold separately], you can send images from the Memory
Card directly to the printer with a few simple operations.
or, With the PictBridge Support, you can control the printer directly
through your DVD Camcorder in order to print out stored pictures.
For direct printing of your stored pictures using the
PictBridge function, you must connect your
DVD Camcorder to a PictBridge printer using a
USB cable.
Connecting
To a Printer (USB Connect)
1. Turn your printer power off.
= Turn your DVD Camcorder on by setting the
[Mode] switch to [CARD]
2. Set the [Power] switch to [[_(Player)].
= Move the [Joystick] to select an image to
print
3. Press the [MENU] button.
• The menu list will appear
4. Move the [Joystick] up or down to select
<System> then press the [Joystick(OK)].
5. Move the [Joystick] up or down to
setect <USB Connect>, then press the
[Joystick(OK)].
6. Move the [Joystick] up or down to select
<Printer>, then press the [Joystick(OK)].
= <Computer>: Connect to a computer.
<Printer>: Connect to a printer. (To use the
<Pict Bridge> function, select this.)
7. Connect your DVD Camcorder to the printer
using the provided USB cable
8. Turn your printer power on.
= The <Pict Bridge> menu screen appears
automatically after a short period.
= The cursor highlights <Print>.
USB
+
Connec_
a
I_Compute_
/
_Seteci
_Exit
/
(_
[]
PIevious
TM
._-
-
• o- "
:
J=-
PictBridge s61ossta operativa en el M.Player Mode. '-,pagina 28
At conectar Is Videocamara con DVD a ins impresoras con el soporte
PictBddge (ss vende por separsdo), puede enviar imageries desde
la tarjeta de memoria directamentea Is impresora con una sede de
operacionessendllas utilizando los botones de la videocamara
Con el soporte PictBddge, puedecontrolar Is impresoradirectamente
a traves de la Videocamara con DVD pars imprimir imageries
almacenadas Pars la impresion directs de imageries
almacenadasutilizando lafuncion PictBridge, debe
conectar Is Videocamara con DVD a una impresora
PictBridge utilizando uncable USB
%
_Move
a-
]
Next
Conexi6n a una impresora (USB Connect)
f. Apaguelaimpresora.
• Encienda la videocamara colocando el
interruptor [Mode] en [CARD].
2. Coloque el interruptor [Power] en [12_{Player)].
• Mueva el [Joystick] para selscclonar la
imsgen que vaa imprimir.
3. Presioneel boton [MENU]
. Aparece la lists del men&
4. Mueva el [Joystick] hada arriba o hada abajo
pars seleccionar <System> y presione el bot6n
[Joystick(OK)]
5. Mueva el [Joystick] hacia arriba o hacia abajo
pars seleccionar <USB Connect> y presione el
bot(_n[Joystick(OK)]
6. Mueva el [Joystick] hacia arriba o hacia abajo
pars seleccionar <Printer> y presione el boton
[Joystick(OK)]
. <Computer>: se conecta aun PC
. <Printer>: se conectaa una impresora.
(Pars LltilizarIsfunci6n <Pict Bridge>,
selecdone esto.)
7. Conects la Videocamara con DVD a Is impresora
utilizando el cane USB suministrado
8. Enciendalaimpresora
. La pantalla del menu <Pict Bridge> aparece
automaticamente tras un tiempo
. El cursor resalta <Print>
[ ENGLISH
]
[ ESPAI_OL
PictBridge TM
Settin 9 the Number
1
2
3
4
PictBridge TM
of Prints
Ajuste
"
Move the [Joystick]
up or down to select <Copies>,[_
then press tile [Joystick(OK)]
Move the [Joystick]
up or down te set the number
of printe, then prees the [Joystick(OK)].
Setting
the DatelTime Imprint
del nmJmero de copias
5'/01_
1
[]
2
Option
3
P_evous
Next_
Time display type_ then prees the [Joystick(OK)].
Date/Time display type: <Off>, <Date>,
<Date&Time>
<Time>,
4
[_
5/o _:3
[]
Printing images
Move the [Joystick] up er down to select <Print>, then
press the [Joystick(OK)], and selected image files will
be printed
Canceling
again
The message <Cancel>
•
•
•
•
•
•
•
de la opci6n Date/Time Imprint
Mueva el [Joystick]
hacia arriba o hacia abajo
para seleccionar <Date/Time> y presione elbot6n
[Joystick(OK)[
Mueva el [Joystick]
hacia arriba o hacia abajo
para seleccionar el tipo de visualizacion de fecha
horay presione el botch [Joystick(OK)].
. Tipo de visualizaci6n de fecha y horn: <Off>,
<Date>, <Time>, <Date&Time>
Impresion
the Printing
Tooonoel
the_mege
pdnt_ng,
prese
[Joystick(OK)]
button
Mueva el [Joystick] hacia ardba o hacia abajo
para seleccionar <Copies> y presione el bot6n
[Joystick(OK)]
Mueva el [Joystick]
hacia arriba o hacia abajo
para definir el n_imero de impreslones y presione el
botch [Joystick(OK)].
_uste
Move the [Joystick]
up or down te select
<Date/Time>,
then prees the [Joystick(OK)]
Move the [Joystick]
up or down te select the Date,'
•
]
_ _i_::
de im_qenes
Mueva el [Joystick]
hacia arriba e hacia abajo para
seleccionar <Print> y presione el botch [Joystick(OK)]
y se impdmiran los archivos de imageries
Next_
seleccionados
...................................................
./
Cancelaci6n
appears and the image printing will be canceled
The Date/Time Option may not be supported by all printers Check with
your printer manufacturer
The Date/Time menu cannot be setup if the
printer does not support this option.
The PictBridge TM is a registered trademark ef CIPA(Camera & Imaging
Products Association), an image transfer standard developed by Canon,
Fuji, HP, Olympus, Seiko Epson, and Sony
PictBddge supporting printers are commerdally
available
Use the USB cable provided with the DVD Camcorder
Use the AC power adapter fer your DVD Camcorder during PictBddge
Direct Printing Turning your DVD Camcorder off during printing might
damage data on the Memory Card
Printing photo images is supported. Meving images are not available for printing
You can set various printing options depending on the printer.
Please refer to the user's manuat of the printer for details.
de la impresion
Para cancelar la impresion de Ea imagen, presione de nuevo el bot6n
[Joystick[OK]].
Aparece el mensaje <Cancel> y se cancelara la impresion de la imagen
.
.
.
•
•
.
.
La opci6n de impresidn de fecha y horn no la admitiran todas Ins
impresoras Compruebelo con el fabricante de la impresora El men_i
Date/Time no puede configurarse sila impresora no admJte esta opcion
PictBridge ' es una marca registrada de CIPA (Camera & Imaging
Products Association), un estandar de transferencia de ira&genes
desarrollado por Canon, Fuji, HP, Olympus, Seiko Epson, y Sony
Existen en el mercado impresoras que soportan PJctBddge.
Utilice el cable USB que se facilita con la Videocamara con DVD.
Utilice eJ adaptador de CA pare la Videocamara con DVD durante la
impresi6n directa de PictBridge Apagar la videocamara durante la
impresi6n puede daSar los datos de la tarjeta de memoria
Se admite la impresi6n de fotografias. Las secuencias no se pueden
impnmlr
Puede definir vadas opciones de impresi6n dependJendo de la impresora
Consulte el manual del usuado de la impresora para obtener detalles
[ ENGLISH
]
[ ESPANOL
USB interface
=
=_
Transferring
-
.
Interfaz USB
-
a Digital
Image
through
a USB Connection
*:o The DVD Camcorder supports both USB 11 and 20 standards
(Depends on the PC specification)
_* You can transfer a recorded file in memory Card to a PC via a USB
connection
_* If you transfer data to a PC, you need to install the software
(DV Driver, Video Codec, Direct× 90) supplied with the DVD
Carncorder.
USB Connection
S eed de endin
on the S stem
Transferencia
de imagenes digJtales mediante una conexi6n USB
•:, La Videocamara con DVD admite los estandares USB 11 y 20
(Depende de la especiflcaci6n del PC)
+ Puede transferir un archivo grabado en una tarjeta de memoda a
un PC a traves de una conexi6n USB
•:÷ Para transferir dabs al ordenador es necesario instalar el software
(DV Driver, Video Codec, DirectX 90) que se proporciona junto
con la Videocamara con DVD
Velocidad
de la conexion
USB _
e! sistema.
High speed USB connection is supported by Microsoft (Windows)
device drivers only.
= Windows 98SE/ME- Full Speed USB
[f
= Windows 2000 - High speed USB on a system
with Service Pack 4 or later installed.
= Windows XP- High speed USB on a system with
Service Pack 1 or later installed.
\
La conexbn USB de aita velocidad s61o la admiten los controladores
de dispositivos de Microsoft (Windows).
• Windows 98SE/ME: USB a toda velocidad
• Windows 2000: USB de alta velocidad en
un sistema con Service Pack 4 o posterior
instalado.
• Windows XP: USB de aita velocidad en
un sistema con Service Pack 1 o posterior
instalado.
System
Requisitos
/
Requirements
Windows
Minin
CPU
OS(Operating
Sys_m)
um
System
Reco_nmended
Intel_ Pentium IIITM 600MHz
Intel_ Pentium 4 _
Window_
Window_
98SEiME
_28MB
5_2MB
HDD cagacity
IGB or n/o_
2GB or mol_
ReSOlLrt_n
¸1024x 768 dots 24bit Color
¸1024 x 768 dots 24bit Color
_JSB
USB/
USB2 0 H_gh Speed
/
del sistema
Min_mo
2GHz
2000iXP
Memon/
•
USB interface between the DVD Camcorder and a Mac is not
possible.
Operations is not guaranteed for all of the recommended computer
environments mentioned above.
Recon endado
Intel _ Pent um lit '_ 600 I_lHz
InteP Pentilm
Wndows
Windows e 2000XP
98SEI_IE
_28 P,IB
GB o has
4_
2GHz
5_2 _,IB
2 GB o mas
Windows
_024 x 768 puntos _ color Sistema
de
/024 x 768 guntos _colo de
24 bits
24 bts
USBI
•
]
•
•
J
I JSB2
0 de alta
velocidad
No es posible la interfaz USB entre la Videocamara con DVD y un
Mac.
No se garantiza e! funcionamiento en todos los entornos
informaticos recomendados mencionados antedormente.
[ ENGLISH
]
[ ESPAI_OL
USB interface
Interfaz USB
=
•
=
=
=
=
=
=
=
On a slower PC than recommended, movie playback may not be
smooth or video editing may take a long time.
On a slower PC than recommended, movie playback may skip
frames or operate unexpectedly.
intel®Pentium III 7_'_
or Pentium 4 TMis a trademark of the Intel
Corporation.
Windows ®is a registered trademark of the MicrosofP Corporation.
All other brands and names are property of their respective owners
in M.Cam Mode or M.Player Mode, be sure that the Memory Card
is inserted into the DVD Camcorder before connecting USB cable.
if no Memory Card or an unformatted Memory Card is inserted, PC
will not recognize your DVD Camcorder as a removable disk.
USB Streaming requires Video Cod®c, DV Driver and DirectX 9.0.
if you disconnect the USB cable from the PC or the DVD
Camcorder during the data transfer, the data transfer will stop and
the data may be damaged.
if you connect the USB cable to a PC using a USB HUB or with
other devices at the same time, it may cause conflict and may not
work properly If this occurs, remove all other USB devices and try
the connection again
•
•
•
•
•
•
•
•
]
En un PC mas lento de Io recomendado, es posible que la
reproduccion de peticulas no sea tan uniforme o puede que la
edici6n de video tarde algo mas.
En un PC mas lento de Io recomendado, es posible queen la
reproduccion de peliculas se salten fotogramas o funcione de
forma inesperada
Intel ®, Pentium Itl T'_o Pentium 4 "rMes una marca registrada de
Intel Corporation.
Windows ®es una marca registrada de Microsoft ®Corporation
El resto de marcas y nombres pertenecen a sus respectivos
propietarios
En M.Cam Mode o M.Player Mode, asegOrese de que la tarjeta
de memoda esta dentro de la Videocamara con DVD antes de
conectar el cable USB. Si no tiene ninguna tarjeta de memoria o
tiene una sin formato, el PC no reconocera la Videocamara con
DVD como un disco extraJble.
USB Streaming requiere Video Codee, DV Driver y DirectX 9.0
Si desconecta el cable USB del PC o de la Videocamara con DVD
durante la transferencia de datos, la transferencia de datos se
detendra y puede que los datos resutten daSados.
Si conecta e! cable USB a un PC utilizando el HUB USB o con
otros dispositivos al mismo tiempo, puede causar conflictos y
puede que no funcione correctamente. Si esto ocurre, retire el
resto de dispositivos USB e intente la conexi6n de nuevo.
[ ENGLISH
]
[ ESPAi_OL
USB interface
interfaz USB
- -
*:- The USB Connect function works only in M.Player Mode.
_page 28
*:- Using the USB cable, you can connect your DVD Camcorder to a
computer to copy your moving images and photo imagesfrom the
Memory Card, or to a printer to print your images.
1
Set the [Mode] switch to [CARD].
2
Set the [Power] switch to [[_(Player)].
3
Pressthe [MENU] button.
• The menu list will appear.
4
select <USB
up or down
Connect>,
to
love
_Select
_Exit
7
Move the [Joystick] up or down to select
<Computer> or <Printer>, then press the
[Joystick(OK)].
• You can select <Computer> to use the
DVD Camcorder as a PC Camera, USB
Stream or removable disk
• You can select <Printer> to use the Pictbddge
feature. =page 109
To exit, pressthe [MENU] button.
•
._
=
•
-
3. Presione el boton [MENU]
• Aparece la lista de! men&
4. Mueva el [Joystick] hacia arriba o hacia
abajo para seleccionar <System> y presione
el boton [Joystick(OK]]
5. Mueva el [Joystick] hacia arriba o hacia
abajo para seleccionar <USB Connect> y
presione el boton [Joystick(OK)]
%
[Joystick(OK)].
6
,=_
La funci6n USB Connect s61oesta operativa en el M.Player
Mode =pagina 28
or, Con e! cable USB, puede conectar su Videocamara con DVD a
un PC para copiar sue fotografias y secuencias desde la tarjeta
de memoria, o conectarla a una impresora para imprimir Ins
imageries.
_-Con jJlter
_EngLish
then press the
e
+
Move the [Joystick] up or down to select
<System>, then press the [Joystick(OK)]
Move the [Joystick]
o-
1. Coloque el interruptor [Modo] en [CARD].
2. Coloque el interrupter [Power] en
[[_(Player)].
_r,
5
a
_Move
_Select
,
6. Mueva el [Joystick] hacia arriba o hada
abajo para seleccionar <Computer> o
<Printer> y presione el boron [Joystick(OK)].
• Puede seleccionar <Computer> para
utilizar la Videocamara con DVD come
_Exit
una Camara Web, USB Stream o disco
extraibie.
Puede seleccionar <Printer> para utilizar la funcion Pictbridge.
-pagina 109
7. Para salir, presione el boron [MENU]
]
[ ENGLISH
]
USB interface
[ ESPANOL
interfaz USB
• •
*:o You need to install DV Media PRO Program to play back movie
files recorded by the DVD Camcorder on your PC.
+ Turn on your PC Exit all other running applications
*:o insert the provided CD into the CD-RQM drive.
The setup screen appears automatically soon after the CD is
inserted If the setup screen does not appear, click on 'Start" on
the bottom left corner and select "Run" to display a dialog. Type
"D:\autorun.exe" and then press ENTER, if your
CD-ROM drive is mapped to "D:Drive".
+
DV Driver is a software driver that is required to support
establishing connection to a PC.
(If it is not installed, some functions will not be supported.)
1. Click on <DV Driver> on the Setup screen.
. Driver software is installed automatically. Following drivers will
be installed:
- USB Removable disk driver (Windows 98 SE only)
- USB PC-CAMERAdriver
2. Click on <Confirm> to finish driver installation.
. Windows 98 SE users need to restart Windows.
3.
if the <DireetX 9.0> is not installed, it is installed automatically
after setting <DV Driver>.
. After installing <DirectX 90>, please restad your PC.
= If <DirectX 9.0> is instafled already, there is no need to restart
the PC.
=
Click on <Video Codec> on the Setup screen.
<Video Codec> is required to play movie files recorded by this
DVD Camcorder on a PC.
]
a
_
_ oa •
• |
-e • _°O
+
Tiene que instalar el pregrama DV Media PRO para reproducir los
archivos de video grabades con la Videocamara con DVD en el PC
+
+
Encienda el PC. Salga de todas las aplicaciones en ejecuci6n
Introduzca el CD que se fadlita en la unidad de CD-ROM.
Aparece automaticamente la pantalla de configuracion justo
despues de introducir el CD. Si no aparece la pantalla de
configurad6n, haga dic en 'Start (Inicie)" en la esquina inferior
izquierda y selecciene 'Run (Ejecutar)" para abrir el diabgo
Escriba "D:\auterun.exe" y presione INTRO, si la unidad de
CD-ROM aparece asignada a la unidad "D:Drive".
+
DV Driver es un controlador de software necesario para poder
establecer la conexion con un PC.
(Si no se instal& es posible que no se admitan aigunas funciones.)
1. Haga olic en el <DV Driver> en la panta]la Setup.
• Se instala automaticamente el software del controlador
necesario. Se instalaran los siguientes controladores:
- Controlador de disco extraible USB (s61opara Windows 98 SE)
- Controlador de camara Web USB
2. Haga clic en <Confirm> para finalizar la instalaci6n del
contrelador.
Los usuarios de Windows 98 SE tienen que reiniciar Windows
3. Si no se instala <DireotX 9.0>, se instala autem_ticamente
tras definir <DV Driver>.
• Tras instalar <DirectX 9.0>, reinicie el PC.
• Si ya esta instalade <DirectX 9.0>,, no hay necesidad de
reinidar el PC.
•
Haga clic en <Video Codec> en la pantalla de configuraei6n.
<Video Cedec> es necesarie para reproducir en el PC archives de
video grabados en la Videocamara con DVD
[ ENGLISH
]
[ ESPANOL
USB interface
interfaz USB
1. Click <Photo Express> on the Setup screen.
= It is a photo editing tool that allows users to edit images
1. Haga clic en el <Photo Express> en Ja pantalla Setup.
• Es una herramienta de edid6n fotografica que permite a los
1. Click <Quick Time> on the Setup screen.
• QuickTime is Apple's technology for handling movie, sound,
animation, graphics, text, music, and even 360-degree virtual
reality (VR) scenes.
1. Haga clic en el <Quick Time> en la pantalla Setup.
= QuickTime es una tecnologia de Apple para la utilizaci6n de
video, sonido, animaci6n, graficos, texto, mOsica e incluso
escenas de realidad virtual en 360 grados (VR).
-.o
a-o
I
•
After insertingthe CD, the setup screen displays automatically.
Follow the instruction to start installation
Ulead Video Studio is a video editing tool that allows users to edit
movie files.
=
=
=
=
=
=
=
]
Please install by using the Software CD
that came with this DVD Camcorder.
We do not guarantee compatibility for
different CD versions
For photo editing, use Photo Express
For movie playback on a PC, install
software in this order: DV Driver - DirestX
9.0 - Video Codes
For movie editing, please use Ulead Video
Studio that came with the product
For PC Cam use, DV Driver installation is
required.
You have to install DV Driver, Video Codes and DireetX 9.0 to run
DV Media Pro properly
If a message saying 'Digital Signature not found" or something
similar appears, ignore the message and continue with the
installation.
Tras introducir el CD, aparece automaticamente la pantalla de
configuracion Siga las instrucciones para iniciar la instalaci6n
Ulead Video Studio es una herramienta de edici6n de video que
permits a los usuarios editar archivos de video.
•
tnstala utilizando el CD de software que se
incluye con esta Videocamara con DVD.
No garantizamos la compatibilidad para
diferentes versiones de CD
•
Para edicion de fotografias, utilice Photo
Express.
•
Para reproducci6n de video en un PC,
instale el software en este orden: DV
Driver - DirsctX 9.0 - Video Codes
= Para edici6n de video, utilice Ulead Video
Studio que se incluye con el producto.
= Para el uso de la Camara PC, es necesaria
la instalacion de DV Driver.
Tiene que instalar DV Driver, Video Codes y DireetX 9.0 para
ejecutar correctamente DV Media Pro.
Si aparece un mensaje del tips "Digital Signature not found (Firma
digital no encontrada)" o algo similar, ignore el mensaje y continOe
con la instalaci6n.
[ ENGLISH
]
[ ESPANOL
USB interface
Q
-
e
•
.
interfaz USB
D
•
1
Connect a USB cableto the
2
USB jack on the PC.
Connect the other end of the
-
a
.
D
1. Conecte un extremo del cable
USB al terminal USB del PC
2. Conecte el otro extremo de!
cable USB al termh_al USB
de la Videocamara con DVD
USB cable into the USB jack
on the DVD Camcorder.
(USB jack)
• If a PC is connected to the
DVD Camcorder with a
(conector USB).
• Si se cenecta un PC a la
Videocamara con DVD
con un cable USB, s61ose
puede utilizar et interrupter
[Power], [Mode] y la
palanca [Zoom].
USB cable, only [Power]
switch, [Mode] switch_
[Zoom] lever can be
operated
Disconnectinq
the
US8
Cable
Desconexibn
del cable USB
+
After completing the data transmission, you must disconnect the
cable in the following way:
+
1
Select the removable disc icon and click the right mouse button to
select "Eject".
Select "Confirm" and disconnect the USB cable when the Windows
1. Seleccione el icono del disco extraible y haga clic en el boton
derecho del raton para seleccionar 'Eject (Expulsar)".
2
Splash screen appears
=
=
]
If you disconnect the USB cable from the PC or the DVD
Camcorder while transferring, the data transmission will stop and
the data may be damaged.
tf you connect the USB cable to a PC via a USB HUB or
simultaneously connect the USB cable along with other USB
devices, the DVD Camcorder may not work properly, if this occurs,
remove all USB devices from the PC and reconnect the DVD
Camcorder.
You should set the <USB Connect> to <Computer> to connect to a
PC via USB cable -page 113
Tras completar la transmisidn de dabs, debe desconectar e! cable
de la forma siguiente:
2. Seleccione "Confirm (Confirmar)" y desconecte el cable USB
cuando desaparezca la pantalla emergente.
•
•
•
Si desconecta el cable USB del PC o de la Videocamara con DVD
mientras se estan transfiriendo dabs, la transmisi6n se detendra y
puede que los dabs resulten dafiados.
Si conecta el cable USB al PC a travcs de un concentrador (hub)
USB, o silo conecta de manera simultanea con otros aparatos
USB, es posible que la Videocamara con DVD no funcione
correctamente. En este caso desconecte del PC los otros
aparatos USB y vuelva a conectar la Videocamara con DVD.
Debe fijar <USB Connect> (Conexbn USB) en <Computer> (PC)
para conectar a un PC a traves del cable USB. _pagina 113
[ ENGLISH
]
[ ESPAI_OL
USB interface
Using
the PC Camera
interfaz USB
Function
Utilizacibn
4- This function works only in Camera Mode. -page 28
+
+ To use the PC Camera function, the DV Driver, Video Codec and
+
DireetX 0.0 programs must be installed in the PC
+ You can use this DVD Camcorder as a PC Camera.
+
+ When you connect to a Web site that provides video chatting
functions, you can use your DVD Camcorder for such functions.
+
+ When using this DVD Camcorder for video conferencing (such
as NetMeeting), voice communication may not be supported
+
depending on the video conferencing software. In this case,
connect an external microphone to the soundcard of the PC to
enable voice communication.
4- Using the DVD Camcorder with PC Net-meeth'_gprogram installed,
you can participate in a video conference.
+
+ The PC Camera's screen size (Transferred video frame rate for the
PC Camera function is max 15 fps.)
- 640X480(VGA) pixels for USB 20
_J-_ _m-,,. _ ,_r-.
connection.
[_
_
4° if PC is connected with the USB to the DVD
ii!i -'_
Camcorder, only the [Power] switch, [Mode]
switch, [Zoom] lever can be operated
1
2
3
]
Set the [Mode] switch to [DISC].
Setthe [Power] switch to [_(Camera)]
Connect one end of the USB cable to the USB
jack on the DVD Camcorder and the other end
to the USB connector on your computer.
de la funci6n
PC Camera
Esta fi.inci6n s61o esta operafiva en el Camera Mode _pagina 28
Para utilizar la funcion de camara Web, deben instalarse en el PC
los programas DV Driver, Video Codee y DireetX 9.0.
Esta Videocamara con DVD se puede usar como una camara
para PC
Si se conecta a un sitio web que ofrezca funciones de chat con
video, puede utilizar la Videocamara con DVD para este fin
AI utilizar esta Videocamara con DVD para videoconferencia (como
NetMeeting), es posible que no se admita la comunicacion de voz
dependiendo del software de videoconferencia. En eete caso,
conecte un microfono extemo a la tarjeta de sonido del PC para
activar la comunicac[dn per voz
Puede realizar videoconferencias conectando la Videocamara con
DVD a un PC que disponga de[ programa NetMeeting.
4- El tamafio de la pantalla de PC Camera (La
_ _
_ ,_
velocidad de fotogramas del video transferide
para la funcion PC Camera es de 15 fps.)
- 640X480 (QVGA) pixeles para conexion
USB 2.0.
_:- Si se conecta un PC a la Videocamara con
DVD con un cabte USB, solo se puede utilJzar
el interrupter [Power], [Mode] y la palanca
[Zoom].
1. Coloque el interrupter [Mode] en [DISC]
2. Coloque e[ interrupter [Power] en
[1_ (Camera]].
3. Conecte un extremo det cable USB al
conector USB de la Videocamara con DVD y
el otro al conector USB del PC.
[ ENGLISH
]
[ ESPAI_OL
USB interface
Using
the US8
]
interfaz USB
Streaming
Function
*:o This function works in both Camera Mode and Player Mode.
_page 28
+ To use USB streaming, the DV Driver, Video Codee and DireetX
9.0 programs must be installed in the PC.
+ You can view DVD Camcorder video on your PC using USB
streaming.
+ Youcan also store it as a moving image in the "avF'file format on a PC.
Utilizacibn
+
+
+
+
de la funci6n
US8
Streaming
Esta funci6n esta operativa en los Camera Mode y Player Mode.
_pagina 28
Para utilizar USB streaming, deben instalarse en el PC los
programas DV Driver, Video Codee y DireetX 9.0.
Puede ver video de la Videocamara con en su PC utilizando USB
Streaming.
Tambien puede guardar en un PC come una secuencia de
imagenes en el formato de archivo "avi"
1
Connect one end of the USB cable to the USB jack on the DVD
Camcorder and the other end to the USB jack on your computer
1.
2
Setup and execute Windows Movie Maker or the Ulead VIDEO
Studio Software application provided on the CD.
• For detailed instructions for Ulead VIDEO Studio use, refer to
the program's Help function.
• Windows Movie Maker is used for Windows ME and XP users.
(C:tprogram filestMovie maker\moviemk.exe)
2. Configure y ejecute Windows Movie Maker o la aplicaci6n Ulead
VIDEO Studio que se induye en el CD
= Para obtener instrucciones detalladas sobre el uso de Ulead
VIDEO Studio, consulte la funci6n de ayuda del programa
Windows Movie Maker se utiliza para usuarios de Windows ME
y XR (C:\program files\Movie maker\moviemk.exe)
Using
the removable
Disk
Function
+
You can easily transfer data from a Memory Card to a PC without
additional cards via a USB connection.
1
Set the [Mode] switch to [CARD], set the [Power] switch to
[1_ [Camera)] or [[2E](Player)].
2
Connect one end of the USB cable to the USB jack on the DVD
Camcorder and the other end to the USB jack on your computer
3
To verify whether the removable disk has been properly recognized,
open Windows Explorer and locate the removable disk
Conecte un extremo del cable USB al conector USB de la
Videocamara con DVD y e! otro at terminal USB del PC.
Utilizaci6n
+
de la funcibn
de disco
extraible
Se pueden transferir datos de manera sencilla desde una tarjeta
de memoda a un PC mediante una conexbn USB, sin necesidad
de una tarjeta adicional
1. Coloque el interruptor [Mode] en [CARD], coloque el interruptor
[Power] en [l_l(Camera]]
o [[]_(Player)].
2. Conecte un extremo de! cable USB al conector USB de la
Videocamara con DVD y e! otro at terminal USB de! PC.
3. Para verificar si se ha reconocido correctamente el disco extraibie,
abra el Explorador de Windows y Iocalice el disco extraibie
[ ENGLBH
]
[ ESPANOL
Maintenance
=
•
I
II
Mantenimiento
_
•
=-
=g
=.e
•
+ Each country or region has its own electric and color systems.
*1o Before using your DVD Camcorder abroad, check the following items,
Power
,
.
sources
You can use your DVD Camcorder in any country or area with the
supplied AC Power adapter within 10OV to 240V, 50/60 Hz.
Use a commercially available AC jack adapter, if necessary,
depending on the design of the local wall outlet
Color
system
+
+
•
PAL-compatible CountdestReglons
Australia, Austria, Belgium, Bulgaria, China, ClS, Czech RepuBliC,
Denmark, Egypt. Finland. France. Germany, Greece, Great Britain
_oHano Hong Kong, Hungary nd_a.trae. lraq, Kuwatt, L{bya,
Malaysia, Mauritius, Norws Romania, SaudiArabia, Singapore,
S!ovak Republic, Spain. Sweden. Switzerland. Syria. Thailand.
Tunisia etc.
NTSC-compatible CountriestRegions
Bahamas Canada. Central America Japan. Korea. Mexico
=hilippines. Taiwan. united States of America. etc
o
*_
o-e
--
.
*
|
II -
-
-
.
- *
Los sistemas de electricidad y de color pueden variar de un pais a
otro.
Antes de usar la Videocamara con DVD en el extranjero,
compruebe Io siguiente
Fuentes
•
You can view your recordings using the built-in LCD screen and viewfinder.
However, to view your recordings on a television set or to copy it to an
external device as a video cassette recorder (VCR)/DVD Recorder/
Player, the television set or an external device must be NTSCcompatible and have the appropriate Audio / Video jacks.
Otherwise, you may need to use a separate Video Format Transcoder
(NTSC-PAL format Converter).
de alimentaci6n
Esta Videocamara con DVD se puede utitizar en cualquier pais o
regi6n con e! adaptador de CAque se suministra con ella, siempre
que la cordente sea de 10OV a 240V, 50/60 Hz.
Si es necesado, utilice un adaptador de toma de CA, dependiendo
de! tipo de enchufe del lugar.
Sistema
de color
Puede versu grabaci6n utilizando el pantalla LCD y el visor incorporado
Sin embargo, para vet las grabaciones en un equipo de TV o
para copiarlas en un dispositivo externo come un Grabador VCR
Grabador/Reproductor de DVD, el equipo de TV o et dispositivo
externo deben ser compatibles con NTSC y tenet los puertos de Audio
/ Video apropiados. De Io contrado, puede que tonga que utilizar un
transcodificador de video separado (Converser de formate NTSC-PAL).
Paiseslregiones con sistemas de color compatibles con PAL
Alernan_a.Arabia Saudita, Australia, Austria, Belgica, Bulgaria,
CEI. China Dinamarca, Egipto, Espaha, Finlandia, Francia, Gran
Breta_a. Grecia. Holanda, Hong Kong, Huegria, tndia, Irak, Iran,
Kuwait. Libia, Malasia, Mauricio, Noruega, Republica Checa,
Rep_blica de Eelovaquia, Rumania, Singapur, Siria, Suecia, Suiza,
Tailandia. Tunez. etc.
Paiseelregiones con sistemas de color compatibles con
NTSC:
Bahamas. Canad& Corea, Estados Unidos, Filipinas, Japon,
Note
YOU can
make
recoralngs
]
wlrn
your
DVD
Camcorder
and
aictures on the LCD Screen from ae/where in the world.
view
Puede hacer grabacionee con la Videocamara con DVD y vet tas
imageries en ia pantalla LCD en cualquier lugar del muedo.
[ ENGUSH
]
[ ESPANOL
Troubleshooting
•
+
_ -
Resolucibn de problemas
oQ
=-
Before contacting a Samsung authorized
following simple checks
They may save you the time and expense
Self Diagnosis
(_
service center, perform the
of an unnecessary
Display in <Camera/Player>
call
Modes
•
o-
!_@@iiii
Lento
The Battery Pack is almost
discl/arged
Shal/ge to a charged one
Slow
There is _/o disc in DVD
Camco_der
inset[ a disc
Disc fu_l!
e_ow
There is _/otenough memo_'J to
record
Sha_/ge to a new disc
Erase recolded i_/age
Slow
I_seded disc is not iecognized by
the DVD Camcorder
E}ect al/d re nsert the/lisc
Tly anot]/er dsc
:ormat the disc (OVD RW/+RW)
Lento
Slow
Tile _lisc is finalized
Turecord on a DVD RW disc,
mfinalize t Format the dsc
Slow
Cover is operled
Slose tile cover
Cover is opened!
When there is dew condensation,
Lento
put aside for a white before using
What is Dew Condensation?
Dew condensationhappens when a DVD camcorderis moved to a place wherethere is
a significanttemperaturedifference from the previousplace In other words the water
vaporin the airturns into dew because of the temperaturedifference,and itcondensates
likedew on the externalor internal lenses of the DVDcamcorderand on the reflection
lens and the surface of the disc which are related to playback When this happens,yoL_
temporarilymay not use the record or play functionsof the DVDcamcorder Also it ma
cause a malfunctionor damage to the DVD camcorderwhen usingthe device with the
poweron while there is dew condensation
What can ] do?
Turn the power off and detach the battery pack, and leave it in a dry area for
1_2 hours before using it.
When does the dew condensation occur?
When the device isrelocated to a place with a higher temperah_rethan the previous
location or when using it Jna hot area suddenly, it will cause condensation
1) When recording outside in cold weather during the winter and then using it
in indoors.
2) When recording outside in hot weather after being indoors or inside a car
where the AC was running
t
_o
-
.
*to Antes de ponerse en contacto con un centre de servicio autorizado
Samsung, realice las siguientes comprebadones.
Es posible que ]e ahorren el tiempo y el coste de una Ilamada
innecesane
Slow
Finalized disc!
_0
•
No disc!
Bad Disc!
]
Lento
=
i_i@ _ @i;iiiiiiiiiiiiiiiiiiiiiiiiiiiiiiiiiiiiiiiiiiiiiiiiiiiiiiiiiiiiii@i
a batedaest6 casi
Reempl_cela po_ una cargada
descagada
_o haydiscoenla
_nserte Lm d_SCO
,/ideocamalacon DVD
Ponga un nuevo disco
8orre _a imagen grabada
Lento
_o haysuficientemell or a
3aragraba
_ieldiscoi[_sertado
_oIo
eoanoce
a Video@mara
con
3VD
El discose finaliza
Lento
fapaal_}e_a
Siere la tapa
Si existe condensacion,
de
no Io utilice
durante
Extraiga y vuelva a introducir el disco
Pruebe con otro disco
Formatee el disco (DVD RW/+RW)
_ara gra_ar en un disco DVD RW
_nule _afi_/alizacion
unos minutos
sQue es la condensacibn?
la condensadbn se produceal trasladar la videocamaraa un lugar enel que existe una
diferenciade temperaturaconsiderable con respectoal lugar deorigen
En otras palabras, elvapor de aguaen el aire se convierte enagua debido a la
diferenciade temperaturay se conder_saen las lentes tante interna come externade la
videocamaray enla lentede reflexidny la superficie del discoimpidiendo su correcta
reproduccibn Cuandoesto sucede,es posibIeque nopueda utilizar temporaImentelas
funciones de grabacibno reproduccibnde la videocamaraAsimismo, es posibleque
cause una veda o dabe la videocamaraal utilizar el dispositivo con condensacibn
_,Que puedo hacer?
Apague la unidad, retire la bateria y dejela secar en un area seca durante
1~2 horas antes de utilizaria
_,Cu&ndo se produce la condensacibn?
Cuando se trasIada el dispositivo a un lugar con una temperatura superior a la
temperatura del lugar de origen o al utilizarla de repente en unarea caliente
1) A] grabar en exteriores con una temperatura baja en inviemo y despues
utilizada en intedores
2) AI grabar en exteriores con temperaturas a]tas despues de estar en
intedores o dentro de un coche utilizando CA
[ ENGLISH
]
[ ESPAI_OL
Resolucibn de problemas
Troubleshooting
Self
Diagnosis
Display
in <M.Carn/M.Player>
Modes
Pantalla
de autodiagnbstico
en los modos <M.Cam/M.Player>
_ii!i_ii_iiiilililililililililililililililililililiiii!
¸i_i_i_!;;_i_i!iiiiiiiiiiiiiiiiiiiiiiiiiiiiiiiiiiiiiiiiiiiiiiiiiiiiiiii!i_
No
memory
card!
Slow (M.Cam) There is no Memory
- (M.Player) Card in the DVD
Camcorder.
Insert a Memory
Card.
Memory
card full
Slow
There is not enough
"nemory to record.
Change to a new
Memory Card.
Erase recorded
image.
Memory
card read
error
Slow
The DVD Camcorder Format a Memory
Card or insert a
can not playback.
Memory Card
recorded on this
DVD Camcorder
Memory
card write
error
Slow
The DVD Camcorder Format a Memory
carl not record.
Card or change
to a new Memory
Card.
Not
formatted!
Slow
No file!
The Memory Card
needs to format.
Format a Memory
Card. _page 103
There are no images Record new
recorded on the
images.
Memory Card
No memory
card!
Lento (M.Cam)
(M Player)
No hay tarjeta de Introduzca una
memoria en la
Ladeta de memona.
Videocamara con
DVD.
Memory
card full
Lento
No hay suficiente
memoria para
grabar.
Cambie a una nueva
Larjeta de memona.
Borre la imagen
rabada.
Memory
card read
error
Lento
La videocamara
con DVD no
puede reproducir.
De formato a la
Larjeta de memona
a introduzca una
rabada en la
Videocamara con
DVD.
Memory
card write
error
Lento
La Videocamara
con DVD no
graba
Formatee una
_arjeta de memona o
sambie a una nueva.
Not
formatted!
Lento
De formato a
La tarjeta de
memoria necesita una tarieta de
formato.
memorta
-pagina 103
No file!
Nohayimagenes
grabadas en
la ta_eta de
memoda.
Grabe imageries
nuevas.
A
]
[ ENGLISH
]
[ ESPAI_OL
Troubleshooting
Resolucibn de probJemas
*:o ft these instructions do not solve your problem, contact your
nearest Samsung authorized service center
+
You cannot switch the •
DVD Camcorder on.
•
The DVD Camcorder
shuts off automatically.
•
Charge runs out
quickly
•
•
•
The atmospheric temperature is too {ow.
The Battery Pack has not been charged fully
The BatteryPack is completelydead, and
cannotbe recharged useanother BatteryPack
•
The contrast between the subject and
the background is too great for the DVD
Camcorder to operate normally. Make the
background bright to reduce the contrast
or use the BLC function while you are
recording in bright Surroundings.
A vertical strip appears
on the screen when
recording a dark
background
The image in the
Viewfinder is blurred.
Auto focus does not
work.
Check the Battery Pack or the AC Power
adapter.
You have left the DVD Camcorder set to
STBY for more than 5 minutes without
using it To turn on the DVD Camcorder,
press the [Start/Stop] button.
The BatteryPack is fullyexhausted Replaceit
witha fully chargedbattery pack
•
•
•
•
When the power is
•
turned off and then
turned on, a blue
screen appears instead
of the normal screen
The Viewfinder lens has not been adjusted.
Adjustthe Viewfinder control lever until
the indicators displayed on the Viewfinder
come into sharp focus.
Checkthe Manual Focus menu.
Auto focus does not work in the Manual
Focus mode
If the DC Adapter is connected, remove
the cord, turn on the Power switch and
then connect it again. If the battery is
connected, disconnect it, turn the Power
switch to on, and then connect it again.
]
Si las siguientes instrucciones no le permiten solucionar el
problema, pongase en contacto con el centro de servicio
autorizado de Samsung mas cercano.
No es posible encender la ,
Videocamara con DVD
=
LaVideocamsrs
con DVDse apaga
automaticamente.
=
,
Ls carga se realizs muy
rapidamente
,
,
=
En la pantalla aparece
una linen vertical cuando
se grabs sobre un fondo
oscuro
_J
Compruebela bateria o el adaptador de
CA.
Hadejado laVideocamara con DVD en la
posicion STBYy sin usada durante mas
de 5 minutos Endenda la Videocamara
con DVD, presione el boton [Start/Stop]
La batedaestacompletamente
descargada Cambiela pot una bateda
totalmente cargada.
Latemperatura ambientees demasiado
baja
Labsteria no se ha cargado pot completo.
La bateria esta compbtamente agotaday
no se puede recargar UtiHceotra bateria
El contraste entre el objeto y el fondo es
demasiado pars que la Videocamara con
DVDfuncione normaJmente Ilumine el
fondo para redudr el contrasteo utilice la
funcion BLC mientras grabs en entomos
lumIRosos
La imagense ve borrosa
en eJ Visor
El sistema de enfeque
automatico no funciona
,
,
Nose ha ajustado la lente del visor
Desplacela palanca de control del visor
hastaque los indicsdores que aparecen
en el visormuestren que esta bien
enfocado
,
,
Compruebeelment_ Manual Focus
El enfoque automatico no funciona en el
modode enfoquemanual
Cuando se apaga y se
=
enciende el dispositivo,
aparece una pantalla
azul en vez de Is pantalla
normal
Si el adaptador de CC esta conectado,
quite el cable, encienda el dispositivoy
conecteb de nuevo Siesta conectada
la bateria, desconectela, endenda el
dispositivo y conectelode nuevo
[ ENGLISH
]
[ ESPAI_OL
Troubleshooting
•
•
Pressing the
[StartlStop] button
does not start
recording.
•
•
Disc is not recognized
and the disc cover
Check the [Power] switch is set to
[ I_= (Camera)[.
There is not enough free space in the
disc. Replace the disc with a new one or
format the disc
Discwas finalized.
Make the disc wdtable to record additiona
pictures
DVD Camcorder is too hot. Turn off the
power and coot it down a while.
•
The disc is a damaged one Replace with
a new disc.
.
Check the [Power] switch is set to
[[_(Player)].
Check the disc compatibility.
Check the disc was inserted properly
to face its writable side toward the DVD
Camcorder.
A disc with data that had been recorded
opens.
.
Pressing the [1_NI ]
button does not start
playing
•
=
using other devices may not properly work
with this DVD Camcorder.
Built-in flash will not fire
=
.
Select different flash mode '=page 96
Flash is not available for movh'_gimages.
Resolucibn
]
de problemas
," co_ocadoNoCompruebe
hayespac_o
enqae
[_'suf_c_ente
e_(camera)]._nterruptor
ene_[P°wer]
d_sco,
este
Si se pulsa el
bot6n [Start/Stop]
Inose inida la
INo se reconoce el
Idisco y se abre la
=
=
La Videocamara con DVD esta demasiado
caliente. Apaguela
y dejela enfriar durante un
imagenes
adicionales.
rato.
=
El disco esta daSado. Coloque un disco
nuevo.
=
ISi se pulsa el
Iboton [1_ IN]
Ino se inicia la
reproducci6n.
IEl flash
l incorporado
Ise disparac
=
no
Sustituya el disco per uno nuevo o formatee
el disco.
Disco flnalizado.
Haga que el disco sea grabable para grabar
=
=
encuentre en [[_l(Player)]
que
el interruptor del
[Power]
Compruebe la
compatibilidad
disco.se
Compruebe si el disco se ha insertado
correctamente de forma que ta parte
grabable se encuentre cobcada hacia la
Videocamara con DVD.
ha grabado utilizando otros dispositivos
no fancione correctamente con esta
Es
posibte quecon
un DVD.
disco con datos que se
Videocamara
Seleccione un modo flash diferente ,.,.page 96
El flash no esta disponible para captura de
secuenclas.
[ ENGLBH
]
[ ESPANOL
Troubleshooting
Playback screen
interrupted
unexpectedly
Cannot play back a
recorded DVD-RW/
+RW/-R/+R DL disc.
Cannot play back a
recordedDVB-RWi+RW
-Ri+R DL disc on a PC
Pushing
the [OPEN]
switch does not open
the Disc Cover.
Cannot close the Disc
Cover.
•
Check the Power supply (Battery
Pack or AC Power Adapter) is properly
connected and stable.
=
A disc with data that had been recorded
using other devices may not propedy
work with this DVD Camcorder
A DVD-RW disc recorded in VR mode
cannot be played back using a recorder
that does not support VR mode. Refer
to the useCs manual of playback device
to check compatibility.
=
•
•
Clean the disc using a cleaning cloth.
Finalize the disc (except DVD+RW).
•
Checkthe Power supply(Battery
Pack or AC Power Adapter) is properly
connected and stable.
Detach the Battery Pack from the DVD
Camcorder and install it agah'_.
Make sure the Battery Pack is charged.
Disc finalization was interrupted by
turning the DVD Camcorder off. Turn
the DVD Camcorder on, and take out
the disc after finalizing the disc.
•
•
•
•
•
]
Resolucibn de problemas
La pantalla de
reproduccbn se
interrumpede forma
mesperada.
•
Es posible que un disco con dates
que se ha grabado utilizando otros
dispositivos no funcione correctamente
con esta Videocamara con DVD.
Un disco DVD-RW grabade en modo
VR no puede reproducirse utilizando
un grabador que no admita el modo
VR Consulte el manual del usuario
del dispositivo de reproducci6n para
comprobar la compatibilidad.
No se puede reproducir
un disco DVD-RWi
+RW/-Ri+R DL>.
No se puede
reprodudr un disco
DVD-RW/+RW/-R/+R
DL grabade en un PC
•
LimpJe el disco utilizando
un patio
•
FJnalice el disco (excepto
DVD+RW).
•
Compruebe quela fuente de
alimentaci6n (bateria o adaptador de CA)
este conectada correctamente y estable.
Retire la bateria de la Videocamara con
DVD e instalela de nuevo.
AsegQrese de que la bateria esb
cargada.
La finalizacbn del disco se interrumpi6
al apagarse la Videocamara con DVD.
Encienda la Videocamara con DVD y
saque el disco tras finalizado.
•
Si se pulsa el
interrupter[OPEN]
no se abre la tapa del
disco.
Compruebe quela fuente de
alimentaci6n (bateria o adaptador de CA)
este conectada correctamente y estable.
•
•
Make sure the hand strap is not
entangled.
Make sure the disc was inserted properly
•
No es posibb cerrar la •
tapa del disco.
AsegQrese que no se lie la emputiadura.
AsegOrese de que el disco se ha insertado
correctamente
[ ENGUSH
]
[ ESPAKIOL
Troubleshooting
+
++
+
Resoluci6n
-
+
:
-
++
o+
de problemas
•
+
e +
+
iiiiii!iii!i!i!i!i!i!@;i;i;i!!i{{!;iiiiii;+
iiiiiiiiiiiiiiiiiiiiiiiiiiiiiiii_i@!!!{_(_+_+_+_+_+_+_+_+_+_+_+_+_+_+_+_+_+
¸ +++++++++ +A_m++_ _+++
+++++++++
++++++++++
++++++++++++++++++#++:_+_+
Program AE
Selecting t+/eProgram AE
Functio++
White Ba+ance
Setting wh+te Ba+ance
Dgtal Effec[
Settm§the Digiml specm+
effect
/6 9 Wide
Setting the/6
Camera
Record
Camera
9 W de mode v
RogramAE
Selecm@delafurci@P++rarrAE
,/
_/hite
Balarce
A+us_edel balarce de blaaoo
,/
54
D+gita+
Effect
A+us_edel dec+ es_ec+ald+g+tal
,_
58
16 9W+de
A+us++del modo 6 9 Wide
,/
60
SelecciOnde la estabJ++zac+@
de la ,/
irrager dg+tal
6/
,/
56
OlS
Seledln§ the Digital _mage v
S[aNlizing
Dgtal Zoom
Selectm§ Digta Zuom
D+gita+
Zoom
SelecciOnde+zoom digita+
,/
62
Rec Mode
Selertln§ the recording
speed
Rec Mode
,/
44
Selertm§ the AV input_
output
AV _n@utm
Selec¢_On
de la veocidad de
gtabaciOn
Selec¢lOnde la entre@/ sa_a
deAV
Wnd Cut
Minimzac{Ondel rui@ del viemg
,/
Pho'o Quait
SelecciOnde la caldad de imagen
,/
P_lo_oSize
Selec¢lOnde fama_o de tuto
,/
AV InPut E
96
Record
86
5/
Wiled Cut
M 8 miz ]g wind nose
Photo QLm_ity
Ph_o S_ze
Selectm§ Image Quality
Oelete
Delet ng Files
/01
Delete
E mina616nde a_ch@s
,/
10/
Oele_eA_]
Deiet r_gall Files
/02
DeleteAll
E minaci6nde }odDSbs a_@ivos
,/
/02
Protect
Preventing AccJden[ai
Erasure in Memory Card
/00
P ot_ct
P+evenci@fte_fe a _ortado
accidents de la taqeta de memor a
,/
/ 00
PfiD_Mark
Marking irr ages recolded
on a MemorY/Card'ol
PIInting
/07
Plat Mak
Ma_cation de in agenes
g_abadas en una tdlieta de
men orla papa su impfesi6n
,/
/07
Format
Fomlat ing the MemoH
Card
/03
Format
For r aid de latarje_ade memoda
File No
File Numbering Options
95
File No
Opciones
a_ch vos
Osc Finalize
Finaliz 8g a Disc
DiscFinalize
Finalizaci,Sn@un disco
,/
83
Disc
Unfinalize
A+lulacon de finalizaciOnde
un disco
,/
85
Dsc Fot_rat
For+'ateodeLta disco
'/
82
Dsc !nto
Se 9'opofcona intofmacbn deldis_s '/
LCDBight
A+usl_del tonede brillo de la
_entalla
LCD
,_
,/
,_
38
LCDCoo
A+usl_de bs tonosde coo de a
_entalla
LCD
,/
,/
,/
38
Daterfime
AJuste de la visua_izaciOn de
fecha y I/ora
,/
,/
,/
39
Osc Ur_finalize
Osc FOnrlat
5t
Selecting photo size
7
Me+"o_
nfinal zing a Disc
Forrrat ing Disc
Prov ding a O sc Infolmat on v
3_
%
LCD Srght
Setting the Bright]_ess one
of the LCD Screen
v
38
LCD Color
Setting the Co_o_tones of
the LCD Screen
v
Osc Ino
Display
54
¢
+++++++
DIS
Memo_
Disc
Manage_
v
++++:+++_+a+
_1+_i+i+
Oaie/Time
W £_-Iq_gg5
Setting the Date and Time
Display
v
7
Disc
blenage
38
39
Oisp ay
nnlv
• : s61oSC-DC565
de numeracion
93
94
,/
de
/ 03
95
,/
8O
]
[ ENGLISH
]
[ ESPANOL
Troubleshooting
System
ResoJucibn de proNemas
Ajuste de fecha y hora
Uti_izaci6n de_rrlando
a distancia
Clock Set
3ett ng the dare'time
Remote •
Jsirg the ren ore control
Beep Sound
Setting the Beep sound
ShutterSolnd
HSB Connect
5ettngiheShutte_
sounct
3electingthe HSB device
LangLrage
3electing the OSD
angt age
Ajuste de1soni¢lo del
obturador
Selecc On de1
Oemonstlatier
)emor,stration
disposit vo USB
Ajuste de] sorri¢lo
deaptido
¢
Selecc 6n del klioma
de la OSD
G,:SC-DC564/DC565 only
Demostraci0n
e: s61oSC-DC564/DC565
f
,f
MEMORYSTICK_
MEMORYSTIC_r,_
•
•
"Memory Stick" and "_"
are trademarks of Sony
Corporation
All other product names mentioned herein may be the
trademarks or registered trademarks of their respective
companies.
Furthermore, ,T,_,,and "®" are not mentioned in each
instance in this manual.
"
•
Adem_s,
'TM"
y " ® " no
se mencionan
en todos
los
casos
en
este manual.
J
%.
"Memory Stick" y "_,"
son marcas comerciNes de Sony
Corporation.
El resto de nombres de productos mencionados en este
documento pueden ser marcas comerdales o marcas
registradas de sus respectivas compa_Sias
,f
I
_..
"
Manufactured under license from Dolby Laboratories
'Dolby" and the double-D symbol are trademarks of Dolby
Laboratories.
•
•
Fabricado bajo licencia de Dolby Laboratories
"Dolby" yet simbolo de la done D son marcas comerciales de
Dolby Laboratories
]
[ ENGLBH
[ ESPM, IOL ]
]
Specifications
Q = -
k + Jm -
Video sigr'a_
Especificaciones
4=
I
I
= •
I
4=
•
+
-
o-
o+-
•
I
+
I
+,
I
+
NTSC
Pcture Compression fort1 at MPEG 2
&udJoCompressionfotmat
DOLBY
Reco_dng Quality
XP (about 9Mbps), SP {about 6Mbps)
Image device
COD (Cha ge Col]pied Device) (1 I P,Ipixels}
DIGHAL
SIEREO
CREAIOR
ens
Filte] ctiarnete_
FI 6 26x (Optical) 1200x(D g tal} Electronic zoom lens
@30
S ze_dot numbe]
SO DC563 2 5 nches I13k _ SO D056,1 DC565 2 7 riches 230k
LeD Screen Method
TFT LCD
diewtinde]
Colo/LCD
Video output
/Vp p (750 tenl inated)
S vdeo output
Y _Vp _ 75£_ C 0 286Vp p 750
LP (abou 31klbps)
Audio ol_put
7 5dBs (6000 term nated)
JSB output
Mni B type connector
Exte hal I_lic
O3 5 stereo
Power Source
De 8 4V Lithium Ion Battely Pack 7 4V
Power source type
Lithiu1
Power consump:on
[Recoldin9)
5 6W(SC DC563 LOD'Vievdmde)
5 8W(SC DC564iDC565 LCD'Viewflnder)
Ope]etin9 temperature
0 +400(32
Gen
Ion Batte]_ Pack Power sui_pty O00V-240V)
50i60Hz
Fuente de alimentacion
Bateria de iones de litio _ente de alimentaci6n (_00V-24dV)
F /04F)
5 6W(SC DC563,
Consumo (grebaciOn)
Sto_age tempelatLl_
20+C
External dimension
Heght 2 02 inches (5/ 5 mm) Length 3 44 inches (87 5 ram} Width
4 78 inches (12/ 5 mm}
Tempe_atula de
funcionamiento
_Neight
0 97 Ib (440 g 15 52 oz) (Except for Lithium Ion Battery Pack)
Internal MIO
Onni directional stereo miclsphone
_mpe_atu_a
afmacenaie
Remot_ cont_ol
[SC DO564iDC565
Indoors greate than 49 ft 05 rr/) (st+aight line)
Outdoors about _6 4 ft (5 m) (straight line}
only)
60=C ( 4+F - /40F)
The technical specifications
notice.
and design may be changed
CC 8 4// bateHa lie tones de litio 7 4V
Dimensiones
Peso
without
de
50_0 Hz
LCDA/isor),
5 BW(SC DC564iDC565,
LCDA/isor)
0 = 4d=C (32=F /04=F)
20=C +60C ( 4F - HOT)
Anchura 5/ 5 mm (202 pulg ) Altu_a 875 mm (3 aa pulg ) Longitud
12/5 mm (4 7B pulg )
440 (I/097 Ib /5 52 oz} (Excel_to la b_elia de tones de litio)
Micr6_no e_e_o omni_lileccional
_icr0_no incorporado
Mando a distancia
Interior: mas de 1493 52 cm (49 i_ies) en finea _cta
(s61o SC DC564_DC565) rues de 49_._87 cm (/6¸4 pies) en linea _cta
en exterior.s
Estas especiflcacionee tecnicas y el diseRo estan sujetos a
cambios sin previo aviso
[ ENGLISH
]
[ ESPAI_OL
indice alfab tico
index
-Accessolles
Add
AF¢tF
AV In,OLrt
15
73-74
53
86
_,_emow Stick
_,licropJ/one
_,_ove
_,_oving In/age
Name
Beep Sollnd
34
BLC
49
Operating _,lodes
OSD
C_ock Set
32
OSD Language
Color Nite
Connection
Copying
-Date/Time
Delete
Deleting
Demonstration
Digital Effect
Digital Zoom
DIS
Disc C[eaning
Discs
EASY Q Mode
Exposure
-Fade
File No
Finalize
Flash
Fom/at
Function buttons
Hand St_a_
-Inlom/ation
50
86
89, 9O
39
77
68 72 /0/
37
58
62
61
9
/2
46
52
48
95
83
96
82 /03
17
Partial Delete
PB Zoom
Photo images
Photo Quality
Photo Size
PictBridge
Playlist
Powel Sollrce
Print Mark
Proglam AE
Protection
9_
47
75 76
/04
8/
28
30 3/
Accesor os
Add
AV In/Out
-Bateda de ion de litio
23
Beel) Soun/I
34
BLC (Compensation de luz de rondo)
49
Borrado
68 72/0/
Botones de funciones
17
69 78
67
97
93
9,1
109
63
27
107
54
100
29
Record _,_ode
Remote
Remote contro_
44
33
20
Shuttel Sound
Shuttel S_eed
35
52
Thumbnail index
63
85
H_ -H8
80
28
-LCD
38
Li_hiL_mIorr Ba_tel_JPack
23
Clock Se_
32
Co,or Ni_e
Conexion
Copla
50
86
89, 90
Vievdinder
40
Whi_e Balance
Wind Cu_
56
5/
Zoom
_,lodo de grabaci6n
_,lodo EASYQ
_,lodos de funcionamiento
_,love
Nombre
9/
29
47
,14
46
28
75-76
81
47
OSD
30, 31
38
69, 78
67
93
94
"109
63
107
54
100
-D_e_Tin/e
Delete
Demo_/s_ra_io_
Digital Effec_
D_g_t_Zoo_
DIS
Discos
39
77
37
58
62
61
/2
Pant_l!a de crist_l liqLlido (LCD)
Partial Delete
PB Zoom
PI/o_o QI_I_y
PI/o_o Size
Pic_B_id_e
P_aylis_
P_]n_ _,_ark
P_ograrn AE
P_o_e¢_
Em_¢]ad_la
2/
Remo_e
33
Expos_re
52
-S_/_ltler Sound
35
Fade
Fi_e_o
48
95
Ta_3e_ade me_//o/i_
9/
-__nf_na_zed
85
Finalize
Flash
Fo_ma_
83
96
82,/03
F/_en_ede enel_ia
27
I/liom_ de OSD
36
magenes _o_afi¢_s
_ndice de miniatures
Inlorm_cion
_n_erfaz _SB
3oys_ick
Limpieza de discos
_1
_,lemory Stick
_,len J _afJido
_,licr6fono
36
Quick Menu
Unfinalize
USB Interface
Joystick
Card
15
73-74
86
21
--
-_emo_
]
Velocida/I de_ob_urador
Video
52
/04
97
63
80
_'_ _'_ 8
Visor
40
-Wh_e Ba_a_¢e
Wind Cu_
56
51
28
-Zoom
47
9
[ ENGLISH
Contact
if you
]
SAMSUNG
have
please
any
contact
Reqion Countr_
NoEl/America
Latin America
Europe
CIS
[ ESPANOL
WORLD
questions
the
SAMSUNG
Customer
CANADA
MEX]CO
USA
ARGENTINE
BRAZIL
CHILE
COSTA RICA
EC_JADOR
EL SAL//ADOR
GUATEMALA
JAMAICA
PANAMA
PUERTO RICO
REP DOM[NICA
TRiNiDAD & TOBAGO
VENEZUELA
BELGIUM
CZECH REPUBLIC
DENMARK
FINLAND
FRANCE
GERMANY
HUNGARY
ITALIA
LUXEMBURG
NETHERLANDS
NORWAY
POLAND
PORTUGAL
SLOVAKIA
SPA_N
SWEDEN
U K
RUSSIA
UKRAINE
AUSTRALIA
CHINA
HONG KONG
INDIA
Asia Pacific
INDONESIA
JAPAN
MALAYSIA
PHiUPPINES
S_NGAPORE
THAILAND
Middle East &
Africa
or
TAIWAN
VIETNAM
SOUTH AFRICA
UAE
WiDE
comments
customer
P6ngase
relating to Samsung products,
care
center.
Ca_e Certre
/ 800 SAMSUNG (726 786,1}
0/ 800 SAMSUNG {726 7868)
/ 800 SAMSUNG (726 7864}
0800 333 3733
0800 /24 421
800 726 7864{SAMS_ JNG)
0 800 507 7267
/ 800/0 7267
800 6225
/ 800 299 0013
/ 800 234 7267
800 7267
/ 800 682 3/80
/ 800 75/ 2676
/ 800 7267 864
/ 800/00 5303
02 201 24/8
844 000 844
38 322 887
09 693 79 554
08 25 08 65 65 (O/5€ I_lin)
01805 /2/213(g
0 12iMin)
06 40 985 985
/99 153/53
02 26/ 03 710
0900 20 200 88 {€ 0 [0 ¢,lin)
231 627 22
0 80/ 801 881
80 8 200/28
0850 123 989
902 10 H 30
08 585 367 87
0870 242 0303
8 800 200 0400
8 800 502 0000
/ 300 362 603
800 810 5858¸ 0/0 6475/880
2862 600¸[
3030 8282
/800/100/1
0800 /12 8888
0/20 327 527
/800 88 9999
/800 /0 SAMSUNG {7267864)
/ 800 SAMSUNG {7267864)
/800 29 3232
02 689 3232
0800 329 999
/ 800 588 889
0860 7267864 {SAMS_ JNG)
800SAMSUNG (7267864)
We_ Site
/'_wsamsund
comica
www samsunq comnx
www samsung com
www sarnsun_ coma
_w samsung com/br
_w samsun_ comic_
_w samsung com_/atin
_w samsun_ com_/atin
_w samsung com_/atin
_w samsun_ com_/atin
_w samsung com_/atin
_w samsun_ com_/atin
_w samsung com_/atin
_w samsun_ com_/atin
_w samsung com_/atin
_w samsun_ com_/atin
_w samsung comi_e
_w samsun_ comicz
_w samsung comidk
_w samsun_ comff_
_w samsung comfit
_w samsun_ de
_w samsung comii/u
_w samsun_ comiit
_w samsung _u
www
sarnsunq
www samsung
www samsunq
_wvwsamsung
vwvwsamsunq
_wvwsamsung
vwvwsamsunq
_wvwsamsung
vwvwsamsunq
_WVW
samsung
vwvwsamsunq
_wvwsamsung
vwvwsamsunq
Reqion Count6
North An enca
Latin America
Europe
comn[
comno
com IS_
comiIst
comisk
comies
comise
comiuk
rLr
comiu_
comiau
com cn
comii/k
comikl
comiip
comimy
comiISh
comisg
vwvwsamsung com_th
_wvwsamsung
www samsunq
_wvwsamsung
vwvwsamsung
comitw
com w/
comiza
comimea
oontacto
con
Customer
CANADA
MEXICO
USA
ARGENTINE
BRAZIL
CHILE
COSTA RICA
ECUADOR
EL SALVADOR
GUATEMALA
JAMAICA
PANAMA
PUERTO RiCO
REP DOMINICA
TRIN_DAD & TOBAGC
VENEZUELA
BELGIUM
CZECH REPUBLIC
DENMARK
F_NLAND
FRANCE
GERMANY
HUNGARY
iTALIA
LUXEMBURG
NETHERLANDS
CIS
NORWAY
POLAND
PORTI JGAL
SLOVAKIA
SPAIN
SWEDEN
UK
RUSSIA
UKRAINE
AUSTRALIA
CHINA
HONG KONG
iNDIA
_wvwsamsung comiin
_wvwsamsung
vwvwsamsunq
_wvwsamsung
vwvwsamsunq
_wvwsamsung
en
SAMSUNG
WORLD
WIDE
Si tiene algQn comentario
o pregunta
en relaci6n con bs productos
de Samsung,
p6ngase
en contacto
con el Centro de atenci6n al diente
de SAMSUNG
Asia Pacflc
iNDONESiA
JAPAN
MALAYSIA
PHIUPPINES
SINGAPORE
THAILAND
TAIWAN
Midee East & VIETNAM
Africa
SOUTH AFRICA
_JA E
Care Cert,9
I 800 SAMSUNG {726 7864)
O_ 800 SAMSUNG (726 7864)
I 800 SAMSUNG (726 7864)
0800 333 3733
0800 _24 42_
800 726 7864(SAMSUNG/
0 800 507 7267
800 /0 7267
800 6225
800 29_0013
I 800 234 7267
800 7267
I 800 682 3/80
800 751 2676
I 800 7267 864
800 /00 5303
02 201 24/8
844 000 844
38 322 887
09 693 79 554
08 25 08 65 65 {0 I_/Min)
0_805 /2_2/3 (( 0 12/Min)
06 40 985 985
_99/53 153
02 261 03 7_0
0900 20 200 88 (€ 0/OiMin}
23/ 627 22
0 80/ 801 88/
80 8 200/28
0850/23 989
902/0/_
30
08 585 367 87
0870 242 0303
8 800 200 0400
8 800 502 0000
_300 362 603
800 8_0 C4_58 0[0 6475 _880
2862 600/
3030 8282
_800/_00/_
0800 H2 8888
0_20 327 527
1800 88 9999
_800 _OSAMSUNG (726786
1800 SAMSUNG {7267864)
1800 29 3232
02 689 3232
0800 329 999
800 588 889
0860 7267864 (SAMSUNG)
800SAMSUNG (7267864}
Web Ste
_,'_%,vsamsLmg
_,'_W samsung
_wwv samsLmg
_,_,'v samsung
_wwv samsLmg
_,_,'v samsung
_wwv samsLmg
_,_,'v samsung
_wwv samsLmg
_,_,'v samsung
_wwv samsLmg
_,_,'v samsung
_wwv samsLmg
_,_,'v samsung
_wwv samsLmg
_,_,'v samsung
_wwv samsLmg
_,_,'v samsung
_wwv samsLmg
_,_,'v samsung
_wwv samsLmg
_,_,'v samsung
_wwv samsLmg
_,_,'v samsung
_wwv samsLmg
_,_,'v samsung
_wwv samsLmg
_,_,'v samsung
_wwv samsLmg
_,_,'v samsung
_wwv samsLmg
_,_,'v samsung
_wwv samsLmg
_,_,'v samsung
_wwv samsLmg
_,_,'v samsung
_wwv samsLmg
_,_,'v samsung
corn,ca
com,mx
corn
com,ar
comibr
corn,c1
corn,latin
corn,latin
corn,latin
corn,latin
corn,latin
corn,latin
corn,latin
corn,latin
corn,latin
corn,latin
corn/be
com,cz
corn,<1k
com,fi
com,fi
de
com,hu
corn,it
lu
corn,n1
corn,no
com,pl
comipt
comisk
com,es
com,se
com,uk
ru
com,ur
com,au
corn cn
comihk
_wwv samsLmg corn,in
_wwv samsLmg
_,_,'v samsung
_wwv samsLmg
_,_,'v samsung
_wwv samsLmg
comiid
com,ip
corn,my
comiph
com,s_
_,_,'v samsung com,tl/
_wwv samsLmg
_,_,'v samsung
_wwv samsLmg
_,_,'v samsung
com,tw
com,vn
com,za
com,mea
]
[ ENGLISH
]
THIS DVD CAMCORDER IS MANUFACTURED BY:
[ ESPAI_OL
VIDEOC,,_MARACON DVD FABRICADA POR:
If you have any questions or comments relating to
Samsung products, please contact the SAMSUNG
customer care center Samsang Electronics America, inc.
1-80O-SAMSUNG (726-7864)
www.samst._ng.com
Rolls compliant
Our product complies with "The Restriction Of the use of certain
Hazardous Substances in electrical and electronic equipment",
and we do not use the 6 hazardous materials- Cadmium(Cd},
Lead (Pb), Mercury (Hg), Hexavalent Chromium (Cr+O},Poly Brominated
Biphenyls (PBBs), Poly Brominated Diphenyl Ethers(PBDEs)- in our
products,
Conforme a la directive RollS
Notre produit est conforme a la directive Rolls retative
la "La limitation de rutilisation de certaines substances
dangereuses dans les composants _lectriques et 61ectroniques'.
Nous n'utilisons pas les six matieres dangereuses suivantes dans
la fabrication de nos appareils : cadmium (Cd), plomb (Pb), mercure
(Hg), chrome hexavalent (Cr÷6}, polybromodiphenyles (PBBs) et
polybromodiphenylet
hers (PBDEs).
]