1
Important
Television
Warranty
Format
Information
Viewing
Regarding
Standard screen format televisions (4:3, the aspect ratio of the screen width to height) are
primarily designed to view standard format full-motion video. The images displayed on them
should primarily be in the standard 4:3 ratio fomlat and constantly
moving. Displaying
stationat T graphics and images on screen, such as the dark top and bottom lettefl_ox bars
(wide screen pictures), should be limited to no more than 15% of the total television viewing
per week.
Wide screen fommt televisions (16:9, the aspect ratio of the screen width to height) are
primarily designed to view wide screen fin-mat full-motion video. The images displayed on
them should primarily be in the wide screen 16:9 ratio fommt, or expanded to fill the screen if
your model oilers this feature, and constantly moqng. Displaying stationary graphics and
images on screen, such as the dark side-bars on non-expanded standard fommt teleqsion qdeo
and programming, should be limited to no more than 15% of the total television viewing per
week.
Additionally, viewing other stationary images and text such as stock market reports, video
game displays, station logos, web sites or computer graphics and patterns, should be limited as
desccibed above for all televisions. Displaying aW stationary images that exceed the above
guidelines can cause uneven aging qf picture tubes (CRTs) that leave subtle, but permanent
burned-in ghost images in the television picture. To avoid this, vary the programming and
images, and primarily display.full screen moving images, not stationm3_ patterns or dark
bars. On television models that offer picture sizing features, use these controls to view the
different formats as a full screen picture.
Be careful in the selection and duration of television fommts used for viewing. Uneven CRT
aging as a resuh offormat selection and use, as well as other burned-in images, is not covered
by your Samsung lmfited warrant?_
CONTENTS
Chapter
1- Your
]
New
Digital
TV
....................
5
List of Featut_es ..........................................................................................
Accessories ................................................................................................
Familiarizing Yourself with Your New TV ..................................................
Control Buttons ..............................................................................
Connection Jacks (Side or Front) ....................................................
Connection Jacks (Rear) ..................................................................
Remote Control ..............................................................................
Chapter
2: Installation
....................................
Connecting VHF and UHF Antennas ........................................................
Antennas with 300-ohm Flat Twin Leads ........................................
Antennas with 75-ohm Round Leads ..............................................
Separate VHF and UHF Antennas ..................................................
Connecting Cable TV ................................................................................
Cable without a Cable Box ..............................................................
Cable with a Cable Box that Descrambles All Channels ..................
Connecting to a Cable Box that Descrambles some Channels ........
Connecting a VCR ......................................................................................
Connecting a Second VCR to Record Iron* the TV ..........................
Connecting a DVD Player ..........................................................................
Connecting to Y, Ps, P_ ..................................................................
Connecting to Regular Audio and Video Jacks ................................
Connecting a Digital TV Set-Top Box ........................................................
Connecting to Y, PB,P_ ..................................................................
Connecting a Camcorder ............................................................................
Installing Batteries in the Remote Control ..................................................
Chapter
3: Operation
......................................
Turning the TV On and Off ........................................................................
Plug & Play Feature ..................................................................................
Viewing the Menus and On-Screen Displays ..............................................
Viewing the Menus ..........................................................................
Viewing the Display ........................................................................
Selecting a Menu Language ........................................................................
Acljusting the Screen Automatically (Self Focus) ........................................
Deactivating the Automatic E×ecution of the Self Focus ..................
Removing the '_SelfFocus" Message ft*omthe Display ....................
Memorizing the Channels ..........................................................................
Selecting the Video Signal Source ....................................................
Storing Channels in Memory (kutomatic Method) ..........................
Adding and Erasing Channels ....................................................................
Changing Channels ....................................................................................
Using the Channel Buttons ..............................................................
Using the Number Buttons ..............................................................
Using the Preqous Channel ............................................................
Selecting Your Favorite Channels ..............................................................
To Store Your Favorite Channels ....................................................
To V_ew Your Favorite Channels ......................................................
Labeling the Channels ................................................................................
5
5
6
6
7
8
9
10
10
10
11
11
12
12
12
13
14
14
15
15
15
16
16
16
1T
18
18
18
20
20
20
21
22
23
23
24
24
25
26
27
27
27
27
28
28
28
29
I
CONTENTS
Chapter
3:
I
Operation
(commued) ............................
Picture Control ..........................................................................................
Customizing the Picture ..................................................................
Using Automatic Picture Settings ....................................................
Sound Control ............................................................................................
Adjusting the _>lume ......................................................................
Using the MUTE Button ..................................................................
Customizing the Sound ..................................................................
Using Automatic Sound Settings ....................................................
Setting the Clock ........................................................................................
Option 1: Setting the Clock Manually ............................................
Option 2: Setting the (-;lock Automatically ......................................
Viewing an External Signal Source ............................................................
Setting the Signal Source ..............................................................
Assigning Names to External so!.trces ..............................................
Chapter
4: Special
Features
............................
Fine Tuning Channels ................................................................................
Changing the Screen Size ..........................................................................
Digital Noise Reduction ............................................................................
Selecting the Color Tone ............................................................................
Setting the Blue Screen Mode ....................................................................
Freezing the Picture ..................................................................................
Choosing a Muhi-Channel Sound (MTS) track ..........................................
Auto M_lurne ..............................................................................................
Setting The OrgOff Melody ........................................................................
BBE ............................................................................................................
V_ewing Closed Caption Infommtion ........................................................
Setting the O_gOff Timer ............................................................................
Setting the Sleep Timer ..............................................................................
Using the V-Chip ........................................................................................
How to Change Your Password ......................................................
How to Enable/Disable the Rating Controls ....................................
How to Set up Restnctions Using the "TV Guidelines". ...................
How to Set up Restnctions Using the "MPAA Rating" ....................
Important Notes k]9o!.tt Parental Locks ............................................
How to Set up Restnctions Using the "Canadian English" ..............
How to Set up Resthctions Using the %2ana&an French" ..............
Customizing Your Remote Control ............................................................
Setting Up Yimr Remote Control to Operate Yimr VCR
(Cable box or DVD player) ..............................................................
Remote Control Codes ....................................................................
Chapter
5: Troubleshooting
............................
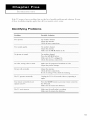
Identifying Problems ..................................................................................
Appendi×
..........................................................
Cleamng and Maintaimng Your TV ............................................................
Using Your TV in Another Country ............................................................
Specifications ............................................................................................
30
30
30
31
32
32
32
32
33
34
34
35
37
37
38
39
39
40
41
41
42
42
43
44
44
45
46
48
49
50
50
51
52
53
54
55
56
57
57
58
59
59
60
60
60
60
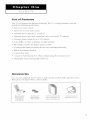
Your
List
of
NEW
TV
Features
Yl)ur TV was designed with the latesttechnolog): This TV isa high-perfi)mlance unit that
includes
the
following
special
control
•
Easytouse
remote
•
Easytouse
on
•
Automatic
timer
•
Ac[justable
picture
•
Automatic
channel
•
A special
•
Fine
•
A buih
•
Buih
•
A spedal
•
Component
•
Ac[justing
screen
filter
tuning
to turn
the
TV on and
and
sound
settings
tuning
control
in, dual
to 181
sharpest
sound
off
that
or elmfinate
channel
can
be stored
in the
TV_s memory
channels
reception
picture
problems
possible
decoder
for stereo
and bilingual
to obtain
a sharper
image
listening
speakers
timer
Video
the
fi)r up
for the
channel
sleep
system
[lleflut
to reduce
in muhi
features:
Input
Screen
jacks
Automatically
from
external
sources
(Self Focus)
Accessories
Once
you have
If any
piece
unpacked
is missing
Remote ControI
(BP59-00058C)/
AAA Batteries
(q30]-000]03)
your
or broken,
T_/; check
call vour
Holde>Caster
(BP61-00447C
(HC-P5241W
to make
sure
that
you
have
all the
parts
shown
here.
dealer.
OwnerE Instructions
I])/
Safl'ty Guide Manual (1)/
Q)uick Guide Manual (1)
\\!_rranty Cards (2)/
Registration Card (1)
I
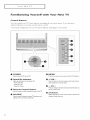
Your
NEW
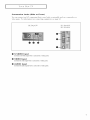
Familiarizing
Control
I
TV
Yourself
with
Your
New
TV
Buttons
You can control your TV_s basic features} includingthe on-screen
advanced features, you must use the remote control.
• The actual configuration
on },,our TV may be different, depending
i
menu. To use the more
on },,our model.
i_iiiiiiii
____iiiiiiiiiiiiiiii__________iiiiiiiiiiiiiiii___________iiiiiiiiiiiiiii___________iiiiiiiiiiiiiii___________iiiiiiiiiiiiiii___________iiiiiiiiiiiiiiii__________iiiiiiiiiiiiiiii_______
i_i_iiiiiiiiiiiiiiiii_i_i_iiiiiiiiiiiiiiiii_q_i_iiiiiiiiiiiiiiii_i_{_iiiiiiiiiiiiiiii_iqq_i_iiiiiiiiiiiiiiiii_i_q_i_iiiiiiiiiiiiiiiiii_iq_iiiiiiiiiiiiiiiii_ii_
_]! POWER
Pressto turntheTV on andoff.
0
MENU
Pressto seean on-screenmenuof yourTV'sfeatures.
e
Q
+ VOL
Press to lower or raise the volume and to select items
e
Stand-By
Indicator
Lights up when you turn the power off.
- Power Off; Red
- Power On ; Off
- Timer On ; Green
Remote
Control
when using the on-screen menu.
@
ACHv
Press to change channels and move between items on
the on-screen menu.
Sensor
Aim the remote control towards this spot on the TV.
0
o
SOURCE
Press to switch between viewing TV programs and
signals from connected components.
(Enter)
While using the on-screen menus, press to activate (or
change) a particular item.
I
Your
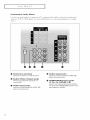
Connection
I
NE\:_ _ TV
Jacks
(Side
or
Front)
"Yl)u can _'onnect an AA' _'omponent that is used only o¢'casionall}¢ su¢'h as a ¢'amcorcler or
;T_cleo game. For reformation
on connecting equipment,
see page 16.
H(2-P4241W
00
0
S-VIDEO
H(2-P4741W
H(2-P5241W
@
Input
Connect an S-Video signal from a camcorder or video game.
0
VIDEO
Input
Connect the video signal from a camcorder or video game.
O
AUDIO
Input
Connect the audio signals from a camcorder or video game.
I
Your
Connection
NEW
Jacks
I
TV
(Rear)
Use the rear panel jacks to connect an AA' component
such as a VCR or a DVD player. For more mfom_atk)n
i0_16.
000
0
Antemma
terminal
0
0
O
Connect to an antenna or a cable TV system.
0
0
Audio/Video
Output
jacks
Connect to the audio/video input jacks of a
that will be connected continuousl?;
on connecting equipment,
see pages
Audio
Input
jacks
Connect to the audio output jacks of VORs, DVD
players and similar devices.
recording VCR.
COMPONENT
(Y, PB, PR,
Video
Input
jacks
Coneect to the video output jacks of VCRs, DVD
Connect to the audio and video outputs of DVD or
DTV Set-Top Box. 480i/480p/1080iY,PBand PRvideo
signal outputs are available.
players and similar devices
O
Input
AUDIO-L/R)
jacks
I
Your
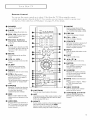
Remote
NEW
TV
I
Control
Yl)u can use the remote control up to about 23 feet from the TT_ When using the remote
control, always point it directly at the T'v_Yl)u can also use your remote control to operate
Set-Top box, VCR, Cable box or DVD player. See pages 55-56 for details.
I[]! POWER
Turnsthe TVon aedoff.
O
P.SIZE
Press to change the picture size.
0
FAY.
OH (Favorite Channel)
Press to switch between your
favorite channels,
e
O
O
MODE
Selects a target device to be
controlled bythis remote control
(i.e., TV, STB, VCR,CABLE or DVD).
_)
PRE-CH
Tuees to the previous channel.
SOURCE
Each time the button is pressed, all
the inputs connected to the
external component jacks will be
shown in regular sequence.
+1OO
Press to select chaneels over 100,
For example, to select channel 121,
press the "+100", then press the
"2" and "I".
INFO
Press to display information on the
TV screen.
MUTE
Press to temporarily cut off the
sound.
VOL
Press
-I-, VOL
to increase
EXIT
Press to exit the menu.
or decrease
the
Control
volume,
Q
SLEEP
Press to select a preset time
interval for automatic shut off.
O
MENU
Displays the main on-screen menu.
_)
STILL
(Main picture)
Press to stop the action during a
particular scene. Press again to
resume normal video.
The still function doesn't operate in
"Component1" or "Component2"
mode.
I_) EMODE
Adjust the TV picture by selecting
one of the preset factory settings
(or select your personal,
customized picture settings).
i_
e
_) CHA,
CHv
Press to change channels.
I_! Number
buttons
Press to select channels directly
on the TV.
O
your
BBE
BBE is a built-in effect that adds
CAPTION
Press to view closed caption information.
_)
clarity, punch and dynamics to the
sound.
SET
Used during set up of this remote control, so that
it will work compatibly with other devices (VCR,
STB, Cable box, DVD, etc.).
i_) ADD/DEL
Press to add or erase channels ie
the TV's memory. Useto memorize
or erase the fine tuning after fine
tuning channels.
(_) RESET
If your remote control is not functioning properly,
take out the batteries and press the BESET
button for about 2-3 seconds. Re-insert the
batteries and try using the remote control again.
the
cursor
in the
menu,
_)
ENTER
While using the oe-screen menus,
press ENTERto activate (or
change) a particular item.
6)
S.MODE
Adjust the TV sound by selecting
one of the preset factory settings
(or select your personal,
customized sound settings).
6)
MTS
(Multichannel Television
Sound)
Press to choose "Stereo", "Mono"
or "SAP (Secondary Audio
Program)".
SELF
FOCUS
Press to adjust for the optimum
picture set in the factory.
@
VCR/DVD
Controls
Controls VCR/DVDfunctions:
Rewind, Stop, Play/Pause, Fast
Forward.
INSTALLATION
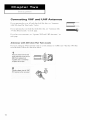
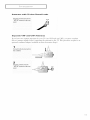
Connecting
VHF
and
UHF
Antennas
If your antenna has a set of leads that look like this, see "Antennas
v4th 300-ohm Flat Twin Leads," below_
If your antenna has one lead that looks like this, see "Antennas with
75"-ohm Round Leads," on next page.
If you have two antennas, see %eparate VHF and UHF Antennas," on
next page.
Antennas
with
300-ohm
Flat Twin
Leads
If you are using an off-air antenna (such as a l_oofantenna ol__l_abbitears") that has 300-ohm
twin fiat leads, follow the directions belowc
31acethe wires from the tw_r
leads under the screws on the
300-75 ohm adap[er mot
supplied), Use a screwdriver
to tighten the screws,
ANT IN
3lug the adapter into the "ANT
N" terminal on me rear panm,
lO
I
I
INSTALLATION
Antennas
with
75-ohm
Round
Plug the antenna lead into the
!_ANTIN'! terminal on the rear
Separate
VHF
and
Leads
ANT IN
UHF
Antennas
If you have two separate antennas for your TV (one VHF and one UHF), you must combine
the two antenna signals before connecting the antennas to the TV This procedure requires a an
optional combine>adapter (available at most electronics shops).
Connect both antenna leads to
tile combiner,
Plug the combiner into the
"ANT IN" term -al on the rear
panel,
11
I
I
INSTALLATION
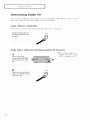
Connecting
Cable
TV
You can connect different cable systems to your T'v_including cable without a cable box, and
cable with a cable box that descrambles some or all channels.
Cable
without
a Cable
Box
If you want to connect cable, and you do not need to use a cable box:
Plug the incoming cable into
the !'ANT IN'_terminal on the
rear panell
Cable
with
a Cable
ANT
box
that
IN
Descrambles
ENNA
OUTterminal on
box.
ANT
Connect the other end of [ms
cable to the "ANT IN" termina
on Tne rear panel
12
Channels
_1 This terminal might be
labeled "ANT OUT, 'WHF
OUT, or sin}ply 'OUT".
Findthe cable thai is
oonnac[
All
IN
I
I
INSTALLATION
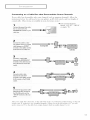
Connecting
to
a Cable
Box
that
Descrambles
Some
Channels
If your cable box descrambles only some channels (such as premium channels), {allow the
instructions below. Yo_.tv_4llneed a two-way splitter, an RF (A/B) sv_qtch,and four lengths of
coamal cable. (These items are available at most electronics stores.)
_l This terminal might be
labeled "ANT IN", '%_HFIN",
or simply 'IN .
Find and disconnect the came
that is connected to the
ANTENNA IN terminal on your
CaBle
BOX,
•
•
Connect this cable to a TWOway splitter. Connect a coaxial
cable between an OUTPUT
terminal on the splitter and the
Ih terminal onthe came DO×,
hmomiag Cable
Splitter
<k,,,Cable Box
3
Connect a coaxial cable
between the ANTENNA OUT
terminal on the cable box and
the B-IN term nal on the A B
switch.
RF(A!B)
Switch
4
Connect another cable
betweee the other OUT
terminal on the selitter anoTne
A-IN termir al on the RF(A/B)
switcl"
5
Connectthe last coaxml cable
between the OUTtermina an
the RF(A/B} switch and tne
"ANT IN" terminal on the rear
pane
After you've made this connection, set the YB switch to the 'A" position for normal viewing. Set the A/B
swilch 1o lhe "B" position to view scrambled channels. (\Vhen ,_ou set the A/B swilch 1o "B," you will
need to tune ,_our TV to the cable boxg output channel, which is usually channel 3 or 4.)
13
I
I
INSTALLATION
Connecting
a VCR
These instructions ass_.mie that you have already connected yo_.trTV to an antenna or a cable
TV system (according to the instructions on pages 10-13). Skip step 1 if you have not yet
connected to an antenna or a cable system.
ivRearPano,
Connect a coaxial cane between the "ANT !N"
terminal on the TV and the ANTENNA OUTterminal On
the VCR.
k _oaxial cable is usually iilclnd_,4 witfi a VCR: (li
not, check your localel_,ct_onics stor_,).
Coaxial Cable
Connect a set of audio cables between the "AV IN 1
(L, R)' (or I"AV IN 2 (L, R)")jacks on the TV and AUDIO
OUTjacks on the VCR.
!f you have a ni0no VCR, co_lncct L(mono) to VCR
Connect a video cable between the !tAV IN 1 (VIDEO)"
(or "AV !N 2 (VIDEO)")jack on the TV and the V!DEO
OUTjack on the VCR.
From Antenna
VCR Rear Panel
• Also, _ou can connect
Connecting
to 'AV 3" on the side panel of T_
a Second
VCR to Record
from
the TV
Ybur TV can send out signals of its pictm_e and sound to be l_ecolded by a second VCR. To do
this, connect your second VCR as follows:
TV Rear Panel
Connect a set of audio cables between the "AV OUT
(L. R)" jacks on the TV and the AUDIO IN aCKS011me
VOR.
The, VCR input jacks might be either oil tli_' m nE or
rear oI the VCR
Coaxial Cable
Connect a video cable between the "AV OUT (VIDEO)"
jack on the TV and the VIDEO IN jack on the VOR.
Refer to ] our VCR's instructi l'_sfor more in[orlnatlon
about n_ w [o recoru using this kind of cot:nection
From Antenna
VCR Rear Panel
14
I
I
INSTALLATION
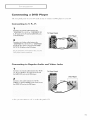
Connecting
a DVD
Player
The rear panel jacks on your TV make it easy to connect a DVD playel_to youu_T'v_
Connecting
to Y, PB. PR
Connect a set of audio cables between the
'!COMPONENT IN 1 (L, R)'! (or "COMPONENT IN 2
(L, 8)") jacks on the TV and the AUDIO OUT jacks
TV Rear Panel
DVD Player
Connect a set of video cables between the
"COMPONENT IN 1 (Y,pB, PR)"(or "COMPONENT
IN 2 (Y, PB, PR)")iacks on the TV and the VIDE0
OUT (Y,PB, pR)jackson the DVD player.
For an exp!anation of Cornpoiient vMeo _s_,c,your
Connecting
to
Regular
Audio
Connect a set of audio cables between the "AV Ilk
and
Video
Jacks
TV Rear Panel
I (L. R)" (or "AV IN 2 [L. R)")jacks on the TV anc
the AUDIO OUTjacks on the DVD 3myer.
DVD Player
Connect a \ideo cable between the "AV IN 1
(VIDEO)" (or "AV IN 2 (VIDEO)")jack on the TV and
the VIDEO OUTjack on the DVD player.
Audio Cable
iiii_
• Also, you can connect to "AV 3" on the side panel of TV.
15
I
I
INSTALLATION
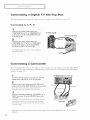
Connecting
a Digital
TV
Set-Top
Box
The rear panel jacks on your TV make it easy to connect a Set-Top Box to your T'v_
Connecting
to
Y, PB. PR
Connect a sat of audio cables between the
!ICOMPONENTIN 1 (L, R)' (or %OMPONENT IN2
TV Rear Panel
(L, R)'!) jacks on the TV and the AUDIO OUTjacks
on the Set-Top Box
DTV Set-Top Box
Connect a set of video cables between the
%OMPONENT IN 1 (Y, PB, PR)' (or !'COMPONENT
IN 2 (Y,PB, PR)'!)jacks on the TV and the VIDEO
OUT(Y, PB, PR)jacks on the Set:Top Box.
For detaik'd hlfomlation,
instruction manua!.
Connecting
refi,r to file Set Top Box
FromCable or
Antenf_a
a Camcorder
The side panel jacks on your TV make it easy to connect a can*corder to your T'v_They allow
you to xdew the can*corder tapes without using a VCR. (Also see "\qewing an External Signal
Source" on page 37.)
1
TV Side Panel (HC-P4241W)
_ocate the AN output jacks on the camcorder. They are
usuall'y found on me slee or rear ofths camcoroar.
2
Coat _ci a set of audio cables between me "AV 3, L. RY"
S-V_deoCable
jacks on the TV and the AUDIO OUTjacks on the carncoroar.
1_ VOM
have'
lnono
Cal[lCo/o_'r.
COl"tlleCl
n(l[lOl&O)
Audio Cable
TO
camcorder audk ouEusing c nly one audio c'abh'.
3
Connect a video came between the "AV 3 (VIDEO)" {or "SVIDEO") jack onthe TV and the VIDEO OUTjacks on the
camcoreer.
The" auaio_vldeo cables shown her_ arc usually included
with a Camcorder. (If uoL check your 1_cal electronics
s_ore.) If your camcorqer is stereo ] ou l'Leed to COI'LI'LeCt
a
set of two cables
Camcoder
• This figure shows the Standard conneclothjack panel. The actual configuration [or your TV may be
d ifk renl.
16
I
INSTALLATION
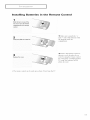
Installing
Batteries
I
in the
Remote
Control
1
S de the backcoverall the
way outto open the bakery
comoartment
of the remote
con[roI.
Insta
two AAA size batteries.
3
Replacethe cover,
_1 Mak{"sure to match the '+"
and '-" ends o[ the batteries \vilh
the diagram inside lhe
compart RlelIl.
_1 Rt,move the batteries and slore
them in a cool, dry place if you
won't be using the remote control
tor a long time. (Assuming typical
TV usage, the batteries last [or
about one year.)
• The remote control can be used up to aboltl 23 feet from the T_(
17
OPERATION
Turning
the
TV
On
and
Off
Press the POWERbutton on the remote control
You can also use the POWER button on the front panel
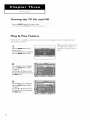
Plug
& Play
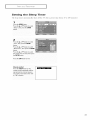
Feature
When the TV is initially powered On, basic customer settings proceed automatically and
subsequently as below_
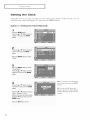
3ress the POWERbdtton on the
remote control
_1 Plug & Play feature doesn't
work when the V-Chip is
activmed or when in the A/V
mode.
I
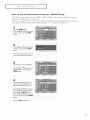
The "Start Plug & Play" is displayea
3ress the ENTERbuttonto star[.
The "Language" menu is displayed.
3ress the ENTERbutton to select
Language
"Language".
3ress the • or • button to select
the appropriate language, then press
the ENTERbutton.
The "Air/CAW" menu is displayed.
3ress the ENTERbutton to select
"Air/CAW",
3ress the • or • b]tton to select
me video signal source.then 3tess
the ENTERbutton.
18
Air/CATV
English
•
I
I
OPERATION
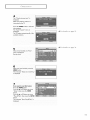
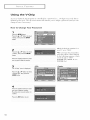
4
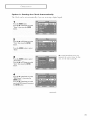
The "Check antenna inaut" is
alsplayed.
Make sure that the antenna is
connectea to the TV,
Press the ENTERbutton to start the
aura program.
The "Auto Program" menu is
atsplayad.
The TV begins memorizing all ofthe
available stations
_1 For details, see page 25.
_1 For details, see page 34-.
5
When it nas finished, the "Time"
Clock
menu is displaye a.
Set the clock,
6
When you have finished, 3ress me
MENU button.
I
]
The message "Enloy your watching."
is disa aye&
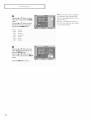
7
If you want to reset this feature:
Press the MENU button,
Press the • or • button to select
"Setup", then Dress me ENTER
button.
Press the • or • button to select
"Plug & Play", than press the ENTER
butmn.
The message "Start Plug & Play" is
alsplayad,
19
I
I
OPERATION
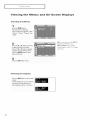
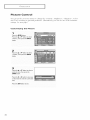
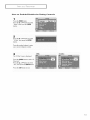
Viewing
Viewing
the
the
Menus
and
On-Screen
Displays
Menus
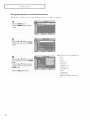
3ressthe MENU out[on.
The main menu is displayed.
There are five menu groups: "Input",
"Picture". "Sound". "Channel" and
"Setup"
3ress the •
or V button to move To
an Item you want m the menu,
3ress the 41 or I_ button to display,
change or use the selec[ec [ems.
3ress the ENTERI: Jtton to en_e)
ffems in me menu.
3
3ress the EXIT button to exit.
Viewing
the
Display
Press the INFO button on the remote
control.
TheTV displays the purrent Channel,
the status of certain picture and
Sopnd settings and the current time.
20
Source List
_1 "A>ucan also use the MENU,
CHA/V,
VOL+/- and
_(ENTER)
buttons on the
control panel of the TV to make
selections.
I
OPERATION
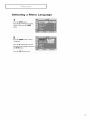
Selecting
a Menu
I
Language
Press the MENU button,
Press the • o- • 3utmn to select
"Setup", then Dressthe ENTER
button,
Press the ENTERbutton m select
"Language",
Press the •
or •
au[mn to select
the appropna[e mnguage, then press
the ENTERout[on,
Press the EXITbutton to exit,
21
I
I
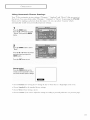
OPERATION
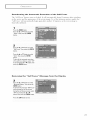
Adjusting
the
Screen
Automatically
(Self
Focus)
The %elf Focus" feature automatically finds the optimum picture quality when blurting,
overlapping colors or incorrect focus occurs. These conditions may be caused by moving your
TV.
3ress the MENU button.
3ress the • or • PUT[On
TOselect
"SeTup", then Dress the ENTER
button.
3ress the • or • button to select
"Self Focus".then pressthe ENTER
button.
The "Self Focus" is se ec_ea.
3ress the ENTERbutton again.
The self focus process beg ns with
the message "Self Focus" and
horizontal bar is disptayea.
When it is finishea, all of things will
disappear ane the optimum picture
nuality can De enjoyea.
Self
Focus
•
_
_l During tl-le process, minor
distortions of the picture may
occur. At this time, the colors
may diffuse and a searching
pattern will appear on the edges
of the screen. This is a normal
part of tl-ie ac!justment.
h=_;r411_
3ress the EXIT button to exm
Alternate method:
Sirnply press the SELFFOCUSbutton
on the remote control to enjov the
up[ mum pmrure qua try,
• Changing channels and any other signal changes will pause the self focus until a stable signal has
returned. It resumes after the signal has been stabilized. This feature will not work without a signal.
• Ambient light that is too bright may affect the self fucus. If this occurs, darken the environment
try again.
22
and
I
I
OPERATION
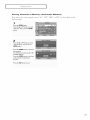
Deactivating
the
Automatic
Execution
of the
Self
Focus
The %elf Focus" feature starts on defauh. It will automatically begin 10 minutes after switching
on the power and the appearance of the screen image. To set the optin*um picture qualit> the
%elf Focus" will automatically begin again after another 30 nfinutes, as the screen image is
then fully stabilized.
Press the MENU button.
Press the • or • but[on to select
"Setup", then cress the ENTER
button.
Language
English
2
Press the • or •
button to select
"Self Focus".men press the ENTER
button.
Press me •
or •
3utton to select
"Auto". the-i press the ENTER
but[on.
To turq offthe automatic execution
of the self focus feature select "Off"
by press ng the • or • butter then
press the ENTERbutton.
Removing
3
Press the •
the
(
"Self
Focus"
Message
from
the
Display
7¸¸/¸(
Oi V button to select
!:Message Display", then press the
ENTERbutt0n,
To remove the message !!Self Focus';
and horizontal bar on the screen
during the se!f focus process, select
:_Off'fby pressing the • or
button, then press the ENTERbutton.
Press the EXITbutton to exit.
23
I
I
OPERATION
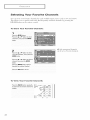
Memorizing
the
Channels
Your TV can memorize and store all of the available channels for both '_off-air" (antenna) and
cable channels. After the available channels are memorized, use the CH A and CH v buttons
to scan through the channels. This elmfinates the need to change channels by entenng the
channel digits.
Selecting
the
Video
Signal
Source
Before your TV can begin n*emodzmg the available channels, you must specify the type of
signal source that is connected to the TV (i.e., an antenna or a cable system).
3ressth_ MENU button,
_ress the •
or •
Air/CATV
Air
ou[[on TOselect
"Channel". tnen press the ENTER
button.
_l If you are connected to an
antenna, press the • or •
button to select "Air'.
_ress the ENTERbutton tc select
"Air/CATV',
_1 If you connected
tlle • or • button
_ress the • or • button to select
"Air" "STD'. "HRC" or "IRC'. then
type of cable system:
'HRC
or"IRC.
pressthe ENTERbutton,
cable, press
to select the
%TD',
3ress tqe EXIT button to exit.
• "STD, HRC" and "IRC identify various types of cable TV systems. Contact your local cable
company to identify flxe type of cable system that exists m your particular area. At this point the
signal source has been selected. Proceed to %tormg Charmels m Memory".
• Subscription
24
cable services require service-specific
requirement
for viewing.
I
I
OPERATION
Storing
Channels
in Memory
(Automatic
Method)
Fh_st,select the coH_ectsignal somve ('_Ai_
_'', '_STD", '_HRC"ol__IRC") as descdbed on the
previous page.
Press the MENU button,
Pressthe • or • butmnto select
Air/CATV
Air
"ChanneF, then Dress the ENTER
button,
Press the •
or •
button to select
"Auto Program". then Dress the
ENTERbutton,
Press the ENTERbutton to star[ the
auto
progr_
ra,
The TV begins memorizing all of the
available sm_tons
Press the ENTERbutton at any z/me
to interrupt me memorization
proces_
Press the EXITbutton to exit.
25
I
I
OPERATION
Adding
and
Erasing
Channels
To add channels that were not memorized (or to delete unwanted channels from memolT):
3ress the MENU button,
3ress me • or • bJtton To select
"Channel". men press the ENTER
button,
2
3ress the •
or •
buttor to select
"Add/Delete", then press the ENTER
button,
Reoealedly pressing [he ENTER
button w ill alternate between add
channel and delete channel,
_ress the CI-I/_ or 6Hv button Ior
number buttons} to switch tc the
appropriate channel, than repeal
above.
3ress the EXIT button to e* [.
Alternate method:
SimDy press the ADD/DEL button on
me remote controlto add channe=s
that were not memorized or to delete
unwanreo cnannels from memory,
26
Air/CATV
Air
I
I
OPERATION
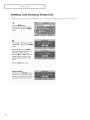
Changing
Using
the
Channels
Channel
Buttons
Pressthe cl-I/', or CHv butt0nt0 changechannel_
When you press the CH A or CH v button, the TV changes channels m sequence. You will
see all the channels that the TV has memonzed. (The TV nlust have memorized at least three
channels.) You will not see channels that were either erased or not memonzed.
Using
the
Number
Buttons
Use the number buttons to quickly tune to any channel.
Press the number buttons to go directly to a channel,
For example, to select channel "2T'; press the "2", then "T'; The TV wi!l
change channels
when you press the second
number,
When you use the number buttons, you can directly select channels that were either erased or
not
l'llel'no
l-ize d.
To select a channel over 100, press the +100 button. (For channel '{122", press the +100
button, then '{2",then '{2".)
To change to single-digit channels (0-9) faster, press the '{0"before the single digit. (For
channel '{4", press the '{0",then 'W'.)
Using
the
Previous
Channel
Press the PRE-CHbutton,
The TV changes to the last cnanne
yoL,were watching,
//
7'
27
I
I
OPERATION
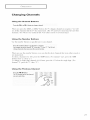
Selecting
Your
Favorite
Channels
Yo_.tcan store yo_.trhvofite channels for each available input source (s_.tchas TV and CATV).
This allows vouj to quickly and easily find frequently watched channels by pressing the
FAV.CH button on the remote control.
To Store
Your
Favorite
_ress the MENU button,
_ress the • or • button to select
Channels:
Air/CATV
Air
"Channel". men press the ENTER
button.
_1 Only memorized channels
can be set as Favorite channels.
_ress the •
or •
button to select
"Favorite Channels". then press the
ENTERoulmn
3ress tne•
or • button to select a
channel, then Dress the ENTER
button,
3ress the ENTERbutton again to
deselect the selected channel.
3ress the EXIT button to exit,
To View
28
Your
Favorite
Channels:
I
I
OPERATION
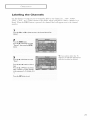
Labeling
the
Channels
Use this feature to assign an easy-to-remember label to any channel (i.e., '_CBS', '_ESPN",
'?BS2", CNN12 etc.) A label consists of five fields, where each field is a letter, a number or a
blank. When the INFO button is pressed, the channel label will appear next to the channel
rlt.tl'llbe t2
Press the CHA or CHV button to tune TOme channel that will be
labalec
Press the MENU button.
Air/CATV
Air
Press tile • or V but[on to select
"Channel", then Dress the ENTER
button.
Pressthe •
"Name"
or V buttontoselect
_1 If you add or delete the TV
channel, the labeled channels list
will also be added or deleted.
Press the _ or I_ bu[mn TOselect a
field.
Press the • or • button to select a
latter, a number or a blank. (Results
in this sequence: A...Z, 8. blank, 0_.9,
-},
Press the EXIT button to exit.
20
I
I
OPERATION
Picture
Control
Yo_.tcan use the on-screen menus to change the '_Contrast', '_Bfightness", %harpness', '_Color"
and '%mr" according to personal pretcrence. (Ahernativel> yo_.tcan use one of the automatic
settings. See next page.)
Customizing
the
Picture
_rass the MENU button,
3rass the • or • button to select
Mode
Dynamic
"Picture". man press the ENTER
button,
3rass the •
or •
button to select
"Custom". then press the ENTER
button,
_rass the A or •
button to select a
particular item, then press the
ENTERbutton
Press the 4 or • button to increase
or aecreasa me value of a particular
item,
3ress tna EXIT button to exit.
30
Contrast
i00
I
I
OPERATION
Using
Automatic
Picture
Settings
Yo_.trIV has automatic picture settings ('_D?¢lamic", %tandard" and '_Movie")that are preset at
the factor?_ Ybu can activate either '_D?_lamic", '_Standard" or '_Movie"by pressing the RMODE
button (or by making a selection from the menu). Or, you can select '_(_ustotn" which
automatically recalls your personalized picture settings
Press the MENU out[on,
Press me • or • button to select
Mode
"Picture". then press the ENTER
button,
Pressthe ENTERbuttonto select
"Mode".
Press the • or • button to select a
particular item. then Dress tile
ENTERbutton,
Press the EXITbutton to exit,
Alternate method:
Press the PMODEbuttononthe
remotecentre]repeatedlyto select
oneof the standardpicturesettings,
!i i
il¸iii
• Choose Dynamic lot viewing the TV during the day or when there is a bright light in the room
• Choose Standard
lot the slandard taclory seltings
• Choose Movie when viewing a movie
• Choose Custom if you want to adjust the settings according to personal prekrence
(see previous page)
31
I
I
OPERATION
Sound
Control
Adjusting
the
Volume
Pressthe VOI + or VOL- buttonsto increaseor decreasethe volume,
Using
the
MUTE
Button
At any time, you can temporarily
cut off the sound
by using the MUTE button.
Press the MUTE button on the
remote €ont[oL
The message "Mute" is displayed
and the sound cuts off.
I BITI_
To turn mute off press th e MUTE
button again or, press either the
VOL- or VOL+ button,
Customizing
the Sound
The souncl settings can be ac[justed to suit youu_pe_sonal pl_ek'_ence. (Ahematively, you can use
one of the automatic settings. See next page.)
3ress me MENU button,
3ress the • or • button to se]ec_
"Sound". then press the ENTER
button.
3ress the •
"Enualizer".
or •
button to select
then uress the ENTER
button.
3ress the _1 or • button to select a
particular item to be changed.
3ress the • or • button to increase
or oecrease the value of a particular
item.
3ress the EXIT button to exit.
32
Mode
Custom
I
I
OPERATION
Using
Automatic
Sound
Settings
Ybur TV has automatic sound settings ('_Standard", "Music", "Movie" and "Speech") that are
preset at the factor)_ Ybu can activate these sound settings by pressing the S.MODE button (or
by making a selection Iron* the menu), or you carl select 'Custom", which automatically recalls
your personalized sound settings.
Press the MENU button,
Press the • or • 3utton to select
Mode
Custom
"Sound", then Dress the ENTER
button,
Presstha ENTERbuRonto select
"Mode".
Press the • or •
button to select a
parncmar item then Dress tile
ENTERbutton,
Press the EXITbutton to exit,
Alternate method:
Press the &MODE button on the
remo[e control repaatedlyto select
one of the standard sound settings,
• Choose Standard
for the standard
factory settings.
• Choose Music when watching music videos or concerts.
• Choose Movie when watching movies.
• Choose Speech when watching a sho,a' thai is mostly dialogue (i.e., news).
• Choose Custom
to recall your personalized
settings.
33
I
I
OPERATION
Setting
the
Clock
Setting the clock is necessat T ill order to use the vadous timer fcatcu*esof the T'v_Also, you can
check the time while watching the TV OCtSt press the INFO button.)
Option
1: Setting
the
3ressthe MENU button.
3ress the • or • button to select
Clock
Manually
Language
English
"Setup", then Dress tile ENTER
but[on.
3ress tile A or •
button to select
"Time". then pl sss me ENTER
button.
3ressthe ENTERbuttonto select
"Clock
3
3ress the ENTERbutton to se]ecz
"Clock Mode".
3ress the • or • button to select
"Manual". then Dress the ENTER
button.
4
3ress the •
or •
button to select
"Clock Set", then press the ENTER
button.
3ress the 411or I_ button to move to
"Hour". "Minute" or "am"
Set the clock you want by pressing
the • or • button, then Dress the
ENTEReuI[on
3ress the EXIT button to exit.
34
_1 The current time will appear
every time you press the 1NFO
button.
_1 You can set the hour and
minute directly by pressing the
number buttons on the remote
control.
I
I
OPERATION
Option
2: Setting
the
Clock Automatically
The Clock can be set automatically if you are receiving a digital signal.
Press the MENU button.
Press the • or • 3utton to select
Language
English
•
"Setup". then Dress the ENTER
button.
Press the •
or •
3utton to select
Clock
"Time". men press the ENTER
burton.
Press the ENTERbutton to setecr
"Clock".
"_ Certain broadcasts may not
transmit the correct time. In this
case, set the time manuall}<
Press the ENTERbutton to smect
"Clock Mode".
Press the • or • button to select
"Auto", then press the ENTER
button.
4
_v
Press me • or • button to select
"PBS Channel".then oressme
ENTER _utton.
Press the • or • button to select
your local PBS channe .tllen press
the ENTERbutton.
conth-med...
35
I
OPERATION
3ress the • or • button to se]ect
"Time Zone". then 3ress the ENTER
button.
_ress the • or • buttor to select
the time zone for your local area
men press the ENTERbutter
• ATE
EAST
CE]X
MTN.
PAC
ALAS.
HAV_
: Arlamlc
: Eastern
: Cer_rral
Moml_am
: Pacific
: Alaska
: Hawaii
6
3ress the •
or •
bitten to select
"DST" (Daylight Saving Time),then
press the ENTERbutton.
3ress the • or V button to select
"Yes" or "No". then press the ENTER
button.
3ress tqe EXIT button to exit.
36
I
_1 Tile set thue can be changed
according to the broadcasting
station and signal when you set
up auto lime.
]f there is a difference between
the real time and set time, please
set up manual time.
I
I
OPERATION
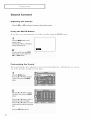
Viewing
an
External
Signal
Source
Use the remote control to switch between _,4ewing signals trom connected equipment, such as
VCR, DVD, Set-Top box and the TV source (broadcast or cable).
Setting
the
Signal
Source
Press tne MENU button,
Press the ENTERbutton to semc[
"lr 3ur"
Press the ENTERbutton to select
"Source List",
Press the •
3r •
signal source.men
button.
button to select a
pressthe
ENTER
Source List
TV
_1 Wllen you connect equipment
to the TM you can choose
between the following sets of
jacks : 'AV3, "S-Video on the
TV_ side panel or 'AVI'. "AV2 ,
'Component 1' or 'Component2"
on the TV_ rear panel.
Press the EXITbutton to exit
Alternate method:
Press the SOURCEbutton on the
remo[e control repeatedly to select
an external signa source
37
I
I
OPERATION
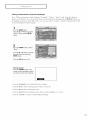
Assigning
Names
to External
Sources
This feature enables you to name the input source you have connected.
3ress the MENU button
3ress the ENTERbutton to select
Source List
"Input"
3ress the • or • bJEor to select
"Edit Name". then Dress the ENTER
button.
3tess the •
or •
buttonto select a
stgnal sourc .=.then Dress the ENTER
button.
3ress the • or • button to setect
an external dev ca, then press the
ENTEREJtton
3ress t-le EXIT button to exit.
38
AVI
<1 The device names available are
listed.
VCR
DVD
Cable STB
HD STB
Satellite STB
AV Receiver
DVD R{,ceiver
Game
Camcorder
DVD Combo
DHR (DVD HDD R_'corder)
PC
SPECIALFEATURES
Fine
Tuning
Channels
The Free Tuning function lets you manually adjust the TV_ tune1_if you have d_ffk'uhy tunmg
channels.
Press the MENU button.
Press the • e- • 3ut[on to select
Air/CATV
Air
"Channel", then press the ENTER
button.
Pressthe•orVbuttonto
"Fine Tune"
select
Press the 41 or • button to aajus[
tile fine tuning.
To store the fine tuning setting in the
TV's memory, 3ress the • button.
The symbol "8" is diep[ayen.
To reset the fine tuning to "00'.
press the V button.
Press tqe EXITbutton to exit.
39
I
SPECIAL
I
FEATURES
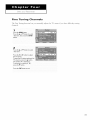
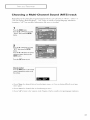
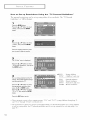
Changing
the
Screen
3ress the MENU button.
3ress the • or v button m select
Size
Mode
Dynamic
"Picture". then pressthe ENTER
button
2
_ress the •
or •
button to select
16:9
_1 In [he "Zoom 1" and "Zoom 2"
mode. liftmg Asavailable bpres_tng the • _r • button.
"Size", then pressthe ENTERbutton.
_ress the •
or •
_1 Capuons or"subtitlc_, mtght be
m_erruptcd in the "Cincnml" and
"Cinema2" modes.
button to select
me screen format you want.
3ress the EXIT button to exm
Alternate method:
3ress the ESIZE button on the remote control repeated y m select one of the screen format you want.
Viewing
with
a 4:3
signal
\rv1-1ena 4-:3 eignal ie received
Viewing
with
a 16:9 signal
(When a 16:9 signal is received
The illuetrations below sh 3w the change of picture while viewin_ a DVD title.
40
I
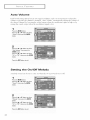
SPECIAL
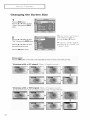
Digital
I
FEATURES
Noise
Reduction
If the broadcast signal received by your TV is weak, you can activate this feature to help reduce
any static and ghosting that may appear on the screen.
Press the MENU button.
Press the • or V button to select
'fPicture!!, then press the ENTER
button.
Press the •
or V button to select
'fDigital NR", thea press the ENTER
button.
Press the • or V button to Select
!!On" or "Off",then press the ENTER
button.
Press the EXITbutton to exit.
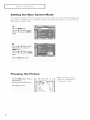
Selecting
the
Color
Press the MENU button.
Press the • or • but[on to select
Tone
Mode
Dynamic
"Picture", then press the ENTER
button.
Press the •
or •
button to select
"Color Tone". then pressthe ENTER
bu[mn.
Press the 4 or • button to increase
or decrease the value ofthe color
tone ("Warm 10-1". "Normal". ano
"Cool 1-10").
Press tqe EXITbutton to exit.
41
I
SPECIAL
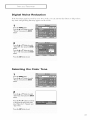
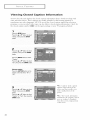
Setting
I
FEATURES
the
Blue
Screen
Mode
If no signal is being received or the signal is very weak, a blue screen automatically replaces the
noisy picture baclcgro_.md. If you wish to continue viewing the poor picture, you must set the
"Blue Screen" mode to 'Off_'.
;ress the MENU button,
;ress tile • or • button to select
Mode
Dynamic
"Picture" then pressthe ENTER
bu_on.
3resstheAorVbu_ontoselect
"Blue Screen'.then eressthe
ENTERbutton
3ressthelor•
bu_ontoselect
"On"or°Off'.then
bu_or
pressthe ENTER
;ress tqe EXIT button to exit.
Freezing
the
Picture
.....
Press the STILLbutton to freeze a
moving picturel
(Normal sound will still be heard,)
Press again t 0 cancel.
42
"_ The still function doesn't
operale in "Cotnponenl 1" or
"Cotnponenl2" mode.
I
SPECIAL
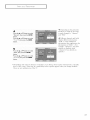
Choosing
I
FEATURES
a Multi-Channel
Sound
(MTS)
track
Depending on the particular program being broadcast, yo_.tcan listen to '_Mono', %tereo" or
%AP (Secondary Audio Program)". %AP" audio is usually a foreign-language translation.
Sometimes 'SAP" has unrelated information like news or weather.
Press the MENU button,
Press the • or • button to select
"Sound", then Dress the ENTER
button,
Press the •
or •
Mode
Custom
button to select
"MTS", men press the ENTER
button,
Press the • or • button to select a
youwan[, men press the
ENTER button,
setting
Press the EXITbutton to exit,
Alternate method:
Press the MTS button on the remote
control reueatedly to select one of
the settings,
_r-dl
R[-'IR'_]R[R'_I
• Choose Mono lot channels that are broadcasting in mono, or i[you are having ditliculty receiving a
stereo signal.
• Choose Stereo lot channels lhal are broadcasting
in slereo.
• Choose SAP to listen to the Separate Audio Program, which is usually a loreign-language translation.
43
I
SPECIAL
Auto
I
FEATURES
Volume
Each broadcasting station has its own signal conditions, and it is inconvenient to acljust the
volume every time the channel is changed. "Auto "_blume" automatically acljusts the volume of
the desired channel by lowenng the sound output when the mod:ulation signal is high or by
raising the sound output when tile modulation signal is low:
1
3ress the MENU but[on.
_ress me A or • button To select
Mode
Custom
"Sound". men oress the ENTER
button.
3ress the • or • DUEOrto select
"Auto Volume". then DressThe
ENTERoulmn
_ress the • or • butter to select
"On" or "Off". then press the ENTER
butmn.
3ress tqe EXIT button to exit.
Setting
A melody
the
sound
can
On/Off
be set to come
Press the MENU button,
Press the • or • button to select
"Sound"; then press the ENTER
button,
Press the • or • button to select
'_Melody", then press the ENTER
button.
Press the • or• button to select
t_On'_or "Off'_, then press the ENTER
button,
Press the EXIT button to exit.
44
Melody
on when
the
TV is powered
On
or Off.
I
SPECIAL
I
FEATURES
BBE
BBEis a buih-in effect that adds clafit)_ punch and dynandcs to the sound.
1
Press the MENU button,
Press the • or • 3utton to select
"Sound", then Dress the ENTER
bu[mn,
Press the •
or •
Mode
Custom
3utmn to select
"BBE% then Dress the ENTERbutton,
Press the • orV bJtmnto select
"0n" or "0if". then press the ENTER
button,
Press the EXIT button to exit,
Alternate method:
Press the BBEbutton on me remote
control reeeatedly to select "On" or
"Off",
45
I
SPECIAL
Viewing
I
FEATURES
Closed
Caption
Information
Your TV decodes and displays the closed captions infommtion that is broadcast along with
some television shows. These captions are usually subtitles for the hearing impaired or
translations into other languages. All VCRs record the closed caption signal trom teleqsion
programs, so pre-recorded qdeo tapes can also deliver closed-caption infom*ation. Check for
the closed caption symbol (E_)
on tile tape's package or your TV program-schedule.
1
3ress the MENU button,
3ress the •
"Setup",
Language
English
or V button to select
theE oress tile ENTER
button.
3ress me •
or •
but[on m select
"Caption", then E"essthe ENTER
button,
3ress the ENTERbutton to select
"Caption",
3ress the • or • button to select
"On". then Dress the ENTERbut[on,
Alternate method:
Press the CAPTIONbutton on the
remote control to select "On" or
"Off"
3ress the • or • put[on m select
"Mode", then oress the ENTER
button,
_ress me • or • bur[or to select
"Caotion" or "-ext". then oress the
ENTERoutron
46
off
"_ In 'Caption" mode, caption
appears at the bottom of the
screen, and they usually cover
only a small portion of the
picture.
"_ In 'T_'xt" mode, inlurmation
unrc,lated to the program, such as
news or weather, is displayed.
T{'xt ohen covers a large portion
of the screen.
I
SPECIAL
Press the •
e" •
FEATURES
button to select
"Channel", then press the ENTER
butmn.
Press the • or • button to select
"1" or "2", then Dress the ENTER
button.
5
Press the • 3r • button to select
"Field". then Dressthe ENTER
butmn,
I
_1 Depending on the particular
broadcast, it might be necessary
to make changes to "Channel"
and
"Field".
_1 Dillcrent channels and [ields
display dillcrent inlormalion:
"Field 2" carries additional
inlormalion lhal supplements lhe
inlormation in "Field 1". (For
example, "Channel l" may have
subtitles in English, while
"Channel 2" has subtitles in
Spanish.)
Press the • o" V 3utton to select
"1" or "2", then E"essthe ENTER
button,
• Misspellings and unusual characters sometimes occur during closed caption transmissions, especially
those of live events. There may be a small dela} before captions appear when you change channels.
These are not malfunctions of the T'_(
47
I
SPECIAL
Setting
I
FEATURES
the
On/Off
3ress the MENU button.
3ress the • or • button to select
Timer
Language
English
'*Setup', then Dress the ENTER
button.
2
3ress the •
or •
button to select
"Time". then press the ENTER
button.
3ress the • or • button to select
"On Timer". men press the ENTER
button.
3ress the • or • button to adjust
"Hot r'. then Dress the • button to
move to the nex[ s[ep.
Set other items using the same
memod as above.
When finisnea, pressthe MENU
button to return.
3
3ress tne • or • au[[on TOselect
"Off Timer". then eress the ENTER
button.
3ress the • or • button to adjust
"Hour". then eress the • button to
move to the next step.
Set other items using t]* _ same
method as above.
3ress tqe EXIT button to exit.
48
_1 The current thne will appear
every thne you press the 1NFO
button.
_1 You can set the hour and
minute directly by pressing the
number buttons on the remote
control.
I
SPECIAL
Setting
Thc
deep
I
FEATURES
the
Sleep
time1 _automatically
dluts
Timer
o_ the TV a_tel _a pl_csct time
Press the MENU button.
Press the • or • button to select
Language
(h_om 30 to 180
minutes).
English
"Setup", then press the ENTER
button.
2
Press the •
or •
button to select
"Time". then press the ENTER
burton.
Press the • or • 3utton to select
"Sleet) Timer". then pressthe ENTER
button.
Press the • or • button to select
me preset time you want. then press
the ENTERbutton.
Press the EXITbutton to exit.
Alternate method:
Press the SLEEPbutton on the
_
[gab
remote control repea[ed]y until the
appropriate time interval aeeears
lany of the preset values from "30"
to "180" mmu[es_
49
I
SPECIAL
Using
I
FEATURES
the
V-Chip
Access to channels and programs is controlled by a password (i.e., a 4-digit secret code that is
defined by the user). The on-screen menu will instruct you to assign a password (and you can
change it later, if necessa®).
How
to
Change
Your
3ress the MENU button.
3ress me • or • button to select
Password
Language
English
"Setup', then oress the ENTER
button.
Thc dcfauh pm nnmbcr for a
new IV sol is "0000".
2
3ress the •
or V button To select
_l If you forget d-lcpin number,
press thc remole control buttons
m the following scqucnc< which
rescm the pin to '0000":
POW-ER (Off), MUTE, 8, 2, 4,
POW-ER (On).
"V-Chip". then Dress the ENTER
button.
3ress the number buttons to enter
your current 4-digit pin number.
3
<USA>
<Canada>
The "V-ChiD" menu is displayed
3ress the •
or •
DUEOrto select
"Change PIN",then press me
ENTERbutton
3ress tne "lumber buttons to enter
your new 4-digit pin numDer,
Re-enter vour new Din number to
confirm.
3ress the EXIT button to exit.
50
PIE
I
SPECIAL
How
to
Enable/Disable
Press the MENU button,
Press the •
"Setup",
or •
I
FEATURES
the
Rating
Language
Controls
English
3u[ton to select
then eress the ENTER
bUTTOn.
Press the •
m •
button to select
"V-Chip '_, then press me ENTER
button,
Press the number buttons to enter
your current 4-digit Bin number,
3
<USA>
<Canada>
The "V-Chip" menu is dise ayed.
Press the ENTERbutton to select "VChiF Lock"
Press the • or • button to select
"Yes", then Dress the ENTERbutton,
Press tqe EXITbutton to exit,
51
I
SPECIAL
How
to
Set
I
FEATURES
up
Restrictions
Using
the
"TV
Parental
The parental t_estdctions can be set up using eithel _ of two methods:
Guidelines"
or "MPAA Eating".
3ressthe MENU button.
_ress the • or • button to select
Language
Guidelines"
The '%V Parental
English
"Setup", then press the ENTER
button.
3ress the •
or •
t_uttonto select
W-Chip", then press the ENTER
button.
3ress the number buttons to enter
your current 4-digit pin numeer.
The "V-Oh 3" menu is displayed.
3ress the •
or •
button to select
"TV Parental Guidelines".then press
the ENTERbutton,
_1 TV-Y
TV-Y7
4
Youcan incependentlylockthe TV
ratings,The lockedTV(FCC)ratings
are indicatedby the "B",
3ress the • or •
but[on zo smect
TV-G
TV-PG
TV-14
TV-MA
: Young children
Children 7 and over
General audience
Parent Guidance
Viewers 14 and over
Mature Audience
the appropriate restriction, then
press the • or ENTERbutton.
3ress the • or v button to select
"B" or "U" men pressthe ENTER
button.
3ress the EXIT button to exit.
These categories consist of two separate groups: 'T_¢Y'' and 'T_¢Y7 '' (young children through age 7),
and 'TV-G" through 'T_<MA '' (everybody else).
The restrictions lot these two groups work independently: If a household includes very young children
as well as young adults, the TV parental guidelines must be set up separately lot each age group. (See
page 54.)
52
I
SPECIAL
How
to
Set
I
FEATURES
up
Restrictions
Using
the
"MPAA
Rating"
The Movie rating system uses the '_MPAA"(Motion Picture Association of America) system,
and its main application is for movies.
When the rating controls is on, the IV will automatically ])lock any progt*ams that are coded
with olzjectionable ratings (either 'MPAA Rating" or 'TV Parental Guidelines").
Press the MENU button.
Press the • 3r • button to select
Language
English
"Setup", then orese the ENTER
button.
Press the •
"V-Chip",
button,
or •
3utton to select
then press the ENTER
Press the number Buttonsto enzer
your current 4-digit pin number.
The "V-Chip" "nenu is displayed.
Press the •
or • button to select
"MPAA Rating", then eress the
ENTERbutton.
4
You can independently Iockthe
movie ratings. The locked movie
ratings are indicated by the "R"
Press the •
°
@
I
,
;i
il
d
or • button to select
the appropriate restriction, then
press the I_ or ENTERbutter
Press the • or • button to select
"B" or "U',men
button.
q_M1
press the ENTER
Press the EXIT button to exit,
53
J
SPECIAL
Important
FEATURES
Notes
About
]
Parental
Locks
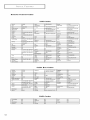
Explanation of the MPAA and TV (FCC) Rating Systems:
TV
(FCC)
Age-Based
Ratings
TV-MA
TM-G
•
V]ature audierces only. This program may contain
"naturethemes profane language, graphic
violence and explicit sexual content,
General audience. It contains little or no violence.
13/-14
TV-Y7
Directed to older children. T,lemes and elements
Parents strongly cautioned. This program may
contain sophisticated themes, sexual content.
strong mnguage and more intense violence.
qo strong language, and little or no sexual
d alogua or situa[ions
mthis program mayinclude mild physical or
....................................
q under
me age of seven.
TV-PG
Parenra guidance suggested. The program may
con[air nfrequent coarse anguage, limited
violence, some suggestive sexual dialogue ana
TVqt
All chi dren. The themes and elements in this
sJruaI
young audience, including children from ages two
- six.
TV
ons,
(FCC)
V
Content
Category
program are specifically designed for a very
MPAA
Violancel
S
G
P6
Sexual €ontent
l
D
FV
System
(Movies)
General audience. No restriction.
Children Under !3 Should be
accompanied by an adult
Offensive languagel
Dialogue sa×ual innuendo,
Rating
P6-13
Fantasy or carteon violence,
Parenta! guidance suggested,
Children under t3 Should be
accompanied by an adult
R
Restricted, Viewers should be 17 or
NC,!7
NR
Not classified. Viewers should be 17
or older,
Not rated.
• TV (FCC) ratings : The particular rating that you have selected will be locked (and indicated as arc, d
"L" on a blue background). Also, all o[ the age-based ratings will be locked within the particular group
(i.e., "group 1" or "group 2"). Suppose that the T_¢G rating and all o[ its contents (V,S, L, and D) are
locked. In that case, more restrictive ratings (T'vCPG,T'_C14, and T_¢MA) and all of their contents (V, S,
L, and D) are automatically locked as well.
• MPAA ratings : The particular rating that you have selected ,,',+illbe locked. In addition, more restrictive
ratings will be locked as well.
• Neither TV (FCC) ratings nor MPAA ratings apply to news programs.
54
I
SPECIAL
How
to
Set
I
FEATURES
up
Restrictions
Press tne MENU button.
Press the • o" • autton to select
Using
the
Language
"Canadian
English"
English
"Setup", then press the ENTER
button.
Press the •
or W button to select
"V-Chip*, men pressme ENTER
button.
Press me number buttons To enter
your current 4-digit pin number.
3
<Canada>
The "V-Chip" menu is displayec
Press the •
or • button to select
"Canadian English", then Dress the
ENTERbutTon.
4
<Canada>
Press the •
or • buttonto select
tile appropriate restriction, then
press the I_ or ENTERbutter
Press the • or • button to select
"B" or "U",men press the ENTER
button.
Press the EXIT button to exit.
E
Exemp[ programming includes_,news, spor[s, documentaries
and other information programming, talk snows, music videos.
and variety programming.
C
Programming intended [orchildren under age 8.
C8+
Programming generally considered acceptable for children 8
years and over to watch on their own.
G
Genera programming, suitable for all auetences.
PG
Parental Guidance.
14+
Programming contains memes or content which may not be
suitable for viewers under the age of 14.
18+
Adult programming
55
I
SPECIAL
How
to
Set
I
FEATURES
up
Restrictions
Using
3ress tile MENU button,
3ress the • or • button to select
the
Language
"Canadian
English
"Setup", then press the ENTER
button.
3ress the •
or •
Du[tonto select
"V-Chip", then oress the ENTER
bu_on,
Press the number buttons to enter
your current 4-digit pin numoer.
3
<Canada>
The °V-Chic" menu is displayed
3ress the • or • button to setecz
"Canadian French".then E"essthe
ENTERout[on
<Canada>
3ress the •
or •
buttonto se ect
the appropriate restriction, then
press the • or ENTERbutton,
3ress the • or • button to setect
"B" or"U".then
button.
press the ENTER
3ress zhe EXIT butter to exm
E
Exempt programming includes.,.news, soorts, decumenmnes
aria other information programming, talk shows, music videos.
ano variety programming,
G
General.
8 ans+ 8+ General-Not recommended for young cnueren
13 arts+ Programming may net be suttable for children under the age
of 13.
16 ans+ Programming is not suitable for chi dren unoerme age of 16.
18 arts+ Programming restricted to adults.
56
French"
SPECIAL
FEATURES
Customizing
Your
]
Remote
Control
Yo_.trTV comes equipped with a universal remote control. In addition to controlling the T'v_the
universal remote control can also operate a VCR, Cable box, DVD and Set-Top Box made by
Sams!.mg(even if yo!.trVCR, Cable box and DVD are made by manufacturers other than Sams!.mg).
• The remote control might not be compatible with all VCRs, DVD players and Cable boxes.
Setting
Up
DVD
player)
Your
Remote
Control
to
Operate
Your
VCR
(Cable
box
or
1
Turnoff yourVCR(Cableboxor OVDplayer),
Press the MODE button to switch the remote control to the VCR gABLE or
DVDI mode.
_1 The remote control has five
modes: TV, STB, VCR, CABLE
and DVD.
3
OnyourSamsungremotecontrol,pressthe SETbutton,
4
Enter3 digitsofthe VCR[Cableboxor OVDpiayer_codelisted on next
pagefor yourbrandof VCR(Cableboxor DVDplayer),
5
Press the POWERbutton an me remote control Your VCR,Cable cox or
DVD player) should turn on. If yc Jr VCR{Cable box or DVD player) turns
on, your remo_e con[rm is now sa_ correctly.
_1 Make sure you enter 3 digits
of the code, even if the first digit
is a "0". (If more than one code
listed, try the first one.)
_1 If your VCR (Cable box or
DVD player) does not turn on,
repeat steps 2, 3, and 4, but try
one of the other codes listed for
the brand of your particular
VCR (Cable box or DVD player).
6
Onceyour remo_ecomrolis set up,pressthe MODEbuttonanytime you
we_tto usethe remorato operateyour VCR(Cableboxor DVDDayeH,
When your remote is in the TV mode, the VCR (or DVD player) control buttons (RE'W, STOP,
PLAY/PAUSE and FF) will still operate _our VCR (or DVD player).
\Vhen your remote control is in the STB, VCR, CABLE or DVD mode, the volume bLttlons still
control }our TV_ volume.
57
I
SPECIAL
Remote
I
FEATURES
Control
Codes
VCR
Aamiral
Aiwa
015,088
024
Akai
026,031,032
Audio Dynamics
Bell & Howell
022,025
O11
Broksonic
O19
Candle
Hilachi
014,024,044,045
Quasar
017,053
InslantRepIW
JC Penny
017
011,014,016,017,023,025,
Radio Shack
011,015,017,018,021,024,
039,044,060,062
RCA
028,036,052,062
009,014,016,017,037,044,
JCL
Ol 1,017,023r025,039,055
O11,023,025,039,055
082
Realistic
O16,018,022,054,055,061
Kenwood
KLH
Canon
Ol 7,062
LG{Golds_ar}
001,002,007,018,023,055,
Samsung
000,016,022,031,041,051
Citizen
016,018,022,054,055,061
069
Sansui
O25
Colortyme
Craig
023
016,021
011,021
009,016,017,023,024,055,
024
040
024
SanTo
Scott
Curtis Mathes
Lloyd
Logik
LXI
Sears
011,014,018,021,027,028,
Magnavox
Marantz
0I 7,038,062,065
011,017,023r025,038,039,
062,073,076
Daewoo
003,004,005,006,007,008,
022,054,085
046,063,078
011,015,017,018,021,024,
028,036,052,062
022,050,058,077
044,052,057
055,070
Sharp
Shinlom
015,036,048,054
DB
023,025
MTC
016,024
Signalure
026,035,040,064
024
Dimensia
009
Multi_ech
016,024,040,041
Sony
026,035,047
Dynatech
Eleclrohome
024
036
NEC
011,023,025,039,055,070,
073
Sylvania
Symphonic
017,024,038,062,065
024
Emerson
O17,018,019,022,024,029,
032,036,043,050,051,056,
Optimus
Panasonic
015
017,062,084,086
Tand7
Talung
011,024
039
058,066,071,074,076,077,
079
Pentax
PentexResearch+
014,044
055
Teac
Technics
024,039,078
017
O11,021,027,028,052,057,
067
Philco
017,038,062,065
Teknika
Philips
O17,038
TMK
017,018,02a,030
076
Funai
024
Pioneer
014,025,042,059
Toshiba
014,022,028,057,058
General Electric
Go Video
009,016,017,041,062
016
Portland
PROSCAN
053,054,061
009
Toshiko
018
Totevision
016,018
Harman Kardon
023
Quartz
011
Fisher
Cable
Box
Codes
AnvMon
Cable S_r
015,016
015,016
Magnavox
015,016,027,029,034,036,
Signature
054
005
Nawoo
Sprucer
Starcom
035
DaeHan
037,040,041,048,049
001
DeaRyun8
003
NSC
017
Stargate2000
066
DongKuk
004
Oak
Sylvania
Eagle
Eastemln_rnational
015,016
020
Osk Sigma
Panasonic
024,046
024
019,067
002
Genemllns_ument
054
Philips
GI
012,013,023,031,032,033,
Pioneer
Hamlin
038,044,075,076,077
011,012,020,021,042,056
Hi_chl
Jermld
LO(Golds_r}
Macom
054
011,035,047,069
TaePyun_Yang
Texscan
015,016,027,029,034,036,
Tocom
025,029,057,058,063
037,040,041,048,049
Unka
039,040,049
Un versal
059,060
Rand_k
026,028,052
015,016
Viewslar
015,016,027,029,034,036,
045,051,054
012,018,023,081,032,033,
RCA
008,035,074
Re_al
011,020,021
Warner Arnex
037,040,041,048,049
052
038,044,054,070,073
Regency
Saewoo
010,04I
0O7
Zenith
022,050,065,069
Samsung
000,011,030,052,071,072
006
045,051
DVD
5S
Codes
Curtis Mathes
009
JVC
003
LG(Golds_ar
I
Panasonic
001
006
019,067
Codes
Philips
PROSCAN
007
Sharp
005
0O8
0O4
RCA
OO8
Sony
Toshiba
Samsun]
000
002
TROUBLESHOOTING
If the TV seems to have a problem, first try this list of possible problems
of these troubleshooting
tips apply, then call your _nearest senTice center.
Identifying
and solutions.
If none
Problems
Problem
Possible
Poor picture.
Try another channel.
AdJust the antenna.
Check all wire connections.
Poor sound quality.
Try another
Solution
channel.
Adjust the antenna.
Make sure the MUTE button is off.
No picture or sound.
Try another channel.
Press the SOURCE button.
Make sure tile TV is plugged in.
Check the antenna connections.
No color, wrong colors or tints.
Make sure the program is broadcast in color.
Adjust the picl ure seltings.
Piclure rolls verticallyt
Adjust the antenna.
Check all wire connections.
If you are nsmg a VCR. check the U'acking.
The TV operates erraticall_
Your
tel'note
conlrol
does
opera/e your TM
The TV won't lurn on
not
Unplug tl'e TV for 30 seconds, then try operating it
again
Press the MODE button lo pul your remote conlrol in
the TV mode.
Make sure the remote has ba/teries.
Make sure the wall oullet is working.
Make sure the remote has ba/teries.
59
APPENDIX
Cleaning
and
Maintaining
Your
TV
With proper care, your TV unit will give you many years of service. Please tollow these
guidelines to get the maxmmm performance
ff{)m your TT_
Placement
• Do not place the TV near extremely hot, cold, humid or dusty places.
• Do not place d-_eTV near appliances wid-_ electric motors that create magnetic fields, such as
vaculMi1
C1earl ers.
• Keep the ventilation openings clear: do not place the TV on a soft surface, such as cloth or paper.
• Place the TV m a vertical position onl}:
Liquids
• Do not handle liquids near or on the T\,( Liquids that spill into it can cause serious damage.
Cabinet
• Never open the cabinet or touch the parts inside.
• Wipe your TV with a clean, dry cloth. Never use water, cleaning fluids, wax, or chemicals.
• Do not put heavy objects on top of the cabinet.
Temperature
• If your TV is suddenly moved from a cold to a warm place, unplug the power cord, and allow at
least two hours for moisture that may have formed inside the unit to dry completel}_
Using
Your
TV
in Another
Country
If you plan to take vour_ TV v_dthyou to a foreign countr?; please be aware of the different
television systems that are in use around the world. A TV designed for one system may not
worl< properly with another system due to differences in the TV channel frequencies.
Specifications
Model
HC-P4241W
HC-P4741W
HC-P5241W
Vohage
AC120V
AC120V
A(2 120V
60Hz
60Hz
60Hz
240watts
240 watts
Frequencyof Operation
Power Consumption
Dimension(Wx D x H)
Weight
oo
240watts
1004xqT1 x 967 mm
39.5 x 18.5x 38.1 in&es
40.4 Kg/89.1 lbs
1126x261 x 984mm
1226x 598x 1276mm
44.3x 103 x 38.7 inches 48.3 x 23.5 x 50.2inches
49.0 Kg/108.0 lbs
56.3Kg/124.1 ]bs
[
MEMO
]
@1
[
62
MEMO
]
[
MEMO
]
G8