1
Garage Door
Remote Control
Model GT-110
1. INTRODUCTION
2. INSTALLATION (CONT)
Congratulations on your purchase of the Skylink® Garage OneTM, Garage
Door Remote Control System. This is a transmitter receiver kit where the
receiver simply replaces your existing garage door opener’s push button
or wall console. Installation is very simple, follow the instructions below
to install the Garage OneTM receiver GT-100R. This kit comes with the
following items:
4-button
keychain transmitter
(Battery included)
Extension wires
Garage OneTM
GT-100R
2. INSTALLATION
WARNING
Unplug the power cord of your garage door opener
before installation to ensure power is not connected.
Multi-Function Wall Console for Chamberlain®, Lift-Master ®, Sears Craftsman ®
Skylink® GT-100R Garage OneTM also has 3 buttons. It can
replace Chamberlain®, Lift-Master®, and Sears Craftsman®
Multi-Function Wall Console directly. That means if you
have any one of these wall consoles, you can simply
remove the existing wall console and replace it with a
Skylink® GT-100R. To replace a multi-function wall
console mentioned above, follow the same procedure as to replace a “Single button” wall console.
If your Chamberlain®, LiftMaster® and Sears Craftsman®
Multi-Function Wall Console has more than 2 wires, the Skylink® GT-100R
should be installed in parallel with the original Multi-Function Wall Console.
Connect the 2 wires from the GT-100R to the 2 terminals marked “RED”
and “WHT” on your existing Multi-Function Wall Console. Polarity DOES
NOT matter. Note: Do not remove the existing wires from your MultiFunction Wall Console.
Garage One TM
Genie® Deluxe Wall Console
The GT-100R Garage OneTM replaces most garage door “push buttons”
or “wall consoles”. There are 2 different kinds of “push buttons”.
1) Single button
For the Genie® Deluxe Wall Console, depending on whether
the “lock” feature will be used.
2) Multi-Function Wall Console
- If the “lock” feature will not be used, you can simply replace
the Genie® Deluxe Wall Console with a Skylink® GT-100R.
To replace a multi-function wall console, follow the same
procedure as to replace a “Single button” wall console.
1) Single button
- If the “lock” feature will be used, you need to connect the Skylink® GT-100R
in parallel with the Genie® Deluxe Wall Console and an additional transformer (sold separately) is needed. Follow the instructions below:
If your garage door opener equips with a single button “push button”,
you can replace the existing push button with Skylink® Garage OneTM
GT-100R. Please follow the procedures below.
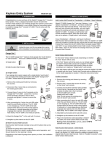
1. Remove the existing push button by removing
the screws.
2. Disconnect the 2 wires that are connected to
the existing push button.
3. Connect these 2 wires to the 2 terminals on the
Garage OneTM GT-100R. Loosen the 2 screws
on the terminals, feed the 2 wires to the 2
terminals and tighten 2 screws to secure the
2 wires.
Parallel Connection
1. Remove the existing push button by removing
the screws.
2. Remove the 2 screws that secure the wires
on the Genie® wall console.
Remove
existing
wires
4. After connecting the 2 wires, the red LED underneath the push button will be on. The GT-100R
is now charging up. The GT-100R will be fully
charged when the buzzer emits a beep (approx
10 seconds to 1 minute depending on the brand
of garage door opener), the red LED will then
flash slowly. The GT-100R is now ready to operate.
5. Mount the Garage OneTM to the wall with 2 screws.
6. Straighten up the antenna on the GT-100R.
2) Multi-Function Wall Console
Multi-Function Wall Console normally comes with 3 buttons that can be
used to:
1) operate the garage door opener lighting,
2) lock the receiver so it doesn’t accept remote control operation, and
3) push button for door opening / closing
Depending on the brand of garage door opener you have, the installation
is different.
3. Connect one end of the extension wires provided
in this kit to the 2 terminals on the Genie® wall
console, the other end to the 2 terminals
on the GT-100R wall console.
Polarity DOES NOT matter.
Note: Do not remove the existing wires
from the Genie® wall console.
Extension
wires
4. After connecting the 2 wires, the red LED underneath the push button will be on. The GT-100R
is now charging up. The GT-100R will be fully
charged when the buzzer emits a beep (approx
10 seconds to 1 minute depending on the brand
of garage door opener), the red LED will then
flash slowly. The GT-100R is now ready to operate.
5. Mount both w all consoles to the wall with screws.
6. Straighten up the antenna on the GT-100R.
7. Plug in the transformer (sold separately) to Skylink®
GT-100R. (For Genie® Deluxe Wall Console only)
Rating of the transformer: 12V DC, 100mA
Diameter of DC plug : 3.5mm
Multi-Function Wall Console – Other Brands
For brands other than Chamberlain®, Lift-Master®, Sears Craftsman® and
Genie®, the Skylink® GT-100R should be installed in parallel with the
original Multi-Function Wall Console. Refer to “Parallel Connection” under
Genie® Deluxe Wall Console.
3. OPERATION
3. OPERATION (CONT)
Operation
To deactivate the lock feature
Keychain Remote
1. Press and hold the lock button for approx. 2 seconds, then release it.
2. When the lock feature is deactivated, the red LED underneath the
push button will flash slowly indicating the Garage OneTM is in normal
operating mode and the lock feature is deactivated.
The upper left button on the keychain remote (Button 1) has been programmed to the receiver at the factory. Pressing this button will activate
the receiver therefore open / close the garage door. If you would like to
add more keychain remote, follow the procedures below.
Antenna
Button 1
Push button
Loss of Signal LED
Lock button
Chamberlain®, Lift-Master ®, Sears Craftsman ® Multi-Function
Wall Console
There are 3 buttons on the Multi-Function Wall Console:
1) Push Button - Open / Close garage door.
2) Lock Button - Enable / Disable handheld remotes to operate the garage
door opener.
3) Light Button - Turn on / off light.
Timer / Learn LED
Learn button
Learn Button
To program Skylink’s remote control / sensor
1. Press the learn button for approx. 5 seconds.
2. The “Timer / Learn” red LED will be on, release the learn button.
3. Activate the Skylink® remote control. If the Skylink® remote control has
multiple buttons, press the button you would like to operate.
4. The “Timer / Learn” LED will be off after it has successfully programmed
the remote control.
5. You can now press the programmed remote to operate the garage
door opener.
Skylink® Garage OneTM also has 3 buttons, their functions are identical to
the Chamberlain® / Lift-Master® / Sears Craftsman® wall console.
Chamberlain®/ Lift-Master®/
Sears®
Function
Equivalent button on
Skylink ® Garage One TM
Push Bar
Open / Close door
Push Button
Lock Button
Enable / Disable operation Lock Button
from handheld remotes
Light Button
Turn light on / off
Learn Button
Chamberlain®
Open / Close door
Erase Skylink® remote controls / sensors
To erase unwanted remote control(s), first erase all remote controls and
sensors, then program the ones you would like to keep.
Prevents operation
from handheld remotes
Turn light on / off
Erase all remote controls / sensors
1. Press and hold the learn button for 15 seconds.
2. The “Timer / Learn” red LED will flash rapidly meaning all remote have
been erased.
3. You have now successfully erased all the remote controls and sensors.
Follow the instructions “To program Skylink’s remote control” to add the
remote control(s) you would like to keep.
Push Button
Press the push button to open or close the garage door.
Lock Button
Lock feature is designed to prevent Skylink® remotes
such as Skylink® Keychain Remote Model 4B-201
to operate the garage door opener.
4. BATTERY
The battery of the keychain remote (Alkaline, Type 23A, 12V) needs to
be replaced when either one of the followings occurs:
1. The LED on the keychain doesn’t flash or on when a key is pressed; or
2. The operating range starts to decrease.
To replace the battery:
1. Undo the two screws on the back of the
transmitter.
The bottom case will then come off.
To activate the lock feature
2. Using a small screwdriver or pen, pry out
the old battery from one end.
1. Press and hold the lock button for approx. 2 seconds, then release it.
2. When the lock feature is activated, the red LED underneath the push
button will flash rapidly.
3. Place the new battery in position. A diagram
in the battery compartment indicates which
end is positive and which is negative.
Note: If a valid wireless remote signal is received while the lock feature is
activated, Garage OneTM will beep to reminding you the Garage OneTM is
locked.
4. Close the battery cover and reinsert
two screws.
+
9. CUSTOMER SERVICE
5. ACCESSORIES
If you would like to order Skylink’s products or have difficulty getting them to work,
please :
1. visit our FAQ section at www.skylinkhome.com , or
2. email us at [email protected] , or
3. call our toll free at 1-800-304-1187 from Monday to Friday, 9 am to 5 pm EST.
Fax (800) 286-1320
Optional accessories can be added to the garage door closer.
Garage Door MonitorTM Sensor – Model GS-101
- Detects garage door position
- Patented sensing technology
- Closes garage door automatically with the preset
timer when work in conjunction with Garage OneTM
- Lithium battery included
Audio Sensor – Model AS-101
- The Audio Sensor is to be used in conjunction with
the Skylink® garage door closer and any CO detector
(sold separately). It is used to detect the CO emission
inside the garage
- When the CO level exceeds the safety limit, the alarm
from the CO detector will sound, which will trigger
Skylink’s Audio Sensor. Skylink® wall console will
open the garage door for 10 minutes to improve air
circulation. Door will then be closed automatically
after the CO level resumes within the safety limit
- 9V Alkaline battery included
Keypad Transmitter - Model KP-434
®
- Keyless Entry Transmitter
- Password to open / close garage door with
Garage OneTM
- Lithium batteries included
6. FCC
This device complies with Part 15 of the FCC Rules. Operation is subject to the
following two conditions: (1) This device may not cause harmful interference, and
(2) This device must accept any interference received, including interference that
may cause undesired operation.
WARNING:
Changes or modifications to this unit not expressly approved by the party
responsible for compliance could void the user’s authority to operate the equipment.
NOTE:
This equipment has been tested and found to comply with the limits for a Class B
digital device, pursuant to Part 15 of the FCC Rules. These limits are designed to
provide reasonable protection against harmful interference in a residential installation.
This equipment generates, uses and can radiate radio frequency energy and, if not
installed and used in accordance with the instructions, may cause harmful interference to radio communications.
However, there is no guarantee that interference will not occur in a particular
installation. If this equipment dose cause harmful interference to radio or television
reception, which can be determined by turning the equipment off and on, the user is
encouraged to try to correct the interference by one or more of the following measures:
- Reorient or relocate the receiving antenna.
- Increase the separation between the equipment and receiver.
- Connect the equipment into an outlet on a circuit different from that to which the
receiver is connected.
- Consult the dealer or an experienced radio/TV technician for help.
7. WARNING
To prevent possible SERIOUS INJURY or DEATH from a closing garage door:
- Activate door ONLY when it can be seen clearly, is properly adjusted, and there
are no obstructions to door travel.
- ALWAYS keep garage door in sight until completely closed. NEVER permit
anyone to cross path of closing garage door.
8. WARRANTY
If, within one year from date of purchase, this pro duct should become defective
(except battery), due to faulty workmanship or materials, it will be repaired or
replaced, without charge. Proof of purchase and a Return Authorization are required.
CUSTOMER SERVICE
17 Sheard Avenue, Brampton, Ontario, Canada L6Y 1J3
Email:[email protected]
http://www.skylinkhome.com
P/N. 101A446
US Patent. 6243000B1
Patent Pending
® are registered trademarks of their respective corporations
©2006 SKYLINK GROUP