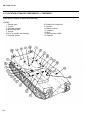
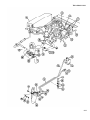
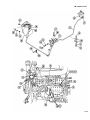
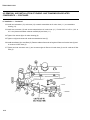
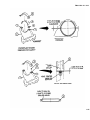
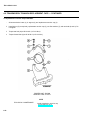
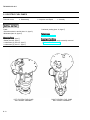
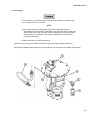
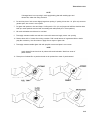
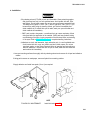
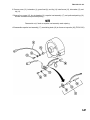
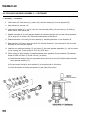
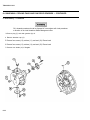
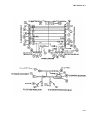
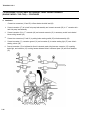
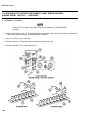
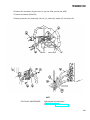
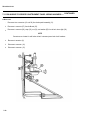
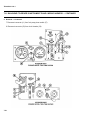
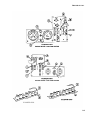
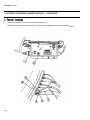
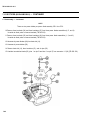
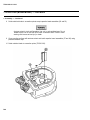
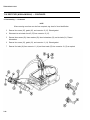
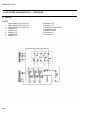
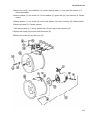
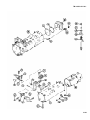
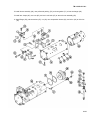
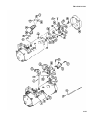
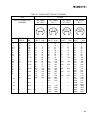
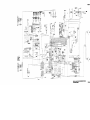
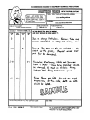
1
TM 9-2350-311-34-1
DIRECT SUPPORT AND
GENERAL SUPPORT
MAINTENANCE MANUAL FOR
HULL, POWERPLANT, DRIVE
CONTROLS, TRACKS, SUSPENSION,
AND ASSOCIATED COMPONENTS
HOWITZER, MEDIUM,
SELF-PROPELLED, 155MM,
Ml 09A2 (EIC: 3EZ)
(NSN 2350-01-031-0586)
AND
HOWITZER, MEDIUM,
SELF-PROPELLED, 155 MM,
Ml 09A3 (EIC: 3E2)
(NSN 2350-01-031-8851)
INTRODUCTION
1-1
GENERAL HULL MAINTENANCE
2-1
TROUBLESHOOTING
3-1
SEPARATION AND ASSEMBLY OF
POWERPLANT COMPONENTS
4-1
FUEL AND AIR INTAKE SYSTEMS
5-1
COOLING SYSTEM
6-1
ELECTRICAL SYSTEM
7-1
FINAL DRIVE AND TRACK SUSPENSION 8-1
HULL-RELATED COMPONENTS
ENGINE AND BATTERY WINTERIZATION
KIT
REFERENCES
9-1
10-1
A-1
AND
HOWITZER, MEDIUM,
SELF-PROPELLED, 155MM,
Ml 09A4 (EIC: 3E8)
(NSN 2350-01-277-5770)
AND
HOWITZER, MEDIUM,
SELF-PROPELLED, 155MM,
Ml 09A5 (EIC: 3E7)
(NSN 2350-01-281-1719)
EXPENDABLE AND DURABLE ITEMS LIST B-1
TOOL IDENTIFICATION LIST
C-1
ILLUSTRATED LIST OF MANUFACTURED
ITEMS
D-1
TORQUE LIMITS
E-1
MANDATORY REPLACEMENT PARTS
F-1
This manual supersedes TM 9-2350 -311-34-1 dated 30 January 1987.
Approved for public release; distribution is unlimited.
HEADQUARTERS, DEPARTMENT OF THE ARMY
19 SEPTEMBER 1994
TM 9-2350-311-34-1
WARNING
RADIOACTIVE MATERIAL(S) TRITIUM (HYDROGEN-3) GAS
Handle with care. In the event the radioluminous source is broken, cracked, or there is no illumination,
immediately wrap device in plastic bag (item 4, Appx B) and notify the local Radiation Protection Officer
(RPO). Contact the base safety office for the name and telephone number of your local RPO:
TELEPHONE:
LOCAL RPO:
SAFETY PROCEDURES FOR NUCLEAR REGULATORY COMMISSION
(NRC) TRITIUM FIRE CONTROL DEVICES
1.
Purpose: To implement mandatory license requirements for use and maintenance of tritium
radioluminous fire control devices used on howitzers, mortars, tanks, and rifles.
2.
Scope: This procedure is applicable to all personnel working with tritium devices, including unit,
direct support, general support maintenance, and operator’s levels.
3. Radiological hazard: The beta radiation emitted by tritium presents no external radiation hazard.
However, if taken internally, it can damage soft tissue. If a capsule is broken, the tritium gas will
dissipate into the surrounding air and surfaces near the vicinity of the break may become
contaminated. Tritium can be taken into the body by inhalation, ingestion, or percutaneous (skin)
absorption/injection
4. Safety precautions:
a. Check for illumination prior to use or service in low light or darkroom. If not illuminated, do not
repair. Wrap the entire device in plastic bag (item 4, Appx B) and notify the local RPO.
b. No eating, drinking, or smoking will be allowed in tritium device work areas.
5.
Emergency procedures: If a tritium source breaks, inform other personnel to vacate the area or
move upwind. If skin contact is made with any area contaminated with tritium, wash immediately
with nonabrasive soap and water. Report the incident to the local RPO. Actions below will be taken
under supervision or direction of the local RPO.
a. Personnel handling the device should wear rubber or latex gloves (item 8, Appx B). Device
must be immediately double wrapped in plastic, sealed, packaged, and evacuated to depot.
Outside package must be identified as “Broken Tritium Device -Do Not Open”. Dispose of used
gloves as radioactive waste, per instructions from local RPO and wash hands well.
b. Personnel who may have handled the broken tritium should report to health clinic for tritium
bioassay. Optimum bioassay sample is at least 4 hours after exposure.
c. Broken tritium sources indoors may result in tritium contamination in the area, such as work
bench or table. The area must be cordoned off, restricted until wipe tests indicate no
contamination.
a
TM 9-2350-311-34-1
6. Further information:
a. Requirements for safe handling and maintenance are located in TM 9-254, General
Maintenance Procedures for Fire Control Materiel.
b. If assistance is needed, contact your local or major command (MACOM) safety office(s) for
information on safe handling, shipping, storage, maintenance, or disposal of radioactive devices.
c. The AMCCOM RPO/licensee may be contacted by calling: DSN 793-2965/2969/2995,
Commercial (309) 782-2965/2969/2995. After duty hours contact the Staff Duty Office through the
operator at DSN 793-6001, commericial (309) 782-6001. The following rules and regulations are
available from HQ, AMCCOM, ATTN: AMSMC-SFS. Rock Island, IL 61299-6000. Copies maybe
requested, or further information obtained by contacting the AMCCOM Radiation Protection
Officer (RPO).
(1) 10 CFR Part 19-Notices, Instructions, and Reports to Workers
(2) 10 CFR Part 20-Standards for Protection Against Radiation
(3) NRC License, License Conditions, and License Application
WARNING
CARBON MONOXIDE HAZARD
Carbon monoxide is a colorless, odorless, deadly poisonous gas, which, when breathed, deprives the
body of oxygen and causes suffocation. Exposure to carbon monoxide can produce headache,
dizziness, loss of muscular control, drowsiness, and coma. Permanent brain damage or death can
result from severe exposure.
Carbon monoxide occurs in the exhaust of fuel-burning heaters and internal-combustion engines and
becomes dangerously concentrated under conditions of inadequate ventilation. The following
precautions must be observed to ensure the safety of personnel whenever the personnel heater or main
or auxiliary engine of any vehicle is operated for maintenance purposes or tactical use:
1.
Do not operate heater or engine of vehicle in an enclosed area unless it is adequately ventilated.
2.
Do not idle engine for long periods without maintaining adequate ventilation in personnel
compartments.
3.
Do not drive any vehicle with inspection plates, cover plates, or engine compartment doors
removed unless necessary for maintenance purposes.
4.
Be alert at all times during vehicle operation for exhaust odors and exposure symptoms. If either
are present, immediately ventilate personnel compartments. If symptoms persist, remove affected
personnel from vehicle and treat as follows: Expose to fresh air; keep warm; do not permit physical
exercise; if necessary, administer artificial respiration. For detailed first aid instructions, consult FM
21-11.
THE BEST DEFENSE AGAINST CARBON MONOXIDE POISONING IS ADEQUATE VENTILATION.
b
TM 9-2350-311-34-1
WARNING
PAINT HAZARD
Chemical Agent Resistant Coating (CARC) paint contains isocyanate, a constituent that can cause
respiratory effects during and after the application of the material. During the application of CARC
paint, coughing, shortness of breath, pain on respiration, increased sputum, and chest tightness
may occur. CARC paint also produces itching and reddening of the skin, a burning sensation of the
throat and nose, and watering of the eyes. An allergic reaction may occur after initial exposure
(ranging from a few days to a few months later) producing asthmatic symptoms including coughing,
wheezing, tightness in the chest, or shortness of breath. The following precautions must be
obeserved to ensure the safety of personnel when CARC paint is applied:
• For spray/brush/roller painting in confined spaces, an airline respirator is required, unless an
air sampling shows exposure to be below standards. If the air sampling is below standards,
either the chemical cartridge or air line respirators are required.
• Spot painters applying CARC paint by brush or roller must wear clothing and gloves affording
full coverage. Personnel using touchup spray kits should wear an air line respirator and
protective clothing.
• Do not use water, alcohol, or amine-based solvents to thin or remove CARC paint. Use of
these solvents with CARC paint can produce chemical reactions resulting in nausea, disease,
bums, or severe illness.
• Do not use paint solvents to remove paint/coating from your skin.
• Mix paint/coating in a well-ventilated mixing room or spraying area away from open flames.
Personnel mixing paint/coating should wear eye protection.
• Use paint/coating with adequate ventilation.
• Personnel grinding or sanding on painted equipment should use high-efficiency, air-purifying
respirators.
• Do not weld, cut, or apply any form of heat to CARC-coated metal until the paint has been
removed from a 4-in. (10.2-cm) area surrounding the rework site. Substances maybe released
that cause skin or respiratory irritation if this is not done. Sand or grind the paint down to the
base metal in the surrounding area and also remove any paint from the other side of the metal.
• When sanding any paint, use the wet sanding method. Older paints may contain lead,
chromates, or other toxic material. Using wet or dry sandpaper, wet down the area before
starting. Keep the sandpaper wet as you sand to keep down paint dust (FM 21-11).
MINERAL SPIRITS AND PAINT THINNER HAZARD
Do not use mineral spirits or paint thinner to clean the howitzer. Mineral spirits and paint thinners are
highly toxic and combustible. Prolonged breathing can cause dizziness, nausea, and even death (FM
21-11).
c
TM 9-2350-311-34-1
WARNING
DRY-CLEANING SOLVENT HAZARD
Dry=cleaning solvent (P-D-680) is toxic and flammable. Wear protective goggles and gloves and use
only in a well-ventilated area. Avoid contact with skin, eyes, and clothes, and don’t breathe vapors. Do
not use near open flame or excessive heat. The flashpoint for type #1 is 100°F (38°C), and for type #2
is 138°F (59°C. If you become dizzy while using dry-cleaning solvent, get fresh air immediately and
seek medical aid. If contact with eyes is made, wash your eyes with water and seek medical aid
immediately (FM 21-1 1).
WARNING
ADHESIVE HAZARD
Adhesives are toxic and flammable. Apply adhesives only in a well-ventilated area. Avoid contact with
skin, eyes, and clothes, and do not breath vapors. Do not use near heat, sparks, or open flame. Read
and follow all warnings and instructions on labels of adhesives. If contact with skin or eyes is made,
wash area with water and seek medical aid immediately (FM 21-1 1).
WARNING
NAPHTHA HAZARD
Naphtha is flammable. Do not smoke or allow open flames in areas where naphtha is being used to
avoid possible explosion or injury (FM 21-1 1).
WARNING
FIRE/FLAMMABLE HAZARD
• Diesel fuel and combustible materials are used in operation and maintenance of this equipment. Do
not smoke or allow open flames or sparks in areas where diesel fuel and combustible materials are
used or stored. Death or severe injury may result if personnel fail to observe this precaution. If you
are burned, seek medical aid immediately.
●
Do not place flammables or explosives on or near the personnel heater (FM 21-11).
WARNING
COMPRESSED AIR HAZARD
Compressed air used for cleaning purposes must not exceed 30 psi (207 kPa). Use only with effective
chip guarding and personal protective equipment (goggles/shield, gloves, etc) (FM 21-11).
d
TM 9-2350-311-34-1
WARNING
ELECTRICAL HAZARD
Ensure MASTER switch is off when working on hull electrical system to prevent injury due to
electrical shock (FM 21-1 1).
WARNING
BATTERY HAZARD
●
●
Batteries contain sulfuric acid that can cause severe bums. Avoid contact with skin, eyes, or
clothing, and remove all metal or jewelry. If battery electrolyte is spilled, stop its burning effects
immediately.
When working on batteries, wear eye protection and remove all jewelry, dog tags, and metal
items to avoid electrical shock and burns (FM 21-1 1).
WARNING
NOISE HAZARD
Excessive noise levels are present any time the equipment is operating. Wear hearing protection
while operating or working around equipment while it is running. Failure to do so could result in
damage to your hearing. Seek medical aid should you suspect a hearing problem (FM 21-11).
WARNING
HAZARDOUS WASTE
When servicing this vehicle, performing maintenance, or disposing of materials such as engine
coolant, transmission fluid, lubricants, battery acids or batteries, and CARC paint, consult your unit/
local regulatory guidance. If further information is needed, please contact the U.S. Army
Environmental Hotline at 1-800-872-3845.
e
TM 9-2350-311-34-1
WARNING
ROTATION HAZARD
Protective fan screens must be installed prior to performing maintenance in the engine
compartment when the engine is running or in ground hop mode. Contact with rotating fan can
cause injury (FM 21-1 1).
WARNING
CRAWLING UNDER EQUIPMENT HAZARD
Never crawl under equipment when performing maintenance unless the equipment is securely blocked.
Keep clear of the equipment when it is being raised or lowered. Do not allow heavy components to swing
while suspended by a lifting device. Exercise extreme caution when working near a cable under tension.
In case of injury, seek medical aid immediately (FM 21-1 1).
WARNING
FALLING EQUIPMENT/ROLLING VEHICLE HAZARD
Unless otherwise specified, perform all maintenance procedures with all equipment lowered to the
ground, transmission in neutral, parking/emergency brake applied, and engine stopped to prevent
possible injury due to falling equipment or rolling vehicle (FM 21-11).
WARNING
PARKING HAZARD
Do not park vehicles head-to-head. Injury to personnel or damage to the vehicles could occur if one
vehicle jumps (FM 21-1 1).
f
TM 9-2350-311-34-1
HEADQUARTERS
DEPARTMENT OF THE ARMY
Washington D. C., 19 September 1994
TECHNICAL MANUAL
NO. 9-2350-311 -34-1
DIRECT SUPPORT AND GENERAL SUPPORT MAINTENANCE MANUAL
FOR HULL, POWERPLANT, DRIVE CONTROLS,
TRACKS, SUSPENSION, AND ASSOCIATED COMPONENTS
HOWITZER, MEDIUM,
SELF-PROPELLED, 155MM, M109A2(EIC:
(NSN 2350-01-031 -0586)
AND
HOWITZER, MEDIUM,
SELF-PROPELLED, 155MM, M109A3 (EIC:
(NSN 2350-01-031 -8851)
AND
HOWITZER, MEDIUM,
SELF-PROPELLED, 155MM, M109A4 (EIC:
(NSN 2350-01 -277-5770)
AND
HOWITZER, MEDIUM,
SELF-PROPELLED, 155MM, M109A5 (EIC:
(NSN 2350-01-281-1719)
3EZ)
3E2)
3E8)
3E7)
REPORTING ERRORS AND RECOMMENDING IMPROVEMENTS
You can help improve this manual. If you find any mistakes or if you know of a way to
improve the procedures, please let us know. Mail your letter, DA Form 2028
(Recommended Changes to Publications and Blank Forms), or DA Form 2028-2
located in the back of this manual direct to Commander, U.S. Army Tank-automotive
and Armaments Command, ATTN: AMSTA-MMAA, Warren, Ml 48397-5000. A reply
will be furnished to you.
You may also provide DA Form 2028-2 information to TACOM via datafax or e-mail:
• TACOM’s fax number is DSN 786-6323
• TACOM’s e-mail address is [email protected], army.mil
DISTRIBUTION STATEMENT A: Approved for public release; distribution is unlimited.
TABLE OF CONTENTS
CONTENTS
PAGE
CHAPTER 1 — INTRODUCTION . . . . . . . . . . . . . . . . . . . . . . . . . . . . . . . . . . . . . . . . . . . . . . . . . . . . . . . . . . . . ...1-1]
Section I
GENERAL INFORMATION . . . . . . . . . . . . . . . . . . . . . . . . . . . . . . . . . . . . . . . . . . . . . . . . . . . . . . . . ...1-5
EQUIPMENT DESCRIPTION AND DATA . . . . . . . . . . . . . . . . . . . . . . . . . . . . . . . . . . . . . . . . . . . . ...1-8
Section II
Section Ill PRINCIPLES OF OPERATION . . . . . . . . . . . . . . . . . . . . . . . . . . . . . . . . . . . . . . . . . . . . . . . . . . . . ...1-17
i
TM 9-2350-311-34-1
CONTENTS
[CHAPTER 2-GENERAL HULL MAINTENANCE.. . . . . . . . . . . . . . . . . . . . . . . . . . . . . . . . . . . . . . . . . . . . . . ...2-1]
Section I
REPAIR PARTS, SPECIAL TOOLS, TMDE, AND SUPPORT EQUIPMENT. . . . . . . . . . . . . . . . . . ...2-2
Section II
GENERAL HULL MAINTENANCE INSTRUCTIONS . . . . . . . . . . . . . . . . . . . . . . . . . . . . . . . . . . . . ...2-2
Section Ill CLEANING, PAINTING, AND LUBRICATION. . . . . . . . . . . . . . . . . . . . . . . . . . . . . . . . . . . . . . . . . . ...2-5
[CHAPTER 3-TROUBLESHOOTING . . . . . . . . . . . . . . . . . . . . . . . . . . . . . . . . . . . . . . . . . . . . . . . . . . . . . . . . . ..3-1
CHAPTER 4 — SEPARATION AND ASSEMBLY OF POWERPLANT COMPONENTS . . . . . . . . . . . . . . . . . . . . .4-1
CHAPTER 5-FUEL AND AIR INTAKE SYSTEMS . . . . . . . . . . . . . . . . . . . . . . . . . . . . . . . . . . . . . . . . . . . . . . ..5-1
CHAPTER 6-COOLING SYSTEM . . . . . . . . . . . . . . . . . . . . . . . . . . . . . . . . . . . . . . . . . . . . . . . . . . . . . . . . . . ...6-1]
Section I
Section II
UNIVERSAL JOINTS AND COOLING FAN DRIVE . . . . . . . . . . . . . . . . . . . . . . . . . . . . . . . . . . . . . ...6-2
RADIATOR SHROUD AND VANEAXIAL COOLING FAN ASSEMBLY . . . . . . . . . . . . . . . . . . . . . ...6-11
CHAPTER 7-ELECTRICAL SYSTEM. . . . . . . . . . . . . . . . . . . . . . . . . . . . . . . . . . . . . . . . . . . . . . . . . . . . . . . . ..7-1
Section I
Section II
POWERPLANT AND HULL WIRING HARNESSES. . . . . . . . . . . . . . . . . . . . . . . . . . . . . . . . . . . . . ...7-2
HULL ELECTRICAL COMPONENTS . . . . . . . . . . . . . . . . . . . . . . . . . . . . . . . . . . . . . . . . . . . . . . . ...7-78
CHAPTER 8-FINAL DRIVE AND TRACK SUSPENSION . . . . . . . . . . . . . . . . . . . . . . . . . . . . . . . . . . . . . . . ...8-11
Section I
Section II
FINAL DRIVE ASSEMBLY . . . . . . . . . . . . . . . . . . . . . . . . . . . . . . . . . . . . . . . . . . . . . . . . . . . . . . . . ...8-2
TRACK SUSPENSION . . . . . . . . . . . . . . . . . . . . . . . . . . . . . . . . . . . . . . . . . . . . . . . . . . . . . . . . . . . ...8-6
[CHAPTER 9-HULL-RELATED COMPONENTS . . . . . . . . . . . . . . . . . . . . . . . . . . . . . . . . . . . . . . . . . . . . . . . ...9-11
I CHAPTER 10- ENGINE AND BATTERY WINTERIZATION KIT . . . . . . . . . . . . . . . . . . . . . . . . . . . . . . . . . . ...10-1]
Section I
Section II
WINTERIZATION KIT INSTALLATION.. . . . . . . . . . . . . . . . . . . . . . . . . . . . . . . . . . . . . . . . . . . . . ...10-2
WINTERIZATION KIT COMPONENTS . . . . . . . . . . . . . . . . . . . . . . . . . . . . . . . . . . . . . . . . . . . . . ...10-24
APPENDIX A-REFERENCES . . . . . . . . . . . . . . . . . . . . . . . . . . . . . . . . . . . . . . . . . . . . . . .
APPENDIX B- EXPENDABLE AND DURABLE ITEMS LIST . . . . . . . . . . . . . . . . . . . . . . . . . . . . . . . . . . . . . . . . B-1
Section I
Section II
INTRODUCTION . . . . . . . . . . . . . . . . . . . . . . . . . . . . . . . . . . . . . . . . . . . . . . . . . . . . . . . . . . . . . . . . . . B-2
EXPENDABLE AND DURABLE ITEMS LIST . . . . . . . . . . . . . . . . . . . . . . . . . . . . . . . . . . . . . . . . . . . . B-3
APPENDIX C-TOOL IDENTIFICATION Last . . . . . . . . . . . . . . . . . . . . . . . . . . . . . . . . . . . . . . . . . . . . . . . . . . . C-1
APPENDIX D-ILLUSTRATED LIST OF MANUFACTURED ITEMS . . . . . . . . . . . . . . . . . . . . . . . . . . . . . . . . . . D-1
II
TM 9-2350-311-34-1
CONTENTS
APPENDIX E-TORQUE LIMITS. . . . . . . . . . . . . . . . . . . . . . . . . . . . . . . . . . . . . . . .. O . . . . . . . . . . . . . . . . . . . E-1
APPENDIX F-MANDATORY Replacement mm... . . . . . . . . . . . . . . . . . . . . . . . . . . . . . . . . . . . . . . . . . F-1
INDEX . o . . . . . . . . . . . . . . . . . . . . . . . . . . . . . . . . . . . . . . . . 0 . ..0..0.09 . . . . . . . . . . . . . . . . . . . . . . . . . INDEX-1 I
FOLDOUTS . . . . . . . . . . . . . . . . . . . . . . . . . . . . . . . . . . . . . . . . . . . . . . . . . . . . . . . . . . . . . . . . . . . . . . . . . . . . FP-1
iii
TM 9-2350-311-34-1
HOW TO USE THIS MANUAL
GENERAL
This manual contains direct support and general support maintenance instructions for the M109A2/M109A3/M109A4/
Ml 09A5 Howitzers’ hull and hull-related components.
The front matter in this manual consists of a cover index, general warnings, and a table of contents.
This manua is divided into 10 chapters and 6 appendixes. Each chapter and appendix begins on a right page with the
page number of 1. Pages are numbered after the chapter number or appendix letter For example 1-14 means Chapter
1, page 14, and A-2 means Appendix A, page 2.
At the end of this manual are an alphabetical index, eight schematics, DA Form 2028-2, and a metric conversion chart.
a. Front Matter
The front cover has an index for the major divisions in this manual The first page of the associated major division has
a black edge that lines up with the applicable cover boxed-in area.
There are general warnings that start on the first right page immediately after the cover that should be read before
performing any maintenance on the howitzer.
The table of contents indicates the page where each chapter, section, appendix, and paragraph starts.
b. Chapters
Chapter 1 provides general information, equipment description, and principles of operation of the howitzer.
Chapter 2 provides maintenance instructions for the hull
Chapter 3 provides direct support and general support troubleshooting procedures for the howitzer.
Chapter 4 provides direct support and general. support maintenance instructions for separating and assembling the
powerplant components.
Chapter 5 provides direct support and general support maintenance instructions for the fuel and air intake systems.
Chapter 6 provides direct support and general support maintenance instructions for the cooling system.
Chapter 7 provides direct support and general support maintenance instructions for the electrical system.
Chapter 8 provides direct support and general support maintenance instructions for the final drive and track suspension.
Chapter 9 provides direct support and general support maintenance instructions for hull-related components.
Chapter 10 provides direct support and general support maintenance instructions for the engine and battery
winterization kit.
Iv
TM 9-2350-311-34-1
c. Appendixes
Appendix A provides titles of documents and publications referenced throughout this manual.
Appendix B provides a list of the expendable and durable items necessary to perform the direct support and general
support maintenance procedures.
Appendix C provides a tool identification list of common tools necessary to perform the direct support and general
support maintenance procedures.
Appendix D provides an illustrated list of manufactured items.
Appendix E provides wet torque limits for screws and fastener information.
Appendix F provides a list of the mandatory replacement parts necessary to perform the direct support and general
support maintenance procedures.
d. Alphabetical Index
The alphabetical index is located after the last appendix and provides an alphabetical listing of information contained in
this manual.
e. Schematics
There are eight electrical schematics in foldout form located at the end of this manual.
f. DA Form 2028-2
DA Form 2028-2 is used to report errors and to recommend improvements for the tasks in this manual.
g. Metric Conversion Chart
The metric conversion chart converts English measurements to metric equivalents. Measurements in this manual are
provided in both English and metric units.
WARNINGS, CAUTIONS, AND NOTES
Warnings, cautions, and notes are provided throughout this manual:
Warnings are provided where injury may occur to personnel on or near the howitzer.
Cautions are provided where equipment may be damaged, but no injuries to personnel should result.
Notes provide information, but no personnel injury or equipment damage should result.
INITIAL SETUPS
Before starting a task, you must obtain all the tools, supplies, and personnel listed in the initial setup. Be sure to read
the task before performing the maintenance. If any other tasks are referenced, you must go to the initial setup page for
each of those tasks to find out what tools, supplies, and personnel will be needed.
v
TM 9-2350-311-34-1
LOCATIONAL TERMS
The terms “front,” “rear,” “left,” and “right” are used to indicate where items are located on the howitzer. These locations
are from the viewpoint of standing behind the howitzer and facing it.
REFERENCING
In this manual, internal referencing is done by chapter, appendix, paragraph, section, or task. For example, (para 8-15)
refers you to Chapter 8, paragraph 15.
Referencing outside this manual is done by the military document or publication number. For example, (TM 9-2350-31110) refers you to that manual.
LOCATING INFORMATION
This manual provides five ways by which you can locate information quickly:
The cover index lists most frequently used major divisions by name and starting page number.
The table of contents.
The chapter and appendixes indexes list data and information covered within those chapters.
The malfunction index (Chapter 3) provides a quick guide to troubleshooting malfunctions.
The alphabetical index provides an alphabetical listing of information contained in this manual.
v i
TM 9-2350-311-34-1
CHAPTER 1
INTRODUCTION
GENERAL
This chapter provides information to familiarize the mechanic with the Ml 09A2/M1 09A3/M1 09A4/M1 09A5 Medium,
Self-Propelled Howitzer’s hull, powerplant, drive controls, tracks, suspension, and other hull-related components. This
information is provided through a physical description of the major components, which the technician is required to
maintain, service, inspect, replace, or repair.
Additional information is provided as reference and guidance on the use of forms, maintenance of records, and filing
reports.
CONTENTS
PAGE
Section 1
GENERAL INFORMATION . . . . . . . . . . . . . . . . . . . . . . . . . . . . . . . . . . . . . . . . . . . . . . . . . . . . . . . . ...1-5
1-1
SCOPE . . . . . . . . . . . . . . . . . . . . . . . . . . . . . . . . . . . . . . . . . . . . . . . . . . . . . . . . . . . . . . . . . . . . . . . ...1-5
1-2
MAINTENANCE FORMS, RECORDS, AND REPORTS . . . . . . . . . . . . . . . . . . . . . . . . . . . . . . . . . . . . 1-5
1-3
DESTRUCTION OF ARMY MATERIEL TO PREVENT ENEMY USE . . . . . . . . . . . . . . . . . . . . . . . ...1-5
1-4
PREPARATION FOR SHIPMENT AND STORAGE. . . . . . . . . . . . . . . . . . . . . . . . . . . . . . . . . . . . . ...1-6
1-5
QUALITY ASSURANCE (QA) . . . . . . . . . . . . . . . . . . . . . . . . . . . . . . . . . . . . . . . . . . . . . . . . . . . . . . ...1-6
OFFICIAL NOMENCLATURE, NAMES, AND DESIGNATIONS . . . . . . . . . . . . . . . . . . . . . . . . . . . ...1-6
1-6
1-7
REPORTING EQUIPMENT IMPROVEMENT RECOMMENDATIONS (EIRS). . . . . . . . . . . . . . . . . ...1-6
1-8
WARRANTY INFORMATION . . . . . . . . . . . . . . . . . . . . . . . . . . . . . . . . . . . . . . . . . . . . . . . . . . . . . . ...1-7
1-9
SAFETY, CARE, AND HANDLING . . . . . . . . . . . . . . . . . . . . . . . . . . . . . . . . . . . . . . . . . . . . . . . . . . ...1-7
1-10
CORROSION PREVENTION AND CONTROL (CPC) . . . . . . . . . . . . . . . . . . . . . . . . . . . . . . . . . . . . ..1-8
Section II
EQUIPMENT DESCRIPTION AND DATA . . . . . . . . . . . . . . . . . . . . . . . . . . . . . . . . . . . . . . . . . . . . ...1-8
1-11
CAPABILITIES AND FEATURES . . . . . . . . . . . . . . . . . . . . . . . . . . . . . . . . . . . . . . . . . . . . . . . . . . . ...1-8
1-12
LOCATION OF MAJOR COMPONENTS. . . . . . . . . . . . . . . . . . . . . . . . . . . . . . . . . . . . . . . . . . . . ...1-10
1-13
DIFFERENCES BETWEEN MODELS... . . . . . . . . . . . . . . . . . . . . . . . . . . . . . . . . . . . . . . . . . . . ...1-14
1-14
EQUIPMENT DATA . . . . . . . . . . . . . . . . . . . . . . . . . . . . . . . . . . . . . . . . . . . . . . . . . . . . . . . . . . . . ...1-15
Section Ill PRINCIPLES OF OPERATION . . . . . . . . . . . . . . . . . . . . . . . . . . . . . . . . . . . . . . . . . . . . . . . . . . . . ...1-17
1-15
EQUIPMENT OPERATION AND DESCRIPTION. . . . . . . . . . . . . . . . . . . . . . . . . . . . . . . . . . . . . . ...1-17
1-1
TM 9-2350-311-34-1
M109A2
1-2
TM 9-2350-311-34-1
M109A3
1-3
TM 9-2350-311-34-1
1-4
TM 9-2350-311-34-1
SECTION 1. GENERAL INFORMATION
1-1 SCOPE
This manual contains instructions for direct support and general support maintenance of the Ml 09A2/M109A3/M1 09A4/
Ml 09A5 Howitzer’s hull, powerplant, drive controls, tracks, suspension, and other hull-related components.
1-2 MAINTENANCE FORMS, RECORDS, AND REPORTS
Department of the Army forms and procedures used for equipment maintenance will be those prescribed by (as
applicable) DA PAM 738-750, The Army Maintenance Management System (TAMMS); DA PAM 738-751, Functional
Users Manual for The Army Maintenance Management System — Aviation (TAMMS-A); or AR 700-138, Army Logistics
Readiness and Sustainability.
Accidents involving injury to personnel or damage to materiel will be reported on DA Form 285, US Army Accident
Investigation Report, in accordance with AR 385-40. Explosive ammunition malfunctions will be reported in accordance
with AR 75-1.
1-3 DESTRUCTION OF ARMY MATERIEL TO PREVENT ENEMY USE
Destruction of the vehicle, armament, and equipment, when subject to capture or abandonment in a combat zone, will
be undertaken by the using army only when the unit commander decides such action is necessary in accordance with
orders of, or policy established by, the Army commander.
Read TM 750-244-6, Procedures for Destruction of Tank-Automotive Equipment to Prevent Enemy Use, for information
on destruction of all mechanical equipment. In general, destruction of essential components, followed by burning, will
usually be sufficient to render the vehicle, armament, and equipment useless. Time is usually critical.
Materiel must be damaged so that it cannot be restored to usable condition by either repair or cannibalization. If a lack
of time or personnel prevents destruction of all parts, give priority to destruction of parts hardest to replace. It is important
that the same parts be destroyed on all vehicles to prevent construction of one complete vehicle from several damaged
ones.
All items of sighting and fire control instruments and equipment, especially telescopes, gunner's quadrants, and ‘
binoculars, are costly and difficult to replace. They should be conserved whenever possible. If you cannot carry them
with you, destroy them by smashing with your sledgehammer, pick, or mattock. Throw the pieces in all directions.
When time is short, a method of destroying the equipment with materials at hand is as follows:
●
Retrieve or smash the sighting and fire control equipment.
●
Load the cannon with a projectile and a full powder charge. Attach a 50-ft (15.24-m) or longer lanyard to the
firing mechanism. Disconnect all recoil cylinders and fire the weapon.
●
Take a sledgehammer and bend the end of the recoil system rods.
1-5
TM 9-2350-311-34-1
1-3 DESTRUCTION OF ARMY MATERIEL TO PREVENT ENEMY USE — CONTINUED
A second method is to close the breechblock, elevate the tube, and toss several thermite grenades down the tube.
Elevate the tube so that the grenades will fall against the breechblock. This will melt the breech and the powder chamber,
causing them to fuse together.
1-4 PREPARATION FOR STORAGE AND SHIPMENT
Basic requirements for administrative storage are covered in TM 9-2350-311-20-2.
1-5 QUALITY ASSURANCE (QA)
Not applicable.
1-6 OFFICIAL NOMENCLATURE, NAMES, AND DESIGNATIONS
Nomenclature in this manual was chosen in accordance with the terms used for provisioning as they appear in the
Repair Parts and Special Tools List (RPSTL) and Maintenance Allocation Chart (MAC). A few tools and hull
components are, however, referred to by names more common than those in the RPSTL. In many cases the more
common name is a shorter name for the same component.
OFFICIAL PROVISIONING NOMENCLATURE
Ammunition rack
Intercommunications power harness
Intercommunications system
155mm, medium, self-propelled howitzer
Safety wire or nonelectrical wire
MORE COMMON NAME
Ammo rack
Wiring harness
Dipstick
Intercom wiring harness
Intercom system
Howitzer
Lockwire
1-7 REPORTING EQUIPMENT IMPROVEMENT RECOMMENDATIONS (EIRs)
If your howitzer needs improvement, let us know. Send us an EIR. You, the user, are the only one who can tell us what
you don’t like about your equipment. Let us know why you don’t like the design or performance. Put it on an SF 368,
Product Quality Deficiency Report. Mail it to the address specified in DA PAM 738-750.
NOTE
When equipment failure occurs, but is not caused by normal wear, poor operation, or
accidental damage, an EIR must be submitted.
1-6
TM 9-2350-311-34-1
1-8 WARRANTY INFORMATION
The Ml 09 Howitzer series is no longer warranted.
1-9 SAFETY, CARE, AND HANDLING
WARNING
Nuclear, Biological, and Chemical (NBC) agents can kill you. If NBC exposure is
suspected, all air filter media must be handled by personnel wearing full NBCprotective equipment (FM 21-1 1).
WARNING
Ml 40 alinement device and Al Al collimator are illuminated by sealed, radioactive
As long as these sources remain sealed, they do not emit
sources of tritium gas
any harmful radiation. There is no limit on handling time. Radioactively illuminated
collimators are indicated by the radioactive sign shown above. If the seal is broken,
see below.
a. Refer to warning page inside front cover of manual.
b. Prior to purging or charging, make the following checks:
(1) Lift cover assembly and check for cracks or loss of illumination.
(2) Look through objective end of collimator and check for broken/cracked reticle and loss of
illumination. If reticle is intact, no cracks are observed, and collimator is illuminated,
proceed with maintenance actions.
(3) If cracks are observed, but collimator is still illuminated, remove collimator scope and
notify the local Radiation Protection Officer (RPO). Seal collimator scope in a double
plastic bag (item 4, Appx B) and return it to depot for disposal.
(4) If no illumination is observed, remove collimator scope and check for illumination in a dark
room. If a slight glow/haze appears, follow procedure in paragraph (3) above. If illumination still is not detected, notify local RPO. Return collimator scope to depot as follows for
disposal.
(a) Seal collimator scope in a double plastic bag (item 4, Appx B) and place in a strong,
tight container (such as a fiberboard box) (item 5, Appx B) with all seams secured
using tape (item 26, Appx B) (masking tape is not authorized).
(b) Label the container: CAUTION — BROKEN
SOURCE. DO NOT OPEN.
1-7
TM 9-2350-311-34-1
1-10 CORROSION PREVENTION AND CONTROL (CPC)
CPC of Army materiel is a continuing concern. It is important that any corrosion problems with this item be reported so
that the problem can be corrected and improvements can be made to prevent the problem in future items. While
corrosion is typically associated with rusting of metals, it can also\ include deterioration of other materials, such as rubber
and plastic. Unusual cracking, softening, swelling, or breaking of these materials maybe a corrosion problem. if a
corrosion problem is identified, it can be reported using SF 368, Product Quality Deficiency Report.
Use of keywords such as “corrosion, “ “rust,” “deterioration,” or “cracking” will ensure that the information is identified as
a CPC problem. The form should be submitted to the address specified in DA PAM 738-750.
SECTION II. EQUIPMENT DESCRIPTION AND DATA
1-11 CAPABILITIES AND FEATURES
NOTE
Refer to TM 9-2350-311-10 for further equipment descriptions and data.
1-11.1 Electrical System
The howitzers’ electrical power is provided through a 24-Vdc (nominal) generating system consisting of the following
components:
a. Four 12-Vdc (nominal) batteries connected in series/paralle that provide 24 Vdc (nominal) to the master relay.
b. M109A2/M1 09A3 Howitzers have a 3-phase, 100-amp alternator that maintains 24-Vdc (nominal) electrical
power through the voltage rectifier, voltage regulator, and to the master relay for systems operation. Ml 09A4/
Ml 09A5 Howitzers have a 3-phase, 180-amp alternator.
c. Master relay that delivers electrical power to electrically operated systems/equipment in the howitzers (hull and
cab) by turning on the MASTER switch. The MASTER switch, located on the driver’s portable instrument
panel, actuates the vehicles’ electrical system. With the powerplant off (engine not running), activation of the
MASTER switch provides delivery of electrical power direct through the alternator, voltage rectifier, voltage
regulator, and master relay circuit.
1-11.2 Powerplant (Engine and Transmission)
The powerplant (engine and transmission) provides the mobility for the howitzers.
1-8
TM 9-2350-311-34-1
The powerplant consists of the following subsystems:
a. Two engines are available:
. Detroit Diesel 8V71T, model 7083-7398, diesel, liquid-cooled, V-8 engine, which generates
405 horsepower at 2300 rpm.
. Detroit Diesel 8V71T, model 7083-7391, diesel, liquid-cooled, V-8 engine, which generates
440 horsepower at 2300 rpm.
Drive control linkages to the transmission are steer control, shift control, and braking. Final drive assemblies
are the interface between the transmission and drive sprockets.
1-11.3 Suspension
Independent, torsion-bar mounted, dual-sided road wheels (seven per side), which support and guide the vehicle track.
1-11.4 Air Cleaner Assembly
Provides filtered air to the engine air intake system.
1-9
TM 9-2350-311-34-1
1-12 LOCATION OF MAJOR COMPONENTS
1-12.1 Location of Major Component
NOTE
Primary fuel filter on some vehicles is located inside engine compartment access
door.
LEGEND
1 External power receptacle (M109A4/M109A5)
2 Combat override switch (M109A4/M109A5)
3 Accessory control box
4 Cannoneer no. 2 heater (M109A4/M109A5)
5 Turbocharger
6 Driver’s seat
7 Driver's and portable instrument panels
8 Drive control
9 Driver’s heater (Ml 09A4/M109A5)
10 Batteries (4)
11 Air purifier (M109A4/M109A5)
12 Rectifier
13 Master relay
14 Voltage regulator
15 Starter relay
1-10
16
17
18
19
20
21
22
23
24
25
26
27
28
29
30
Bilge pump relay
Secondary fuel filter
Oil filters (engine)
Primary fuel filter
Transmission
Coolant surge tank
Fuel tanks and pumps
Bilge pump
Engine
Radiator
Alternator
Fan assembly
Air cleaner
Personnel heater
Fixed fire extinguisher
TM 9-2350-311-34-1
1-11
TM 9-2350-311-34-1
1-12 LOCATION OF MAJOR COMPONENTS — CONTINUED
1.12.2 Stencil Locations for Basic Issue Items (Bll)
LEGEND
1 Powder cans
2 Fuses
3 Projectile stowage
4 M14 aiming light
5 Bucket
6 M712 (or powder can stowage)
7 Projectile spacer
1-12
8 Portable fire extinguisher
9 Canteen
10 Rations (exterior)
11 Telephone
12 Rifles
13 Span periscope (M45)
14 Flashlight
TM 9-2350-311-34-1
1.12.2 Serial Number Locations
NOTE
• The M109A2, M109A3, M109A4, and M109A5 Howitzers have similar data plates.
• Engine serial number and model are stamped on the right upper front comer of the
cylinder block.
1-13
TM 9-2350-311-34-1
1-13 DIFFERENCES BETWEEN MODELS
Differences between models exist (1) when comparing the M109A2 and Ml 09A3 Howitzers; (2) when comparing one
M109A3 to another M109A3 Howitzer and (3) when comparing the M109A2/M109A3 and M1094/M1 09A5 Howitzers.
1-13.1 Hull Rear Doors
The hull rear doors differ among the howitzers. Earlier versions have double doors and later versions have single doors.
All Ml 09A2 Howitzers have single doors.
1-13.2 Personnel Heater Exhaust Deflector
There is no personnel heater exhaust deflector on earlier howitzers. All newer howitzers and all M109A2 Howitzers have
the personnel heater exhaust deflectors mounted on the exhaust grille.
1-13.3 NATO Slave Start Receptacle
At present, not all of the M109 Howitzers have NATO slave start receptacles. Also, the slave start receptacle location
differs between the M109A2/M109A3 and M109A4/M109A5 Howitzers. The M109A2/M109A3 NATO slave start
receptacle is located in the battery compartment. The Ml 09A4/M1 09A5 NATO slave start receptacle is located in the
driver’s compartment.
1-13.4 Primary Fuel Filters
the primary fuel filters are located in different areas of the engine compartment. Some older howitzers’ primary fuel
filters are positioned near the engine vibration damper and the engine oil pan. The later howitzers’ primary fuel filters are
positioned near the oil filters attached to the transmission (vehicle front).
1-13.5 Travel Locks
There are some travel lock differences involving the spring anchors. Differences are minor and are detailed in TM 92350-311-20-1.
1-13.6 Ventilated Face Piece System (VFPS)
M109A4/M109A5 Howitzer hulls have a VFPS consisting of two air heaters, an air purifier, and required hoses.
1-13.7 Telephone Terminals
The location of vehicle telephone terminals differ on M109A2/M109A3 and M109A4/M109A5 Howitzers. The M109A2/
M109A3 terminals are located on the hull rear bulkhead. M109A4/M109A5 terminals are located on the hull rear roof
(exterior).
1-13.8 External Power Receptacle
M109A4/M109A5 Howitzers have external power receptacles located on the rear hull bulkhead.
1-13.9 Alternator and Charging System
M109A2/M109A3 Howitzers have 100-amp alternators/rectifiers. M109A4/M109A5 Howitzers have 180-amp
alternators/rect ifiers. The location for both configurations is the same.
1-14
TM 9-2350-311-34-1
1-13.10 Crew Compartment Subfloor Drains
M109A4/M1 09A5 Howitzers have 13 subfloor drains installed.
1-14 EQUIPMENT DATA
1-14.1 General
6
crew
lb (24,948 kg)
..
Weight (combat loaded) . . . . . . . . . . . . . . . . . . . . . . . . . . . . . . . . . . . . . . . . . . . . . . . . . . . . . . . . . . . .l . . . . . . . . . . . . . . . . . . . . . . . . . . . . . . . . . . . . . . . . . . . . . . . . . . . .55,000
lb (23,587 kg)
..
Weight (less crew, fuel, and stowage) . . . . . . . . . . . . . . . . . . . . . . . . . . . . . . . . . . . . . . . . . . . . . . . . . . . . . . . . . . . . . . . . . . . . . . . . . . . . . . . . . . . . . . . . . . . 52,000
in. (9.13 m)
.
Length (Ml 09A2/M109A3/M109A4) (with armament) . . . . . . . . . . . . . . . . . . . . . . . . . . . . . . . . . . . . . . . . . . . . . . . . . . . . . . . . . . . . . . . . . . . . .359.375
3 in. (9.17 m)
Length (Ml 09A5) (with armament)
243.75 in. (6.19 m)
Length (without armament) . . . . . . . . . . . . . . .
124 in. (3.15 m)
Width
120.43
in. (3.06 m)
Height
109.93
in.
(2.79 m)
Lowest operable height . . . . . . . . . . . . . . . . . . . . . . . ... . . . . . . . . . . . . . . . . . . . . . . . . . . . . . . . . . ........ . . . . . . . . . . . . . . . . . . . . . . . . . . . . . . . . . . . . . . . . . . . . .
18
in.
(45.7
cm)
.
.
.
.
.
.
.......
.
.
.
.
.
.
.
.
.
.
...
.
.
.
.
.
.
.
.
.
.
.
.
.
.
.
.
.
.
.
.
.
.
.
.
.
.
.
.
.
.
.
.
.
.
.
.
.
.
.
.
.
....
.
.
.
.
.
.
.
.
.
.
.
.
.
.
.
.
.
.
.
.
.
.
.
.
.
.
.
.
.
.
.
.
.
.
.
.
.
.
.
.
.
.
.
.
.
.
.
.
.......
Ground clearance
cu ft (63.72 cu m)
Shipping volume . . . . . . . . . . . . . . . . . . . . . . . . . . . . . . . . . . . . ..... . . . . . . . . . . . . . . . . . . . . . . . . . . . . . . . . . . . . . . . . . . . . . . . . . . . . . . . . . . . . . . . . . . . . . . . . . . . . . .2250
..
26 tons (23,587 kg)
Bridge classification . . . . . . ..... . . . . . . . . . . . . . . . . . . . . . . . . . . . . . ..
. . . . . . . . .
. . . . . . . . . . . . . . . . . . . . . . . . . . . . . . . . . . . . . . . . . . . . . . . . . . . . . . . .
. . . ... . . . . . . . . . . . . . . . . . . . . . . . . . . . . . . . . . . . . . . . . . . . . . . . . . . . . . . . . . . . . . . . .
1-14.2 Performance
35 mph (56 km/h) (governed)
High speed (max)
6 mph (10 km/h)
Low speed (max)
Reverse speed (max) . . . . . . . . . . . . . . . . . . . . . . . . . . . . . . . . . . . . . . . . . . . . . . . . . . . . . . . . . . . . . . . . . . . . . . . . . . . . . . . . . . . . . . . . . . . . . . . . . . . . . . . . . . . . . . . . . . . . . . . . . . . .7. .. mph (11 km/h)
Max grade . . . . . . . . . . . . . . . . . . . . . . . . . . . . . . . . . . . . . . . . . . . . . . . . . . . . . . . . . . . . . . . . . . . . . . . . . . . . . . . . . . . . . . . . . . . . . . . . . . . . . . . . . . . . . . . . . . . . . . . . . . . . .......................... ............. 60%
72 in. (1.83 m)
Max trench
21
Max vertical wall . . . . . . . . . . . . . . . . . . . . . . . . . . . . . . . . . . . . . . . . . . . . . . . . . . . . . . . . . . . . . . . . ... . . . . . . . . . . . . . . . . . . . . . . . . . . . . . . . . . . . . . . . . . . . . . . . . . . . . . . . . . . . . . . . .... in. (53.3 cm)
Turn radius (min) . . . . . . . . . . . . . . . . . . . . . . . . . .. . . . . . . . . . . . . . . . . . . . . . . . . . . . . . . . . . . . . . . . . . . . . . . . . . . . . . . . . . . . . . . . . . . . . . . . . . . . . . . . . . ........ . . . . . . . . . . . . . . . 1 vehicle length
217 miles (349 km)
Cruising range . . . . . . . . . . . . . . . . . . . . . . . . . . . . . . . . . . . . . . . . . . . . . . . . . . . ........ . . . . . . . . . . . . . . . . . . . . . . . . . . . . . .
135 gal (51 1 L)
Fuel capacity . . . . . . . . . . . . . .
. . . . . . . . . . . . . . . . . . . . . . . . . . . . . . . . . . . . . . . . . . . . . . . . . . . . . . . . . . . . . . . . . . . . . . . . . . . . . . . . . . . . . . . . . . . . . . . . . . . . . . . . . . . . . . . . . . . . . . . . . . . . . ........
. . . . . . . . . . . . . . . . . . . . . . . . . . . . . . . . . . . . ...... . . . . . . . . . . . . . . . . . . . . . . . . . . . . . . . . . . . . . . . . . . . . . . . . . . . . . . . . . . . . . . . . . . . . . . . . . . . . . . . . . . . . . . . . .. ...........
..........................................
. . . . . . . . . . . . . . . . . . . . . . . . . . . . . . . . . . . . . . . . . . . . . . . . . . . . . . . . . . . . . . . . . . . . . . . . . . . . . . . . . . . . . . . . . . . . . . . . . . . . . . . . . . . . . . . . ................
1-14.3 Engine
Detroit Diesel 8V71T, model 7083-7396 or 7083-7391, liquid-cooled
Type/model
Detroit Diesel Corp (Division of GMC)
Manufacturer
405 (engine model 7083-7396), 440 (engine model 7083-7391 )
Horsepower (gross) at 2300 rpm
Horsepower (net) . . . . . . . . . . . . . . . . . . . . . . . . . . . . . . . . . . . . . . . . . . . . . . . . ... . . . . . . . . . . . . . . . . . . . . . . . . . . . . . . . . . . . . . . . . . . . . . . . . . . . . . . . . . . . . . . . . . . . . . . . . . .345
. .. at 2300 rpm
568
cu in. (9308 cc)
Displacement . . . . . . .......
Bore . . . . . . . . . . . . . . . . . . . . . . . . . . . . . . . . . . ........ . . . . . . . . . . . . . . . . . . . . . . . . . . . . . . . . . . . . . . . . . . . . . . . . . . . . . . . . . . . . . 4.25 in. (10.8 cm)
5.0 in. (12.7 cm)
Stroke
Compression ratio . . . . . . . . . . . . . . . . . . . . . . . . . . . . . . . . . . . . . . . . . . . . . . . . . . . . . . . . . . . . . . . . . . . . . . . . . . . . . . . . . . . . . . . . . . . . . . . . . . . . . . . . . . . . . . . . . . . . . . . . . . . ............. ............... 17:1
Torque (max gross) . . . . . . . . . . . . . . . . . . . . . . . . . . . . . . . . . . . . . . . . . . . . . . . . . . . . . . . . . . . . . . . . . . . . . . . . . . . . . . . . . . . . . . . . . . . . . . . . . . . . . 980
. . Ib-ft (1 329 N•m) at 1700 rpm
895 Ib-ft (1 213 N•m) at 1600 rpm
Toque (max net)
Ignition . . . . . . . . . . . . . . . . . . . . . . . . . . . . . . . . . . . . . . . . . . . . . . . . . . . . . . . . . . . . . . . . . . . . . . . . . . . . . . . . . . . . . . . . . . . . . . . . . . . . . . . . . . . . . . . . . . . . . . . . . . . . . .......... ................... Compression
. . . . . . . . . . . . . . . . . . . . . . . . . . . . . . . . . .
. . . . . . . . . . . . . . . . . . . . . ..... . . . . . . . . . . . . . . . . . . . . . . . . . . . . . . . . . . . . . . . . . . . . . . . . . . . . . . . . . . . . . . . . . . . . . . . . . . . . . . . . . . . . . . . .
. . . . . . . . . . . . . . . . . . . . . . . . . . . . . . . . . . . . . . . . . . . . . . . . . . . . . . . . . . . . . . . . . . . . . ...*.. . . . . . . . . . . . . . . . . . . . . . . . . . . . . . . . . . . . . . . . . . . . . . . . . . . . . . . . ..... ................
. . . . . ..... . . . . . . . . . . . . . . . . . . . . . . . . . . . . . . . . . . . . . . . . . . . . . . . . . . . . . . . . . . . . . . . . . . . . . . . . . . . . ....... . . . . . . .
1-15
1-16
TM 9-2350-311-34-1
1-17/(1-18 blank)
TM 9-2350-311-34-1
CHAPTER 2
GENERAL HULL MAINTENANCE
GENERAL
This chapter provides information and instructions needed to keep hull equipment and components in good repair.
These instruction provide step-by-step and item-by-item illustrated text describing equipment, component service, and
maintenance. References are also provided for maintenance-related procedures not within the scope of this manual (for
example, welding).
CONTENTS
PAGE
Section I
REPAIR PARTS, SPECIAL TOOLS, TMDE, AND SUPPORT EQUIPMENT. . . . . . . . . . . . . . . . . . . . . 2-2
2-1
GENERAL . . . . . . . . . . . . . . . . . . . . . . . . . . . . . . . . . . . . . . . . . . . . . . . . . . . . . . . . . . . . . . . . . . . . . . . . 2-2
2-2
COMMON TOOLS AND EQUIPMENT . . . . . . . . . . . . . . . . . . . . . . . . . . . . . . . . . . . . . . . . . . . . . . . . . . 2-2
SPECIAL TOOLS, TMDE, AND SUPPORT EQUIPMENT. . . . . . . . . . . . . . . . . . . . . . . . . . . . . . . . . . . 2-2
2-3
2-4
REPAIR PARTS . . . . . . . . . . . . . . . . . . . . . . . . . . . . . . . . . . . . . . . . . . . . . . . . . . . . . . . . . . ... . . . . . 2-2
Section II
GENERAL HULL MAINTENANCE INSTRUCTIONS . . . . . . . . . . . . . . . . . . . . . . . . . . . . . . . . . . . . . . . 2-2
2-5
DISASSEMBLY AND ASSEMBLY PROCEDURES . . . . . . . . . . . . . . . . . . . . . . . . . . . . . . . . . . . . . . . . 2-2
2-6
REPLACEMENT OF PARTS . . . . . . . . . . . . . . . . . . . . . . . . . . . . . . . . . . . . . . . . . . . . . . . . . . ..... . 2-3
2-7
BALL AND ROLLER BEARINGS . . . . . . . . . . . . . . . . . . . . . . . . . . . . . . . . . . . . . . . . . . . . . . . . . . . . . . 2-3
2-8
REMOVING BURRS, SCRATCHES, AND RAISED METAL . . . . . . . . . . . . . . . . . . . . . . . . . . . . . . . . . 2-3
2-9
SCREW THREAD INSERTS (ONE-PIECE TYPE) . . . . . . . . . . . . . . . . . . . . . . . . . . . . . . . . . . . . . . . . . 2-4
2-10
WELDING . . . . . . . . . . . . . . . . . . . . . . . . . . . . . . . . . . . . . . . . . . . . . . . . . . . . . . . . . . . . . . . . . . . . . . . . 2-5
2-11
ELECTRICAL TEST EQUIPMENT AND ELECTRICAL TESTING . . . . . . . . . . . . . . . . . . . . . . . . . . . . . 2-5
2-12
SHAFTS, GEARS, AND BEARINGS . . . . . . . . . . . . . . . . . . . . . . . . . . . . . . . . . . . . . . . . . . . . . . . . . . . 2-5
Section Ill CLEANING, PAINTING, AND LUBRICATION . . . . . . . . . . . . . . . . . . . . . . . . . . . . . . . . . . . . . . . . . . . . 2-5
2-13
CLEANING . . . . . . . . . . . . . . . . . . . . . . . . . . . . . . . . . . . . . . . . . . . . . . . . . . . . . . . . . . . . . . . . . . . . ...2-5
2-14
PAINTING . . . . . . . . . . . . . . . . . . . . . . . . . . . . . . . . . . . . . . . . . . . . . . . . . . . . . . . . . . . . . . . . . . . . . ...2-7
2-15
LUBRICATION . . . . . . . . . . . . . . . . . . . . . . . . . . . . . . . . . . . . . . . . . . . . . . . . . . . . . . . . . . . . . . . . . ...2-7
2-1
TM 9-2350-311-34-1
SECTION 1. REPAIR PARTS, SPECIAL TOOLS, TMDE, AND SUPPORT EQUIPMENT
2-1 GENERAL “
Tools, equipment, and repair parts will be issued to direct support and general support maintenance personnel for
maintenance. The tools and equipment issued should only be used for tasks in this manual. When not in use, these tools
should be properly stowed.
2-2 COMMON TOOLS AND EQUIPMENT
For authorized common tools and equipment, refer to the Modified Table of Organization and Equipment (MTOE).
2-3 SPECIAL TOOLS, TMDE, AND SUPPORT EQUIPMENT
The special tools and equipment listed and illustrated in TM 9-2350-31 1-24 P-1 are the only special tools and equipment
necessary to perform maintenance operations described in this manual. TM 9-2350-311 -24P-1 is the authority for
requisitioning special tools and equipment for supporting maintenance use. All references to special tools in this
technical manual are located in Appendix C.
The fabricated tools mentioned apply only to supporting maintenance shops to enable these organizations to fabricate
items locally. Fabricated tools are particularity valuable to shops engaged in repairing many identical components.
2-4 REPAIR PARTS
Repair parts are listed and illustrated in the Repair Parts and Special Tools List (RPSTL) covering direct support and
general support maintenance (TM 9-2350-311 -24P-1 and TM 9-2350-31 1-24P-2). All mandatory replacement parts
identified in the initial setups are listed in Appendix F.
SECTION Il. GENERAL HULL MAINTENANCE INSTRUCTIONS
2-5 DISASSEMBLY AND ASSEMBLY PROCEDURES
Complete disassembly of a component is not always necessary to make a required repair or replacement. Good
judgement should be used to keep disassembly operations to a minimum.
When disassembling a unit, first follow basic inspection procedures, then remove only necessary components and
subassemblies. These components may then be reduced, as required, into individual parts.
2-2
TM 9-2350-311-34-1
During disassembly, tag critical parts such as shims, bearings, and electrical wiring harnesses and leads to make assembly procedures easier. Tagging is important for electrical equipment if circuit number tags are illegible or missing.
CAUTION
Never scribe-mark bearing surfaces
Mark gears on mating teeth with scribe marks, dye, permanent ink, or paint to ensure correct positioning during
assembly. Chalk or crayon markings should be avoided because they are not permanent.
During assembly, subassemblies should be assembled first, combined into major components where possible, and then
installed to form a complete component.
Records to provide repair and replacement data and statistics should be carefully prepared and maintained in
accordance with DA PAM 738-750.
2-8 REPLACEMENT OF PARTS
Unserviceable or nonrepairable assemblies will be broken down into items of issue. Serviceable parts will be returned
to stock. Parts or assemblies that can not be repaired or reconditioned will be salvaged. Use new parts to replace them.
When assembling components and assemblies, replace damaged keys with new ones. If screws, washers, or nuts are
damaged, they must be replaced. Gaskets, packings, bushings, preformed packings, seals, Iockwashers, locknuts,
Iockrings, self-locking fasteners (screws, nuts, etc), cotter pins, and spring pins must be replaced if removed. Springs
must be replaced if broken, kinked, cracked, or do not conform to standards specified in the repair data.
If a required part is not available, reconditioning the existing part will be necessary. Such parts should be inspected after
reconditioning to determine suitability and probable service life. Replacement parts should be requisitioned immediately.
2-7 BALL AND ROLLER BEARINGS
Refer to TM 9-214, Inspection, Care, and Maintenance of Anti-Friction Bearings, for cleaning, inspection, and lubrication
of bearings and instructions for evacuation of bearing life.
2-8 REMOVING BURRS, SCRATCHES, AND RAISED METAL
WARNING
Dry-cleaning solvent (P-D-880) is toxic and flammable. Wear protective goggles and
gloves and use only in a well-ventilated area. Avoid contact with skin, eyes, and
clothes. Do not breath vapors. Do not use near open frame or excessive heat. The
flashpoint for type #1 is 100°F (38°C), and for type #2 is 138°F (59°C). if you become
dizzy while using dry-cleaning solvent, get fresh air immediately and obtain medical
aid. if contact with eyes is made, wash your eyes with water and obtain medical aid
immediately.
2-3
TM 9-2350-311-34-1
2-8 REMOVING BURRS, SCRATCHES, AND RAISED METAL — CONTINUED
Use a fine-mill file, sharpening stone (items 9 and 23, Appx C), or abrasive paper (item 12, Appx B) dipped in drycleaning solvent (item 7, Appx B) to remove burrs, scratches, or raised metal. When filing aluminum, clean file often to
avoid lodging file with aluminum particles that could gouge work surface.
2-9 SCREW THREAD INSERTS (ONE-PIECE TYPE)
When determined feasible by inspection, damaged threads should be repaired by rethreading, use of tap or die, or by
“chasing” on a lathe.
Tapping holes for screw thread inserts that have mutilated threads may be repaired by drilling and tapping hole oversize
and installing larger inserts, or by filling tapped hole by welding, redrilling, and tapping hole to original size. Refer to Table
2-1 for drill size and depth.
Use the following procedure to remove and install screw thread inserts:
2-4
1
Drill thread insert. Refer to Table 2-1 for drill size and depth.
2
Deflect keys inward and break off.
3
Remove reminder of thread insert with a screw extractor.
4
Install screw thread insert until 0.010 to 0.030 in. (0.25 to 0.76 mm) below surface of plate.
5
Drive keys in flush with plate.
TM 9-2350-311-34-1
TABLE 2-1 THREAD INSERTS: DRILL SIZE AND DEPTH
THREAD INSERT
INTERNAL
EXTERNAL
THREAD
THREAD
10-24
3/8-1 6
10-32
7/1 6-14
1/4-20
1/4-28
1/2-13
5/16-18
5/1 6-24
3/8-16
9/16-1 2
3/8-24
7/1 6-14
5/8-I 1
7/1 6-20
1/2-13
11/16
1/2-20
REMOVAL DRILL
TAP DRILL
DIAMETER
COUNTERSINK
DIAMETER
Q
0.332 in.
x
0.397 in.
0.453 in.
0.391 in.
DIAMETER
0.281 in.
DRILLING DEPTH
0.25 in.
0.453 in.
0.344 in.
0.25 in.
0.516 in.
0.406 in.
0.25 in.
0.516 in.
0.578 in.
0.469 in.
0.25 in.
0.578 in.
0.641 in.
0.531 in.
0.25 in.
0.641 in.
0.703 in.
0.534 in.
0.25 in.
2-10 WELDING
For welding instructions and welding materials, refer to TC 9-237.
2-11 ELECTRICAL TEST EQUIPMENT AND ELECTRICAL TESTING
To use electrical test equipment and for electrical testing, refer to TM 9-2350-311 -20-1.
2-12 SHAFTS, GEARS, AND BEARINGS
Gears, bearings, sleeves, and other components may be installed on the shafts as tight fits. The use of an arbor press,
gear pullers, or other appropriate tools for removal and installation maybe required.
SECTION Ill. CLEANING, PAINTING, AND LUBRICATION
2-13 CLEANING
Refer to TM 9-247 for instruction on cleaning and for necessary cleaning materials. Also refer to TM 9-2350-311 -10 and
TM 9-2350-311-20-1 for specific areas to be cleaned.
2-5
TM 9-2350-311-34-1
2-13 CLEANING — CONTINUED
a. Cleaning of Materiel Received from Storage
WARNING
●
Breathing vapor form decreasing solutions can cause headache, dizziness, loss of
muscular control, coma, permanent brain damage, or death. Ensure that area is
well ventilated as a preventative measure.
●
Dry-cleaning solvent (P-D-680) is toxic and flammable. Wear protective goggles
and gloves and use only in a well-ventilated area. Avoid contact with skin, eyes,
and clothes. Do not breath vapors. Do not use near open flame or excessive heat.
The flashpoint for type #1 is 100°F (38°C), and for type #2 is 138°F (59°C). If you
become dizzy while using dry-cleaning solvent, get fresh air immediately and
obtain medical aid. If contact with eyes is made, wash your eyes with water and
obtain medical aid immediately.
Materiel received from storage will be cleaned by dip-tank, vapor-degreaser, or steam method, whichever is applicable
or available. Descriptions of these methods follow. If some time is to elapse before the start of repair operations, apply
a coating of light grade preservative oil (item 10, Appx B) to all finished metal surfaces to prevent rusting.
CAUTION
Do not immerse sealed-typed ball bearings in dry-cleaning solvent or hot oil.
1
Dip-tank method — Disassemble as required. Using rubber gloves (item 26, Appx B), place parts in a
perforated metal basket, submerge, and agitate in a tank containing dry-cleaning solvent (item 7, Appx B).
2
Vapor-degreaser method — Tanks containing a heated solution of trichloroethylene or perchloroethylene are
used for decreasing items that are very greasy or oily and are not readily cleaned by dip-tank method. Place
parts in a perforated metal basket, and submerge just below the vapors in the tank, keeping the basket in this
position until all of the grease, oil, or dirt melts and runs off the parts. If necessary, materiel maybe washed
with decreasing spray unit.
3
Steam method — Place parts in a perforated metal basket and steam-treat until clean. This method is less
efficient than the vapor-degreaser method and may require additional cleaning of parts to remove final traces
of oil or dirt, particularly from recesses.
b. Cleaning After Repair
After repair and prior to assembly, remove shop dirt and other foreign matter from all metal surfaces. Use the diptank or vapor-degreaser method or clean with cloths soaked in dry-cleaning solvent (item 7, Appx B).
c. Cleaning After Shop Inspection
After in-process shop inspections, dip parts in a tank containing fingerprint remover oil. Remove parts while
wearing rubber gloves, and dry thoroughly with dry compressed air or by wiping with clean, lint-free dry cloths.
Apply preservatives as soon as possible after cleaning.
2-6
TM 9-2350-311-34-1
2-14 PAINTING
Refer to TM 9-2330-311-20-1 for painting instructions.
2-15 LUBRICATION
Refer to TM 9-2350-311-10 and TM 9-2330-311-20-1 for lubrication instructions.
2-7/(2-8 blank)
TM 9-2350-311-34-1
CHAPTER 3
TROUBLESHOOTING
GENERAL
This chapter provides the necessary information to quickly and accurately determine the cause of equipment
malfunctions and direct you to procedures for the appropriate corrective action. It provides continued instructions when
TM 9-2350-311 -20-1 refers to support maintenance for corrective action. Check the troubleshooting section of TM 92350 -311-20-1 and proceed as outlined.
Operating a malfunctioning vehicle can cause additional damage to disabled components and possibly injure personnel.
With careful inspection and troubleshooting, damage and injury can be avoided and the causes of vehicle or component
faulty operation can often be determined without extensive disassembly.
The Quick Guide to Troubleshooting (para 3-2) lists common malfunctions or problems and provides a solution or
references the corrective maintenance procedure or technical manual for more detailed information.
When applicable, the Troubleshooting Chart (para 3-3) gives step-by-step instructions to resolve some problems
identified in the Quick Guide to Troubleshooting (para 3-2).
CONTENTS
PAGE
3-1
GENERAL TROUBLESHOOTING INSTRUCTIONS . . . . . . . . . . . . . . . . . . . . . . . . . . . . . . . . . . . . ...3-2
3-2
QUICK GUIDE TO TROUBLESHOOTING. . . . . . . . . . . . . . . . . . . . . . . . . . . . . . . . . . . . . . . . . . . . ...3-2
3-3
Troubleshooting CHART . . . . . . . . . . . . . . . . . . . . . . . . . . . . . . . . . . . . . . . . . . . . . . . . . . . . . ...3-6
3-1
TM 9-2350-311-34-1
3-1 GENERAL TROUBLESHOOTING INSTRUCTIONS
The Quick Guide to Troubleshooting, the master reference table for locating troubleshooting solutions or references,
contains a list of various malfunctions that may occur during operation or inspection of the M109A2/M109A3/M109A4/
Ml 09A5 Howitzer and provides a solution to these problems or references troubleshooting information in the
Troubleshooting Chart or a technical manual.
Before starting troubleshooting procedures, perform basic systems tests as prescribed in TM 9-2350-311 -20-1 and
ensure electrical power is on when necessary.
WARNING
Protective radiator fan screens must be installed prior to troubleshooting in engine
compartment when engine is running or when engine is in ground hop mode. Contact
with rotating fan can cause severe injury.
3-2 QUICK GUIDE TO TROUBLESHOOTING
To use the Quick Guide to Troubleshooting and the Troubleshooting Chart, follow the instructions below:
1 Determine the problem.
2 Locate the problem in the Quick Guide to Troubleshooting.
3 Locate the solution or reference identified for the problem in the Quick Guide to Troubleshooting.
4 Recheck the system and problem.
5 Perform the corrective action as required by the troubleshooting procedure.
6 Verify that the corrective action eliminated the problem.
3-2
TM 9-2350-311-34-1
SOLUTION OR REFERENCE
ITEM
ENGINE
TRANSMISSION
VIBRATES EXCESSIVELY
Para 3-3a
BLACK EXHAUST SMOKE IS
PRESENT
TM 9-2815-202-34
WHITE EXHAUST SMOKE IS
PRESENT
TM 9-2815-202-34
USES EXCESSIVE OIL
TM 9-2815-202-34
HAS NO OR LOW OIL
PRESSURE
TM 9-2815-202-34
VIBRATES EXCESSIVELY
Para 3-3b
OVERHEATS
TM 9-2520-234-35
VEHICLE DOES NOT DRIVE
TM 9-2520-234-35
VEHICLE STEERS PROPERLY
IN ONE DIRECTION ONLY
TM 9-2520-234-35
AIR CLEANER BLOWER DO NOT OPERATE
MOTORS
Repair or replace blower motors as required
(para 5-5).
FUEL SYSTEM
FUEL LEAKAGE IN ENGINE
COMPARTMENT
Inspect fuel tanks for damage, deterioration,
or cracks. Repair or replace fuel tanks as
required (para 5-3).
FLAME HEATER
(ENGlNE MODEL 70837396)
MOTOR AND PUMP ASSEMBLY
DOES NOT OPERATE
Repair motor and pump assembly (TM 9281 5-202-34).
NO OR INSUFFICIENT FUEL
FLOW THROUGH FLAME
HEATER SOLENOIDOPERATED VALVE
Para 3-3c
3-3
TM 9-2350-311-34-1
3-2 QUICK GUIDE TO TROUBLESHOOTING — CONTINUED
ITEM
COOLING SYSTEM
ELECTRICAL SYSTEM
FINAL DRIVE
ASSEMBLY
3-4
PROBLEM
SOLUTION OR REFERENCE
ENGINE OVERHEATS
Para 3-3d
ENGINE COOLING FANS DO
NOT OPERATE WHEN ENGINE
IS RUNNING
Check for broken, damaged, or defective
fan driveshafts (para 6-4).
COOLING FAN DRIVE
ASSEMBLY DOES NOT MEET
BACKLASH REQUIREMENT
Adjust backlash as required (para 6-2).
ELECTRICAL COMPONENTS
INOPERATIVE
Recharge or replace batteries (TM 9-6140200-14).
ELECTRICAL COMPONENTS
INOPERATIVE, DEFECTIVE
GENERATOR
Rebuild alternator as required (TM 9-2920225-34 or TM 9-2920-258-30&P).
ELECTRICAL COMPONENTS
INOPERATIVE, DEFECTIVE
MASTER RELAY
Test relay unit for proper operation (TM 9-
ELECTRICAL COMPONENTS
INOPERATIVE, DEFECTIVE
RECTIFIER
Para 3-3g
EXCESSIVE OIL LEAKAGE
AROUND FINAL DRIVE
Para 8-1
4910-571-1 2&P).
TM 9-2350-311-34-1
ITEM
PROBLEM
SUSPENSION SYSTEM OIL LEAKS FROM UPPER
SPINDLE HOUSING
SPINDLE HOUSING
OVERHEATS
SOLUTION OR REFERENCE
Remove road wheel and road wheel arm
from vehicle and inspect upper spindle
housing for damage or cracks. Replace if
damaged or cracked (para 8-2).
Disassemble upper spindle housing.
Replace damaged bearings or spacers
(para 8-2).
PERSONNEL
INSUFFICIENT AIR
VENTILATION BLOWER CIRCULATION WITH BLOWER
ON
Para 3-3e
BILGE PUMP
PUMP DOES NOT OPERATE
WHEN MASTER SWITCH AND
BILGE PUMP SWITCH ARE IN
ON POSITION
Para 3-3f(1)
PUMP OPERATES, BUT DOES
NOT PUMP SUFFICIENT
WATER
Para 3-3f(2)
PERSONNEL HEATER
FAILS TO OPERATE
TM 9-2540-205-24&P
GLOW PLUG SYSTEM
(ENGINE MODEL 70837391 )
FAILS TO OPERATE
TM 9-2815-202-34.
3-5
TM 9-2350-311-34-1
3-3 TROUBLESHOOTING CHART
a. ENGINE
VIBRATES EXCESSIVELY
References
TM 9-2515-202-34
A
I
Inspect vibration damper (viscous) for damage.
Is vibration damper (viscous) damaged?
Replace vibration damper and verify
that problem is solved (para 4-5).
Inspect mass ring and coupler for damage.
Is mass ring or coupler damaged?
Repair or replace mass ring and
coupler as required (para 4-4).
Refer to TM 9-2515-202-34 for further
troubleshooting procedures.
END OF TASK
3-6
TM 9-2350-311-34-1
b. TRANSMISSION
VIBRATES EXCESSIVELY
References
TM 9-2350-234-35
Check for loose or damaged transmission
trunnion caps.
Are transmission trunnion caps loose or damaged?
Refer to TM 9-2350-234-35 for further
Replace transmission trunnion caps (para 4-6).
END OF TASK
3-7
TM 9-2350-311-34-1
3-3 TROUBLESHOOTING CHART — CONTINUED
C. FLAME HEATER (ENGINE MODEL 7083-7396)
TM 9-2815-202-34
Check flame heater solenoid for fuel flow.
Is fuel flow non-existent or insufficient?
Troubleshoot fuel return system
(TM 9-2815-202-34).
Repair flame heater solenoid
(TM 9-2815-202-34).
END OF ASK
NO OR INSUFFICIENT FUEL FLOW THROUGH FLAME
HEATER SOLENOID-OPERATED VALVE
TM 9-2350-311-34-1
d. COOLING SYSTEM
ENGINE OVERHEATS
TM 750-254
TM 9-2815-202-34
A
Inspect radiator for leaks (TM 750-254).
Does radiator leak?
Repair or replace radiator as required
and verify that problem is solved
(TM 9-281 5-202-34).
Check for defective engine coolant pump (TM
9-281 5-202-34).
I
Is engine coolant pump defective?
Repair or replace coolant pump as
required and verify that problem is
solved (TM 9-2815-202-34).
CONTINUED ON NEXT PAGE
3-9
TM 9-2350-311-34-1
3-3 TROUBLESHOOTING CHART — CONTINUED
d. COOLING SYSTEM
CONTINUED FROM STEP B
Inspect cooling fans for damage (para 6-4).
Are cooling fans damaged?
Inspect, repair, or replace fan drive
gearbox and fans as required (para 6-4).
Refer to TM 9-2520-202-34 for further
END OF TASK
3-10
ENGINE OVERHEATS — CONTINUED
TM 9-2350-311-34-1
e. PERSONNEL VENTILATION BLOWER
INSUFFICIENT AIR CIRCULATION WITH BLOWER ON
Disasemble personnel ventilation blower and
check for seized bearings (para 9-1).
Are bearings seized?
Replace seized bearings and verify
that problem is solved (para 9-1).
Check radio noise filter assembly for continuity
(para 9-1).
Is continuity present?
Replace personnel ventilating fan
(para 9-1).
Replace radio noise filter assembly
(para 9-1).
END OF TASK
3-11
TM 9-2350-311-34-1
3-3 TROUBLESHOOTING CHART — CONTINUED
f.
BILGE PUMP
(1) PUMP DOES NOT OPERATE WHEN MASTER
SWITCH AND BILGE PUMP SWITCH ARE IN ON
POSITION
D isassemble bilge pump and check brushes
for damage or excessive wear (para 9-2).
Are brushes damaged or excessively worn?
Replace damaged or worn brushes
and verify that problem is solved
(para 9-2).
Check field coil and rotor assembly for shorts
(para 9-2).
I
Do field coil and rotor assembly short out?
Replace field coil and rotor assembly
(para 9-2).
END OF TASK
3-12
TM 9-2350-311-34-1
f.
BILGE PUMP
(2) PUMP OPERATES, BUT DOES NOT PUMP
SUFFICENT WATER
Remove bilge pump from vehicle and check for
clogged inlet screen (para 9-2).
Is inlet screen clogged or obstructed?
Clean inlet screen as required and verify
that problem is solved (para 9-2).
Check for clogged, bent, or damaged hoses.
I
Are hoses clogged, bent or damaged?
WARNING
Compressed air used for cleaning
purposes must not exceed 30 psi (207
kPa). Use only with effective chip
guarding and personal protective
equipment (goggles/shieid, gloves, etc).
1
Blow out hose with low-pressure
compressed air and verify that problem
is solved.
CONTINUED ON NEXT PAGE
3-13
TM 9-2350-311 -34-1
3-3 TROUBLESHOOTING CHART — CONTINUED
f.
BILGE PUMP
(2) PUMP OPERATES, BUT DOES NOT PUMP
SUFFICIENT WATER — CONTINUED
CONTINUED FROM STEP B
Check for bent or damaged impeller.
Is impeller bent or damaged?
Replace bilge pump (para 9-2).
Repair or replace impeller as required
(para 9-2).
END OF TASK
3-14
TM 9-2350-311-34-1
g. ELECTRICAL SYSTEM
ELECTRICAL COMPONENTS INOPERATIVE,
DEFECTIVE RECTIFIER
Tools
Multimeter (item 16, Appx C)
NOTE
Rectifier repair information for M1 09A2/M109A3
Howitzers is covered in paragraph 7-15 and repair
information for M1 09A4/M109A5 Howitzers is
covered in paragraph 7-16. Refer toTM9-4910-571 12&P, DA PAM 750-33, and TM 9-6140-200-14 when
troubleshooting electrical system.
1. Place red lead of multimeter on positive
terminal and black lead of multimeter to
negative terminal of diode. Check for
continuity.
2. For triple terminal diodes, repeat this step
for both negative diodes.
Is continuity present?
Replace diode.
1. Place red lead of multimeter in negative
terminal diode and black lead of multimeter
to positive terminal of diode. Multimeter
should read infinity (00). If reading is not 00,
replace diode.
2. For triple diodes, repeat this step for both
negative diodes.
END OF TASK
3-15/(3-16 blank)
TM 9-2350-311-34-1
CHAPTER 4
SEPARATION AND ASSEMBLY OF POWERPLANT COMPONENTS
GENERAL
This chapter describes and illustrates procedures for separating the engine from the transmission and transfer, repairing
the engine vibration damper, and matmg and installing transmission trunnion replacement caps.
This chapter also identifies engine parts and accessories that are required to return an unserviceable, repairable engine
to the overhaul depot for replacement. For repair or maintenance, including repair parts, that are not discussed in this
manual refer to TM 9-2815-202-34 and TM 9-281 5-202-24P for model 8V71T diesel engine and TM 9-2520-234-35 and
TM 9-2520-234-34P for model XTG-411 -2A transmission.
CONTENTS
4-1
4-2
4-3
4-4
4-5
4-6
PAGE
SHIPPING AND STORAGE CONTAINERS AND ENGINE PARTS AND ACCESSORIES LIST. . . ...4-2
REMOVAL AND INSTALLATION OF ENGINE- AND TRANSMISSION-RELATED COMPONENTS ..4-4
SEPARATION OF ENGINE FROM TRANSMISSION AND TRANSFER ASSEMBLY. . . . . . . . . . ...4-15
MASS RING AND COUPLER . . . . . . . . . . . . . . . . . . . . . . . . . . . . . . . . . . . . . . . . . . . . . . . . . . . . . ...4-20
CRANKSHAFT VIBRATION DAMPER . . . . . . . . . . . . . . . . . . . . . . . . . . . . . . . . . . . . . . . . . . . . . . ...4-22
TRANSMISSION TRUNNION REPLACEMENT CAPS . . . . . . . . . . . . . . . . . . . . . . . . . . . . . . . . . . ..4-23
4-1
TM 9-2350-311-34-1
4-1 SHIPPING AND STORAGE CONTAINERS AND ENGINE PARTS AND ACCESSORIES LIST
NOTE
Engine assembly, transmission assembly, and transfer assembly must be shipped
and stored in their appropriate containers. Refer to TM 9-247 for preservation,
storage, and shipment of ordnance material.
ENGINE ASSEMBLY WITH
SHIPPING AND STORAGE CONTAINER
4-2
TM 9-2350-311-34-1
TRANSMISSION ASSEMBLY WITH
SHIPPING AND STORAGE CONTAINER
TRANSFER ASSEMBLY WITH
SHIPPING AND STORAGE CONTAINER
The following engine parts and accessories must be included when returning an unserviceable repairable engine to
overhaul depot:
NOTE
Each assembly returned to overhaul depot must include component engine parts and
accessories. Refer to TM 9-2350-311-24P-1, TM 9-2815-202-34, and TM 9-2815-20224P for reporting and requisitioning information and data.
1
2
3
4
5
6
7
8
9
10
11
Engine oil pan
Cover assemblies (2)
Water and exhaust manifolds (3)
Fuel pump
Primary and secondary fuel filters
Starter
Relay solenoid
Water pump
Filter assembly
Air box heater (engine model 7083-7396)
Turbocharger assembly
12
13
14
15
16
17
18
19
20
21
Blower assembly
Crossover pipe exhaust
Crossover hose assemblies (2)
Oil cooler assembly
Container
Breather pipes (2)
Air inlet housing
Governor
Gage rod
Glow plug controller (engine model 7083-7391 )
4-3
TM 9-2350-311-34-1
4-2 REMOVAL AND INSTALLATION OF ENGINE- AND TRANSMISSION-RELATED
COMPONENTS
This task covers:
a. Removal
b. Installation
Tools
General mechanic’s tool kit (item 14, Appx C)
Lockwashers (2) (item 40, Appx F)
Lockwashers (2) (item 41, Appx F)
Lockwashers (4) (item 32, Appx F)
Lockwasher (item 36, Appx F)
Powerplant removed (TM 9-2350-311-20-1)
Engine and transmission oil and coolant system drained
(TM 9-2350-311-10)
Radiator and surge tank removed (TM 9-2350-311 -20-1 )
Atternator removed (TM 9-2350-311-20-1)
Radiator shroud and cooling fan assemblies removed
(TM 9-2350-311-20-1)
Oil sampling components removed from oil filters and
transmission (TM 9-2350-311-20-1 )
TM 9-2350-311-20-1
a. Removal
WARNING
Do not smoke or use open flame when working on fuel systems. An explosion may
occur, causing severe injury or death.
NOTE
To aid engine and transmission separation, disconnect all hoses at transmission. To
disconnect hoses from engine after separation, refer to TM 9-2350-311-20-1.
4-4
1
Loosen two hose connector nuts (1) and disconnect engine oil filter-to-oil cooler hose (2) and oil cooler-to-oil
filter hose (3).
2
Remove two elbows (4) from two filters (5). Install two elbows to two disconnected hoses (2 and 3).
3
Loosen nut (6) and disconnect oil cooler-to-transmission hose (7).
4
Loosen four screws (8) at oil cooler housing (9).
5
Remove hose connector (10) and disconnect transmission-to-oil cooler hose (11 ).
6
Remove screw (12) and Iockwasher (13) and release transmission-to-oil cooler hose (11 ) from transmission
housing (14). Discard Iockwasher.
TM 9-2350-311-34-1
4-5
TM 9-2350-311-34-1
4-2 REMOVAL AND INSTALLATION OF ENGINE- AND TRANSMISSION-RELATED
COMPONENTS — CONTINUED
a. Removal — Continued
7 Remove screw (15), flat washer (16), Iockwasher (17), and nut (18) at mounting bracket (19) to release
tachometer cable (20) and speedometer cable (21 ) from mounting bracket.
8 Install screw (15), flat washer (16), Iockwasher (17), and nut (18) to mounting bracket (19).
9 Disconnect tachometer cable (20) from engine near generator.
10 Remove speedometer cable (21) and tachometer cable (20).
11 Disconnect four electrical connectors (22 thru 25).
12 Remove two screws (26), two Iockwashers (27), and engine disconnect bracket (28).
13 Install two screws (26) and two Iockwashers (27).
14 Remove nut (29) and sleeve (30) and disconnect primary filter-to-engine-driven fuel pump tube (31 ).
15 Remove two screws (32), two flat washers (33), two Iockwashers (34), two nuts (35), and primary fuel filter
(36). Discard Iockwashers.
16 Disconnect elbow (37) from engine-driven fuel pump (38).
17 Remove three screws (39 and 40), three flat washers (41 and 42), three nuts (43 and 44), and three tube
clamps (45 and 46).
18 Remove screw (47) and tube clamp (48). Install screw to transmission housing (14).
19 Remove primary fuel filter-to-engine-driven fuel pump tube (31 ).
4-6
TM 9-2350-311-34-1
4-7
TM 9-2350-311-34-1
4-2 REMOVAL AND INSTALLATION OF ENGINE- AND TRANSMISSION-RELATED
COMPONENTS — CONTINUED
a. Removal — Continued
20 Remove two adapters (49) from two secondary fuel filter elbows (50).
21 Remove adapter (51) at engine connector (52).
22 Disconnect elbow (53) from engine driven fuel pump (38).
23 Remove three screws (54), three flat washers (55), and three clamps (56).
24 Remove two tubes (57 and 58).
25 Remove two screws (59), two flat washers (60), two Iockwashers (61 ), and two nuts (62). Discard Iockwashers.
26 Remove plug (63).
27 Remove secondary fuel filter (64).
4-8
TM 9-2350-311-34-1
28 Loosen hose clamp (65).
29 Disconnect surge tank-to-coolant main tube hose (66) from coolant main tube (67).
30 Loosen two hose clamps (68).
31 Disconnect hose connector (69) from coolant pump (70).
32 Loosen two hose clamps (71) and remove two hoses (72) from two elbows (73) at crossover tube (74).
33 Remove two elbows (73) from crossover tube (74).
34 Loosen two hose clamps (75) at bypass thermostat housing (76).
35 Remove screw (77), Iockwasher (78), and clamp (79). Discard Iockwasher.
36 Pull coolant main tube-to-bypass thermostat housing connector hose (80) away from bypass thermostat
housing (76).
4-9
TM 9-2350-311-34-1
4-2 REMOVAL AND INSTALLATION OF ENGINE- AND TRANSMISSION-RELATED
COMPONENTS — CONTINUED
b. Installation
WARNING
Do not smoke or use open flame when working on fuel systems. An explosion may
occur, causing severe injury or death.
1
Assemble powerplant (para 4-3).
2
Install two hose clamps (75) to coolant main tube-to-bypass thermostat housing connector hose (80).
3
Attach coolant main tube-to-bypass thermostat housing connector hose (80) and tighten two hose clamps (75).
4
Install clamp (79), new Iockwasher (78), and screw (77).
5
Install two elbows (73) at crossover tube (74).
6
Install two hoses (72) and two hose clamps (71 ) to two elbows (73).
7
Install two hose clamps (68) to hose connector (69).
8
Connect hose connector (69) to coolant pump (70) and tighten two hose clamps (68).
9
Connect surge tank-to-coolant main tube hose (66) to surge tank (81) and tighten hose clamp (65).
10 Install secondary fuel filter (64).
11 Install plug (63).
12 Install two nuts (62), two new Iockwashers (61), two flat washers (60), and two screws (59).
13 Install two tubes (57 and 58).
14 Install three flat washers (55) and three screws (54) and tighten three clamps (56).
15 Connect elbow (53) to engine-driven fuel pump (38).
16 Install adapter (51 ) to engine connector (52).
17 Install two adapters (49) to two secondary filter elbows (50).
4-10
TM 9-2350-311-34-1
4-11
TM 9-2350-311-34-1
4-2 REMOVAL AND INSTALLATION OF ENGINE- AND TRANSMISSION-RELATED
COMPONENTS — CONTINUED
b. Installation — Continued
18 Install primary fuel filter (36), two nuts (35), two new Iockwashers (34), two flat washers (33), and two screws
(32).
19 Install primary fuel filter-to-engine-driven fuel pump tube (31 ).
20 Install sleeve (30) and nut (29) and connect primary fuel filter-to-engine-driven fuel pump tube (31 ) to primary
fuel filter (36).
21 Remove screw (47) from transmission housing (14) and install tube clamp (48) and screw.
22 Install three tube clamps (45 and 46), three nuts (43 and 44), three flat washers (41 and 42), and three screws
(39 and 40).
23 Connect elbow (37) to engine-driven fuel pump (38) and connect primary fuel filter-to-engine-driven fuel pump
tube (31 ).
24
Install all previously removed tubes between engine and transmission to prevent damage.
25 Remove engine disconnect bracket (28). Temporarily remove two screws (26) and two Iockwashers (27) in
transmission. Discard Iockwashers.
26 Install bracket (28), two new Iockwashers (27), and two screws (26). Tighten screws.
27 Connect four electrical connectors (22 thru 25).
28 Install tachometer cable (20) and speedometer cable (21 ).
29 Connect tachometer cable (20) to engine near generator.
30 Remove nut (18), Iockwasher (17), flat washer (16), and screw (15) from mounting bracket (19). Discard
Iockwashers.
31 Secure speedometer cable (21 ) and tachometer cable (20) by installing screw (15), flat washers (16), new
Iockwasher (17), and nut (18) to mounting bracket (19).
4-12
TM 9-2350-311-34-1
4-13
TM 9-2350-311-34-1
4-2 REMOVAL AND INSTALLATION OF ENGINE- AND TRANSMISSION-RELATED
COMPONENTS — CONTINUED
b. Installation — Continued
32 Install new Iockwasher (13) and screw (12) to attach transmission-to-oil cooler hose (11 ) to transmission
housing (14).
33 Install hose connector (10) and connect transmission-to-oil cooler hose (11 ). Provide 0.63- to 0.87-in. (16.0- to
22.1 -mm) clearance between exhaust manifold (84) and hose (11 ).
34 Tighten four screws (8) to oil cooler housing (9).
35 Tighten nut (6) and connect oil cooler-to-transmission hose (7).
36 Install two elbows (4) to two filters (5). Remove elbows from ends of engine oil filter-to-oil cooler hose (2) and
oil cooler-to-oil filter hose (3).
37 Tighten two hose connector nuts (1) and connect engine oil filter-to-oil-cooler hose (2) and oil cooler-to-oil filter
hose (3).
4-14
TM 9-2350-311-34-1
NOTE
FOLLOW-ON MAINTENANCE:
Install oil sampling components
(TM 9-2350-311-20-1
hroud and cooling fan assemblies
(TM9-2350-311-20-1)
Install alternator (TM 9-2350-311 -20-1)
Install radiator and surge tank
(TM9-2350-311-20-1)
Fill engine and transmission oil coolant systems
(TM9-2350-311-10)
Install powerplant (TM 9-2350-311-20-1)
4-3 SEPARATION OF ENGINE FROM TRANSMISSION AND TRANSFER ASSEMBLY
This task covers:
a. Separation
b. Assembly
Lockwashers (6) (item 39, Appx F)
General mechanic’s tool Kit (item 14, AppX C)
Sling (item 21, Appx C)
Torque wrench (item 28, Appx C)
TM9-2350-311-20-1
Gasket (item 68, Appx F)
Lockwashers (14) (item 38, Appx F)
Engine- and transmission-related components removed
(para 4-2)
a. Separation
WARNING
Never crawl under equipment when performing maintenance unless equipment is
securely blocked. Keep clear of equipment when it is being raised or lowered. Do not
allow heavy components to swing while suspended by lifting device. Use extreme
caution when working near a cable under tension.
4-15
TM 9-2350-311-34-1
4-3 SEPARATION OF ENGINE FROM TRANSMISSION AND TRANSFER ASSEMBLY —
CONTINUED
a. Separation — Continued
CAUTION
Use care to avoid damage to powerplant components during disassembly, cleaning,
inspection, repair, and assembly. Nicks, scratches, and dents, resulting from careless
handling, may cause oil leakage or improper functioning. This could result in
transmission failure. All defective parts must be replaced. To prevent damage to
equipment, handle heavy components with slings and hooks and block transmission
for support in required positions.
1 Attach sling to hoist. Attach sling to engine at four lifting eyes (1) and take up slack in sling lines.
Ensure that transmission support at transfer assembly will prevent transmission from
rolling when engine is disconnected.
2 Remove six screws (2), six flat washers (3), and six Iockwashers (4) from tie bar (5) at transmission (6).
Discard Iockwashers.
NOTE
Record length of screws upon removal.
ENGINE MODEL 7083-7391 SHOWN
4-16
TM9-2350-311-34-1
3 Remove 14 screws (7), 14 flat washers (8), and 14 Iockwashers (9). Discard Iockwashers.
4 Pull engine (10) away from transfer assembly (11). Remove gasket (12). Discard gasket.
5 Remove oil tubes (TM 9-2350-311-20-1).
6 Remove coolant hoses and tubes (TM 9-2350-311-20-1).
7 Remove remaining electrical wiring harnesses (TM 9-2350-311-20-1).
ENGINE MODEL 7083-7391 SHOWN
4-17
TM 9-2350-311-34-1
4-3 SEPARATION OF ENGINE FROM TRANSMISSION AND TRANSFER ASSEMBLY —
CONTINUED
b. Assembly
WARNING
Never crawl under equipment when performing maintenance unless equipment is
securely blocked. Keep clear of equipment when it is being raised or lowered. Do not
allow heavy components to swing while suspended by lifting device. Exercise extreme
caution when working near a cable under tension.
1 Install coolant hoses and tubes to engine (TM 9-2350-311-20-1).
2 Install oil tubes to engine (TM 9-2350-311-20-1),
3 Install new gasket (12) and connect transfer assembly (11) to engine (10). Attach engine supports.
4-18
TM9-2350-311-34-1
NOTE
See illustration below for proper screw lengths.
4 Install 14 new Iockwashers (9), 14 flat washers (8), and 14 screws (7).
5 Install six new Iockwashers (4), six flat washers (3), and six screws (2) to tie bar (5) at transmission (6). Torque
six screws to 90-110 Ib-ft (122-149 N•m).
ENGINE MODEL 7083-7391 SHOWN
NOTE
FOLLOW-ON MAINTENANCE:
Install engine- and transmission-related
components (para 4-2)
4-19
TM 9-2350-311-34-1
4-4 MASS RING AND COUPLER
This task covers:
a. Removal
b. Inspection
c. Installation
Tools
General mechanic’s tool kit (item 14, Appx C)
Hammer (item 12, Appx C)
Torque wrench (item 28, Appx C)
Adhesive-sealant (item 3, Appx B)
Seals (2) (item 1, Appx F)
Engine and transmission separated (para 4-3)
a. Removal
1 Remove 12 screws (1), mass ring (2), and coupler (3).
2 Remove seal (4). Discard seal.
NOTE
Step 3 applies to optional coupler. Ring, cover and seal are only on optional coupler.
Standard coupler is built with solid backplate.
3 Remove ring (5), cover (6), and seal (7). Discard seal.
b. Inspection
Inspect rear surface of coupler (3). If surface is oil-soaked, springs or washers are broken, or coupler plate is
distorted, replace coupler.
c. Installation
Adhesives are toxic and flammable. Apply adhesives only in a well-ventilated area.
Avoid contact with skin, eyes, and clothes, and don’t breath vapors. Do not use near
heat, sparks, or open flame. Read and follow all warnings and instructions on labels of
adhesives. If contact with skin or eyes is made, wash area with water and seek
medical aid immediately.
NOTE
Step 1 applies to optional coupler. Ring, cover, and seal are only on optional coupler.
1 Apply coating of adhesive-sealant to new seal (7) and install ring (5), cover (6), and seal.
2 Apply coating of adhesive-sealant to coupling seal grooves and new seal (4) and install seal on coupler (3).
4-20
TM 9-2350-311-34-1
3 Coat splined teeth with adhesive-sealant and install coupler (3) and mass ring (2). Check for 0.010-to 0.012-in.
(0.25- to 0.30-mm) clearance between mass ring (2) and engine (8). If clearance exceeds 0.015 in. (0.38 mm),
carefully strike high points with hammer.
4 Install 12 screws (1). Torque screws to 40-50 Ib-ft (54-68 N•m).
NOTE
FOLLOW-ON MAINTENANCE:
Connect engine and transmission (para 4-3)
4-21
TM 9-2350-311 -34-1
4-5 CRANKSHAFT VIBRATION DAMPER
This task covers:
a. Removal
b. Disassembly
d. Assembly
e. Installation
Tools
General mechanic’s tool kit (item 14, Appx C)
Hammer (item 13, Appx C)
Torque wrench (item 26, Appx C)
Torque wrench (item 27, Appx C)
c. Inspection
Torque wrench (item 28, Appx C)
Split cone (item 77, Appx F)
a. Removal
1 Loosen bolt (1) approximately 0.125 in. (3.2 mm).
2 Strike bolt (1) with hammer to loosen spilt cone (2).
3 Remove bolt (1), spacer (3), split cone (2), and hub and damper assembly (4). Discard spiit cone.
b. Disassembly
1 Remove six bolts (5) and six washers (6).
2 Separate hub (7) and damper (8).
c. Inspection
Inspect damper (8), hub (7), and spacer (3). Replace damaged items as required.
d. Assembly
Install six washers (6) and six bolts (5) to hub (7) and damper (8). Torque bolts to 60-70 lb-ft (81-95 N•m).
e. Installation
1 Install damper and hub assembly (4), new split cone (2), spacer (3), and bolt (1). Torque bolt to 180 Ib-ft (244
N•m),
2 Strike bolt (1) with hammer.
3 Torque bolt (1) to 300 Ib-ft (407 N•M). Strike bolt with hammer again.
4 Torque bolt (1) to 300-330 lb-ft (407-447 N•m).
4-22
TM 9-2350-311-34-1
4-6 TRANSMISSION TRUNNION REPLACEMENT CAPS
This task covers:
a. Replacement Trunnion Cap Preparation
b. Replacement Trunnion Cap Installation
General mechanic’s tool kit (item 14, Appx C)
Drill (item 5, Appx C)
Drill bit (item 6, Appx C)
Torque wrench (item 28, Appx C)
Transmission trunnion cap replacement kit
(item 27, Appx B)
Transmission trunnion cap removed
(TM9-2350-311-20-1)
Marking dye — blue (item 13, Appx B)
4-23
TM 9-2350-311-34-1
4-6 TRANSMISSION TRUNNION REPLACEMENT CAPS — CONTINUED
a. Replacement Trunnion Cap Preparation
1
Locate and mark centerline of two support bolt holes (1) on front and rear of support (2).
2
Locate and mark center of replacement trunnion cap (3) on front and rear vertical face of cap.
3
With powerplant installed and transmission positioned in supports, place replacement trunnion cap (3) with
insert (4) over support (2). Aline center mark on cap with hole center marks on support.
4
Measure pretorque clearance between cap (3) and support (2) at forward and rear edges. Clearance should be
0.005 to 0.007 in. (0.13 to 0.18 mm).
5
If clearance is less than 0.005 in. (0.13 mm), machine trunnion cap mating surfaces to obtain required
clearance. If clearance is greater than 0.007 in. (0. 18 mm), use shims (5) as required to reduce gap.
6
Remove replacement trunnion cap (3) with insert (4) and leave shims (5) (as required) in place on support (2).
7
Install two socket head setscrews (6) in two support bolt holes (1).
NOTE
Screw must protrude 0.005 to 0.010 in. (0.13 to 0.25 mm) above support face or shim
surface, if shims are used.
8
Apply marking dye to mating surface of replacement trunnion cap (3).
9
Reposition replacement trunnion cap (3) and strike top of cap with hammer. Socket head setscrews (6) will
mark hole location outlines in marking dye.
10 Remove replacement trunnion cap (3) and socket head setscrews (6). Caps must be immediately marked “LF”
or “RF” on forward surface to indicate if cap was removed from the left front or the right front (viewed from
driver’s compartment facing forward).
11 Drill two 0.531 in. (13.49 mm) holes from bottom of trunnion cap (3) using outline of setscrews as location
points. Holes must be free of burrs.
4-24
TM9-2350-311-34-1
4-25
TM 9-2350-311-34-1
4-6 TRANSMISSION TRUNNION REPLACEMENT CAPS — CONTINUED
b. Replacement Trunnion Cap Installation
1
Aline transmission insert (4) in support (2) and replacement trunnion cap (3).
2
Install shims (5) (as required), replacement trunnion cap (3), two flat washers (7), and two bolts (8 and 9). Do
not tighten.
3
Torque rear bolt (8) to 85-90 Ib-ft (115-122 N•m).
4
Torque forward bolt (9) to 85-90 Ib-ft (115-122 N•m).
POWERPLANT SHOWN
REMOVED FOR CLARITY
NOTE
FOLLOW-ON MAINTENANCE:
4-26
Install transmission trunnion cap
(TM 9-2350-311-20-1)
TM 9-2350-311-34-1
CHAPTER 5
FUEL AND AIR INTAKE SYSTEMS
GENERAL
This chapter describes and illustrates procedures for disassembly, inspection, repair, assembly, and testing of the fuel
and air intake systems.
CONTENTS
PAGE
5-1
ELECTRIC FUEL PUMPS . . . . . . . . . . . . . . . . . . . . . . . . . . . . . . . . . . . . . . . . . . . . . . . . . . . . . . . . . ...5-2
5-2
FUEL TANKS . . . . . . . . . . . . . . . . . . . . . . . . . . . . . . . . . . . . . . . . . . . . . . . . . . . . . . . . . . . . . . . . . ...5-10
5-3
FUEL TANK PADS . . . . . . . . . . . . . . . . . . . . . . . . . . . . . . . . . . . . . . . . . . . . . . . . . . . . . . . . . . . . . . . .5-20
5-4
FUEL TANK RETAINING STRAPS AND CHANNEL GROUP . . . . . . . . . . . . . . . . . . . . . . . . . . . . . . .5-22
5-5
AIR CLEANER BLOWER MOTORS.. . . . . . . . . . . . . . . . . . . . . . . . . . . . . . . . . . . . . . . . . . . . . . . . . .5-25
5-6
FUEL TANK HEATSHIELD . . . . . . . . . . . . . . . . . . . . . . . . . . . . . . . . . . . . . . . . . . . . . . . . . . . . . . . . . 5-36
5-1
TM 9-2350-311-34-1
5-1 ELECTRIC FUEL PUMPS
This task covers:
a. Disassembly
Tools
General mechanic’s tool kit (item 14, Appx C)
Multimeter (item 16, Appx C)
b. Inspection and Repair
c. Assembly
Preformed packing (item 16, Appx F)
TM 9-2350-311 -20-1
Gasket (item 85,
Gasket (item 86,
Lockwashers (3)
Lockwashers (4)
Appx F)
Appx F)
(item 30, Appx F)
(item 31, Appx F)
LEFT ELECTRIC FUEL PUMP
AND HANGER ASSEMBLY
5-2
Electric fuel pump and hanger assembly removed
(TM9-2350-311-20-1)
RIGHT ELECTRIC FUEL PUMP
AND HANGER ASSEMBLY
TM 9-2350-311-34-1
a. Disassembly
WARNING
Do not smoke or use open flame when working on fuel systems. An explosion may
occur, causing severe injury or death.
NOTE
●
Left and right electric fuel pumps have same basic components and are
disassembled in same sequence. Right electric fuel pump has canted hanger plate
and left electric fuel pump has elbow connector between check valve and hanger
discharge fitting. For purposes of this manual, disassembly of left electric fuel
pump will be discussed.
Ž Elbow connector is on left fuel pump only.
1 Remove check valve (1) and elbow connector (2) from pump hanger discharge fitting (3).
2 Disconnect shielded electrical cable (4) at cover assembly (5) and remove from electric fuel pump (6).
5-3
TM9-2350-311-34-1
5-1 ELECTRIC FUEL PUMPS — CONTINUED
a. Disassembly — Continued
5-4
3
Remove three nuts (7), three Iockwashers (8), cover assembly (5), gasket (9), terminal plate (10), and gasket
(11). Discard Iockwashers and gaskets.
4
Loosen nut (12) and remove nut (13) and serrated washer (14).
5
Remove discharge fitting (3) and preformed packing (15). Discard preformed packing.
6
Loosen clamp (16).
7
Remove hose (17) and clamp (16).
8
Remove two screws (18), two nuts (19), and four Iockwashers (20) from hanger assembly (21) and fuel pump
(6). Discard Iockwashers.
9
Remove ground lead (22).
TM 9-2350-311-34-1
10 Pull latch (23) open.
11 Separate fuel pump (6) and hanger assembly (21).
NOTE
No further disassembly of fuel pump is possible. If fuel pump is defective, replace
pump (TM 9-2350-311-20-1 ).
b. Inspection and Repair
WARNING
Do not smoke or use open flame when working on fuel systems. An explosion may
occur, causing severe injury or death.
1 Troubleshoot electric fuel pump (6) (TM 9-2350-311-20-1).
2 Inspect electric fuel pump housing (24). Replace if damaged or defective.
3 Inspect inlet screens (25). Clean if clogged.
5-5
TM9-2350-311-34-1
5-1 ELECTRIC FUEL PUMPS — CONTINUED
b. Inspection and Repair — Continued
4
Perform fuel flow test (TM 9-2350-311 -20-1 ). Replace pumps if not within performance specifications.
5
Inspect shielded electrical cable (4). Replace if shorted, torn, or frayed.
6
Test electrical cable (4) for continuity (TM 9-2350-311 -20-1 ). Replace if damaged.
7
Inspect ground lead (22). Replace if tom, frayed, damaged, or defective.
8
Test ground lead (22) for continuity (TM 9-2350-311 -20-1 ). Replace if shorted.
9
Inspect cover assembly (5). Replace if damaged or deteriorated.
10 Test cover assembly (5) for continuity between terminal and terminal plate (10) (TM 9-2350-311-20-1).
11 Inspect hanger assembly (21 ). Replace if damaged.
12 Inspect pump hanger discharge fitting (3). Replace if damaged or defective.
13 Test operation of check valve (1) (TM 9-2350-311-20-1), Replace if defective.
14 Inspect hose (17). Replace if cracked or deteriorated.
15 Inspect all other components for damage. Replace if damaged.
5-6
TM 9-2350-311-34-1
c. Assembly
WARNING
Do not smoke or use open flame when working on fuel systems. An explosion may
occur, causing severe injury or death.
NOTE
Left and right electric fuel pumps have same basic components and are assembled in
same sequence. Right electric fuel pump has canted hanger plate and left electric fuel
pump has an elbow connector between check valve and hanger discharge fitting. For
purposes of this manual, assembly of left fuel pump will be discussed.
1 Place electric fuel pump (6) in hanger assembly (21).
2 Close latch (23).
3 install ground lead (22).
4 Install four new Iockwashers (20), two nuts (19), and two screws (18) to fuel pump (6) and hanger assembly
(21).
5-7
TM 9-2350-311-34-1
5-1 ELECTRIC FUEL PUMPS — CONTINUED
c. Assembly — Continued
5
Install hose (17) and clamp (16) to fuel pump (6).
6
Tighten clamp (16).
7
Install new preformed packing (15) and pump hanger discharge fitting (3).
8
Install serrated washer (14) and nut (13) to discharge fitting (3).
9
Tighten nut (12) back onto discharge fitting (3).
10 Install new gasket (11 ), terminal plate (10), new gasket (9), cover assembly (5), three new Iockwashers (8),
and three nuts (7).
5-8
TM9-2350-311-34-1
11 Connect shielded electrical cable (4) to cover assembly (5) and install at fuel pump (6).
NOTE
Elbow connector is on left fuel pump only.
12 Install elbow connector (2) and check valve (1) at discharge fitting (3).
13 Perform fuel flow test (TM 9-2350-311-20-1).
NOTE
FOLLOW-ON MAINTENANCE:
Install electric fuel pump and hanger assembly
(TM9-2350-311-20-1)
5-9
TM 9-2350-311-34-1
5-2 FUEL TANKS
This task covers:
a. Removal
General mechanic’s tool kit (item 14, Appx C)
Adapter (item 1, Appx C)
Fuel hose extension (item 8, Appx C)
Lifting sling (item 22, Appx C)
Suitable container(s)
Torque wrench (item 28, Appx C)
Coating, white (CARC) (item 6, Appx B)
Dry-cleaning solvent (item 7, Appx B)
Naphtha (item 11, Appx B)
Plastic repair kit (for repairs over 1 in. [25.4 mm])
(item 17, Appx B)
b. Repair
co Installation
Plastic repair kit (for repairs under 1 in. [25.4 mm])
(item 18, Appx B)
Primer coating (CARC) (item 14 or 15, Appx B)
.
Personnel Required
Two
TM 9-2350-311-10
TM 9-2350-311 -20-1
Powerplant
removed (TM 9-2350-311-20-1)
a. Removal
WARNING
• Do not smoke or use open flame when working on fuel systems. An explosion may
occur, causing severe injury or death.
●
Fuel is hazardous waste and must be disposed of in accordance with local
procedures or direction of the local Hazardous Waste Management office.
NOTE
Draining fuel tanks manually allows draining in less than 30 minutes. Vehicle must be
driven over maintenance pit providing required clearance to fit 55-gal (208-L)
containers under vehicle. Draining fuel tanks using electric fuel pumps requires 1.5 to
2 hours.
1 Drain fuel tank manually (TM 9-2350-311-10) or use the following electric fuel pump method:
(a) Connect battery ground cables after powerplant is removed (TM 9-2350-311-20-1).
(b) Attach adapter (1) and fuel hose extension (2) to main fuel line (3) at quick disconnect (4).
(c) Move MASTER switch to on to activate fuel pumps (5) and drain fuel into suitable container.
(d) Move MASTER switch to OFF when fuel pumps (5) stop pumping fuel.
5-10
TM 9-2350-311-34-1
(e) Detach adapter (1) and fuel hose extension (2) to main fuel line (3) at quick disconnect (4).
5-11
TM 9-2350-311-34-1
5-2 FUEL TANKS — CONTINUED
2
Remove engine exhaust outlet tube and pipe (6) (TM 9-2350-311 -20-1 ).
3
Remove air cleaner duct and elbow (7) (TM 9-2350-31 1-20-1).
4
Remove fuel tank heat shield (8) (TM 9-2350-311 -20-1 ).
5
Disconnect two electrical connectors (9) at fuel pumps (5) (TM 9-2350-311-20-1).
6
Disconnect two electrical connectors (10) at fuel level transmitters (11 ) (TM 9-2350-311-20-1).
7
Remove fuel level transmitters (11 ) (TM 9-2350-311-20-1).
8
Disconnect hoses and tubes (12) (TM 9-2350-311 -20-1 ).
9
Remove two fuel pumps (5) (TM 9-2350-311 -20-1 ).
10 Remove filler assembly (13) (TM 9-2350-311 -20-1 ).
5-12
TM 9-2350-311-34-1
11 Loosen turnbuckle (14) by reaching through filler opening (15).
12 Remove two screws (16), two flat washers (17), and retaining strap (18) at front of upper fuel tank (19).
13 Pull upper fuel tank (19) outward towards front of vehicle to clear hull recess, then lift out of hull.
14 Remove four screws (20), four flat washers (21 ), and two retaining straps (22).
15 Lift lower fuel tank (23) over engine mount assembly (24) and remove from vehicle.
5-13
TM 9-2350-311-34-1
5-2 FUEL TANKS — CONTINUED
b. Repair
WARNING
●
Do not smoke or use open flames when removing tanks. Wear respirator and
rubberized protective clothing when working on fiberglass. Fiberglass inhalation
can cause severe respiratory problems. Fiberglass particles embedded in skin will
cause irritation and possible infection.
●
Immediately after working with fiberglass and resin, thoroughly wash any exposed
skin surfaces. If fiber particles are imbedded in skin, do not scrub. Rinse area in
warm, soapy water and seek medical assistance.
NOTE
●
Upper and lower fuel tanks are repaired using same procedures.
●
Applying fiberglass and epoxy repair materials in cold shop retards curing.
●
Steps 1 thru 20 apply to tanks with repair holes larger than 1 in. (2.54 cm). Steps
21 thru 27 apply to tanks with cracks or punctures smaller than 1 in. (25.4 mm).
1 For holes larger than 1 in. (2.54 cm) across at any point, cut away damaged area. Make a smooth-edged
circular opening. Sharp angular cuts make repair more difficult.
2 Scarf crater with at least 1.5 in. (3.81 cm) sloping sides, down to opening.
Dry-cleaning solvent (P-D-880) is toxic and flammable. Wear protective goggles and
gloves and use only in a well-ventilated area. Avoid contact with skin, eyes, and
clothes. Do not breath vapors. Do not use near open flame or excessive heat. The
flashpoint for type #1 is 100°F (38°C), and for type #2 is 138°F (59°C). If you become
dizzy while using dry-cleaning solvent, get fresh air immediately and obtain medical
aid. If contact with eyes is made, wash your eyes with water and obtain medical aid
immediately.
3 Remove dust and clean repair area with dry-cleaning solvent.
NOTE
Presence of oil in repair area will result in poor adhesion.
4 Use 0.125 in. (3.2 mm) application of regenerated silica compacted under warm pad to withdraw oil for
improved adhesion.
5 Measure repair area and estimate material requirement.
5-14
TM 9-2350-311-34-1
NOTE
If damaged area is near opening in tank, apply backing plate with masking tape and
release film, rather than using cloth wire.
6
Cut and trim piece of wire screen slightly larger than opening. If opening is less than 1 in. (25.4 mm) across at
greatest point, wire screen is not required.
7
Cut glass cloth patches to size and shape. Cut first patch 0.5 in. (13 mm) larger until sufficient cloth has been
built up to make patched area level with surrounding tank wall (usually six or seven patches).
8
Mix resin and hardener as directed on can label.
9
Thoroughly saturate scarfed area and wire screen with cement and apply screen over opening.
10 Remove about 20% of cement from mixing container. Fold in small amount of regenerated silica to obtain
putty-like consistency. Use this mixture to apply first two layers of glass cloth.
11 Thoroughly saturate smallest glass cloth with putty-like cement and place it over screen.
NOTE
Apply release film and work out air pockets after each lamination. Work from center of
patch outward.
12 Place piece of release film on patch and work out air pockets from center of patch outward.
5-15
TM 9-2350-311-34-1
5-2 FUEL TANKS — CONTINUED
b. Repair — Continued
13 Remove release film.
14 Repeat this procedure for application of second patch.
15 Saturate remaining patches with mixture without silica and apply to crater.
16 Allow completed patch to set undisturbed for 16 to 24 hours.
NOTE
Cure will be slow in temperatures below 70°F (21°C). However, during first hour of
cure, temperature should not exceed 100°F (38°C).
17 To cure in about 4 hours, after patch has cured for 1 hour, place heat lamp over patch and gradually increase
intensity. Keep lamp at least 2 ft (0.6 m) from patch and do not allow temperature to exceed 250°F (121°C).
WARNING
• Naphtha is flammable. Do not smoke or allow open flames in areas where naphtha
is being used to avoid possible explosion or injury.
●
Chemical Agent Resistant Coating (CARC) paint contains isocyanate, a
constituent that can cause respiratory effects during and after the application of the
material. CARC paint may produce itching and reddening of the skin, a burning
sensation of the throat and nose, and watering of the eyes. Refer to TM 9-2350311-20-1 for complete CARC handling instructions.
18 When cure is complete, sand patch flush with surrounding surface. Clean with naphtha and paint fuel tanks
(TM 9-2350-31 1-20-1).
Compressed air used for cleaning purposes must not exceed 30 psi (207 kPa). Use
only with effective chip guarding and personal protective equipment (goggles/shield,
gloves, etc).
19 Pressure test repaired tank using low-pressure compressed air at 3 psi (21 kPa).
20 Thoroughly flush tank and dry with low-pressure compressed air.
NOTE
Steps 21 thru 25 apply to tanks with holes 1 in. (25.4 mm) across at any point.
5-16
TM 9-2350-311-34-1
WARNING
●
Naphtha is flammable. Do not smoke or allow open flames in areas where naphtha
is being used to avoid possible explosion or injury.
• Dry-cleaning solvent (P-D-680) is toxic and flammable. Wear protective goggles
and gloves and use only in a well-ventilated area. Avoid contact with skin, eyes,
and clothes. Do not breath vapors. Do not use near open flame or excessive heat.
The flashpoint for type #1 is 100°F (38°C), and for type #2 is 138°F (59°C). If you
become dizzy while using dry-cleaning solvent, get fresh air immediately and
obtain medical aid. If contact with eyes is made, wash your eyes with water and
obtain medical aid immediately.
21 Scarf crater and clean area to be repaired (steps 2 and 3).
22 Mix sufficient cement to cover hole by following instructions on cement can. Apply cement directly to puncture
or crack (fill entire scarfed area).
NOTE
A small amount of regenerated silica maybe mixed with cement for added
consistency if desired.
23 Allow patch to cure 16 to 24 hours.
Compressed air used for cleaning purposes must not exceed 30 psi (207 kPa). Use
only with effective chip guarding and personal protective equipment (goggles/shield,
gloves, etc).
24 Pressure test, flush, and dry repaired tank (steps 19 and 20).
• Naphtha is flammable. Do not smoke or allow open flames in areas where naphtha
is being used to avoid possible explosion or injury.
• CARC paint contains isocyanate, a constituent that can cause respiratory effects
during and after the application of the material. CARC paint may produce itching
and reddening of the skin, a burning sensation of the throat and nose, and watering
of the eyes. Refer to TM 9-2350-311-20-1 for complete handling instructions.
25 Sand patch smooth, clean with naphtha and paint fuel tanks (para 2-14).
NOTE
Before installing fuel tanks, perform required maintenance on fuel tanks, retaining
straps, tumbuckle, and pads (para 5-3 and para 5-4).
5-17
TM 9-2350-311-34-1
5-2 FUEL TANKS — CONTINUED
c. Installation
1
Lower lower fuel tank (23) into position behind engine mount assembly (24) and install shim washers under
retaining straps as required.
NOTE
Steps 2 thru 4 apply to upper fuel tank.
2
Lower upper fuel tank (19) into hull and push towards rear of vehicle into hull recess.
NOTE
Access nut and screw from inside of vehicle.
3
Retract channel (25), hold nut (26), and loosen screw (27).
4
Ensure upper fuel tank (19) position will aline with crossover tube and filler assembly when installed.
5
Install retaining strap (18), two flat washers (17), and two screws (16).
NOTE
Steps 6 and 7 apply to upper fuel tank.
6
Tighten turnbuckle (14).
7
Use screwdriver to extend channel (25) to fit against upper fuel tank (19). Torque nut .(26) to 10 Ib-ft (13.5
N•m). Turn screw (27) to position channel.
8
Lower lower fuel tank (23) under engine mount assembly (24) and install into vehicle.
9
Install two retaining straps (22), four flat washers (21), and four screws (20).
10 Push upper fuel tank (19) inward towards back of vehicle to clear hull recess and position in vehicle.
11 Install retaining strap (18), two flat washers (17), and two screws (16) at front of upper fuel tank (19).
12 Reach through filler opening (15) and tighten tumbuckle (14).
5-18
TM9-2350-311-34-1
NOTE
FOLLOW-ON MAINTENANCE:
Install powerplant (TM 9-2350-311-20-1)
5-19
TM 9-2350-311-34-1
5-3 FUEL TANK PADS
This task covers:
a. Removal
b. Installation
INITIAL SETUP
Tools
General mechanic’s tool kit (item 14, Appx C)
Parts
Adhesive (item 2, Appx B)
Dry-cleaning solvent (item 7, Appx B)
Sand paper (item 12, Appx B)
Materials
Equipment Conditions
Fuel tanks removed (para 5-2)
a. Removal
NOTE
Remove only pads that are defective and need replacement.
1
Remove hull mounted pads (1) as required. Discard pads.
2
Remove rear retaining strap pad (2) as required (para 5-4). Discard pad.
3
Remove channel pad (3) as required (para 5-4).
CAUTION
Use care during removal of fuel tank pads to avoid puncturing or damaging fuel tanks.
4
5-20
Remove fuel tank pads (4) as required. Discard pads.
TM 9-2350-311-34-1
b. Installation
WARNING
Dry-cleaning solvent (P-D-680) is toxic and flammable. Wear protective goggles
and gloves and use only in a well-ventilated area. Avoid contact with skin, eyes,
and clothes. Do not breath vapors. Do not use near open flame or excessive heat.
The flashpoint for type #1 is 100°F (38°C), and for type #2 is 138°F (59°C). If you
become dizzy while using dry-cleaning solvent, get fresh air immediately and
obtain medical aid. If contact with eyes is made, wash your eyes with water and
obtain medical aid immediately.
●
• CARC paint contains isocyanate, a constituent that can cause respiratory effects
during and after the application of the material. CARC paint may produce itching
and reddening of the skin, a burning sensation of the throat and nose, and watering
of the eyes. Refer to TM 9-2350-311-20-1 for complete handling instructions.
●
Adhesives are toxic and flammable. Apply adhesives only in a well-ventilated area.
Avoid contact with skin, eyes, and clothes, and don’t breath vapors. Do not use
near heat, sparks, or open flame. Read and follow all warnings and instructions on
labels of adhesives. If contact with skin or eyes is made, wash area with water and
seek medical aid immediately.
1 Clean pad mounting surfaces thoroughly with dry-cleaning solvent and remove all old pad and adhesive
residue.
2 Using paint remover or sand paper, remove all paint from mounting surface.
3 Apply adhesive and install new pads (1 thru 4) as required.
NOTE
FOLLOW-ON MAINTENANCE:
Install fuel tanks (para 5-2)
5-21
TM9-2350-311-34-1
5-4 FUEL TANK RETAINING STRAPS AND CHANNEL GROUP
This task covers:
a. Removal
b. Disassembly
c. Assembly
d. Installation
INITIAL SETUP
Tools
General mechanic’s tool kit (item 14, Appx C)
Spring pin (item 2, Appx F)
Equipment Conditons
Materials/Parts
Upper fuel tank removed (para 5-2)
Cotter pin (item 12, Appx F)
a. Removal
1 Remove cotter pin (1). Discard cotter pin.
2 Remove headed pin (2).
3 Remove three screws (3), three nuts (4), and three flat washers (5).
4. Remove rear retaining strap assembly (6).
5 Remove two screws (7) and bracket (8).
NOTE
Nut and retainer are located inside hull crew compartment at forward bulkhead of
Cannon Launched Guided Projectile (CLGP) stowage area.
6 Remove nut (9) and retainer (10).
7 Remove channel (11), stud (12), and nut (13) and remove flat washer (14) through hull recess.
b. Diaaseembly
1 Unscrew turnbuckle (15) and separate top retaining strap (16) from side retaining strap (17). Discard and
replace defective straps or turnbuckle as required.
2 Remove and discard pad (18) if it requires replacement (para 5-3).
3 Remove nut (13) and stud (12) from channel (11). Remove pad (19) if it requires replacement (para 5-3).
4 Remove spring pin (20). Discard spring pin.
5 Remove stud (12) from channel (11).
5-22
TM 9-2350-311-34-1
5-23
TM 9-2350-311-34-1
5-4 FUEL TANK RETAINING STRAPS AND CHANNEL GROUP — CONTINUED
c. Assembly
1 Install new pad (18), as required (para 5-3).
2 Connect turnbuckle (15) to side retaining strap (17) and top retaining strap (16).
3 Install new pad (19), as required (para 5-3).
4 Assemble new spring pin (20), stud (12), and nut (13) to channel (11).
d. Installation
1 Install flat washer (14), nut (13), stud (12), and channel (11) through hull recess in engine compartment.
NOTE
Nut and retainer are located inside hull crew compartment at forward bulkhead of
CLGP stowage area.
2 Install retainer (10) and nut (9).
3 Install bracket (8) and two screws (7).
4 Install rear retaining strap assembly (6).
5 Install three flat washers (5), three nuts (4), and three screws (3).
6 Install headed pin (2).
7 Install new cotter pin (1).
5-24
TM 9-2350-311-34-1
NOTE
FOLLOW-ON MAINTENANCE:
Install upper fuel tank (para 5-2)
5-5 AIR CLEANER BLOWER MOTORS
This task covers:
a. Disassembly
b. Inspection, Repair, and Test
c. Assembly
d. Test
INITIAL SETUP
Tools
General mechanic’s tool kit (item 14, Appx C)
Dial indicator (item 4, Appx C)
Growler (item 10, Appx C)
Lathe (item 17, Appx C)
Multimeter (item 16, Appx C)
Soldering gun (item 11, Appx C)
Materials/Parts
Adhesive (item 2, Appx B)
Lockwashers (20) (item 79, Appx F)
Preformed packing (item 80, Appx F)
Seal (item 15, Appx F)
Seal (item 18, Appx F)
Self-locking nut (item 11, Appx F)
Solder (item 23, Appx B)
solder flux (item 24, Appx B)
References
TB SIG 222
TM 9-214
TM 9-2350-311-10
TM 9-2350-311-20-1
Equipment Conditions
Engine coolant system drained (TM 9-2350-311-10)
5-25
TM 9-2350-311-34-1
5-5 AIR CLEANER BLOWER MOTORS — CONTINUED
a. Disassembly
5-26
1
Remove 10 screws (1), 10 Iockwasher (2), and motor cover (3). Discard Iockwasher.
2
Slide electrical lead insulator (4) away from connector (5).
3
Disconnect electrical lead (6) at connector (5).
4
Remove screw (7) and disconnect ground lead (8). Install screw to commutator end bell (9).
5
Remove motor assembly (10) and two seals (11). Discard seals.
TM 9-2350-311-34-1
6 Remove screw (12), Iockwasher (1), ground lead (8), and clip (14). Install screw (12), Iockwasher (13), and
clip (14).
7 Remove four screws (15), four Iockwasher (16), capacitor lead assembly (17), and preformed packing (18).
Discard Iockwasher and preformed packing.
NOTE
Disassemble only if leads or capacitor lead assembly needs replacing.
8 Disassemble capacitor lead assembly (17), unsoldering leads (19) to disconnect capacitor (20) (TB SIG 222).
5-27
TM 9-2350-311-34-1
5-5 AIR CLEANER BLOWER MOTORS — CONTINUED
a. Disassembly — Continued
9
Remove self-locking nut (21). Unscrew impeller (22). Remove washers (23) (quantity will vary) and felt washer
(24). Discard self-locking nut.
NOTE
Follow step 10 for removal of both brush assembly holders.
10 Remove three screws (25), three Iockwasher’s (26), electrical lead (6), spring (27), and brushes (28) from
brush assembly holder (29). Discard Iockwashers.
11 Remove two screws (30) and two Iockwasher (31). Discard Iockwasher.
12 Separate motor cover (3), stator (32), armature (33), two bearings (34), and flat washer (35).
13 Remove screw (36) and clip (37) from commutator end bell (9).
14 Remove brush assembly holder (29) from commutator end bell (9).
15 Remove ground wire (38).
b. Inspection, Repair, and Test
1
Measure brushes (28). If less than 0.39 in. (9.9 cm), replace brushes.
2
Inspect brush assembly holder (29). Replace if brass fittings are cracked or damaged.
3
Inspect felt washer (24). Replace if cracked or distorted.
4
Inspect two bearings (34) (TM 9-214). Replace as required.
5
Test armature (33) on growler. Use lathe to turn down armature. Undercut mica 0.03 in. (0.8 mm) as required.
6
Test stator (32) for continuity. Replace if field winding is open or shorted.
7
Inspect motor cover (3). Replace if damaged or distorted.
8
Inspect washers (23). Replace if cracked or distorted.
9
Inspect impeller (22). Replace if nicked, cracked, or vanes are broken.
5-28
TM 9-2350-311-34-1
5-29
TM 9-2350-311-34-1
5-5 AIR CLEANER BLOWER MOTORS — CONTINUED
b. Inspection, Repair, and Test — Continued
10 Test capacitor (20) for continuity. If resistance value is indicated on multimeter, replace capacitor.
11 Inspect impeller housing (39). Replace if cracked or damaged.
12 Inspect commutator end bell (9). Replace if cracked or damaged.
13 Inspect motor cover (3). Repair if cracked, dented, or damaged. Replace if beyond repair.
c. Assembly
1 Install ground wire (38) and repeat step 2 for second brush assembly holder (29).
2 install brush assembly holder (29), two new lockwashers (26), and two screws (25) to commutator end bell (9).
3 Install clip (37) and screw (36) to commutator end bell (9).
4 Install flat washer (35), two bearings (34), armature (33), stator (32), and motor cover (3).
5 Install two new Iockwasher (31) and two screws (30).
6 Install brush (28), spring (27), electrical lead (6), new Iockwasher (26), and screw (25) to brush assembly
holder (29).
7 Install felt washer (24) and washers (23).
8 Screw impeller (22) to armature (33) and install new self-locking nut (21).
5-30
TM9-2350-311-34-1
5-31
TM 9-2350-311-34-1
5-5 AIR CLEANER BLOWER MOTORS — CONTINUED
C.
Assembly — Continued
9
Measure from motor cover (3) to end of impeller (22). Add or subtract washers as required to obtain 1.593-to
1.609-in. (4.046- to 4.087-cm) dimension.
10 Solder leads (19) to connect capacitor (20), assembling capacitor lead assembly (17).
11 Install new preformed packing (18), capacitor lead assembly (17), four new Iockwasher (16), and four screws
(15).
12 Install clip (14), ground lead (8), new Iockwasher (13), and screw (12) to impeller housing (39).
1.593 TO 1.609 IN.
(4.046 TO 4.087 CM)
5-32
TM 9-2350-311-34-1
13 Install two new seals (11) and motor assembly (10) to impeller housing (39).
14 Remove screw (7) and connect ground lead (8). Reinstall screw.
15 Connect electrical lead (6) to connector (5).
16 Slide electrical lead insulator (4) toward connector (5).
17 Install motor cover (3), 10 new Iockwasher (2), and 10 screws (1).
18 Bench test air cleaner blower motor assembly using 24-V power source. If working correctly, install in vehicle
(TM 9-2350-311-20-1) and test. If not working, disassemble and repair.
5-33
TM9-2350-311-34-1
5-5 AIR CLEANER BLOWER MOTORS — CONTINUED
d. Test
1
Remove motor cover.
2
Disconnect electrical lead.
NOTE
Steps 3 and 4 apply to M109A2/M109A3 Howitzers. Step 5 applies to M109A4/
M109A5 Howitzers.
3
Start engine and run at idle (TM 9-2350-311-10).
4
Turn on electrical systems.
5
Put vehicle in gear and turn MASTER switch on.
6
Perform electrical test as shown below.
7
Place red lead of multimeter in lead connector (6) and black lead to ground (8).
8
Read and monitor voltage. If voltage increases or fluctuates, replace capacitor.
9
If inoperable, perform other electrical troubleshooting procedures (TM 9-2350-311-20-1).
5-34
TM 9-2350-311-34-1
10 Air cleaner blower motors should meet the following performance specifications:
(a) Rated voltage: 24 Vdc.
(b) Blower load current: 7.5 amps maximum at 73°F (23°C) ambient temperature.
(c) Blower load speed: 11,500 rpm 10% at 77° F (25°C) ambient temperature. For +10% voltage, maximum
speed change of +10. For -10% voltage, maximum speed change of -10%.
VOLTAGE*
MAXIMUM AMPS
CFM
INLET VACUUM GAGE READING
24
5.5
0 minutes
14.0-in. (35.6-cm) water minimum
24
6.5
40 minutes
8.0-in. (20.3-cm) water minimum
24
7.5
60 minutes
0.0-in. (0.0-mm) water minimum
* Performance data at 72 to 82°F (22 to 28°C) ambient temperature.
NOTE
Performance curve at 24 Vdc 25 ± 8°C ambient temperature. Amps line represents
maximum values. Speed, efficiency, and watts output curves are minimum values.
PERFORMANCE CHART
NOTE
FOLLOW-ON MAINTENANCE:
Refill engine coolant system (TM 9-2350-311-10
5-35
TM9-2350-311-34-1
5-6 FUEL TANK HEAT SHIELD
This task covers:
a. Inspection and Repair
INITIAL SETUP
References
Tools
General mechanic’s tool kit (item 14, Appx C)
TM 9-2350-311-20-1
TM 9-237
a. Inspection and Repair
1
Check fuel tank heat shield seals (1) for tearing or deterioration. Replace as required (TM 9-2350-311-20-1).
2
Check supports for cracks or damage. Weld to repair or replace as required (TM 9-237).
3
Check retainers for cracks, damage, or bent areas. Weld to repair, straighten, or replace as required (TM 92350-311-20-1).
4
Check for stripped threads on retainer studs. Drill out and replace welded studs or retainer as required (TM 92350-311-20-1).
5
Check insulation. Replace if deteriorated or burnt (TM 9-2350-311-20-1).
6
Check heat shield body for cracks or broken welds. Weld to repair or replace as required (TM 9-2350-31120-1).
7
Check pad (2) for deterioration. Fabricate new pad if required (item 3, Appx D).
5-36
TM 9-2350-311-34-1
CHAPTER 6
COOLING SYSTEM
GENERAL
This chapter describes and illustrates procedures for removal, disassembly, inspection and test, repair, assembly, and
installation of the cooling system components.
Procedures for removal, inspection, repair, and installation of the coolant manifolds are contained in TM 9-281 5-202-34;
procedures for repair of the cooling system are contained in TM 750-254; procedures for inspection and repair of the
coolant pump are contained in TM 9-2815-202-34.
PAGE
CONTENTS
Section I
UNIVERSAL JOINTS AND COOLING FAN DRIVE ASSEMBLY. . . . . . . . . . . . . . . . . . . . . . . . . . . 6-2
6-1
UNIVERSAL JOINTS . . . . . . . . . . . . . . . . . . . . . . . . . . . . . . . . . . . . . . . . . . . . . . . . . . . . . . . . . . . . 6-2
6-2
COOLING FAN DRIVE ASSEMBLY . . . . . . . . . . . . . . . . . . . . . . . . . . . . . . . . . . . . . . . . . . . . . . . . . 6-4
Section II
RADIATOR SHROUD AND VANEAXIAL COOLING FAN ASSEMBLY. . . . . . . . . . . . . . . . . . . . . 6-11
6-3
VANEAXIAL COOLING FAN ASSEMBLY AND SHROUD. . . . . . . . . . . . . . . . . . . . . . . . . . . . . . 6-11
6-4
VANEAXIAL COOLING FANS AND FAN DRIVE GEARBOX. . . . . . . . . . . . . . . . . . . . . . . . . . . . 6-13
6-1
TM 9-2350-311-34-1
SECTION I. UNIVERSAL JOINTS AND COOLING FAN DRIVE ASSEMBLY
6-1 UNIVERSAL JOINTS
This task covers:
a. Removal
b. Inspection
c. Installation
INITIAL SETUP
Tools
General mechanic’s tool kit (item 14, Appx C)
Vernier calipers (item 2, Appx C)
a. Removal
1 Push two sleeve joints (1 and 2) downward and remove from splined shafts (3 and 4) on fan gearboxes (5 and
6).
2 Pull two universal joints (7 and 8) away from cooling fan drive (9) and up through opening in shroud (10).
b. Inspection
NOTE
If any item is found defective during inspection, entire universal joint must be
replaced.
6-2
1
Check end hubs (11) for chipped, broken, or missing splines (12).
2
Measure shaft length of universal joint (8) under static no-load condition. Length should not exceed 14.5 in.
(36.8 cm).
3
Apply 20 lb (9.1 kg) and 2 lb (0.9 kg) compression to universal joint (8).
4
Measure shaft length of universal joint (8) under compression. Length should be no less than 13.2 in. (33.5
cm).
5
Check end hubs (11) for chipped, broken, or missing splines (12).
6
Measure shaft length of universal joint (7) under static no-load condition. Length should not exceed 12 in. (30.5
cm).
7
Apply 20 lb (9.1 kg) and 2 lb (0.9 kg) compression on universal joint (7).
8
Measure shaft length of universal joint (7) under compression. Length should be no less than 10.7 in. (27.2
cm).
TM9-2350-311-34-1
c. Installation
1 Push two universal joints (7 and 8) down through openings in shroud (10) close to cooling fan drive (9).
2 Slide two sleeve joints (1 and 2) upward and install on splined shafts (3 and 4) of fan gearboxes (5 and 6).
6-3
TM 9-2350-311-34-1
6-2 COOLING FAN DRIVE ASSEMBLY
This task covers:
a. Removal
b. Disassembly
c. Assembly
d. Installation
INITIAL SETUP
Tools
General mechanic’s tool kit (item 14, Appx C)
Dial indicator (item 4, Appx C)
Fabricated bracket (item 1, Appx D)
Micrometer (item 15, Appx C)
Support blocks (item 3, Appx C)
Toque wrench (item 28, Appx C)
Materials/Parts
Gaskets (2) (item 60, Appx F)
Gasket (item 62, Appx F)
Gasket (item 64, Appx F)
Key washer (item 6, Appx F)
Lockwashers (3) (item 30, Appx F)
Lockwashers (12) (item 37, Appx F)
Lockwire (item 9, Appx F)
Lubricant (item 10, Appx B)
Preformed packings (2) (item 14, Appx F)
Preformed packing (item 19, Appx F)
Preformed packing (item 20, Appx F)
Preformed packing (item 47, Appx F)
Preformed packings (2) (item 48, Appx F)
Retaining ring (item 5, Appx F)
Seal (item 65, Appx F)
Equipment Conditions
Cooling fan universal joints removed (para 6-1)
a. Removal
1 Remove 12 screws (1) and 12 Iockwasher (2). Discard Iockwasher.
2 Remove cooling fan drive assembly (3) and gasket (4). Discard gasket.
6-4
TM 9-2350-311-34-1
b. Disassembly
NOTE
Some cooling fan drive assemblies may not include preformed packings.
1 Remove two screws (5), gasket (6), input cover (7), and three preformed packings (8 and 9). Discard gasket
and preformed packings.
2 Remove four screws (10), two bevel gearcase assemblies (11), two shims (12), and two preformed packings
(13). Discard preformed packings.
3 Remove retainer (14), preformed packing (15), and seal (16). Discard preformed packing and seal.
4 Straighten key washer (17) tabs.
5 Remove nut (18) and key washer (17). Discard key washer.
6 Remove outer bearing (19), spacer (20), inner bearing (21), and sleeve (22) from bevel gearshaft (23).
6-5
TM 9-2350-311-34-1
6-2 COOLINF FAN DRIVE ASSEMBLY - CONTINUED
b. Disassembly — Continued
7
Remove Ioclwvire (24), four screws (25), bearing cover (26), and gasket (27). Discard Iockwire and gasket.
8
Remove six screws (28), bearing housing (29), preformed packing (30), and shim pack (31). Measure
thickness of shim pack and record. Discard preformed packing.
9
Remove Iockring (32) and inner bearing (33). Discard Iockring.
10 Remove driveshaft assembly (34) and outer bearing (35).
11 Remove Iockwire (36), six screws (37), and drivegear (38) from driveshaft (39). Discard Iockwire.
NOTE
Some cooling fan drive assemblies may not include screws (40), Iockwasher (41),
valve cover (42), and gasket (43).
12 Remove three screws (40), three Iockwasher (41), valve cover (42), and gasket (43). Discard Iockwasher
and gasket.
6-6
TM 9-2350-311-34-1
c. Assembly
NOTE
Drivegear and bevel gearshaft must be replaced as matched set.
1
Install drivegear (38), six screws (37), new Iockwidre (36), and outer bearing (35) to driveshaft (39). Toque six
screws to 32 Ib-ft (43 N•m).
2
Install driveshaft assembly (34) to housing (44).
3
Install shim pack (31) using thickness recorded in disassembly and install new preformed packing (30), bearing
housing (29), and six screws (28) to housing (44).
4
Install inner bearing (33) and new Iockring (32) to driveshaft (39).
NOTE
Some cooling fan drive assemblies do not include screws (40), Iookwashers (41),
valve cover (42), and gasket (43).
5
6
Install new gasket (43), valve cover (42), three new Iockwasher (41), and three screws (40) to housing (44).
Install new gasket (27), bearing cover (26), four screws (25), and new Iockwire (24). Toque four screws to 1921 lb-ft (26-28 N•m).
7
Establish dimension Bon driveshaft (39) as follows:
(a) Measure distance between retainer boss (45) and top of driveshaft (39) at point between input cover (7)
and drivegear (38).
(b) Add 0.671 in. (17.04 mm) to measured distance.
(c) Record total as dimension B.
6-7
TM9-2350-311-34-1
6-2 COOLING FAN DRIVE ASSEMBLY — CONTINUED
c. Assembly — Continued
8
Install sleeve (22), inner bearing (21), spacer (20), and outer bearing (19) to bevel gearshaft (23).
9
Apply lubricant to new seal (16).
10 Install new key washer (17), nut (18), seal (16), new preformed packing (15), and retainer (14). Bend key
washer tabs to clear retainer wall.
11 Establish dimension A on bevel gearcase assembly by measuring distance from toe end of bevel gearshaft
(23) to flange (47) on retainer (14). Record this measurement as dimension A.
12 Establish dimension Con cooling fan drive assembly by subtracting dimension A from dimension B.
13 Read dimension Z off face of bevel gear shaft (23). Subtract dimension C from dimension Z and record this
difference as shim thickness required.
14 Install two new preformed packings (13), two shims (12), two bevel gearcase assemblies (11), and four screws
(10) to housing (44). Torque screws to 19-21 Ib-ft (2-28 N•m).
15 Check cooling fan drive assembly (3) backlash between bevel gearshaft (23) and driveshaft (39) (backlash
should be 0.004 to 0.008 in. [0.10 and 0.20 mm] ) as follows:
(a) Install fabricated bracket using two appropriate screws (48) and two nuts (49). Bracket should aline with
bevel gearcase assembly (11).
(b) Set and secure cooling fan drive assembly (3) on support blocks on flat surface.
(c) Install dial indicator on bracket and position on gear teeth (50) as shown.
6-8
TM 9-2350-311-34-1
(c) Install dial indicator on bracket and position on gear teeth (50) as shown.
(d) Hold driveshaft (39) to prevent movement and rotate bevel gearshaft (23) counterclockwise as far as
possible without forcing.
(e) Zero dial indicator and slowly rotate gearshaft (23) clockwise reading backlash measurement.
16 Add or remove shims (para 6-4) as required to obtain 0.004- to 0.008-in. (0.10- to 0.20-mm) backlash.
6-9
TM 9-2350-311-34-1
6-2 COOLING FAN DRIVE ASSEMBLY — CONTINUED
c. Assembly - Continued
NOTE
Repeat same procedure for bevel gearcase assembly. Some cooling fan assemblies
may not include packings.
17 Install two new preformed packings (8), new gasket (6), input cover (7), new preformed packing (9), and two
screws (5) to cooling fan drive assembly (3). Apply lubricant to packing (9).
d. Installation
1 Install new gasket (4), cooling fan drive assembly (3).
2 lnstal l12 new Iockwasher (2) and 12 screws (1).
NOTE
FOLLOW-ON MAINTENANCE:
6-10
Install cooling fan universal joints (para 6-1)
TM 9-2350-311-34-1
SECTION Il. RADIATOR SHROUD AND VANEAXIAL COOLING FAN ASSEMBLY
6-3 VANEAXIAL COOLING FAN ASSEMBLY AND SHROUD
This task covers:
a. Separation of Vaneaxial Cooling Fan Assembly from Shroud
b. Separation of Vaneaxial Cooling Fans from Mount
c. Assembly of Vaneaxial Cooling Fans to Mount
d. Assembly of Vaneaxial Cooling Fan Assembly to Shroud
INITIAL SETUP
Personnel Required
Tools
General mechanic’s tool kit (item 14, Appx C)
Two
Equipment Conditions
Materials/Parts
Lockwashers (28) (item 35, APPX F)
Lockwashers (8) (item 37, Appx F)
Sealing compound (item 20, APPX B)
Radiator and shroud removed with fans attached
(TM 9-2350-311-20-1)
a. Separation of Vaneaxial Cooling Fan Assembly from Shroud
CAUTION
Support fan assembly and shroud while screws are being removed. Do not damage,
destroy, or discard generator mounting preformed packing in shroud.
1 Remove 28 screws (1), 28 Iockwasher (2), and 28 washers (3). Discard Iockwasher.
2 Separate cooling fans (4) and mount (5) from shroud (6).
6-11
TM9-2350-311-34-1
6-3 VANEAXIAL COOLING FAN ASSEMBLY AND SHROUD — CONTINUED
b.
Separation of Vaneaxial Cooling Fans from Mount
Remove eight screws (7), eight Iockwasher (8), eight washers (9), and two cooling fans (4) from mount (5).
Discard Iockwasher.
c.
Assembly of Vaneaxial Cooling Fans to Mount
NOTE
Perform required maintenance on fan drive gearbox before assembling (para 6-4).
Install two cooling fans (4), eight washers (9), eight new Iockwasher (8), and eight screws (7).
d. Assembly of Vaneaxial Cooling Fan Assembly to Shroud
1 Place cooling fans (4) and mount (5) in shroud (6).
2 Install 28 washers (3) and 28 new Iockwasher (2). Apply sealing compound to 28 screws (1) and install
screws.
NOTE
FOLLOW-ON MAINTENANCE:
6-12
Install radiator and shroud with fans attached
(TM 9-2350-311-20-1)
TM 9-2350-311-34-1
6-4 VANEAXIAL COOLING FANS AND FAN DRIVE GEARBOX
This task covers:
a. Disassembly
b. Inspection and Test
c. Assembly
INITIAL SETUP
Tools
General mechanic’s tool kit (item 14, APPX C)
Dial indicator (item 4, Appx C)
Fabricated measuring bar (item 5, APPX D)
Socket (item 19, Appx C)
Toque wrench (item 28, Appx C)
Seal (item 66, Appx F)
Seal (item 67, Appx F)
References
TM 9-2350-311 -20-1
Equipment Conditions
Cooling fans removed from shroud (para 6-3)
Materials/Parts
Key washer (item 7, Appx F)
a. Disassembly
CAUTION
Use extreme care when removing impeller to avoid any damage. If impeller is
damaged, entire vaneaxial fan assembly must be replaced.
1 Remove nut (1) using socket and remove key washer (2) and impeller (3). Discard key washer.
2 Remove 10 socket head screws (4), 10 washers (5), and gearbox assembly (6).
6-13
TM 9-2350-311-34-1
6-4 VANEAXIAL COOLING FANS AND FAN DRIVE GEARBOX — CONTINUED
a. Disassembly — Continued
WARNING
Oil is hazardous waste and must be disposed of in accordance with local procedures
or direction of the local Hazardous Waste Management office.
3 Remove plug (7) and drain gearbox (8) oil.
4 Remove breather cap (9).
5 Remove four screws (10), retainer (11), and seal (12). Discard seal.
6 Remove four screws (13), retainer (14), and seal (15). Discard seal.
7 Remove two decals (16) if illegible.
6-14
TM 9-2350-311-34-1
b. Inspection and Test
1
Check gearbox housing (17). Replace if cracked or distorted.
2
Check impeller (3). Replace if nicked, broken, or cracked.
NOTE
Use steps 3 thru 5 to measure gearbox backlash.
3
Secure gearbox (8) to prevent input shaft (18) from rotating.
4
Install fabricated measuring bar on output shaft (19) using washers or spacers (20) as required and install nut
(1). Tighten nut using socket.
5
Push down on measuring bar as far as possible and position dial indicator as shown. Pull up on measuring bar
and check dial indicator reading. Reading should be 0.032 to 0.068 in. (0.81 to 1.73 mm) (0.004 to 0.008 in.
[0.10 to 0.20 mm] backlash).
6
Discard gearbox (8) if backlash is out of tolerance.
6-15
TM 9-2350-311-34-1
6-4 VANEAXIAL COOLING FANS AND FAN DRIVE GEARBOX — CONTINUED
c. Assembly
1 Install new seal (12), retainer (11), and four screws (10).
2 Install new seal (15), retainer (14), and four screws (13) to gearbox (8). Toque screws to 12-15Ib-ft(16-20
N•m).
3 Install breather cap (9) and plug (7).
6-16
TM 9-2350-311-34-1
4 Replenish oil (TM 9-2350-311-20-1).
5 Install gearbox assembly (6), 10 washers (5), and 10 socket head screws (4).
6 Install impeller (3), new key washer (2), and nut (1) with bevel side down. Torque nut to 65-75 Ib-ft (88-102
N•m) using socket. Lock key washer (2) tab.
7 Install two new decals (16) as required.
NOTE
FOLLOW-ON MAINTENANCE:
Install cooling fans to shroud (para 6-3)
6-17/(8-18 blank)
TM 9-2350-311-34-1
CHAPTER 7
ELECTRICAL SYSTEM
GENERAL
This chapter describes and illustrates procedures for removal and installation of hull wiring harnesses and disassembly,
inspection, repair, and assembly of the hull electrical components.
For maintenance and repair of the alternator, refer to TM 9-2920-225-34 or TM 9-2920-258-30&P. For maintenance and
repair of the battery, refer to TM 9-6140-200-14. For maintenance and repair of the starter, refer to TM 9-2920-242-35,
TM 9-2920-243-34, or TM 9-2920-248-35 as required. For repair of other engine electrical components, refer to TM 92815-202-34.
CONTENTS
PAGE
POWERPLANT AND HULL WIRING HARNESSES. . . . . . . . . . . . . . . . . . . . . . . . . . . . . . . . . . . . . ...7-2
Section I
7-1
POWERPLANT AND HULL WIRING HARNESS LISTING. . . . . . . . . . . . . . . . . . . . . . . . . . . . . . . . ...7-2
7-2
CIRCUIT IDENTIFICATION AND ILLUSTRATION OF ELECTRICAL WIRING HARNESSES
7-3
7-4
7-5
7-6
7-7
7-8
7-9
7-10
7-11
7-12
7-13
7-14
Section II
7-15
7-16
(M109A2/M109A3) . . . . . . . . . . . . . . . . . . . . . . . . . . . . . . . . . . . . . . . . . . . . . . . . . . . . . . . . . . . . . . ...7-4
CIRCUIT IDENTIFICATION AND ILLUSTRATION OF ELECTRICAL WIRING HARNESSES
(M109A4/M109A5) . . .. . . . . . . . . . . . . . . . . . . . . . . . . . . . . . . . . . . . . . . . . . . . . 7-6
ENGINE DISCONNECT BRACKET-TO-BULKHEAD WIRING HARNESS (M109A2/M109A3)
(ENGINE MODEL 7083-7396) . . . . . . . . . . . . . . . . . . . . . . . . . . . . . . . . . . . . . . . . . . . . . . . . . . . . . . . .7-8
ENGINE DISCONNECT BRACKET-TO-BULKHEAD WIRING HARNESS (M109A2/M109A3)
(ENGINE MODEL 7083-7391 ) . . . . . . . . . . . . . . . . . . . . . . . . . . . . . . . . . . . . . . . . . . . . . . . . . . . . . 7-12
DRIVER’S BULKHEAD-TO-MASTER RELAY WIRING HARNESS (M109A4/M109A5)
(ENGINE MODEL 7083-7396) . . . . . . . . . . . . . . . . . . . . . . . . . . . . . . . . . . . . . . . . . . . . . . . . . . . . 7-16
DRIVER’S BULKHEAD-TO-MASTER RELAY WIRING HARNESS (M109A4/M109A5)
(ENGINE MODEL 7083-7391 ) . . . . . . . . . . . . . . . . . . . . . . . . . . . . . . . . . . . . . . . . . . . . . . . . ... 7-20
BULKHEAD-TO-HEADLIGHTS/BILGE PUMP WIRING HARNESS. . . . . . . . . . . . . . . . . . . . . . . 7-24
BULKHEAD-TO-PORTABLE INSTRUMENT PANEL WIRING HARNESS
(ENGINE MODEL 7083-7396) . . . . . . . . . . . . . . . . . . . . . . . . . . . . . . . . . . . . . . . . . . . . . . . . . . . . 7-28
BULKHEAD-TO-PORTABLE INSTRUMENT PANEL WIRING HARNESS
(ENGINE MODEL 7083-7391 ) . . . . . . . . . . . . . . . . . . . . . . . . . . . . . . . . . . . . . . . . . . . . . . . . . . . . 7-38
BULKHEAD-TO-DRIVER’S INSTRUMENT PANEL WIRING HARNESS. . . . . . . . . . . . . . . . . . . . .7-48
POWER LEAD WIRING HARNESS (M109A2) . . . . . . . . . . . . . . . . . . . . . . . . . . . . . . . . . . . . . . . 7-60
POWER LEAD (M109A2/M109A3) . . . . . . . . . . . . . . . . . . . . . . . . . . . . . . . . . . . . . . . . . . . . . . . . 7-67
POWER LEAD (M109A4/M109A5) . . . . . . . . . . . . . . . . . . . . . . . . . . . . . . . . . . . . . . . . . . . . . . . .7-72
HULL ELECTRICAL COMPONENTS . . . . . . . . . . . . . . . . . . . . . . . . . . . . . . . . . . . . . . . . . . . . . . . 7-78
RECTIFIER (M109A2/M109A3) . . . . . . . . . . . . . . . . . . . . . . . . . . . . . . . . . . . . . . . . . . . . . . . . . . . 7-78
RECTIFIER (M109A4/M109A5) . .. .... . . . . . . . . . . . . . . . . . . . . . . . . . . . . . . . . . . . . . 7-89
7-1
TM9-2350-311-34-1
SECTION I. POWERPLANT AND HULL WIRING HARNESSES
7-1 POWERPLANT AND HULL WIRING HARNESS LISTING
Circuit/
Wire No.
1
2
3
7
10
14B
15
16
17
18
19
20
21
22
23
24
27
27B
28
29
29-31
31
33A
36
38
37-38
40
40A
41
42
43
47
48
49
50
68
75
76
81
82
91
159
7-2
Circuit Name:
Alternator fieLd circuit
Power lead (rectifier-to-voltage regulator to wire)
Alternator ground circuit
Battery ground leads
Power lead (sLave start receptacle-to-circuit breaker paneL
Bilge pump circuit breaker-to-starter solenoid energizing lead
Power lead-to-light switch (driver's instrument panel)
Light switch-to-headlight dimmer switch lead
Dimmer switch-to-headlight high beam lead
Dimmer switch-to-headlight lower beam lead
Not used
Light switch-to-blackout (B. O.) marker front light lead
Light switch-to-service taillight lead
Light switch-to-service stoplight lead
Light switch-to-B.O. stoplight
Light switch-to-B.O. marker light rear lead
Engine instrumentation and master warning light energizing lead
Voltage regulator cutout relay energizing lead
Fuel gage energizing lead
Fuel tank selector switch-to-upper fuel tank transmitter lead
Fuel tank selector switch-to-fuel tank gage lead
Fuel tank selector switch-to-lower fuel tank transmitter lead
Engine coolant temperature transmitter lead
Engine oil pressure transmitter lead
Driver’s dome light lead
Circuit breaker-to-auxiliary outlet and driver’s dome light power lead
Panel lights for driver’s instrument panel and portable instrument panel power lead
Battery/alternator indicator gage lead
Driver’s intercommunications circuit 1 lead
Driver's intercommunications circuit 2 lead
Driver's intercommunications circuit 3 lead
Slip ring segment board power lead (from wire 10 to segment board)
Slop ring segment board-to-driver’s intercommunications power lead
Slave start receptacle power lead
Slave start receptacle ground lead
Battery interconnection cables
Stoplight switch
Fuel pump circuit leads
Battery-to-master relay power lead
Master relay-to-starter power lead
Headlight ground lead
Personnel vent fan switch power lead (from circuit breaker-to-switch internal accessory control box)
TM 9-2350-311-34-1
159A
159B
159C
321
324
352A
352B
400
400A
400L
400-459B
401
402
402A
405
407
407L
415
415A
76B
416
438
439
439A
439B
439C
439L
450
452
452A
415B
452B
459
459A
459L
459B
486
486A
486L
500
501
502
509
509A
509B
509C
509D
509E
514
515
514
519
Personnel vent fan switch-to-motor lead
Personnel vent fan switch-to-motor lead
Personnel vent fan switch-to-motor lead
Transmission oil pressure transmitter lead
Transmission oil temperature transmitter lead
Low level coolant switch-to-coolant indicator lead
Low level coolant switch-to-coolant indicator lead
Personnel heater input
Circuit breaker-to-heat selector switch power lead (internal accessory control box)
Personnel heater selector switch-to-indicator lamp lead (internal accessory control box)
Power lead from voltage regulator-to-459B driver’s bulkhead
Personnel heater selector switch-to-heater restriction solenoid lead
Personnel heater selector switch-to-heater power lead
Personnel heater fuel pump from wire 402
Accessory control box-to-heater flame detector switch
Personnel heater selector switch-to-heater motor and flame detector switch
Personnel heater selector switch-to-indicator lamp lead
Air cleaner blower motor leads
Air cleaner blower motor relay pressure switch lead
In-tank fuel pumps and generator system relay switch to in-tank fuel pump lead assembly
Air cleaner blower motor ground leads
Circuit breaker-to-Nuclear, Biological, and Chemical (NBC) power switch
NBC power switch-to-components
Air purifier power lead
NBC driver’s heater power lead
NBC Ioader's heater power lead
NBC indicator light lead
Bilge pump switch-to-bilge pump relay lead
Bilge pump relay-to-bilge pump motor power lead
Bilge pump circuit breaker power lead
Air cleaner blower motor relay-to-neutral safety switch
Bilge pump circuit breaker-to-bilge pump relay power lead
Master switch power lead
Master switch power lead
Master switch warning lamp power lead
Connector tie-in-to-400-459B power lead 415
Flame heater master switch-to-motor and pump assembly and ignition unit power lead
(engine model 7083-7396 or glow plug controller-to-glow plug switch (engine model 7083-7391)
Flame heater switch-to-flame heater fuel solenoid lead (engine model 7083-7396) or glow
plug controller-to-glow plug switch (engine model 7083-7391)
Flame heater system warning lamp lead (engine model 7083-7396)
Alternator phase A circuit-to-rectifier lead
Alternator phase B circuit-to-rectifier lead
Alternator phase C circuit-to-rectifier lead
Master warning light circuit power lead
Engine coolant temperature switch lead
Engine oil pressure switch lead
Transmission oil pressure switch lead
Transmission oil temperature switch lead
Parking brake warning lamp lead
Dimmer switch to headlight B.O. high beam lead
Dimmer switch to headlight B.O. low beam lead
Not used
Dimmer switch to high beam indicator lamp lead
7-3
TM9-2350-311-34-1
7-1 POWERPLANT AND HULL WIRING HARNESS LISTING — CONTINUED
Circuit/
Wire No.
Circuit Name:
520
588
588L
L1 and L2
588
Not used
Circuit breaker-to-fuel pump primer switch power lead
Not used
Telephone circuit leads
Not used
7-2 CIRCUIT IDENTIFICATION AND ILLUSTRATION OF WIRING HARNESSES
(M109A2/M109A3)
NOTE
Electrical cables are marked with wire-numbered metal tags attached to junction of
the terminal of cable. All electrical ciruits shown in schematics and wiring diagrams
are identified by wire numbers listed in each area.
LEGEND
1 Wiring harness 12268102— Alternator-torectifier
2 Wire 82— From master relay to wire 82/49
3 Wire 27B — From wiring harness 12268100 to
voltage regulator
4 Wire 2 — From voltage regulator to wire 81
5 Lead 11593784 or 12260266— From bulkhead
connector to slave start receptacle (wire 49) and
to circuit breaker panel (wire 10)
6 Wiring harness 10925829 — From accessory
control box to air cleaner blower assembly
7 Wiring harness 10925829 — From accessory
control box to heater fuel pump and personnel
heater
8 Lead 11593784 or 12260266— From circuit
breaker to:
9 Slip ring segment board (47)
10 Telephone terminal (21 and 22)
11 Accessory control box (37 and 38)
12 Wiring harness 12260298 — From driver’s
compartment/connector to portable instrument
panel
13 Wire 7 — Battery to ground
14 Wiring harness 12260287 — Bulkhead
connector to driver's compartment connector
bracket
7-4
15 Wiring harness 11594268 — Bulkhead
connector-to-driver's instrument panel
16 Wire 68 — Battery positive-to-negative
connectors
17 Wire 81 — From batteries to master relay
18 Wiring harness 11593806 — Rectifier-to-voltage
regulator
19 Wire 82/49 — Engine starter from lower
powerplant connector bracket to bulkhead
connector
20 Wiring harness 12268100— Engine
instrumentation bulkhead connector-topowerplant connector bracket
21 Ground wire — Powerplant to hull
22 Wiring harness 12268102 — From bulkhead
connector to engine instrumentation
23 Wire 82 — From bulkhead connector to engine
starter
24 Wiring harness 10921380 — To headlight
assemblies
25 Wire 452 — Bilge pump relay to bilge pump
26 Wire 29-31 — To fuel level transmitters
Wires 76— To fuel tank fuel pumps
27 Wire 352A and 352B — From wiring harness
12268102 to aeration detector
HULL ELECTRICAL WIRING HARNESS (M109A2/M109A3)
ENGINE MODEL 7083-7396 SHOWN
TM 9-2350-311-34-1
7-5
TM9-2350-311-34-1
7-3 CIRCUIT IDENTIFICATION AND ILLUSTRATION OF WIRING HARNESSES
(M109A4/M109A5)
NOTE
Electrical cables are marked with wire-numbered metal tags attached to junction of
the terminal of cable. All electrical circuits shown in schematics and wiring diagrams
are identified by wire numbers listed in each area.
LEGEND
Wiring harness 12268308 — Alternator to
rectifier
2 Wire 82— From master relay to wire 82/49
3 Wire 27B — From wiring harness 12268418 —
Engine instrumentation bulkhead connector to
powerplant connector bracket
4 wire 2 — From voltage regulator to wire 81
5 Lead 12268304 — From bulkhead connector to
slave start receptacle (wire 49) and to circuit
breaker panel (wire 10)
6 Wiring harness 12268308 — From bulkhead
connector to engine instrumentation
7 Wiring harness 10925829 — From accessory
control box to heater fuel pump and personnel
heater
8 Lead 12268419 — Bulkhead to override switch
lead
9 Wiring harness 12353400 — NATO slave startto-external power receptacle wiring harness
10 Wiring harness 12352794 — Ventilated
facepiece system wiring harness
11 Lead 12268304 — From circuit breaker to:
12 Slip ring segment board (47)
13 Telephone terminal (21 and 22)
14 Accessory control box (37 and 38)
15 Wiring harness 12260298— From driver’s
compartment/connector to portable instrument
panel
1
7-6
16 Wire7— Battery to ground
17 Wiring harness 12260287— Bulkhead
connector to driver’s compartment connector
bracket
18 Wiring harness 11594268— bulkhead
connector to driver's instrument panel
19 Wire 68— Battery positive-to-negative
connectors
20 Wiring harness 12353402— Driver’s bulkheadto- batteries wiring harness
21 Wire 81 — From batteries to master relay
22 Wiring harness 12268303— Rectifier-to-voltage
regulator
23 Wiring harness 12353401 — Engine disconnect
bracket- to-batteries lead assembly
24 Wiring harness 12268418— Engine
instrumentation bulkhead connector-topowerplant connector bracket
25 Wire 82— From bulkhead connector to engine
starter
26 Wiring harness 10921380— To headlight
assemblies
27 Wire 452— Bilge pump relay to bilge pump
28 Wire 29-31 — To fuel level transmitters
Wires 76— To fuel tank fuel pumps
29 Starter to engine electrical disconnect — Wiring
harness 12353072
HULL ELECTRICAL WIRING HARNESS (M109A4/M109A5)
ENGINE MODEL 7083-7396 SHOWN
TM 9-2350-311-34-1
7-7
TM9-2350-311-34-1
7-4 ENGINE DISCONNECT BRACKET-TO-BULKHEAD WIRING HARNESS (M109A2/M109A3)
(ENGINE MODEL 7083-7396)
This task covers:
a. Removal
b. Disassembly
c. Assembly
d. Installation
INITIAL SETUP
Lockwashers (2) (item 25, Appx F)
Iockwasher (item 42, Appx F)
Applicable Configurations
M109A2/M109A3
Tools
References
TM 9-2350-311-20-1
General mechanic’s tool kit (item 14, Appx C)
Materials/Parts
Equipment Conditions
Electrical tape — black (item 25, Appx B)
Lockwasher (item 23, Appx F)
Connector
No.
1
2
3
4
5
6
7
8
9
10
11
7-8
Electrical Lead To:
Batteries disconnected (TM 9-2350-311-20-1)
Wire
No.
Battery assembly to master relay
81
Aeration detector-to-coolant indicator
352B
Aeration detector-to-coolant indicator
352A
Flame heater-to-flame heater switch
466A
Engine oil pressure transmitter-to-engine
oil pressure gage switch
36
Engine coolant temperature transmitterto-engine water temperature gage
33A
Transmission oil temperature transmitter-totransmission oil temperature gage
324
Transmission oil pressure transmitter-totransmission oil pressure switch
321
High/low temperature and pressure
switches/transmitters-to-master warning
light
509
588
Not used
Flame heater motor pump-to-flame heater
switch
466
Connector
No.
12
13
14
15
16
17
18
19
20
21
22
23
24
25
Electrical Lead To:
Wire
No.
In-tank fuel pumps and generator
system relay
76B
Regulator cutoff relay coil energizer
27B
Air cleaner blower motor circuit
415
Master switch voltage regulator lead
400-459B
Engine starter circuit (starter relay bilge
pump circuit breaker neutral safety
14/146
switch)
Voltage regulator-to-master relay lead
2
Ground wire
3
Engine bracket disconnect connector
Voltage regulator connector
Starter relay connector
Bilge pump circuit breaker lead
Driver’s bulkhead connector
Battery connectors
Master relay connectors
TM 9-2350-311-34-1
7-9
TM 9-2350-311-34-1
7-4 ENGINE DISCONNECT BRACKET-TO-BULKHEAD WIRING HARNESS (M109A2/M109A3)
(ENGINE MODEL 7083-7396) – CONTINUED
a. Removal
1 Remove two screws (26), two Iockwasher (27), two nuts (28), and two connectors (29) from batteries (30).
Discard Iockwasher’s.
2 Remove nut (31), Iockwasher (32), and ground wire (33) from voltage regulator mount (34). Discard
Iockwasher.
3 Remove nut (35), Iockwasher (36), and lead (37) from bilge pump circuit breaker (36). Discard Iockwasher.
4 Disconnect five connector (39 thru 43).
5 Remove engine-to-bulkhead wiring harness (44).
b. Disassembly
1 Remove electrical tape only for sections being disassembled.
2 Separate/isolate wiring harness branches.
3 Disassemble wiring harness branches (TM 9-2350-311-20-1).
c. Assambly
1 Assemble wiring harness branches (TM 9-2350-311-20-1).
2 Apply electrical tape only for sections being assembled.
d. Installation
1 Install engine-to-bulkhead wiring harness (44).
2 Connect five connectors (39 thru 43).
3 Install lead (37), new Iockwasher (36), and nut (35) to bilge pump circuit breaker (38).
4 Install ground wire (33), new Iockwasher (32), and nut (31) to voltage regulator mount (34).
5 Install two connectors (29), two nuts (28), two new Iockwasher’s (27), and two screws (26) to batteries (30).
7-10
TM 9-2350-311-34-1
NOTE
FOLLOW-ON MAINTENANCE:
Connect batteries (TM 9-2350-311-20-1)
7-11
TM 9-2350-311-34-1
7-5 ENGINE DISCONNECT BRACKET-TO-BULKHEAD WIRING HARNESS
(M109A2/M109A3) (ENGINE MODEL 7083-7391)
This task covers:
a. Removal
b. Disassembly
c. Assembly
d. Installation
INITIAL SETUP
M109A2/M109A3
Lockwashers (2) (item 25, Appx F)
Lockwashers (2) (item 42, Appx F)
Tools
General mechanic’s tool kit (item 14, Appx C)
References
TM 9-2350-311 -20-1
Applicable Configurations
Materials/Parts
Equipment Conditions
Electrical tape — black (item 25, Appx B)
Lockwasher (item 23, Appx F)
Connector
No.
1
2
3
4
5
6
7
8
9
10
11
7-12
Electrical Lead To:
Batteries disconnected (TM 9-2350-311-20-1)
Wire
No.
Battery assembly to master relay
81
Aeration detector-to-coolant indicator
352B
Aeration detector-to-coolant indicator
352A
Glow plug controller-to-glow plug lamp
486A
Engine oil pressure transmitter-to-engine
oil pressure gage switch
36
Engine coolant temperature transmitterto-engine water temperature gage
33A
Transmission oil temperature transmitter-totransmission oil temperature gage
324
Transmission oil pressure transmitter-totransmission oil pressure switch
321
High/low temperature and pressure
switches/transmitters-to-master warning
light
509
Not used
588
Glow plug controller-to-glow plug switch
486
Connector
No.
12
13
14
15
16
17
18
19
20
21
22
23
24
25
Electrical Lead To:
Wire
No.
In-tank fuel pumps and generator
system relay
76B
Regulator cutoff relay coil energizer
27B
Air cleaner blower motor circuit
415
Master switch voltage regulator lead
400-459B
Engine starter circuit (starter relay bilge
pump circuit breaker neutral safety
switch)
14/14B
Voltage regulator-to-master relay lead
2
Ground wire
3
Engine bracket disconnect connector
Voltage regulator connector
Starter relay connector
Bilge pump circuit breaker lead
Driver’s bulkhead connector
Battery connectors
Master relay connectors
TM 9-2350-311-34-1
7-13
TM 9-2350-311-34-1
7-5 ENGINE DISCONNECT BRACKET-TO-BULKHEAD WIRING HARNESS
(M109A2/M109A3) (ENGINE MODEL 7083-7391) – CONTINUED
a. Removal
1 Remove two screws (26), two Iockwasher (27), two nuts (28), and two connectors (29) from batteries (30).
Discard Iockwasher.
2 Remove nut (31), Iockwasher (32), and ground wire (33) from voltage regulator mount (34). Discard
Iockwasher.
3 Remove nut (35), Iockwasher (36), and lead (37) from bilge pump circuit breaker (38). Discard Iockwasher.
4 Disconnect five connectors (39 thru 43).
5 Remove engine-to-bulkhead wiring harness (44).
b. Disassembly
1 Remove electrical tape only for sections being disassembled.
2 Separate/isolate wiring harness branches.
3 Disassemble wiring harness branches (TM 9-2350-311-20-1).
c. Assembly
1 Assemble wiring harness branches (TM 9-2350-311-20-1).
2 Apply electrical tape only for sections being assembled.
d. Installation
1 Install engine-to-bulkhead wiring harness (44).
2 Connect five connectors (39 thru 43).
3 Install lead (37), nut (35), and new Iockwasher (36) to bilge pump circuit breaker (38).
4 Install ground wire (33), nut (31), and new Iockwasher (32) to voltage regulator mount (34).
5 Install two connectors (29), two screws (26), two new Iockwasher (27), and two nuts (28) to batteries (30).
7-14
TM 9-2350-311-34-1
NOTE
FOLLOW-ON MAINTENANCE:
Connect batteries (TM 9-2350-311-20-1)
7-15
TM 9-2350-311-34-1
7-6 DRIVER’S BULKHEAD-TO-MASTER RELAY WIRING HARNESS (M109A4/M109A5)
(ENGINE MODEL 7083-7396)
This task covers:
a. Removal
b. Disassembly
c. Assembly
d. Installation
INITIAL SETUP
Lockwashers (4) (item 33, Appx F)
Lockwashers (4) (item 34, Appx F)
Lockwasher (item 35, Appx F)
Applicable Configurations
M109A4/M109A5
Tools
References
General mechanic’s tool kit (item 14, APPX c)
TM 9-2350-311-20-1
Materials/Parts
Electrical tape — black (item 25, Appx B)
Lockwasher (item 23, Appx F)
Lockwashers (2) (item 25, Appx F)
Connector
No.
1
2
3
4
5
6
7
8
9
10
11
12
7-16
Electrical Lead To:
Equipment Conditions
Batteries disconnected (TM 9-2350-311-20-1)
Wire Connector
No. No.
81
Battery assembly-to-master relay
Aeration detector-to-coolant indicator
352B
Aeration detector-to-coolant indicator
352A
Flame heater-to-flame heater switch
Engine oil pressure transmitter-to-engine
36
oil pressure gage switch
Engine coolant temperature transmitterto-engine water temperature gage
33A
Transmission oil temperature transmitterto-transmission oil temperature gage
324
Transmission oil pressure transmitter-totransmission oil pressure switch
321
Hig/low temperature and pressure
switches/transmitters-to-master
warning light
509
Air cleaner blower motor switch-to-air
cleaner blower motor assembly
415B-76B
Regulator cutoff relay coil energizer
27B
Air cleaner blower motor circuit
415
13
14
15
16
17
18
19
20
21
22
23
24
25
26
27
Wire
Electrical Lead To:
No.
Master switch voltage regulator
lead
400-4596
Engine starter circuit (starter relay
bilge pump circuit breaker neutral
14/14B/GND
safety switch)
Voltage regulator-to-master relay lead
2
Ground wire
4
Engine bracket disconnect connector
Voltage regulator ground
Engine disconnect
Voltage regulator connector
Starter protection relay
503
Starter protection relay ground
Driver's bulkhead connector-to-starter
protection relay
14C
Driver’s bulkhead
Driver’s bulkhead
Battery positive tenminal
81
Master relay
81
TM 9-2350-311-34-1
7-17
TM 92350-311 -34-1
7-6 DRIVER’S BULKHEAD-TO-MASTER RELAY WIRING HARNESS (M109A4/M109A5)
(ENGINE MODEL 7083-7396) – CONTINUED
a. Removal
1 Remove two screws (28), two Iockwashers (29), two nuts (30), and two connectors (26) from batteries (31).
Discard lockwashers.
2 Remove screw (32), washer (33), Iockwasher (34), nut (35), and strap (36). Discard Iockwasher.
3 Remove screw (37), Iockwasher (38), washer (39), and two ground wires (18 and 22) from voltage regulator
mount (40). Discard Iockwasher.
4 Disconnect connector (23) at wire 503.
5 Disconnect two wiring harnesses (41) from driver’s compartment side of bulkhead (42).
6 Remove eight nuts (43), eight Iockwashers (44), eight washers (45), and eight screws (46). Remove two
connectors (24 and 25) from bulkhead (42). Discard Iockwashers.
7 Disconnect four electrical connectors (19, 20, 21, and 27) and remove wiring harness.
b. Disassembly
1 Remove electrical tape only for sections being disassembled.
2 Separate/isolate wiring harness branches.
3 Disassemble wiring harness branches (TM 9-2350-311-20-1).
c. Assembly
1 Assemble wiring harness branches (TM 9-2350-311-20-1).
2 Apply electrical tape only for sections being assembled.
d. Installation
1 Install wiring harness and connect four electrical connectors (19, 20,21, and 27).
2 Install two connectors (24 and 25), eight screws (46), eight washers (45), eight new Iockwashers (44), and
eight nuts (43) to bulkhead (42).
3 Connect two wiring harnesses (41) to driver’s compartment side of bulkhead (42).
4 Connect connector (23) at wire 503.
5 Install two ground wires (18 and 22), washer (39), new Iockwasher (38), and screw (37) to voltage regulator
mount (40).
6 Install strap (36), nut (35), new Iockwasher (34), washer (33), and screw (32).
7-18
TM 9-2350-311-34-1
7 Install two connectors (26), two nuts (30), two new Iockwashers (29), and two screws (28) to batteries (31).
NOTE
FOLLOW-ON MAINTENANCE:
Connect batteries (TM 9-2350-11-20-1)
7-19
TM 9-2350-311-34-1
7-7 DRIVER’S BULKHEAD-TO-MASTER RELAY WIRING HARNESS (M109A4/M109A5)
(ENGINE MODEL 7083-7391)
This task covers:
a. Removal
b. Disassembly
c. Assembly
d. Installation
INITIAL SETUP
Lockwashers (4) (item 33, Appx F)
Lockwashers (4) (item 34, Appx F)
Lockwasher (item 35, Appx F)
Applicable Configurations
M109A4/M109A5
Tools
General mechanic’s tool kit (item 14, Appx C)
References
TM 9-2350-311-20-1
Materials/Parts
Electrical tape — black (item 25, Appx B)
Lockwasher (item 23, Appx F)
Lockwashers (2) (item 25, Appx F)
Connector
No.
1
2
3
4
5
6
7
8
9
10
11
12
7-20
Equipment Conditions
Batteries disconnected (TM 9-2350-311-20-1)
Wire
Electrical Lead To:
No.
Battery assembly-to-master relay
81
Aeration detector-to-coolant indicator
352B
Aeration detector-to-coolant indicator
352A
486A
Glow plug controller-to-glow plug switch
Engine oil pressure transmitter-to-engine
36
oil pressure gage switch
Engine coolant temperature transmitterto-engine water temperature gage
33A
Transmission oil temperature transmitterto-transmission oil temperature gage
324
Transmission oil pressure transmitter-totransmission oil pressure switch
321
High/low temperature and pressure
switches/transmitters-to-master
warning light
509
Air cleaner blower motor switch-to-air
cleaner blower motor assembly
415B-76B
Regulator cutoff relay coil energizer
27B
Air cleaner blower motor circuit
415
Connector
No.
13
14
15
16
17
18
19
20
21
22
23
24
25
26
27
Wire
Electrical Lead To:
No.
Master switch voltage regulator
lead
400-459B
Engine starter circuit (starter relay
bilge pump circuit breaker neutral
safety switch)
14/14B/GND
Voltage regulator-to-master relay lead
2
Ground wire
4
Engine bracket disconnect connector
Voltage regulator ground
Engine disconnect
Voltage regulator connector
Starter protection relay
503
Starter protection relay ground
Driver’s bulkhead connector-to-starter
protection relay
14C
Driver’s bulkhead
Driver’s bulkhead
Battery positive terminal
81
Master relay
81
TM 9-2350-311-34-1
7-21
TM 9-2350-311-34-1
7-7 DRIVER’S BULKHEAD-TO-MASTER RELAY WIRING HARNESS (M109A4/M1O9A5)
(ENGINE MODEL 7083-7391) – CONTINUED
a. Removal
1
Remove two screws (28), two Iockwashers (29), two nuts (30), and two connectors (26) from batteries (31).
Discard Iockwashers.
2
Remove screw (32), washer (33), Iockwasher (34), nut (35), and strap (36). Discard Iockwasher.
3
Remove screw (37), lockwasher (38), washer (39), and two ground wires (18 and 22) from voltage regulator
mount (40). Discard Iockwasher.
4
Disconnect connector (23) at wire 503.
5
Disconnect two wiring harnesses (41) from driver’s compartment side of bulkhead (42).
6
Remove eight nuts (43), eight Iockwashers (44), eight washers (45), and eight screws (46). Remove two
connectors (24 and 25) from bulkhead (42). Discard Iockwashers.
7
Disconnect four electrical connectors (19, 20,21, and 27) and remove wiring harness.
b. Disassembly
1 Remove electrical tape only for sections being disassembled.
2 Separate/isolate wiring harness branches.
3 Disassemble wiring harness branches (TM 9-2350-311-20-1).
c. Assembly
1 Assemble wiring harness branches (TM 9-2350-311-20-1).
2 Apply electrical tape only for sections being assembled.
d. Installation
1 Install wiring harness and connect four electrical connectors (19, 20,21, and 27).
2 Install two connectors (24 and 25), eight screws (46), eight washers (45), eight new Iockwashers (44), and
eight nuts (43) to bulkhead (42).
3 Connect two wiring harnesses (41) to driver’s compartment side of bulkhead (42).
4 Connect connector (23) at wire 503.
5 Install two ground wires (18 and 22), washer (39), new Iockwasher (38), and screw (37) to voltage regulator
mount (40).
6 Install strap (36), nut (35), new Iockwasher (34), washer (33), and screw (32).
7-22
TM 9-2350-311-34-1
7
Install two connectors (26), two nuts (30), two new Iockwashers (29), and two screws (28) to batteries (31).
NOTE
FOLLOW-ON MAINTENANCE:
Connect batteries (TM 9-2350-311-20-1)
7-23
TM 9-2350-311-34-1
7-8 BULKHEAD-TO-HEADLIGHTS/BILGE PUMP WIRING HARNESS
This task covers:
a. Removal
b. Disassembly
c. Assembly
d. Installation
INITIAL SETUP
Tools
Equipment Conditions
General mechanic’s tool kit (item 14, Appx C)
Batteries disconnected (TM 9-2350-311-20-1)
Air intake grille opened and secured (TM 9-2350-311-20-1)
Engine exhaust grille and front slope plate removed
(TM 9-2350-311-20-1)
Engine compartment access cover removed (TM 9-2350311-20-1)
Materials/Parts
Electrical tape — black (item 25, Appx B)
References
TM 9-2350-311-20-1
Connector
No.
1
2
3
4
5
6
7
8
9
10
11
7-24
Electrical Lead To:
Left fuel pump lead
Left fuel pump
Right fuel pump
Right fuel pump lead
Right upper and lower fuel tank
Right upper fuel tank transmitter lead
Right lower fuel tank transmitter lead
Not Used
Not used
Blackout marker (front light assembly)
Service headlight low beam
Wire Connector
No. No.
76
GND
GND
76
GND
29
31
515
514
20
18
12
13
14
15
16
17
18
19
20
21
22
Wire
Electrical Lead To:
Service headlight high beam
Bilge pump motor connector
Master relay connector
Bilge pump relay lead
Bilge pump relay energizing circuit
Bilge pump relay power lead
Bilge pump circuit breaker connector
Not used
Bilge pump relay connector
Bulkhead connector
Ground
No.
17
452
459
452
450
452B
452B
19
TM 9-2350-311-34-1
7-25
TM 9-2350-311-34-1
7-8 BULKHEAD-TO-HEADLIGHT/BBILGE PUMP WIRING HARNESS — CONTINUED
a. Removal
1 Remove two screws (23), two washers (24), two ground leads (5), and two snap-in connectors (6 and 7) from
fuel level transmitters.
NOTE
Powerplant must be removed to disconnect fuel pump leads (TM 9-2350-311-20-1).
2 Remove four snap-in connectors (1 thru 4) from fuel pump.
3 Disconnect 11 quick disconnects (8, 9, 10, 11, 12, and 19) from left and right headlight assemblies.
4 Remove nut (25) and washer (26) from bilge pump circuit breaker and release connector wire (18).
5 Disconnect four electrical connectors (13, 14,20,and 21).
6 Remove screw (27) and washer (28) and release ground wire (22).
7 Remove 15 plastic retainers (29), 15 screws (30), and 15 washers (31) and release wiring harness.
8 Remove wiring harness.
b. Disassembly
1 Remove electrical tape only for sections being disassembled.
2 Separate/isolate wiring harness branches.
3 Disassemble wiring harness branches (TM 9-2350-311-20-1).
c. Assembly
1 Assemble wiring harness branches (TM 9-2350-311-20-1).
2 Apply electrical tape only for sections being assembled.
d. Installation
1 Install wiring harness.
2 Install 15 washers (31), 15 screws (30), and 15 plastic retainers (33) to wiring harness.
3 Install ground wire (22), washer (28), and screw (27).
4 Connect four electrical connectors (13, 14,20,and 21).
5 Install connector wire (18), washer (26), and nut (25) to bilge pump circuit breaker.
6 Connect 11 quick disconnects (8, 9, 10, 11, 12, and 19) to left and right headlight assemblies.
7-26
TM 9-2350-311-34-1
7 Install four snap-in connectors (1 thru 4) to electric fuel pumps.
NOTE
Powerplant must be removed to connect fuel pump leads (TM 9-2350-311-20-1).
8 Install two snap-in connectors (6 and 7), two guard leads (5), two washers (24), and two screws (23) to fuel
level transmitters.
NOTE
FOLLOW-ON MAINTENANCE:
Install engine compartment access cover
(TM 9-2350-311-20-1)
Install engine exhaust grille and front slope plate
(TM 9-2350-311-20-1)
Close air intake grille (TM 9-2350-311-20-1)
Connect batteries (TM 9-2350-311-20-1)
7-27
TM 9-2350-311-34-1
7-9 BULKHEAD-TO-PORTABLE INSTRUMENT PANEL WIRING HARNESS
(ENGINE MODEL 7083-7396)
Thiss task covers:
a. Removal
b. Disassembly
c. Assembly
d. Installation
Tools
Equipment Conditions
General mechanic’s tool kit (item 14, Appx C)
Batteries disconnected (TM 9-2350-311-20-1)
Portable instrument panel removed (TM 9-2350-311-20-1)
Materials/Parts
Electrical tape — black (item 25, Appx B)
References
TM 9-2350-311-20-1
Connector
No.
1
2
3
4
5
6
7
8
9
10
11
12
13
14
15
7-28
Electrical Lead To:
Wire
No.
Aeration detector
352B
Aeration detector
352A
459B
Master switch
Engine oil pressure gage
36
33A
Engine water temperature gage
324
Transmission oil temperature gage
Transmission oil pressure gage
321
Warning lamp switch
509
Panel lights
40
Fuel level gage and switch
29-31
Engine instrument and master warning light
27
Master switch
459A
Master switch
459
Ground
GND
Parking brake warning switch and light
509E
Connector
No.
16
17
18
19
20
21
22
23
24
25
26
27
28
29
Electrical Lead To:
Wire
No.
Parking brake warning light
509E
In-tank fuel pump and generator system relay 76B
Starter switch — neutral safety switch
14
Flame heater electrical lead
486A
Connector to 415 air cleaner blower
motor relay
27B
Accessory control box
400
Flame heater electrical lead
486
Not used
415
Not used
588
Not used
588L
Not used
588-588L
Voltage regulator
400-459B
Bulkhead connector
Portable instrument connector
TM 9-2350-311-34-1
7-29
TM 9-2350-311-34-1
7-9 BULKHEAD-TO-PORTABLE INSTRUMENT PANEL WIRING HARNESS
(ENGINE MODEL 7083-7398) – CONTINUED
a. Removal
1 Remove screw (30), nut (31), screw (32), and washer (33) to release plastic strap (34) and ground wire (14).
2 Disconnect two connectors (28 and 29).
3 Disconnect connector (13) from bulkhead-to-driver's instrument panel wiring harness, connector (15) from
parking brake light, and connector (16) at wiring harness 12268104 between circuit breakers (35) and driver’s
instrument panel (36).
7-30
TM 9-2350-311-34-1
4
Disconnect connector (11), connector ground (14), and connector (8) at master warning light (37) near driver’s
steering column (38).
5
Disconnect two connectors (15 and 16) from parking brake warning switch (39) at brake assembly (40).
6
Disconnect two connectors (18) (two wires 14) at neutral safety switch (41).
7-31
TM 9-2350-311-34-1
7-9 BULKHEAD-TO-PORTABLE INSTRUMENT PANEL WIRING HARNESS
(ENGINE MODEL 7083-7396) – CONTINUED
a. Removal — Continued
7 Disconnect connector (11) at circuit breaker (42).
NOTE
Connector 18 is a branch of the diode wiring harness assembly on M109A4/M109A5
Howitzers.
8 Disconnect connector (12) from driver's instrument panel wiring harness (43).
9 Disconnect three connectors (10, 15, and 18) at driver’s instrument panel (36). Connector (18) will be removed
from diode assembly on M109A4/M109A5 Howitzers.
7-32
TM 9-2350-311-34-1
10 Disconnect connector (9) from “Y” connector (44) and disconnect connector (21 ) from accessory control boxto-heater/blower wiring harness (45).
11 Disconnect connector (17) from in-tank fuel pump lead assembly and disconnect connector (20) from 'Y“
connector-to-in-tank fuel pump lead assembly.
12 Disconnect two connectors (19 and 22) from flame heater electrical lead (46).
b. Disassembly
1 Remove electrical tape only for sections being disassembled.
2 Separate/isolate wiring harness branches.
3 Disassemble wiring harness branches (TM 9-2350-311-20-1).
c. Assembly
1 Assemble wiring harness branches (TM 9-2350-311-20-1).
2 Apply electrical tape only for sections being assembled.
7-33
TM 9-2350-311-34-1
7-9 BULKHEAD-TO-PORTABLE INSTRUMENT PANEL WIRING HARNESS
(ENGINE MODEL 7083-7396) – CONTINUED
d. Installation
7-34
1
Connect two connectors (19 and 22) at flame heater electrical lead (46).
2
Connect connector (17) at in-tank fuel pump lead assembly and connect connector (20) to “Y” connector-to-intank fuel pump lead assembly.
3
Connect connector (9) to “Y” connector (44) and connect connector (21) to accessory control box-to-heater/
blower wiring harness (45).
4
Connect two connectors (15 and 16) to parking brake warning switch (39) at brake assembly (40).
5
Connect connector (11), connector ground (14), and connector (8) to master warning light (37) near driver’s
steering column (38).
6
Connect connector (13) to bulkhead at driver’s instrument panel wiring harness, connector (15) to parking
brake light, and connector (16) to wiring harness between driver’s instrument panel (36) and circuit breakers
(35).
TM 9-2350-311-34-1
7-35
TM 9-2350-311-34-1
7-9 BULKHEAD-TO-PORTABLE INSTRUMENT PANEL WIRING HARNESS
(ENGINE MODEL 7083-7398) – CONTINUED
d. Installation — Continued
NOTE
Connector 18 is a branch of the diode wiring harness assembly on M109A4/M109A5
Howitzers.
7 Connect three connectors (10, 15, and 18) to driver’s instrument panel (36). Connector (18) will be connected
to diode assembly on M109A4/M109A5 Howitzers.
8 Connect connector (12) to driver’s instrument panel wiring harness (43).
9 Connect connector (11) to circuit breaker (42).
7-36
TM 9-2350-311-34-1
10 Connect two connectors (18) (two wires 14) to neutral safety switch (41).
11 Connect connectors (28 and 29).
12 Install ground wire (14), plastic strap (34), nut (31), screw (30), washer (33), and screw (32).
NOTE
FOLLOW-ON MAINTENANCE:
Install portable instrument panel
(TM 9-2350-311-20-1)
Connect batteries (TM 9-2350-311-20-1)
7-37
TM 9-2350-311-34-1
7-10 BULKHEAD-TO-PORTABLE INSTRUMENT PANEL WIRING HARNESS
(ENGINE MODEL 7083-7391)
This task covers:
a. Removal
b. Disassembly
c. Assembly
d. Installation
INITIAL SETUP
Equipment Conditions
Tools
Batteries disconnected (TM 9-2350-311-20-1)
General mechanic’s tool kit (item 14, Appx C)
Portable instrument panel removed (TM 9-2350-311-20-1)
Materials/Parts
Electrical tape — black (item 25, Appx B)
References
TM 9-2350-311-20-1
Connector
No.
1
2
3
4
5
6
7
8
9
10
11
12
13
14
15
7-38
Wire
Electrical Lead To:
No.
352B
Aeration detector
352A
Aeration detector
459B
Master switch
36
Engine oil pressure gage
33A
Engine water temperature gage
324
Transmission oil temperature gage
321
Transmission oil pressure gage
509
Warning lamp switch
40
Panel lights
29-31
Fuel level gage and switch
27
Engine instrument and master warning light
459A
Master switch
459
Master switch
GND
Ground
509E
Parking brake warning switch and light
Connector
No.
16
17
18
19
20
21
22
23
24
25
26
27
28
29
Electrical Lead To:
Wire
No.
509E
Parking brake warning light
In-tank fuel pump and generator system relay 76B
14
Starter switch — neutral safety switch
486A
Glow plug switch
Connector to 415 air cleaner blower
motor relay
27B
400
Accessory control box
486
Glow plug lamp lead
415
Not used
Not used
588
Not used
588L
Not used
588-588L
Voltage regulator
400-459B
Bulkhead connector
Portable instrument connector
TM 9-2350-311-34-1
7-39
TM 9-2350-311-34-1
7-10 BULKHEAD-TO-PORTABLE INSTRUMENT PANEL WIRING HARNESS
(ENGINE MODEL 7083-7391) – CONTINUED
a. Removal
1
Remove screw (30), washer (31), screw (32), and washer (33) to release plastic strap (34) and ground wire
(14).
2
Disconnect two connectors (28 and 29).
3
Disconnect connector (13) from bulkhead at driver's instrument panel wiring harness, connector (15) from
parking brake light, and connector (16) at wiring harness 12268104 between circuit breakers (35) and driver’s
instrument panel (36).
4
Disconnect connector (11), connector ground (14), and connector (8) from master warning light (37) near
driver's steering column (38).
5
Disconnect two connectors (15 and 16) from parking brake warning switch (39) at brake assembly (40).
7-40
TM 9-2350-311-34-1
7-41
TM 9-2350-311-34-1
7-10 BULKHEAD-TO-PORTABLE INSTRUMENT PANEL WIRING HARNESS
(ENGINE MODEL 7083-7391) – CONTINUED
a. Removal—Continued
6 Disconnect two connectors (18) (two wires 14) at neutral safety switch (41).
7 Disconnect connector (11) at circuit breaker (42).
8 Disconnect connector (12) from driver’s instrument panel wiring harness (43).
NOTE
Connector 18 is a branch of the diode wiring harness assembly on M109A4/M109A5
Howitzers.
9 Disconnect four connectors (10,15, 18, and 19) from driver’s instrument panel (36). Connector (18) will be
removed from diode wiring harness assembly on M109A4/M109A5 Howitzers.
10 Disconnect connector (22) from lead (44).
11 Disconnect connector (9) from “Y” connector (45) and disconnect connector (21) from accessory control boxto-heater/blower wiring harness (46).
12 Disconnect connector (17) from in-tank fuel pump lead assembly and disconnect connector (20) from "Y”
connector to in-tank fuel pump lead assembly.
b. Disassembly
1 Remove electrical tape only for sections being disassembled.
2 Separate/isolate wiring harness branches.
3 Disassemble wiring harness branches (TM 9-2350-311-20-1).
c. Assembly
1 Assemble wiring harness branches (TM 9-2350-311-20-1).
2 Apply electrical tape only for sections being assembled.
7-42
TM 9-2350-311-34-1
7-43
TM 9-2350-311-34-1
7-10 BULKHEAD-TO-PORTABLE INSTRUMENT PANEL WIRING HARNESS
(ENGINE MODEL 7083-7391) – CONTINUED
d. Installation
1 Connect connector (17) to in-tank fuel pump lead assembly and connect connector (20) to “Y” connector at intank fuel pump lead assembly.
2 Connect connector (9) to “Y” connector (45) and connect connector (21) to accessory control box-to-heater/
blower wiring harness (46).
3 Connect two connectors (15 and 16) to parking brake warning switch (39) at brake assembly (40).
7-44
TM 9-2350-311-34-1
4 Connect connector (11), connector ground (14), and connector (8) to master warning light (37) near driver’s
steering column (38).
5 Connect connector (13) at bulkhead-to-driver’s instrument panel wiring harness, connector (15) at parking
brake light, and connector (16) to wiring harness between circuit breakers (35) and driver's instrument panel
(36).
7-45
TM 9-2350-311-34-1
7-10 BULKHEAD-TO-PORTABLE INSTRUMENT PANEL WIRING HARNESS
(ENGINE MODEL 7083-7391) – CONTINUED
d. Installation — Continued
NOTE
Connector 18 is a branch of the diode wiring harness assembly on M109A4/M109A5
Howitzers.
6 Connect four connectors (10, 15, 18, and 19) to driver’s instrument panel. Connector (18) will be connected to
diode wiring harness assembly on M109A4/M109A5 Howitzers.
7 Connect connector (22) to lead (44).
8 Connect connector (12) to driver'ts instrument panel wiring harness (43).
9 Connect connector (11) to circuit breaker (42).
7-46
TM 9-2350-311-34-1
10 Connect four connectors (18) (two wires 14, one wire 415A, and one wire 415B).
11 Connect connectors (28 and 29).
12 Install ground wire (14), plastic strap (34), nut (31), screw (30), washer (33), and screw (32).
NOTE
FOLLOW-ON MAINTENANCE:
Install portable instrument panel
(TM 9-2350-311-20-1)
Connect batteries (TM 9-2350-311-20-1)
7-47
TM 9-2350-311-34-1
7-11 BULKHEAD-TO-DRIVER’S INSTRUMENT PANEL WIRING HARNESS
This task covers:
a. Removal
b. Disassembly
c. Assembly
d. Installation
INITIAL SETUP
References
Tools
TM 9-2350-311-20-1
General mechanic’s tool kit (item 14, Appx C)
Equipment Conditions
Materials/Parts
Batteries disconnected (TM 9-2350-311-20-1)
Portable instrument panel removed (TM 9-2350-311-20-1)
Electrical tape — black (item 25, Appx B)
Lockwashers (2) (item 37, Appx F)
Connector
No.
1
2
3
4
5
6
7
8
9
10
11
12
13
14
7-48
Electrical Lead To:
Service headlight dimmer switch —
low beam
Service headlight dimmer switch —
high beam
Service B.O. IR headlight —
low beam
Service B.O. IR headlight —
high beam
Not used
Master switch circuit
B.O. marker light — front
Fuel level switch — right lower tank
Bilge pump switch — energizing circuit
Fuel level switch — right upper tank
Fuel prime switch
Stop light switch — light switch
Light switch — dimmer switch
Main light switch power lead
Wire
No.
18
17
515
514
459
20
31
450
29
76
75
16
15
Connector
No.
15
16
17
18
19
20
21
22
23
24
25
26
27
28
29
30
Electrical Lead To:
Wire
No.
Main light switch — panel lights
40
Main light switch — B.O. marker rear
24
Main light switch — B.O. stop light
23
Main light switch — service stop light
22
Main light switch — service taillight
21
High beam indicator light
519
Not used
Light circuits
20-24
Driver’s dome light, auxiliary outlet, and trailer
receptacle
37-38
Auxiliary outlet and trailer receptacle
37
Not used
Driver’s dome light
38
Connector dimmer switch
Connector dimmer switch
Connector lighting switch
Master warning switch
459L
TM 9-2350-311-34-1
7-49
TM 9-2350-311-34-1
7-11 BULKHEAD-TO-DRIVER’S INSTRUMENT PANEL WIRING HARNESS — CONTINUED
a Removal
1
Disconnect two connectors (12 and 28) from brake pedal assembly (31).
2
Disconnect connector (27) from bulkhead (32).
3
Disconnect connector (26), strap (33), nut (34), and washer (35) from driver's dome light (36).
NOTE
Connectors are located in well below driver's instrument panel and circuit breakers.
4
Disconnect connector (6).
5
Disconnect connector (14).
6
Disconnect connector (15).
7-50
TM 9-2350-311-34-1
7-51
TM 9-2350-311-34-1
7-11 BULKHEAD-TO-DRIVER’S INSTRUMENT PANEL WIRING HARNESS — CONTINUED
a. Removal — Continued
7 Disconnect connector (11) from fuel pump primer switch (37).
8 Disconnect connector (23) from circuit breaker (38).
7-52
TM 9-2350-311-34-1
NOTE
For quick guide to wire connector locations see paragraphs 7-2 and 7-3.
9 Disconnect seven connectors (29 8, 9, 10, 5,20, and 24) from driver's instrument panel.
NOTE
Screws are located inside of hull on rear bulkhead.
10 Remove two screws (40), two flat washers (41), and two Iockwashers (42) from left and right assemblies (43
and 44). Discard lockwashers.
11 Pull taillight assemblies (43 and 44) away from hull to expose connectors.
12 Disconnect three connectors (16, 18, and 19) from left taillight assembly (43).
13 Disconnect two connectors (16 and 17) from right taillight assembly (44).
7-53
TM 9-2350-311-34-1
7-11 BULKHEAD-TO-DRIVER’S INSTRUMENT PANEL WIRING HARNESS — CONTINUED
a. Removal — Continued
14 Remove plastic strap (45), screw (46), and washer (47) to release wiring harness.
15 Remove 16 plastic straps (48), 16 screws (49), and 16 washers (50) (11 from left bulkhead and 5 from rear
bulkhead).
b. Disassembly
1 Remove electrical tape only for sections being disassembled.
2 Separate/isolate wiring harness.
3 Disassemble wiring harness (TM 9-2350-311-20-1).
c. Assembly
1 Assemble wiring harness (TM 9-2350-311-20-1).
2 Apply electrical tape only for sections being assembled.
d. Installation
1 Install 16 plastic straps (48), 16 screws (49), and 16 washers (50) (11 from left bulkhead and 5 from rear
bulkhead).
2 Install washer (47), screw (46), and plastic strap (45) to secure wiring harness.
3 Connect two connectors (16 and 17) to right taillight assembly (44).
4 Connect three connectors (16, 18, and 19) to left taillight assembly (43).
7-54
TM 9-2350-311-34-1
7-55
TM 9-2350-311-34-1
7-11 BULKHEAD-TO-DRIVER’S INSTRUMENT PANEL WIRING HARNESS — CONTINUED
d. Installation- Continued
NOTE
Install screws from inside hull on rear bulkhead.
5 Position left and right taillight assemblies (43 and 44) on hull and install two screws (40), two flat washers (41),
and two new Iookwashers (42).
NOTE
For quick guide to wire connector locations see paragraphs 7-2 and 7-3.
6 Connect seven connectors (29,8,9, 10,15,20, and 24) to driver’s instrument panel (39).
NOTE
Connectors are located in well below driver’s instrument panel and circuit breakers.
7 Connect connector (23) to circuit breaker (38).
7-58
TM 9-2350-311-34-1
7-57
TM 9-2350-311-34-1
7-11 BULKHEAD-TO-DRIVER’S INSTRUMENT PANEL WIRING HARNESS — CONTINUED
d. Installation — Continued
8 Connect connector (11) to fuel pump primer switch (37).
9 Connect connector (15).
10 Connect connector (14).
11 Connect connector (6).
12 Connect connector (26) and install plastic strap (33), nut (34), and washer (35) to driver's dome light (36).
13 Connect connector (27) to bulkhead (32).
14 Connect two connectors (12 and 28) to brake pedal assembly (31).
7-58
TM 9-2350-311-34-1
NOTE
FOLLOW-ON MAINTENANCE:
Install portable instrument panel
(TM 9-2350-311-20-1)
Connect batteries (TM 9-2350-311-20-1)
7-59
TM 9-2350-311-34-1
7-12 POWER LEAD WIRING HARNESS (M109A2)
This task covers:
a. Removal
b. Disassembly
c. Assembly
d. Installation
INITIAL SETUP
Lockwashers (4) (item 34, Appx F)
Applicable Configurations
M109A2
References
Tools
General mechanic’s tool kit (item 14, Appx C)
TM 9-2350-311-20-1
Equipment Conditions
Batteries disconnected (TM 9-2350-311-20-1)
Driver’s instrument panel removed (TM 9-2350-311-20-1)
Materials/Parts
Electrical tape — black (item 25, Appx B)
Gasket (item 63, Appx F)
Lockwashers (4) (item 30, Appx F)
NOTE
Vehicles with engine model 7083-7396 use connector 5 for flame heater system.
Vehicles with engine model 7083-7391 use connector 5 for glow plug system.
Connector
No.
Wire
Electrical Lead To:
No.
Connector bulkhead (to slave start receptacle) 49
Connector accessory control box
10
Connector slip ring segment board
47
Connector hull lighting wiring harness
(interconnects with wire 15)
10
Connector starter switch/flame heater
switch circuit breaker (to wire 15) (engine model
7083-7396) or connector starter switch/glow
plug switch (engine model 7083-7391)
10
Connector fuel pump circuit
breaker (to wire 76)
10
1
2
3
4
5
6
Connector
No.
7
8
9
10
11
12
Connector fuel prime pump switch
circuit breaker (to wire 588)
Connector master warning light/
engine instrumentation circuit
breaker (to wire 27)
Connector bilge pump switch circuit
breaker (to wire 450)
Connector auxiliary outlet/dome
light circuit breaker (to wires 37 and 38)
Connector slave start receptacle
Ground
a. Removal
1 Disconnect six connectors (5 thru 10) from circuit breakers (13).
2 Disconnect connector (4) from wire 15 lead.
7-60
Electrical Lead To:
Wire
No.
10
10
10
10
49
50
TM 9-2350-311-34-1
7-61
TM 9-2350-311-34-1
7-12 POWER LEAD WIRING HARNESS (M109A2) — CONTINUED
a. Removal
- Continued
3 Disconnect connector (2) from accessory control box (14).
4 Remove screw (15), washer (16), and nut (17) from slip ring segment board (18) and release lead (3).
7-62
TM 9-2350-311-34-1
NOTE
Wiring harness maybe removed from hull with slave start receptacle attached or
leads can be pulled out of receptacle with sockets as required. If wiring harness
removed is without receptacle, skip steps 5 and 6.
5 Remove slave start receptacle (19) as follows:
(a) Remove four screws (20), four Iockwashers (21), and gasket (22) from battery compartment bulkhead.
Discard Iockwashers and gasket.
(b) Push slave start receptacle (19) with mounting plate (23) into driver’s compartment.
6 Remove four screws (24) and four Iockwashers (25) and separate slave start receptacle (19) from mounting
plate (23). Discard Iockwashers.
7-63
TM 9-2350-311-34-1
7-12 POWER LEAD WIRING HARNESS (M109A2) — CONTINUED
a. Removal — Continued
7 Disconnect connector (1) at driver’s compartment bulkhead.
8 Remove two plastic straps (26), four screws (27), and four washers (28) to release wiring harness.
9 Remove 11 plastic straps (29), 11 screws (30), and 11 washers (31).
b. Disassembly
Disassemble wiring harness leads (TM 9-2350-311-20-1).
c. Assembly
Assemble wiring harness leads (TM 9-2350-31 1-20-1).
d. Installation
1 Install 11 plastic straps (29), 11 washers (31), and 11 screws (30).
2 Install two plastic straps (26), four washers (28), and four screws (27) to secure wiring harness.
3 Connect connector (1) at driver’s compartment bulkhead.
4 Connect slave start receptacle (19) to mounting plate (23) with four new Iockwashers (25) and four screws
(24).
NOTE
Wiring harness maybe removed from hull with slave start receptacle attached or
leads can be pulled out of receptacle with sockets as required. If wiring harness
removed is without receptacle, skip steps 5 and 6.
5 Install receptacle (19) as follows:
(a) Push receptacle (19) with mounting plate (23) from driver's compartment into battery compartment.
(b) Install new gasket (22), four new Iockwashers (21), and four screws (20) to battery compartment bulkhead.
7-64
TM 9-2350-311-34-1
7-65
TM 9-2350-311-34-1
7-12 POWER LEAD WIRING HARNESS (MI09A2)
CONTINUED
d. Installation — Continued
6 Secure lead (3) by Installing washer (16), screw (15), and nut (17) to slip ring segment board (18).
7 Connect connector (2) to accessory control box (14).
8 Connect connector (4) to wire 15 lead.
7-66
TM 9-2350-311-34-1
9 Connect six connectors (5 thru 10) to circuit breakers (13).
NOTE
FOLLOW-ON MAINTENANCE:
Install driver’s instrument panel
(TM 9-2350-311-20-1)
Connect batteries (TM 9-2350-311-20-1)
7-13 POWER LEAD (M109A2/M109A3)
This task covers:
a. Removal
b. Disassembly
c. Assembly
d. Installation
INITIAL SETUP
M109A2/M109A3
Tools
General mechanic’s tool kit (item 14, Appx C)
TM 9-2350-311-20-1
Batteries disconnected (TM 9-2350-311-20-1)
Driver’s instrument panel removed (TM 9-2350-311-20-1)
Parts
Electrical tape — black (item 25, Appx B)
7-67
TM 9-2350-311-34-1
7-13 POWER LEAD (M109A2/M109A3) — CONTINUED
NOTE
Vehicles with engine model 7083-7396 use connector 5 for flame heater system.
Vehicles with engine model 7083-7391 use connector 5 for glow plug controller
system.
Connector
No.
1
2
3
4
5
7-68
Electrical Lead To:
Connector bulkhead (to NATO slave start
receptacle)
Connector accessory control box
Connector slip ring segment board
Connector hull lighting wiring harness
(interconnects with wire 15)
Connector starter switch/frame heater
switch circuit breaker (to wire 10) (engine
model 7083-7396) or connector starter switch/
glow plug switch circuit breaker (to wire 10)
(engine model 7083-7391)
wire
No.
Connector
No.
6
49
10
47
7
8
10
9
10
10
Electrical Lead To:
Connector fuel prime pump switch circuit
breaker (to wire 586)
Connector master warning light/engine
instrumentation circuit breaker (to wire 27)
Connector bilge pump switch circuit
breaker (to wire 450)
Connector auxiliary outlet/dome light circuit
breaker (to wires 37-38)
Connector NATO slave start receptacle
Wire
No.
10
10
10
49
TM 9-2350-311-34-1
a. Removal
1 Disconnect five connectors (5 thru 9) from circuit breakers (11).
2 Disconnect connector (4) at wire 15 lead.
3 Disconnect connector (2) at accessory control box (12).
4 Remove screw (13), washer (14), and nut (15) from slip ring segment board (16) and release lead (3).
7-69
TM 92350-311 -34-1
7-13 POWER LEAD (M109A2/M109A3) — CONTINUED
a. Removal — Continued
5 Disconnect connector (1) from driver's compartment bulkhead.
6 Remove two plastic straps (17), four screws (18), and four washers (19) to release power lead.
7 Remove 11 plastic straps (20), 11 screws (21), and 11 washers (22).
8 Remove screw (23), washer (24), and lead (10) and remove wiring harness.
9 Remove two screws (25), two washers (26), and ground lead (27).
7-70
TM 9-2350-311-34-1
b. Disassembly
Disassemble wiring harness leads (TM 9-2350-311-20-1).
c. Assembly
Assemble wiring harness leads (TM 9-2350-311-20-1).
d. installation
1 Install ground lead (27), two washers (26), and two screws (25).
2 Install wiring harness, lead (10), washer (24), and screw (23).
3 Install 11 plastic straps (20), 11 screws (21), and 11 washers (22).
4 Install two plastic straps (17), four washers (1 9), and four screws (18) to secure power lead.
5 Connect connector (1) to driver’s compartment bulkhead.
6 Install lead (3), washer (14), screw (13), and nut (15) to slip ring segment board (16).
7 Connect connector (2) at accessory control box (1 2).
7-71
TM 9-2350-311-34-1
7-13 POWER LEAD (M109A2?M109A3) — CONTINUED
d. Installation — Continued
8 Connect connector (4) at wire 15 lead.
9 Connect five connectors (5 thru 9) to circuit breakers (11).
NOTE
FOLLOW-ON MAINTENANCE:
Install driver's instrument panel
(TM 9-2350-311-20-1)
Connect batteries (TM 9-2350-311-20-1)
7-14 POWER LEAD (M109A4/M109A5)
This task covers:
a. Removal
b. Disassembly
c. Assembly
d. Installation
M109A4/M109A5
Tools
General mechanic’s tool kit (item 14, Appx C)
Electrical tape — black (item 25, Appx B)
Lockwashers (17) (item 35, Appx F)
7-72
TM 9-2350-311-20-1
Batteries disconnected (TM 9-2350-311-20-1)
Driver’s instrument panel removed (TM 9-2350-311-20-1)
TM 9-2350-311-34-1
NOTE
Vehicles with engine model 7083-7396 use connector 8 for flame heater system.
Vehicles with engine model 7083-7391 use connector 8 for glow plug controller
system.
Connector
No.
Electrical Lead To:
Wire
No.
Connector
No.
1
10 8
Connector bulkhead
10
2 Connector accessory control box
47
3 Connector slip ring segment board
4
Connector hull lighting wiring harness
(interconnects with wire 15)
10
5
Connector NBC circuit breaker (to wire 438) 10 9
6 Connector fuel prime pump switch circuit
10 10
breaker (to wire 588)
"Y" connector in-tank fuel pump system
7
10 11
relay (to wire 10)
Electrical Lead To:
Connector starter switch/flame heater
switch circuit breaker (to wire 10) (engine
model 7083-7396) or connector starter
switch/glow plug switch circuit (engine
model 7083-7391 )
Connector master warning light/engine
instrumentation circuit breaker (to wire 27)
Connector bilge pump switch circuit breaker
(to wire 450)
Connector auxiliary outlet/dome light circuit
breaker (to wires 37 and 38)
Wire
No.
10
10
10
10
7-73
TM 9-2350-311-34-1
7-14 POWER LEAD (M109A4/M109A5) — CONTINUED
a. Removal
1 Disconnect six connectors (5, 6, and 8 thru 11) from circuit breakers (1 2).
2 Disconnect connector (4) at wire 15 lead.
3 Disconnect connector (7) at "Y" connector.
7-74
TM 9-2350-311-34-1
4
Disconnect connector (2) at accessory control box (13).
5
Remove screw (14), washer (15), and nut (16) from slip ring segment board (17) and release lead (3).
6
Disconnect connector (1) at driver’s compartment bulkhead.
7
Remove two plastic straps (18), four screws (19), four Iockwashers (20), and four washers (21). Release
power lead and reinstall straps, washers, Iockwashers, and screws. Discard Iockwashers.
8
Remove 13 plastic straps (22), 13 screws (23), 13 Iockwashers (24), and 13 washers (25). Release power lead
and reinstall straps, washers, Iockwashers, and screws. Discard lockwashers.
9
Remove wiring harness from hull.
b. Disassembly
Disassemble wiring harness leads (TM 9-2350-311-20-1).
c.
Assembly
Assemble wiring harness leads (TM 9-2350-311-20-1).
7-75
TM 9-2350-311-34-1
7-14 POWER LEAD (M109A4/M109A5) — CONTINUED
d. Installation
1
Install wiring harness to hull.
2
Secure power lead and install 13 plastic straps (22), 13 washers (25), 13 new Iockwashers (24), and 13 screws
(23).
3
Secure power lead and install two plastic straps (18), four washers (21), four new Iockwashers (20), and four
screws (19).
4
Connect connector (1) at driver’s compartment bulkhead.
5
Install lead (3), washers (15), screw (14), and nut (16) to slip ring segment board (17).
6
Connect connector (2) at accessory control box (13).
7-76
TM 9-2350-311-34-1
7 Connect connector (7) at “Y” connector.
8 Connect connector (4) at wire 15 lead.
9 Connect six connectors (5, 6, and 8 thru 11) to circuit breakers (12).
NOTE
FOLLOW-ON MAINTENANCE:
Install driver’s instrument panel
(TM 9-2350-311-20-1)
Connect batteries (TM 9-2350-311-20-1)
7-77
TM 9-2350-311-34-1
SECTION Il. HULL ELECTRICAL COMPONENTS
7-15 RECTIFIER (M109A2/M109A3)
This task covers:
a. Disassembly
M109A2/M109A3
Tools
General mechanic’s tool kit (item 14, Appx C)
Multimeter (item 16, Appx C)
Soldering gun (item 11, Appx C)
Acetone solvent (item 1, Appx B)
Electrical tape — black (item 25, Appx B)
Gaskets (2) (item 44, Appx F)
b. Inspection and repair
c. Assembly
Lockwashers (3) (item 24, Appx F)
Preformed packing (item 49, Appx F)
Pressure-sensitive tape (item 26, Appx B)
Sealing compound (item 19, Appx B)
Silicone compound (item 22, Appx B)
Solder (item 23, Appx B)
Solder flux (item 24, Appx B)
References
TB SIG 222
LEGEND
1 Power diode assembly CR-1
2 Power diode assembly CR-2
3 Power diode assembly CR-3
4 Power diode assembly CR-4
5 Power diode assembly CR-5
6 Power diode assembly CR-6
7 Capacitor C-1
8 Capacitor C-2
9 Capacitor C-3
10 Capacitor C-4
11 Capacitor C-5
12
13
14
15
16
17
18
19
20
Capacitor C-6
Heat sink terminal
Heat sink
Capacitor C-7
Terminal E-3
Terminal E-2
Terminal E-1
Connector J-1
Connector J-2
NOTE
Point of symbol indicates direction of conventional current flow. Power diodes consist
of two diodes and one terminal.
7-78
TM 9-2350-311-34-1
7-79
TM 9-2350-311-34-1
7-15 RECTIFIER (MI 09A2/M109A3) — CONTINUED
a. Disassembly
NOTE
Perform electrical tests and disassemble defective components only.
1
Remove six screws (21), six flat washers (22), cover (23), and preformed packing (24). Discard preformed
packing.
2
Remove screw (26) and heat sink terminal (13).
3
Remove nut (27) and bushing (28).
4
Remove screw (29), Iockwasher (30), flat washer (31), and lead C-6 and C-7 to E-3 (32) from heat sink (14).
Discard Iockwasher.
7-80
TM 9-2350-311-34-1
5 Unsolder six electrical leads (33) from six power diode assembly terminals (34 and 35) (TB SIG 222).
6 Unsolder electrical lead C-5 to CR-6 (36) at power diode assembly (37) (TB SIG 222).
7 Unsolder electrical lead C-3 to CR-5 (38) at power diode assembly (39) (TB SIG 222).
8 Unsolder electrical lead C-1 to CR-4 (40) at power diode assembly (41) (TB SIG 222).
9 Remove two screws (42), two Iockwashers (43), and two flat washers (44) and release two leads C-7 to E-2
and C-1 to E-1 (45 and 46). Discard Iockwashers.
7-81
TM 9-2350-311-34-1
7-15 RECTIFIER (M109A2/M109A3) — CONTINUED
a. Disassembly — Continued
NOTE
There are two power diodes per power diode assembly CR-1 thru CR-6.
10 Remove three terminals (34) and three insulators (47) from three power diodes assemblies (4, 5, and 6).
Unsolder at diode poles to remove terminals (TB SIG 222).
11 Remove three terminals (35) and three insulators (46) from three power diode assemblies (1, 2, and 3).
Unsolder at diode poles to remove terminals (TB SIG 222).
12 Unscrew six power diodes (49) from heat sink (14).
13 Unscrew six power diodes (50).
14 Remove heat sink (14), three insulators (51), and six pins (52).
15 Unsolder two electrical leads (53) (wire 1 on pin B and wire 3 on pin E) from connector J-2 (20) (TB SIG 222).
7-82
TM 9-2350-311-34-1
16 Remove eight screws (54), connector J-2 (20), connector J-1 (19), and two gaskets (55). Discard gaskets.
NOTE
Capacitor board is held to housing with adhesive. Capacitor board and six capacitors
are issued as an assembly.
17 Remove capacitor board (56) and six capacitors (57) from housing (58).
NOTE
Capacitor board is held to housing with adhesive. Capacitor board and capacitor C-7
are issued as an assembly.
18 Remove capacitor board (59) with capacitor C-7 (15).
7-83
TM 9-2350-311-34-1
7-15 RECTIFIER (MI 09A2/M109A3) — CONTINUED
b. Inspection and Repair
1
Inspect cover (23). Replace if cracked or distorted. Replace decal if missing or damaged.
2
Inspect heat sink (14). Replace if cracked or distorted.
3
Inspect three insulators (51). Replace if cracked or distorted.
4
Inspect six pins (52). Replace if burred or broken.
5
Inspect housing (56). Replace if cracked or distorted.
6
Inspect six terminals (34 and 35). Replace if cracked or broken.
7
Test 12 diodes (49 and 50) for 3 ohms conductive direction (para 3-3). Replace if defective (nonconductive
direction).
7-84
TM 94350-311-34-1
8 Inspect two connectors (19 and 20). Replace if pins are broken. Solder leads if loose (TB SIG 222).
9 Inspect two capacitor boards (56 and 59). Replace if boards are cracked or broken. Check for loose or missing
terminals. Replace as required.
10 Test six capacitors (7 thru 12) for 0.01 MF ± 10%. Replace capacitor assembly if defective.
11 Test capacitor C-7 (15) for 3.0 MF ± 10%. Replace capacitor assembly if defective.
7-85
TM 9-2350-311-34-1
7-15 RECTIFIER (M109A2/M109A3) — CONTINUED
C.
Assembly
1
Install two new gaskets (55), two connectors (19 and 20), and eight screws (54) to housing (58).
2
Solder two electrical leads (53) (wire 1 on pin B and wire 3 on pin E) to connector J-2 (20) (TB SIG 222).
3
Install six pins (52), three insulators (51), and heat sink (14) to housing (58). Apply coating of silicone
compound to mating surfaces of diodes.
4
Install six power diodes (50) and six insulators (48) to housing (58). Install six power diodes (49) and six
insulators (47) to heat sink (14).
5
Solder 6 terminals (34 and 35) to 12 power diodes (49 and 50). Apply coating of silicone compound to mating
surfaces of diodes.
6
Install lead C-6 and C-7 to E-3 (32), flat washer (31), new Iockwasher (30), and screw (29) to heat sink (14).
7
Install bushing (28), nut (27), heat sink terminal lead (13), and screw (26). Apply coating of silicone compound
to diode mating surfaces.
7-86
TM 9-2350-311-34-1
7-87
TM 9-2350-311-34-1
7-15 RECTIFIER (M109A2/M109A3) — CONTINUED
c. Assembly — Continued
8
Solder electrical leads to connection points except capacitor board assemblies (50 and 53).
Acetone solvent is toxic and flammable. Use only in well-ventilated area. Do not
breathe vapors. Do not use near open flame or excessive heat. Failure to heed
warning could cause serious injury or death.
9
Clean mounting surfaces with acetone solvent and install capacitor board assemblies (57 and 60) using
pressure-sensitive tape.
10 Solder electrical leads to connection points (TB SIG 222).
7-88
TM 9-2350-311-34-1
11 Apply sealing compound to six screws (21) and six flat washers (22). Install new preformed packing (24), cover
(23), six screws, and six flat washers.
7-16 RECTIFIER (M109A4/M109A5)
This task covers:
a. Removal
b. Inspection and Repair
c. Assembly
INITIAL SETUP
M109A4/M109A5
General mechanic’s tool kit (item 14, Appx C)
Multimeter (item 16, Appx C)
Socket wrench set (item 20, Appx C)
Soldering gun (item 11, Appx C)
Torque wrench (item 28, Appx C)
Acetone solvent (item 1, Appx B)
Electrical tape — black (item 25, Appx B)
Gaskets (2) (item 45, Appx F)
Lockwashers (3) (item 27, Appx F)
Lockwashers (6) (item 28, Appx F)
Preformed packing (item 50, Appx F)
Pressure-sensitive tape (item 26, Appx B)
Sealing compound (item 20, Appx B)
Silicone compound (item 21, Appx B)
Solder (item 23, Appx B)
Solder flux (item 24, Appx B)
TB SIG 222
TM 9-2350-311-20-1
7-89
TM 9-2350-311-34-1
7-16 RECTIFIER (MI 09A4/M109A5) — CONTINUED
LEGEND
1 Diode assembly CR-1 and CR-4
2 Diode assembly CR-2 and CR-5
3 Diode assembly CR-3 and CR-6
4 Capacitor C-1
5 Capacitor C-2
6 Capacitor C-3
7 Capacitor C-4
8 Capacitor C-5
9
10
11
12
13
14
15
Capacitor C-6
Capacitor C-7
Positive heat sink terminal
Negative bus bar
Positive bus bar
Connector J-1
Connector J-2
NOTE
Point of symbol indicates direction of conventional current flow. Diode assemblies
consist of two diodes.
a. Disassembly
NOTE
Perform electrical tests and disassemble defective components only.
1 Remove eight screws (16), eight flat washers (17), cover (18), and preformed packing (19). Discard preformed
packing.
2 Remove nut (20), lockwasher (21), flat washer (22), five leads (23), and flat washer (24). Discard Iockwasher.
7-90
TM 9-2350-311-34-1
7-91
TM 9-2350-311-34-1
7-16 RECTIFIER (M109A4/M109A5) — CONTINUED
a. Disassembly — Continued
NOTE
When removing more than one wire from receptacle, tag wires for future identification.
3
Remove four screws (25), gasket (26), and connector J2 (15). Discard gasket.
4
Disconnect two wire leads 4 and 5 (27) from connector J2 (15).
5
Remove three screws (28), three washers (29), three Iockwashers (30), and six leads (31). Discard
Iockwashers.
6
Remove four screws (32), gasket (33), and connector J1 (14). Discard gasket.
7
Remove five leads (34) from connector J1 (14) and three leads (35) from connector J2 (15) as required.
7-92
TM 9-2350-311-34-1
8
Remove nut (36) and Iockwasher (37) from ground terminal (38) and disconnect two wire leads (39). Discard
Iockwasher.
9
Remove three screws (40), three washers (41), three Iockwashers (42), and negative bus bar (12). Discard
Iockwashers.
10 Remove two washers (43), two Iockwashers (44), two nuts (45), and ground terminal (38).
11 Remove three screws (46), three washers (47), three Iockwashers (48), and positive bus bar (13). Discard
Iockwashers.
12 Remove nut (49), flat washer (50), screw (51), and Iockwasher (52). Discard Iockwasher.
7-93
TM 9-2350-311-34-1
7-16 RECTIFIER (M109A4/M109A5) — CONTINUED
a. Disassembly — Continued
13 Remove six screws (53), six Iockwashers (54), and three diode assemblies (1, 2, and 3). Discard Iockwashers.
NOTE
Capacitor boards are secured to housing with pressure-sensitive tape. Remove only if
necessary.
14 Remove capacitor board (55) from housing (56).
15 Unsolder three electrical leads (57) from capacitor board (55) (TB SIG 222).
16 Unsolder lead (58) from capacitor board (59) (TB SIG 222).
17 Disassemble all rectifier electrical leads as required (TM 9-2350-311-20-1).
7-94
TM 9-2350-311-34-1
b. Inspection and Repair
1
Inspect cover (18). Replace if cracked or distorted.
2
Inspect housing (56). Replace if cracked or distorted.
3
Test three diode assemblies (1, 2, and 3) for continuity (para 3-3). Replace if defective.
4
Inspect two connectors (14 and 15). Replace if pins are broken. Resolder leads if loose (TB SIG 222).
5
Inspect capacitor boards (55 and 59). Replace if boards are cracked or broken. Check for loose or missing
terminals. Replace as required.
6
Test capacitor (4) with red lead of multimeter on one capacitor terminal and black lead of multimeter on other
capacitor terminal. Multimeter should show continuity, then infinity (00). If only continuity is shown, replace
capacitor assembly.
7
Reverse multimeter leads on capacitor (4) and repeat step 6.
8
Repeat test procedure (steps 6 and 7) for capacitors (5 thru 9) and capacitor C-7 (10).
7-95
TM 9-2350-311-34-1
7-16 RECTIFIER (M109A4/M109A5) — CONTINUED
c. Assembly
LEGEND
1 Diode assembly CR-1 and CR-4
2 Diode assembly CR-2 and CR-5
3 Diode assembly CR-3 and CR-6
4 Capacitor C-1
5 Capacitor C-2
6 Capacitor C-3
7 Capacitor C4
8 Capacitor C-5
7-96
9 Capacitor C-6
10 Capacitor C-7
11 Positive heat sink terminal
12 Negative bus bar
13 Positive bus bar
14 Connector J-1
15 Connector J-2
TM 9-2350-311-34-1
1 Assemble electrical leads as required (TM 9-2350-311-20-1).
NOTE
Refer to electrical wiring diagram for installation of leads.
2 Solder lead (56) to capacitor board (59) (TB SIG 222).
3 Solder three leads (57) to capacitor board (55) (TB SIG 222).
Acetone solvent is toxic and flammable. Use only in well-ventilated area. Do not
breathe vapors. Do not use near open flame or excesive heat. Failure to heed warning
could cause serious injury or even death.
NOTE
Step 4 applies only if capacitor boards (55 and 59) are used.
4 Clean two capacitor boards (55 and 59) with acetone solvent to remove remains of pressure-sensitive tape.
5 Install two strips of pressure-sensitive tape to each capacitor board (55 and 59). Do not remove protective
coating.
6 Clean housing (56) mounting surface with acetone solvent.
7 Remove protective coating on tape and install two capacitor boards (55 and 59) as shown below.
7-97
TM 9-2360-311-34-1
7-16 RECTIFIER (M109A4/M109A5) — CONTINUED
c. Assembly — Continued
8
Apply coating of silicone compound to mating surfaces and install three diode assemblies (1, 2, and 3), six new
Iookwashers (54), and six screws (53). Torque screws to 20-23 lb-in. (2.3-2.6 N-m)
9
Install two nuts (45), two new lockwashers (44), and two washers (43) to ground terminal (38).
10 Install ground terminal (38) and secure by tightening bottom nut (45). Do not tighten top nut (45).
11 Install negative and positive bus bars (12 and 13), six new Iockwashers (42 and 48), six flat washers (41 and
47), and six screws (40 and 46). Torque screws to 20-30 lb-in. (2.3-2.6 N-m).
12 Install new Iockwasher (52), flat washer (50), screw (51), and nut (49) on positive bus bar (13).
13 Install two leads (39), new Iockwasher (37), and nut (36) at ground terminal (38). Tighten nut (36) and top nut
(45) against negative bus bar (12) to secure contact.
14 Install three leads (35) to connector J2 (15) and five leads (34) to connector J1 (14).
15 Apply sealing compound to threads of eight screws (25 and 32).
16 Install connector J1 (14), new gasket (33), and four screws (32).
17 Connect two wire leads 4 and 5 (27) to connector J2 (15).
7-98
TM 9-2350-311-34-1
18 Install connector J2 (15), new gasket (26), and four screws (25).
19 Bend terminals of three leads 1, 2, and 3 (31 ) to 90°.
20 Install six leads (31), three screws (28), three flat washers (29), and three new lockwashers (30).
7-99
TM 9-2350-311-34-1
7-16 RECTIFIER (M109A4/M109A5) — CONTINUED
c. Assembly — Continued
21 Connect two wire leads (23) to two connectors (14 and 15).
22 Install flat washer (22), five leads (23), flat washer (22), new Iockwasher (21 ), and nut (20) to screw (60).
23 Install new preformed packing (19), cover (18), eight flat washers (17), and eight screws (16).
7-100
TM 9-2350-311-34-1
CHAPTER 8
FINAL DRIVE AND TRACK SUSPENSION
GENERAL
This chapter describes and illustrates procedures for disassembly and assembly of the final drive assembly and the track
suspension.
PAGE
Section I
8-1
Section II
8-2
FINAL DRIVE ASSEMBLY . . . . . . . . . . . . . . . . . . . . . . . . . . . . . . . . . . . . . . . . . . . . . . . . . . . . . . . . ...0-2
FINAL DRIVE ASSEMBLY . . . . . . . . . . . . . . . . . . . . . . . . . . . . . . . . . . . . . . . . . . . . . . . . . . . . . . . . ...8-2
8-6
TRACK SUSPENSION
ROAD WHEEL ARM ASSEMBLY—UPPER SPINDLE . . . . . . . . . . . . . . . . . . . . . . . . . . . . . . . . . ...8-6
8-1
TM 9-2350-311-34-1
SECTION I. FINAL DRIVE ASSEMBLY
8-1 FINAL DRIVE ASSEMBLY
This task covers:
a. Disassembly
b. Assembly
Tools
General mechanic’s tool kit (item 14, Appx C)
Fabricated stand (item 2, Appx D)
Torque wrench (item 26, Appx C)
Torque wrench (item 28, Appx C)
Grease (item 9, Appx B)
Lockwashers (24) (item 37, Appx F)
Lockwashers (7) (item 39, Appx F)
Seal (item 84, Appx F)
Seal (item 46, Appx F)
Cotter pin (item 13, Appx F)
Gasket (item 83, Appx F)
Gasket (item 86, Appx F)
Gasket (item 53, Appx F)
Gaskets (2) (item 54, Appx F)
Two
Final drive removed (TM 9-2350-311 -20-1 )
a. Disassembly
1
Remove seal (1), 12 screws (2), 12 Iockwashers (3), cover (4), and gasket (5). Discard seal, lockwashers, and
gasket.
2
Remove seven screws (6), seven Iockwashers (7), housing cover (8), and gasket (9). Discard Iockwashers and
gasket.
3
Remove input splined gearshaft (10) and two bearing races (11 ).
4
Remove two bearing cones (12).
5
Remove cotter pin (13) and nut (14). Discard cotter pin.
6
Remove ring gear (15) and spacer (16).
7
Remove bearing (17).
NOTE
Step 8 applies only to leaking final drive housings.
8 Remove four screws (18), four Iockwashers (19), input shaft cover (20), and gasket (21 ) from final drive
housing (22). Discard Iockwashers and gasket.
8-2
TM 9-2350-311-34-1
8-3
TM 9-2350-311-34-1
8-1 FINAL DRIVE ASSEMBLY — CONTINUED
a. Disassembly — Continued
9 Remove eight screws (23), eight Iockwashers (24), output shaft (25), and gasket (26). Discard Iockwashers
and gasket.
10 Remove bearing (27), gasket (28), cap (29), and seal (30). Discard gasket and seal.
11 Remove two plugs (31).
b. Assembly
8-4
1
Install two plugs (31).
2
Apply coat of grease to mating surface of new seal (30).
3
Install seal (30), cap (29), new gasket (28), and bearing (27).
4
Install new gasket (26), output shaft (25), eight new Iockwashers (24), and eight screws (23). Torque screws to
35-40 Ib-ft (47-54 N-m).
5
Install two bearing cones (12) to input splined gearshaft (10).
6
Install two bearing races (11) and splined gearshaft (10) to final drive housing (22).
7
Install new gasket (9), housing cover (8), seven new Iockwashers (7), and seven screws (6). Torque screws to
75-80 lb-ft (102-108 N-m).
8
Install new gasket (5), cover (4), 12 new Iockwashers (3), 12 screws (2), and new seal (1). Torque screws to
35-40 Ib-ft (47-54 N-m).
9
Install new gasket (21), input shaft cover (22), four new Iockwashers (19), and four screws (18). Torque screws
to 35-40 Ib-ft (47-54 N-m).
TM 9-2350-311-34-1
10 Install bearing (17) to ring gear (15).
11 Install spacer (16) and ring gear (15) to output shaft (25).
12 Place final drive housing (22) in fabricated stand.
13 Install nut (14) and torque nut to 425-475 lb-ft (576-644 N-m) to ensure seating of parts. If slot in nut is alined
with cotter pin hole, install new cotter pin (13). Tighten nut (30° maximum), until slot alines with hole.
14 Install cotter pin (13) with head inserted in nut (14) slot. Hold head in place with bucking bar while bending cotter pin (long leg must be bent flat against nut with short leg bent back, but not protruding beyond end of shaft).
NOTE
FOLLOW-ON MAINTENANCE:
Install final drive (TM 9-2350-311-20-1)
8-5
TM 9-2350-311-34-1
SECTION Il. TRACK SUSPENSION
8-2 ROAD WHEEL ARM ASSEMBLY — UPPER SPINDLE
This task covers:
a. Disassembly
General mechanic’s tool kit (item 14, Appx C)
Prong wrench (item 25, Appx C)
Torque wrench (item 26, Appx C)
b. Assembly
Seal (item 61, Appx F)
Seal (item 71, Appx F)
TM 9-2350-311-20-1
Grease (item 9, Appx B)
Key washer (item 8, Appx F)
Preformed packing (item 21, Appx F)
.
t Conditions
Road wheel arm assembly removed (TM 9-2350-311-20-1)
a. Disassembly
1 Remove two screws (1), housing (2), preformed packing (3), and seal (4). Discard preformed packing and seal.
2 Straighten key washer (5) tabs.
3 Remove nut (6) using prong wrench.
4 Remove key washer (5), thrust spacer (7), and inner bearing race assembly (8). Discard key washer.
5 Remove retainer (9), outer bearing race assembly (10), bearing spacer (11), and seal (12). Discard seal.
b. Assembly
8-6
1
Apply coat of grease to mating surface of new seal (12).
2
Install new seal (12), retainer (9), outer bearing race assembly (10), bearing spacer (11), inner bearing race
assembly (8), thrust spacer (7), and new key washer (5) to upper spindle (13).
3
Install nut (6) to upper spindle (13) using prong wrench. Torque nut to 255-275 Ib-ft (346-373 N-m).
4
Bend key washer (5) tabs to secure key washer to nut (6).
5
Install new seal (4), new preformed packing (3), housing (2), and two screws (1).
TM 9-2350-311-34-1
NOTE
FOLLOW-ON MAINTENANCE:
Install road wheel arm assembly
(TM 9-2350-311-20-1)
8-7/(8-8 blank)
TM 9-2350-311-34-1
CHAPTER 9
HULL-RELATED COMPONENTS
chapter describes and illustrates procedures for disassembly,
repair, and assembly of the personnel
airduct ventilating fan and the bilge pump. It also describes and illustrates the removal and installation of the data plates.
For disassembly,
repair, and assembly of the personnel heater, refer to TM 9-2350-205-24&P.
CONTENTS
PERSONNEL AIRDUCT VENTILATING FAN . . . . . . . . . . . . . . . . . . . . . . . . . . . . . . . . . . . . . . . . . . ..9-2
9-1
9-2
BILGE PUMP . . . . . . . . . . . . . . . . . . . . . . . . . . . . . . . . . . . . . . . . . . . . . . . . . . . . . . . . . . . . . . . . . . . . . 9-8
9-3
DATA PLATES . . . . . . . . . . . . . . . . . . . . . . . . . . . . . . . . . . . . . . . . . . . . . . . . . . . . . . . . . . . . . . . . ...9-16
9-1
TM 9-2350-311-34-1
9-1 PERSONNEL AIRDUCT VENTILATING FAN
This task covers:
a. Disassembly
General mechanic’s tool kit (item 14, Appx C)
Growler (item 10, Appx C)
Multimeter (item 16, Appx C)
Grommet (item 43, Appx F)
Lockrings (2) (item 3, Appx F)
Lockwire (2) (item 87, Appx F)
Lockwashers (2) (item 29, Appx F)
Lockwashers (4) (item 30, Appx F)
b. Inspection and Repair
c. Assembly
Two
References
TM 9-214
Personnel ventilating airduct fan removed (TM 9-2350311-20-1)
Impeller blocked
a. Disassembly
1 Remove nut (1), two washers (2), impeller (3), and shaft key (4).
2 Remove two nuts (5), two Iockwashers (6), and noise filter cover (7) from noise filter (8). Discard Iockwashers.
9-2
TM 9-2350-311-34-1
3 Remove four nuts (9), four Iockwashers (10), and four electrical leads (11 ) from noise filter terminals (1 2).
Discard Iockwashers.
4 Remove Iockwire (13), four screws (14), four flat washers (15), ground wire (16), and noise filter (8). Discard
Iockwire.
5 Remove Iockwire (17), four screws (18), and four flat washers (19) at front of housing (20). Discard Iockwire.
6 Remove grommet (21). Discard grommet.
7 Feed electrical leads (11 ) through grommet hole (22) and remove motor assembly (23).
8 Remove two screws (24) and two electrical brushes (25).
9 Remove two screws (26) and end cover (27).
9-3
TM 9-2350-311-34-1
9-1 PERSONNEL AIRDUCT VENTILATING FAN — CONTINUED
a. Disassembly — Continued
10 Remove armature (28) from motor field and frame assembly (29).
11 Remove two flat washers (30), bearing (31), flat washer (32), and Iockring (33). Discard Iockring.
12 Remove bearing (34), spacer (35), flat washer (36), and Iockring (37) from armature (28). Discard Iockring.
13 Remove spring tension washer (38) and flat washer (39) from armature (28).
b. Inspection and Repair
1 Inspect impeller (3). Remove nicks with soft stone or fine-mill file. Inspect for cracks. Replace if cracked.
2 Test noise filter (8) for continuity. Replace as required (TM 9-2350-311-20-1).
3 Replace grommet (21).
4 Inspect housing (20). Repair damage as required. Inspect for impeller rubbing on housing. Straighten housing
or remove high spots as required.
5 Inspect shaft key (4). Replace if damaged.
6 Check length on two electrical brushes (25). Length should be 0.685 to 0.825 in. (17.40 to 20.96 mm).
7 Inspect two screws (24). Replace if threads are damaged.
NOTE
If armature or motor field and frame assembly are damaged or defective, replace
motor assembly as unit.
8 Test armature (28) on growler.
9 Test motor field and frame assembly (29) for short or open field windings (TM 9-2350-311-20-1).
10 Inspect spring tension washer (38). Replace if damaged.
11 Inspect two bearings (40 and 41 ) (TM 9-214).
c. Assembly
1 Install flat washer (39) and spring tension washer (38) to motor field and frame assembly (29).
2 Install new Iockring (37), flat washer (36), spacer (35), and bearing (34) to armature (28).
3 Install armature (28) to motor field and frame assembly (29).
4 Install new Iockring (33), flat washer (32), bearing (31), and flat washer (30) to armature (28).
9-4
TM 9-2350-311-34-1
9-5
TM 9-2350-311-34-1
9-1 PERSONNEL AIRDUCT VENTILATING FAN — CONTINUED
C.
Assembly — Continued
5
Install two electrical brushes (25) and two screws (24).
6
Install end cover (27) and two screws (26).
7
Feed electrical leads (11) through grommet hole (22) and install motor assembly (23). Install new grommet
(21).
8
Install four flat washers (19), four screws (18), and new Iockwire (17) to front of housing (20).
9
Install noise filter (8), four flat washers (15), four screws (14), ground wire (16), and new Iockwire (13).
10 Rewire noise filter (8). See schematic for complete instructions.
11 Connect four electrical leads (11) to noise filter terminals (12) and install four new Iockwashers (10) and four
nuts (9).
12 Install noise filter cover (7), two new Iockwashers (6), and two nuts (5) to noise filter (8).
13 Install shaft key (4), impeller (3), two washers (2), and nut (1).
9-6
TM 9-2350-311-34-1
NOTE
FOLLOW-ON MAINTENANCE:
Install personnel ventilating airduct fan
(TM 9-2350-311-20-1)
9-7
TM 9-2350-311-34-1
9-2 BILGE PUMP
This task covers:
a. Disassembly
b. Inspection, Repair, and Test
c. Assembly
General mechanic’s tool kit (item 14, Appx C)
Fine-mill file (item 9, Appx C)
Fabricated removal/installation tool (item 4, Appx D)
Grease pencil
Growler (item 10, Appx C)
Multimeter (item 16, Appx C)
Sharpening stone (item 23, Appx C)
Soldering gun (item 11, Appx C)
Parts
Brushes (4) (item 56, Appx F)
Gasket (item 57, Appx F)
Gaskets (4) (item 58, Appx F)
Gaskets (2) (item 59, Appx F)
Gaskets (2) (item 77, Appx F)
Lockwashers (3) (item 69, Appx F)
Lockwashers (4) (item 70, Appx F)
Lockwashers (12) (item 81, Appx F)
Lockwasher (item 32, Appx F)
Lockwire (item 10, Appx F)
Preformed packings (4) (item 14, Appx F)
Snap ring (item 4, Appx F)
Solder (item 23, Appx B)
Solder flux (item 24, Appx B)
TB SIG 222
TM 9-214
TM 9-2350-311-20-1
.
Conditions
Bilge pump removed (TM 9-2350-311 -20-1 )
a. Disassembly
9-8
1
Remove four brush cap assemblies (1) and four preformed packings (2). Discard preformed packings.
2
Remove four brushes (3). Discard brushes.
3
Remove four bolts (4) and four Iockwashers (5). Discard Iockwashers.
4
Remove four screws (6), four fiat washers (7), inlet screen (8), and impeller cover (9).
5
Remove nut (10) using fabricated removal/Installation tool and remove Iockwasher (11) and impeller (12).
Discard Iockwasher.
6
Remove impeller housing (13) and key (14). Remove four nuts (15), four Iockwashers (16), four flat washers
(17), and four gaskets (18). Pull off drive end bell assembly (19). Discard Iockwashers and gaskets.
7
Remove four screws (20), four Iockwashers (21), seal cover (22), and gasket (23). Discard Iockwashers and
gasket.
8
Remove drive end bell assembly (19), four fiberglass sleeves (24), and gasket (25). Remove four studs (26)
from drive end bell assembly if replacement is required. Discard gasket.
TM 9-2350-311-34-1
9-9
TM 9-2350-311-34-1
9-2 BILGE PUMP — CONTINUED
a. Disassembly — Continued
9 Remove Iockwire (27), four screws (28), retainer plate (29), and snap ring (30). Discard Iockwire and snap ring.
10 Remove bearing (31), retainer (32), and drive end bell (33) from rotor (34). Use tape or grease pencil to identify
bearing.
11 Remove commutator end bearing (35). Use tape or grease pencil to identify bearing.
12 Remove yoke (36) and gasket (37) from commutator end bell assembly (38). Discard gasket.
13 Remove four screws (39), four Iockwashers (40), connector (41), two gaskets (42), connector adapter (43),
and insulator sleeve (44). Discard Iockwashers and gaskets.
9-10
TM 9-2350-311-34-1
14 Unsolder electrical lead (45) from field coils (46) to connector (TB SIG 222).
15 Remove screw (47), Iockwasher (48), and field coils (46) from commutator end bell (49). Discard Iockwasher.
16 Remove two screws (50), two Iockwashers (51), and jumper wire (52). Discard Iockwashers.
b. Inspection, Repair, and Test
Compressed air used for cleaning purposes must not exceed 30 psi (207 kPa). Use
only with effective chip guarding and personal protective equipment (goggles/shield,
gloves, etc).
1 Clean inlet screen (8) mesh with compressed air. Inspect mesh. Replace if torn.
2 Inspect impeller cover (9). Replace if damaged or defective.
3 Inspect impeller (1 2). Smooth burrs and nicks with soft stone or fine-mill file.
4 Inspect impeller housing (13). Replace if damaged or defective.
9-11
TM 9-2350-311-34-1
9-2 BILGE PUMP — CONTINUED
b. Inspection, Repair, and Test-Continued
5
Inspect key (14). Replace if damaged or broken.
6
Inspect seal cover (22). Replace if cover is cracked or if mating surfaces are warped.
7
Inspect four fiberglass sleeves (24). Replace if chipped or broken.
8
Inspect two bearings (31 and 35) (TM 9-214). Replace if defective.
9
Inspect drive end bell (33). Replace if cracked or defective or if mating surfaces are warped.
10 Test rotor (34) on growler. Replace rotor if defective. Turn down commutator by undercutting mica as required.
11 Inspect yoke (36). Replace if cracked, damaged, or defective.
12 Inspect connector (41). Replace if defective.
13 Test field coils (46) for continuity (TM 9-2350-311-20-1). Replace if defective.
14 Test jumper wire (52) for continuity (TM 9-2350-311-20-1). Replace if defective.
15 Inspect commutator end bell (49). Replace if cracked, damaged, or defective.
9-12
TM 9-2350-311-34-1
c. Assembly
1 Install jumper wire (52), two new Iockwashers (51 ), and two screws (50).
2 Install field coils (46), new Iockwasher (46), and screw (47) to commutator end bell (50).
3 Solder electrical lead (45) from field coils (46) to connector (TB SIG 222).
4 Install insulator sleeve (44), connector adapter (43), and two new gaskets (42). Install connector (41), four new
Iockwashers (40), and four screws (39).
5 Install new gasket (37) and yoke (36) to commutator end bell assembly (36).
9-13
TM 9-2350-311-34-1
9-2 BILGE PUMP — CONTINUED
c. Assembly — Continued
NOTE
Ensure bearings are installed at location as shown. Do not reverse installation of
bearings.
6 Install commutator end bearing (35) to rotor (34). Check label to correctly identify bearing.
7 Install drive end bell (33), retainer (32), and bearing (31) to rotor (34). Check label to correctly identify bearing.
8 Install new snap ring (30), retainer plate (29), four screws (28), and new Iockwire (27).
9 Install new gasket (25), four fiberglass sleeves (24), and drive end bell assembly (1 9). Replace studs (26) as
required.
10 Install four new gaskets (18), four flat washers (17), four new Iockwashers (16), and four nuts (15).
11 Install new gasket (23), seal cover (22), four new Iockwashers (21), and four screws (20).
12 Install drive end bell assembly (1 9), key (14), and impeller housing (13).
13 Install impeller (12) using fabricated removal/installation tool and install new Iockwasher (11) and nut (10).
14 Install impeller cover (9), inlet screen (8), four flat washers (7), and four screws (6).
15 Install four new Iockwashers (5) and four bolts (4).
16 Install four new brushes (3).
17 Install four new preformed packings (2) and four brush cap assemblies (1).
9-14
TM 9-2350-311-34-1
NOTE
FOLLOW-ON MAINTENANCE:
Install bilge pump (TM 9-2350-311-20-1)
9-15
TM 9-2350-311-34-1
9-3 DATA PLATES
This task covers:
a. Removal
b. Installation
Tools
General mechanic’s tool kit (item 14, Appx C)
a. Removal
NOTE
Vehicle data plates differ only with information shown on plate.
1 Remove four screws (1).
2 Remove data plate (2).
b. Installation
NOTE
Vehicle data plates differ only with information shown on plate.
1 Install data plate (2).
2 Install four screws (1).
9-16
TM 9-2350-311-34-1
CHAPTER 10
ENGINE AND BATTERY WINTERIZATION KIT
GENERAL
This chapter describes and illustrates procedures for installation of the winterization kit into the vehicle and disassembly
and assembly of specific winterization kit components.
CONTENTS
Section I
10-1
Section II
10-2
10-3
PAGE
WINTERIZATION KIT INSTALLATION.. . . . . . . . . . . . . . . . . . . . . . . . . . . . . . . . . . . . . . . . . . . . . ...10-2
WINTERIZATION KIT INSTALLATION. . . . . . . . . . . . . . . . . . . . . . . . . . . . . . . . . . . . . . . . . . . . . . ...10-2
WINTERIZATION KIT COMPONENTS. . . . . . . . . . . . . . . . . . . . . . . . . . . . . . . . . . . . . . . . . . . . . ...10-24
COOLANT HEATER . . . . . . . . . . . . . . . . . . . . . . . . . . . . . . . . . . . . . . . . . . . . . . . . . . . . . . . . . . . . .10-24
BLOWER MOTOR ASSEMBLY . . . . . . . . . . . . . . . . . . . . . . . . . . . . . . . . . . . . . . . . . . . . . . . . . . ...10-36
10-1
TM 9-2350-311-34-1
SECTION I. WINTERIZATION KIT INSTALLATION
10-1 WINTERIZATION KIT INSTALLATION
This task covers:
a. Installation
b. Bleeding Winterization System
INITIAL SETUP
Tools
General mechanic’s tool kit (item 14, Appx C)
Drill set (item 7, Appx C)
Portable drill (item 5, Appx C)
Suitable container
Trailer-mounted welding shop kit (item 24, Appx C)
References
TC 9-237
TM 9-2350-311-10
TM 9-2350-311-20-1
Cooling system drained (TM 9-2350-311-20-1)
10-2
TM 9-2350-311-34-1
LEGEND
1
2
3
4
5
6
7
8
Rear battery winterization box
Front battery winterization box
Heater exhaust outlet
Coolant outlet hose
Coolant heater assembly
Electric fuel pump
Fuel filter
Heater coolant pump
9 Engine coolant right manifold
10 Primary fuel filter-to-coolant heater fuel filter
hose
11 Primary fuel filter
12 Main fuel supply hose
13 Winterization kit control box
14 Coolant heater harness
15 Coolant inlet hose
a. Installation
1 Remove batteries and mounting components (TM 9-2350-311-20-1). Retain all parts for kit installation except
battery tray screws.
2 Move battery wiring harness (1) over hull slope plate (2) to allow clearance for installation of winterization kit
components.
3 Fold up front battery winterization box (3) and insert box through rear battery access opening (4). Locate box in
front battery access opening (5).
10-3
TM 9-2350-311-34-1
10-1 WINTERIZATION KIT INSTALLATION — CONTINUED
a. Installation — Continued
NOTE
Ensure bottom insulation cut-outs are alined with battery tray mounting blocks.
4 Fold up rear battery winterization box (6). Insert through front battery access opening (5) and locate box in rear
battery access opening (4).
NOTE
• Ensure box bottom cut-outs are alined with battery tray mounting blocks.
• Screw and Iockwasher were removed in step 1.
5 Attach front ground cable (7) to hull front plate with screw (8) and Iockwasher (9).
6 Unfold sides of front and rear winterization boxes (3 and 6) and insert six retainer wires (10) at comers.
7 Secure six straps (11) to rivets (12) with Iockwire (13).
8 Place grommets (14) (hidden) on battery heater (15) inlet and outlet tubes and install heater through front
battery access opening (5). Insert tube grommets in front winterization box (3) cut-outs.
NOTE
Screw and Iockwashers were removed in step 1. Four screws and 16 flat washers are
provided for shimming adjustment of tray to make it level. Use of shims should be kept
to minimum.
9 Install battery trays (16) and attach trays and battery heater (15) to sponsor with eight furnished screws (1 7)
and eight Iockwashers (18).
10-4
TM 9-2350-311-34-1
10-5
TM 9-2350-311-34-1
10-1 WINTERIZATION KIT INSTALLATION — CONTINUED
a Installation — Continued
10 Place four batteries on two battery trays with battery terminals positioned as shown below. Secure batteries
using mounting components (TM 9-2350-311-20-1).
11 Open transmission left and right access doors and air-intake grille. Install four shock mounts (19) and two
coolant heater mounting brackets (20) to hull front plate (21) with four lockwashers (22) and four nuts (23).
12 Cut 3.5 in. (8.9 cm) out of existing engine inlet coolant hose (24) at point midway between two coolant heater
mounting brackets (20). Discard hose section. Place two clamps (25) over two hose ends, insert “Y” tube (26)
as shown below, and tighten clamps.
id by 16-in. - (40.6-cm-) long hose (28). Install hose to
13 Place hose clamp (27) over end of 0.625-in. - (15.9-mm-)
.
"Y" tube (26) and tighten clamp
10-6
TM 9-2350-311-34-1
14 Place heater exhaust assembly (29) with hose clamp (30) in mounted position between coolant heater
mounting brackets (20).
15 Install inlet elbow (31) and outlet elbow (32) to coolant heater assembly (33).
16 Place hose clamp (34) over end of 0.625-in. - (1 5.9-mm-) id by 18-in. - (45.7-cm-) long hose (35). Install hose to
heater inlet elbow (31 ) and tighten clamp.
17 Place coolant heater assembly (33) in powerplant compartment as shown below. Connect heater exhaust
assembly (29) and install hose clamp (36) and screw (37).
10-7
TM 9-2350-311-34-1
10-1 WINTERIZATION KIT INSTALLATION — CONTINUED
a. Installation — Continued
18 Place coolant heater assembly (33) on two coolant heater mounting brackets (20) and clamp with four
retaining bands (38) and four screws (39).
19 Install four retaining bands (38), two screws (40), two Iockwashers (41), and two nuts (42).
20 Install exhaust tube end support bracket (43), three flat washers (44), and three screws (45) to three hull front
plate tapping blocks. Close transmission access door to position exhaust tube end. Open door and tighten
screws. Install gasket (46).
21 Place clamp (47) on free end of 16-in. (40.6-cm) hose (28), install hose on coolant heater outlet elbow (32),
and tighten clamp.
22 Remove heater exhaust cover (48), three screws (49), and three flat washers (50) from inside left transmission
access door (51). Lift cover and gasket (52) from outside surface of door.
23 Install exhaust outlet (53) to left transmission access door (51) and install three screws (49), three flat washers
(50), and gasket (52).
24 Install exhaust outlet plug (54) in exhaust outlet (53).
10-8
TM 9-2350-311-34-1
10-9
TM 9-2350-311-34-1
10-1 WINTERIZTION KIT INSTALLATION - CONTINUED
a. Installation — Continued
Plug must be removed from exhaust outlet before operating winterization kit to avoid
damaging vehicle.
25 Remove three screws (55) from engine coolant pump inlet adapter (56). Discard screws.
26 Position pump (57) and inlet adapter (56) against base bracket (58) so pump suppressor (59) is 30° forward
from vertical position (to clear hull front plate) and install three screws (60) and three Iockwashers (61).
27 Place cured bracket (62) over pump (57) and install curved bracket, two screws (63), two flat washers (64),
and two nuts (65) to base bracket (58).
NOTE
Lockwashers maybe installed on any two screws to ground pump on hull.
28 Install pump assembly (68), base bracket (58), four screws (67), two flat washers (68), and two Iockwashers
(69) to hull front plate (21).
29 Install hose clamp (70) to free end of 0.625-in. - (15.9-mm-) id by 18-in. - (45.7-cm-) long
— hose (35). Install hose
to coolant pump outlet (71) and tighten clamp. Cut hose as required.
10-10
TM 9-2350-311-34-1
30 Install elbow (72) and adapter (73) to fuel filter (74) inlet and outlet openings.
31 Install fuel filter (74) with elbow (72) and adapter (73) to bracket (75) with two screws (76), two flat washers
(77), and two nuts (78).
32 Install two adapters (79 and 80) and two nuts (81) to electric fuel pump outlet opening (83) and inlet opening
(82).
33 Install two shock mounts (84), two nuts (85), and two flat washers (86) to bracket (75). Install electric fuel pump
(87) and two nuts (88) to shock mounts and install Iockwasher (89) and flat washer (90) to secure pump and
ground strap (91 ). Install fuel tube (92) between elbow (72) and fuel pump body inlet adapter (80).
10-11
TM 9-2350-311-34-1
10-1 WINTERIZATION KIT INSTALLATION — CONTINUED
a. Installation — Continued
NOTE
Install Iockwasher between ground strap and screw head.
34 Install bracket (75) with fuel filter (74), electric fuel pump (87), and ground strap (91) to hull front plate (21)
using Iockwasher (93), flat washer (94), and two screws (95).
35 Remove plug from right engine coolant manifold (96) and install elbow (97).
36 Install hose clamp (98) to 0.625- in.- (1 5.9-mm-) id by 78-in. - (1.98-m-) long hose (99). Install hose to elbow
(97) and tighten clamp.
37 Install hose clamp (100) to 0.625-in. - (1 5.9-mm-) id by 60-in. - (1.52-m-) long coolant hose (101). Install hose to
engine coolant pump inlet adapter (56) and tighten clamp. Install engine primary fuel filter-to-coolant heater
fuel filter hose to filter inlet adapter (73).
NOTE
Secure hoses in steps 38 and 39 to transmission with strap material using
transmission screws and washers.
38 Place coolant manifold hose (99) along side and front of transmission and connect to battery heater inlet tube
(102). Trim hose to fit and install to heater inlet tube with hose clamp (103).
39 Place coolant hose (101) along front of transmission and connect to battery heater outlet tube (104). Trim hose
to fit and install to heater outlet tube with hose clamp (1 05).
10-12
TM 9-2350-311-34-1
10-13
TM 9-2350-311-34-1
10-1 WINTERIZATION KIT INSTALLATION — CONTINUED
a. Installation — Continued
40 Remove engine access door in driver’s compartment (TM 9-2350-311-20-1). Disconnect fuel main supply hose
at quick-disconnect coupling (106) on primary fuel filter (107).
41 Remove plug (108) on primary fuel filter top inlet opening and install elbow (109).
42 Place coolant heater fuel filter-to-primary fuel filter hose (110) along left side of powerplant compartment and
install to primary fuel filter inlet elbow (109).
43 Use screws, washers, and strap material to secure fuel hose (1 10) at three places on powerplant.
44 Install elbow (111) at heater fuel control valve (112) inlet opening. Connect fuel pump-to-fuel control valve tube
(113) to control valve inlet elbow and install at heater fuel pump inlet opening (82).
10-14
TM 9-2350-311-34-1
NOTE
Refer to TM 9-2350-311-20-1 for M109A2 vehicle procedure.
45 Connect fuel main supply hose (114) to primary filter quick-disconnect coupling (106). Install engine access
door in driver’s compartment.
46 Remove four screws (115) and four Iockwashers (116). Discard screws.
47 Remove four nuts (117) and gasket (118) covering opening in driver’s compartment bulkhead (119).
48 Install coolant heater harness (120) and coolant heater harness receptacle (121), four screws (122), four
Iockwashers (116), and four nuts (117).
10-15
TM 9-2350-311-34-1
10-1 WINTERIZATION KIT INSTALLATION — CONTINUED
a. Installation — Continued
49 Connect coolant heater harness plug (123) to heater receptacle (1 24).
50 Connect harness lead (125) connector to heater coolant pump. Support harness lead with right headlight group
support strap.
51 Connect harness lead (circuit 402C) (126) to electric fuel pump connector.
52 Remove mounting screw (127) from coolant heater mounting bracket (20) and install harness ground lead
(128).
53 Remove two screws (129) and remove cover (130) from winterization kit heater control box (131 ).
NOTE
Harness receptacle must face down. Reposition if necessary (para 10-2).
54 Remove two nuts (132) and two Iockwashers (133), place mounting bracket (134) on screws (135), and install
two nuts and two Iockwashers.
55 Install two screws (129) to cover (130).
56 Install mounting bracket (134), strap, control box (131), two flat washers (136), and two screws (137) to driver’s
compartment bulkhead tapping blocks (above engine compartment access door).
10-16
TM 9-2350-311-34-1
57 Connect control box-to-driver’s compartment harness plug (138) at control box receptacle (139). Connect
harness branch lead (140) to box lead connector (141).
58 Connect control box-to-driver’s compartment harness plug (142) to coolant heater harness receptacle (121 ) in
driver’s compartment bulkhead (119).
10-17
TM 9-2350-311-34-1
10-1 WINTERIZATION KIT INSTALLATION — CONTINUED
a. Installation — Continued
NOTE
• For vehicle circuitry incorporating the 3-position MASTER switch (one position
marked SLAVE), disconnect vehicle harness lead 459B at MASTER switch and
connect kit harness branch labeled 459B between MASTER switch and vehicle
harness lead 459B.
• Steps 59 thru 61 apply to vehicles with engine model 7083-7396. Steps 62 thru 64
apply to vehicles with engine model 7083-7391.
59 Disconnect existing lead 459B (143) at rear of portable instrument panel (144) MASTER switch (145) (TM 92350-311-20-1).
60 Connect branch lead 459B (146) of control box-to-driver’s compartment wiring harness (147) to rear of
MASTER switch (145).
61 Connect existing lead (143) to other lead of control box-to-driver’s compartment lead 459B (146) or existing
lead of 459B (143).
62 Disconnect bulkhead-to-portable instrument-panel wiring harness lead 486A (148) from GLOW PLUG switch
(153) behind driver’s instrument panel.
63 Connect winterization heater control box-to-driver’s compartment harness lead 400 (150) to bulkhead-toportable instrument panel wiring harness lead 486A (148).
64 Connect winterization heater control box-to-drivers compartment harness lead 400 (150) to GLOW PLUG
switch (149).
10-18
TM 9-2350-311-34-1
65 Install two battery jumper leads (151) on battery terminals and tighten lugs (152, 153, and 154).
66 Place grommet (155) over front battery ground lead (1 56), slide grommet over lead, and position in slot on front
battery winterization box.
67 Install front battery ground lead (156) on battery B negative terminal and tighten lug.
68 Place grommet (157) on master relay lead (158) and install lead. Install battery connector lead (circuit 81)
(159) on battery A positive terminal and tighten lug.
69 Install rear battery ground lead (160) on battery D negative terminal and tighten lug.
10-19
TM 9-2350-311-34-1
10-1 WINTERIZATION KIT INSTALLATION — CONTINUED
a. Installation — Continued
70 Slide rear insulation blanket (161) over batteries. Guide free end of rear battery ground lead (circuit 7) (160)
through grommet (162) in blanket and position rear of blanket under rear winterization box tab (163).
71 Place front insulation blanket (164) over batteries, position outer side of blanket under rear winterization box
side tab (165) and position slot on inner side of blanket over stud (166) on front box. Install flat washers (167)
and wing nut (168) to stud.
72 Install rear battery ground lead (circuit 7) (160) to bulkhead with two existing screws and two Iockwashers.
Reroute left headlight wiring harness (169) and place on top of two blankets (161 and 164).
73 Check plug (170) to ensure installation in petcock valve (171) of lower main coolant tube.
74 Bleed coolant system.
10-20
TM 9-2350-311-34-1
75 Place holddown strip (172) for intake grille tarpaulin (173) on grille to serve as template for screw holes. Mark
and remove strip. Drill and tap six 5/1 6-24 UNF-28 holes.
76 Locate 10 footman’s loop-type fasteners (1 74) and weld into place (TM 9-237).
77 Install intake grille tarpaulin (173) with straps (175) and webbing down. Install six 5/16-24 by 3/4-in. screws
(176) and flat washer (177) in holddown strip (172).
78 Secure intake grille tarpaulin (173) by installing straps (175) to 10 loop-type fasteners (174).
10-21
TM 9-2350-311-34-1
10-1 WINTERIZATION KIT INSTALLATION — CONTINUED
a. Installation — Continued
79 Place exhaust grille tarpaulin (178) holddown strip (179) on grille to serve as template. Locate hole at front of
grille and tap six 5/16-24 UNF-28 holes.
80 Locate five loop-type fasteners (180) and weld into position (TM 9-237).
81 Remove four screws (181), install exhaust grille tarpaulin (178) with straps (1 82) up and webbing down, and
install five screws (183) and five flat washers (184).
82 Secure exhaust grille tarpaulin (178) by attaching five straps (182) to five loop-type fasteners (180).
83 Before starting engine, unfasten five straps (182) to secure exhaust grille tarpaulin (178). Roil tarpaulin into
smallest possible tube form.
84 Secure with three webbing assemblies (185).
85 Unfasten 4, 6, 8, or 10 straps as required. Roil air intake grille tarpaulin (173) inward to smallest possible tube
and secure with 3 webbing assemblies (186).
Winterization kit installation is now complete; refer to TM9-2350-311 -10 for operating
instructions. Kit operation is intended to commence upon engine shutdown after
engine temperatures reach normal operating levels. Operation of this kit with engine
coolant temperatures less than 0°F (17.8°C) may result in failure of coolant heater.
b. Bleeding Winterization System
Coolant is hazardous waste and must be disposed of in accordance with local
procedures or direction of the local Hazardous Waste Management office.
1 Disconnect kit coolant hose at elbow on engine-bank right coolant manifold.
2 Temporarily plug elbow, place disconnected coolant hose end in suitable container, and fill radiator (TM 92350-311-10).
NOTE
Do not overdrain coolant system. Return drained coolant to radiator as required, then
continue air bleed procedure. Air bleed should always be performed after removal or
replacement of coolant heater or any coolant line.
3 Start engine and run for short period of time, observing flow of air and coolant out of disconnected hose.
Continuous flow of coolant without air bubbles indicates air bleed accomplished.
10-22
TM 9-2350-311-34-1
NOTE
FOLLOW-ON MAINTENANCE:
Refill cooling system (TM 9-2350-311-20-1)
10-23
TM 9-2350-311-34-1
SECTION Il. WINTERIZATION KIT COMPONENTS
10-2 COOLANT HEATER
This task covers:
a. Disassembly
b. Assembly
General mechanic’s tool kit (item 14, Appx C)
Riveter (item 18, Appx C)
Blind rivets (4) (item 75, Appx F)
Compression sleeve (item 72, Appx F)
Gasket (item 73, Appx F)
Gasket (item 82, Appx F)
Lockwasher (item 26, Appx F)
Lockwasher (item 30, Appx F)
Nuts (2) (item 76, Appx F)
Preformed packing (item 51, Appx F)
Preformed packing (item 52, Appx F)
Screws (4) (item 74, Appx F)
Screws (3) (item 88, Appx F)
Straps (3) (item 22, Appx F)
Engine coolant heater removed (TM 9-2350-311 -20-1 )
a. Disassembly
1
Remove four screws (1) and guard assembly (2).
2
Remove nut (3), tube (4), and two elbows (5 and 6).
3
Disconnect lead (7) from terminal strip (8).
4
Loosen four nuts (9).
5
Turn blower motor assembly (10) counterclockwise and pull off engine coolant heater assembly (11).
6
Remove four assembled screws (12) and receptacle (13) from bracket (14). Discard assembled screws.
7
Disconnect ground lead (15) from housing (16).
8
Disconnect lead (17) from restriction thermostat (18).
9
Disconnect lead (19) from overheat thermostat (20).
10 Disconnect two leads (21 and 22) from flame detector switch (23).
11 Remove three tiedown straps (24) from five receptacle leads (15, 17, 19, 21, and 22). Discard tiedown straps.
12 Remove sleeve (25) from five receptacle leads (15, 17, 19,21, and 22).
13 Remove receptacle (13) from engine coolant heater assembly (11 ).
14 Remove five screws (26) and three leads (27, 28, and 29) from flame detector switch (23).
10-24
TM 9-2350-311-34-1
10-25
TM 9-2350-311-34-1
10-2 COOLANT HEATER — CONTINUED
a. Disassembly — Continued
Use caution when removing compression sleeve from steel tube of flame detector
switch. Compression sleeve will normally be seated against probe. Failure to comply
will result in equipment damage.
15 Loosen nut (30) and remove flame detector switch (23).
16 Remove compression sleeve (31) and nut (30). Discard compression sleeve.
17 Disconnect two leads (32 and 33) from connector (34) on overheat thermostat (20).
18 Disconnect lead (35) from terminal strip (8).
19 Loosen nut (36).
20 Remove two screws (37) and fuel control valve (38) from bracket (39) and fuel tube (40).
21 Remove two screws (41) and bracket (39).
22 Disconnect lead (42) from overheat thermostat (20).
23 Remove nut (43), Iockwasher (44), and retainer (45). Discard Iockwasher.
24 Remove overheat thermostat (20), connector (34), flat washer (46), and preformed packing (47). Discard
preformed packing.
25 Loosen four nuts (48) and remove end plate (49).
26 Remove assembled screw (50), lead (51), and Iockwasher (52) from igniter (53). Discard assembled screw
and Iockwasher.
27 Remove two nuts (54) and preheat resistor (55).
28 Remove igniter (53) and gasket (56). Discard gasket.
29 Remove two screws (57).
30 Leave flange (58) loose on fuel tube (40) and remove tapping plate (59).
31 Remove two assembled screws (60), two nuts (61), and cable (62). Discard assembled screws.
32 Remove fuel tube (40) and resistor (55) as an assembly.
10-26
TM 9-2350-311-34-1
10-27
TM 9-2350-311-34-1
10-2 COOLANT HEATER — CONTINUED
a. Disassembly — Continued
Compression sleeve is to be removed only if resistor requires replacement.
Compression fitting is pressed securely to fuel tube and must be cut or ground off.
NOTE
Compression sleeve must be removed before removing resistor from fuel tube.
33 Remove union (63), compression sleeve (64), nut (36), resistor (55), and flange (58). Discard compression
sleeve.
34 Remove two nuts (65), two clamps (66), and two hook bolts (67), securing burner assembly (68) to heat
exchanger (69).
35 Remove burner assembly (68), preformed packing (70), and gasket (71). Discard preformed packing and
gasket.
36 Remove four screws (72) and bracket (14).
NOTE
Note direction of arrow on diode to ensure proper positioning during assembly.
37 Remove diode (73) from diode holder (74).
38 Remove two screws (75 and 76) and diode holder (74).
39 Remove four screws (77), terminal strip (8), and marker strip (78).
40 Remove nut (79) and bracket (80) with resistor motor (81) attached.
41 Remove nut (82), screw (83), and resistor motor (81).
42 Remove two assembled nuts (84), two flat washers (85), restriction thermostat (1 8), and two spacers (86).
Discard nuts.
43 Remove three screws (87).
44 Spread housing (16) and remove heat exchanger (69).
10-28
TM 9-2350-311-34-1
10-29
TM 9-2350-311-34-1
10-2 COOLANT HEATER — CONTINUED
a. Disassembly — Continued
NOTE
Perform step 45 only if nameplate requires replacement.
45 Remove four blind rivets (88) and nameplate (89). Discard blind rivets.
46 Install two grommets (90).
b. Assembly
1 Install two grommets (90).
2 Install nameplate (89) and four new blind rivets (88) (if removed).
3 Spread housing (16) open and install heat exchanger (69).
4 Install three screws (87).
5 Install two spacers (86), restriction thermostat (18), two flat washers (85), and two new assembled nuts (84).
6 Install resistor motor (81), screw (83), and nut (82).
7 Install bracket (80) with resistor motor (81) and nut (79) to bracket (14).
8 Install marker strip (78), terminal strip (8), and four screws (77).
9 Install diode holder (74) and two screws (75 and 76).
NOTE
Check direction of arrow on diode to ensure proper positioning.
10 Install diode (73) to diode holder (74).
11 Install bracket (14) and four screws (72).
10-30
TM 9-2350-311-34-1
12 Install burner assembly (68), new preformed packing (70), and new gasket (71) to heat exchanger (69).
13 Install two clamps (66), two nuts (65), and two hook bolts (67) to secure burner assembly (68).
14 Install flange (58), preheat resistor (55), nut (36), new compression sleeve (64), and union (63) to fuel tube
(40).
10-31
TM 9-2350-311-34-1
10-2 COOLANT HEATER — CONTINUED
a. Assembly — Continued
15 Install fuel tube (40) and resistor (55) as an assembly.
16 Install cable (62) to resistor (55) with two new assembled screws (60) and two nuts (61).
17 Install tapping plate (59).
18 Install two screws (57) to tapping plate (59).
19 Install igniter (53) and new gasket (56).
20 Install preheat resistor (55) to igniter (53) with two nuts (54).
21 Install lead (51) to igniter (53) with new assembled screw (50) and new Iockwasher (52).
22 Install end plate (49) and four nuts (48).
23 Install new preformed packing (47), flat washer (46), connector (34), and overheat thermostat (20).
24 Install retainer (45), new Iockwasher (44), and nut (43).
25 Install lead (42) to overheat thermostat (20).
26 Install bracket (39) and two screws (41).
27 Install fuel control valve (38) and two screws (37) to bracket (39) and fuel tube (40).
28 Tighten nut (36).
29 Install lead (35) to terminal strip (8).
30 Install two leads (32 and 33) to connector (34) on overheat thermostat (20).
31 Install nut (30) and new compression sleeve (31).
32 Install flame detector switch (23) and tighten nut (30).
10-32
TM 9-2350-311-34-1
10-33
TM 9-2350-311-34-1
10-2 COOLANT HEATER — CONTINUED
a. Assembly — Continued
33 Install three leads (27, 28, and 29) and five screws (26).
34 Position receptacle (13) on engine coolant heater assembly (11) and install sleeve (25) over five receptacle
leads (15, 17, 19, 21, and 22).
35 Connect leads (21 and 22) to flame detector switch (23).
36 Connect lead (19) to overheat thermostat (20).
37 Connect lead (17) to restriction thermostat (18).
38 Connect ground lead (15) to engine coolant heater assembly (11 ).
39 Install receptacle (13) and four new assembled screws (12) to bracket (14).
40 Install three new tiedown straps (24) to secure five receptacle leads (15, 17, 19, 21, and 22).
41 Position blower motor assembly (10) on engine coolant heater assembly (11 ) and turn clockwise until secured
in slots of heater assembly.
42 Tighten four nuts (9).
43 Connect lead (7) to terminal strip (8).
44 Install tube (4), two elbows (5 and 6), and nut (3).
45 Install guard assembly (2) and four screws (1).
10-34
TM 9-2350-311-34-1
NOTE
FOLLOW-ON MAINTENANCE:
Install engine coolant heater
(TM 9-2350-311-20-1)
10-35
TM 9-2350-311-34-1
10-3 BLOWER MOTOR ASSEMBLY
This task covers:
a. Removal
b. Installation
General mechanic’s tool kit (item 14, Appx C)
a. Removal
1 Loosen four nuts (1).
2 Turn blower motor assembly (2) counterclockwise to clear bayonet slots (3) and pull straight off coolant heater
body (4).
b. Installation
1 Install blower motor assembly (2) straight onto coolant heater body (4). Turn assembly clockwise to secure
position.
2 Tighten four nuts (1).
10-36
TM 9-2350-311 -34-1
APPENDIX A
REFERENCES
GENERAL
This appendix provides a list of regulations, pamphlets, forms, manuals, bulletins, and circulars referenced in this
manual. Appropriate indexes should be consulted frequently for latest applicable changes, revisions, and additions.
CONTENTS
A-1
A-2
A-3
A-4
A-5
A-6
A-7
A-8
PAGE
ARMY REGULATIONS . . . . . . . . . . . . . . . . . . . . . . . . . . . . . . . . . . . . . . . . . . . . . . . . . . . . . . . . . . . . .. A-2
DEPARTMENT
OF
THE
ARMY
PAMPHLETS.
. . . . . . . .. A-2
DEPARTMENT OF THE ARMY FORMS. . . . . . . . . . . . . . . . . . . . . . . . . . . . . . . . . . . . . . . . . . . . . . .. A-2
FIELD MANUALS . . . . . . . . . . . . . . . . . .
. . . . . . . . . . . . . .. A-2
STANDARD FORMS . . . . . . . . . . . . . . . . . . . . . . . . . . . . . . . . . . . . . . . . . . . . . . . . . . . . . . . . . . . . . . ..A-2
TECHNICAL BULLETINS . . . . . . . . . . . . . . . . . . . . . . . . . . . . . . . . . . . . . . . . . . . . . . . . . . . . . . . . . . ..A-2
TECHNICAL MANUALS . . . . . . . . . . . . . . . . . . . . . . . . . . . . . . . . . . . . . . . . . . . . . . . . . . . . . . . . . . . ..A-2
TRAINING CIRCULARS . . . . . . . . . . . . . . . . . . . . . . . . . . . . . . . . . . . . . . . . . . . . . . . . . . . . . . . . . . . ..A-4
. . . . . . . . . . . . . . . . . . . . . . . . . . . . . . . . . .
. . . . . . . . . . . . . . . . . . . . . . . . . . . . . . . . .
A-1
TM 9-2350-311-34-1
A-1 ARMY REGULATIONS
Accident Reporting and Records . . . . . . . . . . . . . . . . . . . . . . . . . . . . . . . . . . . . . . . . . . . .. AR 385-40
Malfunctions Involving Ammunition and Explosives . . . . . . . . . . . . . . . . . . . . . . . . . . . . . . . AR 75-1
Army Logistics Readiness and Sustainability. . . . . . . . . . . . . . . . . . . . . . . . . . . . . . . . . . ..AR 700-138
A-2 DEPARTMENT OF THE ARMY FORMS
Recommended Changes to Publications . . . . . . . . . . . . . . . . . . . . . . . . . . . . . . . . . . . . . ..DA FORM 2028
Recommended Changes to Equipment Technical Manuals . . . . . . . . . . . . . . . . . . . . . . . ..DA FORM 2028-2
Accident Report . . . . . . . . . . . . . . . . . . . . . . . . . . . . . . . . . . . . . . . . . . . . . . . . . . . . . . . . ..DA FORM 285
A-3 DEPARTMENT OF THE ARMY PAMPHLETS
The Army Maintenance Management System (TAMES) . . . . . . . . . . . . . . . . . . . . . . . . . ..DA PAM 738-750
Functional Users Manual for The Army Maintenance Management System —Aviation
(TAMMS-A) . . . . . . . . . . . . . . . . . . . . . . . . . . . . . . . . . . . . . . . . . . . . . . . . . . . . . . . . . .. DA PAM 738-751
Charging System Troubleshooting . . . . . . . . . . . . . . . . . . . . . . . . . . . . . . . . . . . . . . . . . . .. DA PAM 750-33
A-4 FIELD MANUALS
First Aid for Soldiers . . . . . . . . . . . . . . . . . . . . . . . . . . . . . . . . . . . . . . . . . . . . . . . . . . . . . ..FM 21-11
A-5 STANDARD FORMS
Product Quality Deficiency Report. . . . . . . . . . . . . . . . . . . . . . . . . . . . . . . . . . . . . . . . . . ..SF 368
A-6 TECHNICAL BULLETINS
Solder and Soldering . . . . . . . . . . . . . . . . . . . . . . . . . . . . . . . . . . . . . . . . . . . . . . . . . . . . ..TB SIG 222
A-7 TECHNICAL MANUALS
Procedures for Destruction of Tank-Automotive Equipment to Prevent Enemy Use..... .TM 750-244-6
Cooling Systems: Tactical Vehicles . . . . . . . . . . . . . . . . . . . . . . . . . . . . . . . . . . . . . . . . . ..TM 750-254
inspection, Care, and Maintenance of Anti-Friction Bearings . . . . . . . . . . . . . . . . . . . . . ..TM 9-214
A-2
TM 9-2350-311-34-1
Operator’s Manual: Howitzer, Self-Propelled: 155MM, M109A2 (2350-01 -031 -0686),
M109A3 (2350-01 -031 -8851), M109A4 (2350-01-277-5770), and M109A5
(2350-01-281-1719) . . . . . . . . . . . . . . . . . . . . . . . . . . . . . . . . . . . . . . . . . . . . . . . . . . .. TM 9-2350-311-10
Organizational Maintenance Manual for Hull, Powerplant, Drive Controls, Tracks,
Suspension and Associated Components. Howitzer, Medium, Self-Propelled
155MM, M109A2 (2350-01-031-0586), M109A3 (2350-01 -031 -8851),
M109A4 (2350-01-227-5770), and M109A5 (2350-01-281-171 9) . . . . . . . . . . . . . . . . . TM 9-2350-311 -20-1
Organizational Maintenance Manual for Cab, Armament, Sighting and Fire Control,
Elevating and Traversing Systems and Associated Components Used on Howitzer,
Medium, Self-Propelled: 155MM, M109A2 (2350-01-031-0586), M109A3
(2350-01-031-8851 ), M109A4 (2350-01 -277-5770), and MI09A5
TM 9-2350-311-20-2
(2350-01-281-1719) . . . .
Organizational, Direct Support and General Support Maintenance Repair Parts and Special
Tools Lists: Howitzer, Medium, Self-Propelled: 155MM, M109A2 (2350-01-031-0586),
Ml 09A3 (2350-01-031 -8851), Ml 09A4 (2350-01-277-5770), and Ml 09A5
TM 9-2350-311-24P-1
(2350-01 -281-1719)
Materials Used for Cleaning, Preserving, Abrading, and Cementing Ordnance
Materiel; and Related Materials Including Chemicals . . . . . . . . . . . . . . . . . . . . . . . . . . TM 9-247
Direct Support and General Support Maintenance Repair Parts and Special Tools List
(Including Depot Maintenance Repair Parts and Special Tools) for Powertrain
Assembly (8351 100) (Allison Model XTG 411-2A) Composed of: Transfer
Assembly, Transmission Input (NSN 2520-00-9535); Transmission Assembly
(NSN 2520-00-894-9533); Drive Assembly, Transmission Output, Vehicle Left
(NSN 2520-00-894-9534) and Drive Assembly, Transmission Output, Vehicle Right
(NSN 2520-00-894-9532) . . . . . . . . . . . . . . . . . . . . . . . . . . . . . . . . . . . . . . . . . . . . . . ..TM 9-2520-234-34P
Field and Depot Maintenance Manual for Powertrain Assembly (8351100)
(Allison Model XTG-411 -2A). Composed of: Transfer Assembly, Transmission
Input (NSN 2520-00-9535); Transmission Assembly (NSN 2520-00-894-9533); Drive
Assembly, Transmission Output, Vehicle Left (NSN 2520-00-894-9534) and Drive
Assembly, Transmission Output, Vehicle Right (NSN 2520-00-894-9532) . . . . . . . . . . TM 9-2520-234-35
General Maintenance Procedures for Fire Control Materiel . . . . . . . . . . . . . . . . . . . . . . . . TM 9-254
Organizational, Direct Support, and General Support Maintenance Manual
(Including Repair Parts and Special Tools Lists) for Combat Vehicle Personnel
Heaters. Hupp MF 510A, Multi-Fuel, 6000 BTU, NSN 2540-00-930-8938.
Hupp MF 510B, Multi-Fuel, 6000 BTU, NSN 2540-01-071-0652. Stewart
Warner 10560C. Multi-Fuel, 6000 BTU, NSN 2540-01-083-0691. Stewart
Warner 10560M, Multi-Fuel, 6000 BTU, NSN 2540-01-071-0651. Stewart
Warner 8460-C24, Multi-Fuel, 2540-00-854-4449, ESPAR Products V7S,
Diesel,40,000 BTU, NSN 2540-01-114-7688 . . . . . . . . . . . . . . . . . . . . . . . . . . . . . . .. TM 9-2540-205-24&P
Unit Maintenance, Direct Support and General Support Maintenance Repair Parts
and Special Tools List (Including Depot Maintenance Repair Parts and Special
Tools List). 8V71 T Engines: Model 7083-7391 (2815-01-335-4579); Model
7083-7395 (281 5-01-260-0211 and 2815-01-043-7092); Model 7083-7396
(2815-01-040-3120 and 2815-01 -260-0212); Model 7083-7398 (281 5-00936-7659); and Model 7083-7399 (2815-00-1 34-4845). . . . . . . . . . . . . . . . . . . . . . . . . TM 9-2815-202-24P
Direct Support and General Support Maintenance for Engine, Diesel with Container
7083-7391 (NSN 2815-01-3354579) Engine, Diesel with Container Model 70837395 (NSN 2815-01 -043-7092) (NSN 2815-01-260-0211) Engine, Diesel with
Container Model 7083-7396 (NSN 2815-01-040-3120) (NSN 2815-01-260-0212)
Engine, Diesel with Container Model 7083-7398 (NSN 2815-01-936-7695) Engine,
Diesel with Container Model 7083-7399 (NSN 2815-00-134-4845). . . . . . . . . . . . . . . . TM 9-2815-202-34
A-3
TM 9-2350-311-34-1
A-7 TECHNICAL MANUALS — CONTINUED
Direct Support and General Support Maintenance Manual: Generator, Engine
Accessory, AC, Prestolite Model AMA-510-2UT (FSN 2920-909-2483);
Leece-Neville Models 3002AC and 3002AD (2920-475-1446), 2184AC
(2920-782-1 955), and 5300GP (2920-818-8635), and Regulator,
Generator Leece-Neville Model 3392R12P (2920-540-9476) . . . . . . . . . . . . . . . . . . . TM 9-2920-225-34
Direct Support Maintenance Manual Including Repair Parts and Special Tools List
Alternator, 180 Amperes, Model 5520AB. . . . . . . . . . . . . . . . . . . . . . . . . . . . . . . . . . . TM 9-2920-258-30&P
Direct Support, General Support, and Depot Maintenance (Including Repair Parts)
for Starter, Engine, Electric, Assembly (NSN 2920-00-226-6545) (Delco-Remy
Model 1113943) (Military PN 10911018-1); (NSN 2920-00-911-5937) (DelcoRemy Model 11 13904) (Military PN 10911018); (NSN 2920-00-912-9510)
(Delco-Remy Model 1113944) . . . . . . . . . . . . . . . . . . . . . . . . . . . . . . . . . . . . . . . . . . . TM 9-2920-242-35
Direct Support and General Support Maintenance Manual (Including RPSTL)
for Starter, Engine, Electric Assembly (Leece-Neville M0017072MB)
(NSN 2920-00-267-9987) . . . . . . . . . . . . . . . . . . . . . . . . . . . . . . . . . . . . . . . ... . . . . ..TM 9-2920-243-34
Direct Support, General Support, and Depot Maintenance (Including Repair Parts)
for Starter, Engine, Electrical Assembly (NSN 2920-00-999-8216) (Prestolite
Model MFY6101IUT) . . . . . . . . . . . . . . . . . . . . . . . . . . . . . . . . . . . . . . . . . . . . . . . . . . .TM9-2920-243-35
Operator and Organizational Maintenance Manual Including Repair Parts and Special
Tools Lists and Simplified Test Equipment for Internal Combustion Engines
(STE/lCE) . . . . . . . . . . . . . . . . . . . . . . .
TM 9-4910-571-12&P
Operator’s, Organizational, Direct Support and General Support Maintenance
Manual for Lead-Acid Storage Batteries. . . . . . . . . . . . . . . . . . . . . . . . . . . . . . . . . . . . .. TM9-6140-200-14
●
A-8 TRAINING CIRCULARS
Operator’s Manual, Welding Theory, Etc . . . . . . . . . . . . . . . . . . . . . . . . . . . . . . . . . . . . . .. TC 9-237
A-4
TM 9-2350-311-34-1
APPENDIX B
EXPENDABLE AND DURABLE ITEMS LIST
General
This appendix lists expendable supplies and materials you will need to maintain the M109A2/M109A3/M109A4/M109A5
Howitzer.
CONTENTS
Section I
B-1
B-2
Section ll
PAGE
INTRODUCTION . . . . . . . . . . . . . . . . . . . . . . . . . . . . . . . . . . . . . . . . . . . . . . . . . . . . . . . . . . . . . . . . . B-2
SCOPE . . . . . . . . . . . . . . . . . . . . . . . . . . . . . . . . . . . . . . . . . . . . . . . . . . . . . . . . . . . . . . . . . . . . . . . . B-2
EXPLANATION OF COLUMNS . . . . . . . . . . . . . . . . . . . . . . . . . . . . . . . . . . . . . . . ...... B-2
EXPENDABLE AND DURABLE ITEMS LIST . . . . . . . . . . . . . . . . . . . . . . . . . . . . . . . . . . . . . . . . . . . B-3
B-1
TM 9-2350-311-34-1
SECTION I. INTRODUCTION
B-1 SCOPE
This appendix lists expendable and durable items needed to maintain the M109A2/M109A3/M109A4/M109A5
Howitzers. These items are authorized to you by CTA 50-970, Expendable Items (Except Medical, Class V, Repair
Parts, and Heraldic Items).
B-2 EXPLANATION OF COLUMNS
a. Column (1) — ITEM NO.
This number is assigned to the entry in the list and is referenced to identify the material, e.g., “Acetone (item 1, Appx B).”
b. Column (2) — LEVEL
This column identifies the lowest level of maintenance that requires the listed items:
C — Operator/crew
O — Unit maintenance
F — Direct support maintenance
H — General support maintenance
c. Column (3) — NATIONAL STOCK NUMBER
This is the national stock number assigned to the item; use it to requisition the item.
d. Column (4) — DESCRIPTION
Indicates the Federal item name and, if required, a description to identify the item. The last line for each item provides
the Commercial and Government Entity Code (CAGEC) in parentheses followed by the PN.
e. Column (5) — UNIT OF MEASURE (U/M)
Indicates the measure used in performing the actual maintenance function. This measure is expressed by a twocharacter alphabetical abbreviation (e.g., EA, IN, PR). If the unit of measure differs from the unit of issue, as shown in
the Army Master Data File (AMDF), requisition the lowest unit of issue that will satisfy your requirements.
Abbreviation
Unit
Abbreviation
Unit
Abbreviation
Unit
BT
CN
EA
GL
bottle
can
each
gallon
KT
OZ
PG
PT
kit
ounce
package
pint
RO
SH
TU
roll
sheet
tube
B-2
TM 9-2350-311-34-1
SECTION Il. EXPENDABLE AND DURABLE ITEMS LIST
(1)
(2)
(3)
(4)
(5)
ITEM
NO.
LEVEL
NATIONAL STOCK NUMBER
DESCRIPTION
U/M
1
6810-00-184-4796
Acetone, technical, 5 gal (19 L) can:
(81348) O-A-51
CN
2
8040-00-664-4318
Adhesive, rubber based, general purpose,
type II,1 pt (0.47 L) can:
(81348) MMM-A-1617
PT
3
8040-00-701-9546
Adhesive, 1 oz (30 mL) primer-bottle, 4.7
oz (139 mL) adhesive-tube:
(81349) MIL-A46106
KT
4
8105-00-2998532
Bag, plastic, 100 each box:
(81348) PP-B-26
EA
5
8115-00-190-5020
Box, shipping, 10 each bundle:
(81348) PPP-B-636
EA
6
8010-01-313-8700
Coating, epoxy, VOC compliant, white,
(CARC), 1 qt (0.9 L) each component
(81349) MIL-C-22750
KT
7
6850-00-281-3061
Dry-cleaning solvent, 4 oz (118 mL) can:
(81348) P-D-680
CN
8
6515-01-150-2977
6515-01-150-2978
6515-01-150-2976
Gloves, patient, exam; package of 100
(89875):
size large, E —011
size medium, E —012
size small, E —010
PG
PG
PG
9
9150-00-935-1017
Grease, automotive artillery, 14 oz (414
mL) cartridge:
(81349) MIL-G-10924
OZ
10
6850-00-003-1194
Lubricant, cleaning:
(81349) MIL-C-83360
CN
11
6810-00-223-9069
Naphtha, aromatic,1 gal (3.8 L) can:
(81348) lT-N-97C
GL
12
5350-00-598-5537
Paper, abrasive, type i, size fine:
(80244) A-A-1202
SH
13
8010-00-551-0128
Pigment, iron-blue, 2 oz (59 mL) tube:
(81348) TT-P-381
TU
B-3
TM 9-2350-311-34-1
(1)
(2)
(3)
(4)
(5)
ITEM
NO.
LEVEL
NATIONAL STOCK NUMBER
DESCRIPTION
U/M
14
8010-01-309-0328
Primer, epoxy coating (CARC), component A, 1 gal (3.8 L); component B, 1 qt
KT
(0.9 L) kit:
(81349) MIL-P-53022
15
8010-01-193-0520
Primer, epoxy coating (CARC), component A; 1 gal (3.8 L); component B, 1 qt
(0.9 L):
(81349) MIL-P-53030
KT
16
2901-00-078-4065
Repair kit, plastic, fuel tank:
(19207) 10941900
EA
17
2901-00-078-4065
Repair kit, plastic, fuel tank, (for holes larger than one in.):
(19207) 10941900
EA
18
8040-01-108-6660
Repair kit, plastic, fuel tank (for holes
smaller than one in.):
(19207) 900M-195
EA
19
8050-00-551-1059
Sealing compound, 3 oz (89 mL) can:
(81349) MIL-S-45180
OZ
20
8030-00-935-7100
Sealing compound, locking and retaining,
single component, 50 cu cm (3.1 cu in.)
bottle:
(81349) MIL-S-22473
BT
21
6850-01-137-8525
Silicone compound, heat sink, 2 oz (59
mL) jar:
(81348) MIL-C-47113
OZ
22
6850-01-304-6632
Silicone compound, 8 oz (237 mL) tube:
(96906) MIL-S-8660
OZ
23
3439-01-150-1051
Solder, rosin core, 1 lb (0.5 kg) roll:
RO
(17794) 1243-0001
24
3439-00-220-3827
Solder flux, 1 pt (0.47 L) bottle:
MIL-F-14256
BT
25
5970-00-816-6056
Tape insulation, electrical, pressure-sensitive adhesive, black, 108 ft (33 m) roll:
(81348) HH-I-111
RO
26
7510-01-146-7767
Tape, pressure-sensitive, 60 yd (54.9 m)
roll:
(81348) PPP-T-60
RO
27
2520-01-373-2760
Transmission trunnion cap replacement
kit:
(19207) 57K0984
KT
B-4
TM 9-2350-311-34-1
APPENDIX C
TOOL IDENTIFICATION LIST
GENERAL
This appendix lists tools and equipment you will need to maintain the M109A2/M109A3/M109A4/M109A5 Howitzer.
CONTENTS
C-1
C-2
PAGE
EXPLANATION OF COLUMNS . . . . . . . . . . . . . . . . . . . . . . . . . . . . . . . . . . . . . . . . . . . . . . . . . . . . . C-2
TOOL IDENTIFICATION LIST . . . . . . . . . . . . . . . . . . . . . . . . . . . . . . . . . . . . . . . . . . . . . . . . . . . . . C-3
C-1
TM 9-2350-311-34-1
C-1 EXPLANATION OF COLUMNS
a. Column (1) — ITEM NO.
This number is assigned to the entry in the listing and is referenced in the initial setup of procedures to identify the tool.
b. Column (2) — NOMENCLATURE
Indicates the Federal item name.
c. Column (3) — NATIONAL STOCK NUMBER
Indicates the national stock number assigned to the tool.
d. Column (4) — PN
Indicates the manufacturer’s PN for the tool.
e. Column (5) — REFERENCE
Indicates the reference source where more detailed item information is located.
C-2
TM 9-2350-311-34-1
C-2 TOOL IDENTIFICATION LIST
(2)
NOMENCLATURE
(1)
ITEM
NO.
(3)
NATIONAL STOCK
NUMBER
(4)
PN
(5)
REFERENCE
1
Adapter
4730-00-266-0541
MS39158-7
TM 9-2350-311-24P
2
Calipers, vernier
5210-00-234-8017
GGG-C-111
GSA Supply Catalog
3
Blocks, support
5510-00-274-5381
MM-L-736
4
Dial indicator
5210-00-277-840
196A
SC 3470-95-A02
5
Drill
5130-00-889-9004
WD0061
SC 4910-95-CL-A74
6
Drill bit
5133-00-189-9324
10034
GSA Supply Catalog
7
Drill set, twist
5133-00-293-0983
GGG-D-751
SC 4910-95-CL-A74
8
Extension, fuel hose
4720-00-080-8586
8708306
TM 9-2350-311-24P-1
9
File, fine-mill
5110-00-203-4645
TEAX1FK
SC 4910-95-CL-A72
10
Growler
6625-00-828-5810
TS965U
SC 4940-95-CL-B20
11
Gun, soldering
3439-00-618-6623
D550-3
SC 4910-95-CL-A72
12
Hammer, 1 lb
5120-00-061-8543
GGG-H-86
SC 5180-90-N26
13
Hammer, 3 lb
5120-00-900-6103
A-A-1292
SC 5180-90-N26
14
General mechanic’s tool kit
15
Micrometer, depth
5210-00-542-4602
1JA1651H05
GSA Supply Catalog
16
Multimeter
6625-01-139-2512
T00377
SC 4910-95-CL-A72
17
Lathe, engine
3416-01-030-8195
1334-MIL
SC 3416-01-030-8195
18
Riveter, hand-held
5120-00-017-2849
200
SC 4910-95-CL-A74
19
Socket
5120-01-255-8232
12268253
TM 9-2350-311-24P
20
Socket wrench set
5120-00-322-6231
21
Sling, multiple leg lifting
3940-01-977-7389
10930560
TM 9-2350-311-24P
22
Sling, lifting
3940-00-675-5003
PD101-96
TM 9-2350-311-24P
23
Stone, sharpening
5345-00-198-8050
SS-S-736
GSA Supply Catalog
24
Welding shop kit, trailer-mounted
3431-01-090-1231
S04M2
SC 3431-95-A04
25
Wrench, prong
5120-00-034-0867
109141193
TM 9-2350-311-24P-1
26
Wrench, torque
5120-00-221-7983
SW130-301
SC 4910-95-CL-A72
27
Wrench, torque
5120-00-853-4538
F200I
SC 4910-95-CL-A72
28
Wrench, torque
5120-00-640-6364
1753LDF
SC 4910-95-CL-A72
SC 5180-90-N26
GSA Supply Catalog
C-3/(C4 blank)
TM 9-2350-311-34-1
APPENDIX D
ILLUSTRATED LIST OF MANUFACTURED ITEMS
GENERAL
This appendix includes complete instructions for making items authorized to be manufactured or fabricated at direct
support and general support maintenance levels. All bulk materials needed for manufacture of an item are listed on the
illustration. An index in alphanum eric order is provided for cross-referencing the item to be manufactured to the figure
that covers fabrication criteria.
ITEM NO. NOMENCLATURE
1
FIGURE NO
2
3
4
FAN DRIVE FABRICATED BRACKET . . . . . . . . . . . . . . . . . . . . . . . . . . . . . . . . . . . . . . . . . . . . . . . . ...1
FINAL DRIVE FABRICATED STAND . . . . . . . . . . . . . . . . . . . . . . . . . . . . . . . . . . . . . . . . . . . . . 2
FABRICATED PAD . . . . . . . . . . . . . . . . . . . . . . . . . . . . . . . . . . . . . . . . . . . . . . . . . . . . . . . . . . . . . . . ...3
FABRICATED REMOVAL/INSTALLATION TOOL. . . . . . . . . . . . . . . . . . . . . . . . . . . . . . . . . . . . . . . ...4
5
VANEAXIAL FAN GEAR BOX FABRICATED MEASURING BAR
5
D-1
TM 9-2350-311-34-1
ITEM 1 FAN DRIVE FABRICATED BRACKET
Material
0.75- by 0.080-in. (19.1-by 2.03-mm) steel
Fabricate bracket from steel according to specifications below.
Figure 1
D-2
TM 9-2350-311-34-1
ITEM 2 FINAL DRIVE FABRICATED STAND
Material
Old sprocket hub (NSN 2520-00-066-0239; PN 19207)
0.125- by 2.5-in. (3.2-by 64-mm) flat steel
1 Fabricate rack from steel to support weight of final drive.
2 Ensure final drive fits comfortably in rack. Bolt rack to upper ring or weld rack to hub (TM 9-237).
3 Before using stand, bolt stand securely to floor through lower ring.
Figure 2
D-3
TM 9-2350-311-34-1
ITEM 3 FABRICATED PAD
Material
0.5-in. (13-mm) thick thermal glass fiber felt insulation (type II; MIL-I-16411)
Glass cloth (type I; class 9; MIL-C-20079)
Fibrous glass cord (type SR-4-5; MIL-I-3158)
1
2
Fabricate pad according to specifications below.
Stitch with
fibrous glass cord as required to maintain shape.
Figure 3
D-4
TM 9-2350-311-34-1
ITEM 4 FABRICATED REMOVAL/INSTALLATION TOOL
Material
0.125- by 0.69-in. (3.2-by 17.5-mm) steel
Fabricate removal/installation tool from steel according to specifications below.
Figure 4
ITEM 5 VANEAXIAL FAN GEAR BOX FABRICATED MEASURING BAR
Material
0.125- by 0.75-in. (3.2-by 19.1-mm) steel
Fabricate measuring bar from steel according to specifications below.
Figure 5
D-5/(D-6 blank)
TM 9-2350-311-34-1
APPENDIX E
TORQUE LIMITS
GENERAL
This appendix provides general wet torque limits for screws used on the M109A2/M109A3/M109A4/M109A5 Howitzer.
Specific torque limits are indicated in the maintenance procedures for applicable components. The general torque limits
given in this appendix shall be used when specific torque limits are not provided in the maintenance procedure.
These general torque limits cannot be applied to screws that retain rubber components; the rubber components will be
damaged before the correct torque limit is reached. If a specific torque limit is not provided for screws that contain rubber
components in the maintenance procedure, tighten the screw or nut until it touches the metal bracket, then tighten it 1
more turn.
This appendix also provides information on tightening metal fasteners, fastener size and thread pattern, and fastener
grade.
PAGE
CONTENTS
TORQUE LIMITS . . . . . . . . . . . . . . . . . . . . . . . . . . . . . . . . . . . . . . . . . . . . . . . . . . . . . . . . . . . . . . . . E-2
E-1
E-2
HOW TO USE TORQUE TABLE . . . . . . . . . . . . . . . . . . . . . . . . . . . . . . . . . . . . . . . . . . . . . . . . . . . . E-2
E-3
TIGHTENING METAL FASTENERS . . . . . . . . . . . . . . . . . . . . . . . . . . . . . . . . . . . . . . . . . . . . . . . . . . E-4
E-4
FASTENER SIZE AND THREAD PATTERN . . . . . . . . . . . . . . . . . . . . . . . . . . . . . . . . . . . . . . . . . . . .. E-4
E-5
FASTENER GRADE . . . . . . . . . . . . . . . . . . . . . . . . . . . . . . . . . . . . . . . . . . . . . . . . . . . . . . . . . . . . . . E-5
E-1
TM 9-2350-311-34-1
E-1 TORQUE LIMITS
Table E-1 lists wet torque limits. Wet torque limits are used on screws with high-pressure lubricants applied to threads.
E-2 HOW TO USE TORQUE TABLE
1
Measure diameter of screw you are installing.
2
Count number of threads per in. or use a pitch gage.
3
Under heading “SIZE", look down "DIA IN.” column until you find diameter of screw being installed (there will
usually be two lines beginning with same size).
4
Use “THREADS PER IN.” column under “SIZE” heading to find number of threads per in. that matches number
of threads counted in step 2.
5
To find grade of screw you are installing, “SAE CAP SCREW HEAD MARKING” row to match markings on
head to correct picture on torque table.
6
Look down column under picture found in step 5 until you find torque limit in Ib-ft or N•m for diameter and
threads per in. of screw you are installing.
NOTE
Manufacturer’s cap screw head marking may vary. These are all Society of
Automotive Engineers (SAE) grade 5 (3 line).
E-2
TM 9-2350-311-34-1
TABLE E-1 TORQUE LIMITS FOR WET FASTENERS
TORQUE
SIZE
SAE CAP SCREW HEAD
MARKINGS
SAE GRADE
NO. 1 OR 2
SAE GRADE
NO. 5
SAE GRADE
NO. 6 OR 7
DIA
IN.
THREADS
PER IN.
DIA
MM
LB-FT N•M
LB-FT N•M
LB-FT
1/4
1/4
5/16
5/16
3/8
3/8
7/16
7/16
1/2
1/2
9/16
9/16
20
28
18
24
16
24
14
20
13
20
12
18
6.35
6.35
7.94
7.94
9.53
9.53
11.11
—
12.70
—
14.29
—
5
5
10
12
16
18
25
27
35
37
46
50
7
7
13
16
22
24
34
37
48
50
62
67
7
9
15
17
28
32
44
50
68
77
99
10
12
21
23
38
43
60
67
92
104
134
9
—
17
—
31
—
50
—
77
—
12
—
23
—
42
—
67
—
104
—
5/8
5/8
3/4
3/4
7/8
7/8
1
1
1-1/8
11
18
10
16
9
14
8
14
—
15.88
—
19.05
—
22.23
—
25.40
—
25.58
57
86
95
104
144
158
212
225
—
77
117
128
140
195
214
287
305
—
108
135
153
243
266
356
392
531
594
720
792
146
183
207
330
360
482
531
720
805
976
1074
108
—
150
—
252
—
396
—
594
—
—
146
—
204
—
342
—
537
—
805
—
—
1-1/4
—
31.75
—
—
—
—
—
1-3/8
—
34.93
—
—
—
—
1-1/2
—
38.10
—
—
1314
1512
1746
1980
—
—
—
1782
2050
2367
2684
N•M
SAE GRADE
NO. 8
LB-FT
N•M
11
13
22
24
40
44
63
70
95
108
140
15
17
29
33
54
60
85
95
128
146
189
153
189
216
338
378
545
608
819
891
1152
1296
1638
1800
2142
2448
2844
3204
207
256
293
458
513
738
824
1110
1208
1562
1757
2221
2440
2904
3319
3856
4344
E-3
TM 9-2350-311-34-1
E-3 TIGHTENING METAL FASTENERS
When torquing fastener, select torque wrench with range (Table E-2) that fits required torque value. A torque wrench is
most accurate from 25% to 75% of its stated range. A torque wrench with stated range of 0-100 Ib-ft (0-136 N•m) will
be most accurate from 25-75 Ib-ft (34-102 N•m). Accuracy of readings will decrease as you approach 0 Ib-ft (0 N•m) or
100 Ib-ft (136 N•m). The following ranges (Table E-2) are based on this principle:
TABLE E-2 TORQUE RANGES
STATED RANGE
MOST EFFECTIVE RANGE
0-200 Ib-ft (0-271 N•m)
0-600 Ib-ft (0-813 N•m)
4-13 Ib-ft (5-18 N•m)
0-170 Ib-ft (0-230 N•n)
44-131 Ib-ft (60-178 N•m)
30-60 Ib-ft (41-81 N•m)
50-50 Ib-ft (68-610 N•m)
15-75 Ib-ft (20-102 N•m)
E-4 FASTENER SIZE AND THREAD PATTERN
Threaded fasteners are categorized according to diameter of fastener shank. Thread styles are divided into broad
groups; two most common ranges being coarse (Unified Coarse-UNC) and fine (Unified Fine-UNF). These groups are
defined by the number of threads per in. on the bolt shanks. In addition, threads are categorized by thread class (Table
E-3), which is a measure of the degree of fit between the threads of the bolt or screw (external threads) and the threads
of the attaching nut or tapped hole (internal threads). The most common thread class for bolts and screws is class 2.
TABLE E-3 THREAD CLASSES AND DESCRIPTION
EXTERNAL
I
1A
2A
3A
INTERNAL
I
FIT
Loose fit
Medium fit
Close fit
1B
2B
3B
Thread patterns are designed as follows:
NOTE
Unless followed with -LH (e.g., 3/4-1 OUNC-2A-LH), threads are right-hand.
E-4
TM 9-2350-311-34-1
E-5 FASTENER GRADE
In addition to thread type classification, threaded fasteners are also classified by material. The most familiar fastener
classification system is the SAE grading system (Table E-4).
TABLE E-4 SAE SCREW AND BOLT MARKINGS
BOLTS
SCREWS
SAE grade 2
No marking
SAE grade 3
Two radial dashes
180° apart
SAE grade 5
Three radial dashes
120° apart
SAE grade 6
Four radial dashes
90° apart
SAE grade 7
Five radial dashes
72° apart
SAE grade 8
Six radial dashes
60° apart
Markings on Hex Locknuts
Grade A — no marks
Grade B — three marks
Grade C — six marks
Grade A — no mark
Grade B — letter B
Grade C — letter C
Grade A — no notches
Grade B — one notch
Grade C — two notches
E-5/(E-5 blank)
TM 9-2350-311-34-1
APPENDIX F
MANDATORY REPLACEMENT PARTS
GENERAL
This appendix provides a cross-reference list of mandatory replacement parts and is included for that purpose only.
PAGE
CONTENTS
EXPLANATION OF COLUMNS . . . . . . . . . . . . . . . . . . . . . . . . . . . . . . . . . . . . . . . . . . . . . . . . . . . . . F-2
F-1
F-2
MANDATORY REPLACEMENT PARTS LIST . . . . . . . . . . . . . . . . . . . . . . . . . . . . . . . . . . . . . . . . . . .. F-3
F-1
TM 9-2350311-34-1
F-1 EXPLANATION OF COLUMNS
a. Column (1) — ITEM NO.
This number is assigned to the entry in the listing for cross-referencing to the part number.
b. Column (2) — PN
Indicates the PN used by the manufacturer (individual, company, firm, corporation, or Government activity), that controls
the design and characteristics of the item by means of its engineering drawings, specification, standards, and inspection
requirements to identify an item or range of items.
c. Column (3) — DESCRIPTION
This column contains the nomenclature that appears on the first page of the task under the subheading “Materials/
Parts.”
F-2
TM 9-2350-311-34-1
F-2 MANDATORY REPLACEMENT PARTS LIST
( 1 )
ITEM NO.
2
3
4
5
6
7
8
9
10
11
12
13
14
15
16
17
18
19
20
21
22
23
24
25
26
27
28
29
30
31
32
33
34
35
36
37
40
39
40
(2)
PN
M83248-1-235
MS16562-35
MS16624-1059
MS16624-1066
MS16624-18
MS172281
MS190070-052
MS19070-152
MS20995-C41
MS20995C20
MS21042-5
MS24665-229
MS24665-629
MS28775-222
MS29513
MS29513-115
MS29513-15
MS29513-154
MS29513-251
MS29513-261
MS29513-260
MS3367-5-9
MS35334-21
MS35335-31
MS35335-35
MS35335-37
MS35335-91
MS35338-138
MS35338-42
MS35338-43
MS35338-44
MS35338-46
MS35338-60
MS35338-61
MS35338-63
MS35338-64
MS35338-65
MS35338-66
MS35338-67
MS35338-7
(3)
DESCRIPTION
Seal
Spring pin
Lockring
Snap ring
Retaining ring
Key washer
Key washer
Key washer
Lockwire
Lockwire
Self-locking nut
Cotter pin
Cotter pin
Preformed packing
Seal
Preformed packing
Preformed packing
Seal
Preformed packing
Preformed packing
Preformed packing
Strap
Lockwasher
Lockwasher
Lockwasher
Lockwasher
Lockwasher
Lockwasher
Lockwasher
Lockwasher
Lockwasher
Lockwasher
Lockwasher
Lockwasher
Lockwasher
Lockwasher
Lockwasher
Lockwasher
Lockwasher
Lockwasher
F-3
TM 9-2350-311-34-1
F-2 MANDATORY REPLACEMENT PARTS LIST — CONTINUED
(1)
ITEM NO.
41
42
43
44
45
46
47
48
49
50
51
52
53
54
55
56
57
58
59
60
61
62
63
64
65
66
67
68
69
70
71
72
73
74
75
76
77
78
79
80
F-4
(2)
PN
MS35338-8
MS35358-63
MS35489-425
MS51007-10
MS51007-13
MS51915-36-1
MS9021-034
MS9021-037
MS9021-254
MA9021-263
178768-22
1730051-1
10898034
10898036
10898038
10900537
10900571
10900572
10906665
10920615
10921767
10942143
10954677
11605391
11669687
12268242
12268248
12289974
20-12-5
21-2-5
360-8023-03
4-060115B
475067
488558
488755
488756
50-099
5162811
5703549
5703549
(3)
DESCRIPTION
Lockwasher
Lockwasher
Grommet
Gasket
Basket
Seal
Preformed packing
Preformed packing
Preformed packing
Preformed packing
Preformed packing
Preformed packing
Gasket
Gasket
Gasket
Brushes
Gasket
Gasket
Gasket
Gasket
Seal
Gasket
Gasket
Gasket
Seal
Seal
Seal
Gasket
Lockwasher
Lockwasher
Seal
Compression sleeve
Gasket
Screw
Blind rivet
Nut
Gasket
Split cone
Lockwasher
Preformed packing
TM 9-2350-311-34-1
2
(1)
PN
ITEM NO.
81
82
83
84
85
86
87
88
3
6220-21
703349
7718488
7962191
8712442
8712448
900010-32C
9419742
DESCRIPTION
Lockwasher
Gasket
Gasket
Seal
Gasket
Gasket
Lockwire
Screw
F-5/(F-6 blank)
TM 9-2350-311-34-1
INDEX
PAGE
CONTENTS
A
Aircleaner . . . . . . . . . . . . . . . . . . . . . . . . . . . . . . . . . . . . . . . . . . . . . . . . . . . . . . . . . . . . . . . . . . . . . . . . . . . . . .1-9,5-25
Air cleaner blower motor . . . . . . . . . . . . . . . . . . . . . . . . . . . . . . . . . . . . . . . . . . . . . . . . . . . . . . . . . . . . . . . . . . . 5-25
Troubleshooting . . . . . . . . . . . . . . . . . . . . . . . . . . . . . . . . . . . . . . . . . . . . . . . . . . . . . . . . . . . . . . . . . . . . . . . . 3-3
Air intake system . . . . . . . . . . . . . . . . . . . . . . . . . . . . . . . . . . . . . . . . . . . . . . . . . . . . . . . . . . . . . . . . . . . . . . . . 5-1
B
Ball and roller bearings . . . . . . . . . . . . . . . . . . . . . . . . . . . . . . . . . . . . . . . . . . . . . . . . . . . . . . . . . . . . . . . . . . . . . 2-3,2-5
Basic issue item, location of . . . . . . . . . . . . . . . . . . . . . . . . . . . . . . . . . . . . . . . . . . . . . . . . . . . . . . . . . . . . . . . . . . . . 1-12
Bearings, ball and roller . . . . . . . . . . . . . . . . . . . . . . . . . . . . . . . . . . . . . . . . . . . . . . . . . . . . . . . . . . . . . . . . . . . . . 2-3,2-5
Bilge pump . . . . . . . . . . . . . . . . . . . . . . . . . . . . . . . . . . . . . . . . . . . . . . . . . . . . . . . . . . . . . . . . . . . . . . . . . . . . . . . . . . 9-8
Troubleshooting . . . . . . . . . . . . . . . . . . . . . . . . . . . . . . . . . . . . . . . . . . . . . . . . . . . . . . . . . . . . . . . . . . . . . . . . . . 3-12
Bleeding winterization kit lines. . . . . . . . . . . . . . . . . . . . . . . . . . . . . . . . . . . . . . . . . . . . . . . . . . . . . . . . . . . . . . . . . 10-22
Blower motor . . . . . . . . . . . . . . . . . . . . . . . . . . . . . . . . . . . . . . . . . . . . . . . . . . . . . . . . . . . . . . . . . . . . . . . . . . . . . . 10-36
Bulkhead-to-driver’s instrument panel wiring harness . . . . . . . . . . . . . . . . . . . . . . . . . . . . . . . . . . . . . . . . . . . . . . . 7-48
Bulkhead-to-headlights/bilge pump wiring harness . . . . . . . . . . . . . . . . . . . . . . . . . . . . . . . . . . . . . . . . . . . . . . . . . . 7-24
Bulkhead-to-portable instrument panel wiring harness (engine model 7083-7391). . . . . . . . . . . . . . . . . . . . . . . . . . 7-38
Bulkhead-to-portable instrument panel wiring harness (engine model 7083-7396). . . . . . . . . . . . . . . . . . . . . . . . . . 7-28
c
Channel group . . . . . . . . . . . . . . .
Circuit identification . . . . . . . . . . .
Cleaning . . . . . . . . . . . . . . . . . . . .
Components
Engine-related. . . . . . . . . . . .
Hull-related . . . . . . . . . . . . . .
Location of major. . . . . . . . . .
Transmission . . . . . . . . . . . . .
Coolant heater . . . . . . . . . . . . . . .
Coolant pump . . . . . . . . . . . . . . . .
Cooling fan drive . . . . . . . . . . . . .
Cooling fan, vaneaxial . . . . . . . . .
Cooling system . . . . . . . . . . . . . .
Troubleshooting. . . . . . . . . . .
Corrosion, prevention and control
Coupler . . . . . . . . . . . . . . . . . . . .
Crankshaft . . . . . . . . . . . . . . . . . .
. . . . . . . . . . . . . . . . . . . . . . . . . . . . . . . . . . . . . . . . . . . . . . . . . . . . . . . . . . . . . . . 5-22
. . . . . . . . . . . . . . . . . . . . . . . . . . . . . . . . . . . . . . . . . . . . . . . . . . . . . . . . . . . . . 7-4,7-6
. . . . . . . . . . . . . . . . . . . . . . . . . . . . . . . . . . . . . . . . . . . . . . . . . . . . . . . . . . . . . . . . 2-5
......................................
......................................
......................................
......................................
......................................
......................................
......................................
....................................
......................................
......................................
......................................
......................................
......................................
. . . . . . . . . . . . . . . . . . . . . . . . . . 4-4
. . . . . . . . . . . . . . . . . . . . . . . . . . 9-1
. . . . . . . . . . . . . . . . . . . . . . . . . 1-10
. . . . . . . . . . . . . . . . . . . . . . . . . . 4-4
. . . . . . . . . . . . . . . . . . . . . . . . 10-24
. . . . . . . . . . . . . . . . . . . . . . . . . . 4-9
. . . . . . . . . . . . . . . . . . . . . . . 6-2,6-4
. . . . . . . . . . . . . . . . . . . . . 6-11,6-13
. . . . . . . . . . . . . . . . . . . . . . . . . . 6-1
. . . . . . . . . . . . . . . . . . . . . . . . . . 3-9
. . . . . . . . . . . . . . . . . . . . . . . . . . 1-8
. . . . . . . . . . . . . . . . . . . . . . . . . 4-20
. . . . . . . . . . . . . . . . . . . . . . . . . 4-22
D
Damper, vibration . . . . . . . . . . . . . . . . . . . . . . . . . . . . . . . . . . . . . . . . . . . . . . . . . . . . . . . . . . . . . . . . . . . . . . . . . ...4-22
Data plates . . . . . . . . . . . . . . . . . . . . . . . . . . . . . . . . . . . . . . . . . . . . . . . . . . . . . . . . . . . . . . . . . . . . . . . . . . . . . . ...9-16
Data, equipment . . . . . . . . . . . . . . . . . . . . . . . . . . . . . . . . . . . . . . . . . . . . . . . . . . . . . . . . . . . . . . . . . . . . . . . . . . ...1-15
Destruction of materiel and equipment . . . . . . . . . . . . . . . . . . . . . . . . . . . . . . . . . . . . . . . . . . . . . . . . . . . . . . . . . ...1-5
Differences between models . . . . . . . . . . . . . . . . . . . . . . . . . . . . . . . . . . . . . . . . . . . . . . . . . . . . . . . . . . . . . . . . ...1-14
Draining fuel tanks . . . . . . . . . . . . . . . . . . . . . . . . . . . . . . . . . . . . . . . . . . . . . . . . . . . . . . . . . . . . . . . . . . . . . . . . ...5-10
INDEX-1
TM 9-2350-311-34-1
CONTENTS
PAGE
D — CONTINUED
Driver’s bulkhead-to-master relay wiring harness (M109A4/M109A5) (engine model 7083-7391) . . . . . . . . . . . ...7-20
Driver’s bulkhead-to-master relay wiring harness (M109A4/M109A5) (engine model 7083-7396) . . . . . . . . . . . . . . 7-16
Durable items. . . . . . . . . . . .. . . . . . . . . . . . . . . . . . . . . . . . . . . . . . . . . . . . . . . . . . . . . . . . . . . . . . . . . . . . . . . . . . . . B-1
E
Electric fuel pump. . . . . . . . . . . . . . . . . . . . . . . . . . . . . . . . . . . . . . . . . . . . . . . . . . . . ....... . . . . . . . . . . . . . . . 5-2
. . . . . . . . . ...1-8,7-1
Electrical system. . .
Testing and test equipment . . . . . . . . . . . . . . . . . . . . . . . . . . . . . . . . . . . . . . . . . . . . . . . . . . . . . . . . . . . . . . . . . . 2-5
Troubleshooting . . . . . . . . . . . . . . . . . . . . . . . . . . . . . . . . . . . . . . . . . . . . . . . . . . . . . . . . . . . . . . . . . . . . . . .3-4,3-15
2-5
Electrical testing and test equipment . . . . . . . .. . . . . . . . . . . . . . . . . . . . . . . . . ...... . . . . . . . . .
Engine disconnect bracket-to-bulkhead wiring harness (M109A2/M109A3) (engine model 7083-7391 ) . . . . . . . . . .7-12
Engine disconnect bracket-to-bulkhead wiring harness (M109A2/M109A3) (engine model 7083-7396). . . . . . . . ...7-8
Engine . . . . . . . . . . . . . . . . . . . . . . . . . . . . . . . . . . . . . . . . . . . . .. . . . . . . . . . . . . . . . . . . . . . . . . . . 1-8,1-15,3-3,4-4
Parts . . . . . . . . . . . . . . . . . . . . . . . . . . . . . . . . . . . . . . . . . . . . . . . . . . . . . . . . . . . . . . . . . . . . . . . . . . . . . ..... 4-3
Driven pump . . . . . . . . . . . . . . . . . . . . . . . . . . . . . . . . . . . . . . . . . . . . . . . . . . . . . . . . . . . . . .. ...... . . . 4-6
Related components . . . . . . . . . . . . . . . . . . . . . . . . . . . . . . . . . . . . . . . . . . . . . . . . . . . . . . . . . . . .. . . . . . . 4-4
Separation from transmission and transfer assembly . . . . . . . . . . . . . . . . . . . . . . . . . . . . . . . . . . . . . . . . . . . . . 4-15
Troubleshooting . . . . . . . . . . . . . . . . . . . . . . . . . . . . . . . . . . . . . . . . . . . . . . . . . . . . . . . . . . . . . . . . . . . . . . . . . . .3-3
Equipment
1-15
Data . . . . . . . . . . . . . . . . . . . . .
.....
.
.
.
.
.
.
.
Improvements and recommendations, reporting . . . . . . . . . . . . . . . . . . . . . . . . . . . . . . . . . . . . . . . . . . . . . . . ...1-6
Operation and description . . . . . . . . . . . . . . . . . . . . . . . . . . . . . . . . . . . . . . . . . . . . . . . . . . . . . . . . . . . . . . . ...1-17
Destruction of . . . . . . . . . . . . . . . . . . . . . . . . . . . . . . . . . . . . . . . . . . . . . . . . . . . . . . . . . . . . . . . . . . . . . . . . ...1-5
Electrical testing and test . . . . . . . . . . . . . . . . . . . . . . . . . . . . . . . . . . . . . . . . . . . . . . . . . . . . . . . . . . . . . . . . . ...2-5
Expendable and durable items . . . . . . . . . . . . . . . . . . . . . . . . . . . . . . . . . . . . . . . . . . . . . . . . . . . . . . . . . . . . . . . . .. B-1
.
.0..
.
...
.
.
.
.
.
.
.
.
.
.
..
.
...
.
.
.
.
O
.
O
F
Fan drive gearbox . . . . . . . . . . . . . . . . . . . . . . . . . . . . . . . . . . . . . . . . . . . . . . . . . . . . . . . . . . . . . . . . . . . . . 6-13
Fan drive, cooling . . . . . . . . . . . . . . . . . . . . . . . . . . . . . . . . . . . . . . . . . . . . . . . . . . . . . . . . . . . . . . . . . . . . . . . . . . ...6-4
Fan, personnel airduct ventilating. . . . . . . . . . . . . . . . . . . . . . . . . . . . . . . . . . . . . . . . . . . . . . . . . . . . . . . . . . . . . . ...9-2
Fan, vaneaxial cooling . . . . . . . . . . . . . . . . . . . . . . . . . . . . . . . . . . . . . . . . . . . . . . . . . . . . . . . . . . . . . . . . 6-11,6-13
Filters
Primary fuel . . . . . . . . . . . . . . . . . . . . . . . . . . . . . . . . . . . . . . . . . . . . . . . . . . . . . . . . . . . . . . . . . . . . . . . . . . . ...4-6
Secondary fuel . . . . . . . . . . . . . . . . . . . . . . . . . . . . . . . . . . . . . . . . . . . . . . . . . . . . . . . . . . . . . . . . . . . . . . . . . ...4-8
Final drive . . . . . . . . . . . . . . . . . . . . . . . . . . . . . . . . . . . . . . . . . . . . . . . . . . . . . . . . . . . . . . . . . . . . . . . . . . . 1-17,8-1,8-2
Troubleshooting . . . . . . . . . . . . . . . . . . . . . . . . . . . . . . . . . . . . . . . . . . . . . . . . . . . . . . . . . . . . . . . . . . . . . . . . ...3-4
Flame heater, troubleshooting.. . . . . . . . . . . . . . . . . . . . . . . . . . . . . . . . . . . . . . . . . . . . . . . . . . . . . . . . . . . . . . . ...3-3
Forms, maintenance . . . . . . . . . . . . . . . . . . . . . . . . . . . . . . . . . . . . . . . . . . . . . . . . . . . . . . . . . . . . . . . . . . . . . . . . ...1-5
Fuel filter . . . . . . . . . . . . . . . . . . . . . . . . . . . . . . . . . . . . . . . . . . . . . . . . . . . . . . . . . . . . . . . . . . . . . . . . . . . . . . . . . ...4-6
Primary . . . . . . . . . . . . . . . . . . . . . . . . . . . . . . . . . . . . . . . . . . . . . . . . . . . . . . . . . . . . . . . . . . . . . . . . . . . . . . . ...4-6
Secondary . . . . . . . . . . . . . . . . . . . . . . . . . . . . . . . . . . . . . . . . . . . . . . . . . . . . . . . . . . . . . . . . . . . . . . . . . . . . ...4-8
Fuel pumps . . . . . . . . . . . . . . . . . . . . . . . . . . . . . . . . . . . . . . . . . . . . . . . . . . . . . . . . . . . . . . . . . . . . . . . . . . . . . . . . ..5-2
Fuel system . . . . . . . . . . . . . . . . . . . . . . . . . . . . . . . . . . . . . . . . . . . . . . . . . . . . . . . . . . . . . . . . . . . . . . . . . . . . . ...5-1
Troubleshooting . . . . . . . . . . . . . . . . . . . . . . . . . . . . . . . . . . . . . . . . . . . . . . . . . . . . . . . . . . . . . . . . . . . . . . . . ...3-3
INDEX-2
TM 9-2350-311-34-1
PAGE
CONTENTS
Pads .
Repair
Straps
Lower.
Upper.
. . . . . . . . . . . . . . . . . . . . . . . . . . . . . . . ... . . . . . . . . . . . . . . . . . . . . . . . 5-20
5-14
. . . . . . . . . . . . . . . . . . . . . . . . . . . . . .
......................
. . . . . . . . . . . . . . . . . . . . .
.... ... . . . . . . . . . . . . . . . . . . . . . . . 5-13
. . . . . . . . . . . . . . . . . . . . . . . . . . . . .. . . . . . . . . . . . . . . . . . . . . . . . 5-13
G
6-13
Gearbox, fan drive . . . . . . . . . . . . . . . . . . . . . . . . .
General hull maintenance instructions. . . . . . . . . . . . . . . . . . . . . . . . . . . . . . . . . . . . . . . . . . . . . . . . . . . . . . . . . . 2-2
1-5
General information . . . . . . . . . . . . . . . . . . . . . . . . ...... .
Glow plug system, troubleshooting . . . . . . . . . . . . . . . . . . . . . . . . . . . . . . . . . . . . . . . . . . . . . . . . . . . . . . . . . . . . ...3-5
H
H a n g e r
a s s e m b l i e s
.
.
.
.
.
.
.
.
.
.
.
.
.
Heat shield, fuel tank . . . . . . . . . . . . . . . . . . . . . . . . . . ...... .
.
.
.
.
.
.
.
.
.
.
.
.
.
.
. . . . . . . .
5 - 2
. . . . . . . . . . . . . . . . . . . . . . . . . . . . . . 5-36
Heater, personnel . . . . . . . . . . . . . . . . . . . . .
Hull electrical components . . . . . . . . . . . . . . . . . . . . . . . . . . . . . . . . . . . . . . . . . . . . . . .
Hull-mounted pads . . . . . . . . . . . . . . . . . . . . . . . .
Hull-related components . . . . . . . . . . . . . . . . . . . .
.
.
.
.
.
.
.
.
. . . . . . ... 3-8
. . . . . . . . . . . . . . . . 7-78
5-20
. . .....
. . . . . 9-1
. . ...... . . .
I
Identification list, tool . . . . . . . . . . . . . . . . . . . . . . . . . . . . . . .... . .. . . . . C-1
Illustrated list of manufactured items . . . . . . . . . . . . . . . . . . . . . . . . . . . . . . . . . . . . . . . . . . . . . . . . . . . . . . . . . . . . D-1
Instructions, general troubleshooting . . . . . . . . . . . . . . . . . . . . . . . . . . . . . . . . . . . . . . . . . . . . . . . . . . . . . . . . . . . ...3-1
J
Joints, universal . . . . . . . . . . . . . . . . . . . . . . . . . . . . . . . . . . . . . . . . . . . . . . . . 6-2
K
Kit, winterization . . . . . . . . . . . . . . . . . . . . . . . . . . . . . . . . . . . . . . . ....
. 10-1
L
Limits, torque . . . . . . . . . . . . . . . . . . . . . . . . . . . . . . . . . . . . . . . . . . . . .. . . E-1
Location
Basic issue items . . . . . . . . . . . . . . . . . . . . . . . . . . . . . . . . . . . . . . .......1-12
Major components . . . . . . . . . . . . . . . . . . . . . . . . . . . . . . . . . . . . . . . . . . . . .. . .1-10
Lubrication . . . . . . . . . . . . . . . . . . . . . . . . . . . . . . . . . . . . . . . . . . . . . . .. . 2-7
INDEX-3
TM 9-2350-311-34-1
CONTENTS
PAGE
M
Maintenance forms . . . . . . . . . . . . . . . . . . . . . . . . . . . . . . . . . . . . . . . . . . . . . . . . . . . . . . . . . . . . . . . . . . . . . . . . . ...1-5
Mandatory replacement parts.... . . . . . . . . . . . . . . . . . . . . . . . . . . . . . . . . . . . . . . . . . . . . . . . . . . . . . . . . . . . . . . F-1
Manufactured items . . . . . . . . . . . . . . . . . . . . . . . . . . . . . . . . . . . . . . . . . . . . . . . . . . . . . . . . . . . . . . . . . . . . . . . . D-1
Massing . . . . . . . . . . . . . . . . . . . . . . . . . . . . . . . . . . . . . . . . . . . . . . . . . . . . . . . . . . . . . . . . . . . . . . . . . . . . . . 4-20
Materiel, destruction of . . . . . . . . . . . . . . . . . . . . . . . . . . . . . . . . . . . . . . . . . . . . . . . . . . . . . . . . . . . . . . . . . . . . . ...1-5
Motor, air cleaner blower . . . . . . . . . . . . . . . . . . . . . . . . . . . . . . . . . . . . . . . . . . . . . . . . . . . . . . . . . . . . . . . . . . . ...5-25
Motor, blower . . . . . . . . . . . . . . . . . . . . . . . . . . . . . . . . . . . . . . . . . . . . . . . . . . . . . . . . . . . . . . . . . . . . . . . . . . . ...10-36
N
Nomenclature, names, and designations . . . . . . . . . . . . . . . . . . . . . . . . . . . . . . . . . . . . . . . . . . . . . . . . . . . . . . . . ...1-6
0
Operation and description, equipment . . . . . . . . . . . . . . . . . . . . . . . . . . . . . . . . . . . . . . . . . . . . . . . . . . . . . . . . . . 1-17
P
Pad
Fuel tank . . . . . . . . . . . . . . . . . . . . . . . . . . . . . . . . . . . . . . . . . . . . . . . . . . . . . . . . . . . . . . . . . . . . . . . . . . . . . 5-20
Hull-mounted . . . . . . . . . . . . . . . . . . . . . . . . . . . . . . . . . . . . . . . . . . . . . . . . . . . . . . . . . . . . . . . . . . . . . . . . . . 5-20
Painting . . . . . . . . . . . . . . . . . . . . . . . . . . . . . . . . . . . . . . . . . . . . . . . . . . . . . . . . . . . . . . . . . . . . . . . . . . . . . . . . . . . . .2-7
Parts
Engine . . . . . . . . . . . . . . . . . . . . . . . . . . . . . . . . . . . . . . . . . . . . . . . . . . . . . . . . . . . . . . . . . . . . . . . . . . . . . . . . ..4-3
Mandatory replacement . . . . . . . . . . . . . . . . . . . . . . . . . . . . . . . . . . . . . . . . . . . . . . . . . . . . . . . . . . . . . . . . . . . F-1
Repair . . . . . . . . . . . . . . . . . . . . . . . . . . . . . . . . . . . . . . . . . . . . . . . . . . . . . . . . . . . . . . . . . . . . . . . . . . . . . . . ...2-2
Personnel airduct ventilating fan . . . . . . . . . . . . . . . . . . . . . . . . . . . . . . . . . . . . . . . . . . . . . . . . . . . . . . . . . . . . . . . ..9-2
Personnel heater, troubleshooting. . . . . . . . . . . . . . . . . . . . . . . . . . . . . . . . . . . . . . . . . . . . . . . . . . . . . . . . . . . . ...3-11
Personnel ventilation blower . . . . . . . . . . . . . . . . . . . . . . . . . . . . . . . . . . . . . . . . . . . . . . . . . . . . . . . . . . . . . . . . . ...9-2
Troubleshooting . . . . . . . . . . . . . . . . . . . . . . . . . . . . . . . . . . . . . . . . . . . . . . . . . . . . . . . . . . . . . . . . . . . . . . . . . 3-11
Plates, data . . . . . . . . . . . . . . . . . . . . . . . . . . . . . . . . . . . . . . . . . . . . . . . . . . . . . . . . . . . . . . . . . . . . . . . . . . . . . . ...9-16
Power lead (M109A2/M109A3) . . . . . . . . . . . . . . . . . . . . . . . . . . . . . . . . . . . . . . . . . . . . . . . . . . . . . . . . . . . . . . ...7-67
Power lead (M109A4/M109A5) . . . . . . . . . . . . . . . . . . . . . . . . . . . . . . . . . . . . . . . . . . . . . . . . . . . . . . . . . . . . . . ...7-72
Power lead wiring harness (M109A2). . . . . . . . . . . . . . . . . . . . . . . . . . . . . . . . . . . . . . . . . . . . . . . . . . . . . . . . . ...7-60
Powerplant . . . . . . . . . . . . . .... . . . . . . . . . . . . . . . . . . . . . . . . . . . . . . . . . . . . . . . . . . . . . . . . . . . . . . . . . . . . 1-8
Principles of operation . . . . . . . . . . . . . . . . . . . . . . . . . . . . . . . . . . . . . . . . . . . . . . . . . . . . . . . . . . . . . . . . . . . . . ...1-17
Pump
Bilge . . . . . . . . . . . . . . . . . . . . . . . . . . . . . . . . . . . . . . . . . . . . . . . . . . . . . . . . . . . . . . . . . . . . . . . . . . . . . . . . . ...9-8
Coolant . . . . . . . . . . . . . . . . . . . . . . . . . . . . . . . . . . . . . . . . . . . . . . . . . . . . . . . . . . . . . . . . . . . . . . . . . . . . . . . . ..4-9
Engine-driven . . . . . . . . . . . . . . . . . . . . . . . . . . . . . . . . . . . . . . . . . . . . . . . . . . . . . . . . . . . . . . . . . . . . . . . . . . ...4-6
Electric fuel . . . . . . . . . . . . . . . . . . . . . . . . . . . . . . . . . . . . . . . . . . . . . . . . . . . . . . . . . . . . . . . . . . . . . . . . . . . ...5-2
Q
Quality assurance . . . . . . . . . . . . . . . . . . . . . . . . . . . . . . . . . . . . . . . . . . . . . . . . . . . . . . . . . . . . . . . . . . . . . . . . . . ...1-6
Quick guide to troubleshooting . . . . . . . . . . . . . . . . . . . . . . . . . . . . . . . . . . . . . . . . . . . . . . . . . . . . . . . . . . . . . . . . ...3-2
INDEX-4
TM 9-2350-311-34-1
PAGE
CONTENTS
R
Records, maintenance . . . . . . . . . . . . . . . . . . . . . . . . . . . . . . . . . . . . . . . . . . . . . . . . . . . . . . . . . . . . . . . . . . . . . . ...1-5
Rectifier (M109A2/M109A3) . . . . . . . . . . . . . . . . . . . . . . . . . . . . . . . . . . . . . . . . . . . . . . . . . . . . . . . . . . . . . . . . . ...7-78
Rectifier (M109A4/M109A5) . . . . . . . . . . . . . . . . . . . . . . . . . . . . . . . . . . . . . . . . . . . . . . . . . . . . . . . . . . . . . . . . . ...7-89
References . . . . . . . . . . . . . . . . . . . . . . . . . . . . . . . . . . . . . . . . . . . . . . . . . . . . . . . . . . . . . . . . . . . . . . . . . . . . . . . . A-1
Repair parts . . . . . . . . . . . . . . . . . . . . . ... . ... . . . .... . . . . . . ..... . . . . . . . .. . ..... . . . . . . . . . 2-2
Repair, fuel tank . . . . . . . . . . . . . . . . . . . . . . . . . . . . . . . . . . . . . . . . . . . . . . . . . . . . . . . . . . . . . . . . . . . . . ... . 5-14
Reporting, equipment improvements and recommendations . . . . . . . . . . . . . . . . . . . . . . . . . . . . . . . . . . . . . . . . ...1-6
Road wheel arm . . . . . . . . . . . . . . . . . . . . . . . . . . . . . . . . . . . . . . . . . . . . . . . . . . . . . . . . . . . . . . . . . . . . . . . . . . . ...8-6
s
Safety, care, and handling . . . . . . . . . . . . . . . . . . . . . . . . . . . ...... . ...... . . . . . . . . . . . . . . . . . . ..... .. 1-7
Scope . . . . . . . . . . . . . . . . . . . . . . . . . . . . . . . . . . . . . . . . . . . . . . . . . . . . . . . . . . . . . . . . . . . . . . . . . . . . . . . . . . . ...1-5
5-36
Shield, fuel tank heat . . . . . . . . . . . . . . . . . . . . . . . . . .
Shipment, preparation for . . . . . . . . . . . . . . . . . . . . . . . . . . . . . . . . . . . . . . . . . . . . . . . . . . . . . . . . . . . . . . . . ...1-6,4-2
Shipping and storage containers. . . . . . . . . . . . . . . . . . . . . . . . . . . . . . . . . . . . . . . . . . . . . . . . . . . . . . . . . . . . . . ...4-2
Shroud, vaneaxial cooling fan...... . . . . . . . . . . . . . . . . . ..... . . . . . . . . . . . . . . . . . . . . . . . . ... . . . 6-11
Special tools . . . . . . . . . . . . . . . . . . . . . . . . . . . . . . . . . . . . . . . . . . . . . . . . . . . . . . . . . . . . . . . . . . . . . . . . . . . . . . . . . 2-2
Spindle, upper road wheel arm. . . . . . . . . . . . . . . . . . . . . . . . . . . . . . . . . . . . . . . . . . . . . . . . . . . . . . . . . . . . . . . ...8-6
Sprockets . . . . . . . . . . . . . . . . . . . . . . . . . . . . . . . . . . . . . . . . . . . . . . . . . . . . . . . . . . . . . . . . . . . . . . . . . . . . . . . ...1-17
Storage, preparation for . . . . . . . . . . . . . . . . . . . . . . . . . . . . . . . . . . . . . . . . . . . . . . . . . . . . . . . . . . . . . . . . . . . . . 1-6,4-2
Straps, fuel tank retaining . . . . . . . . . . . . . . . . . . . . . ...... . . . . . . . . . . . . . . . . . . ... . . . . . . . . . . . . . . . .. 5-22
Suspension . . . . . . . . . . . . . . . . . . . . . . . . . . . . . . . . . . . . . . . . . . . . . . . . . . . . . . . . . . . . . . . . . . . . . . . . . 1-9, 1-17,8-6
Troubleshooting . . . . . . . . . . . . . . . . . . . . . . . . . . . . . . . . . . . . . . . . . . . . . . . . . . . . . . . . . . . . . . . . . . . . . . . . . . .3-5
.
..
.
.
.
.
.
.
.
.
.
.
.
.
.
.
.
.
.
.
.
.
.
.
.
.
.
.*
.
.
.
.
.
.
.
.
.
.
.
T
Tanks, fuel . . . . . . . . . . . . . . . . . . . . . . . . . . . . . . . . . . . . . . . . . . . . . . . . . . . . . . . . . . . . . . . . . . . . . . . . . . . . . . ...5-10
Thread inserts, screw . . . . . . . . . . . . . . . . . . . . . . . . . . . . . . . . . . . . . . . . . . . . . . . . . . . . . . . . . . . . . . . . . . . . . . . ...2-4
Tool identification list . . . . . . . . . . . . . . . . . . . . . . . . . . . . . . . . . . . . . . . . . . . . . . . . . . . . . . . . . . . . . . . . . . . . . . . . . . C-1
Tools, special . . . . . . . . . . . . . . . . . . . . . . . . . . . . . . . . . . . . . . . . . . . . . . . . . . . . . . . . . . . . . . . . . . . . . . . . . . . . . ...2-2
Torque limits . . . . . . . . . . . . . . . . . . . . . . . . . . . . . . . . . . . . . . . . . . . . . . . . . . . . . . . . . . . . . . . . . . . . . . . . . . . . . . E-1
Tracks . . . . . . . . . . . . . . . . . . . . . . . . . . . . . . . . ...... . . . . . . . . . . . . . . . . . . . ... . . . . . . . . . . . . . . . . 1-17,8-1
Transfer assembly . . . . . . . . . . . . . . . . . . . . . . . . . . . . . . . . . . . . . . . . . . . . . . . . . . . . . . . . . . . . . . . . . . . . . . . . ...4-15
Transmission . . . . . . . . . . . . . . . . . . . . . . . . . . . . . . . . . . . . . . . . . . . . . . . . . . . . . . . . . . . . . . . . . . . . .1-8,1-16,4-4,4-15
Troubleshooting . . . . . . . . . . . . . . . . . . . . . . . . . . . . . . . . . . . . . . . . . . . . . . . . . . . . . . . . . . . . . . . . . . . . . . . . ...3-3
Trunnion cap . . . . . . . . . . . . . . . . . . . . . . . . . . . . . . . . . . . . . . . . . . . . . . . . . . . . . . . . . . . . . . . . . . . . . . . . . . ...4-23
Troubleshooting . . . . . . . . . . . . . . . . . . . . . . . . . . . . . . . . . . . . . . . . . . . . . . . . . . . . . . . . . . . . . . . . . . . . . . . . . . . ...3-1
Air cleaner blower motor . . . . . . . . . . . . . . . . . . . . . . . . . . . . . . . . . . . . . . . . . . . . . . . . . . . . . . . . . . . . . . . . . ...3-3
Bilge pump . . . . . . . . . . . . . . . . . . . . . . . . . . . . . . . . . . . . . . . . . . . . . . . . . . . . . . . . . . . . . . . . . . . . . . . . ...3-5,312
Cooling system . . . . . . . . . . . . . . . . . . . . . . . . . . . . . . . . . . . . . . . . . . . . . . . . . . . . . . . . . . . . . . . . . . . . . . . 3-10
Electrical system . . . . . . . . . . . . . . . . . . . . . . . . . . . . . . . . . . . . . . . . . . . . . . . . . . . . . . . . . . . . . . . . . . . . . .3-4,3-15
Engine . . . . . . . . . . . . . . . . . . . . . . . . . . . . . . . . . . . . . . . . . . . . . . . . . . . . . . . . . . . . . . . . . . . . . . . . . . . . . ..3-3,3-6
Final drive assembly . . . . . . . . . . . . . . . . . . . . . . . . . . . . . . . . . . . . . . . . . . . . . . . . . . . . . . . . . . . . . . . . . . . . ...3-4
Flame heater . . . . . . . . . . . . . . . . . . . . . . . . . . . . . . . . . . . . . . . . . . . . . . . . . . . . . . . . . . . . . . . . . . . . . . . ...3-3,3-8
Fuel system . . . . . . . . . . . . . . . . . . . . . . . . . . . . . . . . . . . . . . . . . . . . . . . . . . . . . . . . . . . . . . . . . . . . . . . . . . . ...3-3
General instructions . . . . . . . . . . . . . . . . . . . . . . . . . . . . . . . . . . . . . . . . . . . . . . . . . . . . . . . . . . . . . . . . . . . . . ...3-2
Glow plug system . . . . . . . . . . . . . . . . . . . . . . . . . . . . . . . . . . . . . . . . . . . . . . . . . . . . . . . . . . . . . . . . . . . . . . ...3-5
Personnel heater . . . . . . . . . . . . . . . . . . . . . . . . . . . . . . . . . . . . . . . . . . . . . . . . . . . . . . . . . . . . . . . . . . . . . . . ...3-5
INDEX-5
TM 9-2350-311-34-1
PAGE
CONTENTS
T — CONTINUED
Personnel ventilation blower... . . . . . . . . . . . . . . . . . . . . . . . . . . . . . . . . . . . . . . . . . . . . . . . . . . . . . . . . . . 3-5,3-11
Quick guide to . . . . . . . . . . . . . . . . . . . . . . . . . . . . . . . . . . . . . . . . . . . . . . . . . . . . . . . . . . . . . . . . . . . . . . . . . . 3-2
Suspension system . . . . . . . . . . . . . . . . . . . . . . . . . . . . . . . . . . . . . . . . . . . . . . . . . . . . . . . . . . . . . . . . . . . . . ...3-5
Transmission . . . . . . . . . . . . . . . . . . . . . . . . . . . . . . . . . . . . . . . . . . . . . . . . . . . . . . . . . . . . . . . . . . . . . . . ...3-3,3-7
Trunnion cap, replacement of . . . . . . . . . . . . . . . . . . . . . . . . . . . . . . . . . . . . . . . . . . . . . . . . . . . . . . . . . . . . . . . . ...4-23
u
Universal joints . . . . . . . . . . . . . . . . . . . . . . . . . . . . . . . . . . . . . . . . . . . . . . . . . . . . . . . . . . . . . . . . . . . . . . . . . . . . ...6-2
Upper spindle, road wheel arm.. . . . . . . . . . . . . . . . . . . . . . . . . . . . . . . . . . . . . . . . . . . . . . . . . . . . . . . . . . . . . . . ...8-6
v
Ventilation, equipment . . . . . . . . . . . . . . . . . . . . . . . . . . . . . . . . . . . . . . . . . . . . . . . . . . . . . . . . . . . . . . . . . . . . . ...9-2
Vibration damper, crankshaft . . . . . . . . . . . . . . . . . . . . . . . . . . . . . . . . . . . . . . . . . . . . . . . . . . . . . . . . . . . . . . . . ...4-22
w
Warranty information . . . . . . . . . . . . . . . . . . . . . . . . . . . . . . . . . . . . . . . . . . . . . . . . . . . . . . . . . . . . . . . . . . . . . . . ...1-7
Welding . . . . . . . . . . . . . . . . . . . . . . . . . . . . . . . . . . . . . . . . . . . . . . . . . . . . . . . . . . . . . . . . . . . . . . . . . . . . . . . . . . ...2-5
Winterization kit . . . . . . . . . . . . . . . . . . . . . . . . . . . . . . . . . . . . . . . . . . . . . . . . . . . . . . . . . . . . . . . . . . . . . . . . . . ...10-1
Components . . . . . . . . . . . . . . . . . . . . . . . . . . . . . . . . . . . . . . . . . . . . . . . . . . . . . . . . . . . . . . . . . . . . . . . . . ...10-24
Bleeding lines . . . . . . . . . . . . . . . . . . . . . . . . . . . . . . . . . . . . . . . . . . . . . . . . . . . . . . . . . . . . . . . . . . . . . . . . ...10-22
Installation of . . . . . . . . . . . . . . . . . . . . . . . . . . . . . . . . . . . . . . . . . . . . . . . . . . . . . . . . . . . . . . . . . . . . . . . . . ...10-2
Wiring harness listing . . . . . . . . . . . . . . . . . . . . . . . . . . . . . . . . . . . . . . . . . . . . . . . . . . . . . . . . . . . . . . . . . . . . . . . ...7-2
Wiring harness
Power lead (M109A2) . . . . . . . . . . . . . . . . . . . . . . . . . . . . . . . . . . . . . . . . . . . . . . . . . . . . . . . . . . . . . . . . . . . . .7-60
Bulkhead-to-driver’s instrument panel . . . . . . . . . . . . . . . . . . . . . . . . . . . . . . . . . . . . . . . . . . . . . . . . . . . . . . . .7-48
Bulkhead-to-headlights/bilge pump . . . . . . . . . . . . . . . . . . . . . . . . . . . . . . . . . . . . . . . . . . . . . . . . . . . . . . . . ...7-24
Bulkhead-to-portable instrument panel (engine model 7083-7391). . . . . . . . . . . . . . . . . . . . . . . . . . . . . . . . . ..7-38
Bulkhead-to-portable instrument panel (engine model 7083-7396). . . . . . . . . . . . . . . . . . . . . . . . . . . . . . . . . ..7-28
Driver’s bulkhead-to-master relay (M109A4/M109A5) (engine model 7083-7391) . . . . . . . . . . . . . . . . . . . . 7-20
Driver's bulkhead-to-master relay (M109A4/M109A5)(engine model 7083-7396) . . . . . . . . . . . . . . . . . . . . ...7-16
Engine disconnect bracket-to-bulkhead (M109A2/M109A3)(engine model083-7391) . . . . . . . . . . . . . . . 7-12
Engine disconnect bracket-to-bulkhead (M109A2/M109A3)(enginemodel7083-7396) . . . . . . . . . . . . . . . . 7-8
INDEX-6
By Order of the Secretary of the Army:
GORDON R. SULLIVAN
General, United States Army
Chief of Staff
Official:
Milton H. Hamilton
MILTON H. HAMILTON
Administrative Assistant to-the
Secretary of the Amy
07482
DISTRIBUTION:
To be d i s t r i b u t e d in
requirements
for TM
accordance
with
9–2350-311-34-1 .
* U.S. GOVERNMENT PRINTING OFFICE: 1994-546-017/00171
DA Form 12-37-E,
block
1661,
—
PIN:
061100-000
This fine document...
Was brought to you by me:
Liberated Manuals -- free army and government manuals
Why do I do it? I am tired of sleazy CD-ROM sellers, who take publicly
available information, slap “watermarks” and other junk on it, and sell it.
Those masters of search engine manipulation make sure that their sites that
sell free information, come up first in search engines. They did not create it...
They did not even scan it... Why should they get your money? Why are not
letting you give those free manuals to your friends?
I am setting this document FREE. This document was made by the US
Government and is NOT protected by Copyright. Feel free to share,
republish, sell and so on.
I am not asking you for donations, fees or handouts. If you can, please
provide a link to liberatedmanuals.com, so that free manuals come up first in
search engines:
<A HREF=http://www.liberatedmanuals.com/>Free Military and Government Manuals</A>
– Sincerely
Igor Chudov
http://igor.chudov.com/