1
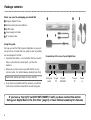
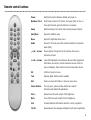
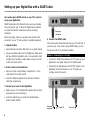
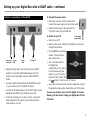
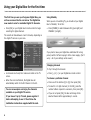
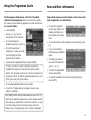
Digital TV receiver
User guide
Welcome
Thank you for buying this Free-toview Digital Box. This product allows
you to enjoy free-to-view Digital TV on
any television - with crisp sound, clear
pictures and interactive entertainment
and services.
This product is simple to install please follow the installation
instructions carefully.
Make sure you read the safety notes towards the end
of this guide. Please note:
• Please keep this guide and product packaging in a safe
place.
• Please follow the installation instructions carefully. Before
you begin, make sure you have easy access to the
connectors on your TV and any other connected
equipment.
• This product can be stored in its original packaging in a
cool dry place at a temperature between -5oC and +40oC.
Wait until the product has reached room temperature
before use
• If any parts are missing, do not attempt to install this
product. Please contact our Helpline on 08700 100 484 lines open Monday to Friday 8:30am to 8:00pm, Saturday
9am-6pm, Sunday 9am-5:30pm (calls charged at the
national rate.)
• Cleaning: always disconnect from the mains supply before
cleaning. Wipe with a lint-free cloth or one that has been
slightly dampened with clean water. Never use detergents,
liquid cleaners or aerosol cleaners.
• Maintenance: refer all maintenance and servicing to
qualified personnel. Any attempt to service the product or
use non-recommended parts will invalidate the warranty.
2
Index
Package contents . . . . . . . . . . . . . . . . . . . . . . . . . . . . . . 4
Remote control buttons . . . . . . . . . . . . . . . . . . . . . . . . . . 5
Setting up your Digital Box with a SCART cable . . . . . . . . . 6
Using your Digital Box for the first time . . . . . . . . . . . . . . 8
Changing channels . . . . . . . . . . . . . . . . . . . . . . . . . . . . . 8
Using the Programme Guide . . . . . . . . . . . . . . . . . . . . . . 9
Now and Next information . . . . . . . . . . . . . . . . . . . . . . . . 9
Using the Setup menu . . . . . . . . . . . . . . . . . . . . . . . . . 10
TV Setup: Display format . . . . . . . . . . . . . . . . . . . . . . . 10
Timer programming . . . . . . . . . . . . . . . . . . . . . . . . . . . 11
Using Favourites . . . . . . . . . . . . . . . . . . . . . . . . . . . . . . 12
Channel Setup, Channel Organiser . . . . . . . . . . . . . . . . . 12
Parental Control, PIN numbers . . . . . . . . . . . . . . . . . . . . 13
Channel tuning, languages and subtitles . . . . . . . . . . . . . 14
Using your VCR recorder with the Digital Box . . . . . . . . . 15
Using the Interactive TV and Teletext . . . . . . . . . . . . . . . .15
Understanding the messages on your Digital Box . . . . . . . 16
General problem solving . . . . . . . . . . . . . . . . . . . . . . . . 17
Where to get more help and technical information . . . . . . 19
Important care and safety advice . . . . . . . . . . . . . . . . . . 20
3
Package contents
When you open the packaging you should find
1 Ferguson Digital TV Box.
1
2
3
2 Remote control plus two batteries.
3 SCART cable.
4 Power supply and cable.
5 RF (coaxial) cable.
4
5
Using this guide
We hope you will find this Ferguson Digital Box very easy to
set up and use. To make this user guide as clear as possible,
we have designed it so that …
Connections at the rear of your Digital Box:
• Important information, or an instruction that you need to
follow, is preceded by a bullet point - just like this
sentence.
• Whenever you have to press a specific button on your
remote control, it is written between brackets [Like this].
Useful hints and tips are shown in a box, like this.
• If you have any problems with this product, you will find
most common solutions towards the back of this guide.
From your
aerial
To your
TV
To your
VCR/DVD
To your
TV
Power
in
If you have a Top Up TV card DO NOT INSERT IT until you have reached the section
‘Using your Digital Box for the first time’ (page 8) or have finished scanning for channels
4
Remote control buttons
Power
Switches the system between standby and power on.
Numbers 0 to 9
Press these to select a TV channel, then press [OK]. For two- or
three-digit channels, press the buttons in succession.
Swap
Switches between the current and previously viewed channels.
Sub(titles)
Opens the Subtitles menu.
Menu
Opens the Digital Box Setup menu.
Guide
Shows the TV Guide, also often called the Electronic Programme
Guide (EPG).
^
^ and
arrows
Moves up/down through the list of channels. Also used in
interactive services.
< and > arrows
(when EPG displayed) moves between Now and Next programme
information. Also used to control interactive services. When no
menu is displayed, these buttons raise and lower audio volume
OK
Confirms choices in menus.
Text
Displays digital Teletext, where available.
Exit
Clears on-screen information or closes an open menu.
Colour buttons
The red, green, yellow and blue buttons are used for
interactive and digital text applications.
Vol+/-
Raises/lowers the audio output of the Digital Box.
Mute
Turns off/on the audio output from the Digital Box.
Info
Provides additional information about the current programme.
TV/AV
Swaps between the analogue and digital inputs (where applicable).
5
Setting up your Digital Box with a SCART cable
You need a spare SCART socket on your TV in order to
set up your Digital Box.
SCART connections offer the best picture and sound quality.
They can also tell your TV when the Digital Box is switched
on and off and whether widescreen pictures are being
broadcast.
Before you begin, make sure you have easy access to the
connectors on your TV and any other connected equipment.
1 Unpack the Box
• Unpack the Box and check that there are no parts missing.
• Choose a suitable location for the Digital Box. Make sure it
will have sufficient ventilation and is not exposed to direct
sunlight, heat, humidity or water. Make sure you can 'see'
it with the remote control.
2 Insert remote control batteries
• Open the remote control battery compartment - on the
under-side of the remote control.
From your
roof aerial
4 Connect the SCART cable
Choose the option below that best suits your TV (and VCR, if
you have one). If you need a longer SCART cable, you can
find one at most TV or electronics retailers.
Option 1: connecting to a TV only
• Connect the SCART cable between the 'TV' socket on your
Digital Box's rear panel and your TV's SCART socket.
• Connect the RF cable between the 'RF OUT' output on the
Digital Box and the RF socket on your TV (where you
normally connect the aerial).
• Insert the batteries supplied in the direction indicated
inside the compartment.
3 Connect your aerial to the Digital Box
• Make sure your TV is switched off, together with any other
equipment you are connecting to.
• Insert the cable from your aerial into the Digital Box
socket marked 'AERIAL'.
From your
roof aerial
6
To your TV
To your TV
Setting up your Digital Box with a SCART cable - continued
5 Connect the power cable
Option 2: connecting to a TV and VCR
• Make sure the mains outlet is switched off.
Connect the power supply into the mains outlet.
• Insert the small power cable plug into the
'5V DC IN' socket on the Digital Box.
6 Switch on your TV
• Switch on your TV.
To the mains
power outlet
• Switch on the mains outlet for the Digital Box. The Box’s
red light should show.
From your
roof aerial
To your
VCR
To your
VCR
To your TV
• [Skip this single step if your VCR has just one SCART
socket]: Connect the SCART cable between the VCR
socket on your Digital Box and your VCR's SCART IN
socket.
• Connect a SCART cable between the SCART OUT socket
on your VCR and your TV's SCART IN socket.
• Connect the RF cable between the 'RF OUT' socket on the
Digital Box and the RF input socket on your VCR.
• If there isn’t already one in place, connect a second RF
cable between the RF output on your VCR and the RF
input socket on your TV.
• Press [POWER] on your Box
remote. The Box’s green
light should show.
• Your TV should switch to
the Digital Box
automatically. If not, select
the AV channel using the
button on your TV remote
marked AV, EXT, TV/AV, O/E
or a
symbol, or refer to your TV manual.
• If you cannot see the picture from the Digital Box, refer to
the problem solving section towards the end of this guide.
You are now ready to tune in to the digital TV service.
Please go to the section 'Using your Digital Box for the
first time'.
7
Using your Digital Box for the first time
The first time you use your Ferguson Digital Box, you
will see a screen like the one below. The Digital Box
now needs to scan for available Digital TV channels.
Using Standby
• Press [OK] on your Digital Box's remote control to begin
searching for digital channels
• Press [POWER] to switch between ON (green light) and
STANDBY (red light).
When you are not watching TV, you should set your Digital
Box to 'Standby'. To do this:
The search will take between 2 and 5 minutes, depending on
the digital TV service in your area.
If you plan to leave your Digital Box unattended for a long
period, switch it off and unplug it at the mains supply. (Don’t
worry - all of your settings will be saved.)
Changing channels
To ‘hop’ through the channels
• When the scan has finished, the Digital Box will
automatically switch to the first channel in the list.
You can now explore and enjoy the channels
available on your Digital TV service.
If you have a Top Up TV card, please register it
before attempting to use it. Then follow the
installation instructions supplied with the card.
8
^
• As channels are found, their names are listed on the TV
screen.
• Press [^] or [ ] on your Digital Box remote control.
To choose a particular channel
• Press one of the buttons [0] to [9], then press [OK].
• To select 2 or 3 digit channels (10 to 999), press the
number buttons required in succession, then press [OK].
• If you do not press [OK], the Box will change to the
selected channel after approximately 1 second.
Using the Programme Guide
Now and Next information
The Programme Guide shows a full list of available
channels and programmes. When you choose the Guide,
the channel you are watching appears as a small inset screen.
To view the Guide:
Now and Next gives you information on the current and
next programmes on each channel.
• Press [^] or [ ] to scroll
through the list of channels.
• To open the Now/Next
menu press [INFO]. This
displays information on
the programme showing
Now.
• To scroll through the
programmes press [<] and [>].
• To see information on the programme showing Next, press
[>].
• To scroll forwards and
backwards, one day at a time,
press the [blue] and the
[yellow] colour buttons.
• To see more detailed
information press [INFO]
again.
^
• To preview the highlighted channel, press [INFO].
To add a reminder to watch a particular programme,
highlight the programme and press the [green] colour
button. The reminder will show for a short period when the
programme starts. To add the selected programme to your
Timer, press the [red] colour button.
• To change the channel
you want information for
press [^] or [ ].
^
• Press [GUIDE].
• To watch the highlighted
channel press [OK].
• To exit the Now/Next menu without changing channel
press [EXIT].
• To view the highlighted channel, press [OK].
• To exit the TV Guide without changing channel, press
[EXIT] or [GUIDE].
The [SWAP] button lets you easily keep an eye on two TV
channels by switching between the current channel and the
last channel you watched for more than 5 seconds - so you
can ‘hop’ between the two channels. Please note: this
feature does not operate when the TV Guide is displayed.
9
Using the Setup Menu
TV setup: display format
The Setup Menu lets you
choose and change a wide
range of your Digital Box’s
features.
This lets you tell the Digital Box whether you have a
‘normal’ or widescreen TV.
• To access the Setup Menu,
press [MENU].
• Use [^] or [ ] to highlight the option you wish to change.
• To change the setting use the [<] or [>] buttons.
The menu options are:
• If you have a widescreen TV choose 16:9 widescreen.
• Choose the TV Setup option.
^
• TV Setup - lets you change
how programmes are displayed
on your TV (widescreen 16:9 or normal 4:3).
• Press [MENU] to open the Setup Menu.
• If you have a ‘square’ 4:3 TV choose 4:3.
• Timer Programming - lets you set a timer so that the
Digital Box changes to a specific channel at a certain time
(such as when you wish to record a programme).
• Favourites - helps you move quickly between your
favourite TV channels.
• Channel Setup - lets you add and delete channels and set
parental control options.
• Languages - when a programme is broadcast in multiple
languages, this lets you choose the language you listen to
and on-screen text or subtitles that are displayed.
• Software Revision - lets you view the software version
running on your box and to check for a software update.
As updates are handled automatically by your Digital Box it
is not recommended that you use this option.
10
4:3 letterbox
4:3 centre cutout
4:3 Full Frame
For 4:3 TVs, choose the widescreen option (illustrated
above) according to your personal preference:
• Letterbox - will show a black border top and bottom when
watching a widescreen broadcast on a 4:3 TV.
• Centre cutout - will trim the left and right edges of the
picture.
• Full frame - will force the programme into the available
screen space.
Timer Programming
You can set the Digital Box's Programme Timer to
switch the Box to any channel you choose, at any time
you choose. So you'll always see (or be able to record)
your favourite programmes!
• Press [ ] to highlight 'Time' and press [<] and [>] to
change the time or use the buttons [0-9] to type in the
time directly. (Use the 24 hour clock: e.g for 5 pm type
17:00.)
For the duration of the timer
programme, the Box's green
light will flash and it will not
respond to the remote control
unless you press [EXIT].
• Press [ ] to highlight 'Duration' and use the number
buttons [0 - 9] to type in the length of the program or use
[<] and [>] to change the duration.
^
^
• Press [ ] to highlight a free event or an event you wish to
edit and press [OK].
• Press [<] and [>] to change the channel number, or enter
the 3-digit channel number directly using the number
buttons [0-9], eg, for channel 17 type ‘017’.
^
• Press [ ] to highlight Timer Programming and press [OK].
^
• Press [MENU] to open the Setup Menu.
^
(Please note that you cannot record one digital channel and
watch another digital channel at the same time).
^
If you wish to record a
programme, make sure
your video is set to the
Digital Box channel and
set to record at the time your programme is on.
• Press [ ] to highlight 'Repeat'. Press [>] to choose from
daily, weekly, Monday to Friday or Monday to Saturday. If
your programme is not part of a series leave 'Repeat' set to
'No'.
• Press [ ] to highlight 'Subtitles'. Press [>] to choose 'yes'
or 'no'. Please note that not all channels broadcast
subtitles.
• When you are happy that all options have been set
correctly press [OK] to store your programme. Your set
Timer Programmes will be shown.
• If Parental Controls are set on the channel, you will be
asked to enter your PIN in order to complete the Timer
Programme.
• To exit Timer Programming press [MENU].
• To review or change any of your Timer Programmes, press
[MENU] and follow the steps above.
^
• Press [ ] to highlight 'Date' and press [<] and [>] to
change the date, or enter a date directly using the buttons
[0-9]
11
Using Favourites
Channel Setup and Channel Organiser
^
To use Favourites lists, you must start by creating one.
• Press [MENU]
• Select the Favourites option and press [OK].
• Press the [Green] colour button to create a new list.
• Press the [Yellow] colour button to edit the list.
^
• Use the [^] and [ ] buttons to highlight the channels you
wish to add and press [OK] to add each channel
• To rename the list, use [>] to highlight the list. Then press
the [Yellow] colour button to edit its name.
^
• Using the on-screen keyboard, use the [^
< >] buttons
to highlight the letters you want - or to delete characters and press [OK] to confirm each selection.
• To save the list name, press the [Green] colour button.
• To finish, press [MENU] or [EXIT].
12
The Channel Organiser
lists the channels available
on your Digital TV service.
• Press [MENU] to access
the Setup Menu.
• Press [ ] to highlight
Channel Setup. Press [OK].
• Highlight Channel Organiser
and press [OK].
• To delete a channel, press
the [Red] colour button.
(You will be asked for a PIN
- the default is 0000.)
• To change the order of a
channel, press the [Green] colour button, then move it
using [^] and [ ]. To save its position, press [OK].
^
To watch a channel that is
not on your Favourites list,
you must type its number
using the number buttons, or use the TV Guide, as the [^]
and [ ] buttons will skip over any channels not in the active
Favourites list.
The Channel Setup menu
lets you organise your
channels, set Parental
Controls and scan for new
channels.
^
The Favourites list lets
you hop up and down a
list of channels, ignoring
those channels you
rarely or never watch.
You can have up to 10
Favourites lists.
• To change a channel name, press the [Yellow] colour
button, then use the on-screen keyboard to enter its new
name. Then press [Green] to save the name.
• To go back to the Channel Setup menu, press [MENU].
• To leave the Menu completely, press [EXIT].
Using parental controls to block channels
The Parental Control feature allows you to lock or unlock
channels or change the censorship options (where available)
using a PIN number. Please note that this feature works only
when the broadcaster transmits censorship information.
When a programme being broadcast is blocked by the
parental control setup, you can override the settings and
watch the programme by entering your PIN number.
Changing your PIN number
To set or change your PIN, choose the Change PIN option
from the Parental Control menu. The default PIN is 0000.
• To change your PIN, highlight the Change PIN box and type
in the PIN you want.
• Type it again in the Confirm New PIN box.
Lock/unlock individual channels
^
• Use [ ] to highlight Channel Setup then press [OK].
• Choose the Parental Control option.
• Type in your PIN - the default PIN is 0000.
• Use [<] or [>] to change the Censorship level. These
settings affect the entire service on your Digital Box. To
lock or unlock individual channels, see below.
The parental control options are:
•
•
•
•
•
•
Block will block all channels
18 will block channels with an age rating of 18+
15 will block channels with an age rating of 15+
12 will block channels with an age rating of 12+
6 will block channels with an age rating of 6+
Off will not block any services
• On the Parental Control
menu, choose the
Lock/Unlock Services
option.
^
• Press [MENU] to access the Setup Menu.
• Use [^] and [ ] to
highlight the
channel/s you wish to lock
or unlock.
• Press [OK] to switch
between the Lock/Unlock
setting.
If you lose your PIN, please refer to the instructions in the
General Problem Solving section on page 18.
13
Channel Tuning - scanning for channels
Languages and subtitles
You can have your Digital Box check for new channels at
any time using the Channel Tuning menu.
Some programmes are
broadcast in more than
one language. When
alternative languages are
available, they will be
displayed in the Audio menu.
• Choose Channel Tuning.
Full Scan Add New
Channels scans the airwaves
for new channels and adds
them to your line up. If you
cancel this operation part way
through, you will keep your
existing channels.
Full Scan Replace Existing
Channels deletes your current
channel line up, then scans
the airwaves for new channels and creates a new line up. If
you cancel this operation part way through, you will lose all
channels and need to repeat the tuning process.
• Press [MENU].
• Use [ ] to highlight 'Audio language for current
programme' and Press [OK].
• Use [^] and [ ] to select the desired language.
• Press [OK] to confirm your choice.
Using subtitles
Many programmes are broadcast with subtitles, sometimes in
a choice of languages. To display subtitles:
• Press [SUB] on your
remote.
^
^
• Use [ ] to highlight the
Channel Setup option and
press [OK].
^
• Press [MENU].
^
To access Channel Tuning:
• Use [^] and [ ] to
highlight the desired
subtitle option.
• Press [OK] to confirm
your choice.
• To leave the Subtitle menu, press [SUB] again or [EXIT].
You can also make these changes through the Setup Menu.
14
Using your VCR with the Digital Box
Using Interactive TV and Teletext
To record and view a digital channel
Your Digital Box gives you full access to Interactive TV
and Teletext.
• Select the digital channel you want to record.
• Select the Digital Box channel on your VCR, and press
record or set your recording timer.
Please note: your Digital Box must be set to the channel you
wish to record for the full duration of the recording.
To record an analogue channel while watching a digital
channel.
You can record an analogue TV channel while watching a
digital channel.
• Select the desired analogue channel on your VCR and
record as usual.
To record a digital channel while watching an analogue
channel.
• Select the digital channel you want to record on your
Digital Box.
Teletext is available on certain channels, and there is a
dedicated Teletext channel - see your TV Guide for more
information.
• To see the Teletext service on the channel you are
watching, press the [TEXT] button.
Interactive TV lets you ‘interact’
with some TV programmes and
channels. When a programme is interactive, you will
normally see the Press Red symbol on your TV screen.
• To access Interactive TV, press the [red] colour button on
your remote control.
• To use the service, you will need to use the colour buttons
on your remote. See on-screen instructions for which
buttons to press.
• Select the Digital Box channel on your VCR, and press
record or set your recording timer.
• Use your TV remote to switch to your choice of analogue
channels.
Please note: like most Digital Boxes, this product can only
receive one digital channel at a time. This means that you
cannot record one digital channel while watching another
digital channel. Please note that your VCR will also record any
on-screen displays shown at the time of recording.
15
Understanding the messages on your Digital Box
Message
Possible cause
What to do
No Channels.
No channels have been stored on the
Digital Box.
The Box needs to be tuned into the
available broadcasts. See the section:
Channel Setup - scanning for channels.
Encrypted channel/Data channel.
You may be on a data-only channel or the
channel may have been encrypted by the
broadcaster.
Try switching to a different channel.
No signal.
Your TV aerial may not be properly
connected. The signal from your aerial
may be too high or too low or distorted
by something between your aerial and
the Digital Box.
Check your aerial and any connections
between the aerial and the Digital Box.
Try re-scanning the channels (see Service
Setup - scanning for channels).You may
need to consult an aerial installer.
No channel/No channels added.
Your Digital Box was unable to detect and
decode any digital channels during
installation.
Check all of the aerial connections. Check
that the digital signal is available in your
area. Call Freeview on 08708 80 99 80.
On Programme Guide: Select the channel
for information.
The Digital Box is unable to receive
information about the programmes being
transmitted on this channel.
Change to the channel and wait for the
Digital Box to receive the required
information (the broadcasters normally
send this several times per minute).
Censored/Locked.
The channel has been censored or locked
by the Parental Control settings.
See the section on Parental Control
settings.
16
General problem solving
What happens
What to do
Your Remote control isn't
working.
Make sure you are pointing the remote control directly at your Digital Box and that nothing is blocking
the line of sight. Make sure the box is not in ‘Timer mode’ (green light flashing) - if it is, press [EXIT].
Check the batteries in your remote control. Replace them if required.
The Digital Box does not
seem to work/there is
nothing shown on the
TV.
Is there a green light on the front panel? If No:
• Press the [POWER] button on your remote control.
• Make sure that all cables are firmly connected to the Digital Box and TV/VCR.
• Check that the Digital Box is properly plugged in to the power supply.
If Yes:
• Check you have the correct channel selected on your TV set.
• If a VCR is connected between the Digital Box and the TV, ensure that it is on and all cables are
correctly attached.
• Check if your VCR is causing the problem by connecting the Digital Box directly to your TV.
The picture and/or sound
keeps breaking up.
There are several possible causes of this type of problem: Your signal may be weak. You may have an
old, low-performance or damaged aerial or cable between your aerial and TV. If you have an amplifier
for your aerial, it may need to be upgraded.
• Press [MENU]. Select Channel Setup and press [OK]. Select Status and press [OK].
• Check for any obvious damage to the aerial and cables and make sure that the connectors are
properly fitted. If this does not work, have your installation checked by a professional; your aerial
may provide a better signal if it is relocated.
• Check the digital TV coverage in your area - see your retailer, or call the Digital Helpline number on
page 19.
You are missing some
channels.
• Some TV channels are not available in every area. For advice on coverage in your area contact
Freeview on 08708 80 99 80 or visit www.freeview.co.uk.
• You may need to rescan the digital channels. Please refer to the section: Channel Tuning - Scanning
for Channels.
17
General problem solving
What happens
What to do
You made a video recording of
a digital channel and all or
part of the programme was
not recorded.
• Make sure your VCR is properly connected.
• Make sure it is tuned to the Digital Box output.
• Make sure your Digital Box was set to the channel you wanted to record.
• Switch the VCR to the appropriate AV input.
You have forgotten your PIN.
• Press the [MENU] button on your remote. Select 'software revisions' from the bottom of this
menu. Then select 'software version' from this menu. Press the numbers 1478. The PIN will
be reset. The box will go into standby mode and the splash screen will be displayed when the
box is powered on. Any settings (such as timer events) will need to be set up again.
You cannot see digital
channels after you have
moved your Digital Box to a
different house.
• Scan for channels again. Please refer to the section: Channel Tuning - Scanning for Channels.
The picture is sometimes
distorted/rolls sideways
• When the widescreen option in ‘TV Setup’ is set to ‘Full frame’ some 4:3 (square) TVs may
lose synchronisation when a widescreen programme is broadcast. If your TV has this problem,
change the widescreen option in the TV Setup menu to ‘letterbox’ or ‘centre cutout’.
Subtitles do not appear
although they are set to 'on'.
• Some programmes are transmitted without subtitles.
The picture appears to be
'squashed' or 'cut off'.
• Make sure your TV settings are correct. Please refer to the section: Setup Menu - TV setup.
I forgot to plug in the aerial
when I set up the Digital Box
• Switch off your Digital Box at the mains supply. Plug in the aerial. Switch the Digital Box
mains supply back on. Please refer to the section: Channel Tuning - Scanning for Channels.
18
• It is possible that the aerial at your new house is not adequate to receive digital TV or that
there is a poor signal in your area. You may need to consult an aerial installer.
Where to get more help
If you have any problems using your Digital Box and
cannot find the solution in this user guide:
For general problems contact the Digital Helpline
• Please contact our Digital Helpline on 08700 100 484 lines open Monday to Friday 8:30am to 8:00pm, Saturday
9am-6pm, Sunday 9am-5:30pm (calls charged at the
national rate.)
• If possible, when calling, you should be close to your TV
and have your Matsui Digital Box and TV switched on.
For general Freeview reception enquiries
• Freeview: 08708 80 99 80 or www.freeview.co.uk (calls
charged at the national rate.)
• Digital TV Group: www.dtg.org.uk
Please refer to the product specification for further details on
power requirements, etc. This product uses a class II
insulated power supply - it does not require an earthed
mains supply. This product is for indoor use only.
Product technical specification
• Digital terrestrial TV receiver
• Fully DVB-compliant
Due to continued product improvement, this specification
may change without notice
UHF Channel
DVB compatible
Decoding
Video
Audio
Symbol rate
Power
Power requirements
RF connection
TV connection
Power connection
Accessories
Channel 21-69
-75 to -20 dBm
Bandwidth 8 MHz.
ETS 300 744.
MPEG2 compatible (DVB/Main profile@Main
level).
1.5~15Mb/s (720 x 576).
MPEG2 - Musicam (layer 1&2)
(32,44.1,48 kHz).
2~40Mbaud.
Plug mounted power supply unit:
Input: 230V AC, 50Hz
Output: regulated 5V DC, 1.2A.
8W in operation, 8W in standby.
IEC connector 169-2 (female), diameter
9.5mm.
Two SCART.
Composite/RGB/S-video + audio (stereo).
2.5mm DC jack, centre-positive.
Power supply unit, remote control, 2 AAA
batteries, RF cable, SCART cable, user guide.
The product complies with the following European Council Directives:
•
•
•
EN60065.
73/23/EEC (the Low Voltage Directive) as amended.
89/336/EEC (the EMC Directive) as amended.
Digital Terrestrial Television Broadcast Receiver and Decoder.
Made in UK.
19
Important care and safety advice
This Digital Box has been manufactured to meet international
safety standards, but you must take care to operate it safely.
It is important that you read these safety instructions.
If you have any doubts about the installation, operation or
safety of this Digital Box, contact us, as shown below.
• Do not place the Digital Box on an unstable surface or on
a bed, sofa, rug, or similar surface as this may block air
ventilation and cause it to overheat. Never place the
Digital Box over a radiator or in an unventilated cabinet.
Electrical warning
• Cleaning: always disconnect from the mains supply before
cleaning. Wipe with a lint-free cloth or one that has been
slightly dampened with clean water. Never use detergents,
liquid cleaners or aerosol cleaners.
• Your Digital Box power supply contains a high voltage
which is sufficient to cause a dangerous electric shock.
• Never remove the Digital Box cover or attempt to open the
power supply. There are no user-serviceable parts inside.
• The Digital Box power supply is a sealed unit and the fuse
is not changeable. Only use the power supply supplied (or
manufacturer's replacement) with your Digital Box.
• Switch off the power supply from the mains wall socket
before you disconnect any equipment from the Digital Box.
• Never push anything into holes, slots or other openings in
the case.
Positioning the box
• The Digital Box and cables should be placed so that they
are not likely to be walked on or pinched by items placed
upon or against them.
• Do not expose your Digital Box to direct sunlight or to
extreme temperatures (above 40oC or below -5oC), high
moisture levels or dust.
• Condensation may accumulate on the Digital Box if it is
subjected to sudden changes in temperature. In this case,
allow the Digital Box to rest for one hour before use.
• Do not block the ventilation holes of the Digital Box. Allow
at least 10 cm on all sides of the Digital Box (including the
top, but excluding the base) for ventilation.
Cleaning
Unplug when not in use
• When not in use for an extended period, unplug the Digital
Box from the mains outlet. Do not overload wall outlets
and extension adaptors as this can result in a risk of fire
or electric shock.
Use only authorised servicing
If any of the following occur
• Any of the cables or plugs are damaged.
• Liquid has spilled onto, or objects have fallen into, the
Digital Box.
• The Digital Box has been dropped or the casing has been
damaged.
• The Digital Box does not operate normally.
Carefully unplug the Digital Box from the electrical
outlet and
• Contact the store where you bought this Digital Box.
• Contact our Digital Helpline on 08700 100 484 - lines
open Monday to Friday 8:30am to 8:00pm, Saturday 9am6pm, Sunday 9am-5:30pm (calls charged at the national
rate.)
20
Ferguson
Freeview TV receiver
User Guide
Ferguson-FDTT2500-TUTVR-user-guide-11505v1.2p