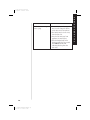
1
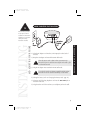
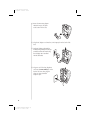
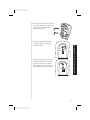
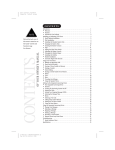
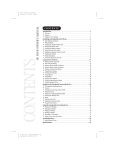
CONTENTS OF YOUR OWNERS MANUAL Color profile: Disabled Composite Default screen C:\LaDonna\Exs9600\EXS9600.vp Tue Dec 01 11:27:58 1998 CONTENTS Introduction. . . . . . . . . . . . . . . . . . . . . . . . . . . . . . . . . . . . . . . . . . . . . . . . . . . 1 Welcome. . . . . . . . . . . . . . . . . . . . . . . . . . . . . . . . . . . . . . . . . . . . . . . . . . . . . . . . . . . . 1 Features . . . . . . . . . . . . . . . . . . . . . . . . . . . . . . . . . . . . . . . . . . . . . . . . . . . . . . . . . . . . 1 Included in Your Package . . . . . . . . . . . . . . . . . . . . . . . . . . . . . . . . . . . . . . . . . . . . . . 2 Installing and Adjusting Your Phone. . . . . . . . . . . . . . . . . . . . . . . . . . . . . . . 3 Desk/Tabletop Installation. . . . . . . . . . . . . . . . . . . . . . . . . . . . . . . . . . . . . . . . . . . . . . 3 Wall Installation. . . . . . . . . . . . . . . . . . . . . . . . . . . . . . . . . . . . . . . . . . . . . . . . . . . . . . 4 Installing the Handset Battery Pack . . . . . . . . . . . . . . . . . . . . . . . . . . . . . . . . . . . . . 10 Charging the Battery Pack. . . . . . . . . . . . . . . . . . . . . . . . . . . . . . . . . . . . . . . . . . . . . 11 Cleaning the Battery Contacts . . . . . . . . . . . . . . . . . . . . . . . . . . . . . . . . . . . . . . . . . . 12 Setting the Pulse/Tone Switch. . . . . . . . . . . . . . . . . . . . . . . . . . . . . . . . . . . . . . . . . . 12 Adjusting the Handset Volume Controls . . . . . . . . . . . . . . . . . . . . . . . . . . . . . . . . . . 13 Installing the Beltclip . . . . . . . . . . . . . . . . . . . . . . . . . . . . . . . . . . . . . . . . . . . . . . . . . 14 Headset Installation . . . . . . . . . . . . . . . . . . . . . . . . . . . . . . . . . . . . . . . . . . . . . . . . . . 15 Automatic Digital Code Security . . . . . . . . . . . . . . . . . . . . . . . . . . . . . . . . . . . . . . . . 15 Using Your New Phone . . . . . . . . . . . . . . . . . . . . . . . . . . . . . . . . . . . . . . . . . 16 Making and Receiving Calls. . . . . . . . . . . . . . . . . . . . . . . . . . . . . . . . . . . . . . . . . . . . 16 Flash and Call Waiting. . . . . . . . . . . . . . . . . . . . . . . . . . . . . . . . . . . . . . . . . . . . . . . . 16 Storing a Phone Number in Memory . . . . . . . . . . . . . . . . . . . . . . . . . . . . . . . . . . . . 17 Editing a Phone Number in Memory . . . . . . . . . . . . . . . . . . . . . . . . . . . . . . . . . . . . 18 Erasing a Number from Memory. . . . . . . . . . . . . . . . . . . . . . . . . . . . . . . . . . . . . . . . 19 Using Memory Dialing. . . . . . . . . . . . . . . . . . . . . . . . . . . . . . . . . . . . . . . . . . . . . . . . 20 Traveling Out-of-Range . . . . . . . . . . . . . . . . . . . . . . . . . . . . . . . . . . . . . . . . . . . . . . . 20 Using Caller ID. . . . . . . . . . . . . . . . . . . . . . . . . . . . . . . . . . . . . . . . . . . . . . . . . . . . . . 21 Using Redial . . . . . . . . . . . . . . . . . . . . . . . . . . . . . . . . . . . . . . . . . . . . . . . . . . . . . . . . 25 Using the Tone Feature . . . . . . . . . . . . . . . . . . . . . . . . . . . . . . . . . . . . . . . . . . . . . . . 25 Using the Page Feature . . . . . . . . . . . . . . . . . . . . . . . . . . . . . . . . . . . . . . . . . . . . . . . 26 Troubleshooting . . . . . . . . . . . . . . . . . . . . . . . . . . . . . . . . . . . . . . . . . . . . . . 27 Quick Reference Chart . . . . . . . . . . . . . . . . . . . . . . . . . . . . . . . . . . . . . . . . . . . . . . . . 27 Specifications . . . . . . . . . . . . . . . . . . . . . . . . . . . . . . . . . . . . . . . . . . . . . . . . 29 Fold out the back cover of this owners manual to use the handy Controls and Functions page for reference. INTRODUCTION I N T R O D U C T I O N TO YOUR NEW PHONE Color profile: Disabled Composite Default screen Introduction WELCOME Congratulations on your purchase of the Uniden EXS9600 cordless telephone. This phone is designed for reliability, long life, and outstanding performance utilizing the latest in 900 MHz Spread Spectrum technology. FEATURES • • • • • • • • • • • • • • • 900 MHz Spread Spectrum Technology Caller ID and Call Waiting Caller ID 50 Number Caller ID Memory 3-Line, 16 Character Backlit LCD Handset Display 10 Enhanced Memory Dial Locations 32 Digit Redial 2nd Battery Capability Back-up Power Supply with Optional Battery Pack Redial, Flash, and Pause Pulse/Tone Dialing Page 7 Day Standby Battery Time 4 Hour Talk Time Handset Earpiece and Ringer Volume Control Hearing Aid Compatible Digital Spread Spectrum Technology utilizes a wider frequency band vs. a single narrow band used in standard digital transmissions. The result is a more secure conversation with the clarity of digital sound, extended range, and minimal interference from other cordless phones. TM Random Code digital security automatically selects one of over 65,000 codes for the handset and base. These features enhance your phone's security and also prevent unauthorized calls as a result of your phone being activated by other equipment. 1 C:\LaDonna\Exs9600\EXS9600.vp Tue Dec 01 11:28:00 1998 Color profile: Disabled Composite Default screen INCLUDED IN YOUR PACKAGE TIP To get the most from your phone, please read this owners manual thoroughly. Also be sure to complete and mail the product registration form. Handset Base AC Adapter NOTE If any of these items are missing or damaged, contact the Uniden Parts Department at (800)554-3988. Hours are from 8:00 a.m. to 5:00 p.m. Central Time, Monday through Friday. We can also be reached on the web at www.uniden.com. Rechargeable Battery Long Telephone Cord Short Telephone Cord Desktop/ Wall Mount Adapter • This Owners Manual • Precautions and Important Safety Instructions • Registration Card 2 C:\LaDonna\Exs9600\EXS9600.vp Tue Dec 01 11:28:08 1998 Beltclip Wall Mounting Screws Color profile: Disabled Composite Default screen Installing and Adjusting Your Phone DESK/TABLETOP INSTALLATION TIP AND ADJUSTING YOUR PHONE 1) Plug the AC adapter cord into the 9 VDC input jack on the back of the base. 2) Wrap the AC adapter cord around the strain relief notch. ! Place the power cord so that it does not create a trip hazard or where it could become chafed and create a fire or electrical hazard. 3) Plug the AC adapter into a standard 120 VAC wall outlet. ! Use only the Uniden AC adapter supplied with this phone and DO NOT use an outlet controlled by a wall switch. 4) Charge the battery (refer to Charging the Battery Pack, page 11). 5) Plug one end of the long telephone cord into the TEL LINE jack on the back of the base. 6) Plug the other end of the cord into your telephone jack on the wall. 3 C:\LaDonna\Exs9600\EXS9600.vp Tue Dec 01 11:28:11 1998 INSTALLING AND ADJUSTING INSTALLING Before choosing a location for your phone, read the Installation Considerations included in the Precautions and Important Safety Instructions brochure. Color profile: Disabled Composite Default screen 7) Attach the desktop stand to the base. HINT Before using your phone, fully charge the NickelCadmium battery pack for 15-20 hours. ! Place the power cord so that it does not create a trip hazard or where it could become chafed and create a fire or electrical hazard. 8) Set the base on a desk or tabletop and place the handset into the base. Then, raise the antenna to a vertical position. WALL INSTALLATION ▼ Standard wall plate mounting This phone can be mounted on any standard AT&T or GTE wall plate. 1) Remove the mounting adapter from the notches at the top of the base. 2) Rotate the mounting adapter 180° and snap it into place at the bottom of the base. 4 C:\LaDonna\Exs9600\EXS9600.vp Tue Dec 01 11:28:16 1998 Color profile: Disabled Composite Default screen ! DO NOT use an outlet controlled by a wall switch. Before you plug the other end of the telephone cord into the modular jack on the wall, charge the battery (refer to Charging the Battery Pack, page 11). 4) Put the AC adapter cord inside the molded wiring channel, then wrap it around the strain relief notch. Plug the AC adapter into a standard 120 VAC wall outlet. INSTALLING AND ADJUSTING ! 3) Plug the AC adapter cord into the 9 VDC input jack on the back of the base. 5) Plug one end of the short telephone cord into the TEL LINE jack on the back of the base, then plug the other end into a standard telephone jack. 6) Line up the mounting slots on the base with the mounting posts on the wall, then push in and down until the phone is firmly seated. 5 C:\LaDonna\Exs9600\EXS9600.vp Tue Dec 01 11:28:20 1998 Color profile: Disabled Composite Default screen 7) On the base unit, pull the handset retainer out of the slot and rotate it clockwise 180°. 8) Flip the retainer from front to back, then slide it back into the slot so that the lip of the retainer faces up and the oval is at the bottom of the retainer. This will hold the handset in place. 6 C:\LaDonna\Exs9600\EXS9600.vp Tue Dec 01 11:28:23 1998 Color profile: Disabled Composite Default screen ▼ Direct wall mounting 1) Insert two mounting screws into the wall, with their appropriate anchoring device, 3-15/16 inches apart. Allow about 3/16 of an inch between the wall and screw heads for mounting the phone. ! Be careful not to insert the mounting screws into possible electrical hazards such as cables, wiring, or pipes. 2) Remove the mounting adapter from the notches at the top of the base. 7 C:\LaDonna\Exs9600\EXS9600.vp Tue Dec 01 11:28:26 1998 INSTALLING AND ADJUSTING If you don't have a standard wall plate, you can mount your phone directly to the wall. Before doing this, consider the following: • Select a location away from electrical cables, pipes, or other items behind the mounting location. Inserting screws into areas such as this can be hazardous. • Try to mount your phone within 10 - 15 feet of a working phone jack in order to avoid excessive cord lengths. Remember, you are not mounting to a wall plate with a built in phone jack. • If the selected mounting area has no wooden support beams directly behind it, you will need the appropriate anchoring devices in order for the wall to properly support your phone. Color profile: Disabled Composite Default screen 3) Rotate the mounting adapter 180° and snap it into place at the bottom of the base. 4) Plug the AC adapter cord into the 9 VDC input jack on the back of the base. 5) Put the AC adapter cord inside the molded wiring channel, then wrap it around the strain relief notch. Plug the AC adapter into a standard 120 VAC wall outlet. 6) Plug one end of the long telephone cord into the TEL LINE jack on the back of the base, then plug the other end into a standard telephone jack. 8 C:\LaDonna\Exs9600\EXS9600.vp Tue Dec 01 11:28:30 1998 Color profile: Disabled Composite Default screen 7) Line up the mounting slots on the base with the mounting screws on the wall, then push in and down until the phone is firmly seated. INSTALLING AND ADJUSTING 8) On the base unit, pull the handset retainer out of the slot and rotate it clockwise 180°. 9) Flip the retainer from front to back, then slide it into the slot so that the lip of the retainer faces up and the oval is at the bottom of the retainer. This will hold the handset in place. 9 C:\LaDonna\Exs9600\EXS9600.vp Tue Dec 01 11:28:32 1998 Color profile: Disabled Composite Default screen INSTALLING THE HANDSET BATTERY PACK ! Use only Uniden battery model (BT-990) supplied with your phone. 1) Press in on the battery cover release and slide the cover down until it comes off. 2) Install the nickel-cadmium battery with the label facing down. 3) Slide the battery cover on until it snaps into place. 10 C:\LaDonna\Exs9600\EXS9600.vp Tue Dec 01 11:28:36 1998 Color profile: Disabled Composite Default screen CHARGING THE BATTERY PACK ▼ Initial battery charging Before plugging the phone line into your new phone for the first time, fully charge the battery pack for 15-20 hours without interruption. 1) Place the handset on the base. 2) Make sure that status LED lights. If the LED doesnt light, check to see that the AC adapter is plugged in and that the handset makes good contact with the base charging contacts. NOTE Please visit your authorized Uniden dealer to obtain an extra battery pack or contact the Uniden parts department at (800)554-3988. Hours are from 8:00 a.m. to 5:00 p.m. Central Time, Monday through Friday. Charging optional battery packs The base unit of your phone is equipped with a compartment for charging an extra battery pack for use in your handset. You can obtain an extra battery pack from your authorized Uniden dealer. 1) Position the battery pack so the inner side with contacts is facing up. 2) Slide the battery pack into the charging compartment until it clicks into place. 3) Charge the battery for 24 hours. When charging is complete, pull up on the latch to remove the battery pack. To install the charged battery into the handset, refer to "Installing the Handset Battery Pack," page 10. ! In the event of a power failure, your spare battery pack can be used as a back-up power supply for the base unit. 11 C:\LaDonna\Exs9600\EXS9600.vp Tue Dec 01 11:28:38 1998 INSTALLING AND ADJUSTING ▼ Color profile: Disabled Composite Default screen ▼ Low battery indicator When the battery pack is very low and Low Battery needs to be charged, the phone is programmed to eliminate functions in order to save power. If the phone is not in use, Low Battery flashes. If the phone is in use, Low Battery flashes and the handset beeps. Complete your conversation as quickly as possible and return the handset to the base for charging. CLEANING THE BATTERY CONTACTS To maintain a good charge, clean all charging contacts on the handset and base about once a month with a pencil eraser or other contact cleaner. DO NOT use liquids or solvents; you may damage your phone. SETTING THE PULSE/TONE SWITCH TIP Most phone systems use tone dialing. Check with your local phone company if youre not sure whether your system is tone or pulse. 12 C:\LaDonna\Exs9600\EXS9600.vp Tue Dec 01 11:28:41 1998 Be sure the PULSE/TONE switch is in the TONE position unless your local phone system uses pulse dialing. Color profile: Disabled Composite Default screen ADJUSTING THE HANDSET VOLUME CONTROLS ▼ Handset ringer volume When the phone is in standby mode, pressing the vol ▲ or ▼ key on the handset selects the handset ringer volume. There are two ringer volume settings; high and low. To select the high volume setting, press vol ▲. The handset displays Ringer High. Ringer High To select the low volume setting, press Ringer Low. ▼ Ringer Low Handset earpiece volume There are three volume settings for the handset earpiece; high, normal, and low. The handset earpiece volume can only be adjusted during a call. To lower the volume, press vol ▼, and to raise the volume, press vol ▲. The handset will display Volume High, Volume Normal, or Volume Low, indicating the current volume setting. 13 C:\LaDonna\Exs9600\EXS9600.vp Tue Dec 01 11:28:44 1998 INSTALLING AND ADJUSTING vol▼. The handset displays Color profile: Disabled Composite Default screen INSTALLING THE BELTCLIP ▼ IMPORTANT To attach the beltclip 1) Remove the slot cover. Use only the Uniden HS910 headset specifically designed for Spread Spectrum phones. You will hear a buzz or hum on other headsets. 2) Insert the beltclip into the empty slot and press down until it clicks. IMPORTANT Keep headset wire away from base antenna. ▼ NOTE To remove the beltclip 1) Pull back on the release tab and pull the beltclip up. If you are using an optional headset, you must still use the handset keypad for phone operations. 2) Replace the slot cover. You can store either the beltclip or slot cover on the bottom of the base. 14 C:\LaDonna\Exs9600\EXS9600.vp Tue Dec 01 11:28:49 1998 Color profile: Disabled Composite Default screen HEADSET INSTALLATION Your phone may be used with an optional headset, the Uniden HS910. To use this feature, simply insert the headset plug into the headset jack. Your headset is ready for hands-free conversations. headset jack AUTOMATIC DIGITAL CODE SECURITY To prevent other parties from making unauthorized calls on your phone line, a digital code was added to the EXS9600. Your phones handset and base share this code, which is randomly set each time you place the handset in the charging cradle. If the phone experiences a power failure, you must reset the digital security code. ▼ To reset the digital security code 1) Restore power to the base 2) Place the handset on the base. The status LED blinks to indicate that the digital security code is reset. USING YOUR C:\LaDonna\Exs9600\EXS9600.vp Tue Dec 01 11:28:50 1998 PHONE 15 Color profile: Disabled Composite Default screen Using Your New Phone MAKING AND RECEIVING CALLS Handset On Base USING YOUR NEW PHONE To answer a call 16 C:\LaDonna\Exs9600\EXS9600.vp Tue Dec 01 11:28:55 1998 To make a call To hang up To redial Handset Off Base 1) Pick up the handset. 1) Press any key. 2) If not in Autotalk Mode, 2) If not in Autotalk Mode, press talk. press talk. 1) Press talk. 1) Pick up the handset. 2) Press talk. 2) Listen for the dial tone. 3) Listen for the dial tone. 3) Dial the number. 4) Dial the number. OR Dial the number, then press talk. OR Dial the number, then press talk. Press talk, or return the handset to the base (AutoStandby). 1) Pick up the handset. 1) Press talk. 2) Press talk. 2) Listen for the dial tone. 3) Listen for the dial tone. 3) Press redial. 4) Press redial. FLASH AND CALL WAITING If you have call waiting service and a call waiting tone sounds while you are on a call, press flash to accept the waiting call. There is a short pause, then you will hear the new caller. To return to the original caller, press flash again. Color profile: Disabled Composite Default screen STORING A PHONE NUMBER IN MEMORY NOTE Whenever you are using a menu screen, you must press a key within 20 seconds or the phone will return to standby. You may also press memory to exit a memory menu at any time. 1) Remove the handset from the base. 2) Press and hold memory for two seconds. The following screen appears. Memory Store 1> 2 3) Use the : and ; keys or number keypad to choose the memory location where you would like to enter a number. 4) Press select. The following screen appears, and a cursor flashes indicating that the display is ready for the name to be entered. Store Name ❚ 5) Use the : and ; keys to scroll through the character menu. Use the < and > keys to move the cursor to the desired location, and enter the name. HINT The character menu consists of letters, symbols, and numbers. HINT The does nothing to the dialing sequence. It simply allows you to display a dash. 7) Enter the phone number with the number keypad (direct entry) or the : and ; keys. Use the : and ; keys to enter symbols, such as dashes. Use the < and > keys to move the cursor to the desired location, and enter the number. NOTE When entering numbers, press pause to enter a pause in the dialing sequence. The display shows a P. The pause feature is useful for long distance calling, credit card dialing, or sequences requiring a pause between digits. 8) Press select. The handset beeps and displays a confirmation screen. For example, if you store a name and number into memory location number one, the display shows Memory 1 Stored. Memory 1 Stored 17 C:\LaDonna\Exs9600\EXS9600.vp Tue Dec 01 11:28:58 1998 PHONE 9) Press memory or return the handset to the charging cradle to exit store mode. Or, wait 20 seconds for the phone to return to standby. YOUR The pause button counts as one digit. Pressing pause more than once increases the length of pause between numbers. Store Number ❚ USING NOTE 6) Press select. The following screen appears, and a cursor flashes indicating that the display is ready for the number. Color profile: Disabled Composite Default screen EDITING A PHONE NUMBER IN MEMORY NOTE Whenever you are using a menu screen, you must press a key within 20 seconds or the phone will return to standby. You may also press memory to exit a memory menu at any time. NOTE If you select Go Back at any time, no changes are made and the handset shows the Memory Store screen. Follow these steps to edit a phone number that you have already programmed into memory. 1) Remove the handset from the base. 2) Press and hold memory for two seconds. The display shows the Memory Store screen and any saved numbers. Memory Store 1> KAYSIE SCHLITZ 2 UNIDEN 3) Use the : and ; keys or number keypad to select the memory location you would like to edit. The < and > keys toggle between the names display and the numbers display. 4) Press select. The following screen appears with the memory location number that you have selected in the display. NOTE > Edit Memory 1 Delete Memory 1 Go Back You may move the > cursor down to Go Back and press select if you would like to exit this menu. 5) With > cursor next to Edit Memory, press select. The following screen appears, and a cursor flashes indicating that the display is ready for the name to be edited. Store Name KAYSIE SCHLITZ 6) Use the : and ; keys to scroll through the character menu. Use the < and > keys to move the cursor to the desired location, and enter the name. HINT The does nothing to the dialing sequence. It simply allows you to display a dash. 18 C:\LaDonna\Exs9600\EXS9600.vp Tue Dec 01 11:29:00 1998 7) Press select. The following screen appears, and a cursor flashes indicating that the display is ready for the number to be edited. Store Number 8175551212 8) Enter the phone number with the number keypad (direct entry) or the : and ; keys. Use the : and ; keys to enter symbols, such as dashes. Use the < and > keys to move the cursor to the desired location, and enter the number. Color profile: Disabled Composite Default screen 8) Press select. The handset beeps and displays a confirmation screen. For example, if you store a name and number into memory location number one, then the handset shows Memory 1 Stored. Memory 1 Stored 9) The display then returns to the Memory Store screen. You may select another number to edit (return to step 3) or you may press memory to return to standby. ERASING A NUMBER FROM MEMORY Use these steps to erase a programmed number from memory. Once a number is erased, that memory location may be programmed with a new number. 1) Remove the handset from the base. 2) Press and hold memory for two seconds. The handset shows the Memory Store screen with any saved numbers displayed. NOTE If you select Go Back at any time, no changes are made and the handset shows the Memory Store screen. UNIDEN 4) Press select. The following screen appears with the memory location number that you have selected in the display. > Edit Memory 1 Delete Memory 1 Go Back Edit Memory 1 > Delete Memory 1 Go Back Delete Memory? Yes > No 19 C:\LaDonna\Exs9600\EXS9600.vp Tue Dec 01 11:29:03 1998 PHONE 7) Use the : key to move the > cursor to the Yes command. YOUR 6) Press select. The following confirmation screen appears. USING If you select No, no changes are made and the handset shows the Memory Store screen. 2 3) Use the : and ; keys or number keypad to select the memory location you would like to delete. The < and > keys toggle between the names display and the numbers display. 5) Use the ; key to move the > cursor down to the Delete Memory command. NOTE Memory Store 1> KAYSIE SCHLITZ Color profile: Disabled Composite Default screen 8) Press select. There is a confirmation tone, and the handset displays Memory Memory 1 Deleted 1 Deleted. 9) The display then returns to the Memory Store screen. You may select another number to delete (return to step 3) or you may press memory to return to standby. HINT Use the < and > keys to toggle between the names and the numbers displayed in memory. USING MEMORY DIALING Follow the steps below to dial a number using a programmed memory location. 1) Press memory. The handset displays your programmed memory locations. 1 > KAYSIE SCHLITZ 2 Uniden 3 Grandma 2) Use the : and ; keys or the number keypad to select the memory location you would like to dial. 1 KAYSIE SCHLITZ 2 > Uniden 3 Grandma 3) Press talk and the number dials. NOTE When the handset is removed from the base, press talk then memory on the handset keypad before selecting the memory location. TRAVELING OUT-OF-RANGE As you begin to move too far from your base unit, you will first hear a clicking sound. As you travel further out-of-range, the voice transmission will begin to break up. If you pass the range limits of the base unit, your call will terminate. 20 C:\LaDonna\Exs9600\EXS9600.vp Tue Dec 01 11:29:05 1998 Color profile: Disabled Composite Default screen USING CALLER ID You must subscribe to Caller ID from your phone company in order to use this feature. ▼ Setting up Caller ID options There are three Caller ID setup options available; they are Autotalk, CIDCW, and Area Code. NOTE You must subscribe to CIDCW from your phone company in order to use this feature. HINT CIDCW performs the same as regular Caller ID on a call waiting number. You must subscribe to CIDCW from your phone company in order to use this feature. The Area Code feature is used when storing or directly calling numbers from Caller ID memory. All numbers with this area code are dialed directly without the area code. If you will be programming numbers within your area code that require all ten digits to be dialed, it is recommended that you do not program this feature. To change your Caller ID options: 1) Press setup. The following screen appears. 1>Auto Talk:Off 2 CIDCW :On 3 Area Code: 21 C:\LaDonna\Exs9600\EXS9600.vp Tue Dec 01 11:29:07 1998 PHONE 3) After you have made your selections, press setup and return the handset to the charging cradle. The statues LED flashes, indicating that your setup changes are now effective. YOUR 2) Use the : and ; keys to move the cursor to the selection that you would like to change. Press the select key to toggle between On and Off for Autotalk and CIDCW. Press select and use the number keypad to enter or change the area code, then press select again. USING You may use the < and > keys to toggle between numbers when programming the area code. AutoTalk allows you to answer the phone without pressing the talk button. If the phone rings when Autotalk is on, simply remove the handset from the cradle and the phone automatically answers the call. If the phone rings when Autotalk is off, you must press talk to answer the call. This option is useful to help you screen your calls more effectively. Color profile: Disabled Composite Default screen ▼ Screening your calls Caller ID allows you to review caller 12/21 12:30PM 01 information before you answer your Schlitz Kaysie phone. After the first ring, the display 817-555-1212 shows the date, time, call count, name, and phone number of the caller. If your Caller ID service is number only, then the name does not appear on the second line. If a name or number is not available, the display will show a message such as Line Error, Private Number, Private Name, etc. NOTE If you have no New Caller ID Messages, then the New display is blank. Only the Total display appears. NOTE Once a Caller ID message has been viewed, it is no longer considered a new message. ▼ Reviewing Caller ID messages To review your Caller ID messages, follow the steps below. 1) Press call id, and the Caller ID summary screen appears. The screen shows the number of new messages and total messages. 2) Press ; to scan through the messages. The most recent message appears first, with the date, time, call count, name, and phone number. Press : to scan backwards through the list. 3) Once you have reviewed your oldest message, the following screen appears. Press call id to return to standby. NOTE If you have no Caller ID messages, then the total is shown as 00. 22 C:\LaDonna\Exs9600\EXS9600.vp Tue Dec 01 11:29:09 1998 NOTE New : 01 Total : 02 12/21 12:30PM 03 Schlitz Kaysie 8175551212 End Once you have viewed all of your Caller ID messages and reach the End display, the message list does not cycle back to the beginning. You must press : to view your previous messages. Color profile: Disabled Composite Default screen ▼ Calling a Caller ID number 1) Press call id, and the Caller ID summary screen appears. The screen shows the number of new messages and total messages. 2) Select the number that you would like to dial. Press ; to scan forward through the messages and : to scan backwards through the list. New : 01 Total : 02 12/21 12:30PM 03 Schlitz Kaysie 8175551212 3) Press talk and the number automatically dials. ▼ Storing a Caller ID number into a memory location 1) Press call id, and the Caller ID summary screen appears. The screen shows the number of new messages and total messages. 2) Press ; or : to find the message that you would like to store, then press memory to store the selected message. New : 01 Total : 02 12/21 12:30PM 03 Schlitz Kaysie 8175551212 3) The select location screen appears. Use Select Location 1> KAYSIE SCHLITZ the : and ; keys to select a blank memory location where you would like to 2 UNIDEN store the number. (If you want to replace an existing number with the Caller ID number, skip to step 5.) NOTE Replace Memory? Yes YOUR If you select No, then the Caller ID screen returns. 5) If you choose to replace an existing number with the Caller ID number, press select, and the following screen appears. > No PHONE 6) Use the : key to move the cursor to Yes and press select. A confirmation tone sounds, and the number is programmed. 23 C:\LaDonna\Exs9600\EXS9600.vp Tue Dec 01 11:29:11 1998 USING 4) Press select. A confirmation tone sounds, and the number is programmed. (Do not complete steps 5 and 6.) Color profile: Disabled Composite Default screen ▼ Deleting a Caller ID message To delete a single Caller ID message, follow the steps below. 1) Press call id, and the Caller ID summary screen appears. The screen shows the number of new messages and total messages. 2) Select the number that you would like to delete. Press ; to scan forward through the messages and : to scan backwards through the list. 3) Press delete, and the following screen appears. New : 01 Total : 02 12/21 12:30PM 03 Schlitz Kaysie 8175551212 Delete Message? > Yes No 4) Press select or delete. A confirmation tone sounds and the Caller ID screen returns with the next message displayed. 5) After you have deleted the oldest Caller ID messages, the display shows End. Press call id to return to standby. ▼ End Deleting all Caller ID messages To delete all of your Caller ID messages, follow the steps below. 1) Press call id, and the Caller ID summary screen appears. The screen shows the number of new messages and total messages. NOTE If you select No, then the Caller ID screen returns. 24 C:\LaDonna\Exs9600\EXS9600.vp Tue Dec 01 11:29:13 1998 2) Press delete, and the following screen appears. New : 01 Total : 02 Delete All? Yes > No 3) Use the : key to move the cursor to Yes, then press select or delete. Color profile: Disabled Composite Default screen 4) A confirmation tone sounds, and the following screen appears. Total:00 5) Press call id to return to standby. USING REDIAL The redial key redials the last number dialed. The redialed number can be up to 32 digits long. USING THE TONE FEATURE If you are dialing in the pulse mode and need to enter tone digits, press tone to enter the digits. Once the call has ended, the tone mode is canceled and pulse dialing resumes. USING NOTE The tone feature applies only when the base unit is set to pulse. YOUR C:\LaDonna\Exs9600\EXS9600.vp Tue Dec 01 11:29:17 1998 PHONE 25 Color profile: Disabled Composite Default screen USING THE PAGE FEATURE To locate the handset (while its off the base), press page on the base. The handset beeps for 60 seconds and displays Paging. Paging Press talk on the handset to end paging. Press talk again to return to standby. 26 C:\LaDonna\Exs9600\EXS9600.vp Tue Dec 01 11:29:19 1998 YOUR NEW PHONE TROUBLESHOOTING Color profile: Disabled Composite Default screen Troubleshooting QUICK REFERENCE CHART If your phone is not performing to your expectations, please try these simple steps before calling Uniden customer service. If you are still unable to resolve the problem, contact your place of purchase or call customer service at (800) 297-1023. PROBLEM SUGGESTION The charge light wont come • Make sure the AC adapter is on when the handset is placed plugged into the base and wall outlet. in the base. • Make sure the handset is properly seated in base. • Make sure the charging contacts on the handset and base are clean. The audio sounds weak and/or scratchy. • Make sure that the base antenna is in a vertical position. • Move the handset and/or base to a different location away from metal objects or appliances and try again. Cant make or receive calls. • Check both ends of the base telephone line cord. • Make sure the AC adapter is plugged into the base and wall outlet. • Disconnect the AC adapter for a few minutes, then reconnect it. • Place the handset back on the charging cradle for a few seconds. The status LED will blink indicating that the phone has been reset. 27 C:\LaDonna\Exs9600\EXS9600.vp Tue Dec 01 11:29:21 1998 Color profile: Disabled Composite Default screen The handset doesnt ring or receive a page. 28 C:\LaDonna\Exs9600\EXS9600.vp Tue Dec 01 11:29:22 1998 SUGGESTION • The Nickel-Cadmium battery pack may be weak. Charge the battery on the base unit for 15-20 hours. • The handset may be too far away from the base unit. • Place the base unit away from appliances or metal objects. • Place the handset back on the charging cradle for a few seconds. The status LED will blink indicating that the phone has been reset. T R O U B L E S H O O T I N G PROBLEM SPECIFICATIONS OF YOUR NEW PHONE Color profile: Disabled Composite Default screen Specifications GENER AL The EXS9600 complies with FCC Parts 15 and 68. Frequency control: PLL Modulation: Direct Sequence Spread Spectrum; DBPSK Operating temperature: 0º to 50º C (+32º F to +122º F) BASE Frequency: 904.2 to 925.8 MHz (20 channels) Power requirements: 9V 350 mA (from AC adapter) Size: 5-1/2in.(W) x 3-3/4in. (D) x 10in. (H) Weight: Approx. 17.8oz. (including optional battery) HANDSET Frequency: 904.2 to 925.8 MHz (20 channels) Power requirements: Rechargeable Nickel Cadmium battery pack Size (without antenna): 2-1/4in. (W) x 1-3/4in. (D) x 7-1/4in. (H) Weight: Approx. 9.3oz. (including battery) Battery: BT-990 Capacity Talk mode Standby mode 600 mAH, 3.6V 4 hours 7 days Specifications, features, and availability of optional accessories are all subject to change without prior notice. 29 C:\LaDonna\Exs9600\EXS9600.vp Tue Dec 01 11:29:23 1998 CONTROLS AND FUNCTIONS