1
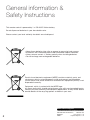
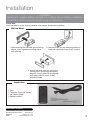
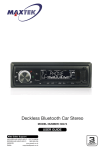
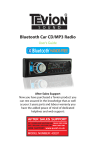
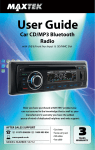
Deckless Bluetooth Car Stereo
Deckless Bluetooth62207
Car Stereo
MODEL NUMBER: 62207
USER GUIDE
After Sales Support
UK/N.IRELAND HELPLINE NO: 01270 508538
REP.IRELAND HELPLINE NO:
1800 995 036
WEBSITE:
www.quesh.co.uk
UK/N.IRELAND HELPLINE NO 01270 508538
EMAIL:
[email protected]
REP.IRELAND HELPLINE NO 1800 995 036
Web Support
www.quesh.co.uk
Contents
1. Welcome Section
2. General Information & Safety Instructions
3. Installation
4. Wiring Connections
5. Fascia Controls
6. Remote Control
7. Basic Operation
8. Radio Operation
9. USB & SD Operation
10. AUX In, RCA Out
11. Bluetooth Operation
12. FAQ
13. Specifications
After Sales Support
UK/N.IRELAND HELPLINE NO: 01270 508538
REP.IRELAND HELPLINE NO:
1800 995 036
WEBSITE:
www.quesh.co.uk
EMAIL:
[email protected]
Welcome Section
Congratulations!
You have made an excellent choice with the purchase of this quality
MAXTEK® product.
By doing so you now have the assurance and peace of mind which
comes from purchasing a product that has been manufactured to
the highest standards of performance and safety, supported by the
high quality standards of Quesh.
We want you to be completely satisfied with your purchase so this
MAXTEK® product is backed by a comprehensive manufacturer’s
3 year warranty and outstanding after sales service through our
dedicated helpline.
We hope you enjoy using this product for many years to come.
If you require technical support or in the unlikely event that your
purchase is faulty, please telephone our helpline for immediate
assistance. Faulty product claims made within the 3 year warranty
period will be repaired or replaced free of charge provided that you
have a satisfactory proof of purchase (keep your receipt safe).
This does not affect your statutory rights. However be aware that the
warranty will become null and void if the product is found to have
been deliberately damaged, misused and/or disassembled.
After Sales Support
UK/N.IRELAND HELPLINE NO: 01270 508538
REP.IRELAND HELPLINE NO:
1800 995 036
WEBSITE:
www.quesh.co.uk
EMAIL:
[email protected]
1
General information &
Safety Instructions
This remote control is powered by 1 x ‘CR-2025’ lithium battery.
Do not dispose of batteries in your household waste.
Please contact your local authority for details on safe disposal.
• Never throw batteries into a fire or expose to excessive heat sources.
• If batteries are swallowed, please seek immediate medical attention.
• Always ensure correct +/- battery polarity when installing batteries.
• Do not recharge non-rechargeable batteries.
Electrical and electronic equipment (WEEE) contains materials, parts and
substances, which can be dangerous to the environment and harmful to
human health if the waste of electrical and electronic equipment (WEEE) is not
disposed of correctly.
Equipment, which is marked with the WEEE logo
(as shown on the left), should not be thrown away with your household waste.
Contact your local authority waste disposal department, as they will be able to
provide details of the recycling options available in your area.
After Sales Support
2
UK/N.IRELAND HELPLINE NO: 01270 508538
REP.IRELAND HELPLINE NO:
1800 995 036
WEBSITE:
www.quesh.co.uk
EMAIL:
[email protected]
Installation
WARNING!
Disconnect negative battery terminal from battery before starting installation.
Consult the vehicle owner’s manual for proper instructions.
Please Note:
Mark the polarity of the existing speaker wires before disconnecting battery.
DIN Front Mount
1. After removing the old radio and mounting
sleeve, insert supplied mounting sleeve
into opening.
2. Bend the tabs on the mounting sleeve to
keep the mounting sleeve firmly in place.
3. Attach the wires from the unit to the
existing wires. See wiring connections
diagram. Insert radio into dashboard
then apply the trim frame to the
outside of radio.
Supplied Parts
2
1
1
1
Keys
Faceplate Case (not shown)
1/8” Stereo Cable
Remote control
After Sales Support
UK/N.IRELAND HELPLINE NO: 01270 508538
REP.IRELAND HELPLINE NO:
1800 995 036
WEBSITE:
www.quesh.co.uk
EMAIL:
[email protected]
3
Wiring Connection
Make sure that you have a good earth connection. A good earth connection will eliminate most electrical
noise problems. A good earth connection requires a tight connection to the vehicle's metal chassis.
The area around the earth connection should be clean, bare metal without rust, paint, plastic, dust, or dirt
for a good electrical connection.
ISO-connector
A
RCA OUT
left=white
right=red
Antenna
socket
B
Connector A
1. Rear right speaker(+)/Purple
2. Rear right speaker(-)/Purple-Black
3. Front right speaker(+)/Grey
4. Front right speaker(-)/Grey-Black
5. Front left speaker(+)/White
6. Front left speaker(-)/White-Black
7. Rear left speaker(+)/Green
8. Rear left speaker(-)/Green-Black
Please Note:
Follow the above wiring diagram to install the
head unit with new or existing speakers.
This unit is designed for use with four (4) speakers
with an impedance between 4 Ohms to 8 Ohms.
An impedance load of less than 4 Ohms could
damage the unit.
Connector B
1. 2. 3. 4. Battery 12V (+)/Yellow
5. Antenna power/Blue-White
6. 7. ACC+/Red
8. Ground/Black
Never bridge or combine the speaker wire
outputs. When not using four speakers, use
electrical tape to tape the ends of the un-used
speaker outputs to prevent a short circuit.
Never connect the negative speaker terminals to
earth connection.
After Sales Support
4
UK/N.IRELAND HELPLINE NO: 01270 508538
REP.IRELAND HELPLINE NO:
1800 995 036
WEBSITE:
www.quesh.co.uk
EMAIL:
[email protected]
Fascia Controls
1. Mode Select / TA /Answer Button
2. Sound Select / VOLume +/- / AF
3. Next Track / Fast Forward Button
4. Remote Control Receiver
5. LCD Screen
6. USB Slot
7. Release Panel Button
8. Auto Preset Scan / Reject Button
9. Power On / Off / Mute
10. Band Switch / PTY
11. Previous Track / Backwards Button
12. Number 1 / Play / Pause
13. Number 2 / Introduction
14. Number 3 / Repeat
15. Number 4 / Random
16. Number 5 / Folder Down
17. Number 6 / Folder Up
18. AUX Input Port
19. Microphone receiver
20. SD Card slot
21. Reset Button
After Sales Support
UK/N.IRELAND HELPLINE NO: 01270 508538
REP.IRELAND HELPLINE NO:
1800 995 036
WEBSITE:
www.quesh.co.uk
EMAIL:
[email protected]
5
Remote Control
Operating the remote control
• Aim at the face panel of the CD receiver, the maximum distance at which signals can be received
is about 6 metres.
• Make sure that the signal path is not obstructed.
Battery Safety
• Take care when fitting batteries, observing the polarity marking on the battery and the product.
• Never dispose of batteries in fire. Risk of explosion.
• Never attempt to recharge non-rechargeable batteries.
• Seek immediate medical advice if you believe a cell has been swallowed.
• Keep batteries away from children.
• Remove batteries from a product if it is not to be used for a period of time.
1
2
MODE
MUTE
3
CLK
SEL
4
BND
5
TA
AF
PTY
1
2
3
4
5
6
6
APS
7
8
9
10
11
12
13
14
15
1.
2.
3.
4.
5.
6.
7.
8.
9.
10.
11.
12.
13.
14.
15.
Power On / off
Mute Sound Button
Stations Tune / Seek / Track Down
Band Switch
TA Control
Radio Memory 1-6
Mode Select
Sound +
Time Clock Display
Sound Select Key
Stations Tune / Seek / Track Up
Sound Auto Preset Scan
AF Control
PTY Control
Replacing the batteries
Follow the 3 steps below:
1. Remove the cover from the back of the remote control.
2. Insert a CR-2025 Lithium battery.
3. Replace the cover on the back of the remote control.
After Sales Support
6
UK/N.IRELAND HELPLINE NO: 01270 508538
REP.IRELAND HELPLINE NO:
1800 995 036
WEBSITE:
www.quesh.co.uk
EMAIL:
[email protected]
Basic Operation
Tuning the unit On / Off
Fader
Press POWER button to turn the unit on. Press
again to turn the unit off.
Mode Selection
Press VOL dial repeatedly until the display shows
“FAD”, Rotate the VOL dial to adjust the balance
between the front & rear speakers. When “F=R” is
shown on the screen, it indicates that the fader is 0.
Press the MODE button repeatedly to cycle through
different play modes.
Preset Equalizer Function
Loudness Control
Press the VOL dial repeatedly until the display
shows “LOUD ON” or “LOUD OFF”. Rotate the
VOL dial to adjust. When “LOUD ON” is shown on
the display indicates that loudness function is on.
Mute Control
Press the MUTE button to activate the mute
function. Press the button again to cancel.
Volume
Rotate the VOL dial to adjust the volume level. Turn
the VOL dial clockwise to increase the volume, and
vice versa. The larger the number of volume, the
louder the volume level.
Bass
Press the VOL dial repeatedly until the display
shows “BAS”. Rotate the VOL dial to adjust. When
DSP is ON, bass control is not available.
Treble
Press SEL dial repeatedly until the display shows
“TRE”. Rotate the VOL dial to adjust. When DSP is
ON, treble control is not available.
Press VOL dial until the display shows “EQ” ,then
rotate the VOL dial to choose the EQ sound effects.
The Sequence of equalizer setting will be as follows:
FLAT-ROCK-POP-CLASS
Press VOL dial to confirm.
Beep Function
Press VOL dial repeatedly until the “BEEP” shown
on the screen. Rotate the VOL dial to choose
“BEEP OFF” or “BEEP ON”. “BEEP OFF” means
beep function is inactive. “BEEP ON” means a beep
sound will be heard when any button pressed.
Clock
Press the CLK button on the remote, the clock will
show on the display. Press and hold the VOL button
for 3 seconds will also show the clock. The clock
will be automatically set by the RDS signal from the
main radio stations.
Reset
Turn the unit off with the ‘ON/OFF’ button. Press and
hold ‘MOD’ & ‘BND’ for 3 seconds. A message will
appear on the display to confirm the unit has reset.
Balance
Press VOL dial repeatedly until the display shows
“BAL”, then Rotate the VOL dial to adjust the
balance between the left & right speakers. When
“L=R” is shown on the screen, it indicates that the
balance is 0.
Menu Cycle:
Press VOL then press VOL again to cycle to the next option.
Bass > Treb > Bal > FAD > Loud > EQ > Stereo/Mono > LOC > Beep
After Sales Support
UK/N.IRELAND HELPLINE NO: 01270 508538
REP.IRELAND HELPLINE NO:
1800 995 036
WEBSITE:
www.quesh.co.uk
EMAIL:
[email protected]
7
Radio Operation
Choose Radio Band
Automatic Scan & Store
Press the BND Button anytime to access the radio
function. The unit comes with five bands, three FM
Bands (FM1, FM2, and FM3) and two AM Bands
(AM1, and AM2). Each of the five bands can store
up to six preset stations, for a total of 30 preset
memory stations.
While listening to the FM or AM Radio, press and
hold the F/PS Button for 3 seconds. The receiver
will automatically scan and save to the presets the
strongest radio station signals available to you in
your area.
Radio Tune / Seek Function
Press the F/PS button once to perform the preset
scanning function. In FM or AM mode, press the F/
PS button and the stations stored in the FM band
preset will be scanned. The scan will pause on each
preset for 6 seconds before moving on to the next.
To stop and listen to a preset of your choice press
the SEL dial.
In radio mode, press the Seek +/- button to
automatically seek the next strong and clear radio
station. Press and hold the Seek +/- button until
the screen shows MANUAL. At this time, you can
manually fine tune your desired frequency. Wait until
the MANUAL disappears in order to perform auto
seek again.
Press and hold the SEEK |<< or >>| button for 2
seconds and the radio will seek the next strong
and clear frequency station. Repeat to seek more
stations in your listening area with a strong signal.
Mono / Stereo Reception Control
In FM radio mode, Press VOL button repeatedly
until the display shows ‘MONO’ or “STEREO”.
Rotate the VOL dial to choose the reception control,
the word “MONO” shown on the screen indicating
the mono reception is received and “STEREO” for
stereo.
Scan Saved Stations
Local / DX
Press VOL Button repeatedly until the display shown
“LOC”. Rotate the VOL button to choose,
“LOC ON“ or “LOC OFF”. When “LOC ON” is shown
on the display, this means local reception is turned
on. When “LOC OFF” is shown on the display, this
means distant reception is turned on.
Local and distance reception settings can facilitate
the radio reception, depending on the location in
which the radio is being used.
Save Your Preset Stations
There are six numbered preset buttons which
can store and recall stations for each band. While
listening to a radio station you would like to save
as a pre-set, press and hold one of the buttons
numbered 1-6 until the preset station number is
shown. The button you pressed is now the pre-set
button for that station.
After Sales Support
8
UK/N.IRELAND HELPLINE NO: 01270 508538
REP.IRELAND HELPLINE NO:
1800 995 036
WEBSITE:
www.quesh.co.uk
EMAIL:
[email protected]
Radio Operation
TA - (Traffic Anouncement)
Retune S/L - (Short/Long)
Press and hold the TA button so that the unit will
receive traffic announcement from local radio
stations.
This function is to set the initial duration of automatic TA Search. Press and hold the VOL dial
until the clock is shown on the display, then press
the VOL dial to cycle through the menu selections until “RETUNE_S” is shown, rotate the VOL
dial to choose “RETUNE_S” or “RETUNE_L”. The
default is “RETUNE_S”.
To choose the TA mode, press the VOL dial for
2 seconds, the display will show “TA SEEK”.
Rotate the encoder volume to choose between
the TA SEEK and TA ALARM, after chooisng,
please leave the unit idle for the mode to activate.
In TA SEEK mode, the unit will seek for traffic
announcement program when TA is pressed.
When in TA ALARM mode, no TA/TP is displayed
and the alarm is set off.
PTY - (Program Type)
This radio will allow you to select the type of
program required, and will search for a station
broadcasting that type of program. Press and
hold the PTY button once to show the music
type. Then press 1-6 button to choose the
different music types available.
Press the PTY button twice to show the speech
type program. Then press 1-6 button to choose
the different speech type program. Each number
key will show 3 different speech programs for you
to choose.
Mask DPI - Mask ALL
Press the VOL button for 2 seconds, the display
will show the clock. Press the VOL button again
so that the unit will show “MASK DPI”. Rotate
the encoder volume to toggle between MASK
DPI and MASK ALL mode. Then leave the unit
idle for the mode to take effect. During MASK
DPI mode, the unit will mask only the AF which
has different PI, this is the default mode; during
MASK ALL mode, the unit will mask the AF which
has different PI and no RDS signal with high field
strength.
PI Sound/Mute
Press and hold the VOL dial until the clock is
shown on the display, then press the VOL dial
to cycle through the menu selections until “PI
SOUND” is shown. This will stop any conflicting
AF sources that may bounce around in built up
areas and any phenomenon that could cause the
same effect.
Area
Press and hold the VOL dial until the clock is
shown on the display, then press the VOL dial to
cycle through the menu selections until “AREA”
is shown. This will allow you to either listen to
your radio in the E.U. or U.S.A.
RDS Operation
This unit is equipped with the latest technology
of EON control, so that when you are listening to
Radio or CD, if there is any travel announcement
from a nearby local station, the radio will already
know the frequency of that radio station. Then
it will receive the station, turn up the volume,
or interrupt the playback of the music for the
duration of the announcement. At the end of the
announcement the radio will return to its previous
state ready for the next announcement.
Advanced Menu Cycle
Press and hold VOL till clock appears then quickly press it again to cycle to the next option.
Clock > AF > TA Seek > PI Sound > Retune > Mask > Area
After Sales Support
UK/N.IRELAND HELPLINE NO: 01270 508538
REP.IRELAND HELPLINE NO:
1800 995 036
WEBSITE:
www.quesh.co.uk
EMAIL:
[email protected]
9
USB, SD/MMC Operation
Play MP3 / WMA from USB/SD
Introduction
Plug the USB or SD card into the USB or SD port.
The MP3 and WMA files in the USB or SD card
will be played automatically. If there is no MP3 or
WMA files in the USB or SD card, “USB PLAY” or
“SD/MMC” will be shown on the screen.
Press the “2 INT” button to select the previous
part of each song in the card / USB to play.
The “INT + Track no.” will be shown on the
screen, indicating each song will be played for
10 seconds. After the ending of one song, the
consequent song will be played for 10 seconds
and so on. Press the “2 INT” button to cancel.
Play Mode
The USB or SD/MMC mode can be chosen by
pressing the MODE button. The “USB PLAY”
means it is in USB play mode, while “SD/MMC”
means it is in SD play mode.
Track / Folder Search
Press >>| button once to advance one track,
Press |<< button once to go back one track.
Press F/PS button once, the track number will be
blink on the screen. Rotate the VOL dial to select
the track number in this folder. Press VOL dial to
confirm the selection.
Repeat
Press the “3 RPT” button to repeat the same
song continuously. The “RPT+ Track no.” will
be shown on the screen, indicating the repeat
process is operating. Press “3 RPT” button to
cancel.
Random
ID3
Press the “4 RDM” button to play all the files in
card/ USB in random order. The “RDM + Track
no.” will be shown on the screen, indicating the
songs are arranged in random order. Press “4
RDM” button to cancel.
The name of the song will be displayed
automatically on the screen.
Folder Down
Play / pause
When the card/ USB device has already been
loaded the playback of the first track starts
automatically. Press the “1 ” button and the
“PAUSE” will be flashing on the screen.
Press the “ 5
folder.
- ” button once to go back one
Folder UP
Press the “6
folder.
+
” button once to advance one
AUX IN, RCA OUT
Auxiliary Input
RCA Output
The auxiliary input port is on the fascia. Insert the
stereo 3.5mm plug into the AUX IN port on the
panel of the unit. Connect the other end of the
cable to the headphone port of any external audio
device such as an MP3 player, portable DVD
player, etc. Press the Mode button to select AUX.
The RCA output port is on the back of the unit.
(Refer to page 5) This output is for connecting
amplifier, equalizer, or other audio device that
requires a pre-amp out connection.
(Red = Right, White = Left)
Follow the manufacturers instructions for the
audio device that you are connecting.
After Sales Support
10
UK/N.IRELAND HELPLINE NO: 01270 508538
REP.IRELAND HELPLINE NO:
1800 995 036
WEBSITE:
www.quesh.co.uk
EMAIL:
[email protected]
Bluetooth Operation
Pairing
Rejecting Calls
The bluetooth function of this radio is always in
standby mode ready for pairing and connection,
signalled by a flashing bluetooth icon on the LCD
Display.
During the ring tone or conversation, press the
“REJECT” button to end the call or reject the call.
“END CALL” will be shown on the display and the
unit will resume to the original play mode.
Run the bluetooth search and connect function
on your mobile phone. Find and select “BT car
stereo” on your mobile phone. If you are asked
for a connection password, please input “0000”
on your mobile phone to finish the pairing. The
bluetooth icon on the display will be on indicating
that the connection is established. The bluetooth
functions are ready to use.
BT Audio (A2DP)
Calling
Disconnecting
In any play mode, dial the desired number on your
mobile phone. The unit will switch to bluetooth
handsfree mode automatically. “CALL OUT” will
be shown on the display indicating the dialling is
in progress.
Press MOD/(with green phone logo) button until
the unit displays “BT MUSIC”. BT audio will play
automatically when you play the song on the
mobile phone.
You can pause by the “   ” button.
To choose previous or next song press |<< or >>|
button.
Disconnect the paired phone by operating on the
cellphone. You cannot process disconnection on
the car radio headunit.
Accepting Calls
When there is incoming call, the call number will
be shown on the display indicating there is phone
call to answer. “BT TALK” will be shown after the
“ANSWER” button is pressed. Rotate the VOL
dial during the ring tone or conversation to adjust
the respective volume level.
After Sales Support
UK/N.IRELAND HELPLINE NO: 01270 508538
REP.IRELAND HELPLINE NO:
1800 995 036
WEBSITE:
www.quesh.co.uk
EMAIL:
[email protected]
11
FAQ
Problem
Cause
Solution
No power.
The car ignition is switched
off.
If the power supply is properly connected, switch the ignition key to
ON or ACC.
The fuse is blown.
Replace the fuse according to the
wiring diagram.
Error on LCD display or no
function when buttons are
pressed.
Inbuilt processor is not
operating due to noise.
Press the RESET button.
(See page 6.)
Fascia is not mounted
correctly.
Reattach fascia correctly.
Poor or no radio
reception.
Loose connection /
Not connected.
Check aerial connection on the
back of the unit.
Poor reception area.
Manually tune in station.
Bad earth connection.
Check the cradle has a rust free,
tight connection to the vehicle’s
chassis.
Internal vehicle aerial.
3rd party signal booster maybe
required.
Auto scan does not stop at a
station.
Transmission signal are too
weak.
Manually tune in station.
No sound.
Volume control set too low.
Turn up volume properly.
The device has not been connected properly.
Check wiring according to the
wiring diagram.
MP3/WMA files on USB or
SD/MMC do not play.
Storage greater than 8Gb.
Use a USB, SD/MMC storage
device with no greater storage
capasity than 8Gb
Incorrect file format. (NTFS)
Format the storage device into
either FAT or FAT32 file format.
The music files are DRM
protected.
Bluetooth not working.
Bluetooth module locked up.
Device connecting via
Bad pairing profile on device.
bluetooth but not functioning.
Bluetooth version not compatible
This unit is not DRM
compatible.
Disconnect and reconnect ISO
cable.
Delete the pairing profile off of your
device, press RESET on fascia (see
page 6.) and re-pair device.
No solution.
Please Note:
AM band services are being reduced and this will affect certain areas.
After Sales Support
12
UK/N.IRELAND HELPLINE NO: 01270 508538
REP.IRELAND HELPLINE NO:
1800 995 036
WEBSITE:
www.quesh.co.uk
EMAIL:
[email protected]
Specification
General
Power supply requirement
Current Consumption
Maximum power output
Number of channels
Impedance load
DC 12V
10A max
4 x 25W (measured at 14.4V)
2 x Stereo
4 Ohms - 8 Ohms
FM
Frequency range
87.5MHz - 108MHz
I.F. Frequency10.7MHz
AM
Frequency range
522KHz - 1620KHz
I.F. Frequency450KHz
LINE-OUT
Output1200mV Maximum
SD or USB
SystemMP3 audio codex
Frequency response
20-100Hz <=5dB
10-20KHz <=5dB
After Sales Support
UK/N.IRELAND HELPLINE NO: 01270 508538
REP.IRELAND HELPLINE NO:
1800 995 036
WEBSITE:
www.quesh.co.uk
EMAIL:
[email protected]
13
Warranty Certificate
Warranty
This product is guaranteed to be free from defects in workmanship and parts for a period of 36 months
from the date of purchase. Defects that occur within this warranty period, under normal use and care,
will be repaired, replaced or refunded at our discretion, solely at our option with no charge for parts and
labour. The benefits conferred by this warranty are in addition to all rights and remedies in respect of
the product the consumer has under existing U.K. laws.
Proof of Purchase
This warranty is valid for the original purchase and is not transferable.
Please keep your purchase receipt as proof of purchase and as proof of the date of when the purchase
was made. The receipt must be presented with the warranty card when making a claim under this
warranty.
Service during the Warranty Period
Please ensure the product is properly packaged so as to ensure that no damage occurs in transit. Also
make sure that you have included a detailed explanation of the problem.
Extent Warranty
This warranty is limited to defects in workmanship or parts. All defective products or parts will be
repaired or replaced. This warranty does not extend to accessories.
Normal Wear and Tear
This warranty does not cover normal wear and tear of the product or parts.
Exclusions
This warranty does not cover the following:
• Any defect caused by accident, misuse, abuse, improper installation or operation, lack or reasonable
care, unauthorised modification, loss of parts, tampering or attempted repair by a person not
authorised by the distributor.
• Any product that has been damaged by lightning strike either directly or indirectly, or on a main’s
or vehicle outlet power surge or liquid ingress.
• Any product that has not been installed, operated or maintained in accordance with the
manufacturer’s operating instructions provided with the product.
• Any product that has been used for purposes other than domestic use.
• The product if it is located outside of the U.K.
• Any damage caused by improper power input or improper cable connection.
After Sales Support
UK/N.IRELAND HELPLINE NO: 01270 508538
REP.IRELAND HELPLINE NO:
1800 995 036
WEBSITE:
www.quesh.co.uk
EMAIL:
[email protected]
Warranty Card
Deckless Bluetooth Car Stereo
Model Number: 62207
Please keep your purchase receipt together with your warranty card
Name:
Address:
Date of purchase:
Location of purchase:
Fault Description:
We recommend that you attach a photocopy of your receipt, showing the date of purchase, to this
warranty card and keep it for your reference. In the event of a product fault, please call the After Sales
Support team. Please ensure that you have the product details (as shown on this card) to hand so that
the support team are able to respond as quickly and efficiently as possible.
After Sales Support
UK/N.IRELAND HELPLINE NO: 01270 508538
REP.IRELAND HELPLINE NO:
1800 995 036
WEBSITE:
www.quesh.co.uk
EMAIL:
[email protected]
Service Helpline
QUESH LTD,
1 SOLWAY COURT,
CREWE BUSINESS PARK,
CW1 6LD
Intentionally left blank
Intentionally left blank