1
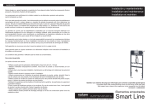
DELUXE REMOTE IMMOBILISER
USER INSTRUCTIONS
CYCL PS
SECURITY SYSTEMS
PROUDLY
AUSTRALIAN
Contents
Page
Introduction
2
! Silent arming
3
! Panic
Operations
! Horn Connection
! Central Locking
! Remote controls
!
!
!
!
!
!
!
!
!
!
!
3
Arming/Disarming
3
Automatic Arming
3
Dome Light Function
4
Immobilisation
4
Emergency Override
4
Override Procedure
5
Programmable Options 6
Program Options Table 6
Program Options Desc’ 7
Changing PIN Code
9
Battery Replacement
10
Optional Features
! Boot release
! Anti-hijacking
! Electric window closer
! Diagnostics
10
11
11
11
11
12
12
12
12
Specifications
13
Trouble Shooting
13
Warranty
14
User Details
15
- Page 1 -
CYCLOPS PARALYSER 355
ENGINE IMMOBILISER
CYCL PS
SECURITY SYSTEMS
Introduction
Congratulations on having one of the world's most advanced engine
immobilisers installed in your vehicle. The CYCLOPS P355 meets Australian
Standards AS/NZS 4601. The P355 uses high security, high reliability
circuitry to disable your car’s engine.
The P355 is designed as a modular system, and so by adding an approved
siren, sensor and switch connections, the P355 can be upgraded to a fully
featured alarm system.
- Page 2 -
OPERATIONS
REMOTE CONTROLS
LED
The P355 is supplied with two rolling code remote
controls. Each time a button is pressed, the code
rolls to a new code. Each code is never used twice. A
small green Light Emitting Diode (LED) will light
when a remote control button is pressed.
MAIN BUTTON
SECONDARY
BUTTON
ARMING AND DISARMING
KEYRING
To arm or disarm the system, press the main button
on the remote control. The vehicle’s indicators will
confirm a valid remote operation. Two flashes for arm and one flash for
disarm. The status LED located on the car’s dash or steering column will
flash when the immobiliser is armed.
AUTOMATIC ARMING
The P355 will automatically disable the engine 40 seconds after the ignition
switch is turned off. Pressing the main remote control button after the system
has automatically armed, will command the P355 to disarm for another 40
seconds. Switching the ignition switch to the ON position is the only way to
stop/reset the auto-arming countdown.
- Page 3 -
DOME LIGHT FUNCTION
When the P355 is disarmed by remote control, the internal circuitry will
switch on the car’s dome light for 30 seconds. This feature will be
cancelled if the driver turns the ignition switch to the ON position. Factory
setting is disabled (see page 7 for details)
IMMOBILISATION
The P355 includes two independent circuits of immobilisation. Each circuit
starves the engine of one of it’s critical power supplies. The circuits are
designed to be fail-secure, so if a would-be thief was to cut power to the
P355, the circuit design will ensure the car remains immobilised.
EMERGENCY PIN OVER-RIDE
If either of the remote controls supplied with the P355 is lost, broken or
stolen, the immobiliser can be disarmed by use of a unique 4 digit Personal
Identification Number (PIN). The PIN is entered using a combination of
ignition switch and LED flashes (see page 5).
- Page 4 -
OVER-RIDE PROCEDURE
To illustrate the PIN over-ride procedure we will assume a PIN of 4,3,2,1.
1. If indicators are already flashing (and horn is sounding - see Optional
Features: HORN) allow the system to reset with all doors closed.
2. Turn ignition switch to ON position, the status LED will remain lit.
3. Turn ignition switch to the ACC position and count the LED flashes.
4. Turn ignition switch ON when the 4th flash has extinguished.
5. Turn back to ACC position and count 3 flashes, switch ignition ON.
6. Turn back to ACC position and count 2 flashes, switch ignition ON.
7. Turn back to ACC position and count 1 flash, switch ignition ON.
When all four digits have been entered correctly, the car’s indicators will
flash once to confirm that the immobiliser is disarmed. The engine can be
started and the car driven. The automatic arming feature will ensure car is
secured again if the ignition is left off for more than 40 seconds.
- Page 5 -
PROGRAMMABLE OPTIONS
The P355 includes 9 programmable options which alter the system functions to comply with the
user’s preferences and vehicle special needs. Changing an option setting is as simple as
! Switch the ignition key ON a certain number times (this number corresponds to the option
number).
! Press the remote control after the prompt from the vehicle’s indicators.
After the remote press the indicators will flash either once or three times to show the result of the
option change. Please see the follow table:
PROGRAMMABLE OPTIONS TABLE
IGNITION SWITCH TURNS
1 FLASH
3FLASHES
3
DISABLED
ENABLED
ANTI HIJACK
7
PROGRAM NEW REMOTE
9
DOME LIGHT UPON DISARM***
DISABLE
PRESS REMOTE
ENABLED
11
HORN/SIREN OUTPUT TYPE
PULSED
CONSTANT
13
ARM/DISARM CONFIRMATION
DISABLED
ENABLED
15
120 SEC RELOCK
DISABLED
ENABLED
17
C/LOCKING PULSE TIME***
0.8 SEC
3 SECS
19
CHANGE PIN CODE
21
OPEN DOOR WARNING
BEGIN NEW PIN
DISABLED
ENABLED
*** do not change - installer only (incorrect setting can damage the system or central locking)
- Page 6 -
PROGRAMMABLE OPTION DESCRIPTIONS
Option #3** the Anti Hijack feature locks the car doors when the
ignition is switched on, except when a connected door is open. The anti
hijack feature unlocks the doors when the ignition is switched off (when
driver has reached destination). The feature is disabled if the dome light
illumination is extended by a vehicle timing circuit.
!
Option #7 programming remote isn't strictly an optional feature. This
feature is used if a spare remote is purchased. Carry out the same
procedure as normal option changes. The first flash indicates the system
is ready to accept a new remote code. Press the main button of the new
remote control within two seconds to teach system. Four indicator
flashes indicates successful programming procedure.
!
Option #9 illuminates the dome light of the vehicle for thirty seconds
when the system disarmed. The light will extinguish early if the ignition
switch is turned to the ON position. Installer may have disabled this
function to prevent damage to system (enquire before enabling).
!
Option #11** determines whether the 30 seconds of siren output is
constant or pulsed. The constant output suits a connection to a siren,
which allows the siren to sound at full volume. The pulsed output suits the
car horn.
** optional feature - will require additional connection(s).
!
- Page 7 -
PROGRAMMABLE OPTION DESCRIPTIONS cont’
Option #13** sets the system to always arm/disarm in silent mode. The
standard indicator flashes will accompany each arm/disarm command, but
the siren will remain silent.
!
Option #15** enables the auto-relock feature. The doors will
automatically re-lock when the vehicle has been disarmed by remote
control and the doors remain closed for more than 120 seconds.
!
Option #17** is used to extend the time length of the central locking
pulses. Vehicles that use a pneumatic central locking system require
about three seconds to allow the pump to charge the air hoses. Enable this
option only to extend the time in these situations.
!
Warning: extending the pulse time to a direct drive relay will cause damage to actuator.
! Option #19 is used to change the values of the Emergency PIN. A card
with the PIN details must be supplied by your installer. Please contact
your installer if the card is missing.
! Option #21 the alarm system can be set to produce an open door warning
when arming. The warning is in the form of a short series of chirps from
the siren or horn. Do not enable this option where the dome light
illumination is extended by the vehicle’s timing circuit.
** optional feature - will require additional connection(s).
- Page 8 -
CHANGING PIN CODE
To alter the PIN code of the system, follow the standard option change
procedure; select option #19.
!
The vehicle indicators will flash twice to inform you that the system is
ready to accept the new PIN. The “time-out” is set to two seconds. If
the programming has not begun before then, the system will drop-out
of programming mode.
!
Enter the new digits by momentarily pressing the main button on a
valid remote control. The vehicle indicators will flash in response to
each press. Stop pressing when the correct digit count is achieved.
Each digit will be confirmed by two indicator flashes.
!
Enter the remaining digits in the same fashion. Four flashes will
confirm the programming procedure is complete.
Arm the system and confirm the new PIN by completing override
procedure (page 5). Ensure the new PIN is recorded, but do not leave in
vehicle.
- Page 9 -
BATTERY REPLACEMENT
Using a flat head screwdriver to carefully
CASE TOP
separate the two body housings taking care
not to disturb the circuit board. Remove
the old batteries whilst paying attention
to the orientation of the positive
and negative terminals. Insert
new batteries in identical
fashion to the original and reassemble remote. Test remote
control by pressing main button.
REMOVE BATTERIES
For further information, please
IN THIS DIRECTION
contact your local Cyclops service
centre. Remote battery type
CR2016.
MEMBRANE
PCB
CASE BOTTOM
KEYRING
OPTIONAL FEATURES
All optional features require additional connections. Many require
additional hardware as well. Each feature is described within the next
pages.
- Page 10 -
HORN CONNECTION
The P355 includes circuitry to sound the car horn relay. The car horn will
toot to confirm arming / disarming. The car horn will pulse for thirty
seconds if a thief opens the door after the system was armed by remote.
TEMPORARY SILENT ARMING
The second button on the remote control can be used to cancel the car horn
confirmation*. To cancel car horn toots for one operation, press the second button
momentarily before pressing the main button. The confirmation car horn toots will
be re-enabled for the next operation. The P355 can also be programmed to
permanently disable the car horn confirmation by changing option #13.
PANIC
When the main button on the remote control is pressed and held down for more than
two seconds the system will go into a panic mode*. In this mode the indicators will
flash and the car horn will pulse. The panic mode will continue for thirty seconds.
Should you wish to cancel the panic signal before thirty seconds, press the main
button of the remote control again.
CENTRAL LOCKING
Each time the P355 is armed by remote control the car doors will lock. Likewise when
disarming by remote control, the doors will unlock. When the auto-lock feature (#15)
is enabled, the doors will re-lock after 120 seconds if all doors remain closed after
disarming.
- Page 11 -
BOOT RELEASE
Press the second button on the remote control and keep it depressed until the boot
releases*. This will take about three seconds. A successful boot release signal will
disarm the alarm and flash the vehicle indicators four times. This function can only
operate if the vehicle is equipped with an electrical boot release.
ANTI HIJACK
Two seconds after the ignition is switch to the ON position, the P355 will lock the
cars doors. The lock signal will be cancelled if the P355 detects any connected door
open*. As soon as the ignition switch is turned off, the P355 will unlock the doors*.
This feature comes as standard, and can be disabled (see option #3).
ELECTRIC WINDOW CLOSER
Only when the P355 is armed by remote control, the electric windows of the car will
roll up until closed.
ONBOARD DIAGNOSTICS
Each time the P355 is triggered,
the system stores the identity
of the triggered zone in
memory. A diagnostic report is
produced the next time the
P355 is disarmed by remote
control.
Flashes
1
Zone Description
Bonnet switch
2
Auxiliary trigger
3
Door open
4
Glass breakage sensor
- Page 12 -
SPECIFICATIONS
Manufactured by
Model Number
Standards met
Supply voltage
Current consumption
Country of manufacture
RF Transmission Freq
Dynamco Pty Ltd.
P355.
AS/NZS 4601
+9VDC - 15VDC.
less than 20mA (while armed).
China (in Dynamco’s ISO-9002 facility).
433MHz
TROUBLE SHOOTING
System won't arm. LED on dash won't flash.
!
!
!
Make sure that ignition switch is in the OFF position.
Ensure the vehicle battery is not flat.
Try your spare remote transmitter unit.
!
!
Try spare remote control
Use Emergency PIN to override system and contact nearest Cyclops service centre.
!
If the remote fails to operate and the LED does not light up when the button is pressed then
change the battery. To do this you will need a small screwdriver. See page 10 for details on
battery replacement
System won’t disarm. LED on dash won’t extinguish.
The remote fails to operate
- Page 13 -
WARRANTY
The Dynamco range of Cyclops Security Systems is covered by an extensive two year warranty (parts & accessories one year). In the unlikely event of a
faulty system Dynamco will either replace or repair the system at no cost during the 2 year period.
The warranty does allow for the following conditions ~
Subject to the conditions stated below, Dynamco Pty Ltd warranty the product to be free from manufacturing defects and faulty material within the
warranty period stated.
That the warranty registration has been completed in full at the time of purchase / installation and is produced when warranty service is sought
The warranty does not cover general maintenance such as cleaning / adjusting of door, boot, bonnet or any entry point switch, nor replacement of
consumables items such as transmitter batteries, lighting circuit bulbs / switches.
The warranty shall be null & void if: 1.
Any person other than by an Authorised Cyclops Sales, Service & Installation Centre has repaired the product.
2.
Should a system / part defect become apparent within the warranty period DYNAMCO PTY LTD will repair the product free of charge for parts
and labour. The warranty does not cover service labour content or mobile service content.
3.
The product has been altered or tampered with in any way, or the serial number altered, defaced or removed.
4.
The defect has been caused by negligence by the owner or their agent / third party.
5.
The product has not been operated correctly, installed by an unauthorised Cyclops installer or has been subjected to misuse or undue wear and tear
6.
Siren, control module, remote controls or any other system part are damaged by water.
The warranty does not cover the following costs: 1.
Transport of the product to and from Cyclops Service Centres.
2.
Insurance of the product whilst in transit to or from the Cyclops Service Centres
3.
Cost of any service call / labour where the product is found by Cyclops to be in good working order
The benefits conferred by this Warranty are in addition to all other rights and remedies, which the consumer has conferred in law.
“No liability is accepted for any loss, loss from, damage to or inability to use the vehicle to which the system is installed”.
- Page 14 -
WARRANTY REGISTRATION
PURCHASED FROM
OWNER’S NAME
TYPE OF VEHICLE
VEHICLE REGO
MODEL OF UNIT
P.I.N
DATE OF MANUFACTURE
DATE OF INSTALL’
WARRANTY PERIOD
CONTROL MODULE
SIREN & REMOTES
INSTALLER’S NAME
AFTER HOURS EMERGENCY PHONE
- Page 15 -
.
.
.
.
CYCL PS
SECURITY SYSTEMS
.
.
.
.
.
.
.