1
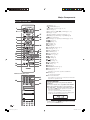
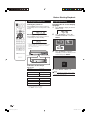
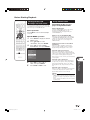
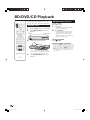
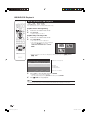
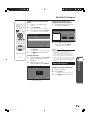
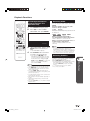
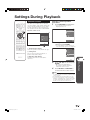
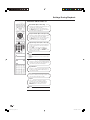
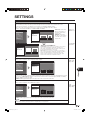
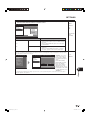
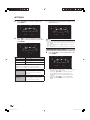
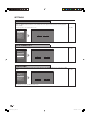
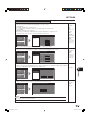
SETTINGS
AUDIO VIDEO SETTINGS
TV ASPECT RATIO
• If you switch your TV (i.e. because you have bought a new one) and the screen aspect ratio of the
connected TV changes, you will have to change the “TV ASPECT RATIO” setting.
• You can set the screen aspect ratio of the connected TV, and adjust the video output.
• Select “TV ASPECT RATIO” from “AUDIO VIDEO SETTINGS”.
MENU [AUDIO VIDEO SETTINGS - TV ASPECT RATIO]
MENU [AUDIO VIDEO SETTINGS]
WIDE 16:9: Select this
when connecting to a
TV ASPECT RATIO
AUDIO VIDEO SETTINGS
TV with a 16:9 screen
COMPONENT VIDEO OUT
SPEAKER SETTINGS
HDMI VIDEO OUT
QUICK START
aspect ratio.
HDMI AUTO DETECTION
AUTO POWER OFF
NORMAL 4:3: Select
AUDIO OUT
AQUOS LINK
16 : 9
4:3
DYNAMIC RANGE CONTROL
PLAYBACK SETTING
this when connecting to
FRONT DISPLAY / LED
a TV with a 4:3 screen
VERSION
WIDE
NORMAL
aspect ratio.
SOFTWARE UPDATE
WIDE 16:9
NORMAL 4:3
SYSTEM RESET
MENU
[AUDIO VIDEO SETTINGS - TV ASPECT RATIO]
TV ASPECT RATIO
COMPONENT VIDEO OUT
HDMI VIDEO OUT
HDMI AUTO DETECTION
AUDIO OUT
DYNAMIC RANGE CONTROL
LETTER BOX
PAN SCAN
<When selecting NORMAL 4:3>
LETTER BOX: If you connect to a TV with a screen aspect
ratio of 4:3 and playback a DVD with 16:9 video, the
video will be played back with black bands at the top and
bottom while maintaining the 16:9 ratio.
PAN SCAN: If you connect to a TV with a screen aspect
ratio of 4:3 and playback a DVD with 16:9 video, the video
will be played back with the left and right sides of the
image cut off to display in 4:3 screen aspect ratio. (This
function works if the disc is labelled for 4:3PS.)
LETTER BOX,
PAN SCAN
COMPONENT VIDEO OUT
• This sets the resolution of the component video output.
MENU
[AUDIO VIDEO SETTINGS]
[AUDIO VIDEO SETTINGS - COMPONENT VIDEO OUT]
1080i, 720p,
480p, 480i
TV ASPECT RATIO
COMPONENT VIDEO OUT
HDMI VIDEO OUT
HDMI AUTO DETECTION
AUDIO OUT
DYNAMIC RANGE CONTROL
1080i
720p
480p
480i
q
AUDIO VIDEO SETTINGS
SPEAKER SETTINGS
QUICK START
AUTO POWER OFF
AQUOS LINK
PLAYBACK SETTING
FRONT DISPLAY / LED
VERSION
SOFTWARE UPDATE
SYSTEM RESET
MENU
Settings
• Some TV are not fully compatible with the Blu-ray disc player, which may cause the image distortion. In this
case, press “COMPONENT RESET” on the remote control for five seconds. Component video out will be
reset to 480i (factory preset value).
Caution: HDMI output and Component output can not be used at the same time.
HDMI VIDEO OUT
• This sets the resolution of the HDMI video output.
MENU
[AUDIO VIDEO SETTINGS]
AUDIO VIDEO SETTINGS
SPEAKER SETTINGS
QUICK START
AUTO POWER OFF
AQUOS LINK
PLAYBACK SETTING
FRONT DISPLAY / LED
VERSION
SOFTWARE UPDATE
SYSTEM RESET
MENU
[AUDIO VIDEO SETTINGS - HDMI VIDEO OUT]
AUTO,
1080p, 1080i,
720p, 480p
TV ASPECT RATIO
COMPONENT VIDEO OUT
HDMI VIDEO OUT
HDMI AUTO DETECTION
AUDIO OUT
DYNAMIC RANGE CONTROL
AUTO
1080p
1080i
720p
480p
Caution: HDMI output and Component output can not be used at the same time.
NOTE
• When the BD player is connected to a 1080p 24Hz compatible TV and the HDMI VIDEO OUT is set to AUTO, 1080p
24Hz will automatically be displayed when compatible discs are played back.
33
BD-HP20U_en_e.indd 33
2007/08/06 10:20:50