1
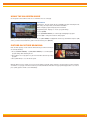
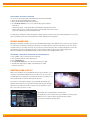
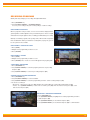
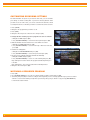
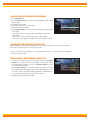
User Guide
Plex Advanced TV
powered by
V1-0412
Table of contents
Say Hello to Plex Advanced TV powered by Microsoft Mediaroom....................................................................................................... 2
Your Plex Advanced TV digital receiver................................................................................................................................................... 3
Your Remote Control................................................................................................................................................................................ 4
Programming Your Remote..................................................................................................................................................................... 5
Using your Plex Advanced TV service..................................................................................................................................................... 6
High Definition TV.................................................................................................................................................................................... 6
Managing Live TV Feeds......................................................................................................................................................................... 6
Using the Menu........................................................................................................................................................................................ 7
Using the On-Screen Guide..................................................................................................................................................................... 8
Picture-in-Picture Browsing..................................................................................................................................................................... 8
Customizing Your Guide.......................................................................................................................................................................... 9
Favorites List............................................................................................................................................................................................ 9
Using Search.......................................................................................................................................................................................... 10
Video On Demand................................................................................................................................................................................. 11
Parental Control..................................................................................................................................................................................... 12
Whole Home DVR.................................................................................................................................................................................. 13
Controlling Live TV................................................................................................................................................................................. 13
Recording Programs.............................................................................................................................................................................. 14
Customizing Recording Settings........................................................................................................................................................... 15
Watching a Recorded Program............................................................................................................................................................. 15
Unlocking a Recorded Program............................................................................................................................................................ 16
Managing Recording Conflicts.............................................................................................................................................................. 16
Resolving a Recording Conflict............................................................................................................................................................. 16
Screen Aspect Resolution..................................................................................................................................................................... 17
Descriptive Video................................................................................................................................................................................... 17
Digital Audio Output............................................................................................................................................................................... 17
Applications........................................................................................................................................................................................... 18
Frequently Asked Questions................................................................................................................................................................. 19
Troubleshooting your Plex Advanced TV system.................................................................................................................................. 21
How to contact North State Communications....................................................................................................................................... 23
Say Hello to
Plex Advanced TV
powered by
...and say goodbye to planning around your shows, running out to rent a movie and being tied to just one TV. You can now enjoy
features only available with digital TV such as Video On Demand and High Definition (HD) programming and with the
Interactive Programming Guide planning your TV viewing is a breeze. You can use keyword search to find your favorite
programs or actors and even find out what else is on while watching your current program with Picture-in-Picture browsing.
Plus get convenience and flexibility with Plex Advanced TV powered by Microsoft Mediaroom applications.
If you have a Plex Advanced TV Digital Video Recorder (DVR) you also have the power to record, pause and replay live TV with the
press of a button. Plus, with Whole Home DVR, one DVR is all you need. You can record and watch your shows from any TV in your
home with a digital receiver. And you can record up to 2 shows at once.
Please keep this guide in a safe place. It’s filled with tips and easy-to-follow instructions that will help you every step of the way.
For more information, call us at 336-886-3900.
2
Your Plex Advanced TV
Digital Receiver
The following illustrations outline your digital receiver (HD or HD DVR) functions and connections.
Digital receivers may not be exactly as shown below.
POWER
LINK
1.
2.
3.
4.
5.
6.
7.
8.
HD
RECORD
MENU
OK
Power – Turns your digital receiver on or off and is lit when power is on.
Model number – Identifies hardware model.
Link – Lit when the digital receiver is connected to the North State network.
HD – Lit when the digital receiver is configured to display HD content.
Record – Lit on all digital receivers when a DVR recording is in progress.
Menu – Displays onscreen menu.
Navigation – Moves selection up, down, left or right.
USB – Not currently enabled.
Model numbers: SA430, SA330, Cis430, Cis330 and ISB 7,000
Plug layouts may vary depending on receiver model. Plugs are identified on back of receiver.
1. Network In – Connects the network cable from your home network or modem.
2. USB – Not currently enabled.
3. HDMI (Out) – HDMI is the HD connection that contains both audio and video signals.
4. Use for HDTVs Component Video Out – Component video cables can be used for
high quality signals to either HD or non-HDTVs.
5. S-Video Out – S-Video is preferred for older TVs.
6. RCA Video / Audio 1 Out – These connections are ideal for VCRs and older TVs.
The audio ports can be used independently if other video connections have been used.
7. RCA Video / Audio 2 Out – These duplicate connections are available for users with multiple devices.
8. Optical – This is an all-digital audio connection. It is ideal for audio receivers.
9. Video Out – Connects to the antenna jack on the TV.
10. Video In – For North State installer use only.
11. Power In – Connects to the supplied adapter to power the unit.
3
Your Remote Control
Why have multiple remotes when all you need is one? The Plex Advanced TV remote is universal and works with most TVs, DVD
players, VCRs and A/V receivers.
Once your remote is programmed, select the device you want to power
on by first pressing either , ,
or
and then pressing .
Allows you to control your digital receiver
Allows you to control your TV
Displays a detailed description of the
selected program
Displays the search menu
Turns the device you are controlling
on and off
Displays the Call Display menu
Allows you to control your DVD player
Allows you to control an auxiliary device
such as a VCR, DVD player or A/V receiver
Displays the Video On Demand menu
Increases volume
Decreases volume
and menus one page at a time
Scrolls through the program listings
Displays the main menu
Returns to the previous menu screen
Quick access to Plex Advanced
TV applications
Moves selection up, down, left or right
Selects the highlighted item
Displays the Interactive
Programming Guide
Exits all menu screens and returns
to live TV
Turns all sound on and off
Returns to the previous channel and shows
picture-in-picture of the last 5 channels
you viewed
Deletes letters or numbers entered
Toggles between 5 screen-size settings
The following buttons also allow you to access additional functions if you have a DVR:
Records live TV
Reverses or fast-forwards your Video On Demand
movie, VCR/DVD, live TV or recorded program.
Repeatedly press the button to choose from 3 speeds.
Stops your Video On Demand movie, VCR/DVD,
or recorded program
Pauses your Video On Demand movie, VCR/DVD,
live TV or recorded program
Plays your Video On Demand movie, VCR/DVD,
paused live TV or recorded program
Reverses in 7-second intervals or fast-forwards in
30-second intervals for Video On Demand movie,
live TV and recorded programs
Displays recorded programs and scheduled recordings
Please note that A, B, C, TV/VIDEO and GO INTERACTIVE are
not currently enabled.
4
Programming Your Remote
Your remote is initially programmed to only operate your receiver. Therefore,
you must program the remote to operate your TV, DVD player, or other devices.
Note: You must use the IR (infrared) remote within line of sight of the receiver for
the receiver to operate correctly.
HOW DOES YOUR UNIVERSAL REMOTE CONTROL WORK?
You tell the remote which device you want to operate using the four keys, called mode keys, arched across the top of the remote
on each side of the Power button. These keys are labeled STB, TV, DVD, and AUX. Each mode key is associated with a specific
device. For example, after programming the remote, to operate your TV you simply press the TV key. Other keys you press on
the remote, thereafter, should operate your TV. To operate a different device, just press the mode key for the next device you want
operate.
AUTO-SEARCHING THE CODE LIBRARY FOR TV OR DVD MODE CODES (PROGRAM CODE 922)
Note: This procedure only applies to TVs and DVDs. Once one is programmed, program the other using the same steps and a
different mode key.
1. Turn on the device that you want to assign to the TV or DVD key.
2. Point the remote at the device.
3. Press and hold a selected mode key (TV or DVD), then press the OK key. For example, to search for a TV code, press and hold TV and OK at the same time.
4. Release both keys and all the mode keys blink twice.
5. Enter the programming code 9 2 2 by pressing the numeric keys on the remote. The mode key you selected in step 3 blinks twice to indicate a successful entry.
6. Point the remote toward the device, and press PLAY.
7. Your device powers off when it finds the correct code. Then, choose one of the following options:
• Save code and exit – Press the ENTER key on the remote to program the code in the remote and the mode key flashes three times indicating successful entry.
To program more devices, please call Product Support at 886-3900.
5
Using your
Plex Advanced TV service
Quick tip: When not in use for 4 hours the digital receiver will automatically enter standby mode to conserve energy. But don’t
worry; your scheduled recordings will not be interrupted.
HIGH DEFINITION TV
High Definition (HD) is an entirely new way to watch television. Experience a true
widescreen picture that’s up to 10x better than regular cable TV. And with 5.1
Dolby® Digital sound, HD is a treat for your ears as well.
All North State digital receivers are HD-ready,
you’ll find the HD channels between 1000 and 1435.
MANAGING LIVE TV FEEDS
In the guide, HD programs are identified by an HD icon after the program title.
Plex Advanced TV supports up to 6 TVs and delivers 5 HD and 2 SD TV feeds to your household. A TV feed can be a live TV show,
a Video On Demand program or a Pay Per View (PPV) event. If you have 2 or more TVs tuned to the same live TV program you’ll
only be using 1 live TV feed. Also, watching programs that have already been recorded on your DVR doesn’t use a live feed.
For example, you can do one of the following:
• Watch 6 different live TV programs; 5 in HD and 1 in SD
• Record 1 live program on your DVR and watch 6 other live programs
• Record 2 live programs on your DVR and watch 5 live programs
The number of live HD (high definition) programs you can watch at once depends on the service in the area you live. All Plex Advanced TV homes can watch or record at least 5 live TV program in HD and 2 in SD (standard definition) at the same time. Depending on the service availability at your home, you may be able to watch or record 2 live TV programs in HD and a third in standard
definition.
If you try to watch or record more live TV programs than you have available feeds, your Plex Advanced TV service will present you
with options to select the programs that you wish to watch or record.
For example, if 3 live TV programs are being watched and a fourth TV is turned on to watch another program, you will be prompted
to choose which programs you want to continue to watch or record. If you choose to interrupt a program on another TV, a message
will be displayed on both affected TVs.
With your Plex Advanced TV DVR, while the live TV feeds are being used to watch or record live programs, you can watch up to 4
recorded programs on your other TVs. Viewing a recorded program does not use a live TV feed as it is stored on your DVR.
6
Subscribing to the Time Choice theme pack allows you to watch or record your
favorite programs outside your local time zone with time shifting and will help
you manage usage of your live feeds. This means you can watch or record your
favorite programs earlier when it is more convenient for you.
Quick tip: Turning off one of your digital receivers will free up a live TV feed.
USING THE MENU
Use the menu to quickly access the Live TV, Recordings (DVR only), Video On
Demand, Applications, Settings and Help Center drop down menus.
Here is a brief description of each drop down menu:
LIVE TV
Watch live TV - Allows you to watch a live TV program.
Guide - Accesses the program guide.
Favorites - Accesses your customized favorites list.
Search - Allows you to easily find your favorite TV shows, Video On Demand and PPV programs.
RECORDED TV (DVR SUBSCRIBER)
View recordings - Lists all in progress and completed recordings.
Scheduled - Lists all future recordings.
Add a recording - Allows you to record a program using search,
the guide or by entering the channel number and recording time.
APPLICATIONS
Plex Avenue - Provides access to interactive online content, such as news,
weather, and online games, all accessible from your receiver.
VIDEO ON DEMAND
Video On Demand - Lists all videos by category
Current rentals - Lists all your rented titles and those that are still available to view
Search - Allows you to easily find your favorite Video On Demand titles
SETTINGS
General - Allows you to turn system sound effects on or off, access system information and troubleshoot your connection.
Television - Allows you to customize your guide, favorites list, screen aspect ratio and closed captioning.
Audio - Allows you to activate descriptive video and change your digital audio output settings.
Parental Controls - Allows you to block Video On Demand titles, PPV events and programs by channel, rating or content.
Restart system - Reboots your digital receiver. All your user settings will be saved.
7
USING THE ON-SCREEN GUIDE
Use the guide to find out which shows are on and which ones are coming up.
CALLOUTS:
Information - Provides details about a highlighted program including the title,
time, rating, description and cast information if available.
Guide - Displays program listings by time and channel.
Programming view - Displays 1½ hours of program listings.
1. Press (GUIDE).
2. Use (UP/DOWN ARROWS) to scroll through and highlight a program.
3. Press (OK) to change the channel to that program.
Quick tip: To view a list of all programs on a channel, use (LEFT ARROW) to highlight the channel logo and number and press (OK)
and to go forward or backward in the guide in 24-hour intervals, press (REW/FF).
PICTURE-IN-PICTURE BROWSING
Find out what’s playing on other channels without missing a moment of what you
are currently watching.
1. Press (UP/DOWN ARROWS) or (LEFT/RIGHT ARROWS) to scroll through the
program listings while watching live TV.
2.Press (OK) to select a program or to get more information about an upcoming
program.
3. Press (EXIT TO TV) to close the browse panel.
Quick tip: When you press (LAST) on your remote, Plex Advanced TV will change channels to the last channel you were watching.
You will also see a pop-up of the last 5 channels you viewed with Picture-in-Picture. This pop-up will disappear after 10 seconds or
press (LAST) again to exit this screen immediately.
8
CUSTOMIZING YOUR GUIDE
Customize your guide so that it shows only the channels you watch
the most.
1. Press (MENU).
2. Use (LEFT/RIGHT ARROWS) to select Settings.
3. Use (UP/DOWN ARROWS) to select Television and press (OK).
4. Use (UP/DOWN ARROWS) to select Customize
your guide and press (OK).
5. Use (UP/DOWN ARROWS) to highlight available channel(s)
and press (OK) to add or remove the channel(s). A green checkmark
will appear next to the channel(s) that are included in the guide.
6. Navigate to Save and press (OK) to save your changes.
FAVORITES LIST
You can customize your onscreen guide to display only the channels you want
to view by creating a favorites list. A separate favorite list can be created on each
digital receiver.
CREATING YOUR FAVORITES LIST FOR THE FIRST TIME
1. Press (MENU).
2. Use (UP/DOWN ARROWS) to select Favorites under Live TV and press (OK).
3. Use (UP/DOWN ARROWS) to select Set up favorites and press (OK).
4. Use (UP/DOWN ARROWS) to highlight the available channels and press (OK) to add it to the favorites list.
5. Navigate to Save and press (OK) to save your changes.
A green checkmark will appear next to the channels that are included in your favorites list.
SELECTING YOUR FAVORITES LIST
1. Press (MENU).
2. Use (UP/DOWN ARROWS) to select Favorites under Live TV and press (OK).
EDITING YOUR FAVORITES LIST
1. Press (MENU).
2. Use (LEFT/RIGHT ARROWS) to select Settings.
3. Use (UP/DOWN ARROWS) to select Television and press (OK).
4. Use (UP/DOWN ARROWS) to select Set up favorites and press (OK).
5. Use (UP/DOWN ARROWS) to highlight the available channels and press (OK) to add or remove the channel(s).
A green checkmark will appear next to the channels that are included in your favorites list.
6. Navigate to Save and press (OK) to save your changes.
9
USING SEARCH
Use search to quickly and easily find your favorite TV shows, Video On Demand titles and PPV events.
1. Press MENU, LIVE TV, and SEARCH.
2. Highlight OPTIONS to search by one of the following:
•Title of a TV show, Video On Demand or PPV program
•Name of a person (actor/actress/director)
3. Navigate to highlight the first letter you are entering and press (OK).
4. Repeat step 3 to enter more letters.
a.To enter a number, navigate to 123 and press (OK).
b.Navigate to highlight a number and press (OK).
c.To return to the alphabet, navigate to ABC and press (OK).
5. Navigate to highlight the desired search result and press (OK)
to view upcoming episodes of the same program or different programs with the same cast.
6. Use (UP/DOWN ARROWS) to highlight the program title and press (OK).
7. Use (UP/DOWN ARROWS) to highlight the desired option and press (OK).
Quick tip: Quickly search by using the number keypad on your remote
to spell the name of the person or program you are looking for.
10
VIDEO ON DEMAND
With Video On Demand you can order great films and enjoy full control to start, pause, rewind and fast-forward. Choose from
hundreds of titles, including Hollywood blockbusters, timeless classics and a wide variety of titles available in HD. Plus check out
Video On Demand to watch great shows and movies when it’s convenient for you. And TV Video On Demand content is included
with channel subscription so there is no charge to view. To find out what’s playing, go to channel 15 or check out the On Demand
menu.
If you want to prevent unauthorized rentals, create a rental locking PIN. Refer to page 12 to learn how.
RENTING A VIDEO ON DEMAND PROGRAM
Renting a Video On Demand program
1. Press (VIDEO ON DEMAND).
2. Use (LEFT/RIGHT ARROWS) to select a video category. For Video OnDemand
select the TV category. For those with subcategories, use (UP/DOWN
ARROWS) to select the desired subcategory and press (OK).
3. Use (UP/DOWN ARROWS) to select a video and press (OK). A Program info
screen will appear for you to watch a preview or rent the video.
4. Use (UP/DOWN ARROWS) to select Rent for $ and press (OK). Or if you have
selected a Video On Demand title select Play and press (OK).
5. Use (UP/DOWN ARROWS) to select Rent for $ and press (OK). The video will
begin playing immediately.
If you have blocked adult-rated content, the titles of the adult films will not appear
in the Video On Demand menu within the adult category. To view these titles refer
to page 13 to learn how to disable your Parental Controls.
WATCHING A RENTED VIDEO ON DEMAND PROGRAM
Watch your rentals as many times as you want within the rental period (48 hours
for most rentals).
1. Press (Video On Demand) or tune to channel 2 and highlight My Videos to
view your current rentals.
2. Use (CIRCLE OF ARROWS) to select the movie you would like to watch
and press (OK).
3. Press (OK) to start playing the video.
11
PARENTAL CONTROL
Not all shows are meant for all eyes, which is why you’re in control of what your family watches. To do so, Parental Controls must
be configured on each of your digital receivers with your PIN and will allow you to block programs by channel, rating and content.
You’ll also need this PIN to modify your settings, view blocked content or change your PIN.
CREATING A PARENTAL CONTROL PIN
CREATING A VOD LOCKING PIN
The default PIN is 9999.
1. Press (MENU).
2. Use (LEFT/RIGHT ARROWS)
to select Settings.
3. Use (UP/DOWN ARROWS)
to select Parental Controls and press (OK).
4. Use (UP/DOWN ARROWS)
to select Parental Controls and press (OK).
5. Create a 4-digit PIN using the number
pad on your remote control.
6. Confirm the 4-digit PIN by re-entering the PIN.
Prevent unauthorized rentals of Video On Demand programs by creating
a rental locking PIN. This PIN is independent of your Parental Control PIN.
The default PIN is 9999.
1. Press (MENU).
2. Use (LEFT/RIGHT ARROWS) to select Settings.
3. Use (UP/DOWN ARROWS) to select Parental Controls and press (OK).
4. Use (UP/DOWN ARROWS) to select Rental locking and press (OK).
5. Create a 4-digit PIN using the number pad on your remote control.
6. Confirm the 4-digit PIN by re-entering the PIN.
7. Press (OK) to select Rental locking.
8. Use (LEFT/RIGHT ARROWS) to select Save and press (OK).
BLOCKING AND UNBLOCKING PROGRAMS
Block or unblock programs by channel or content rating.
1. Press (MENU).
2. Use (LEFT/RIGHT ARROWS) to select Settings.
3. Use (UP/DOWN ARROWS) to select Parental Controls and press (OK).
4. Enter your 4-digit Parental Control PIN with the number pad on your
remote control.
5. Use (UP/DOWN ARROWS) to highlight Change next to the blocking option
you want to use and press (OK). You must lock the Adult programs option to
block adult rated content.
6. Use (UP/DOWN ARROWS) to make you selection and press (OK).
Rental
–Allows PIN requirement for VOD rental.
Channels
–Allows you to block selected channels.
USTV Parental
Guidelines
–Allows blocking of programs based on TV ratings.
Movie ratings
–Allows you to block programs rated G, PG, R or X.
When you choose to block by rating, all programs with higher
ratings will also be blocked. To block Adult Movies you must
set the adult program to locked.
Unrated content –Allows you to block programs that are not rated e.g.
educational programs and movies released before 1960s.
Adult content
–Allows PIN requirement for Adult content programming.
12
WATCHING A BLOCKED PROGRAM
You can access blocked programs temporarily with your Parental Control PIN.
1. Tune to the blocked program and press (OK).
2. Enter your Parental Control PIN in the text receiver.
3. Use (UP/DOWN ARROWS) to select one of the following options and press.
•.Don’t unlock
•.Unlock this program – The program will be automatically locked again after 2 hours
•.Unlock all TV for 2 hours – All blocked programs on this TV will be unlocked for 2 hours
(option not available if there is blocked adult content).
If rental locking is enabled for a Video On Demand or PPV program, you must first enter your rental locking PIN to access the program. You will then need to enter your Parental Control PIN to watch the blocked program.
WHOLE HOME DVR
With Whole Home DVR, one DVR is all you need to get full DVR functionality on any digital receiver in your home. You can pause
a recorded show you have been watching in your living room and pick up where you left off in the kitchen or den. You can also
schedule and access recordings from any room in your home, and even watch the same recording from different rooms at the
same time and control them separately. Plus pause, rewind and fast-forward live TV from any TV with a digital receiver.
Whole Home DVR gives you full DVR functionality on up to 5 other TVs when equipped with receivers.
RESUMING A RECORDED PROGRAM ON A DIFFERENT TV
1. Press (STOP) on the recorded show you are watching.
2. Go to another TV and turn on the digital receiver.
3. Press (RECORDED TV).
4. Use (UP/DOWN ARROWS) to select the same show and press (OK).
5. Select Resume play and press (OK) to start viewing the recording
from where you left off.
CONTROLLING LIVE TV
When you’re watching a show, your DVR will save it for up to 90 minutes, so you
can pause, rewind and fast-forward whenever you like on the TV connected to
your DVR. Once you’ve paused live TV, a status bar will show you where you are
in the program and how much has been temporarily saved.
If you pause for longer than 90 minutes, the program will automatically start
playing from the point where you paused it. All temporarily saved live TV will be
deleted once you change the channel or turn your TV off. Remember, if you’d
like to save a show, be sure to record it.
•The shaded green segment indicates saved program.
•The bright green cursor indicates where you are within the saved program.
•When the cursor is at the far right of the green shaded segment,
you are at the current time in the program.
13
RECORDING PROGRAMS
Quickly and easily manage your recordings through the DVR menu.
1. Press (RECORDED TV).
2. Use (LEFT/RIGHT ARROWS) or (UP/DOWN ARROWS)
to access your recordings, edit your recording settings, or add a recording.
RECORDING PROGRAMS
When a program is being recorded, a red record icon will be displayed in the
guide regardless of which digital receiver you are watching TV on. The record light
will remain lit on all your digital receivers, including your DVR, during a recording.
Quick tip: Sometimes programs, like sporting events, will run a little longer than
their scheduled time. But if you extend the recording time (see page 15) you can
be sure you won’t miss a minute.
RECORDING A SINGLE EPISODE
1. Press (GUIDE).
2. Navigate to the program that you wish to record.
3. Press (RECORD).
RECORDING A SERIES
1. Press (GUIDE).
2. Navigate to the program that you want to record.
3. Press (RECORD) twice. A series record icon will appear in the program guide.
STOPPING A RECORDING
1. Press (RECORDED TV).
2. Use (UP/DOWN ARROWS) to select the program you wish to stop recording
and press (OK).
3. Use (UP/DOWN ARROWS) to select Stop recording and press (OK).
CANCELLING A FUTURE RECORDING
1. Press (RECORDED TV).
2. Use (LEFT/RIGHT ARROWS) to select Scheduled.
3. Use (UP/DOWN ARROWS) to select the program that you wish to cancel recording and press (OK).
4.To cancel a recording of:
•An episode – select Don’t record, press (OK) and then select Cancel Episode or Cancel Recording and press (OK).
•A series – Use (UP/DOWN ARROWS) to select Series record info, press (OK), then select Cancel series, press (OK), select Cancel series and press (OK).
DELETING A RECORDED PROGRAM
1. Press (RECORDED TV).
2. Use (UP/DOWN ARROWS) to highlight the recorded program that you want to delete and press (OK).
3. Use (UP/DOWN ARROWS) to select Delete and press (OK).
4. Use (UP/DOWN ARROWS) to select Delete and press (OK) to confirm deletion.
14
CUSTOMIZING RECORDING SETTINGS
No matter what time an episode of your favorite show ends, you can customize
your settings to extend recording time or protect it from being deleted. And if
you’d like to save an entire series, you can also customize the start time, extend
recording time and choose whether you want to record first runs as well as reruns.
1. Press (GUIDE).
2. Navigate to the program that you want to record.
3. Press (INFO).
4. Navigate to Record episode or Record series and press (OK).
To change the time slot that you prefer a program series to be recorded in:
a. Navigate to TIME and press (OK).
b. Use (UP/DOWN ARROWS) to select the desired option and press (OK).
To indicate whether first run and rerun of a series will be recorded:
a. Navigate to SHOW TYPE and press (OK).
b. Use (UP/DOWN ARROWS) to select First run only or First run & rerun and press (OK).
To extend a recording time:
a. Navigate to STOP RECORDING and press (OK).
b. Use (UP/DOWN ARROWS) to select a time period and press (OK).
To protect your recordings from being deleted automatically:
a. Navigate to KEEP and press (OK).
b. Use (UP/DOWN ARROWS) to select one of the following and press (OK).
Keep until space needed – Deletes the program automatically when space
is needed.
Keep until I delete – Stores the program until it is manually deleted.
5. Navigate to Record and press (OK).
WATCHING A RECORDED PROGRAM
1. Press (OK).
2. Use (UP/DOWN ARROWS) to select the recorded show that you want to watch and press (OK).
3. Select Play and press (OK) to view the recording from the beginning. Your recorded program will stop if you tune to another channel. You can resume watching exactly where you left off by either going to channel 1 or by pressing (RECORDED TV)
to view the Recorded TV menu.
15
UNLOCKING A RECORDED PROGRAM
1. Press (RECORDED TV).
2. Use (UP/DOWN ARROWS) to select the recorded show that you want to watch
and press (OK).
3. Select Play and press (OK).
4. Press (OK) to unlock the recorded program.
5. Enter your Parental Control PIN.
6. Use (UP/DOWN ARROWS) to select one of the following options and press (OK).
•Don’t unlock.
•Unlock this program – The program will be automatically locked again
after 2 hours.
•Unlock all TV for 2 hours – All blocked programs on this TV will be
unlocked for 2 hours (option not available if there is blocked adult content).
MANAGING RECORDING CONFLICTS
When everything you want to watch just happens to be on at the same time, there’s no need to miss any of them.
Record up to 2 programs at a time, on any TV in your home.
If you try to record more than 2 programs or too many HD programs at a time, a recording conflict screen will appear
to help you resolve the conflict.
RESOLVING A RECORDING CONFLICT
1. To cancel recording the program that caused the conflict, use (UP/DOWN
ARROWS) to select Don’t record and press (OK); or to resolve the conflict
by changing which programs to record, use (UP/DOWN ARROWS) to select
resolve conflict and press (OK).
2. Use (UP/DOWN ARROWS) to select the program(s) you want to record and
press (OK). All the other program(s) will no longer be marked with a red record
icon. Until a conflict is resolved the program(s) will still be scheduled but will not
record. This will be indicated by a crossed-out red record icon.
3. Navigate to Save Changes and press (OK).
16
Display Settings
SCREEN ASPECT RESOLUTION
Using your TV’s user guide as a reference, you can adjust your screen settings
by choosing the most suitable resolution from this list and then following steps 1 to 8:
•4:3 standard definition
•Widescreen standard definition
•720p High Definition
•1080i High Definition
1. Press (MENU).
2. Use (RIGHT ARROW) to highlight Settings.
3. Use (UP/DOWN ARROWS) to select Television and press (OK).
4. Use (UP/DOWN ARROWS) to select Screen aspect ratio and High Definition and press (OK).
5. Use (UP/DOWN ARROWS) to select the setting that is appropriate for your TV.
6. Navigate to Continue and press (OK).
7. Navigate to Start test and press (OK). The system will verify whether your TV can display the selected setting.
8. If you can see the video on your screen, use (UP/DOWN ARROWS) to select Keep setting and press (OK)to save.
Or, if you see a black screen, your TV may not be able to display the selected setting or it may not be properly connected to your
digital receiver. Use (UP/DOWN ARROWS) to choose another setting or check your cables to ensure proper connection between
your TV and digital receiver.
Quick tip: To remove the black bars that appear on both sides of the screen when you watch standard definition programming on an
HDTV, press (ENTER OPTIONS) and use (UP/DOWN ARROWS) to select the optimum setting for your TV.
DESCRIPTIVE VIDEO
Descriptive video is a feature available on select programs for the visually impaired that provides audio descriptions of the visuals in
a program.
1. Press (MENU).
2. Use (LEFT/RIGHT ARROWS) to select Settings.
3. Use (UP/DOWN ARROWS) to select Audio and press (OK).
4. Use (UP/DOWN ARROWS) to select Audio description and press (OK).
5. Use (UP/DOWN ARROWS) to select Descriptive video and press (OK).
6. Navigate to select Save and press (OK).
DIGITAL AUDIO OUTPUT
Digital audio output allows you to adjust your audio settings.
1. Press (MENU).
2. Use (LEFT/RIGHT ARROWS) to select Settings.
3. Use (UP/DOWN ARROWS) to select Audio and press (OK).
4. Use (UP/DOWN ARROWS) to select Digital audio output and press (OK).
5. Navigate to select Stereo or Surround sound and press (OK).
6. Navigate to select Save and press (OK).
17
APPLICATIONS
Plex Advanced TV offers great applications that put you in control to make TV convenient for you.
PLEX AVENUE
Plex Avenue offers many popular apps for TV - with more on the way. Our apps are loaded with fully-licensed content from trusted
sources, and they are easy to use, easy to find, easy to personalize, and easy to integrate into your television viewing experience.
Plus, we are always working on more great features. Check www.northstate.net for the latest features.
18
Frequently Asked
Questions
Are all Plex Advanced TV channels digital?
Yes. Plex Advanced TV is a 100% digital television service.
Is my DVR a digital receiver?
Yes, your DVR is an HD digital receiver with additional
functionality that allows you to record, pause and replay live TV.
Will Plex Advanced TV affect my home phone service?
No, your home phone will not be affected.
Will I be able to watch digital TV on my existing TV?
Yes. A Plex Advanced TV digital receiver receives the digital
TV signal and converts it into a format that works with your
existing TV. This allows you to enjoy digital picture and sound
on all channels.
How many TVs can I watch Plex Advanced TV on?
Plex Advanced TV supports up to 6 TVs. If you have Whole
Home DVR service, you can watch your recordings on any of
your 6 TVs that have receivers.
How many “Favorites” lists can I create?
You can create one “Favorites” list on each digital receiver
you have in your home. “Favorites” lists from one receiver
to another can be different. Refer to page 9 to create your
Favorites List.
How can I control what my children are watching?
Parental Controls (page 12) allow you to block programs by
title, rating or content. To get you started, you can go to SETTINGS, then PARENTAL CONTROL, and follow the instructions.
What is the difference between Video On Demand and Pay
Per View (PPV)?
Video On Demand offers a selection of movies and TV shows
that you can rent at any time and watch as many times as you
want within the rental period. PPV service is not yet available
on Plex Advanced TV. Refer to page 11 for Renting a Video
On Demand program.
19
How do I return to watching a Video On Demand rental
after I’ve turned to another channel?
There are 3 convenient ways:
1. If your Video on Demand rental is the last program you watched, simply press the LAST button on your remote.
2. Turn to channel 2
3. Press the VIDEO ON DEMAND button on your remote, and highlight MY VIDEOS.
What should I do if I have problems with my Plex Advanced
TV service?
If you are experiencing a problem with Plex Advanced TV
service, please call North State Product Support at 886-3900.
They can help you with any problems from programming
your remote to setting your Favorites List. There are also
Troubleshooting tips on page 21 and 22 of this Manual.
How can I order another remote control?
You can purchase another Plex Advanced TV remote by going
to your nearest North State store. The cost is $35 plus tax.
Can I pause, rewind and fast-forward live TV from any TV in
my home?
By subscribing to Whole Home DVR service, you can pause
and rewind live TV on up to 6 TVs that have receivers.
How long can I Pause live TV for?
With a DVR, you can Pause live TV for up to 90 minutes. After
90 minutes the paused program will start playing again.
What happens when my DVR’s storage space is full?
If all your recordings are protected and your DVR’s storage
space is full, a pop-up will appear on your screen to warn you
and your DVR will stop recording.
What happens if I don’t “protect” my recordings?
If your recordings are not protected, when less than 10% of
disk space is remaining, your DVR will start deleting them
beginning with the oldest unprotected recordings.
Frequently Asked
Questions
How do I “protect” my recordings?
To protect you recording, when you are record a program, go
to RECORDED TV, navigate to KEEP UNTIL and choose KEEP
UNTIL I DELETE. See page 15 for more details.
How many programs can I record at once?
At a minimum you can record 2 live programs at once on your
DVR and both of these programs can be in HD. See page 16
to learn about recording programs.
Can I schedule a recurring recording?
Yes. Choose the program you want to record from the
program guide, then press RECORD twice (see page 14) and
you’ll see the series record icon appear. You’ll now record this
show every time it airs. You can record an episode or an entire
series by following the on-screen instructions.
If I pause live TV on channel 5, then change to channel 6 for
a bit, can I go back to watch what I missed on channel 5?
No. If you change the channel, the live TV program that was
saved temporarily by your DVR will be deleted. If you would
like to be able to watch the program again, ensure that you
record the program.
Can I watch a previously recorded program while recording
a live program?
Yes, recorded material is stored on your DVR’s hard drive and
watching it does not interfere with recording live TV.
If my DVR is off, will it still record a scheduled program?
Yes, your DVR will turn on to start recording and turn off when
the recording is completed.
Why can’t I get my guide to come up?
Press the STB button at the top of your remote then press
GUIDE.
Why can’t I get MENU to come up?
Press the STB button at the top of your remote the press
MENU.
Why is the picture too big/too small for the screen? Why
are there black areas on both sides of the picture?
Your Screen Video Output may be set for Zoom. Press the
ZOOM button on the lower right corner of your remote to
toggle through the 5 available settings for the one that’s best
for your TV.
Why will the remote not operate the TV?
You can program your Plex Advance TV remote to work with
your TV. Page 5 of the user guide provides step by step
direction for programming the remote. You can also call
Product Support at 886-3900 and the trained staff will help
walk you through the process.
Why can’t I get a picture on my TV?
Please contact Product Support at 886-3900.
What is the default VOD PIN?
9999
What is the default Parental Control PIN?
9999
If I reboot my DVR will I lose my scheduled recordings?
No, all of your scheduled recordings will be saved.
What if I forget my PIN numbers?
You can call North State Product Support (886-3900) and they
will re-set the PIN to its default setting. At that point you can
change it to your own PIN.
20
Troubleshooting your
Plex Advanced TV
CANNOT TURN ON MY PLEX ADVANCED TV DIGITAL RECEIVER
•Try pressing the front panel power button on your digital receiver.
•Make sure that all your power cords are completely inserted into a power outlet.
•Ensure that your TV set is plugged into a working power outlet.
•If the Plex Advanced TV digital receiver is plugged into a power bar or surge protector, make sure that the power bar is on and has
not tripped. If it has tripped, press the reset button on the power bar to restore power.
•If the digital receiver is connected to a switched electrical outlet, make sure that the switch is on.
•If the green LED light at the front of the Plex Advanced TV digital receiver lights up, your receiver is now on and working.
THE PLEX ADVANCED TV DIGITAL RECEIVER DOES NOT INITIALIZE
•Check to ensure that your modem or router is operating and that all cords are properly connected.
•Turn the power on the digital receiver off and on.
NO PICTURE OR POOR PICTURE QUALITY
•Check to ensure that your TV is set to the right video input.
•Ensure that the TV channel is set to the appropriate channel to match the settings on your Plex Advanced TV digital receiver and
VCR/DVD (Video 1, 2, etc.).
•Check the back of your Plex Advanced TV powered by Microsoft Mediaroom digital receiver and any additional devices to ensure
that all of the cables are firmly connected.
•Make sure that all the connections are made according to the appropriate configuration for your particular requirements.
PLEX ADVANCED TV DIGITAL RECEIVER DOES NOT RESPOND TO MY REMOTE CONTROL UNIT
•Check the batteries in your remote.
•Press the North State STB button at the top of the remote.
•Change channels using the buttons on your digital receiver. If this works, check the remote control batteries.
•Note if the buttons light up when you press them. If not, check the remote control batteries.
•If your remote control works with your Plex Advanced TV digital receiver but not with your TV or VCR/DVD, try re-programming the
remote control using the codes in the remote control user guide.
•Ensure that there is a clear path between the remote control and the equipment. If necessary, clean the infra-red receivers
on the equipment
NO AUDIO OR POOR AUDIO QUALITY
•Check to ensure that the audio output cables from the Plex Advanced TV digital receiver to the TV are firmly connected.
•Change the Digital audio output setting from Surround sound back to Stereo.
21
THE POWER LIGHT ON THE PLEX ADVANCED TV DIGITAL RECEIVER IS ON,
BUT I HAVE A SNOWY SCREEN ON MY TV
•If your TELUS remote control is programmed to control your TV, press the TV button, and then press the TV/Video button to cycle
through your video inputs.
•Refer to your TV’s remote control setup guide to change inputs on your TV.
•If you are unable to switch between video inputs by using your remote(s), refer to your TV’s user guide for further instructions.
•Check to ensure that your cables are firmly attached.
SOME PROGRAMS HAVE BLACK BARS ON THE SIDE OF THE SCREEN
The black bars appear when you watch standard definition programming on your HDTV. You can minimize or remove the black bars
on the side of your screen by pressing ENTER/ZOOM on your remote control and navigate to select the optimum setting for your TV.
THE PLEX ADVANCED TV DIGITAL RECEIVER SEEMS TO BE STUCK OR FROZEN ON A SCREEN
•Try pressing the MENU button on your remote control.
•If the MENU page is not displayed, initiate the reset procedure as described below.
If you’re still unable to solve the problem, try resetting the digital receiver by unplugging it from the power outlet for at least 10
seconds and plugging it back in. This resets the device and usually resolves most problems related to the receiver. If the problem
persists, please call 336-886-3900.
22
HOW TO CONTACT NORTH STATE COMMUNICATIONS
For Product Assistance, please call 336-886-3900.
Or if you’d like to tell us how we’re doing, please call 336-886-3720.
For the most up-to-date information on Plex Advanced TV, visit www.northstate.net.
SERVICE AND MAINTENANCE
Your Plex Advanced TV digital receiver doesn’t contain any user-serviceable parts, and removing the cover may expose you to
dangerous voltage and other electrical hazards.
You will also want to avoid connecting any equipment to the USB ports on the back of your Plex Advanced TV digital receiver.
They’re for future use only and you could potentially damage both the equipment and the digital receiver.
CLEANING
Wipe with a damp cloth when necessary. Do not use liquid or aerosol cleaners.
23