1
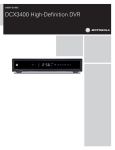
Reference Guide
DVR Manual
MediaShower DVR & Set-top box manual
02
Solarus MediaShower
whole-home DVR
Take control with Solarus MediaShower
and whole-home DVR.
Solarus MediaShower presents a whole-home DVR service like no
other. With this service, you can record your favorite programs
on any TV in your home. You can record up to five shows all
at the same time. You can even start watching a recorded
program in one room and pick it up in any other room in your
house! Remote DVR allows you to control programming from
anywhere with browser capable devices like a smart phone
or computer. All regular set-top boxes that are connected to
your DVR/Set-top box will have Live TV functions, too! This
means you can use the pause, play, rewind and fast forward
features on all TV’s in your house. MediaShower whole-home
DVR is the ultimate TV service, allowing you to watch what
you want, when you want, from anywhere in your home!
Solarus MediaShower... a better experience!
9/9/14
3
Let’s Get Started
Get to know your Solarus whole-home DVR and set-top box
Your Solarus whole-home DVR/Set-top box supports all of the MediaShower TV
services including Pay Per View, Video on Demand and HD.
Your DVR and set-top box must be handled much in the same way as a computer
to reduce potential for damage.
• Position it in an open space to allow airflow around the DVR/Set-top box
• Do not place the DVR/Set-top box in an enclosed entertainment unit or cabinet
•Do not place the DVR/Set-top box on a soft surface such as a rug, sofa, bed or
other similar surface
•The DVR/Set-top box should not be next to an external heat source that could
raise the temperature of the unit
•Connection into a surge protector along with your other audio/video equipment is highly recommended
Front Panel
1
2
ItemDescription
3
4
5
6
7
8
Function
1
Power
2
Link LED
The power button will turn the DVR/Set-top box on and off.
When held for more than 5 seconds the DVR/Set-top box is restarted.
Green lighting indicates the power is on
Green lighting indicates data or programming stream is being received
3
HD LED
Blue lighting indicates the DVR/Set-top box is in HD mode
(720p or 1080i setting mode)
4
Record
Red lighting indicates program recording
5
Menu
Press the Menu button to activate the on-screen menu
Up, down,
left and right
arrow keys
Up and down arrow keys allow you to change channels. Left and right
arrow keys allow you to navigate through the guide and menu
OK
Confirms channels or menu options
USB Port
USB 2.0 Connector, not supported at this time, reserved for future use
6
7
4
8
Rear Panel
1
2
3
Item Description
4
5
6
7
8
9
10
11
12
Function
1
To Wall (Video In)
Coax input for home video network
2
To TV (Video Out)
Coax output for TV or VCR
3
Network
Ethernet Port
4
eSATA
eSATA connector not currently supported, reserved for future use
5
Y PB PR
Components to connect video output to an HDTV
6
S-Video
Video output for VCR or TV with S-Video connections
7
Video Out
RCA output to connect to TV, VCR, DVD recorder or other device
8
Audio Out L and R
9
Optical
10
HDMI
Left and Right RCA stereo audio output
S/PDIF audio output to a digital home theater receiver menu
Input for high-definition TV or home theater receiver
with HDMI connection
11
USB
USB 2.0 connector, not currently supported, reserved for future use
12
Power +12V DC
DC power adaptor connection
5
Remote Control
Included Accessories
Batteries
Power Adapter
Remote Control
DVR Manual
Remote Control
Remote Control
Manual
User Manual
To view your MediaShower TV service, complete the following steps:
A. Press the STB button on your remote control
B.Press the Power button on your remote control, this
will power on your TV and DVR/Set-top box simultaneously
C. Press the Menu button to display the main menu
D. Use the arrow keys to select an option: Live TV,
Recorded TV, Video On Demand, Settings, Applications,
My MediaShower
You are now ready to sit back, relax and enjoy a better TV experience!
Batteries
To change the batteries, open the cover on the back of the remote. Press the
cover tab gently and lift the cover up. Other ways of opening the cover may result
in breaking the cover. The batteries should be installed observing the polarity
presented on the inside of the battery compartment.
6
Remote Control Functions
Use your remote to access programs, adjust volume, control your DVR/Set-top
box and On Demand selections as well as scroll through and confirm actions
within the on-screen menus.
Mode buttons to control TV and
additional devices
Rewind/Fast-forward controls
Record TV with the press of
a button
Stop recording or replay modes
Skip back in 7-second increments
Go to the Video On Demand menu
Pause your programming
Skip forward in 30 second
increments
Go directly to your list of recorded
programs
Go to the main menu screen
Return to previous menu screen
Reserved for future use
Use your cursor keys to navigate
guide and menu screens
OK confirms your menu and
guide selections
Return to live TV
Display program information
Quick access to Search
Quick access to Favorites
Increase/Decrease audio volume
Quick access to Caller ID History
Access your on screen
program guide
Browse channels
Review last 5 channels viewed
Edit text on the search screen
and PIN fields
Customize guide, channel and
viewing options
7
Connect your Solarus DVR/Set-top box
Basic Connections
These are the required connections for your DVR/Set-top box to operate properly.
Connect the Ethernet port on your DVR/Set-top box to the Ethernet socket on your
wall with the Ethernet cable. Connect the power supply via the Power Adaptor.
TV Connections
Choose one of the available types of connections for your DVR/Set-top box with
your TV.
HDTV
SDTV
8
Audio Connections
Choose one of the three types of audio connections available. If you have a home
theater system you can connect it to your DVR/Set-top box using the S/PDIF or
HDMI connector and the appropriate cable. *HDMI is recommended for better sound.
TV
Hi-Fi Equipment
Home Cinema
9
Set up your Solarus DVR/Set-top box
DVR/Set-top box Initial Boot Up
Once you have completed connecting your DVR/Set-top box to your TV, turn on
your DVR/Set-top box. The DVR/Set-top box will boot up and communicate with
the Solarus server in order to download all programming information. This process
can take up to 5 minutes.
HDTV Set Up
The default setting for your DVR/Set-top box is 4:3 standard definition TV, if you
will be connecting your DVR/Set-top box to a standard definition TV or would
prefer to view your programming in 1080i format, please follow the steps below:
1. Press the Menu button on your
remote control
2. Scroll to Settings
3. Scroll to Television and press OK
on your remote control
4. Scroll to Screen Aspect Ratio
and High Definition and press OK on your remote control
5. Select the aspect ration preferred for your television
6.Scroll to Continue and press OK, choose Start Test.
You will receive a confirmation screen with a count
down. Scroll to Keep Setting and press OK. You will see
a confirmation bar appear across the top of the screen
confirming your selection. If no selection is made, your
DVR/Set-top box will revert back to the original setting.
10
DVR/Set-top box Functions
Audio
To set up the language preference settings follow the steps below .
1.
Press the Menu button on your
remote control
2.
Scroll to Settings
3.
Scroll to Audio and press OK
on your remote control
4. Scroll to Audio Language and
press OK on your remote control
5.Select English
6.
Scroll to the Save option and press
OK on your remote control
11
DVR/Set-top box Functions
Control Live TV Programming and Recording
With Solarus whole-home DVR you will be able to control your TV like never before.
Pause, fast-forward or rewind as many times as you want – all with a push of a few
buttons on your remote control. When you pause or rewind a live TV program, you
can choose to either watch the buffered program or catch up to live TV by pressing
FF or skip on your remote. Pause, rewind and fast-forward of live TV can also be
performed by any Solarus connected set-top box in your home.
Controlling live TV on a Set-top box
In order to control live TV on a set-top box a program must be available for use.
If the maximum amount of programs are watched and recorded on other TV’s
then you will not be able to control live TV on that set-top box. You can resolve
this through Conflict Management. See page 16 for information on Conflict
Management.
Each set-top box when in use or powered on counts as a program being watched. If
you see a message that displays “Too many devices in use” on your TV screen, ensure
that the set-top boxes not in use are powered off by pressing the power button.
Buffered Programs (feature also available on all Solarus set-top boxes)
Your DVR will create a temporary recording of the channel you are watching.
This feature is referred to as a buffer and your DVR will automatically buffer the
program you are watching. Your DVR will buffer up to 1.5 hours of programming,
the buffer process will continue until you:
•
Switch to another channel. Switching channels will cause your DVR/Settop box to begin buffering the program you just turned to and remove the
previous program stored in the buffer.
•
Turn off your DVR. When you turn off your DVR/Set-top box, it clears the buffer.
To record all of your currently buffered programming, just press the record button.
This will record all of the content that is currently in the buffer for the current
program up to 90 minutes.
Status Bar
The Status Bar appears whenever you use a replay control such as pause, fastforward or rewind. The status bar also provides you details about the program you
are watching.
12
Pause a Live Program
Use Pause to freeze the program you are watching. Programs will remain in pause
for up to 1.5 hours.
1.Press Pause to freeze the program
2.Press Play to resume watching at normal speed
Rewind or Fast-Forward a Live Program
You can rewind or fast-forward at four different speeds, which are indicated by 2
arrows and a multiplier number next to the arrows (i.e. 2. 3. 4)
1.Press Rewind or Fast-Forward up to four times to
increase the speed. The status bar at the bottom of
your screen will indicate where you are in the program
2.
You can only fast-forward up to the point of the live TV
program. You cannot fast-forward ahead of live TV
3.Press Play to resume watching at normal speed
Catch up to the live TV program
When you pause or rewind a live TV program, you can choose to either watch the
buffered program or catch up to live TV by pressing FF or the skip button on your
remote control. See remote control functions on page 7.
Record and Replay Programs
Your Solarus DVR can record up to 100 hours of SD programming or up to 40
hours of HD programming. Storage space will depend on the type of content you
are recording (HD or SD).
Recorded TV Menu
From the Recorded TV menu you can access recorded content to View, Edit,
Delete and Schedule recordings. To access the Recorded TV menu options, press
Recorded TV on your remote control.
The following actions are available through your Recorded TV menu:
•
View Recordings. You can view a list of your recordings sorted by date or
title by scrolling to date or title in the Menu header.
•
Scheduled. On the Scheduled option you can Manage, Edit and Cancel your
scheduled recordings and series recordings.
•
Add Recording. The Add Recording option allows you to schedule new
recordings manually by the program channel, date and time.
13
DVR/Set-top box Functions
To record a program:
1.
While watching TV. Press Record on
your remote control. The red record
LED will light up on the front of the
DVR/Set-top box.
2.
While in the Program Guide. Highlight
a program and press Record on your
remote control. A red dot will appear
next to the selected program title
verifying your recording selection.
3.
Record a future single program. Press
Recorded TV on your remote control.
Scroll to Add Recording, scroll down
to Search and press OK on your
remote control. Type in the title, actor
or director’s name for the program
you want to record. Once the program you are searching for
appears on the right hand side of the screen scroll to the
program and press OK on your remote control. Select your
recording preferences.
4.
Record multiple programs at the same time. Your DVR has the
ability to record multiple streams at one time. Use the steps
above to select multiple recordings even if they are scheduled
for the same or overlapping times.
Play a Recorded Program
To replay one of the programs you have recorded on your DVR, press the
Recorded TV button on your remote control. Scroll to the program you want to
watch and press OK on your remote control. A Program Info menu appears, select
the Play option and press OK.
14
Series Recording
Solarus DVR makes it easy to record every episode of your favorite program. With
the Record Series feature you can schedule recordings of your favorite program
by title, date or time. You can choose to have all episodes record or just new
episodes. Series Record gives you the ability to choose which channels to record,
whether to record in SD or HD and whether to start the recording early or end
the recording late.
1.
Schedule a Series Recording while in the program guide. Scroll
to the program you would like to
schedule a Series Recording
for and press the Record button
on your remote control twice.
Three red dots will appear next
to the program indicating a series
recording of that program has been scheduled.
2.
Edit a Series Recording. Press the Recorded TV
button on your remote control. Scroll to Scheduled, all
scheduled recordings are listed by date.
3.
Cancel a Series Recording. Press the Recorded TV
button on your remote control. Scroll to Scheduled
and select a recording to cancel and press OK. Choose
the Don’t Record option and confirm the cancellation.
15
DVR/Set-top box Functions
Series Priority (not currently supported, reserved for future use)
The Series Priority feature enables you to prioritize your series recordings that
you have scheduled on your DVR. The prioritization feature lets you tell your DVR
which series recordings are the most important should a recording conflict occur.
To prioritize your Series Recordings:
1.
Press the Recorded TV button on your remote control
2.
Scroll to Series
3.
Scroll to Series priority and press OK on your remote control
4.Using your arrow cursor keys scroll to the arrow buttons
to the right of each series title and press OK to move the
priority up or down until the Series has been moved to
your preferred priority level. As you press the OK button
you will see the Series title move up or down in the list.
5.
Scroll to Save and press OK on your remote control
Conflict Management
Your DVR has a Conflict Management feature. If you attempt to record more
programs than your DVR will allow the Recording Conflict screen will appear
alerting you of the conflict.
To resolve the conflict:
1.On the Recording Conflict screen select the Resolve
Conflict option to choose which recording to cancel.
2.To cancel the newly selected program recording choose
the Don’t Record option on the Recording Conflict
screen.
3.If a recording conflict occurs during a recording that is
already in progress a message will appear stating “All TV
Services are in use”. You can choose to Try again later or
Select a recording to be cancelled.
Note: If you choose to cancel a recording of one episode in a series recording due
to a conflict, all future episodes will remain as originally scheduled.
16
The conflict management feature also includes a Series Recording Conflict
Management option. When multiple Series Recordings are scheduled at the same
time and a conflict arises, you will be notified by a Series Conflict screen. To
resolve the Series Conflict choose from the options below:
•
Record all episodes of title – Selecting this option will
take you to a recordings option screen which will enable
you to set your recording preferences for this series
•
Record this series only when no conflict occurs – This
option will prompt your DVR to only record episodes of
a series when no other conflicts occur, however, when
a conflict does occur this program will not record, this
option assigns the selected series a low priority
•
Choose which shows to record – This option will enable
you to select the programs that you would prefer to record
17
DVR/Set-top box Functions
Remote DVR Instructions – Web Browser
How to Get Started:
Remote DVR Access: Go to www.solarus.net/mediashower-television and click on
“Remote DVR Manager”
Direct URL Address: http://rdvr.solarus.net/RDVRWebClient/Default.aspx#/Home
Account ID (Username): This can be found on your TV by choosing the “Menu,”
then “Applications,” then “Manage STB.” It is the 8-digit number.
*If you cannot access your 8-digit account ID, you can always call 715-421-6085
and a member of our friendly support team will be able to assist you.
Password: Default is 1234
How to Use:
1.Begin by choosing which channel you wish to record
• A
ll channels will be listed
on the left
•S
elect a channel and a list of shows will appear
Continued…
18
How to Use:
2.You will then be presented
with 3 options:
• Record Episode
• Record Series
• Cancel
•
If you choose to Record Episode your options are:
o STOP RECORDING:
• At scheduled end time, 5 minutes after, 15 minutes
after, 30 minutes after, 1 hour after, 2 hours after, 3
hours after
o KEEP AT MOST:
• All episodes until space is needed, All episodes
until I erase
•
If you choose to Record Series, your options are:
oTIME:
• Any day, around X AM/PM; Any day, anytime;
Any day, anytime, once per day
o SHOW TYPE:
• First run & rerun, First run only
o STOP RECORDING:
• At scheduled end time, 5 minutes after, 15 minutes
after, 30 minutes after, 1 hour after, 2 hours after, 3
hours after
o KEEP AT MOST:
• All episodes until space is needed, All episodes
until I erase, 1 latest episode, 2 latest episode, 3
latest episode, 4 latest episode, 5 latest episode,
6 latest episode, 7 latest episode, 14 latest episode
Don’t forget to click Record or Don’t Record!
Continued…
19
DVR/Set-top box Functions
How to Use:
•View your recordings by clicking
on “Recordings” in the upper
right hand corner.
•Search for a channel or program
by title, people or description by
clicking “Search” in the upper
right hand corner.
•Click “Guide” to refer back to the
television channels. Change your
password and logout by using
the buttons in the upper right
hand corner.
20
Remote DVR Instructions – Android or Apple Operating System
How to Get Started:
1.First, download the MediaShower app. On the Android operating system, go to
“Play Store.” On the Apple operating system, go to “App Store.”
2. Type in Mediaroom – RDVR by Tech Mahindra Ltd and download
3.Once the app is installed, open it and the first screen you will see is the Initial
Setup where it states “Please provide configuration details.” Push “OK” on this
screen
4.Your User Account will be available on your TV by choosing the “Menu,” then
“Applications,” then “Manage STB.” It is the 8-digit number. If you cannot access
your 8-digit account ID, you can always call 715-421-6085 and a member of our
friendly support team will be able to assist you.
5. The Password defaults to 1234
6. The Service URL is http://rdvr.solarus.net/mobile
a. You must put http:// at the beginning or it will not authenticate
7. Press “OK” after filling in all of the blanks and the service will authenticate.
8. If it is successful, you will get logged in successfully!
9. If it is not successful, you will need to try again.
How to Use:
1.The button that looks like a cog in upper right hand corner shows your account
settings. You should only need to access this if the web address or password
changes.
2.The button that looks like a file drawer in upper right hand corner shows the
DVR information. It shows Disk Space on DVR (total capacity and available
space), Search (allowing you to search for a program by title or people), and
Settings (taking you back into account settings).
3.The Guide button brings up all channels and allows you to find programming
through the guide for the current date.
4.The Upcoming button allows you to select an upcoming date in the upper left
hand corner and view guide information.
5.The Scheduled button shows what channels have scheduled recordings set up.
It will only list channels with future recordings.
6.The Recorded button shows all channels with recordings. It will only list
channels with recordings on them.
21
Frequently Asked Questions
Questions about your Solarus DVR/Set-Top Box
I have questions about my DVR/Set-top box and would prefer to speak with a
Technical Support Representative.
Please call 888.676.8638 to speak with a Technical Support Representative.
How many hours of programming can I store in my DVR/Set-top box?
The total number of recording hours will depend on the mix of SD (standarddefinition)or HD (high-definition) programs you have recorded. On average
you can store up to 40 hours of HD programming or up to 100 hours of SD
programming.
Can I view and record HD programming with my DVR/Set-top box?
Yes. Your DVR/Set-top box supports both SD and HD formats. A subscription to
Solarus HD service is required to view and record HD programming. As a bonus,
Solarus MediaShower broadcasts the local channels in HD for free!
Do I need to have my DVR/Set-top box connected to a telephone line?
No. Your DVR/Set-top box updates through the Network connection.
What happens if my DVR/Set-top box temporarily loses power?
All recordings saved prior to the power loss will be saved, as well as your future
recording schedules. Recordings that are set to record during the power loss will
be missed.
If the power goes out, will my Parental Control, Favorites and Users Settings be lost?
No. These settings should not be lost if your DVR/Set-top box loses power.
Why do I see the “too many devices are in use” message when only one of set-top
box is in use?
Each set-top box when in use or powered on counts as a program being watched.
If you see the “too many devices in use” message on your TV screen ensure that
the set-top boxes not in use are powered off by pressing the power button.
22
Questions about Recording and Replaying Programs
How many channels can I watch and record at the same time?
Depending on your service area you may be able to record up to five programs at once.
Can I watch a show I’m recording before the recording has completed?
Yes. You can either watch the program live as it is being recorded, or you can
access the program through the recorded TV menu as it continues to be recorded.
Can I record On Demand programs?
No. Your DVR/Set-top box does not record On Demand programs. Keep in mind
that On Demand programming can be watched over a specified period of time
and you have the ability to start it any time you choose.
If I have a home theater will my DVR record a program in Dolby Digital 5.1®?
Yes. If the program is broadcast in Dolby Digital 5.1® the program will be recorded
with Dolby Digital 5.1®. If the program is broadcast in analog sound, the recording
will also be in analog sound despite your home theater’s audio connection to your
DVR/Set-top box.
What picture format will my DVR record programs in?
Your DVR will record the programs in the same format they are broadcast.
Can I increase the rewind and fast-forward speed?
Yes. Your DVR has the ability to rewind and fast-forward at four speeds when
viewing live TV or recorded programming. The arrows appear in the status bar on
the screen while in rewind or fast-forward mode.
You may also skip back in 7-second increments by pressing the replay button or skip
ahead in 30-second increments by pressing the FWD button on your remote control.
Does my DVR record any of the menu bar, on-screen program guide, audio
volume changes or anything else that appears on the screen when I am using my
remote control?
No. Your DVR only records the audio and video of the program you are recording.
23
Frequently Asked Questions
Questions about Recording and Replaying Programs
A recording may start a minute or more after the program has begun. Why is this?
Your DVR is synced with the TV listing and if a network starts a program earlier
than on the program guide the DVR will miss that time unless you program your
DVR to record earlier.
Only a part of my program was recorded. Why?
If the beginning of the program did not record, you may have scheduled to record
after the program had begun. If the end of the program did not record, it could be
your DVR has reached its content storage capacity. Another reason could be loss
of power or digital TV signal during the recording.
Questions about Managing your Recordings
How long can I keep my recordings?
You can keep them as long as you want. Lock the programs you do not want
auto-deleted. You may need to erase some locked recordings to make room for
others if storage capacity becomes an issue.
Does my DVR automatically erase programs to make room for new ones?
Yes. Your DVR will automatically erase programs when space is needed. Your DVR
will delete the oldest recordings first.
Can I erase part of a recorded program?
No. Your DVR can only erase the program in its entirety.
How many future recordings can I schedule?
You can set as many future recordings as you want provided you have the
necessary storage capacity.
24
Questions about Managing your Recordings
Do Parental Controls work with my DVR/Set-top box?
Yes. Your Parental Controls will restrict what is viewed or recorded. If you schedule
a recording for a program or channel that is blocked the program will record but
the video will not appear and the audio will be muted. You will need to disable
your parental lock feature to view the program while it is being recorded.
Where do I find the available capacity on my DVR?
The Disk Space Availability is listed at the bottom of the System Resources page.
To navigate to the System Resources page press the Menu button on your remote
control and scroll to Settings. Choose General then System Information where
you will find the System Resources tab.
Can I Rewind, Fast-forward, Record or Pause live TV from all set-top boxes in
my home?
The Rewind, Fast-forward, Record and Pause Live TV functions are available on
all TVs in your home only if you subscribe to MediaShower whole-home
DVR service.
If you subscribe to this service, the Record function may be activated from
any set-top box in your home by pressing the Record button on your remote
control, this function is not limited just to the DVR. You may choose to record
programming from any set-top box in your home, then immediately access it
through the Recorded TV menu in order to use the Rewind, Fast-forward and
Pause functions.
What is Remote DVR?
Remote DVR is a feature that allows you to record programs on your DVR at
home from a computer or browser capable mobile device like a cell phone or
tablet.
How do I access Remote DVR?
From an Internet enabled device like a computer, visit:
www.solarus.net/mediashower-television and click on Remote DVR Manager. If
that doesn’t work, try the direct URL address:
http://rdvr.solarus.net/RDVRWebClient/Default.aspx#/Home You will need your
Account ID and Password to access the feature. Your Account ID can found on
your TV by choosing the “Menu,” then “Applications,” then “Manage STB.” It is the
8-digit number. The default Password is 1234.
From an Internet enabled tablet or cell phone:
You will need to download the MediaShower app to your phone. Search for
Mediaroom – RDVR by Tech Mahindra Ltd in your phone’s app store. You will
need your Account ID and Password to access the feature. Your Account ID can
be found on your TV by choosing the “Menu,” then “Applications,” then “Manage
STB.” It is the 8-digit number. The default Password is 1234.
25
Contact Us
Business Hours:
Monday - Friday: 7:30am - 5:30pm
Saturday: 8:00am - Noon
Address:
440 East Grand Avenue
Post Office Box 8045
Wisconsin Rapids, WI 54495-8045
Telephone:
715.421.8111 or 800.421.9282
Fax:
715.421.6081
Website:
solarus.net
Email:
[email protected]
Support Helpline:
24 x 7 x 365: 715.421.6085 or 888.676.8638
26
27
440 East Grand Avenue
Post Office Box 8045
Wisconsin Rapids, WI 54495-8045
solarus.net
28