1
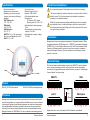
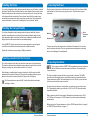
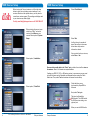
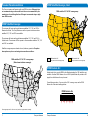
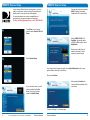
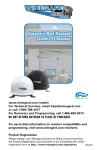
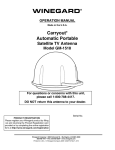
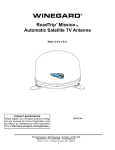
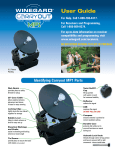
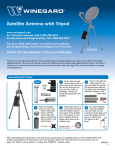
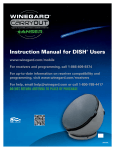
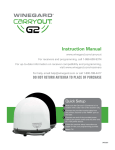
www.winegard.com/mobile For Technical Services, email [email protected] or call 1-800-788-4417 For Receivers and Programming, call 1-866-609-9374 DO NOT RETURN ANTENNA TO PLACE OF PURCHASE. For up-to-date information on receiver compatibility and programming, visit www.winegard.com/receivers Product Registration Please register your Winegard product by filling out and returning the Product Registration Card provided or by completing the online registration form at http://www.winegard.com/registration. 2452172 Specifications • One button operation • Supports up to two receivers • Depending on receiver type and location, can access the following satellites: DISH® Western Arc: 110°, 119°, 129° DISH Hybrid: 110°, 119°, 61.5° DISH Eastern Arc: 61.5°, 72°, 77° DIRECTV®:119° or 101° (will not receive HD on 110° or any KA-band HD on 99° and 103°) Safety Recommendations Do not paint this antenna. Painting the antenna will void your warranty. • Gray plastic base • Elevation range 20° to 92° • Azimuth +360° (0-692°) • UV-protected plastic dome • Compact size 20” diameter, 15.6” height Shipping size: 23” x 23” x 17¾” • Specifications for max amperage: 5.0 A • Specifications for unit operating voltage: 10.5–13.8 V • Specifications for supply voltage: 12–13.8 V Bell TV™: 91° or 82° The Carryout antenna is meant for stationary use only and will not function while in motion. The Carryout antenna is not intended for permanent mounting on a commercial vehicle. While the Carryout antenna is designed with Winegard’s focus on quality and durability in mind, it is still an electronic device, and care should be taken when transporting and setting up the Carryout antenna. Do not toss or drop the Carryout antenna. Trademarks Winegard and Carryout are registered trademarks of Winegard Company. DISH is a registered trademark of DISH Network L.L.C. DIRECTV is a registered trademark of DIRECTV, Inc., a unit of Hughes Electronics Corp. Bell TV is a trademark of Bell Canada, Inc. Reference made to products or services provided by companies, other than Winegard Company, does not represent any endorsement of those products or services. Dome Handle Switch Settings Eyelet Base The Carryout antenna switch settings are preset for DIRECTV. To set the antenna for any other programming provider, remove the dome and set the switches according to the appropriate diagram below. Otherwise, proceed to “Installing the Carryout Handle” on the next page. DIRECTV 1 2 3 4 5 6 DISH 7 8 1 2 3 4 5 6 7 8 Models Bell TV Disclaimer 1 2 3 4 5 6 Key GM-1599, CB-1599 (camouflage dome) 7 8 GM-1518, CB-1518 (white dome) 0 = up 1 = down DISH Hybrid 1 2 3 4 5 Although every effort has been made to ensure that the information in this manual is correct and complete, no company shall be held liable for any errors or omissions in this manual. Changes and technological advances are continuously being made in the satellite market. Information provided in this manual was accurate at time of printing. If the Carryout antenna does not function as expected, please contact Winegard Company at 1-800-788-4417, or visit our website at www.winegard.com. Hybrid mode is for use in areas where the 129° satellite is not available. 1 Carryout Antenna 6 Carryout Antenna 7 8 2 Installing the Dome Connecting the Power If you have changed the switch settings under the dome, you will need to re-install the dome. Place the Carryout Dome over the unit so that the Carryout decal on the Dome is directly above the connections on the base of the unit. Line up the holes in the dome with the inserts in the Carryout base. Insert all of the dome screws except the two nearest to the cable connections on the base. Do not tighten the screws at this time. Continue with “Installing the Carryout Handle” below. Plug the power cord into the quick disconnect socket in the Carryout base. Make sure that the lock ‘clicks’ when you plug the cord in. This will ensure a good connection. MAIN Installing the Carryout Handle If you have changed the switch settings under the dome, install the Carryout handle by threading two screws through the handle and then through the two holes nearest the cable connections on the base. Installing the handle here will help protect the cable connections from accidental damage. If using DIRECTV, simply remove the two screws nearest the coax and power connectors on the base and use these screws to install the handle. Tighten all of the dome screws using a Phillips screwdriver. Selecting a Location for the Carryout Try to find a location that is fairly level and has a clear view of the southern sky. The location should provide a stable enough surface to keep the Carryout from falling over during use, and the surface must be ±5° of level. Other things to consider when choosing a location for the Carryout are traffic patterns and the weather. Placing the Carryout near a walking path may cause people to trip over the cables or knock the Carryout off of the signal. TIP The Carryout antenna comes with 50’ of cable. Keep this in mind when selecting a location. SEC Main Port Quick Disconnect Socket Secondary Port Connect coax to the main connection on the base of the antenna. Do not use a wrench to tighten the cable. The coax provided uses weatherproof connectors, which can be damaged if over-tightened. Connecting the Cables NOTE If the receiver is used for DIRECTV HD programming at home, make sure that the B-Band converter has been removed prior to connecting the Carryout antenna. The Carryout antenna comes with two coax ports set in the base. The MAIN port will control the toggle function and should always be connected when the Carryout antenna is in use. This cable should run to the “Sat In” port on the back of the receiver that will be used most often. Once the Carryout antenna is connected to your receiver, you can plug it into a 12 V Cigarette plug outlet in your vehicle or a 120 V to 12 VDC converter with a cigarette style outlet. When connecting the Carryout antenna, Winegard recommends using a 120 V to 12 VDC power converter or 12 VDC power source that meets power supply specifications. Before turning the Carryout antenna on, refer to “DISH Receiver Setup” on page 5 or “DIRECTV Receiver Setup” on page 11. 3 Carryout Antenna Carryout Antenna 4 DISH Receiver Setup DISH Receiver Setup Before turning the Carryout antenna on, follow the steps below to clear out any existing receiver settings. If your receiver differs from the options shown, you may need to consult your receiver manual. The wording and display used in your receiver may differ slightly. 4 Select Check Switch. 5 Select Test. For help, email [email protected] or call 1-800-788-4417 1 Before starting, disconnect coax cable from “Sat In” on back of receiver. Press Menu on your remote. Select option 6, System Setup. It will go through a number of steps, then return to the screen shown here with previous information cleared. If at any point it asks you to save, select Save or Yes. 2 Select option 1, Installation. Reconnect the coaxial cable to the “Sat In” port on back of receiver. Now turn on the antenna. Allow it 3–4 minutes to acquire satellites. If setting up a DISH 311, 301, or 500 series receiver, in some cases you may need to check the boxes next to Superdish and Alternate before running the Check Switch test. Then, select Test and continue with normal receiver setup. Check that there are no checkmarks by SuperDISH or Alternate. 6 3 Select option 1, Point Dish. Next, select Test again. SW64 This time it will install the SW64 switch. This SW64 switch is a DISH receiver setting, not a physical part. When you see the SW64 as the installed switch, the antenna is ready for use. 5 Disclaimer: Receiver setup instructions are accurate at time of printing and may change without notice. Call Winegard tech line for assistance: 1-800-788-4417. Carryout Antenna Carryout Antenna 6 DISH Satellite Coverage, Cont. Receiver Recommendations The Carryout antenna will operate with most DISH receivers. Winegard does not recommend using receivers with hard drives not recommended by the manufacturer for mobile applications. Winegard recommends using a single tuner DISH receiver. DISH satellite 61.5° & 129° coverage map DISH Satellite Coverage The antenna will locate and toggle between satellites 110°, 119° and 129° in Western Arc Mode. The Carryout antenna will not operate in all areas where satellites 110°, 119° and 129° are available. The antenna will locate and toggle between satellites 110°, 119° and 61.5° in Hybrid mode. The antenna will not operate in all areas where satellites 110°, 119° and 61.5° are available. Satellite coverage maps are based on level, stationary operation. Reception interruption may also occur during adverse weather conditions. DISH satellite 61.5° Carryout antenna coverage map DISH satellites 110° & 119° coverage map (Dotted area indicates coverage.) DISH satellite 129° Carryout antenna coverage map DISH Eastern Arc Hybrid mode is for use with DISH in the Northeast where the 129° satellite is not available. If neither DISH Western Arc nor DISH Hybrid Mode will provide an HD signal, then the Eastern Arc may be used. Consult the map above. If you are in the 61.5° coverage area, use the DISH Eastern Arc. See switch settings below. DISH Eastern Arc 1 2 3 4 5 6 7 8 Coverage maps are for reference only and do not guarantee coverage. 7 Carryout Antenna Carryout Antenna 8 DIRECTV Receiver Setup DIRECTV Receiver Setup If your receiver differs from the options shown, you may need to consult your receiver manual. The wording and display used in your receiver may differ slightly. For more information on receiver compatibility and programming, visit www.winegard.com/receivers. 4 You may be required to press the DASH (-) before proceeding (underneath #7 on the remote). 5 Select 3-LNB (18”x20”) or 3 Satellites. If given the option of SWM or Multi-switch, select Multiswitch. For help, email [email protected] or call 1-800-788-4417 1 Press Menu on your remote, and then select Parental, Fav’s & Setup. Now power on the Carryout antenna, and allow it a few minutes to acquire signal. 2 Select System Setup. If you want to check signal strengths, choose Signal Strength from the menu options before returning to this screen. Now, press Continue. 6 3 In your receiver menu, you will need to identify the Satellite Menu. Once there, find the option for Satellite Setup. After pressing Continue, the receiver will automatically verify your setup. Continue with step 7 on the next page. 9 Disclaimer: Receiver setup instructions are accurate at time of printing and may change without notice. Call Winegard tech line for assistance: 1-800-788-4417. Carryout Antenna Carryout Antenna 10 7 Errors may be displayed on the Installation Status screen. This is normal to see one or two boxes with an X instead of a . 10 The receiver will run Data Feed and Guide Feed Tests for a few moments. Select Continue. 8 Select Continue. 11 You will be prompted to set up the remote. Select Setup Remote Later to do this at a later time. 9 The program guide will download. 12 Select Watch DIRECTV. Receiver setup is now complete. When the status bar reaches 100%, press Continue. Receiver Recommendations The Carryout antenna will operate with most DIRECTV receivers. Winegard does not recommend using receivers with hard drives not recommended by the manufacturer for mobile applications. Winegard does not recommend using an HD receiver since HD programming will not be available. 11 Carryout Antenna Carryout Antenna 12 DIRECTV Satellite Coverage Overall Installation The antenna will locate and toggle between satellites 101° and 119°. The Carryout antenna will not operate in all areas where satellites 101° and 119° are available. Nicks or cuts in wiring jacket may cause water to leak into vehicle. The Carryout antenna is not compatible with 110° or KA-band satellites 99° and 103°. TV 120V Power Cable Entry Plate Coax Cable 120V Power TV Refer to the figure below for an operational coverage map of satellite 101° and 119°. Satellite coverage maps are based on level, stationary operation. Reception interruption may also occur during adverse weather conditions. Coax Cable Receiver DIRECTV satellite 101° & 119° coverage map Receiver Operating the Carryout Antenna 1 Turn on the receiver and television set. The Carryout antenna must be connected to a receiver plugged into 120 V AC. 2 Verify that you are getting the receiver menu screens on the television. These screens are available with or without the dish finding the signal. 3 Connect the power for the Carryout antenna. The dish will detect if it is already on a satellite signal. If it detects a signal, the dish will move to check its alternate satellite and then move back to the original satellite signal. During the Carryout antenna’s normal search process, you may hear a slight grinding sound as the unit checks its limits. This is normal and does not harm the unit. 4 If no signal was detected, the dish will begin its search to locate the primary satellite. Once the dish locates a signal, it will pause long enough to identify which satellite it has located. This may or may not be visible on your receiver’s point dish screen. 5 After the unit has verified that it has the correct satellite, it will move to check DIRECTV satellite 101° Carryout antenna coverage map DIRECTV satellite 119° Carryout antenna coverage map the alternate satellite and move back to the primary satellite to complete the search routine. 6 Once the unit stops moving for more than one minute, it should be locked on Coverage maps are for reference only and do not guarantee coverage. the signal. Your receiver may need a moment or two to download new programming before viewing is possible. If you do not have signal, see “Troubleshooting” on page 18. NOTE Because the Carryout antenna uses information from the last location where it was on a signal, satellite acquisition may take longer if the dish is inactive over long distance traveling. 13 Carryout Antenna Carryout Antenna 14 Troubleshooting Finished Using the Carryout Antenna? Issue Possible Cause The antenna does not attempt to find a satellite, or it never moves. Verify power source is providing +12 VDC to the antenna. Ensure that the quick disconnect power connector is fully seated and locked into the quick disconnect socket. The antenna continuously searches and eventually stops without ever acquiring any satellites. Verify the main coax cable from the antenna is connected to the “Satellite In” port on the back of the receiver. Verify all coax cables are properly terminated and that there are no loose connections. Check to see if the southern sky is clear. Trees, buildings, large signs or an overpass can block the signal. Rain, snow, or excessive dew on the dome can interrupt the signal. Brush any snow or dew off of the dome. If heavy rain or snowfall is blocking the signal, it may be necessary to wait until the weather clears. 7 Coil the power cable for easy storage. With DIRECTV, the dish will find the alternate satellite but not the primary satellite. Make sure that the switches on the electronics control box are set for DIRECTV. See page 2. These switches are found on the electronics box under the dome. Connecting to the Cable TV Entry Port on Your RV I am not getting all of the DISH channels that I subscribed to. Go to the Check Switch Menu on the receiver. Make sure it is set for SW64. Both even and odd transponders on satellite 110°, 119°, and 129° should be listed. Local programming may not be available outside of your local coverage area. I have switched satellite service providers. How do I set my dish for my new provider? Remove the dome, and set switches to correct provider. See switch settings on page 2. My receiver appears to be locked up and is not responding. DIRECTV users should reboot by one of the following methods: Press the red reset button on the inside of the small door on the receiver, OR unplug the receiver from AC outlet for 20 seconds, and plug back in. Follow the steps below to prepare the Carryout antenna for travel or storage: 1 Unplug the Carryout antenna at the cigarette plug. 2 Unplug your satellite receiver(s). 3 Disconnect the coax cable for any receivers connected to the antenna. 4 Disconnect any coax cable connected to the Carryout base. 5 Coil the cables to make storage easier. 6 Unplug the quick disconnect power from the base of the antenna. Generally, the port on the side of an RV is designed for cable TV. The cable from this port runs through the wall plate for the over-the-air antenna or through a video distribution system. Satellite signals will not pass through these circuits. The only thing that can be between the Carryout antenna and the satellite receiver is coax. Therefore, it is important to make sure that the cable from the external port by-passes everything and runs directly to the satellite receiver. Go to http://www.winegard.com/kbase/upload/carryout_wiring.pdf for more information on wiring the Carryout antenna. DISH users should reboot by one of the following methods: Press and hold the power button on the receiver for 15 seconds, and then release, OR unplug the receiver from AC outlet for 20 seconds, and plug back in. Maintenance The Carryout antenna is designed to be maintenance free. However, it is a good idea to clean the dome from time to time with a soft cloth, water and dish soap. The antenna appears to lock onto signal, but my receiver does not show a picture or signal reading. DIRECTV users should verify the antenna type is set to either 3 LNB “18X20” or 2 LNB oval. Alternate Power Supply Specifications •DC Voltage range: 13–15 VDC •DC Voltage tolerance: 2–5% over from 0% to 100% of rated load •Typical min. current range: 5–6 amps •Ripple and noise max: 100 mV p-p 15 Verify the switch settings are set correctly for the desired provider. See switch settings on page 2. DISH/Bell users should verify the “Check Switch” installed in the receiver; DISH users should verify this to be SW64, and Bell users should verify this to be SW42. Note: a new receiver will initially have an “Unknown Check Switch”, but the antenna will still perform a search; however, it will not toggle to alternate satellites. •AC input voltage range: 100–120 VAC •Frequency: 50–60 Hz •Integrated Cigarette Receptacle Carryout Antenna Carryout Antenna 16 WINEGARD MOBILE PRODUCTS LIMITED WARRANTY (2 YEARS PARTS; 1 YEAR LABOR) Winegard Company warrants this product against defects in materials or workmanship for a period of two (2) years from the date of original purchase. During year one (1) of such warranty, Winegard Company will also pay authorized labor costs to an authorized Winegard dealer to repair or replace defective products. No warranty claim will be honored unless at the time the claim is made, Customer presents proof of purchase to an authorized Winegard dealer (to locate the nearest authorized Winegard dealer, contact Winegard Company, 3000 Kirkwood Street, Burlington, Iowa 52601, Telephone 800-288-8094 or visit www.winegard.com). Customer must provide proof of purchase with a dated sales receipt for the Winegard product to verify the product is under warranty. If the date of purchase cannot be verified, the warranty period shall be considered to begin thirty (30) days after the date of manufacture. If a defect in material or workmanship is discovered, Customer may take the product to an authorized Winegard dealer for service. Customer must provide proof of purchase to verify the product is under warranty. If the product is brought to an authorized Winegard dealer for service prior to expiration of year one (1) of the warranty period and a defect in material or workmanship is verified by Winegard Technical Services, Winegard Company will cover the Winegard dealer’s labor charges for warranty service. The Winegard dealer must contact Winegard Technical Services in advance for pre-approval of the service. Approval of the service is at the sole discretion of Winegard Company. Alternatively, Customer may ship the product prepaid to Winegard Technical Services (located at 3111 Kirkwood Street, Burlington, Iowa 52601, Telephone 800-788-4417). Customer must return the product along with a brief description of the problem and provide Winegard Technical Services with Customer’s name, address, and phone number. Customer must also provide proof of purchase to verify the product is under warranty. If the product is returned before the expiration of the warranty period, Winegard Company will (at its option) either repair or replace the product. This Limited Warranty does not apply if the product has been damaged, deteriorates, malfunctions or fails from: improper installation, misuse, abuse, neglect, accident, tampering, modification of the product as originally manufactured by Winegard in any manner whatsoever, removing or defacing any serial number, usage not in accordance with product instructions or acts of nature such as damage caused by wind, lightning, ice or corrosive environments such as salt spray and acid rain. This Limited Warranty also does not apply if the product becomes unable to perform its’ intended function in any way as a result of the television signal provider making any changes in technology or service. RETURN AUTHORIZATION POLICY A Return Material Authorization (RMA) is required prior to returning any product to Winegard Company or Winegard Warranty Services under this warranty policy. Please call our Technical Services Department at 800-788-4417 or send an e-mail to [email protected] to obtain the RMA number. Please furnish the date of purchase when requesting an RMA number. Enclose the product in a prepaid package and write the RMA number in large, clear letters on the outside of the package. To avoid confusion or misunderstanding, a shipment(s) without an RMA number(s) or an unauthorized return(s) will be refused and returned to Customer freight collect. WINEGARD COMPANY DOES NOT ASSUME ANY LIABILITIES FOR ANY OTHER WARRANTIES, EXPRESS OR IMPLIED, MADE BY ANY OTHER PERSON. ALL OTHER WARRANTIES WHETHER EXPRESS, IMPLIED OR STATUTORY INCLUDING WARRANTIES OF FITNESS FOR A PARTICULAR PURPOSE AND MERCHANTABILITY ARE LIMITED TO THE TWO YEAR PERIOD OF THIS WARRANTY. In states that do not allow limitations on implied warranties, or the exclusion of limitation of incidental or consequential damages, the above limitations or exclusions do not apply. Some states do not allow limitations on how long an implied warranty lasts, or the exclusion of limitation of incidental or consequential damages, so the above limitations or exclusions may not apply to you. This warranty gives Customer specific legal rights. Customer may also have other rights that may vary from state to state SATELLITE RECEIVER WARRANTY See manufacturer’s limited warranty policy. WS-MOBWARREV2 Rev. 1/10 Winegard Company • 3000 Kirkwood Street • Burlington, IA 52601 800-288-8094 • Fax 319-754-0787 • www.winegard.com • Printed in U.S.A. ©2011 Winegard Company Rev12 12/12 2452172