1
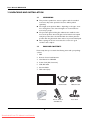
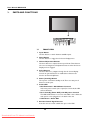
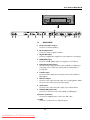
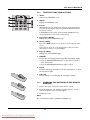
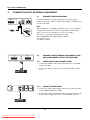
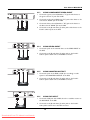
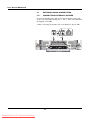
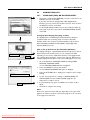
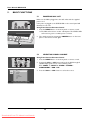
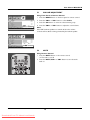
Downloaded From TV-Manual.com Manuals
User Manual BDS4241R
TABLE OF CONTENTS
1.
IMPORTANT NOTES AND SAFETY INSTRUCTIONS . . . . . . . . . . . . . . . . . . . . . . . . . . . . . . . 4
1.1
1.2
1.3
1.4
2
UNPACKING AND INSTALLATION . . . . . . . . . . . . . . . . . . . . . . . . . . . . . . . . . . . . . . . . . . . . . 8
2.1
2.2
2.3
3
Front View . . . . . . . . . . . . . . . . . . . . . . . . . . . . . . . . . . . . . . . . . . . . . . . . . . . . . . . . . . . . . . . . . . .10
Rear View . . . . . . . . . . . . . . . . . . . . . . . . . . . . . . . . . . . . . . . . . . . . . . . . . . . . . . . . . . . . . . . . . . . .11
Remote Control . . . . . . . . . . . . . . . . . . . . . . . . . . . . . . . . . . . . . . . . . . . . . . . . . . . . . . . . . . . . . .12
3.3.1 General Functions . . . . . . . . . . . . . . . . . . . . . . . . . . . . . . . . . . . . . . . . . . . . . . . . . . . . . . . 12
3.3.2 Teletext Function Buttons. . . . . . . . . . . . . . . . . . . . . . . . . . . . . . . . . . . . . . . . . . . . . . . . . . 13
3.3.3 Inserting the Batteries in the Remote Control . . . . . . . . . . . . . . . . . . . . . . . . . . . . . . . . . . 13
CONNECTIONS TO EXTERNAL EQUIPMENT . . . . . . . . . . . . . . . . . . . . . . . . . . . . . . . . . . . 14
4.1
4.2
4.3
4.4
5
Unpacking . . . . . . . . . . . . . . . . . . . . . . . . . . . . . . . . . . . . . . . . . . . . . . . . . . . . . . . . . . . . . . . . . . . .8
Package Contents . . . . . . . . . . . . . . . . . . . . . . . . . . . . . . . . . . . . . . . . . . . . . . . . . . . . . . . . . . . . . .8
Installation Notes . . . . . . . . . . . . . . . . . . . . . . . . . . . . . . . . . . . . . . . . . . . . . . . . . . . . . . . . . . . . . . .9
PARTS AND FUNCTIONS . . . . . . . . . . . . . . . . . . . . . . . . . . . . . . . . . . . . . . . . . . . . . . . . . . . . 10
3.1
3.2
3.3
4
Safety Instructions . . . . . . . . . . . . . . . . . . . . . . . . . . . . . . . . . . . . . . . . . . . . . . . . . . . . . . . . . . . . . .4
Warnings and Precautions . . . . . . . . . . . . . . . . . . . . . . . . . . . . . . . . . . . . . . . . . . . . . . . . . . . . . . . .6
1.2.1 Note to the CATV System Installer . . . . . . . . . . . . . . . . . . . . . . . . . . . . . . . . . . . . . . . . . . . 6
Cleaning & Care . . . . . . . . . . . . . . . . . . . . . . . . . . . . . . . . . . . . . . . . . . . . . . . . . . . . . . . . . . . . . . . .7
End-Of-Life Disposal . . . . . . . . . . . . . . . . . . . . . . . . . . . . . . . . . . . . . . . . . . . . . . . . . . . . . . . . . . . .7
Connecting to an Aerial . . . . . . . . . . . . . . . . . . . . . . . . . . . . . . . . . . . . . . . . . . . . . . . . . . . . . . . . .14
Connecting External Equipment (VCR, DVD, camcorder, satellite receiver) . . . . . . . . . . . . . . . . . .14
4.2.1 Using SCART (AV) Socket Input . . . . . . . . . . . . . . . . . . . . . . . . . . . . . . . . . . . . . . . . . . . . . 14
4.2.2 Using S-Video Input . . . . . . . . . . . . . . . . . . . . . . . . . . . . . . . . . . . . . . . . . . . . . . . . . . . . . . 14
4.2.3 Using Component Video Input . . . . . . . . . . . . . . . . . . . . . . . . . . . . . . . . . . . . . . . . . . . . . . 15
4.2.4 Using Video Input . . . . . . . . . . . . . . . . . . . . . . . . . . . . . . . . . . . . . . . . . . . . . . . . . . . . . . . . 15
4.2.5 Using Monitor Output . . . . . . . . . . . . . . . . . . . . . . . . . . . . . . . . . . . . . . . . . . . . . . . . . . . . 15
4.2.6 Using DVI Input . . . . . . . . . . . . . . . . . . . . . . . . . . . . . . . . . . . . . . . . . . . . . . . . . . . . . . . . . 15
External Audio Connection . . . . . . . . . . . . . . . . . . . . . . . . . . . . . . . . . . . . . . . . . . . . . . . . . . . . . .16
4.3.1 Connecting External Speaker . . . . . . . . . . . . . . . . . . . . . . . . . . . . . . . . . . . . . . . . . . . . . . . 16
Connecting a PC . . . . . . . . . . . . . . . . . . . . . . . . . . . . . . . . . . . . . . . . . . . . . . . . . . . . . . . . . . . . . .17
4.4.1 Using RGB (VGA) or DVI Video Input . . . . . . . . . . . . . . . . . . . . . . . . . . . . . . . . . . . . . . . . 17
BASIC FUNCTIONS . . . . . . . . . . . . . . . . . . . . . . . . . . . . . . . . . . . . . . . . . . . . . . . . . . . . . . . . 18
5.1
5.2
5.3
5.4
5.5
Powering ON / OFF . . . . . . . . . . . . . . . . . . . . . . . . . . . . . . . . . . . . . . . . . . . . . . . . . . . . . . . . . . .18
Selecting Signal Source . . . . . . . . . . . . . . . . . . . . . . . . . . . . . . . . . . . . . . . . . . . . . . . . . . . . . . . . . .18
Volume Adjustment . . . . . . . . . . . . . . . . . . . . . . . . . . . . . . . . . . . . . . . . . . . . . . . . . . . . . . . . . . . .19
MUTE . . . . . . . . . . . . . . . . . . . . . . . . . . . . . . . . . . . . . . . . . . . . . . . . . . . . . . . . . . . . . . . . . . . . . .19
Display Information . . . . . . . . . . . . . . . . . . . . . . . . . . . . . . . . . . . . . . . . . . . . . . . . . . . . . . . . . . . .20
2
Downloaded From TV-Manual.com Manuals
User Manual BDS4241R
6
ADVANCED FUNCTIONS . . . . . . . . . . . . . . . . . . . . . . . . . . . . . . . . . . . . . . . . . . . . . . . . . . . 21
6.1
6.2
6.3
6.4
6.5
6.6
6.7
6.8
6.9
6.10
6.11
6.12
6.13
6.14
TV Channel Controls . . . . . . . . . . . . . . . . . . . . . . . . . . . . . . . . . . . . . . . . . . . . . . . . . . . . . . . . . . .21
6.1.1 Storing TV Channels Automatically . . . . . . . . . . . . . . . . . . . . . . . . . . . . . . . . . . . . . . . . . . . 21
6.1.2 Storing TV Channels Manually. . . . . . . . . . . . . . . . . . . . . . . . . . . . . . . . . . . . . . . . . . . . . . . 22
6.1.3 Fine Tuning TV Channel Reception . . . . . . . . . . . . . . . . . . . . . . . . . . . . . . . . . . . . . . . . . . . 23
6.1.4 Labeling the TV Channels . . . . . . . . . . . . . . . . . . . . . . . . . . . . . . . . . . . . . . . . . . . . . . . . . . 24
6.1.5 Choosing a MTS (Multi-Channel Television Sound) Mode . . . . . . . . . . . . . . . . . . . . . . . . . . 25
6.1.6 Editing TV Channels . . . . . . . . . . . . . . . . . . . . . . . . . . . . . . . . . . . . . . . . . . . . . . . . . . . . . . 26
Picture Controls . . . . . . . . . . . . . . . . . . . . . . . . . . . . . . . . . . . . . . . . . . . . . . . . . . . . . . . . . . . . . .27
6.2.1 Adjusting Picture Settings . . . . . . . . . . . . . . . . . . . . . . . . . . . . . . . . . . . . . . . . . . . . . . . . . . 27
6.2.2 Reset to the Factory Defaults. . . . . . . . . . . . . . . . . . . . . . . . . . . . . . . . . . . . . . . . . . . . . . . 27
Sound Controls . . . . . . . . . . . . . . . . . . . . . . . . . . . . . . . . . . . . . . . . . . . . . . . . . . . . . . . . . . . . . . .28
6.3.1 Adjusting Sound Settings. . . . . . . . . . . . . . . . . . . . . . . . . . . . . . . . . . . . . . . . . . . . . . . . . . . 28
6.3.2 Reset to the Factory Defaults. . . . . . . . . . . . . . . . . . . . . . . . . . . . . . . . . . . . . . . . . . . . . . . 28
OSD Menu Language . . . . . . . . . . . . . . . . . . . . . . . . . . . . . . . . . . . . . . . . . . . . . . . . . . . . . . . . . . .29
Power Save Mode . . . . . . . . . . . . . . . . . . . . . . . . . . . . . . . . . . . . . . . . . . . . . . . . . . . . . . . . . . . . .29
Minimize Screen Sticking . . . . . . . . . . . . . . . . . . . . . . . . . . . . . . . . . . . . . . . . . . . . . . . . . . . . . . . .30
Freezing the Current Picture . . . . . . . . . . . . . . . . . . . . . . . . . . . . . . . . . . . . . . . . . . . . . . . . . . . . .30
On-Screen Display Timeout . . . . . . . . . . . . . . . . . . . . . . . . . . . . . . . . . . . . . . . . . . . . . . . . . . . . . .30
Adjusting the Menu Transparency . . . . . . . . . . . . . . . . . . . . . . . . . . . . . . . . . . . . . . . . . . . . . . . . .30
Changing the Screen Size . . . . . . . . . . . . . . . . . . . . . . . . . . . . . . . . . . . . . . . . . . . . . . . . . . . . . . .31
Setting up the PC Input . . . . . . . . . . . . . . . . . . . . . . . . . . . . . . . . . . . . . . . . . . . . . . . . . . . . . . . . .31
Teletext . . . . . . . . . . . . . . . . . . . . . . . . . . . . . . . . . . . . . . . . . . . . . . . . . . . . . . . . . . . . . . . . . . . . .32
Viewing the Picture In Picture (PIP) . . . . . . . . . . . . . . . . . . . . . . . . . . . . . . . . . . . . . . . . . . . . . . . .34
Remote Management . . . . . . . . . . . . . . . . . . . . . . . . . . . . . . . . . . . . . . . . . . . . . . . . . . . . . . . . . . .35
7
INPUT MODE . . . . . . . . . . . . . . . . . . . . . . . . . . . . . . . . . . . . . . . . . . . . . . . . . . . . . . . . . . . . . 36
8
TECHNICAL SPECIFICATIONS. . . . . . . . . . . . . . . . . . . . . . . . . . . . . . . . . . . . . . . . . . . . . . . . 38
9
CLEANING AND TROUBLESHOOTING. . . . . . . . . . . . . . . . . . . . . . . . . . . . . . . . . . . . . . . . . 41
9.1
9.2
10
Cleaning . . . . . . . . . . . . . . . . . . . . . . . . . . . . . . . . . . . . . . . . . . . . . . . . . . . . . . . . . . . . . . . . . . . . .41
Troubleshooting . . . . . . . . . . . . . . . . . . . . . . . . . . . . . . . . . . . . . . . . . . . . . . . . . . . . . . . . . . . . . . .42
LIMITED WARRANTY(EUR) . . . . . . . . . . . . . . . . . . . . . . . . . . . . . . . . . . . . . . . . . . . . . . . . . . 43
3
Downloaded From TV-Manual.com Manuals
User Manual BDS4241R
1.
IMPORTANT NOTES AND SAFETY INSTRUCTIONS
1.1
SAFETY INSTRUCTIONS
Read and keep these instructions.
Heed all warnings.
Follow all instructions.
Do not use this apparatus near water.
Disconnect from the electric outlet before cleaning. Do not use
liquid or aerosol cleaners. Clean only with a slightly damp cloth.
Do not block any of the ventilation openings. Install in accordance
with the manufacturers instructions.
Do not install in direct sunlight, near any heat sources such as
radiators, heat registers, stoves, or other apparatus (including
amplifiers) that produce heat.
Do not defeat the safety purpose of the polarized or grounding
type plug. A polarized plug has two blades with one wider than the
other. A grounding type plug has two blades and a third grounding
prong.The wide blade or third prong are provided for your safety.
When the provided plug does not fit into your outlet, consult an
electrician for replacement of the obsolete outlet.
Do not remove cover, to prevent electric shock. Refer servicing to
qualified service personnel only.
Unauthorized modification of this equipment or usage of an unshielded
connecting cable may cause excessive interference.
Adjust only those controls that are covered by the operating
instructions. Improper adjustment of other controls can result in
damage which often requires extensive work by a qualified technician
to restore the unit to normal operation.
Use in well-ventilated area and do not block any of the ventilation
openings. Install in accordance with the manufacturer’s instructions.
The unit must be operated from the type of power source
indicated on the label. If the type of available power is unknown,
consult your dealer or local power company.
Protect the power cord from being walked on or pinched
particularly at plugs, convenience receptacles, and the point where
they exit from the apparatus power outlet.This is a safety feature.
If you are unable to insert the plug into the outlet, contact your
electrician. Do not alter the plug; this will defeat the safety feature.
Do not overload wall outlets and extension cords as this can result
in a risk of fire or electric shock.
If the picture displayed looks abnormal, turn off the unit and
disconnect it from the electric outlet.Verify your signal wire
connections and reconnect the display to the electric outlet.
Only use attachments/accessories specified by the manufacturer.
4
Downloaded From TV-Manual.com Manuals
User Manual BDS4241R
Use only with a cart, stand, tripod, bracket, or table specified by the
manufacturer, or sold with apparatus.When a cart is used, use
caution when moving the cart/apparatus combination to avoid
injury from tip-over.
Unplug this apparatus during lightning storms or when unused for
long periods of time.
Refer all servicing to qualified service personnel. Servicing is required
when the apparatus has been damaged in any way, such as power-supply cord or plug is damaged, liquid has been spilled or objects have fallen into apparatus, the apparatus has been exposed to rain or moisture,
does not operate normally, or has been dropped.
This product may contain mercury. Disposal of this material may be
regulated due to environmental considerations.
For disposal or recycling information, please contact your local
authorities or the Electronic Industries Alliance: www.eiae.org
Damage Requiring Service:
The appliance should be serviced by qualified service personnel
when:
• The power supply cord or the plug has been damaged or frayed.
• Objects have fallen, or liquid has been spilled into the appliance.
• The appliance has been exposed to rain.
• The appliance does not appear to operate normally or exhibits a
marked change in performance.
• The appliance has been dropped, or the enclosure damaged.
• Unit does not operate normally when the operating instructions
are followed.
Tilt/Stability:
• All displays must comply with recommended international global
safety standards for tilt and stability properties of its cabinet design.
• Do not compromise these design standards by applying
excessive pull force to the front, or top, of the cabinet which
could ultimately overturn the product.
• Do not endanger yourself, or children, by placing electronic
equipment/toys on the top of the set and cause product damage
and/or personal injury.
• Do not place the unit on an unstable cart, stand or table. Or the
product may fall, causing serious damage.
Do not place the unit on a bed, sofa, rug, or similar surfaces.
Wall or Ceiling Mounting:
The appliance should be mounted to a wall or ceiling only as
recommended by the manufacturer.
Power Lines:
An outdoor antenna should be located away from power lines.
Object and Liquid Entry:
Care should be taken so that objects do not fall and liquids are not
spilled into the enclosure through openings.
5
Downloaded From TV-Manual.com Manuals
User Manual BDS4241R
Battery Usage:
CAUTION:To prevent battery leakage that may result in bodily
injury, property damage, or damage to the unit.
• Install all batteries correctly, with + and - aligned as marked on
the unit.
• Do not mix batteries (old and new or carbon and alkaline, etc.).
• Remove batteries when the unit is not used for a long time.
1.2
WARNINGS AND PRECAUTIONS
1.2.1
NOTE TO THE CATV SYSTEM INSTALLER
This reminder is provided to call the CATV system installer’s attention
to Article 820-40 of the NEC that provides guidelines for proper
grounding and, in particular, specifies that the cable ground must be
connected to the grounding system of the building, as close to the
point of cable entry as practical.
KNOW THESE SAFETY SYMBOLS
This lightning flash with arrow-head within a triangle indicates
uninsulated material within your unit, which can cause an electric
shock. For the safety of everyone in your household, do not
remove product cover.
For the safety of everyone in your household, do not remove
product cover.The exclamation point within a triangle calls
attention to features for which you must read the enclosed
literature closely to prevent operating and maintenance problems.
WARNING
To reduce the risk of fire or electric shock, this appliance must not be
exposed to rain or moisture, and objects filled with liquids, such as
vases, must not be placed upon this apparatus.
CAUTION
To prevent electric shock, match wide plug blade to wide slot, and fully
insert.
ATTENTION
Pour éviter les chocs électriques, introduire la lame la plus large de la
fiche dans la bome correspondante de la prise et pousser jusqu’au
fond.
6
Downloaded From TV-Manual.com Manuals
User Manual BDS4241R
1.3
CLEANING & CARE
To avoid possible shock hazard, please be sure that the television is
unplugged from the electrical outlet before cleaning.
When cleaning the television screen, take care not to scratch or
damage the screen surface (avoid wearing jewelry or using anything
abrasive).
Wipe the front of the screen with a clean cloth dampened with
water. Use even, easy, vertical strokes when cleaning.
Gently wipe the cabinet surfaces with a clean cloth or sponge
dampened in a solution of cool clear water. Use a clean dry cloth
to dry the wiped surfaces.
Occasionally vacuum the ventilation holes or slots in the cabinet
back.
Never use thinners, insecticide sprays, or other chemicals on or
near the cabinet, as they might cause permanent marring of the
cabinet finish.
Do not allow a still image to be displayed for an extended period
of time as this can cause a permanent after-image to remain.
1.4
END-OF-LIFE DISPOSAL
This Philips product and its packaging contain materials that can be
recycled and re-used. Specialized companies can recycle your
product to increase the amount of reusable materials and minimize
the amounts which need to be properly disposed.
This product might also use batteries, which should not be thrown
away when depleted, but should be handed in and disposed of as
small chemical waste.
Please find out about the local regulations regarding the disposal of
the television, batteries, and packaging materials whenever you
replace existing equipment.
7
Downloaded From TV-Manual.com Manuals
User Manual BDS4241R
2. UNPACKING AND INSTALLATION
2.1
UNPACKING
This product is packed in a carton, together with the standard
accessories. Any other optional accessories will be packed
separately.
The weight of the product differs - depending on the type - from
29 to 43 kg. Due to the size and weight it is recommended to
move it by 2 people.
The protective glass and the glass substrate are installed on the
front of the product. Since both glass can be broken and scraped
easily the product has to be handled with care. Never place the
product with the glass faced down unless it is protected with pads.
After opening the carton ensure that the content is in good
condition and complete.
2.2
PACKAGE CONTENTS
Please verify that you received the following items with your package
content:
1
PDP
2
Remote Control with batteries
3
User Manual on CD-ROM
4
Power Cord (UK, Continent)
5
VGA, DVI cable
6
Antenna Cable
7
Table stand (feet)
PDP
User’s Manual
8
Downloaded From TV-Manual.com Manuals
Antenna Cable
Remote Control/
AAA Batteries
VGA, DVI cable
Power Cord
User Manual BDS4241R
2.3
INSTALLATION NOTES
Due to the high power consumption, always use the plug
exclusively designed for this product. If an extended line is
required, please consult your service agent.
The product should be installed on a flat surface to avoid tipping.
The distance between the back of the product and the wall should
be maintained for proper ventilation. Avoid installing the product in
the kitchen, bathroom or any other places with high humidity so as
not to shorten the service life of the electronic components.
Please ensure the product is installed horizontally. Any 90 degrees
clockwise or counter-clockwise installation may induce poor
ventilation and subsequent component damage.
To protect the screen and avoid screen damage, do not display a
still picture for a long time.
The PDP can normally operate only under 2000m in height. It
might abnormally function at a place over 2000m in height and do
not install and operate there.
9
Downloaded From TV-Manual.com Manuals
User Manual BDS4241R
3.
PARTS AND FUNCTIONS
3.1
FRONT VIEW
1
Input Button
Use this button to switch between available inputs.
2
Menu Button
Use this button to engage the On Screen Display menu.
3
Volume Adjustment Buttons
Use these buttons to adjust volume up and down.These buttons
also serve as navigation and adjustment buttons when On Screen
Display menu is engaged.
4
Select Buttons
Use these buttons to navigate through the On Screen Display
menu. If an optional TV tuner is installed, these buttons also
function as Channel Up/Down.
5
Power (Standby) Button
Turns power on/off from standby mode.There is a wait period
between on/off cycles.
6
Status LED
• Not Illuminated = No AC Power detected
If the main power switch (rear of panel) is turned off, this LED
will not illuminate.
• Red = Standby (Power OFF) with AC power detected
The LED will illuminate in red color if the PDP is shut off but the
main power cord is plugged into the back of the unit.
• Solid Green = Power ON
7
Remote Control Signal Receiver
Point the remote control towards this spot on the PDP.
10
Downloaded From TV-Manual.com Manuals
User Manual BDS4241R
3.2
REAR VIEW
1
External speaker output
Connect to external speakers.
2
RS-232 Connector
Connect to a PC to update software.
3
Digital DVI input
Connect to digital video signals from a Set-Top box or Computer.
4
RGB(VGA) input
Connect to RGB (VGA) output of Computer or Set-Top box.
5
Component Video inputs
Auto-detecting component video inputs (Y/Pb/Pr or Y/Cb/Cr) for
connecting to the component output jacks of a DVD player or
Set-Top Box.
6
S-Video input
Connect S-Video signals from external sources such as VCRs or
DVD players.
7
Monitor output
Connect to the video and audio input of a recording VCR or DVD
Connect to the audio input of an audio system.
8. Video input
Connect to the video and audio output of an external device.
9
SCART (AV) Connector
Connect to external sources such as VCRs or DVD players.
10 Power connection
Connect the supplied power cord to the wall outlet.
11 ANT
Connect to an antenna or a cable TV system.
11
Downloaded From TV-Manual.com Manuals
User Manual BDS4241R
3.3
REMOTE CONTROL
3.3.1
GENERAL FUNCTIONS
1
Sound Mute On/Off
2
Standby Power On/Off
Push this button to switch on the PDP from Standby mode.
Push it again to turn it off to Standby mode.
3
Menu
Activates the OSD (On Screen Display) menu
4
Volume +/Turns volume up or down.
5
Channel Up/Down
Changes the TV channels sequentially.
6
INPUT
Displays the available input sources.
7
AUTO
- Used to adjusts the screen automatically when connected to the
Digital Visual Interface (DVI) or PC input.
- Used to launch the Program Table menu while watching analog TV
channels.
8
I.SIZE (Image SIZE)
Used to select the picture size.
9
MTS
Used to select the sound mode.
10 FREEZE
Freeze the display on the screen.The playback system will continue
playing.
11 Number keypad
Use number keypad to select the TV channel you want to watch.
12 RECALL
Display information.
13 SLEEP
Press this button to set timer off.
14 PIP Function Buttons
LOCATE : Used to select a location of the sub-picture. It is available in PIP mode only.
SIZE : Used to select a size of the sub-picture. It is available in PIP
mode only.
SWAP : Used to interchange the main picture and sub-picture.
It is available in PIP and PBP mode only.
A.SWAP : Used to select the audio for the main or sub-picture.
It is available in PIP and PBP mode only.
SPLIT : Used to select a PIP mode (NORMAL, PIP, PBP)
S.SELECT (Screen SELECT) : Used to select the main picture
or sub-picture.Then you can
adjust the status of selected
picture. It is available in PIP and
PBP mode only.
12
Downloaded From TV-Manual.com Manuals
User Manual BDS4241R
3.3.2
TELETEXT FUNCTION BUTTONS
1
TEXT
Activates the TELETEXT mode.
2
INPUT
Displays the TELETEXT index.
3
Fastext
With Fastext, you can easily access the topic and relevant pages
you want by pressing the red, green, yellow and blue buttons on
the remote control.
In TELETEXT mode, volume controls remain available, but the
relevant symbols are not shown on the screen.
4
Page Down (AUTO)
Displays the previous TELETEXT page.
5
Zoom (I.SIZE)
Press the I.SIZE button once to zoom in on the top part of the
screen.
Press twice to zoom in on the bottom part of the screen and
three times to return to normal display.
6
Page Up (MTS)
Displays the next TELETEXT page.
7
FREEZE
Freezes the current page, preventing update and subpage display.
• Press the HOLD/POSITION button on the remote control to
select this function.
• Press the HOLD/POSITION button again to cancel.
8
Reveal
Reveals hidden page information. Press the Reveal button to show
the information again.
9
Sub-page
Press to display a secondary page by entering its number.
3.3.3
INSERTING THE BATTERIES IN THE REMOTE
CONTROL
1
Remove the cover on the rear of the remote control.
2
Insert two AAA size 1.5V batteries ensuring that the "+" and "-"
ends of the batteries are correctly aligned.
3
Replace the cover.
Note:
Do not mix battery types, e.g. alkaline and manganese.
13
Downloaded From TV-Manual.com Manuals
User Manual BDS4241R
4.
CONNECTIONS TO EXTERNAL EQUIPMENT
4.1
CONNECTING TO AN AERIAL
To view TV channels correctly, a signal must be received using an
antenna. Connect the aerial or network input cable to the ANT jack on
the rear of the PDP.
Note:
When installing or re-installing your PDP, be sure to use the supplied
coaxial antenna cable. If you connect using a different coaxial cable,
there is risk of noise or interference to the screen image.
(You must not use another general purpose cable.
Use the 3M/5M/7M cable supplied by your dealer.)
• An outdoor aerial
• A cable TV network
4.2
CONNECTING EXTERNAL EQUIPMENT (VCR,
DVD, CAMCORDER, SATELLITE RECEIVER)
4.2.1
USING SCART (AV) SOCKET INPUT
1
Connect the SCART socket of the external device to the SCART
socket of the PDP.
2
Connect the video recorder to the antenna wall socket or cable
box.
4.2.2
USING S-VIDEO INPUT
1
Connect the S-Video (4-pin DIN) connector of the external device
to the S-VIDEO INPUT of the PDP.
2
Connect the red (R) and white (L) audio jacks of the device to the
R and L audio-in jacks located next to the S-VIDEO connector.
14
Downloaded From TV-Manual.com Manuals
User Manual BDS4241R
4.2.3
USING COMPONENT VIDEO INPUT
1
Connect the green-colored (labeled as "Y") jack of the device to
the green-colored "Y" jack of the PDP.
2
Connect the red-colored (labeled as "Pr") jack of the device to the
red-colored "PR/CR" jack of the PDP.
3
Connect the blue-colored (labeled as "Pb") jack of the device to
the blue-colored "PB/CB" jack of the PDP.
4
Connect the red (R) and white (L) audio jacks of the device to the
R and L audio-in jacks of the PDP.
4.2.4
USING VIDEO INPUT
1
Connect the jack of the external device to the VIDEO INPUT of
the PDP.
2
Connect the red (R) and white (L) audio jacks to the R and L
audio-in jacks located next to the VIDEO connector.
4.2.5
USING MONITOR OUTPUT
1
Connect the jack of the DVD or VCR (for recording) or audio
system to the MONITOR OUTPUT of the PDP.
2
Connect the red (R) and white (L) audio jacks to the R and L
audio-in jacks located next to the VIDEO connector.
4.2.6
USING DVI INPUT
1
Connect the DVI-jack of the DVD, decoder or satellite receiver to
the DVI INPUT of the PDP.
2
Connect the red (R) and white (L) audio jacks to the R and L
audio jacks located next to the DVI connector.
15
Downloaded From TV-Manual.com Manuals
User Manual BDS4241R
4.3
EXTERNAL AUDIO CONNECTION
4.3.1
CONNECTING EXTERNAL SPEAKER
Connect the speaker audio cable to the external speaker output jack
on the rear of the PDP matching the “+” and “-” ends of the cable with
the diagram on the PDP.
• Before connecting the speaker wire to the PDP, turn off your PDP.
16
Downloaded From TV-Manual.com Manuals
User Manual BDS4241R
1
4.4
CONNECTING A PC
4.4.1
USING RGB (VGA) OR DVI VIDEO INPUT
1
Connect the 15-pin D-Sub RGB(VGA) connector of the PC to the
RGB-IN connector of the PDP.
If you have a PC that is equipped with a DVI (Digital Visual
Interface), you may connect the PC DVI connector from the PC to
the DVI-IN connector of the PDP.
2
For both RGB (VGA) and DVI, connect the red (R) and white (L)
audio jacks of the PC to the R and L (DVI/RGB) AUDIO IN jacks
of the PDP.
Setting Up Your Display Using Plug and Play
This display adheres to VESA Plug and Play standard to eliminate
complicated and time consuming setup of monitors.This PDP
identifies itself to the computer and automatically sends the PC its
Extended Display Identification Data (EDID) using Display Data
Channel (DDC) protocols.
2
3
How to Set up Your PC for Use with PDP (Windows)
The display settings for a typical Windows-based computer are shown
below. However, the actual screens on your computer will differ
depending on the version of Windows and video card equipped with
the computer. Even though the actual screen may look different from
example displayed below, basic set-up routine will apply in most cases.
1
Go to the Window's CONTROL PANEL by clicking START,
SETTINGS, CONTROL PANEL.
=> The CONTROL PANEL Window is displayed.
2
Select the DISPLAY icon from this window.
=> The DISPLAY PROPERTIES dialog box is displayed.
3
Select the SETTINGS tab to display your computer's video output
settings.
4
4
Set the "Screen Resolution" settings to 1024x768 PIXELS. For
COLOR QUALITY, select 24 BIT COLOR (might also be
expressed as 16 million colors).
5
5
If a vertical-frequency option is available, set the value to 60 or
60 Hz.
6
Click OK to complete the setting.
Note:
Both screen position and size will vary, depending on the type of PC
graphics card and its resolution selected. See page 36 for an overview
of the supported resolutions.
17
Downloaded From TV-Manual.com Manuals
User Manual BDS4241R
5.
BASIC FUNCTIONS
5.1
POWERING ON / OFF
Make sure the PDP is plugged into the wall outlet with the supplied
power cord.
If the power is plugged in, the STATUS LED on the control panel will
illuminate in red color.
Using Front Panel or Remote Control
1 Press the MENU button on the front panel or remote control.
=> The PDP will now turn on after a brief pause.The STATUS LED
will now turn green to indicate power on status.
2
5.2
Turn off the power by pressing the POWER button on the front
panel or the remote control again.
SELECTING SIGNAL SOURCE
Using Front Panel or Remote Control
1 Press the MENU button on the front panel or remote control.
Main Input
TV
2
Pressing the CH+ or CH- button will cycle the PDP through all
available input signal sources in the following order:
TV - SCART 1 - SCART 2 - VIDEO - S-VIDEO COMPONENT - RGB - DVI
3
Press the VOL+ or VOL- button to select the source.
SCART 1
SCART 2
VIDEO
S-VIDEO
COMPONENT
RGB
DVI
Move [- CH +]
Select [- VOL +]
Exit [MENU]
18
Downloaded From TV-Manual.com Manuals
User Manual BDS4241R
5.3
VOLUME ADJUSTMENT
Using Front Panel or Remote Control
1 Press the MENU button on the front panel or remote control.
Image
Screen
Volume
Treble
Bass
Balance
Mute
Audio Preset
Move [- CH +]
Image
Screen
Volume
Treble
Bass
Balance
Mute
Audio Preset
Move [- CH +]
Setup
Audio
60
055
072
043
ON
OFF
[-VOL+] to Preset Audio
Adjust [- VOL +] Exit [MENU]
Setup
2
Press the VOL+ or VOL- button to select Audio.
3
Press the CH- button to enter the selected menu group.
4
Press the VOL+ or VOL- button to adjust the sound volume.
Note:
If the PDP's built-in speakers are turned off, then the volume
controls will not affect volume generated by the built-in speaker.
Audio
60
055
072
043
ON
OFF
[-VOL+] to Preset Audio
Select [- VOL +]
Exit [MENU]
5.4
MUTE
Using Remote Control
1 Press the MUTE button on the remote control.
=> The audio is cut off.
2
Press the MUTE, VOL+ or VOL- button to turn the audio
back on.
19
Downloaded From TV-Manual.com Manuals
User Manual BDS4241R
5.5
DISPLAY INFORMATION
Via Remote Control
Press the RECALL button to display the channel information and setting status. Press again to exit.
TIMER OFF
Note:
The displayed information can differ, depending on the selected source.
001-ABC
TV
20
Downloaded From TV-Manual.com Manuals
User Manual BDS4241R
6.
Image
ADVANCED FUNCTIONS
Screen
Setup
Audio
TV
Channel Settings
Program Edit
Move [- CH +]
Image
Screen
Select [- VOL +]
Setup
Exit [MENU]
Audio
Move [- CH +]
Image
Screen
AUSTRIA
Move [- CH +]
STORING TV CHANNELS AUTOMATICALLY
You can scan for the frequency ranges available (availability depends on
your country). Automatically allocated program numbers may not
correspond to actual or desired program numbers. However you can
sort numbers manually and clear any channels you do not wish to
watch.
1
Press the MENU button on the front panel or remote control.
2
Press the VOL+ or VOL- button to select TV.
Press the CH- button to enter the selected menu group.
=> The Channel Settings is selected.
3
Press the VOL+ button to enter the selected menu group.
4
Press the CH- or CH+ button to select Country.
Press the VOL+ or VOL- button to select your country.
5
Press the CH- or CH+ button to select Auto Search.
Press the VOL+ or VOL- button to start the search.
=> The scan starts.The scanned channels are automatically stored
in the order which reflects their position in the frequency range
(with lowest first and highest last). If you want to stop, press
the MENU button.
Audio
6
After channel search is complete, the Program Table is displayed.
You can edit channels.
For more details, refer to “EDITING TV CHANNELS” on page 26.
Exit [MENU]
TV
Channel Settings
Auto Search
Program Table
Country
Program Edit
6.1.1
[-VOL+] to scan channels
Select [- VOL +]
Setup
TV CHANNEL CONTROLS
TV
Channel Settings
Auto Search
Program Table
Country
Program Edit
6.1
[-VOL+] to scan channels
AUSTRIA
Select [- VOL +]
Exit [MENU]
Channel Scan In Progress
---
Channels Found
105.694 MHz
Exit [MENU]
21
Downloaded From TV-Manual.com Manuals
User Manual BDS4241R
6.1.2
Image
Screen
Setup
Channel Settings
Auto Search
Program Table
Country
Program Edit
Move [- CH +]
Image
Screen
Audio
Setup
You can choose whether or not to store each of the channels found
and the program number of each stored channel which you wish to
identify.
TV
[-VOL+] to scan channels
AUSTRIA
Select [- VOL +]
Audio
STORING TV CHANNELS MANUALLY
Exit [MENU]
TV
1
Press the MENU button on the front panel or remote control.
2
Press the VOL+ or VOL- button to select TV.
Press the CH- button to enter the selected menu group.
3
Press the CH- or CH+ button to select Program Edit.
Press the VOL+ button to enter the selected menu group.
=> The Program is selected.
4
To assign a program number to a channel, find the correct number
by pressing the VOL+ or VOL- button.
5
Press the CH- or CH+ button to select Channel.
Press the VOL+ or VOL- button to select the channel to be
stored.
6
If necessary, re-select the broadcasting system required.
Press the CH- or CH+ button to select System.
Press the VOL+ or VOL- button to select required system
(B/G, D/K, I, or L).
7
To store the channel and associated program number, select Store
Program by pressing the CH- or CH+ button.
Press the VOL+ or VOL- button.
Channel Settings
[-VOL+] to scan channels
Auto Search
Program Table
Country
AUSTRIA
Program Edit
001
Program
Move [- CH +] Select [- VOL +] Exit [MENU]
Image
Screen
Setup
Audio
Program Table
Country
Program Edit
001
Program
Fine Tune
001
Channel
Move [- CH +] Select [- VOL +]
Image
Screen
Country
Program Edit
Program
Fine Tune
Channel
System
Move [- CH +]
Image
Screen
Setup
Audio
TV
051
Exit [MENU]
TV
001
051
001
i
Select [- VOL +]
Setup
Audio
Exit [MENU]
TV
051
Fine Tune
Channel
001
System
i
Edit Labels
A - - - MTS Mode
MONO A
[-VOL+] to Store Settings
Store Program
Move [- CH +] Select [- VOL +] Exit [MENU]
22
Downloaded From TV-Manual.com Manuals
User Manual BDS4241R
6.1.3
FINE TUNING TV CHANNEL RECEPTION
If the signal is weak or distorted, you may have to fine tune the channel
manually.
Image
Screen
Setup
Channel Settings
Auto Search
Program Table
Country
Program Edit
Move [- CH +]
Image
Screen
Audio
[-VOL+] to scan channels
Audio
Program Table
Country
Program Edit
Program
001
Fine Tune
Channel
001
Move [- CH +] Select [- VOL +]
Image
Screen
Setup
Audio
Exit [MENU]
Screen
Setup
Press the MENU button on the front panel or remote control.
2
Press the VOL+ or VOL- button to select TV.
Press the CH- button to enter the selected menu group.
3
Press the CH- or CH+ button to select Program Edit.
Press the VOL + button to enter the selected menu group.
4
To select the channel to be tuned, select Channel by pressing the
CH- or CH+ button.
Press the VOL+ or VOL- button to select required channel.
5
Press the CH- or CH+ button to select Fine Tune.
Press the VOL+ or VOL- button to obtain a good quality of the
picture and sound until you reach the optimal setting.
6
To store your setting, select Store Program by pressing the
CH- or CH+ button.
Press the VOL+ or VOL- button.
TV
051
Exit [MENU]
TV
Auto Search
[-VOL+] to scan channels
Program Table
Country
Program Edit
Program
001
Fine Tune
051
Move [- CH +] Adjust [- VOL +] Exit [MENU]
Image
1
AUSTRIA
Select [- VOL +]
Setup
TV
Audio
Note:
If you are unable to fine tune a channel, check that the System setting
is correct.
TV
Fine Tune
051
Channel
001
System
i
Edit Labels
A - - - MTS Mode
MONO A
[-VOL+] to Store Settings
Store Program
Move [- CH +] Select [- VOL +] Exit [MENU]
23
Downloaded From TV-Manual.com Manuals
User Manual BDS4241R
6.1.4
Image
Screen
Setup
Audio
You can assign an easy-to-remember label to any channel. A label consists of several fields, where each field is a letter, a number, a symbol, or
a blank.When the RECALL button is pressed, the channel label is displayed next to the program number.
TV
Channel Settings
Auto Search
Program Table
Country
Program Edit
Move [- CH +]
Image
Screen
[-VOL+] to scan channels
AUSTRIA
Select [- VOL +]
Setup
Audio
Program Table
Country
Program Edit
Program
001
Fine Tune
Channel
001
Move [- CH +] Select [- VOL +]
Image
Screen
Setup
LABELING THE TV CHANNELS
Audio
1
Press the MENU button on the front panel or remote control.
2
Press the VOL+ or VOL- button to select TV.
Press the CH- button to enter the selected menu group.
3
Press the CH- or CH+ button to select Program Edit.
Press the VOL+ button to enter the selected menu group.
4
To select the channel to be assigned to a new name, select
Channel by pressing the CH- or CH+ button.
Press the VOL+ or VOL- button to select required channel.
5
Press the CH- or CH+ button to select Edit Labels.
Press the VOL+ button.
6
Press the yellow or cyan button to select a letter (A~Z or a~z), a
number (0~9), a symbol (!, “, #, $, etc.), or a blank.
Move on to the previous or next field by pressing the VOL+ or
VOL- button.
Exit [MENU]
TV
051
Exit [MENU]
TV
Program Edit
Program
001
Fine Tune
001
Channel
System
i
Edit Labels
A - - - Move [- CH +] Select [- VOL +] Edit [ Y ] and [ C ]
051
Exit [MENU]
24
Downloaded From TV-Manual.com Manuals
User Manual BDS4241R
6.1.5
CHOOSING A MTS (Multi-Channel Television
Sound) MODE
Depending on the particular program being broadcast, you can listen to
Mono or Stereo.
Image
Screen
Setup
Audio
TV
1
Press the MENU button on the front panel or remote control.
2
Press the VOL + or VOL- button to select TV.
Press the CH- button to enter the selected menu group.
3
Press the CH- or CH+ button to select Program Edit.
Press the VOL+ button to enter the selected menu group.
4
Press the CH- or CH+ button to select MTS Mode.
Press the VOL+ or VOL- button to select required mode.
It is variable depending on the broadcast.
Channel Settings
Auto Search
Program Table
Country
Program Edit
Move [- CH +]
Image
Screen
Program
Fine Tune
Channel
System
Edit Labels
MTS Mode
Move [- CH +]
[-VOL+] to scan channels
AUSTRIA
Select [- VOL +]
Setup
Audio
Exit [MENU]
TV
001
051
001
i
A - - - AUTO
Select [- VOL +] Exit [MENU]
• MONO A - MONO B - MONO - AUTO
• MONO A - MONO B - STEREO - AUTO
• BILINGUAL A - BILINGUAL B - BILINGUAL - AUTO
Note:
You can simply select required MTS mode by repeatedly pressing the
MTS button on the remote control.
25
Downloaded From TV-Manual.com Manuals
User Manual BDS4241R
6.1.6
Image
Screen
Setup
Audio
TV
Channel Settings
Program Edit
Move [- CH +]
Image
Screen
Select [- VOL +]
Setup
Move [- CH +]
Audio
[-VOL+] to Scan Channels
AUSTRIA
Select [- VOL +]
011
012
013
014
015
016
017
018
019
020
-----------------------------------------
3
Press the VOL+ button to enter the selected menu group.
4
Press the CH- or CH+ button to select Program Table.
Press the VOL+ or VOL- button.
=> The Program Table is displayed.
021
022
023
024
025
026
027
028
029
030
Deleting unwanted channels
You can delete the channels you do not want to keep.
5
Exit [MENU]
Program Table
ABC01
BBC02
CBC03
DBC04
-------------------------
Press the MENU button on the front panel or remote control.
Press the VOL+ or VOL- button to select TV.
Press the CH- button to enter the selected menu group.
=> The Channel Settings is selected.
TV
Move [- CH +] and [- VOL +]
Delete [ R ] Change [ G ]
001
002
003
004
005
006
007
008
009
010
1
2
Exit [MENU]
Channel Settings
Auto Search
Program Table
Country
Program
ram Edit
E
EDITING TV CHANNELS
-----------------------------------------
Exit [MENU]
Press the CH-, CH+, VOL+, or VOL- button to select the
channel you wish to delete.
Press the red button to delete required channel.
Changing channels
You can change the program numbers of stored channels.
6
Press the CH-, CH+, VOL+, or VOL- button to select the
channel you wish to change.
Press the green button.
7
Press the CH-, CH+, VOL+, or VOL- button to select another
channel you wish to change.
Press the green button.
=> The channels are exchanged.
Program Table
Move [- CH +] and [- VOL +]
Delete [ R ] Change [ G ]
001
002
003
004
005
006
007
008
009
010
BBC02
CBC03
DBC04
-----------------------------
011
012
013
014
015
016
017
018
019
020
-----------------------------------------
021
022
023
024
025
026
027
028
029
030
-----------------------------------------
Exit [MENU]
Program Table
Move [- CH +] and [- VOL +]
Delete [ R ] Change [ G ]
001
002
003
004
005
006
007
008
009
010
DBC04
CBC03
BBC02
-----------------------------
011
012
013
014
015
016
017
018
019
020
-----------------------------------------
021
022
023
024
025
026
027
028
029
030
-----------------------------------------
Exit [MENU]
26
Downloaded From TV-Manual.com Manuals
User Manual BDS4241R
6.2
PICTURE CONTROLS
6.2.1
ADJUSTING PICTURE SETTINGS
Various picture adjustments can be set using the Picture Adjustment
OSD menu.
Image
Screen
Setup
Brightness
Contrast
Sharpness
Color
Tint
Image Preset
Move [- VOL +]
Audio
1
083
052
019
063
050
[-VOL+] to Preset Image
Select [- CH +]
Press the MENU button on the front panel or remote control.
=> The Image menu is displayed.
2
Press the CH+ button to enter the selected menu group.
3
Press the CH- or CH+ button to select the option to be adjusted.
Depending on the input source, the following menu’s appear:
Exit [MENU]
• Brightness - Contrast - Sharpness - Color - Tint
- Image Preset
Image
Screen
Setup
Brightness
Adjust [- VOL +]
• Brightness - Contrast - Phase - Frequency
- Sharpness (RGB (PC) mode)
Audio
083
Exit [MENU]
4
Press the VOL+ or VOL- button to select the optimal setting.
5
Press the MENU button to return to the previous menu.
6.2.2
Image
Screen
Brightness
Contrast
Sharpness
Color
Tint
Image Preset
Move [- CH +]
Setup
Audio
083
052
019
063
050
Image Preset Complete!
Select [- VOL +]
RESET TO THE FACTORY DEFAULTS
1
Press the CH+ or CH- button to select Image Preset.
2
Press the VOL+ or VOL- button to reset the picture settings to
the factory defaults.
Exit [MENU]
27
Downloaded From TV-Manual.com Manuals
User Manual BDS4241R
6.3
SOUND CONTROLS
6.3.1
ADJUSTING SOUND SETTINGS
Various sound adjustments can be set using the Sound Adjustment
OSD menu.
Image
Screen
Volume
Treble
Bass
Balance
Mute
Audio Preset
Move [- CH +]
Setup
Audio
60
055
072
043
ON
OFF
[-VOL+] to Preset Audio
Adjust [- VOL +] Exit [MENU]
1
Press the MENU button on the front panel or remote control.
2
Press the VOL+ or VOL- button to select Audio.
3
Press the CH- button to enter the selected menu group.
4
Press the CH+ or CH- button to select the desired option:
Treble - Bass -Balance
5
Press the VOL+ or VOL- button to adjust the settings.
6.3.2
Image
Screen
Volume
Treble
Bass
Balance
Mute
Audio Preset
Move [- CH +]
Setup
Audio
RESET TO THE FACTORY DEFAULTS
1
Press the CH+ or CH- button to select Audio Preset.
2
Press the VOL+ or VOL- button to reset the sound settings to
the factory defaults.
60
055
072
043
ON
OFF
Audio Preset Complete!
Select [- VOL +]
Exit [MENU]
28
Downloaded From TV-Manual.com Manuals
User Manual BDS4241R
6.4
OSD MENU LANGUAGE
This PDP has multiple OSD Menu languages built-in including English,
French, Spanish, Italian, German, Dutch, and Portuguese.
Image
Screen
Setup
Audio
English
Language
Sleep Timer
OSD Settings
Move [- CH +]
030
Select [- VOL +]
Exit [MENU]
1
Press the MENU button on the front panel or remote control.
2
Press the VOL+ or VOL- button to select Setup.
3
Press the CH- button to enter the selected menu group.
4
Press the VOL+ or VOL- button to select the required language.
6.5
Image
Screen
Setup
Move [- CH +]
This PDP is equipped with a Power Save mode under RGB(VGA) or
DVI input modes.When there are no signals detected by the PDP for a
certain time, the PDP will automatically go into sleep mode until signal
is restored.You can select a time period between 10 and 180 minutes.
Audio
Language
Sleep Timer
OSD Settings
English
030
Adjust [- VOL +]
POWER SAVE MODE
Exit [MENU]
1
Press the MENU button on the front panel or remote control.
2
Press the VOL+ or VOL- button to select Setup.
3
Press the CH- button to enter the selected menu group.
4
Press the CH+ or CH- button to select Sleep Timer.
5
Press the VOL+ or VOL- button to select the required time
interval.
Note:
You can simply select required time interval by repeatedly pressing the
SLEEP button on the remote control.
29
Downloaded From TV-Manual.com Manuals
User Manual BDS4241R
6.6
Image
Screen
Setup
Size
Freeze
Sticking Minimum
Audio
AUTO
OFF
OFF
ON
ON
1
Move [- CH +]
Select [- VOL +]
MINIMIZE SCREEN STICKING
If the fixed pattern is displayed for a long time, a difference in
brightness is caused around the lighting area and non-lighting area due
to deterioration in the fluorescent substance used in the plasma
module. It comes to be recognized as image sticking.This feature allows
you to make the occurrence of image sticking as slow as possible.
Exit [MENU]
Press the MENU button on the front panel or remote control.
2
Press the VOL+ or VOL- button to select Screen.
3
Press the CH- button to enter the selected menu group.
4
Press the CH+ or CH- button to select Sticking Minimum.
5
Press the VOL+ or VOL- button to select the required option
(OFF or ON).
6.7
FREEZING THE CURRENT PICTURE
You can freeze the picture when watching a television program.
Image
Screen
Setup
Size
Freeze
Sticking Minimum
Move [- CH +]
Audio
AUTO
OFF
OFF
Select [- VOL +]
ON
ON
Exit [MENU]
1
Press the MENU button on the front panel or remote control.
2
Press the VOL+ or VOL- button to select Screen.
3
Press the CH- button to enter the selected menu group.
4
Press the CH- or CH+ button to select Freeze.
5
Press the VOL+ or VOL- button to select required option (OFF
or ON).
Note:
Simply press the FREEZE button on the remote control. then current
picture is stilled.To return to normal viewing press it again.
6.8
ON-SCREEN DISPLAY TIMEOUT
You can select for how long the OSD will be shown.
Image
Screen
Setup
1
Audio
English
Language
Sleep Timer
OSD Settings
030
070
020
Transparency
Timeout
Move [- CH +]
Adjust [- VOL +]
Exit [MENU]
Press the MENU button on the front panel or remote control.
2
Press the VOL+ or VOL- button to select Setup.
3
Press the CH- button to enter the selected menu group.
4
Press the CH- or CH+ button to select OSD Settings.
5
Press the Vol+ button to enter the selected menu group.
6
Press the CH- or CH+ button to select Timeout.
7
Press the VOL+ or VOL- button until you reach the optimal setting
6.9
ADJUSTING THE MENU TRANSPARENCY
You can give the transparency OSD background.
Image
Screen
Setup
Language
Sleep Timer
OSD Settings
English
Transparency
Timeout
Move [- CH +]
1
Press the MENU button on the front panel or remote control.
2
Press the VOL+ or VOL- button to select Setup.
Audio
Adjust [- VOL +]
030
3
Press the CH- button to enter the selected menu group.
070
020
4
Press the CH- or CH+ button to select OSD Settings.
5
Press the VOL+ button to enter the selected menu group.
=> The Transparency is selected.
6
Press the VOL+ or VOL- button until you reach the optimal setting.
Exit [MENU]
30
Downloaded From TV-Manual.com Manuals
User Manual BDS4241R
6.10
CHANGING THE SCREEN SIZE
You can select the screen size which best corresponds to your viewing
requirements.
Image
Screen
Setup
Size
Freeze
Sticking Minimum
Move [- CH +]
Audio
AUTO
OFF
OFF
Select [- VOL +]
ON
ON
1
Press the MENU button on the front panel or remote control.
2
Press the VOL+ or VOL- button to select Screen.
3
Press the CH - button to enter the selected menu group.
=> The Size is selected.
4
Press the VOL+ or VOL- button to select required screen size.
Exit [MENU]
AUTO - FILL ALL - FILL ASPECT - ZOOM ANAMORPHIC - *WIDE
Image
Screen
Setup
Size
Select [- VOL +]
Audio
( *WIDE is only available when the split screen mode is
not selected.)
AUTO
Exit [MENU]
Note:
You can simply select required screen size by repeatedly pressing the
I.SIZE (Image SIZE) button on the remote control.
6.11
SETTING UP THE PC INPUT
Preset to the RGB mode by pressing the INPUT button.
Image
Screen
Setup
Audio
Size
AUTO
H Position
035
V Position
044
Auto
Freeze
OFF
ON
Sticking Minimum
OFF
ON
Move [- CH +] Select [- VOL +] Exit [MENU]
1
Press the MENU button on the front panel or remote control.
2
Press the VOL+ or VOL- button to select Screen.
3
Press the CH - button to enter the selected menu group.
Adjusting the PC screen automatically
1 Press the CH - or CH+ button to select Auto.
2
Image
Screen
Setup
H Position
Adjust [- VOL +]
Press the VOL+ or VOL- button.
=> The screen quality and position are automatically adjusted.
Audio
035
Exit [MENU]
Note:
You can adjust the PC screen automatically by simply pressing the
AUTO button on the remote control.
Selecting the position of the PC screen if it does not fit the
PDP screen
1 Press the CH - or CH+ button to select H Position or
V Positing.
2
Press the VOL+ or VOL- button to fit the TV screen until you
reach the optimal setting.
31
Downloaded From TV-Manual.com Manuals
User Manual BDS4241R
6.12
TELETEXT
The Teletext service is available in many countries under a variety of names
(TOP Text, Fastext, FLOF test,Videotext). It is provided as a free service by
some television broadcasters.This service provides a real wealth of
information, available at any time, on weather, sporting results, news, games,
etc.The information is presented in pages organized in topics specified in
color on the screen and you can access this information by simply pressing
the buttons of the same color on the remote control.
This product doesn't have a tuner inside, but an external settop box may
still contain channels with teletext information.
Accessing Teletext
1 Press the CH+ or CH- button to select the required source.
2
Press the TEXT button (Œ) on the remote control.
=> Teletext opens on the index page (100).
3
Press the TEXT button again to exit.
Select a specific Teletext page
1 Enter the three-digit Teletext page number using the numeric
buttons.
=> The current page is displayed. If the selected page is linked to
with several secondary pages these pages are displayed in
sequence.
2
Press the FREEZE button (∏) to freeze the display on a given
page.
3
To resume, press the FREEZE button again.
Display TELETEXT index
1
Press the INPUT button (´) to display the TELETEXT index.
Fastext
1 Press the red, green, yellow and blue buttons (ˇ) on the
remote control to easily access the topic and relevant pages you
want.
Page Down (AUTO)
1 Press the AUTO button (¨) to display the previous TELETEXT
page.
Zoom (I. SIZE)
1 Press the I. SIZE button (ˆ) once to zoom in on the top part of
the screen.
2
Press twice to zoom in on the bottom part of the screen and
three times to return to normal display.
32
Downloaded From TV-Manual.com Manuals
User Manual BDS4241R
Page Up (MTS)
1 Press the MTS button (Ø) to display the next TELETEXT page.
FREEZE
1 Press the FREEZE button (∏) on the remote control to freeze
the current page, preventing update and subpage display.
2
Press the FREEZE button again to cancel.
Reveal
1 Press the Reveal button (”) to hide page information. Press the
button again to unhide.
Sub-page
1 Press the sub-page button (’) to display a secondary page by
entering its number.
Subtitles
Some channels provide subtitles for some of their program through
Teletext.The numbers of the relevant pages are specified on the
Teletext index page.
1
Enter the number of the relevant page to display the subtitles.
=> The subtitles appear in the TV picture.The header disappears
after a couple of seconds.
2
Press any button on the remote control (except TEXT or the
volume adjustment buttons) to display the subtitles again.
3
Press the TEXT button (Œ) to return to TV mode.
Note:
In Teletext mode, volume controls remain available, but the relevant
symbols are not shown on the screen.
33
Downloaded From TV-Manual.com Manuals
User Manual BDS4241R
6.13
VIEWING THE PICTURE IN PICTURE (PIP)
You can display a sub-picture with the main picture. In this way you can
watch PDP the video input from any connected devices while watching
other video input.
Selecting a PIP mode
Press the SPLIT button repeatedly to select required mode.
The available modes are displayed in the following order.
NORMAL - PIP - PBP
Split Screen
NORMAL
Selecting a location of the sub-picture
Press the LOCATE button.
Press the VOL-, VOL+, CH -, or CH+ button to select required location. It is available in PIP mode only.
Selecting a size of the sub-picture
Press the SIZE button.
Press the VOL- or VOL+ button to select required size.
It is available in PIP mode only.
PIP Locate
PIP Size
34
Downloaded From TV-Manual.com Manuals
User Manual BDS4241R
Swapping the main picture and the sub-picture
Press the SWAP button.
The main picture and the sub picture are interchanged.
It is available in PIP and PBP mode only.
Sub Input
SCART 1
SCART 2
VIDEO
S-VIDEO
TV
X
X
X
X
SCART 1
X
Main Input
X
SCART 2
X
VIDEO
X
S-VIDEO
COMPONENT
X
X
X
X
RGB
X
X
X
X
DVI
X
X
X
X
Swapping the audio of the main or sub-picture
Press the A.SWAP (Audio SWAP) button repeatedly.
You can hear the audio of the main or sub-picture alternately.
It is available in PIP and PBP mode only.
Selecting the main picture or the sub-picture
Press the S.SELECT button repeatedly.
You can select the main or sub-picture alternately and adjust the status
of selected picture.
It is available in PIP and PBP mode only.
PIP Settings
Sub Input
SCART 1
SCART 2
VIDEO
S-VIDEO
Main Input
TV
SCART 1
X
SCART 2
X
VIDEO
X
S-VIDEO
X
COMPONENT
RGB
DVI
“ ” Max. : 480p, 576p, 1024x768/60Hz
In the PIP mode, the sub input source is differently defined
for the default value (scart1 or scart2) depending on your PDP model.
6.14
REMOTE MANAGEMENT
This display can be managed remotely through the RS232 9-pin port,
by using a Serial Interface Communication Protocol (SICP).
The specifications of the SICP protocol can be found in a separate
document, called "SICP User Manual".
35
Downloaded From TV-Manual.com Manuals
User Manual BDS4241R
7.
INPUT MODE
VGA Resolution
Active Resolution
Standard
Resolution
H Pixels
V Lines
VGA
640
480
WVGA
848
480
SVGA
800
600
XGA
1024
768
SXGA
1280
1024
Refresh Rate
Pixel Rate
Aspect ratio
60
72
75
60
60
72
75
60
70
75
60
25.175 MHz
31.5 MHz
31.5 MHz
16:9
Video Graphic Array
16:9
Wide Video Graphic Array
16:9
Super VGA
16:9
Super VGA Extended
Graphic Array
16:9
Super XGA
Refresh Rate
Pixel Rate
29.97 Hz
59.94 Hz
25 Hz
50 Hz
13.5 MHz
27 MHz
13.5 MHz
27 MHz
Refresh Rate
Pixel Rate
Aspect ratio
74.25 MHz
16 : 9
Normally DVB Mode
74.25 MHz
16 : 9
Normally ATSC Mode
40 MHz
50 MHZ
49.5 MHz
65 MHz
75 MHz
78.5 MHz
108 MHz
Stand for Mode
SDTV Resolution
Standard
Resolution
480i
480p
576i
576p
Active Resolution
H Pixels V Lines
720
480
720
576
Aspect ratio
Stand for Mode
4 :3
Modified DVB Mode
4 :3
Modified PAL Standard
HDTV Resolution
Active Resolution
Standard
Resolution
H Pixels
V Lines
720p
1280
720
1080i
1920
1080
30 Hz
50 Hz
25 Hz
30 Hz
1080p
Stand for Mode
Not supported
• The PC text quality is optimum in XGA mode (1024 x 768, 60Hz).
• When this PDP is used as a PC display, 24-bit color is supported (over 16 million colors).
• Your PC display screen might appear different depending on the manufacture (and your particular version of
Windows). Check your PC instruction book for information about connecting your PC to a display.
• If a vertical and horizontal frequency-select mode exists, select 60Hz (vertical) and 31.5kHz (horizontal). In some
cases, abnormal signals (such as stripes) might appear on the screen when the PC power is turned off (or if the PC
is disconnected). If so, press the INPUT button to enter the video mode. Also, make sure that the PC is connected.
• When connecting a notebook PC to the PDP, make sure that the PC screen is displayed through only the PDP
(Otherwise, random signals might appear).
36
Downloaded From TV-Manual.com Manuals
User Manual BDS4241R
• When horizontal synchronous signals seem irregular in RGB mode, check PC power saving mode or cable
connections.
• The display settings table complies to the IBM/VESA standards, and based on the analog input.
• The DVI support mode is regarded as same to the PC support mode.
• The best timing for the vertical frequency to each mode is 60Hz.
37
Downloaded From TV-Manual.com Manuals
User Manual BDS4241R
8.
TECHNICALS SPECIFICATIONS
Display
Item
Specifications
42" (920.1(H) x 518.4(V) ±0.5mm)
Screen Size (Active Area)
Aspect ratio
Number of pixels
Pixel pitch
Displayable Colors
Brightness
Contrast Ratio
Color Temperature
Viewing Angle
16:9
852 (H) x 480 (V)
1. 080 (H) x 1. 080 (V) [mm]
1 billion (Option)
2
1500 cd/m
10,000:1
9500 K
Over 160 degrees
38
Downloaded From TV-Manual.com Manuals
User Manual BDS4241R
In / Out Terminals
Item
RGB Input
Internal speaker
External speaker (option)
D-Sub Jack x 1 (9 pin)
DVI Jack x 1 (24 pin)
RCA Jack x 1
D-Sub Jack x 1 (15 pin)
Component Input
RCA Jack x 1
RCA Jack x 1
Monitor Output
RCA Jack x 1
S-Video Input
Mini DIN Jack x 1 (4 pin)
Video Input
RCA Jack x 1
Scart
Scart Jack x 2 (21 pin) [Full x 1, Half x 1]
Antenna Input
DIN - Type x 1
Speaker Output
RS-232C
DVI Input
Specifications
10W(L) + 10W(R) [RMS] /8Ω 2Way 2Speaker
10W(L) + 10W(R) [RMS] /8Ω 2Way 4Speaker
TXD + RXD(1:1)
Digital RGB :TMDS MAX : 720p,1080i,1280x1024/60Hz(SXGA)
Audio:0.5V[rms](Normal) / 2Channel(L+R)
Analog RGB:0.7V[p-p](75Ω), H/CS/V:TTL(2.2kΩ), SOG:1V[p-p](75Ω)
MAX:720p, 1080i, 1280x1024/60Hz(SXGA)
Audio:0.5V[rms](Normal) /2 Channel (L + R)
Y:1V[p-p](75Ω), Pb/Cb:0.7V[p-p](75Ω), Pr/Cr:0.7V[p-p](75Ω)
480i, 576i, 480p, 576p, 720p, 1080i
Audio: 0.5V[rms](Normal) / 2 Channel (L + R)
Video : 1V[p-p](75Ω)
Audio : 0.5V[rms](Normal) /2 Channel (L + R)
Y:1V[p-p] (75Ω), C:0.286V[p-p] (75Ω)[NTSC]
Y:1V[p-p] (75Ω), C:0.300V[p-p] (75Ω)[PAL/SECAM]
Video : 1V[p-p](75Ω)[NTSC / PAL / SECAM]
Audio : 0.5V[rms](Normal)/2 Channel(L + R)
Video : 1V[p-p] (75Ω)
Y : 1V[p-p] (75Ω), C : 0.3V[p-p](75Ω)
RGB : 0.7V[p-p] (75Ω)
Audio : 0.5V[rms](Normal)/2 Channel(L + R)
UHF/VHF (75Ω) [Unbalanced]
Channel : 48.25 MHz ~ 863.25 MHz
System : PAL - B/G, D/K, I and SECAM - B/G, D/K, L/L’
39
Downloaded From TV-Manual.com Manuals
User Manual BDS4241R
General
Item
Specifications
AC 100 V ~ 240 V, 50/60 Hz
250 W
Power Supply
Power Consumption
Dimension ( With Stand )
[W mm x H mm x D mm]
Weight ( Without Stand )
1028 x 625 x 89.8 (A)
29 kg
Environment Condition
Item
Temperature
Humidity
Pressure
Operational
Storage
Operational
Storage
Operational
Storage
Specifications
0 ~ 40
-20 ~ 60
20 ~ 80% RH (No condensation)
10 ~ 90% RH (No condensation)
800 ~ 1100 hPa (Al titude: 0 ~ 2,000 m)
700 ~ 1100 hPa (Al titude: 0 ~ 3,000 m)
External Speaker (Option)
Specifications
113 mm x 626.6 mm x 82.2 mm
5 kg (L + R )
2 Way 4 Speaker System
10 W (RMS)
8 Ohm
87 dB/W/M
45 Hz ~ 20 KH z
Dimension (W x H x D)
Weight
Type
Input
Impedance
Output Sound Pressure
Frequency Response
Internal Speaker (Option)
Specifications
2 Way 2 Speaker System
10 W (RMS)
8 Ohm
88 dB/W/M
170 Hz ~ 20 KHz
Type
Input
Impedance
Output Sound Pressure
Frequency Response
40
Downloaded From TV-Manual.com Manuals
User Manual BDS4241R
9.
CLEANING AND TROUBLESHOOTING
9. 1
CLEANING
Cautions When Using the Plasma Display
Do not bring your hands, face or objects close to the ventilation
holes of the plasma display.Top of plasma display is usually very hot
due to the high temperature of exhaust air being released through
the ventilation holes. Burns or personal injuries may occur if any
body parts are brought too close. Placing any object near the top
of the display could also result in heat related damages to the
object as well as the display itself.
Be sure to disconnect all cables before moving the plasma display.
Moving the display with its cables attached may damage the cables
and thus case fire or electric shock danger.
Disconnect the power plug from the wall outlet as a safety
precaution before carrying out any type of cleaning or maintenance
procedure.
Front Panel Cleaning Instructions
The front of the display has been specially treated.Wipe the
surface gently using only a cleaning cloth or a soft, line-free cloth.
If the surface is particular dirty, soak a soft, line-free cloth in a mild
detergent solution.Wring the cloth to remove excess liquid.Wipe
the surface of the display to remove dirt.Then use a dry cloth of
the same type to dry.
Do not scratch or hit the surface of the panel with fingers or hard
objects of any kind.
Do not use volatile substances such as insert sprays, solvents and
thinners.
Cabinet Cleaning Instructions
If the cabinet becomes dirty, wipe the cabinet with a soft, dry cloth.
If the cabinet is extremely dirty, soak a lint-free cloth in a mild
detergent solution.Wring the cloth to remove as much moisture as
possible.Wipe the cabinet. Use another dry cloth to wipe over
until the surface is dry.
Do not allow any water or detergent to come into contact with
the surface of the display. If water or moisture gets inside the unit,
operating problems, electrical and shock hazards may result.
Do not scratch or hit the cabinet with fingers or hard objects of
any kind.
Do not use volatile substances such as insert sprays, solvents and
thinners on the cabinet.
Do not place anything made from rubber or PVC near the cabinet
for any extended periods of time.
41
Downloaded From TV-Manual.com Manuals
User Manual BDS4241R
9.2
TROUBLESHOOTING
Symptom
Possible Cause
Remedy
No picture is displayed
1.The power cord is disconnected.
2.The main power switch on the back of the PDP is
not switched on.
3.The selected input has no connection.
4.The PDP is in standby mode in RGB mode.
1. Plug in the power cord.
2. Make sure the power switch is switched on.
3. Connect a signal connection to the PDP.
Interference displayed on
the PDP or audible noise
is heard
Caused by surrounding electrical appliances,
cars/motor cycles or fluorescent lights.
Move the PDP to another location to see is the interference is reduced.
Color is abnormal
The signal cable is not connected properly.
Make sure that the signal cable is attached firmly to
the back of the PDP.
Picture is distorted with
abnormal patterns
1.The signal cable is not connected properly.
2.The input signal is beyond the capabilities of the
PDP.
1. Make sure that the signal cable is attached firmly.
2. Check the video signal source to see if it is beyond
the range of the PDP. Please verify its specifications
with this PDP's specification section.
Display image doesn't fill
up the full size of the
screen
1. If under RGB mode, the H-Size and V-Size is
incorrectly set.
2. If under AV1,AV2, or Component with 480i input,
the 4:3 WIDE mode is switched on.
1. Use H-Size and V-Size to adjust the size of the
video.
2. Use the I.SIZE button to scroll through various full
screen modes.
Can hear sound, but no
picture
Improperly connected source signal cable.
Make sure that both video inputs and sound inputs
are correctly connected.
Can see picture but no
sound is heard
1. Improperly connected source signal cable.
2.Volume is turned all the way down.
3. MUTE is turned on.
1. Make sure that both video inputs and sound inputs
are correctly connected.
2. Use the VOL+/- button to hear sound.
3. Switch MUTE off by using the MUTE button.
Some picture elements do Some pixels of the plasma display may not turn on
not light up
This PDP is manufactured using an extremely high
level of precision technology:
however, sometimes some pixels of the PDP may not
display.
This is not a malfunction. Please see the enclosed
warranty card for more information.
A still picture is displayed for an over extended
After-Images can still be
seen on the PDP after the period of time.
PDP is powered off.
(Examples of still
pictures include logos,
video games, computer
images, and images
displayed in 4:3 normal
mode)
Do not allow a still image to be displayed for an
extended period of time as this can cause a permanent after-image to remain on the PDP.
42
Downloaded From TV-Manual.com Manuals
User Manual BDS4241R
10.
LIMITED WARRANTY (EUR)
Two Year Free Labor
Two Year Free Parts
WHO IS COVERED?
You must have proof of the date purchased to receive warranty
service. A sales receipt or other document showing the date that you
purchased the product is considered proof of purchase.
WHAT IS COVERED?
Warranty cover age begins the day you buy your product. For two
years thereafter, all defective parts will be repaired or replaced and
labor is free. After two years from the day of purchase, you pay for the
replacement or repair of all parts, and for all labor charges. All parts,
including repaired and replaced parts, are covered only for the original
warranty period.When the warranty on the product expires, the
warranty on all replaced and repaired parts also expires.
WHAT IS EXCLUDED?
Your warranty does not cover:
labor charges for removal, installation or setup of the product,
adjustment of customer controls on the product, and installation or
repair of antenna systems outside of the product.
product repair and/or part replacement because of misuse,
accident, unauthorized repair or other cause not within the control
of Philips Consumer Electronics Europe.
reception problems caused by signal conditions or cable or antenna
systems outside the unit.
a product that requires modification or adaptation to enable it to
operate in any country other than the country for which it was
designed, manufactured, approved and/or authorized, or repair of
products damaged by these modifications.
incidental or consequential damages resulting from the product.
(some states do not allow the exclusion of incidental or
consequential damages, so the above exclusion may not apply to
you.This includes, but is not limited to, prerecorded material,
whether copyrighted or not copyrighted.)
modifications or adaptations to enable the product to operate in
any country other that the country for which it was designed,
manufactured, approved and/or authorized, or the repair of
products damaged by these modifications.
normal wear and tear (decreased light output of PDP module)over
the product's lifetime.
phosphor burn. Do not display static images for prolonged periods,
otherwise phosphor burn might appear on part of the panel.
limited quantity of cells (fine pixel elements) that do not produce
light, or that remain lit after they should have turned off.
43
Downloaded From TV-Manual.com Manuals
User Manual BDS4241R
WHERE IS SERVICE AVAILABLE?
Warranty service is available in all countries where the product is
officially distributed by Philips Consumers Electronics Europe.
In countries where Philips Consumers Electronics Europe does not
distribute the product, the local Philips service organization will
attempt to provide service (although there may be a delay if the
appropriate spare parts and technical manual(s) are not readily
available).
MAKE SURE YOU KEEP...
Please keep your sales receipt or other document showing proof of
purchase. Attach it to this owner's manual and keep both nearby.
Also keep the original box and packing material in case you need to
return your product.
BEFORE REQUESTING SERVICE...
Please check your owner's manual before requesting service.
Adjustments of the controls discussed there may save you a service
call.
TO GET WARRANTY SERVICE,
OR IF YOU HAVE QUESTIONS...
Please contact Philips at one of the telephone numbers below:
Austria . . . . . . . . . . . . . . . . . . . . . . . . . . . . . . . 0820 901115
Belgium . . . . . . . . . . . . . . . . . . . . . . . . . . . . . . . 070 253 010
Denmark . . . . . . . . . . . . . . . . . . . . . . . . . . . . . . . 35 25 87 61
Finland . . . . . . . . . . . . . . . . . . . . . . . . . . . . . . . 09 2290 1908
France . . . . . . . . . . . . . . . . . . . . . . . . . . . . . . . 08 9165 0006
Germany . . . . . . . . . . . . . . . . . . . . . . . . . . . . 0180 5 007 532
Greece . . . . . . . . . . . . . . . . . . . . . . . . . . . . 00800 3122 1223
Ireland . . . . . . . . . . . . . . . . . . . . . . . . . . . . . . . . . 1 601 1161
Italy . . . . . . . . . . . . . . . . . . . . . . . . . . . . . . . . . . 199 404 042
Luxembourg . . . . . . . . . . . . . . . . . . . . . . . . . . . . . 26 84 3000
Netherlands . . . . . . . . . . . . . . . . . . . . . . . . . . 0900 0400 063
Norway . . . . . . . . . . . . . . . . . . . . . . . . . . . . . . . . 22 70 82 50
Portugal . . . . . . . . . . . . . . . . . . . . . . . . . . . . . . 2 1 359 1440
Spain . . . . . . . . . . . . . . . . . . . . . . . . . . . . . . . . . 902 888 785
Sweden . . . . . . . . . . . . . . . . . . . . . . . . . . . . . . . 08 632 0016
Switzerland . . . . . . . . . . . . . . . . . . . . . . . . . . . . 02 2310 2116
United Kingdom . . . . . . . . . . . . . . . . . . . . . . . 0906 1010 017
Russia . . . . . . . . . . . . . . . . . . . . . . . . . . . . . . 8 800 200-0880
Repair must be performed by an authorized service center or a factory
service center. If you do not live near a factory service center, contact
your dealer. If you dealer is an authorized service center, he will
arrange repair.
44
Downloaded From TV-Manual.com Manuals
User Manual BDS4241R
REMEMBER...
Please record the model and serial numbers found on the product
below. Also, please fill out and mail your warranty registration card
promptly.
It will be easier for us to notify you if necessary.
MODEL#_ _ _ _ _ _ _ _ _ _ _ _ _ _ _ _ _ _
SERIAL#_ _ _ _ _ _ _ _ _ _ _ _ _ wo _ _ _
45
Downloaded From TV-Manual.com Manuals