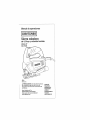
1
Operator's Manual
4.5 Amp
Variable Speed
Sabre Saw
Model No.
320.17234
z_ CAUTION
Read, understand
and follow
all Safety Rules and Operating Instructions
in this Manual before using this product°
Sears, Roebuck and Co.,
Hoffman Estates, IL 60179 U.S.A.
Visit our Craftsman website: www.craftsman,com
•
•
•
•
•
•
•
•
WARRANTY
SAFETY
UNPACKING
DESCRIPTION
ASSEMBLY
OPERATION
ADJUSTMENTS
MAINTENANCE
9-8-06
ONE YEAR FULL WARRANTY
ON CRAFTSMAN ® PRODUCT
If this Craftsman product fails due to a defect in material or workmanship
within one year from the date of purchase, RETURN IT TO THE NEAREST
SEARS STORE OR PARTS AND REPAIR CENTER OR OTHER
CRAFTSMAN OUTLET IN THE UNITED STATES FOR FREE
REPLACEMENT°
This warranty does not include expendable parts such as lamps, batteries,
bits or blades,
If this Craftsman product is used for commercial or rental purposes, this
warranty applies for only 90 days from the date of purchase.
This warranty gives you specific legal rights, and you may also have other
rights, which vary from state to state°
Sears, Roebuck and Co,, Hoffman Estates, IL 60179
SAVE THESE INSTRUCTIONSI
READ ALL INSTRUCTIONS!
The purpose of safety symbols is to attract your attention to possible dangers,
The safety symbols, and the explanations with them, deserve your careful attention
and understanding. The symbol warnings DO NOT by themselves eliminate any
danger, The instructions and warnings they give are no substitutes for proper accident
prevention measures,
Z_ WARNING:
BE SURE to read and understand all safety instructions in this
manual, including all safety alert symbols such as "DANGER", "WARNING" and
"CAUTION", BEFORE using this saw. Failure to follow all instructions listed below
may result in electric shock, fire and/or serious personal injury°
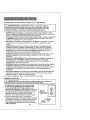
SYMBOL MEANING
ALERT SYMBOL: Indicates DANGER, WARNING, OR
CAUTION. May be used in conjunction with other symbols or pictographso
SAFETY
DANGER: Failure to obey this safety warning WILL result in
death or serious in_ury to yourself or to others. Always follow
the safety precautions to reduce the risk of fire, electric shock
and personal injury.
I z_WARNING
I serious
Failure to
obeytothis
safety or
warning
CANAlways
result
J
injury
yourself
to others.
l_
j injury to yourself or others or property damage. Always follow
CAUTION
in death
follow
theorsafety
precautions to reduce the risk of fire, electric shock and
personal Injury,
Failure to obey this safety warning MAY result in personal
the safety precautions to reduce the risk of fire, electric shock
and personal injury.
DAMAGE PREVENTION AND INFORMATION MESSAGES
These inform user of important information and/or instructions that could lead to
equipment or other property damage if not folbwedo Each message is preceded by the word
"NOTE =''as in the example below:
"t
j
not
followed.
NOTE:
Equipment and/or property damage may result if these instructions are
WEAR
YOUR
Z_WARNING:
The operation of any sabre saw can result
in foreign objects being thrown Into your eyes, which can
result In severe eye damage. Before beginning power tool
operation, ALWAYS wear safety goggles or safety glasses
with side shield and a full-face shield when needed.We
recommend a Wide Vision Safety Mask for use over
eyeglasses or standard safety glasses with side shield,
available at Sears Stores or other Craftsman Outlets.
J
|
manual before using this sabre saw, Failure to follow all instructions may
in this
[ result
_WARNING:
BE SURE
to readserious
and understand
all instructions
in electric shock,
fire and/or
personal injury.
WORK AREA SAFETY
I,, Keep your work area clean and well lit. Cluttered workbenches and dark areas
invite accidents.
2 DO NOT operate power tools in explosive atmospheres, such as in the presence
of flammable liquids, gases, or dust. Powertools createsparks whichmay ignite
the dust or fumes_
3, Keep bystanders, children and visitors away while operating a power tool,
Distractions can cause you to lose control
4. Make your workshop childproof with padlocks and master switches° Lock
tools away when not in use.
5. MAKE SURE the work area has ample lighting so you can see the work and that
there are no obstructions that will interfere with safe operation BEFORE using your saw.
PERSONAL SAFETY
1. KNOW your power tool. Read the operator's manual carefully, Learn the saw's
applications and limitations, as well as the specific potential hazards related to this toot.
2, STAY ALERT, watch what you are doing and use common sense when operating
a power tool..
3, DO NOT use tool while tired or under the influence of drugs, alcohol or medication.
A moment of inattention while operating power tools may result in serious personal
injury,
4o DRESS properly, DO NOT wear loose clothing or jewelry, Pull back long hair. Keep
your hair, clothing, and gloves away from moving pads. Air vents often cover moving
parts and should also be avoided., Loose clot!ling, jewelry or long hair can be caught
_nmoving parts,
5_ AVOID accidental starting. Be sure switch is in "OFF" position before
plugging in. DO NOT carry tools with your finger on the switch. Carrying tools
with your finger on the switch or plugging in tools that have the switch in the
"ON" position invites accidents.
6,, REMOVE adjusting keys or wrenches before turning the 1ool "ON", A wrench
that is left attached to a rotating part of the tool may result in personal injury.
7, Do not overreach, Keep proper footing and balance at all times. Proper footing
and balance enables better control of the tool in unexpected situations,
B.,ALWAYS SECURE YOUR WORK. Use clamps or a vise to hold work when practical,.
It is safer than using your hand and frees both hands to operate tool.
9. USE SAFETY EQUIPMENT° Always wear eye protection,, Dust mask, non-skid safety
shoes, hard hat, or hearing protection must be used for appropriate conditions°
10. DO NOT USE ON A LADDER or unstable support. Stable footing on a solid surface
enables better control of the tool in unexpected situations.
4
TOOL USE AND CARE SAFETY
operating this saw. Failure to follow all instructions
listed below may result in
I electric
WARNING:
BE SURE
to read
and understand
all instructions before
shock, fire and/or
serious
personal
injury.
I. ALWAYS use clamps or other practical ways to secure and support the
workpiece to a stable platform. Holding the work by hand or against your body is
unstable and may lead to loss of control.
2o DO NOT force the tool, Use the correct tool and blade for your application.
The correct tool and blade wilt do the job better and safer at the rate for which it is
designed°
3. DO NOT use the tool if switch does not turn it "On" or "Off". Any tool that cannot
be controlled with the switch is dangerous and must be repaired.
4o DISCONNECT the plug from the power source before making any adjustments,
changing accessories or storing the tool, Such preventive safety measures reduce
the risk of starting the tool accidentallyo
5. NEVER leave the tool running. ALWAYS turn it off. DO NOT leave the tool until it
comes to a complete stop°
6. STORE idle tools out of the reach of children and other untrained
Tools are dangerous in the hands of untrained users.
persons.
7. MAINTAIN tools with care. Keep cutting tools sharp and clean. Properly maintained
tools with sharp cutting edges are less likely to bind and are easier to control,,
& CHECK for misalignment
or binding of moving parts, breakage of parts, and any
other condition that may affect the tool's operation. If damaged, have the tool serviced
before using. Many accidents are caused by poorly maintained tools°
9,. USE ONLY accessories that are recommended for this tool. Accessories that may
be suilable for one tool may become hazardous when used on another tool.
10. Keep handles dry, clean,and free from oil and grease,.
ELECTRICAL
SAFETY
[ _WARNING:
]
/ installing
J
Do not permit fingers to touch the termina,s of plug when
or removing the plug from the outlet,
1oDouble insulated tools are equipped with a
polarized plug (one blade is wider than the other).
This plug will fit in a polarized outlet only one way.
If the plug does not fit fully in the outlet, reverse the
plug,, If it still does not fit, contact a qualified electrician
to install a polarized outlet° Do not change tile plug in
any way.
2. Double insutation[_ eliminates the need for the
three-wire grounded power cord and grounded power
supply system,, Applicable only to Class tl
(double-insulated) tools. This sabre saw is a double
insulated tool.
Cover of
Grounded
Outlet Box ---"-
@
@
@
ELECTRICAL
[
SAFETY conto
_WARNING"
Double insulation
precautions
when operating
this tool. DOES NOT take the place of normal safety
3. BEFORE plugging in the tool, BE SURE that the outlet voltage supplied is within the
voltage marked on the tool's data plate.. DO NOT use "AC only" rated tools with a DC
power supply..
4o AVOID body contact with grounded surfaces, suci_ as pipes, radiators, ranges and
refrigerators. There is an increased risk of electric shock if your body is grounded.
5.. DO NOT expose power tools to rain or wet conditions or use power tools in wet
or damp locations, Water entering a power tool will increase the risk of electric shock.
6.. INSPECT tool cords for damage. Have damaged too! cords repaired at a Sears
Service Center BE SURE to stay constantly aware of the cord location and keep it well
away from the moving blade_
7. DO NOT abuse the cord, NEVER use the cord to carry the toot by or pull the plug
from the outlet, Keep cord away from heat, oil, sharp edges or moving parts_ Replace
damaged cords immediately. Damaged cords increase the risk of e[ectdc shock.
EXTENSION CORDS
Use a proper extension cord, ONLY use cords listed by Underwriters Laboratories (UL).
Other extension cords can cause a drop in line voltage, resulting in a loss of power and
overheating of tool. For this tool an AWG (American Wire Gauge) size of at least
14-gauge is recommended for an extension cord of 25-ft. or less in length_Use 12-gauge
for an extension cord of 50-ft. Extension cords 100-ft, or longer are not recommended,
Remember, a smaller wire gauge size has greater capacity than a larger number
(14-gauge wire has more capacity than 16-gauge wire; 12_gauge wire has more capacity
than 14*gauge). When in doubt use the smaller number.
When operating a power too! outdoors, use an outdoor extension cord marked "W-A" or
'_V'L These cords are rated for outdoor use and reduce the risk of electric shock.
Z_ CAUTION:
Keep the extension cord clear of the working area, Position the
cord so that it will not get caught on lumber, tools or other obstructions while you
are working with a power tool,
Z_WARNING:
Check extension cords before each use, If damaged replace
immediately, Never use tool with a damaged cord since touching the damaged
area could cause electrical shock, resulting in serious injurj,
SAFETY
SYMBOLS
FORYOUR
TOOL
Thelabel on your tool may include the following
symbols.
V.......................................................................................................
Volts
A ...................................................................................................
Amps
Hz .......................................................................................................
Hertz
W ..................................................................................................
Watts
rain .............................................................................................
Minutes
...........................................................................................................
Alternating current
.............................................................................................
Direct current
no ..................................................................................
No-load speed
[_ ....................................................................................................
Class II construction, Double Insulated
,,oJmtn..........................................................................................
Revolutions or Strokes per minute
Z_, ............................................................................. Indicates danger, warning or caution.
It means attention! Your safety is involved.
SERVICE SAFETY
1o If any part of this saw is missing or should break, bend, or fail in any way;
or should any electrical component fail to perform properly: SHUT OFF the power
switch and remove the saw plug from the power source and have the missing,
damaged or failed paris replaced BEFORE resuming operation°
2o Tool service must be performed only at a Sears Parts and Repair Center_ Service
or maintenance performed by unqualified personnel could result in a risk of injury.
3, When servicing a tool, use only identical replacement parts, Follow instructions
In the maintenance section of this manual. Use of unauthorized parts or failure to
follow maintenance instructions may create a risk of electric shock or injury.
SAFETY RULES FOR SABRE SAWS
_Keep
hands away from cutting area and blade, Keep one
hand on the handleltrigger switch and your other and on the front, top of the
saw's handle/motor housing. If both hands are holding the saw, the
blade cannot cut them,
I Z_ CAUTION:
]
Blades coast after saw is switched off.
I, KEEP your body positioned to either side of the saw blade and not in direct line
with the saw blade.
2. DO NOT reach under the workplece. The blade extends under the workpiece when
saw is cutting_
3. DO NOT touch the blade or the workpiece immediately after operation;
be extremely hot and could burn your skin.
they may
4,, DO NOT cut an oversized workplece.
5. CHECK for the proper clearance under the workplece before cutting so that the
blade will not strike the workbench or material under the workpieee.
7
SAFETY RULES FOR SABRE SAWS conto
6. MAKE SURE the blade is not contacting
turned on.
the workpiece before the switch is
7_ HOLDTOOL by insulated gripping surfaces (handles) when performing an
operation where the cutting tool may contact hidden wiring or its own cord.
Contact with a "live" wire will make the exposed metal pads of the tool "five" and
shock the operator.
8. SECURE MATERIAL before cutting, Never hold a workptece in your hand or
across your legs. Small or thin material may flex or vibrate with the blade,
causing loss of control.
9, When ripping, ALWAYS USE a rip fence or straight edge guide. This improves the
accuracy of the cut and reduces the chance of the blade binding,
10, NEVER cut more than one piece at a time. DO NOT STACK more than one
workplece on the worktable at a time.
11. AVOID awkward operations and hand positions
cause your hand to move into the blade.
where a sudden slip coutd
12. NEVER reach into the cutting path of the blade.
13. BLADE GUIDE ROLLERS must support the blade when cutting The rollers must rest
against the back edge of bfadeo THE ONLY cutting operation when rollers DO NOT
support the btade is the scrolling mode, WHEN SCROLLING the blade must swivel as
it fs guided to follow scroll patterns. ALWAYS move the base back and blade guide up
and back away from blade in scrolling mode.
14. ALAWYS use blades that have the correct size and shape, Blades that do not match
the mounting hardware of the saw wilt run erratically and will cause loss of control.
15r ALAWYS BE SURE that all adjusting screws and the blade holder are fastened tightly
BEFORE making a cut. Loose adjusting screws can cause the tool to slip and loss of
control may result°
z_ WARNING:
Use of this tool can generate dust containing chemicals known
to cause cancer, birth defects or other reproductive harm, Some examples of these
chemicals are:
* Lead from lead-based paints
. Crystalline silica from bricks and cement and other masonry products.
. Arsenic and chromium, from chemically treated lumber°
Your risk from these exposures varies, depending upon how often you do this type
of work.To reduce your exposure to these chemicals:
° Work in a well-ventilated area.
. Work with approved safety equipment, such as those dust masks that are specially
designed to filter out microscopic particles,.
Avoid prolonged contact with dust from power sanding, sawing, grfndlng, drilling
and other construction activities. Wear protective clothing and wash exposed areas
with soap and water.
Allowing dust to get intoyour mouth, eyes, or lay on the skin may promote absorption of
harmful chemicals,.
WARNING;
Use of this tool can generate and!or disbursedust,which may
cause seriousand permanentrespiratory or other injury. Alwaysuse NIOSH/OSHA
approvedrespiratoryprotectionappropriatefor the dust exposure.Direct particles
away from face and body.
8
ADDITIONAL
RULES
FOR SAFE OPERATION
follow all instructions listed below may result in electric shock, fire ancllor serious
Z_ WARNING:
BE SURE to read and understand all instructions. Failure to
personal
injury°
1
1. Know your power tool. Read operator's manual carefully Learn the applications
and limitations, as well as the specific potential hazards related to this tool. Following
this rule will reduce the risk of eiectric shock, fire or serious injury,
2. ALWAYS wear safety glasses or eye shields when using this saw. Everyday
eyeglasses have only impact-resistant lenses; they are NOT safety glasses.
3 PROTECT your lungs. Wear a face mask or dust mask if the operation is dusty.
4 PROTECT your hearing, Wear appropriate personal hearing protection during use.
Under some conditions noise from this product may contribute to hearing loss.
5o ALL VISITORS AND BYSTANDERS MUST wear the same safety equipment that the
operator of the saw wears.
6. INSPECT the tool cords periodically and if damaged have them repaired
nearest Sears Service Center. BE AWARE of the cord location.
at your
7. ALWAYS check the tool for damaged parts° Before further use of the tool, a guard or
other part that is damaged should be carefully checked to determine if it will operate
properly and perform its intended function, Check for misalignment or binding of
moving pads, breakage of pads, and any other condition that may affect the tool's
operation, A guard or other part that is damaged should be properly repaired or
replaced at a Sears Service Center.
8, INSPECT and remove all nails from lumber before sawing.
9. SAVE THESE INSTRUCTIONS. Refer to them frequently and use them to instruct
others who may use thls tool, If someone borrows this tool, make sure they have
these instructions
also.
Saw Blade Path
The area over, under, behind or in front of the blade, as it applies to the workpieceo That
area which will be or has been cut by the blade,
Set
The distance that the saw blade tooth is bent (or set) outward from the face of the blade.
Strokes per Minute or Stroke Speed
The blade speed of a sabre saw, which can be varied, usually from 0 to 3000 strokes
per minute.
Cross cut
A cutting or shaping operation made against the grain of the work piece.
Bevel Cut
A cutting operation made with the blade at any angle other than 90 ° to the base.
Ripping or Rip Cut
A culting operation along the lenglh of the workpiece,
9
9-8-06
17234
Freehand Cut
Performing a cut without using a fence, miter gauge, fixture, work clamp, or other propeF
device to keep the workpiece from twisting or moving during the cut,
Orbital Sawing
In addition to the up and down movement of a sabre saw's blade, there is orbital action
which thrusts the blade forward on the cutting stroke and greatly increases the cutting
speed over conventional sabre saws.,
Scrolling
Allows the blade to swivel for intricate pattern cutting°
Through Sawing
Any cutting operation where the blade extends completely through the thickness of the
workpiece.
Kerf
The material removed by the blade in a through cut orthe slot produced by the blade in a
non-through or partial cuL
Workpiece or Material
The item on which the cutting operation is being done_ The surfaces of a workpiece are
commonly referred to as faces, ends and edges.,
Gum
A sticky, sap-based residue from wood products
Resin
A sticky, sap-based substance that has hardened.
z_ WARNING:
Your saw should NEVER be connected to the power source
when you are assembling parts, making adjustments, installing or removing
blades, cleaning or when it is not in use. Disconnecting the saw will prevent
accidental starting, which could cause serious personal injury.
loThe Edge Guide is to be found in the color box,,
2oThe Two Blades are stored in the blade storage compartment
saw's base,
located in the rear of the
3. The Vac Adapter is attached to the saw,,
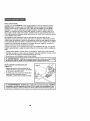
4_Carefully lift the saw out of the color box and place on a stable fiat surface,,
5o inspect the saw carefully to make sure that no breakage or damage has occurred
during shipping, If any of the items mentioned are missing (refer to Fig_ 1 on page
11) return the saw to your nearest Sears store or Craftsman outlet to have the saw
replaced.
z_
WARNING:
If any parts are broken or missing, DO NOT attempt to plug
in the power cord or operate saw until the broken or missing parts are replaced.
Failure to do so could result in possible serious injury.
10
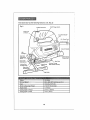
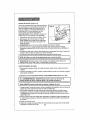
PARTS
2. Two wood cutting blades
(stored in b_ade
storage compartment)
LIST
(Fig. I)
3. Edge Guide
(stored in case)
IIl
(
loSaw
4_ Vacuum Adapter
(attached to saw)
11!
5. Carry bag
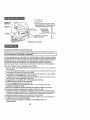
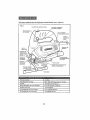
KNOW YOUR SABRE SAW (Flgo2)
NOTE: Before
attempting
to use
your saw, familiarize yourself with all of the
operating
features
and safety
requirements.
Your sabre saw has a precision built electric motor and it should only be connected to a
120-volt, 60-Hz AC ONLY power supply (normal household current) DO NOT operate on
direct current (DC) This large voltage drop will cause a loss of power and the motor wiIf
overheat if the saw does not operate when plugged into a correct 120-volt, 60-Hz AC
ONLY outlet, check the power supply This saw has an 8-ft, 2-wire power cord (no adapter
needed)_
This Sabre Saw has the following
features:
1 4.5 Amp, Variable Speed Motor, 800 to 3000 SPM strokes per minute
(no-load speed),
2, Variable Speed is controlled by the speed dial located on the top front of the trigger
switch handle.
3o Blade Guide Support
for smooth cutting.
Roller provides added blade control, 11/16 inch blade stroke
4. Durable Epoxy Coated Steel Base glides smoothly over workpiece
easy adjustments,
5o Bevel Cutting Capacity 0 ° to 45° left and right.
6 Quick blade changes with no tools.
7o LED Worklight
Bevel scaie for
illuminates cutting area
8 "Live Tool indicator"
Light is green when saw is plugged into power source
9, Extended Length Trigger Switch with Power Lock-On Button,
10. Clear Front Chip Shield/Blade
Guard
11 Sawdust Removal: Vacuum adapter on bottom of saw attaches to 11/44nch adapter
and then to wet/dry vac (bath sold separately) for removal of sawdust and chips from
the cutting area
12. Includes
Edge Guide, ideal for fast, straight repetitive cutting
I3. Permanently Lubricated 100% Ball Bearings for smooth operation, long life_
14. Includes Impact Resistant Case for easy carrying and storage.
11
1
This Sabre Saw has the following
Fig, 2
features:
cont. (Fig° 2)
VariableSpeedDial
On/OffTriggerSwitch
Power Lock
On Button
"Live Too! Indicator"
Light
8-It
Power Cord
Vacuum Adapter
LED
Worklight
Clear Chip
Shield/Blade
Guard
Blade Storage
Compartment
Edge Guide
Mounting
Base Plate
Locktng Knob
for Edge Guide
Blade
Blade Guide
Rol]ers
TooNess Change
Bfade Holder Assembly
Edge Guide
Mounting Slol
Edge Guide
HOll
_*
J,
I
.........
Rat!rig ...........................
4.5 Amps
No Load Speed
800 - 3000 SPM (strokes
...............................
Input
Bevel Cutting Angle
.... 12D-volts, 60,-Hz AC
Range
cutting
Depth in Steel
........
0" to 45 = left and right
Blade Stroke
Cutting Depth in Wood
per rain,)
11/16-inch
..........
2'l;e-inl
1t4-tn.
12
(5smmi
(6ram)
........
i
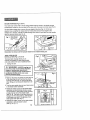
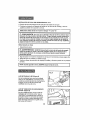
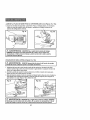
BLADE STORAGE (Fig. 3 and 4)
Your sabre saw comes witl_ 2 wood cutting blades that are stored in the blade storage
compartment located on the very back of the saw under the power cord inlet (see Fig. 3)
To open blade storage door, remove the vac adapter tube (see Fig. 4). Lift the vac
adapter tube up siightty (to release tab from base plate) and pull vac adapter tube
straight out to remove. Pull tab on blade storage door down to open and turn saw upside
fown to remove blades (see Fig 3)..
Fin 3
="
Remember
X
I
_OmrPar,ment .4%_._
f ...-_-.J
to always use the proper blade for the material being cut.
TOOL-LESS BLADE
INSTALLATION (Fig, 5, 6 and 7)
Tool-less blade change allows you to
remove and replace the saw blade quickly
and easily without the use of additional tools.
1,
Unplug the saw..
Z_ WARNING;
ALWAYS unplug saw
from the power source before changing
blades or making any adjustments.
Failure to unplug the saw could result in
accidental starting which can cause
serious personal Injury°
2o Raise up the clear chip shield, lift one side out
of its mounting s$ot, and remove the shield
from the saw (see Fig. 5). Appty a little force
when lifting and removing the shield from the
saw
3o Turn the saw upside down so you have access
to the blade holder assembly.
4.. Rotate the "black" cover on the blade holder
assembty counterclockwise about a quarter
turn and hold it in this position while inserting
a blade into the slot of the blade holder
(see Fig 6) The teeth of the blade should be
facing to the front and point up, and the back
of the blade must rest in the groove of the
blade guide roller (see Fig 7)°
5. Release the "black" cover on the blade holder
assembly to lock the blade in place
(see Fig. 6, Fig 7 )o
13
Fig. 7
TOOL-LESS
BLADE INSTALLATION cont. (Fig, 5, 6 and 7)
5 Pull on blade to make sure 1he blade ts securely locked in place_
6 Attach the clear chip shield into its mounting slots and snap the shield down to its
proper position.
L
NOTE: For use with both "T" and "U" shanked
blades,
I
!
Z_ CAUTION:
Once the blade is installed in the saw, it is always exposed.
There is no lower blade guard. Use caution when handling the saw so that the
blade does not catch clothing, skin, etc, Each time you set the saw down take
care not to bend the blade, Always set saw down on its side when blade is
installed.ALWAYS remove blade when saw is not being used.
REMOVING THE BLADE
1o Unplug the saw.
L_ WARNING:
ALWAYS unplug saw from the power source before
changing blades or making any adjustments. Failure to unplug the saw could
..................
result in accidental starting which can cause serious personal injury,
2 Follow steps 1 through 4 on the tool-less blade installation (see pages !3 and I4).
3oCarefully remove the blade (or change the biade).
4_Reattach the clear chip shield and snap it down to its proper position_
i NOTE: When storing your saw, ALWAYS remove the cutting blade.
LED WORKLIGHT
(Fig.B)
"Yoursabre saw has an LED worklight that
turns "ON" automaticafly when the saw is
plugged into a power source, The light helps
provide easy visibility of the cutting line.
"LIVE TOOL INDICATOR" LIGHT (Fig. 9)
Your saw has a "Live Tool Indicator" green
light that turns "ON" automatically when
the saw is plugged into a power source.The
light is Iocated on both sides of the base of
the trigger -switch handle near the body of
the saw.
14
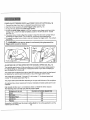
POWER ON-OFFTRIGGER
SWITCH and POWER "LOCK-ON"
BUTTON (Fig. 10)
1. Connect the plug of your saw to a standard household power outlet,
2. S1art the toot by squeezing the ontoff trigger switch (see Fig, I0),
3o To stop the tool, release the or/off trigger switch.
4, To lock the ontoff trigger switch in the "on" position, press trigger switch and while
holding it "on", press in the lock-on button, located on the left side of the handle
(see Fig, 10).
5,, The power lock-on button allows the operator to keep the sabre saw running without
squeezing the trigger switch. This is useful for continuous sawing applications.
6. To release the power lock-on button, press and release the trigger switch. This wilt turn
the tool off°
I
Z_ WARNING:
trigger switch
If the lock-on button is continuously
cannot be released.
Fig. I0
being depressed, the
Fig. 11
Variable
Power Lock-On
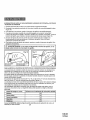
ADJUSTINGTHE
CUTTING SPEED WITH THE VARIABLE SPEED DIAL (Fig, 11)
The variable speed feature of this saw allows you to match the proper cutting speed to
the material being cut, enhancing the overall performance of your saw and helping to
save the blades from undue wear.
The speeds can be adjusted from 800 to 3000 SPM (strokes per minute) no-toad speed,
by adjusting the variable speed dial located on top of the trigger swftch handle°
The speed dial is numbered "1" through "6", with number "1" the slowest speed and
number "6" the fastest speed (see Fig_ 11).
The proper blade speed will differ depending on the type and thickness of the workpiece.
As a general rule, slower speeds are for denser materials and faster speeds are for soft
materials_
High speeds will allow you to cut workpieces faster, but biade life will be reduced,,
"he following chart can help you pick the proper speed,
Workpiece to be cut
Wood
Mild steel
Stainless Steel
Aluminum
Plastics
Number on Variable Speed Dial
5=6
3-6
3-4
3_6
2-5
Remember to ALWAYS use the proper cutting blade for the cutting application and the
material you are cuttlngo
15
i
SAWDUST REMOVAL(Fig, 12)
WARNING: ALWAYSunplug saw from the power source BEFORE
making any adjustments or attaching accessories.
"four sabre saw comes with a 1114-inchvac
adapter tube that can be attached to a wet/dry
vac !_osewith a 11/4-inch hose adapter and then
to a wet/dry vac (all sold separatefy)_
This will help remove dust, chips and cutting
debris from the cutting area°
The vac adapter tube will need to be removed
from the saw for access to blade storage
compartment and when setting and cutting bevels,,
Fig. 12
To remove the vac adapter tube, lift up to release
tab from saw's base and pull straight ouL
To re-attach, just slide back into position and engage tab°
GENERAL CUTTING TIPS
1. Always place the best or "finished" side of your workplace "face down" so it does not
get scraped or abused while sawing, ALWAYS CLAMP workpiece securely before
sawing.
2_ Draw your cutting lines, patterns or designs on the "backside" facing you.This means
they would be reversed or backwards from the way they will appear on the
"finished" side,
3oAlways select the correct blade type for your cutting application,
4. Place front edge of saw base on the material to be cut and line up the blade with your
cutting line.
5o Hold saw firmly and turn it on, Let the btade reach selected speed before starting the
cut°
6o Press down (to keep saw base flat against the workpiece) as you slowly push the saw
in the direction of the cut°
7. Gradually build up the blade speed, cutting as close to the line as possible (unless you
want to leave enough room for finished sanding).
& As you cut, you may need to reposition the vise or clamps to keep the workpiece stable..
9.. DO NOT force the saw because the blade teeth may rub and wear without cutting,
which may result in breaking the blade.
10. Let the saw do most of the work°
11..ALWAYS cut slowiy when following curves, so the blade can cut through cross grain.
This will provide an accurate cut and will prevent the blade from wandering°
i
NOTE: ALWAYS apply a steady firm "DOWN" pressure on the front and body of the
saw as you cutoThis will keep the saw blade from JUMPING ...............................................
out of the workpiece.
WARNING: ALWAYSclamp and support workpiece securely. ALWAYS
maintain proper control of saw. Failure to clamp and support workpiece and
loss of control of saw could result in serious injury.
16
J
CUTTING METAL
When cutting metal ALWAYS clamp down tt_emetal workpiece and ALWAYS use a
METAL cutting blade. Be extremely careful to move the saw very slowly as you cut° Use
the LOW speeds (Position 1, 2 or 3 on the variable speed dial)+ DO NOT twist, bend or
force the blade+ If the saw jumps or bounces as you cut, change to a blade with finer
teeth+ If the blade begins to clog when cutting soft metal, change to a blade with coarser
teeth+
For easier cutting, lubricate the blade with a stick of cutting wax (if available) or cutting oil
when cutting steel+ Thin metal should be sandwiched between two pieces of wood or
tightly cramped on a single piece of wood (wood on top of tile metal),, Draw the cut lines
or design on the top piece of wood.
When cutting aluminum extrusion or angle iron, clamp the work in a bench vise and saw
close to the vise jaws+
When sawing tubing with a diameter larger than the blade is deep, cut tllrough the wall of
the tubing and then insed the blade into the cut, rotating the tube as you saw+
1. When cutting metals, a suitable cooling / cutting oit must be used°
2. Spread the oi! onto the blade or workpiece at regular tntewats during cutting in order to
reduce wear or overheating of the blade.
3+ Don't make bevel cut when cutting metal,
' _making
WARNING;
ALWAYS
any adjustments
or
unplug
from the power source BEFO,_E
attachingsaw
accessories.
CUTTING WITH A STRAIGHTEDGE
(Fig. 13)
1,, Mark the position of the side edge of the saw
base and then cramp the straightedge on the
mark and parallel to the cut.
2. As you cut, keep the saw base edge flush
against the straightedge and flat on the
workpiece.
Fig. 13 _
maintain proper control of saw. Failure to clamp and support workplace and
l Z_
ALWAYS
support injury.
workpiece securely. ALWAYS
toss WARNING:
of control of saw
could clamp
result and
in serious
17
PLUNGE CUTTING
(Fig. 14)
One of the most useful features of this type of
tool is the ability to start a cut anywhere on the
workpiece surface _ without the need of drilling
a starting ho]e. Plunge cutting is useful and time
saving for making rough openings in soft
materials. It makes it unnecessary to drill a hole
for an inside or pocket cuL
Fig. 14
0
_
I, Draw lines for the opening you want to cuL
2 Hold saw firmty and tilt it forward so only the
toe of the saw base rests on the workpiece.
3, MAKE SURE that the blade is well clear of the
workpieceo
4, Start the saw and then gradually lower the blade into the workpiece, firmly holding the
toe of the saw base to prevent side wobble,,
5, Slowly pivot the saw downward tike a hinge until the blade cuts through and the base
rests flat on the workpiece.
6, Begin sawing in the usual manner along the cut line.
l NOTE: DO NOT use a scroll blade for plunge cutting.
IMPORTANT: DO NOT try to plunge cut into hard materials, such as hardwoods like oak
or maple, or metals such as steel.
TO MAKE SHARP CORNERS
1_ Cut up to the corner, then back up slightly before rounding short of the corner°
2. After the opening is complete, go back to each corner and cut from the opposite
direction to square it off.
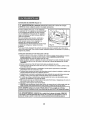
TO ADJUST BASE PLATE FOR BEVEL CUTTING (Fig. 15 and 15a)
j making
_ WARNING:
ALWAYS
unplug saw
from the power source BEFORE
any adjustments
or attaching
accessories.
i
I NOTE: ALWAYS remove the blade before adjusting the cutting angle.
1. After removing the blade from the saw, remove the vac adapter from under the base
(see Sawdust Removal, Page 16)_
2. To adjust the cutting angle, first turn the tool upside down and use the hex key provided
on the power cord to loosen the hex screws that hold the blade guide/rollers assembly
and saw base in place (Fig° 15),,
3. Move the base of the saw slightly forward and tilt it to the desired angle between (7
and 45" left or right, using the scale marked on the base brackeL
4, Install a cutting blade
5_ Slide the blade guide/rollers assembly until the blade guide!ro!lers rest against the back
edge of the blade.
18
TO ADJUST BASE PLATE FOR BEVEL CUTTING cent, (Fig. t5 and 15a)
6, Re4ighten the hex screws. For accurate work, it is necessary to make a trial cut,
measure the work, and reset the angle until the correct setting is achieved.
Fig. 15a
M
maintain proper control of saw. Failure to clamp and support workpiece and
I Z_
ALWAYS
supportinjury.
workpiece securely. ALWAYS
lossWARNING:
of control of saw
could clamp
result and
in serious
USINGTHE
EDGE GUIDE (Fig. 16 and 16a)
i
WARNING;
ALWAYS unplug saw from the power source BEFORE
making any adjustments or attaching accessories,
i
1o Insert the bar of the edge guide through the slots in the base of the sabre saw
(see Fig. 16). The edge guide can be inserted from either side of the base, with the
guide edge facing down.
2, Screw the edge guide locking knob into the threaded hole in the base to tighten the
edge guide bar in place,,
3. Measure the distance from the edge of the workpiece to the line of cut. Slide the edge
guide to this desired distance and tighten the locking knob to secure edge guide in place
(Fig. 16a) and make your cut,,
Fig, 16a
I
maintain proper control of saw. Failure
I Z_
WAR N ING: ALWAYS clamp and
to clamp and support workpiece and
support workpiece securely. ALWAYS
loss of control of saw could result In serious injury,
19
t
t
1
I
I
1
personnel may result in misplacing of internal wires and components,
I Z_
WARNING:
Preventive
could
cause a serious
hazard. maintenance performed by unauthorized
which
i
|
SERVICE
1..When servicing a tool, use only identical replacement parts. Use of unauthorized parts
or failure to follow maintenance instructions may create a risk of electrical shock or
serious personal injury°
2. All service that requires opening the sabre saw MUST ONLY be performed by a Sears
Service Center. All motor parts represent an important part of the double insulation
system and MUST ONLY be serviced by a Sears Service Center. Service performed by
unqualified personnel could result in a risk of injury.
3. Avoid using solvents when cleaning plastic parts_ Most plastics are susceptible to
damage from various types of commercial solvents and may be damaged by their use.
Use clean cloths to remove dirt, carbon dust, etc.
GENERAl.
Z_ WARN ING:
ALWAYS disconnect the tool from the power source BEFORE
cleaning or performing any maintenance,
,/_ WARNING:
DO NOT at any time let brake fluids, gasoline,
petroleum-based products, penetrating oils, etc. come in contact with plastic
parts. Chemicals can damage, weaken or destroy plastic, which may result in
serious personal injury.
It has been found that electric tools are subject to accelerated wear and possible
premature failure when they are used to work on fiber glass boats and sports cars,
wallboard, spackling compounds or plaster, The chips and grindings from these materials
are highly abrasive to electrical too! parts, such as bearings, brushes, commutators, etc.
Consequently, it is not recommended that this tool be used for extended work on any
fiberglass material, wallboard, spackling compound or plaster. During any use on these
materials, it is extremely important that the tool is cieaned frequently by blowing with an
air jet..
shields during power toot operations,
or when blowing
dust. If operation ls
l z_
WARNING:
Always
wear safety goggles or safety glasses with side
dusty,
also wear a dust
mask.
LUBRICATION
All of the bearings in this tool are lubricated with a sufficient amount of high-grade
lubricant for the life of the tool under normal operating conditions, Therefore, no further
lubrication is required.
20
I
t
I Z_
WARNING:for this
The tool
use might
of attachments
or accessories
that are
recommended
be dangerous
and could result
in not
serious injury. I
Sears and other Craftsman outlets have a large selection
blades designed for specific cutting applications.
of Craftsman sabre saw
Sabre saw blades are available for super fine wood scrolling, and smooth, medium
and fast wood cutting. Select metal cutting blades for fast or for smooth cutting,
or knife blades designed to cut vinyl, leather, rubber, cork and carpet.
"[here are special blades available for cutting abrasive materials such as plaster
and wallboard, and most all blades are available in individual packs or variety and
assorted sets.
Sears and other Craftsman outlets also offer safety equipment, sawhorses, work
stands, straight edges, cutting guides and a large selection of clamps to help you
with all your sawing needs.
Visit your local Sears store or other Craftsman
21
i
I
1
!
outlets
or shop www.craftsman.com
22
Manual de operaciones
Sierra caladera
de 4,5 Amp y velocidad variable
Modelo N°
320.17234
PRECAUCION:
Antes de utilizar el producto,
lea, comprenda y siga todas las Normas de
Seguridad e lnstrucciones de funcionamiento de
este Manual.
Sears, Roebuck and Co.,
Hoffman Estates, IL 60179 EE.UU.
Visite nuestro sitio web de Craftsman':
www.craftsman.com
• GARANT{A
• SEGURIDAD
• DESEtVlBALAJE
• DESCRIPCION
=ARMADO
• FUNCIONAMIENTO
= AJUSTES
=MANTENIM1ENTO
Garantfa ..........................................................................................................
P_gina 24
S[mbobs de Seguridad ..............................................................
P&gina 25
Instrucciones de Seguridad .......................................................
P&ginas 26-31
Glosario de T6rminos ....................................................................
PAginas 31-32
Desembalaje ......................................................................................
P,_ginas 32-33
DescripciSn ......................................................................................
P_ginas 33-34
Armado .................................................................................................. P&ginas 35-36
Funcionamiento .........................................................................................
P_ginas 36-41
Mantenimiento .................................................................................
PAgina 42
Accesorios .............................................................................................. P&gina 43
Numeros de tel6fone para adquifir repuestos Sears .............................
Contratapa
UN AI_IO DE GARANT|A
DE CRAFTSMAN ®
COMPLETA
PARA EL PRODUCTO
Si este producto Craftsman falla debido a un defecto en el material o mano
de obra dentre de un aSo a partir de la fecha de compra, REGRESELO
AL COMERCIO O AL CENTRO DE REPUESTOSY REPARACIONES DE
SEARS M,_S CERCANO U OTRO PUNTO DE VENTA DE CRAFTSMAN
EN LOS ESTADOS UNIDOS DE AMERICA PARA SU REPOSICION
GRATUITA.
Esta garantfa no incluye las partes fungibles come !_mparas, baterfas,
brocas u hojas.
Si se utiliza este producto Craftsman para propSsitos comerciales o de
alquiler, esta garantfa se aplica durante 90 dfas solamente a partir de la
fecha de comprao
Esta garantfa otorga derechos jurfdicos especfficos y tambi6n puede tener
otros derechos, que var[an de estado en estado.
Sears, Roebuck and Co. Hoffman Estates, IL 60179
iCONSERVE ESTAS INSTRUCCiONES!
iLEA TODAS LAS INSTRUCCIONESI
24
El propSsito de los simbolos de seguridad es
posibles petigros. Los simbolos de seguridad
atenci6n y comprensi6n. La advertencia de
Las lnstrucciones y advertencias que brindan
de prevenctSn de accidenteso
ilamar su atenciSn con respecto a los
y la expLicaciSn de elias merecen cuidadosa
los sfmbotos NO elimina ningSn peligro en sL
no son sustitutas de las medIdas correctas
/_ ADVERTENCIA:
ASEGORESE de leer y comprender todas las instrucciones de
seguridad de este manual, tncluso todos los simbolos de sierra tales como"PELIGRO",
"ADVERTENCIA°' y "PRECAUCtON', ANTES de utilizar esta sierra. Si no se respetan
todas tas fnstrucciones que se Incluyen en la stguiente lists se pueden producfr
descargas el_ctricas, lncendios y/o lesiones personales graves.
SIGNIFICADO DE S[MBOLOS
I Z_
ADVERTENCIA O PRECAUCION. Se puede utifizar en conjuncibn con otros
S[MBOLO
DE ALERTA
DE SEGURIDAD:
indlca PELIGRO,
slmbolos o piclograf|as,,
St no se respeta esta advertencla de segur|dad OCASIONARA la
muerte o lesionas graves personales o en los dem_s_ Siempre alga
las precaucienes de seguridad pars reducir el riesgo de tncendies,
descargas el_ctrtcas y lesiones personales_
Z_ ADVERTENCIA
[
I
I Z_ PRECAUCION
Si no se respeta esta advertencis de seguridad PODRA
OCASIONAR Is muerle o lesiones graves personales o de los
demos. Slempre slga las precauclonas de segurtdad para
reducir el rlesgo de Incendlos, descargas el_etr|cas y lesiones
personates.
1 ocasionar
sf no se respeta
advertencis
de seguridad
ES POSIBLE
lesionesestagraves
personales
o a los dem_,s
o dahos
a la proptedsd_ Slempre slga las precauctones
para reduclr el riesgo de |ncendios, descargas
lestones personales.
PREVENCtON
DE DAt_OSY MENSAJES
de segurldad
el_ctrleas y
DE INFORMACION.
Estos comunican al usuario la tnformaclSn y/o instrucciones
fmportantes que st no se respelan,
pedrfan producfr el daSo de! equlpo o de olra propiedad, Cada mensaje es precedtdo per ta
palabra "NOTA:" come en el siguiente ejemplo:
NOTA: SI no se respetan
lapropledad.
estas Instrucclones
se puede productr el daSo det equtpo ylo
_'_ ADVERTENCIA: E! funcionamtento de cualquier sierra
caladora puede produclr que se lancen objetos extraSos a los
ojos, Io que puede producir una lesi6n severs para la vista. Antes
de tnictar el funclonamlento de la herramlenta eldctrica, SIEMPRE
utiitce galas de seguridad o anleojos de seguridad con protecci6n
lateral y un protector complete pars la cars cuando sea necesario.
Recomendames una M_scars de seguridad de visl6n amplta pars
utiltzar sabre los anteojos o los anteoJos de seguridad estdndar
con protecci6n lateral, disponfbles en los Comerctos Sears u
otros Punlos de vents Craftsman.
25
z_ ADVERTENCIA: ASEGURESE de leer y entender todas tas
instrucciones de este manual antes de utilizar la sierra caladora. SI no se
respetan todas ias instrucciones, se pueden producir descargas eldctricas,
ineendios ylo lesiones personales graves.
SEGURIDAD DEL ._REA DETRABAJO
1. Conserve el _rea de trabajo limpta y bten !lumfnada. Los bancos de trabajo
atestados de objetos y las _reas oscuras son una invitaciSn a los accidentes_
2, NO uttltce las herramientas el_ctricas en amblentes explosivos, tales come los
que se encuentran en presencia de Ifquidos inflamables, gases o polvo_ Las
herramtentas el_ctricas hacen chispas que pueden encender el polvo o los gases.
3,, Mantenga a las personas presentes, niSos y visitantes alejados mientras utiliza
la herramienta el_ctrica. Las distracciones pueden provocarle la p_rdida del control.
4. Asegurese de que el taller sea a prueba de niSos con candados e interruptores
generales,, Guarde las herramientas bajo llave cuando no se utilizan,,
5. ASEGURESE de que el _rea de trabajo tenga amplta ttuminaciSn de manera tal que
pueda ver el trabajo y que no haya obstrucciones que puedan interferir con e!
funcionamiento seguro ANTES de utilizar su sierra.
SEGURIDAD
PERSONAl;.
I. CONOZCA su herramienta el_ctricao Lea cuidadosamente el manual de
operaclones., Aprenda las apltcaciones y limitaciones de la sierra, as{ como tambi6n
los peligros potenciales espec{ficos relacionados con esta herramienta.
2o MANTIENGASE ALERTA, observe Io que hace y utitice el sentido comun cuando
utitice una herramienta el_ctrica,
3oNO utilice la herramienta si esta cansado o bajo influencia de drogas, alcohol o
alguna medicaciSno Un momento de distracci6n mientras utiliza herramientas
el_ctricas puede provocar lea|ones personales graves,,
4,, UTILICE prendas de vestir adecuadas. NO use ropa suelta ni alha}aso Recoja el
pelo largo hacia atr_s, Conserve el pelo, las prendas de vestir y los guantes alejados
de las partes mSvites. Las prendas de veslir sueltas o el pelo largo pueden quedar
enganchados en Easpartes mSviles. Los conductos de ventilaciSn generalmente
cubren las partes m6vites y tambi_n se deber{a evitar el contacto con elEos,
5. EMITE que se encienda de manera accidental,, Asegurese de que el interruptor se
encuentre en la posiciSn "APAGADO" antes de enchufar_ NO Ileve herramientas con
el dedo en el tnterruptor_Cuando lleva herramientas con el dedo en el interruptor o
enchufa herramienlas que tienen el inlerruptor en [a posiciSn "ENCENDIDO", deja la
puerta abierta a los accidentes_
6. RETIRE |as Ilaves de ajuste o fas llaves para las tuercas de [as hojas antes de
"ENCENDER" la herramientao Si se deja una Ilave de tuercas enganchada en una
parle giratoria de la herramienta pueden producirse lesiones personales.
7. No pierda el equilibrio. Conserve y mantenga el equilibrio adecuadamente
en
todo momentm Conservar y mantener el equilibrio adecuadamente permits un
mejor control de la herramienta en situaciones inesperadaso
8. SIEMPRE ASEGURE SU TRABAJOo Utilice abrazaderas o una morsa para sostener
cuando results pr_.ctfco, Es m&s seguro que utilizar la mano y deja ambas manos
fibres para utilizar la herramienta.,
9_UTILICE EL EQUIPO DE SEGURIDAD. Stempre utilice protecci6n para la vista°
Se deben utitizar m_scaras contra el polvo, zapatos de seguddad antideslizantes,
cascos o protecciSn auditiva para crear un ambiente adecuado_
10_ NO UTILICE SOBRE UNA ESCALERA nt en un apoyo inestable. El equilibrio
estable sobre una superficie sSlida perm{te un mejor control de la herramienta en
situaciones inesperadas.
26
SEGURIDAD
EN LA UTILIZACION
Y CUtDADO DE LA HERRAMtENTA
ADVERTENClA:
ASEGURESE de leer y comprender todas las
instrucciones antes de utilizar esta sierra. Si no se respetan todas las
instrucciones que se incluyen en la stgutente lista se pueden producir
descargas el_ctricas, lncendios y/o lesiones personales graves,
I. SIEMPRE utilice abrazaderas u otras formas pr_cticas para asegurar y fljar la
pieza de trabaJo a una plataforma eatable. Si sostiene la pieza con la mane o con el
cuerpo, no es estable y puede provocar la p_rdida delcontrol
2. NO aplique presi6n a la herramtenta. Utilice la herramienta y la hoja correcta para
su aplicaci6n. La herramienta y [a hoja eorrecta realizar_n el trabajo meier y m_.s
seguro a la velocidad para Ia cua! fue disehada,
3. NO utiltce la herramienta si el interrupter no la "Apaga" o "Enciende". Cualquier
herramtenta que no se pueda controlar con el interrupter es peligrosa y se debe
reparar.,
4. DESCONECTE el enchufe de la fuente de energla antes de reallzar ajustes,
camblar accesorlos o guardar la herramlenta.
Dichas medidas de seguridad
preventivas reducen el desgo de que la herramienta se encienda accidentalmente.
5. NUNCA deje la herramients funcionando. SIEMPRE ap_guetao NO sueite la
herramienta hasta que no se haya detenido completamente.
6 GUARDE las herramientas que no utiliza fuera det alcance de los niSos y otras
personas inexpertas. Las herramientas son peligrosas en manes de usuarios
inexpertoso
7., REALICE E!. MANTENIMIENTO de las herramientas con cuidado. Conserve las
herramientas de corte afiladas y limp|as. Las herramientas conservadas
adecuadamente con los bordes de corte afilades tienen menos probabilidad de
atascarse y son m_s f_cites de controlar.
8o VERIFIQUE si extsten desajustes o atascamientos de las partes m6vlles, ruptura
de partes o cualquier otra condiciSn que pueda afectar el funcionamiento de la
herramienta_ SI est_ dafiada, Iteve la herramienta a arreglar antes de utilizar Muchos
accidentes son provocados per las malas condiciones de mantenimiento de la
herramienta.
9,, UTILICE SOLAMENTE los accesorios recomendados para esta herramienta. Los
accesorios que pueden resultar apropiados para una herramienta pueden resultar
peligrosos cuando se utilizan en otras herramienlas.
10., El mantlene dirlge seco, limpio y los |ibera det aceite y de la grasa,
SEGURIDAD ELI_CTRICA
_
ADVERTENCIA:
Noopermita
los dedos
toquen los terminales del
enchufe
cuando se coloca
saca el que
enchufe
del tomacorrlente.
I, Se equipan las herramientas de doble aislamiento
con un enchufe polarizado (una cuchilla es mz_s
ancha que ta otra)o Este enchufe se ajustard a un
tomacorriente polarizado unidireecionat, Si el enchufe
no se ajusta comp|etamente al tomacorrlente, invierta el
enchufeo Si a_n asf no se ajusta, comuniquese con un
electricista califlcado para que instate una salida
polarizada, No cambie el enchufe de ninguna manera.
2. El doble aislamiento [] elimina ta necesidad del
conector de tres cables con conexi6n a tierra y el sistema
de suministro de energia con conexi6n a tierra. Se aplica
solamente a las herramientas (de doble ais_amiento)
Clase It. Esta sierra caladora es una herramtenta de
doble alslamlento.
27
Tapa
de la
cata del
puesto
a tierra - @
Iomacorrien_e
SEGURIDAD
ELI_CTRICA
cont,
l segurtdad
_ ADVERTENCIA:
El se
doble
aislamtento
NO reemplaza las precauciones de
normales cuando
utttiza
esta herramienta.
1
3. ANTES de enchufar fa herramienta, ASEGURESE DE QUE el voltaje de salida
suministrado se encuentre dentro de voltaje marcado en la ptaca de dates de la
herramientao NO utilice tas herramientas con la especificaci6n "CA solamente" con un
suministro de energia CC,,
4_EVITE el contacto corporal con las superficies de conexi6n a tierra, tales come
tubes, radiadores, pianos de devanado repartido y refrigeradores_ Existe un aumento de
riesgo de descarga e!_ctrica si su cuerpo tiene conexiSn a tierra,
5, NO exponga tas herram|entas el_ctricas a la Iiuvta o condfciones de humedad nl
utiitce las herramtentas el6ctrlcas en lugares hlJmedos o mojados. Si ingresa ague
en la herramienta el_ctrica aumenta el riesyo de descarga el6ctricao
6. VERIFtQUE qua los cables de la herramienta no est_n dafiados, Lleve los cables
da_,ados de la herramienta a un Centre de servicio t_cnico de Sears para su reparaci6no
ASEGORESE de tener constantemente presente la ubicaci6n del cable y mant_ngalo
fuera de! alcance de la hoja m6vil.
7_NO abuse del cable. NUNCA utllice el cable para Ilevar ta herramlenta opara
desenchufarta del tomacorriente, Mantenga el cable fuera del alcance de fuentes de
cater, aceite, bordes afilados o partes m6viles, Reemplace los cables dafiados
inmediatamente. Los cables dafiados aumentan el riesgo de descargas electrtcaso
CUERDAS DE LA EXTENSION
Utilice un alargue adecuado. SOLAMENTE utilice los cables incluides en la lista de
Underwriters Laboratories (UL),, Otros alargues pueden causer una caida en la ltnea de
voltaje, lo que produce p_rdida de energ[a y el sobrecalentamiento de ]a herramientao
Para esta herramienta se recomienda un tamaP,o de Medida de cable americano (AWG, per
su sigla en ingt_s) de calibre 14 ai menos para un alargue de 25 pies o manor Iongitud.
Utilice un calibre 12 pare un alargue de 50 pies,, No se recomtendan los alargues de 100
pies o de mayor lengltud.
Recuerde que, un tamafio de calibre de cable mzis pequefio t|ene mayor capacidad qua
un n_mero mrs alto (el cable de calibre I4 tiene rues capacidad que el cable de calibre 16; el
cable de calibre 12 tiene m,% capacidad que el cable de calibre 14),. Si tiene dudes, utilice
el nt]mero m_s pequeflo
Cuando utiiice ta herramienta el_ctdca en el exterior, emplee un alargue para exterior con la
marca "W-A" o "W"_ Estos cables estan clasilicados para usar en el exterior y reducir el
riesgo de descarga el_ctrica_
Z_ PRECAUCION:
conserve el alargue fuera del _rea de trabajo. Coloque el
cable de manera tel qua no se enganche en la madera, las herramlentas u otras
obstrucciones mlentras trabaja con una herramienta et_ctrlca.
ADVERTENClA:
Verlflque el cable del alargue antes de cada utt!lzactbno
SI est& daSado, reemplace inmediatamente. Nunca utilfce una herram|enta con un
cable daSado ya qua si se toca el _rea da£=ada podr[a provocar una descarga
el_.ctrica y produclr una lest6n grave.
28
SiMBOLOS
DE SEGURIDAD PARA SU HERRAMIENTA
La etiqueta de su herramienta puede incluir los siguientes sfmbolos:
V.........................................................................................................
Voftios
A ...................................................................................................
Ampedos
Hz ......................................................................................................
Hercios
W ...................................................
...........................................
Varies
min .............................................................................................
Minutes
•..,.,.................................................................................................
Corriente alterna
__-==-=__
.........................................................................................
Cordente continua
no .............................................................................
.Velocidad libre de carga
[] ................................................................................................
ConstrucciSn Clase II, Doble aislamiento
ooJmtn......................................................................................
Revoluciones o Carreras per minute
Z_o...........................................................................Indica peligro, advertencia o precauciSn.
Signiflca: iliAtenciSnl!! Su seguridad se
encuentra comprometidao
SEGURIDAD EN EL SERVIC10 TI_CNICO
1. Si cualquier parte se pierde, se rompe, se dobla o falla de cualquier forma; o si
cualquler componente el6ctrico no funclona adecuadamente:
APAGUE el
interrupter de potencla desenchufe la sierra de la fuente de energia y haga reemplazar
la parle perdida, dafiada o que no funciona ANTES de utilizar nuevamente.
2. El servicio tdcnico de la herramienta se debe realizar solamente en un Centro de
repuestos y reparaciones de Sears. E! servicio t_cnico o mantenimiento que se
realice per personal no calificado pedria producir riesgo de lesiones,
3. Cuando realice el servtcio t_cnico de una herramienta, utilice solamente las
partes de reemplazo Id6nttcas. Respete las instrucclones de la secel6n de
mantenimiento de este manual. Si se utilizan partes no autorizadas o no se respetan
las instrucciones de mantenimiento, se puede crear un riesgo de descarga el_ctrica
o tesiSn.
REGLAS DE SEGURIDAD PARA LAS SIERRAS CALADORAS
_
I_lantengalas manos fuera del alcance del _rea y de la hoja
de corte. Mantenga una mano en el mango/interruptorde gatitlo y la otra en el
frente, en la parte superior del mangolcarcasadel motor. La hoja no puede
producircortes en las manos si ambas se encuentran sosteniendo la sierra.
Z_ PRECAUCION:
se apaga.
La hojas continL_andesliz_ndose luego de que la sierra
1,,MANTENGA el cuerpo ubicado hacia cualquiera de los taterales de la hoja de la
sierra y no en ifnea dlrecta con la hoja de la sierra,
2oNO coloque la mano debaJo de la pleza de trabajo. La hoja se extiende por debajo
de la pieza de trabajo cuando la sierra est_ cortando.
3,, NO toque ta hoja ni la pieza de trabajo inmediatamente despuds del torte;
pueden estar extremadamente calientes y quemar su piel.
4_ NO corte una pieza de trabajo de tamafio mayor de Io normal,
5,, VERIFIQUE que quede un espacio libre apropiado debajo de la pieza de trabajo
antes de cortar a fin de que la hoja no penetre en el banco de traba|o o en el
material debajo de la pteza.
29
1
t
1
I
REGLAS DE SEGURtDAD PARA LAS SIERRAS CALADORAS
cont.
6 ASEGIJRESE de que la hoja no entre en contacto con la pieza de trabajo antes de
que se encienda el interrupter.
7_SOSTENGA LA HERRAMIENTA per ias superficies de sujeci6n aisladas (mangos)
cuando reallce una acttvidad en ia cual la herramtenta de corte puede entrar en
contacto con cableado oculto o con su propio cable. El contacto con un cable 'Mvo"
expondr_ las partes met_licas a corriente y provocar& una descarga en el usuarioo
8. ASEGURE EL MATERIAL antes de cortar, Nunca sostenga una pieza de trabaJo con
sus manes o entre sus piernas, El material pequefio o delgado se puede flexionar o
vtbrar con la hoja y provocar la p_rdida de! control.
9 Cuando reallce un corte longitudinal, StEMPRE UTILICE una gufa para corte o gui'a
para hordes rectos. Esto mejora la prectsi6n del corte y reduce la posibitidaddel
atascamtento de la hoja.
10. NUNCA corte m_is de una pieza a la vez. NO APILE mQs de una pieza de trabajo en
la mesa de trabajo a la vez.
11. EVITE posturas y posiciones de ia mane Inconvenientes en las cua|es un
desltzamiento repentino podrfa causar que su mane se mueva hacia la hoja,
12,.NUNCA coloque la mane en el trayecto de torte de la hoja,
13..LOS RODILLOS GUIA PARA LA HOJA deben sostener la hoja cuando se realiza un
code.. Los rodi_ios deben estar apoyados en et borde posterior de la hoja. E] mode
desplazamiento as el 0NICe ripe de corte en el cual los rodillos NO sostienen la hoja.
CUANDO SE DESPLAZA, la hoja debe girar segOn se guie para seguir los patrones de
desplazamlento. En el mode desplazamiento, SIEMPRE mueva ta base hacia atr&s la gufa
para la hoja hacia arriba y hacia atr&s fuera del alcance de la hoja.
14.. Utilice SIEMPRE las l&minas que tienen la lalla y la dtmensi6n de una variable correctas,
Las !_minas que no corresponden con la dotaciSn fisica de montaje de la sierra se
ejecutar_n irregularmente y causar_n la p_rdida de control.
15, SEA SIEMPRE SEGURO que todos los lorniltos de reglaje y et sestenedor de la lamina
est_n sujetados firmemente ANTES de hacer un code° Los tornilbs de reglaje flojos
pueden hacer la herramienta deslfzarse y la p6rdida de control puede resullar.
Z_ ADVERTENClA:
La utilizact6n de esta herramtenta puede generar polvo que
contiene quimicos conocidos per causar c_ncer, defectos de nacimiento u otros dafios
para la reproducci6n. Algunos ejemples de estos quimlcos son:
• El plomo de las pinturas a base de plomo.
• La sflJcecristalina de los ladrillos, el cemento y otres productes de albaflileria,.
• El ars_nico y el creme, de la madera tratada quimicamente.
E! riesgo de estas exposiciones varfa, dependlendo de ia frecuencla con que realiza
este ttpo de trabaJo. Para reduclr su expesiel6n a estos quimlcos;
, Trabaje en _,reasbfen ventiladas.
• Trabaje con los equiposde seguridad aprobades, tales come m_scaras contra el polvo que
est_n especialmente diseSadas para filtrar partfculas microsc6picas.
Evite el contacto pro|ongado con el polvo de lijadoras, sierras, pulidoras, perforadoras
etEictrlcas y otras acttvldades de la construcclSn, Utllice ropa de protecci6n y lave las
_reas expuestas con agua y jab6n.
Si permite que el polvo ingress a su boca, ojos o permanezca en la piel, se puede fomentar
fa absorciSnde qufmicos nocivos..
z_ ADVERTENCIA: Et use de esta herramlenta puede generar y/o emitlr polvo,
el cual podr[a ocaslonar dafios resptratortos graves y permanentes u otras lesiones,
Use slempre proteccl6n respfratorla NIOSH!OSHA aprobada contra la exposlcl6n at
polvo. Dtrlja las particulas lejos de su cara y cuerpo.
3O
_EGLAS ADICIONALES PARA UN FUNCIONAMIENTO
SEGURO
Z_ ADVERTENCIA:
ASEGORESE de leer y comprender todas los
instrucciones. Si no se respetan todas las instrucciones que se incluyen en la
siguiente lista se pueden pmducir descargas el_ctrtcas, incendios y/o iesiones
personales graves.
Conozca su herramienta el_ctrica, Lea cuidadosamente el manual de operaciones.
Aprenda los aplicaciones y limitaciones de Ia sierra, asi como tambi_n los peligros
potenciales especificos relacionados con esta herramienta Si respeta esla regla,
reducir& los riesgos de descargas el_ctricas, incendlos o tesiones graves°
2. SIEMPRE utllice galas de segurldad o protectores para la vista cuando emplee
esta sierra. Los anteojos para todos los dias solamente tienen lentes resistentes a los
impactos; NO son galas de seguridado
3, PROTEJA sus pulmones. Utilice una m,_scara para ta cara o una m#.scara contra el
polvo si et trabajo es polvoriento.
4. PROTEJA su audict6n. Utilice una prolecci6n auditiva personal adecuada durante el
empleo. Bajo clertas condiciones, el ruido de este producto puede contribuir a la
p_rdida de la audici6n,
5. TODOS LOS VISITANTES Y PERSONAS PRESENTES DEBEN utilizar el mismo
equipo de seguridad qua el usuario de la sierra,,
6, INSPECClONE los cables de la herramlenta peri6dicamente
y sl est&n dafiados
h_galos reparar en el Centro de servicio tdcnico Sears m_s cercanooTENGA
PRESENTE la ubicaci6n del cable.
7, SIEMPRE veriflque las herram|entas para determlnar sl exlsten partes daSadas,
Antes de seguir utitlzando la herramienta, se deberia verificar con cuidado el protector
u otra parle que se haya daSado para determinar si funcionar_ apropiadamente y
realizar,_ la funci6n deseada. Vedfique si existen desajustes o atascamientos de las
partes mSviles, ruptura de partes o cualquier otra condici6n que pueda afectar el
funcionamiento de la herramienta, Se deberia reparar o reemplazar e! protector u otra
parle que se haya daSado en el Centro de servicio l_cnico de Sears.
8oINSPECCIONE y retire todos los clavos de ta madera antes de pasar la sierra.
9, CONSERVE ESTAS INSTRUCCIONES. Remffase a elias frecuentemente
y
utiticelas para capacitar a otras personas que puedan utilizar esta herramienta.
SI alguien le pide esta herramienta prestada, aseg_rese de que se Ileve tambi#n
estas instrucciones.
Trayecto de la hoja de la sierra
El &rea sobre, debajo, detras o en frenle de la hoja, segun se aplique a la pieza de
trabajo. E1 &rea que ser_, o ha sido cortada por la hoja.
Triscar
La distancia que est_ doblado (o triscado) el diente de la hoja de la sierra hacia fuera de
ia cara de la hoja.
Carreras por minuto o velocidad de carrera
La ve!ocidad de la hoja de una sierra caladora, que puede variar, generalmente desde
0 a 3000 carreras por minuto.
Oorte transversal
Actividad de corte o para dar forma que se realiza contra la veto de la pieza de trabaioo
torte biselado
Actividad de corte que se reatiza con la hoja a un &ngulo diferente de 90 ° grados a la base.
Corte longitudinal
Actividad de corte a Io largo de la
pieza de trabajo,
I
I
I
I
31
Corte a mano atzada
Realizar un corte sin utilizar una gula, calibre de inglete, plantitla sujetadora, abrazadera
de trabajo u otros dispositivos apropiados para evitar que la pieza de trabajo se retuerza
o mueva durante el corte..
Aserrar de modo orbital
Adem_,s del movimiento hacia arriba y hacia abajo de la hoja de la sierra caladora,
existe una acciSn orbitat que empuja la hoja hac{a adelante sobre la carrera de corle y
aumenta enormemente la veiocidad de corte pot encima de las de las sierras caladoras
convencionaleso
Desplazamiento
Permite que la hoja gire para cortes de patrones complicadoo
Aserrar de lado a lado
Cualquier actividad de corte en la cual se extiende la hoja comptetamente de lado a lado
del espesor de la pfeza de trabajo°
Ranura
El material removido por la hoja en un corte de {ado a lado o la ranura producida per la
hoja en un corte incompleto o parcia[
Pieza de trabajo o material
El art{culo sobre el cual se realiza la actividad de corte. Las superficies de la pieza de
trabajo c6mSnmente se denominan caras, terminales y bordeso
Caucho
Un residuo pegajoso a base de savia de los productos de madera.
Resina
Una sustancia pegajosa a base de savia que se ha endurecido.
Z_ ADVERTENCIA:
NUNCA deberia conectar la sierra a la fuente de
energia cuando arme las partes, haga ajustes, instale o quite las hojas, limpie o
cuando la sierra no estd en usa. AI desconectar la sierra, evita qua _sta se
encienda accidentalmente, Io cual podr{a causar lesiones personales graves.
, La guia de borde se encuentra en la caja.
2. Se atmacenan las Dos Hojas en el compartimiento de almacenamlento para hojas
ubicado en la parte posterior de la base de la sierra.
3,. El Adaptador de Aspirador est,. acoplado a la sierra,
4., Con cuidado, saque la sierra de1caja y colSquela sobre una superficie plana
estable.,
5. Verifique cuidadosamente que la sierra no haya sufrido roturas o danes durante el
transporte. Si faita alguno de los artlculos mencionados (remftase a la Figura 1 en la
p_gina 33), devuelva la sierra al comercio Sears ® o a] punto de venta de Craftsman ®
m_,s cercano para su reposici6n.
Z_ ADVERTENCIA: st alguna de las partes estd rata o si falta, NO trate de
conectar el cable de alimentaci6n o hacer funcionar la sierra hasta qua se
repongan las partes rotas o faltanteso Si no se cumple can Io anterior, pueden
ocurrir iesiones graves.
32
LISTA DE
PARTES
2_ Dos hojas de corte para madera
(almacenadas en el compartimiento
de almacenamiento para hojas)
(Figura 1)
3. Guia lateral
(aimacenada
E
1. Sierra
en el estucha)
,
Adaptador de aspirador
(sujetoa la sierra)
5. Bolsa para transports
CONOZCA SU SIERRA CALADORA
(Figura 2)
NOTA: Antes de intentar utilizar la sierra, familiaricese
de funcionamiento
y requisites de seguridad.
con todas las caracterfsticas
!
|
i
Su sierracaladora tiene una motor el6ctrico armado de precisiSny solamente deberia conectarse
a un suministro de potencia de 120 voittos, 60 Hz CA UNICAMENTE (corriente dom_stica normal),,
NO haga funcionar con corriente continua (CC).,Esta gran caida de voltaJecausard una p_rdida
de polencia y el motor se sobrecalentar&. St la sierra no funciona cuando se enchu[a a un
tomacorriente correcto de 120 vottios, 60 Hz CA UNICAMENTE, verifiqua at suministro d_
potencia, Esta sierra tiente un cable de potencia de 6 pies, de 2 hilos (no se necesita adaptador),
Esta sierra caladora tiene las siguientes caracteristtcas:
1..4,5 Amp., Motor de velocidad variable, 800 a 3000 CPM carreras per minute (velocidad
libre de carga),,
2, Se controla la Velocidad variable a trav6s det cuadrante de veloctdad ubicado en la parte
frontal superior del mango del interrupter de gatilIoo
3oLos RodiUos de soperte guia para la heja brindan control agregado de la hoja_ Carrera
de la hoja de 11/I6 pulgadas para cortes m_s suaveso
4_ La Base de acero con recubrimiento ep6xico durable se desliza suavemente sobre la
pieza de trabajo, Escala biselada para f_cil ajusle.
5. Capactdad de corte biselado de 0° a 45° de izqu_erda a derecha.
6oCambioa de hojas r_pidos sin herramientas.
7. La luz de trabajo LED ilumina et &tea de corte
8oLa luz del"lndicador de la herramlenta acttva" es verde cuando la sierra est_
enchufada a la fuente de energla,,
9. Interrupter de gatitlo de longitud extendtda con Bot6n de fijacl6n de potencta.
10,,Pretecci6n frontal de despeje contra astillas/Protector
de hoja
11, Extracclbn de aserrin: El Adaptador de aspirador que se encuentra en la parte inferior
de la sierra se acopla al adaptador de 1_!4pulgadas para asptrar en seco/hl3medo (ambos
se venden per separado) para la extraccl6n de aserrin y part[culas del &rea de corte.
12, Incluye Guia lateral, ideal para cortes repetitivos, rectos y r&pidos,
13. Cojtnetes de bolas permanentemente lubrlcados a1100% para un funcionamiento sin
complicaciones y una vida _til prolongada,
14. Incluye un estuche resistente a los golpes con facilidad port, tit y de
almacenamlento.
33
Esta sierra caladora tiene las siguientes caracteristicas:
cont. (Figura 2)
Fig. 2
Cuadranle
de vefoctdad
variabfe
lnterruptor de gatillo de
Encendido / Apagado
Bot6nde
de kecuencia
de la herramtenta activa"
(_
(_
Luz de 'lndtcador
Cable de
potencia de
8 pies
Adaplador de
aspi_ador
Luz de
[rabajo LED
Protecci6n de
despejecont[a
astiilas/Protector
de hoja
Ranura de
montaje de
gu{a Ealeral
Compartimtento
de almaeenamiento
para hojas
Perilia de
fljaci6n para
gufa Jatm'at
base
Hoja
Rodiilos guia
para la hoja
Montaje de soporte de hoJa de
cambio sin herramientas
Fenlede montage
du guide de bard
Potencla
nominal
Vetocldad
libre de carga
Entrada
4,5 amp.
800 - 30DO CPM (carreras
par minuto)
120 volt/as, 60 Hz de CA
Rango del 6ngulo de carte del bfsel
0 ° a 45" lzqulerda
Carrera
11/16 pulgadas
de la hoja
Profundidad
de carte en madera
2 '_/_6pulgadas
Prafundldad
de carte en acero
1/4 pulgadas
34
y derecha
(55ram)
(6ram)
i
ALMACENAMIENTO PARA HOJA (Figuras 3 y 4)
Su sierra caladora viene con dos 2 sierras para cedar madera que se almacenan en el
compartimiento de almacenamiento par alas I_ojas que se encuentra ubicado en et darso de
la sierra debajo de la entrada de{ cable de alimentaciSn (v_ase Figura 3)_
Para abrir la tapa del atmacenam{ento para hojas, retire el tuba del adaptador del aspirador
(v_ase Figura 4)° Levante el tube del adaptador del aspirador tigeramenle (para soltar Ia
pestaSa de la placa base) y tire del tube del adaptador del aspirador para sacarlo, Tire de la
pestaSa en la tapa de almacenamiento para las hojas y d_ vuelta la sierra para sacar las
hojas (v_ase Figura 3),,
Fig. 3
_ecuerde
utilizar siempre
la hoJa apropiada
para el material que se corta.
INSTALACION DE HOJA SIN HERRAMIENTAS
(Figuras 5, 6 y 7)
E{ cambio de hojas sin herramientas fe permite
sacar y reemplazar la hoja de ia sierra r_.piday
f_cilmente sin utilizar herramienlas adicionales_
, Desenchufe la sierra.
Z_ ADVERTENClA:
SlEMPRE
desenchufe la sierra de la fuente de energ[a
antes de cambiar las hojas o de hacer
cualquter ajuste. Si no desenchufa la sierra
podria produclr un arranque accidental que
puede causar teslones personales graves,
2, Levante la protecci6n de despeje de aslilfas, suba
un lateral {uera de ta ranura de montaje y saque
la proteccbn de la sierra (v_ase Figura 5).
Aplique un pace de fuerza cuando Eevantey
saque la protecciSn de la sierra.
3. D_ vue]ta la sierra para tenet acceso a! montaje
de soporte de la hoja.
4. Introduzca ta cuchiila dentro de la abrazadera
de la cuchilla para un dedo; la abrazadera se
bloqueara autom&ticamente. Los dientes de
la cuchilla deben mirar hacia el frente y apuntar
hacia arriba, y la parte trasera de ia cuchitfa
debe descansar en la ranura del rodillo gu{a
de la cuchiEla(ver Fig. 6 y Fig. 7)
35
/
Fig. 7
INSTALACION
DE HOJA SIN HERRAMIENTAS
conto
5. Empuje la hoja para asegurarse de que est6 bien sujeta en su lugaro
6. Coloque la protecciSn de despeje de astillas en las ranuras de montaje y cierre la
cubieda a presi6n en ta posiciSn correcta.
NOTA: Para utitizar tanto con hoja de v&stago "T" come "U'L
L_ PRECAUCION:
Una vez que se instala la hoja en la sierra, siempre est_
expuesta° No hay protector de hoja inferior. Tenga cuidado cuando manipula la
sierra de manera tal que ta hoja no se atasque en lax prendas de vestir, la piel,
etc. Cada vez que deje de trabajar con la sierra, tenga cuidade de no doblar la
hoja. Stempre coloque la sierra de costado cuando se instala la hoJa. SIEMPRE
saque la hoja de la sierra cuando no se utiltza.
PARA SACAR LA HOJA
1_,Desenchufe la sierra,,
ADVERTENCIA:
SIEMPRE desenchufe la sierra de la fuente de energ{a
antes de cambiar las hojas o de hacer cualquier ajusteo Si no desenchufa la
sierra podria producir un arranque accidental que puede causar lesiones
personales graves.
i
i
i
.i,,ll i
2, Siga los pasos I a 4 sobre la instalaci6n de ]a hoja sin herramientas (v_ase p_.gina 35).
3. Saque la hoja con cuidado (o cambie la heja)_
4,, Vuetva a co_ocar la protecciSn de despeje de astilias y ci_rreia a presiSn en su posici6n
correcta.
I
Fig. 8
LUZ DETRABAJO
LED (Figura 8)
Su sierra catadora tiene una luz de trabajo
LED que se "ENCIENDE" autom_,ticamente
cuando se enchufa la sierra en una fuente de
energ{ao La luz es util para brindar f&ci_
visibilidad de la lfnea de code.
LUZ DE"INDICADOR DE HERRAMIENTA
ACTIVA" (Figura 9)
Su sierra caladora tiene una luz verde de
"lndicador de herramienta activa" que se
"ENCIENDE" autom_ticamente cuando se
enchufa la sierra en una fuente de energfa,
Esta luz de ubica a ambos laterales de la
base del mango interrupter de gatilfo cerca
del cuerpo de ia sierra.
36
INTERRUPTER
DE GATILLO PARA ENCENDIDO°APAGADO
DE POTENC|A y BOT6N DE
"FIJACION" DE POTENC1A
t. Conecte el enchufe de su sierra a un tomacorriente de potencia dom6stico.
2, Encienda ta herramienta presionado el interrupter de gatifto de encendido/apagado (v_ase
Figura t0).
3. Pare delener la herramienta, suelte el interrupter de gatillo de encendido/apagadoo
4. Pare fijar el interrupterde gatlIlo de encendido!apagado en la posici6n "encendido",
presione el interrupter de gatillo y mientras Io sostiene en ta posici6n "encendido', presione
el bot6n de fijaci6n, que se ubica en e! lateral tzquierdo del mango (vease Figure tO)r
5oEt bet6n de fijaci6n de potencia permite al usuario mantener la sierra caladora en
funcionamiento sin tenet que presienar el interrupterde gatitto. Esto es _lil para
apficaclones continues de la sierra_
6, Pare sollar el bot6n de fijaci6n de potencia, prestone y suetle et interrupter de gatillo,. Esto
apagar_ la herramientao
I z.4X,
ADVERTENC'A:
S, se pulse de
centinuamente
puede
soltar el bot6n de interrupter
gatiilo.
Fig, 10
Bot6n de fijacf6n
de polencia
el bot6n de f,jaci,n,
no se
i
Fig. 1t
Interrupter de galitl0 de
encendido/apagado
PARA AJUSTAR LA VELOCIDAD DE CORTE CON EL CUADRANTE DE VELOCIDAD VARIABLE
La caracteristica de velocidad variable de esta sierra le permite combiner Ia velocidad corle
aproptada con el material que se va a corlar, Io que mejora el rendimiento general de su
sierra yes L_lilpare proteger a las hojas del desgaste indebido.
Se pueden ajustar las velocidades desde 800 a 3000 CPM (carreras per minute), velocidad
tibre de carga, ajuslando el cuadrante de velocidad variable ublcado en la parle superior det
mango del inlerruptor de gatillo,
El cuadrante de veloeidad se enumera de "1" a "6", con el nt_mero "1" come la veloctdad m&s
baja y el n_mero "6" come la velocidad mAs alta (v_ase Figures 11).
La velocidad correcta de la hoja diferir_t dependiendo del ripe y espesor de la pieza de trabajo_
Come regla general, las vefocidades m&s lentas son pare los materiales m_s densos y las
velocldades m&s r&pidas pare los materiales m&s blandoso
Las velocidades m#,saltas le permttir_n cotter las ptezas de trabajo m_s r,_pldo, pero se
reductr,_ la vide ulil de la hoja. La siguiente table puede ayudado a elegir la velocidad
adecuada,,
Pieza de trabaio a corlar
Madera
Acero dulce
Acero inoxidable
AlUminio
Pl&sticos
Ndmero
en el cuadrante
de velocidad
variable
5.6
3.6
3-4
3-6
2-5
Recuerde SIEMPRE utilice ta hoja de corte correcta para la aplicaci6n de corte y el
material que est_ cortando,,
37
9-8-06
17234
EXTRACCION DE ASERRiN (Ftgura 12)
t ANTES
_ ADVERTENCIA:
desenchufe
la sierra de la fuente de energfa
de hacer cualqulerSIEMPRE
ajuste o de
acoplar accesorloso
Su sierra caladora viene con un tube adaptader
de aspirador de 1114pulgada que se puede acoptar
a una manguera de aspirador en seco/hOmedo
con un adaptador de manguera de 11/4pulgada y
tuego a un aspirador en secot hOmedo (todo se
vende per separedo)
Esto ser,_ btil pare sacar el polvo, particulas y
fragmentos del corte fuera del _rea de cone.
Ser_ necesario sacar el tube adaplador de
aspirador de la sierra pare acceder al
compartimiento de almacenamlento para las hojas
y cuando se configuran y realizan los codes
Fig. 12
biselados°
Para sacar el tube adaptador de aspirador, levante para setter ta pesta5a de la base de la
sierra y tire hacia fuera+ Para volver a acoplar, solamente deslice nuevamente a su posicidn y
enganche 1apesta#,a_
CONSEJOS GENERALES PARA REALIZAR CORTES
t° Siampre coloque la care major o "acabada" de ta pieza de trabajo "hacia abajo'+de manera
tal que no se raspe o maJtrate miantras realize el code SIE_PRE SUJETE CON
ABRAZADERAS la plaza de trabaio antes de cortar_
2. Dtbuje las IFneas+patronms o disefios de corte en et "reverse" que est& orientado al usuario,
Esto significa que va a set el inverse o a! rev6s de la forma que aparece en la cara
"acabada".
3. Siempre selecctone el tipo de hoja correcto pare su aplicaciSn de code.
4+Coloque el borde frontal de la base de la sierra sn el material a ser codado y alinee ;a hoja
con la Ifnea de corte_
5, Sostenga la sierra firmemente y enci_ndala_ Permita que la hoja alcance la ve;ocidad
seieccionada antes de comenzar a cortar.
6. Presione (para mantener la base de la sierra plane contra {a pteza de trabajo) a medida que
empuja lentamente 1asierra en la direcci6n del corte+
7. Gradualmente incremente la velocidad de la hoja, cortando tan cerca de la linea come sea
posible (a manes que quiera dejar suficiente espacio pare el acabado con lija),
8+A medida que code, es probable qua necesite reubicarla morse o las abrazaderas para
conservar la estabilidad de la pieza de trabajo.
9+NO fuerce la sierra ya que el diente de fa hoja puede fdccionarse y desgastarse sin cedar, le
qua puede producir qua se rompa la hoja.
10. Deje qua la sierra haga ia mayor[a del trabajoo
t 1°SIEMPRE corte lentamente cuando siga curves, de manera tel qua la hoja pueda cortar tas
vetas cruzadas,+Esto proporcionar_ un code precise y evitar& que la hoja se desv[e.
I
' NOTA; SlEMPRE aplLqueuna presl6n"HAClA ABAJO" flrme y estable en el frente y
cuerpo de la sierra mientras corta. Esto evitar_ qua la sierra SALTE de la plaza de trabajoo |
mantenga el control adecuado de la sierra, St no sujeta con abrazaderas nt fija la
_pleza
ADVERTENClA:
sujetepodrfa
bien la
pteza delesiones
trabajo. graves.
SIEMPRE
de trabaJo y pierde SIEMPRE
control deftje
ta y
sierra
provocar
38
PARA CORTAR METAL
Cuando corte metal SIEMPRE sujete con abrazaderas la pieza de trabajo de metal y
SIEMPRE utilice una sierra para cortar METALES. Sea extremadamente cuidadoso
cuando mueva ta sierra a medida que corta. Utilice las velocidades de mode BAJO
(Posici6n !, 2 o 3 en el cuadrante de velocidad variable). Tambi6n utilice la posiciSn
"BAJO" en la palanca de control orbitalo NO retuerza, ni doble, ni fuerce ta hoja., Si la
sierra salta o rebota cuando est& cortado, cambie la hoja per una de dientes m#,s fines.
Si la hoja comienza a atascarse cuando est,_ cortando un metal dulce, cambie la hoja per
una de dientes m&s grueses_
Para facilitar el corte, lubdque la hoja con una barra de cera para cortar (si hay
disponible) o aceite para cortar cuando corte acero. Las piezas de metal finas se deben
colocar entre dos maderas o sujetar con abrazaderas sobre una sela madera (la madera
encima delmetal)Dibuje
las lineas o e! diseSo de corte en la parte superior de la madera.
Cuando corte una extrusiSn de aluminto o un _ngu|o de hierro, sujete en una morsa y
realice e! corte cerca de las mordazas de la morsa.
Cuando corte cares con un di&metro mayor que la profundidad de la hoja, corte de lade
a lade la pared del care y luego introduzca la hoja en eTcorte, gire el case a medida que
corta,,
1. Cuando code metales, se debe utilizar un refrigerante / aceite para cedar adecuado,
2. Extienda el aceite en la hoja o pieza de trabajo en intervalos regulares du;ante el corte
a fin de reducir el desgaste o sobrecalentamiento de la hoja
3. No se hace un corte biselado cuando cortes metaleso
PARA CORTAR CON ESCANTILLON
(Figura 13)
1. Marque la posiciSn del borde lateral de la
base de la sierra y luego suiete el escantillSn
en la marca y paralelo a! corte.
2. A medida que corta, conserve el borde de la
base de la sierra alineado contra el
escantillSn y plana sobre la pieza de trabajo.
mantenga el control adecuado de la sierra, Si no sujeta con abrazaderas
ni fija
' _la pleza
ADVERTENCIA;
SIEMPRE
la pieza
de trabajo.SlEMPRE
de trabajo y pierde
control fije
de y
la sujete
sierra bien
podrta
provocar
lesiones graves,
39
CORTE DE PISTON
(Figura
14)
Una de ias caractedsticas m&s L_tilesde este tipo
de herramienta as ta capacidad de comenzar un
corte en cualquier lugar en la superficie de fa
pieza de trabajo: sin necesidad de perforar un
orificio de iniciOoEl corte de pist6n es _til y
ahorra tiempo para hacer aberturas en
matedales blandos. No es necesario perforar un
odficio para un code interior o de cavidades.
1 ..Dibuje lfneas para el orificio que desea cortar.
2. Mantenga la sierra firmemente e inclinela
hacia adelante de manera tal que solamente
el pie de ia base de la sierra se apoye en la
pieza de trabajo_
3. ASEGURESE de que la hoja est_ bten alejada de la pieza de trabajo.
4, Encienda ta sierra y luego graduatmente baje la hoja hacia la pieza de trabajo,
firmemente sosteniendo el pie de la base de la sierra para evitar que se tambalee el
lateral.
5. Lentamente haga girar ]a sierra hacia abajo come una bisagra hasta que la hoja code
de lade a lade y la base se apoye an la pieza de trabajo.
6. Comience el corte de la manera habitual a Io largo de la ilnea de certeo
I
NOTA: NO utilice una hoja de desplazamiento para el corte de pist6n.
1
IMPORTANTE: NO intente hacer cortes de pist6n en materiates duros, tales come
maderas duras, come robte o arce, o metales tales come el acero.
HACER ESQUINAS FILOSAS
Io Corte hasta la esquina, luego retroceda levemente antes de dar vuelta cerca de la
esquina..
2_ Luego de completar el orificio, regrese a cada esquina y corte en la direcci6n opuesta
para hacerla cuadradao
AJUSTAR LA PLACA DE BASE PARA EL CORTE BISELADO (Figuras 15 y 15a)
i _energ_a
ADVERTENCIA:
SIEMPRE ajuste
desenchufe
la sierraaccesorfos.
de la fuente de
ANTES de hacer cualquler
o de acoplar
NOTA: SIEMPRE saque la hoja antes de ajustar el _ngulo de corte.
1. Luego de sacar la hoja de ]a sierra, retire el adaptador del aspirador que se encuentra
debajo de la base (v_ase ExtracciSn de aserr[n, P&gina 38)
2. Para ajustar el #.ngulo de code, pdmero d_ vuelta la herramfenta y ut_lice la llave
hexagonal provista en el cable de alimentaci6n de energia para aflojar los tornillos
hexagonales qua sostienen el montaje de la gu[a/rodillos de la hoja y la sierra an su
tugar (Figura 15),
3. Mueva la bass de la sierra hacia atr&s levemente e incl[nela al &ngulo deseado enlre
0° y 45 ° hacia la fzquierda o derecha, ulilizando la escala marcada en la abrazadera
de la base.
4. tnstale una hoja de code°
5o Deslice el montaje de la gu[a/rodillos de la hoja hasta que la gu[a para la hoja quede
apoyada en e! dorso de ia hoja.
40
I
i
AJUSTAR LA PLACA DE BASE PARA EL CORTE BtSELADO cont. (Figuras 15 y 15a)
6. Ajuste los tornillos hexagonales nuevamente. Para un trabajo preciso, es necesario
hacer un corte de ensayo, medir el trabajo y restablecer el ,_ngulo hasta que se
alcance la configuraci6n correcta.
\
Fig. 15a
!
I Z_
ADVERTENCIA:
SIEMPRE fije y sujete bien la pieza de trabajo.
I SIEMPRE mantenga el control adecuado de la sierra. Si no sujeta con
! abrazaderas nt fija la pieza de trabajo y pierde control de la sierra podria
I pr°v°ca r lesiones
graves_ ......................
,.........
UTILIZACI()N DE GU{A LATERAL (Ftguras 16 y 16a)
Z_ ADVERTENCIA:
SIEMPRE desenchufe la sierra de ia fuente de energia
ANTES de hacer cualquier ajuste o de acoplar accesorios.
I
I
1_lntroduzca la barra de la guia lateral a tray,s de las ranuras en la base de la sierra
caladora (v_ase Figura 16). Se puede introducir fa guia lateral en cuatquier lateral de la
base, con la guia lateral hacia abajo.
2. Atomille la peritla de sujeci6n de la guia lateral en el orificio roscado de la base para
ajustar la barra de la guia lateral en su tugar.
3. Mida la distancia desde et borde de la pieza de trabajo hasta la I{nea de code. Deslice la
guia lateral hasta la disiancia deseada y ajuste ta perilla de sujeciOn para asegurar la
gu[a lateral en su lugar (Figura 16a) ' realice el corteo
Fig. 16a
H.H I
ill .J
.......t.....
ADVERTENCIA:
SIEMPRE fije y sujete bien ia pieza de trabajo. SIEMPRE
mantenga el control adecuado de la sierra. Si no sujeta con abrazaderas n! fija la
pieza de trabajo y pierde control de la sierra podr[a provocar lesiones graves.
41
1
autorizado puede dar come resultado la colocaci6n err6nea de los cables internes
[Z_
ADVERTENCIA:
El mantenimlento
preventive
y componentes,
to que podr_a
causar un peligro
grave° realizado per personal no
I
J
SERVICIO
1. Cuando realice el servicto t_cnico de una herramienla, utilice solamente las piezas de
repuesto td_nticasoSi se ulilizan repuestos no autorizadas o no se siguen las
instrucciones de mantenimiento, se puede crear un riesgo de descarga el_ctrica o lesiSn
personal grave_
2. Todo servicio t_cnico que requlera la aperlura de la sierra caladora DEBE REALtZARSE
IJNICAMENTE per un Centre de servtcto t_cntco Sears,, Todas las partes del motor
representan una parle !mportante del sistema de doble aislamiento y el mantenimiento
DEBE REALIZARSE UNICAMENTE per un Centre de servicio t_cnico Sears. El se_icio
t_cnico que se realice per personal no calificado podria dar come resurtado el riesgo de
lesiones_
3_ Evite la utilizaciSn de solventes cuanrJo se limptan las partes pl_sticas_ La mayor_a de tos
pt_sticos son susceptibles a daSos de vados lipos per Ios solventes comerciales y se
pueden daSar con su utilizaci6n. Utilice paSos limpios para sacar la suciedad, polvo de
carbSn, etc.
GENERAL
ADVERTENCiA:
StEMPRE desconecte la herramfenta de la fuente de
energia ANTES de limpiar o realizar alg_n tipo de mantenimtento.
/_
ADVERTENCIA:
EN NINGUN memento perm|ta que liquidos para frenos,
gasolina, productos a base de petr6teo, aceltes penetrantes, etc. entren en contacto
con las partes pl_stlcas. Los quimlcos pueden dafiar, debtlftar o destruir el pl_stico,
Io que puede producir una lesi6n personal grave.
Se ha hallado que cuando se utilizan para trabajar en bores de libra de vidrio y aulomSviles
deportivos, placas para tabiques, compuestos de reHeno o yeso, [as herramientas el_ctricas
son susceptibles a desgaste acelerado y fallas prematuras posibtes,. Las partfculas y abrasi6n
de estos materiales son altamente abrasives para las partes de fas herramientas el_ctricas,
tales come cojinetes, escobillas, conmutadores, etc. En consecuencia, no se recomienda la
utilizactSn de esta herramienta para trabajos prolongados en cualquier material de fibra de
vidrio, placas para tabiques, compuestos de reUeno o yesooDurante la utilizaci6n de estos
materiales, es extremadamente tmportante que se limpien las herramientas frecuentemente
soplando con chorro de aireo
Z_ ADVERTENCIA:
Siempre utilice galas de seguridad o anteojos de
seguridad con protectores laterales durante el funcionamientos de la herramienta
el6ctrlca o cuando se sepia el polvoo SI la actfvldad es polvortenta, tambl_n utlltce
una m_scara contra el polvo.
LUBRICACION
Todos los coJinetes de esta herramienta est&n lubrlcadoscon una cantidad suflciente de
fubricantede alto grade para la vida Util de la herramienta bajo condiciones normales de
funcionamiento, Per Io tanto, no se requiere otra lubdcaci6no
42
recomendados para esta
! Z_
ADVERTENCIA:
lesiones
graves.
herramtenta podr{a resultar peligrosa y podrfa causer
La utiltzaci6n de repuestos o accesorlos que no son
Los puntos de vents Sears y otros de Craftsman tienen una gran selecci6n de hojas
pars sierras caladoras Craftsman disefiadas para apltcaciones de corte especificas.
Hay hojas pars sierras caladoras disponibles para desplazamtento en madera
superflnas y corte de madera suave, medio y r_pldo_Seteccione Iss hojas de corte de
metal pars cortes r&pidos o pars cortes suaves, o las hojas de cuchttlo disefiadas pars
cortar vinilo, cuero, goma, corcho y alfombras.
Existen hojas especiales dtsponibles pars cortar materlales abrasivos tales como yeso
y places pars tabiques, y la mayorta de las hojas est_n disponibles en pequetes
Indtvlduales o en juegos varlados y surtidos.
Los puntos de vents de Sears y otros de Craftsman tambi_n ofrecen equipos de
seguridad, caballetes pars serrar, plataformas de trabajo, bordes rectos, guias de corte
y una gran seleccl6n de abrazaderas pars ayudarlo con sus necestdades pars setter.
Visite su comercio Sears local u otros puntos de venta Craftsman o compre en
www.craftsman.com
43
Getltflxed,
" "
-i:at you
¸
r
home orours!
Your Home
For expert troubleshooting
and home solutions advice:
manage
home
www,rnanagemyhome,com
For repair - in your home - of all major brand appliances,
lawn and garden equipment, or heating and cooling systems,
no matter who made it, no matter who sold it t
For the replacement parts, accessories and
owner's manuals that you need to do-it-yourself.
For Sears professional installation of home appliances
and items like garage door openers and water heaters,
1-800-4-MY-HOME
(1.-800-469.4663)
®
Ca, anytime,
dayor
nIghl
(U S A and Canada)
www.sears.corn
www.sears,ca
Our Home
For repair of carry-in items like vacuums, lawn equipment,
and electronics, call anytime for the location of the nearest
Sears Parts & Repair Service Center
1.800.488-1222 (US.A.)
www..sears,corn
1-B00-469-4663 (Canada)
www,sears.ca
To purchase a protection agreement on a product serviced by Sears:
1-800-827-6655
(UoS,Ao)
Pare pedir servicio de reparaci6n
a domicilio, y pare ordenar piezas:
1-888-SU-HOGAR®
(1,,888-784,,6427)
1-800-36t-6665
(Canada)
Au Canada pour service en frar_ais:
14300-LE-FOYER_c
(t-800.533-6937)
www3ears_ca
..............................
Sears
©Sears_,
LLC
® Registered Trademark t "/t_ Trademark I SM Service Mark of Sears Brands. LLC
® Marca Registrada 1 TM Marca de F&brlca t SM Marca de ServIclo de Sears Brands, LLC
_,_cMarque de commerce f _._D
Marque d_pas_e de Sears Brands, LLC