1
Owner's Manual
Vacuum Cleaner
Model
116.32712
116.30712
116.38512
116.38612
116.38613
116.38812
116.38912
116.39512
116.39612
116.39712
CAUTION:
Read and followall
safety and operating
instructionsbefore first
use of this product.
Sears, Roebuck and Co., Hoffman Estates, IL 60179 U.S.A.
www.sears.com
PartT No. COIZAMD40UE_O-8175048
Printed in U,S.A.
Before UsingYour New Vacuum .....
KenmoreVacuum Cleaner Warranty
Important Safety Instructions ........
Parts and Features .................
Assembly instructions .............
2
. 2
3
4
5-6
Operating Instructions
.............
6
Pile Height Selection and Setlfng
......
7
Carpet/Bare Floor Selector
...........
7
Releasing the Handle ...............
8
ON/OFF Switch ....................
8
Atiachments ......................
8+!0
Attachment Use Chart ............
10
Vacuuming Tips ....................
1t
Pe#ermanceFeatures
Vacuum Cleaner
............ 11-12
Care ................
13
Vacuum Storage ...................
13
Cleaning Exterior and Attachments .....
t3
Dust Bag Changing ...................
14
Filter Changing ....................
15
Bait Changing and Agitator Cteaning
18-18
Clog Removal ....................
19
Light Bulb Changing ................
20
Agitator Servicing .....................
2!
Agitator Assembly ..................
21
Troubleshooting ....................
22
Requesting Assistance Or Service ., 23
PIease read thisguide, It will help you assemble and operate yournew Kenmore vacuumin
the safest and most effective way
For more Information about vaccumcleaner care and operation, ceilyour nearest Sears store..
You will need the completemodel and serial numbers when requesting information.Your vacu+
um's model and serial numbers are located on the Model and Serial Number Plate°
Use the space below to record the model number and serial number of your new Kenmore
vacuum.
Model No.
Serial No,
Date of Purchase
Keep thisbook and your sales check (receipt) in a safe place for future reference..
LIMITED ONE YEAR WARRANTY ON KENMORE VACUUM CLEANER
This warrantyis for one year from the date of purchase, and Includes onlyprivate household
vacuum cleaner use, During the warranty year, when this vacuum cleaner is operated and
maintained according to the owner's manual instructions, Sears witlrepair any defects in
material or workmansNp free of charge+
This warranty excludes vacuum bags, belts, light bulbs, and fillers, which are expendable parts
and become worn during normal useFor warranty service, return this vacuum cleaner to the nearest Sears Service Center In
the United States,
This warrantyapplies onlywhile thisproduct is in use in the United States. This warrantygives
you specific legal rights, and you may also have other rightswhtch vary from state to state.
Sears, Roebuck and Co,, D/817 WA, Hoffman Estates, tL 60179
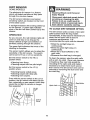
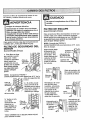
WARNING
Your safety is important to us,To reduce the risk of fire, electrical shock, injury
to persons or damage when using your vacuum cleaner, follow basic safety procautions including the following:
Read thismanual before assembling or
Do not use with any ,opening blocked;
using your vacuum cleaner.
keep free of dust, lint, hair and anything
that may reduce air flow,.
Use your cleaner only as described in
thismanual. Use only with Sears recommended attachments.
To reduce the riskof electrical shock Do not use outdoors or on wet surfaces,,
Disconnect electrical supply before any
servicing or cleaning Failureto do so
cou{d resultin e{ectrical shock or personal injury.
Always turncleaner off before unplugging.
Do not unplugby pulling on cord_To
unplug, grasp the plug, not the cord.
Do not use with damaged cord or plug. If
cleaner is not working as it should, has
been dropped, damaged, left outdoors, or
dropped into water, returnit to a Sears
Service Cenler_
Do not pull or carry by cord, use cord as
a handle, closedoor on cord, or pullcord
around sharp edges or corners. Do not
run cleaner over cord_Keep cordaway
from heated surfaces.
Keep hair, loose ctothlng, fingers, and all
partsof body away from openings and
moving parts.
Do not use cleaner without dust bag
and/or tillers in place.
Always change the dust bag alter vacuuming carpet cleaners or freshener, powders and fine dust..These products clog
the bag, reduce airflow and can cause
the bag to burst. Failure to change bag
could cause permanent damage tothe
cleaner..
Do not use the cleaner to pick up sharp
hard obiecls, small toys, pins, paper
clips, etc. They may damage the cleaner
or dust bag,
Do not pick up anything that ts burning
or smoking, such as cigarettes, matches,
or hot ashes,.
Do not leave cleaner when plugged in.
Unplug from outlet when not in use and
before servicing.
Do not use cleaner to pickup flammable
or combustibleliquids (gasoline, cleaning
ituids, perfumes,etc..),or use in areas
where they may be presenL The fumes
from these substances can create a life
hazard or explosion.
Do not allow to be used as a toy. Close
attention is necessary when used by or
near children.
Use extra care when cleaning on stairs°
Do not put on chairs, tables,etc. Keep
on floor.
Do not handle plug or cleanerwith wet
hands,
You are responsiblefor making sure that
your vacuum cleaner is not used by anyone unable to operate it properly.
Do not put any objects into openings°
SAVE THESE INSTRUCTUONS
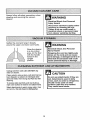
Proper assembly and safe use of your vacuum cleaner are your responsibililies.Your
cleaner is intended only for household use. Read thisOwner's Manual carefullyfor
important use and safety information, This guide contains safety statements under
warning and caution symbols, Please pay special attentionto these boxes and follow
any instructions given. WARNING statements alert you to such dangers as fire, electrical shock, burns and personal injury. CAUTION statemenls alert you to such dangers
as personal injury and/or propertydamage.
..........................
,
ii
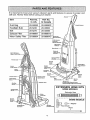
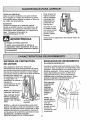
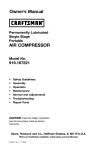
!t is important to know your vacuum cleaner's parts and features to assure its proper and
safe use° Review these before using your cleaner_
Item
Dust Bag
Headlight Bulb
Part No.
In U.S.
Part No.
in Canada
....
205o6oo ' 20-'50690€
20-5240
20-40600
Beit
20-5275
2o-40096
Exhaust Filter
20-86881
20:B6881C
Motor Safety Filler
20-86884
20-B6884C
_So.,or
Beft
(Underneaft_)
EXTENSION
HOSE KITS
SOME MODELS
Extension Hose
iIliii!I(ltlI! ltiIIiX?
SOME MODELS
_
leer
Adaptor
erUSlwand
l
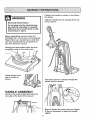
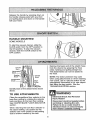
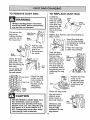
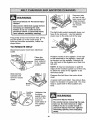
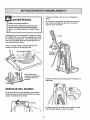
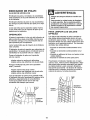
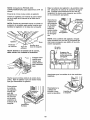
Position the handle as shown in the illustrationbelow,,
Electrical Shock Hazard
Slide the handle into the opening at the top
of Ihe vacuum
Do not plug into the electrical supply until the assembly is complete.
Failure to do so could result in electrical shock or injury,
Before assembling vacuum, check Ihe
PACKING LIST on the coverof the separale
Repair Parts List Use this list to verity that
you have received all the components of
your new Kenmore vacuum.
Remove the tape located below the dust
cover/filter cover on the motor case.
_
Tape
Altach stretch hose
endto nozzle as
shown.
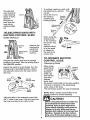
HANDLE
Insert the screw so it passes throughthe
handle intothe vacuum
ASSEMBLY
Remove the screw located just belowthe
lop edge of the back of the vacuum
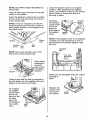
Begin to tighten the screw with your lingers
it may be necessary to adjustthe handle
slightly.
Usinga
screwdriver,
tighten
the
screw.
m
. CAuTmoN
Do not overtlghten.
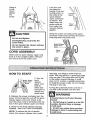
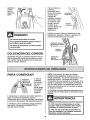
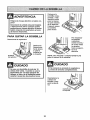
Lock the cord
into place by
forcing it into the
locking notch on
lhe body of the
quick release
upper cord hook
as shown, This
helps keep the
power cord out
from under the
vacuum cleaner
agitator.
Lockin[
Notch
Wrap the power cord around tile upper
and lower cord hooks and lock the power
cord plug onto the power cord,
Overttghtenlng could strip the
screw holes.
Do not operate the cleaner without
the screw in place.
Power
CORD ASSEMBLY
Cord
Make sure the quick release upper cord
hook is in the upright position, Remove
the wire tfe from the power cord,
HOW TO START
Qttlck Releat
pper Cord
1. Turn the
quick
release
upper cord
hook to
either side
and down to
release the
power cord
2. Release the power cord plug from the
power cord and pull the cord off the quick
release upper cord hook., Check to be
sure the power cord is still locked inlo the
lock in the quick release upper cord hook,,
3. Check to see if the cleaner has bag
installed_ See DUST BAG CHANGING
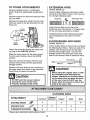
NOTE: To reduce the risk of electric
shock, this vacuum cleaner has a polar-
Lower
Cord
Hooks
ized plug, one blade is wider than the
other°This plug will fit in a polarized outlet
only one way. If the plug does not fit fully
in the outlet, reverse the plug., If it still
does not fit, contact a qualified technician
to install the proper outlet. Do not change
the plug in any way_
4. Plug the polarized power cord into a
120 Volt outlet located near the floor,
..........
Personal Injury and Product Damage
Hazard
* DO NOT plug in if switch is in the ON
position.Personal Injury or damage
could result.
, DO NOT use outlets above counters.
Damage to items In surroundingarea
couldoccur.
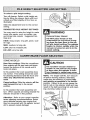
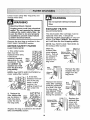
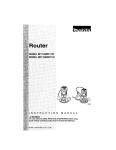
Toselecta pileheightsetting
Turn off cleaner. Select a pile height set_
ting by tilting the cleaner back until front
wheels are lifted slightly off the floor as
illustrated.
Slide the adjustment lever to the correct
setting.
SUGGESTED
PILE HEIGHT
_.i:i_ i :::i::!:ii¸!
i iiiili,
Vi_i:_i_
!! _:i_¸: i ! _
SETTINGS
You may need to raise the height to make
some jobs easier, such as scatter rugs
and longer pite carpets Suggested settings are:
HIGH; shag carpet, long pile, plush, scatter rugs.
MED: medium to long pile.
LOW: short to medium pile.
EX LOW: very low pile.
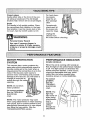
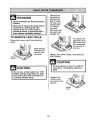
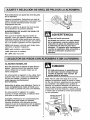
RNING
Personal Injury Hazard
DO NOT place hands or feet
underneath the unit when changing from the bare floor to the carpet pile height settlng.The agitator
begins to revolve rapidly when the
vacuum is turned on and is in the
carpet setting.
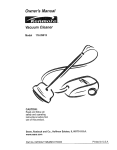
SOME MODELS
Bare floor setting: Slide the carpet/bare
floor selector all the way back and down
toward the bottom of the nozzle until it
locks into place,
In this position the brush assembly does
not revolve.. This setting should be used
for cleaning hardwood and tite floors and
when any attachments (tools) are
used,,
Carpet setting: Slide the selector all the
way forward and up to the carpet
position_
In this position the brush assembly will
turn.. When carpets are being cleaned the
selector should be in this position.
CAUTION
Do not allow vacuum cleaner to
remain tn one spot for any length
of time when the agitator is turning. Damage to carpet may occur,
NOTE; For longer bell life, turn vacuum
off before moving selector, otherwise
make sure the selector is pushed fully
and quickly as possible to the desired
position., Failure to do so can cause the
belt to rub on the selector shaft and may
result in the belt becomtng hot and creating a burning rubber smell°
Carpet/Bare
Floor Selector
Attention: Refer to your carpet manufacturers cleaning recommendations. Some
more delicate carpets may require that
they be vacuumed with the agitator turned
off. to prevent carpet damage°
To Carpet
Position
To Bare Floor
Position
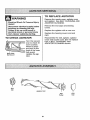
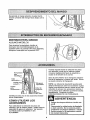
Release the handle by pressing down on
the handle release pedal with your foot
and pulting back and down on the handle
with your hand..
HANDLE MOUNTED
SOME MODELS
To start the vacuum cleaner, slide the
OnlOff switch from the OFF position lo
the ON position. To stop the vacuum
cleaner, slide the On/Off switch to the
OFF position..
Remove the lower end of the stretch hose
from the cleaner by grasping the hose
collar, twistingand pulling straight out.,
The attachments can now be added to
the hose..
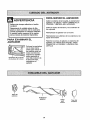
Crevice
Tool
Telescoping,
Dusting
Hose
Combfnetion
Brush _
Hose
_1(_
Collar
Identifyeach of the attachments shown
above.
TO USE ATTACHMENTS
Place the carpet/bare floor selector in the
bare floor settingby rotating the selector
back and down to the bare floor setting.
See CARPET/BARE FLOOR SELECTOR
section.
When returning the bare floor selector to
the carpet setting, use caution as the
selector can move quickly to that setting
due to tension created by the bell
NOTE: The motor protector may open
when using attachments or when cleaning
new carpet, due to reduced airflow by the
attachments themselves or by new carpet
fuzz filling the bag quickly. See the
TROUBLESHOOTING section°
. wARN NG
.....
Electrical Shock And Personal
Injury Hazard
Disconnect electrical supply before
servlclng or cleaning the unit.
Failure to do so could result in
electrical shock or personal injury
from cleaner suddenly starting,
To achieve maximum reaci_wilh
the attachments, add the
crevice
toolto the end of
the wand by
suction
insertingand
Control
twistingslightly.
The attached
hose swivels to
easier in every
direction.
Remove the
hose from the
make clip
cleaning
hose
by
pulling straight
out.
swivei
_pfng
Wand
TELESCOPING WAND WITH
SUCTION CONTROL SLIDE
SOME MODELS
crevice
Toot
Telescopfng
Wand
Remove the
telescoping
wand from
itS storage
position_
Remove the crevicetoolfrom its storage
position in the wand Turn the lockingring to
the UNLOCK position,
Extend the wand to its full length,Turn the
lockingring Io the LOCK position, Attach
the extension wand onto the open end of
the hose.
Lowor_",,,_
Suction
Wand_"_a",,_"_,,._'_',_
Control Sltdo
_\Unlock
"_,_
"__ ...._
Upper
Wand
Align the tabs on the extension wandwith
the "J" slots in the hose. Push the wand into
the hose and twistto the right to lock-
Crevice
Tool
sed
When using the
dusting brush
or the combination brush, they
may be
attached directly to the wand
or placed on
the end of the
crevice fool,
TO OPERATE SUCTION
CONTROL SLIDE
Telescoping Wand
When using
__S
ucli°n
attachments
Control
forcleaning
!tde
draperies,
I
small rugs
with low pile
andother
delicate
items, twist
the suction control slide to the open posttion_
This lever is located on the telescoping
wand, close to the hose,,
This will reduce suction for ease of cleaning°
NOTE: Return suction control sfide to the
closedposition for normal cleaning
E.50.o.,o.
When usingattachments,be carefulnot
to overextendthe stretchhose when
reaching.Tryingto reachbeyondthe
hosestretchcapabilitycouldcausethe
cleanerto tip over.Make surethe carpet/barefloorselectorIs in the bare floor
i position.Damage to the floorsurface
may occur if the carpetsettlngIs used.
TO STORE ATTACHMENTS
EXTENSION HOSE
Remove dusting brush or combination
brush, Snap into appropriate storage locatiom
SOME MODELS
Some models include an extra hose which
connects to the stretch hose on the vacuum
for a longercleaning reach.
Remove crevice toolfrom lhe wand by twisting,,Lay aside.
Unit Hose
A_,
Extension Hose
Remove the extension wand from the hose,
Twist the wand to the left and pull from the
hose end.,
Inserl the two labs on the end of the
extension hose intothe two "J" shaped slots
on the unit hose and twistto connecL
Lock
All attachments and the telescoping wand
can be attached tothe open end of the
hose.
Locking
Ring
FLOOR BRUSH AND WAND
Upper
Wand
SOME MODELS
Some models have an extra brush and wand
for cleaningbare floors, Twist one end of the
adaptor into the floor brush and the other
end intothe straight wand, Connect the
straight wand to the telescopic wand and
then to the vacuum hose or extension hose.
Unlock the wand by turningthe wand locking ring to the UNLOCK position,
Slide the lower wand into the upper wand,
Turn the wand locking ring !o the LOCK
position
Floor Brush _
Place the crevice tool down into the compressed wand. Snap intolhe appropriate
storage location,,
wo°,J Ao°p
Reinsert the hose fully intothe opening on
the lowerbody from which it was removed
Press firmly to assure connection
CAUTION
When using the regular hose or wflh
the extension hose attached, the
cleaner should be on a solid surface
on the same level or below the level
of the user's feet, DO NOT use the
hoses when the cleaner is above the
level of the user's feet.
CAUTION
DO NOT pull the vacuum cleaner
around the room by the hose,
Property damage could result.
i_ll..............
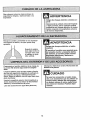
CLEANING AREA
Between
Furniture* Cushions* Drapes*
ATTACHMENT
DUSTING BRUSH
X
_
COMBINATION BRUSH
X
X
CREVICE TOOL
_
Stairs
X
X
*Alwaysclean altachrnents
beforeustn, on fabrics.
10
X
X
X
Walls
X
For best cleaning results,
keep the airflow passage
clear,.
Carpet edges
Guide either side or the fron_of the nozzle atong a baseboard, The full length
brushes help remove dirt at carpet edges,
Stairs
Put handle in fu_lupright position. Place
the carpet/bare floor selector in the bare
floor position. Use the crevice tool or fabric brush_ Set the On/Off switch to ON.
Occasionally,
check each of
the areas indicated for clogs.
Unplug the
cleaner from
. wARN,Na
the outlet before checking°
Personal Injury Hazard
Use care if vacuum cleaner is
placed on stairs. If It falls, personal Injury or property damage could
result.
.....
....
ii
MOTOR PROTECTION
SYSTEM
PERFORMANCE
INDICATOR
SOME MODELS
When the unit is running with normal air
flow, the light on the performance indicator
is off. The light comes on whenever the
airflow becomes blocked.. If that occurs,
check the disposabte dust bag, motor
safety filter and other possible ctog
locations shown in CLOG REMOVAL
This vacuum has a motor protector bypass valve which aufomatically opens to
provide coo}ing air to the motor when a
clog prevents the normal flow of air to the
motor., If the by-pass valve opens to
prevent motor overheating and possible
damage to the vacuum, you will notice a
change of sound as air
rushes through the valve
opening.
To correct
problem:
See the
TROUBLESHOOTING
chart,
NOTE: Do not block
motor protector.
To correct problem:
See the TROUBLESHOOTING
chart.
NOTE: The
light may
a_socome on
when using
attachments,
due to
reduced
a{rflow
throughthe
attachmenL
NOTE: The motor protector may open
when using attachments or when cleaning
new carpet, due to reduced airflow by the
attachments themselves or by new carpet
fuzz ftIlingthe bag quickly.. See the
TROUBLESHOOTING section,
11
Performance
Indicator
!. WARNINa...........
DIRT SENSOR
SOME MODELS
The electronic dirt sensor is a feature
which will detect particles as they pass
through the vacuum cleaner
Electrical Shock And Personal
injury Hazard
Disconnect electrical supply before
servicing or cleaning the unit.
Fallure to do so could result In
electrical shock or personal injury
from cleaner suddenly starting.
The dirt sensor indicatorsand sensor
sensitivity switch are located on the front
of the switch cover..
A red light Indicatesdirt is being picked up
by the cleaner, A green light indicates
most of the dirt has been picked up by the
cleaner.
TO CLEAN DIRT SENSOR OPTICS
The dirt sensor optics consist of two optic
cells located inside the bag holder.
Occasionally, it may become necessary to
clean the two optic cells to assure
maximum performance. It is
recommended the optic cells be cleaned:
OPERATION
As you vacuum, the red indicator light will
come on and stay on as long as the
sensor detects a high concentration of
particles passing through the cleaner..
•When the red light stays on
continuously,.
=When the green light stays on
continuously.
•When dirt or dust adheres to the
optic cells.
•Whenever the dust bag is changed,,
The green light indicates that most of the
cleaning is complete.,
The sensor switch allows you to select the
sensitivity of the dirt sensor. The switch
can be set to HI (+) or LO (-) sensitivity,
Set the sensor switch to the HI (+)
position when:
To clean the sensor, wipe the optic cells
with a soft, dry"cloth_ Never use cleaners
or liquids as they can help speed the
recoatlng of the optic cells and make it
necessary to clean them much sooner
than normal The dirt sensor area can be
reached by removing the dust cover and
the dust bag.
•Cleaning bare floors,
•Cleaning carpet with low pile height,,
Set the sensor switch to the LO (-)
position when:
• Cleaning heavily soiled areas,.
•Cleaning carpet with deep pileo
• Cleaning new carpets.
Even with the sensor switch in the LO (-)
position, the dirt sensor wil_detect carpet
fuzz, especially on new carpet, which may
cause the red light to remain on longer
than expected
Optic Cells -=_
Switch
I
Cover
12
Always follow all safety precautions when
cleaning and servicing the vacuum
cleaner_,
Electrical Shock And Personal
Injury Hazard
Disconnect electrical supply before
sen/Icing or cleaning the unit.
Failure to do so could result in
electrical shock or personal Injury
from cleaner suddenly startlng_
!
m
Gather the cord and wrap tt loosely
around the upper and lower cord hooks
Electrical Shock And Personal
Injury Hazard
Store the cleaner
in a dry, indoor
area, on the floor
with the handle
locked in the
upright
position.,
Wrapping the cord too tightly puts
stress on the cord and can cause
cord damage. A damaged cord Is an
electrical shock hazard and could
cause personal injury or damage.
Unplugcord from walloutleL DO NOT ddp
wateron cleaner,
Clean exterbr using a clean, soRcbth thathas
been dipped in a solutionof mild liquid detergent and water,then wrung dry_Wipe dry after
cleaning.,
Do not use attachments if they are
wet, Attachments used in dirty
areas, such as under a refrigerator,
should not be used on other
surfaces until they are washed.
They could leave marks,
To reduce staticeleclricity and dust build-up,
wipe outersu&ce of cleaner and attachments.
Wash attachmentsin warm soapywater, rinse
and air dry. Do not clean tn dishwasher.
13
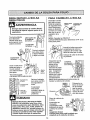
TO REMOVE
DUST
BAG
TO REPLACE
DUST
Unfold the
new dust bag,,
Fold the safety
seal lab on the
new dust bag
away from the
BAG
rust
WARNINa
....... .......
ays unplug power cord from
trical outlet before performing
service on vacuum.
Pull out on the
bag cover
release located
near the top of
the bag cover
_;_
opening that
fits on the bag
holder,
Bag Cover /_
Release _'_'_,_"_--i
,',
iA
Pull the bag
I I JI
,
post
Bag
Throw away the
used dust Sag.
Do not reuse.
~ Molor
Safely
Ftltor
"//%'_]J
'_
l
and lift up
Remove and
cover
forward
lay aside.
Grasp the dust
__"_
bag collar and
pull gently, carefully removing the
y'
dust bag,
I
/
NOTE: See PARTS AND FEATURES for
Bag number,
Cover
Bag
--_/_t
_,,_
Seal Tab
Check the bag
holder and the
motor safety ill*
ter. if eilher is
blocked, check
TROUBLESHOOTING.,
Insert the dust bag
onto the bag holder
completely by holding
the bag collar_
Place the dust bag
collar into position.
Tuck the bag
behind each of
the four bag
retention corner
flaps shown here.
Be sure the bottom and stdes of
the dust bag are
completely wffhin
bag cavity prior to
replacing the bag
cover,,
Bag
Retentto
Corner
Flaps
Position the bag
cover so its
positioning tabs
fit into the body
positioning tab
slots
S!ot_
Close the bag cover.,
CAUTION
NEVER REUSE A DUST BAG. Very
fine materials, such as carpet
freshener, face powder, fine dust,
plaster, soot, etc. can clog the bag
and cause tt to burst before tt ts
full. Change bag more often when
vacuuming these materials.
ii iii
You will hear a
distinct snap
when cover ts
securely closed.
Check to see
that the dust
bag is fully
enclosed in the
bag cover.
14
Check
motor
safety
fillerfrequently
and
cl_ange
whendirty.
WARNING
Electrical Shock Hazard
EXHAUST
Unplug power cord from electrical
outlet. Do not operate the cleaner
without the motor safety _ter. Be
sure the filter is dry and properly
installed to prevent motor failure
and/or electrical shock.
The electrostatic fiiter cartridge must be
replaced when dirty.. It should be
replaced regularly depending on use conditions.. The filter CANNOT be washed
as it will lose its dust trapping ability.
Remove the dust bag as outiined in the
DUST BAG CHANGING section.
MOTOR
SAFETY
FILTER
ELECTROSTATIC
NOTE; See PARTS AND FEATURES for
the exhaust filter number.
FILTER
ELECTROSTATIC
Slide the
exhaust filter
cover release
down. Pult out
on exhaust ill-
1, This white & grey
filter must be
replaced when dirlyo
It should be
replaced regularly
depending on use
conditions. The filter CANNOT be
washed as it will
lose its dust trapping ability.
Bag
Cover_.--_
Exhausl Filler
CoverRelease_
Exhausl
Filter
ter cover to
cover/
remove
from
bag
cover.
Cever-_,:!
,/_
I I l!
Remove the electrostatic filter cartridge from the
bag cover.
_
NOTE: See PARTS AND FEATURES for
motor safety filter number.
2, if the filter,
located in the bottom of the bag
cavity, is dirty,
remove it by
pulling forward out
from under the
ribs..
3. Replace the
filter, white side
up, by sliding it
back into place
under the ribs in
the bag cavity.
Replace the electrostatic filter cartridge,
carefully positioning
it so that it fits into
the bag cover. The
side labeled "This
aide out" should be
facing the operator.,
Mot_r
safely
Bag
cover_.-,
ExhBust
Fllter_
._.
coverRele._e-_',%..jj!
exhaest _:J
I
I
Replace the bag as outlined in the DUST
BAG CHANGING section.
15
Replace the
exhaust fitter
cover and
secure the
latch by pushing it upward
E. WARNiNG
Depress tabs
on rear o! agitator cover and
rotate forward
to release from
the nozzle
body..
Electrical Shock Or Personal Injury
Hazard
Disconnect electrical supply before
servicing or cleantng the unit.
Failure to do so could result in
electrical shock or personal Injury
from cleaner suddenly starting.
Agitator
Cover
The light bulb socket assembly does not
have to be removed, La the agitator
cover over to the side ,ut of the way.
Frequently check and remove hair, string
and lint build-up in the brush area° If
build-up becomes excessive, follow the
steps below.
TO REMOVE BELT
Disconnect power cord from electrical
outlet.
Carpet/Bare
Floor Selector
To Carpet
Belt
Positionhands on the agitator..If the belt
is still attached to the agitator, there will
be tension on the agitator_ Carefully lift
the right end of the agitator and then the
left end._
Place the
carpet/bare
floor selector
in the carpet
position°
NOTE: It may be necessary to pull the
edge of the furniture guard out of the way
to allow the ends of the agitator to be
removed easily.
Slide latches
outward and
remove nozzle
Remove the belt from the motor drive
shaft.
COVer.
A spare belt is provided, See above illustration for location of spare belt. You may
keep a spare belt in this 1ocation any
timer
Nozzle
Cover
Agttafor
Cover
Unfasten the
furniture
guard retainers from the
posts on
both sides of
the agitator
cover.
wARNING
.......
Personal Injury Hazard
Be careful when removing the agitator as the belt tension Is hlgh,
Failure to do so could result in
personal injury from the agitator
releasing quickly and snapping
away.
16
TO CLEAN AGITATOR
TO REPLACE
BELT
Make sure that the carpet/bare floor
selector is in the carpet position.
Loop the new bell on the motor shaft.
NOTE: In order to keep cleaning elftclency
high and to prevent damage to your vacu_
urn, _tor
must be
Molor
The agitator must be cleaned according to
the following schedule:
Vacuum Use
HEAVY
(useddeity)
Clean
every week
MODERATE
(used 2-3 times/week)
every month
LIGHT
(used 1 time/week)
every 2 months
Pulley
w
Bell
CerpeUBaro Floor
Selector Shaft
BELT ROUTING
Remove ant dirt or derbris in the belt path
area or in the agitator area,
Correct Routing
of Belt
(Selector tn CarpefPosftlon)
Exploded View - Agitator
Assembly
Carpet/Bare
Floor
Selec tot Shaft
C_p
Agtlator
Unit
I "
Bolt
Pu!ley
Incorrect
Routing
Shaft
of Belt
(Belt on Selector Shall)
_nd
Cap
Carefully remove
Carpet/Bare F/oor
Selector Shall
debris located on
the agitator, end
any
or
caps,string
or agitator
shaft..
_.__
Incorrect
(Selector
Shaft
Routing of Belt
in Bare Floor Posfffon)
End Cap
Replace the end caps, See the exploded
view for correct assembly.
Agftalor
17
Belt
CarpeUBere Floor
Seleclor Shaft
NOTE: See PARTS AND FEATURES for
bett number°
Lower the agitator cover to its original
position. After positioning the agitator
cover, push forward on the two (2) locking
tabs in order to ensure that they are
securely in place.
Loop the other end of the belt on the bolt
putley on the agitator..
Insert the agitator by placing the rounded
portion of the end cap down into the slot
in the nozzle base,
Re-fasten
the furniture
guard retainers to the
posts on
both sides of
the agitator
cover°
NOTE: It may be necessary to hold the
furniture guard out of the way in order to
allow proper insertion of the agitator into
the nozzle base°
Agitator
Furniture
Guard
Retainer
Agitator
Cover
NOTE: If the agitator cover is not installed
correctly, you may experience a loss of
performance and possible agitator vibration, etc.
Nozzle
Base
Base
Slot
End
Cap
Fumitur_
Guard
Headlight
Wire
NOTE: Care must be taken due to the
belt tension during reassembly,,
Press firmly,
checking to
see that
each end is
completely
inserted..
Make sure the headlight wires are tucked
securely in
place.
Check to see that the belt is centered on
the belt pulley,.Turn the agitator with your
fingers to see that it turns freely,.
To re-attach
the agitator
cover, insert
the six (6)
tabs into the
six slots
along the
front edge of
the nozzle
base°
Replace the
nozzle cover
and secure
the latches_
Tabs/
slots
18
Nozzle
Cover
Always follow all safety precautions when
cleaning and servicing the vacuum
cleaner_
!
Re-insert the t_ose into the opening on
the lower body from which it was
removed. Press firmly to assure
connection..
WARNING
Electrical Shock Or Personal Injury
Hazard
Disconnect electrical supply before
servicing or cleaning the unit.
Failure to do so could result In
electrical shock or personal injury
from cleaner suddenly starting,
JJ
J
If the cleaner does not seem to have adequate suction, first check if the dust bag is
full or if a filter is clogged, See DUST
BAG CHANGING and FILTER CHANGING,
-Stretch
Hose
Hose
Coltar
If the bag and filter areas are free of
clogs, check the hose area. Remove the
lower end of the stretch hose from the
cleaner by grasping the hose collar, twisting, and pullingstraight out,
HoseIn
and Out
..................
Plug in the
vacuum and
turn it on,
Stretch the
hose to
maximum
length and
then allow
the hose to
return to Its
storage
length,
Turn the unit
off and
unplug the
unit.
Personal Injury Hazard
DO NOT place hands or feet
underneath the unit at any time.
The agitator will be revolving
rapidly when the vacuum fs turned
on and is in the carpet setting.
If the bag and filter areas and the hose
areas are free of clogs, check the nozzle
area° To check this area, see the section
on BELT CHANGtNG AND AGITATOR
CLEANING.
Return the cleaner to the upright posilion
before pluggtng into an electrical outlet.
Visually inspect lhe hose and the base
area into which lhe hose is inserted,,
Remove any visible clog.
19
Remove the
light bulb by
pushing the
bulb in while
lurning counterclockwise
to release
from the
slot.Then pull
the light bulb
straight out,
•WARN.' G
...... i
Electrical Shock Or Personal Injury
Hazard
Disconnect electrical supply before
servicing or cleaning the unit,
Failure to do so could result in
electrical shock or personal injury
from cleaner suddenly starting,
TO REMOVE LIGHT BULB
To replace the
light bulb carefully insert and
turn clockwise
to securely fit
into sloL
Disconnectpowercord from electrical
outlet.,
Slide latches
outward and
remove nozzle cover
l
_•
NOTE: See PARTS AND FEATURES for
bulb number°
not plug In or turn on until the
uum is completely reassem-
CAUTIo'N ..................
................
Do not use a bulb rated over 15W
(130V). During extended use, heat
from the bulb could overheat surrounding plastlc parts.
Replace the
nozzle cover
and secure the
latcheso
Nozzle
Cover
20
I
I
I
! •WARNING
TO REPLACE
-
Remove the nozzle cover, agitator cover
and agitator. See BELT CHANGING AND
AGITATOR CLEANING,,
Electrical Shock Or Personal Injury
Hazard
Remove the end caps and bearing
Disconnect electrical supply before
servicing or cleaning the unit.
Failure to do so could result in
electrical shock or personal Injury
from cleaner suddenly' starting.
COVerS°
Replace the agitator with a new one..
Replace the bearing covers and end
caps.
TO CHECK AGITATOR
/
......
Base Guard
Plate.
BaR
AGITATOR
Reassemble the belt, agitator, agitator
cover and nozzle cover. See "To replace
belt" in BELT CHANGING AND
AGITATOR CLEANING section.,
. Turn the vacuum
worn brushes_
When brushes
are worn to the
level of the base
belt guard,
replace the agitater,
End
Cap
Bert
Pultey
21
End
C_p
Review this chart to flnd do-it-yourself solutions for minor performance problems_ Any service needed, other than those described in this owner's manual, should be performed by
an authorized service representalfveo
RN|
-I .....
,ectrical Shock Hazard
Disconnect electrical supply before servicing or cleaning the unit,
Failure to do so could result In electrical shock or personal injury
,i,i
Cleaner won't run,
Poor Job of dirt
plck--up_
I, Unplugged at wail out_et
1o Plug infirmly, push onioi!switch to
on..
2_ Tripped circuit breaker/blown fuse
at household service panel,
3o On/off switch not turned on
2, Reset circuit breaker or replace fuse
1o Full or clogged dust beg
2, Wrong pile helght setting
3,, Worn agitator
4o Clogged nozzle or bag holder.
1. Change bag, (page 14)
Clogged hose
6_ Hole in hose.
7.,
Broken/misplaced belt,
B,,
Hose not inserted tully
3. Push on]off switch to on.
2. Adjust setting, (page 7),
3o Replace agitator. (page 21)
4_ Check CLOG REMOVAL, (page tg),
5. Check forclogs. (page t9),
6. Replace hose
7o Replace/fix belt. (page 16-18)
B, insert hose fuliy, (page t0),
9, Motor protection system activated,
10. Dirty filters
9o Check for clogs. (page t9),
10,, Change filters, (page 15)
Cleaner picks up
moveable rugs or
)ushes too hard°
1,, Wrong pile height setting
1, Adjust setting, (page 7),
Light won't work°
1_ Burned out light bulb
1., Change light bulb, (page 20),
Agitator does not
turn,,
1,, Broken belt
2. Bare floor selector In bare
floor setting
1_ Replace bell (pages t6-18),,
2. Move selector to the carpet setting,
(page 7),
3. Check BELT CHANGING AND
AGITATOR CLEANING.
(pages 16-_8)
3, Be_tInsta[Ied incorrectly
Performance indicator,
some models, fs rod,
=,H=
1. Full or clogged dust bag
2. Dirty filters
3, Clogged aldlowpassage
4,, Certain attachment tools.
I.,
2,,
Change beg. (page 14)
Change tilters, (page 15),
3. Clear clog from aidlow passage,
(page 19),
4o This Is normal, Llghl should go o!t
when tool ts removed
Air flow restricted
with attachment use,
1, A_lachment use restricts air flow.
1o Check ATTACHMENTS, (page B)
Sound changes.
2o New carpet fuzz clogged sir path.
2. Check CLOG REMOVAL end clean
hose, (page t9)
Excessive nolae as
vacuum Is shut off.
1, Belt rubbing on carpet/bare floor
selector sha{L
Push selector eli the way forward,
(page 7)
Dirt Sensor, some
models, wgi not work.
1, Dirty optic celts
Clean optic calls, (page 12)
22
Get it fixed,,at your home or oursW.
For repair of major brand appliances in your own home ...
no matter who made it, no matter who sotd it!
1-800-4-MY-HOME ®
Anytime,
day or night
( t -80D-469-4663)
(U S A. and Canada)
www.sears.com
www, searsoCa
For repair of carry-in products like vacuums, lawn equipment, and
electronics, call for the nearest Sears Parts and Re pair Center.
1-800-488-1222
Anytime,
day orntght
(U S A only)
www.sears.com
For the replacement parts, accessories and owner's manuals
that you need to do-it-yourself,
1-800-366-PART
call Sears PartsDirectS'fl
6 a m - 11 p m,
(1-800-366-7278)
(USA
7 days a week
only)
www_sears.comipartsdlrect
To purchase or inquire about a Sears Service Agreement
or Sears Maintenance Agreement:
1_800-827-6655
7am
-5
pm,,CST,
(u s A )
Mon,-Sat
1-800-361-6665
9am
Pare pedir servicio de reparaci6n a
domicilto, y pare ordenar piezas:
1-888-SU-HOGAR
-Sprn
(Canada)
EST, M-F,
4 pm
Sat
Au Canada pour service en fran_ais:
1--800-LE-FOYER _c
s_'4
(I -800-533-6937)
(1-88B-784-6427)
www sears,ca
HomeC ,entral J
© Sears, Roebuck and Co,
® Registered Trademark / l_'_Trademark / s_,_Service Mark el Sears, Roebuck and Co
® Marca Regislrada I ,r_,,Marca de F&brtca / s_,_
Marca de Servicie de Seats, Roebuck and Co,
_c Marque de commerce / _'_ Marque _pos_e de Sears, Roebuck and Co
23
Sears, Roebuck and Co., Hoffman Estates, II 60179 EUA
Pieza N-",CaIZAMD3_UOa-8175048
Impreso en EUA
Manual Dei Propietario
Aspiradora
Modelo
116.32712
116.30712
116.385t2
116.38612
116.38613
116.38812
116.38912
116.39512
116.39612
116.39712
CUIDADO:
Lea y stgue todas las
instrucciones
de operaci6n
y seguridadantes det uso de
este producto_
Sears, Roebuck and Co., HoffmanEstates,IL 60179 U.S.A.
www.sears.com
Pieza N"_C_1ZAMD4_IU_-8175048
tmpreso en EUA
Antes de user su asplradora nueva _,
2
Garantlade la asplradora de Kenmore
2
Instruccloneslrnportantes de
segurldad ...........................
3
Plezas y caracteHstlcas ......
4
Instrucclonesde ensamblamiento .... G.G
Instrucclones de opsracl6n
.....
Ajuste y seleccl_nde nivel de polo de fa
alfombra ...............
Selector de pleascon altombray .....
sin alfombra
6
7
7
Desprendimiento del mango ..............
8
Interrupter de encendldo/apagado .....
8
Accesortos ........................
8-t0
Cuadro de usa de los accesorios.......
t0
Sugerenclas pars aspirer..............
CaracterfslIcas de rendimlento ......
Cuidado de la asplradora ...............
I3
Afmacenamtenlo de ]a aspiradora .......
13
Limpieza (tel extedor y de los accesorios ... 13
Csmbio de la botsa para polvo...........
14
Cambio del filtros ................... 15
Cambio de la cortes y lirnpieza dot
agitador .......................
16-18
C(,_moellmlnar los residuesde basura
en los conduclos ......................
19
Gamblede la bembilla .................
20
Culdado del agitador ...................
21
Ensambfe ¢Jefagitador .................
21
Reconoclmlentode problemas.......
Inforrnact6nde asslstancia
o servlclo ..................
22
23
tt
t t-12
Par favor lea esla guts qua ts ayudara a assemblery operar su asptradora nuava de Kenmora en una manera
m_s segura y eifecliva.
F'aramas informacl6n aeerea del cuidado y eperact6nde esta aspirador,llama a su tlenda Sears mas cercana.
Cuando prequnte par Informaci_nusted nscisitar_ el nSmerocomplete de sorts y modelo de la aspiradora qua
esl_ Iocado en la place de ?asnSmeros de rnodelo y saris.
Use el espactode abajo pars registrare?numero de modelo y aerie pafa su nueva asplradora de Kenmore.
N,3msrode Modelo
N_mero de Serle
Fecha de Compra
Melange asia libra y su recibo en u lager seguroparsrelerenctas futures
GARANTIA LIMITADA DE UN AI_ODE LA ASPIRADORA KENMORE
Esta garantiaes par unshe desde ta fechade compra,e incluye sotamenteel usa de la aspiradera en hogares
privados..Durante el aSode garanlla, cuando ta aspiradora esoparada y mantenlda de acuerde al manual de
instrucciones del duefio, Sears reparar_ cualquierdefacto en materlales o [abdcaci6n libra de cargo.
Esla garanlla exctuyetasbotsaa de celecci6n, correas, tampariIlas, y lii_ros,tas cuates sonparlesgastablss qua
so detedoran con eluso normal.
Pars el servlclode garanlia_retorne esta asptradora at Centre de Serviclo Seers m_is cercano en los
Estedos Untdoso
Esta ga_ant[aseaptica solamente mientras eats productoest,. en usa en los Estados Unldos. Esta garanttale
da a usled detaches legales especfficos, y us|edpuede tenet tarnbi_n aires detaches los cuales varlan de
estado a estado.
Sears, Roebuckand Co., D18t7 WA, Holfman Estates, IL 60179
.V ADVE NCiA .................
Su segurtdad ea muy tmportante para nosotros_ Pare reduatr el rlesgo de tncendlo,cheque
el_etrlco_les!6n corporal o daSoe al utilizer su aeplredara, act,3ede acuerdo con precauclanes
b_sloes de seguddad, entre ellas_
Lea este manuel antes do armar o utilizer su
aspiradara.
Use su aspiradora untcamenLeen _aterma
descdta en este manual. Use _nicamente con
accesorios recomendades per Sears.
Pare reduclrel riesgodo cheque e1_ctrico,no use
su asplradora al sire libra ni sabresuperficies
mejades
Deseonecte la fuente de electricdad antes de
dar se_vicioo limpiar. De io cantradopodrla
causarunchequeet_ctdcoc_lesi6ncorpora_
Slempre dabs apagarsu aspiradora antes de
desconectada.
No desconecte la aspiradora tfrsndo delcordon
el_ctrico. Pare desconectada, hateel enchule, no
el card6no
No use la aspiradora sl el cord6no elenchute
est,_daSado. Sila aspiredora no est&
funcfonando adecuadamenle osi se ha dejado
ceer, est_ dafiada, se ha deiadoexpuestaa Ia
lntempedeo se ha dejado caer an ague, devu_.
vafa aun Centre de servicio de Sears
No hale ni transpo_teIs aspiradora per el cord6n;
no use 0! cord6n comemango;no cterrepue[tas
sobre el cord6n;no hale e5card6nsobre robotdes agudos ni esqufnas,No pass la asp{faders
sobree! cordon Mantengael cardSnaJejadode
supedicies calientes,
No abandons la aspiradora cuandeest_ canoe.
tada.Descon_etela cuandono la est_ usandey
antes de dade servicio.
No permits qua sea ulilizada came juguete Se
requfere toner mayorcuidado cuando sea
utilizada en la proximidaddenifioso par ntfias
No toque la aspiradora ntet enchufecan las
manes moladas.
No cafoqueobjetos en las aberturae.
No utiltce la espiradora si algune abedura est_
btoqueada;mantL_nga_a
libra de poivo,pelusa,
cabellosy cualquieracosa qua pedrfa dlsminuir
el fluje de sire
Mantenga el cabeilo, ropa suelta, dodos y todaa
las partes del cuerpo atejados de tas aberturasy
plazas mec_nicas.
No use la aspiradora sin tenor tnstaladala boise
parepolvo ylo tosfiltros
Cambie stempre la boise pare polvodespu_s de
aspirerftmpladores de atfombras o desadoranfes,
talcos y pelvesfines. EstoeproductosatascanIs
balsa, reducen ef Iluia de sire y pueden causer
qua _sta se PampaSi no cambiata balsa p_dr[a
ocasionardaho permanente ata aspi_adora
No use la asptradorapare ievantarobjetos agu_
dos, jugueteepequeSos, alfileres, eujetapapeles,
eta Poddan dafter la aspiradora ota boise pare
potvo,
No levante ninguna cosa qua se est& quemando
o emittendo hurno, coma dgardllas, ceriltos o
cenizascaltentes..
No use la aspi[adera pare asptrar lfquidos
inflamableso combustibles (gasa_ina,lfquidos
paretimpieza, perfumes, etc.) nila use en
tugares deride _stes padrlan esterpresentes.Los
vapores de estas sustancias puedenc_earun
pefigrode incendio o explosi6n
Tonga ouldado especial al utilizer la asptradora
en escalenes,,No ia co_oquesobre siIlas,mesas,
etc..Mant6ngala en et plso..
Usted es responsabtede asegurar qua su aspiredora no sea utilizada per ninguna persona que no
puedamar_ejadacorrectamente..
GUARDE ESTAS INSTRUCCIONES
El armado y use seguro de su aspiradora son su responsabllidad.
Eetaaspiradora ha side dise_,ada
exclusivamente pare use dom_s_tco,La asptradoradeber_ almacenarse on un tugar seco yen e_intorio[ Lea este Manuat de_proptetartodetentdamente,pues contienetnformactSnlmportantesobre segu*
tidedy usa, Esta qula contlene informaciSnsobre seguddad deba]o de simbolesde advertiencla
cuidado. Per fever pangs atenciSnespecfal a estas insirucclonesdadas Advertencla: Este
informaci6n ta alertar_,con el pal}grode fuego,chequeseleclricos, quemadas y les_anas Culdado:
Este tniormact_nte alertara a peligras come lesiones y daSos de prapiedad.
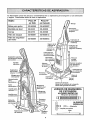
EB tmportante cancer tBs ptezes y ceracterfsttces de su asptradora pars asegurar su usa 8decuado
y seguro. Exsmfnelas antes de user su asplradora
Objeto
Pteza N-"
en EUA
Plaza Ng
en Canad_
Balsa para polvo
20-50690
20-50690C
Bombiila de feral
20-5240
20-40600
Correa
20-5275
20-40096
Filtro de seguridad
del motor
20-86884
20-86884C
_lnterrupter
de oncendtdo/
apagado
pairs (al9unos
modelas)
Seguro do la
cubterta de
ta balsa
Cublerta
la balsa
L/beraci6n
is aubterla
SuJetador
superlor_
da llbetact6n
do, cord6n
(algunos
modelos)
do
del
fiitro do essapaLlberacl6n
de 1,1cublerta
r&pfda
----------=_
do la be
Pslanca
escape
(dontro)
Jtil_
\
ta
aftura
para
ejustar
SuJetadors
rend/ndento
de
Selector do plsos
con alfombra
y
sin aifomb_
_
;_
la cubiena
de
dot cord6n
_
lnrorlar,._'_'-----.__
Mango
para
___._
Cublerta
,-.nspo,_.'-f]j
Helamlentas
pars
hT::2fduras
fe_
1,1boqutlla
--_C'-
sacud_ri
.'_r
F_
!_
_.,q_
" Mangusra
telesc6plco-_
de
'_
_
glralorfa
list
USar
-Man£/uera
expansible
Cortes
de re _uoste
(abaJo
datr_s
de la cubte_a
dol aJustader
de Is boqullla
do afluraJ
JUEGOS DE MANGUERA
DE EXTENSION
ALGUNOSMODELOS
Protector
__c
ALGUNOS
_-(_
lllmsros
do sertq
del models
MODELOS
Adaptador
epli,
opa.:.u,::s
i
!
ADvERTENCiA
Pellgro de cheque eldctrico
No conecte |a asplradora hasta qua tar*
mine de armada. De 1ocontrario podrfa
causer un cheque etL,ctrico o lesi6n corporal.
Coloque et mango come seve en el diagrama
abajo.
Al mantener la manguera do manera qua no interfera, mueva el mango ala aberlura en la porte
superior de ia aspiradora
AntAntes de armor la aspiradora, chequeela LISTA
DE EMBALAJE en {a cubierta separada de la Lista
de Partespara Reparaci6n. Use esta lista pare verificar que ha rec_bidotodas los componentesde su
nueva aspirado_aKenmore.
Ratter ta banda adhesive ubieada debajo de ta
cubtertade polvoen la caja del motor
Fije el cabo de la
menguera expansiblea
la bequilla come se
muestra
Inserte el torniIIopare qua pasopar e! mangode la
aspiradora
MONTAJE DEL MANGO
Quite el torni_lodot mango localizado justodebajo
dot horde superior de la porteposterior de la aspF
fedora,ver }lustraciSnde arriba.
Emptecea apretar el tornilloconlos dodos Ouiz_
sea necesado ajustar un pocoel mango.
Aprlete
ef
torntlo
Flje et cord6n en
posIcibn,
forz_ndolo en la
ranura de bloqueo
ubicada en e!
cuerpo dei
sujetsdor supedor
det cord6n, come
se muestra Esto
ayuds a que et
cordbn no se
enrede debaJo deI
agltador de ta
asp{fedora
COR un
destornllador.
!
\
Hendidur,
do fiJacf6n
Cord6n
Enrole el cordSn el,_ctrlco alrededor de los
sujetadores superior y inferior y presione la
rsnurs del enchufe sobre el cordSn..
CuIDADO
No apdete demaalado el tomllloo
SI Io aprleta demaslado podr_a arrulnar
los orlficlos pare el tomlllo,
No opera la asptrsdora sin tener Instalsdo et tornlloo
Sujetador
superl_o_r _'_
de !tberact6nr_ptda _\_
u
COLOCACION DEL CORDON
Aseg_rese de que elsujstador superior del cordSn de tberac{,Sn r_plda se encuentre en posicI6n vertical. Quite el alambre con el que est,t.
atado el cordSn et6ctrlco.
PARA COMENZAR
_io
sujetad°r
uperior do
eracl6n
plda del
rd6n
1, Gfre el
sujetador
del cord6n
de tadoa
lade y
hacla abejo
pare llberar
el cordSn
el_ctrfco,
2. Desprenda el enchufe del cordSn el(_ctrico y
quite el cord_,n del suJetador superior,
Compruebe que el cordSn etdctrtco stgue fijado
en la ranura de bloqueo def sujetador superior
3. Vertlque que la asptradora tenga Instalada
una boise. Consults la CAMBIO DE LA
BOLSA PARA POLVO
Inferior
_'_..
"->,111£
\ ',_
NOTA: Pare reductr el rlesgo de cheque
el_ctrlco0asia espimdore cuenta con une
claviJapolartzada, uno de los contactos es rods
ancho que el otto, La clavlja sSIo pusde
Introduclrse de une manera en el enchufe St la
clavUa no cabs bten en et enchufe, InvLdrtala. SI
a,3nno cabs, lame aun etectrtctstapars que
Instals un enchufe aorrecto No altere Is ctsvtJa
de ntnguns manera.
4. Conecte el corddn eI_ctrlco pelartzado en un
enchufe de 120 voltfosque se encuentre cerce
del plso..
ADVERTENCIA
Pelgro de lesl6n personaly dafio al products
• NO conecte te nsplredora e! el Interrupter estd an IB poelctdn ON, Podri'a
reaultar en lesl6n personal o da_o.
, NO use los enchufes [ocstlzsdos sabre los mueblea, Los objetos cercanoe
pedrfan raeultar dafiados.
Pare
selecclonar
unaJuste
denlveldepolo
deIsalfombra:
Apague la asplradora, Selecclone un nlvel de
ajuste Incflnando la asplradore hacla atr&s hast
qua tas ruedas delanleras est_n un poso
despegadas del plso,
Desltce la patanca de ajuste de nfvel de pelo
de ta elfombra s Is postcl_n deseada
SUGERENCIAS DE AJUSTE DE NIVEL DE
PELO ALFOMBRA
Pars qua sete facfliten algunas tsreas de
tlmpteza, come per ejemplo tapetes eueftos y
alfombraa de pelo large, puede qua sea necesarlo clever ajuste de nlvel de peto de Is alfombrao Los sjustes sugeddos son los suguientes,
HIGH: pale &spare y lanudo, polo largo, felpa,
atfombras o tapetes Irregulares.
MED: polo mediano o poco largo.
LOW: pefo corto o medtano,
ADVERTENClA
Pellgro de leel6n personal
NO PONE lea manes o los pies debaJo
de la aaptradors cuando eatable de la
eelecct6n de pleoe sin alfombra haste
la eeleccl6n de nlvet de polo de la
alfombra, El agltador glra rspldamente
cuando ta aeplradora estd encendlds y
eatd an ta seleccldn de plsoa con
atfombra°
EX LOW: pelo muy come,
ALGUNOS MODELOS
Pare de eecclonar el sJuete de ptso descubistro: Opdma et bot6n de selecct6n hasta
aires y debaJo de la boquilla haste qua se
sienta asegurado,
En esta poslctSnel agltedor no da vulllas Esta
poslctSndebe ester usada pare limplamiento
de plso de readers y moss[co y cuando se
uean algunoa atachamlentoe
(herramlentas).
Seleccldn de pleas con atfombra: Optima el
boron complatamenta haste el fronts y per
arrlba haste ts poslcl6n de pisos con atlombra
En esta postcf6n el agltador da vuellas,
Cuando se ltmpla atfombras, el selector tiene
qua estar an esta postclSn
Atencl6n: Roll,rose a tas recomendactones
del fabrlcante pare llmplar su alfombra.
Algunas affombras rods delicadas pueden
requerlr el use de Is aspiradora con el sgltador
desconectsde pare prevsnlr qua le alfombra
sea dafisda
No deje permanacer la aeplradora en
un solo iugar durante nlngdn t|empo
CUIDADO
euando
et agttador eatd rotandoo Se
puedo dafiar la alfombra,
Nots: Pare la vtda rods targa de la cortes,
spague Is aspfrsdora antes de mover et selector, de errs manors, aseg_rese de qua apr_ate
per complete y tan rdpldo come posible el
selector a Is postcl6n deseada. SI usted no Io
hace de esla manera0 puede causer que la
cortes frota el eJe del selector y puede eelentar
y causer qua se queme la cortes que causerie
un o!or quemado,
Selector do ptsos
can ,_tfombra y
sin affombra
Heels la
posicl6n do
pfsos con
alrombra
pisas sin
alfornbra
I
Desprends et mango pisando el pedal de lfberacl6n y ttranda del mango hacts sbsjo con Is
mane,
MONTADO EN EL MANGO
ALGUNOS MODELOS
Psra arrsncsr is ssplradora, desllca el
interrupter de encendldo/spsgsdo de Is
poslct6n OFF s ls posiclSn ON.. Pars detenerts,
coloque ei tnterruptor an ls posictSn OFF
Herralrtlonta
_,
pars
I_|
_t 1 _,
hendtdurasIli_'-_tl_i
,o,o
Ittl
fl
!"
C6Ofl/opar° __
°°°°"
c,,pt,o
I I!}_'_
ltl
l Ii I^...
Cuando regress hast° ts seleccf6n de pleos
con alfombra, cuIda qua el selector puede
moverse r_pldamente has1° is selecclSn a
cause de ts tenstSn de Is cortes
Sacs Is parts Inferior de la manguera expansible de Is aspIradsrs y tirando per aires Ahora
se puede conectsr Ia manguera
NOTA: La v_lvula de desvlacl6n pusde ester
ablerta mlentres se usan los sccesodos o pars
ltrnplar uns elfombrs nuava a cause de un flujo
reducido de sire per toe accesorlos mlsrnos o
per Is pelusa de Is alfombra qua llene Labetas
rspldamente, Consulte el cuadro
RECONOCIMIENTO DE PROBLEMAS,.
oooo,o.o,°o- 2toN
Identtfique cads uno de los sccesorlos mostrados a conttnuactSn
COMe UTILIZAR LOS
ACCESORIOS
Pars selectlonar Is seleccl6n de pisos sin
slfombrs, glra el selector sltr_,s y ebsjo heats Is
setecci6n de plsos sln slfombrs.. Vet seccl6n
de PISOS CON ALFQMBRA Y SIN
ALFOMBRA.
ADVERTENCIA
Pet|gro de cheque eldctrlco o lesldn corporal
Desconecte la unldad antes de Ilmplads
o dsr]e serviclo. De Io contrarlo podrfa
producirsa un cheque el_ctrlco o causer
lesl6n corporal sl |a aeplrsdora arrsnca
de manet° Imprevista.
La manguera
tncorporada gtra
pare facltttar la
ltmpteza an cue!quiet dtreccI6n
Pars quttar la
manguera, tire
de la manguera
del collar,
Pars oblener Ia maxima
Iongitud con lOSSCCeSO-Manftuera,
rtos, lnstele Is herramienta
para handldures
an el extreme
Desffzador
daitubo,
de control de
Pars hacerlo,
introd_zcata en
eltubo
y g{rets Tubo
un
poco
Gir_torla_
TUBO TELESCOPICO
CONTROL
DE ASPIRACION
ALGUNOS MODELOS
p_ra
hendlduras
destacado
CON
Saqua at tubo
telesc6plco
de su lugsr
de alma
cenamfsnto°
Tube
telosc6pfco
Herramlenta
pars hendiduras
Cuando use el
cepiIIo
pars
sacudir o el
cepiilo pars
combtnsctbn,
dPUedelnstetarlos
frsctamente en
el tubo o en
extreme de la
herramlente pars
hendtdures
PARA OPERAR
EL
DESLlZADOR
DE CONTROL
Retire la herramtenta pars handlduras de su
lugsr de almacenemtento dentro del tubo, Gtre
etsro de bloqueo haste la postci6n UNLOCK,
Desptlegue el tube completamente Gire el are
de bloqueo daf tube hasla la postcl6n LOCK_
Instals et tube de extensldn an et extreme
abferto de la manguera,
Tube _._
inferlor----_'..._'_._
-@orlr
_,_
Oesltzador
de control
Tubo
superior
Aiinee las pesteSas del tubo de exiensk_n con
las ranuras en forms de "J" de fa manguera,
EmpuJe el tubo dentro de la manguera y gtre
hacfa le deracha pars btoquearlo°
DE ASPIRAClON
Tube telesc6pico
Cuando use eccesor]os pars llmplar corttnas,
tepetes peque_os de pslo corto y otros
artfculos deltcados, glre eldesttzador de control
de aspiracf6n ala postct6n ablerta, Este
selector se
Dsslfzador
Esto reducir_
de control
te potancta de
_e aspfracl6n
asplract6n
,
para faclliter la
IImpiezao
NOTA:
Coloque el desiizador de centre! de aspiracl6n
ala poslctSncerreda para la Umpleza normal
. cu,o oo......
Cuando usa los accesorlos, tenga culdado
de no estlrar demaslsdo la mangusra
expansible para tinter de elcanzar rods leJoso
SI trata de estlrar ta menguera rods de Is
debldo, podrfa causer qua la esplredora ee
venga absJo. Aseg_treeede qua et selector
pars alfombra/sln elfombra eatd an la poslcldn pars "sin aifombm'L Se puede hacer
dafioe ta auperflctadel plso sl eleetecter
pare alfombrNaln elfombra estd an Is posIcl_in pars "alfombra".
ALMACENAJE DE LOS
ACCESORIOS
MANGUERA DE EXTENSION
Retire et cepiilopars sacudiro el cepil!opare
combtnaci6n.Cot6quelosfirmemente en su lugar de
efmacenamlentocorrespondiente.
Unos modelos incluyenuna manguera auxiltarque
conecla conta manguera de estiraren ta aspiradora
pars una e×tensi6nm_s largepa_alimpiar
ALGUNOS MODELOS
Retirela herramienta pars hendlduras de{tube
glrdndola P6ngalaa uniado,
Retireel tubede extensi6nde la ma_guera Gtreei
tubehaclala lzquterday tire det extremede la
manguera
Insertstasdos teng0etas en el extremede la
manguerade extensi6n en las des tenuresformadas
comela tetra J en la asplradora y gIre pars ceneetar,
Be puede ceneetartodas las herramfentasy e[ tubs
tefesc6plcoconet extreme abierlo de la manguera
CEPILLO PARA PISOS YTUBO
ALGUNOS MODELOS
Tubs
superlar
Unosmodelosiienen un cepiiloy untubeauxiliares
pars timpiar toseueiossinalfombras,Gire e! extreme
del edaptadorhaolee! eeptilode susie y el otro
extremehacla el tuberecto.Conecte el tuba recfo
cen et tubetetesc6picoy fuegoconia mangueraen
ta aspIradorao con ta manguera de extensi6n,
Desbloqueeel tube girando el are de bloqueo haste
ta postcf6nUNLOCK
Oesliceel tube in|erior dentrodel tubesuperior Gire
et are de blequeo de1tube ala posiei6n LOCK_
cepnlo pars ptsos
Intreduzcata her_amientapara hendiduras dentro
deltube comprlmido,inslaie bien en su posici6nde
almscenamfente,
Tube-J
AsegOresede que la unidad esl6 apagada inserte
nuevamenle _amanguera complelameniedentro de
ta abertura ubicada en la parle inferior de la
aspiradera, de donde ta sac6 inictalmente
__._-_
Adaptador -J _
CUIDADO
Cuando use la msnguersen forms norms|o
con la manguera de extenst6n instalada_Is
asplradora debe msntenerse sobre un_
supedtcte firms at mlsmo nlvel o a un n]vet
inferior que los pies del usuario. NO use las
mangueras cuendo la espiradoraest6 aun
nlvel rods alto qua los pies del usuerto.
Ire de Is asplradora pot la msnguera
CUIDADO
.....
hebltacl6n. Podr(snocurrlr de,_oss
p,rte"e" °!,s
iJ
_,REA A LIMPIAR
ACCESORIO
CEPILLO
SACUDIR PARA
HERRAMiENTA PARA
HENDIDURAS
CEPILLO PARA
i. COMB|NAC|ON
.. d_
t Muebles* I
Entre
colJlnes*
Cortlnas'
i
Escalones
X
x
×
x
x
x
"Slempre ltmpte los accesorlos antes de user sobre telas.
10
Paredes
Orlllas
de
Pare obtener los
meJores resultsdos de limpieza,
mantenga desb{oquaados los
conductosde
fluJo
de alre
alfombraa.
Guts uno de los costados o _aparte anterior
de la boqullla a lo largo dal horde de la pared
Los cepilios largos ayudan e aspirer la tlerra an
las oriilas de Ias atfombras,
Eats|ones,
Coloque el mango en la posiciSn vertical
Mueva el selector de p{so con atfombras y s{n
elfombras s la poslclSn sin alfombrss Usa Is
herramtente pars hendlduras o el cepltlo pare
telas Coloque el interrupter de
encendido/epagado en ON
Examine de vez
en cuando cads
una de las zones
qua se indlca
podflan causer
bloqueo.,
E. Aow
Desconecte la asptradora del enchufe antes de
exemlnarla
Pellgro de lasldn personal
Actde con precauct6n al coloca la
asptradora sobre escalones° St ae cae,
podde causer lest6n personal o dBtio a
ta propledad,
SISTEMA DE PROTECTION
DE MOTOR
INDICADOR DE RENDIMIENTO
ALGUNOS
Cuando ta untdad est_ funclonendo con el ftujo
normal de sire, el indlcador de rendtmiento estd
apagado, Se enciende la luz cuando el fiuJo de
alre est_ obstrufdo SI esto pass, revise Is
boise dtsponsible pare polvo, el ftftro de te
segurtdad det motor y otros cotocactones
poslbles pare los reslduos de basura. Verse
COMO ELIMtNAR LOS RESIDUOS DE
BASURA EN LOS CONDUCTOS,
Esta asplredora tlena una v_,lvule de
desvlacldn qua slrve come protector de motor
qua se abre automattcsmente pare proveer un
flujo de alre al motor cuando un zueco Impida
qua ctrcule el alre al motor,, Sl se abre la vdlvula
bypass pare lmpedtr que Itt-_--...'-f,_'3
\t
serecafenteetmotory quelj_---_/t_-_t/\
nohegada_,oale
_Ill _ II11
III
i
asplradora,
se notari_
un _I_L_
cambto de
_I_II
I_II
III
IllI
son_domlantres
ela_re_llll
ll]
i
pot la aberturs d la
_11|
NOTA: NO obstruye
H._l_._ii
\
Pare ¢orreglr
el problems:
Ve_.se et
diagrams
RECONOCi MIENTO DE
PROBLEMAS
Irp, tttl
el t I_ _
MODELOS
il! !
protector de motor.,
,_"_17
_ !I1 k
Pare oorreglr el pro* _L_r_! / l_l i_
blame: Consulte el
_]_
Es
cusdro RECONOCt.
_l,,_,,=3F_Z_!l..._._ NOTA:
postble qua ta
MIENTO DE PROBLEpro;ectore__ _
Iuz enctenda a]
MAS
de motor
user los
NOTA: Le v_lvuta de desvlscl6n puede ester
ablerta mtentrss sa usan los eccesorios o pare
limplar una atfombra nueva a cause de un ftujo
reductdo de airs por tea accesorlos mtsmos o
pot ta peiusa de la alfombra que Ilene la boise
rspldamente, Consutte el cuedro
RECONOCtMIENTO DE PROEILEMAS
rondfm/onto
accesor}os
porque el flujo
de alre as
reduc[do por los
accasodos
11
/
INDICADOR
!
DE POLVO
ALGUNOS MODELOS
Et indlcador de polvoyet tndicador de sensibilidad
est_n iocslizados en {a parle detantera de la cubistta del indicado_
PeUgro de cheque eldc|rteo o lesldn corporal
Eltndicador el_ctrico de polvoes una ceractsrfslica
qua averIgua el petvo m{entrasque paso per Is asp1radera_
Desconecte Is unldad antes de llmplarla
o darts servlclo, De Io contrarlo podrla
productrse un cheque eldctrlco o causer
leal6n corporal el la asptradora arranca
de manera imprevtstao
La luz roja indics qua Is aspiradora aspiree{potvo,
La luz verdeindicaque ta mayor(adel potvo ya es
asplrsda per fa aspirsdora
PARA LIMPtAR LAS CELDAS
OPTiCAS
OPERACION
Los 6pticos del indicador de polvo consistsen
dos celdas 6ptlcas Io¢atizadss denlro del compartimtento pare ts boise, De vez en cuando es
nacesarlo ltmplsr tas dos celdss 6plicas pare que
funcionen a su capacidad m_ixfma Se recomienda limpiar los cetdas 5prices:
A! pasar Is aspiradora, la luz rojs del indicador de
potvo enclendey sigue encendida mienlras qua
el tndIcadoraverfgua una concentracr6n alto de
polvo pasando per ta ssp_radora
Ls tuz verde indies qua la mayoffa de ta lImpleza
est,, complete
•Cuando se enciende conttnuemente Is luz
roja.
,Cuando se enciende contlnusmente Is luz
vsrda_
•Cuendo se adhleren Is tlerrs o el po[vo en tss
celdas 6p/icss
.Cuando se cambta la botsa pare polvo,
El indlcador de petvo ie permits que seleectone la
sensibilidad.Se puede porter e_indicador pare ta
senstbilidad en ts posici6n alto (+) o baja (-}
Ponga el indicador de pelvo en la pesici6n
alia (+) cuando:
,,Aspire sobre tee suelos sin e{fombrae
oAsNra sobre una sltombra con et pete baJo,
Para ltmplar el indleador, ltmplelo con un trope
suave y seco. Nunca use los detergentes o tlquldos porqua s!los pueden ensuciaflo m&s r_4pids
Loscetdas 6prices y ser_ necesarlo limpladas
m_,s pronto qua normal Se slcanza et compartimlento para el indicsdor de potvo per quilar la
cubtertade potvo y la betas papapolvo,
Ponga el indlcador de potvo en !s posici6n
bats (-) cuando:
•Aspire sobra &teas muy sudas
•Aspire sobre une alfombra con el polo afro.
.Aspire sobro uns alterable nueva
Con et Indlcador de polvo en la postci6n "ON",
el tndlcador de polvo avedgusr8 Is pelusa de la
elfombra, espectatmente en una sffombrs
nuevs qua puede causer que Is luz roJs
enclenda m_s tiempo qua normal
Celdas _1_.
Control
dot
Indlcadorde
sensiblltdad
__
Cublerta
opticas
/ J lOolo
i-zt !oo°,,o,o,
12
SuJetador
_ do la bolsa
1
Stga
stempre redes tas instrucciones de
ADVERTENCIA
segurldad at limptar y darle servtclo a su
asplradors,
Pellgro de cheque eldctrlco o lesl6n corporal
Desconscte la unldad antes de Itmplarfa
o darle servlcto,. De to contrarto pedals
produclree un cheque eldctrlca o causer
lesl6n corporal s! la asplradera arranca
de manera Imprevlstm
Recaja el cardSn y enrrSItelo en los suJatadores superior e Inferior, stn qua quede muy
apretado,
ADVERTENCIA
I Pallgro de cheque el_ctrlco
o lesl6n
corporal
SI enrotla el cord6n muy apretado puede tenaarlo touche y causerie daSoa,
De da_arae, el corddn podrfa causer
descargaa et6ctrlcae y lealonea o
daSes peraonalea,
Guards la aspiredora bajo techo en
un _ugar seco, con
el mango en posict6n vertical,
enJusguay daje secar al sire. No los lave en
lavadora de plates,
Desconecte el cordSn e(_ctrlco de la clavlja de
ta pared_ NO ehorae ague aobre la aaplrao
dora_
Limpte el extertar con un trapo suave y limplo,
qua ha side exprlmtdo despu_s de remojar an
una soiuct6n de ague y detergents Itqu[do
ltgero Seque el exterior con un trapo seco despu_s de ltmptsr,
CUIDADO
No use los accesorlos s! estdn moJados, Los accesorlos qua ss utlllcen en
_reaa auclaa, debaJo del refrlgerador,
no deben usarae en otraa superficies
sin antes ear lavadoso Podrfan deJar
marcaa,
Ltmp[e la supsrf[cie exterior del recept_cufo y
de los accesodos pare rsductr la electdcldad
est,,tics y ta acumutaclSn de palvo
Lave los accesodos en ague tibia jsbonosa,
13
PARA CAMBIAR LA BALSA
PARA QUITAR LA BALSA
PARA POLVO
Desdoble la boise
pare polvo nueva,
"
Doble la lengueta
de segufldad de la
ADVERTENCIA
Be
__!!sa
_ pare Long#eta
._ - de
pu,'vu
sogUtlrJao
_,
nuevaboisepare
Slampre dasconecte el cord6n 61acid¢o antes de reparar alguns parts de Is
eeplradora_
Tire hada adelante
de |a liberaci6n
situada cercado la
parte superior de la
cubiertade bolsa
Liberacf6n de
la cubierta
de bolsa
_
\\ _-'_j_..._-_
"\'_
/ _/
/
._ j"
_
f
/
NOTA: Consulte las PII_ZASY
CARACTER[STICAS pare determtnar el N" de la
bolsa pare polvo.,
Cublerta:le
ta balsa
Inserts ta botsa para polvo
completamentesobre et
sujetador de la boise suJetando la botsa per el collar.
Tire de la cubierta
de la boise hacia
el frente Retfreta
y d_jelaaun lade,
Tomeel collar de la
bolsa pare potvo y
tire can culdado
pare retlrarla balsa
pare polvo.
_/_/'>,.
p01voen direcctOn f
contraria ata aber- !/I
tufa queva en el ///
sujetador de la
/
bolsa,
J'
_
__
Co_oqueel collar de la balsa
an posici6n_
Aseg0rese que la
balsa se quada
detras de !as
tengOetas de
retenci6n de cada
lade demostradas
aquL Aseg_rese
de qua la parts
Inlerior
de la bolsa
para potvo esl_
completamente
dentro de ta cavidad para ta balsa antes de
tnstalar ta cubfertade ta bolsa
Balsa
para
polvo
Tire la botsa usada
ala basuraoNO ta vuetva a user.
So]ol_dordo
i_bots_
* CaVldad
pat's
la boise
- Fmlo_r,_
soaurid_d
d_t real'at
Reviseet suietador
de la bolea y el filtro
de seguridad del
Cotoque ta cublerta de la bolsa de manera
qua las pastafias entre en las
ranura de posF
ctOndel cuerpo,
motor,
Si estuvieran
btoqueados,
consultsta tablede
diagn6sticode
problemas,
! Cu,oA0O...................
"
Cierre la cubierta de
la balsa°
NUNCA REUTlUCE UNA BOLSA PARA
POLVO.Los materlales muy fines, tales
come desodorantes pare slfombres, talco
facial, polvo fine, yeso, hollfn, pelusa de
alfombras nuevas, etc., pueden atascer ta
balsa y causer qua sa romps antes de qua
est_ lions° Camble Is balsa m_s segu|do
cuando aspire eats tlpo de materlaleso
At escuchar un
chasqu_do
caracleflstico ser_
tndicaci_n de queta
cubierla ha cerrado
bten,
Aaeg_rese de qua
ta balsa pare polvo estd Instalada per
complete en la cubferta de balsa.
14
Examine
elfiltrode segufidad
de1motor de vez
en cuando y csmbio cusndo est_ sucle,
CuIDAD 0
pore le asplradora
ADVERTENCIA
Bin el flltro de
peo
,H,,
Pellgro de cheque eldatr]co
Deeenchufe el cord6n de le cortlente
el6ctrlcao No opere ]a aep|radore sin el
flltro de aegurldad del motor,
Aeeg(3ureee de qua el flltro est., eeco e
Instelado adecuedamente pare impedlr
qua el motor falle y/o qua Be produzce
un cheque e!_ctrlco_
ELECTROSTATICO
Esle csrtuchodeffi{|roeleotrostdlfco se tiene qua
csmbiar est_ sucto,,Dabs camblarse peri0dicamonte segSn los condiclones de use. El _lro no
Be puede laver puee prderld su capacldad
pare atrspar allrapar polvo.
NOTA: Consul{e los PtEZAS Y
CARACTERISTICAS para determiner el N=, de la
fiftm de escape,,
DEL
MOTOR
ELECTROSTATICO
1. Este fHtro se ttene
qua cambtarcuando
est_ sucto. Debe
cambfarse peri6dicamonte seg_n iss
condic_onesde use.
El fl|tro no se puede
lavar pues prderfa
su cspacldad psra
atrapar attrspar
polvo°
Mueva haole abaJo
Is liberaci_n det
cubtertadel $}itro
de escape. Tire
hacla adalsnte deI
cubierla det fillro
de escape pare
quttar la cubierta
de la balsa,
Filtro de
sogurtdad
Cubtertade/_
la bofsa.-...__j.
LiberatiOn de
t_j
la cubierta det
f,L
2, Si el fittro,Iocalizado st fondo de la
cavidad pare la balsa,
est_ sucio, sdquelol{rondo de dl hacIa
adelante per debsjo
Reemplazce et cartuchode1fillro electrosldtico, colocdndoIo con cuidadopara
qua quepa en la
cubierta de la bolsa,
Et lade Indicado
'THIS SIDE OUT'
debe dsr at opetsdor
de 1as esldas
3, Vuelva a cotecar e| liltm
desfiz&ndoto de
nueveen su
lugar debsJode
los estr[ss en {a
cavtdadpsra la
bolss
V_ase CAMBIO DE LA BOLSA PARA POLVO
pare cambiar Is boise
I
II
.oo.os.y
Quite el cartucho de!
fiflro eleclrost_tico de
la cublerta de balsa.
NOTA: Consulte los PIEZAS Y
CARACTERtSTICAS pare determiner el N °. de Is
fill.re de seguridad del
motor,
Ftttro de
sogurldad
i 'Him'
FILTRO DE ESCAPE
Pare quitar la botsa, stga los Instrucclones en
CAMBtO DE LA BOLSA PARA POLVO,
FILTRO DE SEGURIDAD
,,
Cubierta_
Flltro
J ._
.oooo,,o.o,o
cubfortadelfil,ro/J
fit l_escape
_'_"_'_'L]
J IU
15
Reemplazca el
cublerla
del liltro
de escape y
empuje hacta
ebajo Is liberacidn pare
asegurarlo.
i_
•
Leng_ecas
ADVERTENClA
Pellgro de cheque eldctrlco o lestdn
corporal
Dseconecte la untdad antes do Itrn_
ptarla o doris servlclo, De Io conttario
podrfa produc]rse un cheque eldctrleo
o causer lealSn corporal st Is aspiredora errsnca de manors lmprevtstao
Cubferta
_....r
{
Tire hacia aba]o de
las lengSetss en ta
parts strasera de]
agitator y ruede
hacta adelente parr
liberar de fa unidad
de boquilla
do/agltador
No as necesado quitar el ensarnble de porter&mparas.. Co[oque a[ lade ta cubierta del agitador
Frecuenternente revise et drea del cepUloy quite lode peJo,cord6n o petuss qua se hays acuroulade, Sita acumulacl6n es exeeslva, siga )as
Instrucctonee a contlnuactSn
PARA QUITAR LA CORREA
Desconects el cord6ne]_clficode1enchufe
Belt
Selector de plsos
con atfombray
sin a/fombra
Mueve e]
selector de
pisos con
Coloque las rnanos en el agitator, S{la coffee ya
est,_ Instalada en el agitador,habr_, tens_6n en el
agitator. Tonga cuidada cuando levar_tael ac3ttm
tot de la boqui!ia.
Haste la
sin a]fornposlc/Sn de braa la
) ptsos con
postddn a
NOTA: puede set necesar[o liter del horde del
protector de rnuebles pars qua los extremes de!
rolor ss puedan sacsr con faciHdad,
con aifomla
postcidn
b_a..
Dssllcelos
hacks afuera
y quite la
cubierta de
llberaciones
la boquilla,
Quite ta cortes o reta del eje de transrnisi6n de)
motor.
Uns cortes de repuesta eat& disponibte
Vde ala
i[ustract_n pars fa locact_nde la correa de
repuesta Le cortes dR repussla ss puede
guarder er_el rnismo sitio.
._ LaLehes
/tL%lfI
B
Nozzte
__
Cover
ADVERTENCIA
Pe!lgro de lesl6n personal
del ag/tador
Suelle los
Su]etador sujetadores
detprotector de{ prolsctor
demeubtes de rnueb]es
de tea pestaSas en
ambos lades
de ]a cubtarts del agitado_.
Tsngs cutdado el qultar el ceptllo cllfndrleo, la tenel6n do la cortes ea grands. S! no tlene precsucl6n podrle eufrtr
una teeldn personal sl el ceptllo ee IIbeta r_p|damente y sale dlaparado.
t6
NOTA: Para manteneruna atta eficlenctade
timpieza y ev}taret dose ata aspiradera,
[_'
do
d v
_e e
b|
PARA CAMBIAR
Aeegurase qua el selector de pfsos con y sin
elfombra este an la poslclSn de p|soe con
alfombra, Coloque la nueva cortes alradedor
dot eJe de ttansmlsldn dot motor,
E! agftador se deba limpiar despu_s de habedo
usado de 7 a 10 veces_
The agitator must be cleaned according to
the following schedule:
FR_QUENTE (utilisatlonquelidienne)
hebdomadaire
MODERI_E(utittsation2 _ tro_slois
par semafne)
LE:G_RE(ufllisatienhebdomadatre
t
Mensuel
EJe de transmlsl6n
det motor
Bfmensuel
Poles
pare
cortes
Remove ant dirt or derbris in the belt path area or
in the agitatorarea,
nueva
EJo de selector
de plsos con y
sln alfombra
CORREA SOBRE LA RANURA GUIA
Retire lodelndido de basura o sucledad de ]a zone
de ]a cerraa y del agitador_
Perspectiva despiezada
Agitador
LA CORREA
Correa Estd Centrada
Sobre ta Ranura Guia
(selector de plsos can y sin alfombra
este en la poslcl6n do pfsos con alfombra)
-
Eje del selector de
Eje de
plsos con y sin
lransmlskJn
alfombra
det motor
Tep_dol
ext[em_
Unldad dot
agfladar
_
Poise
pare
Correa No Estd Centrada
Sobre la Ranura Guia
(Cortesaldrededor del eJedef selector
de pfsos cony s/n alfombra)
Tape del
extreme
€O_rO_
"--_//:_
Tapa de!
ex|remo
_k .nro,..r.
/I
EJsdel selector
de plsos COny
slh alfombra
Con euidado quite
lee tapes y qulle
e! hllo o los reslos
ublcados en eI
agitedor, an los
soportes del cap,l[o, o en el eje del
agttador,
EJode.
transmtsten
del motor
Correa No Estd Centrada
Sobre ta Ranura Guia
(El selector doplsos cony sin affombra
este en la poslcl6n de ptsossin alfombra)
Selectorde
Cambfa tas tapes del extreme, Yea ta perspeco
live desptezada pars segutr el orden corrects
_e cofoceeldn de los plazas
EJe de
Iransmisl6n
dot molar
17
EJo del seleelor
de plsos con
y sin alfombra
NOTA:
Consulte
las PIEZAS AND
CARACTERfSTICAS pars determiner el N_ de
corree,
Baje la cubterla del agltador ala postcl6n original Despu_s de colocar la cubterts del agttadot EmpuJe hacta adelante en las dos (2)
teng0etas de cterre pare asegurar que esl_n
en su cotocaci6n apropiada..
Ensarte Is cortes nueve sobra el agitador
Inserte el agltador per lnsertar la parts radonde de la taps an la ranura de la base de la
boquffla.
Abroche los
sujetadores
del protector
de muebles
a tea peatafias en
ambos tados
de la cublerta det egits_
dor_
NOTA: Puede ser necessr]o sacsr o 8rrlmer et
protector de muebfes para poder lnsertar con
faclltdsd a] egitador en la base de la bequHla
SuJetador
de meubtes
Cub/erfa
del agftador
NOTA: St le cublerta del agitador, empuJe
hacia adelante en las dos (2) lengOetas de
cferre para asegurar qua est_n en su colocacibn apropiads..
Aglfadar
Tape de!
extreme
Ranura do la
base de boquftla
El cable
do/a luz
NOTA: Dabldo ala tensldn de la cortes,
debe sctuar con culdado a! Inetslerla°
_/Asegurarlas
_t[
Ii_,
EmpuJe flrmemanta pars
reviser qua
cads extreme
estd instafado
blen
lengiJetasestdn
en sU colocacl6n
apropfada
AsegQrese qua tos cables de la luz est_ bten
tnstalada.
Revise qua la correa estd en el centre de la
poles, Gtre el agltador con sue dedos haste
qua g]re fibremente el agltador
fL ttl
Pars colocar
te cublerta
de] agltador,
Long,eras
de cierro
seis
(6) tss
Inserts
tengtJetas en
en fa parts
adelante de
tas
ranures
Is base
de la
boquitla..
Reemp]azca ta
cubierta de
boquilIa y ase_
gure fas pastilles
Leng_Jelas/
Ranuras
t8
Cubferfa
de
le baqui/la
Proceda
elempre con precauclones de segud-
inserle nuevamente ta manguera en ta aberlura
de la parte Inferior de donde la retirS,Empuje can
firmeza pare asegurarse de que quede bten
conectada,.
dad at ifmplar y dar servlclo la ssplradors-
,c,,
Pellgro de cheque eNictrtco o leel6n
corporal
Desconecte la unldad antes de I]mplarla o darle servlclo, De io contrarlo
podrt's produclrae un cheque etdctrlco
o causer lest6n corporal sl Is aspiredora arrance de manera Imprevlata.
SI considers que ta asplradora no aspire bien
asegQrese primero de que Eabolsa no astd
Itens y de qua el ftltro no estd atascado. Consuite lee tnstrucclones sobre CAMBIO DE LA
BOLSA PARA POLVO y LIMPIEZA DES
FtLTROS.
Collar
de la
St las zones del flltro y la bolsa no est_.n arescedes, examine la zone de la manguers, Retire
el extreme inferior de la manguera expansible
de la asptredora tom_ndola per el coltar y
ttrando de hacfa ardba,
Enchufe la
aspiradora y
encl_ndala
Estlre al
m&xlmo le
manguera y
iuego permits
que se encoJa
haste eu
temaffo normal
do almacensmiento
ADvERTENcIA
Pellgro de leeldn personal
NO coloque nunca lea manes nl los
pies debeJo de la unldad, E! agltador
derd vueltss rdptdamente cuanda la
ssplradora eatd encendlds y eat6 en ts
poslcldn "carpet setting" (con stfombra)°
SI lee zones del flltro y fa boise y las zones de
la manguera no eetdn atascadas, examine Is
zone de la boqutlla_ Pars examlnar dlchs zone.
consufte la seccf6n sobre CAMBIO DE LA
CORREA Y LIMPIEZA DEL AGITADOR
Apague la
unidad y
descon_clelso
Coloque is asplradora en la posiclOnvertical
antes de conecterta en at enchufe,
Examine vtsuafmenle Is zone de la base donde
se Inserts ta manguera
Retire cualquler material bloquesnte.
19
Remueva la
bombllla empujandola y vslte
dendola vustta
pare la tzquterde pare sacarla
de la sbertura.
Despu_s saque
ta bombtt_a
pare afuera
. OVERTENc,A
Pellgro de cheque eldctrlco o lesl6n corporal
Desconecte la unldsd antes de tlmplarla
o darte servlcfo. Da Io contrado podrfs
produclrse un cheque el_ctrtco o csussr
lesl6n corporal st la ssplradora arranca
de manera lmprevlsta.
llll,,,
II,II, '
" I'
I
I
I
PARA QUITAR LA BOMBILLA
Desconecte la aspfradora.
le bomb]Its,
culdedosePar remplacar
mente inserts y
de vuetta hacta
ia derecha
haste asegurarla en is
abertura
Deslice lss
llberaclones
hacla sfuera
y quite {a
cublerta de
la boqullJa.
NOTA: Mire PIEZAS Y CARACTERISTtCAS
pare el numero de ta bombtlta..
CU|DADO
CUIDADO
No oonaete o ancende la aaplradora
antes de armada eompletemente.
No use urta bomb|lie de mde de 15
vatloa (130 volts)° Cuando aa use ta
asplradora per un largo perlodo de
tlampo, el cater de la bombllle puede
calentar lag psrtea de plastleo eereao
Reemplazea la
cub{errs de
bequllfa
y asegure Paspestlllos,
Cublertade
la boqut!la
2O
ADvERTE.c
.......
A
Pellgro de cheque eldctrlco o leel6n
corporal
Deaconecte la unldsd antes de IImplarls o darle esrvtclo° De lo contrarlo
podrfa produclree un cheque eldctrlco
o c_ussr laat6n corporal al la aaplradora srranca de manors Imprevlsta,
PARA EXAMINAR
AGITADOR
Protector
de/a
correa
de/a place de te base
PARA QUITAR EL AGITADOR
Quits la cublerta de Is boqultla, la cubierta del
agltador y el ag_tador, V_ase CAMB;O DE LA
CORREA Y LIMPtEZA DEL AGITADOR,
Quite tas tapes del extreme y tes cubtertas de
los co|inetes
Reemplazce el agltador con un nuevo,
Reemplazca tas cubiertas de los cojinates y las
tapes det extreme
EL
Rearrne ta corrsa0el agltador, la cubterte del
agltador y la cublerta de la boquLlta, Vdase
CAMB]O DE LA CORREAY L1MP!EZA DEL
CEPILLO
Coloque ts asplradota
con la base hacls
ar[iba pars revtsar st
los cepi_los est_n en
males condlclones_,
Cuando los cept!los
est_n gestados al
nfvetdel protector de
la ptaca de base,
reemplazca el
agttador
Tapadol
extreme
ag!tador
Polea
para
cortoa
21
Tapedef
extreme
Consults
este
cuadro
pare encontrer soluclonesqua ustedrnlsmo puedereattzarcuandotongaproblames menorasdarendlmlento.Cualquferso]violsqua necssttaaparte de otros descfltos en este
manualtIenenquaser hashesper un repress]antede ssrvlcloautorizado.
Desconecte Is asplradora antes
de de
darla
aervlclo
o tlmplarla,, De Io contrar|o
ADVERTENCIA
Po,,g,o
cheque
el ctrlco
podrfa produclraa un cheque etdctrlco o causer lealdn corporal.
.........
Ls nsp]redor_ no
funcionao,
ii
,illll,llli,i,ll,
lllll,,
i illl,i,,mi,l,,i,i,i,i
I.
ESt_ dosconectade
1. Conoc,lo bi0n, opr|m_ s_actor do
cnce_dido/_pagado a la posici_n ON
2,
CoItecircuilo.s be]ado o fusible
2., Restablezca e]co,rise|re.olios o
cambia _ fusi_e,
quemado on e] t_.b_eto do eervicto
do fa resldencla.
Interrupter da encondtdo!apegedo
no rJst_on [a posicJbnON,
N¢_I_spIr_
setlsfaclorlementB.
i
t., Bols_ pare pcivo lions o ntascada,
2, Aiusln IncQn'cctodo nivel de peloda
l_ al{ombra=
3, As_iadnr dee0as,lado,
3. C_,toque el fore,ropier" de cncendido/
apegado en la posictdn ON
'I. Camblolabolsa,
(p_glna 'I4)
2., Ajuste e! nive]_ (p_oina 7)
4,, Boquiito. o sujetador do fa boise atascada.
3., Camb|o el agitador, (pd_ina 21}
4, Revise COM(_ ELtMIt_AR LOS RESIDUES
DE BASURA EN LOS CONDUCTOS.
5, Manguora atascado.
5, Llmpiar tube par_ et mug,s. (p_g|na "19).
6, Manguo_ to,la.
7, Colrea rote
6,, Camb_e 1_mangue_'a
B. Ls mangueta
s, Inse_loblen]am_n[_uct_.
(p,:t_lfna :i9),
7,, Camb}91a corr_;_. (p,_glnas 15,,1B).
no cs,l_ b]en inse_,lada.
9,, Actlvacl_r_ dol sis]ores de ptolocliSn
del moist
10.
t0.
Fi_lros do sogurIdad.
(pdg_na 19)
9. Detern'dno sl ox}ste_ _oqueos.
(p,'_gina 10)
Cambla cl filtros, (p_glna 15)
Le seph'adara lown|a
,laps]as o ee dlfi'cut
empujaK,
1_ AJus]o incorrccto do nlvol do p01o
do la allombtt4
1. At_sts el l_IVOl.(p,':tgln_7).
La Iuz no fun¢]sn_..
1. Bomb]lie |undtda.
I,
Cambto la bombtlla. {p_glna20}.
1, Coo'ca rote,
'1
C,_mblo la cortes. (p_gina16.-lB)
2
2, C_mb_a el selecto_ on ]a _ei_cc}_n
con alfonlbra, (p_glna 7)
El ensemble
del _gttndor
nD 91r_
Selector do piss con alhambra y
piss :Bino.l]ombr_ on ta eeleccl_,o
do piQo sin attombta
3,, Cortes Inst_iada Ineorrectamento.
3,, Revise CAMBIO DE LA CORREA Y
UMPIEZA DEL CEP|LLO, (paginas ,18,,18,),
1, Bolos pare p_vo lions s olasc_da,
t
2,. F31tzosdo soguddad.
2. Csmbie ol flits'as,(p_gina 15).
3,, C_nducto do llu}o de aide atascado,
3., Retire e_ma,ledal b_oqueante de]
conducto do aIre. (p_g_ne lg),
4, Ciertos acccsndes.
4. Esto o9 no_m_'J. L_ luz debn apag_r_o a:l
Realri_e]en del finis de
el use do lea eccosorto=,
1, Et use de Ins eccoserlos limits el
tlojo do Bite,
1. Roy|so use DE LOS
ACCESORIOS, (p._01ne 8)
Cemblo do Ben]do,
2., Ls pelusa do una altembra nuevo
obstruya el paso do sire,
2. RevI_o C_MO EUM]NAR LOS RES-.
IDUOS DE BASURA EN LOS CONDUCTOS y llmple la mangueto, (p_gina 19)
Ruldo sxceelvo cuando, go
spegn le e=,ptr,_dora,
1
1, Opdmo oi belch comptetamenlo
haste o! f_enle, (p_glna 7)
tndlcador
modeloe,
1. Cddas _plic_s
El fndlcadot
relents,
de rendI-
_]gunoe
modeloe,
est_ ro|a.
Cambie la boise. (pdgtt_a 14).
q_ilar le hertamlenlo.
do potvo_ algunoe
no funclon_
Seleclor do pisoiat]ombra no osJ_
ompujando cemplclamentn _f ]renle,
esldn suttee.
22
I,
lJmple ]as celdes _ptlcas,(p>na 12)
Get it fixed, at your horne or ours!
For repair of major brand appliances in your own home ...
no matter who made it, no matter who sold it!
1-800-4-MY-HOME ®
Anytime, day or nigh_
(1-800-469-4663)
(U S A and Canada)
www.searsocom
wwwosears,ca
For repair of carry-in products like vacuums,lawn equipment, and
electronics,
call for the nearest
1o800-488-1222
Sears
Parts
and
Repair
Center.
Anytime, day or nighl (US A only)
www, searsocom
For the replacementparts,accessoriesand owner'smanuals
that you need to do-it-yourself,call Sears PartsDtrect_'!
1-800-366-PART
6am
(1-800-366-7278)
-11 prn.
7daysaweek
(U S A only)
www.sears,,com/part sdirect
To purchase or inquire abouta Sears Service Agreement
or Sears
1-800-827-6655
7 am-
Maintenance
(rd .SA )
Agreement:
1-800-361-6665
5 p,rn, CST, Men - Sat
(Canada)
9 a m - 8 p,m EST, M - F, 4 pm Sat
Para pedir servicio de reparaci6na
domicilio, y pare ordenar plezas:
1-B88-SU-HOGAR '_*
(1-888-784-6427)
Au Canada pour service en franqaFs:
I-800-LE_FOYER _c
(1-800-533-6937)
wwwsears ca
HomeCentraP
© Sears, Roebuck and Co.
® Registered Trademark / TM Trademark / _ Service Mark o! Sears, Roebuck and Co,
®Marca Reglstrada t TM Marca de F,_brica 1 _ Msrca de ServlcIo de Sears. Roebuck and Co.
_._cMarque d_ commerce I
Marque d_pos_e de Sears, Roebuck and Co.
23
Sears, Roebuck and Coo, Hoffman Estates, iI 60179 U_S+A,
Part No,,C_ 1ZAMD3OUO£t+8175048
Printed in US+Ao