1
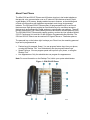
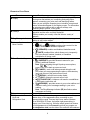
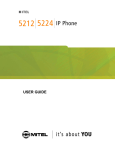
MITEL
3300 IP Communications
Platform
ACD Agent Guide
for the Mitel 5224
and 5324 IP Phones
NOTICE
The information contained in this document is believed to be accurate in all respects but is not
warranted by Mitel Networks™ Corporation (MITEL®). The information is subject to change without
notice and should not be construed in any way as a commitment by Mitel or any of its affiliates or
subsidiaries. Mitel and its affiliates and subsidiaries assume no responsibility for any errors or
omissions in this document. Revisions of this document or new editions of it may be issued to
incorporate such changes.
No part of this document can be reproduced or transmitted in any form or by any means - electronic
or mechanical - for any purpose without written permission from Mitel Networks Corporation.
ACD Agent Guide
for the Mitel 5224/5324 IP Phones
July 2009
®,™ Trademark of Mitel Networks Corporation
© Copyright 2009, Mitel Networks Corporation
All rights reserved
2
Contents
About this Guide ...........................................................................................................................4
What is Automatic Call Distribution (ACD)? ..................................................................................4
About Your Phone .....................................................................................................................5
Elements of Your Phone........................................................................................................................ 6
Ring/Message Indicator ......................................................................................................................... 7
About Feature Access Codes ................................................................................................................ 7
For Users on Resilient 3300 ICP Systems ............................................................................................ 7
IP Phone and Line Interface Module ..................................................................................................... 7
Tips for Your Comfort and Safety ..............................................................................................8
Don't cradle the handset! ....................................................................................................................... 8
Protect your hearing .............................................................................................................................. 8
Feature Access Codes ..............................................................................................................9
For Agents on Resilient 3300 ICP Systems...............................................................................9
Features Not Available ..............................................................................................................9
ACD Agent Features and Capabilities ........................................................................................10
What are Agent Groups? .........................................................................................................10
About ACD Agent Hot Desking................................................................................................10
ACD Express Agents ........................................................................................................................... 11
Logging In ................................................................................................................................11
Displaying Agent Log-In Information........................................................................................13
Logging Out .............................................................................................................................13
Answering Calls .......................................................................................................................13
Using the Auto Answer Feature...............................................................................................14
Activating Auto Answer........................................................................................................................ 14
Deactivating Auto Answer.................................................................................................................... 14
Using a Headset ......................................................................................................................14
Installing a Headset (no Feature Control Switch) ................................................................................ 15
Handling Calls with a Headset (no Feature Control Switch): .............................................................. 15
Installing a Headset with Feature Control Switch ................................................................................ 16
Handling Calls with a Headset (with Feature Control Switch): ............................................................ 16
Using and Canceling the Work Timer ......................................................................................17
Taking a Break from Calls (Make Busy Feature).....................................................................18
Activating Make Busy .......................................................................................................................... 18
Removing Make Busy.......................................................................................................................... 18
Queue Threshold Alert......................................................................................................................... 19
Group Presence.......................................................................................................................19
Visual Indications.....................................................................................................................21
Audible Indications...................................................................................................................21
Displaying Queue Status .........................................................................................................22
Personal Directory ...................................................................................................................23
3
About this Guide
This guide describes operation of the Automatic Call Distribution (ACD) Feature
Package on Mitel Networks IP Phones.
For operation of other features associated with a Mitel Networks IP Phone (some
of which will work in conjunction with ACD), refer to the set guide.
What is Automatic Call Distribution (ACD)?
The Automatic Call Distribution Feature Package is offered by the
Mitel Networks 3300 Integrated Communications Platform (ICP). ACD is a
method of switching large volumes of similar calls directly to a selected group of
extensions (Agents). All calls are distributed equally among the Agents. The calls
are all of a similar nature, and the Agents are trained/equipped to provide the
particular information or service the caller is requesting.
Typical examples of ACD applications include:
•
airline reservation offices
•
telephone order desks for large retail stores
•
customer service departments of telephone or cable T.V.
companies.
When there are more incoming calls than available Agents, the calls may be
routed to recordings. The recordings can advise the callers that all Agents are
busy, and that an Agent will answer as soon as possible. Various recordings may
be provided to inform the caller as to call progress if an Agent is not accessed
immediately, or to advise the caller of information the Agent will require when
connection is established.
The 3300 ICP distributes calls to the Agents in so that all Agents are given an
equal workload. A Supervisor usually oversees the operation, monitors the
activity of the Agents, and handles any situations that may arise.
4
About Your Phone
The Mitel 5224 and 5324 IP Phones are full-feature, dual port, dual mode telephones
that provide voice communication over an IP network. Each features a back-lit liquid
crystal display (LCD) screen, display-assisted access to features, on-hook dialing and
off-hook voice announce with handsfree answerback, and a large ring/message
indicator. The 5224 and 5324 IP Phones offers 24 programmable keys for one-touch
feature access. Both phones provide ten fixed feature keys for convenient access to
features such as Conferencing, Redial, and many customizable user settings. These IP
phones support Mitel Call Control (MiNet) protocols and session initiated protocols (SIP).
The 5224 and 5324 IP Phones also support modules, such as the Line Interface Module,
5310 IP Conference Unit, and the 12 and 48 Button Programmable Key Modules. The
5224 and 5324 IP Phones can be used as ACD Agent Phones or Teleworker phones.
The personal key on the bottom right is always your Prime Line; the remaining personal
keys can be programmed as:
•
•
•
Feature keys (for example, Swap). You can program feature keys from your phone,
or using the Desktop Tool. Your administrator can also program feature keys.
Speed Call keys. You can program speed call keys from your phone, or using the
Desktop Tool.
Line Appearances. Only the administrator can program line appearances.
Note: For more information on the Desktop Tool, talk to your system administrator.
Figure 1: 5224/5324 IP Phone
5
Elements of Your Phone
Element
n Display
o Softkeys
p Ring/Message Indicator
q Volume, Speaker and
Mute Controls
Function
Provides a two-line, 20-character liquid crystal display (LCD)
viewing area that assists you in selecting and using phone
features, accessing your voice mail, and identifying callers.
When you are using the Superkey menu interface, prompts and
feature information appear on the display screen. For information
on selecting menu options with or without softkeys, see
“Selecting Menu Options” in this guide.
Context-sensitive keys change depending on the modes of the
operation and the menu currently displayed.
Softkeys enable you to easily view and select a variety of
features.
Flashes to signal an incoming call and to indicate a message
waiting in your voice mailbox.
Provide the following audio control capability:
(UP) and
(DOWN) provide volume control for the
•
ringer, handset, and handsfree speakers.
•
(SPEAKER) enables and disables Handsfree mode.
•
r Fixed-Function Keys
s Keypad
t Programmable Personal
Keys and
Designation Card
(MUTE) enables Mute, which allows you to temporarily
turn your phone’s handset, headset, or handsfree
microphone off during a call.
Give you access to the following phone functions:
(SUPERKEY): provides access to menus for your
•
phone's additional features.
Note: When navigating through Superkey menu options,
press
or
to back up one menu level.
(CANCEL): ends a call when pressed during the call,
•
and, when you are programming the phone, eliminates any
input and returns to the previous menu level.
•
(REDIAL): calls the last number dialed.
(HOLD): places the current call on hold.
•
(TRANS/CONF): initiates a call transfer or establishes
•
a three-party conference call.
•
(MESSAGE): provides access to your voice mailbox and
flashes to notify you of messages waiting in your voice
mailbox.
Note: The Ring/Message indicator (p) also flashes when
messages are waiting.
Use to dial.
Provides 24 keys that can be programmed as speed call keys,
feature keys, or line appearance keys, according to your
communication needs. Personal keys have status indicators.
On a 5224/5324 IP Phone, the bottom right personal key is
always your Prime Line key. Write the name (speed call, feature
or line appearance) of the Personal keys that you program on
the designation card (use the side of the card with the textboxes
6
u Handsfree Speaker
v Handset
provided).
Use the slot behind the plastic cover at the bottom of the phone
to remove/insert the designation card.
Provides sound for Handsfree calls and background music.
Use for handset calls. If you are in headset or handsfree mode,
you do not need to use the handset.
Ring/Message Indicator
When indicator is…
Flashing rapidly
it means that…
Your phone is ringing
Flashing slowly
On
A Message or Callback Message is waiting at your phone
Your phone is ringing another phone
Off
Your phone is idle, or you are on a call
About Feature Access Codes
Use of some features requires dialing access codes. The codes are flexible and may be
different than those in this guide. Ask your Administrator for a list of codes you should use.
For Users on Resilient 3300 ICP Systems
If during a call, you hear two beeps that is repeated every 20 seconds it means that your
phone is switching to a secondary 3300 ICP system. The call continues but some of the
keys and features on your phone function differently. The keys and features begin
working normally again after you hang up. If your phone switches to the secondary
system while your speaker or handset is muted (that is, while the
MUTE key light is
on), the call remains muted until you hang up. Normal operation resumes when your
phone switches back to the primary system. If your phone is idle and switched to the
secondary system, you'll see a flashing rectangle on the display. The rectangle remains
until the switch to the primary system is complete.
IP Phone and Line Interface Module
The Line Interface Module is an optional device that adds an analog phone line (POTS)
capability to your 5224/5324 IP Phone. If Emergency Call Routing is not programmed on
your 3300 ICP, you must use the Line Interface Module to dial emergency calls. For
more information on emergency number dialing, refer to Emergency Calls.
If you have a Line Interface Module connected to your 5224/5324 IP Phone, all
programming of the Line Interface Module, except the Analog Key, is done by the
Installer when your phone is installed. For more information, refer to “Using the Line
Interface Module” in this guide.
7
Tips for Your Comfort and Safety
Don't cradle the handset!
Prolonged use of the handset can lead to neck, shoulder, or back discomfort, especially
if you cradle the handset between your ear and shoulder. If you use your phone a lot,
you may find it more comfortable to use a headset. See the section on headset usage in
this guide for more information.
Protect your hearing
Your phone has a control for adjusting the volume of the handset receiver or headset.
Because continuous exposure to loud sounds can contribute to hearing loss, keep the
volume at a moderate level.
Important Note for Headset Users: Mitel Headsets with Feature Control Switch must
be installed in the dedicated headset jack (the jack on the back of the phone).
Installation will disable your handset microphone. Disconnecting the headset at the jack
or at the quick-disconnect plug restores handset operation.
8
Feature Access Codes
The following telephone features can be activated or disabled by Feature Access
codes, when no Feature Keys are programmed for this purpose:
•
Auto Answer
•
Do Not Disturb
•
Headset Operation
•
Login
•
Logout
•
Make Busy
•
Group Presence
Contact your System Administrator for these and other Feature Access codes available
on your telephone system, or to have these features programmed to be activated by a
Feature Key. Record your Feature Access codes in the Personal Directory table at the
end of this guide.
For Agents on Resilient 3300 ICP Systems
If you hear two beeps repeated every 20 seconds during your call, it means that your
phone is switching to a secondary 3300 ICP system. Your call continues. Normal
operation resumes when your phone switches back to the primary system. If your phone
is idle and switched to the secondary system, you’ll see a flashing rectangle on the
display. The rectangle remains until the switch to the primary system is complete.
Features Not Available
There may be procedures in this guide that you cannot perform on your
telephone, and your display may not appear exactly as described in this guide.
You may also have additional functionality not described in this guide. The
reason for this is that your company has specially selected your features and
calling privileges. See your System Administrator if you have any questions.
9
ACD Agent Features and Capabilities
What are Agent Groups?
Traditional ACD agents or hot desk ACD agents may be grouped together to
handle incoming telephone calls that are associated with particular functions or
departments in an organization; for example, Sales or Engineering. Callers are
then directed to the Group that best serves their needs. The formation of ACD
agent groups with two or more agents in each group allows calls to be handled
on a group basis rather than on an individual basis. An agent can have multiple
agent IDs, but can login to only one agent ID per telephone.
Traditional agents or hot desk agent groups are assigned a unique 3-digit
reporting number as well as an agent group directory number. You will use both
of these numbers as discussed throughout this guide.
Agent groups can be programmed to overflow between each other. This means
that if activated, calls that are directed to one agent group can be programmed to
overflow to other agent groups if the first Group was unavailable due to being in
an overload condition. This overflow capability allows ACD calls to be handled,
even though an agent group has been set in a Do Not Disturb mode.
You can have your set programmed to receive additional information concerning
group activity. This information is called Queue Threshold Alert and Queue
Status.
ACD Express Groups associate agents into one skill group, but take advantage
of ACD Path features. ACD Express Groups have limited support for RADs,
embedded media for music on hold, Interflow, and resilience.
About ACD Agent Hot Desking
The ACD Agent Hot Desking feature allows you to log into any hot desk enabled set or
ACD enabled set and the system automatically configures the set with your personal
speed calls, features, and phone settings. The system also associates your personal
phone settings, such as directory number, system settings, language display, and button
programming with the set.
For example, you could log into a hot desk enabled set or ACD enabled set, dial a
number, and the system stores that number against the Redial key for your set profile.
After logging out, if you log into another hot desk enabled set or ACD enabled set, you
can press the Redial key to dial the last number that you had dialed previously while you
were logged into the other set.
10
After logging in as an hot desk ACD agent, you can use the following personal phone
features and change the following settings:
• Call forwarding (all types)
•
Callback messages (message waiting indicator)
•
Auto Answer
•
Do Not Disturb (DND)
•
Last Number Redial
•
Timed Reminder
•
Triple Ring Callbacks
•
Advisory Status Message
•
Group Presence
ACD Express Agents
An ACD Express Agent is a hot desk ACD agent. A hot desk ACD agent becomes an
ACD Express Agent on the system when the first group in which it is programmed is an
ACD Express Group.
ACD Express Agents have the same behaviors as hot desk ACD agents, except that
ACD Express Agents:
•
never consume an ACD license. They consume a User license at provisioning time.
Resilient ACD Express Agents consume the user license on the primary ICP.
•
can be members of ACD Express Groups.
•
can be members of up to eight different ACD Express Groups.
•
cannot be members of ACD 2000 agent skill groups.
Note 1: You can have a maximum of 100 logins at any given time.
Note 2: Hot Desk ACD agents that are not programmed in any groups do not consume
an ACD license when they log in.
Logging In
Automatic Call Distribution (ACD) calls are directed to Logged In Agents only.
ACD calls are not directed to a telephone where there is no Agent Logged In.
You can log in by following the procedure described below.
An important concept in the ACD system for you to be aware of is agent mobility.
Since you as an Agent are assigned a 1- to 7-digit Identification (I.D.) number to
log in with, you can be called by this I.D. number, as well as by the telephone
extension number where you are working. This means that you can be called by
11
your I.D. number regardless of where you may be located. For this reason, it is
also a good idea for your Agent I.D. number to be included in your company’s
telephone directory.
As an Agent, you can belong to multiple groups. When you log in using your
Agent I.D., you are automatically logged in to all groups in which you are a
member. Check with your manager if you do not know the ACD Log-In access
code or do not have an I.D. number. The Agent I.D. number is unique to each
Agent, and allows the system to distribute ACD calls to Logged In Agents. An
Agent can stay logged in indefinitely on the same telephone. You can also log in
by using an alternative Feature Access code not explained in this guide.
NOTE: If the I.D. is in use by another Agent, or the I.D. is invalid, the Log-In
procedure is terminated. If an Agent Log-In code is dialed, but no I.D. is entered
within 60 seconds, the Log-In procedure is not activated and your set is treated
as a Logged Out set.
After you have logged in, you can display your Log-In information. Refer
to”Displaying Agent Log-In Information“ for further details.
If you are a traditional ACD agent, you require your Agent ID to log in; if you are
a ACD desk agent, you require your Agent ID and your User Personal
Identification Number (PIN).
To log in as a traditional agent:
1. Press SuperKey. “Agent Login?” is displayed.
2. Press Yes.
3. Dial your Agent ID number and press Enter.
To log in as a hot desk ACD agent or ACD Express agent:
1. Press HotDesk. “No User Logged In” appears in the display.
2. Press Login. “Enter your Ext#” is displayed.
3. Dial your Agent ID number and press OK. “Enter your PIN” appears.
4. Enter your PIN and press OK.
12
Displaying Agent Log-In Information
It is possible to display and verify Log-In information when you are logged in to a
set. The information displayed is the Agent I.D. number logged in at that set. To
display Agent Log-In information
1. Press SuperKey.
2. Press No until PERSONAL KEYS appears on the display.
3. Press Yes and the Agent Identification (I.D.) number currently logged
in will be displayed for 3 seconds.
4. The prompt SELECT A KEY appears. You may select another Line
Select Key for similar information if the set has more than one line
appearance.
If you press your Prime Line Key, your display shows your Agent I.D.
number and your name (if programmed).
5. To exit, press SuperKey.
Logging Out
Logging out returns the set to Make Busy and it no longer receives Automatic
Call Distribution (ACD) calls, since ACD calls are directed to Logged-In
telephones only. Your set operates normally for non-ACD use when logged out.
Logging Out can be activated during a call in progress, and takes effect only
when you terminate (hang up) the call. This allows you to activate this feature
before your set can ring again for another call.
To log out:
1. Press SuperKey. “Agent Logout?” is displayed.
2. Press Yes.
Note: If you log out of an agent session while a call is in progress, “LOGGED OUT” will
not appear in the display until the call is ended.
Answering Calls
Answering ACD calls is not unlike answering regular calls. If the telephone rings,
the indicator beside your Line Select Key flashes.
To answer the call, pick up the handset and begin speaking.
13
A headset option can be programmed into your system, eliminating the need to
pick up the handset. This is helpful in high call traffic situations normally
encountered in an ACD environment. To use a headset, refer to ”Using A
Headset“. You should also refer to ”Using the Auto Answer Feature“ for high
telephone traffic situations.
Using the Auto Answer Feature
You may prefer to answer your calls automatically using the Auto Answer
feature, for either handset or headset operation. Once programmed, when you
receive a call you hear one short ring before being automatically connected to
the caller.
Never leave your telephone unattended while the Auto Answer feature is turned
on.
Activating Auto Answer
To activate the Auto Answer feature:
•
Press the Auto Answer Feature Key. The indicator beside the Auto Answer key
turns on.
Deactivating Auto Answer
To deactivate the Auto Answer feature:
•
Press the Auto Answer Feature Key. The indicator beside the Auto Answer key
turns off.
Using a Headset
Note: Your system administrator may have enabled full-time headset operation
on your telephone. Telephones with full-time headset operation enabled must be
operated only with headsets.
Telephones that are not programmed for full-time headset operation should be
programmed with a HEADSET feature key to allow you to switch between
handset and amplified headset (no feature control switch) operation.
Switching between handset and headset mode when using a Headset with
Feature Control Switch can be accomplished by connecting or disconnecting the
headset at the quick-disconnect plug on the headset cord, but you should also
disable headset operation if the handset will be used for an extended period of
time.
14
A headset can be used either in regular answer mode or with the Auto Answer
feature programmed.
Most headsets are installed using the same jack that the handset plugs into. Mitel
Networks Headsets with Feature Control Switch (PN 9132-800-500-NA/ 9132800-501-NA) plugs into the dedicated headset jack (the jack nearest the front of
the set).
Installing a Headset (no Feature Control Switch)
To install the headset for your use
1. When the telephone is not in use, lift the handset from the cradle and
carefully turn the set upside down.
2. Unplug the handset cord where it connects to the telephone.
3. Plug in the headset cord in the same place.
4. Set the telephone upright and press the Headset feature key.
5. Store your handset in a safe place.
To return to handset operation
1. When the telephone is not in use, lift the handset from the cradle and
carefully turn the set upside down.
2. Unplug the headset cord where it connects to the telephone.
3. Plug in the handset cord in the same place.
4. Set the telephone upright and return the handset to the cradle.
5. Press the Headset Feature Key.
6. Store your headset in a safe place.
Handling Calls with a Headset (no Feature Control Switch):
To answer a call (when Auto Answer is disabled):
•
Press the flashing Line Select key.
To hang up:
•
Press the Cancel Function Key.
15
Installing a Headset with Feature Control Switch
IMPORTANT NOTE: Mitel Networks Headsets with Feature Control must be
installed in the dedicated headset jack (the jack nearest the front of the set).
Installation will disable your handset microphone. Disconnecting the headset at
the jack or at the quick-disconnect plug restores handset operation.
To install the headset for your use
1. When the telephone is not in use, lift the handset from the cradle and
carefully turn the set upside down.
2. Plug the headset cord into the headset jack (the jack nearest the front
of the set).
3. Set the telephone upright and return the handset to the cradle.
4. Press the Headset Feature Key.
To return to handset operation
1. When the telephone is not in use, lift the handset from the cradle and
carefully turn the set upside down.
2. Unplug the headset cord where it connects to the telephone.
3. Set the telephone upright and return the handset to the cradle.
4. Press the Headset Feature Key.
5. Store your headset in a safe place.
Handling Calls with a Headset (with Feature Control Switch):
To answer a call (when Auto Answer is disabled):
•
Press the flashing Line Select key
-orQuickly press and release the Feature Control Switch.
To mute the headset microphone:
•
Press and hold the Feature Control Switch.
To hang up:
•
Press the Cancel Function Key
-orQuickly press and release the Feature Control Switch.
16
Using and Canceling the Work Timer
The Work Timer provides a delay after each ACD call, before the next call is
directed to you. This gives you a certain amount of time to compete any work
generated by the previous call.
The Work Timer is automatic and you are not required to perform any procedures
to activate it. The length of time provided by the timer varies from 0 to 600
seconds, and is programmed only by the System Administrator.
Work Timers apply to ACD Agents and ACD calls only. Other calls to and from
your set do not activate a Work Timer. If the Make Busy or Do Not Disturb
features are activated at your telephone, the Timer is cancelled for that call.
Once you terminate an ACD call, WORK TIMER appears on the display for the
duration of the Work Timer period. When the Work Timer expires, WORK TIMER
disappears from the display and you are ready to take another call.
You have the option of canceling the Work Timer and accepting another call
before the Timer expires. Cancellation of the Timer affects only the next ACD
call.
To cancel the Work Timer, press the
key. Your set displays the normal
screen and is now available for the next ACD call.
17
Taking a Break from Calls
(Make Busy Feature)
Activate the Make Busy feature to stop receiving Automatic Call Distribution
(ACD) calls at your set for relatively brief periods of time, thereby avoiding the
need to log out and subsequently log in again. Make Busy ensures that your
ACD set does not receive calls while you are unavailable to handle the calls.
Your Mitel IP Phone operates as a normal telephone except for ACD use during
the Make Busy state. You can activate this feature between calls or during a call
in progress. The Make Busy state commences upon completion of that call. This
allows you to activate this feature before your set can ring again for another call.
Activating Make Busy
To activate the Make Busy feature:
•
Press the Make Busy Feature Key. Your set displays MAKE BUSY
until it is deactivated.
Removing Make Busy
To deactivate the Make Busy feature:
•
Press the Make Busy Feature Key. Make Busy is removed from your
set, and the display returns to idle.
Note: Your System Administrator can configure the system to automatically place your
set in Make Busy when you log in. In this case, you must remove Make Busy before you
can start taking ACD calls.
18
Queue Threshold Alert
Thresholds are programmed into the ACD system to provide a basis for alerting
Agents and Supervisors that calls have waited longer than acceptable limits
(thresholds) to be answered.
If your set is programmed with a Generic Group Queue Status Feature Key, it
can provide a visual indication of the current workload conditions of the
Automatic Call Distribution (ACD) Group into which you are logged. Your set may
also be programmed to provide an audible alert that Queue Status has changed.
Note: Agents in the Logged Out, Do Not Disturb, or Make Busy states are not
considered active Agents for the purpose of Queue Threshold Alert.
Group Presence
Group Presence allows members of an ACD Group to make themselves “absent”
or “present” in a group. Only members who are present in a group are offered
calls to that group.
Users belonging to multiple groups can control their presence in each group
separately through the use of feature keys (one for each group), or by dialing a
feature access code (FAC) followed by the group number.
Supervisors can also dial a FAC from their phone to change the presence status
of an agent.
To join an ACD group:
1. Lift the handset.
2. Do one of the following:
•
Press the Group Presence Feature key to join the group associated
with the key.
•
Dial the Group Presence - Join Group feature access code followed
by the group directory number.
The LED associated with the key is steady lit when the member is present
and off when absent.
19
To leave an ACD group:
1. Lift the handset.
2. Do one of the following:
•
Press the Group Presence Feature key to join the group associated
with the key.
•
Dial the Group Presence - Leave Group feature access code followed
by the group directory number.
The LED associated with the key is steady lit when the member is present
and off when absent.
To join all ACD groups:
1. Lift the handset (optional on devices that support on-hook dialing).
2. Dial the Group Presence - Join All ACD Groups feature access code.
To leave all ACD groups:
1. Lift the handset (optional on devices that support on-hook dialing).
2. Dial the Group Presence - Join All ACD Groups feature access code.
To change another group member's presence status:
1. Lift the handset.
2. Dial the Group Presence - Join Group Third Party or Group Presence
- Leave Group Third Party .
3. Dial the directory number of the group member.
4. Dial the group directory number.
20
Visual Indications
If your set is programmed to provide a visual alert, the indicator beside the
Queue Status Feature Key indicates the three levels of alert as follows:
•
a solid indicator beside the Line Select Key on your set indicates that
the workload is below the first threshold limit programmed
•
a slowly flashing indicator indicates that the workload is above the first
but below the second threshold limit programmed
•
a quickly flashing indicator indicates that the workload is above the
second threshold limit programmed.
Audible Indications
For sets programmed for audible indications, the system provides the following
different ringing patterns, depending on the threshold alert status:
•
a single ring occurs when the longest waiting caller exceeds the
programmed first threshold time interval
•
a double ring occurs when the longest waiting caller exceeds the
programmed second threshold time interval
•
a single or double ring occurs when a previous threshold time interval
is reverted to (i.e., when the longest waiting call is answered and the
next longest waiting caller is in a different threshold level).
21
Displaying Queue Status
Agents may access the following queue-status information about their Group:
•
the number of active Agents in the Group
•
the number of calls waiting for the Group (queue)
•
the length of time that the longest call has been waiting for the Group.
Note: Agents in the Logged Out, Do Not Disturb, or Make Busy states are not
considered active Agents for the purpose of Queue Status.
When You Need To Know Your Group's Queue Status
•
If your set is programmed with a Generic Group Queue Status
Feature Key, press the key.
22
Personal Directory
Your Extension Number: ____________________
Your Agent I.D. Number: ____________________
Your User PIN (ACD hot desk agents only): ___________________
Your Supervisor’s Extension Number: ________________
Your Group Name/Number: ___________________
Use this table to record your frequently used numbers.
Name
Number
Use this table to record the feature access codes you are most likely to need on
your telephone.
Feature
Access Code
Auto Answer
Do Not Disturb
Headset Operation
Make Busy
Group Presence - Leave Group
Group Presence – Join Group
Group Presence - Leave All ACD Groups
Group Presence - Join All ACD Groups
Group Presence - Leave Group Third Party
Group Presence - Join Group Third Party
23