1
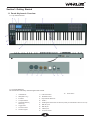
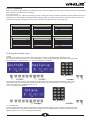
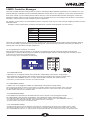
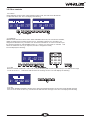
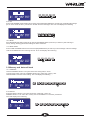
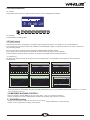
PANDA MIDI CONTROLLER
USER’S MANUAL
HANGZHOU WORLDE DIGITAL PIANO CO.,LTD
Panda Keyboard Overview
Introduction
.
. .
. .
.
.
.
.
. .
.
.
. .
Section 1: Getting Started
.
.
.
.
.
.
.
.
.
.
.
.
.
.
.
.
.
.
.
.
.
.
. .
. . . . . . . . . .
.
.
2
.
.
.
.
.
.
3
3
4
.
.
.
.
.
.
.
1.1 Panda Keyboards Overview. . . . . . . . .
. . . . . . . .
1.2 Setup . . . . . . . . . . . . . . . . . . . . . . . . . . .
. . . . . . . . . . . . . . . . . . .
1.3 Using The Panda With Your Software
1.4 MIDI Connections . . . . . . . . . . . . . . . . . . . . . . .
1.5 Power Supply . . . . . . . . . . . . . . . . . . . . . . . . .
Section 2: Basic MIDI Control From Panda line
.
.
.
.
.
.
.
.
.
.
4
4
.
.
. .
Section 3: Advanced Settings
.
.
.
6
7
7
.
.
8
. . . . . . . . . . . . . . . . . .
.
9
9
10
11
12
. . . . . . . . . . . .
.
5
5
5
.
2.1 Function Keys. . . . . . . . . . . . . . . . . . . . . . . . . .
2.2 The Keyboard
. . . . . . . . . . . . . . . . . . . . . .
2.3 Channel
. . . . . . . . . . . . . . . . . . . . . . . . .
2.4Changing Voice and Voice Bank
. . . . . . . . . . . . . . . . . . . . .
2.5 MIDI Controller Messages
1
.
. .
.
.
3.1How to make good use of the keyboard . . . . . . . . . . . . . . . . .
3.2 Other Controls
. .. . . . . . . . . . . . . . . . . . . . . . .
3.3Memory and Data Call Back
. . . . . . . . . . . . . . . . . . . .
3.4 Control Functions . . . . . . . . . . . . . . . . . . . . . . . .
3.5 Pad Control . . . . . . . . . . . . . . . . . . . . . . . . . .
3.6 MMC(MIDI Machine Control) . . . . . . . . . . . . . . . . . . . . .
12
12
.
13
4.1 MIDI Out from USB Function . . . . . . . . . . . . . . . . . . . . .
13
Section 4: Usage Examples
.
.
.
.
.
.
. .
Section 5: MIDI Information Specification
.
5.1 Program & Bank Changes Explained
.
Section 6: Troubleshooting
Section 7: Technical Info
Section 8: Appendices
.
.
.
.
.
.
.
.
.
.
.
.
.
.
.
.
.
.
.
.
.
.
.
.
.
.
.
.
.
.
.
.
.
.
.
.
.
.
.
.
.
.
.
.
.
.
.
.
.
.
.
. . . . . . . . .
. . . . . . . . . .
.
.
.
.
.
.
.
.
.
.
.
.
.
.
.
.
.
.
.
.
.
. . . . . . . . . . . . . . . .
Appendix A - MIDI IMPLEMENTATION CHART . . . . . . . . . . . . . . . .
Appendix B – Useful MIDI Data Tables
. . . . . . . . . . . . . . . . . . . .
Appendix C - General MIDI Controller Numbers (MIDI Cc’s) . . . . . . . . . . . .
Appendix D – Assignable Controller Numbers to Linear Controllers
. . . . . . . . . . .
Appendix E –A ssignable Controller Numbers to Non-Linear Controllers . . . . . .
Appendix F – Assignable Controller Numbers to Rotary Encoders. . . . . . . . . .
Appendix G – Assignable Controller Numbers to Pressure P ads . . . . . . . . . .
Appendix H- Factory Presets . . . . . . . . . . . . . . . . . . . .
Appendix I - Hexadecimal Conversion Chart . . . . . . . . . . . . . . . .
1
13
.
13
14
14
15
16
18
18
18
18
19
19
19
20
Introduction
The eight fully assignable pads give you the ability to trigger samples. The eight fully assignable
endless rotary encoders and sliders can be assigned as135 controllers.
The versatile and easy-to-use Panda keyboard is a great controller in the studio and live on stage.
What’s in the Box ?
<
Panda keyboard
<
User manual CD-ROM
<
USB cable
Panda Keyboard overview
Here is a rundown of some of the great features the Panda keyboards have to offer:
<
8 trigger pads with velocity.
<
2xAssinable Pedal Interfaces (PEDAL A,PEDAL B), which can be assigned as 135 controllers
<
8xAssignable Dials. Each dial can establish an independent channel , and can be assigned as 135 controllers
<
8xAssignable Slider, each slider can be assigned as 135 controllers
<
Assignable Pitch Bend Wheel and Modulation Wheel(Wheel P & Wheel M),which can be assigned as 135 controllers.
<
6 Buttons for MMC.
<
1xMaster Volume Slider.
<
8 double Function button with shift, providing 15 functions like PROGRAM, CHANNEL, VEL-CURVE, OCTAVE, TRANSPOSE,
<
BANK M, BANK L, DUAL, SPLIT, MUTE, AFTER TOUCH, CONTROL ASSIGN and etc.
<
10xData entry and +/- button.
<
Built-in Memory, which can store/load 6 groups of user's parameter.
<
1xMIDI OUT,1X MIDI IN
<
USB interface, adaptable to USB 2.0(FULL SPEED). Power supplied by USB and DC 9 V.
<
Have the ability for future upgrading via USB(Please visit www.worlde.com.cn)
<
Compatible with Windows XP/Vista/Windows7 and Mac OSX. Drive free and hot-plug supported.
2
Section1: Getting Started
1.1 Panda Keyboards Overview
1.1.1 Top Panel Overview
1.1.2 Back Panel Overview
1.1.3 Control Definitions
The controls are referred by name throughout this manual.
1:
LCD DISPLAY
2:
3:
18:
Power switch
9:
Pitch Bend wheel
Slider(49/61 only )
10:
Modulation wheel
Encoders
11:
Keyboard with Aftertouch
4:
Transport buttons
12:
Pedal A
5:
Assignable buttons(
49/61 only)
13:
Pedal B(press ‘Shift’ button to select the polarity of Pedal B when switch on the unit)
6:
Trigger Pads
14:
MIDI OUT port
7:
Function buttons
15:
MIDI IN port
8:
Numeric keypad
16:
USB 2.0 port
17:
DC power socket
3
1.2 Setup
If you intend to connect your Panda keyboard to a computer, please read sections 1.2 and 1.3 first. If you only intend to use your
Panda keyboard to control a sound module or synthesizer using the external MIDI OUT you should skip to section 1.4.
1.2.1 Minimum System Requirements
If you are using your Panda with a computer, the following minimum system requirements apply:
Windows
Mac OS
Pentium 3 800 MHz or higher
Macintosh G3* 800/G4* 733 MHz or higher
(CPU requirement may be higher for laptops)
(CPU requirement may be higher for laptops)
256 MB RAM
OS X 10.3.9 with 256 MB RAM,
DirectX 9.0b or higher
OS X 10.4.2 or greater with 512 MB RAM
Windows XP (SP2) or higher
*G3/G4 accelerator cards are not supported.
(Windows 98, Me, NT or 2000 not supported)
WORLDE suggests you also check the minimum system requirements for your software, as they may be greater than the above.
USB hubs are not supported. Worlde suggests that you connect directly to one of your computer’s built in USB ports.
1.3 Using The Panda With Your Software
When installed, the Panda appears as a simple MIDI device with one input port and one output port. You should select the listed Panda
input port as the MIDI input device in your software. Once this is set, your software should be able to receive notes and controller
data from the Panda.
If you have connected external MIDI gear like a drum machine or another keyboard to your Panda’s MIDI IN port, this gear can
be interfaced to the computer by selecting the listed Panda input port. This way, your Panda is acting as a MIDI to USB
interface.
The port names are defined as USB Audio Device when connecting to USB port.
It will appear as a single USB Composite Device in the Device Manager.
1.4 MIDI Connections
The MIDI Out port accepts a standard 5-pin DIN-type MIDI plug (available from most professional audio retailers).
The MIDI Out port can be used to connect the Panda to a hardware sequencer, an external synthesizer or sound module, for
example.
4
1.5 Power Supply
If you are using your Panda with a computer via its USB port, there is no need for an external power supply. Your Panda will draw its
power from the computer.
However, if you are intending to use your Panda without connecting to a computer’s USB port, then you will need to use an external
power supply. No power supply is included in the box, so please select one that meets the following requirements:
<
9V DC
<
250mA – 300mA
< Center positive
Section 2:Basic MIDI Control From Your Panda
Your Panda controller will not make any sound unless it is connected to a computer or other external MIDI gear. This is because the
Panda sends MIDI data when you play it and does not produce sound on its own. Instead, it is used to control a virtual instrument on
your computer or a MIDI sound module to generate sounds.
This is a good place to introduce you to the way we approach the differences between the Panda 61 and 49 and the Panda 25. The
appearance and functionality of the Panda 61 and 49 are the same, it’s just the size of the keyboard that is different, so when we give
instructions for these models, these two are always grouped together. The Panda 25 looks different and a number of its functions are
accessed in a different way, so for this model we will always give you a separate set of instructions.
2.1 Function Keys
2.1.1 Panda 49 and 61 Functions
Panda49/61 key
2.1.2 Panda25 Functions
Panda25 key
Numeric Keypad:
Use the numeric keypad to enter values during programming. The LCD display will show the values as you enter them.
5
2.2 The Keyboard
When you play the keyboard, MIDI note messages are sent. These messages are read by your computer software or external MIDI
gear and used to generate sound accordingly.
2.2.1 Velocity Curve
Every time you press a key, a MIDI note message is sent with a velocity value between 0 and the maximum; this value specifies how hard you
pressed the key. Since different people have different playing styles, your Panda offers a number of different velocity curves. You
should experiment with the different velocity curves to find the curve that best suits your playing style.
C2
C2
C3
140
140
140
120
120
120
100
100
100
80
80
80
60
60
60
40
40
40
20
20
0
20
0
1
2
3
4
5
6
7
8
9
10
0
1
2
3
4
C4
5
6
7
8
9
10
1
140
120
120
120
100
100
100
80
80
80
60
60
60
40
40
40
20
20
0
4
5
6
7
8
9
10
5
6
7
8
9
10
20
0
0
3
4
C6
140
2
3
C5
140
1
2
1
2
3
4
5
6
7
8
9
10
1
2
3
4
5
6
7
8
9
10
To change the velocity curve:
CURVE
Velocity Curve selection function button. When this button is valid, the LCD displays the ‘VelCURVE' and
the number of current velocity curve. It can be adjusted by +/- button or Numeric Button and confirmed by Enter button.
The initial value is 1, adjusting scale is 1~6.The LCD displays the following:
2.2.2 OCTAVE
Octave adjusting function button. This function allows the keyboard to change the Pitch up/down by octave. When
this button is valid, the LCD shows the ‘OCTAVE’ and the value of current transposition. It can be adjusted by +/button. The initial value is 0,adjusting scale is -4~5.
The LCD displays the following:
2.2.3 TRANSPOSE
Transpose adjusting function allows the keyboard to change the Pitch up/down by semi-tone.When this button is valid,
the LCD displays the ‘x’pose’ and the value of current transpose. It can be adjusted by +/-button. The initial value is 00,
adjusting scale is -12~12. The LCD displays the following:
6
2.3 CHANNEL
Channel selection function button, selecting current MIDI channel. When this button is valid, the LCD displays the
‘Channel’ and the current channel number. The channel can be selected with +/- Button or Numeric button and
confirmed by Enter button. The initial setting is 1,adjusting scale is 1~16.The LCD displays the following:
2.4 CHANGING VOICE AND VOICE BANK
2.4.1 PROGRAM
Voice adjusting function button. adjusting the voice of current channel. When this button is valid, the LCD
displays the ‘Program’ and the current voice number. The voice can be adjusted or selected with NUMERIC
button or +/-Button. The initial setting is 00,adjusting scale is 0~127.The LCD displays the following:
2.4.2 BANK L/M
Voice bank adjusting function button, adjusting the voice bank of current channel. When these buttons are valid,
the LCD displays the ‘BANK L/M’ and the current voice bank number. The voice can be adjusted or selected with
NUMERIC button or +/- Button. The initial setting is 00,adjusting scale is 0~127.
7
2.5MIDI Controller Messages
There are 135 MIDI controller messages that are used for controlling the MIDI-adjustable parameters in your software or on your
external MIDI gear. Examples of these controllable parameters include volume, pan, expression, reverb, chorus and portamento.
Each of the controls on your Panda keyboard is able to send any of the 128 standard MIDI controller messages to control such
parameters. Please note that in order for these effects to work, the MIDI device you are sending to must be able to receive these
messages. A full list of these control messages is given in Appendix C.
For example, you may want to set the Modulation wheel to control the reverb amount. This is done by assigning controller 91 to the
Modulation wheel.
Examples of other popular effects are listed in the table below. (Please consult Appendix C for the full list.)
Effect
Control Number
Modulation
1
Volume
7
Pan
10
Expression
11
Reverb depth
91
Chorus depth
93
There are many different types of virtual instruments available and most of these respond to MIDI controller messages, allowing
you to control a variety of parameters from your Panda keyboard. Please review the manual that came with your software or
external gear to see what these controller numbers are.
2.5.1 Programming the Controls on Your Panda
When programming a physical controller on your Panda, the controller that was last used will be the first one selected for
programming. To select a different physical controller for programming,t.he method is: Move the physical controller you wish
to program ,and press the assignable button.
When in assign, the LCD displays the following:
2.5.2 ASSIGNABLE DIAL
8 dials that can be assigned channel and controller No. independently. First press the “assign”button.
Then operate the dial to select the dial, and the LCD shows the controller number and the controller value.
Input the No. with NUMERIC button or +/- button when the dial is selected. The numbers are the
controllers. you also need to use enter to confirm the data.
2.5.3 ASSIGNABLE SLIDER
9 sliders that can be assigned controller No. independently. First press the “assign” button
Then operate the slider, and the LCD shows the controller number and the controller value. Input the
No. with NUMERIC button or +/-button when the slider is selected, The numbers are the controllers.
You also need to use enter to confirm the data.
2.5.4 ASSIGNABLE WHEEL
The modulation and pitch bend are the default function of the 2 wheels. It can be assigned controller
No. independently. First press the “assign”button. Then operate the wheel to select the wheel, and
the LCD shows the controller number and the controller value. Input the No. with NUMERIC button or
+/- button when the wheel is selected. The numbers are the controllers.
You also need to use enter to confirm the data.
2.5.5 ASSIGNABLE PEDAL
2 pedal interfaces that can be assigned controller No. independently. First press the “assign”button. Then
operate the pedal to select it, and the LCD shows the controller number and the controller value. Input the
No. with NUMERIC button or +/- button when the pedal is selected. You need to use enter to confirm the data.
8
2.5.6 MASTER VOLUME
It sends GM Master Volume message(F0 7F 7F 04 01 00 xx F7)
2.5.7 PAD SETTING
Activate a pad, Press the Ctrl Assign button .The LCD display will display the currently assigned controller
of the pad. The controller number 128 is for pad note. Press shift” to edit the Pad note. Enter the new pad
number you want the pad to assigned with the numeric button or +/- button.
”
2.5.8Groups:A,B,C,D,E(49/61)
The button can be assigned as a controller, Press the ‘CTRL ASSIGN’ button, then press a button, the LCD
display ‘ctrldata1’, input the numb er of the controller that you wa nt to operate, press the 'enter' to confirm the value.
The LCD will display 'ctrldata2',at this moment, you can input the value that the controller should be send.
Section 3. Advanced Settings
3.1 How to make good use of the keyboard
3.1.1 DUAL
Dual switch function button.
When Dual is ON, the LCD displays the ‘DUAL_ON', Keyboard sends MIDI info of two channels, with the
voice/channel of both channels adjustable. The 2nd voice and channel of 2 layer can be adjusted currently
(Dual is ON). Dual and Split can not be used at the same time. When Dual is ON, Split is OFF.
The LCD displays the following:
3.1.2 SPLIT
Keyboard Split ON/OFF function button. When Split is ON, the LCD displays the’SPLIT_ON’. the keyboard is split
to right section and left section by the split point, with each section use it’s own channel. The voice /channel of both
channels is adjustable. The voice and channel of right section can be adjusted currently(Split is ON),Dual and Split
can not be used at the same time. When Split is ON,Dual is OFF. The LCD displays the following:
SPLIT POINT
Default Split Point is the central C (MIDI No. 60). User can choose the Split Point. Hold the Split button,
LCD shows CHO, reminding user to select the SPLIT POINT. Press the key that needs to be the new
Split Point, LCD shows don, meaning this key is set to be the new Split Point.
3.1.3 A. TOUCH
Channel After Touch ON/OFF function button. When Touch is ON, the LCD shows ‘TOUCH ON’
and the system sends Channel After Touch info when pressing the keys.
The LCD displays the following:
9
3.2 Other controls
3.2.1 MUTE
MUTE ON/OFF function button. When MUTE function is ON, The LCD shows ‘MUTE ON’
no MIDI info will be sent. The LCD displays the following:
3.2.2 ASSIGN
ASSIGN mode ON/OFF function button. When ASSIGN mode is ON, The LCD shows ‘ASSIGN’,
default as assigning the controller number. that is assignable. Operate the controller to be
assigned and select the very controller LCD shows the controller No. of current controller. Input
the desired controller No. with NUMERIC button or +/- button (e.g. when a dial is selected, LCD
shows the default No. 007. If you input 010, the dial is assigned as PAN).
The LCD displays the following:
3.2.3 GM
GM:Press CHAN and BANK L buttons at the same time(25)/GM ON button(49 and 61)to send GM ON message
(F0 7E 7F 09 01 F7).LCD shows ‘GM ON’ when the message is sent. The LCD displays the following:
3.2.4 GS
Press CTRL ASSIGN and BANK L buttons at the same time(25)/GS ON botton (49 and 61)to send GM ON message
F0 41 10 42 12 40 00 7F 00 41 F7).LCD shows 'GS ON' when the message is sent. The LCD displays the following:
10
3.2.5 XG
Press CTRL ASSIGN and OCTAVE buttons at the same time(25)/XG ON button (49 and 61)to send GM ON message
(F0 43 10 4C 00 00 7E 00 F7).LCD shows ‘XG ON’ when the message is sent. The LCD displays the following:
3.2.6 Reset
Press PROGRAM and SHIFT buttons at the same time(25)/RESET button (49 and 61) to reset the system restoring to
factory setting, sending system initial setting info at the same time.
3.2.7 SNAP SHOT
Press CHAN and PROG buttons at the same time(25)/SANP button (49 and 61) to send message of all user settings.
LCD shows SNAP when the message is sent. The LCD displays the following:
3.3 Memory and data call back
3.3.1 MEMORY
Press the MEMORY button. The system enters the storing state, it stores
6 groups setup value. Using the NUMERIC button1~6 to select the memory area.
Press ENTER to store the control setting. The LCD displays the following;
3.3.2 RECALL
Press the RECALL button, The system enters the recall state. Using the
NUMERIC button 1~6 to select the memory area. Press ENTER to recall the parameters
The LCD displays the following:
11
3.4 Control functions
3.4.1 SHIFT
Using SHIFT KEY to select the upper function of the key. The LCD displays the following:
3.4.2 ENTER
Press ENTER to confirm the data
3.5 Pad Control
3.5.1 Pressure Control
Using the pressure control, the pads give you a different type of performance option on your Panda. You can control parameters
on your software in a way that would not be possible on a standard dial or slider. The pressure pads can be used to make some
very interesting effects.
As we’ve seen above, each pad can be assigned an individual MIDI controller number.
As you apply more and more pressure to the pad, the value of the controller you are sending will
increase, until the maximum value is reached. On release, the pad will return to the minimum value.
3.5.2 Pad Curve
The Pad Curve setting is used to set the response curve of all eight pads. It is not possible to set the response curve of the pads
independently.
140
140
140
120
120
120
100
100
100
80
80
80
60
60
60
40
40
40
20
20
20
0
0
1
2
3
4
5
6
7
8
9
0
10
1
2
3
4
5
6
7
8
9
10
120
120
100
100
80
80
60
60
40
40
20
1
2
3
4
5
6
7
8
9
2
3
4
5
6
7
8
9
10
140
140
140
120
100
80
60
40
20
0
1
20
0
1
2
3
4
5
6
7
8
9
0
1
2
3
4
5
6
7
8
9
3.5.3 Pads Note setting
Press one pad, then press assign. After that you shall press shift, then you can set the MIDI note by numeric buttons or +/- buttons.
and press ENTER to confirm.
3.6 MMC(MIDI MACHINE CONTROL)
There are 6 buttons used for MMC-[|<<],[<<],[>>],[O],[stop],[play].It is common to set the 6
buttons as Sequencer remote control buttons, it needs to be working with sequencer software.
3.7 NRPN/RPN setting
Assign the controller to 132~135,after that you can set the NRPN OR RPN by numeric buttons.
Please consult Appendix D on Page 18 for full list.
12
Section 4: Usage Examples
4.1Recording Your Performance On A Sequencer
A MIDI sequencer will allow you to record, play back, store and edit MIDI data. Although hardware sequencers exist, we will focus on
the more commonly used software sequencers in this manual. Examples of popular software sequencers are Pro ToolsTM, CubaseTM
and LogicTM, although there are many different sequencing applications available for your computer.
In order to use the Panda with your sequencer, you need to set up the sequencer software so that the Panda is recognized as the
sequencer’s MIDI input device.
You need to choose a MIDI output device that is capable of making sound when MIDI data is sent to it. This may be a soundcard on
your computer, a VST instrument or a sound module connected to a MIDI port which is in turn connected to your computer. Please
consult your sequencer’s user manual for more information on how this is done. In this manual, section 1.3.1, “Using The Panda With
Your software” details how the Panda will appear in the device listing of your sequencer.
With the Panda set up to communicate with the sequencer, data will go into the sequencer and will be routed to a virtual synthesizer
within the sequencer software or sent to an external sound module via a MIDI output port. The virtual synthesizer or external sound
module will turn the MIDI data into audible sounds. You can then record the incoming MIDI data and edit your performance using
your sequencer.
Section 5:MIDI Information Specification
5.1 Program & Bank Changes Explained
The original GM MIDI Specification was designed to access only 128 different sounds using Program Change messages (0-127).
As MIDI devices grew to be more sophisticated and contain more sounds, Bank Change messages were included in the specification
to allow for more than 128 sounds to be accessed. Within each bank there are a possible 128 different sound patches that can be
accessed using the standard Program Change command. Using the expanded 14-bit Bank Change command, there are now 16,384
banks available—each with 128 sounds patches. Technically speaking, the first 7 bits of the 14-bit Bank Change message are sent in a
single byte known as the Bank LSB. The last 7 bits define another byte known as the Bank MSB. The Bank LSB is the most commonly
used. This allows for 128 bank changes, and often there is no need to send a Bank MSB.
You will find almost all MIDI devices respond to Program Change commands and many are organized according to the GM listing. In
all General MIDI devices, the different sounds are always organized in the same way from device to device, so the piano sounds are in
their particular place, the string sounds are in their place, the drum sounds and so on. All GM devices (both hardware and software
sound modules) are clearly labeled as such, so you know that their sounds are organized in the General MIDI structure. So when a GM
device receives a MIDI Program Change, it calls up a type of sound that you expect from the GM sound set. All non-GM devices call
up unique sounds from their memory upon receiving MIDI Program Changes. Since the sounds in a non-GM device are not arranged
in a particular order, you need to take a look at the device itself to see which sound you want and at which location in the memory it
resides. Many VST instruments such as Native Instruments’ FM7 or the synth modules in Reason are non-GM devices.
Bank Change messages are useful when calling up sounds from a large library that may exist in a particular sound module or software
synth. For example devices that are built with Roland's GS specification or Yamaha's XG specification require you to specify a Bank
Change in order to access the extra voices and effects that these devices provide.
Sending Program, Bank LSB and Bank MSB data is made simple using the Panda. Please consult section 2.4 to see how this is done.
13
Section 6: Troubleshooting
The Panda has been designed to give you high performance MIDI control. It has been tested under a wide range of system and
operating conditions. However, there are virtually limitless numbers of operating scenarios, any of which could affect your system’s
performance. Though this section cannot cover all possible situations you may encounter, we would like to offer some suggestions
for dealing with common problems.
If you are connecting to a computer, we recommend that you avoid connecting too many devices to your computer at the same time.
The more devices you have connected to the computer, the greater the load on the computer’s CPU. Although it is possible in theory
to connect multiple USB devices at the same time, doing so may degrade your system’s performance.
My Panda suddenly stopped working after having performed well since installation on a computer:
<
Switch off the unit and leave it off for 10 seconds. Then restart your computer, power up your Panda and try
again.
I have connected the Panda to my computer. When I press a key, there is a delay before I hear any sound.
This delay is known as latency. Latency with MIDI signals is caused at the computer and is not coming from the Panda.
This may be due to the CPU load of the soft-synth you are using. MIDI data is simply control data. MIDI data is read by
the soft synth; the soft synth then completes a large number of complex calculations in order to produce the sound you
hear, and all of this processing activity takes time. If you already have adjusted the appropriate parameters relating to
latency on your sound card, try re-installing the latest drivers for the sound card, or try reducing the buffer sizes of the
sound card. If you are using a host application, check its buffer size settings as most applications allow for user adjustment
to improve timing.
<
<
PC only: If your soundcard supports ASIO or WDM, then please use these drivers. It is suggested that you’d better
not use the MME driver which is older and less efficient in design and will have a much higher latency. In the audio
device settings, please select the ASIO driver if available.
Section 7:Technical Info
Electro Static Discharge, Electrical Fast Transient and Conducted RF interference may cause the unit malfunctioning. In such
case, unplug the unit and plug it in again to restore normal operation.
Note: Your WORLDE product has been tested to comply with FCC Standards FOR HOME OR OFFICE USE. Modifications not
authorized by the manufacturer may void users authority to operate this device.
English
Caution:
Note: This equipment has been tested and found to comply with the limits for a Class B digital device, pursuant to Part 15 of the
FCC Rules. These limits are designed to provide reasonable protection against harmful interference in a residential installation. This
equipment generates, uses and can radiate radio frequency energy and, if not installed and used in accordance with the instructions, may
cause harmful interference to radio communications. However, there is no guarantee that interference will not occur in a particular
installation. If this equipment does cause harmful interference to radio or television reception, which can be determined by turning the
equipment off and on, the user is encouraged to try to correct the interference by one or more of the following measures:
<
Re-orient or relocate the receiving antenna.
<
Increase the separation between the equipment and receiver.
<
Connect the equipment to an outlet on a circuit different from that to which the receiver is connected.
<
Consult the dealer or an experienced radio/ TV technician for help.
ASIO is a trademark of Steinberg Soft– und Hardware GmbH.
VST is a trademark of Steinberg Soft– und Hardware GmbH
WARNING:
This product contains chemicals, including lead, known to the State of California to cause cancer, and birth defects
or other reproductive harm. Wash hands after handling.
14
Section 8: Appendices
Appendix A - MIDI IMPLEMENTATION CHART
Function
Transmitted
Recognized
Basic
Channel
Default
Changed
1-16
1-16
X
X
Mode
Default
Messages
Altered
Mode 3
0
*****
X
0-127
*****
X
True Voice
Velocity
Note ON
Note OFF
0
X
X
X
After
Touch
Key’s
Channel
X
0
X
X
0
X
Note
Number
Pitch Bend
Control
Change
0-119
120-127
0
0
X
X
Program
Change
0-127
*****
X
True #
0*
0*
SystemExclusive
System
Common
Song Position Pointer
SongSel
Tune Request
X
X
X
X
X
X
System
Real Time
Clock
Commands
X
X
X
X
Aux
Messages
All Sounds Off
ResetAl l Contr ollers
Local ON/OFF
All Notes OFF
Active Sensing
SystemReset
0
0
0
0
X
X
X
X
X
X
X
X
Notes
Mode 1: OMNI ON, POLY
Mode 2: OMNI ON, MONO
Mode 3: OMNI OFF, POLY
Mode 4: OMNI OFF, MONO
15
0: Yes
X: No
Remarks
*GM, GM2, MMC,
Appendix B – Useful MIDI Data Tables
BI-General MIDI Instruments-Program Change Numbers
Piano
Bass
Reed
Synth Effects
0 Acoustic Grand Piano
32 Acoustic Bass
64 Soprano Sax
96 SFX Rain
1 Bright Acoustic Piano
33 Fingered Bass
65 Alto Sax
97 SFX Soundtrack
2 Electric grand Piano
34 Electric Picked Bass
66 Tenor Sax
98 SFX Crystal
3 Honky Tonk Piano
35 Fretless Bass
67 Baritone Sax
99 SFX Atmosphere
4 Electric Piano 1
36 Slap Bass 1
68 Oboe
100 SFX Brightness
5 Electric Piano 2
37 Slap Bass 2
69 English Horn
101 SFX Goblins
6 Harpsichord
38 Syn Bass 1
70 Bassoon
102 SFX Echoes
7 Clavinet
39 Syn Bass 2
71 Clarinet
103 SFX Sci-Fi
Chromatic Percussion
Strings/Orchestra
Pipe
Ethnic
8 Celesta
40 Violin
72 Piccolo
104 Sitar
9 Glockenspiel
41 Viola
73 Flute
105 Banjo
10 Music Box
42 Cello
74 Recorder
106 Shamisen
11 Vibraphone
43 Contrabass
75 Pan Flute
107 Koto
12 Marimba
44 Tremolo Strings
76 Bottle Blow
108 Kalimba
13 Xylophone
45 Pizzicato Strings
77 Shakuhachi
109 Bag Pipe
14 Tubular bells
46 Orchestral Harp
78 Whistle
110 Fiddle
15 Dulcimer
47 Timpani
79 Ocarina
111 Shanai
Organ
Ensemble
Synth Lead
Percussive
48 String Ensemble 1
80 Syn Square Wave
112 Tinkle Bell
17 Percussive Organ
49 String Ensemble 2
81 Syn Sawtooth Wave
113 Agogo
18 Rock Organ
50 Syn Strings 1
82 Syn Calliope
114 Steel Drums
19 Church Organ
51 Syn Strings 2
83 Syn Chiff
115 Woodblock
20 Reed Organ
52 Choir Aahs
84 Syn Charang
116 Taiko Drum
21 Accordion
53 Voice Oohs
85 Syn Voice
117 Melodic Tom
22 Harmonica
54 Syn Choir
86 Syn Sawtooth Wave
118 Syn Drum
23 Tango Accordion
55 Orchestral Hit
87 Syn Brass & Lead
119 Reverse Cymbal
Guitar
Brass
Synth Pad
Sound Effects
24 Nylon Acoustic
56 Trumpet
88 New Age Syn Pad
120 Guitar Fret Noise
25 Steel Acoustic
57 Trombone
89 Warm Syn Pad
121 Breath Noise
26 Jazz Electric
58 Tuba
90 Polysynth Syn Pad
122 Seashore
27 Clean Electric
59 Muted Trumpet
91 Choir Syn Pad
123 Bird Tweet
28 Muted Electric
60 French Horn
92 Bowed Syn Pad
124 Telephone Ring
29 Overdrive
61 Brass Section
93 Metal Syn Pad
125 Helicopter
30 Distorted
61 Syn Brass 1
94 Halo Syn Pad
126 Applause
31 Harmonics
62 Syn Brass 2
95 Sweep Syn Pad
127 Gun Shot
16 Drawbar Organ
16
B2-Roland GS And Yamaha XG NRPN Messages
NRPN
NRPN
Data
Data
MSB
LSB
MSB
LSB
CC99
CC98
CC06
CC38
01
08 00-7F
n/a
(-64 - 0 - +63) Vibrato Rate (relative change)
01
09 00-7F
n/a
(-64 - 0 - +63) Vibrato Depth (relative change)
01
0A 00-7F
n/a
(-64 - 0 - +63) Vibrato Delay (relative change)
01
20 00-7F
n/a
(-64 - 0 - +63) Filter Cutoff Freq. (relative change)
01
21 00-7F
n/a
(-64 - 0 - +63) Filter Resonance (relative change)
01
63 00-7F
n/a
(-64 - 0 - +63) EG (TVF&TVA) Attack Time (relative change)
01
64 00-7F
n/a
(-64 - 0 - +63) EG (TVF&TVA) Decay Time (relative change)
01
66 00-7F
n/a
(-64 - 0 - +63) EG (TVF&TVA) Release Time (relative change)
*14
00-7F 00-7F
n/a
(-64 - 0 - +63) Drum Filter Cutoff Freq. (relative change)
*15
00-7F 00-7F
n/a
(-64 - 0 - +63) Drum Filter Resonance (relative change)
*16
00-7F 00-7F
n/a
(-64 - 0 - +63) Drum EG Attack Rate (relative change)
*17
00-7F 00-7F
n/a
(-64 - 0 - +63) Drum EG Decay Rate (relative change)
18
00-7F 00-7F
n/a
(-64 - 0 - +63) Drum Instrument Pitch Coarse (relative change)
*19
00-7F 00-7F
n/a
(-64 - 0 - +63) Drum Instrument Pitch Fine (relative change)
1A
00-7F 00-7F
n/a
(0 to Max) Drum Instrument Level (absolute change)
1C
00-7F 00-7F
n/a
(Random, L>C>R) Drum Instrument Panpot (absolute change)
1D
00-7F 00-7F
n/a
(0 to Max) Drum Instrument Reverb Send Level (absolute change)
1E
00-7F 00-7F
n/a
(0 to Max) Drum Instrument Chorus Send Level (absolute change)
%1F
00-7F 00-7F
n/a
(0 to Max) Drum Instrument Variation Send Level (absolute change)
* added by Yamaha XG; % changed from Delay to Variation by Yamaha XG
B4-Gm2 Chorus Types
B3-General MIDI Drums-Note assignments
0.
1:
Small Room
Medium Room
2:
Large Room
3:
Medium Hall
4:
Large Hall
8:
Plate
0.
Chorus1
1:
Chorus 2
2:
Chorus 3
3:
Chorus 4
4:
FB Chorus
5:
Flanger
B5-General MIDI Drums-Note assignments
MIDI Note
Drum Sound
MIDI Note
Drum Sound
MIDI Note
Drum Sound
35
Acoustic Bass Drum
52
Chinese Cymbal
69
Cabasa
36
Bass Drum 1
53
Ride Bell
70
Maracas
37
Side Stick
54
Tambourine
71
Short Whistle
38
Acoustic Snare
55
Splash Cymbal
72
Long Whistle
39
Hand Clap
56
Cowbell
73
Short Guiro
40
Electric Snare
57
Crash Cymbal 2
74
Long Guiro
41
Low Floor Tom
58
Vibraslap
75
Claves
42
Closed Hi-Hat
59
Ride Cymbal 2
76
Hi Wood Block
43
High Floor Tom
60
Hi Bongo
77
Low Wood Block
44
Pedal Hi-Hat
61
Low Bongo
78
Mute Cuica
45
Low Tom
62
Mute Hi Conga
79
Open Cuica
46
Open Hi-Hat
63
Open Hi Conga
80
Mute Triangle
47
Low-Mid Tom
64
Low Conga
81
Open Triangle
48
Hi-Mid Tom
65
High Timbale
49
Crash Cymbal 1
66
Low Timbale
50
High Tom
67
High Agogo
51
Ride Cymbal 1
68
Low Agogo
17
Appendix C - General MIDI Controller Numbers (MIDI CC's)
0~127
G ener al con tro ller
128
PAD co ntr oller
129
P itch Ben d
130
Master Vo lume
131
P rogra m Chang e
132
RPN Coarse
133
RPN Fine
134
NRPN Co arse
135
NRPN Fin e
Appendix D – Assignable Controller Numbers to Linear Controllers
This table applies to the following controls on your Panda:
<
Sliders
<
Aftertouch strip
<
Pitch bend wheel
<
Modulation wheel
<
Expression pedal
0~127
G ener al con tro ller
128
PAD co ntr oller
129
P itch Ben d
130
Master Vo lume
131
P rogra m Chang e
132
RPN Coarse
133
RPN Fine
134
NRPN Co arse
135
NRPN Fin e
Appendix E-Assignable Controller Numbers to Non-Linear Controllers
This table applies to the following controls on your Panda
<
Assignable buttons Panda 49/61 only)
<
Transport controls
<
Sustain pedal
0~127
G ener al con tro ller
128
PAD co ntr oller
129
P itch Ben d
130
Master Vo lume
131
P rogra m Chang e
132
RPN Coarse
133
RPN Fine
134
NRPN Co arse
135
NRPN Fin e
18
Appendix F – Assignable Controller Numbers to Rotary Encoders
This table only applies to the Rotary encoders on your Panda
0~127
G ener al con tro ller
128
PAD co ntr oller
129
P itch Ben d
130
Master Vo lume
131
P rogra m Chang e
132
RPN Coarse
133
RPN Fine
134
NRPN Co arse
135
NRPN Fin e
Appendix G – Assignable Controller Numbers to Pressure Pads
This table only applies to the pressure Pads on your Panda.
G ener al con tro ller
128
PAD co ntr oller
129
P itch Ben d
130
Master Vo lume
131
P rogra m Chang e
132
RPN Coarse
133
RPN Fine
134
NRPN Co arse
135
NRPN Fin e
English
0~127
Appendix H - Factory Presets
Penal controller
R1
R2
R3
R4
R5
R6
Controller number
07
92
91
74
131
81
Controller name
Standard MIDI Controller
Standard MIDI Controller
Standard MIDI Controller
Standard MIDI Controller
Program Change
Standard MIDI Controller
R7
R8
PITCHBEN W HEEL
MODULATION WHEEL
S1
S2
S3
73
93
129
01
130
42
65
Standard MIDI Controller
Standard MIDI Controller
Pitch Bend
MODULATION
Master Volume
Standard MIDI Controller
Standard MIDI Controller
S4
S5
S6
S7
S8
S9
Pad
94
07
67
95
71
70
128
Standard MIDI Controller
Standard MIDI Controller
Standard MIDI Controller
Standard MIDI Controller
Standard MIDI Controller
Standard MIDI Controller
Pad controller
Pedal A
Pedal B
67
11
Standard MIDI Controller
Standard MIDI Controller
19
Appendix I - Hexadecimal Conversion Chart
Hexadecimal value
Decimal value
Hexadecimal value
Decimal value
Hexadecimal value
Decimal value
0
0
2B
43
56
86
1
1
2C
44
57
87
2
2
2D
45
58
88
3
3
2E
46
59
89
4
4
2F
47
5A
90
5
5
30
48
5B
91
6
6
31
49
5C
92
7
7
32
50
5D
93
8
8
33
51
5E
94
9
9
34
52
5F
95
0A
10
35
53
60
96
0B
11
36
54
61
97
0C
12
37
55
62
98
0D
13
38
56
63
99
0E
14
39
57
64
100
0F
15
3A
58
65
101
10
16
3B
59
66
102
11
17
3C
60
67
103
12
18
3D
61
68
104
13
19
3E
62
69
105
14
20
3F
63
6A
106
15
21
40
64
6B
107
16
22
41
65
6C
108
17
23
42
66
6D
109
18
24
43
67
6E
110
19
25
44
68
6F
111
1A
26
45
69
70
112
1B
27
46
70
71
113
1C
28
47
71
72
114
1D
29
48
72
73
115
1E
30
49
73
74
116
1F
31
4A
74
75
117
20
32
4B
75
76
118
21
33
4C
76
77
119
22
34
4D
77
78
120
23
35
4E
78
79
121
24
36
4F
79
7A
122
25
37
50
80
7B
123
26
38
51
81
7C
124
27
39
52
82
7D
125
28
40
53
83
7E
126
29
41
54
84
7F
127
2A
42
55
85
Contact informati on:
HANGZHOU WORLDE DIGITAL PIANO CO., LTD
5 Houshan Road, GujiaQiao, Wuchang Industry Park,
Yuhang District, Hangzhou, Zhejiang 310023,China
Tel:+86-571-88 730848
Fax:+86-571-88 730748
Email:sales@worl de.com.cn
Website:www.worl de.com.cn
20