1
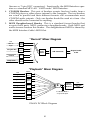
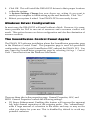
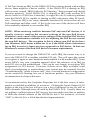
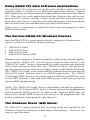
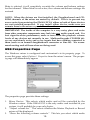
1
DMAN PCI ™
MANUAL
Version PCI 052199
IMPORTANT! PLEASE READ THIS MANUAL CAREFULLY, AND FOLLOW THE DMAN PCI DRIVER AND DirectX INSTALLATION PROCEDURE BEFORE INSTALLING THE DMAN PCI CARD.
Table of Contents
FCC Class B and CE Compliance ...................................................... 2
Introduction ................................................................................................. 3
What’s In the Box ...................................................................................... 3
About the DMAN PCI ................................................................................ 3
Product Features....................................................................................... 3
Product Specifications .......................................................................... 4
Minimum System Requirements ................................................... 4
The DMAN PCI Adaptor Card .............................................................. 5
Quick Guide to Getting Started ...................................................... 7
Windows Software Installation...................................................... 7
Hardware Installation ........................................................................... 9
Installing the Adaptor Card......................................................................... 9
Installing a Daughterboard........................................................................ 10
Connecting to External Devices ................................................................ 10
Restarting Your Computer for the First Time................... 11
In Windows 98 ............................................................................................. 12
In Windows 95 ............................................................................................ 12
Windows Driver Configuration....................................................... 13
The SoundFusion Control Panel Applet ................................. 13
The Windows Device Manager ....................................................... 14
Driver Resource Conflicts.................................................................. 15
Using DMAN PCI with Software Applications..................... 17
The Various DMAN PCI Windows Devices............................... 17
The Windows Mixer (WSS Mixer) .................................................. 17
Windows “Master” (Playback) Mixer ........................................ 18
WSS Properties Page ............................................................................ 19
Windows “Record” Mixer.................................................................... 20
Windows Sound Recorder.................................................................. 20
Using Third-Party Applications ................................................... 21
Troubleshooting ....................................................................................... 22
Appendix A - About Digital Recording .................................... 25
Digital Recording Dos and Don’ts............................................... 26
Appendix B - Digital Audio Terms............................................... 27
Lifetime Limited Warranty............................................................... 28
FCC Class B and CE Compliance
WARNING: This equipment has been tested and found to comply with the
limits for a CLASS B digital device, pursuant to Part 15 of the FCC Rules. These
limits are designed to provide reasonable protection against harmful interference in a residential installation. This equipment generates, uses and can radiate radio frequency energy and, if not installed and used in accordance with
the instructions contained in this manual, may cause harmful interference to
radio and television communications. However, there is no guarantee that
interference will not occur in a particular installation.
If this equipment does cause harmful interference to radio or television reception, which can be determined by turning the equipment off and on, the user is
encouraged to try to correct the interference by one or more of the following
measures: 1) reorient or relocate the receiving antenna; 2) increase the separation between the equipment and the receiver; 3) connect the equipment into an
outlet on a circuit different from that of the receiver; 4) consult the dealer or an
experienced audio television technician.
NOTE: Connecting this device to peripheral devices that do not comply with
CLASS B requirements, or using an unshielded peripheral data cable could
also result in harmful interference to radio or television reception.
The user is cautioned that any changes or modifications not expressly
approved by the party responsible for compliance could void the user ’s
authority to operate this equipment.
To ensure that the use of this product does not contribute to interference, it is
necessary to use shielded I/O cables.
This product also complies with European CE requirements.
2
Introduction
Congratulations on purchasing a DMAN PCI Digital Audio Card, and welcome to the world of digital hard disk based recording. Please take the time to
read this manual -- it contains valuable information about installing and operating your new card. If you take the time now to familiarize yourself with the
installation and features of the card, it can potentially save a lot of time and
frustration. We know that you’re eager to get started recording so we will try
to cover the important information first!
What’s in the Box?
Your DMAN PCI box contains:
• This Instruction Manual
• DMAN PCI Adaptor Card
• MIDI Interface Cable
• Diskettes for Windows 98/95 installation
• Midiman Warranty Registration Card
IMPORTANT: Please fill out the included Warranty Registration Card and
mail or fax it to us as soon as possible. Registering your DMAN PCI will
help us to give you the best possible service and support.
About the DMAN PCI
The DMAN PCI is a full-featured, yet low-cost adaptor card that turns your
computer into a digital audio workstation. The DMAN PCI offers high-quality
audio on gold-plated line inputs and outputs, MIDI input/output, General
MIDI wavetable synthesizer, CD-ROM audio input, and expansion header for
optional third-party synthesizer daughterboards.
The DMAN PCI is a “PCI audio accelerator” that actually offloads the computer of many of its CPU-intensive audio duties. The DMAN PCI adaptor card
and supplied Windows driver software are fully DirectX compatible.
Product Features
•
•
•
•
•
•
PCI 2.1 compliant card. Requires one IRQ and no DMA channels.
High quality audio specs: 90 dB dynamic range.
Full-duplex for simultaneous stereo record and playback.
Stereo line-level inputs and outputs on gold-plated RCA jacks.
MIDI In and MIDI Out on 5-pin DIN connectors.
Built-in 64-voice General MIDI Wavetable Synthesis with GS reverb and
chorus effects, independent of hardware MIDI I/O.
3
•
•
•
•
Built-in header for addition of standard wavetable daughter board (optional).
Integrated Analog Mixer.
High-quality differential CD audio input.
Full Windows 95/98 Plug-and-Play compatibility.
Product Specifications
•
•
•
•
•
•
•
•
•
•
Operates in any PCI (2.0 or higher) adaptor slot.
18-bit delta-sigma A/D and D/A converters, 16-bit (or 8-bit) data path.
All standard sample rates supported, up to and including 48 kHz.
Total Dynamic Range: 90 dB, THD+N: -85 dB typical.
Frequency Response: 20 Hz to 20 kHz, +/-0.5 dB.
Line Level Impedance: 13.6 k Ohms.
Maximum Audio I/O levels: +6 dBV (-10dBV nominal).
16-channel MIDI interface drives external MIDI port and daughterboard
header.
DirectX ™ 3D Positional Audio.
255 MIPs custom DSP architecture, 96-channel streaming interface with
hardware scatter/ gather support.
Minimum System Requirements
•
•
•
•
•
CPU: Pentium 90 MHz or faster, or equivalent.
Memory: 16 MB (32 MB strongly recommended).
Storage: 15 MB available disk space on hard disk.
Operating System: Windows95 or Windows98, plus DirectX 5 or higher.
Expansion Slot: One available PCI slot (PCI BIOS 2.0 or higher).
4
4.
1.
2.
3.
5.
Figure 1
The DMAN PCI Adaptor Card (See Figure 1.)
1.
Line Inputs. This pair of RCA jacks receives stereo line-level audio from
the outside world. Both inputs are high-impedance and are designed for
use at -10dBV nominal levels. They can handle peak signals of up to
+6dBV (2 Vrms). Typical connections to these jacks are line-level outputs
of a mixer or external microphone preamp, the recording outs of an instrument amplifier or the line outs of a tape deck.
NOTE: The Line Inputs are not designed for direct connection to microphones. In order to use a microphone with the DMAN PCI, you will need to
connect it through either a microphone preamp (such as the Midiman
“Audio Buddy”) or a mixer (such as the Midiman “MiXiM 10”).
2.
3.
Line Outputs. This pair of RCA jacks outputs stereo line-level audio to the
outside world. The output signals are designed for -10dBV nominal levels,
with peak output of up to +6dBV (2 Vrms). Normally these jacks would be
connected to an external amplifier and speakers, self-powered multimedia
speakers, a DAT or other stereo mix-down recorder.
MIDI Interface Connector. This connector attaches to the included MIDI
Interface Cable to provide standard MIDI Input and Output connectors
5
4.
5.
(known as “5-pin DIN” connectors). Functionally, the MIDI Interface operates as a standard MPU-401 “UART mode” MIDI interface.
CD-ROM Headers. This pair of headers accepts line-level audio from a
CD-ROM player or other source internal to the computer. The two headers
are wired in parallel and their different formats will accommodate most
CD-ROM audio outputs. Only one header should be used at a time – the
other should not be connected to anything.
MIDI Daughterboard Header. This is a standard format header that
accepts third party MIDI synthesizer daughterboards. Both MIDI and
audio streams traverse this header. The daughterboard MIDI is shared by
the MIDI Interface Cable’s MIDI Out.
“Record” Mixer Diagram
Left
Volume/
Balance
CD In
Right
Volume/
Balance
Daughter BD
Line In
Volume/
Balance
Loop back
Volume/
Balance
Record
Input
Select
Digital Audio
to PC
A/D Converter
(See Playback Mixer)
“Playback” Mixer Diagram
Left
PC Digital Audio
“Wave”
Volume/
Balance
Right
Synth
Daughter BD
Volume/
Balance
+
Volume/
Balance
CD In
Volume/
Balance
Line In
Volume/
Balance
Master
Volume/
Balance
To “Record” Mixer’s
“Loop back” input.
DMAN PCI Block Diagram
6
Left
Line Out
Right
Quick Guide to Getting Started
Here is the list of steps required to get your DMAN PCI card up and running:
1.
Install drivers and support software (See Windows Software Installation).
IMPORTANT: You should run the DMAN PCI Setup program before
installing the DMAN PCI adaptor card in your system. This order will make
Plug-and-Play configuration more reliable.
2.
3.
4.
Physically install the card in your computer (See Hardware Installation).
Restart Windows and allow Windows Plug-and-Play to configure the
DMAN PCI drivers (See Restarting Your Computer for the First Time).
Configure your digital recording software to select the DMAN PCI as its
active audio adaptor (See Using DMAN PCI with Software Applications
and your applications software manual).
Windows Software Installation
Your DMAN PCI package includes a set of Windows 95/98 software diskettes.
These diskettes contain the DMAN PCI Setup program, the DMAN PCI
Windows driver software and DirectX software drivers. This section describes
how to run the Setup program and install all of these DMAN PCI software
components.
IMPORTANT: You should run the DMAN PCI Setup program before
installing the DMAN PCI adaptor card in your system. This order will make
Plug-and-Play configuration more reliable.
Follow the directions below to run the DMAN PCI Setup program:
1.
2.
3.
4.
5.
Insert the disk entitled “DMAN PCI Windows Driver & DirectX
Installation, Disk 1” into your 3.5 floppy drive. Go to the Start menu; select
"Run…"
Type "a:\setup" and click OK (use “b:\setup” if you must use the B: drive).
The Midiman DMAN PCI logo will appear while InstallShield prepares for
setup. Then, the big blue DMAN PCI Windows Setup screen appears,
announcing “Midiman DMAN PCI Setup.”
A Welcome dialog box now appears. Select "Next>" to continue.
The Select Components dialog box then appears. The list of installable
components will show: Driver Files and DirectX Files. Each component
will have a check box to the left of it, which indicates whether or not that
component will be installed. By default, each component is selected for
installation. It is recommended that you leave the selections this way.
7
IMPORTANT: The DMAN PCI requires the installation of DirectX drivers,
version 5 or higher. Without DirectX installed, the DMAN PCI driver installation may crash. The DMAN PCI Setup program can install DirectX 6 on
your computer before the DMAN PCI drivers are installed. It is very important to select this option if you do not already have DirectX 5 or higher
installed on your computer.
Also in the Select Components dialog box is the Destination Folder setting.
This specifies where the selected software components will be stored. By
default, this folder is C:\MIDIMAN\DMAN PCI. It is recommended that you
leave that setting as is.
NOTE: You may select another target folder by selecting the Browse... button. If you do choose this option, be sure to write down the destination folder, as you will need this information later in the installation process.
6.
7.
Select “Next>” to copy the driver files to the destination folder. This copy
process may require a few minutes. Since the software requires several
diskettes, Setup will occasionally prompt you for the next diskette. When
prompted, remove the previous diskette, insert the new one, and select
“OK” (no need to browse or type a path other than [drive letter]:\ ).
Continue to do this until all the components have been copied to your hard
disk.
If you have selected the DirectX component for installation as suggested,
setup will now run the DirectX installer. When the Microsoft DirectX 6
Setup dialog box appears, select “Yes” to begin installation.
NOTE: The DirectX 6 installer is smart enough to not overwrite newer version(s) of DirectX that may already be installed on your system.
8.
The Microsoft DirectX 6 Setup will display a Licensing Agreement. To
agree, press "Yes." Setup will continue its check for versions of DirectX,
then extract and copy the necessary files.
9. A DirectX Setup dialog box appears when it completes the installation successfully, and it will ask you to select “OK.” Click on “OK”.
10. Next, the Information dialog box tells you that Setup will now install the
drivers and update registry. It may take up to a few minutes. Click “OK,”
and wait for the Setup Complete dialog box to appear.
11. When the Setup Complete dialog box appears, setup is complete. It is recommended that you shut down your computer and then install the DMAN
PCI card. To do this, select “No, I will restart my computer later,” then
click “Finish”. This will return you to the Windows Desktop. You can
remove the last floppy disk at this point. Go to the Start button, choose
“Shut Down,” then tell the computer you want it to “Shut down,” and
click OK.
8
Hardware Installation
After successfully installing all of the DMAN PCI software components (See
Windows Software Installation) and powering down your computer, you may
install the DMAN PCI adaptor card.
Installing the Adaptor Card
To mechanically install the DMAN PCI, do the following:
1.
2.
3.
4.
5.
6.
7.
8.
9.
Turn off your computer.
Remove its cover and position the computer so you may easily access its
PCI slots.
Select the PCI slot where you will install your DMAN PCI card. Make sure
it is a PCI slot. If you don't know what “PCI slot” means, check the
owner’s manual for your computer. PCI slots are distinguishable from ISA
slots by being shorter and set back farther from the outside of the computer. However, some newer computers have only PCI slots.
The PCI slot you just selected should have a metal bracket associated with
it that covers the PCI slot’s access hole on the back of the computer. This
bracket is usually fastened to the computer with a single screw. Remove
the screw and bracket -- be sure not to lose the screw as you will need it
later!
Before removing the DMAN PCI from its protective anti-static bag, touch
the metal power supply case of the computer in order to dissipate any static electricity charge your body may have accumulated.
Remove the DMAN PCI card from its bag. If you are planning on
installing an optional daughterboard, now is the time to do it (see
Installing a Daughterboard below). If you will be connecting your computer’s CD-ROM audio outputs to the DMAN PCI, it might also be a good
time to do this.
Position the DMAN PCI card over the target PCI slot and fit the card loosely over it with the DMAN PCI card upright. Press the card gently but firmly downward into the slot until the card is completely and squarely seated
in the slot. If the card seems difficult to seat, a slight rocking motion may
help. If the card is impossible to seat, you may be trying to install the
DMAN PCI in a non-PCI slot. If this is the case, go back to Step 3.
Once the DMAN PCI board is firmly seated, screw its metal bracket down
into the computer chassis, using the screw you removed in Step 4 above.
Place the cover back on your computer.
9
Installing a Daughterboard
The DMAN PCI comes with a built-in General MIDI compatible wavetable
synthesizer. However, a (26-pin header) daughterboard connector is provided
for installation of an optional third-party synthesizer daughterboard. The
daughterboard header is compatible with most industry-standard daughterboards.
To install a daughterboard on the DMAN PCI daughterboard header, follow
these steps:
1.
2.
With the DMAN PCI in front of you, remove the daughterboard from its
anti-static bag.
Carefully align the daughterboard header socket with the DMAN PCI
header pins. Make sure that the daughterboard is properly oriented so it is
“inboard” to the DMAN PCI card.
IMPORTANT: Pin 1 of the header is marked on the DMAN PCI in white
ink. Be sure that DMAN PCI pin 1 will match up with the daughterboard
pin 1 when installed.
3.
Press the daughterboard and DMAN PCI together until the header and
socket mate firmly.
Connecting to External Devices
Once the DMAN PCI card is installed in your computer, you are ready to make
connections to external devices. While reading this section, please refer to the
diagram “Typical DMAN PCI Setup.”
1.
2.
3.
Connect the DMAN PCI Line Out jacks to your amplifier, multimedia
speakers, the channel or monitor inputs of your mixer, or whatever else
you may be using to listen with. To avoid a potential audio “pop” it is a
good idea to turn off the amplifier or self-powered speakers before connecting to Line Out.
Connect the buss, aux, direct, or alt out of your mixer, or Line Out of
another audio source, to the DMAN PCI Line In jacks. In order to use a
microphone with the DMAN PCI, the microphone must be connected to
the DMAN PCI through a mic preamp or mixer.
If you plan on using external MIDI, connect the supplied MIDI Interface
Cable to the matching DMAN PCI connector at the back of the computer.
Use the cable assembly thumbscrews to attach it securely to the DMAN
PCI connector.
10
4.
5.
If you installed the MIDI Interface Cable in Step 3, you may now attach
any MIDI devices you may have. Connect the MIDI device MIDI Out to
the DMAN PCI MIDI In, and connect the MIDI device MIDI In to the
DMAN PCI MIDI Out. You will most likely need to use standard MIDI
cables to make these connections.
Move your computer back to its original position. You may now turn on
your computer.
DMAN PCI
Line In (L)
Line In (R)
Mic
Line Out (L)
Guitar
Line Out (R)
Right Out
Left Out
MIDI
MIDI Out
MIDI In
Line Mixer
Main In
MIDI In
MIDI Out
Left
Right
Amplifier
MIDI Keyboard
Typical DMAN PCI Setup
Restarting Your Computer for the First Time
(after installing the DMAN PCI)
After installing the DMAN-PCI board, the first time you power up your computer the Plug-and-Play (PnP) system must configure the board for use. This
process will usually only be required once, unless you move the DMAN-PCI to
a different PCI slot at a later time.
11
In Windows 98
1.
2.
3.
After carefully following the “Hardware Installation” instructions, you
may power up your computer (A Building driver information database
box will appear and then go away).
The Add New Hardware Wizard box will ask you “What do you want
Windows to do?” “Search for the best driver for your device” will already
be checked. Click “Next>.”
The Add New Hardware Wizard instructs Windows to search for new drivers. Uncheck “floppy drive,” and check the box that says, “Specify a location.” The A:\ drive will be highlighted as the search destination. It is
IMPORTANT here that the folder that was created for the DMAN-PCI driver during the “Windows Software Installation” be used instead. Please
replace “A:\” by typing in the following path, exactly as shown:
C:\Midiman\DMAN-PCI
NOTE: If for some reason you selected another destination folder during
software installation, please enter it instead.
4.
5.
6.
Click “Next>.” Windows driver file search will find the driver for the
device: “DMAN-PCI Audio Accelerator.” Click Next>, and Windows will
copy files.
The Add New Hardware Wizard will announce that Windows has finished
installing the software required. Click “Next>.”
A New Hardware Found box will appear while Windows associates the
drivers with the device. When it returns you to your Windows desktop,
the DMAN PCI is now ready for use.
In Windows 95
1.
2.
3.
After carefully following the “Hardware Installation” instructions, you
may power up your computer (A Building driver information database box
will appear and then go away).
A New Hardware Found dialog box appears, asking you how you want to
select your new driver. Select “Driver from disk provided by hardware
manufacturer” will be checked at this point. Click OK.
An Install From Disk dialog box now appears, and the A:\ drive will be
highlighted as the search destination. It is IMPORTANT here that the folder that was created for the DMAN-PCI driver during the “Windows
Software Installation” be used instead. Please replace “A:\” by typing in
the following path, exactly as shown:
C:\Midiman\DMAN-PCI
NOTE: If for some reason you selected another destination folder during
software installation, please enter it instead.
12
4.
5.
6.
Click OK. This will install the DMAN-PCI drivers to their proper locations
within the system.
A System Settings Change box now shows up, asking if you want to
restart your computer to finish setting up the new hardware. Click “Yes.”
Reboot your system if asked. Your DMAN-PCI is now ready for use.
Windows Driver Configuration
In most cases, the DMAN PCI will install without a hitch. However, it is sometimes possible for PnP to run out of resources and a resource conflict will
result. This section focuses on driver configuration and also the elimination of
resource conflicts.
The SoundFusion Control Panel Applet
The DMAN PCI software installation places the SoundFusion properties page
in the Windows Control Panel. This properties page is used for specialized
configuration of the Crystal SoundFusion DSP onboard the DMAN PCI. You
may open the SoundFusion properties page by selecting Settings | Control
Panel | SoundFusion from the Windows Start menu.
There are three tabs in the properties page: General Properties, AEC, and
MIDI. General Properties controls the following settings:
• 3D Stereo Enhancement. Enabling this feature will increase the apparent
left/right channel separation of the outgoing audio. This “enhancement”
adds a large amount of coloration to the audio and may or may not be
what you desire for your use. This is disabled by default to avoid any
potential confusion.
13
•
•
SoundFusion™ DSound Acceleration. This feature allows the DSP to perform many of the audio duties that would otherwise have to be handled by
the host CPU. In other words, it enables audio acceleration. The default
setting is “enabled.”
Taskbar. Enabling this function places a SoundFusion™ icon on the
Windows taskbar for easy access to the SoundFusion properties page.
The AEC page controls the following setting:
• Acoustic Echo Cancellation. This feature could be used if the DMAN PCI
board is being used as a speakerphone. This is disabled by default (set to
Never).
The MIDI page controls the following setting:
• Maximum Notes. This is the polyphony setting of the built-in synthesizer.
Raising this number will increase the number of simultaneous MIDI notes,
but will decrease the number of simultaneous 3D audio channels. By
default, this is set to the General MIDI standard setting: 24 notes simultaneously. 64 notes is the maximum polyphony possible.
The Windows Device Manager
You may find the DMAN PCI driver status in the Windows Device Manager
page of the System Properties dialog box. Open the Device Manager by pressing the Windows Start Button and selecting Settings | Control Panel | System |
Device Manager. Once the Device Manager is open, it will display a list of
device “types.” Scroll down through the list until you locate Sound, video and
game controllers. Click on the “+” next to Sound, video and game controllers
to view the installed products within that type. DMAN PCI is of the class
Sound, video and game controllers and should appear in the list if the DMAN
PCI drivers are properly installed. Below is an example view of the Device
Manager device list.
14
This example shows the Midiman DMAN PCI and Midiman WINMAN 4x4/S
(another Midiman product) entries in the Windows Device Manager device
list. The DMAN PCI is properly installed with no conflicts, as is the WINMAN
4x4/S.
If a device in this list is having a resource conflict with another device, or if
there are driver problems, a yellow exclamation point will generally appear on
top of the icon next to that device. There are several approaches to solving this
dilemma.
NOTE: Most sound card installation problems result from attempting to use
system resources (IRQ’s and Address locations) that are already in use by other
hardware components in the system.
Driver Resource Conflicts
By highlighting the item with the problem (yellow exclamation point showing), then clicking the Properties button (or double-clicking the actual item),
you will open up a Properties page for that device. Selecting the Resources tab
from within the Properties dialog box will allow you to view resources, plus
view possible conflicts by highlighting each item (by clicking on it) one-by-one
and examining the “Conflicting resource list:” at the bottom of the box.
It is sometimes possible for a resource problem to not show up in the
Conflicting Resource List or as a yellow exclamation point in the Device
Manager. If you have any doubts about the configuration of your device (or
just to double-check), you can view all of the devices and their associated IRQs
by highlighting Computer at the top of the Device Manager list and clicking
the Properties button. This will give you a dialog box with IRQ numbers on
the left, and devices on the right.
15
If PnP has chosen an IRQ for the DMAN PCI that is being shared with another
device, there might be a device conflict. If the DMAN PCI is sharing an IRQ
with an entry named “IRQ Holder for PCI Steering,” that is normal and should
function properly. If the DMAN PCI is sharing an IRQ with another PCI
device (such as a USB Host Controller), it might also do so without problems
since the DMAN PCI is capable of sharing an IRQ with many other PCI products. However, IRQ’s are rarely shareable between ISA devices that are not
PnP-compliant and other cards. If this is the case one of the devices will have
to be manually adjusted to use another IRQ.
NOTE: When resolving conflicts between PnP and non-PnP devices, it is
usually easier to readjust the resource settings of the non-PnP device.
Windows is only aware of the resource settings of the installed PnP devices
and has no information available to it for adjusting the PnP devices around
the non-PnP devices. The exception to this is when a non-PnP device has a
true Windows 98/95 driver written for it, or if the BIOS allows instructions
for an IRQ to receive a legacy device as opposed to a PnP device. In that case
Windows is aware of the non-PnP device’s resource requirements.
If you ever need to change the DMAN PCI card’s IRQ, the easiest way is to
move the DMAN PCI to another available PCI slot. This will cause the system
to recognize it again as new hardware and establish it with another IRQ. Some
newer BIOS’s (see your computer manual) allow the selection of an IRQ for
each PCI slot on the motherboard. This can be very handy in resolving IRQ
assignments for PCI devices. However, if there are no IRQs available, some
kind of reconfiguring or reprioritizing your system may be required. See the
“Troubleshooting” guide for more info. Also, a second hardware configuration
can be created for running two sets of hardware profiles. See your Windows
documentation for help in this area.
As mentioned earlier, the Computer Properties list is the best source of information to establish availability of resources. Clicking the Input/Output (I/O)
button at the top of the box will give you a list of Addresses in use (as well as
DMA channels, although none are used by the DMAN PCI). Usually, there are
not address conflicts between PnP devices, but one might note that an address
of 300h (the default address of the WINMAN 4x4/S, for instance), will read
“0300” in this list (it is a 16-bit hexadecimal representation).
16
Using DMAN PCI with Software Applications
Once the DMAN PCI software is set up, the card is installed, and its drivers are
properly loaded, it is ready for use with audio application software. Some of
these applications will require manual configuration in order to use the DMAN
PCI. There are a few audio applications built into Windows that will be common on all PC systems: usually a mixer, sound recorder and media player.
Most users may choose to purchase and install third-party software packages
that are much more powerful than those provided with Windows.
Either way, it is important to understand the name and purpose of each
DMAN PCI function.
The Various DMAN PCI Windows Devices
Since the DMAN PCI is a multi-function board, it appears to Windows software as a collection of different Windows devices:
•
•
•
•
DMAN PCI Audio
DMAN PCI Mixer
DMAN PCI Synth
DMAN PCI External MIDI
Whenever you configure a Windows-supplied or third-party software application to use the DMAN PCI, you will need to look for these devices. The
“DMAN PCI Audio” device is responsible for audio recording and playback,
such as that contained in WAV files. The “DMAN PCI Mixer” sets the recording and playback levels of the various audio sources on the DMAN PCI board.
The “DMAN PCI Synth” is the General MIDI synthesizer that is built into the
DMAN PCI board. Windows sees it as a MIDI Output device. The “DMAN
PCI External MIDI” device is associated with the MIDI In and MIDI Out jacks
on the MIDI Interface Cable, and with MIDI going to and coming from the
optional MIDI daughterboard.
NOTE: The “DMAN PCI Synth” device is dedicated to the built-in synthesizer.
The “DMAN PCI External MIDI” device is shared between the daughterboard
and the external MIDI connector. In other words, whatever MIDI data you
send to the external MIDI connector will also go to the daughterboard; the
built-in synthesizer is independent of the other two.
The Windows Mixer (WSS Mixer)
The DMAN PCI audio playback and recording mixes are handled by the
Windows Sound System mixer, which ships with Windows. There are two
ways to open this mixer:
17
1.
2.
At the Windows Start menu select Programs | Accessories | Multimedia |
Volume Control.
Double-click your mouse on the little “speaker” icon on the Windows
taskbar. If this speaker icon is not present on your taskbar, you may enable
it by selecting Settings | Control Panel | Multimedia from the Windows Start
menu, checking “Show volume control on the taskbar” and clicking the
“OK” button.
Once open, you may view and adjust the Master (playback) mixer and the
Record mixer.
Windows “Master” (Playback) Mixer
The Master mixer is the default mixer and appears each time you open the
Windows volume control. The Master mixer provides control over the playback volume and balance for each DMAN PCI audio source:
•
•
•
•
•
•
Master – This is the board’s master volume/balance; it controls the overall
level at the board’s Line Out jack.
Wave – This sets the output level/balance from the board’s D/A converter.
Synthesis – This sets the output level/balance of the onboard synthesizer.
DaughterBd – This sets the output level/balance of the daughterboard synthesizer if a daughterboard is installed.
Compact Disc – This sets the output level/balance of the audio coming
from your CD-ROM, if connected to the board.
Line In – This sets the output level/balance of the Line Input. This control
may be used to monitor the Line In signal during full-duplex
recording/playback.
To adjust volume levels and balances, simply click and drag the desired controls with your mouse. Note that each device also has a “Mute” control. When
18
Mute is selected, it will completely override the volume and balance settings
for that channel. When Mute is not active, the volume and balance settings are
restored.
NOTE: When the drivers are first installed, the Daughterboard and CDROM channels of the mixer are muted by default. This is to prevent any
excess noise from entering the DMAN PCI if either or both of those devices
are not installed/connected. If you install either device, make sure you
unmute them in the mixer or you will not hear them.
IMPORTANT: The inside of the computer is a very noisy place and noise
from other computer components may leak into any audio sound card. For
best signal-to-noise performance, mute or turn down the playback volume
levels of any devices not currently in use. Multimedia-grade CD-ROM drives are notoriously noisy and so are inputs that have nothing connected to
them (such as an unused daughterboard connector or Line In). We recommend muting each of these when not being used.
WSS Properties Page
The Windows mixer is configured and customized via its property page. To
access this page, select Options | Properties from the mixer’s menu. The property page will immediately appear.
The properties page provides three settings:
1.
2.
3.
Mixer Device. This selects which audio card will be controlled by the
Windows mixer. If the DMAN PCI is the only audio card installed in you
system, it will probably be your only choice.
“Adjust volume for.” This selects whether the Master Playback or Record
mixer will be displayed.
“Show the following volume controls.” This lets you select which audio
19
devices to display in the mixer. If a device’s box is checked, it will appear
in the mixer. You can completely customize the look of your mixer by
unchecking any device that you do not plan to currently use.
Windows “Record” Mixer
The Record mixer selects the recording source and provides control over the
recording volume and balance for each DMAN PCI audio device. Since the
Windows Mixer always starts up with the Master mixer showing, you will
need to manually select the Record mixer in order to view it. Do this by selecting Options | Properties from the Master mixer. A dialog box will appear, and
you may then select “Recording” from the box labeled “Adjust volume for.”
See the section “Windows Mixer Properties Page” for more information about
this dialog box.
The Record mixer allows you to select one input at a time for recording. This is
accomplished by checking the “Select” box below the desired device. A special
device named “Loopback” allows you to record from all sources simultaneously.
In this example, the Line In has been chosen as the input device. This is the
default setting when the drivers are first installed. To adjust recording levels
and balances, simply click and drag the desired controls with your mouse.
Windows Sound Recorder
Windows provides a mechanism for audio playback and recording using its
Sound Recorder application. Open the Start Menu, then select Programs |
Accessories | Multimedia | Sound Recorder to bring up the Sound Recorder. The
Sound Recorder relies on the Windows multimedia settings to tell it what
devices to record and play back. Access these settings in the Multimedia
Properties Audio page (found in Settings | Control Panel | Multimedia | Audio).
In this property page, be sure to select “DMAN PCI Audio” as the preferred
playback device and preferred recording device. You might also want to select
“Use only preferred devices” as well. You will also need to open the Windows
20
Recording Mixer and select one of the DMAN PCI devices as the recording
source.
The Sound Recorder can apply various effects and processing to your recorded
audio. For more information on this, select “Help” from the Sound Recorder
menu.
Using Third-Party Applications
Sooner or later you may want to use DMAN PCI with some of the advanced
audio recording and MIDI sequencing applications currently available from
third-party software developers. It is with these applications that the DMAN
PCI becomes a true multi-track digital audio recording tool. Although there
are various setup parameters built into Windows for selecting audio quality,
etc., the third-party applications usually work around those settings.
IMPORTANT: Third-party digital audio recording software most often
bypasses the general Windows settings and instead has its own means of setting up the DMAN PCI record/playback sample rate, format, full and halfduplex settings (check your manual for info on how to set up these parameters). For example, you often select the sampling rate (22 kHz, 44.1 kHz, and
even 48 kHz on some products) and format (16-bit stereo, 8-bit mono, etc.)
directly from within the application. However, you will select the recording
source (e.g. Line In, Compact Disc In) and input level from the mixer application supplied with Windows.
In addition, the application may require you to explicitly select the audio
device by name for the application to use. In the case of the DMAN PCI, the
audio device you should select is “DMAN PCI Audio.” If the application supports MIDI, there will most likely also be a MIDI Setup or MIDI Devices page
in which you must select the “DMAN PCI External MIDI” as the MIDI
input/output device, or the “DMAN PCI Synth” for playing the onboard synthesizer only.
There are too many applications to discuss here, so please consult the user’s
manual that shipped with your third-party application for more specific information regarding its audio and MIDI configuration and setup.
21
Troubleshooting
This section addresses potential problems that can arise in all operating system
environments, with emphasis on hardware troubleshooting. Within the PC
environment there is a limited number of hardware resources (Addresses,
IRQs, and DMA channels) available for use. Most audio card installation problems arise from improperly set IRQ values. Please see the section Windows
Driver Configuration to review the proper settings for your computer.
Problem: My computer won't boot when I installed the DMAN PCI card, or,
I got a Fatal Exception blue screen.
Possible Cause 1: A version of DirectX 5.0 or better has not been installed in
your system. Remove the DMAN PCI card, then restart Windows. Follow the
software installation as described in the section, "Windows Software
Installation." Next, follow the procedures described in the "Hardware
Installation," and "Restarting Your Computer for the First Time" sections.
Problem: The DMAN PCI does not show up in my Device Manager, nor does
the card work.
Possible Cause 1: Proper procedure for software and hardware installation has
not been followed. DMAN drivers must be installed first, as well as a version
of DirectX that is at least 5.0. See the sections, "Windows Software Installation,"
"Hardware Installation," and "Restarting Your Computer for the First Time."
Problem: No sound on either recording or playback.
Possible Cause 1: Improper connections of the audio accessories. Verify that
the Line Out is properly connected to an external amplifier, powered speakers
or mixer. Also check your audio source and verify that its levels are turned up.
Possible Cause 2: Improper volume control adjustment in the mixer. Two volume controls affect the sound level of each audio device (Output Level and
Master Volume) -- make sure none are set too low or muted. See The Windows
Mixer (WSS Mixer) section for more information.
Possible Cause 3: Recording source is not properly selected in the Windows
Record Mixer. See The Windows Mixer (WSS Mixer) section for more information.
Possible Cause 4: There is a resource conflict with another device in your computer. This is more evident during the recording and playback of digital audio
than in monitoring the Line In. Check the DMAN PCI configuration (Address
and IRQ) against those of the other devices on your computer. If necessary,
change the settings for the one or more of the devices.
Problem: Repetitious Sound.
Possible Cause: Wrong IRQ or IRQ conflict. Often this will result in a small
segment of sound (0.5 to 1 second) repeating itself over and over, sometimes
completely locking up the computer. You will need to change the IRQ setting
22
of one or more devices in your system. Refer to the section Windows Driver
Configuration.
Problem: Installation has not been successful or Windows cannot resolve
one or more hardware resource conflicts (the devices affected are highlighted with an exclamation mark in the Windows Device Manager).
Possible Cause 1: There is an IRQ or Address conflict. Some legacy devices
(older ISA cards that are not PnP-compliant) may exist in the system. Because
the PnP BIOS has difficulty in identifying and configuring these legacy devices,
it cannot adequately configure and resolve conflicts between the PnP and nonPnP devices. Refer to the section Windows Driver Configuration.
Possible Cause 2: There are not enough IRQs available in the system to support all the installed hardware. You usually have no choice but to reconfigure
your system or remove one or more cards from the system. Reconfiguring a
system may include disabling a serial or parallel port to free up that IRQ, disabling the audio portion of a voice modem that is taking up an additional IRQ,
or jumpering a PnP modem that is taking up an IRQ other than that associated
with COM1 or COM2. Sometimes this can go smoothly, and sometimes it can
turn into a rather tricky endeavor. Consult a computer professional if you’re
uncertain.
Problem: A third-party Windows digital audio program does not play or
record to/from the DMAN PCI.
Possible Cause 1: You have not selected the DMAN PCI Audio driver from
your application. Most third-party applications require you to select a specific
driver (because there can be more than one in an advanced system) for use
with the application. Select the driver named “DMAN PCI Audio” as your
audio driver. The manner in which this selection is made is dependent on the
application (see your specific application manual).
Possible Cause 2: The DMAN PCI Audio driver is not properly installed.
Install/reinstall all DMAN PCI audio drivers (see Windows Software
Installation section).
Possible Cause 3: The third-party application has an audio device profiling
utility that must be run before a new audio device will function properly. See
your music software’s documentation for advice.
Problem: A third-party Windows MIDI program does not play or record
MIDI to/from the DMAN PCI.
Possible Cause 1: You do not have a MIDI keyboard or sound module properly attached to the MIDI interface adaptor cable. The DMAN PCI MIDI Out
should connect to the external device’s MIDI In, and vice-versa.
Possible Cause 2: The DMAN MIDI driver is not properly installed.
Install/reinstall all DMAN drivers (see Windows Software Installation section).
Possible Cause 3: You have not selected the DMAN MIDI driver from your
application. Many third-party applications require you to select a specific
23
MIDI driver (because there can be more than one in an advanced system) for
use with the application. Select the driver named “DMAN PCI Synth” and/or
“DMAN PCI External MIDI” as your MIDI driver(s). The manner in which
this selection is made is dependent on the application (see your specific application manual).
Problem: I can open the Windows Record mixer but can’t find the Playback
mixer or vice-versa.
Solution: Change between the two by selecting Options | Properties from the
mixer’s menu. Also, make sure that the DMAN PCI is selected as the Mixer
device. See the section on Windows Mixer for more specific information.
Problem: I’m getting some pops and clicks in my audio recording or playback.
Possible Solution: Many accelerated graphics cards use enough system
resources that the recording buffer can’t keep up with demand. This can cause
clicks in the recording. This can often be solved by turning off the graphics
acceleration features of the graphics card. In Windows, this is accessed from
Settings | Control Panel | System | Performance | Graphics.
BEFORE CALLING TECH SUPPORT
It is best to be in front of the computer in which you are installing the DMAN PCI when
attempting to reach Midiman Technical Support for help.
Have the computer powered up, with the DMAN PCI Drivers and Diagnostics Disk and this
manual close by.
Please be ready to identify which Midiman product you have, and to concisely explain what
the problem is that you are encountering.
Take a deep breath, then dial the Tech Support number listed on the back of the manual or
email at the address listed.
Tech Support hours are 9AM to 5PM Pacific time, Monday thru Friday. There is no best time
to call, but persevere and you will get through to a human being who will be eager to help
you.
Expect email answers within 24 to 36 hours.
If you have any questions, comments, or suggestions about DMAN PCI or any
MIDIMAN product, we invite you to contact us directly at:
MIDIMAN
45 E. Saint Joseph Street
Arcadia, CA 91006-2861
Technical Assistance:
E-mail:
Fax:
World Wide Web:
(626) 445-8495
[email protected]
(626) 445-7564
www.midiman.net
24
Appendix A - About Digital Recording
If your past experience has been limited strictly to analog recording, you're in
for a big treat! If you have digital recording experience already, you can skip
over this section (our feelings won't be hurt).
As taught in high school science class, sound is composed of waves of changing pressure (level) and frequency (pitch). Analog recording captures these
waves in their entirety and records them as variations in magnetic flux (tape)
or variations in depth (good old-fashioned vinyl). On playback, analog recording adds noise to the recorded sound at relatively high levels (tape has background hiss, vinyl has surface noise); it therefore causes a low signal-to-noise
(S/N) ratio. Because this noise level is comparatively high, the dynamic range
(the ratio of softness to loudness) of the recording is decreased.
On the other hand, digital recording samples the sound waves (typically 44,100
times per second - i.e. a rate of 44.1 kHz) and records the sounds as digital
data. This numeric data can be stored on a hard or floppy disk, DAT tape (in
some software packages), CD, or any other common data storage media.
During digital playback, no media noise is added by the recording medium.
This results in a much greater S/N ratio and greatly increased dynamic range
over traditional analog methods. The end result is cleaner, quieter recordings.
The only noise present in the digital realm is any noise introduced by the A/D
or D/A converter and this varies according to the quality of the converter and
the PC board design. Using quality components and design practices as in the
DMAN PCI, the only way to make a noisy digital recording is to manually add
the noise yourself!
DMAN PCI supports recording and playback in many audio formats. When
selecting an audio format, you are usually trading off sound quality versus the
amount of disk space the recorded audio will consume. In general, sound
quality increases as the Sample Rate increases, as the number of bits used
increases, as stereo is used instead of mono, and when the audio is not compressed (i.e., its format is PCM not ADPCM or A-Law). Sample Rate is the
parameter most directly related to frequency response. For CD audio, 44.1kHz
is the standard, and should be chosen for most audio applications. Choose a
sample rate that is at least twice the frequency (this is called the Nyquist value)
of the highest audio frequencies you want to record. For example, if your
source material has a frequency range of 30 Hz to 10 kHz, such as voiceovers,
and its appropriate for your application, you can record at a sample rate of 22
kHz. Also, if storage space is an issue, this rate will take up half of the disk
space that 44.1kHz will (plus, voiceovers can be done in mono). You can see
from this example that 44.1kHz has been chosen for CD audio because it is a
little more than twice the highest frequency in the range of human hearing.
Bits determine the resolution of the data. The more bits, the higher the resolu25
tion. The higher the resolution, the better the sound quality. Select 16-bit for
higher quality recording. Recording in 8-bit format can sometimes cause distortion, or a hissing sound, during playback.
Digital Recording Dos and Don’ts
In the digital realm, level meters are not meant to ever go into the red. Digital
recording is very unforgiving of clipping. Unlike analog systems, where tape
saturation gives a nice smooth compression, digital distortion sounds like
someone is breaking a pane of glass in your ear. Make sure that you give yourself lots of headroom both when recording and mixing. You’ve got all that
dynamic range – now use it!
Measure twice, cut once. Take your time to make sure that mic position, EQ,
and effects settings are exactly what you want when tracking. With digital
audio “Fix it in the mix” hardly ever works.
Know your signal chain. Some programs set the levels internally, others use
the Windows level controls. Make sure you know which is which. If you are
not getting the levels you expect, retrace your signal chain and make sure that
you are adjusting levels in the correct places. Some programs also add digital
effects to your output. If you hear something that you don’t think you put
there, check around for DirectX effects!
PLEASE NOTE: Just like a professional analog tape deck, the DMAN PCI is
expecting a line level signal. A microphone preamp or mixing console may
be needed to boost the signal you are trying to record to that of “line level.”
No microphone input has been included on the DMAN PCI since onboard
mic inputs offer compromised quality.
Plan ahead. Think about tracking ahead of time and decide in what order you
are going to record the tracks. Keep a track list. Use it to make notes when you
are recording (where you might need to punch in and out, etc.). With hard
disk recording you don’t have to worry about the bass track bleeding into the
vocal track or whether the heads have the same response on different tracks,
but you still want to have a plan.
Back up your work. Sure, most editing functions with HDR (hard disk recording) systems are non-destructive, but some are not. If you are doing a lot of
editing (or even if you’re not, but don’t want to take any chances), back up
your audio tracks. Audio takes up a lot of disk space, so you might want to
have a large format removable drive (Iomega Zip or Jaz, Syquest EZ Flyer or
CD-ROM for example) on which to store audio files.
Optimize your hard disk often. Fragmented audio files are inefficient and
often cause problems with writeable audio programs.
26
Appendix B - Digital Audio Terms
A/D and D/A converters: A/D stands for Analog-to-Digital and D/A means
Digital-to-Analog. The higher the bit rate and the greater the sampling rate,
the better the audio reproduction. DMAN PCI specifications are equivalent or
better than most audio CD players.
DSP: An acronym for Digital Signal Processor. DSP’s are processors that are
specially tweaked for computation-intensive applications such as playing and
recording audio and audio effects.
Dynamic Range: The ratio between the quietest and loudest sounds that can
be recorded without distortion. Usually measured in decibels (dB).
Full duplex: The ability to record and playback at the same time. Also known
as “simultaneous playback/record.” If you are using a multi-track digital
recording program, such as Samplitude, SAW, or Cakewalk Audio, this is a
very important feature. Full duplex would, for example, allow you to hear previously recorded vocal tracks while you’re recording the harmonies, a must for
workable audio recording.
MPU-401: A standard for MIDI interfaces, developed by Roland Corporation,
back in the early days of MIDI. This is the most common PC MIDI interface
used under DOS. Under Windows, MPU type interfaces run in UART (sometimes called “dumb”) mode.
Windows Sound System (WSS): Microsoft released the Windows Sound
System audio adaptor in 1992. Its features included a 16-bit stereo A/D converter, 16-bit stereo D/A converter, data compression and de-compression,
analog audio mixing, microphone and line-level input, line-level output and a
high-throughput system interface. Some compatibility with it still remains in
today’s Windows operating system.
27
Lifetime Limited Warranty
MIDIMAN warrants that this product is free of defects in materials and workmanship under normal use so long as the product is owned by the original
purchaser and that purchaser has registered his/her ownership of the product
by sending in the completed warranty card.
In the event that MIDIMAN receives written notice of defects in materials or
workmanship from such an original purchaser, MIDIMAN will either replace
the product, repair the product, or refund the purchase price at its option. In
the event any repair is required, shipment to and from MIDIMAN and a nominal handling charge shall be born by the purchaser. In the event that repair is
required, a Return Authorization number must be obtained from MIDIMAN.
After this number is obtained, the unit should be shipped back to MIDIMAN
in a protective package with a description of the problem and the Return
Authorization clearly written on the package.
In the event that MIDIMAN determines that the product requires repair
because of user misuse or regular wear, it will assess a fair repair or replacement fee. The customer will have the option to pay this fee and have the unit
repaired and returned, or not pay this fee and have the unit returned unrepaired.
The remedy for breach of this limited warranty shall not include any other
damages. MIDIMAN will not be liable for consequential, special, indirect, or
similar damages or claims including loss of profit or any other commercial,
damage, even if its agents have been advised of the possibility of such damages, and in no event will MIDIMAN’s liability for any damages to the purchaser or any other person exceed the price paid for the product, regardless of
any form of the claim. MIDIMAN specifically disclaims all other warranties,
expressed or implied. Specifically, MIDIMAN makes no warranty that the
product is fit for any particular purpose.
This warranty shall be construed, interpreted, and governed by the laws of the
state of California. If any provision of this warranty is found void, invalid or
unenforceable, it will not affect the validity of the balance of the warranty,
which shall remain valid and enforceable according to its terms. In the event
any remedy hereunder is determined to have failed of its essential purpose, all
limitations of liability and exclusion of damages set forth herein shall remain in
full force and effect.
28
If you have any questions, comments or suggestions about this product or any
MIDIMAN product, we invite you to contact us directly at:
MIDIMAN U.S.
45 East Saint Joseph Street
Arcadia, CA 91006-2861 U.S.A.
Sales Information:
626-445-2842
Sales Information (email):
[email protected]
International Sales (email):
[email protected]
Tech Support:
626-445-8495
Tech Support (email):
[email protected]
Fax:
626-445-7564
Internet Home Page:
http://www.midiman.net
MIDIMAN U.K.
Hubberts Bridge House
Hubberts Bridge
Boston, Lincs.
PE20 3QU England
Sales Information:
Sales Information (email):
Technical Support:
Technical Support (email):
Fax:
01205 290680
[email protected]
01309 671301
[email protected]
01205 290671
MIDIMAN Deutschland (Germany)
Kuhallmand 34
D-74613 Ohringen Germany
Sales Information:
Sales Information (email):
Technical Support:
Technical Support (email):
Fax:
Internet Home Page:
07941-98-7000
[email protected]
07941-98-70030
[email protected]
07941-98-70070
http://www.midiman.de
1