1
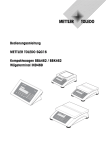
Operating Instructions
METTLER TOLEDO SQC16
Compact Scales BBA462 / BBK462
Terminal IND469
IND
469
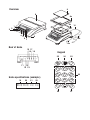
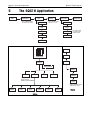
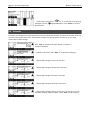
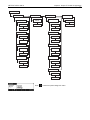
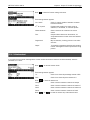
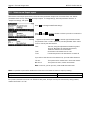
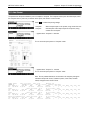
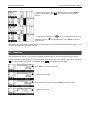
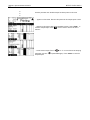
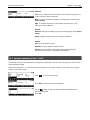
Overview
9
9
9a
3
2
9b
1
4
5
10
8
67
10b
10a
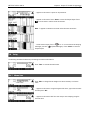
Rear of Scale
15 17
16 18
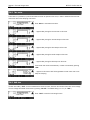
Keypad
16
23
24
25
i
11
13
12 14
1
-,/&
4
ghi
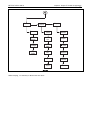
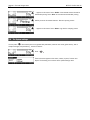
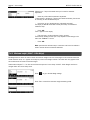
Scale specifications (example)
19
20
Max1: 3kg Min1: 20g
Max2: 6kg Min2: 40g
21
22
e1: 1g
e2: 2g
d1: 1g
d2: 2g
7
2
abc
5
jkl
8
pqrs
tuv
.
0
+ ...
26
3
def
6
mno
9
wxyz
C
27
28
Overview
1
Display
Scale specifications
2
On/Off key
19
Maximum load
3
Zero key
20
Minimum load
4
Tare key
21
Verification scale interval (certified scale)
5
Enter or print key
22
Max. resolution
6
Command softkeys (6)
7
Keypad
8
Adjustable feet
Keypad
9
Weighing pan
23
Shift key (ABCÆabcÆ123ÆABC …)
10
9a:
wind protector
24
Database key
9b:
shield
25
Info key
Power supply:
26
Special characters key
10a: power cord (scale w/o battery)
27
Clear key
10b: AC adapter (scale with battery)
28
Numeric keys
Rear of scale
11
Power supply
12
Model plate
13
Hole for anti-theft device
14
Spirit level (only on certified scales and those with
MonoBloc weighing cells)
15
PS2 connector for keyboard and/or BCR (Barcode
reader)
16
COM3 (RS232C interface)
17
COM2 (RS232C interface)
18
COM1 (RS232C interface)
Contents
METTLER TOLEDO SQC16
Contents
1
2
3
Page
Setting up the scale.....................................................................................................8
1.1
Safety and environment ...............................................................................................................8
1.2
Positioning and leveling the scale................................................................................................9
1.3
Connecting to power supply.........................................................................................................9
Basic functions.......................................................................................................... 10
2.1
Switching on and off and zeroing ...............................................................................................10
2.2
Setting date and time ................................................................................................................10
2.3
Language settings .....................................................................................................................11
2.4
Simple weighing .......................................................................................................................12
2.5
Weighing with tare ....................................................................................................................13
2.6
Recording weighing results........................................................................................................14
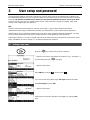
User setup and password ........................................................................................... 15
3.1
Defining a user name ................................................................................................................15
3.2
Creating a password..................................................................................................................16
4
Getting to know the SQC16 software........................................................................... 17
5
The SQC16 Application ..............................................................................................18
5.1
Overview of article definition .....................................................................................................20
5.2
Creating an article for the first time ...........................................................................................22
5.3
The database ............................................................................................................................25
5.3.1
Creating a new article .................................................................................................................26
5.3.2
The 'Search' softkey ....................................................................................................................27
5.3.3
Editing the parameters of an existing article...................................................................................27
5.3.4
Copying the parameters of an existing article to a new article ..........................................................28
5.3.5
Deleting an article.......................................................................................................................28
5.3.6
Printing the parameters of an article .............................................................................................28
5.4
Sampling of articles ..................................................................................................................29
5.5
Test series ................................................................................................................................30
5.6
Taring .......................................................................................................................................31
5.6.1
Manual tare ...............................................................................................................................31
5.6.2
Tare series .................................................................................................................................32
5.6.3
Bulk tare....................................................................................................................................32
5.7
Density .....................................................................................................................................33
5.8
Printing/Clearing statistics.........................................................................................................33
METTLER TOLEDO SQC16
Contents
Contents
Page
5.9
The System settings ..................................................................................................................34
5.9.1
Tolerance specifications ..............................................................................................................36
5.9.2
Global density ............................................................................................................................36
5.9.3
Sample messages ......................................................................................................................37
5.9.4
Tare configuration.......................................................................................................................37
5.10
The Function settings.................................................................................................................38
5.10.1 Violation check...........................................................................................................................39
5.10.2 2nd Tolerance System ..................................................................................................................40
5.10.3 Shared Statistics.........................................................................................................................41
5.10.4 Test...........................................................................................................................................41
5.10.5 Supplement ...............................................................................................................................41
5.10.6 Adjust........................................................................................................................................41
5.11
The Report settings....................................................................................................................42
5.11.1 Statistics and Sample reports .......................................................................................................44
5.11.2 Define contents of the report.........................................................................................................45
5.11.3 x-chart (Mean value trace) ..........................................................................................................48
5.11.4 Marginals ..................................................................................................................................48
5.11.5 Linefeeds ...................................................................................................................................48
5.11.6 A4 Printout.................................................................................................................................49
5.12
6
7
Printing summary of database ...................................................................................................50
Special features of SQC16 ......................................................................................... 51
6.1
Working with barcodes ..............................................................................................................51
6.2
Individual tare sampling ............................................................................................................51
6.2.1
Preweighing and backweighing in two samples.............................................................................51
6.2.2
Preweighing and backweighing in one sample ..............................................................................53
6.3
Sampling with batch..................................................................................................................54
6.4
Transfer key ..............................................................................................................................55
Vision Setup..............................................................................................................57
7.1
Overview and operation .............................................................................................................57
7.2
Calling up the menu and entering the password .........................................................................58
7.3
Menu overview..........................................................................................................................59
7.3.1
Scale.........................................................................................................................................59
7.3.2
SQC16 ......................................................................................................................................60
7.3.3
Terminal ....................................................................................................................................61
7.3.4
Communication..........................................................................................................................62
7.3.5
Diagnostics................................................................................................................................63
Contents
METTLER TOLEDO SQC16
Contents
Page
7.4
Scale settings (SCALE)..............................................................................................................63
7.4.1
Adjust/calibrate (SCALE Æ Calibration).........................................................................................64
7.4.2
Display resolution and weighing unit (SCALE Æ Display)...............................................................64
7.4.3
Automatic zero point correction (SCALE Æ Tare)............................................................................65
7.4.4
Automatic zero point correction (SCALE Æ Zero)............................................................................65
7.4.5
Automatic save of tare and zero values (SCALE Æ Restart).............................................................66
7.4.6
Adaptation to environmental conditions and weighing mode (SCALE Æ Filter)..................................66
7.4.7
Automatic adjustment (SCALE Æ FACT)........................................................................................67
7.4.8
Minimum weight (SCALE Æ Min Weigh).......................................................................................68
7.4.9
Resetting scale to factory default settings (SCALE Æ Reset) ............................................................69
7.5
SQC16 settings (SQC16)...........................................................................................................69
7.5.1
User Login (SQC16 Æ User Login)...............................................................................................69
7.5.2
Auto Log Out (SQC16 Æ Auto Log Out) ........................................................................................70
7.5.3
Minimum Password Length (SQC16 Æ Minimum PW Length)........................................................70
7.5.4
User Setup (SQC16 Æ User Setup)...............................................................................................70
7.6
Terminal settings for device (TERMINAL Æ Device) ....................................................................71
7.6.1
Language settings (TERMINAL Æ Device Æ Language) .................................................................72
7.6.2
Sleep function (TERMINAL Æ Device Æ Sleep)..............................................................................72
7.6.3
Adjusting the contrast of the display (TERMINAL Æ Device Æ Contrast)...........................................72
7.6.4
Invert (TERMINAL Æ Device Æ Invert) ..........................................................................................73
7.6.5
Changing the size of weight display (TERMINAL Æ Device Æ Weight display) .................................73
7.6.6
Adjusting the date and time (TERMINAL Æ Device Æ Date Time) ....................................................73
7.6.7
Adjusting the date and time (TERMINAL Æ Device Æ Beep) ...........................................................74
7.7
Define supervisor password (TERMINAL Æ Access) ....................................................................74
7.8
Reset terminal settings to factory settings (TERMINAL Æ Reset) .................................................75
7.9
Communication settings (COMMUNICATION)..............................................................................75
7.9.1
Mode (COMMUNICATION Æ Mode)..............................................................................................76
7.9.2
Parameters (COMMUNICATION Æ Parameters) .............................................................................76
7.9.3
Printer type (COMMUNICATION Æ Printer type)..............................................................................77
7.9.4
Header (COMMUNICATION Æ Define Header)................................................................................77
7.9.5
Add LineFeed (COMMUNICATION Æ Add LineFeed)........................................................................77
7.9.6
Reset communication (COMMUNICATION Æ Comx Æ Reset Com)..................................................78
7.9.7
PS2 Settings (COMMUNICATION Æ PS2)......................................................................................78
7.10
Diagnostic settings (DIAGNOSTICS) ...........................................................................................79
7.10.1 Keyboard (DIAGNOSTICSÆ Keyboard Test)...................................................................................79
7.10.2 Display (DIAGNOSTICSÆ Display Test) ........................................................................................80
7.10.3 Serial Number 1 (DIAGNOSTICSÆ SNR1) .....................................................................................80
7.10.4 Serial Number 2 (DIAGNOSTICSÆ SNR2) .....................................................................................80
METTLER TOLEDO SQC16
Contents
Contents
Page
7.10.5 List 1 (DIAGNOSTICSÆ List 1).....................................................................................................81
7.10.6 List 2 (DIAGNOSTICSÆ List 2).....................................................................................................81
7.10.7 Reset All (DIAGNOSTICSÆ Reset All) ............................................................................................81
8
9
10
11
Other important information ....................................................................................... 82
8.1
Error messages in display .........................................................................................................82
8.2
Messages on printer..................................................................................................................83
APPENDIX: Tolerance systems....................................................................................86
9.1
Entry of tolerances ....................................................................................................................86
9.2
Legal tolerance systems ............................................................................................................86
9.3
Free tolerance systems with one tolerance .................................................................................87
9.4
Free tolerance systems with two tolerances................................................................................87
9.5
Free tolerance systems with three tolerances .............................................................................87
APPENDIX: Optional equipment .................................................................................. 88
10.1
LC-I/O Relay Interface................................................................................................................88
10.2
Attachment of peripheral devices ...............................................................................................89
10.3
Accessories...............................................................................................................................90
Technical data...........................................................................................................91
11.1
General data and delivered items ..............................................................................................91
11.1.1 BBA/BBK462 .............................................................................................................................91
11.1.2 IND469 .....................................................................................................................................92
11.2
Dimensions...............................................................................................................................93
11.2.1 BBA/BBK462 .............................................................................................................................93
11.2.2 IND469 .....................................................................................................................................94
11.3
Interface technical data .............................................................................................................94
11.3.1 BBA/BBK462 .............................................................................................................................94
11.3.2 IND469 .....................................................................................................................................95
11.4
Interface commands ..................................................................................................................95
11.4.1 Preconditions .............................................................................................................................95
11.4.2 SICS Command set.....................................................................................................................95
11.5
Table of Geo Values ..................................................................................................................99
11.5.1 GEO VALUES 3000e, OIML Class III (European Countries) ..............................................................99
11.5.2 GEO VALUES 6000e/7500e OIML Class III (Height £ 1000 m) .....................................................100
11.6
Declaration of Conformity ........................................................................................................101
Chapter 1: Setting up the scale
METTLER TOLEDO SQC16
8
1
Setting up the scale
Please read through these operating instructions carefully and adhere to them at all times. If you discover that materials
are missing or that the wrong ones have been supplied, or if you have any other problems with your scale, please refer to
the dealer and salesperson concerned, or if necessary to the METTLER TOLEDO representative responsible.
1.1
Safety and environment
•
Do not use the scale in hazardous areas (unless it is clearly identified
as being approved for these areas).
•
If the power cord is damaged, the scale must no longer be operated.
Therefore check the cable regularly and ensure that a free space of about
3 cm is left at the rear of the scale, so that the cable is not kinked too
severely.
•
Never tamper with the retaining screws for the load plate support
underneath the weighing pan.
•
When the weighing pan is removed, never insert a solid object
underneath the load plate support.
•
Never open the scale by removing the screws in its base.
•
Use only approved accessories and peripherals.
•
Handle the scale with utmost care; it is a precision instrument. Blows on
the weighing pan must be avoided, and heavy overloads must not be
placed on it.
•
Important instructions when using scales in the food sector: those parts
of the scale can come into contact with food products have smooth
surfaces and are easy to clean. The materials used do not splinter and
are free from contaminants. In food processing areas, it is recommended
that a protective cover (accessory) is used. This must be cleaned
regularly, just like the scale itself. Damaged or heavily contaminated
protective covers must be replaced immediately.
•
When the scale is finally taken out of service, observe the current
environmental regulations. The scale is equipped with a battery that
contains heavy metals and therefore must not be treated as normal
refuse! Local regulations for disposing of environmentally hazardous
substances must be complied with.
METTLER TOLEDO SQC16
Chapter 1: Setting up the scale
9
1.2
Positioning and leveling the scale
The correct location is a decisive factor in ensuring accurate weighing results.
-
Choose a stable and vibration-free location (particularly important for
high-resolution scales using METTLER TOLEDO MonoBloc technology).
Place the scale on a surface that is as horizontal as possible and strong
enough to bear its weight when fully loaded.
-
Check the ambient conditions.
-
Avoid:
- Direct sunlight
- Strong drafts (e.g. from fans or air conditioning systems)
- Excessive temperature fluctuations.
•
Turn the adjustable feet so that the scale is horizontal. If a spirit level is
filled, the bubble must be located within the inner circle.
Note: The SQC16 has a special filter that accelerates certain procedures
(zeroing, taring) in a non-tranquil environment. This inevitably means that
there is a slight loss of accuracy with the results. For high-precision results,
care must be taken to ensure as tranquil and stable an environment as
possible, so that the filter is not activated.
Major changes in geographical location:
Every scale is set by the manufacturer to suit the local gravitational
conditions (geographical adjustment value) in the geographical zone to
which the instrument is supplied. If a major change of geographical location
takes place, this setting must be adjusted by a service technician or a new
setting made. Certified scales must, in addition, be recalibrated in
accordance with national certification regulations.
1.3
Connecting to power supply
•
Before connecting the power supply plug, verify that the voltage stated on
the model plate is the same as the local power line voltage.
•
For maximum possible precision, adjust the scale after installing it
(Chapter 7.4.1). Note: Certified scales must be adjusted by an
authorized organization. Please consult your dealer.
Chapter 2: Basic functions
METTLER TOLEDO SQC16
10
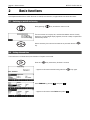
2
Basic functions
This Chapter describes how to switch the scale on and off, zero and tare it, weigh materials and record the results.
2.1
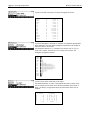
Switching on and off and zeroing
Briefly pressing «
» key switches the scale on or off.
The scale carries out a display test, and then the software version is briefly
displayed. Once the weight display appears, the scale is ready to operate and
automatically zeroed.
Note: If necessary, the scale can be zeroed at any time with the line «
key.
2.2
Setting date and time
Time can be set in 24 hours format, and the date in European or US format.
Press the «
» key continuously for about 2 seconds.
…appears on the screen and then briefly press the «
Select TERMINAL by pressing «
» and press «
» key again.
».
…appears on the screen. Select Device and press «
».
»
METTLER TOLEDO SQC16
Chapter 2: Basic functions
11
…appears on the screen. Select Date Time by pressing «
« ».
…appears on the screen. Select Date by pressing the «
» and press
» and press «Edit».
…appears on the screen. Use the numeric keypad to enter the date (e.g.
11022005) and confirm with «OK». Incorrect inputs can be deleted with
«Erase». «
» and «
» can be used to move the cursor.
To set the correct time, do the same procedure but select Time instead of
Date.
Note: Only the Supervisor has access rights to modify the Date/Time.
2.3
Language settings
Language can be set: English, German, French, Spanish or Italian.
Press the «
» key continuously for about 2 seconds.
…appears on the screen and then briefly press the «
Select TERMINAL using «
» and press «
» key again.
».
…appears on the screen. Select Device and press «
».
…appears on the screen. On Language press «Edit».
…appears on the screen. Choose the desired language and then press
«OK».
Chapter 2: Basic functions
METTLER TOLEDO SQC16
12
2.4
Simple weighing
Place the object to be weighed on the scale.
The bar graph at the top of the display shows how much of the weighing
range is being used and how much is still available (as % of total scale
capacity).
Wait until the stability detector (a small ring at the left edge of the display)
disappears, then…
… read the indicated net weight.
METTLER TOLEDO SQC16
Chapter 2: Basic functions
13
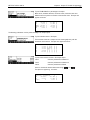
2.5
Weighing with tare
Place the empty weighing container or packaging on the scale.
T
Press the «
T
» key briefly to tare the scale.
The zero display and the 'Net' (net weight) symbol appear.
Place the material to be weighed in the container, then…
… read the net weight of the weighing sample.
Note: The tare weight is retained until either a new tare is determined, or the
scale is zeroed or switched off.
Chapter 2: Basic functions
METTLER TOLEDO SQC16
14
2.6
Recording weighing results
Press the «
» key to send the current weighing result to the peripheral
device (usually a printer) via a COM port which has to be set up as 'Printer'.
Please refer to Chapter 7.9 for instructions on configuring the interface(s).
METTLER TOLEDO SQC16
Chapter 3: User setup and password
15
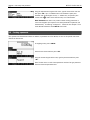
3
User setup and password
To avoid incorrect operation of the scale in normal use, the vision setup menu can be protected with a password. The
scale differentiates between users and a supervisor. When the scale leaves the factory, the entire menu can be accessed
by anyone. We therefore recommend you to define your own supervisor password as soon as you set up the scale.
This limits access by the users to a smaller number of vision setup menu items (settings for language, sleep mode,
contrast, invert, weight display and date/time).
Note:
Please be aware that the term 'Supervisor' (valid for Vision Setup; i.e. general scale operations and SQC16
operator/administrator setup) is different from 'Operator' and 'Administrator' (valid for SQC16 specific operations).
There should be only one (unnamed) Supervisor who has access to the Supervisor password and therefore, can setup
several (named) administrators and several (named) operators, including resetting of their passwords.
Please refer to Chapter 7.2 on how to navigate within the 'Vision Setup'-menu and thus reach the menu position 'Vision
Setup Æ TERMINAL Æ Access' (Chapter 7.7) for defining the Supervisor password.
3.1
Defining a user name
Press the «
» key continuously for about 2 seconds.
…appears on the screen, enter Supervisor password (if any; Æ Chapter 7.7)
and then briefly press the «
» key again.
…appears on the screen.
Select SQC16 by pressing «
» and then press «
».
If you want to work with operator login, User Login should be activated.
Select User Setup and press «Edit».
…appears on the screen.
Define the user (User name, Number, Access Rights) by pressing «Edit»
again.
Chapter 3: User setup and password
METTLER TOLEDO SQC16
16
Using the alphanumeric keypad of the scale, type the name of the user and
then press «OK». Up to 16 different users can be defined. Specify also
'Number' and 'Access Rights' of user, i.e. whether only as operator (who
cannot enter «
» menu within SQC16 mode) or as administrator.
Note: Password menu here is only meant to delete existing passwords in
case it was forgotten (the supervisor can erase passwords of operators and
administrators). For defining Æ Chapter 3.1. Please see also Chapter 7.5 for
more detailed information about SQC16 vision menu.
3.2
Creating a password
Once operator and administrator names are defined, a password has to be defined, as soon as the specific user enters
'SQC16' for the first time.
In weighing mode, press «SQC16».
Select the user name and then press «OK».
Using the numeric keypad of the scale, type the password and then press
«OK».
Note: The first time it will ask 'Create password' and then 'Re-type password'.
Enter the same new password twice.
METTLER TOLEDO SQC16
Chapter 4: Getting to know the SQC16 software
17
4
Getting to know the SQC16 software
SQC16 is an application for the 4-Series Compact Scales / Terminals. It is a convenient SQC compact system.
This chapter describes working with the SQC16 application. You might consider consulting Chapter 0 first about how to
specify the behavior of the scale during weighing to match the surroundings. Further, you can specify general options
such as scale identification, date, time, etc.
The SQC16 compact system offers evaluation and monitoring possibilities to statutory requirements for the fields of filling
process control. It is suggested to attach a suitable METTLER TOLEDO strip printer or A4/Report printer.
Note: For more information about the meaning of the expressions 'Adjustment', 'Batch Statistics', 'Global Density',
'Individual Tare', 'Plausibility Limits', 'Mean Value Requirements', 'Shared Statistics', 'Supplement', 'Test', 'Tolerance
System', 'Violation Check', 'Weighing Mode' and '2nd Tolerance System' please consult the included CD and select
'Appendix' of the 'SQC16 Training'. Alternatively, open the file Appendix_E.pdf on the root of the CD.
Special features of the system:
Internal calibration weight
available as option
Language
a choice of 11 languages
Max. number of articles
300
Data backup/restore/edit
Statistics printing
convenient also under MS Windows 98/ME/NT/2000/XP
Bar code
for simple and effortless article selection
Tolerance systems
EU, Free1, Free2, Free3
Units
g, kg, lb, oz, ml, l, fz
Statistics per article
2 sets of statistics closed manually, e.g. for hourly and daily statistics
Batch statistics
printed and closed automatically at end of batch
A4/Letter report printing
choose between the Complete or Compact printing
Histogram
in sample record and statistics
Class table
in sample record and statistics
Graphics
x/R (mean value/range) or x/s (mean value/standard deviation) in sample record
and statistics
Additive or subtractive weighing
for simple handling
Minimum nominal support
checking of the nominal value (warning if less than 100 resolution steps are
defined)
Individual tare
for tare weights with high standard deviation (i.e. wide scatter)
Mean tare
enter manually or by weighing a tare series or bulk tare
Sample size
max. 999 (Note: with individual tare, there are 50 pre-weighing values available
for each of max. 20 articles simultaneously)
Plausibility check
selectable (for nominal: for each article / for tare: system wide)
Adjustment
to get suitable adjustment messages for the filling machine
Violation check
for alarms after various defined events (T1-, T2-Violators below defined amount,
etc.)
Chapter 5: The SQC16 Application
METTLER TOLEDO SQC16
18
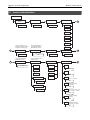
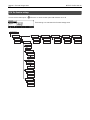
5
The SQC16 Application
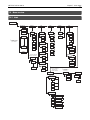
Start
Sample/Test *
Tare
* only if 'SQCSet/Config/
* only if selected article
Start
Function/Test' is active
Print/Clear
Density *
has unit ml, l or fz
Weigh mode
Stat 1
Edit
Stat 2
10 x T
Batch *
Set nxT
Close
* only if Batch stats
are active for the
selected article
Cancel
SQC16
Database Key
Print/Clr
Articles
Reports
Select Article
Options
Search *
Print
Catalog
Print System
Settings
Cancel
Ok
* only when there
are 5 or more
articles in the database
Print
G. Dens.*
* only if selected article
has unit ml, l or fz
Delete
Copy
New
Define
Articles
Print
Close
Reports
METTLER TOLEDO SQC16
Chapter 4: Chapter 5: The SQC16 Application
19
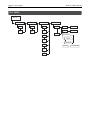
System
Report
Function
Tolerance
Viol.
Check
Statistics
Global
Density
2nd Tol.
Sys.
Sample
Messages
Shared
Stats.
x - chart
Tare
Config.
Test
Marginals
Supplement
Adjust
Shift key
Before sampling, it is necessary to define at least one article.
Linefeeds
A4 Printout
Chapter 5: The SQC16 Application
METTLER TOLEDO SQC16
20
5.1
Overview of article definition
Article Definition
ID
No.
Name
Edit
Edit
A
Unit
Edit
g
kg
lb
oz
ml
l
* only if unit is either ml, l or
fz and the article has not been
assigned to a density group
A
Density *
* only if unit is either ml, l or
fz and 'SQCSet/System/
Global Density' is active
* only if 'SQCSet/Function/
Supplement' is active
B
Supplement *
Edit
Nominal
Density Group *
Edit
fz
Edit
B
Tare
Edit
Edit
* only if 'SQCSet/Function/
Adjust' is active
Tolerance System
Adjustment *
Fast
EU
Normal
Free1
Slow
Free2
Minimum Step
Free3
Edit
Factor
Edit
C
Tolerances
+/Active/Inactive
T1Edit
T1+* * only if +/- is active
Edit
T2-* * if tolerance system
is not Free1
Edit
T2+* * if tolerance system is not
Free1 and +/- is active
Edit
T3-* * if tolerance system
is Free3
Edit
T3+* * if tolerance system is
Free3 and +/- is active
Edit
METTLER TOLEDO SQC16
Chapter 4: Chapter 5: The SQC16 Application
21
* only if 'SQCSet/Function/
Violation Check' is active
C
Violation Check *
Individual Tare
Viol. Check T1 Critical
Edit
Weighing Mode
1,1..2,2
Standard
1,2..1,2
Additive
Viol. Check T1 Reject
Subtractive
Plausibility
D
Plausibility Edit
Plausibility +
Edit
Edit
Print Violations
<T2
Active/Inactive
Active/Inactive
Mean Tolerance
Mean TolEdit
Mean Tol+
Edit
* only if 'SQCSet/Function/
Share' is active
D
Sample Size
Edit
E
Batch
Active/Inactive
Print Ind. Values
Active/Inactive
Set as default
Active/Inactive
Transfer Key
Active/Inactive
Shared Statistics *
Select
E
Chapter 5: The SQC16 Application
METTLER TOLEDO SQC16
22
5.2
Creating an article for the first time
You must define at least the name and nominal fill quantity of one or more articles. Furthermore, you can define, e.g. the
weighing mode, the weighing unit and the number of weighing per sample as well as the tolerance system to be used for
the evaluation.
In weighing mode, press «SQC16».
If 'User Login' is activated then select the user name and press «OK».
Note: This step can be skipped if "Vision Setup" Æ "SQC16" Æ "User Log-in"
is set to Off.
Using the alphanumeric keypad of the scale, type the password and then
press «OK».
Press «Articles».
Since there is no existing database yet, press «Yes» to create one.
Using the keypad, type in the article name and then press «OK». Continue
with the next parameter (Article No.) by pressing « ».
Press «Edit». Using the keypad, type in the article number and then press
«OK». Continue with the next parameter (ID) by pressing « ».
Press «Edit». Using the keypad, type in the identification number and then
press «OK». Continue with the next parameter (Unit) by pressing « ».
Press « » to change the unit. As soon as the choices appear, use « » to
». Continue with the next parameter
choose the desired unit and press «
(Density if liquid was chosen, otherwise Nominal) by pressing « ».
METTLER TOLEDO SQC16
Chapter 4: Chapter 5: The SQC16 Application
23
Press «Edit». Using the keypad, type in the density weight value and then
press «OK». This parameter appears only if Unit selected is ml (milliliter), l
(liter) or fz (fluid ounce). Continue with the next parameter (Density Group)
by pressing « ».
Press «Edit». Using the keypad, type in the number of density group and then
press «OK». This parameter appears only if Unit selected is ml, l or fz and if
"SQC Config" Æ "Function" Æ "Global Density" is active. Continue with the
next parameter (Nominal) by pressing « ».
Press «Edit». Using the keypad, type in the nominal weight value and then
press «OK». Continue with the next parameter (Tare) by pressing « ».
In order to work with reasonable weighing results, it is recommended not to
enter Nominal values lower than 100 times the scale resolution.
Nevertheless, the system allows entries with a minimum of 30 times the
resolution.
Example BBK462SQC-3XS:
Scale resolution d = 0.01g
Minimum recommended Nominal value = 100x0.01g = 1g
Minimum allowed Nominal value = 30x0.01g = 0.3g
This warning message appears if the entered Nominal value is lower than
100 times the scale resolution.
By pressing «Yes», the minimum recommended Nominal value automatically
suggested by the system, i.e. 10 ml, is being set.
By pressing «No», the entered value is set as Nominal if it is not lower than
30 x resolution
NOTE: The minimum recommended Nominal value varies depending on the
scale resolution and article unit.
This error message appears if the entered Nominal value is lower than 30
times the scale resolution.
Press «Edit». Using the keypad, type in the tare weight and then press «OK».
Continue with the next parameter (Supplement) by pressing « ».
Press «Edit». Using the keypad, type in the supplement value and then press
«OK». This parameter appears only if "SQC Config" Æ "Function" Æ
"Supplement" is active. Continue with the next parameter (Adjustment) by
pressing « ».
Chapter 5: The SQC16 Application
METTLER TOLEDO SQC16
24
To select adjustment, press «
». This parameter appears only if "SQC
Config" Æ "Function" Æ "Adjustment" is active.
Select the speed of adjustment (Fast, Normal or Slow) by pressing «
».
Also, define the minimum step value by selecting the parameter Min. Step
and then pressing «Edit». Using the keypad, type in the minimum step value
and then «OK». The parameter Min. Step sets the threshold, i.e. smaller
adjustment messages will not be given.
Furthermore, define Factor using «Edit». Using the keypad, type in the factor
value and then press «OK». The computed adjustment value will be
multiplied with the factor value in order to determine the final adjustment
message. Continue with the next parameter (Tol. System) by pressing « ».
Press « » to change tolerance system (EU, Free1, Free2 or Free3).
Continue with the next parameter (Tolerance settings) by pressing « ».
Press « » to change the positive and negative tolerance settings. Continue
with the next parameter (Violation Check) by pressing « ».
Press «
» to select violation checking. This parameter appears only if
"SQC Config" Æ "Function" Æ "Violation Check" is active. Continue with the
next parameter (Individual Tare) by pressing « ».
Press «
» to select individual tare mode. Continue with the next
parameter (Weighing mode) by pressing « ».
Press « » to change weighing mode (Standard, Additive or Subtractive).
After selecting, continue with the next parameter (Plausibility) by pressing
« ».
Press « » to change plausibility settings. Continue with the next parameter
(Sample Size) by pressing « ».
Change sample size (-n-) by pressing «Edit» and then type in the desired
number of individual values per sample. Continue with the next parameter
(Print Individual Value) by pressing « ».
METTLER TOLEDO SQC16
Chapter 4: Chapter 5: The SQC16 Application
25
Each individual value will be printed out in the sampling report if this function
» to unselect (or «
» to select). Continue with
is selected. Press «
the next parameter (Transfer Key) by pressing « ».
If selected (press «
»), the weighing result will not be automatically
sampled once stability is reached. You will have to press Accept for each
individual value. Continue with the next parameter (Shared Statistics) by
pressing « ».
If selected (press «
»), you will be asked to select the common article.
With this function, you will be able to combine the sampling data of two or
more articles into one common article, enabling you to monitor overall
production.
In order to share an article's data with a common article, the following
parameters have to be identical: Unit, Nominal, Tolerance System and
Tolerances.
This parameter appears only if "System" Æ "Function" Æ "Shared Statistics"
is active. When defining an article for the very first time, this parameter
will not be available and will therefore jump to the next parameter, since there
are no other existing articles yet to share statistics with. Continue with the
next parameter (Batch) by pressing « ».
If selected (press «
»), batch statistics are calculated and printed out for
each batch. At the start of sampling, you will be asked to enter the batch
name. Continue with the next parameter (Set as default) by pressing « ».
If selected (press «
»), the parameter settings of this article will be set as
default for defining new articles. The default article will appear within square
brackets in the article list: [Article name].
Press Close (and confirm with Yes) to save the new article in the database. The article parameter will be printed.
5.3
The database
The following describes the use of the article database.
Briefly press the «» key.
…appears on the screen. You can now see the articles in your database.
Chapter 5: The SQC16 Application
METTLER TOLEDO SQC16
26
Scroll on the articles using « » and « », and press «OK» to choose the
desired article to be used in the sampling. Press «Options» to go to the
Options menu, or press «Search» to search articles in the database (see also
Chapter 5.3.2). Otherwise, press «Cancel» to abort operation.
… appears on the screen if «Options» is pressed. This function is used to
delete or copy the highlighted article or to change («Define») or print out its
parameters. «New» will create a new article based on the default article.
5.3.1 Creating a new article
The following describes the operations for creating a new article in the database.
Briefly press the «» key.
…appears on the screen. You can now see the articles in your database.
…appears on the screen. Press «Options».
…appears on the screen. Press «New».
…appears on the screen. Using the keypad, type in the name of the new
article and then press «OK». In order to define the parameters of this new
article, follow the same procedures as described in Chapter 5.2 for Article
Number, ID, Unit, Density, Density Group, Nominal, Tare, Supplement,
Adjustment, Tolerance System, Tolerances, Violation Check, Individual Tare,
Weighing Mode, Plausibility, Sample Size, Print Individual Values, Transfer
Key, Shared Statistics, Batch and Set as Default.
METTLER TOLEDO SQC16
Chapter 4: Chapter 5: The SQC16 Application
27
5.3.2 The 'Search' softkey
The following describes the operations for searching articles in the database.
Follow the first three steps as described in Chapter 5.3.
…when this screen appears, press «Search».
NOTE: Search button only appears when there are more than four articles in
the database.
Press «Erase» to clear the article name and using the keypad, type in the first
letter of the article you are searching for. The articles corresponding to the
letter you typed in will be shown on the left side of the screen.
5.3.3 Editing the parameters of an existing article
The following describes the operations for editing the parameters of an existing article in the database.
Follow the first four steps as described in Chapter 5.3. Use the «Search» if necessary.
…when this screen appears, press «Define».
…appears on the screen. Change the parameters of the article name by
pressing «Edit».
…appears on the screen. Press «Erase» to delete the existing article name.
» and
Change it by typing in a new name using the keypad. Press «
» to move cursor from left to right and vice-versa. Press «OK» when
«
input is done. Otherwise, press «Cancel» to abort operation.
Continue editing the rest of the parameters by following the same procedures
as described in Chapter 5.2.
Note: Once SQC16 has generated a statistics, you can no longer edit the
following parameters of that article: Name, Unit, Nominal Tolerance system
and Tolerance. If you wish to edit the parameters of an article that already
has a statistics, you have to print and clear the statistics first by pressing
«Print/Clr» in standby mode (see also Chapter 5.8).
Chapter 5: The SQC16 Application
METTLER TOLEDO SQC16
28
5.3.4 Copying the parameters of an existing article to a new article
Sometimes, when creating a new article, it may be easier to copy the parameters of an existing article and then editing
only the parameters that need to be changed. The following describes the operations for copying the parameters of an
existing article on to a new one.
Follow the first four steps as described in Chapter 5.3. Use «Search» if necessary.
…when this screen appears, press «Copy». After copying and making
necessary changes, you can select a particular article for you to set as
default so that next time you copy, the default article will be selected first.
Using the keypad, type in the new article name and then press «OK». The
parameters of the article chosen are now copied on to the new article.
Continue with the other parameters by following the same procedures as
described in Chapter 5.2.
5.3.5 Deleting an article
The following describes the operations for deleting an article from the database.
Follow the first four steps as described in Chapter 5.3.
…when this screen appears, press «Delete».
…appears on the screen. Press «Yes» to delete. Otherwise, press «Cancel»
to abort operation.
Note: Articles that have existing statistics values cannot be deleted, until
these statistics are cleared as described in Chapter 5.8.
5.3.6 Printing the parameters of an article
The following describes the operations for printing out the parameters of an article on an attached printer.
Follow the first four steps as described in Chapter 5.3. Use «Search», if necessary.
…when this screen appears, press «Print».
…appears on the screen. SQC16 will print out all the parameters of the
chosen article.
METTLER TOLEDO SQC16
Chapter 4: Chapter 5: The SQC16 Application
29
5.4
Sampling of articles
The following describes the operations on how sampling of articles is performed.
Press «Start» to commence sampling.
…appears after placing the first item on the scale.
…appears after placing the second item on the scale.
…appears after placing the third item on the scale.
…appears after placing the fourth item on the scale.
…appears after placing the fifth item (default setting) on the scale.
…appears on the screen. A report will be printed out.
…appears on the screen. Press «Close» to close the Sample Report. Press
« » to scroll down to see the rest of the statistics.
Chapter 5: The SQC16 Application
METTLER TOLEDO SQC16
30
…end of statistics report. Press «
messages (see also «
Sample Report.
5.5
» or «C» to close the end of sampling
»/System/Messages). Press «Close» to close the
Test series
A test series is a sample for the simple determination of mean and standard deviation. Therefore, the test series results are
not saved in the statistics of the article, but are merely printed out for testing purposes. It serves e.g. to set a filling
machine after a product change.
Press «Test» to activate the test series function (if selected in
System/Function/Test)
…appears on the screen. Press «Start» to commence test sampling.
…appears after placing the first item on the scale.
…appears after placing the second item on the scale.
…appears after placing the third item on the scale.
…appears after placing the fourth item on the scale.
…appears after placing the fifth item on the scale. You may go on until the
maximum sampling of 999 is reached or press «End» to finish sampling.
METTLER TOLEDO SQC16
Chapter 4: Chapter 5: The SQC16 Application
31
…appears on the screen. A report will be printed out.
…appears on the screen. Press «Close» to close the Sample Report. Press
« » to scroll down to see the rest of the statistics.
Note: 'T' appears to indicate a test series within the mean value trace.
…end of statistics report. Press «
messages (see also «
Sample Report.
5.6
» or «C» to close the end of sampling
»/System/Messages). Press «Close» to close the
Taring
The following describes the three ways of entering tare values within SQC16.
Press «Tare» to activate the tare function.
5.6.1 Manual tare
Press «Edit» to change the tare weight of an article manually to a known
value.
…appears on the screen. Using the keypad of the scale, type in the tare value
and then press «OK».
…appears on the screen. SQC16 is now ready to start sampling using the
new tare value.
Chapter 5: The SQC16 Application
METTLER TOLEDO SQC16
32
5.6.2 Tare series
A tare series is a procedure, by which individual tare items are placed on the scale, in order to determine the mean tare
value to be used in the sampling of an article.
Press «Start» to commence tare series.
…appears after placing the first tare item on the scale.
…appears after placing the second sample on the scale.
…appears after placing the third sample on the scale.
…appears after placing the fourth sample on the scale.
…appears after placing the fifth sample on the scale.
A tare series does not end automatically. It needs to be ended by pressing
«End».
…appears on the screen. SQC16 has generated a mean value and is now
ready for sampling.
5.6.3 Bulk tare
The bulk tare softkey «10xT» is used to determine the mean tare value, based on the number of tare items in the settings.
You can change the number of tare items by pressing «Set nxT». The default setting is n=10 (Æ «10xT»).
Press «10xT» to switch to bulk taring function.
METTLER TOLEDO SQC16
Chapter 4: Chapter 5: The SQC16 Application
33
…appears on the screen. Press «Start» to commence bulk taring.
Place 10 tare items on the scale and then press «Accept».
…appears on the screen. SQC16 has generated a mean value and is now
ready for sampling.
5.7
Density
This function makes it possible for the user to conveniently change the density value, without having to go to the menu of
the article definition. However, this function appears only if a liquid unit is selected in the article definition, i.e. "ml", "l" or
"fz".
Press «Density».
Press «Erase» to delete the existing value and, using the keyboard, type in
the desired value and then press «OK». Please refer to Chapter 5.9.2 Global
Density for more information.
5.8
Printing/Clearing statistics
The following describes the operations on how to print and/or clear statistics. Note the difference between «Print» (printing
only) and «Prt/Clr» (print first and erase after printing). SQC16 will always print the statistics before permanently erasing
it from the database. Of course, it should be checked first, if enough paper is available, otherwise the data will be lost.
Consider backing up your data with BR16 PC-program before erasing important data.
Press «Print/Clr» while the article whose statistics should be printed (and
cleared in case of Prt/Clr) is the current one.
Choose the statistics that you wish to delete («Stat1», «Stat2» or «Batch»).
Note: «Batch» appears only if "Batch" is activated under "Articles" Æ
"Options" Æ "Define" Æ "Batch". See also Chapter 6.3.
Chapter 5: The SQC16 Application
METTLER TOLEDO SQC16
34
…appears on the screen. Press «Prt/Clr» if the selected statistics should be
erased after printing. Press «Print» to leave data untouched after printing.
SQC16 prints out the selected statistics. Wait until printing is done.
…appears on the screen. Press «Close» to go back to sampling screen.
5.9
The System settings
» then select System to set general SQC parameters (tolerance unit mode; global density; end of
You can press «
sample messages, tare plausibilitiy), valid for all articles.
Press «
».
Three sub-menus appear on the screen, namely: System, Function and
Report. The following is an overview of the System Settings menu.
METTLER TOLEDO SQC16
Chapter 4: Chapter 5: The SQC16 Application
35
System Settings
Tolerance Mode
T (abs)
Selected
Global Density
Selected
Not Selected
Messages
Tare Config
Sample1
Selected
Not Selected
Not Selected
Sample2
t (rel)
Selected
Selected
Not Selected
Not Selected
Stat1
%
Selected
Selected
Not Selected
Not Selected
Unit
Stat2
Selected
Selected
Not Selected
Not Selected
Batch
Selected
Not Selected
Press «
» to enter the System settings sub-menu.
Tare Plaus. Tare Plaus. +
Chapter 5: The SQC16 Application
METTLER TOLEDO SQC16
36
The following selection appears:
"Tolerance"
Define tolerance entries (menu)
"Global density"
Global density (same for all articles)
"Messages"
Define messages at the end of samples
"Tare Config"
Define minimum and maximum tolerances in
percentage
5.9.1 Tolerance specifications
With the factory setting, the tolerances are entered and displayed relative to the nominal fill quantity and in the selected
unit. If you wish to change this setting, select the parameter "Tolerance" and then press « ».
"T (abs)"
Representation of the tolerances relative to zero
"t (rel)"
Representation of the tolerances relative to the nominal fill
quantity
"%"
Tolerance specifications in percentage
"Unit"
Tolerance specifications in the unit applicable to the article
5.9.2 Global density
With Global density active, articles with liquid units can be one in one of among 30 Density Groups, selectable in the
article definition menu. If the density of an article belonging to a specific Density Group was modified, all articles
belonging to the same group will have their density parameters modified as well.
Press «
» or «
» to select or unselect Global Density.
METTLER TOLEDO SQC16
Chapter 4: Chapter 5: The SQC16 Application
37
5.9.3 Sample messages
Selecting "Messages" will display relevant information at the end of the sampling, such as Article Name, Article ID, Date,
Number of Samples, Total Number of Samples, Mean Value, Standard Deviation, Minimum Value, Maximum Value and
Range.
Press «
» to activate sample messages.
Sample 1/2, Sample 2/2, Stat1, Stat2 and Batch are all selected by default.
».
To deactivate, simply press «
Below are examples of sample messages that may appear on the display:
Sample 1/2
Sample 2/2
Statistics 1
Press «Close» to close the
Sample Report.
5.9.4 Tare configuration
This function will allow to set a +/- plausibility for the individual values of a tare series. It refers to the current tare value.
Press «
» to enter the Tare Configuration menu.
Enter desired Minimum and Maximum Tolerances by pressing the «Edit» and
typing in the value using the numeric keypad of the scale.
Chapter 5: The SQC16 Application
METTLER TOLEDO SQC16
38
5.10 The Function settings
»\Function" to switch several special SQC functions on or off.
You can use the menu option "«
The following is an overview of the Function Settings menu.
Function Settings
Violation Check
2nd Tol. System
Shared Statistic
Selected
Selected
Selected
Selected
Selected
Selected
Not Selected
Not Selected
Not Selected
Not Selected
Not Selected
Not Selected
Viol. Check Unit
%
PCS
Sample
Selected
Not Selected
Stat1
Selected
Not Selected
Stat2
Selected
Not Selected
Batch
Selected
Not Selected
Test
Supplement
Adjust
METTLER TOLEDO SQC16
Chapter 4: Chapter 5: The SQC16 Application
39
Press «
» to enter the Function settings sub-menu.
The following selection appears:
"Viol. Check"
Check if a certain number of toleration violations
has been exceeded
"2nd Tol. System"
Evaluate each sample of an article using an
additional, to be defined, 2nd tolerance system.
"Shared Statistics"
Share a common set of statistics for various
articles
"Test"
Sample without influence on the statistics, for
simple determination of mean value and standard
deviation
"Supplement"
May be necessary if a filling process is not stable
with time
"Adjust"
To activate the adjustment algorithm with resulting
numeric messages that serve to optimize the filling
process
5.10.1 Violation check
If you wish to have an alarm message when a certain number of tolerance violations has been exceeded, select the
parameter "Viol. check".
Press «
» to activate Violation check.
The following selection appears:
"%"
Check if unit should be percentage instead of PCS
"PCS"
Check if unit should be pieces instead of %
Press «
» to check the desired unit.
"Sample"
Select to monitor tolerance violations in Sample
"Stat1"
Select to monitor tolerance violations in Statistics 1
"Stat2"
Select to monitor tolerance violations in Statistics 2
"Batch"
Select to monitor tolerance violations in Batch
Press «
» or «
» to select or unselect any of the above 4 items.
Chapter 5: The SQC16 Application
METTLER TOLEDO SQC16
40
When no article has the Violation Check activated, you can select either "%"
or "PCS" as its unit. Then you can select an article wherein you want to
activate the Violation Check and define the values for VC T1 Critical, VC T1
Reject, <T2 and make the Mean Tolerance active or inactive.
"VC T1 Critical" If during the sampling, the specified amount of Tolerance
Violators for T1 -/+ reaches the specified Critical values, an alarm will set off
informing the user that there is a certain number of samples that are "T1
Critical (Pcs or %)".
"VC T1 Reject"
If during the sampling, the specified amount of Tolerance
Violators for T1 -/+ reaches the specified Reject values, an alarm will set off
informing the user that there is a certain number of samples that are "T1
Reject (Pcs or %)", and the whole sampling will then be rejected.
"<T2" this refers to the amount of T2- violators; this function can be enabled
or disabled.
"Mean Tolerance" The check for mean tolerances (tm- and tm+) is a check
on the deviation of the mean value from target value
5.10.2 2nd Tolerance System
If you desire evaluations of the same article using different tolerance systems, e.g. according to a free tolerance system to
improve the filling accuracy, select the parameter "2nd Tol. System".
Press «
» to activate 2nd tolerance system, then the correlations and
relationships under the article definition.
Before you can define an article as a slave, you need to define an article as a
master (reference) first. This master is a normal article. It has at least the
following parameters defined:
a. Name
b. Nominal value
c. Tolerance system
d. Tolerances
If you define a slave of a master, all data defined in the master-article will be
copied to the slave. Now you can only change a few parameters on the
slave-article:
a. Tolerance system
b. Tolerances
c. Violation check
d. Individual values printout
METTLER TOLEDO SQC16
Chapter 4: Chapter 5: The SQC16 Application
41
5.10.3 Shared Statistics
If you wish to have a common set of statistics for various articles, select the parameter "Shared Statistics". To perform the
shared statistics and for every common article, an article must be defined.
Press «
definition.
» to activate Share, then define the relationships under the article
5.10.4 Test
If you wish to perform sampling for simple determination of mean value and standard deviation, without influence on the
statistics, select the parameter "Test".
Press «
» to activate Test.
5.10.5 Supplement
It may sometimes be necessary to switch on Supplement, if a filling process is not stable. To do so, select the parameter
"Supplement".
Press «
» to activate Supplement.
5.10.6 Adjust
To work with adjustment messages, select the parameter "Adjustment". If selected, then the parameter 'Adjustment, as well
as its sub parameters 'Speed', 'Min. Step' and 'Factor' will become available in the article definition of each article.
Press «
» to activate Adjustment.
Chapter 5: The SQC16 Application
METTLER TOLEDO SQC16
42
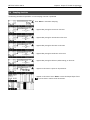
5.11 The Report settings
This function allows you to generate reports according to your specific needs. If you wish to change this setting, select the
parameter "Report".
Using « » and « », choose «Report». The following is an overview of the
Report Settings menu.
Report Settings
Statistics
Sample
x - chart
Marginals
A4 Printout
Linefeeds
x/R
Selected
x/s
Not
Selected
Statistics
Edit
Sample
See details in
Header/
Footer
...
Selected
Not
Selected
Edit
x
Compact
Code
Edit
%
Selected
Not
Selected
See details in
Header/
Footer
Complete
...
%
x
Staf1 Info
Individual
Chart
Statistics
Values
Selected
Not
Selected
Selected
Selected
Stat2 Info
Not
Selected
Not
Selected
Selected
Not
Selected
Batch Info
Selected
Not
Selected
METTLER TOLEDO SQC16
Chapter 4: Chapter 5: The SQC16 Application
43
x
Min/Max/
Range
Header/
Footer
Header 1
Selected
Not
Selected
Tol.
Violators
Class
Table
Histogram
x - chart
%
Selected
Selected
Selected
Selected
Selected
Selected
Not
Selected
Not
Selected
Not
Selected
Not
Selected
Not
Selected
Not
Selected
Free
Selected
Edit
Not
Selected
Date
Selected
Not
Selected
Time
Selected
hh:mm
Not
Selected
Header 2
hh:mm:ss
Footer 1
Same as Header 1
Footer 2
Footer 3
Press «
» to enter the Report settings sub-menu.
The following selection appears:
"Statistics"
Define the content of the statistics report
"Sample"
Define the content of the sample report
"x-chart"
R(ange) or s in the mean value trace
"Marginals"
Switch reporting of marginals on or off
"Linefeeds"
Define number of linefeeds at the end of report
"A4 printout"
Switch report printing between Complete and
Compact
Chapter 5: The SQC16 Application
METTLER TOLEDO SQC16
44
5.11.1 Statistics and Sample reports
Both statistics and sample reports menu contain the same parameters except for the "Individual Chart" and "StatVal"
parameters which are only available in the sample reports. To change settings, select the parameter "Statistics" or
"Sample" accordingly, then press « ».
Press «
» to change Header/Footer settings.
Using « » and « », choose a header or a footer you wish to include in the
».
printout and then press «
…appears on the screen. Press «
» to activate type of header or footer.
The parameter "Free" is used to enter a text, and the parameter "Date" and/or
"Time" is used to print date and time.
"Free"
"Date"
"Time"
Text entry using the alphanumeric/numeric keypad of
the scale. Maximum 24 characters are possible,
additional characters will be truncated.
Switch date in the selected line on or off
Format time printout in the selected line or switch off
If you wish to have the time in the selected line, you must define the format.
"hh:mm"
"hh:mm:ss"
Time printout in the selected line in hours and minutes
Time printout in hours, minutes and seconds
Note: In one line, you can print only a free text or date and/or time.
Notes: It is possible to print out the identification of the scale in the header or footer of a report by entering:
Example: Header 3
Æ Free Æ
.T.
METTLER TOLEDO
Example: Footer 2
Æ Free Æ
.S.
SNR:
SQC16
2511378
If the printer connected to the scale is an EPSON LX-300 printer, the report can only be customized by setting Header1,
Header2 and Footer1 as "Free".
METTLER TOLEDO SQC16
Chapter 4: Chapter 5: The SQC16 Application
45
5.11.2 Define contents of the report
The following information can be printed out in the statistics and sample reports:
"Min/Max/Range"
Minimum value/maximum value/range (=Max-Min) in the report
"Tolerance"
Tolerance violators in the report
"Class table"
Class table in the report
"Histogram"
Histogram in the report
"x-chart"
Mean value trace in the report
"%"
x/s/R/Min/Max/R in percent in the report
"Individual Chart"
Individual chart in the report (only in sample reports)
"StatVal"
Statistics values in the report (only in sample reports)
Select or unselect the desired information using «
» or «
».
To print out minimum value, maximum value and difference in the report. The
report will appear as follows:
Min
Max
R
90.81%
100.27%
9.46%
72.65 g
80.22 g
7.57 g
To print tolerance violators in the report. The report will appear as follows:
<T2<T1>T1+
>T2+
0
1
0
0
0.00
20.00
0.00
0.00
%
%
%
%
Chapter 5: The SQC16 Application
METTLER TOLEDO SQC16
46
To print class table in the report. The report will appear as follows:
<T2<T1<T1-4
-3
-2
-1
+1
+2
+3
+4
>T1+
>T1+
>T2+
0
0
1
1
2
3
4
7
8
5
2
0
0
0
0.00
0.00
3.33
3.33
6.66
9.99
13.32
23.31
26.64
16.65
6.66
0.00
0.00
0.00
%
%
%
%
%
%
%
%
%
%
%
%
%
%
To print the histogram in the report. A histogram is a graphical representation
of the distribution. The area of the rectangle is proportional to the number of
individual values in the classes.
The range from Nominal to T1 is divided into 4 classes, from T1 to T2 (if
used) into 2 classes, and from T2 to T3 (if used) into one class. The
histogram will appear as follows:
<T2
<T1
<T1
-4
-3
-2
-1
+1
+2
+3
+4
>T1
>T1
>T2
▐▓
▐▒
▐▒▒
▐░░░
▐░░░░░░
▐░░░░░░░░░░░░
▐░░░░░░░░░░░░░░░
▐░░░░░░░░░░░░░░░░
▐░░░░░░░░░░░░░
▐░░░░░░░
▐░░░
▐▒▒
▐▒
▐▓
To print x-chart (mean value trace) in the report.
The standard deviation (s trace) or the range of the values (R trace) of the
last 10 samples can be shown in the left trace (selectable in the menu "xChart", see below), the right trace shows the mean values of the last 10
samples.
s Chart
│
* │
│
*│
│
*
│
* │
0
7.57
│
│
│
│
-
x
¯ Chart
│ ░│ │ │
│ │░ │ │
│ ░ │ │
│ ░ │ │
Nom. +
METTLER TOLEDO SQC16
Chapter 4: Chapter 5: The SQC16 Application
47
To print x/s/Min/Max/R in percentage in the report.
Mean value, standard deviation, minimum value, maximum value and
difference are also printed out relative to the nominal value. The report will
appear as follows:
x
¯
96.68 %
s
3.71 %
Min 90.81 %
Max 100.27 %
R
9.46 %
77.350
2.965
72.65
80.22
7.57
g
g
g
g
g
The following information can be printed out only in the Sample report.
To print individual trace in the report.
The individual values of a sample are also shown graphically with the
tolerances and violations. The report will appear as follows:
1
2
3
4
5
77.93
76.61
72.65
79.34
80.22
│ │ ░│
│ │░ │
│▒│ │
│ │ ░
│ │ ░
│
│
│
│
│
│
│
│
│
│
To print some statistics values in the sample report.
"Stat1"
Summary information of Statistics1
"Stat2"
Summary information of Statistics 2
"Batch"
Summary information of Batch
Select or unselect the desired information using «
The report will appear e.g. as follows:
Stat.1: Sample#
3
¯
x
98.48%
78.784 g
s
3.71%
2.965 g
<T11
6.67 %
» or «
».
Chapter 5: The SQC16 Application
METTLER TOLEDO SQC16
48
5.11.3 x-chart (Mean value trace)
In addition to the mean value 'x', either the 'Range' (heaviest individual value minus the lightest individual value) or the
standard deviation 's' will be shown.
Press «
»
… select either x/R (to show range) or x/s (to show standard deviation) by
«
».
5.11.4 Marginals
Marginals are values less than the nominal value and greater than or equal to the negative tolerance limits. This can be
switched on or off in the reports. They will only appear in the free tolerance systems.
Select or unselect Marginals using «
» or «
».
5.11.5 Linefeeds
For aesthetic purposes, empty lines (called linefeeds) may also be added at the end of the report.
Press «
» to add a linefeed in statistics, sample or code.
"Statistics"
Linefeeds at the end of statistics reports (1..3..99).
"Sample"
Linefeeds at the end of sample reports (1..3..99).
"Code"
Linefeeds at the end of the entry of codes (1..3..99).
METTLER TOLEDO SQC16
Chapter 4: Chapter 5: The SQC16 Application
49
5.11.6 A4 Printout
The operator has the option whether to print in Complete or Compact. The Complete version prints the whole report, while
the Compact version prints only a selection of the report, and the font is much smaller.
Press «
» to define the printing settings.
"Complete"
"Compact"
Whole sample report will be printed, using normal font size
Selected parts of the sample report will be printed, using
smaller font size reports
…appears when "Complete" is selected.
This is an actual report printed in "Complete" mode.
…appears when “Compact” is selected.
This is an actual report printed in "Compact" mode.
Note: The only added information not included in the compact printing are:
Individual sample with charts, Tolerance System, Class Table, Violation
Check, Histogram and s-chart/ x-chart.
Sample result
SAMPLE 01
Qty
Mean (x,¯)
10
100.14 ml
Date: 20.01.2005
Time: 13:39
Operator: JA
Nominal 100.0 ml
Tare (x,¯)14.8 g
Density 1.2500 g/ml
Std. Dev
Min.
Max.
Range
<T3- <T2- <T1- Marg >T1+ >T2+ >T3+
4.68 ml
93.00 ml
107.60 ml
14.60 ml
0
0
2
3
1
0
0
Stat1
Qty
Mean (x,¯)
10
100.14 ml
From: 20.01.2005 - 13:39
Std. Dev
Min.
Max.
4.68 ml
93.00 ml
107.60 ml
To: 20.01.2005 - 13:40
Range
<T3- <T2- <T1- Marg >T1+ >T2+ >T3+
14.60 ml
0
0
2
3
1
0
0
Stat2
Qty
Mean (x,¯)
10
100.14 ml
From: 20.01.2005 - 13:39
Std. Dev
Min.
Max.
4.68 ml
93.00 ml
107.60 ml
To: 20.01.2005 - 13:40
Range
<T3- <T2- <T1- Marg >T1+ >T2+ >T3+
14.60 ml
0
0
2
3
1
0
0
Batch <<<<<<<Batch>>>>>>>>
From: 20.01.2005 - 13:39
Qty
Mean (x,¯)
Std. Dev
Min.
Max.
10
100.14 ml
4.68 ml
93.00 ml
107.60 ml
To: 20.01.2005 - 13:40
Range
<T3- <T2- <T1- Marg >T1+ >T2+ >T3+
14.60 ml
0
0
2
3
1
0
0
Chapter 5: The SQC16 Application
METTLER TOLEDO SQC16
50
5.12 Printing summary of database
This function allows you to print out the summary of all articles stored in the database.
Press «Print/Clr»
…appears on the screen. Press «Reports».
…appears on the screen. Press «PrtCat» to print out the catalog, «PrtSys» to
print all parameter of 'System' or «PrtGlDens» to print a list with the values of
the 30 density groups.
…appears on the screen. The attached printer will print out the following
information of all articles stored in the database:
Article index
Article Name
Name of 2nd tol.sys article (only if defined)
Article number (only if defined)
Article ID (only if defined)
Nominal
Supplement (only if defined)
Target (only if supplement and adjustment are defined)
Tare
Density (only if unit is for liquid)
Tolerance system
Individual tare (only if active)
Common article (only if defined)
METTLER TOLEDO SQC16
Chapter 6: Special features of SQC16
51
6
6.1
Special features of SQC16
Working with barcodes
The SQC16 system can be equipped with a bar code reader. When the article
data are defined, e.g. the following parameters can be read in: Article name,
article number, identification, user name, text for header and footers in the
printout.
4 1 0 0
4 5 6 2
If you wish to select the articles for sampling, using the bar code reader, you
must define the number of the bar code (e.g. EAN) as article number.
To activate, the desired article can be selected directly by reading in the bar
code.
In sampling mode, also the batch number can be read in with the bar code.
6.2
Individual tare sampling
There are two possible ways to work with individual tare:
- 1,1..2,2
Preweighing and backweighing are in two samples. First, all preweighings are done in one
sample and afterwards, the backweighings are done in the same order as the preweighings in
a second sample.
- 1,2..1,2
Preweighings and backweighings are in one sample. After every preweighing, the
backweighing follows immediately.
Preweighings can be gross values (Æ backweighing: tare value) or tare values (Æ backweighing: gross value). Any
defined mean tare value from the database will have its effect to calculate the net value as well.
Note: When you are done with preweighing but not with backweighing, you will not be able to delete the sampling unless
you press «Start» and then «End».
6.2.1 Preweighing and backweighing in two samples
Activate individual tare sampling by defining an article with its "Ind. Tare" parameter selected. Press the «» and select
the article you wish to use. Press "Options", then "Define" then press « » until the parameter "Ind. Tare" is highlighted.
» and choose mode "1,1 .. 2,2" and then press «
» to activate this individual tare mode.
Press «
".1" appears immediately after the article name, indicating that SQC16 is now
ready for preweighing. Press «Start» to commence sampling.
Chapter 6: Special features of SQC16
METTLER TOLEDO SQC16
52
…appears on the screen. SQC16 is now ready to perform the preweighing.
First container was placed on the scale.
•
•
•
Continue procedure until the fifth container has been placed on the scale.
Fifth (which is here also the last) container was placed on the scale.
".2" appears immediately after the article name, indicating that SQC16 is now
ready for backweighing. Press «Start» to commence sampling.
Place the first sample together with the first container on the scale.
•
•
•
Then, place second sample and second container on the scale. Continue
procedure until the fifth sample has been placed.
…appears on the screen. Wait until the printout of the sample report is done.
…appears on the screen. SQC16 has generated a report. Press «Close» to
close the Sample Report. Press « » to scroll down to see the rest of the
statistics.
…end of statistics report. Press «
messages (see also «
Sample Report.
» or «C» to close the end of sampling
»/System/Messages). Press «Close» to close the
METTLER TOLEDO SQC16
Chapter 6: Special features of SQC16
53
6.2.2 Preweighing and backweighing in one sample
Activate individual tare sampling by defining an article with its "Ind. Tare" parameter selected. Press the «» and select
the article you wish to use. Press "Options", then "Define", then press « » until the parameter "Ind. Tare" is highlighted.
» and choose mode "1,2 .. 1,2" and then press again «
» to activate this individual tare mode.
Press «
Note: When you are done with preweighing but not with backweighing, you will not be able to delete the sampling unless
you press «Start» and then «End».
".1" appears immediately after the article name, indicating that SQC16 is now
ready for preweighing. Press «Start» to commence sampling.
…appears on the screen. SQC16 is now ready to perform the preweighing.
Place the first container on the scale (In this example: Pre-weighing of tare
values, not gross values).
Place the first sample, incl. container, on the scale. The container’s weight
value becomes the tare weight and is subtracted from the gross weight.
Actual weight is shown on the upper left-hand corner of the screen (Act).
Place the second container on the scale.
Place the second sample, incl. container, on the scale.
•
•
•
Continue procedure until the fifth container and fifth sample have been placed
on the scale accordingly (in this example: -n- = 5).
…appears on the screen. Wait until the printout of the sample report is done.
…appears on the screen. SQC16 has generated a report. Press «Close» to
close the Sample Report. Press « » to scroll down to see the rest of the
statistics.
Chapter 6: Special features of SQC16
METTLER TOLEDO SQC16
54
…end of statistics report. Press «
messages (see also «
Sample Report.
6.3
» or «C» to close the end of sampling
»/System/Messages). Press «Close» to close the
Sampling with batch
Batch sampling means to have a batch identification for sampling data. Each batch has its own batch statistics.
Activate batch sampling by pressing the «» and select the article you wish to use. Press "Options", then "Define", then
press « » until the parameter "Batch" is highlighted. Press «
» to activate batch sampling mode.
Press «Start» to commence sampling.
…appears on the screen. Using the keypad, type in the name of the batch
and then press the «OK»
…appears on the screen. SQC16 is now ready for batch sampling.
Place first sample on the scale.
•
•
•
Continue procedure until the fifth sample has been placed on the scale
Continue procedure until the fifth sample has been placed on the scale
.…appears on the screen. Wait until the printout of the sample report is done.
METTLER TOLEDO SQC16
Chapter 6: Special features of SQC16
55
…appears on the screen. SQC16 has generated a report. Press «Close» to
close the Sample Report. Press « » to scroll down to see the rest of the
statistics.
…end of statistics report. Press «
messages (see also «
Sample Report.
» or «C» to close the end of sampling
»/System/Messages). Press «Close» to close the
Note: When a new batch name is defined, SQC16 will automatically print and then clear the previous batch statistics. You
may then commence with a new batch statistics.
6.4
Transfer key
Using the transfer key enables you to control the weighing procedure especially for items that require filing or dosing.
Activate transfer key by pressing the «» and select the article you wish to use. Press "Options", then "Define", then press
« » until the parameter "Transfer key" is highlighted. Press «
» to activate transfer key mode.
Press «Start» to commence sampling.
...appears on the screen.
Place first sample on the scale. Press «Accept» to accept the value.
...appears on the screen.
Chapter 6: Special features of SQC16
METTLER TOLEDO SQC16
56
•
•
•
Continue procedure until the fifth sample has been placed on the scale
.…appears on the screen. Wait until the printout of the sample report is done.
…appears on the screen. SQC16 has generated a report. Press «Close» . to
close the Sample Report. Press « » to scroll down to see the rest of the
statistics.
…end of statistics report. Press «
messages (see also «
Sample Report.
» or «C» to close the end of sampling
»/System/Messages). Press «Close» to close the
METTLER TOLEDO SQC16
Chapter 7: Vision Setup
57
7
Vision Setup
Vision Setup can be used to change the settings of the scale and to activate functions, thereby allowing the scale to be
adapted to individual weighing needs.
Important: We recommend defining your own supervisor password (Æ Chapter 3.2).
7.1
Overview and operation
After switching on...
Standby / weighing mode
Long press on
Password
Type password,
end with
SCALE
SQC16
TERMINAL
COMMUNICATIONS
DIAGNOSTICS
Chapter 7.3.1
Chapter 7.3.2
Chapter 7.3.3
Chapter 7.3.4
Chapter 7.3.5
Navigating through the Vision Menu is done through the six softkeys found at the bottom of the display. The softkeys
change depending on the currently selected menu item to allow the user to perform the appropriate action for the
selected item.
This softkey selects the previous item listed on the current menu.
This softkey selects the next item listed on the current menu.
This softkey selects the first item on the next “page” of the menu. If all the items for the current menu
are visible (i.e. there are four or less items for the current menu), this softkey is not visible.
Chapter 7: Vision Setup
METTLER TOLEDO SQC16
58
This softkey enters the submenu of the currently selected item. If the currently selected item does not
have a submenu, this softkey is not visible.
This softkey leaves the current submenu and goes one level up. If the Vision Menu is already at the top
level, pressing this softkey is similar to pressing «End» (see below).
This softkey allows the user to edit the value or setting of the currently selected item. If the currently
selected item contains a submenu, this softkey is not visible.
Some menu items perform specific actions rather than editing. Pressing this softkey directs the Vision
Menu to perform the action specified by the currently selected menu item.
This softkey can be pressed at any time to leave the Vision Menu. The Vision Menu will then prompt the
user to save or discard the changes the user has made. The user may also press «Cancel» at this time
to go back to the Vision Menu.
7.2
Calling up the menu and entering the password
Press «
appears.
» key and hold it down until the prompt to enter the password
User: No password required, just press «
» key.
Supervisor: Enter password (sequence of keystrokes, Chapter 7.7)
immediately and confirm with the «
» key. Otherwise, after a few
seconds, the scale returns to weighing mode. If an incorrect password is
entered, the menu cannot be called up. Note: When the scale leaves the
factory, no supervisor password is defined, so when the password is
requested, just press «
» key.
METTLER TOLEDO SQC16
Chapter 7: Vision Setup
59
7.3
Menu overview
7.3.1 Scale
Scale
Calibration
Display
Tare
Zero
Restart
Filter
Unit 1
Auto Tare
AZM
Off
Vibration
Start?
-0-
g
xxx g
kg
* depends
Calibration weight
on the
type of balance
t
xxx g
lb
oz
- done -
Off
Off
On
0.5d
Chain Tare
Resolution *
Mid
High
1d
Process
Off
2d
On
5d
Universal
AutoClr Tare
*on the
Resolution depends
type of balance
Low
On
Dosing
10d
Stability
Off
Fast
On
0.0005
Standard
Pushb. Tare
Precise
0.01
Disable
* Monobloc
Only available in
with
Active
internal calibration
FACT
* Min
Only shows if
Weigh
value is set
MinWeigh
Off
Temperature
Reset
Start?
On
Off
SURE?
1K
2K
5K
Day / Time
Days
Time1
Time2
Time3
Edit Days
Edit Time1
Edit Time2
Edit Time3
Chapter 7: Vision Setup
METTLER TOLEDO SQC16
60
7.3.2 SQC16
SQC16
User Login
Auto Log Out
Min. PW Length
Off
Off
0
On
On
1
User Setup
User1
User16
2
User
Edit
Number
Edit
Access Rights
Operator
3
Administrator
4
5
6
Password
Erase password
METTLER TOLEDO SQC16
Chapter 7: Vision Setup
61
7.3.3 Terminal
TERMINAL
Device
Sleep
Language
English
Off
Deutsch
1 minute
Français
3 minutes
Italiano
5 minutes
Español
15 minutes
Nederlands
30 minutes
Contrast
Invert
Weight Display
0
No
small
Yes
big
Date Time
Off
Date Format
EU
10
US
Date
13.12.02
Time
Polski
08.45.33
Slovák
Slovenski
Czech
Magyar
Access
Supervisor Pwd
Enter Pwd
Retype Pwd
Reset
Start?
Are you sure?
Beep
On
Chapter 7: Vision Setup
METTLER TOLEDO SQC16
62
7.3.4 Communication
COMMUNICATIONS
Mode
COM1
COM2
Parameters
Printer Type
Printer
Sprinter 1
Header Line 1
Auto Print
GA 42
Header Line 2
RS-P42
Header Line 3
LX-300
Header Line 4
GA 46
Header Line 5
Continuous Wt
COM3
*COM 3 is not available in
IND469SQC
Define Header
Dialog
2nd Display
*COM 1 and COM 2 only
LC-I/O
BCR
Baud
Parity
Handshake
300
7-none
No
600
7-odd
XonXoff
1200
7-even
2400
8-none
4800
8-odd
Swiss French
9600
8-even
Belgian French
19200
German
38400
German Swiss
57600
PS2
Keyboard
*COM 1 and COM 2 only
BCR
US International
Not Used
UK
Article Search
French
Italian
Spanish
Latin America
115200
COM 3
Add Line Feed
0
9
Reset Com
Start?
Are you sure?
METTLER TOLEDO SQC16
Chapter 7: Vision Setup
63
7.3.5 Diagnostics
DIAGNOSTICS
Keyboard Test
Start?
PUSH 1
Display Test
Start?
SNR1
SNR2
List1
List2
Start?
2564494
<Display Test>
Printout
Reset All
Start?
Are you sure?
PUSH 25
7.4
Scale settings (SCALE)
This function block allows the user to change general scale functionality.
Please refer to Chapter 7.3.1 on how to reach the menu position 'Vision Setup Æ SCALE' and how to navigate within the
'Vision Setup'-menu.
Enter the SCALE menu («
») and choose one of the functions listed below.
Available functions and settings:
The screen on the right hand side shows
the most important scale settings as a
preview.
Adjust/calibrate the scale
Æ Chapter 7.4.1
Display accuracy and weighing unit
Æ Chapter 7.4.2
Tare settings
Æ Chapter 7.4.3
Automatic zero point correction
Æ Chapter 7.4.4
Automatic storage of tare and zero values
Æ Chapter 7.4.5
Adaptation to environmental conditions and weighing
mode
Æ Chapter 7.4.6
Automatic adjustment(FACT)
Æ Chapter 7.4.7
Minimum weight
Æ Chapter 7.4.8
Reset 'SCALE' settings to factory settings
Æ Chapter 7.4.9
Chapter 7: Vision Setup
METTLER TOLEDO SQC16
64
7.4.1 Adjust/calibrate (SCALE Æ Calibration)
This function enables the scale to be adjusted/calibrated (weighing pan must be empty). Not available on certified
scales!
Please refer to Chapter 7.3.1 on how to reach the menu position 'Vision Setup Æ SCALE Æ Calibration' and how to
navigate within the 'Vision Setup'-menu.
Press «Yes» and follow the instructions given on the screen.
After choosing the calibration weight, place the weight on the weighing pan
and then press «OK».
It is recommended to use the maximum calibration weight from the list. If it is
not possible to use the maximum weight, at least do not use less than onethird of the maximum load to ensure reliable weighing values.
Calibration is done. Continue with other functions or press «End» and confirm
with «Yes» to save the changes.
Note: Abort calibration at any given time by pressing «Cancel».
7.4.2 Display resolution and weighing unit (SCALE Æ Display)
This function allows the user to change the weighing unit, and to set the resolution of the weight.
Please refer to Chapter 7.3.1 on how to reach the menu position 'Vision Setup Æ SCALE Æ Display' and how to navigate
within the 'Vision Setup'-menu.
Press «
» and select e.g. 'Unit 1', then «Edit» to change the unit.
METTLER TOLEDO SQC16
Chapter 7: Vision Setup
65
In order to change the settings of the resolution of the scale, select
'Resolution'.
Use «
» and «
» to select the desired resolution and press «OK».
7.4.3 Automatic zero point correction (SCALE Æ Tare)
This function allows the user to configure all the available tare function of the scale.
Please refer to Chapter 7.3.1 how to reach the menu position 'Vision Setup _ SCALE _ Tare' and how to navigate within
the 'Vision Setup'-menu.
Switch the available functions Auto Tare, Chain Tare, AutoClr Tare or
Pushb.
Tare either On or Off.
Automatic tare automatically tares the scale once a load (>=9d) is placed on the weighing pan. If this is active, the icon
AT flashes on the lower right side of the display.
Chain tare allows several tare actions without clearing the tare memory. If this is not active, the tare memory has to be
cleared by pressing the «C» softkey. The tare memory has to be cleared before a new tare can be performed.
Automatic clear tare automatically clears the tare memory once the load is removed from the weighing pan.
Push button tare enables/disables the use of the «ÆTÅ» key to perform manual taring.
7.4.4 Automatic zero point correction (SCALE Æ Zero)
With Auto Zero, small deviations in the weight (in the range of 50% of 1d) are automatically zeroed. Always active for
certified scales!
Please refer to Chapter 7.3.1 on how to reach the menu position 'Vision Setup Æ SCALE Æ Zero' and how to navigate
within the 'Vision Setup'-menu.
Press «
» to go to the Auto Zero settings.
Press «Edit» to assign the zero setting range or to switch the function off.
Chapter 7: Vision Setup
METTLER TOLEDO SQC16
66
7.4.5 Automatic save of tare and zero values (SCALE Æ Restart)
This function allows the user to set the scale so that it is able to automatically save the tare and zero values after
switching off or when a power outage occurs. Not available on certified scales. Automatic save switched off is the
factory setting.
Block can only be accessed by a supervisor.
Please refer to Chapter 7.3.1 on how to reach the menu position 'Vision Setup Æ SCALE Æ Restart' and how to navigate
within the 'Vision Setup'-menu.
Press «Edit» to switch the automatic save switch function on or off.
7.4.6 Adaptation to environmental conditions and weighing mode (SCALE Æ Filter)
Vibration function allows the user to set the scale so that it is able to adapt itself to the existing environmental conditions.
Process function allows the user to set the weighing mode of the scale (weighing process adapter).
Stability function allows the use to adjust the weighing speed.
Please refer to Chapter 7.3.1 on how to reach the menu position 'Vision Setup Æ SCALE Æ Filter' and how to navigate
within the 'Vision Setup'-menu.
Press «
» to go to the vibration and process settings menu.
METTLER TOLEDO SQC16
Chapter 7: Vision Setup
67
Vibration:
Low: For very stable and stable environment. Scale operates very quickly but
is more sensitive to external influences.
Mild: For normal environment conditions. Scale operates at medium speed
(factory setting).
High: For unstable environment. Scale operates more slowly but is less
sensitive to external influences.
Process:
Universal: Setting for all weighing types and normal weighing goods (factory
setting)
Dosing: Setting for dispensing liquids or powdery substances.
Stability:
Fast: The scale operates very fast.
Standard: The scale operates of medium speed.
Precise: The scale operates with the greatest possible reproducibility.
The slower the scale works, the greater the reproducibility.
7.4.7 Automatic adjustment (SCALE Æ FACT)
FACT function allows the user temperature or time dependent adjustment. This menu item only appears on scales with an
internal adjustment weight.
Please refer to Chapter 7.3.1 on how to reach the menu position 'Vision Setup Æ SCALE Æ FACT' and how to navigate
within the 'Vision Setup'-menu.
Press «
» to go to the FACT settings.
Press «Edit» to select the menu item temperature.
Use the « » softkey to select the desired temperature difference for the
automatic adjustment.
Press «OK».
Chapter 7: Vision Setup
METTLER TOLEDO SQC16
68
Defining up to 7 days of the week and up to 3 times for automatic
adjustment.
- Select day of the week for automatic adjustment.
7 zeros appear in the display. The first zero stands for Monday, the second
for Tuesday, the third for Wednesday etc.
- Use the key to go to the desired day of the week and enter 1.
The display 0100100 means that Tuesday and Friday are selected as
calibration days.
- Press «OK».
Time 1 appears in the display.
- Enter the time(s) for the calibration (hours, minutes).
The format for entering the time (EU or US) depends on the settings in the
menu item TERMINAL-> Device.
-
Press «OK».
Note: apart from the calibration days at least one time has to be defined in
order to activate the time controlled calibration!
7.4.8 Minimum weight (SCALE Æ Min Weigh)
Min Weigh function allows the user to switch the minimum weight on and off. If the weight on the scale falls below the
stored minimum value, an * appears on the display in front of the weight indicator. This menu item only appears if the
service technician has saved a minimum weight.
Please refer to Chapter 7.3.1 on how to reach the menu position 'Vision Setup Æ SCALE Æ Min Weigh' and how to
navigate within the 'Vision Setup'-menu.
Press «
» to go to the Min Weigh settings.
Press «Edit» to switch the minimum weight monitoring on/off.
METTLER TOLEDO SQC16
Chapter 7: Vision Setup
69
7.4.9 Resetting scale to factory default settings (SCALE Æ Reset)
This function resets the 'SCALE' block to its original factory settings. Can only be accessed by a supervisor.
Please refer to Chapter 7.3.1 on how to reach the menu position 'Vision Setup Æ SCALE Æ Reset' and how to navigate
within the 'Vision Setup'-menu.
Press «Yes» to reset the scale settings. 'SURE?' will appear, press «Yes» to
confirm. The scale settings are now reset to its original factory settings.
7.5
SQC16 settings (SQC16)
This function block allows the user to change the SQC16 application specific settings of the scale. Can only be accessed
by a supervisor.
Please refer to Chapter 7.3.2 on how to reach the menu position 'Vision Setup Æ SQC16' and how to navigate within the
'Vision Setup'-menu.
Enter the SQC16 menu («
») and choose one of the functions listed below.
Available functions and settings:
The screen shows the most important
application settings as a preview.
User Login
Æ Chapter 7.5.1
Auto Log Out
Æ Chapter 7.5.2
Minimum Password Length
Æ Chapter 7.5.3
User Setup
Æ Chapter 7.5.4
7.5.1 User Login (SQC16 Æ User Login)
If this function is turned off, SQC16 will allow the application to operate without the user having to log in.
Please refer to Chapter 7.3.2 on how to reach the menu position 'Vision Setup Æ SQC16 Æ User Login' and how to
navigate within the 'Vision Setup'-menu.
Press «Edit» to switch User Login on or off.
Confirm selection by pressing «OK».
Chapter 7: Vision Setup
METTLER TOLEDO SQC16
70
7.5.2 Auto Log Out (SQC16 Æ Auto Log Out)
This function, if activated, automatically logs you out after each sampling procedure.
Please refer to Chapter 7.3.2 on how to reach the menu position 'Vision Setup Æ SQC16 Æ Auto Log Out' and how to
navigate within the 'Vision Setup'-menu.
Press «Edit» to switch on or off.
Confirm selection by pressing «OK».
7.5.3 Minimum Password Length (SQC16 Æ Minimum PW Length)
With this function, you can specify the minimum length of the passwords to be defined. If the user defines a password
that has less than the specified number of digits, SQC16 will give a message that the password is invalid.
Please refer to Chapter 7.3.2 on how to reach the menu position 'Vision Setup Æ SQC16 Æ Minimum PW Length' and
how to navigate within the 'Vision Setup'-menu.
Press «Edit» to change the minimum length of password.
Select the desired number of length and confirm selection by pressing «OK».
7.5.4 User Setup (SQC16 Æ User Setup)
This function allows you to define and set up a maximum of 16 users that can work with SQC16 if “User Login” (Chapter
7.5.1) is switched on. You can define their name, ID number, type of access rights and reset their passwords from this
function.
Please refer to Chapter 7.3.2 on how to reach the menu position 'Vision Setup Æ SQC16 Æ User Setup' and how to
navigate within the 'Vision Setup'-menu.
Press «Edit» to set up a new user or modify the settings of an existing user.
METTLER TOLEDO SQC16
Chapter 7: Vision Setup
71
Use « » and « » to select the user you wish to modify. To define a new
user, select “<EMPTY>” from the user list and press «Edit» to modify the
settings of the selected user.
Use « » and « » to select the parameter you wish to modify and press
«Edit».
User
User name (must be unique)
Number
User ID number
Access Rights Select whether the user has Administrator or Operator
Password
7.6
».
access rights. An Operator cannot enter the «
Reset the user’s password.
Terminal settings for device (TERMINAL Æ Device)
This function block allows the user to change display and peripheral oriented settings of the scale. Only the “Device”
block is available to the user.
Please refer to Chapter 7.3.3 on how to reach the menu position 'Vision Setup Æ TERMINAL Æ Device' and how to
navigate within the 'Vision Setup'-menu.
Enter the TERMINAL menu («
below.
») and choose one of the functions listed
Available functions and settings:
The screen shows the most important
terminal settings as a preview.
The screen shows a preview of the most
important settings of the active item, e.g.
those of device if 'Device' is active (i.e.
highlighted).
Language settings
Æ Chapter 7.6.1
Sleep function
Æ Chapter 7.6.2
Contrast
Æ Chapter 7.6.3
Invert
Æ Chapter 7.6.4
Weight display
Æ Chapter 7.6.5
Date and time
Æ Chapter 7.6.6
Beep
Æ Chapter 7.6.7
2
Chapter 7: Vision Setup
METTLER TOLEDO SQC16
72
7.6.1 Language settings (TERMINAL Æ Device Æ Language)
This function allows the user to change the language settings of the scale.
Please refer to Chapter 7.3.3 on how to reach the menu position 'Vision Setup Æ TERMINAL Æ Device Æ Language' and
how to navigate within the 'Vision Setup'-menu.
Press «Edit» to go to the Language settings menu.
Use «
» and «
» to select the desired language setting and press «OK».
7.6.2 Sleep function (TERMINAL Æ Device Æ Sleep)
This function is useful to enhance the lifetime of the display backlight.
Please refer to Chapter 7.3.3 on how to reach the menu position 'Vision Setup Æ TERMINAL Æ Device Æ Sleep' and how
to navigate within the 'Vision Setup'-menu.
Press «Edit» to go to the Sleep settings menu.
The display backlight will turn itself off automatically when the selected time
elapses.
7.6.3 Adjusting the contrast of the display (TERMINAL Æ Device Æ Contrast)
This function allows the user to adjust the contrast of the screen display.
Please refer to Chapter 7.3.3 on how to reach the menu position 'Vision Setup Æ TERMINAL Æ Device Æ Contrast' and
how to navigate within the 'Vision Setup'-menu.
Press «Edit» to go to the Contrast settings menu.
Select the degree of contrast using «
selection.
» or «
». Press «OK» to confirm
METTLER TOLEDO SQC16
Chapter 7: Vision Setup
73
7.6.4 Invert (TERMINAL Æ Device Æ Invert)
This function allows the user to select either a white or a black background of the screen display.
Please refer to Chapter 7.3.3 on how to reach the menu position 'Vision Setup Æ TERMINAL Æ Device Æ Invert' and how
to navigate within the 'Vision Setup'-menu.
Press «Edit» to go to the Invert settings menu.
Choose the desired setting (Yes or No) and then press «OK» to confirm
selection.
7.6.5 Changing the size of weight display (TERMINAL Æ Device Æ Weight display)
This function allows the user to select either a small or a big weight display on the screen.
Please refer to Chapter 7.3.3 on how to reach the menu position 'Vision Setup Æ TERMINAL Æ Device Æ Weight display'
and how to navigate within the 'Vision Setup'-menu.
Press «Edit» to go to the Weight Display settings menu. Default setting is
'Small'.
Choose the desired size and then press «OK» to confirm selection.
7.6.6 Adjusting the date and time (TERMINAL Æ Device Æ Date Time)
This function allows the user to set date and time of the scale.
Please refer to Chapter 7.3.3 on how to reach the menu position 'Vision Setup Æ TERMINAL Æ Device Æ Date Time' and
how to navigate within the 'Vision Setup'-menu.
Press «
» to go to the Date and Time settings menu.
Press «Edit» to change format either from US or EU format. Select 'Date' to
change the date and 'Time' to adjust the internal clock of the scale. Press
«OK» to confirm selection.
Chapter 7: Vision Setup
METTLER TOLEDO SQC16
74
7.6.7 Adjusting the date and time (TERMINAL Æ Device Æ Beep)
This function allows the user to switch the beep on or off, that is appearing on each key press.
Please refer to Chapter 7.3.3 on how to reach the menu position 'Vision Setup Æ TERMINAL Æ Device Æ Beep' and how
to navigate within the 'Vision Setup'-menu.
Press the «Edit» key to go to the Beep settings menu.
Choose the desired setting (On or Off) and then press «OK» to confirm
selection.
7.7
Define supervisor password (TERMINAL Æ Access)
This function allows the user to change the supervisor password of the scale. Can only be accessed by a supervisor.
Please refer to Chapter 7.3.3 on how to reach the menu position 'Vision Setup Æ TERMINAL Æ Access' and how to
navigate within the 'Vision Setup'-menu.
Press «
»…
… and then press «Edit» to enter a new password.
Enter the password using the keypad, press «OK» to confirm. 'Retype Pwd'
appears. Retype the new password and press «OK» again.
In case you forgot the password, you may press «
«
», «
», «
» keys in sequence to access the Vision Setup.
»,
METTLER TOLEDO SQC16
Chapter 7: Vision Setup
75
7.8
Reset terminal settings to factory settings (TERMINAL Æ Reset)
This function resets the 'TERMINAL' block to its original factory settings. The supervisor password ('TERMINAL Æ Access')
will not be reset, only “Device” block.
Please refer to Chapter 7.3.3 on how to reach the menu position 'Vision Setup Æ TERMINAL Æ Reset' and how to
navigate within the 'Vision Setup'-menu.
Press «Yes» to reset the terminal settings. 'SURE?' will appear, press «Yes» to
confirm. The terminal settings are now reset to its original factory settings.
7.9
Communication settings (COMMUNICATION)
This function block allows the user to change the peripheral settings of the scale. Differences will appear depending on the
option pack installed. Can only be accessed by a supervisor.
Please refer to Chapter 7.3.4 on how to reach the menu position 'Vision Setup Æ COMMUNICATION' and how to navigate
within the 'Vision Setup'-menu.
Enter the COMMUNICATION menu («
the functions listed below.
»), select a port and choose one of
Available functions and settings:
The screen shows the most important
communication settings as a preview.
The screen shows a preview of the most
important settings of the active item, e.g.
those of COM1 if 'Com1' is active (i.e.
highlighted).
Note: COM3 is not available for
IND469SQC. COM2 is used for
ETHERNET or WLAN (IND469 only) in
case such option is installed.
Mode
Æ Chapter 7.9.1
Parameters
Æ Chapter 7.9.2
Printer type
Æ Chapter 7.9.3
Define Header
Æ Chapter 7.9.4
Add Linefeed
Æ Chapter 7.9.5
Reset 'COMMUNICATION' settings to factory settings
Æ Chapter 7.9.6
PS2 settings
Æ Chapter 7.9.7
Chapter 7: Vision Setup
METTLER TOLEDO SQC16
76
7.9.1 Mode (COMMUNICATION Æ Mode)
This function enables the user to set the input/output mode of a COM port.
Please refer to Chapter 7.3.4 on how to reach the menu position 'Vision Setup Æ COMMUNICATION Æ Mode' and how to
navigate within the 'Vision Setup'-menu.
Press «Edit» to go to the Mode settings menu.
The mode setting can be changed to either Printer, Auto Print, Continuous
Weight, Dialog, 2nd Display, or LC-I/O. In this example, Com1 was set to
Printer.
Press «End» and confirm with «Yes» to save the changes.
7.9.2 Parameters (COMMUNICATION Æ Parameters)
Please refer to Chapter 7.3.4 on how to reach the menu position 'Vision Setup Æ COMMUNICATION Æ Parameters' and
how to navigate within the 'Vision Setup'-menu.
The current Baud Rate, Parity and Handshake settings are displayed on the
screen. Press « » and …
… «Edit» to change settings of Baud, Parity or Handshake.
Baud:
Parity:
300
7-none
600
7-odd
1200
7-even
2400
8-none
4800
8-odd
9600
8-even
19200
38400
57600 (Only for COM3)
115200 (Only for COM3)
Handshake:
No
XonXoff
METTLER TOLEDO SQC16
Chapter 7: Vision Setup
77
7.9.3 Printer type (COMMUNICATION Æ Printer type)
This function allows you to choose the type of printer to be used in printing out reports.
Please refer to Chapter 7.3.4 on how to reach the menu position 'Vision Setup Æ COMMUNICATION Æ Printer Type' and
how to navigate within the 'Vision Setup'-menu.
Press «Edit» to go to the Printer Type settings menu.
Choose the desired type of printer and then press «OK».
7.9.4 Header (COMMUNICATION Æ Define Header)
This feature is basically used to add header lines on the printouts during weighing mode. Up to 5 lines can be added. If
defined for an A4/Report printer, line 1,2 and 3 will be used for header information in SQC mode print-outs as well.
Please refer to Chapter 7.3.4 on how to reach the menu position 'Vision Setup Æ COMMUNICATION Æ Define Header'
and how to navigate within the 'Vision Setup'-menu.
… when this screen appears, press «
» enter the header settings menu.
Press «Edit» to edit a header line.
Using the keypad, type a header line text. Up to a maximum of 24 characters
are allowed. Press «OK» when done. Identification information '.T.' and '.S.'
(see 5.11.1) can be used as well.
7.9.5 Add LineFeed (COMMUNICATION Æ Add LineFeed)
This feature is used to add an empty Linefeed on the printout right after each report. The default is '4', meaning 4 empty
lines are generated right after each report, to make it more convenient for the user to detach the printed output from the
printer.
Please refer to Chapter 7.3.4 on how to reach the menu position 'Vision Setup Æ COMMUNICATION Æ Add LineFeed' and
how to navigate within the 'Vision Setup'-menu.
Chapter 7: Vision Setup
METTLER TOLEDO SQC16
78
… when this screen appears, press «Edit» to change the Add LineFeed
settings menu.
Use « » and « » to choose the desired number of lines and then press
«OK» to confirm changes.
7.9.6 Reset communication (COMMUNICATION Æ Comx Æ Reset Com)
This function resets the 'COMMUNICATION' block to its original factory settings.
Please refer to Chapter 7.3.4 on how to reach the menu position 'Vision Setup Æ COMMUNICATION Æ Comx Æ Reset
Com' and how to navigate within the 'Vision Setup'-menu.
Press «Yes» to reset the settings of the current Com port. 'SURE?' will appear,
press «Yes» to confirm. The chosen Com port is now reset to its original
factory settings.
7.9.7 PS2 Settings (COMMUNICATION Æ PS2)
This function allows setting up of the peripherals that are attached via the PS2 Interface.
Please refer to Chapter 7.3.4 on how to reach the menu position 'Vision Setup Æ COMMUNICATION Æ PS2' and how to
navigate within the 'Vision Setup'-menu.
Press «
» to go to the PS2 settings menu.
Select the item you wish to configure.
Keyboard
It is possible to attach a PS2 keyboard to the scale via the PS2 Interface. This
function enables you to specify the layout of the keyboard that you are using.
Note: When a PS2 keyboard is attached, it is possible to work with SQC16
using only this keyboard. The keys F1-F6 simulate the softkeys, F9-F11
simulate the top 3 function keys of the scale. You can press «Enter» and
«Esc» keys to simulate the «OK» and «Cancel» softkeys respectively. The
«Backspace» key simulates the «C» key.
METTLER TOLEDO SQC16
Chapter 7: Vision Setup
79
BCR
Aside from a keyboard, it is also possible to attach a barcode reader via the
PS2 Interface. This function enables you to specify the designation of the data
coming from the barcode reader used for Direct Input (i.e. when the scale is
in weighing or SQC mode).
Not Used
Article search
Ignore data coming from the barcode reader.
Use the data for searching through the article database.
Note: Whenever the scale is asking for user input, the barcode reader can
always be used to scan in data in the context of the user input.
7.10 Diagnostic settings (DIAGNOSTICS)
This function block allows the user to verify if all keys are functioning properly. Can only be accessed by a supervisor.
Please refer to Chapter 7.3.5 on how to reach the menu position 'Vision Setup Æ DIAGNOSTICS' and how to navigate
within the 'Vision Setup'-menu.
Enter the DIAGNOSTICS menu («
below.
») and choose one of the functions listed
Available functions and settings:
Keyboard Test
Æ Chapter 7.10.1
Display Test
Æ Chapter 7.10.2
Serial Number 1
Æ Chapter 7.10.3
Serial Number 2
Æ Chapter 7.10.4
List1
Æ Chapter 7.10.5
List2
Æ Chapter 7.10.6
Reset All
Æ Chapter 7.10.7
7.10.1 Keyboard (DIAGNOSTICSÆ Keyboard Test)
Please refer to Chapter 7.3.5 on how to reach the menu position 'Vision Setup Æ DIAGNOSTICS Æ Keyboard Test' and
how to navigate within the 'Vision Setup'-menu.
In order to check if all the keys are functioning properly, press «Yes» to start
the keyboard test. Note: The test cannot be cancelled after starting ('End' has
no function during test).
Chapter 7: Vision Setup
METTLER TOLEDO SQC16
80
Press all 25 keys in sequence. If a key is functioning, the scale jumps to the
next key. The keys are numbered as follows:
11 12 13
14 15 16
5
1
6
7
2
8
9
3
10
4
17 18 19
20 21 22
23 24 25
7.10.2 Display (DIAGNOSTICSÆ Display Test)
Please refer to Chapter 7.3.5 on how to reach the menu position 'Vision Setup Æ DIAGNOSTICS Æ Display Test' and how
to navigate within the 'Vision Setup'-menu.
In order to check if the screen is functioning properly, press «Yes» and…
… appears on the screen.
7.10.3 Serial Number 1 (DIAGNOSTICSÆ SNR1)
Please refer to Chapter 7.3.5 on how to reach the menu position 'Vision Setup Æ DIAGNOSTICS Æ SNR1' and how to
navigate within the 'Vision Setup'-menu.
The serial number of the scale is displayed
7.10.4 Serial Number 2 (DIAGNOSTICSÆ SNR2)
'SNR2' cannot be chosen within SQC16 (no analog option support)
METTLER TOLEDO SQC16
Chapter 7: Vision Setup
81
7.10.5 List 1 (DIAGNOSTICSÆ List 1)
Please refer to Chapter 7.3.5 on how to reach the menu position 'Vision Setup Æ DIAGNOSTICS Æ List 1' and how to
navigate within the 'Vision Setup'-menu.
Press «Yes» to print out the current settings of the whole Vision Setup menu.
7.10.6 List 2 (DIAGNOSTICSÆ List 2)
'List 2' cannot be chosen within SQC16 (no analog option support)
7.10.7 Reset All (DIAGNOSTICSÆ Reset All)
This function resets all blocks of the whole Vision Setup Menu to its original factory settings. The supervisor password
('TERMINAL Æ Access') will not be reset.
Please refer to Chapter 7.3.5 on how to reach the menu position 'Vision Setup Æ DIAGNOSTICS Æ Reset All' and how to
navigate within the 'Vision Setup'-menu.
Press «
all.
» to go to the List Memory settings menu and press «Yes» to reset
Chapter 8: Other important information
METTLER TOLEDO SQC16
82
8
Other important information
This Chapter gives information on error messages and instructions for cleaning your scale. It also includes the declaration
of conformity and technical data.
8.1
Error messages in display
Overload
Reduce the load on the scale or the preload.
Underload
Place weighing pan on the scale and ensure that it can move freely.
Weight reading does not stabilize
• Ensure a tranquil environment.
• Ensure that the weighing pan is free to move.
Change the setting of the vibration adapter (Chapter 7.4.6)
Not possible to zero scale
Ensure that the zeroing is only carried out in the permissible range and not
under overload or underload conditions.
Timeout occurred
The scale was not able to attain a stable weight value within the time out
period (15 seconds) after «Start» was pressed.
Value is out of range
The scale is in an underload or overload condition. Thus, it is not possible to
perform sampling.
No calibration/adjustment
Disconnect the power cord plug and then plug it in again. If the error
message reappears, calibrate/adjust the scale (Chapter 7.4.1). If this does
not help, contact your dealer or local representative.
Cannot save article
No nominal or tolerance values are defined. Define nominal and tolerance
values in article definition.
METTLER TOLEDO SQC16
Chapter 8: Other important information
83
EAROM checksum error
Disconnect the power cord plug and then plug it in again. If the error
message reappears, contact your dealer or local representative.
8.2
Messages on printer
1
48.20
Not plaus:
2
50.91
3
50.91
4
48.37
5
50.90
│ │ ░│ │
33.10
│ │ ▒ │
│ │ ▒ │
│ │ ░│ │
│ │ ░ │
│
g
│
│
│
│
1
48.20 │ │ ░│ │ │
-------- ABORT ---------
<T20
0.00
<T11
20.00
>T1+
0
0.00
>T2+
0
0.00
Report cancelled.
%
%
%
%
-------- SAMPLE -----------20.03.80 - 03:21----- THE QUALITY COMPANY Operator
RIZA
Name
IndTare <--Nominal
Not plausible
Weight of sample is not within the plausible limits.
Abort
«Abort» softkey was pressed during sampling.
Report Cancelled
«Cancel» softkey was pressed during printing of sampling report.
Preweigh values rejected
«End» softkey was pressed before the first sample was weighed.
AAA
100.00 g
Preweigh values rejected
-------- ABORT ---------
1
99.83
2
97.28
Skipped
4
99.83
5
50.90
│ │ ▒
│ │░ │
│ │
│ │
│ │
│ │
▒ │ │
│ ░│ │
Skipped
«Skip» softkey was pressed during backweighing. If a tare sample is not
successfully carried out, it can be skipped by pressing the «Skip» softkey.
Therefore, its corresponding preweigh values will be omitted.
Chapter 8: Other important information
METTLER TOLEDO SQC16
84
T1 Critical
T1 Reject
<T2 Viols
3.00 %
2.00 %
1
T1 Critical Violator
Number or percentage of critical amount of T1- violators in the sample.
T1 Rejected Violator
Number or percentage of rejected amount of T1- violators in the sample.
<T2 Violators
Number of <T2 violators in the sample.
Stat1 T1 Critical 3.00 %
Stat1 T1 Reject
2.00 %
Stat1 <T2 Viols
1
Stat1 T1 Critical Violator
Number or percentage of critical amount of T1- violators in Stat1.
Stat1 T1 Rejected Violator
Number or percentage of rejected amount of T1- violators in Stat1.
Stat1 <T2 Violators
Number of <T2 violators in Stat1.
Stat2 T1 Critical 3.00 %
Stat2 T1 Reject
2.00 %
Stat2 <T2 Viols
1
Stat2 T1 Critical Violator
Number or percentage of critical amount of T1- violators in Stat2.
Stat2 T1 Rejected Violator
Number or percentage of rejected amount of T1- violators in Stat2.
Stat2 <T2 Violators
Number of <T2 violators in Stat2.
Batch T1 Critical 3.00 %
Batch T1 Reject
2.00 %
Batch <T2 Viols
1
Batch T1 Critical Violator
Number or percentage of critical amount of T1- violators in Batch.
Batch T1 Rejected Violator
Number or percentage of rejected amount of T1- violators in Batch.
Batch <T2 Violators
Number of <T2 violators in Batch.
Stat1: Sample
x
93.57 %
<TM-: x-Nom
s
7.32 %
<T13
1
93.570
-6.430
6.850
60.00
g
g
g
%
Mean Tolerance Violator
Difference: Mean value minus Nominal value
METTLER TOLEDO SQC16
Chapter 8: Other important information
85
Signature:
........................
----------03:51--------Batch cleared
Batch cleared
When changing batch name at the start of sampling, statistics of old batch
will be printed and cleared. A new batch statistics will be generated.
New batch statistics
-------- SAMPLE -----------20.03.80 - 03:51----
Signature:
........................
----------03:51--------Stat1 cleared
Signature:
........................
----------03:51--------Stat2 cleared
Stat1: Samples
2
x
96.74 % 48.370 g
s
0.01 %
0.007 g
Δx =
1.64 g
----------03:56---------
Stat1 cleared
«PrtClr» softkey was pressed in standby mode. All contents of Stat1 will be
deleted.
Stat2 cleared
«PrtClr» softkey was pressed in standby mode. All contents of Stat2 will be
deleted.
Adjustment message
An adjustment message was printed due to steadily increasing or decreasing
mean values over several samples.
Chapter 9: Appendix: Tolerance systems
METTLER TOLEDO SQC16
86
9
APPENDIX: Tolerance systems
The tolerance system depends on the legal regulations applicable to the filling operations. All tolerance systems can be
plus/minus or minus systems. Toggle with "+/-" in the article definition under "Tolerances".
9.1
Entry of tolerances
Entry of tolerances as a difference to the nominal value (N), in absolute value or in %, selectable in the
menu "System" under "Tolerance Mode".
200g
t1-or %
195g
<T1-
Example: N = 200 g, lower limit = 195 g
Entry in "Tolerances"
Entry in "Tolerance Mode"
5g
2.5 %
195 g
97.5 %
t(rel) and Unit
t(rel) and %
T(abs) and Unit
T(abs) and %
T1-or %
0g
9.2
EU +/-
Legal tolerance systems
>T2+
European Union
and Switzerland
Tolerances:
t1–, t1+, t2+ selectable,
t2– fixed:
t2– := 2*t1–
Default values:
t1– statutory, t1+ := t1–
t2+ := t2–
T2+
t2+
EU -
European Union
and Switzerland
>T1+
T1+
t1+
N
Tolerances:
t1– selectable, t2–
N
t1-
T1t2-
<T1-
t1t2-
<T1<T2-
T2-
T1<T2-
T2-
t2– := 2*t1–
Default values:
t1– statutory
METTLER TOLEDO SQC16
Chapter 9: Appendix: Tolerance systems
87
9.3
Free
1+/-
Free tolerance systems with one tolerance
Free tolerance system, e.g.
for USA handbook 133 test
plans A and B
>T+
T+
t+
Canada
Australia
Free 1-
T-
T<T-
Tolerances:
<T-
t–, t+ selectable.
.Marg.
Australia
.Marg.
Tolerances:
N
t-
Canada
N
t-
Free tolerance system,
e.g. for USA handbook
133 test plans A and B
t– selectable, (t–:=t1–)
default value: t+ := t–
9.4
Free
2+/-
Free tolerance systems with two tolerances
Free tolerance system
Free 2-
>T2+
Tolerances:
t1+, t2+, t1–, t2–
selectable.
t2+
Tolerances:
>T1+
T1+
Default values:
t2– := 2*t1–,
T1t2-
<T1-
<T2-
t2– := 2*t1–
T1t2-
t1-
Default values:
Marg.
t1-
t+ := t–.
Free
3+/-
N
Marg.
t1–, t2– selectable.
t1+
N
9.5
Free tolerance system
T2+
T2-
<T1-
<T2-
T2-
Free tolerance systems with three tolerances
Free tolerance system
>T3+
t3+
>T2+
T2+
Tolerances:
t1+, t2+, t3+
t1–, t2–, t3– selectable.
Default values:
t2– := 2*t1–,
t3– := 3*t1–,
t+ := t–.
t2+
T3+
>T1+
T1+
Free 3-
N
Free tolerance system
Tolerances:
t1–, t2–, t3– selectable.
Marg.
t1-
T1t2-
t1+
N
Marg.
t1-
T1t2t3-
<T1<T2
<T3-
Default values:
t2–:=2*t1–
t3–:=3*t1–
T2T3-
t3-
<T1<T2<T3-
T2T3-
Chapter 10: Appendix: Optional equipment
METTLER TOLEDO SQC16
88
10
APPENDIX: Optional equipment
10.1 LC-I/O Relay Interface
The LC-I/O Relay Interface allows adjustment messages to be relayed to an attached machine and peripheral devices such
as warning lamps, control motors or valves to be controlled and switched by the SQC16.
Output signals: The outputs are controlled as follows:
Function
Outpu
t
Violator check T1: critical
1
Violator check T1: rejected
1
Violator check TM+
2
Violator check TM-
2
Adjustment-
3
adjustment * factor 1)
10 … 65000 ms, steps of 1 ms
Adjustment+
4
adjustment * factor 1)
10 … 65000 ms, steps of 1 ms
Tolerance violator T1-
5
until sample removed
Tolerance violator T2-
6
until sample removed
Tolerance violator T3-
5+6
until sample removed
Tolerance violator T1+
7
until sample removed
Tolerance violator T2+
8
until sample removed
Tolerance violator T3+
7+8
until sample removed
1)
On period
until confirmed with «
» key
» key
flashes until confirmed with «
until confirmed with «
0.5 s/0.5 s
» key
flashes until confirmed with «
» key
0.5 s/0.5 s
See also "Adjustment" and "Factor" in Chapter 5.2
Example:
Adjustment = 0.45 g
Adjustment = 3.52 oz
Factor = 1.0
Factor = 0.1
Input signals: No input signals are relayed to SQC16.
t = 0.45 sec
t = 0.352 sec
METTLER TOLEDO SQC16
Chapter 10: Appendix: Optional equipment
89
10.2 Attachment of peripheral devices
The following peripheral devices can be controlled:
•
•
•
•
•
Bar-code reader and/or keyboard (PS2, fixed)
Host PC for Backup/Restore/Edit program BR16 (COM1, 3)
Strip printer (COM2/RS-P42)
A4/Report printer
Relay interface LC-I/O
Boldface = standard connection
The following devices (max. 3 at the same time) can be controlled via COM ports:
LC-I/O
If the relay interface has to be controlled, it must be attached to one of the scale's COM
ports and that port must be set to "LC-I/O".
Host (PC)
If the host has to be controlled, it must be attached to one of the scale's COM ports and
that port must be set to "Dialog".
Strip printer
If a strip printer has to be controlled, it must be attached to one of the scale's COM ports
and that port must be set to "Printer" with the printer type set to the appropriate printer.
A4/Report printer (Epson LX-300) If an A4/Report printer has to be controlled, it must be attached to one of the scale's
COM ports and that port must be set to "Printer" with the printer type set to "LX-300".
Note: The bar-code reader and the keyboard must be plugged to the PS/2 connector.
Chapter 10: Appendix: Optional equipment
METTLER TOLEDO SQC16
90
10.3 Accessories
BBA462, BBK462 (IND469, GA46 Æ CD / Datasheet) accessories:
Printer with normal paper
Accessories for RS-P42 or
Sprinter 1
Strip Printer RS-P42, incl. RS232 cable
RS-P42
229265
• Strip Printer 'Sprinter 1', EURO version
21253399
• Strip Printer 'Sprinter 1', UK version
21253745
RS232 cable for 'Sprinter 1' 1.8m (25/9-pin DSub, m/m crossover)
21253677
Paper rolls, 5 pcs
72456
Ribbon cartridges, black, 2 pcs
65975
Auxiliary display
Auxiliary display (not incl.: RS232 cable 410024)
RS-PD/PASM
21302875
Barcode scanner (PS/2)
For attachment of barcode reader
DATALOGIC
DLC7070-M1
21900880
Barcode scanner (PS/2Y)
For attachment of barcode reader and keyboard
DATALOGIC
DLC7070-M1
21900881
Barcode scanner (wireless)
For attachment of barcode reader
DATALOGIC
Gryphon M100-CS
21900949
Protective covers (1 incl.)
• Protective cover for small platform scale
21203207
• Protective cover for large platform scale
21203206
Antitheft device
Mechanical antitheft device
229175
Operating instructions
• German
21901253
(1 incl.)
• English
21901254
• French
21901255
• Italian
21901256
• Spanish
21901257
Relay interface, digital
outputs
8x220V (not incl.: RS232 cable 410024)
Keyboard
PC compatible Mini-Keyboard (US Layout)
21900944
Protective cover
For keyboard 21900944
21900945
PC program
BR16 Backup/Restore/Edit SQC16 Data
RS232 cable 1.8m (9-pin D-Sub, m/f, parallel)
LC-I/O
BR16
21202217
21901246
410024
METTLER TOLEDO SQC16
Chapter 11: Technical data
91
11
Technical data
11.1 General data and delivered items
Standard delivery package:
•
•
•
Complete scale
Operating instructions
Quick Guide (with included CD)
11.1.1 BBA/BBK462
Applications
Weighing
SQC
Settings
Vibration adapter
Weighing process adapter
Automatic zero correction
Power-saving shutoff
Display backlighting
Display
Active point-matrix display, 35 mm high, with CFL backlit (235 x 64 pixel)
Interface
3 built-in RS232C interface (COM1, COM2, COM3; see 11.3)
PS2 interface for keyboard and barcode reader
Optional interfaces (Ethernet; instead of COM2)
Ambient conditions
Mains connection
Use
Altitude
Temperature range BBA4..
Temperature range BBK4..
Over voltage category
Contamination level
Relative humidity
Indoor use only
up to 2000 m
–10 .. +40 °C / 14 .. 104 °F
+10 .. +30 °C / 50 .. 86 °F
II
2
Maximum relative humidity 80 % for
temperatures up to 31 °C / 88 °F,
decreasing linearly to 50 % relative
humidity at 40 °C / 104 °
Direct connection to the mains (MAINS supply voltage fluctuations up to ±10% of
the nominal voltage):
230 V, 50 Hz, 70 mA
240 V, 50 Hz, 70 mA
120 V, 60 Hz, 90 mA
100 V, 50/60 Hz, 90 mA
For battery operation:
Connection via mains adapter: 90 – 264 V, 47 – 63 Hz, 300 mA
In feed on the unit: 24 V, 1.3 A
Chapter 11: Technical data
METTLER TOLEDO SQC16
92
Battery operation
If the voltage supply is interrupted, the unit automatically switches over to battery operation.
Net weight
Protection Class (IEC
529, DIN 40050,
EN60529)
Resolution of the analog
second scale interface
Model
Without battery
With battery
BBA4.. – .. SM
BBA4.. – .. LA
BBK4.. – .. XS
BBK4.. – .. SM
BBK4.. – .. LA
4,6 kg
8,2 kg
4,9 kg
4,7 kg
10,5 kg
5,3 kg
8,9 kg
5,6 kg
5,4 kg
11,2 kg
With internal calibration
weight (without battery)
–
–
5,4 kg
5,2 kg
11,7 kg
IP43 (not with Ethernet interface)
300.000 points in non certified configuration
7.000 points in certified configuration
11.1.2 IND469
Applications
Weighing
SQC
Settings
Automatic zero compensation mode during switching on and during operation
Filter for adapting to the environmental conditions (vibration adapter)
Filter for adapting to the weighing mode, e.g. dispensing (weighing process
adapter)
Switch-off function, sleep mode for power-operated devices, energy saving mode
for storage battery operation
Display illumination
Display
Active point-matrix display, 35 mm high, with CFL backlit (235 x 64 pixel)
Keyboard
Tactile-touch membrane keypad
Scratch-resistant labeling
Housing
Stainless steel 1.4301 or AISI 304
Net weight
IND469 with AC power
Supply unit
IND469 with storage battery
approx. 2.6 kg
approx. 3.2 kg
Protection type
(DIN 40050)
IP69k
Mains connection
Direct connection to power supply (supply voltage fluctuation not exceeding ±10 % of the
rated voltage)
IND469 weighing terminal: Rated voltage 100 ... 240 VAC / 47 ... 63 Hz / 300 mA
IND469xx weighing terminal: Rated voltage 230 VAC ±10 % / 47 ... 63 Hz / 300
mA
BBA469 compact scale: Rated voltage 100 ... 240 VAC / 47 ... 63 Hz / 300 mA
METTLER TOLEDO SQC16
Chapter 11: Technical data
93
Storage battery operation
Supply at device: 24 VDC / 1.0 A
If the supply voltage is interrupted, the scale switches automatically over to storage
battery operation
Ambient conditions
Application
Height
Temperature range Class III
Temperature range Class II
Over voltage category
Degree of soiling
Relative humidity
In interiors
up to 2000 m
–10 .. +40 °C / 14 .. 104 °F
0 .. +40 °C / 32 .. 104 °F
II
2
Up to max. 80%, non condensing
2 built-in RS232C interface (COM1, COM2; see 11.3)
PS2 interface for keyboard and barcode reader
Optional interfaces (Ethernet or WLAN; instead of COM2)
Interface
11.2 Dimensions
11.2.1 BBA/BBK462
XS
SM
LA
1)
A
335
335
370
B
265
265
360
C
100
100
115
All dimensions in mm
* with adjustable feet fully screwed in
D
240
240
350
E
200
200
240
F
46
46
52
G
276
276
310
H
208
208
304
I
216
216
310
K
165
L
165
Chapter 11: Technical data
METTLER TOLEDO SQC16
94
11.2.2 IND469
Dimensions in mm
11.3 Interface technical data
11.3.1 BBA/BBK462
The scale is provided with an EIA RS-232C (CCITT V24/V.28) voltage-controlled interface as standard. Maximum cable
length is 15 m. All interfaces are in the form of a 9-pin D-sub female connector. Instructions for configuring the interfaces
are given in Chapter 7.9.2.
Interface
1 (standard)
2 (standard)
3 (standard)
RS232C
RS232C
RS232C
Pin 1
---
---
---
Pin 2
TxD
TxD
TxD
Pin 3
RxD
RxD
RxD
Pin 4
---
---
---
Pin 5
GND
GND
GND
Pin 6
---
---
---
Pin 7
---
---
---
Pin 8
---
---
---
Pin 9
VCC
VCC
VCC
Type
Pin assignment
TxD:
Transmit data
RxD:
Receive data
GND: Signal ground
VCC:
Power supply +5V
METTLER TOLEDO SQC16
Chapter 11: Technical data
95
11.3.2 IND469
The device is equipped with 2 communication interfaces. The following combinations are possible:
Standard
Ethernet
WLAN
COM1
RS232
RS232
RS232
COM2
RS232
Ethernet
WLAN
11.4 Interface commands
Your scale can be configured and operated, and can communicate with a PC via RS232C interface.
11.4.1 Preconditions
The following preconditions must be fulfilled to achieve communication between the scale and a PC:
•
The scale must be connected to the RS232C interface of the PC using the necessary cable (e.g. 410024).
•
The scale interface must be set in “Dialog” mode (see Chapter 7.9.1).
•
A terminal program must be available on the PC (e.g. “Hyper Terminal”).
•
The communication parameters (protocol, bits and parity, data transfer rate) must be set using the same values in
the terminal program and in the scale (see Chapter 7.9.2).
11.4.2 SICS Command set
Your scale basically supports the Mettler Toledo Standard Interface Command Set (MT-SICS). The SICS command set
used are “Level 0”, “Level 1”, and some “Level 2” commands. Detailed information on the interface commands is given
in the “MT SICS Reference Manual” (No. 705184, only available in English).
Notes:
• Every command line must be terminated with <CR><LF> (corresponding to the “Enter” or “Return” key on the PC
keyboard). The command is then executed immediately. To correct a line, this needs to be entered again completely.
• For commands with parameters, the “_” symbol signifies an empty space, and in the examples given, serves solely
to clarify the syntax.
• For commands that require text parameters, the quotation marks must be entered, as they indicate to the scale that
they enclose a text string and not another parameter.
Chapter 11: Technical data
METTLER TOLEDO SQC16
96
The following lists the supported MT-SICS commands:
I0
Inquiry of all implemented MT-SICS commands.
I1
Inquiry of MT-SICS level and MT-SISCS versions.
I2
Inquiry of scale data.
I3
Inquiry of scale software version.
I4
Inquiry of serial number.
S
Send stable weight value.
SI
Send weight value immediately irrespective of scale stability.
SIR
Send weight values repeatedly irrespective of scale stability.
Z
Zero the scale.
ZI
Zero the scale immediately irrespective of scale stability.
@
Reset the scale to condition after switching on but without a zero setting being performed.
D
Write text into scale display. (E.g. D_“text”).
DW
Switch back to weight display after D command.
K
SR
Configure key control.
T
Tare the scale.
TA
Inquire or preset the tare weight value.
TAC
Clear the tare value.
TI
Tare immediately regardless of whether the current value is stable or not.
C2
Initiate calibration.
I10
Inquire or set the scale ID.
I11
Inquiry of scale type.
DAT
Inquire of set the date on the scale.
P100
Print out text on the printer. (E.g. P100_“text”).
P101
Print out current stable weight value.
P102
Print out current weight value irrespective of scale stability.
PWR
Switch the scale on or off.
ST
Send current stable weight value and then continuously on weight change equal to or greater than the preset
value. (E.g. SR_10.00_g).
Send stable weight after pressing the «
» key.
TIM
Inquire or set the time on the scale.
SU
Send stable weight value with currently displayed unit.
SIU
Send weight value with currently displayed unit immediately irrespective of scale stability.
SIRU
Send weight value with currently displayed unit immediately and repeat.
SRU
Send stable weight value with currently displayed unit and repeat on weight change greater than or equal to
preset value.
Aside from the standard MT-SICS commands, SQC16 also provides the following commands for working with the scale:
M01
Inquire or set the weighing mode ('Vision Setup Æ SCALE Æ Filter Æ Process': Chapter 7.4.6).
M01
M01_0
M01_1
Inquiry of weighing mode.
Set weighing mode to “Universal”.
Set weighing mode to “Filling”.
METTLER TOLEDO SQC16
Chapter 11: Technical data
97
M03
Inquiry or setting of AutoZero ('Vision Setup Æ SCALE Æ Zero Æ Auto Zero': Chapter 7.4.4).
M03
M03_0
M03_1
M09
Inquiry or setting of display contrast ('Vision Setup Æ TERMINAL Æ Device Æ Contrast': Chapter 7.6.3)
M09
M09_x
M14
Inquiry of AutoZero mode.
Set “AutoZero” to off.
Set “AutoZero” to on.
Inquiry of display contrast.
Set the display contrast to x% where x can have a value of 0-100.
Inquiry of available languages
M14
-->
M14_B_x_"<First Language>"
...
M14_A_x_"<Last Language>"
where x (all these terms are in English):
0 = English
1 = German
2 = French
3 = Spanish
4 = Italian
8 = Polish
10 = Czech
11 = Hungarian
12 = Slovak
13 = Slovenian
14 = Dutch
M15
Example:
M14
-->
M14_B_0_"English"
M14_B_1_"German"
M14_B_2_"French"
M14_B_3_"Spanish"
M14_B_4_"Italian"
M14_B_8_"Polish"
M14_B_10_"Czech"
M14_B_11_"Hungarian"
M14_B_12_"Slovak"
M14_B_13_"Slovenian"
M14_A_14_"Dutch"
Inquiry/setting of language (see also chapter 7.6.1).
M15
M15_x
Inquiry of actual language.
Setting of language.
x: Number according to
available languages (see
command M14).
Examples:
M15
-->
M15_A_0
<English is currently set>
M15_1
-->
M15_A
<German is set now>
Chapter 11: Technical data
METTLER TOLEDO SQC16
98
M16
Inquiry or setting of the sleep status ('Vision Setup Æ TERMINAL Æ Device Æ Sleep': Chapter 7.6.2)
M16
M16_x
Inquiry of “Sleep” status.
Set the “Sleep” status to the value of x where x can be:
0 = Off
1 = 1 minute
2 = 3 minutes
3 = 5 minutes
M19
Inquiry of adjustment weight.
M21
Inquiry or setting of “Unit1” ('Vision Setup Æ SCALE Æ Display': Chapter 7.4.2) and display unit.
M21
M21_Des_x
I31
Inquiry of “Unit1” and display unit.
Set the “Des” (designation) unit to the value of x where
Des:
x:
0 = Unit 1
0=g
1 = Display unit
1 = kg
2=t
7 = lb
8 = oz
Inquire or define the record header for printouts in 'Weighing mode'. For SQC, see special header and footer
lines in system setup.
I31_x
I31_x_”text”
Inquiry the definition for the x header line.
Define the text for a specific header line where:
x
1..5
text String of characters with a maximum of 24 characters.
Example:
I31_1_“Mettler Toledo GmbH”
I31_2_“Heuwinkelstrasse”
I31_3_“CH-8606 Naenikon”
I31_4_“Telefon 01/944 22 11”
I31_5_“Internet www.mt.com”
The header can be viewed in 'Vision Setup Æ COMMUNICATION Æ Define Header'.
METTLER TOLEDO SQC16
Chapter 11: Technical data
99
11.5 Table of Geo Values
For weighing instruments verified at the manufacturer’s, the geo value indicates the country or geographical zone for
which
the instrument is verified. The geo value set in the instrument (e.g."Geo 18") appears briefly after switch-on or is specified
on a label.
Table GEO VALUES 3000GEO 3000e shows the geo values for European countries.
Table GEO VALUES 6000e/7500e shows the geo values for different gravitation zones.
11.5.1 GEO VALUES 3000e, OIML Class III (European Countries)
Geographical latitude
46°22' - 49°01'
49°30' - 51°30'
41°41'- 44°13'
42°24' - 46°32'
48°34' - 51°03'
54°34' - 57°45'
57°30' - 59°40'
59°48' - 64°00'
64°00' - 70°05'
41°20' - 45°00'
45°00' - 51°00'
47°00' - 55°00'
34°48' - 41°45'
45°45' - 48°35'
51°05 - 55°05'
63°17' - 67°09'
35°47' - 47°05'
55°30’ - 58°04'
49°27' - 50°11'
47°03' - 47°14'
53°54' - 56°24'
50°46' - 53°32'
57°57' - 64°00'
64°00' - 71°11'
49°00' - 54°30'
36°58' - 42°10'
43°37' - 48°15'
55°20' - 62°00'
62°00' - 69°04'
45°49' - 47°49'
47°44' - 49°46'
45°26' - 46°35'
36°00' - 43°47'
35°51' - 42°06'
49°00' - 55°00'
55°00' - 62°00'
*factory setting
Geo Value
18
21
16
18
20
23
24
25*
26
17
19*
20
15
19
22
26
17
23
20
18
22
21
24*
26
21
15
18
24*
26
18
19
18
15
16
21*
23
Country
Austria
Belgium
Bulgaria
Croatia
Czech Republic
Denmark
Estonia
Finland
France
Germany
Greece
Hungary
Ireland
Iceland
Italy
Latonia
Luxembourg
Liechtenstein
Lithuania
The Netherlands
Norway
Poland
Portugal
Romania
Sweden
Switzerland
Slovak Republic
Slovenia
Spain
Turkey
Great-Britain
Chapter 11: Technical data
METTLER TOLEDO SQC16
100
11.5.2 GEO VALUES 6000e/7500e OIML Class III (Height £ 1000 m)
Geographical latitude
Geo Value
00°00’ - 12°44’
05°46’ - 17°10’
12°44’ - 20°45’
17°10’ - 23°54’
20°45’ - 26°45’
23°54’ - 29°25’
26°45’ - 31°56’
29°25’ - 34°21’
31°56’ - 36°41’
34°21’ - 38°58’
36°41’ - 41°12’
38°58’ - 43°26’
41°12’ - 45°38’
43°26’ - 47°51’
45°38’ - 50°06’
47°51’ - 52°22’
50°06’ - 54°41’
52°22’ - 57°04’
54°41’ - 59°32’
57°04’ - 62°09’
59°32’ - 64°55’
62°09’ - 67°57’
64°55’ - 71°21’
67°57’ - 75°24’
71°21’ - 80°56’
75°24’ - 90°00’
5
6
7
8
9
10
11
12
13
14
15
16
17
18
19
20
21
22
23
24
25
26
27
28
29
30
METTLER TOLEDO SQC16
Chapter 11: Technical data
101
11.6 Declaration of Conformity
Declaration of Conformity / Important notice for verified weighing instruments in EC countries:
Æ 22013175 (document, included with shipment)
USA/Canada:
This equipment has been tested and found to comply with the limits for a Class A digital device, pursuant to both Part 15
of the FCC Rules and the radio interference regulations of the Canadian Department of Communications. These limits are
designed to provide reasonable protection against harmful interference when the equipment is operated in a commercial
environment. This equipment generates, uses and can radiate radio frequency energy and, if not installed and used in
accordance with the instruction manual, may cause harmful interference to radio communications. Operation of this
equipment in a residential area is likely to cause harmful interference, in which case the user will be required to correct the
interference at his own expense.
Cet appareil a été testé et s’est avéré conforme aux limites prévues pour les appareils numériques de classe A et à la
partie 15 des règlements FCC et à la réglementation des radio-Interférences du Canadian Department of Communications.
Ces limites sont destinées à fournir une protection adéquate contre les interférences néfastes lorsque l’appareil est utilisé
dans un environnement commercial. Cet appareil génère, utilise et peut radier une énergie à fréquence radioélectrique ; il
est en outre susceptible d’engendrer des interférences avec les communications radio, s’il n’est pas installé et utilisé
conformément aux instructions du mode d’emploi. L’utilisation de cet appareil dans les zones résidentielles peut causer
des interférences néfastes, auquel cas l’exploitant sera amené à prendre les dispositions utiles pour palier aux
interférences à ses propres frais.
Este equipo ha sido probado y observa los límites establecidos para los equipos digitales de Clase A, de conformidad
con la Sección 15 de las Normas de la FCC y las normas de radiointerferencia del Departamento de Comunicaciones
Canadiense. Estos límites se establecen para proporcionar una protección razonable contra interferencias perjudiciales
cuando el equipo funciona en un entorno comercial. Este equipo genera, utiliza y puede radiar energía de radiofrecuencia
y, si no se instala y emplea según el manual de instrucciones, podría provocar interferencias perjudiciales para las
comunicaciones por radio. El funcionamiento de este equipo en una zona residencial podría causar interferencias
perjudiciales, en cuyo caso se le exigirá al usuario que corrija la interferencia y corra con los gastos derivados de dicha
corrección.
Dieses Gerät wurde getestet und ist in Übereinstimmung mit den Grenzwerten für digitale Geräte der Klasse A
entsprechend den FCC-Vorschriften, Teil 15 und den Bestimmungen bezüglich Hochfrequenzstörungen des Canadian
Department of Communications. Diese Grenzwerte sind aufgestellt, um einen ausreichenden Schutz vor Störungen bei
Nutzung der Geräte in einer gewerblichen Umgebung zu bieten. Dieses Gerät erzeugt, nutzt und kann elektromagnetische
Energie abgeben und bei Nichtbeachtung der Aufbau- und Nutzungshinweise der Betriebsanleitung den Funkverkehr
beeinträchtigen. Der Betrieb in Wohngebieten kann zu Interferenzen führen, die der Betreiber auf eigene Kosten korrigieren
muss.
In base alle prove a cui è stato sottoposto, si è rilevato che questo apparecchio è conforme ai limiti stabiliti per i
dispositivi digitali di Classe A secondo il Punto 15 delle norme FCC e le norme sull’interferenza radio del Ministero delle
Comunicazioni canadese. Questi limiti sono stati concepiti per fornire una protezione adeguata contro interferenze
dannose quando l'apparecchio viene utilizzato in ambito commerciale. Questo apparecchio genera, impiega e può
irradiare energia a radiofrequenza e, se non è installato e utilizzato seguendo il manuale di istruzioni, può causare
interferenze dannose per le comunicazioni radio. Il funzionamento di questo apparecchio in zone residenziali può
facilmente causare interferenze dannose; in questo caso all’utente verrà richiesto di eliminare le interferenze a proprie
spese.
METTLER TOLEDO SQC16
Index
103
INDEX
<
<T2 ............................................ 40
2
2nd display .................................. 76
2nd tolerance system..................... 17, 40
A
A4 printout .................................. 49
accept softkey.............................. 33
access rights ............................... 71
adjustment .................................. 17, 24
adjustment message .................... 41, 85, 88
adjustment speed......................... 24
ambient conditions....................... 9
Appendix_E.pdf............................ 17
article name ................................ 26
article number.............................. 22
auto print .................................... 76
auto zero..................................... 65
automatic save ............................ 66
auxiliary scale ............................. 76
B
backweighing .............................. 51
bar code reader............................ 51
barcode reader connection ............ 79
batch .......................................... 25
batch sampling............................ 54
batch statistics............................. 17, 55
baud rate .................................... 76
beep ........................................... 74
bulk tare softkey........................... 32
C
calibration ................................... 64
cancel softkey.............................. 27
catalog ....................................... 50
class table................................... 45, 46
close softkey................................ 29, 31, 37, 52, 53,
54, 55, 56
code - linefeeds ........................... 48
communication............................ 75, 76, 78
compact printing .......................... 49
complete printing ......................... 49
continuous weight ........................ 76
contrast settings........................... 72
copy softkey ................................ 26, 28
D
database..................................... 25
date and time .............................. 10, 44, 73
default article ............................... 25
define softkey............................... 26, 27
delete softkey............................... 26, 28
density group............................... 23
density weight.............................. 23
dialog ......................................... 76
difference..................................... 45, 47
display test .................................. 10, 80
E
edit softkey .................................. 27
erase softkey................................ 27
F
FACT ........................................... 67
factor .......................................... 24
filter ............................................ 66
footer .......................................... 44
G
GA46 .......................................... 90
geographical adjustment value ...... 9
global density .............................. 17, 36
H
handshake .................................. 76
header ........................................ 44, 77
header/footer................................ 44
histogram.................................... 45, 46
I
identification number .................... 22
IND469....................................... 90
individual chart ............................ 45, 47
individual tare .............................. 17, 24, 51
invert .......................................... 73
K
keyboard connection .................... 78
keyboard test ............................... 79
L
language..................................... 11, 72
LC-I/0 ......................................... 76
linefeeds...................................... 48, 77
M
marginals.................................... 48
maximum tolerance...................... 37
maximum value ........................... 45, 47
mean .......................................... 30
mean tare.................................... 32
mean tolerance ............................ 40
mean value ................................. 32, 33, 47
mean value requirements .............. 17
min weigh ................................... 68
minimum password length............ 70
minimum step.............................. 24
minimum value............................ 45, 47
Index
METTLER TOLEDO SQC16
104
mode settings .............................. 76, 77
N
new softkey ................................. 26
nominal weight ............................ 23
O
on and off switch ......................... 10
options softkey............................. 26
P
parity .......................................... 76
password .................................... 16, 58, 70, 71, 74
plausibility limits .......................... 17
plausibility settings....................... 24
power supply plug........................ 9
preweighing................................. 51
print individual value .................... 25
print softkey................................. 26, 28
printer ......................................... 76
printout ....................................... 81
process setting............................. 67
PS2 settings ................................ 78
R
range .......................................... 46, 48
report .......................................... 42
reports softkey ............................. 50
reset ........................................... 69, 75, 78, 81
resolution .................................... 64, 65
S
sample - linefeeds........................ 48
sample messages ........................ 36, 37
sample report .............................. 44
sample size................................. 24
sampling of articles ...................... 29
search softkey.............................. 27, 28
serial number .............................. 80
set nxT softkey ............................. 32
shared statistics ........................... 17, 25, 41
shift key ...................................... 34
sleep function .............................. 72
SQC16 Training ........................... 17
standard deviation ....................... 30, 46, 47, 48
statistics...................................... 33
statistics - linefeeds ...................... 48
statistics report............................. 30, 31, 44, 52, 54,
55, 56
statistics values ........................... 45, 47
summary of database................... 50
supplement ................................. 17, 23, 41
T
tare............................................. 65
tare and zero values ..................... 66
tare configuration ......................... 36, 37
tare series.................................... 32
tare weight................................... 23
taring .......................................... 31
test ............................................. 17, 41
test sampling ............................... 30
test series .................................... 30
tolerance ..................................... 24, 36
tolerance settings ......................... 24
tolerance spec. in percentage ........ 36
tolerance spec. in unit................... 36
tolerance system .......................... 17, 24, 86
tolerance violation ........................ 39, 45
tolerances relative to nominal ........ 36
tolerances relative to zero .............. 36
transfer key.................................. 25, 55
U
unit ............................................. 22
user ID number ............................ 71
user login .................................... 69
user name ................................... 16, 71
V
VC T1 critical ............................... 40
VC T1 reject ................................. 40
vibration settings .......................... 66
violation check............................. 17, 24, 39
W
weighing mode ............................ 17, 24
weight display size ....................... 73
X
x/s/R/Min/Max/R in percent............ 45
x-chart ........................................ 45, 46, 48
For the future benefit of your METTLER TOLEDO product, and
to preserve its value, METTLER TOLEDO service assures you
of its quality and measuring accuracy for years to come.
Please request full details of our attractive terms of service.
Thank you.
2
1
9
0
1
2
5
4
Subject to technical changes.
© Mettler-Toledo AG 2007
21901254A
Printed in Germany
Mettler-Toledo AG, Heuwinkelstrasse, 8606 Nänikon, Switzerland
Tel. +41 44 944 22 11, Internet: http://www.mt.com
0705/2.12